

Page 1
INFUSION PUMP ANALYZER
IPA-1000
USER MANUAL
Page 2

Page 3

BC BIOMEDICAL
IPA-1000
TABLE OF CONTENTS
DESCRIPTION............................................................................................................. 3
OVERVIEW.................................................................................................................. 5
KEYS............................................................................................................................ 7
SCREENS.................................................................................................................... 8
MESSAGES ................................................................................................................. 10
SETUP ......................................................................................................................... 12
OPERATIONS.............................................................................................................. 13
CONNECTING CHAMBERS........................................................................... 13
THEORY OF OPERATIONS........................................................................... 14
RUNNING A TEST.......................................................................................... 15
OPTIMIZING MEASUREMENTS .................................................................... 16
MANUAL REVISIONS.................................................................................................. 17
WARRANTY................................................................................................................. 17
SPECIFICATIONS ....................................................................................................... 18
NOTES......................................................................................................................... 20
1
Page 4

iii
CAUTION
iii
ONLY DISTILLED WATER SHOULD BE USED IN THE CHAMBERS WITH THE
IPA-1000. DO NOT USE TAP WATER, GLUCOSE OR ANY OTHER FLUID;
THIS WILL CAUSE THE TUBING TO BECOME CONTAMINATED.
iii
N O T I C E
iii
BC GROUP INTERNATIONAL, INC. RESERVES THE RIGHT TO MAKE
CHANGES TO ITS PRODUCTS OR SPECIFICATIONS AT ANY TIME,
WITHOUT NOTICE, IN ORDER TO IMPROVE THE DESIGN OR
PERFORMANCE AND TO SUPPLY THE BEST POSSIBLE PRODUCT. THE
INFORMATION IN THIS MANUAL HAS BEEN CAREFULLY CHECKED
AND IS BELIEVED TO BE ACCURATE. HOWEVER, NO RESPONSIBILITY
IS ASSUMED FOR INACCURACIES.
Manual IPA-1000 Copyright © 2005
www.bcgroupintl.com
3/05 Rev 01
Made in the USA
2
Page 5

BC GROUP
IPA-1000
INFUSION PUMP ANALYZER
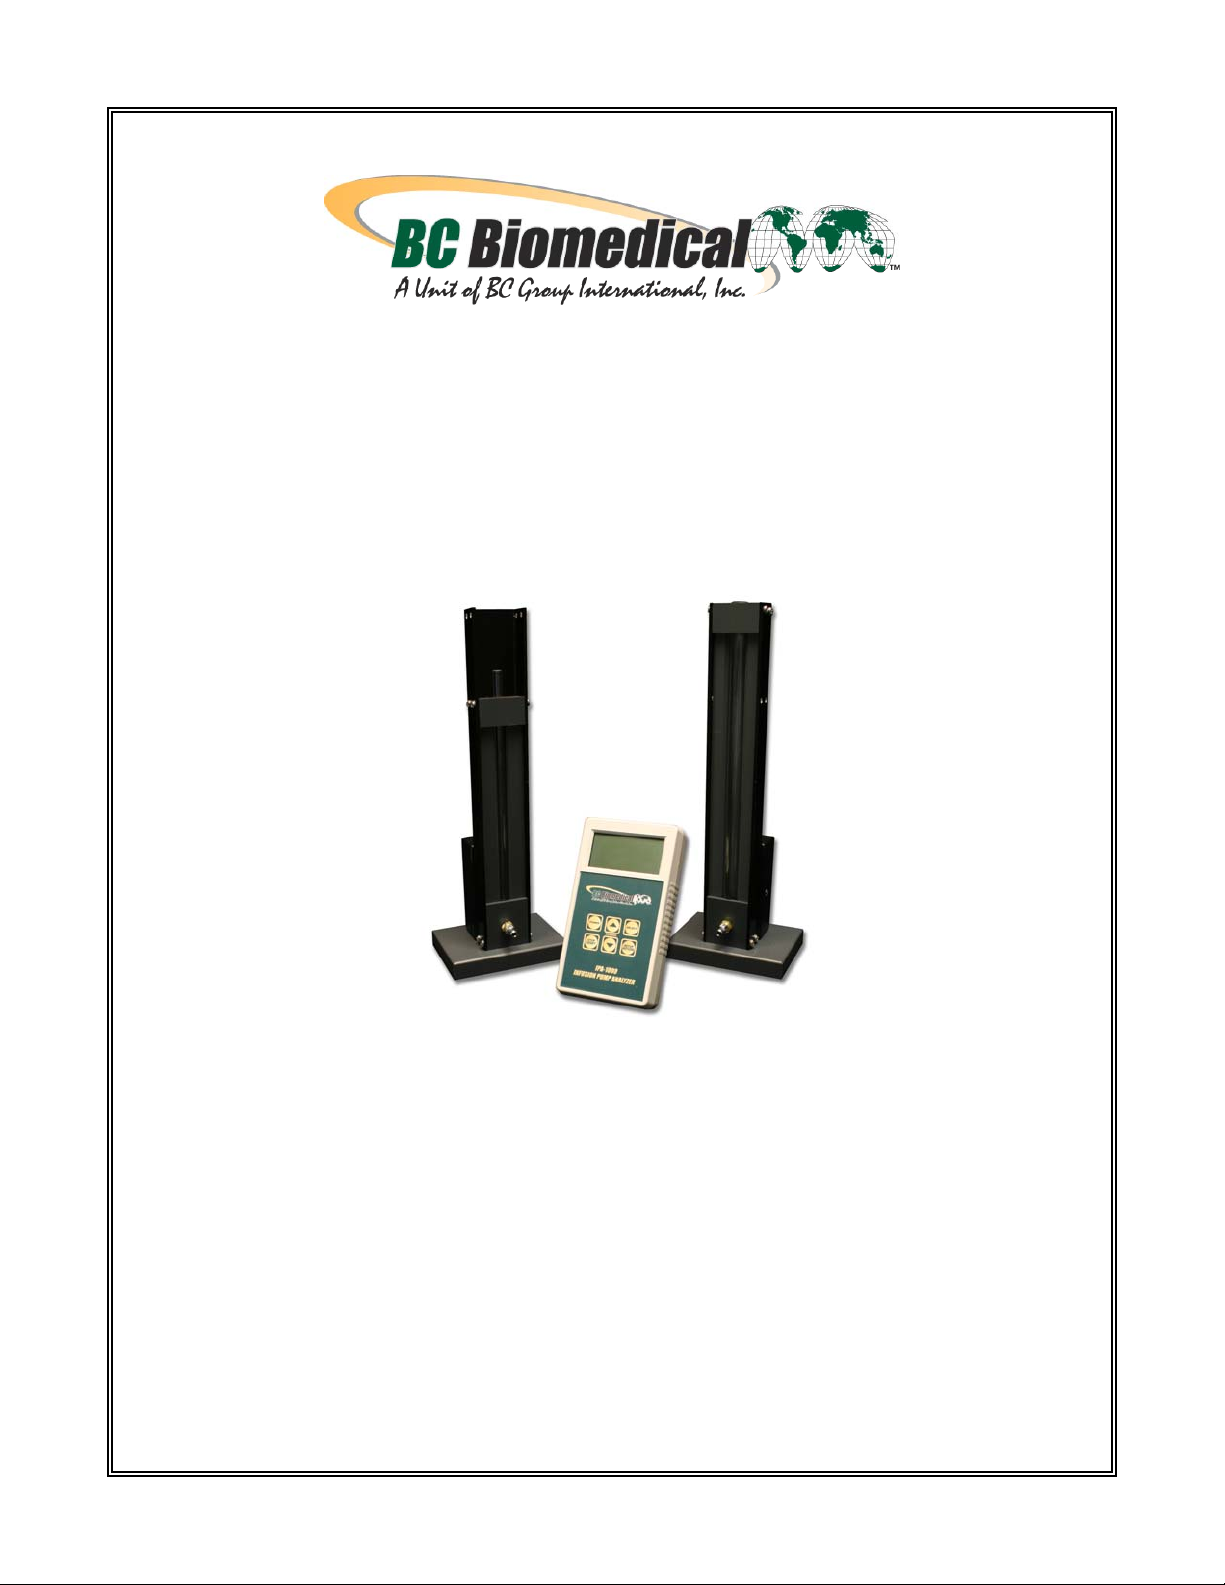
The Model IPA-1000 Series is a Microprocessor based High Precision infusion Pump
Analyzer (IPA). It tests the flow rate of intravenous (I.V.) infusion pumps. The flow rates
are displayed in milliliters per hour. The unit can test two volumetric pumps for output flow
rate simultaneously using two volumetric chambers.
The following are highlights of some of the main features.
IPA-1000 (BASIC FEATURES):
• LARGE GRAPHICS DISPLAY WITH CURSOR SELECTION OF
OPTIONS AND SETUP OF PARAMETERS
• +/- 1% OF READING FLOW ACCURACY
• STANDARD MILLITERS PER HOUR RANGE
• DIGITAL CALIBRATION – NO POTS TO TURN
• SELECTABLE DISPLAY OPTIONS AND DIGIT SIZES
• BATTERY LIFE DISPLAY (0 TO 100%)
• SOFTWARE ADJUSTABLE CONTRAST
• USES ANY COMBINATION OF CHAMBERS
• 3.5 ML & 35 ML CHAMBERS AVAILABLE
• SIMPLE TO MAINTAIN AND CLEAN (NO VALVES)
• REPLACEABLE TUBES
• SEALED LEVEL SENSORS
• AUTOMATIC DETECTION OF CONNECTED CHAMBER TYPE
• PROGRAMABLE END OF TEST AUDIO
• PROGRAMABLE AUTO OR MANUAL TEST START
• OPTIONAL BATTERY ELIMINATOR
3
Page 6

OPTIONAL ACCESSORIES:
• BE2000PU 120 VAC BATTERY ELIMINATOR, U.S.
• BE2000PE 220 VAC BATTERY ELIMINATOR, EUROPE
• BC20-30109 SOFT CARRYING CASE
AVAILABLE MODELS:
The base unit plus one of the volumetric chambers are required to test infusion pumps.
The part numbers are:
• IPA-1000 INFUSION PUMP ANALYZER BASE UNIT
• MC3.5-1000 3.5 mL VOLUMETRIC CHAMBER
• MC35-1000 35 mL VOLUMETRIC CHAMBER
4
Page 7
)
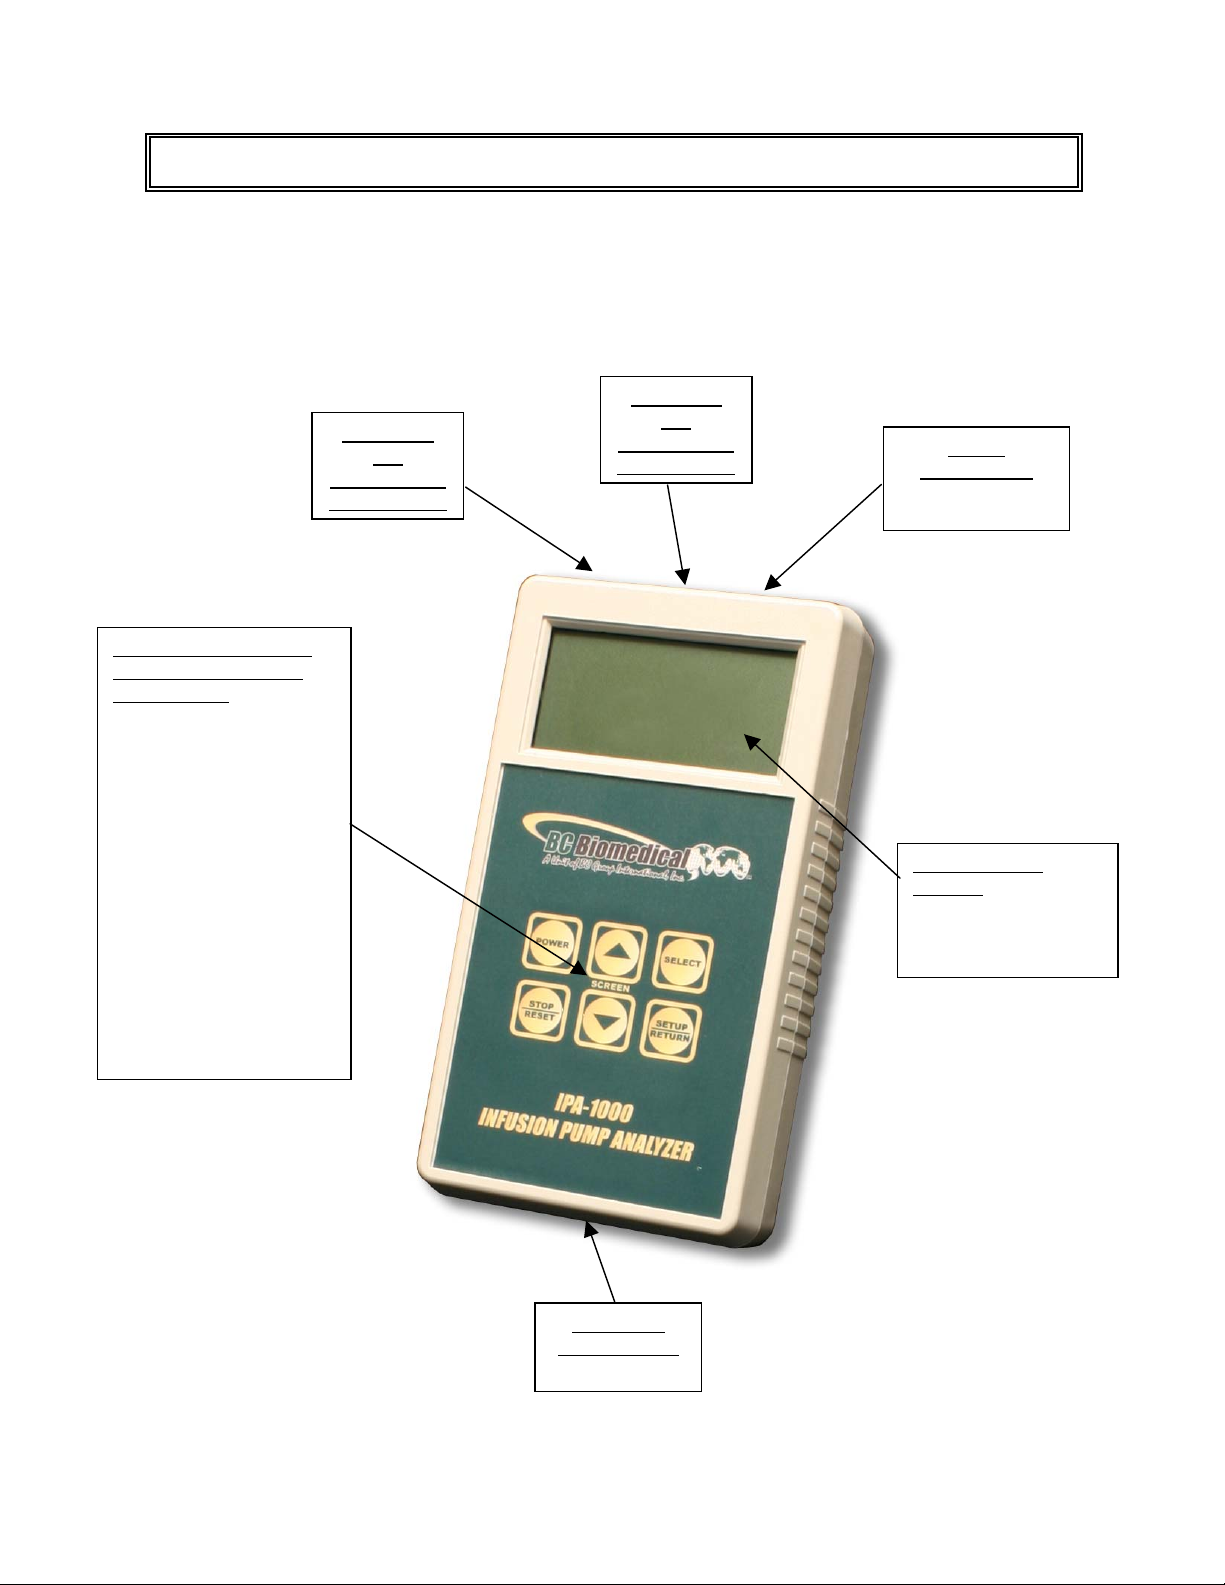
OVERVIEW
This section looks at the layout of the IPA-1000 and its Chambers and gives descriptions of
the elements that are present.
8 pin Mini-
8 pin Mini-
Din
connector for
connection to
6 Light Touch Keys for
Selecting Parameters
and Settings:
POWER for Turning Unit
On and Off
UP and DOWN Arrows
for Scrolling Through
Selected Options.
(When No Options are
Selected, for Changing
Display Screen.)
SELECT for Choosing
Setting or Parameter to
Change
SETUP/RETURN for
Entering and Exiting
Setup Menu
RESET for canceling a
test.
Din
connector for
connection to
Power
2.1 mm Jack
(Optional Battery
Eliminator
LCD Graphical
Display:
Shows Test Data,
Chamber Status and
Configuration Data
9V Battery
Compartment
(Back)
5
Page 8

3.5 mL Chamber
MC3.5-1000
35 mL Chamber
MC35-1000
8 pin Mini-
Din
connector for
connection to
8 pin Mini-
Din
connector for
connection to
Luer Lock
Connector for
Fluid In
6
Page 9

KEYS
Six tactile-touch keys are provided for system operation:
– This key turns the unit off and on. The unit will return to the screen that was
active when it was turned off.
– In the DISPLAY MODE, these keys toggle the display through the
available main screens.
In the SELECT MODE, if a parameter has been highlighted, these keys with scroll through
the available settings.
– On the Setup screen, there are a number of parameters that may be selected
and changed. This key sequences the cursor (Highlight) through those parameters.
– This key is used to STOP any of the running flow tests or to manually reset the
system if Auto Test Reset is set to NO. (See Setup Section for more details.)
– This key toggles the unit into and out of the Setup Mode. Depressing this key
will enter the Setup screen where the configuration can be viewed and adjusted.
Depressing the key again will exit the Setup Mode and return to the previously viewed
main screen.
7
Page 10

SCREENS
MAIN SCREENS
– There are four main screens: Chamber 1, Chamber 2, DUAL and
Connector. The available screens can be toggled using .
CHAMBER SCREENS
– The Chamber screens have a large time and flow rate display, as
shown below. The arrow at the top of the screen indicates the connector used for that
Chamber. The level indicator at the bottom of the screen identifies the level of water in the
Chamber.
MESSAGE DISPLAY
The display will resemble the following:
Chamber Not Detected
OR DATA
Ready For Flow
CONNECTOR
LOCATION
Chamber 1
Chamber 2
Flow Rate Too High
Invalid Sensor Sequence
Chamber Needs
Calibration
Low Battery
DATA
UNITS
Seconds
mL/hr
LEVEL
INDICATOR
See
Page 11
for special
graphics
8
Page 11

DUAL SCREEN – The DUAL screen shows the status of both Chambers at the same time.
MESSAGE DISPLAY
OR DATA
Chamber Not Detected
Ready For Flow
Flow Rate Too High
CONNECTOR
LOCATION
Chamber 1
Chamber 2
Invalid Sensor Sequence
Chamber Needs
Calibration
Low Battery
LEVEL
INDICATOR
See
DATA
UNITS
Page 11
for special
graphics
Seconds
mL/hr
CONNECTOR SCREEN
– The connector screen indicates the layout of the connectors at
the top of the IPA-1000. Also shown is the volume capacity of any connected Chambers.
VOLUME
3.5 mL
35 mL
Not Detected
9
Page 12

MESSAGES
Several status messages are available to indicate the present state of the system. The
following is a brief description of the available messages:
CHAMBER NOT DETECTED – This message indicates that a Chamber has not been
detected.
READY FOR FLOW– This message indicates that the Chamber is reset and waiting for
fluid to be detected at the bottom sensor. As soon as fluid is detected, the timer will begin
running and the test will begin. The test ends when the fluid reaches the top sensor or
when the Reset key is depressed.
FLOW RATE TOO HIGH – This message indicates that the flow rate is higher than the
resolution of the meter.
INVALID SENSOR SEQUENCE– This message indicates that water is detected at the top
sensor but not at the bottom sensor. This could be caused by either a bad sensor or a
bubble in the tube.
CHAMBER NEEDS CALIBRATION– This message indicates that a Chamber has been
detected, but the calibration data stored in the Chamber is invalid. The Chamber should be
returned for re-calibration.
10
Page 13

LOW BATTERY– This message indicates that the batteries are low and should be
replaced.
LEVEL INDICATOR
A special graphic has been incorporated into the display to identify the level of water in
each Chamber. The graphic is located at the lower right corner of the display for each
channel.
This graphic indicates that water is not present at the lower or upper sensor.
This graphic indicates that fluid is present at the lower sensor.
These graphics are displayed sequentially to indicate that a test is running.
This graphic indicates that water is detected at the top and bottom sensor.
This graphic indicates that water is present at the top sensor, but not the bottom.
This is an invalid condition, indicative of either a bubble at the bottom sensor or a
faulty sensor.
11
Page 14

SETUP
The Setup Mode allows the user to adjust the configuration of the meter. The Setup screen
can be entered using the key. The parameters can be changed by using
key to highlight the line and to toggle the available options.
The Setup screen can be exited using the key.
The following is a breakdown of the parameters available in the configuration of the unit
and their available options:
System Setup Configuration
Parameter Description Range
Determines the period of inactivity before the unit is
turned OFF. A timer is started when the unit is
turned ON and is reset each time a key is pressed.
When the timer reaches the value set in this
Auto Off Timer (Min)
Auto Test Reset
End of Test Beeps
Contrast Adjust
parameter, the power is automatically turned OFF.
(NOTE: Setting this parameter to 0 disables the
Auto Off timer. When running from line power, the
unit does not automatically shut off. Auto Off timer
is inactive during a test.)
The auto reset mode automatically resets the
system for a new flow test when the tube is
emptied. If Auto Test Reset is set to NO, the user
must manually press the RESET key to configure
the system for another test.
This determines the number of times that the unit
will beep at the completion of a test. If set to zero,
the unit will not beep.
Sets the contrast of the display screen.
0-30 Minutes
YES/NO
0-15
0-20
Battery Life
Software
Displays current life of the battery.
At 10%, a warning screen will appear.
At 0%, the unit will power down automatically.
Displays current software program.
12
0-100%
(Read Only)
(Read Only)
Page 15

OPERATIONS
CONNECTING CHAMBERS
Chambers are connected to the base unit with a straight through 8Pin Mini Din male
to 8Pin Mini Din Male cable. Chambers can be connected or disconnected at any time.
Disconnecting a chamber while a test is running will cancel the test.
As a chamber is connected or disconnected, the display will change to display the
available chambers. For example, if a test is running on Channel 1 and a second Chamber
is plugged into Channel 2, the display will automatically change to the dual display mode. If
both chambers are connected and Chamber 1 is removed, the display will automatically
change to the large screen displaying Chamber 2.
NOTE: The screen can always be manually changed by using the keys.
13
Page 16

THEORY OF OPERATIONS
Infrared sensors are used to detect the presence of water in the chamber. There are
two sensors in each chamber. As water is detected at the bottom sensor, an internal timer
is started. The timer runs internally in hundredths of seconds but is only displayed in tenths
of seconds. The test automatically ends when water is detected at the top sensor. A
buzzer will sound to indicate that the test is complete. The buzzer can be programmed to
sound for a specific number of beeps (0-15 beeps, see setup).
The flow rate is calculated based on the volume of the chamber and the time
required to fill the tube. The volume of the chamber is calibrated and stored internally in
the chamber. Since the calibration data is stored in the chamber, they are interchangeable
with any base unit.
A test in progress can be aborted by pressing the key, by disconnecting
the chamber or by water not being detected at the bottom sensor.
14
Page 17

RUNNING A TEST
To run a flow test, the chamber must be Ready for Flow, as indicated in the base
unit display (see Messages). When the base unit is setup for Manual Reset, the
key must be used to manually reset the unit after each test. When the base unit is setup
for Automatic Reset, the chamber will be automatically reset when the water level drops
below the bottom sensor.
A flow test can be started whenever the display indicates “Ready for Flow”. The
flow test is started by water being detected at the bottom sensor. Before initiating the flow
on the Infusion pump under test, ensure that the pump is programmed to deliver a sufficient
amount of water to fill the chamber to the top sensor.
NOTE: The chamber volumes of 3.5mL and 35mL are nominal; it is advised that delivery
volume should be about 4 mL and 40 mL respectively.
15
Page 18

OPTIMIZING MEASUREMENTS
To optimize the performance of the IPA-1000, it is recommended that a wetting
agent be used to minimize the surface tension of the test solution. The test solution should
be Distilled water mixed with “MICRO-90.” “MICRO-90” can be purchased from
Cole- Parmer in a 1% solution (Part Number A-18100-01, www.coleparmer.com
,
1-800-323-4340). Further dilute the “MICRO –90” by using one part of “MICRO-90” to
10 parts of Distilled water. If foaming becomes a problem, dilute the “MICRO-90” to a
20:1 solution.
The sheeting action of the test solution has a minor effect on test results. It is
recommended to discard the first reading of a device under test. Run the test and then
repeat the test. Only record data from the second test.
Any droplets remaining in the chamber after a test run will affect the accuracy of the
test results. Adjust the drain rate to minimize the droplets.
iii
ONLY DISTILLED WATER SHOULD BE USED IN THE CHAMBERS WITH THE
IPA-1000. DO NOT USE TAP WATER, GLUCOSE OR ANY OTHER FLUID;
THIS WILL CAUSE THE TUBING TO BECOME CONTAMINATED.
CAUTION
16
iii
Page 19

A
A
MANUAL REVISIONS
Revision #
Program # Revisions Made
Rev 01 DT7312CA Preliminary Manual
Rev 02 DT7312CA Page Numbers adjusted
LIMITED WARRANTY
WARRANTY
FROM DEFECTS IN MATERIALS AND WORKMANSHIP UNDER THE SERVICE FOR WHICH THEY
RE INTENDED. THIS WARRANTY IS EFFECTIVE FOR TWELVE MONTHS FROM THE DATE OF
SHIPMENT.
EXCLUSIONS: THIS WARRANTY IS IN LIEU OF ANY OTHER WARRANTY EXPRESSED OR
IMPLIED, INCLUDING, BUT NOT LIMITED TO ANY IMPLIED WARRANTY OF MERCHANTABILITY
OR FITNESS FOR A PARTICULAR PURPOSE.
BC GROUP INTERNATIONAL, INC. IS NOT LIABLE FOR ANY INCIDENTAL OR CONSEQUENTIAL
DAMAGES.
NO PERSON OTHER THAN AN OFFICER IS AUTHORIZED TO GIVE ANY OTHER WARRANTY OR
SSUME ANY LIABILITY.
REMEDIES: THE PURCHASER'S SOLE AND EXCLUSIVE REMEDY SHALL BE: (1) THE REPAIR OR
REPLACEMENT OF DEFECTIVE PARTS OR PRODUCTS, WITHOUT CHARGE. (2) AT THE OPTION
OF BC GROUP INTERNATIONAL, INC., THE REFUND OF THE PURCHASE PRICE.
: BC GROUP INTERNATIONAL, INC. WARRANTS ITS NEW PRODUCTS TO BE FREE
17
Page 20

SPECIFICATIONS
IPA-1000 UNIT
FLOW RANGE
3.5 mL CHAMBER
FLOW RANGE
35 mL CHAMBER
FLOW RESOLUTION
FLOW ACCURACY
TIME RESOLUTION
INTERNAL
DISPLAY
SETUP MEMORY
MEMORY RETENTION
OPERATING RANGE
STORAGE RANGE
CONSTRUCTION
SIZE
WEIGHT
CONNECTIONS
FOR BASE UNIT
INTERCONNECT CABLE
POWER
POWER CONSUMPTION
BATTERY LIFE
BATTERY ELIMINATOR
(OPTIONAL)
0.0 to 999.9 mL/hr
15.0 to 9999.9 mL/hr
0.1 mL/hr
+/- 1% RDG, +/- LSD
0.01 Seconds
LCD Graphical 128 X 64 Pixels
EEPROM, All Parameters
10 Years w/o Power
0 to 50 Degrees C
-40 to 60 Degrees C
Enclosure - ABS Plastic
Face - Lexan, Back Printed
7.09 x 3.94 x 1.56 inches
180 x 100 x 40 mm
(HxWxD)
<
1 lbs. (0.45 kg)
Power - 2.1 mm Center Negative
Chamber - 8 pin Mini Din Female
8 pin Mini Din Male to 8 pin Mini Din
Male Straight Through
LINE: 9VDC, Center Negative
BATTERY
ON:
No Modules - 8 mA, 1 Module - 12 mA,
2 Modules - 16 mA
OFF:
less than 60µA
CONTINUOUS: TBD
OFF: 12 months
BE2000PU (120 VAC) - US
BE2000PE (220 VAC) - Euro
9V, 200 mA DC
: 9V Alkaline
18
Page 21

3.5 mL and 35mL CHAMBERS
FLOW RANGE
3.5 mL CHAMBER
FLOW RANGE
35 mL CHAMBER
FLOW RESOLUTION
FLOW ACCURACY
15.0 to 9999.9 mL/hr
0.1 mL/hr
+/- 1% RDG, +/- LSD
OPERATING RANGE
STORAGE RANGE
CONSTRUCTION
0 to 50 Degrees C
Enclosure - ABS Plastic
SIZE
14.0 x 5.0 x 3.5 inches
356 x 127 x 89 mm
(HxWxD)
WEIGHT
CONNECTIONS
FOR CHAMBERS
INTERCONNECT CABLE
FLOW MEDIA
<
Unit - 8 pin Mini Din Female
Flow Media - Luer Lock
8 pin Mini Din Male to 8 pin Mini Din
Male Straight Through
Distilled Water
P:\MANUALS\BCGroup\…\IPA-1000_UM_rev02.doc
0.0 to 999.9 mL/hr
-40 to 60 Degrees C
2.2 lbs (1 kg)
19
Page 22

NOTES
20
 Loading...