


EX712.2
Stereo System
OWNER’S MANUEL
MODE D’EMPLOI
MANUEL DEL USUARIO
BEDIENUNGSANLEITUNG
DEUTSCH SPANISH FRANCAIS ENGLISH
BC ACOUSTIQUE
14 Avenue de l’Europe - 77600 Bussy-Saint-Georges France
1
Introduction
Dear Customer,
Thank you for choosing a BC Acoustique product. Its implementation has been our know-how, both in terms of design to the manufacturing. Electronic components and mechanical parts correspond to the selection criteria of very high quality. Operation and finish of each product have been checked before delivery. To obtain best results, please read the advice contained in this document.
Summary |
|
Glossary |
|
|
|
Safety Instructions ……..…………………………………………………..02 Glossary .………………………………………………………………..……….02 Recommandations ..………………………………………………………..02 Recycling product ..…………..…………………………………………….03 Location and precautions ……….………………………………………03
Power Sources …………….………………………………………………….03
Warranty .……..………………………………………………………………..03 Basic Instructions: QUICK START ………..…………...……………..04 Rear panel - Connections …………………………..…….…………….04
Front panel - Connections and uses ……………………..……....06 Under the amplifier - Switch anti-hum (Ground On/Off) ...07 Remote Control .……………………………………………………………..08 Listening to the CD Player ………………………………………….……09
USB playback ………………...……………………………………………...10 WIRELESS device playback …………....………………………………….10
Listening to the radio …………………………………………………….11
Specifications .………………………..……………………………………….12 Troubleshooting ………..…………………………………………………...13 Advices ……………..………………………………………………………...…13
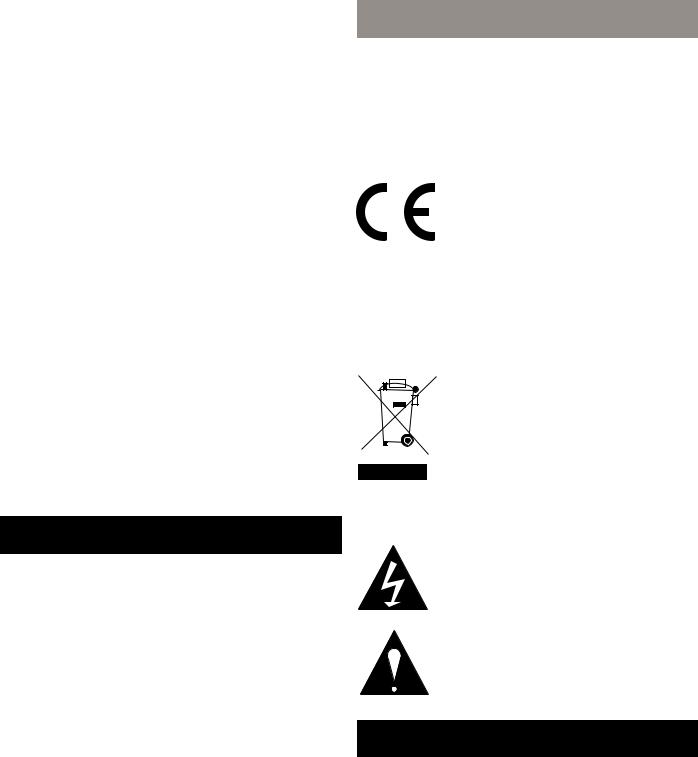
The CE mark indicates that this product complies with European directives called «low voltage» (2006/95/EC), Electromagnetic Compatibility (2004/108/EC) and apply
eco-design requirements for energy products (2009/125/EC) when the appliance is installed and used in accordance with the user manual.
ForcontinuedcomplianceonlyBCAcoustiqueaccessoriesmust be used with this product and servicing must be performed by specialized and qualified staff.
The WEEE symbol is that of the European
Union regarding the recycling of electrical and
electronic equipment. It indicates that this product contains electrical and electronic components that can be reused, recycled or recovered. Therefore this product should not be disposed of in your regular trash. Thank you
to return the unit or contact your authorized dealer for more information.
Safety instructions
Weinviteyoutoreadtheinstructionsontheproperuseofyour productcarefully.Theywillensuretheproperfunctioningofthe latter and it safely.
-Do not use this device in a wet area or near water.
-Cleanonlywithadrycloth.Asaprecautionitisbesttounplug the unit before handling.
-Never cover the ventilation of the unit. Be sure to install the unit in a well ventilated location.
-Do not install near heat sources.
-Take great care of the power cord and plugs electrical connection. In particular, do not walk, or press the power cord, specifically at plugs, power plant and the output of the power supply.
- Use only parts and accessories recommended by BC Acoustique.
-Be sure to use an appropriate power supply to the power jack on the unit outlet. Especially if the device is equipped with a ground, it is necessary to use it.
-Unplug the apparatus during lightning storms or when not in use for a long time.
This symbol alerts the user to the presence of «dangerous voltage» uninsulated which may pose a risk of electric shock to the user.
This symbol alerts the user that the documentation that comes with the device contains important instructions for maintenance and proper use of the product.
Recommandations
In the case of headphones, do not use it to excessive noise. Otherwise,prolongedlisteningathighvolumelevelsmaycause permanent damage to your hearing.
When disposing of used batteries, please comply with governmental regulations or rules defined by the public statements relating to the environment applicable in your country.
Never expose the batteries (battery pack or batteries installed)
to excessive heat such as sunshine, fire, etc ...
2

Product recycling |
|
Warranty |
|
|
|
Attheendofitsusefullife,thisproductshouldnotbedisposed of with regular garbage, but returned to a collection point for therecyclingofelectricalandelectroniccomponents.Thispoint is emphasized by the symbol on the product, the instruction manual and on the packaging.
The materials can be reused in accordance with their markings. Through reuse and recycling of raw materials or any other form of recycling, you make an important contribution to environmental protection. Your municipality can tell you where is the point of the nearest collection site.
Location and precautions
Avoid placing it in direct sunlight or near a heat source. No source of light shall be placed on the apparatus. Also avoid all sources that could cause vibration, dust, cold or moisture. The recommended ambient temperature range is 5-35 °C.
The device must be installed on a stable, level surface. Do not place the unit on an unstable surface or shelf. The unit may fall, causing serious injury to a child or adult as well as serious damage to the product. Do not place other equipment on top of the unit.
Due to stray, turntables or CRT TVs magnetic fields should not be located near the unit to avoid possible interference.
Power sources
The unit should be operated only from the type of power source indicated on the label. If you are unsure of the type of power available to you, thank you to contact your dealer or the company responsible for the power supply in your area.
Turnoffdeviceifyoudonotintendtousethisunitforalongtime.
Incaseofprolongedabsencefromhome,itisrecommendedto unplug from the electrical outlet.
Make sure each cable is correctly inserted. To prevent hum or background noise, do not mix different other antenna cable with the power cord or speaker wires.
BCAcoustiquewarrantsthisproductpartsandlabor(underthe conditions specified below).
BC Acoustique will repair or replace (at its discretion) this product or any defective parts. The warranty period may vary by country. If in doubt, contact your dealer. Always retain proof of purchase of this product.
For warranty service, please contact the BC Acoustique authorized reseller from which you purchased this product. If your dealer is not itself repair the product, it can be sent to BC Acoustique authorized after-sales service. If necessary, you will need to ship this product in its original packaging or packaging affording an equal degree of protection.
Proof of purchase such as an invoice stating that the product is covered by the Guarantee must be presented for any warranty claims.
This warranty is void if:
-The factory serial number has been altered or removed.
-This product was not purchased from an authorized reseller BC Acoustique. To confirm that the serial number has been altered or that the product was purchased from an authorized reseller BC Acoustique, you can call BC Acoustique or distributor in your country.
-If the power supply cord or plug is damaged.
-If liquid has been spilled or if objects have fallen inside.
-If the unit has been exposed to rain or water.
-If the unit is dropped or damaged in any way.
-This warranty does not cover cosmetic damage or damage causedbyorduetoforcemajeure,anaccident,misuse,abuse, negligence,commercialuseormodificationofpartanyproduct.
-This warranty does not cover damage caused by or resulting from misuse, a maintenance or improper installation or repairs made or attempted by anyone other in BC Acoustique or not
BC |
Acoustique dealer or technician approved, authorized |
to |
carry out maintenance and repair under warranty for |
BCAcoustique.Anyunauthorizedrepairswillvoidthiswarranty.
This warranty does not cover products sold «AS IS».
-REPAIR OR REPLACEMENT AS PROVIDED UNDER THIS WARRANTY IS THE EXCLUSIVE REMEDY OF THE CONSUMER.
-BC ACOUSTIQUE NOT BE LIABLE FOR ANY INCIDENTAL OR CONSEQUENTIAL DAMAGES.
DEUTSCH SPANISH FRANCAIS ENGLISH
3

Warranty
- Some countries do not allow the exclusion or limitation of incidental or consequential damages or exclusions of implied warranties. Therefore, the limitations or exclusions herein may not apply. This warranty gives you specific legal rights, in addition to other rights which vary from state to state or country to country.
Basic instructions
Quick starting guide
Make sure that the device is not plugged into the mains beforemakinganyconnections. Itisalso recommendedtoturn off or disconnect all other devices associated while making connections to the product.
Connect the speakers to the speaker terminals on the back and the sources of the corresponding input jacks on the back.
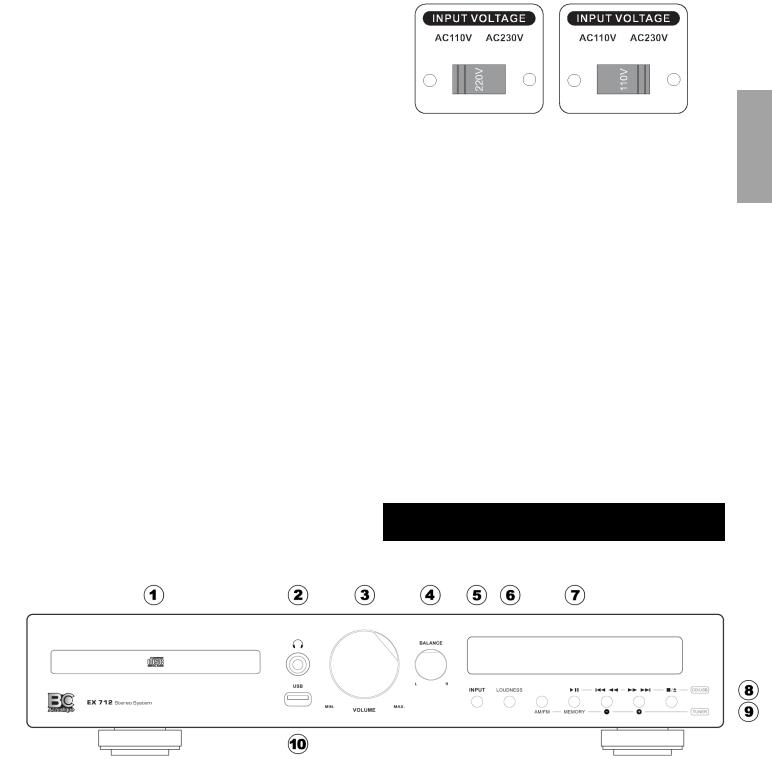
IMPORTANT: Make sure you have set the voltage selector to suit your country: INPUT VOLTAGE: AC110 (USA) and AC230
(EUROPE).
Connect the power cord to the connector on the one hand AC Mains product and the other to a wall outlet. Turn the POWER switch on the ON position (I).
If the unit is equipped with a standby, then press the STANDBY button to turn it on.
Press the input selector for the source you want to hear.
Rear panel
WARNING: Besuretoturnoffthepoweronyourproductbefore making any connections. Similarly it is best to cut the power of other devices you want to connect to your amplifier.
Connections to the stereo system
ANTENNAS (Connecting the AM and FM antennas)
FM indoor antenna: Connect the included FM antenna connector on the rear panel, deploy it and tune your favorite station. Fix the antenna to a suitable location such as a window frame or wall that gives the best reception and secure it.
FM outdoor antenna: In an area where FM signals are weak, it may be necessary to use an outdoor FM antenna. Use a three-element outdoor antenna (commercially available), or a five-element antenna in a area where radio signals are particularly weak, and use a 75 Ω coaxial cable to connect it.
Note: Disconnect the indoor FM antenna when using an outdoor antenna.
AM antenna: UseinternalorexternalAMantennaandconnect there to one of the two terminals at the rear of the unit.
When using an outdoor antenna, always connect a grounding wire to the GND terminal. Leave the internal antenna connectedevenwhenalsousingaconnectedoutdoorantenna.
OUTPUTS (OUTPUT - RCA)
REC
It allows to retrieve the selected amplifier to «source» level audio signal that is independent of the level volume control. This output is traditionally used to connect the amplifier to a recording device.
LINE
It allows to retrieve the selected audio amplifier in proportion to the level of volume control signal. This output is mainly used to connect an additional power block to perform a «bi-amplification».
OPTIONAL BOARD POWER
Thisconnectorisdesignedtoaccommodatethepowercableto an external card such as the EX-PHONO-2X card.
For connecting the optional phono card, use the stereo power cable supplied with the card and a stereo RCA cable to connect the card to the EX-712.2 to the AUX INPUT.
4
Connections |
|
Connections and uses |
|
|
|
WIRELESS ANTENNA
This connector is for receiving a WIRELESS antenna. The supplied antenna is mounted directly to the back of the unit. The WIRELESS range is limited to few meters (depending on the nature of the obstacles located between the EX712.2’s antenna and your WIRELESS source).
It is possible to obtain an optional "WIRELESS long-range" antenna. It consists of a cable to shifting the antenna. Moreover, this antenna is larger.
LARGE / SMALL SPEAKER OUTPUT - (High Pass Filter)
This switch allows you to enable or disable an high pass filter to use all the power of the amplification on trebles frequencies which is useful if you have a subwoofer connected to the SUB output of the EX-712.2.
Thus, when the SMALL position is activated, the EX-712.2 let pass only the high frequencies (trebles).
DIGITAL INPUTS
Your stereo system has a built-in digital-to-analog converter. Thereforeitispossibletoconnectadigitalsource(suchasmost modern television screens).
To ensure compatibility with all existing types of digital terminals, the EX-712.2 has an "optical" socket and a "coaxial). However this entry is unique and it is possible to connect one device at a time.
The entry "optical" take precedence over the entry "coaxial" in case you have wired both.
LOUDSEPAKER TERMINALS
Connect the speaker to the terminals marked RIGHT "+ R" and "R -" ensuring that "R +" is connected to the "+" terminal of the enclosure and "R -" is connected to the terminal "- "the same enclosure. Connect the LEFT speaker to the terminals marked "L +" and "L -" by doing the same.
Make sure that no wires are not insulated can bypass the speakeroutputs.Makesurethatthespeakerterminalsaretight enough to ensure a good electrical connection. If the terminal screwsarenottightenough,thesoundqualitymaybeaffected.
Useonlydedicatedwiretothespeaker(asectionof1.5mm²or more is recommended especially if the cable length is greater than 3m).
Important Note: Check the impedance of your speakers. When using a pair of speakers, you can use speakers with an impedance of between 4 and 8 ohms.
INPUT VOLTAGE
IMPORTANT: Before turning on your amplifier, check that you have positioned the voltage selector based on your geographic location: AC110V (USA, etc ...) and AC230V (EU, etc ...). Also be sure to use a fuse appropriate for the selected voltage sector.
Example position voltage selector:
|
|
|
|
|
|
220V for Europe |
|
110V for USA |
fuse T2AL/230V |
|
fuse T4AL/110V |
AC MAIN INPUT
Onceallconnectionstothestereosystem,plugthepowercable into an outlet and turn the unit on. Your EX-712.2 is now ready for use.
POWER - ON (I) / OFF (0) BUTTON
This switch allows shutdown or operation of the amplifier.
SUBWOOFER OUTPUT
Connect this output to your active subwoofer.
Note: Depending on your speakers, set SPEAKER OUTPUT
SMALL ( ) to optimize the frequency management of your 2.1 system. Then low frequencies will only be sent to your subwoofer and high frequencies to your speakers.
Front panel
DEUTSCH SPANISH FRANCAIS ENGLISH
5
 Loading...