

Baxi uSense User Manual

Please keep these instructions in a safe place.
If you move house, please hand them over to the next occupier.
United Kingdom
en
User Guide
Digital clock thermostat
uSense

Dear end user,
Thank you for choosing this uSense. You can control your home heating using the uSense or also by using an app. With this
uSense, you are in the driver’s seat to control the temperature of your home. It’s all about your comfort, just the way you want it.
This manual contains easy to use information and is intended for installers and end users.
Use the manual menu to get quick access to the instructions you need. For your own safety and optimum performance of the
uSense, we advise you to read the manual first.
The manual is subject to change, the online version is always the latest. If you are using a printed copy, please check the web
site for the latest version. See contact details on the front or back cover.
We hope you will enjoy working with the uSense.

Contents
7667977 - v.01 - 25102017 3
Contents
1 Manual menu . . . . . . . . . . . . . . . . . . . . . . . . . . . . . . . . . . . . . . . . . . . . . . . . . . . . . . . . . . . . . . . . . . . . . . . . . . . . . . . . . . . . . . .5
2 Introduction . . . . . . . . . . . . . . . . . . . . . . . . . . . . . . . . . . . . . . . . . . . . . . . . . . . . . . . . . . . . . . . . . . . . . . . . . . . . . . . . . . . . . . . . 6
2.1 Symbols used in the manual . . . . . . . . . . . . . . . . . . . . . . . . . . . . . . . . . . . . . . . . . . . . . . . . . . . . . . . . . . . . . . . . . . . . . .6
2.2 Introducing the uSense . . . . . . . . . . . . . . . . . . . . . . . . . . . . . . . . . . . . . . . . . . . . . . . . . . . . . . . . . . . . . . . . . . . . . . . . . . 6
2.3 The uSense and its app . . . . . . . . . . . . . . . . . . . . . . . . . . . . . . . . . . . . . . . . . . . . . . . . . . . . . . . . . . . . . . . . . . . . . . . . . 7
2.4 What's new for the uSense . . . . . . . . . . . . . . . . . . . . . . . . . . . . . . . . . . . . . . . . . . . . . . . . . . . . . . . . . . . . . . . . . . . . . . . 7
2.5 How to use the uSense . . . . . . . . . . . . . . . . . . . . . . . . . . . . . . . . . . . . . . . . . . . . . . . . . . . . . . . . . . . . . . . . . . . . . . . . . .7
2.5.1 Using the rotary dial and buttons . . . . . . . . . . . . . . . . . . . . . . . . . . . . . . . . . . . . . . . . . . . . . . . . . . . . . . . . . . .7
2.5.2 Entering the main menu and menu items . . . . . . . . . . . . . . . . . . . . . . . . . . . . . . . . . . . . . . . . . . . . . . . . . . . . 7
2.5.3 Entering the Quick Access menu and menu items . . . . . . . . . . . . . . . . . . . . . . . . . . . . . . . . . . . . . . . . . . . . . 8
2.5.4 Returning to the previous step or home screen . . . . . . . . . . . . . . . . . . . . . . . . . . . . . . . . . . . . . . . . . . . . . . . .8
2.5.5 Scrolling through menu items and changing settings . . . . . . . . . . . . . . . . . . . . . . . . . . . . . . . . . . . . . . . . . . . 8
2.5.6 Screen shows no information . . . . . . . . . . . . . . . . . . . . . . . . . . . . . . . . . . . . . . . . . . . . . . . . . . . . . . . . . . . . . 9
2.6 Description of the display . . . . . . . . . . . . . . . . . . . . . . . . . . . . . . . . . . . . . . . . . . . . . . . . . . . . . . . . . . . . . . . . . . . . . . . . 9
2.6.1 Description of the icons in the display . . . . . . . . . . . . . . . . . . . . . . . . . . . . . . . . . . . . . . . . . . . . . . . . . . . . . . . 9
2.6.2 Customising the main screen display . . . . . . . . . . . . . . . . . . . . . . . . . . . . . . . . . . . . . . . . . . . . . . . . . . . . . . 11
2.7 Zone selection . . . . . . . . . . . . . . . . . . . . . . . . . . . . . . . . . . . . . . . . . . . . . . . . . . . . . . . . . . . . . . . . . . . . . . . . . . . . . . . .11
2.8 Presence detection . . . . . . . . . . . . . . . . . . . . . . . . . . . . . . . . . . . . . . . . . . . . . . . . . . . . . . . . . . . . . . . . . . . . . . . . . . . . 12
3 General use . . . . . . . . . . . . . . . . . . . . . . . . . . . . . . . . . . . . . . . . . . . . . . . . . . . . . . . . . . . . . . . . . . . . . . . . . . . . . . . . . . . . . . .13
3.1 Changing the mode quickly . . . . . . . . . . . . . . . . . . . . . . . . . . . . . . . . . . . . . . . . . . . . . . . . . . . . . . . . . . . . . . . . . . . . . .13
3.2 Changing the room temperature . . . . . . . . . . . . . . . . . . . . . . . . . . . . . . . . . . . . . . . . . . . . . . . . . . . . . . . . . . . . . . . . . . 13
3.2.1 Changing the temperature in manual mode . . . . . . . . . . . . . . . . . . . . . . . . . . . . . . . . . . . . . . . . . . . . . . . . . 13
3.2.2 Changing the temperature in scheduling mode . . . . . . . . . . . . . . . . . . . . . . . . . . . . . . . . . . . . . . . . . . . . . . .14
3.2.3 Changing the temperature for a short period in scheduling mode . . . . . . . . . . . . . . . . . . . . . . . . . . . . . . . . .14
3.3 Creating a temperature schedule to control the room temperature . . . . . . . . . . . . . . . . . . . . . . . . . . . . . . . . . . . . . . . 14
3.3.1 Changing the weekdays of a temperature schedule . . . . . . . . . . . . . . . . . . . . . . . . . . . . . . . . . . . . . . . . . . . 15
3.3.2 Copying a weekday of a temperature schedule . . . . . . . . . . . . . . . . . . . . . . . . . . . . . . . . . . . . . . . . . . . . . . .16
3.3.3 Selecting another temperature schedule . . . . . . . . . . . . . . . . . . . . . . . . . . . . . . . . . . . . . . . . . . . . . . . . . . . .17
3.4 Changing the zone temperatures . . . . . . . . . . . . . . . . . . . . . . . . . . . . . . . . . . . . . . . . . . . . . . . . . . . . . . . . . . . . . . . . . 17
3.5 Topping up your installation . . . . . . . . . . . . . . . . . . . . . . . . . . . . . . . . . . . . . . . . . . . . . . . . . . . . . . . . . . . . . . . . . . . . . 17
3.6 Going on holiday . . . . . . . . . . . . . . . . . . . . . . . . . . . . . . . . . . . . . . . . . . . . . . . . . . . . . . . . . . . . . . . . . . . . . . . . . . . . . . 17
3.6.1 First option . . . . . . . . . . . . . . . . . . . . . . . . . . . . . . . . . . . . . . . . . . . . . . . . . . . . . . . . . . . . . . . . . . . . . . . . . . .18
3.6.2 Second option . . . . . . . . . . . . . . . . . . . . . . . . . . . . . . . . . . . . . . . . . . . . . . . . . . . . . . . . . . . . . . . . . . . . . . . . 18
3.7 Activating fireplace mode . . . . . . . . . . . . . . . . . . . . . . . . . . . . . . . . . . . . . . . . . . . . . . . . . . . . . . . . . . . . . . . . . . . . . . . 19
3.8 Switching to antifrost mode . . . . . . . . . . . . . . . . . . . . . . . . . . . . . . . . . . . . . . . . . . . . . . . . . . . . . . . . . . . . . . . . . . . . . .19
3.9 Switching the central heating on/off . . . . . . . . . . . . . . . . . . . . . . . . . . . . . . . . . . . . . . . . . . . . . . . . . . . . . . . . . . . . . . . 20
3.10 Switching to cooling mode . . . . . . . . . . . . . . . . . . . . . . . . . . . . . . . . . . . . . . . . . . . . . . . . . . . . . . . . . . . . . . . . . . . . . . 20
3.11 Switching to auto mode . . . . . . . . . . . . . . . . . . . . . . . . . . . . . . . . . . . . . . . . . . . . . . . . . . . . . . . . . . . . . . . . . . . . . . . . .20
4 Customisation . . . . . . . . . . . . . . . . . . . . . . . . . . . . . . . . . . . . . . . . . . . . . . . . . . . . . . . . . . . . . . . . . . . . . . . . . . . . . . . . . . . . . 21
4.1 Hot water settings . . . . . . . . . . . . . . . . . . . . . . . . . . . . . . . . . . . . . . . . . . . . . . . . . . . . . . . . . . . . . . . . . . . . . . . . . . . . . 21
4.1.1 Changing the hot water temperature . . . . . . . . . . . . . . . . . . . . . . . . . . . . . . . . . . . . . . . . . . . . . . . . . . . . . . . 21
4.1.2 Setting the hot water comfort mode . . . . . . . . . . . . . . . . . . . . . . . . . . . . . . . . . . . . . . . . . . . . . . . . . . . . . . . .21
4.1.3 Setting the hot water reduced (energy-saving) mode . . . . . . . . . . . . . . . . . . . . . . . . . . . . . . . . . . . . . . . . . . 21
4.1.4 Changing the hot water schedule . . . . . . . . . . . . . . . . . . . . . . . . . . . . . . . . . . . . . . . . . . . . . . . . . . . . . . . . . 21
4.2 uSense settings . . . . . . . . . . . . . . . . . . . . . . . . . . . . . . . . . . . . . . . . . . . . . . . . . . . . . . . . . . . . . . . . . . . . . . . . . . . . . . .22
4.2.1 Setting the time and date . . . . . . . . . . . . . . . . . . . . . . . . . . . . . . . . . . . . . . . . . . . . . . . . . . . . . . . . . . . . . . . .22
4.2.2 Setting country and language . . . . . . . . . . . . . . . . . . . . . . . . . . . . . . . . . . . . . . . . . . . . . . . . . . . . . . . . . . . . 22
4.2.3 Main screen setting . . . . . . . . . . . . . . . . . . . . . . . . . . . . . . . . . . . . . . . . . . . . . . . . . . . . . . . . . . . . . . . . . . . . 23
4.2.4 Presence sensor . . . . . . . . . . . . . . . . . . . . . . . . . . . . . . . . . . . . . . . . . . . . . . . . . . . . . . . . . . . . . . . . . . . . . . 23
4.2.5 Display current or target temperature . . . . . . . . . . . . . . . . . . . . . . . . . . . . . . . . . . . . . . . . . . . . . . . . . . . . . . 23
4.2.6 Child lock . . . . . . . . . . . . . . . . . . . . . . . . . . . . . . . . . . . . . . . . . . . . . . . . . . . . . . . . . . . . . . . . . . . . . . . . . . . . 23
4.2.7 Changing the name of an activity . . . . . . . . . . . . . . . . . . . . . . . . . . . . . . . . . . . . . . . . . . . . . . . . . . . . . . . . . 24
4.2.8 Changing the name of a zone . . . . . . . . . . . . . . . . . . . . . . . . . . . . . . . . . . . . . . . . . . . . . . . . . . . . . . . . . . . . 25
4.2.9 Changing the display settings . . . . . . . . . . . . . . . . . . . . . . . . . . . . . . . . . . . . . . . . . . . . . . . . . . . . . . . . . . . . 25
4.3 uSense connections (with Wi-Fi and the app) . . . . . . . . . . . . . . . . . . . . . . . . . . . . . . . . . . . . . . . . . . . . . . . . . . . . . . . 25
4.3.1 Establishing the Wi-Fi connection . . . . . . . . . . . . . . . . . . . . . . . . . . . . . . . . . . . . . . . . . . . . . . . . . . . . . . . . . 25
4.3.2 Downloading the app . . . . . . . . . . . . . . . . . . . . . . . . . . . . . . . . . . . . . . . . . . . . . . . . . . . . . . . . . . . . . . . . . . .26
4.3.3 Connecting the app with the uSense . . . . . . . . . . . . . . . . . . . . . . . . . . . . . . . . . . . . . . . . . . . . . . . . . . . . . . .26
4.3.4 Registering installer access . . . . . . . . . . . . . . . . . . . . . . . . . . . . . . . . . . . . . . . . . . . . . . . . . . . . . . . . . . . . . .27
4.4 Advanced settings . . . . . . . . . . . . . . . . . . . . . . . . . . . . . . . . . . . . . . . . . . . . . . . . . . . . . . . . . . . . . . . . . . . . . . . . . . . . .27
4.4.1 Resetting to default settings . . . . . . . . . . . . . . . . . . . . . . . . . . . . . . . . . . . . . . . . . . . . . . . . . . . . . . . . . . . . . 27

Contents
4 7667977 - v.01 - 25102017
4.4.2 Check for software update . . . . . . . . . . . . . . . . . . . . . . . . . . . . . . . . . . . . . . . . . . . . . . . . . . . . . . . . . . . . . . .27
4.4.3 Temperature calibration . . . . . . . . . . . . . . . . . . . . . . . . . . . . . . . . . . . . . . . . . . . . . . . . . . . . . . . . . . . . . . . . .27
4.4.4 Pre heat . . . . . . . . . . . . . . . . . . . . . . . . . . . . . . . . . . . . . . . . . . . . . . . . . . . . . . . . . . . . . . . . . . . . . . . . . . . . . 28
4.4.5 Auto mode . . . . . . . . . . . . . . . . . . . . . . . . . . . . . . . . . . . . . . . . . . . . . . . . . . . . . . . . . . . . . . . . . . . . . . . . . . . 28
5 Messages and data . . . . . . . . . . . . . . . . . . . . . . . . . . . . . . . . . . . . . . . . . . . . . . . . . . . . . . . . . . . . . . . . . . . . . . . . . . . . . . . . .29
5.1 Outside temperature . . . . . . . . . . . . . . . . . . . . . . . . . . . . . . . . . . . . . . . . . . . . . . . . . . . . . . . . . . . . . . . . . . . . . . . . . . . 29
5.2 Energy consumption . . . . . . . . . . . . . . . . . . . . . . . . . . . . . . . . . . . . . . . . . . . . . . . . . . . . . . . . . . . . . . . . . . . . . . . . . . . 29
5.3 Installer details . . . . . . . . . . . . . . . . . . . . . . . . . . . . . . . . . . . . . . . . . . . . . . . . . . . . . . . . . . . . . . . . . . . . . . . . . . . . . . . 29
5.4 Appliance data . . . . . . . . . . . . . . . . . . . . . . . . . . . . . . . . . . . . . . . . . . . . . . . . . . . . . . . . . . . . . . . . . . . . . . . . . . . . . . . 29
5.5 Technical information . . . . . . . . . . . . . . . . . . . . . . . . . . . . . . . . . . . . . . . . . . . . . . . . . . . . . . . . . . . . . . . . . . . . . . . . . . 30
5.6 Error messages overview . . . . . . . . . . . . . . . . . . . . . . . . . . . . . . . . . . . . . . . . . . . . . . . . . . . . . . . . . . . . . . . . . . . . . . . 30
6 Installation . . . . . . . . . . . . . . . . . . . . . . . . . . . . . . . . . . . . . . . . . . . . . . . . . . . . . . . . . . . . . . . . . . . . . . . . . . . . . . . . . . . . . . . . 32
6.1 System overview . . . . . . . . . . . . . . . . . . . . . . . . . . . . . . . . . . . . . . . . . . . . . . . . . . . . . . . . . . . . . . . . . . . . . . . . . . . . . .32
6.1.1 Systems with gateway . . . . . . . . . . . . . . . . . . . . . . . . . . . . . . . . . . . . . . . . . . . . . . . . . . . . . . . . . . . . . . . . . . 32
6.1.2 System without gateway . . . . . . . . . . . . . . . . . . . . . . . . . . . . . . . . . . . . . . . . . . . . . . . . . . . . . . . . . . . . . . . . 32
6.2 Standard delivery . . . . . . . . . . . . . . . . . . . . . . . . . . . . . . . . . . . . . . . . . . . . . . . . . . . . . . . . . . . . . . . . . . . . . . . . . . . . . 32
6.3 Preparation . . . . . . . . . . . . . . . . . . . . . . . . . . . . . . . . . . . . . . . . . . . . . . . . . . . . . . . . . . . . . . . . . . . . . . . . . . . . . . . . . . 33
6.4 Installation of the gateway . . . . . . . . . . . . . . . . . . . . . . . . . . . . . . . . . . . . . . . . . . . . . . . . . . . . . . . . . . . . . . . . . . . . . . 33
6.5 Location of the uSense . . . . . . . . . . . . . . . . . . . . . . . . . . . . . . . . . . . . . . . . . . . . . . . . . . . . . . . . . . . . . . . . . . . . . . . . . 34
6.6 Installation of the uSense . . . . . . . . . . . . . . . . . . . . . . . . . . . . . . . . . . . . . . . . . . . . . . . . . . . . . . . . . . . . . . . . . . . . . . . 34
6.7 Setup procedure . . . . . . . . . . . . . . . . . . . . . . . . . . . . . . . . . . . . . . . . . . . . . . . . . . . . . . . . . . . . . . . . . . . . . . . . . . . . . . 34
6.8 Software update . . . . . . . . . . . . . . . . . . . . . . . . . . . . . . . . . . . . . . . . . . . . . . . . . . . . . . . . . . . . . . . . . . . . . . . . . . . . . . 35
7 Troubleshooting . . . . . . . . . . . . . . . . . . . . . . . . . . . . . . . . . . . . . . . . . . . . . . . . . . . . . . . . . . . . . . . . . . . . . . . . . . . . . . . . . . . .36
7.1 Error messages . . . . . . . . . . . . . . . . . . . . . . . . . . . . . . . . . . . . . . . . . . . . . . . . . . . . . . . . . . . . . . . . . . . . . . . . . . . . . . .36
7.2 Other problems or questions . . . . . . . . . . . . . . . . . . . . . . . . . . . . . . . . . . . . . . . . . . . . . . . . . . . . . . . . . . . . . . . . . . . . .36
8 Appendix . . . . . . . . . . . . . . . . . . . . . . . . . . . . . . . . . . . . . . . . . . . . . . . . . . . . . . . . . . . . . . . . . . . . . . . . . . . . . . . . . . . . . . . . . 37
8.1 Terms and conditions . . . . . . . . . . . . . . . . . . . . . . . . . . . . . . . . . . . . . . . . . . . . . . . . . . . . . . . . . . . . . . . . . . . . . . . . . . 37
8.2 Disposal . . . . . . . . . . . . . . . . . . . . . . . . . . . . . . . . . . . . . . . . . . . . . . . . . . . . . . . . . . . . . . . . . . . . . . . . . . . . . . . . . . . . 37
8.3 Technical specifications . . . . . . . . . . . . . . . . . . . . . . . . . . . . . . . . . . . . . . . . . . . . . . . . . . . . . . . . . . . . . . . . . . . . . . . . 37
8.4 ErP information . . . . . . . . . . . . . . . . . . . . . . . . . . . . . . . . . . . . . . . . . . . . . . . . . . . . . . . . . . . . . . . . . . . . . . . . . . . . . . . 38
8.4.1 Product fiche . . . . . . . . . . . . . . . . . . . . . . . . . . . . . . . . . . . . . . . . . . . . . . . . . . . . . . . . . . . . . . . . . . . . . . . . . 38
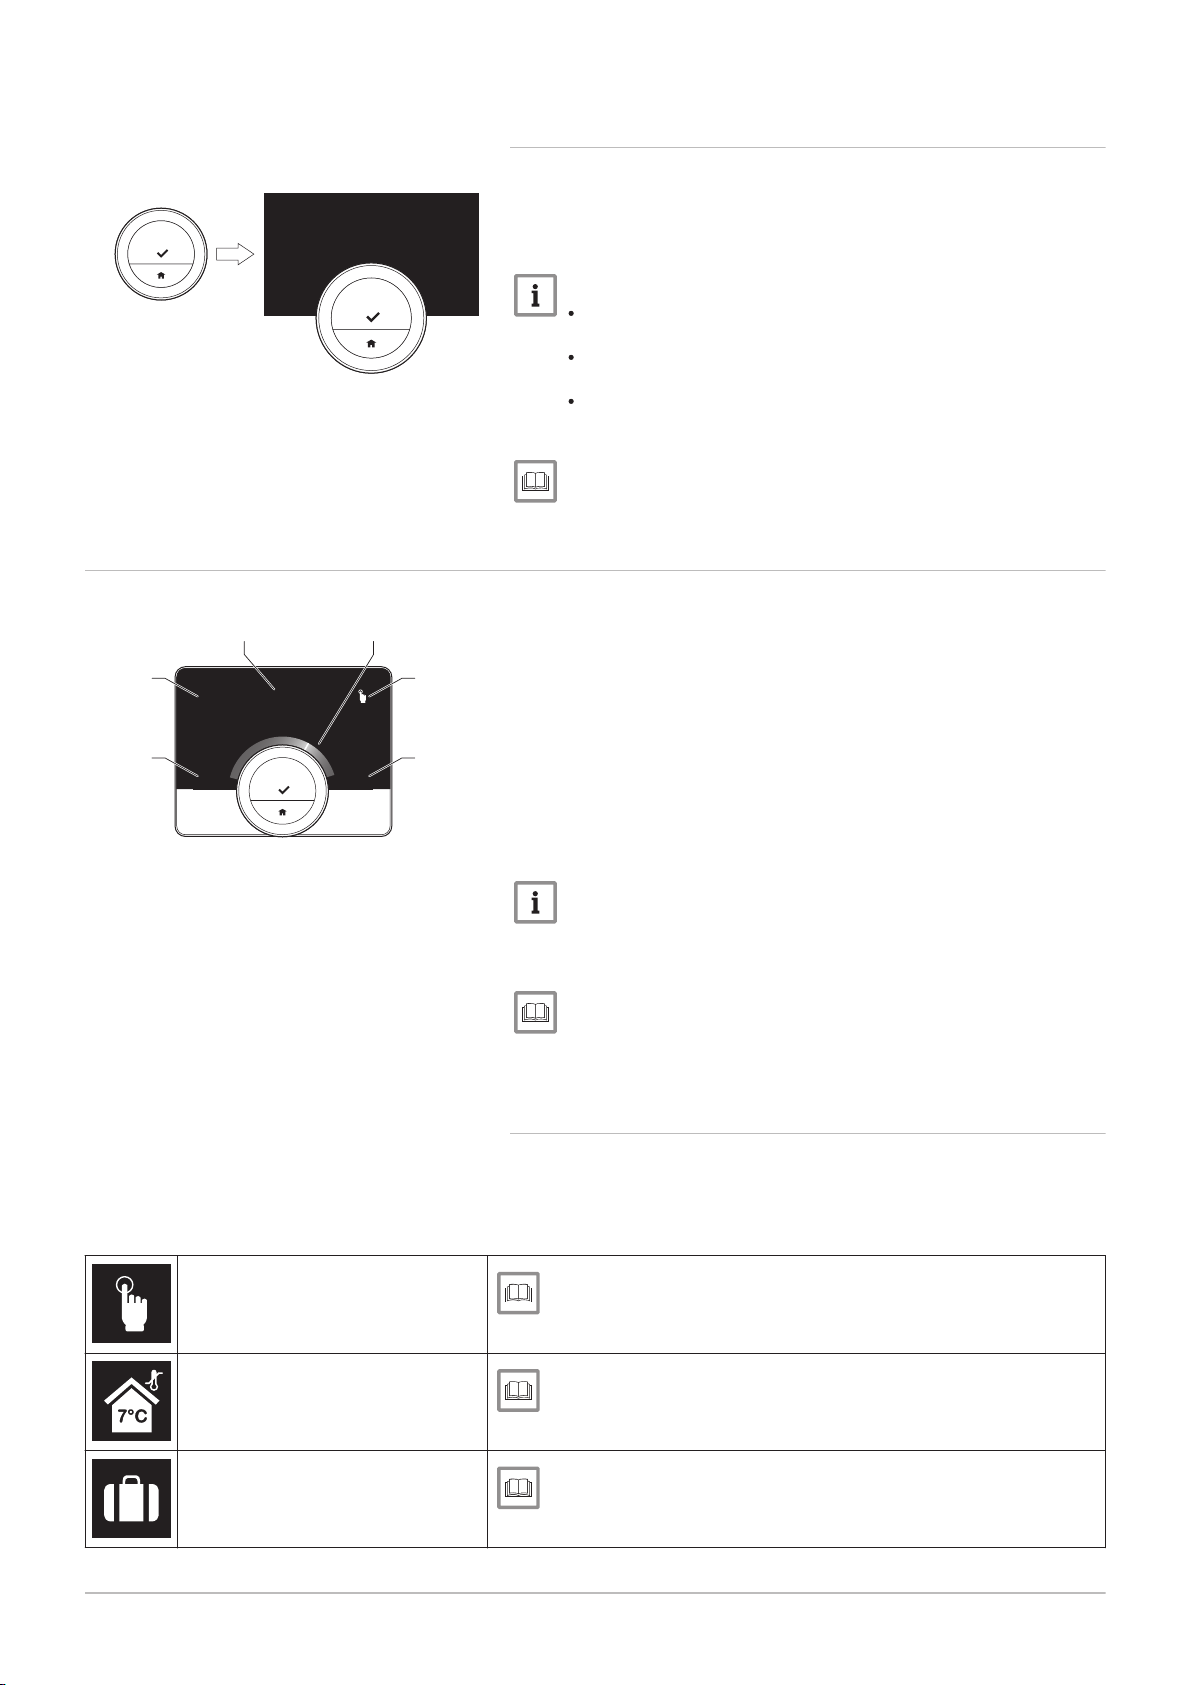
1 Manual menu
AD-3001023-01
AD-3001024-01
AD-3001025-01
AD-3001026-01
AD-3001027-01
AD-3001028-01
AD-3001029-01
7667977 - v.01 - 25102017 5
Fig.1
Introduction
1 Manual menu
Introduction
This chapter introduces you to the thermostat. You will find basic informa
tion, e.g. how to use the rotary dial and buttons plus how to interpret the
information on the screen.
Chapter: Introduction, page 6
Fig.2 General use
Fig.3 Customisation
Fig.4 Messages and data
Fig.5 Installation
General use
This chapter helps you with the daily use of the thermostat. You will find
instructions for daily use like how to change temperatures in different
modes, changing control modes.
Chapter: General use, page 13
Customisation
This chapter helps you with customising the thermostat.
Chapter: Customisation, page 21
Messages and data
This chapter helps you with navigating to information and data of the ther
mostat and system.
Chapter: Messages and data, page 29
Installation
This chapter helps you with the installation and commissioning of the ther
mostat.
Chapter: Installation, page 32
Fig.6 Troubleshooting
Fig.7 Appendix
Troubleshooting
This chapter helps you when there is a problem with the thermostat, an er
ror message will appear on the home screen.
Chapter: Troubleshooting, page 36
Appendix
This chapter gives you more technical information about the thermostat.
Chapter: Appendix, page 37
AD-3001023-01
2 Introduction
6 7667977 - v.01 - 25102017
2 Introduction
2.1 Symbols used in the manual
This chapter introduces you to the thermostat. You will find basic informa
tion, e.g. how to use the rotary dial and buttons plus how to interpret the
information on the screen.
Next chapter: General use, page 13
First chapter: Manual menu, page 5
This manual uses various symbols to draw attention to special instructions.
We do this to improve user safety, to prevent problems and to guarantee
correct operation.
Warning
Risk of dangerous situations that may result in minor personal in
jury.
Caution
Risk of material damage.
Important
Please note: important information.
2.2 Introducing the uSense
See
Reference to other manuals or pages in this manual.
Intended use. The uSense is designed to operate as a room thermostat
with the possibility to operate your heating system. It has a Wi-Fi connec
tion to be able to connect to the Internet, making it possible to operate the
uSense with an app on a mobile device.
Warning
Do not use the uSense for systems that are not in accordance
with the intended use.
A simple user interface. Like many other interfaces you have to scroll
through menus, select and enter options and confirm changes. The
uSense has only two buttons that you can either short-press or long-press.
There is one rotary dial to scroll forward or backward. It’s as easy as that!
Controlling the temperature. Your plans change. No problem, control the
temperature as you wish, in manual mode or schedule mode. You can
even be flexible by switching between three schedules. Do you prefer us
ing your mobile device anywhere in the house? The uSense app is availa
ble for iOS, Android and Windows.
What do I do when I …? I want to …? How do I …? Are you going away
for a holiday? Do you want to make a fire in your fireplace? Do you need a
hot water boost? Or do you want a short temperature change? You can
find most answers in the "General use" chapter.
For more information, see
General use, page 13
2.3 The uSense and its app
AD-3000987-01
App
App
21.0 °C
5.0 30.0
AD-3000988-01
<1 >1
>1<1
AD-3000989-01
<1
...
.....
.......
.........
7667977 - v.01 - 25102017 7
2 Introduction
Fig.8
2.4
The climate in your home contributes to your comfort; with the uSense you
are able to control the temperature in your home the way you want it.
In case you prefer to control your climate with your mobile device (e.g.
smartphone or tablet) you can download the app and connect it with your
uSense.
Important
The uSense needs a reliable connection with other devices (e.g.
appliance, Wi-Fi router) in your home.
What's new for the uSense
This document is based on the latest software version. The list describes
the new software functionalities for the uSense based on software version
1.30.X:
Auto filling function (the availability depends on your appliance.)
Cooling function (the availability depends on your appliance.)
Fireplace mode (the availability depends on your appliance.)
Check for software update
Child lock function
Changing name of zone
Wi-Fi configuration screens updated
See
Technical information, page 30, for information about the current
software version of your uSense.
2.5 How to use the uSense
Fig.9
Fig.10
Before you can use the uSense, it first needs to be installed.
For more information, see
Installation, page 32
2.5.1
Using the rotary dial and buttons
The rotary dial has two buttons: the top button is the select button, the bot
tom button is the home button. Pressing a button for a shorter or longer
time will start different actions, as shown in this manual.
Short button press: Press less than a second on the button (<1).
Long button press: Press longer than a second on the button (>1).
Rotary dial: Turn the rotary dial to choose and adjust menus, submenus
and settings.
2.5.2 Entering the main menu and menu items
The main menu gives you access to all submenus and settings.
Short-press the select button to enter the main menu from the home
screen.
Turn the rotary dial forward or backward to select a menu item.
Short-press the select button to confirm the selection.
AD-3000990-01
>1
.
.
.
.
.
.
.
.
.
.
.
.
.
.
.
.
.
21.0 °C
AD-3000991-01
<1
21.0 °C
23.0
...
.....
.......
.........
AD-3000992-01
>1
21.0 °C
23.0
AD-3000993-01
...
.....
.......
.........
<1
AD-3000994-01
21.0 °C
23.0
<1
2 Introduction
8 7667977 - v.01 - 25102017
2.5.3 Entering the Quick Access menu and menu items
Fig.11
Fig.12
Fig.13
The Quick Access menu gives you access to a selection of menu items.
Long-press the select button to enter the Quick Access menu from the
home screen.
Turn the rotary dial forward or backward to select a menu item.
Short-press the select button to confirm the selection.
2.5.4 Returning to the previous step or home screen
You can return to the previous step of the menu or return immediately to
the home screen.
1. Short-press the home button to return to the previous step.
2. Long-press the home button to return to the home screen.
Fig.14
Fig.15
2.5.5
Scrolling through menu items and changing settings
With the rotary dial you can scroll through menu items and change values,
temperatures and time settings.
1. Turn the rotary dial to scroll through the menu items.
2. Select the menu item you want to change.
3. Short-press the select button to confirm the selection.
4. Turn the rotary dial to scroll through the submenu items.
5. Select the submenu item you want to change.
6. Short-press the select button to confirm the selection.
7. Turn the rotary dial to change the setting.
8. Short-press the select button to confirm the selection.
2.5.6 Screen shows no information
AD-3000995-01
>30
AD-3000996-01
21.0 °C
5.0 30.0
3
4
1
6
2
5
7667977 - v.01 - 25102017 9
2 Introduction
Fig.16
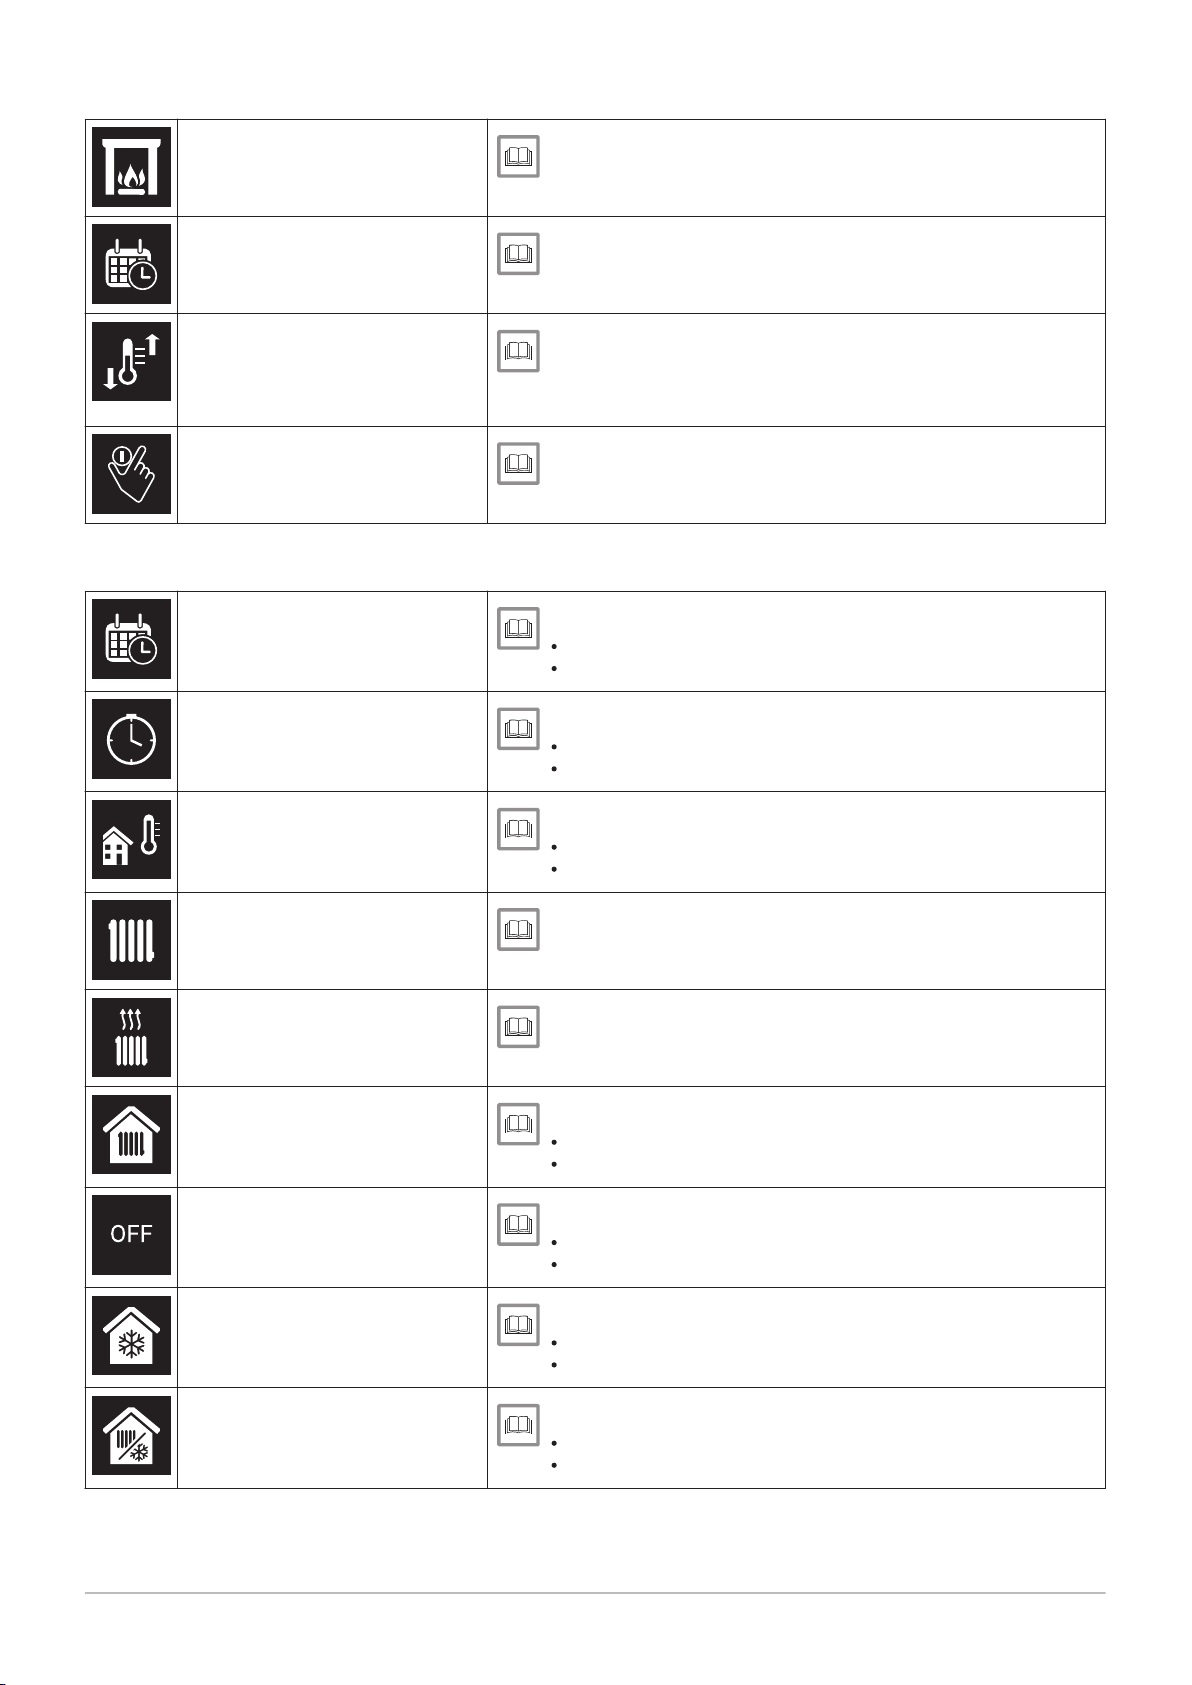
2.6
Fig.17
Description of the display
When the rotary dial, select button or home button are not operated and
no people are in front of the uSense for 30 seconds, the display of the
uSense goes in stand-by mode and will show no information (black
screen).
Important
Press a button, turn the rotary dial or use the presence sensor
to activate the display.
The uSense will display the home screen after activation of the
display. Any unconfirmed setting or selection will be lost.
On delivery the presence sensor is active. You can switch off
the presence detection.
For more information, see
Presence sensor, page 23
1
Current temperature (or target temperature)
2
Temperature scale
3
Control mode icon
4
Main screen information box
5
Main screen information box
6
Zone icon
The temperature scale in the main screen shows the difference between
the current and target temperature. The white line represents the current
temperature. The target temperature is displayed in small digits next to the
scale. The temperature scale is visible when the current temperature dif
fers from the target temperature.
Tab.1 Control mode icons
Manual mode: Manual mode is ac
tive
Anti-frost mode: Anti-frost mode is
active
Holiday period: Holiday period is ac
tive
Important
The uSense displays the current temperature in a large font by de
fault. You can change the display of the temperature to show the
target temperature.
For more information, see
Screen shows no information, page 9
Main screen setting, page 23
Changing the display settings, page 25
2.6.1
Possible icons in the display (depending on the configuration of the sys
tem).
Description of the icons in the display
See
Changing the mode quickly, page 13
Changing the temperature in manual mode, page 13
See
Changing the mode quickly, page 13
Switching to antifrost mode, page 19
See
Changing the mode quickly, page 13
First option, page 18
2 Introduction
10 7667977 - v.01 - 25102017
Fireplace mode: Fireplace mode is
active
Temperature scheduling: Tempera
ture scheduling is active
Short temperature change: Schedul
ing mode is interrupted for a short
temperature change
Rotary dial: You are turning the rota
ry dial to set the temperature
Tab.2 Main screen icons
Date
Time
See
Changing the mode quickly, page 13
Activating fireplace mode, page 19
See
Changing the mode quickly, page 13
Changing the temperature in scheduling mode, page 14
See
Changing the mode quickly, page 13
Changing the temperature for a short period in scheduling
mode, page 14
See
Changing the temperature in manual mode, page 13
Changing the temperature in scheduling mode, page 14
See
Setting the time and date, page 22
Main screen setting, page 23
See
Setting the time and date, page 22
Main screen setting, page 23
Outdoor temperature
Boiler status: Heating demand
Boiler status: Heating active
Appliance mode: On
Appliance mode: Off
Appliance mode: Cooling
See
Main screen setting, page 23
Outside temperature, page 29
See
Main screen setting, page 23
See
Main screen setting, page 23
See
Switching the central heating on/off, page 20
Main screen setting, page 23
See
Switching the central heating on/off, page 20
Main screen setting, page 23
See
Switching to cooling mode, page 20
Main screen setting, page 23
Appliance mode: Auto
See
Switching to auto mode, page 20
Main screen setting, page 23
Tab.3 Zone icons
7667977 - v.01 - 25102017 11
Basement
2 Introduction
See
Changing the zone temperatures, page 17
Changing the name of a zone, page 25
Bedroom
Kitchen
Living room
Study
Swimming pool
Generic
See
Changing the zone temperatures, page 17
Changing the name of a zone, page 25
See
Changing the zone temperatures, page 17
Changing the name of a zone, page 25
See
Changing the zone temperatures, page 17
Changing the name of a zone, page 25
See
Changing the zone temperatures, page 17
Changing the name of a zone, page 25
See
Changing the zone temperatures, page 17
Changing the name of a zone, page 25
See
Changing the zone temperatures, page 17
Changing the name of a zone, page 25
Tab.4 Error icon
Error display: The appliance reports
an active error
2.7
Zone selection
See
Error messages overview, page 30
Troubleshooting, page 36
2.6.2 Customising the main screen display
You can configure the main screen of the display by adding two informa
tion boxes on the screen, one to the left and one to the right of the rotary
dial.
The information boxes can show:
Time and date
Detailed information about your system
You can also change the display of the temperature to show the current or
target temperature.
For more information, see
Main screen setting, page 23
Display current or target temperature, page 23
In case you have multiple zones in your heating system, it is possible to
control temperatures in multiple zones. A zone can be a room or, for ex
ample, the ground or first floor. The zones are named CircA, CircB etc. by
default. These factory names can be changed in any name you prefer.
You can change the names on the uSense or in the app.

AD-3000997-01
21.0
°C
10.0
2 Introduction
12 7667977 - v.01 - 25102017
2.8 Presence detection
The multiple zoning options needs to be supported by a matching appli
ance configuration.
For more information, see
Changing the name of a zone, page 25
Changing the zone temperatures, page 17
Fig.18
The main screen of the display will light up (for 5 seconds) if the presence
sensor detects that you are in front of the uSense or pass by. You can dis
able the presence sensor in the settings menu.
For more information, see
Presence sensor, page 23
 Loading...