

Page 1
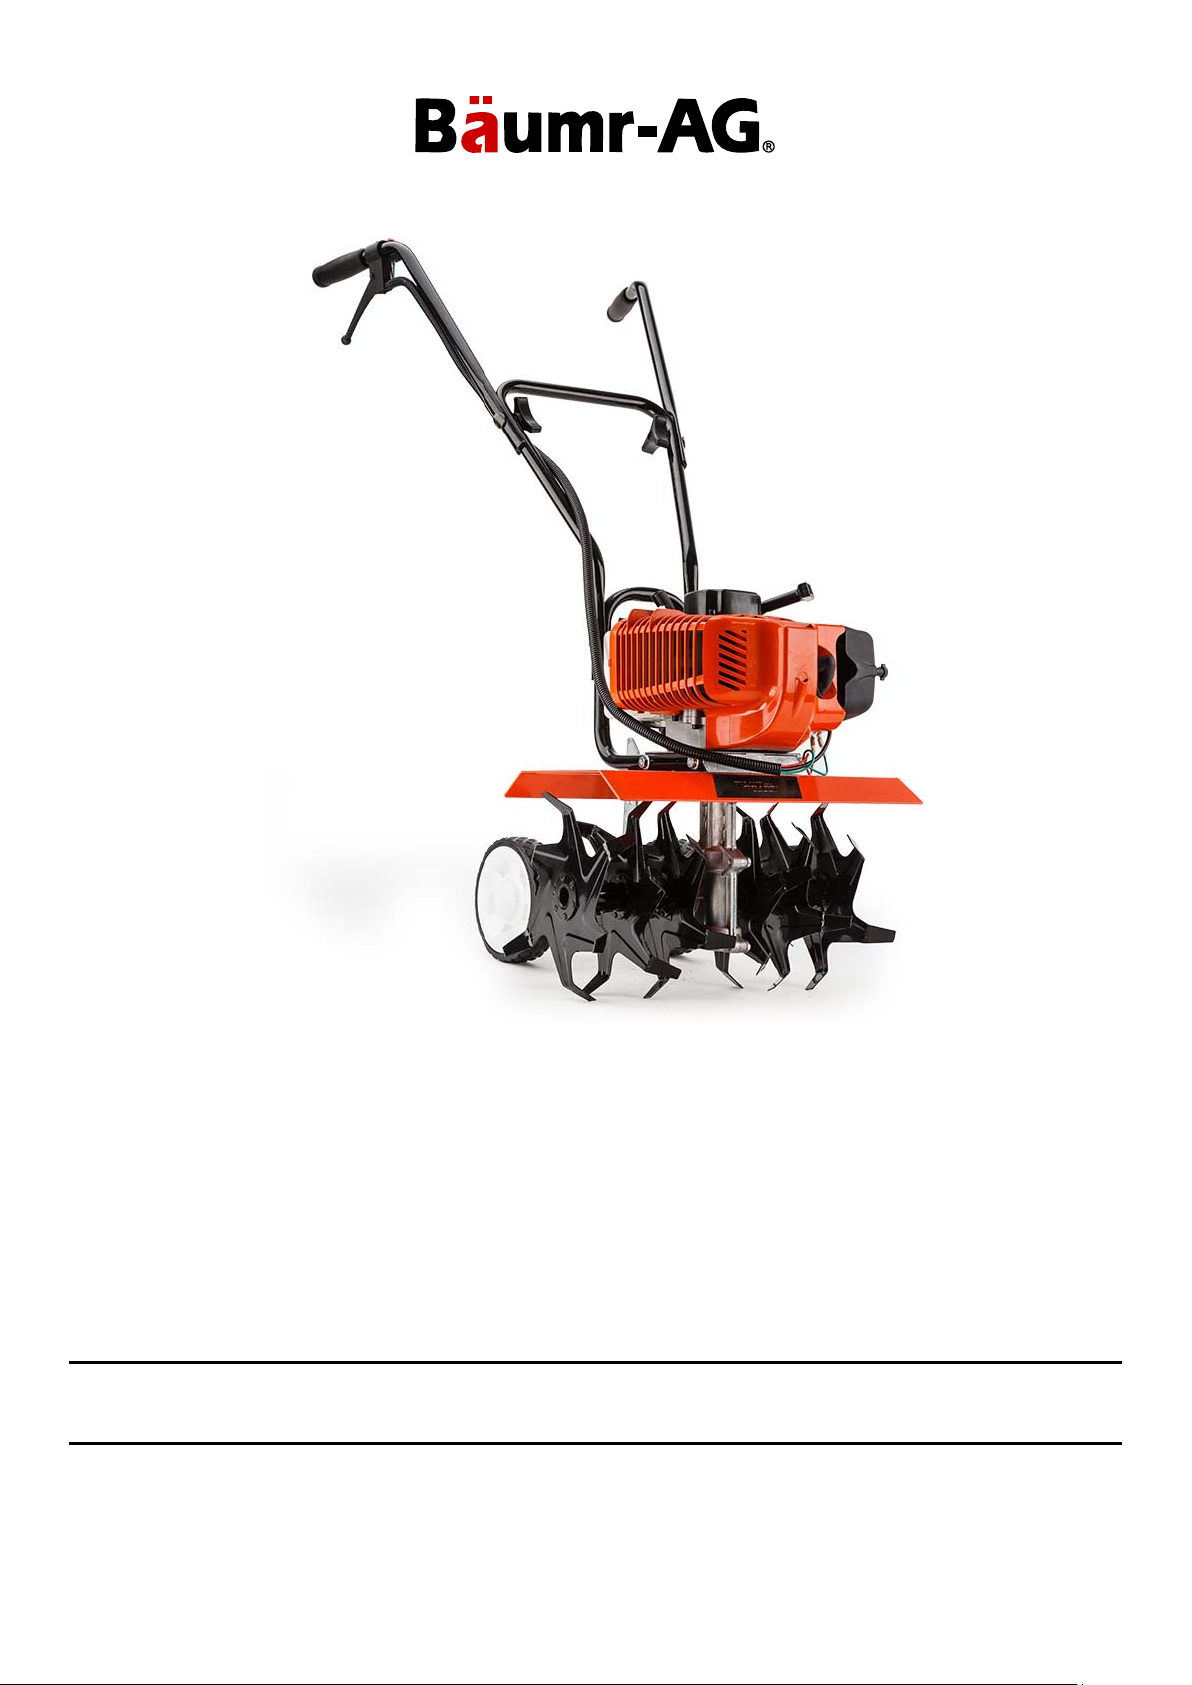
Six Blade Hand-Held Cultivator Tiller
BT-677
[Revision 4.0 December 2017]
User Manual
READ THIS MANUAL CAREFULLY BEFORE USE – FAILURE TO DO SO MAY RESULT IN INJURY, PROPERTY DAMAGE AND
MAY VOID WARRANTY. • KEEP THIS MANUAL FOR FUTURE REFERENCE. • Products covered by this manual may vary in
appearance, assembly, inclusions, specifications, description and packaging.
Page 2

Six Blade Hand-Held Cultivator Tiller - BT677
Table of Contents
Safety................................................................................................................................................................ 1
Know your Tiller .............................................................................................................................................. 3
Included Items ................................................................................................................................................. 4
Assembly ......................................................................................................................................................... 5
Quick Start Guide.......................................................................................................................................... 10
Maintenance .................................................................................................................................................. 11
Air Filter .................................................................................................................................................................. 11
Spark Plug .............................................................................................................................................................. 11
Reduction Gearbox ................................................................................................................................................ 12
Specifications ................................................................................................................................................ 13
Preface
Thanks for buying the Six Blade Hand-Held Cultivator Tiller - BT677, another high-quality machine from our company!
To get the most out of your purchase, please read the manual before using the tiller. We ask you to please read this
manual carefully beforehand in order to familiarise yourself with this product and after reading, please store this
instructional manual for future reference. Failure to follow the proper protocols listed in the manual may cause
personal injury to the operator or damage to equipment.
E&OE © 2017 Baumr-AG i
Page 3

Six Blade Hand-Held Cultivator Tiller - BT677
BAUMR-AG BAUMR-AG BAUMR-AG BAUMR-AG BAUMR-AG BAUMR-AG BAUMR-AG BAUMR-AG BAUMR-AG BAUMR-AG BAUMR-AG
BAUMR-AG BAUMR-AG BAUMR-AG BAUMR-AG BAUMR-AG BAUMR-AG BAUMR-AG BAUMR-AG BAUMR-AG BAUMR-AG BAUMR-AG
Safety
•
Accurate assembly and safe and effective use of the rototiller is the owner’s responsibility.
•
Read and follow all safety instructions.
•
Carefully follow all assembly instructions.
•
Ensure that anyone who uses the tiller must read the manual and be familiar with all controls and safety
precautions.
•
Operate the tiller according to the safety instructions and recommendations outlined here.
•
Your tiller is equipped with a safety device that enables you to stop the wheels and tines in an emergency.
•
Learn how to safely control the tiller at all times.
•
Do not allow children to operate this rototiller. Keep small children away from the area being tilled. Do not allow
adults to operate the tiller without proper instruction.
•
Dress appropriately when operating the tiller. Always wear sturdy footwear. Never wear sandals, sneakers or open
shoes and never operate the tiller with bare feet. Do not wear loose clothing that might get caught in moving parts.
•
Carefully inspect the area to be tilled and remove all foreign objects. Do not till above underground water lines,
gas lines, electric cables or pipes. Do not operate the tiller in soil with large rocks and foreign objects which can
damage the equipment.
•
Disengage all clutches and leave all control levers in the neutral position before starting the engine.
•
Handle fuel with care; it is highly flammable:
− Use an approved fuel container.
− Never add fuel to a running engine or hot engine.
− Fill the fuel tank outdoors with extreme care. Never fill the fuel tank indoors.
− Replace the gasoline cap securely and clean up spilled fuel before restarting.
•
Never operate the tiller without guards, covers and hoods in place.
•
Be extremely cautious when operating in reverse. Take extra care to avoid slipping or falling, and keep hands and
feet clear from the tines.
•
Use extreme caution when operating on or crossing gravel drives, walks or roads. Stay alert for hidden hazards or
traffic.
•
After striking a foreign object, stop the engine, remove the wire from the spark plug, thoroughly inspect the tiller for
any damage and repair the damage before restarting and operating the tiller.
•
If vegetation clogs the tines, raise the handlebars to elevate the lines and run the tiller in reverse. If this does not
clean chopped vegetation from the tines, stop the engine and disconnect the spark plug wire before removing
vegetation by hand.
•
The engine muffler will be hot from operation. Do not touch it with bare skin or a severe burn may result.
•
If the unit should start to vibrate abnormally, stop the engine and check immediately for the cause. Vibration is
generally a sign of trouble.
•
Do not run the engine indoors; exhaust fumes are deadly.
•
Do not overload the machine capacity by attempting to fill too deep at too fast a rate.
•
Never operate the machine at high transport speeds on slippery surfaces. Look behind and use care when
backing.
•
Never allow bystanders near the unit.
•
Use only attachments and accessories approved by the manufacturer of the tiller.
•
Never operate the tiller without good visibility or light.
•
Be careful when tilling in hard ground. The tines may catch in the ground and propel the tiller backwards. If this
occurs, let go of the handlebars and do not restrain the machine.
E&OE © 2017 Baumr-AG 1
Page 4

Six Blade Hand-Held Cultivator Tiller - BT677
BAUMR-AG BAUMR-AG BAUMR-AG BAUMR-AG BAUMR-AG BAUMR-AG BAUMR-AG BAUMR-AG BAUMR-AG BAUMR-AG BAUMR-AG
BAUMR-AG BAUMR-AG BAUMR-AG BAUMR-AG BAUMR-AG BAUMR-AG BAUMR-AG BAUMR-AG BAUMR-AG BAUMR-AG BAUMR-AG
•
Take all possible precautions when leaving the machine unattended. Disengage all control levers, stop the engine,
wait for all moving parts to stop and make certain guards and shields in place.
•
When leaving the operating position for any reason:
− Shut off the engine.
− Wait for all moving parts to stop.
E&OE © 2017 Baumr-AG 2
Page 5
Six Blade Hand-Held Cultivator Tiller - BT677
BAUMR-AG BAUMR-AG BAUMR-AG BAUMR-AG BAUMR-AG BAUMR-AG BAUMR-AG BAUMR-AG BAUMR-AG BAUMR-AG BAUMR-AG
BAUMR-AG BAUMR-AG BAUMR-AG BAUMR-AG BAUMR-AG BAUMR-AG BAUMR-AG BAUMR-AG BAUMR-AG BAUMR-AG BAUMR-AG
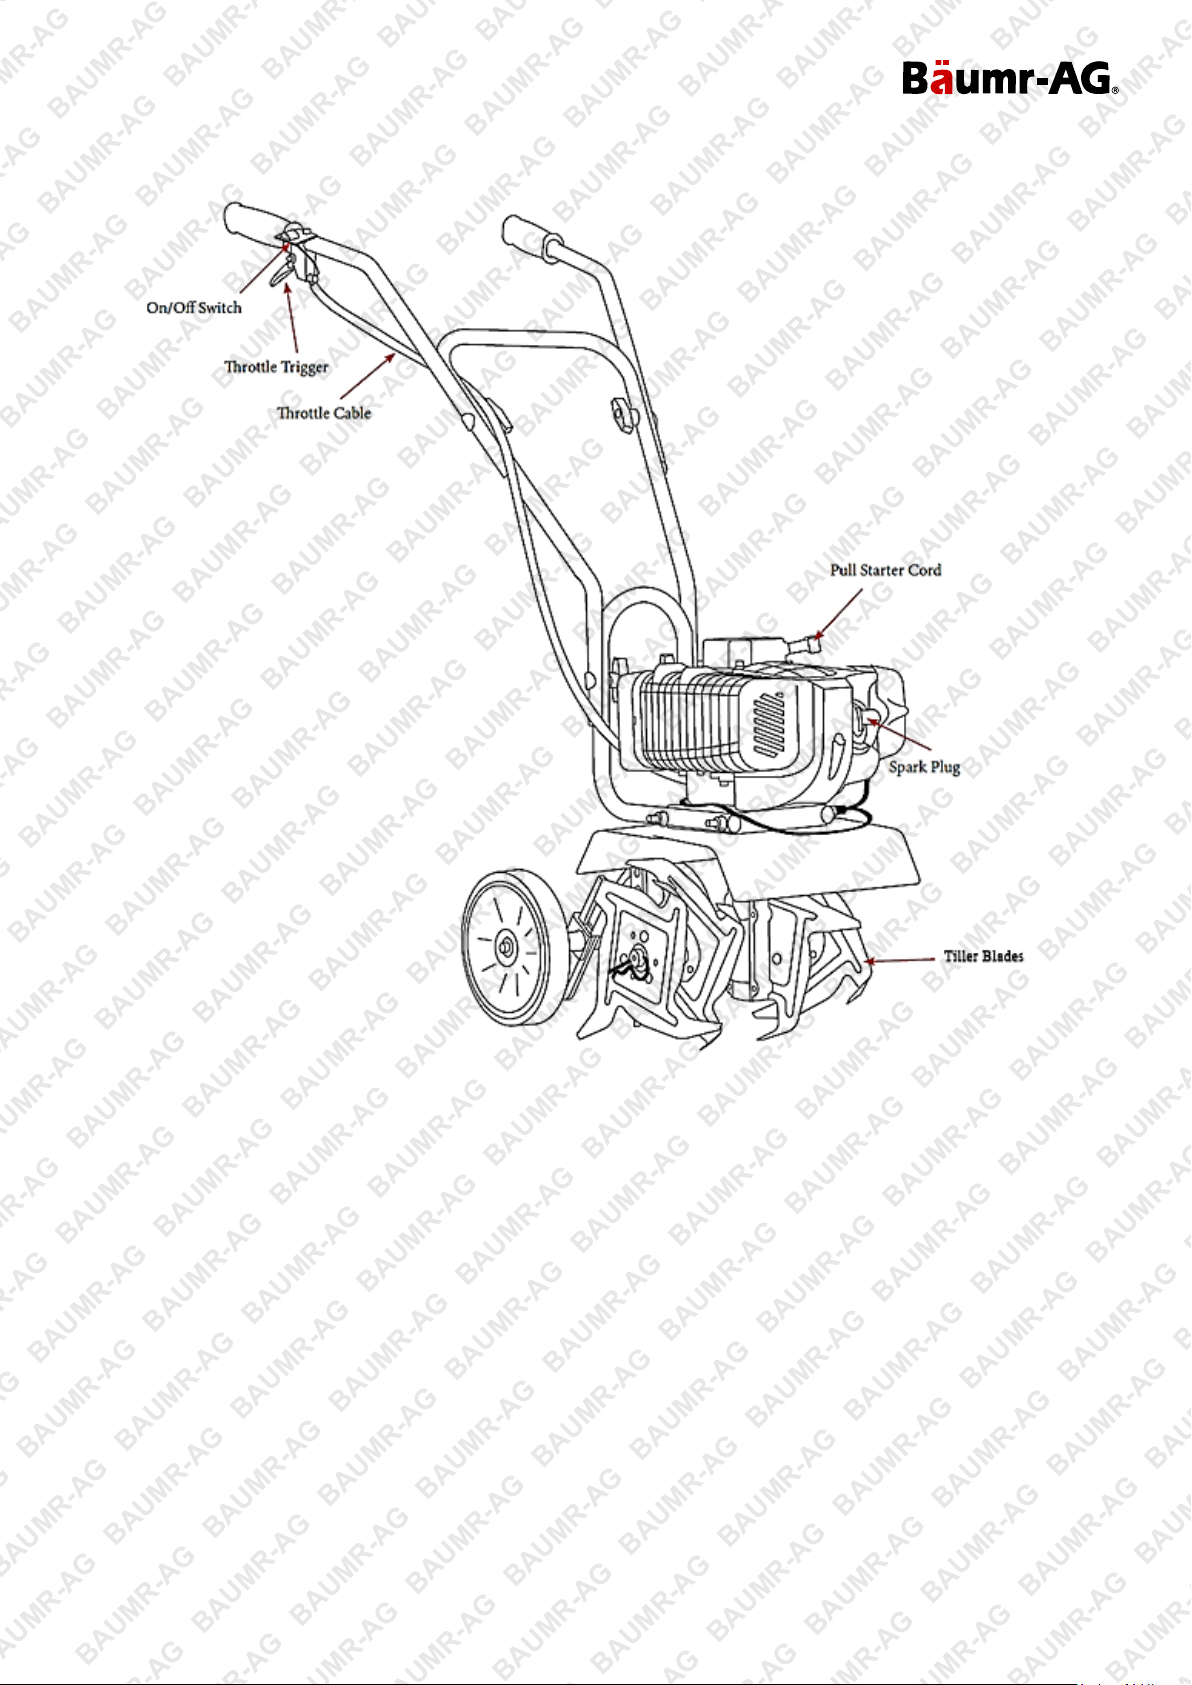
Know your Tiller
E&OE © 2017 Baumr-AG 3
Page 6
Six Blade Hand-Held Cultivator Tiller - BT677
BAUMR-AG BAUMR-AG BAUMR-AG BAUMR-AG BAUMR-AG BAUMR-AG BAUMR-AG BAUMR-AG BAUMR-AG BAUMR-AG BAUMR-AG
BAUMR-AG BAUMR-AG BAUMR-AG BAUMR-AG BAUMR-AG BAUMR-AG BAUMR-AG BAUMR-AG BAUMR-AG BAUMR-AG BAUMR-AG
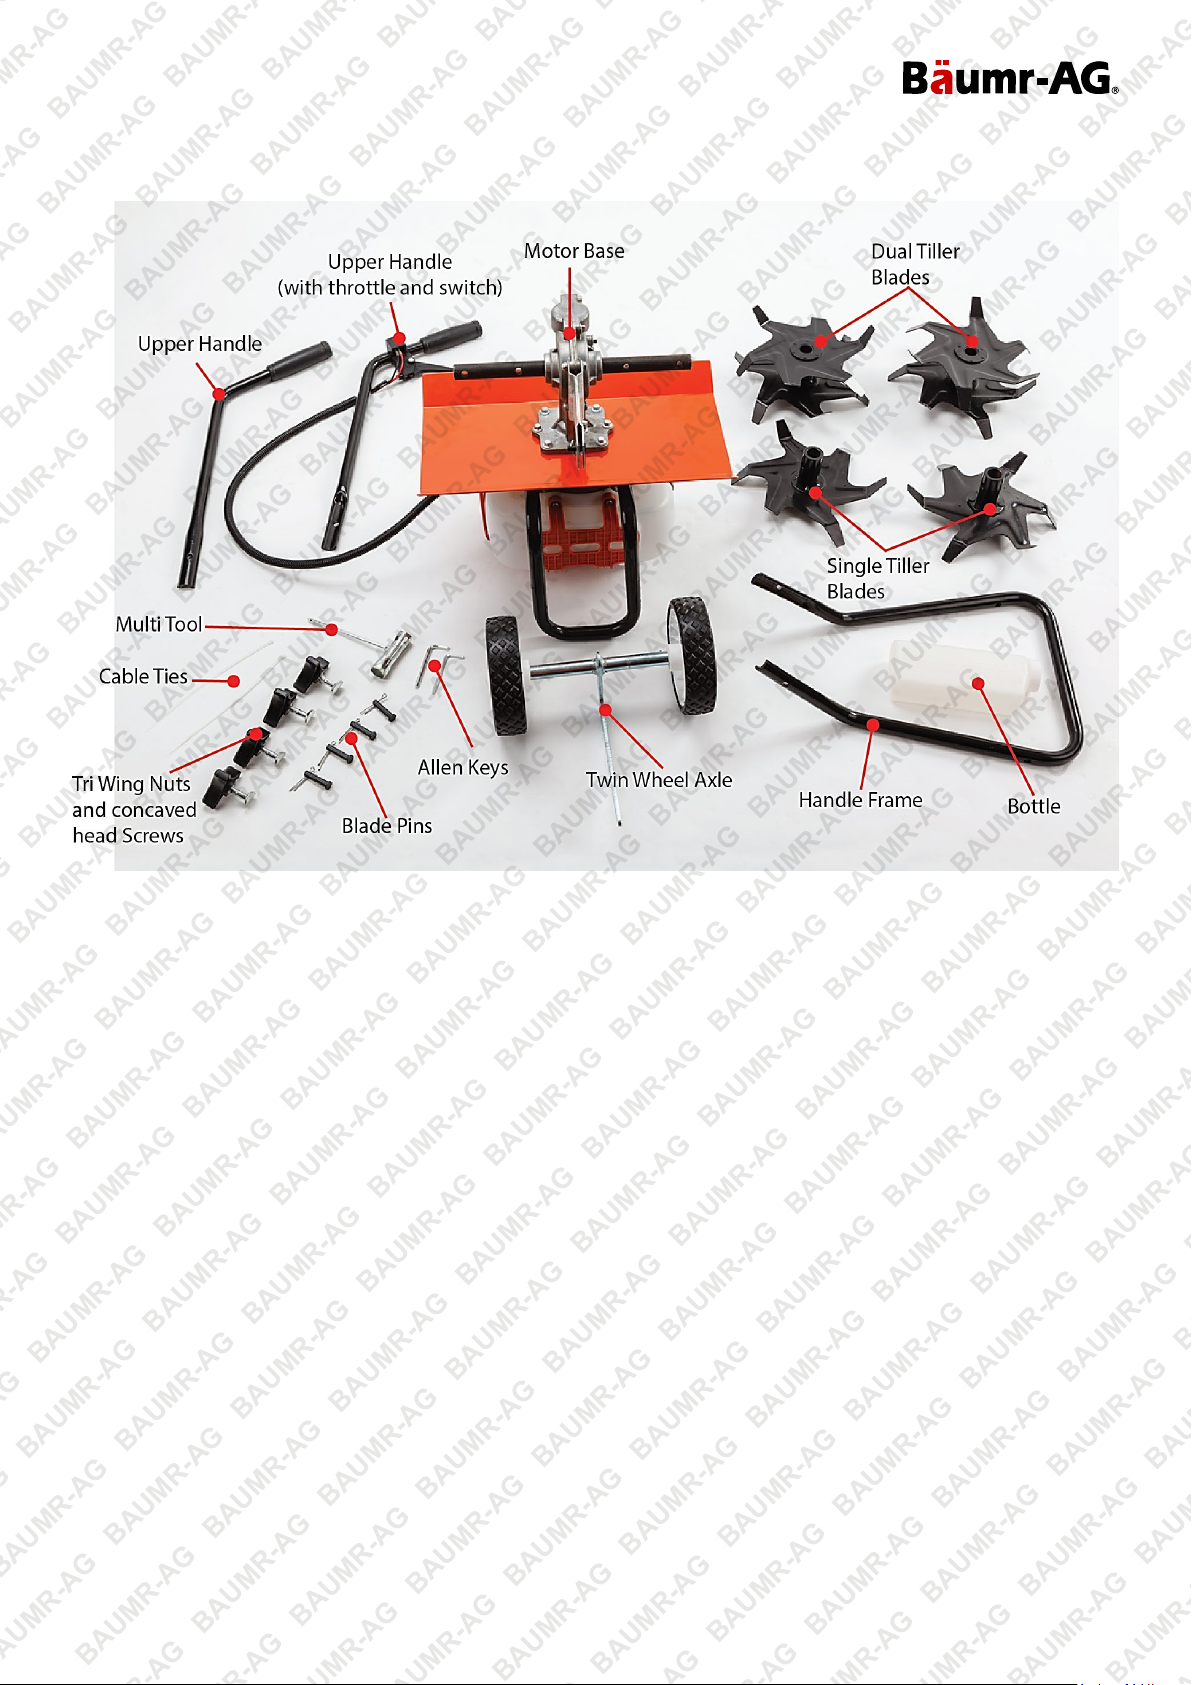
Included Items
1x Motor Base (with upper handle, throttle and switch)
1x Upper handle
2x Dual Tiller Blades
2x Single Tiller Blades
1x Bottle (for fuel and 2 stroke mixing)
1x Handle Frame
1x Twin Wheel Axle
2x Allen Keys (5mm & 4mm)
4x Blade Pins
4x Tri Wing nuts (for handles)
1x Multi Tool (with 17mm & 19mm hex socket and Phillips
head tip)
2x Cable Ties
E&OE © 2017 Baumr-AG 4
Page 7
Six Blade Hand-Held Cultivator Tiller - BT677
BAUMR-AG BAUMR-AG BAUMR-AG BAUMR-AG BAUMR-AG BAUMR-AG BAUMR-AG BAUMR-AG BAUMR-AG BAUMR-AG BAUMR-AG
BAUMR-AG BAUMR-AG BAUMR-AG BAUMR-AG BAUMR-AG BAUMR-AG BAUMR-AG BAUMR-AG BAUMR-AG BAUMR-AG BAUMR-AG
Assembly
Please note, this is to be done straight out of the box. Ensure no fuel or petrol mix is in the tank.
Augers and auger tips are consumable parts, and are not covered under warranty.
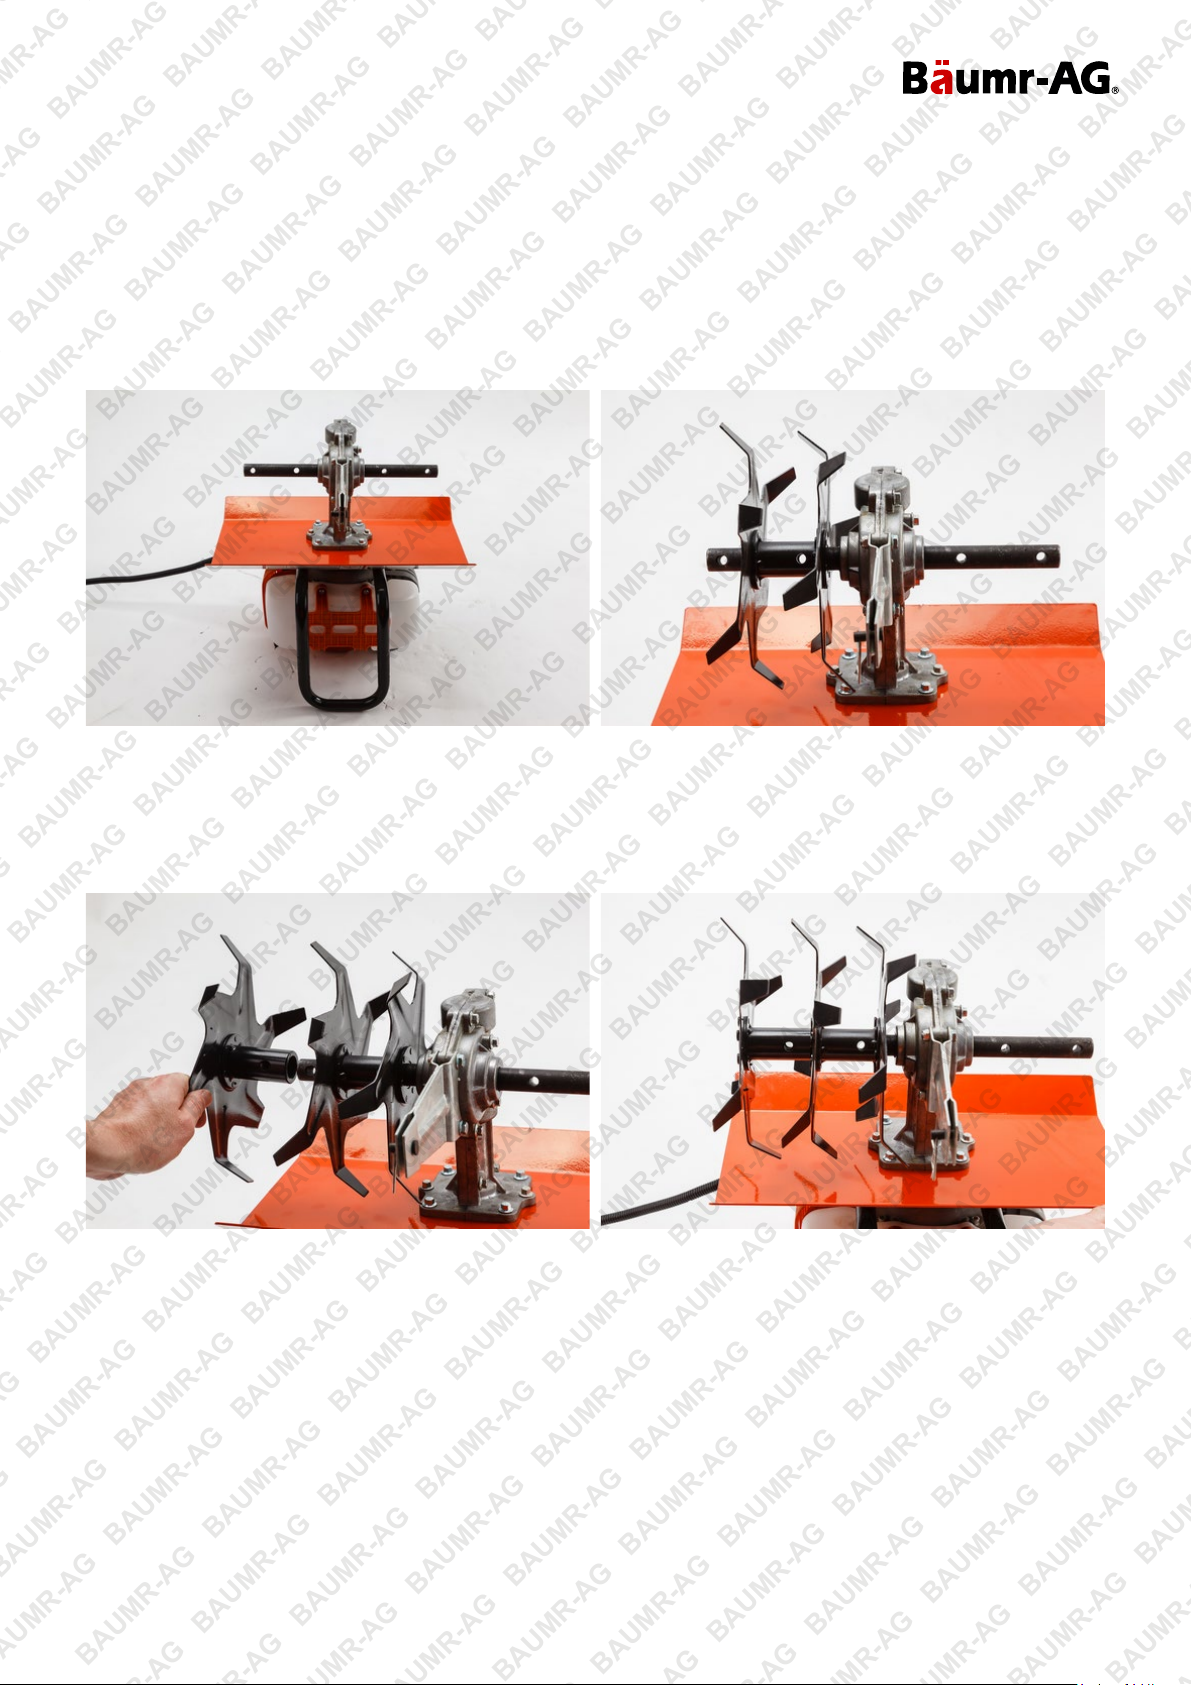
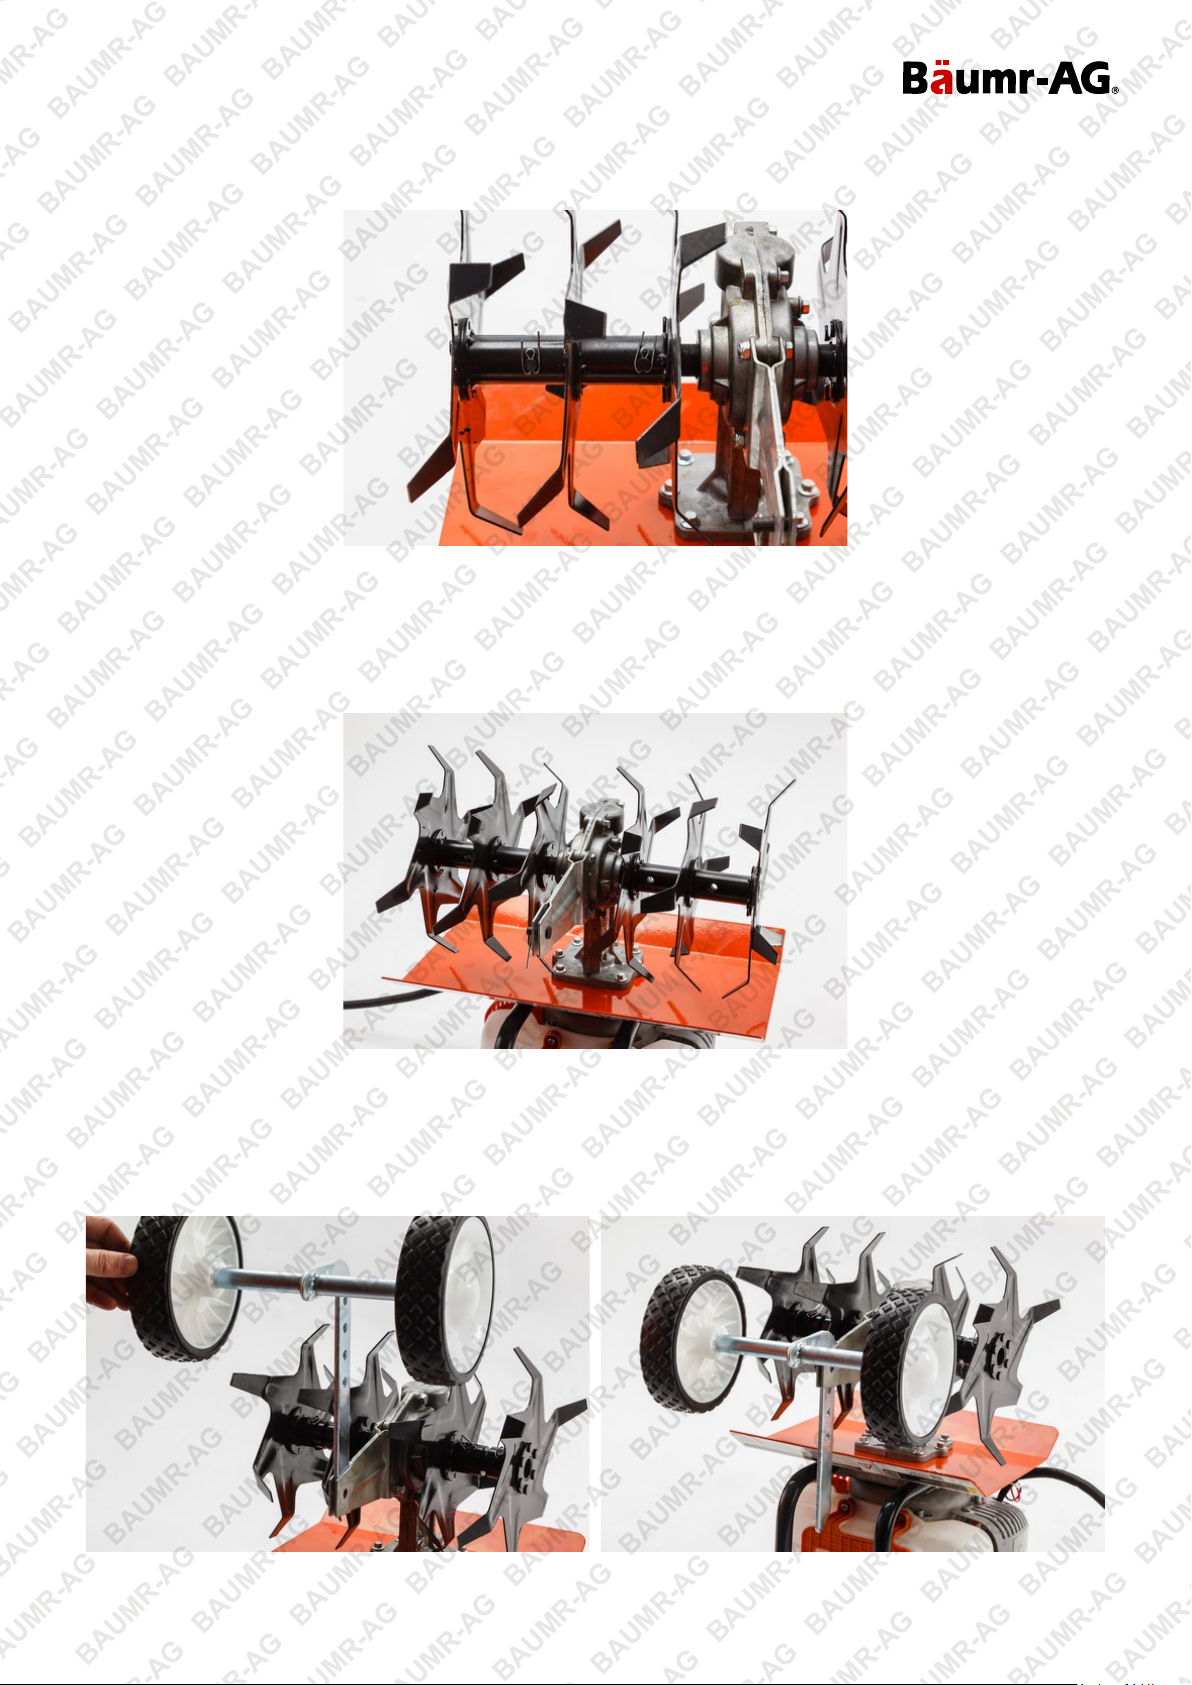
Step 1: Attaching the tiller blades
Place the motor base upside down (ensuring NO fuel is in the tank – Fig. 1a) and place 1 dual blade onto the axle and
align the pin holes (Fig. 1b).
Figure 1a Figure 1b
Step 2
Place a single blade with the spacer facing in (Fig. 2a) and align the pin holes (Fig. 2b).
Figure 2a Figure 2b
E&OE © 2017 Baumr-AG 5
Page 8
Six Blade Hand-Held Cultivator Tiller - BT677
BAUMR-AG BAUMR-AG BAUMR-AG BAUMR-AG BAUMR-AG BAUMR-AG BAUMR-AG BAUMR-AG BAUMR-AG BAUMR-AG BAUMR-AG
BAUMR-AG BAUMR-AG BAUMR-AG BAUMR-AG BAUMR-AG BAUMR-AG BAUMR-AG BAUMR-AG BAUMR-AG BAUMR-AG BAUMR-AG
Step 3
Insert blade pins then split pin and bend legs (Fig. 3).
Figure 3
Step 4
Do the same for the other side (Fig. 4).
Figure 4
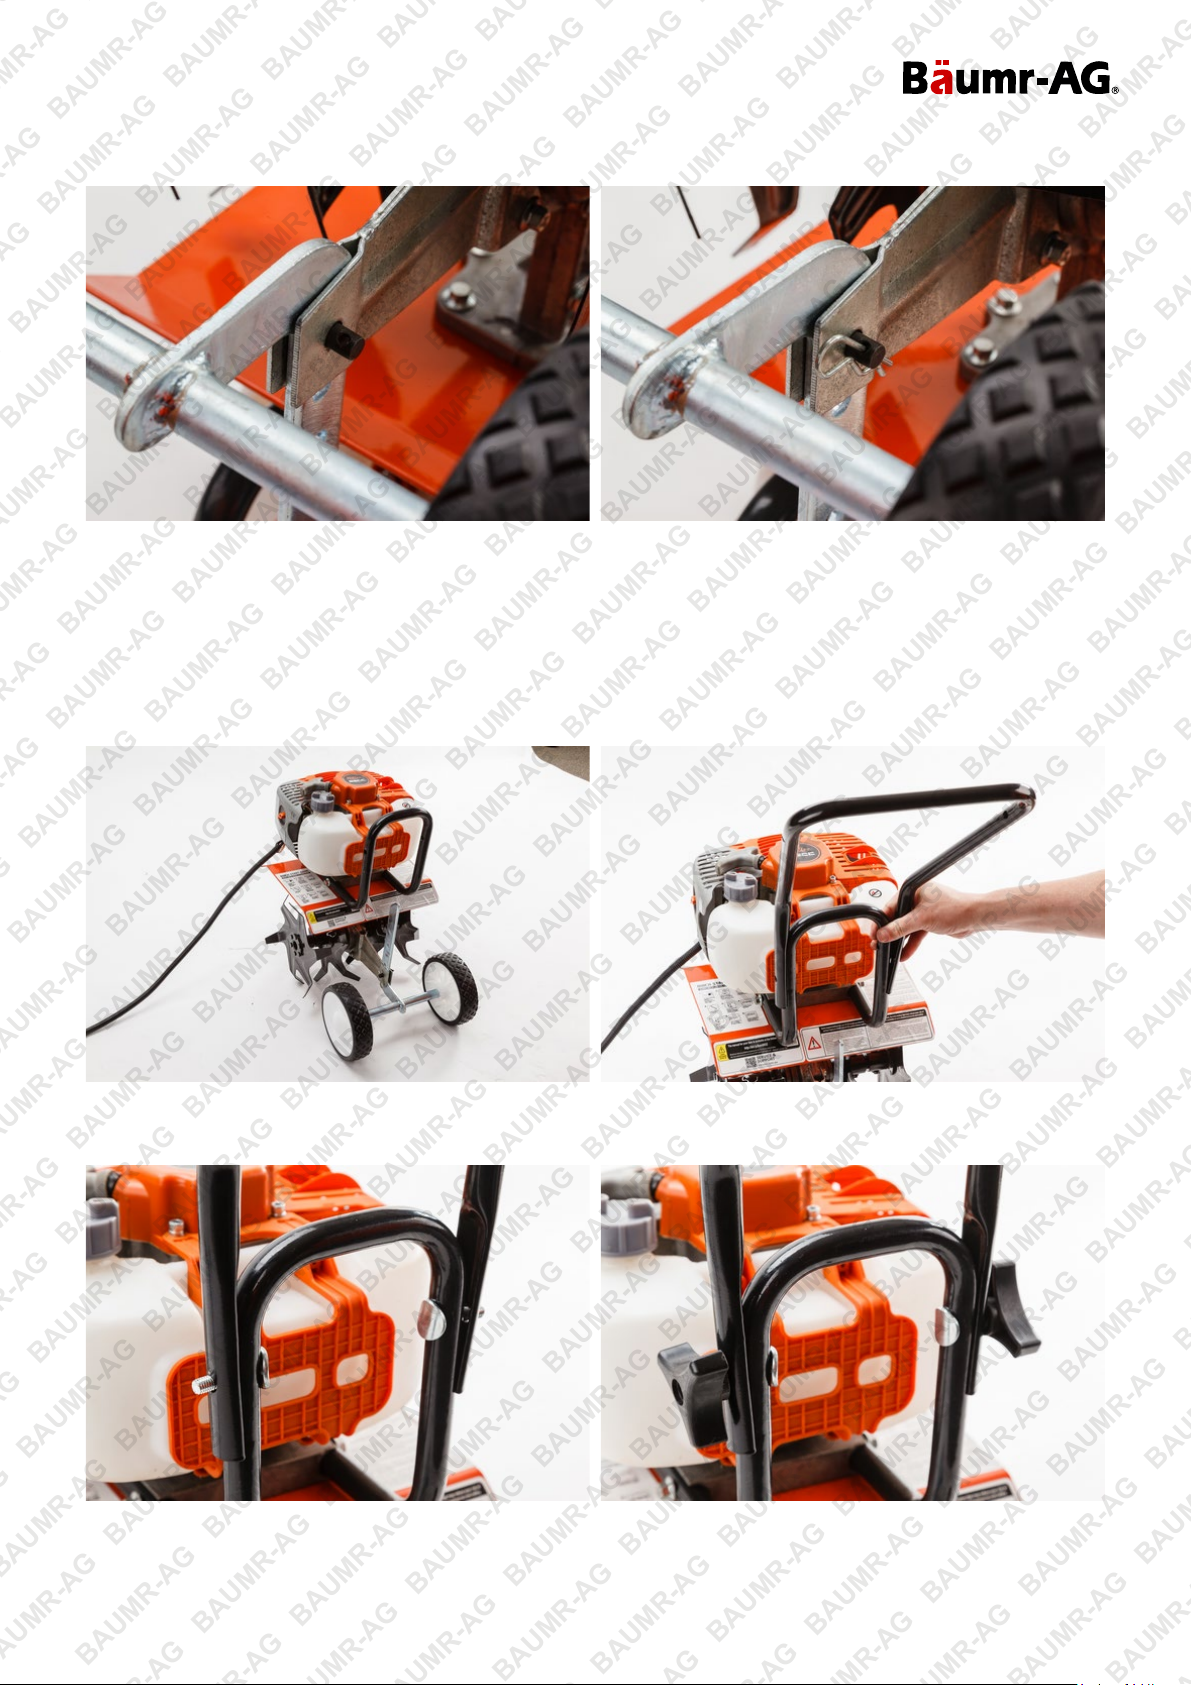
Step 5: Attaching the Wheels
Slide wheel axel into the tail of the motor base (Fig. 5a and 5b). Insert pin and locking wire (Fig. 5c and 5d).
E&OE © 2017 Baumr-AG 6
Page 9
Six Blade Hand-Held Cultivator Tiller - BT677
BAUMR-AG BAUMR-AG BAUMR-AG BAUMR-AG BAUMR-AG BAUMR-AG BAUMR-AG BAUMR-AG BAUMR-AG BAUMR-AG BAUMR-AG
BAUMR-AG BAUMR-AG BAUMR-AG BAUMR-AG BAUMR-AG BAUMR-AG BAUMR-AG BAUMR-AG BAUMR-AG BAUMR-AG BAUMR-AG
Figure 5a Figure 5b
Figure 5c Figure 5d
Step 6: Attaching the Handles
Turn motor base so it is standing upright on the wheels and tiller blades (Fig. 6a). Attach handle frame (Fig. 6b) with
screws and tri wing nuts. Ensure that the concaved head is on the inside (Fig. 6c) and the tri wing nuts are on the
outside (Fig. 6d).
Figure 6a Figure 6b
Figure 6c Figure 6d
E&OE © 2017 Baumr-AG 7
Page 10
Six Blade Hand-Held Cultivator Tiller - BT677
BAUMR-AG BAUMR-AG BAUMR-AG BAUMR-AG BAUMR-AG BAUMR-AG BAUMR-AG BAUMR-AG BAUMR-AG BAUMR-AG BAUMR-AG
BAUMR-AG BAUMR-AG BAUMR-AG BAUMR-AG BAUMR-AG BAUMR-AG BAUMR-AG BAUMR-AG BAUMR-AG BAUMR-AG BAUMR-AG
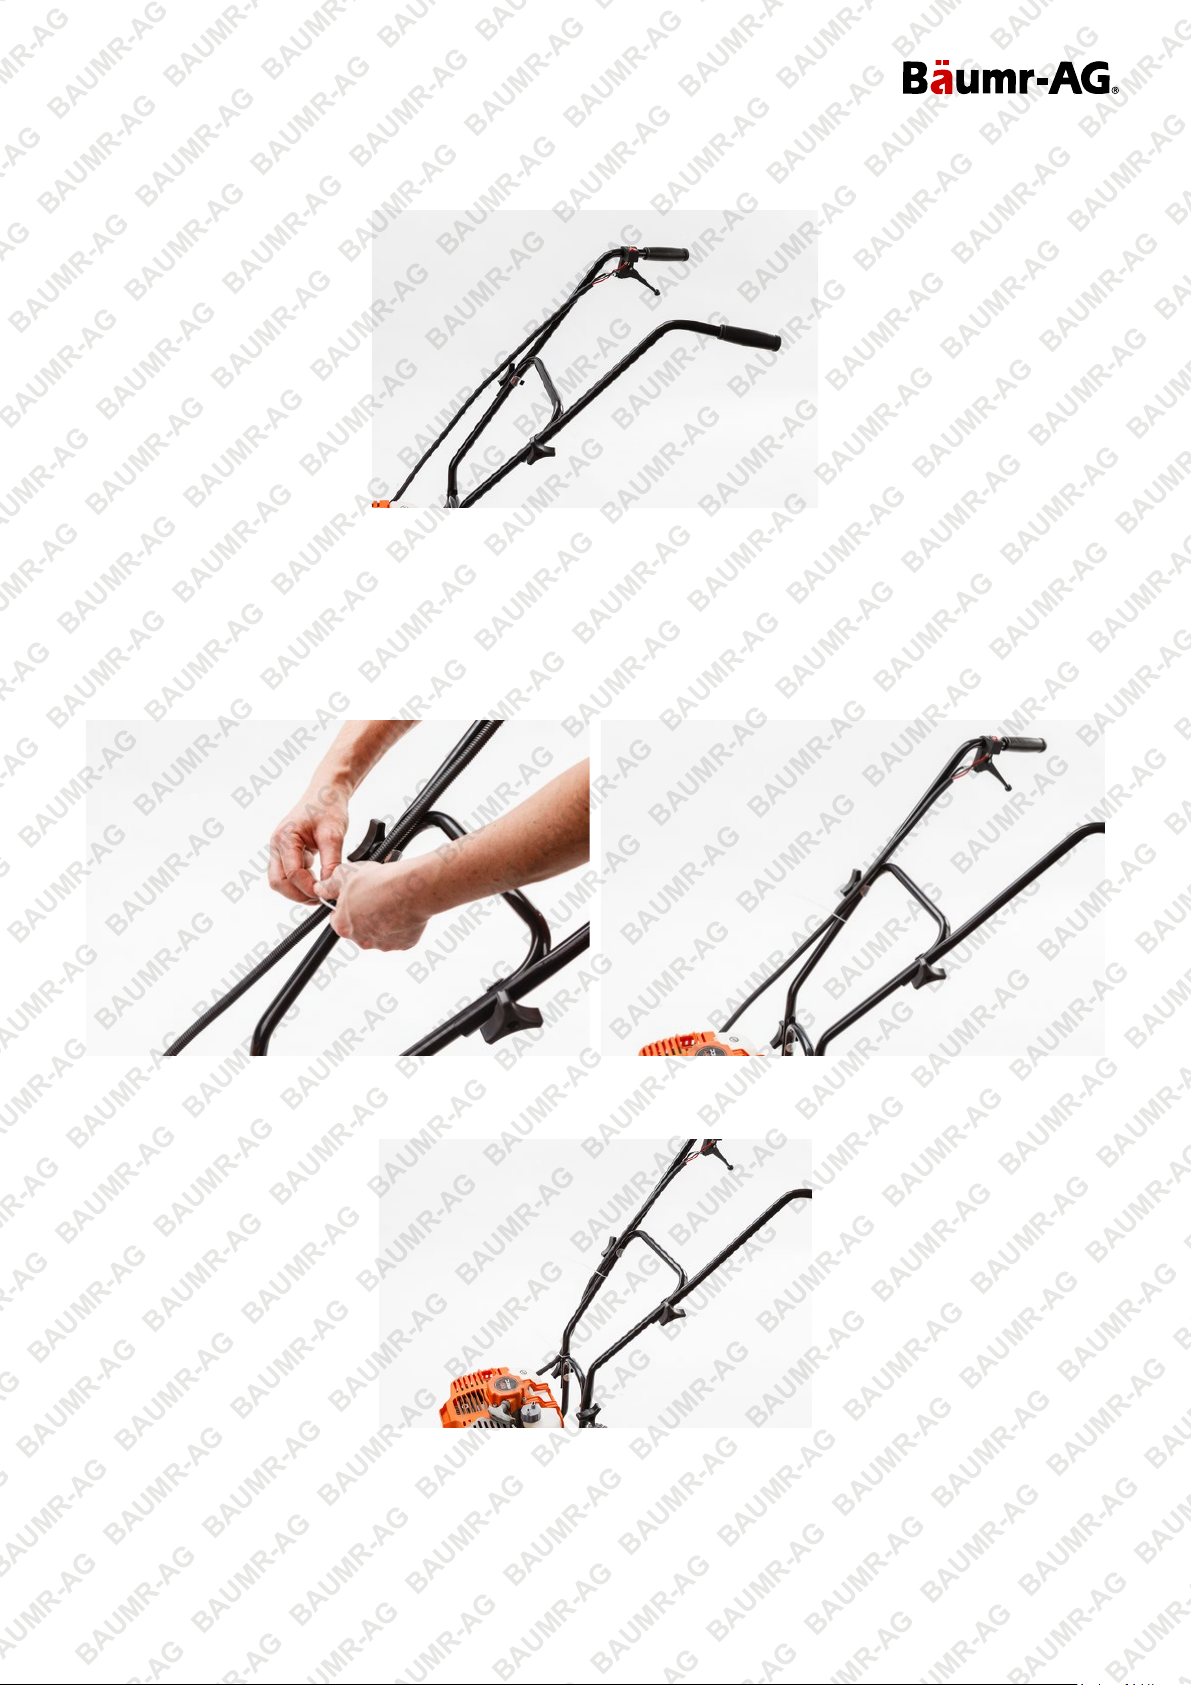
Step 7:
Attach upper handles in the same manner as Step 6 (Fig. 7).
Figure 7
Step 8:
Tie down throttle cable with provided cable ties (Fig. 8a, 8b & 8c). Ensure that it is not too tight. If it is too tight, this
may result in the throttle cable getting caught and will affect the operation of the engine. If this does happen, please
cut cable tie and replace with a newly purchased cable ties.
Figure 8a Figure 8b
Figure 8c
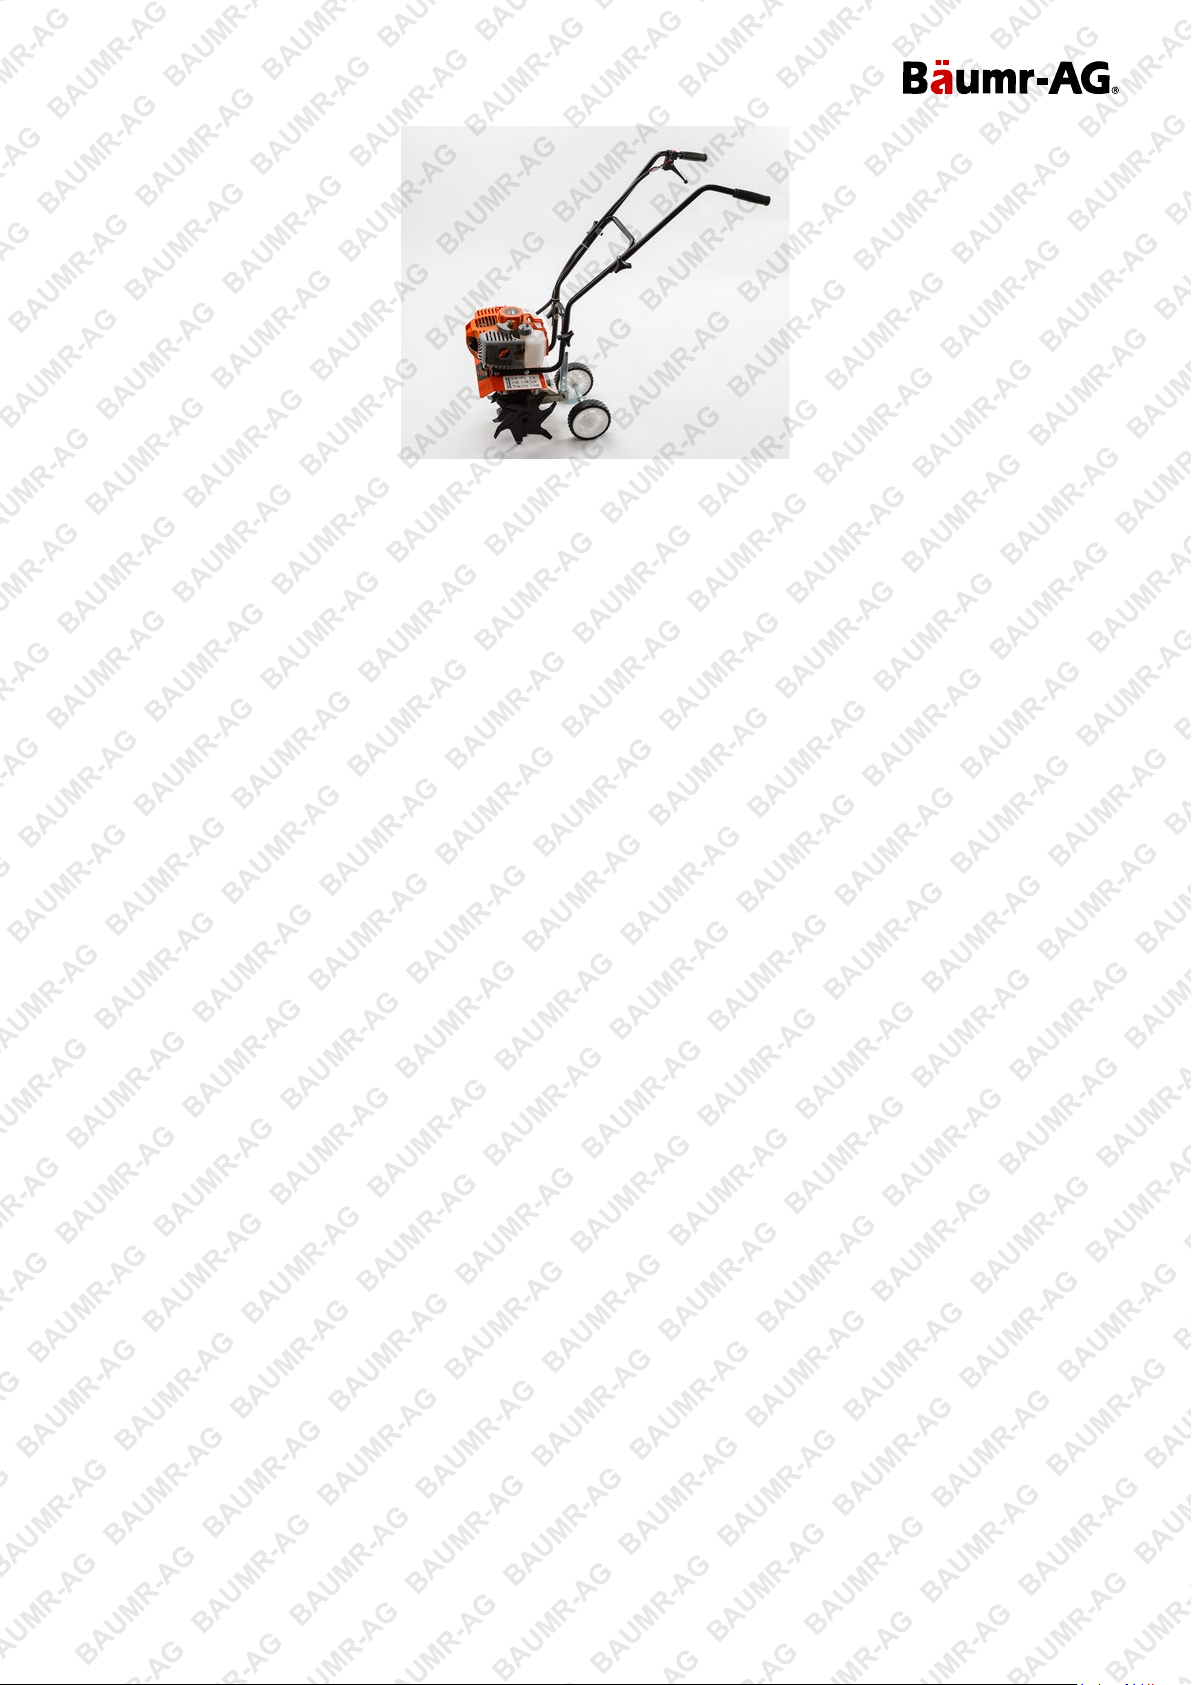
Step 9:
This is now complete (Fig. 9). Please refer to our quick start guide.
E&OE © 2017 Baumr-AG 8
Page 11
Six Blade Hand-Held Cultivator Tiller - BT677
BAUMR-AG BAUMR-AG BAUMR-AG BAUMR-AG BAUMR-AG BAUMR-AG BAUMR-AG BAUMR-AG BAUMR-AG BAUMR-AG BAUMR-AG
BAUMR-AG BAUMR-AG BAUMR-AG BAUMR-AG BAUMR-AG BAUMR-AG BAUMR-AG BAUMR-AG BAUMR-AG BAUMR-AG BAUMR-AG
Figure 9
E&OE © 2017 Baumr-AG 9
Page 12
Six Blade Hand-Held Cultivator Tiller - BT677
BAUMR-AG BAUMR-AG BAUMR-AG BAUMR-AG BAUMR-AG BAUMR-AG BAUMR-AG BAUMR-AG BAUMR-AG BAUMR-AG BAUMR-AG
BAUMR-AG BAUMR-AG BAUMR-AG BAUMR-AG BAUMR-AG BAUMR-AG BAUMR-AG BAUMR-AG BAUMR-AG BAUMR-AG BAUMR-AG
Quick Start Guide
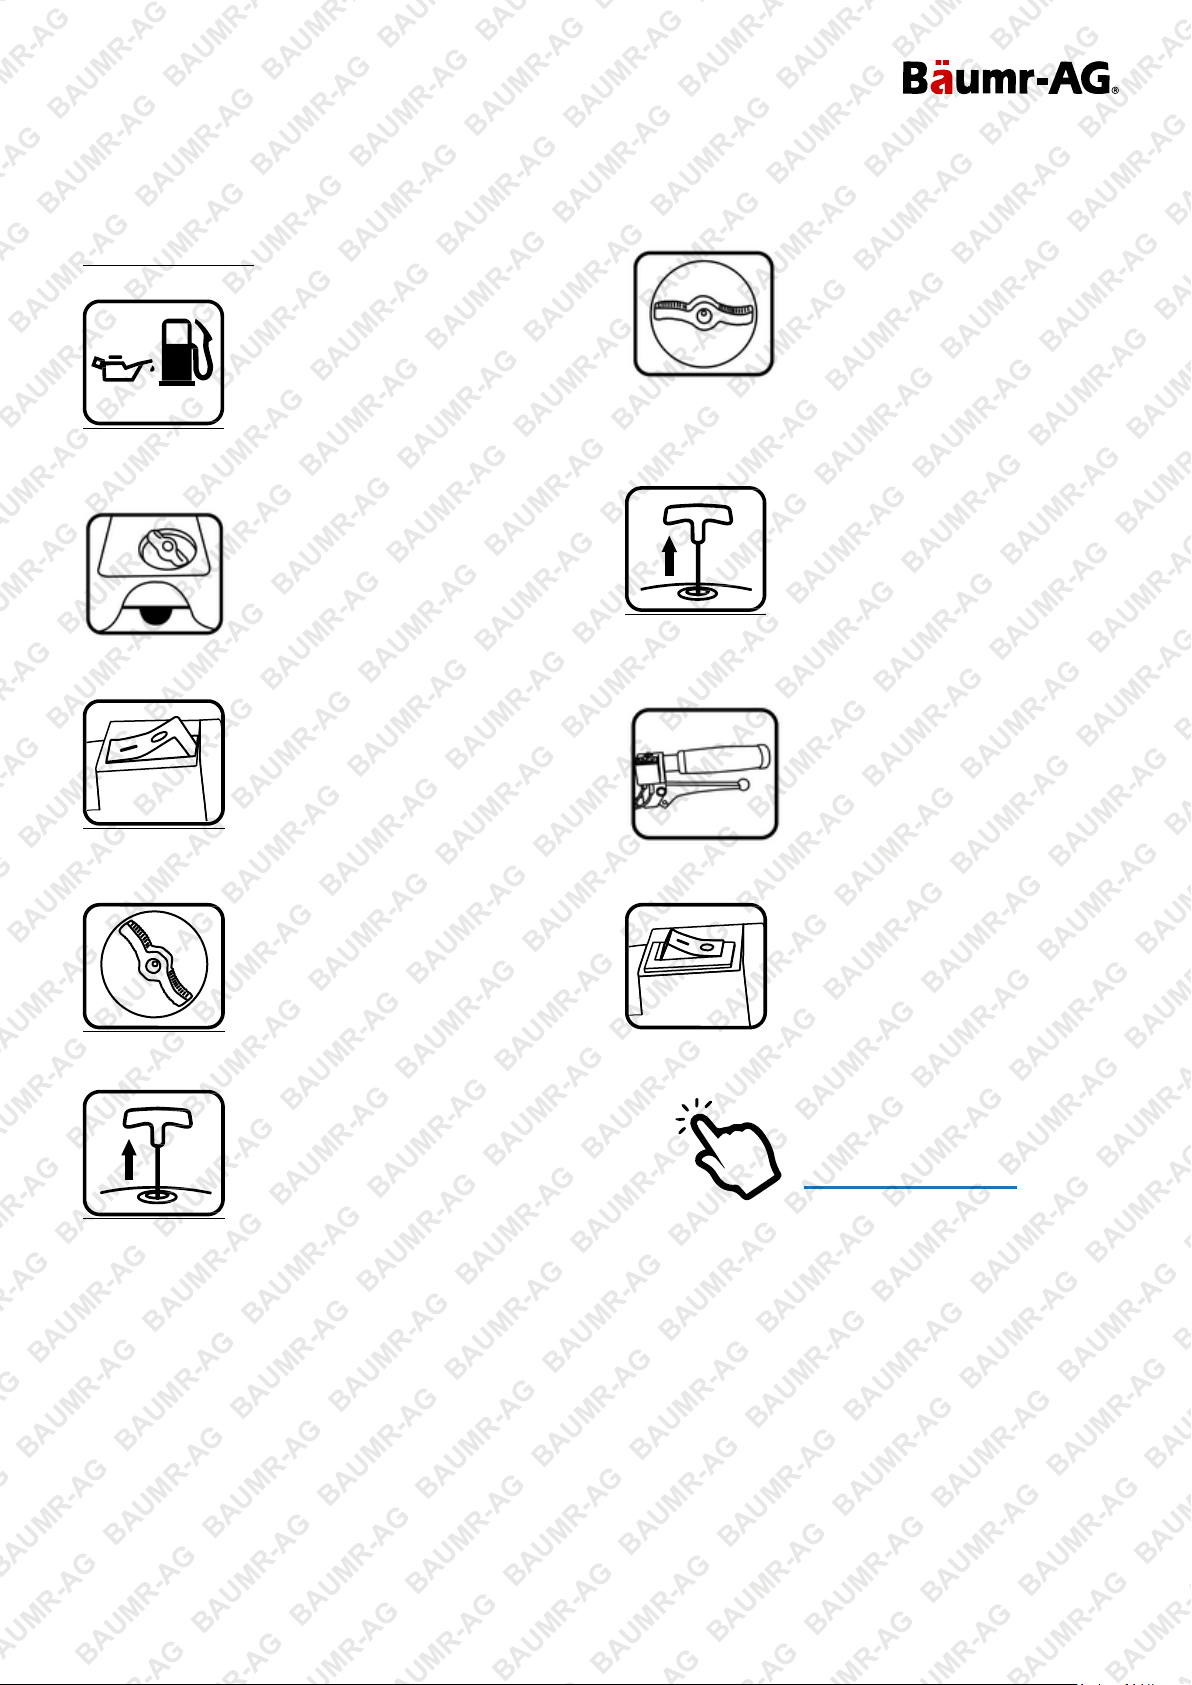
Step 1: Ensure enough petrol/oil mixture is in the tank.
Always use 25:1 ratio (This equates to 40mL of 2 stroke oil
to 1L of petrol).
Step 2: Press primer bulb 2-3 times (Fuel should flow
through clear tube).
Step 3: Push ON/OFF switch to ON position.
Step 6: Turn choke to “RUN.”
Step 7: If engine stalled, pull starter cord again until it starts.
Step 8: Squeeze throttle according to desired need.
Step 4: Turn choke to “COLD.”
Step 5: Pull starter cord 3-4 times or until engine starts.
Step 9: When finished, turn ON/OFF switch to OFF.
Click to Watch:
Starting a 2-Stroke
E&OE © 2017 Baumr-AG 10
Page 13
Six Blade Hand-Held Cultivator Tiller - BT677
BAUMR-AG BAUMR-AG BAUMR-AG BAUMR-AG BAUMR-AG BAUMR-AG BAUMR-AG BAUMR-AG BAUMR-AG BAUMR-AG BAUMR-AG
BAUMR-AG BAUMR-AG BAUMR-AG BAUMR-AG BAUMR-AG BAUMR-AG BAUMR-AG BAUMR-AG BAUMR-AG BAUMR-AG BAUMR-AG
Maintenance
Air Filter
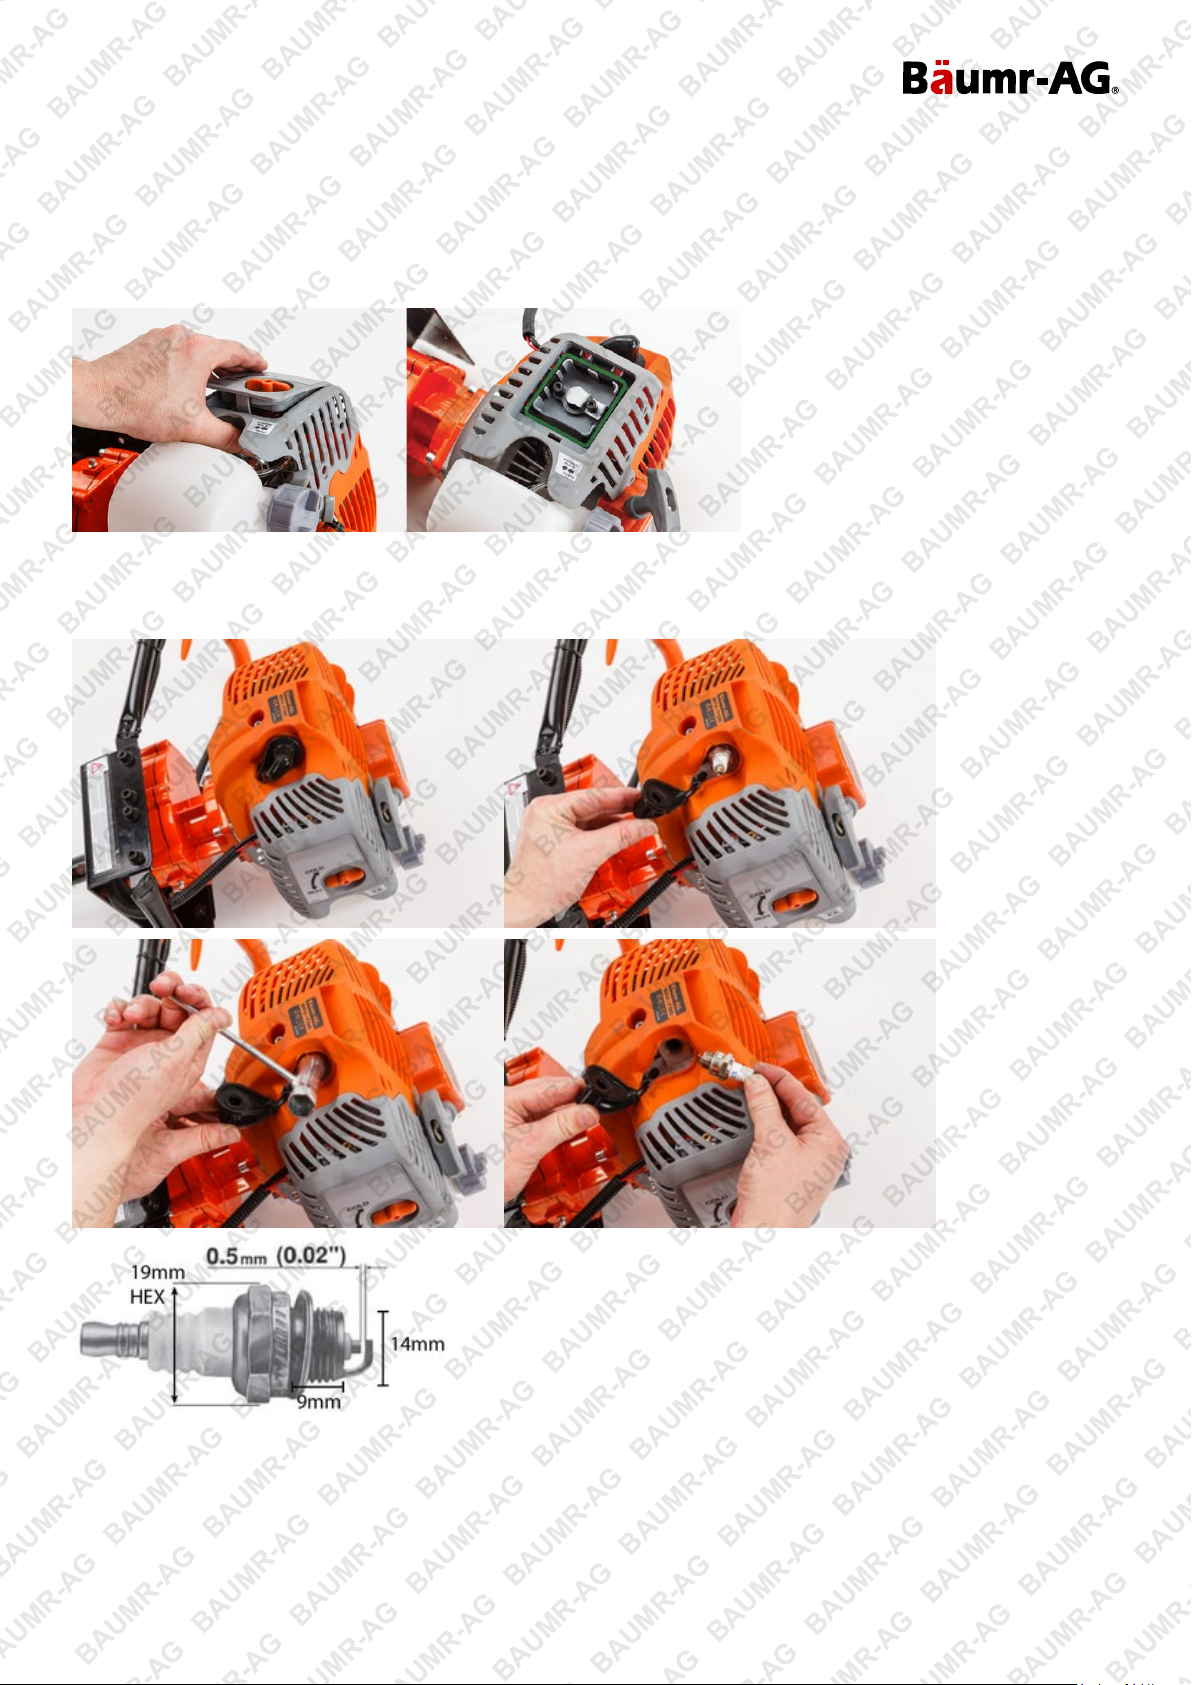
Every eight hours, remove the cover and the filter. The filter should be washed and dried before refitting it. Remove
cover to get access to the air filter (highlighted in green, below):
Spark Plug
Clean the spark plug and check the electrode gap periodically. Below are dimensions if it needs replacing.
This product comes with a Torch branded spark plug, model L7T. Please see below for cross referenced spark plugs:
•
NGK; BM6A, BPM7A
•
CHAMPION; CJ6Y, CJ7Y, CJ8
•
DENSO; W20M-U
•
BOSCH; WS5F, WS7F, WS8F
E&OE © 2017 Baumr-AG 11
Page 14

Six Blade Hand-Held Cultivator Tiller - BT677
BAUMR-AG BAUMR-AG BAUMR-AG BAUMR-AG BAUMR-AG BAUMR-AG BAUMR-AG BAUMR-AG BAUMR-AG BAUMR-AG BAUMR-AG
BAUMR-AG BAUMR-AG BAUMR-AG BAUMR-AG BAUMR-AG BAUMR-AG BAUMR-AG BAUMR-AG BAUMR-AG BAUMR-AG BAUMR-AG
Reduction Gearbox
Every 100 working hours, change the grease in the reduction gearbox.
WARNING!
Maintenance procedures that are not reported in this manual must only be carried out by an
authorised service personnel. Only use original spare parts.
E&OE © 2017 Baumr-AG 12
Page 15

Six Blade Hand-Held Cultivator Tiller - BT677
BAUMR-AG BAUMR-AG BAUMR-AG BAUMR-AG BAUMR-AG BAUMR-AG BAUMR-AG BAUMR-AG BAUMR-AG BAUMR-AG BAUMR-AG
BAUMR-AG BAUMR-AG BAUMR-AG BAUMR-AG BAUMR-AG BAUMR-AG BAUMR-AG BAUMR-AG BAUMR-AG BAUMR-AG BAUMR-AG
Specifications
Max. Tilling Depth
Tilling Width
Engine Type
Displacement
RPM
Starting System
Fuel Type
Fuel-Oil Ratio
Fuel Volume
Max. Output
Max. Speed
150mm
400mm
Petrol - Two Stroke Commercial
65cc
10,000RPM w/ Centrifugal clutch
Recoil (pull cord start)
Regular Unleaded 95 +RON
25:1 (25 parts fuel to 1 part two stroke oil)
1L
5hp
9,000r/min
E&OE © 2017 Baumr-AG 13
Page 16
Some experts believe that the incorrect or prolonged use of almost any
product may cause serious injury or death. To help reduce your risk of
serious injury or death, refer to the information below. For more information,
see www.datastreamserver.com/safety
Consult all documentation, packaging
and product labelling before use. Note
that some products feature
documentation available online. It is
recommended to print and retain the
documentation.
Before each use, check the product for
loose/broken/damaged/missing parts,
wear or leaks (if applicable). Never use a
product with
loose/broken/damaged/missing parts,
wear or leaks.
Products must be inspected and serviced
(if applicable) by a qualified technician
every 6 months. This is based on
average residential use by persons of
average size and strength, and on a
property of average metropolitan size.
Use beyond these recommendations may
require more frequent
inspections/servicing.
Ensure that all users of the product have
completed a suitable industry recognised
training course before being allowed
access to the product.
The product has been supplied by a general merchandise
retailer that may not be familiar with your specific
application or description of application. Be sure to attain
third-party approval from a qualified specialist for your
application before use, regardless of any assurances from
the retailer or its representatives.
This product is not intended for use where fail-safe
operation is required. As with any product (for example,
automobile, computer, toaster), there is the possibility of
technical issues that may require the repair or
replacement of parts, or the product itself. If the possibility
of such failure and the associated time it may take to
rectify could in any way inconvenience the user, business
or employee, or financially affect the user, business or
employee, then the product is not suitable for your
requirements. This product is not intended for use where
incorrect operation or a failure of any kind, including but
not limited to, a condition requiring product return,
replacement, parts replacement or service by a technician
may cause financial loss, loss of employee time or an
inconvenience requiring compensation.
If this product has been purchased in error when
considering the information presented here, contact the
retailer directly for details of their returns policy, if
required.
©2017 Baumr-AG. All rights reserved. No part of this document, including descriptive content, concepts,
ideas, diagrams or images may be reproduced or transmitted in any form or by any means, electronic or
mechanical, including photocopying, scanning or recording, or any information storage and retrieval system,
without express permission or consent from the publisher.
 Loading...