

Page 1

User Manual
Software for DSL
Digital Speed Switch
Software version from 0.9.9
Baumer Hübner GmbH
Max-Dohrn-Str. 2+4
D-10589 Berlin
Phone +49 (0)30 690 03 - 0
Fax +49 (0)30 690 03 -104
info@baumerhuebner.com
www.baumer.com
Page 2

Contents
Page
1 Symbols used ...................................................................................................... 4
2 Device versions ................................................................................................... 5
3 System requirements .......................................................................................... 5
4 Installation ........................................................................................................... 6
5 First program start .............................................................................................. 7
5.1 Language setting .............................................................................................................................. 7
5.2 Interface ............................................................................................................................................ 8
5.3 Saving the settings ........................................................................................................................... 9
6 User interface .................................................................................................... 10
6.1 Information window......................................................................................................................... 11
6.2 St atus window ................................................................................................................................. 12
6.3 Main window ................................................................................................................................... 13
6.3.1 Register: Switching speeds ............................................................................................................ 13
6.3.2 Register: Spe ed m oni tor ................................................................................................................. 15
6.3.3 Register: Messages ........................................................................................................................ 16
7 Log-in ................................................................................................................. 17
8 Communication error........................................................................................ 18
9 Log file ............................................................................................................... 19
10 Appendix ............................................................................................................ 20
10.1 Technical data ................................................................................................................................. 20
10.2 Terminal assignments ..................................................................................................................... 21
10.3 Connections for the DS 93 R relay module (only with DSL.R) ....................................................... 22
Baumer_DSL-WinXP_MA_ENBaumer_DSL-WinXP_MA_EN.doc 2/22 Baumer Hübner GmbH
01.11.2010 / bja Berlin, Germany
Page 3

Disclaimer of liability
The present manual was compiled with utmost care, errors and omissions reserved. For this reason Ba umer
Huebner GmbH rejects any liability for the information compiled in the present manual. Baumer Huebner
GmbH nor the author will accept any liability for di rec t or indirect damages resulting from the use of the
present information.
At any time we should be pleased receiving your comments and proposals for further improvement of the
present document.
Baumer_DSL-WinXP_MA_ENBaumer_DSL-WinXP_MA_EN.doc 3/22 Baumer Hübner GmbH
01.11.2010 / bja Berlin, Germany
Page 4
1 Symbols used
The note at the right of the symbol must be observed in all cases.
The following path and file details refer to a CD drive
(use the correct drive letter).
The following path and file details refer to a hard disk
(use the correct drive letter).
Button
bold
Symbol for the corresponding button or key in the user interface.
Italic text, used here for the voltage level of a switched output (only for DSL.R).
low
Bold italic text, used here for the file paths and file names.
Baumer_DSL-WinXP_MA_ENBaumer_DSL-WinXP_MA_EN.doc 4/22 Baumer Hübner GmbH
01.11.2010 / bja Berlin, Germany
Page 5

2 Device versions
The DSL is a speed switc h that is integrated into an incremental en coder. At the time of writing (edition:
March 2009) it is supplied in two versions:
Version 1: DSL.R suitable for operation with the external relay module DS 93 R.
• Version with 3 switched outputs that can be swit ched according to the speed. If the device is at
standstill or the rotational speed n is less than the switching speed n
switched output will be high. If n ≥ n
then it will be low.
s(on)
• If an internal error occurs (for instance, dirt on the disk, so that the counted pulse rate is incorrect )
then the outputs will switch to low.
Version 2: DSL.E with three internal electronic relays.
• Integrated current monitoring for each relay: This checks whether, when the relay is closed, a current
of at least 5 mA flows through the switched circui t.
• Two relay outputs (R1, R2) are switched according to the speed. If the device is at standstill or n <
then the corresponding relay is closed. If n ≥ n
n
s(off)
then it will be open.
s(on)
then the corresponding
s(off)
• The third relay output (C1) is a check output. If no current flows through at least one of the switched
circuits of the relay outputs (R1, R2), although the relay is closed, then the check output (C1) will be
opened.
• If no current flows through the switched circuit of t he check relay (C1), although the relay is closed,
then R1 and R2 will be opened.
• If an internal error occurs (for instance, dirt on the disk, so that the counted pulse rate is incorrect )
then all relays will be opened
3 System requirements
PC with - operating system Windows 98 SE, ME, 2000 or X P
- USB connection
- at least 64 MB RAM
- at least 30 MB available on the hard disk.
The DSL is fitted with an RS 485 interface. Data exchange with the PC requires an RS 485 converter (“USB
to RS 485” or “RS 232 to RS 485”). A “USB to RS 485” converter can be obtained from Baumer Hübner
GmbH (Order code: USB 485-Converter).
Baumer_DSL-WinXP_MA_ENBaumer_DSL-WinXP_MA_EN.doc 5/22 Baumer Hübner GmbH
01.11.2010 / bja Berlin, Germany
Page 6
4 Installation
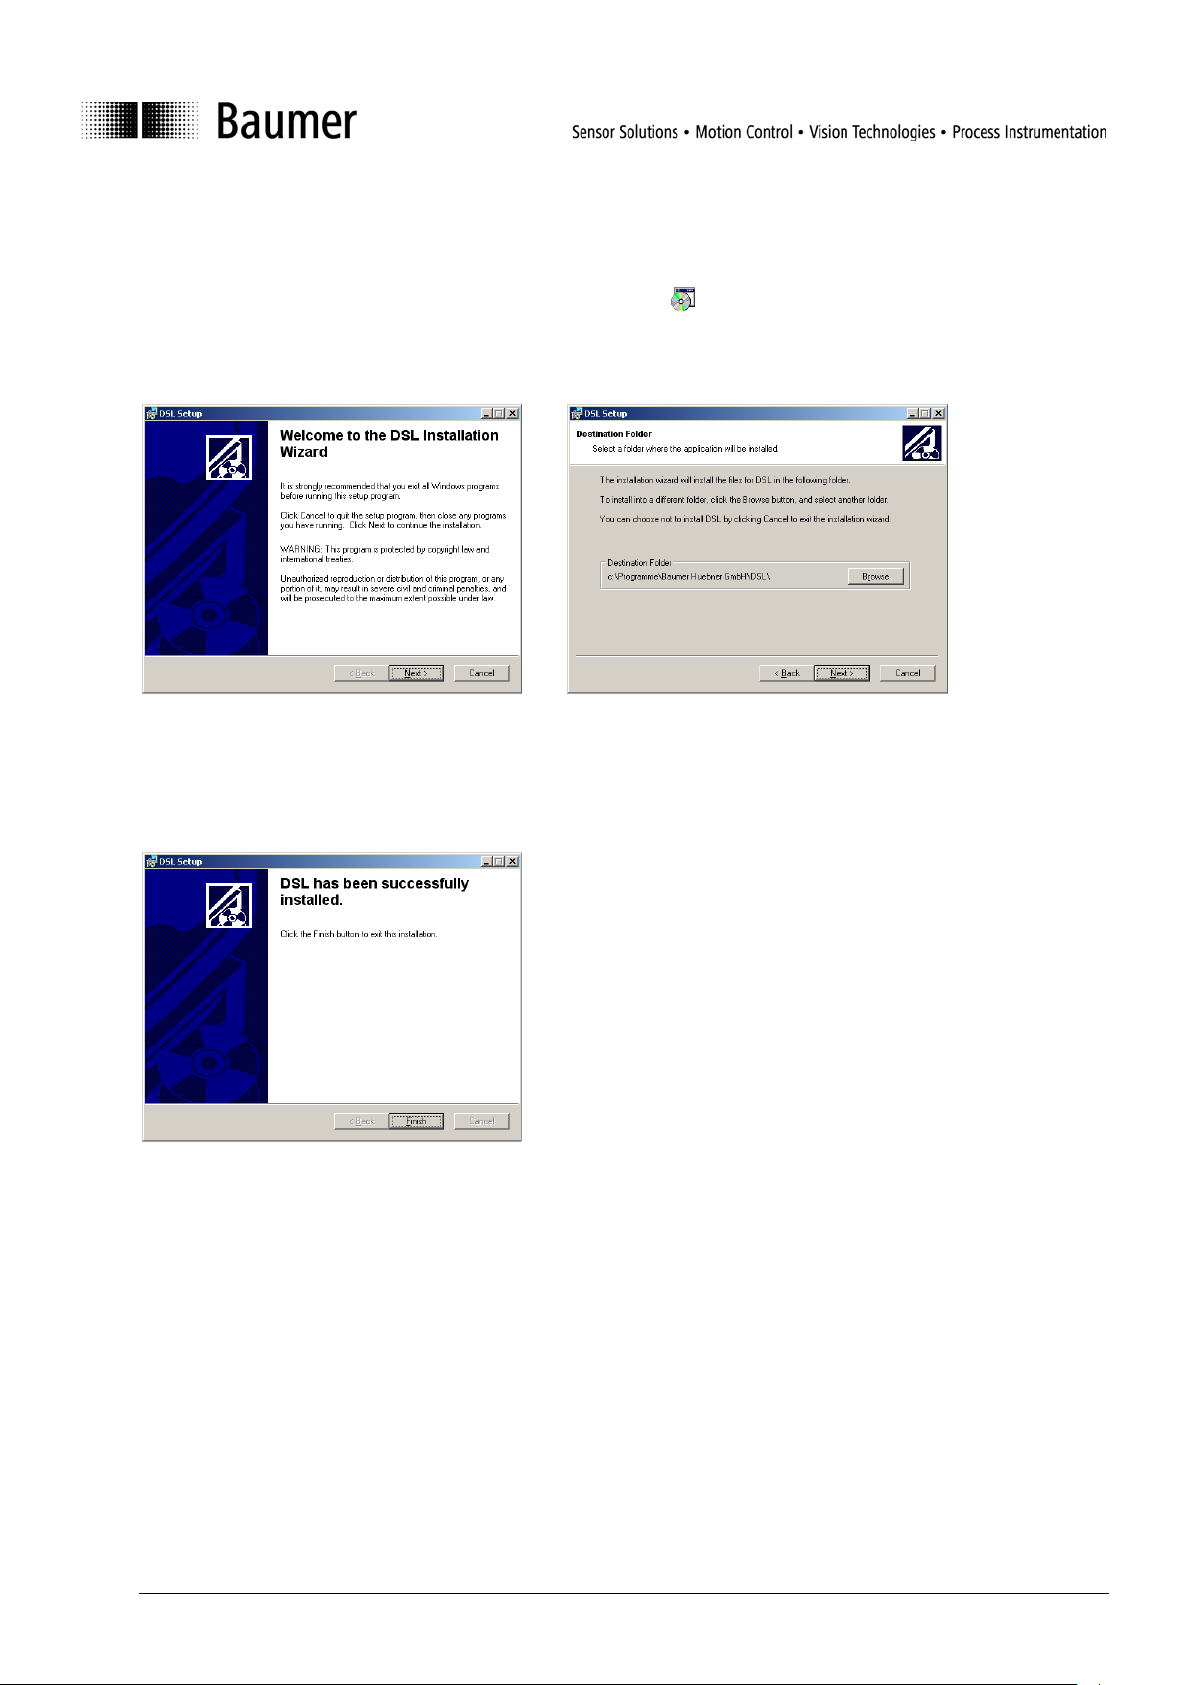
After inserting the CD in the drive, use Explorer to go to the \DSL\Installer\ directory and start setup.exe.
This will install the program and the runtime library. The installation language is only available in english.
After starting the setup p rogram, the following screens will appear (Figs. 1 and 2):
Fig. 1 Installation Fig. 2 Installation
It is recommended that you keep to the default installation path.
When installation has been complete d successfully, a corresponding message will appear (Fig. 3).
Fig. 3 End of installation
St art the program after a standard installation with
Start ⇒ Programs ⇒ Baumer Huebner GmbH ⇒ DSL
Baumer_DSL-WinXP_MA_ENBaumer_DSL-WinXP_MA_EN.doc 6/22 Baumer Hübner GmbH
01.11.2010 / bja Berlin, Germany
Page 7
5 First program start
Before the program start the RS485-Converter has to be connected otherwise the serial interface
used by the converter will not appear in the overview of all usable serial interfaces.
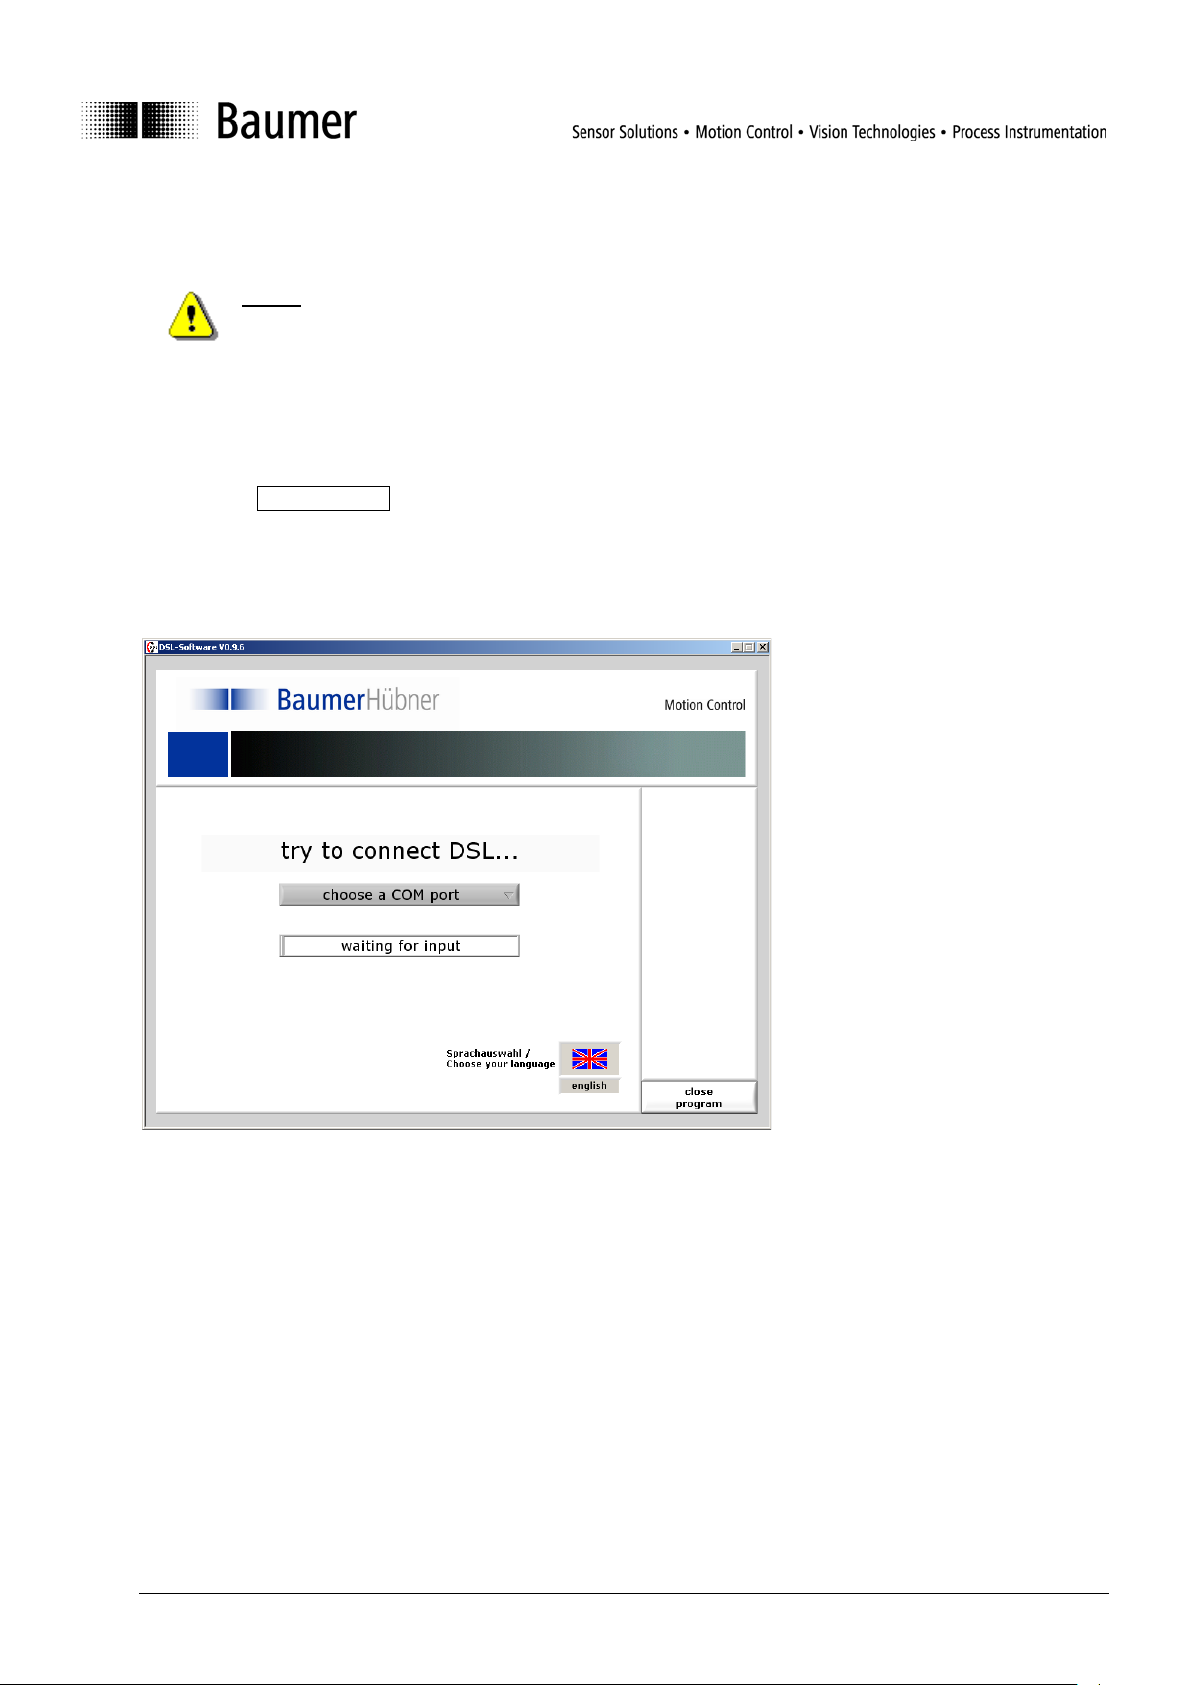
The first time the program is started, a selection screen will appear where you can choose the language for
the user interface and the system interface (Fi g. 4). The software version of t he user interface is displayed in
the header of this window.
You can use Close program to terminate the software at any time. Parameter changes that have not been
saved will be lost.
5.1 Language setting
Fig. 4 Start screen
Clicking on the national flag will call up a select i on of languages that have been implemented for t he user
interface. The required language can be selected by clicking on t he appropriate national flag.
Baumer_DSL-WinXP_MA_ENBaumer_DSL-WinXP_MA_EN.doc 7/22 Baumer Hübner GmbH
01.11.2010 / bja Berlin, Germany
Page 8

5.2 Interface
To establish a connection with the DSL, the serial interface (to which the RS 485 converter is connected)
must be set up in the selection field (Fig. 5).
Fig. 5: COM port selection
The Auto-Scan function can be used in following ca ses:
1. If the RS485-Converter was connected after the programm start and the serial interface does not appea r
in the overview
2. If the serial interface is not known
This transmits an identification to every serial interface (COM1 to 8) and waits for a response telegram from
the attached DSL.
Because of insufficient implementation of virtual serial interface driver (e.g. bluetooth) problems can
appear during the Auto-Scan. In that case please choose the serial i nterface manually.
If other devices are connected to the individual serial interfaces, then it cannot be ruled out that
they may interpret the transmitted ID as a m essage directed to them.
If a serial interface is discovered that has a DSL attached, then this will be indicated (Fig. 6).
Fig. 6: COM port confirmation
Baumer_DSL-WinXP_MA_ENBaumer_DSL-WinXP_MA_EN.doc 8/22 Baumer Hübner GmbH
01.11.2010 / bja Berlin, Germany
Page 9

5.3 Saving the settings
The language selected and the serial interface that is used are recorded in a configuration f i le \DSL
Software.ini in the main directory of the operator program. For subseq uent program starts, the setti ngs are
read out from this file and the start window will not appear again.
To alter the language setting at a later date, the software must be started without a DSL being
connected. In this case, the start screen will appear once more.
Baumer_DSL-WinXP_MA_ENBaumer_DSL-WinXP_MA_EN.doc 9/22 Baumer Hübner GmbH
01.11.2010 / bja Berlin, Germany
Page 10
6 User interface
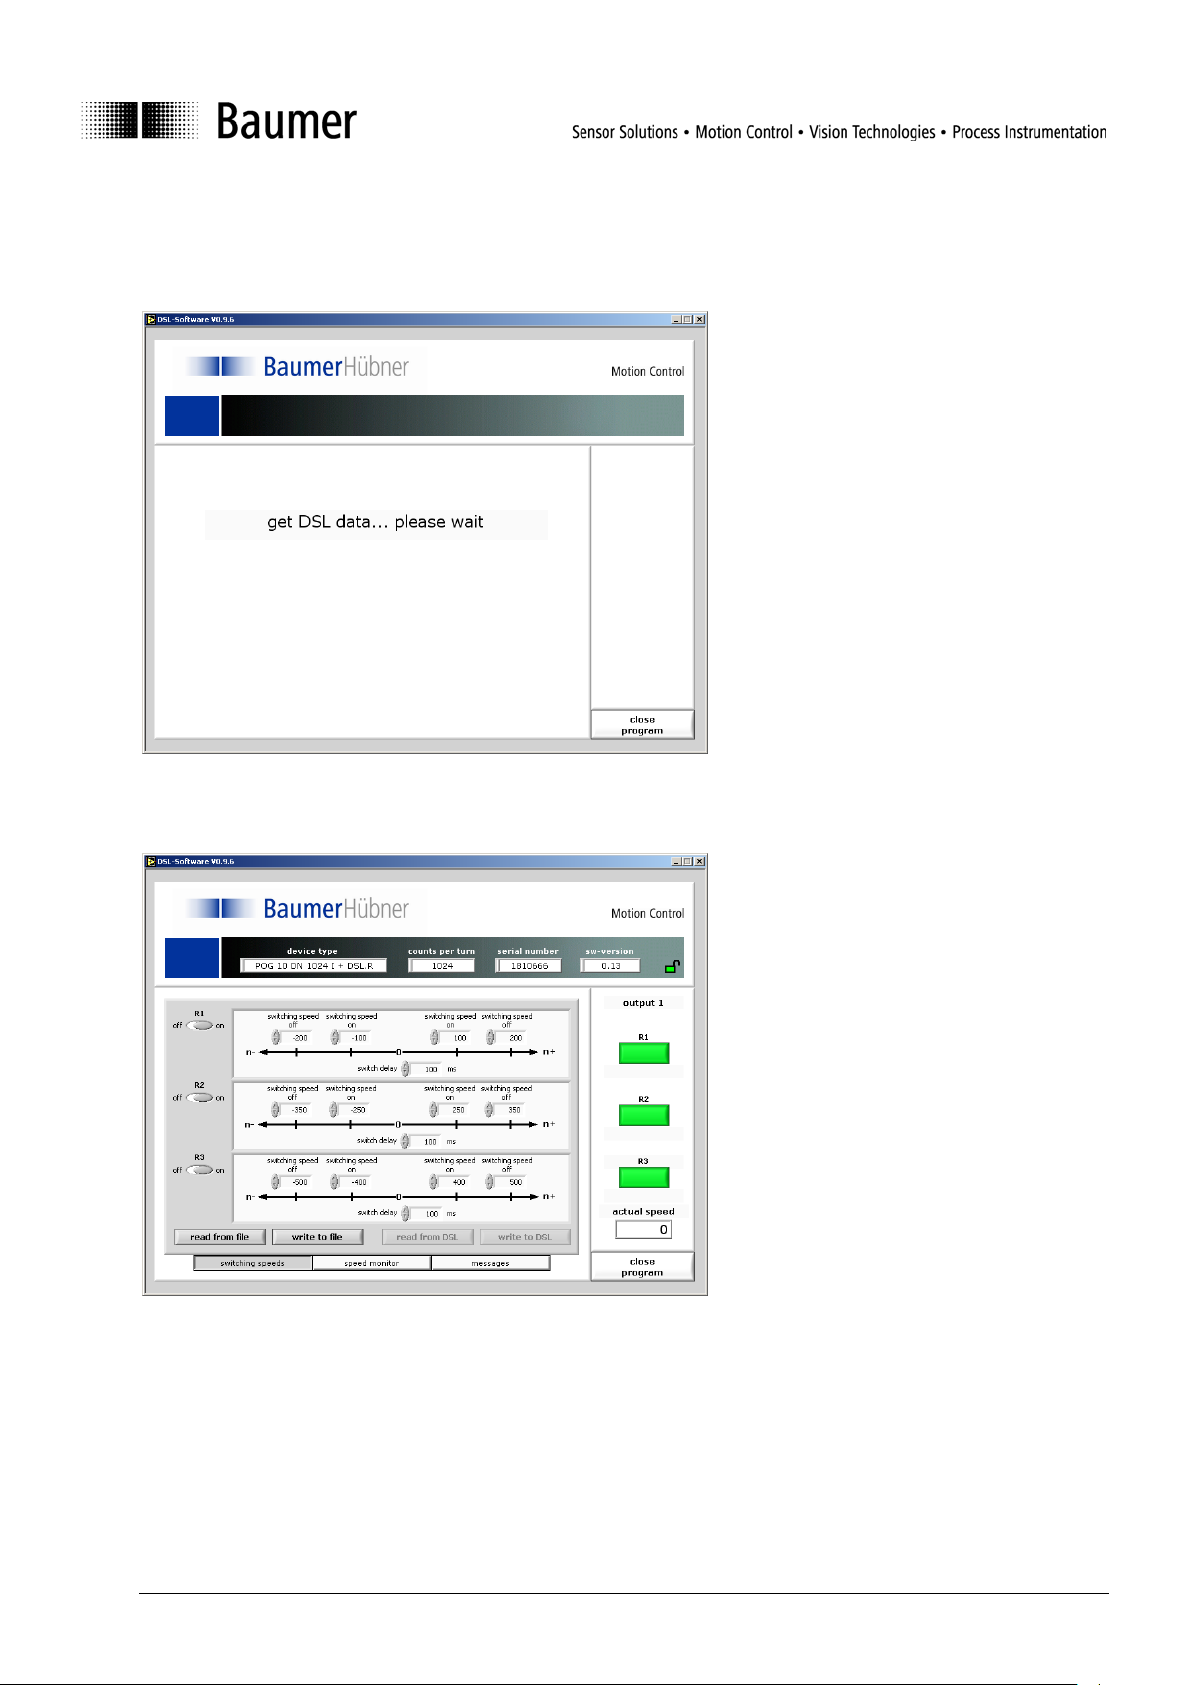
When the DSL has been d etected on a serial interface, the param eters will be read out from the internal
memory of the device (Fig. 7).
Fig. 7: Fetching device data
After all the parameters from the DSL have been read out, the complete user interface will appear (Fig. 8).
Fig. 8: User interface
This is divided into three sections:
Baumer_DSL-WinXP_MA_ENBaumer_DSL-WinXP_MA_EN.doc 10/22 Baumer Hübner GmbH
01.11.2010 / bja Berlin, Germany
Page 11

6.1 Information window
Fig. 9: Information window
The data for the connected device are shown in the information window (Fig. 9), with the exact type
designation, serial number, device software version, number of counts per turn.
If the DSL is protected by a password, then a small padlock symbol will appear in the information windo w.
If the user is not logged in to the DSL, it will appear re d and locked
unlocked
.
, after log-in it changes to green and
After the connected device has been c hanged, a new log-in is required, even if both devices have the same
password.
If an error occurs in the device, the warning symbol
will appear. The reason for the warning can be
called up in the register card Messages in the main window, after which the warning can be deleted.
Baumer_DSL-WinXP_MA_ENBaumer_DSL-WinXP_MA_EN.doc 11/22 Baumer Hübner GmbH
01.11.2010 / bja Berlin, Germany
Page 12

6.2 Status window
The status window (Fig. 10) shows the current speed of the connected
) or the three relays
switched output is shown below
control (appearing at R1 and R2): there is no current flowing
output 1 or 2 (appearing at check output C1): there is no
ng through the circuit of R1 or R2, even though the
relay is closed.
device and the states of the three outputs (DSL.R
(DSL.E) through indicator lights.
• Indicator light is green:
Relay is closed and at least a current of 5 mA flows (DSL.E), or
switched output is high (DSL.R).
• Indicator light is yellow:
Relay is closed but no current or less than a current of 5 mA flows
(DSL.E), or switched output is high (DSL.R).
• Indicator light is red:
Relay is open, or switched output is low.
The reason for the open relay or low
the red indicator.
The following causes are possible for a DSL.R:
− Speed (exceeded the switch-off speed)
− Internal error (wrong number of pul ses, or initialization error)
The following causes are possible for a DSL.E:
Fig. 10: Status window
− Speed (exceeded the switch-off speed)
− Internal error (wrong number of pul ses, or initialization error)
− I-
through the control circuit, even though rel ay C1 is closed.
− I-
current flowi
Because of the serial data transmission between the device and the PC, there may be a delay
before the output states are displayed.
Baumer_DSL-WinXP_MA_ENBaumer_DSL-WinXP_MA_EN.doc 12/22 Baumer Hübner GmbH
01.11.2010 / bja Berlin, Germany
Page 13

6.3 Main window
The register cards at the bottom of the window ca n be used to switch between the three main software
functions:
Switching speed Speed monitor Messages
6.3.1 Register: Switching speeds
After the device data have been read out, the register Switching speeds appears, in which the parameters
that are stored in the DSL can be read out and edited.
Fig. 11: “Switching speeds” register for DSL. E
The third output shown in Fig. 11 is the check output of the DSL.E (described above under 6.2). On a DSL.R,
a third field for making settings for switching speeds will appear instead (see figure 8).
The parameters for each output are set up separately. In addition, individual ON and OFF switching speeds
can be set up for clockwise (right-handed) and anti-clockwise (left-handed) rotation, i. e. up to 4 different
switching speeds for each output). System req ui rements impose a minimum hysteresis of 5% or 2 rpm.
Furthermore, a switching delay from 0 t o 500 m sec can be entered for each switched output, in order to be
able to ignore very short speed peaks.
Baumer_DSL-WinXP_MA_ENBaumer_DSL-WinXP_MA_EN.doc 13/22 Baumer Hübner GmbH
01.11.2010 / bja Berlin, Germany
Page 14

• The maximum OFF switching speeds that can be entered as parameters are th e m aximum encoder
speeds (see separate data sheet ). Higher values will be reset to this maximum value. If an OFF
switching speed is set to be lower than the corresponding ON speed, then the ON speed will be
corrected to the maximum possible value (the OFF switching speed minus the minimum hysteresis).
• The maximum ON switching speed s that can be entered as parameters are the minimum speeds as
specified in the data sheet for the encod er. If smaller v al ues are entered, these will be reset to the
minimum possible value. The maxim um value that can be entered as a parameter for the ON switching
speed is the OFF switching speed minus the minimum hysteresis, larger values will be corrected t o this
maximum value.
An unused input can be de-activated by the slidin g switch “Output on/off” that is shown on the left.
On the DSL.E version, any unused output (R1, R2, C1) must be de-activated. This is necessary
because the current monitoring will detect an er ror condition if the output switches without any load
being connected.
Alterations to parameters are activat ed by operating the Save parameters button. The altered values will
only be written to the DSL and become effective when this has ha ppened. In order to be able to save
parameters, the user must be logged i n to the device (see Chapter 7 “Log-in”). At the same time, the new
parameters will be incorporated in the
C:\DSL_Parameter.txt log file.
The parameters shown inside the input mask can be stored in separate files by pre ssing
write to file. With read from file stored parameters can be loaded back into the input mask.
Baumer_DSL-WinXP_MA_ENBaumer_DSL-WinXP_MA_EN.doc 14/22 Baumer Hübner GmbH
01.11.2010 / bja Berlin, Germany
Page 15

6.3.2 Register: Speed monitor
Fig. 12: “Speed monitor” register
The Speed monitor register (Fig. 12) shows the present speed curve as a function of time. The highest and
lowest speed values that have occurred since the start of recording are marked respectively by a red line
(maximum value) and a green line (minimum value). The ordinate scaling is made autom atically to match the
minimum and maximum that have been recorded.
Recording is stopped by operating the Pause button, and the graph is deleted by operating Clear graph.
Changing to another register in the main windo w will also delete the speed curve.
Baumer_DSL-WinXP_MA_ENBaumer_DSL-WinXP_MA_EN.doc 15/22 Baumer Hübner GmbH
01.11.2010 / bja Berlin, Germany
Page 16

6.3.3 Register: Messages
Fig. 13: “Messages” register
The Messages register (Fig. 13) shows the contents of the log file
C:\DSL_Parameter.txt which is stored
on the computer. The scroll bar can be used to sc roll through the entire text.
If the warning symbol appears in the information window (se e Chapter 6.1 “Information window”), the
reason for the warning will also be displayed. Delete error can be used to remove the warning. The remov al
of a warning will also be noted in the log file, and requires a previous log-in (see Chapter 7 “Log-in”).
A software reset inside the DSL will be executed by pressing the Reset DSL button.
Baumer_DSL-WinXP_MA_ENBaumer_DSL-WinXP_MA_EN.doc 16/22 Baumer Hübner GmbH
01.11.2010 / bja Berlin, Germany
Page 17

Fig. 15: New password
7 Log-in
Fig. 14: Log-in
Before switching speeds can be programmed or errors can be deleted, a
log-in is required. To do this, it is necessary to enter a user nam e
(Fig. 14).
This name is stored in the DSL and in the
C:\DSL_Parameter.txt log file. If the DSL is protected by a
password, this password will also be requested.
After entering the user name and (if required) the password, the user
can choose between Log-in and Log-in and new password.
If more characters are entered for the user name and password than the maximum number
permitted (15 or 8 respectively), the string will automatically be cut off at the maximum length.
Special chara ct ers may be used, and a distinction is made between capital (upper-case) and
lower-case letters.
The device is delivered without password protection.
An incorrect password triggers an erro r message, and the log-in window remains open until either t he correct
password is entered or Cancel is operated.
If Log-in and new password is chosen, then a new entry template appears (Fig. 15), with the request to enter
the new password twice.
To cancel a password protection that has been entered,
leave both fields empty.
If Cancel is operated in this template, then the user remains logged in to
the device with the old password.
An alteration to a password is recorded in the
C:\DSL_Parameter.txt log file, but the password itself is not
recorded here.
Baumer_DSL-WinXP_MA_ENBaumer_DSL-WinXP_MA_EN.doc 17/22 Baumer Hübner GmbH
01.11.2010 / bja Berlin, Germany
Page 18

8 Communication error
If the communication between the PC and DSL is faulty (for instance, because the connecting cable has
been disconnected or the supply volt age was interrupted) then the following messag e will appear:
Fig. 16: Communication error
Use Reconnect to establish communication once more – a fresh log-in is not required.
In exceptional cases, the program will have t o be st opped and then restarted.
Baumer_DSL-WinXP_MA_ENBaumer_DSL-WinXP_MA_EN.doc 18/22 Baumer Hübner GmbH
01.11.2010 / bja Berlin, Germany
Page 19

9 Log file
When altered data (switching points, password …) are saved in the DSL, an entry is made in the
C:\DSL_Parameter.txt log file.
Example: Entry for switching points
Serial number: 2271560481
Device type: POG10DN2500I+DSL.R
SW Version: 0.07
Last change:
Date: 06.04.2005
Time: 15:15:17
User: Tester
with password
Switched output 1:
Switching speed off n+ : 11 rpm
Switching speed on n+ : 6 rpm
Switching speed on n- : -6 rpm
Switching speed off n- : -8 rpm
Delay: 100 msec
Output activated
Switched output 2:
Switching speed off n+ : 8 rpm
Switching speed on n+ : 6 rpm
Switching speed on n- : -1800 rpm
Switching speed off n- : -1920 rpm
Delay: 120 msec
Output: activated
Switched output 3:
Switching speed off n+ : 1009 rpm
Switching speed on n+ : 800 rpm
Switching speed on n- : -1700 rpm
Switching speed off n- : -1921 rpm
Delay: 200 msec
Output: activated
Baumer_DSL-WinXP_MA_ENBaumer_DSL-WinXP_MA_EN.doc 19/22 Baumer Hübner GmbH
01.11.2010 / bja Berlin, Germany
Page 20

10 Appendix
10.1 Technical data
for the combination POG 10 + DSL, HOG 10 + DSL, POG 1 1 + DSL, H O G 11 + DSL,
HOG 16 M + DSL, HOG 16 + DSL, HOG 165 + DSL
(version DSL.R or DSL.E)
permissible device temperature -20°C … +85°C (HOG 16 [M] + DSL, HOG 165 + DSL)
-30°C … +85°C (xOG 10 + DSL, xOG 11 + DSL)
max. speed in rpm electronic: mechanical: 6000
7,2 x 10⁶
z
protection class IP 66 / IP 67 (HOG165 + DSL)
square-wave cycles / turn z 512, 1024, 2048, 2500
logic level HTL or TTL
max. switching frequency 120 kHz
switching speeds ns (DSL) ± 16 … 6000 rpm for z = 512
± 8 … 6000 rpm for z = 1024
± 4 … 3500 rpm for z = 2048
± 3 … 2900 rpm for z = 2500
maximum response time 40 msec
only for DSL.R
operating voltage UB +15 … +30 V DC
max. 200 mA (no load)
3 outputs high (12 V) for n < n
low (0 V) for n ≥ n
s
s
load capability per output: max. 20 mA
only for DSL.E
operating voltage UB +9 … +30 V DC
max. 200 mA (no load)
2 electronic make contacts closed for n < n
open for n ≥ n
s
s
230 V AC/DC, max. 250 mA
1 electronic make contact closed for “no error”
open for “error”
230 V AC/DC, max. 250 mA
Baumer_DSL-WinXP_MA_ENBaumer_DSL-WinXP_MA_EN.doc 20/22 Baumer Hübner GmbH
01.11.2010 / bja Berlin, Germany
Page 21
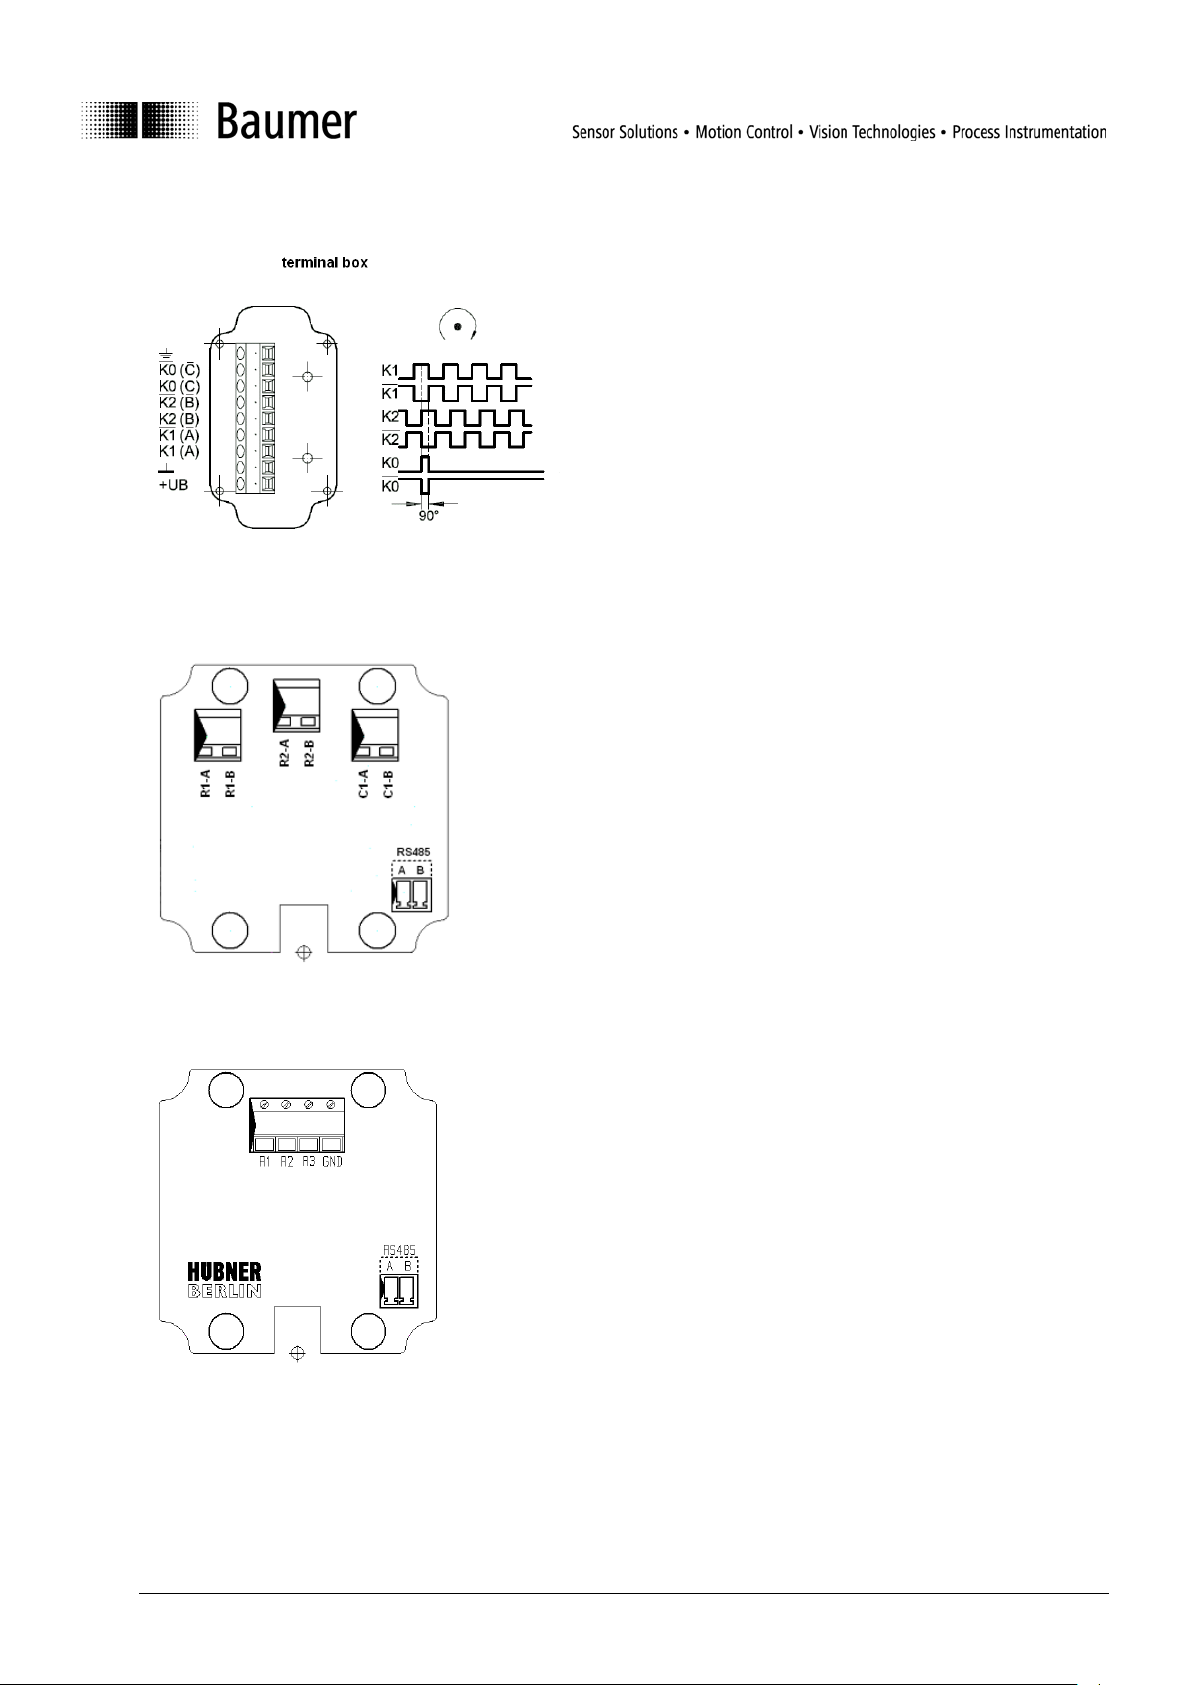
10.2 Terminal assignments
Fig. 17: POG/HOG terminal assignments
Fig. 18: DSL.E terminal assignments
Fig. 19: DSL.R terminal assignments
Baumer_DSL-WinXP_MA_ENBaumer_DSL-WinXP_MA_EN.doc 21/22 Baumer Hübner GmbH
01.11.2010 / bja Berlin, Germany
Page 22

10.3 Connections for the DS 93 R relay module (only with DSL.R)
3 check LEDs
3 relays
6A / 250 V AC
1A / 48 V DC
Fig. 20: Connections for DS 93 R
Fig. 20 shows the relay states when no voltage is applied to the DSL.R or the speed is higher than all the
three parameterizable switching speeds: Al l relays have dropped out.
Baumer_DSL-WinXP_MA_EN 22/22 Baumer Hübner GmbH
MB700.E – 10A1 – Software version 0.9.9 P.O. Box 12 69 43 · D-10609 Berlin, Germany
01.11.2010 / bja
info@baumerhuebner.com · www.baumer.com
Technical modifications reserved.
Phone: +49 (0)30/69003-0 · Fax: +49 (0)30/69003-104
 Loading...