

Page 1
REFLEX
FRIDGE-FREEZER
Page 2
User Manual for your
REFLEX
FRIDGE-FREEZER
NOTE: This User Instruction Manual contains important
information, including safety & installation points, which will
enable you to get the most out of your appliance. Please keep it
in a safe place so that it is easily available for future reference.
DD 18/12/06
1
Page 3

CONTENTS
YOUR FRIDGE-FREEZER’S SPECIFICATIONS …….…….3
SAFETY INFORMATION / ENVIRONMENTAL NOTE …. 4
USING YOUR FRIDGE-FREEZER………………………..5-13
YOUR REFLEX FRIDGE-FREEZER……………………….5
BEFORE USING YOUR FRIDGE-FREEZER……………6
USING YOUR FRIDGE-FREEZER……………………..…7-15
ARRANGING FOOD ………………………………………..16-17
NOTES ON USING YOUR APPLIANCE ………………..18
CLEANING AND MAINTENANCE………………………..19-21
INSTALLING YOUR FRIDGE-FREEZER……………...22-29
TROUBLESHOOTING ………………………………….……30
CONDITIONS OF GUARANTEE…………………………….…33
CONTACT DETAILS……………………………………………...34
2
Page 4

f
Specifications o
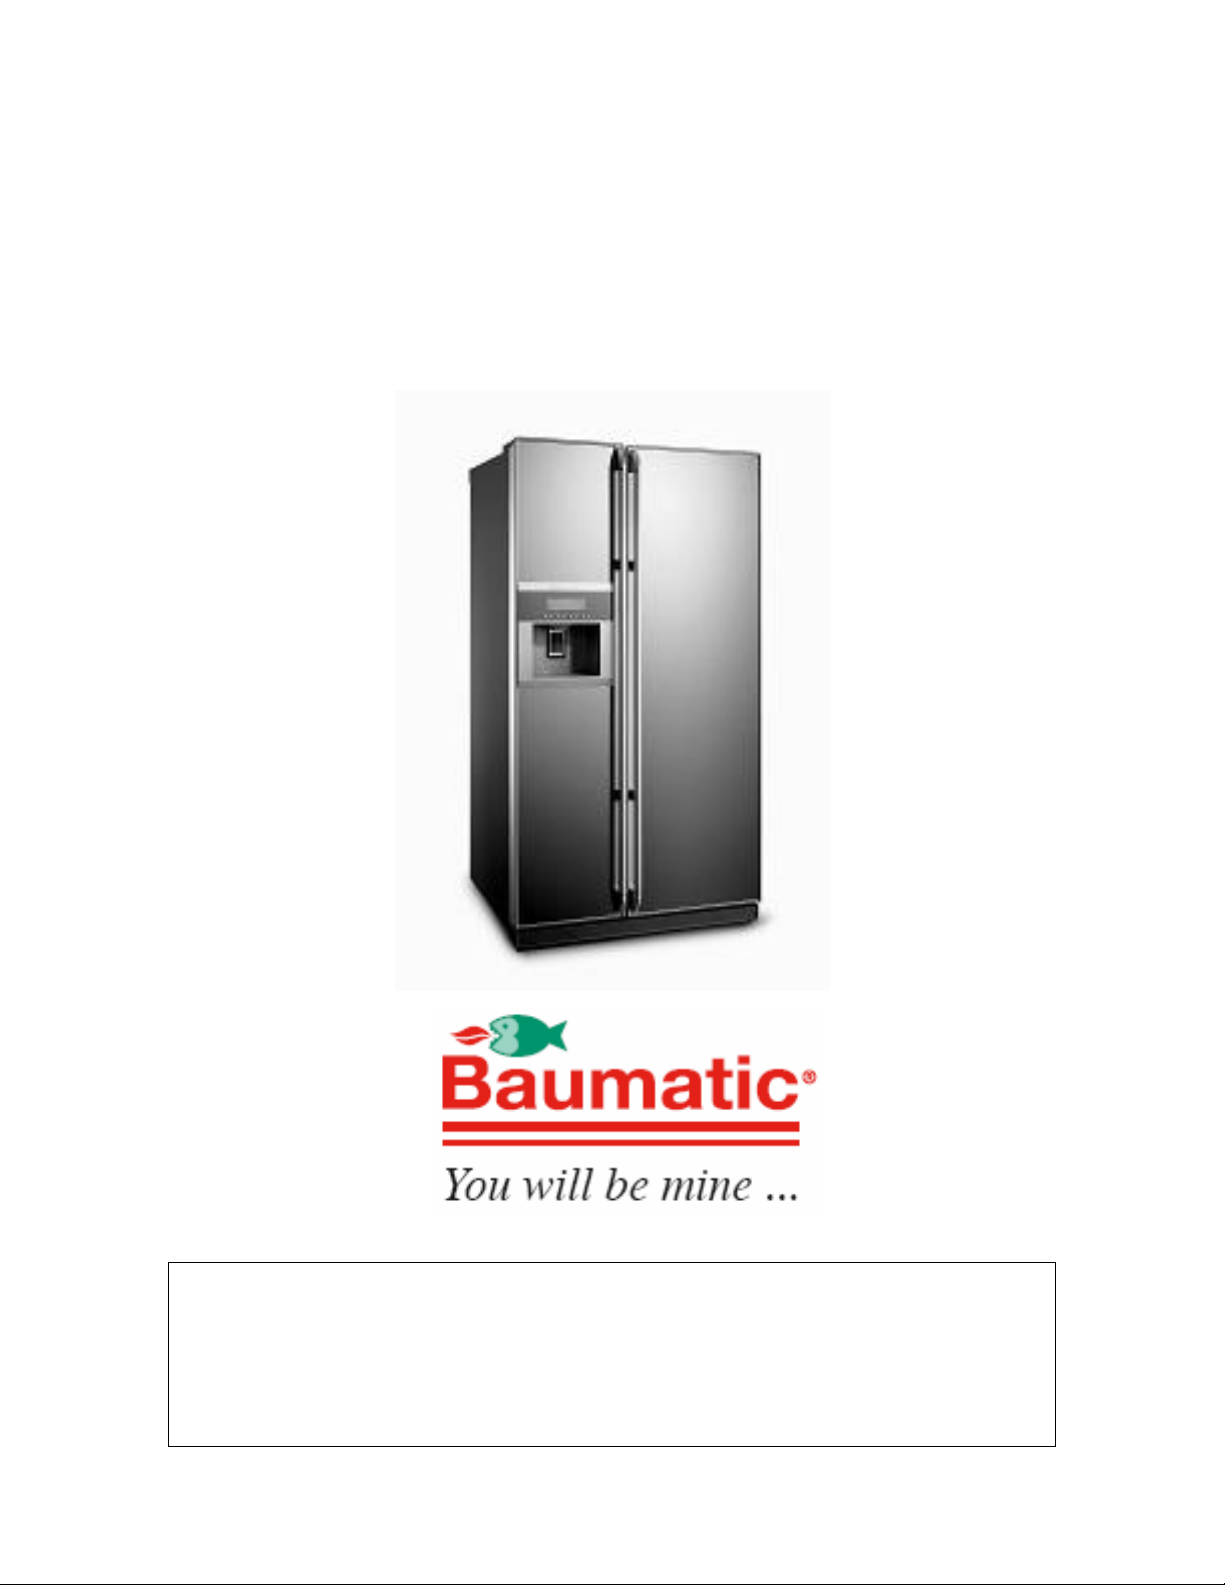
Congratulations on purchasing a Baumatic REFLEX
Fridge-Freezer!
Your Fridge-Freezer has:
 Digital control panel
 Ice maker
 Water dispenser
 Gross capacity: 556 litres
 Net capacity (fridge / freezer): 365/191 litres
 Energy efficiency class: A
 Star rating: ****
 Frost Free fridge & freezer
 Multi airflow cooling system
 Deodorizer
 Open door warning alarm
 NANO Anti-bacterial accessories
your REFLEX Fridge-freezer
 4 Safety glass shelves
 Meat drawer
 Folding Wine tray
 2 Salad crispers
 Egg rack
 Butter compartment
 2 General racks
 2 Bottle racks
 3 Freezer shelves
 6 Door racks
Dimensions mm (H x W x D)
1812 x 942 x 803
To fully enjoy using your appliance long into the future,
please firstly familiarise yourself with the specifications,
safety advice and operational instructions included in this
manual.
NOTE:
When you install your Fridge-Freezer, it is important to bear in
mind its climatic rating.
In order to find out the climatic rating of your appliance, check
the data rating tag inside your refrigerator. It indicates the
ambient temperature range within which your appliance will
function.
3
Page 5
Important Safety Information: Please Read this before installing & using.
ELECTRICAL SAFETY
NOTE - This appliance must be grounded. In the event of a malfunction or breakdown,
•
grounding will reduce the risk of electric shock by providing a path of least resistance of
electrical current. You will be able to tell if it is because a non-grounded appliance will give off
an electrical discharge.
grounding of appliance.
• DURING THE GUARANTEE PERIOD ONLY BAUMATIC SERVICE ENGINEERS OR AN AUTHORISED AGENT OF
BAUMATIC SHOULD CARRY OUT REPAIRS ON THIS UNIT.
• DO NOT USE IF THE SUPPLY CORD IS DAMAGED. NEVER TAKE RISKS WITH FIRE!
ENSURE YOU CONNECT THIS APPLIANCE TO A SUPPLY RATED AT 220-240V (or 200-230V) and 50HZ.
NOTE: the supporting structure is constructed in panels of treated sheet steel, electrostatically
enamelled to resist ill-treatment and to give long-lasting beauty and shine.
Manufacturer declines all responsibility for any damage due to non-
: Do not attempt to alter the specifications of
this appliance. Doing so could damage the
machine, cause injury & invalidate your
warranty. DO NOT USE ADAPTERS/SHUNTS.
: Do not allow children to play with, near or
inside this Fridge-Freezer.
: Never allow the back coils of the Fridge-freezer
to come into contact with any wall surface.
ALWAYS ENSURE THAT THE SPACE INTO
WHICH YOU ARE PLACING YOUR APPLIANCE IS
FREE OF STORED ITEMS SUCH AS PAPERS OR
OTHER FLAMMABLE MATERIALS.
: NEVER block the VENTILATION OPENINGS OF THE
: Do not pull on the power supply cable to
free the plug from the wall!
: Do not attempt to use your Fridge-Freezer
outdoors or any place where it is likely to
come into contact with the elements.
: Do not pull out or insert the plug with wet
hands.
: Before any cleaning or maintenance work,
ensure that the appliance has been
disconnected from the power supply.
PLEASE OBSERVE ALL INSTALLATION ADVICE IN THIS MANUAL FOR
SAFE USAGE OF YOUR APPLIANCE.
Note: Before discarding an old refrigerator/freezer, switch off and disconnect it
from the power supply. Cut off and render any plug useless. Ensure that the door
cannot jam (removing it is best), regardless of whether or not it can be pushed open
from inside. AN OLD FRIDGE/FREEZER CAN BE A DEADLY PLAYTHING FOR CHILDREN!
APPLIANCE EITHER INSIDE OR ON ITS EXTERIOR.
IT IS VITAL TO KEEP YOUR FRIDGE-FREEZER WELL
VENTILATED SO THAT THERE IS PROPER AIR FLOW
BETWEEN THE BOTTOM OF THE UNIT AND THE
PLINTH / KICK PLATE ON WHICH IT IS SITTING.
: WARNING – DO NOT DAMAGE THE REFRIGERANT
CIRCUIT. AT THE END OF THE FUNCTIONAL LIFE
OF THE EQUIPMENT (WHICH USES COOLING GAS
R600o [ISOBUTANE]) AND INFLAMMABLE GAS
INSIDE THE INSULATING FOAM, IT MUST BE
PLACED IN SAFETY BEFORE SENDING IT FOR
PROPER WASTE DISPOSAL.
CONFORMITY TO W.E.E.E. DIRECTIVE
4
Page 6
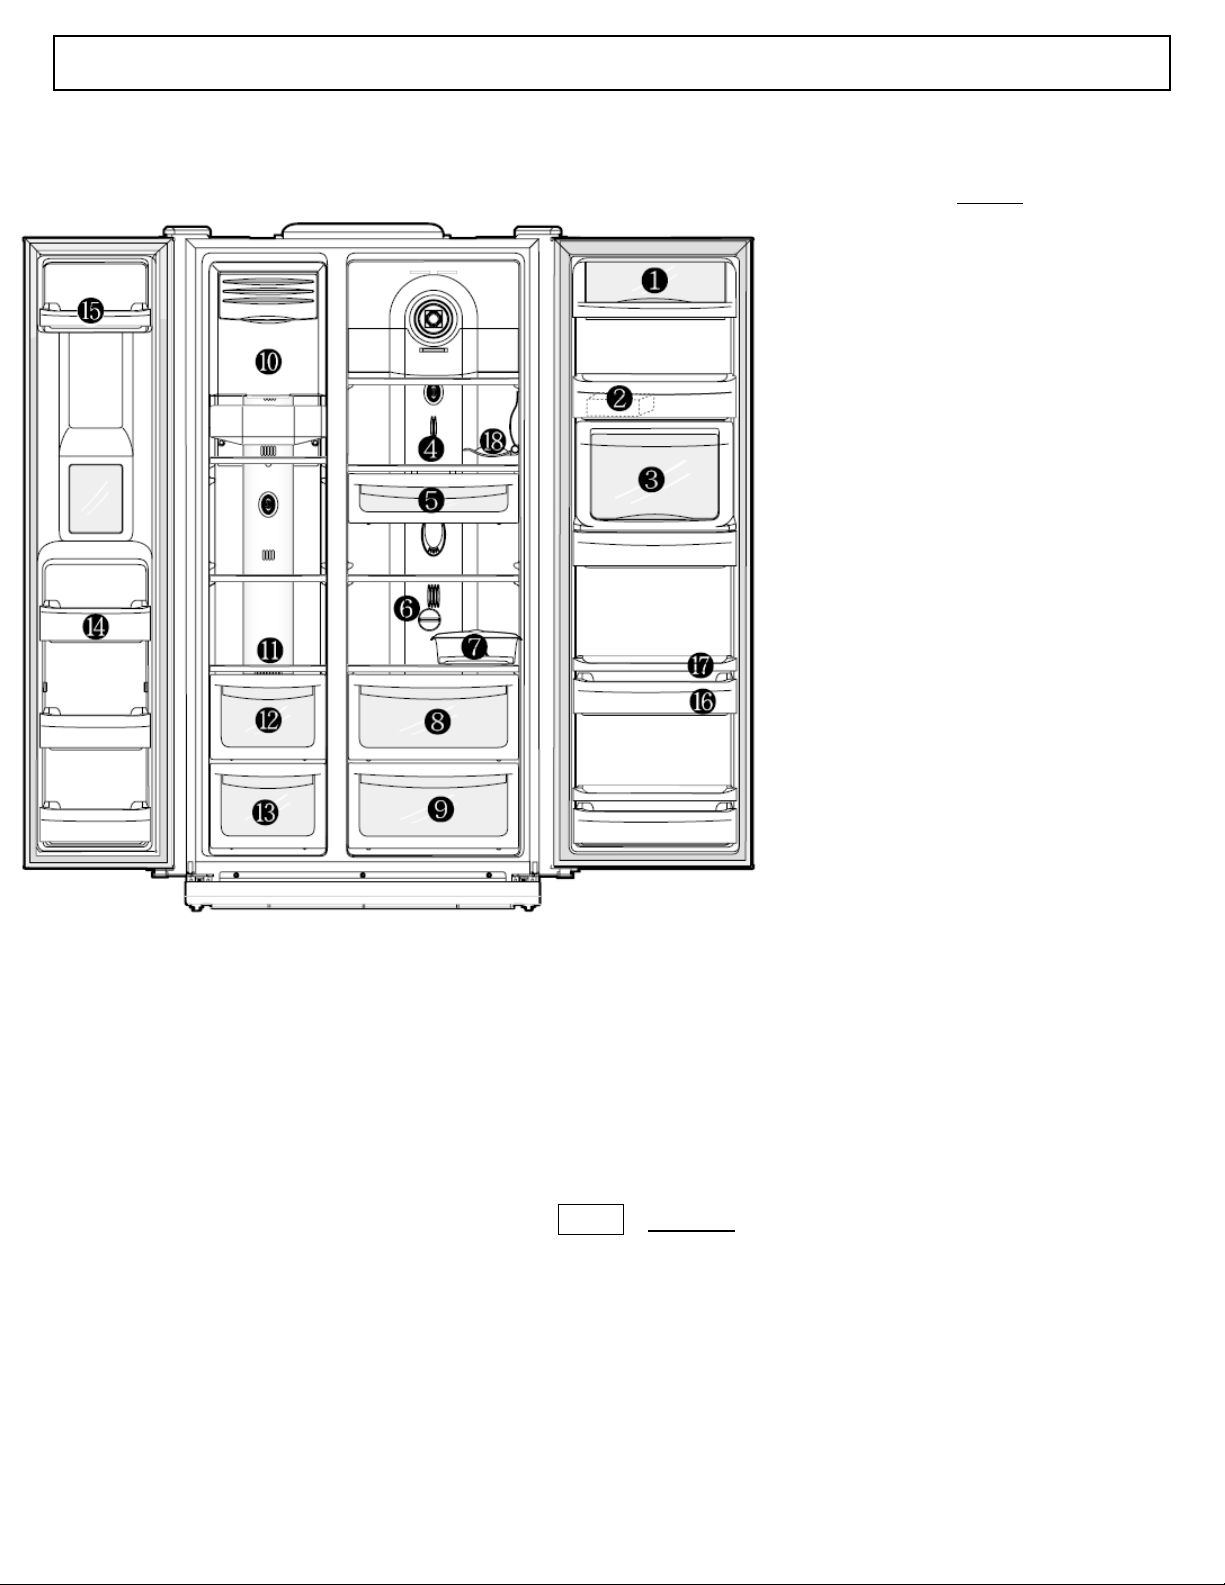
Using your Baumatic REFLEX FRIDGE-FREEZER:
y
Your REFLEX Fridge-Freezer:
8. VEGETABLE CASE &
CHILLED CASE – A crisper
for storing vegetables.
9. FRUIT CASE – A crisper for
storing fruit.
10. ICE CUBES STORAGE
CASE.
11. FREEZER SHELF
(Tempered glass) – For
storing frozen food such as
meat, fish, ice-cream…
5
12. DRYING CASE - For
storing dried foods.
13. MEAT CASE – For
storing meat, fish,
chicken with foil cover or
vinyl wrap.
14. FREEZER POCKETS
– For storing frozen
foods. NOTE store ice cream or long
stored foods in the top
freezer pocket.
15. FREEZER SMALL
POCKET – For storing
small frozen foods.
DO NOT
KEY
1. DAIRY SECTION – For storing
dairy products such as butter &
cheese.
2. SMALL POCKET – For storing
small, packaged foods.
3. DRINKS SECTION – For beverages
and canned drinks.
4. REFRIGERATOR SHELF
(Tempered Glass) – For storing
common foods.
5. CHILLED CASE – For storing foods
temporarily that are ready to
cook (meat, fish …).
6. VEGETABLE & CHILLED CASE
TEMPERATURE DIAL – This dial
sets the desired temperature.
7. MOVABLE EGG CASE - The egg
rack within can be lifted out at
our convenience.
16. REFRIGERATOR RACK
– For storing refrigerating
foods, milk, juice, beer,
etc.
17. REFRIGERAGTOR
RACK BAR - Keeps
tall containers from
falling from the rack
bar.
18. WINE BOTTLE
RACK - Holds
one wine bottle.
Page 7

UPON DELIVERY:
When your Fridge-Freezer has been delivered, you will
need to wait approximately
8 hours before turning it on.
The refrigerant in the compressor needs time to settle.
PLEASE DO NOT PLUG OR SWITCH ON THE APPLIANCE
ANY EARLIER THAN THIS!
NOTE:
THERE CAN BE AN ODOUR WHEN
YOU FIRST SWITCH ON THE
APPLIANCE. IT WILL VANISH
WHEN THE UNIT STARTS
COOLING.
We recommend that you
have the Fridge-Freezer
delivered near to where you
plan to install it so that the
refrigerant can settle.
SITUATING YOUR FRIDGE-FREEZER
CAUTION
AND LEAVE AT LEAST 5CM OF SPACE ABOVE THE UPPER SECTION
AND 5 INCHES (12.7 CM) BETWEEN THE REAR OF THE APPLIANCE
AND THE WALL BEHIND IT.
: DO NOT PLACE THE APPLIANCE NEAR HEAT SOURCES,
FOR FULL INSTALLATION ADVICE, PLEASE SEE PAGE 21
MAKE A NOTE OF THE LOCATION FOR YOUR NEW FRIDGE-FREEZER. MAKE
SURE THAT IT WILL FIT PROPERLY AND ENSURE THAT:-
1) The doors can open freely and completely.
2) You can access your food conveniently.
3) There is sufficient space at the back for the cooling coils to
give off heat safely & that they do not touch the plug (see SAFETY
SECTION).
6
Page 8
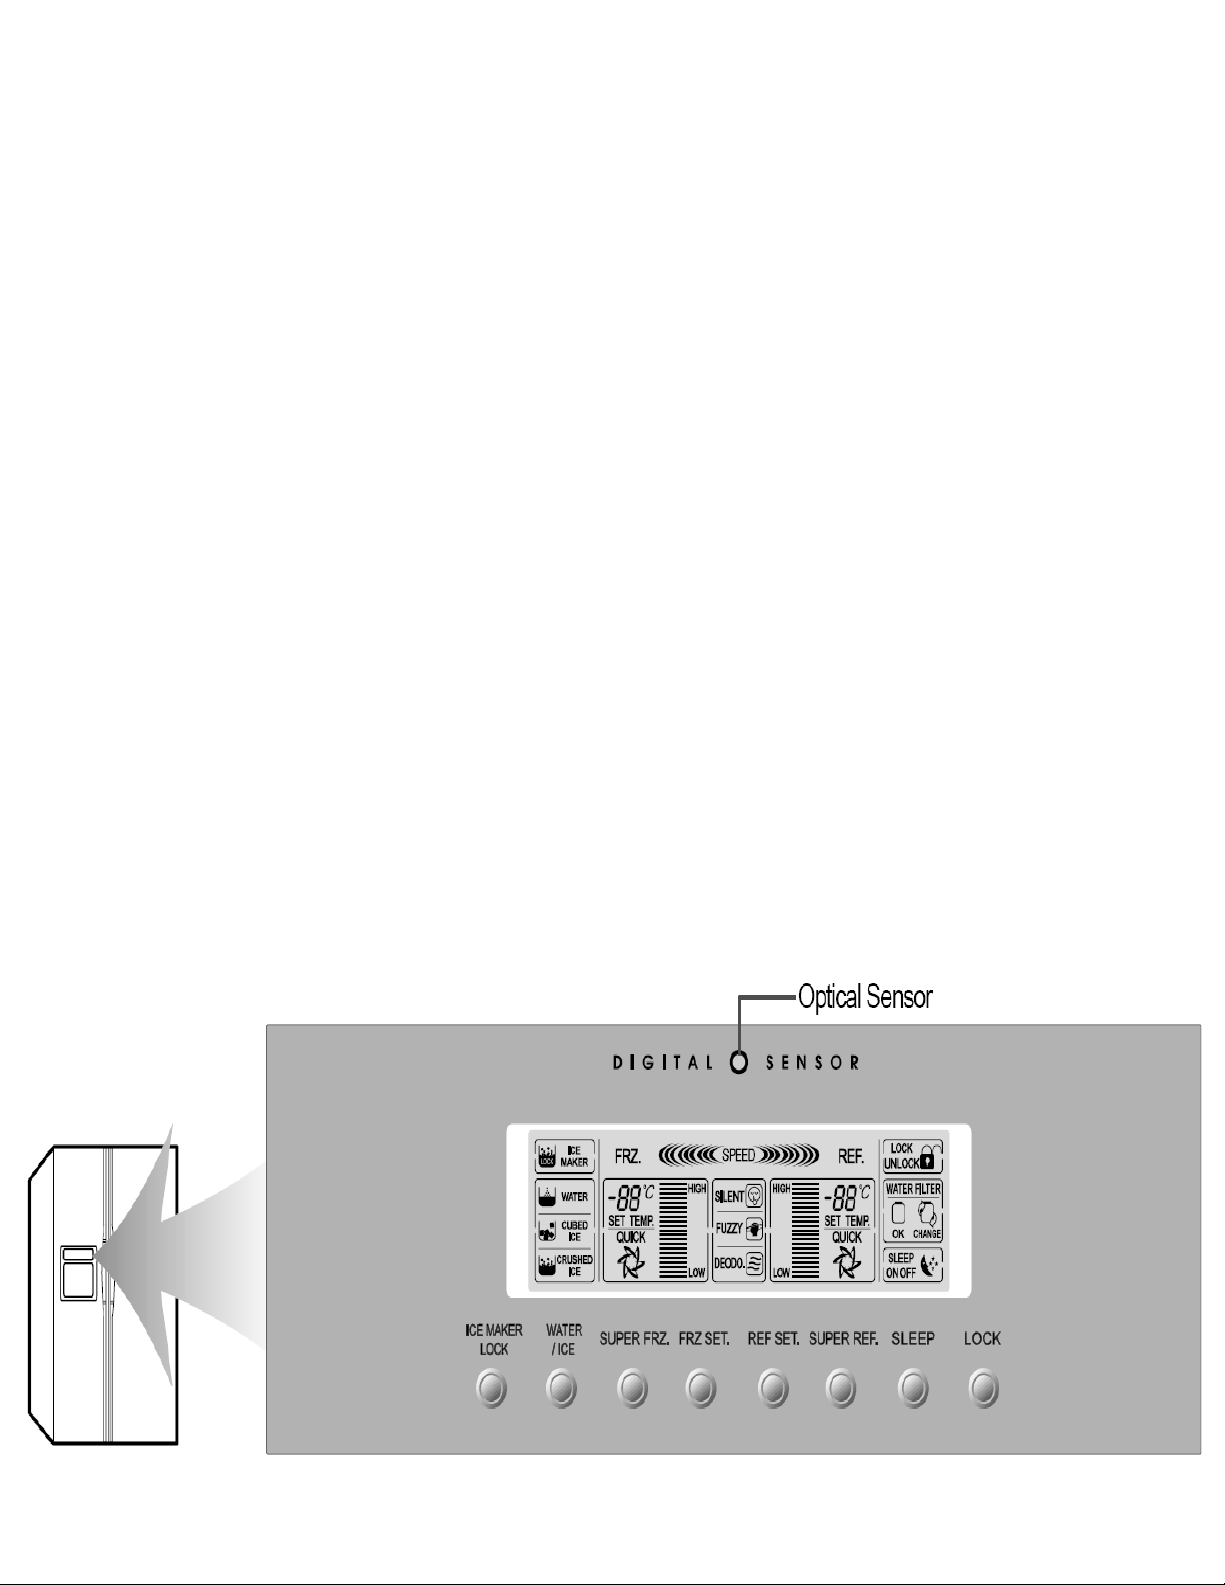
TURNING YOUR FRIDGEFREEZER ON FOR THE
FIRST TIME
• Once you have installed your fridge-freezer and plugged it
in, you will need to understand how the CONTROL PANEL
works in order to set the temperature you want your
appliance to operate at.
• Please familiarise yourself with the control panel which can
be found at the top of the unit.
7
Page 9
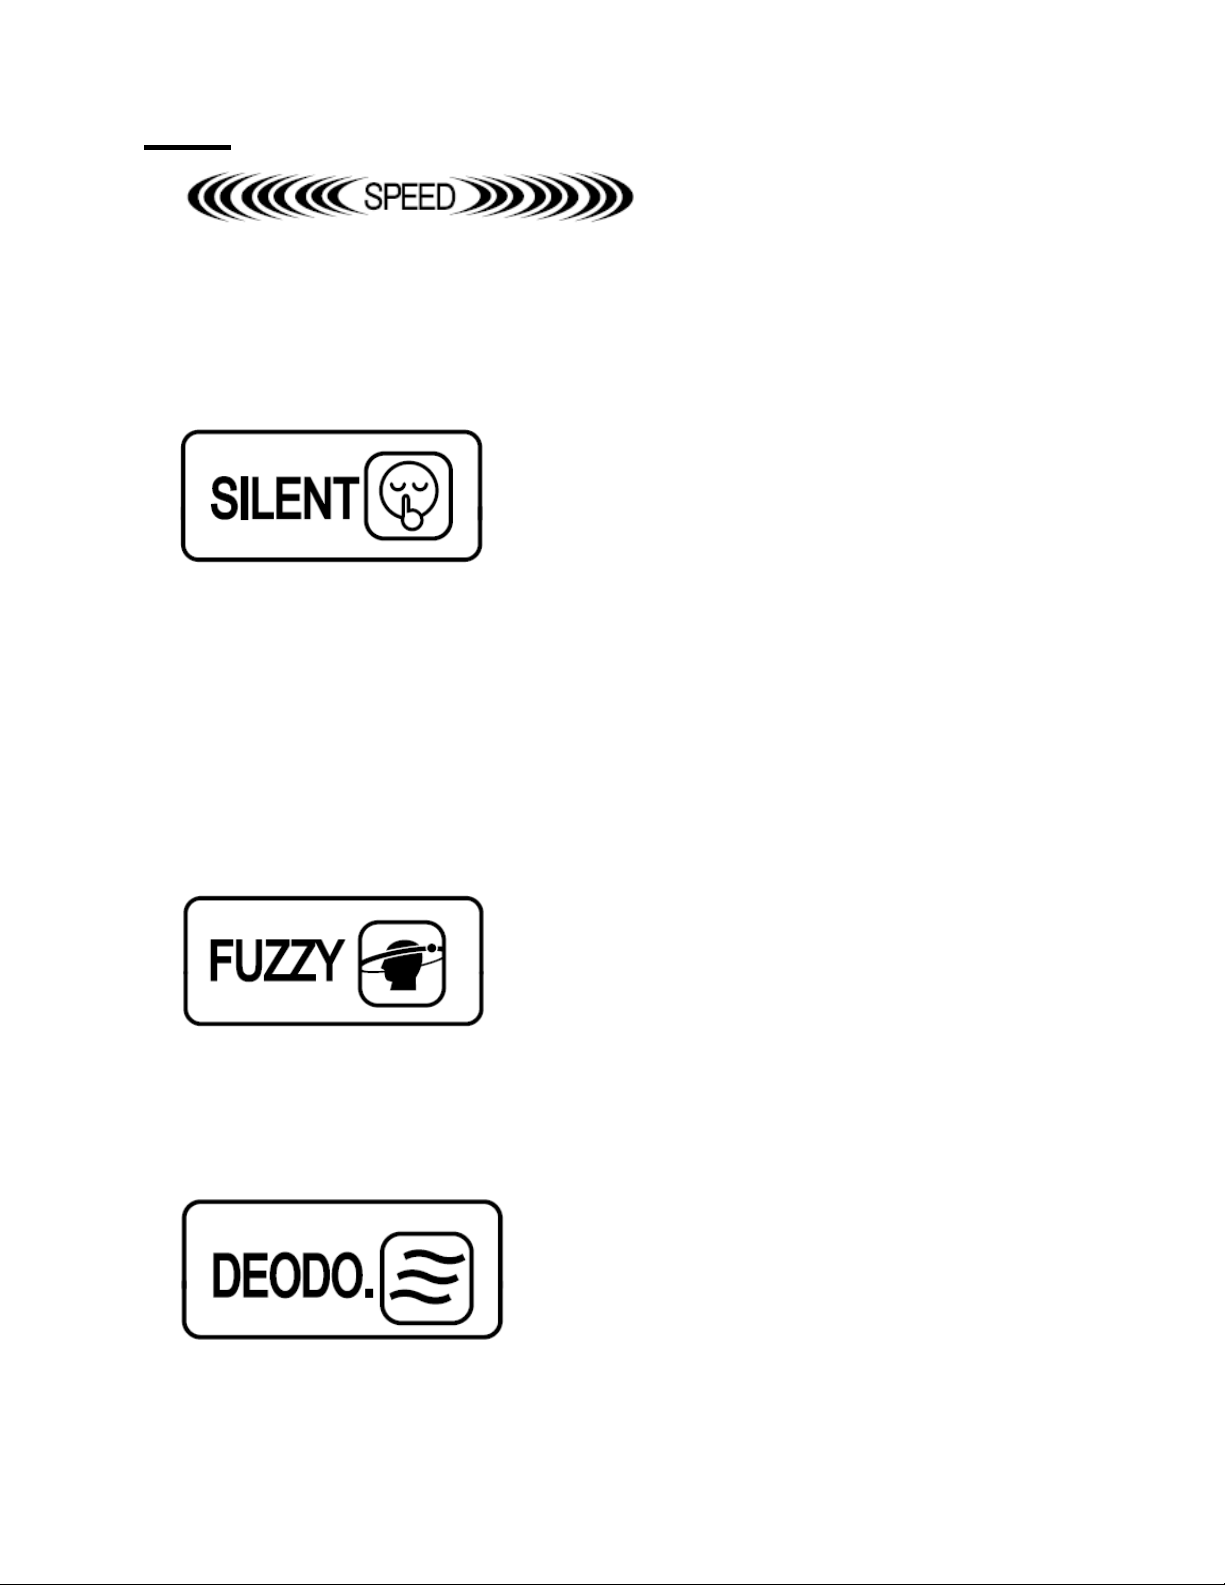
KEY
This mode will engage if you fill the fridge with too much
food at once or if you open the door too frequently.
SPEED MODE will then start automatically to maintain the
optimal temperature.
The Optimal Sensor in the top centre of the panel senses
the amount of light surrounding the refrigerator.
Whenever this sensor detects darkness (at night) the
Silent Mode will engage so that the appliance makes less
working noise.
CAUTION – DO NOT COVER the sensor with anything
(magnets, papers, etc.).
Shows that the digital control system is working in the
refrigerator (This icon is always lit when appliance is on).
As long as the refrigerator is working, this icon is lit to show that
the deodorising function is operating.
8
Page 10
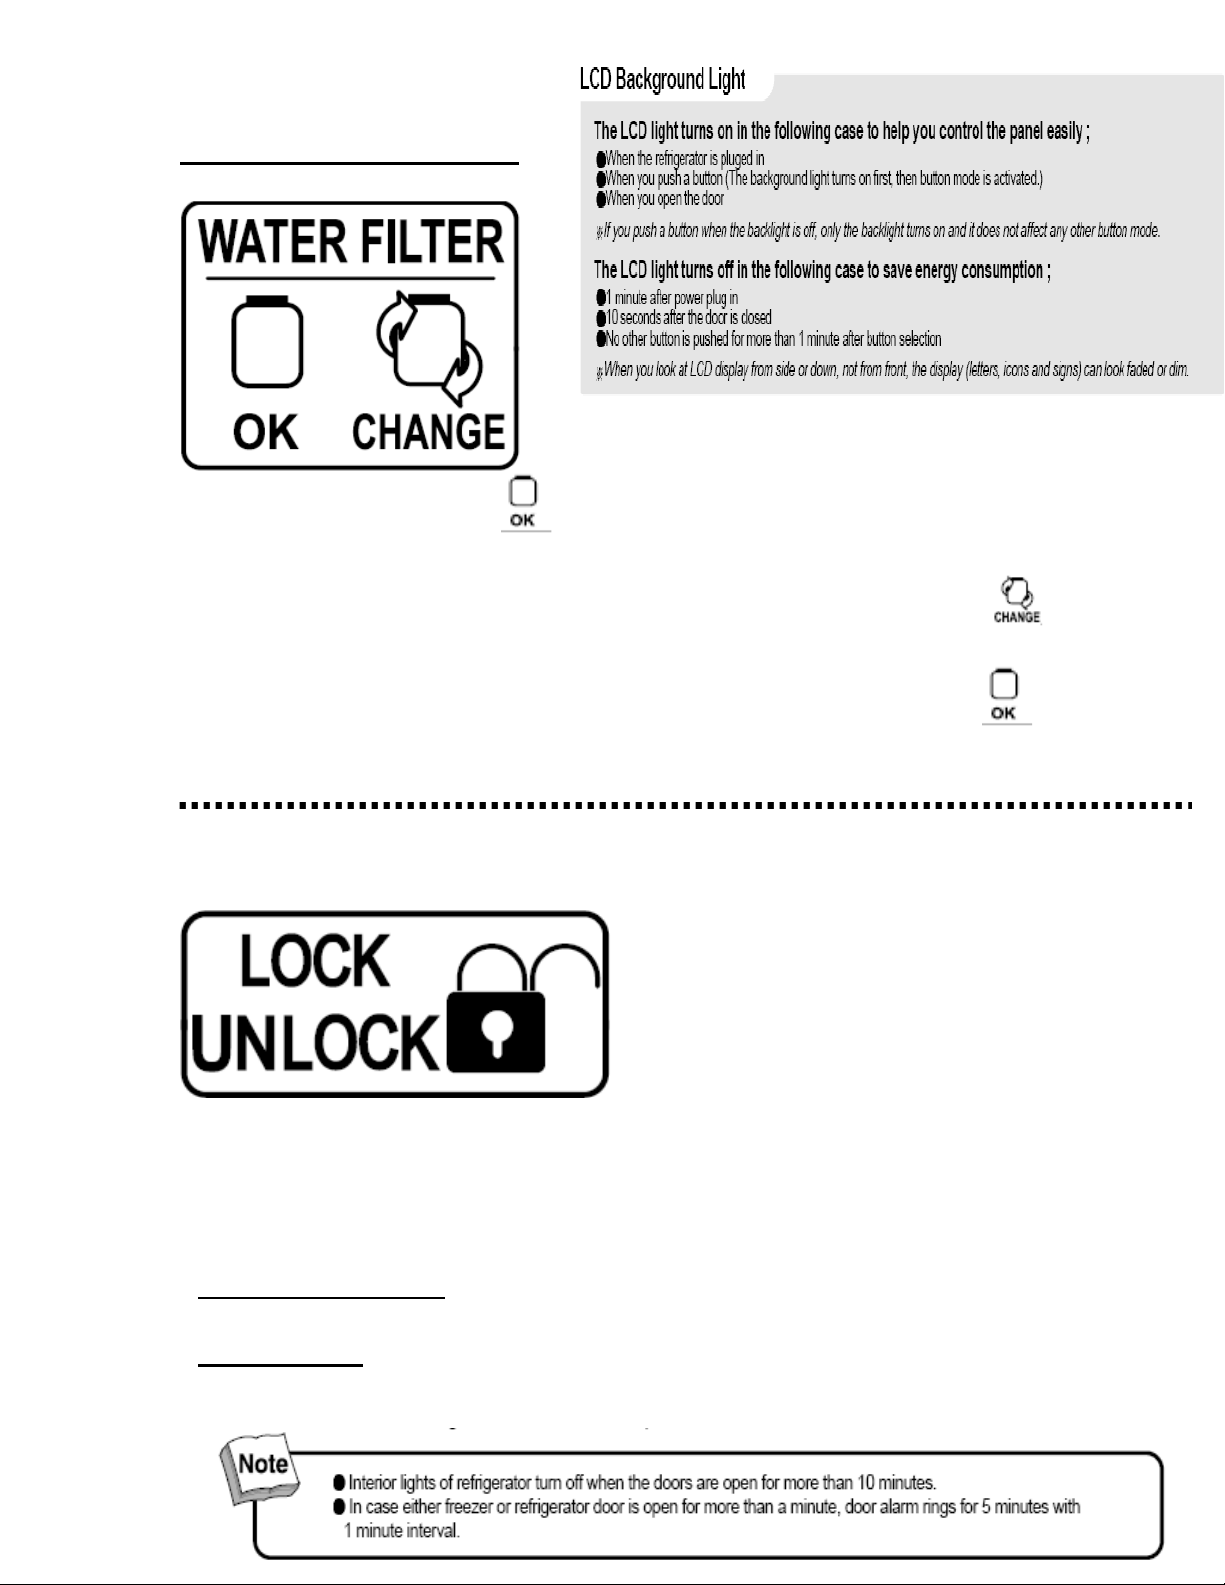
WATER FILTER CHANGE:
The NORMAL LED (
) will stay lit for the first six months after
the first switching on of the appliance.
When the time comes to CHANGE the filter or RESET (
), press
the ICE MAKER LOCK for 3 seconds or more while pressing the
LOCK button. The LED will then change to NORMAL (
).
CHILD LOCK FUNCTION
To keep your appliance safe from accidental damage caused by
children pressing buttons, you can set the LOCK function.
Press this button to disable the control panel and to keep the
function and temperature set as intended.
TO SET THE LOCK:
Press the LOCK button.
TO UNLOCK:
Press the LOCK button again for longer than a second to UNLOCK.
9
Page 11
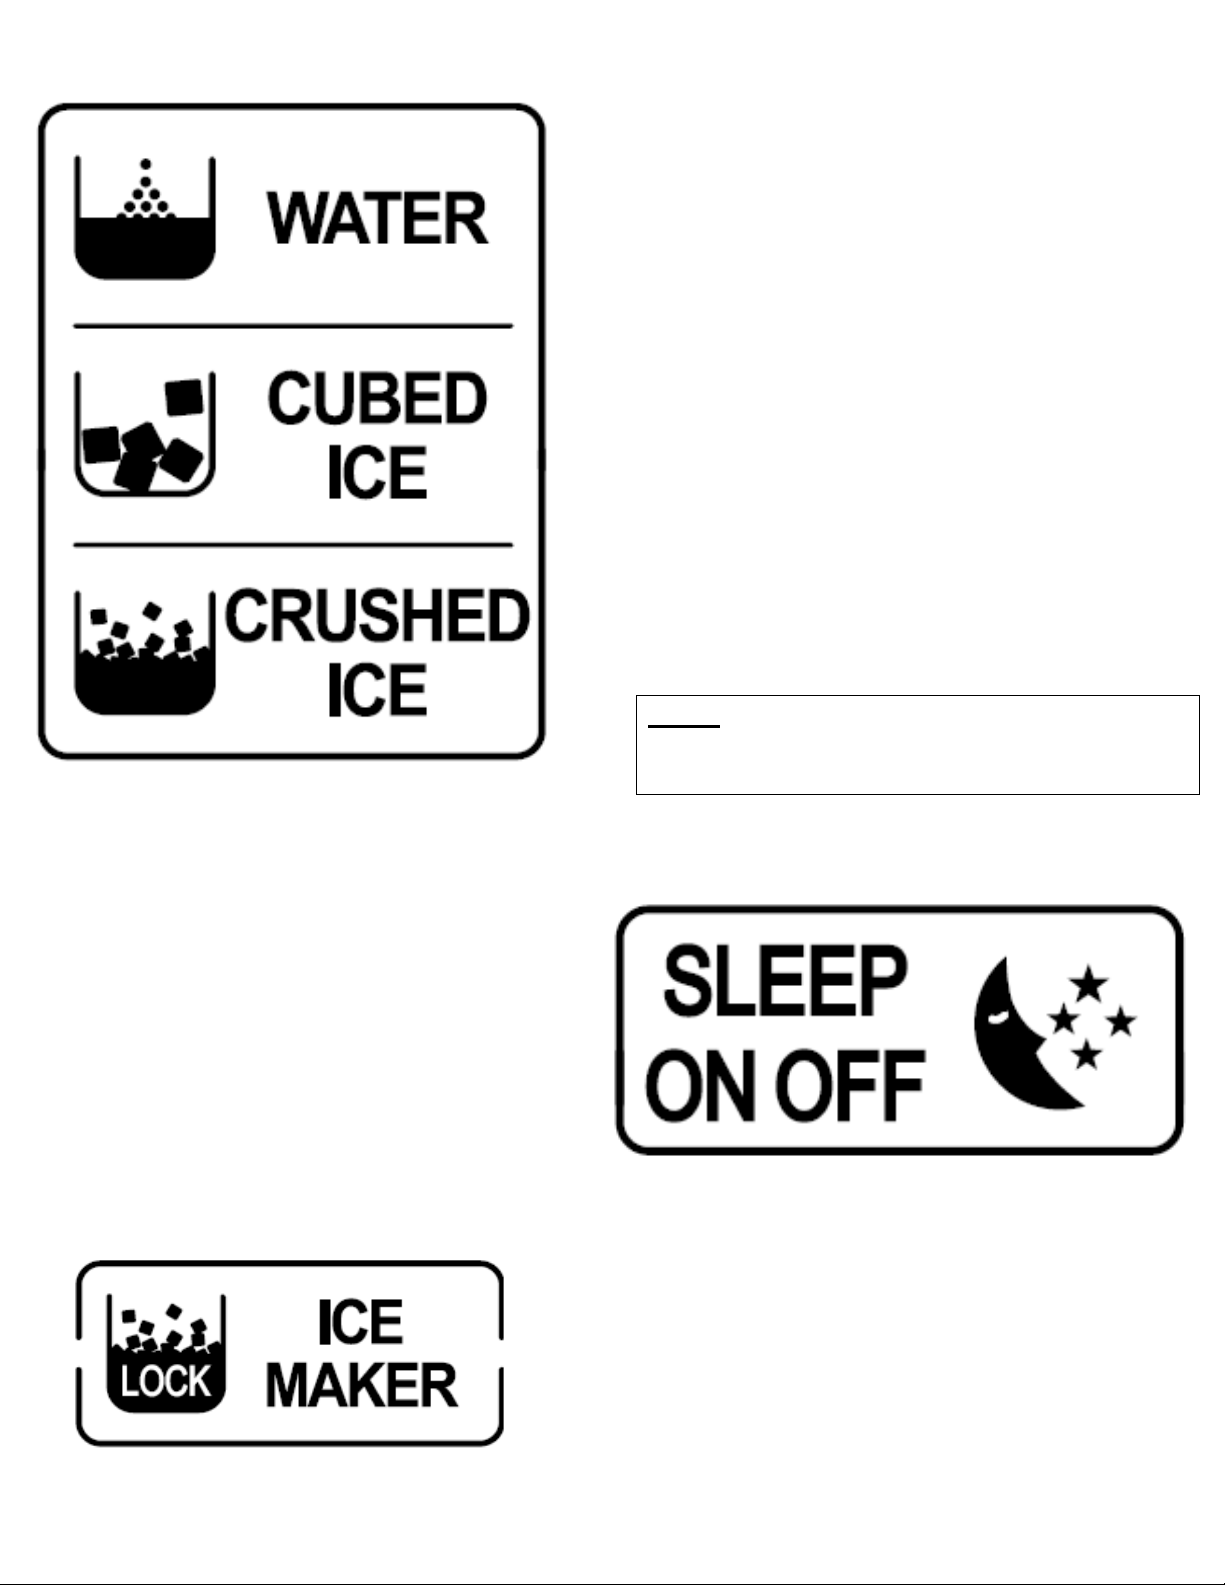
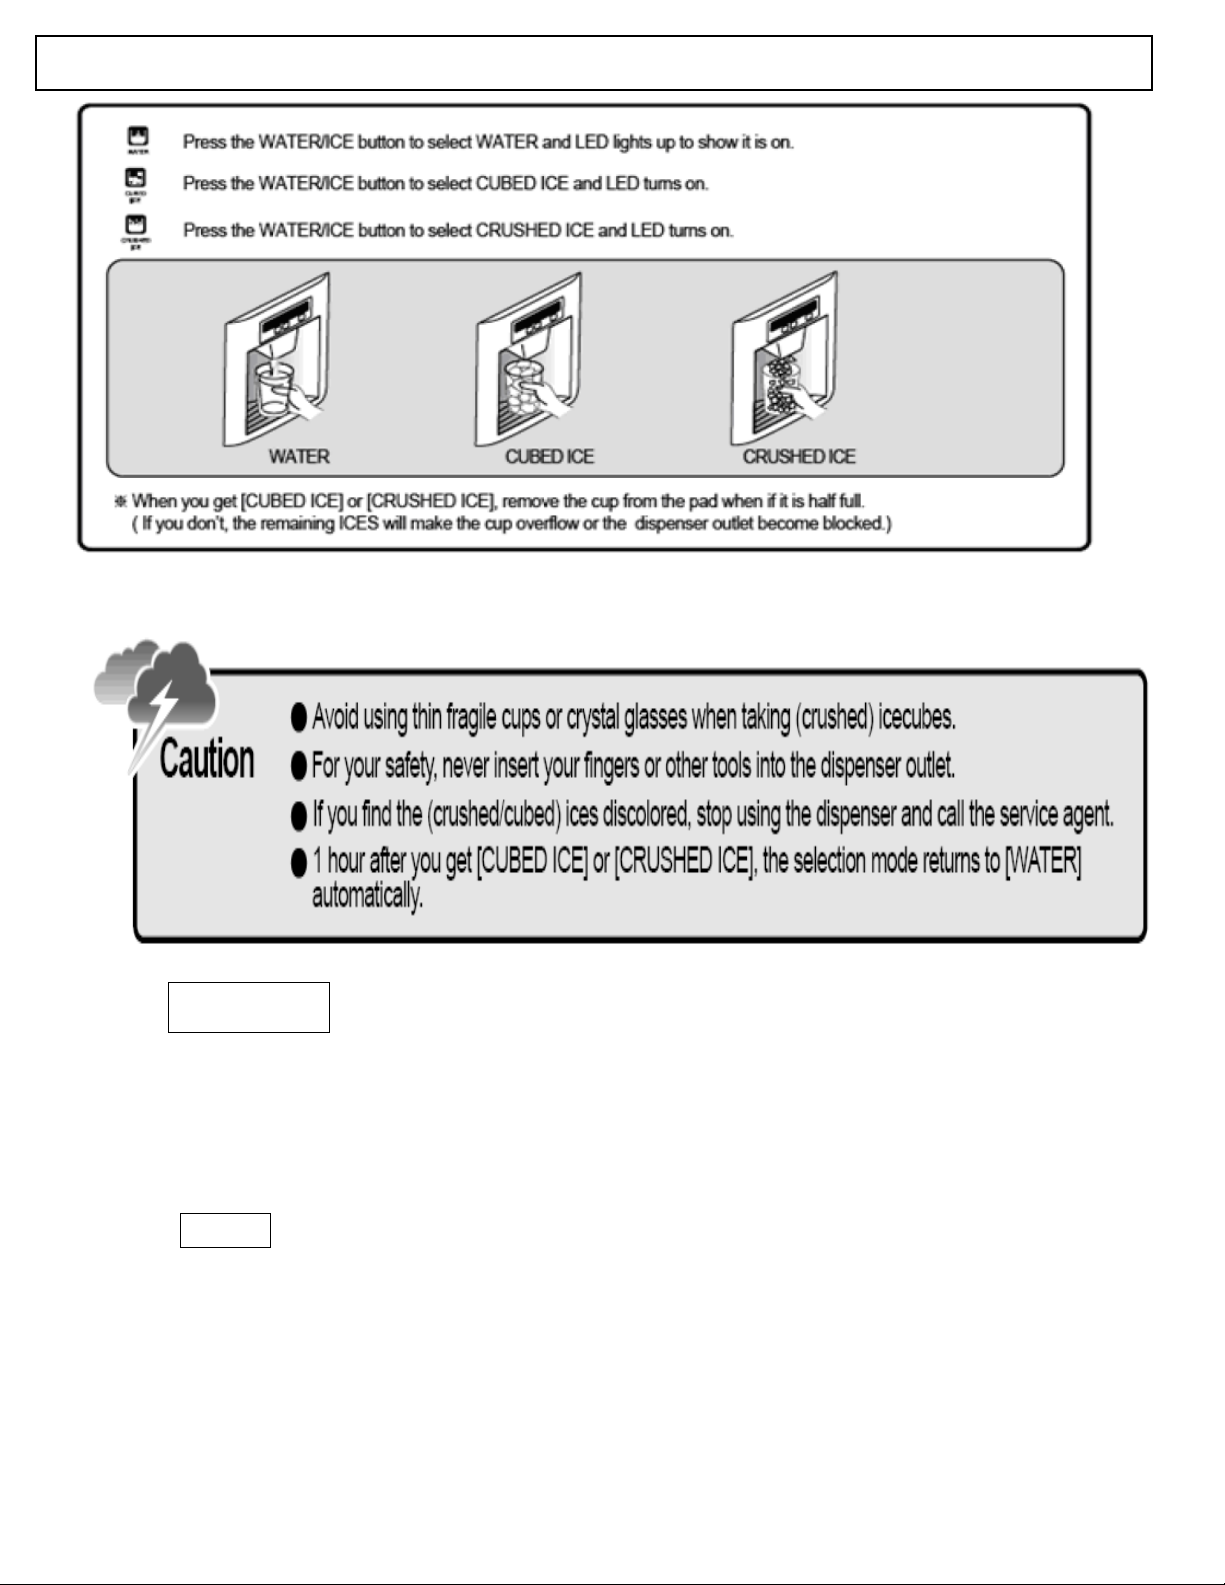
For your convenience, you can select
WATER, CUBED ICE, or CRUSHED
ICE.
o A rectangular line will light up
around your selection to indicate
that this will be the selection
dispensed.
TO OBTAIN YOUR SELECTION:
PRESS the WATER/ICE button until the
selection you want is lit up on the
display.
o While holding your cup or glass
beneath the dispenser, PRESS the
WATER/ICE button again.
o Your selection will be dispensed 1-
2 seconds later.
If you need total silence from the
refrigerator, just push the SLEEP
button.
¾ This MODE will work for a
maximum of 12 hours before
returning to the previously set
mode.
¾ If you want to stop SLEEP mode
before 12 hours is up, just push the
button
again.
NOTE: Be careful that you have your
glass held properly beneath the
dispenser to avoid the chance of spillage.
When cleaning the ice cubes case
assembly or when you do not use the
ice maker for a long period, remove the
ice cubes in the ice storage case and
press the button to stop making ice
cubes.
10
Page 12

SETTING THE TEMPERATURE IN YOUR REFRIGERATOR
NOTE –
YOU JUST PRESS THE ‘REF
SET’ PAD TO DISPLAY THE
AVAILABLE TEMPERATURE
RANGE UNTIL YOU STOP
AT THE ONE YOU WANT
TO USE.
NOTE: AMBIENT TEMPERATURES OF 5 DEGREES CELSIUS OR LESS CAN CAUSE ITEMS
IN YOUR REFRIGERATOR TO FREEZE – BE CAREFUL WHERE YOU SITUATE IT.
11
Page 13

YOUR REFRIGERATOR HAS A VEGETABLE AND
CHILLED CASE (‘6’ in Key on page 5).
This can be used either as a crisper for keeping vegetables or as a
colder chilled case, for your convenience.
¾ THE TEMPERATURE IN THE CHILLED CASE IS SOMEWHAT
LOWER THAN THE VEGETABLE ONE.
SETTING THE TEMPERATURE IN YOUR FREEZER
When you turn the dial to ‘Vegetable
Case’, the temperature in the drawer will be ideal for
storing vegetables.
When you turn the dial to ‘Chilled
Case’, the temperature in the drawer will be lower than
when set on ‘Vegetable Case’, this will allow you to keep
food more fresh.
Do not place items of food close to the cold air spout, as this can weaken
the cold air circulation.
Do not try to store fish in the ‘Chilled Case’ for a long time – it will
deteriorate. For long term storage of fish, it is better to store it in the
freezer.
12
Page 14

SETTING THE TEMPERATURE IN YOUR FREEZER
NOTE –
YOU JUST PRESS THE ‘FRZ
SET’ PAD TO DISPLAY THE
AVAILABLE TEMPERATURE
RANGE UNTIL YOU STOP
AT THE ONE YOU WANT
TO USE.
13
Page 15
USING THE AUTOMATIC ICEMAKER IN YOUR FRIDGE-FREEZER
TIP
¾ If you dispense 3 cups of water of more, the next charge
of water may not be cool. Add some ice cubes to the
water or wait until the water becomes cold once again
before obtaining water from your appliance.
NOTE:
o About 10 ice cubes a day (7-8 times daily) are made at one
time. If the ice storage tray becomes full, ice making will
stop.
o The icemaker will make banging noises when ice cubes
fall into the ice storage case. THIS IS NORMAL.
o To prevent bad odour or smells, regularly clean the ice
cube storage chest.
14
Page 16

FROST FREE FEATURE
IMPORTANT NOTE:
Both your fridge and freezer are FROST
FREE. This means that you will NEVER HAVE
TO DEFROST either your refrigerator or your
freezer.
¾ Your appliance will
prevent frost from
forming anywhere in the
appliance.
REMINDER: Allow the unit time to settle after delivery. If your plug
and power socket are now behind the fridge and you still need to move the
unit into place, be especially careful:
distance between the back of the fridge and the wall.
¾ Although this feature
virtually guarantees a
frostless environment, you
should still be careful NOT
to expose the interior of
the appliance to excessive
amounts of humidity.
Remember to leave a safe
When you first switch on the appliance,
allow 24 hours for it to cool down to the
desired temperature. During this time,
DO NOT open the door often or place a lot
of food inside the unit.
15
Page 17

ARRANGING FOOD IN YOUR FRIDGE-FREEZER
Refrigerator Compartment:
• To reduce
humidity and the consequent increase of
frost, NEVER place liquids in unsealed containers
the refrigerator. Frost tends to concentrate in the
coldest parts of the evaporator. In time, the unit
will need more frequent defrosting if too much
humidity develops inside it.
• NEVER place warm
inside the refrigera
Warm food must b
e
allowed to cool at room
temperatur
t
hen be arranged to
e
nsure adequate air
c
irculation in the
r
efrigerator
e. It should
food
tor.
in
• DO NOT ALLOW
anything to touch the
refrigerator’s back
wall as it will cause
frost. Also,
packaging, especially
paper, can stick to it
and spoil.
c
ompartment.
• DO NOT open the refrigerator door too often or
leave it open for long spells of time.
• ARRANGE meat and cleaned fish (wrapped in
packages or sheets of plastic) which you will then
use within 1-2 days, towards the rear of the fridge
compartment.
• You can put fruits and vegetables into the crisper
without packing them.
R our
EMINDER: You should regulate the temperature of y
F
ridge-Freezer bearing the following in mind
o Ambient temperature
How often the doors are opened o
Quantity of food stored in the compartments
o
o The location of your appliance
and closed
:
16
Page 18

ARRANGING FOOD IN YOUR FRIDGE-FREEZER
Freezer Compartment
• Your freezer’s primary function is to allow you to store
deep-frozen or frozen foods for long periods of time,
• D
and to make ice cubes.
O NOT PUT
SEALED
CONTAINERS
LIKE BOTTLES IN
THE FREEZER.
• While freezing large q
fish, mincemeat, etc.
you can access the
• The instructions sh
always be care
• DO NOT PUT
WARM FOOD
INTO THE
ZER
FREE
.
uantitie
), divide
m separate
own on froz
fully followed.
• DO NOT PUT FRESH
OR WARMISH FOOD
WITH FROZEN FOOD
SIDE-BY-SIDE AS THE
FORMER CAN THAW THE
LATTER AND CAUSE
SPOILAGE.
s of fresh food (meat,
it into freezer bags so
ly.
en food packages should
If no information is
provided,
•
FOOD, ENSURE THAT THESE
HAVE BEEN FROZEN AT
SUITABLE TEMPERATURES AND
THAT THE PACKAGING IS
INTACT AND NOT SODDEN.
months from
WHEN BUYING FROZEN
food should not be s re than 3
STORE YOUR FROZEN GOODS
IN YOUR S FREEZER AS SOON A
POSSIBLE AFTER PURCHASE.
the purchase date.
tored for mo
• IF A PACKAGE OF FROZEN FOOD
SHOWS SIGNS OF SWELLING OR
WET MARKS, IT IS PROBABLE
THAT THE FOOD HAD
PREVIOUSLY BEEN POORLY
STORED AND HAS NOW
DETERIORATED. DISCARD IT.
• The storage life of frozen food depends on the room
temperature, thermostat setting, how often the door is
opened, the type of food and how long it has taken
to get
the food from the store to your freezer. Always follow the
p ed the
rinted packaging instructions and never exce
maximum storage life indicated.
17
Page 19

DEODORIZER
• This refrigerator is equipped with a
deodorizer that traps and breaks d
pleasant smells, thus keeping the air in
un
e refrigeration compartment fresh.
th
• This d
the co
refrige
eodor a ed in
oling air p e
ration com
NOTE: To e
deodorizing performance, wrap
foods and foodstuffs that emit
powerful odour in plastic
wrapping film.
iz tion system is locat
assage in the wall of th
partment.
nsure maximum
NOTE: Be careful where you store
your appliance. For example, your
own
refrigerator will experience
performance difficulties if it is kept in
a place whose temperature dips
below the set temperature of the
refrigerator.
Also b air e careful to keep the
vents on the rear inside wall of
the re
frigerator
open.
IN CAS
E OF A BLACKOUT
(GENERAL POWER FAILURE)
In case of Power Failure, try to find out how
long the electricity will be off. If the failure
is not going to be for any
hours, leave the food in the fr
keep the door closed.
If the POWER FAILURE is going t
longer than 12 hours and some fo
defrosts, consume the latt
po
ssible.
longer than 12
eezer and
o last
od
er as soon as
18
Page 20

CLEANING / MAINTENANCE
NOTE: Before attempting Fridge-
NOTE: Before attempting FridgeFreezer, UNPLUG IT and make sure you do the
Freezer, UNPLUG IT and make sure you do the
following:
following:
9 Remove the baskets and the ice-cube
9 Remove the baskets and the ice-cube
9 Leave the door open.
9 Leave the door open.
9 In order to collect water deposits, tak
9 In order to collect water deposits, tak
water using a sponge.
water using a sponge.
9 Clean the inside of your Fridge-Freezer u
9 Clean the inside of your Fridge-Freezer u
bicarbonate in warm water (1 tablespoon ter).
bicarbonate in warm water (1 tablespoon ter).
9 Clean the condenser (back of unit) with a
9 Clean the condenser (back of unit) with a
NEVER USE SOLVENTS TO CLEAN THE I
NEVER USE SOLVENTS TO CLEAN THE I
to clean your to clean your
tray. tray.
e out the bottom drawer and soak up the e out the bottom drawer and soak up the
sing a solution of soda
sing a solution of soda
Bicarbonate to 2 litres of wa
Bicarbonate to 2 litres of wa
broom once a year.
broom once a year.
NSIDE OF YOUR FRIDGE-FREEZER. NSIDE OF YOUR FRIDGE-FREEZER.
19
19
Page 21

LONG ABSENCES: In the case of long absences, the appliance should be
switched off and food removed from the compartments. You should also clean
the interior surfaces and leave both doors slightly open to prevent the formation
of mould or odour. You should empty it out completely and dry it .
20
Page 22

REPLACING THE LIGHT BULBS
21
Page 23

22
Page 24

23
Page 25

24
Page 26

25
Page 27

INSTALLATION INSTRUCTIONS – REFLEX FRIDGE-FREEZER:
1) Allow for adequate space and install your fridge-freezer
1) Allow for adequate space and install your fridge-freezer
on a firm, level floor. This is very important as the appliance
on a firm, level floor. This is very important as the appliance
must be level so that there will be no unnatural noises or
must be level so that there will be no unnatural noises or
poor cooling.
poor cooling.
2) Ensure that you are going to be placing your fridge-
2) Ensure that you are going to be placing your fridge-
freezer away from heat sources and in a well-ventilated
freezer away from heat sources and in a well-ventilated
position. This should be at least 50 cm from radiators, gas
position. This should be at least 50 cm from radiators, gas
or coal stoves and 5 cm away from electric stoves. Do not
or coal stoves and 5 cm away from electric stoves. Do not
place the appliance in the path of direct sunlight.
place the appliance in the path of direct sunlight.
3) Make sure that the plug is accessible after positioning
3) Make sure that the plug is accessible after positioning
your fridge-freezer.
your fridge-freezer.
4) Keep a space of 15cm above your fridge freezer.
4) Keep a space of 15cm above your fridge freezer.
This will maintain
5) You need 5 inches,
5) You need 5 inches,
(12.7 cm) clearance
(12.7 cm) clearance
between the rear of
between the rear of
your appliance and
your appliance and
the wall behind it. If
the wall behind it. If
supplied, fit the plastic
supplied, fit the plastic
wall spacers to the
wall spacers to the
condenser at the back
condenser at the back
of the refrigerator.
of the refrigerator.
This will maintain
good performance.
good performance.
6) If placing beside another refrigerator or freezer, keep at
least 5cm between the units to prevent condensation.
7) Gently move the appliance into place.
NOTE – Upon delivery, you may need to remove the freezer
and/or refrigerator door/s if the appliance cannot get
through your doorway.
26
26
Page 28

INSTALLATION-AMBIENT TEMPERATURE
UIDELINES
G
OU MUST install this appliance in a well ventilated, dry
Y
oom.
r
Energy use is affected by the ambient temperature.
You are therefore advised to:
Not expose the appliance to direct sunlight;
Not install the appliance next to radiators,
cookers or other sources of heat;
Only install the appliance at a location whose
ambient temperature corresponds to the climate
classification, for which the appliance is designed.
The climate classification can be found on the data rating
tag, which is located at the left on the inside of the
appliance.
Cooling Temperature Ranges
Climate Classification Recommended Ambient
Temp.
SN +10 to +32° C
N +16 to +32° C
ST +18 to +38°C
T +18 to +43°C
If the appliance is installed next to another refrigerator
or freezer a clearance of 5 cm at the side is required.
This is to prevent the formation of condensation on the
utside of the appliance.
o
27
Page 29

28
Page 30

29
Page 31

30
Page 32

g
Troubleshootin
Trace a problem using the table below instead of having to call for
help.
PROBLEM WHAT TO DO
YOUR FRIDGE-FREEZER DOES NOT
APPEAR TO BE WORKING / OPERATION
LAMPS ARE OFF WHEN THEY SHOULD BE
ON / FOOD HAS
DEFROSTED WITHOUT YOUR
KNOWLEDGE / NO APPARENT POWER
CHECK THAT THE PLUG IS WELL-INSERTED INTO THE
POWER SOCKET
THAT THERE IS POWER FROM THE MAINS – THERE MAY BE
A BLACKOUT OR YOUR FUSES MAY HAVE BLOWN.
THAT THE ELECTRONIC THERMOSTAT (REGULATOR FOUND
ON THE INSIDE WALL OF THE FRIDGE-FREEZER NEAR THE
TOP) IS IN THE RECOMMENDED FUNCTIONING POSITION
AND NOT ‘0’ (OFF).
THAT THE SOCKET IS SUFFICIENT AND NO ADAPTER
OR EXTENSION LEADS HAVE BEEN USED.
THAT THE POWER SUPPLY VOLTAGE CORRESPONDS
TO THE APPLIANCE.
YOU HAVE OVERLOADED THE APPLIANCE. TAKE OUT
AND CONSUME FOOD; LOOK FOR OUT-OF-DATE FOOD
THAT CAN BE DISPOSED OF.
YOUR FRIDGE-FREEZER APPEARS TO BE
PERFORMING POORLY
THERE IS A NOISE
THE THERMOSTAT SETTING IS SET TO ‘1’. SET IT
HIGHER.
ENSURE THAT THE DOOR HAS BEEN CLOSED PROPERLY.
FOR INSTANCE, THERE MAY BE A PROBLEM INSIDE THE
UNIT, KEEPING THE DOOR OPEN OR ANOTHER
FAULT, SUCH AS BROKEN OR MISSING
DOOR SEAL.
ENSURE THAT THERE IS NO DUST ON THE CONDENSER.
ENSURE THAT THERE IS ENOUGH ROOM AT THE REAR AND
SIDES OF THE UNIT/
THE COOLING GAS WHICH CIRCULATES MAY MAKE
A SLIGHT NOISE (BUBBLING SOUND) EVEN WHEN
THE COMPRESSOR IS NOT RUNNING. THIS IS
NORMAL. IF THESE SOUNDS CHANGE, ENSURE:
YOUR UNIT IS WELL LEVELLED /
NOTHING IS TOUCHING THE REAR OF THE UNIT /
NO MATERIAL ON THE APPLIANCE IS VIBRATING.
31
Page 33

IMPORTANT
– MAKE SURE THAT THERE IS ADEQUATE AIR FLOW
FOR YOUR FRIDGE-FREEZER. PARTICULAR AREAS TO WATCH
INCLUDE THE SPACE BETWEEN THE FEET. KEEPING THESE
AREAS WITH ADEQUATE AIR-CIRCULATION WILL PREVENT YOUR
FRIDGE FREEZER FROM EXPERIENCING PROBLEMS.
32
Page 34

Baumatic Ltd. Conditions of guarantee
Dear Customer,
Your new Baumati appliance comes complete ith a free 12 month guarantee covering both parts and
labour c
Baumatic a ortunity to automatically extend the guaran
months at n n initial guarantee period of 24 months. Th
applies to England, Scotland, Wales and Nort
To qualify for your full 24 months guarantee yo appliance within 28 days of purchase
to be covered under this guarantee. This can be done online via: www.baumatic.co.uk
the guarantee card which can be found in each
Should any
policy is negated and Baumat de
The guarantee covers the appliance for norma
Any claims made under the terms of the guara
issued at the time of purchase.
This guarantee is transferable only with the w
If the appliance fails and is considered either n
(2 years if registered) and five years, a free of .
The guarantee for any replacement will only b inder of the guarantee on the original product
purchased.
The guarantee does not cover:
In the course of the work carried out it may be
position. Whilst all reasonable care will be tak
sustained to any property whatsoever in this p
This guarantee is in addition to and does not d
Contacting Baumatic Ltd
Sales Service
TEL: 0118 933 6900 TEL: 0118 933 691
FAX: 0118 931 0035 FAX: 0118 986 9124 FAX: 0118 933 6942 0118 933 6942
For ROI (Republic of Ireland), please contact one of the numbers below:
TEL: 01 – 6266798 FAX: 01 - 6266634
Thanks you for buying Baumatic.
*
33
osts resulting from defective materials or workmanship.
lso gives you the opp
* In addition, your appliance is covered b
charge the parts required to repair the app
defect that arises due to faulty ma
purchase date.
* An additional 1 to 3 year insurance sch
warranty period.
person other than an authorised re td interfere with the appliance, the
- Sinks and tap
- Failure to comply with the manufactu
- The replacement of cosmetic compon
- Accidental damage or wilful abuse.
- Subsequent loss or damage owing to
- Incorrect installation
- Losses caused by Acts of God, civil
- Filters, fuses, light bulbs, external ho aintwork, plastic items, covers,
baskets, trays, shelves, burner bases,
Applies to UK, Scotland, Wales & Northern Ireland only (Republic of Ireland has 1 year labour & 1 year parts warranty only)
c w
o extra cost, giving a
terials o
ic Ltd will be un r no further liability.
s
tee period for a further 12
e extended guarantee period
hern Ireland only.
u must register your
or through returning
new Baumatic appliance.
y a 5 year parts warranty. Baumatic Ltd will provide free of
li
ance, only if they are fitted by a Baumatic engineer, for any
r workmanship within a period of 5 years from the original
me for labour is available should you wish to extend the
e
presentative of Baumatic L
l domestic use only, unless otherwise stated.
ntee must be supported by the original invoice/bill of sale
ritten consent of Baumatic Ltd.
ot repairable or uneconomical to repai
charge replacement will not be offered
e for the rema
rers instructions for use.
ents of accessori
the failure of the appliance or electrical supply
war, failure to obtain spare pa
ses, damage to bodywork, p
burner caps, decals, corrosion, rubber seals.
necessary to remove the appliance from it operating
en, Baumatic Ltd cannot accept responsibility for damage
rocess.
iminish your statutory or legal rights.
Spares Technical/Advice
1 TEL: 0118 933 6922 0118 933 6933
es
rts, strikes or lockouts
r between 12 months
Page 35

Headquarters
Baumatic Ltd.
Baumatic Buildings,
6 Bennet Road,
Reading,
Berkshire
RG2 0QX, United Kingdom
Sales Telephone
+44 118 933 6900
Sales Fax
+44 118 931 0035
Service Telephone
+44 118 933 6911
Service Fax
+44 118 986 9124
Spares Telephone
+44 118 933 6922
Technical / Advice Telephone
+44 118 933 6933
E-mail
:
sales@baumatic.co.uk
technical@baumatic.co.uk
Http (Internet site):
www.baumatic.com
34
Page 36

35
 Loading...