

Page 1
INSTRUCTION MANUAL
BHTP400SS
38cm Domino dual zone
teppanyaki hob.
Page 2
PIANO DI COTTURA DOMINO TEPPANYAKI FILOTOP
HOB
HOB
HOB
HOB
HOB
HOB
Installazione - Uso - Manutenzione
IT
DOMINO COOKING HOB TEPPANYAKI FILOTOP
Installation - Use - Maintenance
TABLES DE CUISSON DOMINO TEPPANYAKI FILOTOP
Installation - Emploi - Entretien
EINBAUKOCHGERÄT DOMINO TEPPANYAKI FILOTOP
Installation - Gebrauch - Wartung
PLACA DE COCCIÓN DOMINO TEPPANYAKI FILOTOP
Instalación - Uso - Mantenimiento
MESAS DE ENCASTRAR DOMINO TEPPANYAKI FILOTOP
GB
FR
DE
ES
PT
Instalação - Uso - Manutenção
Page 3
Caro Cliente,
sentitamente La ringraziamo e ci
congratuliamo per la scelta da Lei fatta.
Questo nuovo prodotto, accuratamente
progettato e costruito con materiali di
primissima qualità, e stato accuratamente
collaudato per poter soddisfare tutte le Sue
esigenze di una perfetta cottura.
La preghiamo pertanto di leggere e rispettare
le facili istruzioni che Le permetteranno
di raggiungere eccellenti risultati sin dalla
prima utilizzazione. Con questo moderno
apparecchio Le formuliamo i nostri più vivi
auguri.
IL COSTRUTTORE
I
GB
FR
DE
ES
Italiano
English
Français
Deutsch
Español
I
Indice
Avvertenze di sicurezza
Descrizione dell’apparecchio
Istruzioni per l’utente
Istruzioni per l’installatore
QUESTO PRODOTTO È STATO CONCEPITO
PER UN IMPIEGO DI TIPO DOMESTICO.
IL COSTRUTTORE DECLINA OGNI
RESPONSABILITÀ NEL CASO DI EVENTUALI
DANNI A COSE O PERSONE DERIVANTI DA
UNA NON CORRETTA INSTALLAZIONE O DA
USO IMPROPRIO, ERRONEO OD ASSURDO.
L’APPARECCHIO NON DEVE ESSERE
USATO DA PERSONE (COMPRESI BAMBINI)
CON RIDOTTE CAPACITÀ FISICHE,
SENSORIALI O MENTALI, O DA PERSONE
CHE MANCANO DELL’ESPERIENZA E DELLE
3
PT
Português
CONOSCENZE NECESSARIE SE NON SOTTO
LA SUPERVISIONE O DIETRO ISTRUZIONI
SULL’USO DELL’APPARECCHIO DA PARTE
DI UNA PERSONA RESPONSABILE PER LA
LORO SICUREZZA.
I BAMBINI DEVONO ESSERE CONTROLLATI
PER ASSICURARSI CHE NON GIOCHINO
CON L’APPARECCHIO.
Page 4

Avvertenze di sicurezza
Siete pregati di osservare questa indicazione, poiché in
I
caso contrario si estingue qualsiasi diritto di garanzia per
i danni insorti.
Impiego conforme allo scopo previsto
• Non assentarsi durante il funzionamento
dell’elettrodimestico.
• Questo apparecchio deve essere impiegato soltanto
per la cottura e l’arrostimento di pietanze per uso
domestico.
• L’apparecchio non deve essere utilizzato come
superficie di lavoro o appoggio.
• Non sono ammesse trasformazioni o modifiche
all’apparecchio.
• Non appoggiate ne conservate liquidi infiammabili,
materiali facilmente incendiabili o oggetti che
possono fondersi (ad es. pellicola, plastica, alluminio)
sull’apparecchio o nelle immediate vicinanze.
Sicurezza dei bambini
• Tenete i bambini piccoli lontani dall’apparecchio.
• Lasciate avvicinare i bambini più grandicelli
all’apparecchio solo sotto sorveglianza.
• Per evitare un’accensione accidentale povocata
da bambini e animali domestici, raccomadiamo di
attivare la sicurezza dei bambini.
Norme di sicurezza generali
• Il montaggio e l’allacciamento dell’apparecchio
devono essere effettuati esclusivamente dai tecnici
qualificati e autorizzati.
• Gli apparecchi da incasso devono essere messi in
funzione solo dopo l’installazione in piani di lavoro e
mobili da incasso adeguati e a norma.
• In caso di guasti all’apparecchio esso deve essere
spento e staccato dalla corrente elettrica, per evitare
una possibile scossa elettrica.
una distanza minima del busto dal piano di cottura
acceso di almeno 30 cm.
• Lo spazio richiesto per la ventilazione di 5 mm fra il
piano di lavoro e la sottostante parte anteriore del
mobile non deve essere coperto.
• Non utilizzare pentole di ghisa o dal fondo rovinato,
non levigato e che presentano sporgenze. Potrebbero
graffiare il piano durante gli spostamenti.
Sicurezza durante la pulizia
• Per pulire l’apparecchio occorre spegnerlo e
attendere che si raffreddi.
• Per motivi di sicurezza è vietata la pulizia
dell’apparecchio con idropulitrici a vapore oppure ad
alta pressione.
Per evitare danni all’apparecchio
• Oggetti che possono fondere e liquidi traboccanti
possono bruciare, rimanendo attaccati al piano, e
devono essere rimossi immediatamente.
Indicazioni particolari per il Teppan Yaki
• Durante il funzionamento la dilatazione del grill può
generare rumori. Non si tratta di un problema del
piano di cottura e il suo funzionamento non viene
compromesso in alcun modo.
• In caso di uso frequente del piano, al centro, in
corrispondenza della suddivisione delle zone, si può
formare una leggera bombatura del piano cottura.
Non si tratta di un problema del piano di cottura e il
suo funzionamento non viene compromesso in alcun
modo. Pertanto:
- si consiglia di non deporre le pentole nel punto di
divisione delle zone, poichè potrebbero risultare
instabili;
- la cottura in questa zona può produrre risultati
irregolari, per esempio nel caso delle crespelle.
Sicurezza durante l’utilizzo
• Il grasso surriscaldato e gli oli si incendiano molto
rapidamente. Attenzione! Pericolo di incendio!
• ATTENZIONE! Pericolo di scottature! Olio o grasso
aggiunti successivamente sul piano di cottura già
caldo si infiammano molto rapidamente e possono
generare schizzi.
• Un impiego disattento dell’apparecchio può
comportare il rischio di bruciature.
• Rimuovere adesivi e pellicole dal piano in
vetroceramica e smontare il piano cottura.
• I cavi degli apparecchi elettrici non devono essere
posati sulla superficie calda dell’apparecchio o su
stoviglie calde.
• Disinserire la zona di cottura dopo ogni uso.
• Si consiglia ai portatori di pacemaker di mantenere
4 5
Page 5

Descrizione dell’apparecchio
Le caratteristiche principali del suo
apparecchio
• Il piano di cottura è spesso 11 mm. È composto da
due stradi di acciaio inox e uno di alluminio frapposto
tra i due. Il piano di cottura è caratterizzato da un buon
accumulo termico che riduce la rapida diminuzione
della temperatura del piano di cottura, per esempio
durante la preparazione di carne prelevata dal
frigorifero.
• Ogni superficie Teppan Yaki è un pezzo unico, viene
lavorata a mano e levigata da specialisti. Eventuali
differenze nel disegno di levigatura sono normali e
non comportano alcuna limitazione al funzionamento.
Più è usato più acquista valore.
• Il piano di cottura è suddiviso in due ampie zone
regolabili separatamente.
• Il Teppan Yaki è posizionato al centro di un piano in
acciaio inox e distanziato dal piano stesso in modo
che la temperatura perimetrale nel piano inox non
raggiunga una temperatura troppo elevata.
• Il canale perimetrale attorno al Teppan Yaki serve
come raccolta di piccoli pezzi di cibo e liquidi
che successivamente a fine cottura si possono
agevolmente rimuovere.
• Il livello di potenza sul quale è leggibile l’impostazione
(vedi Fig. 1 posiz. 8) consente di mantenere costante
la temperatura desiderata. In tal modo si evita il
surriscaldamento dellle pietanze, a vantaggio di una
cottura povera di grassi e che preserva il contenuto
nutritivo degli alimenti.
• Le pietanze vengono preparate o riscaldate
direttamente sul piano di cottura, con o senza grasso.
Tuttavia è possibile cucinare anche con le pentole.
• Il piano cottura deve essere sempre preriscaldato.
I
Prima del primo impiego
Prima pulizia
• Eliminare la pellicola protettiva.
• Pulire il pannello di comando con un panno umido.
• Pulire il piano di cottura raffreddato con un panno
umido, nella direzione della molatura.
Attenzione! Si raccomanda di non utilizzare
strumenti per la pulizia appuntiti o aggressivi.
Potrebbero danneggiare la superficie.
Page 6

Istruzioni per l’utente
Installazione
I
Tutte le operazioni relative all’installazione
(allacciamento elettrico) devono essere eseguite da
personale qualificato secondo le norme vigenti.
Per le istruzioni specifiche vedi parte riservata
all’installatore.
Accensione/ spegnimento del Touch Control
(Fig. 1)
L’elettronica Touch Control viene attivata
I
azionando il tasto ON/OFF e commuta dalla
modalità OFF alla modalità di attesa. A tale scopo
occorre azionare il tasto ON/OFF come tasto unico e per
la durata di 1 s. Si sentirà un breve bip. Nella modalità di
attesa sul display della zona di cottura viene visualizzato
staticamente “0”.
Eventualmente questa visualizzazione può andare in
secondo piano a causa di una segnalazione di calore
residuo oppure di errore.
Se entro il tempo della modalità di attesa (10 s) viene
attivata una zona di cottura, il controllo commuta nella
modalità attiva.
Se entro 10 s non viene effettuata nessuna introduzione,
il controllo commuta automaticamente con un breve bip
nella modalità OFF.
Nella modalità attivo o nella modalità di attesa,
l’elettronica può venire commutata in ogni momento
nella modalità OFF azionando il tasto
ON/OFF. La funzione di spegnimento ha sempre priorità
durante il funzonamento; vale a dire che il controllo si
spegne, anche attivando più tasti contemporaneamente.
Accensione di una zona di cottura
Nella modalità di attesa o in quella attiva, una zona di
cottura può venire attivata mediante i tasti Più/Meno, a
Meno che la zona di cottura non si trovi in quel momento
nella programmazione timer (vedi capitolo timer).
Se s’inizia con il tasto “+”, il livello di cottura passa da “0”
a “4”. Se s’inizia con il tasto “-”, il livello di cottura passa
da “0” a “9”.
Spegnimento di una zona di cottura
a) Azionando contemporaneamente il tasto “+” e “-”
della zona di cottura desiderata.
b) Selezionando il livello di cottura “0” della zona di
cottura desiderata con il tasto “-”.
Se si spegne l’ultima zona di cottura, il controllo
commuta nella modalità OFF dopo 10 s se non ci sono
altre attivazioni.
Tutte le zone di cottura vengono spente con effetto
immediato azionando il tasto ON/OFF.
Livelli di cottura e di potenza
I livelli di cottura e di potenza delle zone di cottura
vengono visualizzati tramite un display (posiz. 8 Fig. 1).
Secondo standard vengono visualizzati i livelli di potenza
con i numeri da “1” a “9”.
Indicatore di calore residuo
Serve a indicare all’utente che la piastra è ad una
temperatura pericolosa in caso di contatto con tutta
l’area sovrastante la zona cottura. La temperatura viene
determinata seguendo un modello matematico e un
eventuale calore residuo viene indicato con una “H” dal
corrispondente display a sette segmenti.
Il riscaldamento e il raffreddamento sono calcolati in
relazione a:
- Il livello si potenza selezionato (da “0” a “9”);
- Il periodo di attivazione dei relè dopo aver spento la
zona cottura.
Il corrispondente display mostra “H” fino a che la
temperatura della zona non scende al di sotto del livello
critico (< 60 °C) secondo il modello matematico.
Funzione Timer
La funzione Timer può venire utilizzata
come timer per la zona di cottura o
come sveglia indipendente, però mai
per entrambe le funzioni.
I due display a 7 segmenti della rispettiva zona di cottura
servono per la visualizzazione del tempo rimanente in
minuti, fino a quando non viene fatto scattare l’allarme
del timer.
Selezione timer
- Per programmare un timer, il touch deve trovarsi nella
modalità di attesa o nella modalità attiva.
- L’azionamento del tasto timer serve per la selezione
della funzione timer per una zona di cottura.
- La segnalazione della programmazione di un timer
mediante i tasti Più/Meno avviene attraverso il led
8 per il modello 2 induzione e il led 6 per il modello
wok induzione. Il led del timer lampeggiante segnala
che il valore dei display a 7 segmenti si riferisce al
timer e può venire modificato. Quando un contatore
continua a funzionare nella modalità OFF, il led del
timer s’illumina staticamente. Ciò indica che il valore
raffigurato sui display appartiene al timer, ma non può
venire momentaneamente modificato direttamente; a
tale scopo occorrerebbe riattivare il controllo.
- L’azionamento del tasto timer dipende dalle condizioni
di funzionamento precedentemente impostate:
a) La zona di cottura corrispondente al timer è attivata
(livello di cottura > 0): Il timer viene programmato in
riferimento alla zona di cottura; quando si azzera,
spegne automaticamente la zona di cottura; non è
6 7
Page 7
possibile selezionare un contatore indipendente.
Un ulteriore azionamento del tasto timer commuta
direttamente all’impostazione del livello di cottura.
b) La zona di cottura corrispondente al timer è
disattivata (livello di cottura = 0): Il timer viene
progtammato indipendentemente e continua a
funzionare anche nello stato di OFF. Finchè il
contatore funziona, non è possibile attivare la zona di
cottura.
Impostazione del valore di timer
- In seguito alla selezione del timer avvenuta, il led
assegnato lampeggia come sopra descritto. Con i
tasti Più/Meno è possibile impostare il tempo di count
down del timer desiderato.
- Iniziando con il tasto Più, il primo valore visualizzato
salta su “01” e aumenta progressivamente da 1 fino a
un massimo di “99” (limite superiore).
- Iniziando con il tasto Meno, il valore visualizzato
sull’indicazione salta su “30” e diminuisce in passi
da 1 fino allo “01” (primo limite inferiore). Al suo
raggiungimento viene emesso un segnale acustico.
Per raggiungere lo “00”, occorre prima rilasciare il
tasto Meno e poi riattivarlo. Azionando ulteriormente
il tasto Meno, la visualizzazione “00” non verrà
modificata (secondo limite inferiore).
- L’impostazione può avvenire anche tramite
azionamenti permanenti dei tasti Più o Meno o tramite
azionamenti singoli (selezionare: azionamento tasto,
rilascio, azionamento, rilascio, ecc.).
- In caso di azionamento permanente del tasto, si
verifica un’accelerazione automatica della velocità
di regolazione, vale a dire che il tempo tra un passo
e quello successivo si riduce, finchè il tasto rimane
premuto.
- Se entro 10 sec. (parametro) il tasto Più o il tasto
Meno non viene nuovamente premuto, dopo aver
selezionato il timer della zona di cottura corrente (il
display rimane su “00”), l’indicazione e l’assegnazione
dei tasti Più/Meno commutano automaticamente alla
zona di cottura.
- Quando un timer viene utilizzato come contatore
(sveglia), l’indicazione e l’assegnazione dei tasti non
commutano alla zona di cottura, dato che essa non
può venire attivata.
- Un timer parte in genere con il count down, se
quest’ultimo è stato programmato con dei valori non
uguali a 0. Esempio: il timer parte con il rilascio del
tasto Più dopo aver impostato il valore timer “01”.
- Le impostazioni di timer sono prioritarie rispetto alla
delimitazione del tempo di funzionamento in presenza
di impostazioni di livelli alti di cottura.
- Se viene programmata solo una sveglia, il controllo
dapprima rimane nella modalità di attesa (nessun’altra
zona di cottura è attivata). Se non vengono introdotti
altri valori nuovi, il TC si comporta come sopra
descritto e commuta nella modalità di OFF.
Scadere del timer/ allarme del timer e
conferma
- Gli ultimi 10 s prima dello scadere del timer vengono
visualizzati sul display (count down fino all’allarme).
- Una volta scaduto il tempo impostato di un timer,
scatta l’allarme del timer, la zona di cottura assegnata
viene subito spenta.
- Il display, insieme al led del timer selezionato,
lampeggia alternando il livello di cottura “00” con “H”,
in caso di calore residuo.
- La segnalazione dell’allarme dura al massimo 2
minuti, se l’utente non interviene prima.
- Al termine dei 2 minuti o azionando un tasto qualsiasi,
la segnalazione dell’allarme viene sospesa.
Il segnalino acustico (cicalino) nonchè la spia di
controllo del timer vengono disattivati.
Spegnimento del timer/Modifica delle
impostazioni del timer
- E’ possibile modificare il valore impostato del timer,
nella modalità di attesa o attiva, in ogni momento
dopo selezione avvenuta, attivando il tasto Più o
Meno.
- E’ possibile spegnere il timer, portandolo sul valore
“00” premendo il tasto Meno o premendo un’unica
volta contemporaneamente i tasti Più o Meno.
Blocco dei tasti (sicurezza per i bambini)
Bloccaggio/attivazione Key Lock
L’azionamento del tasto Key-Lock nella modalità di
attesa o attiva, comporta il bloccaggio della tastiera;
il led Key-Lock “9” si illumina in modo statico. E’
necessario osservare i tempi per l’azionamento del tasto
Key-Lock.
Il controllo continua a lavorare nella modalità
precedentemente imposatata, ma non può più essere
comandato da altri tasti, tranne che dal tasto Key-Lock
o dal tasto ON/OFF.
Tutti i tasti bloccati non vengono controllati dal controllo
riguardo all’azionamento continuo. Lo spegnimento con
il tasto ON/OFF è possibile anche in stato di bloccaggio.
La funzione Key-Lock incl. spia di controllo è
nuovamente attiva in caso di riaccensione (nella
modalità di attesa 10s), fino a quando verrà disattivata
azionando nuovamente il tasto Key-Lock l’attivazione/
disattivazione della funzione Key-Lock nella modalità di
OFF non è possibile.
Sbloccaggio/disattivazione Key Lock
Il nuovo azionamento del tasto Key-Lock nella modalità
di attesa o attiva comporta lo sbloccaggio della tastiera
e lo spegnimento della spia di controllo Key-Lock
I
Page 8
assegnata.
I
Tutti i tasti sensore possono venire nuovamente azionati.
Blocco dei tasti (sicurezza per i bambini)
Attivazione e disattivazione
L’azionamento del tasto key-lock nella modalità di
aesa o aiva comporta il disinserimento della potenza
del dispositivo. Sul display compare il simbolo “11”.
È possibile solo il totale spegnimento con il tasto
ON/OFF o lo sblocco azionando il simbolo key-lock e
dopo il bip il simbolo “+” o “-”.
Per bloccare in sicurezza la regolazione di un
fuoco, azionare contemporaneamente il simbolo
TIMER e il simbolo “-”. Il led key-lock “9” per il modello
2 induzione e “7” per il modello wok induzione, si
accende. Il controllo continua a lavorare nella modalità
precedentemente impostata e non può essere
comandata da altri tasti, tranne lo spegnimento con il
tasto key-lock. Lo sblocco avviene azionando di nuovo
contemporaneamente il simbolo TIMER e il simbolo “-”
1
2
1
1
1 ZONA COTTURA 1.400 W
2 ZONA COTTURA 1.400 W
2
2
3b
8
5
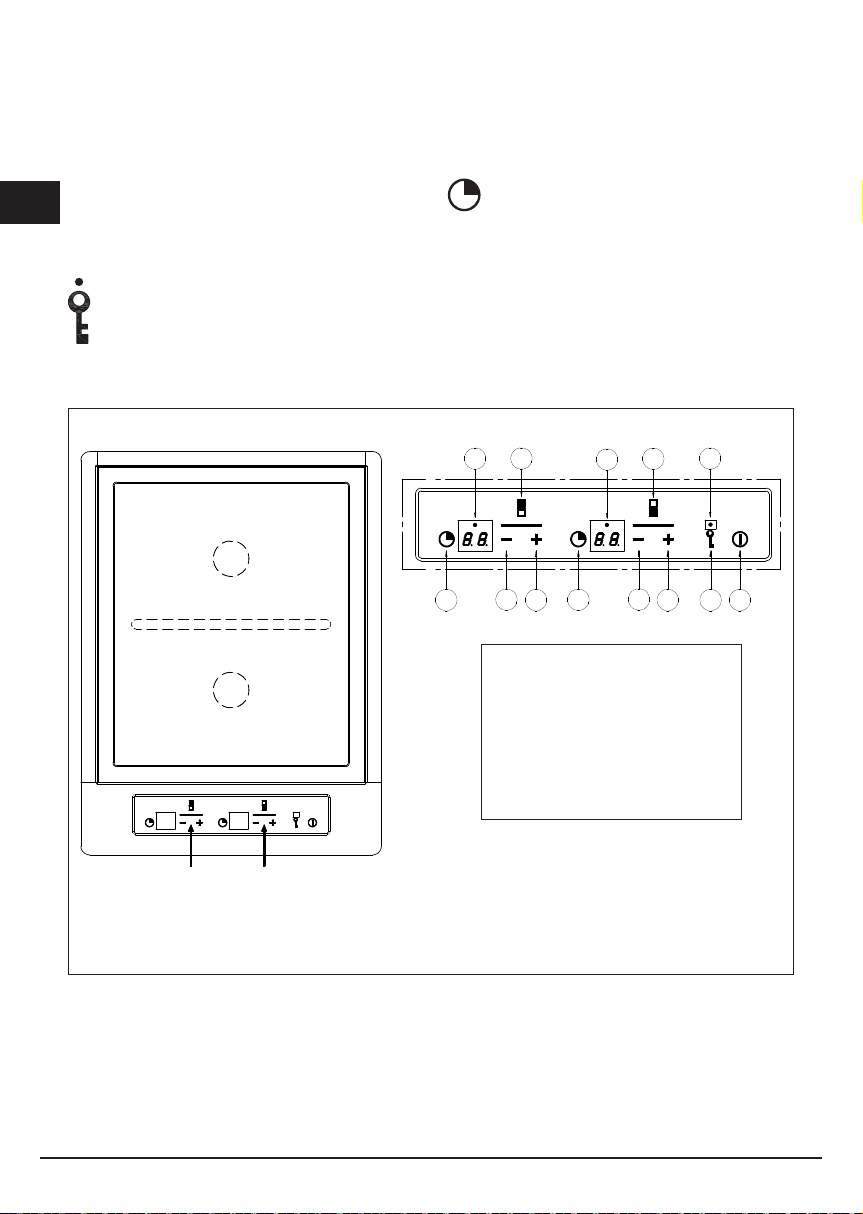
1. Accensione/spegnimento - On/Off
2. Sicurezza bambini (Key Lock)
3. Indicazioni zona cottura
4. Incremento potenza
5. Decremento potenza
6. Timer (a)
7. Timer (b)
8. Led timer
9. Led Key Lock
6
47 452 1
3a
8
9
Fig. 1
8 9
Page 9
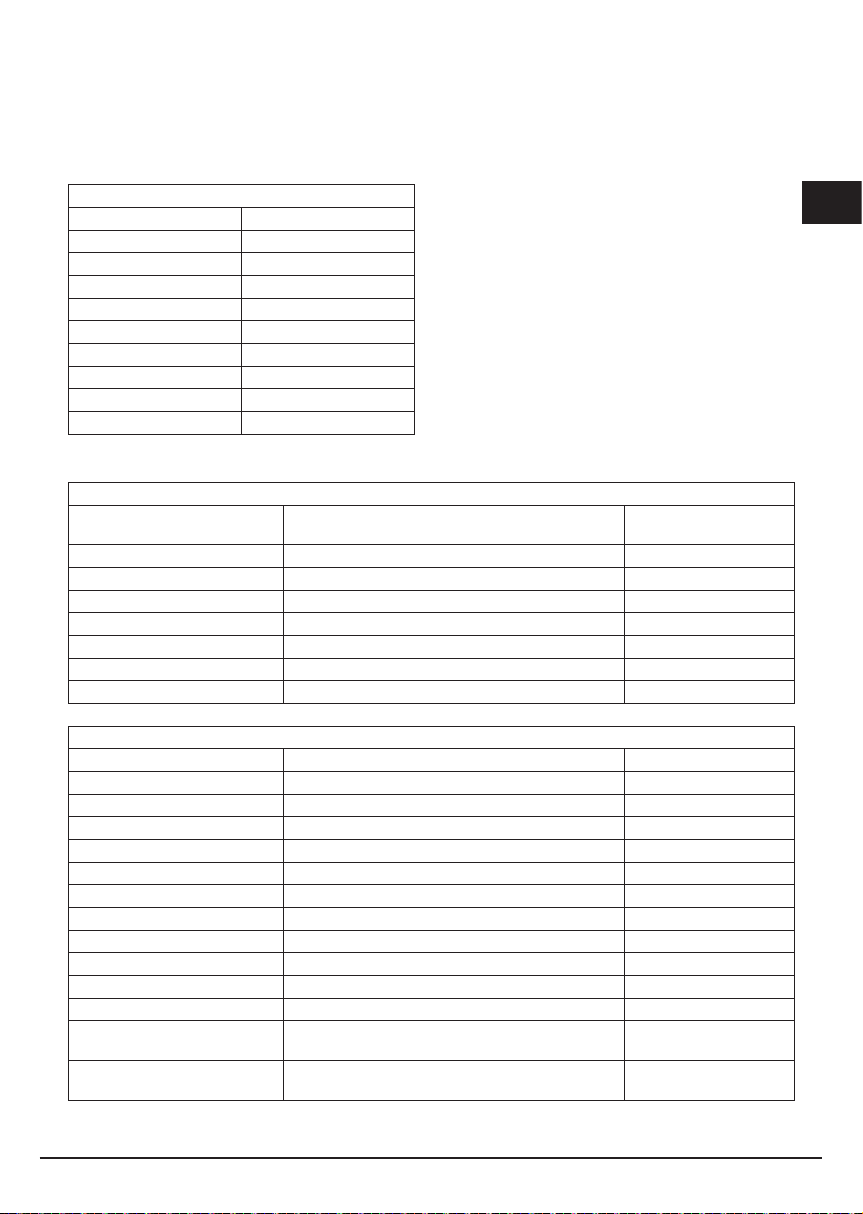
IMPOSTAZIONE DEI LIVELLI DI COTTURA
LIVELLI COTTURA TEMPERATURE (°C)
1 50
2 75
3 100
4 125
5 150
6 170
7 190
8 205
9 220
TEMPERATURA MASSIMA e PUNTO DI FUMO
GRASSO
BURRO 130/4 150
LARDO 170/6 200
GRASSI DI MANZO 180/6 210
OLIO D’OLIVA 180/6 200
OLIO DI GIRASOLE 200/7 220
OLIO DI ARACHIDI 200/7 235
OLIO DI COCCO 200/7 240
TIPI DI CIBO TEMPERATURE (°C) LIVELLO DI POTENZA
PESCE e FRUTTI DI MARE 170-180 6
VITELLO 160-180 6
MANZO 200-210 8
MAIALE 180-210 7
AGNELLO 180-200 7
POLLAME 160-180 6
SALSICCIA 200 7-8
UOVO FRITTO 140 4-5
FRITTATA 140-160 5
FRUTTA 140-160 5
VERDURE 140-160 5
CUOCERE IL RISO
PRECEDENTEMENTE COTTO
CUOCERE LA PASTA
PRECEDENTEMENTE COTTA
RACCOMANDATA (°C) LIVELLO DI POTENZA
TEMPERATURA MASSIMA
CONSIGLI IN CUCINA
Nota: preriscaldare sempre il piano di cottura!
Suggerimenti per la cottura con il
Teppan Yaki
Utilizzo di grassi e oli
Quando vengono utilizzati grassi e oli, è molto importante
selezionare la giusta temperatura. Impostando la
giusta temperatura, gli importanti componenti degli oli
e di grassi si mantengono. Se invece la temperatura è
troppo alta, il grasso inizia a fumare (il cosidetto “punto
di fumo”).
PUNTO DI FUMO (°C)
140-160 5
140-160 5
I
Page 10

Pulizia e manutenzione
I
Attenzione: Pericolo di scottature durante la pulizia
del piano di cottura ancora caldo!
Attenzione: Non pulite mail il piano di cottura con
polvere abrasiva o detergenti agressivi.
Pulizia del piano cottura con cubetti di
ghiaccio
1. Spegnere l’apparecchio e attendere che raffreddi a
circa 80° C.
2. Depositare sul piano cottura i singoli cubetti di
ghiaccio uno dopo l’altro; contemporaneamente
staccate lo sporco con la paletta e spingetelo nella
scanalatura, fino ad aver eliminato i residui più grossi.
Eliminare i residui dalla scanalatura (per esempio con
carta da cucina). In alternativa ai cubetti di ghiaccio si
può usare anche acqua fredda.
3. Attendere che il piano di cottura raffreddi a circa 80
°C. Con un panno pulito e un poco di acqua fredda
pulite vigorosamente.
4. Pulizia a freddo:
- Lasciate agire un solvente per grassi per circa 5
minuti.
- Rimuovere i resti di sporco con la paletta o usando
Inox. Togliere il gomitolo d’acciaio.
- Sciacquate con acqua (panno umido).
5. Le macchie eventualmente prodotte da albume o
acidi presenti negli alimenti, quando il piano di cottura
è freddo, possono essere eliminati con succo di
limone e un panno pulito. Sciacquate con cura con
un panno umido.
Se il piano di cottura prima della pulizia si era già
reffreddato, riscaldatelo fino ad 80 °C e spegnetelo
nuovamente.
Pulizia del piano tra due preparazioni
Procedere come indicato nei punti 2 e 3.
Pulizia del pannello comandi
1. Pulite l’apparecchio un panno umido e un po di
detergente.
2. Asciugare il detergente con un panno pulito.
10 11
Page 11
Istruzioni per l’installatore
Installazione
Le presenti istruzioni sono rivolte all’installatore qualificato
quale guida all’installazione, regolazione e manutenzione
secondo le leggi e le normative in vigore. Gli interventi
devono sempre essere effettuati ad apparecchiatura
disinserita elettricamente.
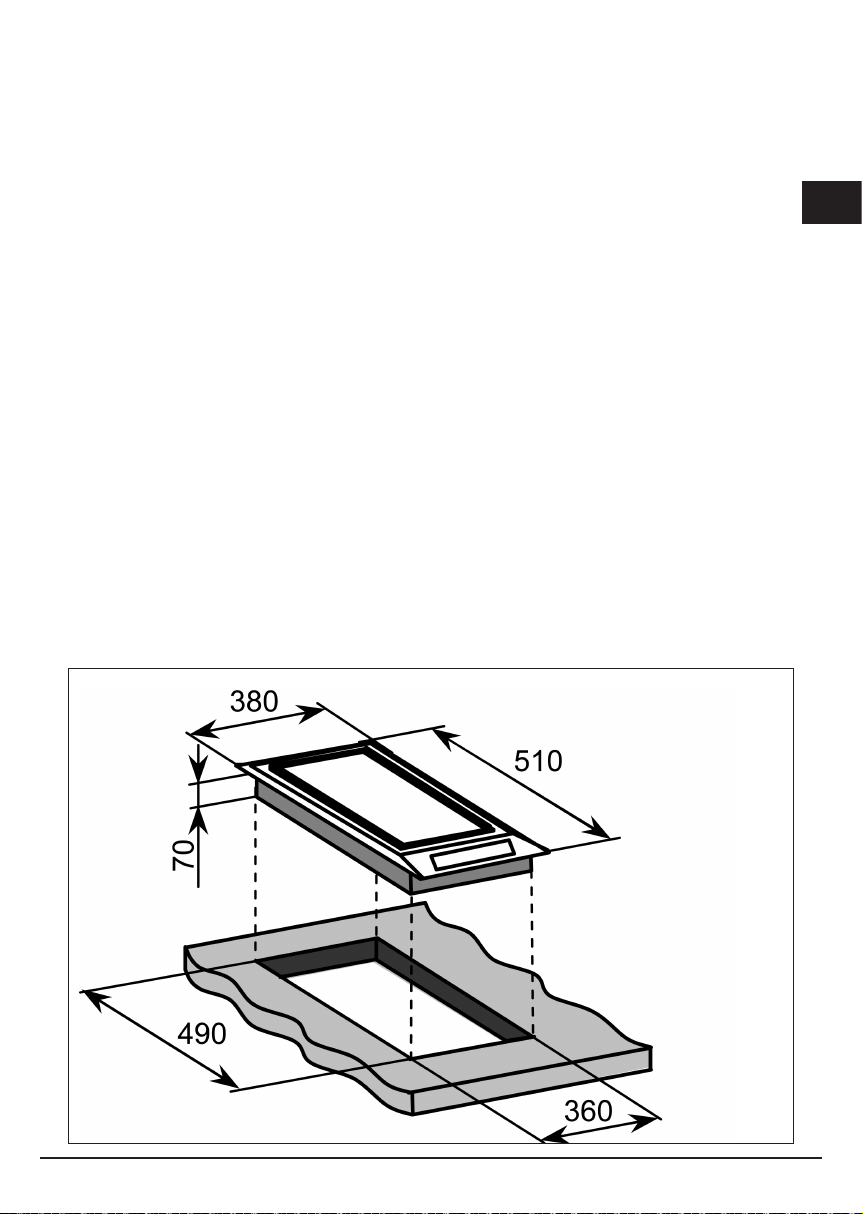
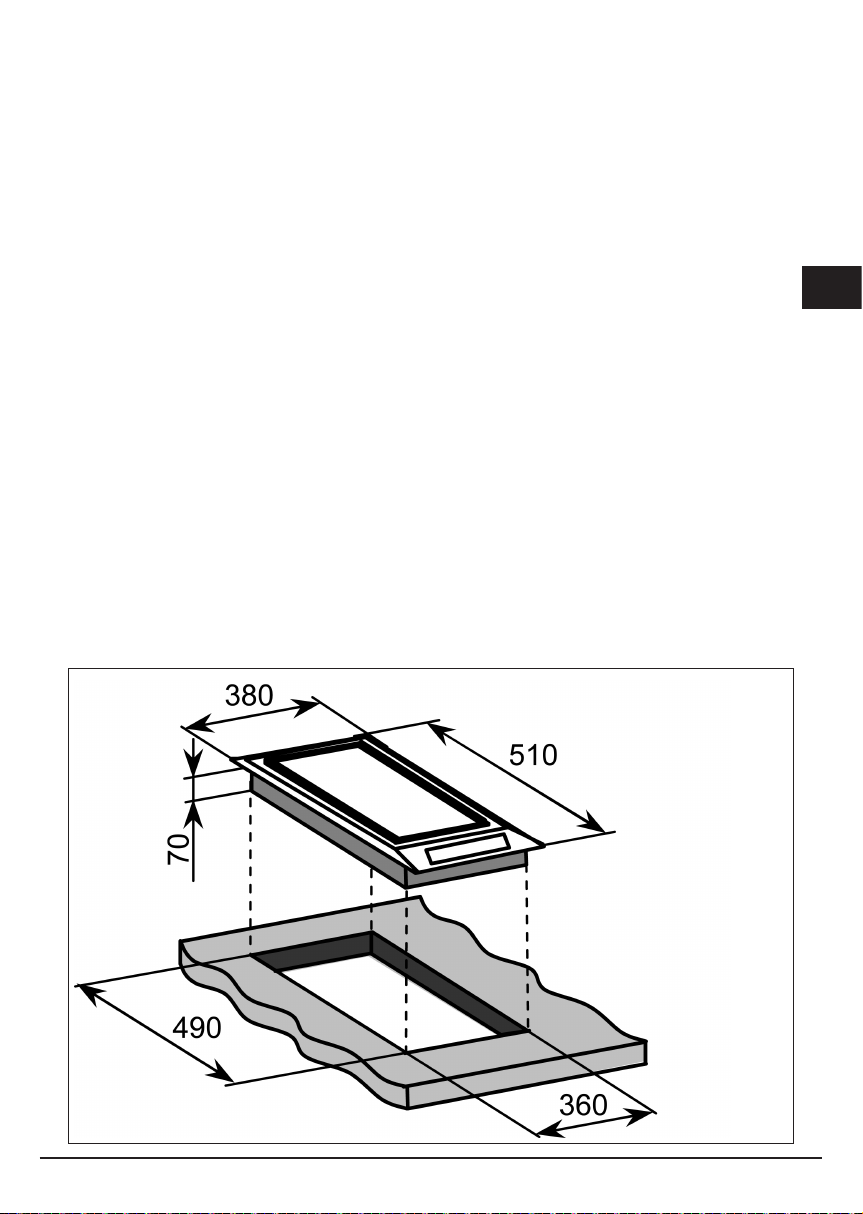
Posizionamento (Fig. 2)
L’apparecchio è previsto per essere incassato in un piano
come illustrato nell’apposita figura. Predisporre su tutto il
perimetro del piano il sigillante a corredo. E’ sconsigliabile
l’installazione sopra un forno contrariamente accertarsi che:
- il forno sia munito di un efficace sistema di
raffreddamento;
- che non avvenga in nessun caso passaggio di aria calda
dal forno verso il piano;
- prevedere passaggi d’aria come indicato in figura (Fig.
3).
Per fissare il piano al top usare le staffe con vite in dotazione
e il sigillante che va posto sotto il bordo perimetrale del
piano ed il top dove viene installato (vedi Fig. 4).
Collegamento elettrico (Fig. 5)
Prima di effettuare l’allacciamento elettrico accertarsi che:
- le caratteristiche dell’impianto siano tali da soddisfare
quanto indicato sulla targa matricola applicata sul fondo
del piano;
- che l’impianto sia munito di un efficace collegamento
di terra secondo le norme e le disposizioni di legge in
vigore. La messa a terra è obbligatoria a termini di legge.
Nel caso in cui l’apparecchiatura non sia munita di cavo e/o di
relativa spina utilizzare materiale idoneo per l’assorbimento
indicato in targa matricola e per la temperatura di lavoro. Il
cavo in nessun punto dovrà raggiungere una temperatura
superiore di 50°C a quella ambiente.
Per il collegamento diretto alla rete è necessrio interporre un
interruttore omnipolare dimensionato per il carico di targa
che assicuri la sconnesione della rete con una distanza
di apertura dei contatti che consenta la disconnesione
completa nelle condizioni della categoria di sovratensione
III, conformemente alle regole di istallazione (il cavo di terra
giallo/verde non deve essere interrotto).
La presa o interruttore omnipolare devono essere
facilmente raggiungibili con l’apparecchiatura installata.
N.B.:
- Il costruttore declina ogni responsabilità nel caso che
quanto sopra e le usuali norme antinfortunistiche non
vengano rispettate.
Se il cavo di alimentazione è danneggiato, esso deve
essere sostituito dal costruttore o dal suo servizio assistenza
tecnica o comunque da una persona con qualifica similare,
in modo da prevenire ogni rischio.
I
Fig. 2
Page 12

I
GUARNIZIONE SIGILLANTE
100
MIN.
380 100
FRONTE
MIN.
600
MIN.
1,5
30
ARIA 100 Cm2 MIN.
( 2 X 50 )
20 MIN.
ARIA 100 Cm2 MIN.
( 2 X 50 )
50 MIN.
Fig. 3
GUARNIZIONE SIGILLANTE
1,5
40
Fig. 4
~230V
H05 RR–F 3x1.5
H05 VV–F 3x1.5
LN
Fig. 5
SIGILLANTE
TOP
Fig. 4
Page 13
Dear Customer,
we would like to thank you and congratulate
you on your choice.
This new product has been carefully designed
and built using top quality materials, and
meticulously tested to ensure that it meets all
your culinary requirements.
Please read and observe these simple
instructions, which will enable you to achieve
excellent results from the very first time you
use it. This state-of-the-art appliance comes
to you with our very best wishes.
THE MANUFACTURER
I
GB
FR
DE
ES
Italiano
English
Français
Deutsch
Español
GB
Index
Safety warnings
Description of the appliance
User instructions
Installation instructions
THIS PRODUCT IS DESIGNED FOR
DOMESTIC USE.
THE MANUFACTURER DECLINES ALL
RESPONSIBILITY FOR DAMAGES TO THINGS
OR PEOPLE DERIVING FROM INCORRECT
INSTALLATION OR IMPROPER, ERRONEOUS
OR UNSUITABLE USE.
THE APPLIANCE MUST NOT BE USED
BY PEOPLE (INCLUDING CHILDREN)
WITH PHYSICAL, SENSORIAL OR
MENTAL IMPAIRMENTS, OR BY PEOPLE
WITHOUT THE NECESSARY EXPERIENCE
13
PT
Português
OR KNOWLEDGE, UNLESS THEY ARE
SUPERVISED OR INSTRUCTED IN THE
USE OF THE APPLIANCE BY A PERSON
RESPONSIBLE FOR THEIR SAFETY.
CHILDREN MUST BE SUPERVISED TO
ENSURE THAT THEY DO NOT PLAY WITH THE
APPLIANCE.
Page 14

Safety warnings
Please follow these instructions because any damage
caused by not following them will not be covered by the
warranty.
Intended Use
• Do not leave the appliance unattended during
GB
operation.
• This appliance must only be used for baking and
roasting dishes for domestic use.
• The appliance should not be used as a work surface
or support.
• Conversions or modifications to the appliance are not
permitted.
• Do not place or store inflammable liquids, materials
that burn easily or objects that could easily melt (such
as film, plastic or aluminium) on or near the appliance.
Child safety
• Keep small children away from the appliance.
• Older children may only approach the appliance
under supervision.
• We recommend using the child safety lock to avoid it
accidentally being turned on by children or pets.
General safety rules
• The appliance must only be installed and connected
by qualified and authorized technicians.
• Built-in appliances should only be used after
installation in adequate counter tops and cabinets
that conform to standards.
• If the appliance malfunctions, it must be turned off and
disconnected from the electricity to avoid possible
electric shock.
Safety when cleaning
• To clean the appliance, turn it off and let it cool.
• For safety reasons, it is forbidden to clean the
appliance with a steam cleaner or high pressure.
To avoid damaging the appliance
• Objects that can melt and overflowing liquids can
burn and stick to the surface and must be removed
immediately.
Special instructions for the Teppan Yaki
• During operation, the expansion of the grill make
noise. This is not a problem with the cooking surface
and does not affect its operation in any way.
• If the surface is used frequently, the cooking surface
can develop a slight convexity in centre between
the zones. This is not a problem with the cooking
surface and does not affect its operation in any way.
Therefore:
- we recommend that you not place pots on the
separation point between zones, which may be
unstable;
- cooking in this area can produce irregular results,
for example in the case of the pancakes.
Safety in use
• Hot grease and oils can ignite very quickly. Warning!
Danger of fire!
• WARNING! Danger of burns! Oil or grease add to an
already hot stovetop can ignite very quickly and spit.
• Careless use of the appliance can lead to the risk of
burns.
• Remove stickers and film from the glass ceramic
surface and remove the cooking surface.
• Cables of electrical appliances must not touch its hot
surface or hot pots and pans.
• Switch off the cooking zone after each use.
• If you have a pacemaker, keep your chest at least 30
cm away from the cooking surface when it is on.
• The 5-mm space between the work surface and the
cabinet below is required for ventilation and must not
be covered.
• Do not use pans made of cast iron or with a ruined
bottom that is not smooth and has protrusions. They
could scratch the surface when moved.
14 15
Page 15

Description of the appliance
The main features of the appliance
• The cooking surface is 11 mm thick. It consists of
two layers of stainless steel with a layer of aluminium
between them. The cooking surface holds heat well,
which reduces the rapid drop in temperature of the
cooking surface such as during the preparation of
meat taken from the refrigerator.
• Each Teppan Yaki surface is unique, handmade
and polished by a specialist. Any differences in
the polishing design are normal and do not limit its
operation in any way. The more it is used, the more
valuable it becomes.
• The cooking surface is divided into two large are that
are regulated separately.
• The Teppan Yaki is placed in the centre of a stainless
steel surface and is separated from the surface so
that the perimeter of the stainless steel surface does
not get too hot.
• The perimeter channel around the Teppan Yaki
collects small pieces of food and liquids that can
easily be removed after cooking.
• The legible power level setting (see Fig. 1, pos. 8)
allows keeping the desired temperature constant.
In this way, overheating dishes is avoided, which is
good for low-fat cooking, which preserves the nutrient
content of foods.
• Dishes are prepared or heated directly on the cooking
surface, with or without fat. However, you can also
cook with pots and pans.
• The cooking surface must always be preheated.
GB
Before first use
First cleaning
• Remove the protective film.
• Clean the control panel with a damp cloth.
• Clean the cooled cooking surface with a damp cloth,
wiping in the direction of the pattern.
Warning! We recommend not using sharp tools
or abrasives for cleaning. They could damage the
surface.
Page 16
User instructions
Installation
All installation operations (electrical connection) must be
carried out by people qualified in compliance with the
laws in force.
For specific instructions, see the installation section.
GB
On/off of the Touch Control (Fig. 1)
The electronic Touch Control is activated by means
I
of the ON/OFF button and switches from the OFF
mode to the Standby mode.
To do so it is necessary to press the ON/OFF button for
1 second. A short Beep will be heard.
When in standby, “0” is displayed on the display of the
cooking zone.
This display may go into background due to a residual
heat or error signal.
If a cooking zone is activated during the standby time (10
sec.), the control switches over to the On mode.
If no introduction is made within the 10 sec., the control
automatically switches to OFF with a short beep.
The electronics can be switched to the OFF mode at
any time during the ON mode or the Standby mode
by pressing the ON/ OFF button. The Off function
has priority when operating, meaning that the control
switches off even by activating several buttons at the
same time.
Switching on a cooking zone
When in the Standby or On mode, a cooking zone can
be switched on by means of the Plus/Minus button, as
long as the cooking zone is not in the timer programming
mode at that moment (see Timer chapter).
If starting with the “+” button, the cooking level changes
from “0” to “4”. If starting with the “-“ button, the cooking
level changes from “0” to “9”.
Switching off a cooking zone
a) Pressing the “+” and “-” buttons of the desired cooking
zone at the same time.
b) Selecting cooking level “0” of the desired cooking
zone with the “-” button.
If the last cooking zone is switched off, the control
switches to the OFF mode after 10 sec. if nothing else
is switched on.
All cooking zones are switched off immediately by
pressing the ON/OFF button.
Cooking and power levels
The cooking and power levels of the cooking zones are
shown on a display (Fig. 1, pos. 8).
In accordance with standards, the power levels are
displayed with numbers from “1” to “9”.
Residual heat indicator
It tells you if the plate is dangerously hot if in contact
with the entire area above the cooking zone. The
temperature is determined by means of a mathematical
model and possible residual heat is indicated by “H” on
the corresponding 7 segment display.
Heating and cooling are calculated based on:
- The selected power level (from “0” to “9”);
- The relay activation time after the cooking zone has
been switched off.
The corresponding display shows “H” until the zone
temperature drops below the critical level (< 60 °C)
according to the mathematical model.
Timer function
The Timer function can be used as a
cooking zone timer or independent
alarm but never for both functions. The
two 7 segment displays of the respective cooking zones
are used to view the remaining time in minutes up until
the timer alarm is activated.
Timer selection
- To program a timer, the touch control must be in the
Standby or On mode.
- The timer button is pressed in order to select a timer
function for the cooking zone.
- The programming of a timer using the Plus/Minus
keys is signalled by led 8 for induction model 2 and
led 6 for the wok induction model. The flashing timer
LED signals that the 7 segment display value refers
to the timer and can be modified. When a timer
continues to function in the OFF mode, the timer LED
remains on.
This indicates that the value on the display is related
to the timer, but cannot be directly modified at that
particular moment; to do so, the control must be
reactivated.
- The activation of the timer button depends on the
conditions of the previously set function: a) The
cooking zone corresponding to the timer is on (cooking
level > 0): The timer is programmed in reference to
the cooking zone; the cooking zone automatically
switches off when reset; an independent timer cannot
be selected. The cooking level setting is accessed
when the timer button is pressed again.
b) The cooking zone corresponding to the timer is
off (cooking level = 0): The timer is independently
programmed and continues to function even in OFF.
The cooking zone cannot be activated until the timer
is functioning.
16 17
Page 17
Setting of the Timer value
- Following the selection of the time, the related LED
flashes as described above. The countdown time
of the desired timer can be set by means of the +/buttons.
- Starting with the plus button, the first value displayed
is “01” and progressively increases from 1 to a
maximum value of “99” (upper limit).
- Starting with the minus button, the value displayed on
the indication is “30” and diminishes to “01” (first lower
limit). When this value is reached, an acoustic signal
is emitted. By pressing the minus button again, the
display “00” will not be modified (second lower limit).
- Setting can be performed by permanently pressing
the plus or minus buttons or by intermittently pressing
them (selection: press button, release, press button,
release, etc).
- If the button is permanently pressed, the regulation
speed automatically accelerates, meaning that the
time between one step and the next is reduced, until
the button is released.
- If the Plus or Minus buttons are not pressed within
10 sec. (parameter), after having selected the timer
of the current cooking zone (the display remains on
“00”), the indication and allocation of the +/- buttons
automatically switch to the cooking zone.
- When a timer is used as an alarm, the indication
and allocation of the buttons does not switch to the
cooking zone, being that this cannot be activated.
- The timer normally starts in countdown, if programmed
with two values that are not 0. For example: the timer
starts when the Plus button is released after the timer
value has been set at “01”.
- The timer settings have priority over the delimitation
of the operating time if high cooking levels have been
set.
- If only one alarm has been programmed, the control
remains at first in the standby mode (no other cooking
zone is on). If no other new values are introduced, the
TC behaves as described above and switches to the
OFF mode.
Timer laps/ timer alarm and confirmation
- The last 10 sec. before the timer lapses are displayed
(countdown up to alarm).
- Once the set time of the timer has lapsed, the timer
alarm is activated and the assigned cooking zone is
switched off.
- The display and the selected timer LED flash
alternating the cooking level from “00” to “H”, if there
is residual heat.
- The warning alarm lasts for at least 2 minutes if the
user does not switch it off before.
- The alarm signal switches off after the 2 minutes is up
or if any button is pushed.
The buzzer and the timer control light are switched
off.
Timer off /Modification of the timer setting
- The timer settings can be modified in the Standby
or On mode at any time after the selection has been
made by pressing the Plus or Minus buttons.
- The timer can be switched off, setting it to value “00”,
by pressing the Minus button or by pressing the Plus
and Minus buttons together.
Key Lock (child safety)
Locking/ unlocking of the Key Lock
The keypad is blocked when the Key Lock button is
pressed in the Standby or On mode; the Key-Lock
LED “9” lights permanently.
The control continues to operate in the previously set
mode but can no longer be controlled by other buttons,
except by the Key-Lock button or the ON/OFF button.
Switching off with the ON/OFF button is also possible
when locked. The Key-lock button LED switches off
when the Touch control and Key-Lock function are
switched off. The LED lights again if reactivated (within
10 sec.) until it is deactivated by pressing the Key-Lock
button once again. The activation/ deactivation of the
Key-Lock function is not possible in the OFF mode.
Unlocking/ deactivation of the Key Lock
The keypad is unlocked and the Key-Lock LED is
switched off when the Key-Lock button is pressed again
in the Standby or On mode. All sensor buttons can once
again be activated.
Key-Lock (child safety)
Activation and deactivation
The activation of the key-lock in the pause or active
mode causes the deactivation of the power to both
burners.
The symbol “11” appears on the display. It can only
be totally turned off with the ON/OFF bu on or the
release by activating the key-lock symbol and then the
“+” o “-” symbol a er the beep.
To block the regulation of a burner in safety,
activate the TIMER symbol and the “-” symbol
related to the burner at the same time. The key-lock “9”
LED will light. The control will continue to operate in the
previously set mode and cannot be controlled by other
bu ons, except for switching off with the key-lock bu on.
The release is performed by activating again the TIMER
symbol and the “-” symbol together.
GB
Page 18
GB
3b
8
3a
8
9
1
2
1
1
1 COOKING AREA 1,400 W
2 COOKING AREA 1,400 W
2
2
5
1. Turning On/Off
2. Child Safety (Key Lock)
3. Cooking zone indications
4. Increase power
5. Decrease power
6. Timer (a)
7. Timer (b)
8. LED Timer
9. Key Lock LED
6
47 452 1
Fig. 1
18 19
Page 19
SETTING COOKING LEVELS
COOKING LEVELS TEMPERATURES (°C)
1 50
2 75
3 100
4 125
5 150
6 170
7 190
8 205
9 220
MAXIMUM TEMPERATURE and SMOKE POINT
GREASE
BUTTER 130/4 150
LARD 170/6 200
BEEF FAT 180/6 210
OLIVE OIL 180/6 200
SUNFLOWER OIL 200/7 220
PEANUT OIL 200/7 235
COCONUT OIL 200/7 240
TYPES OF FOOD TEMPERATURES (°C) POWER LEVEL
FISH and SEAFOOD 170-180 6
VEAL 160-180 6
BEEF 200-210 8
PORK 180-210 7
LAMB 180-200 7
POULTRY 160-180 6
SAUSAGE 200 7-8
FRIED EGG 140 4-5
OMELETTE 140-160 5
FRUIT 140-160 5
VEGETABLES 140-160 5
COOKING RICE
PREVIOUSLY COOKED
COOKING PASTA
PREVIOUSLY COOKED
MAXIMUM TEMPERATURE
RECOMMENDED POWER LEVEL (°C)
ADVICE IN THE KITCHEN
Note: Always preheat the cooking surface!
Note: Always preheat the cooking
surface!
Use of fats and oils
When using fats and oils, is very important to select the
right temperature. When the right temperature is set, the
important components of the oils and fats remain. If the
temperature is too high, the fat begins to smoke (the
“smoke point”).
SMOKE POINT (°C)
140-160 5
140-160 5
GB
Page 20

Cleaning and maintenance
Warning: There is a danger of burns when cleaning
a cooking surface that is still hot!
Warning: Never clean the cooking surface with
GB
abrasive powders or aggressive detergents.
Clean the cooking surface with ice cubes
1. Switch off the appliance and wait for it to cool down
to about 80 °C.
2. Place single ice cubes on the cooking surface one
after another; simultaneously detach the dirt with the
spatula and push into the groove until the largest
residues have been removed. Remove the residues
from the groove (with a paper towel, for example).
You can also use cold water as an alternative to ice
cubes.
3. Allow the cooking surface to cool to about 80 °C.
Clean energetically with a clean cloth and a little cold
water.
4. Cold cleaning:
- Let a grease solvent work for about 5 minutes.
- Remove the residual dirt with a spatula.
- Rinse with water (damp cloth).
5. When the cooking surface is cool, any spots left by
egg whites or the acids in foods can be removed with
lemon juice and a clean cloth. Rinse thoroughly with
a damp cloth.
If the cooking surface was already cool before
cleaning, warm it to 80 °C and then switch it off
again.
Cleaning the surface between two dishes
Proceed as directed in steps 2 and 3.
Cleaning the control panel
1. Clean the appliance with a damp cloth and a little
detergent.
2. Wipe off the detergent with a clean cloth.
20 21
Page 21
Installation instructions
Installation
these instructions are aimed at qualified fitters as a
guide to installation, adjustment and maintenance in
compliance with the laws and standards in force. The
operations must always be carried out with the appliance
disconnected from the electricity supply.
Positioning (Fig. 2)
The appliance is made to be fitted into a counter top, as
show in the figure. Apply the sealant supplied around the
whole perimeter of the hob. Installation over an oven is
not recommended, but if this is necessary, check that:
- the oven has an efficient cooling system;
- there is no passage of hot air from the oven to the
hob;
- allow air passages as shown in the figure (Fig. 3).
To fasten the surface to the top, use the brackets with
screws provided and the sealant, which is placed under
the perimeter edge of the surface and the top where it is
installed (see Fig. 4).
Electrical connection (Fig. 5)
Before connecting to the electricity supply, ensure that:
- the characteristics of the system are such as to satisfy
that indicated on the registration plate applied to the
bottom of the hob;
- the system has an effective earth connection
compliant with the standards and laws in force.
Connection to earth is compulsory by law.
If the appliance has no cable and/or plug, use material
suitable for the absorption indicated on the registration
plate and for the working temperature. The cable must
not reach a temperature higher than 50°C above room
temperature in any point.
For direct connection to the network it is necessary
to fit an omnipolar switch of a suitable size to ensure
disconnection of he network with a contact opening
distance that allows complete disconnection in the
conditions of the overtension category III, compliant with
the installation regulations (the yellow/green earth wire
must not be interrupted).
The omnipolar socket or switch must be easy to reach
when the appliance is installed.
N.B.:
- The manufacturer declines all responsibility if the
usual accident prevention standards and the above
instructions are not observed.
If the power cable is damaged, it must be replaced by
the manufacturer or by the manufacturer’s technical
servicing network, or by a similarly qualified operator, to
prevent every possible risk.
GB
Fig. 2
Page 22

GUARNIZIONE SIGILLANTE
SEAL
GB
100
MIN.
380 100
FRONT
FRONTE
MIN.
600
MIN.
1,5
30
ARIA 100 Cm2 MIN.
AIR
( 2 X 50 )
20 MIN.
AIR
ARIA 100 Cm2 MIN.
( 2 X 50 )
50 MIN.
Fig. 3
GUARNIZIONE SIGILLANTE
SEAL
1,5
40
Fig. 4
~230V
H05 RR–F 3x1.5
H05 VV–F 3x1.5
LN
Fig. 5
SEALANT
TOP
Fig. 4
Page 23

Cher Client,
Vous venez d’acheter l’un de nos produits et
nous vous en remercions vivement.
Ce nouveau produit, minutieusement conçu
et construit avec des matériaux de tout
premier choix, a été soigneusement testé afin
de satisfaire chacune de vos exigences en
matière de cuisson.
Nous vous prions de lire et de respecter ces
instructions simples qui vous permettront
d’obtenir d’excellents résultats dès la première
utilisation. Nous vous souhaitons une bonne
cuisine avec cet appareil moderne.
LE CONSTRUCTEUR
I
GB
FR
DE
ES
Italiano
English
Français
Deutsch
Español
FR
Sommaire
Avertissements de sécurité
Description de l’appareil.
Instructions pour l’utilisateur
Instructions pour l’installateur
CE PRODUIT A ETE CONÇU POUR UN
USAGE DOMESTIQUE.
LE CONSTRUCTEUR DECLINE
TOUTE RESPONSABILITÉ EN CAS DE
DOMMAGES SUBIS PAR LES CHOSES
OU LES PERSONNES DERIVANT D’UNE
INSTALLATION INCORRECTE OU
D’UN USAGE IMPROPRE, ERRONE OU
INCOHERENT.
NE PAS CONFIER L’UTILISATION DE
L’APPAREIL A DES PERSONNES (Y
COMPRIS DES ENFANTS) AYANT DES
CAPACITES PHYSIQUES, SENSORIELLES
23
PT
Português
OU MENTALES REDUITES, OU A DES
PERSONNES QUI NE POSSEDENT PAS
L’EXPERIENCE ET LES CONNAISSANCES
NECESSAIRES ; LA SUPERVISION D’UN
ADULTE RESPONSABLE POUR LEUR
SECURITE ET EN MESURE DE COMPRENDRE
LE MODE D’EMPLOI DE L’APPAREIL EST
OBLIGATOIRE.
IL FAUT SURVEILLER LES ENFANTS POUR
S’ASSURER QU’ILS NE JOUENT PAS AVEC
L’APPAREIL.
Page 24

Avertissements de sécurité
Il est important de suivre cette indication, car, dans le
cas contraire, les dommages occasionnés ne seront
couverts par aucune garantie.
Usage prévu
• Ne vous absentez pas durant le fonctionnement de
l’appareil électroménager.
• Cet appareil, à usage domestique, doit être
exclusivement utilisé pour la cuisson et le rôtissage
de mets.
• L’appareil ne doit pas être utilisé comme un plan de
FR
travail ou d’appui.
• Il est interdit de transformer ou de modifier l’appareil.
• Ne posez pas et ne conservez pas de liquides
inflammables, de matériaux pouvant s’incendier
facilement ou d’objets risquant de fondre (par ex. les
pellicules, le plastique, l’aluminium) sur l’appareil ou
à proximité de ce dernier.
Sécurité des enfants
• Eloignez les enfants de l’appareil.
• Les enfants plus grands peuvent s’approcher de
l’appareil sous la surveillance d’un adulte.
• Pour éviter l’allumage accidentel de la part d’un enfant
ou d’un animal domestique, nous recommandons
d’activer la sécurité enfants.
Consignes générales de sécurité
• Le montage et le branchement de l’appareil doivent
être exclusivement effectués par des techniciens
qualifiés et autorisés.
• Les appareils à encastrer ne peuvent être mis en
service qu’après leur installation à l’intérieur de plans
de travail ou de meubles encastrables appropriés et
conformes aux normes en vigueur.
• En cas de défauts de l’appareil, celui-ci doit être mis
hors tension et débranché du secteur, pour éviter le
risque d’électrocution.
• Les porteurs de pacemakers devraient maintenir une
distance minimale de 30 cm entre le buste et le plan
de cuisson.
• Ne couvrez pas l’espace de 5 mm entre le plan de
travail et la partie avant du meuble situé en dessous,
nécessaire pour l’aération.
• N’utilisez pas de casseroles en fonte ou au fond
endommagé, rugueux ou présentant de saillies. On
risque de rayer le plan en les déplaçant.
Sécurité durant le nettoyage
• Eteignez l’appareil et laissez-le refroidir avant de le
nettoyer.
• Pour des raisons de sécurité, il est interdit de nettoyer
l’appareil avec une nettoyeuse à vapeur ou à jet
haute pression.
Pour éviter d’endommager l’appareil
• Les objets susceptibles de fondre et les liquides
débordants peuvent brûler, restant collés au plan de
cuisson ; il faut les éliminer immédiatement.
Indications particulières pour le Teppan Yaki
• Durant le fonctionnement, la dilatation du gril peut
être bruyante. Il ne s’agit pas d’un problème du plan
de cuisson et son fonctionnement n’est absolument
pas compromis.
• Si l’on utilise souvent le plan de cuisson, un léger
bombage peut se former au centre, au niveau de la
subdivision des zones. Il ne s’agit pas d’un problème
du plan de cuisson et son fonctionnement n’est
absolument pas compromis. Par conséquent :
- il est recommandé de ne pas poser les casseroles
sur le point de séparation des zones car elles
pourraient être instables.
- dans cette zone. la cuisson peut être irrégulière,
par exemple, si l’on cuisine des crêpes.
Sécurité durant l’utilisation
• La graisse surchauffée et les huiles s’incendient très
rapidement. Attention ! Risque d’incendie !
• ATTENTION ! Danger de brûlures ! L’huile et la
graisse versées dans un second temps sur le plan
de cuisson chaud s’enflamment très rapidement et
peuvent produire des éclaboussures.
• Un usage inattentif de l’appareil peut impliquer un
risque de brûlures.
• Enlevez les autocollants et les pellicules du plan en
vitrocéramique et démontez le plan de cuisson.
• Les câbles des appareils électriques ne doivent pas
être posés sur la surface brûlante de l’appareil ni sur
de la vaisselle chaude.
• Désactivez la zone de cuisson après toute utilisation.
24 25
Page 25

Description de l’appareil
Les principales caractéristiques de votre
appareil
• Le plan de cuisson a une épaisseur de 11 mm. Il
est constitué par deux couches d’acier inox et d’une
couche d’aluminium interposée. Le plan de cuisson
est caractérisé par une bonne accumulation thermique
qui réduit la baisse rapide de la température du plan
de cuisson, par exemple durant la préparation de
viande prélevée dans le réfrigérateur.
• Toute surface Teppan Yaki est une pièce unique,
réalisée à la main et polie par des spécialistes. Les
éventuelles différentes de polissage sont normales et
ne compromettent en aucun cas le fonctionnement.
Plus on l’utilise, plus il prend de valeur.
• Le plan de cuisson est subdivisé en deux grandes
zones réglables séparément.
• Le Teppan Yaki est positionné au centre d’une
surface en acier et à une certaine distance du plan
de cuisson de manière à ce que la température
périmétrale de la surface en inox n’atteigne pas une
température excessive.
• Le canal périmétral autour du Teppan Yaki sert à
récupérer les petits morceaux d’aliment et les petites
quantités de liquides qui s’éliminent facilement en fin
de cuisson.
• Le niveau de puissance sur lequel on peut lire la
sélection (voir Fig. 1 rep. 8) permet de maintenir une
température constante. On évite ainsi une surchauffe
des aliments, en faveur d’une cuisson pauvre en
graisses, tout en en préservant le contenu nutritif.
• Les mets sont directement préparés ou chauffés sur
le plan de cuisson avec ou sans graisse. On peut
toutefois cuisiner avec des casseroles.
• Toujours préchauffer le plan de cuisson.
FR
Avant la première utilisation
Premier nettoyage
• Enlevez la pellicule de protection.
• Nettoyez le bandeau de commande avec un chiffon
humide.
• Nettoyez le plan de cuisson froid avec un chiffon
humide, en frottant dans le sens du meulage.
Attention ! On recommande de ne pas utiliser
d’instruments pointus ou agressifs pour le
nettoyage. On risquerait d’endommager la surface.
Page 26

Instructions pour l’utilisateur
Installation
Toutes les opérations relatives à l’installation
(branchement électrique) doivent être effectuées par
du personnel qualifié conformément aux normes en
vigueur.
Pour les instructions spécifiques, voir la partie réservée
à l’ installateur.
Mise en marche / arrêt du Touch Control (Fig. 1)
FR
actionnant la touche ON/OFF et en commutant
le mode OFF en mode d’attente. Pour ce faire, il faut
enclencher la touche ON/OFF en touche unique durant
1 sec. On percevra un bip rapide.
En mode d’attente, l’afficheur du foyer de cuisson affiche
statiquement “0”. Eventuellement, cet affichage peut
passer au second plan à cause d’un signalement de
chaleur résiduelle ou d’erreur.
Si un foyer est enclenché durant le délai de mode
d’attente (10 sec), le contrôle passe en mode actif.
Si aucune commande n’advient dans les 10 sec, le
contrôle commute automatiquement en mode OFF avec
un bip rapide.
En mode actif ou en mode d’attente, l’électronique peut
être commutée à tout moment en mode OFF à l’aide de
la touche ON/OFF. La fonction d’arrêt a toujours priorité
durant le fonctionnement, ce qui signifie que le contrôle
s’éteint même en enclenchant plusieurs touches
simultanément.
L’électronique Touch Control s’enclenche en
I
Mise en marche d’un foyer
En mode d’attente ou en mode actif, un foyer peut être
enclenché à l’aide des touches Plus/Moins, à moins
que la zone de cuisson ne se trouve en programmation
minuterie à ce moment-là (voir chapitre minuterie).
Si on commence avec la touche “+”, le niveau de cuisson
passe de “0 » à « 4 ». Si on commende avec la touche
“-”, le niveau de cuisson passe de “0 » à « 9 ».
Arrêt d’un foyer
a) En actionnant simultanément la touche “+” et “-” du
foyer voulu.
b) en sélectionnant le niveau de cuisson « 0 » du foyer
voulu à l’aide de la touche “-”.
Si on éteint le dernier foyer, le contrôle commute
en mode OFF après 10 sec s’il n’y a pas d’autres
commandes. Tous les foyers s’éteignent immédiatement
en enclenchant la touche ON/OFF.
Niveaux de cuisson et de puissance
Les niveaux de cuisson et de puissance des zones de
cuisson s’affichent sur un écran (rep. 8 Fig. 1).
Selon les standard, les niveaux de puissance sont
affichés avec des numéros de “1” à “9”.
Indicateur de chaleur résiduelle
Sert à indiquer à l’utilisateur que la plaque a atteint
une température dangereuse en cas de contact
avec tout l’espace au-dessus de la zone de cuisson.
La température est définie en suivant un modèle
mathématique et une chaleur résiduelle éventuelle est
indiquée par un « H » sur l’afficheur corr espondant à
sept segments. Le chauffage et le refroidissement sont
calculés en fonction :
- du niveau de puissance sélectionné (de “0” à “9”).
- la période d’enclenchement des relais après avoir
éteint le foyer.
L’afficheur correspondant affiche « H » jusqu’à ce que la
température du foyer descende sous le niveau critique
(< 60 °C) selon le modèle mathématique.
Fonction minuterie
La fonction minuterie peut être utilisée
comme minuterie pour le foyer ou
comme réveil indépendant mais
jamais pour les deux fonctions. Les deux afficheurs à 7
segments du foyer respectif servent à afficher le temps
restant en minutes, jusqu’à ce que retentisse l’alarme
de la minuterie.
Sélection de la minuterie
- Pour programmer la minuterie, la touche doit se
trouver en mode d’attente ou en mode actif.
- L’enclenchement de la touche minuterie sert à
sélectionner la fonction minuterie pour un foyer de
cuisson.
- La signalisation de la programmation d’un
temporisateur moyennant les touches Plus/Moins
se produit à travers le voyant 8 pour le modèle 2 à
induction et le voyant 6 pour le modèle wok à induction.
Le voyant clignotant de la minuterie signale que la
valeur des afficheurs à 7 segments se rapporte à la
minuterie et peut être modifiée. Quand un compteur
continue à fonctionner en mode OFF, le voyant de la
minuterie s’éclaire statiquement. Ceci indique que la
valeur sur les afficheurs se réfère à la minuterie, mais
ne peut être directement modifiée momentanément.
Pour ce faire, il faudrait réenclencher le contrôle.
- L’enclenchement de la touche de minuterie dépend
des conditions de fonctionnement programmées
auparavant.
a) Le foyer correspondant à la minuterie est
enclenché (niveau de cuisson > 0): La minuterie est
26 27
Page 27

programmée en référence au foyer.
Quand elle est remise à zéro, elle éteint
automatiquement le foyer. Il n’est pas possible de
sélectionner un compteur indépendant. Une nouvelle
remise à zéro de la touche minuterie commute
directement à la programmation du niveau de
cuisson.
b) Le foyer correspondant à la minuterie est déclenché
(niveau de cuisson = 0):
La minuterie est programmée indépendamment
et continue à fonctionner même en OFF. Tant
que le compteur fonctionne, il n’est pas possible
d’enclencher le foyer.
Programmation de la valeur de la minuterie
- Suite à la sélection de la minuterie, le voyant attribué
clignote comme décrit ci-dessus. Avec les touches
Plus/Moins, on peut programmer le temps de compte
à rebours de la minuterie.
- En commençant pas la touche Plus, la première valeur
affichée saute sur “01” et augmente progressivement
de 1 jusqu’à un maximum de « 99 » (limite supérieure).
- En commençant par la touche Moins, la valeur
affichée sur l’indication saute à “30” et diminue de un
cran jusqu’à « 01 » (première limite inférieure). Une
fois atteinte, un signal acoustique retentit.
Pour atteindre le “00”, il faut d’abord lâcher la touche
Moins, puis la réenclencher. En appuyant encore
sur la touche Moins, l’affichage « 00 » ne sera pas
modifié (seconde limite inférieure).
- La programmation peut se faire par enclenchements
permanents des touches Plus ou Moins ou
par enclenchements individuels (sélectionner :
enclenchement de la touche, déclenchement,
enclenchement, déclenchement, etc.)
- En cas d’enclenchement permanent de la touche, on
constate une accélération automatique de la vitesse
de réglage, cela signifie que le temps entre une étape
et la suivante se réduit, jusqu’à ce que la touche reste
enfoncée.
- Si dans les 10 sec (paramètre), la touche Plus ou
la touche Moins n’est pas à nouveau sollicitée,
après avoir sélectionné la minuterie du foyer utilisé
(l’affichage reste sur « 00 »), l’indication et l’attribution
des touches Plus/Moins commutent automatiquement
sur le foyer.
- Quand une minuterie est utilisée comme compteur
(réveil), l’indication et l’attribution des touches ne
commutent pas sur le foyer, puisqu’il ne peut être
enclenché.
- Une minuterie part en général avec le compte à
rebours si ce dernier a été programmé avec des
chiffres non égaux à 0. Exemple : la minuterie
démarre avec le déclenchement de la touche Plus
après avoir programmé la valeur minuterie de “01”.
- Les programmations de minuterie sont prioritaires par
rapport à la délimitation du temps de fonctionnement
en présence de programmations de niveaux élevés
de cuisson.
- On programme uniquement un réveil, le contrôle
reste de prime abord en mode d’attente (aucun autre
foyer n’est enclenché). Si on n’introduit pas d’autres
valeurs, la minuterie se comporte comme décrit plus
haut et commute en mode OFF.
Déclenchement de la minuterie/alarme de la
minuterie et confirmation
- Les 10 dernières sec. avant l’échéance de la
minuterie sont affichées sur l’afficheur (compte à
rebours jusqu’à l’alarme).
- Une fois que le temps programmé est écoulé, l’alarme
de la minuterie se déclenche, le foyer en question est
immédiatement éteint.
- L’afficheur et le voyant de la minuterie clignotent en
alternant le niveau de cuisson « 00 » avec « H » en
cas de chaleur résiduelle.
- Le signalement de l’alarme dure au maximum 2
minutes, si l’utilisateur n’intervient pas avant.
- A la fin des 2 minutes ou en actionnant une touche
quelconque, le signalement de l’alarme est suspendu.
Le signal acoustique (sonnerie) et le voyant de
contrôle de la minuterie sont déclenchés.
Arrêt de la minuterie /Modification des
programmations de la minuterie
- Il est possible de modifier la valeur programmée sur la
minuterie, en mode d’attente ou actif, à tout moment
après la sélection, en enclenchant la touche Plus ou
Moins.
- Il est possible d’éteindre la minuterie en l’amenant
sur la valeur “00” en appuyant sur la touche Moins
ou en appuyant une seule fois simultanément sur les
touches Plus ou Moins.
Verrouillage des touches Key Lock
Blocage/enclenchement du Verrouillage des
touches
L’enclenchement de la touche Key-Lock
(verrouillage des touches) en mode d’attente ou
actif implique le blocage du clavier, le voyant Key-
Lock « 9 » s’allume en mode statique.
Le contrôle continue à travailler en mode programmé
mais ne peut plus être commandé par d’autres touches,
sauf par la touche Key-Lock ou par la touche ON/OFF.
L’arrêt avec la touche ON/OFF est possible même en
état de blocage. Le voyant correspondant à la touche
Key-Lock s’éteint quand on déclenche la touche et la
fonction Key-Lock. Le voyant est à nouveau actif en
cas de remise en marche (dans les 10 sec) jusqu’à ce
qu’il soit déclenché à nouveau à l’aide de la touche Key-
FR
Page 28

Lock. L’enclenchement/ déclenchement de la fonction
Key-Lock en mode OFF n’est pas possible.
Déblocage/déclenchement du Verrouillage des
touches Key-Lock
Le nouvel enclenchement de la touche Key-Lock en
mode d’attente ou actif implique le déblocage du clavier
et l’arrêt du voyant Key-Lock attribué. Toutes les touches
capteurs peuvent être à nouveau enclenchées.
Key-Lock (sécurité enfants)
FR
Activation et désactivation
L’actionnement de la touche key-lock en mode
d’aente ou actif entraîne la désactivation de la
puissance au niveau des deux flammes. L’a_cheur
indique « 11 ». La touche ON/OFF ne permet que
l’extinction totale ou le déverrouillage en actionnant le
symbole key-lock et, après le Bip, le symbole « + » ou
« - ».
Pour verrouiller en toute sécurité le réglage d’une
flamme, actionner simultanément le symbole
TIMER et le symbole « - » relatifs à la flamme en
question.
La LED key-lock « 9 » s’allume. Le contrôle continue
à travailler dans le mode sélectionné et ne peut pas
être commandé par d’autres touches ; seule l’extinction
est possible au moyen de la touche key-lock. Pour le
déverrouillage, actionner de nouveau simultanément le
symbole TIMER et le symbole « - ».
1
2
1
1
1 ZONE DE CUISSON 1400 W
2 ZONE DE CUISSON 1400 W
2
2
3b
8
5
47 452 1
1. Allumage/extinction – On/Off
2. Sécurité enfants (Key Lock)
3. Indications zone de cuisson
4. Augmentation de la puissance
5. Diminution de la puissance
6. Minuterie (a)
7. Minuterie (b)
8. Del minuterie
9. Del Key Lock
8
6
3a
9
Fig. 1
28 29
Page 29

SELECTION DES NIVEAUX DE CUISSON
NIVEAUX DE CUISSON TEMPERATURES (°C)
1 50
2 75
3 100
4 125
5 150
6 170
7 190
8 205
9 220
TEMPERATURE MAXIMALE ET POINT DE FUMEE
GRAISSE
BEURRE 130/4 150
LARD 170/6 200
GRAISSES DE BŒUF 180/6 210
HUILE D'OLIVE 180/6 200
HUILE DE TOURNESOL 200/7 220
HUILE D'ARACHIDES 200/7 235
HUILE DE NOIX DE COCO 200/7 240
TYPES D'ALIMENT TEMPERATURES (°C) NIVEAU DE PUISSANCE
POISSON ET FRUITS DE MER 170-180 6
VEAU 160-180 6
BŒUF 200-210 8
PORC 180-210 7
AGNEAU 180-200 7
VOLAILLE 160-180 6
SAUCISSES 200 7-8
ŒUFS AU PLAT 140 4-5
OMELETTE 140-160 5
FRUITS 140-160 5
LEGUMES 140-160 5
CUIRE LE RIZ CUIT PRECE-
DEMMENT
CUIRE LES PATES CUITES
PRECEDEMMENT
RECOMMANDEE (°C) NIVEAU DE PUISSANCE
TEMPERATURE MAXIMALE
CONSEILS DE CUISINE
Remarque : Toujours préchauffer le plan de cuisson !
Suggestions pour la cuisson avec le
Teppan Yaki
Utilisation des graisses et des huiles
Lorsqu’on utilise des graisses et des huiles, il est très
important de sélectionner la température correcte. En
sélectionnant la température correcte, on préserve les
éléments importants des huiles et des graisses. En
revanche, si la température est trop élevée, la graisse
se met à fumer (c’est le soi-disant “point de fumée”).
POINT DE FUMEE (° C)
140-160 5
140-160 5
FR
Page 30

Nettoyage et entretien
Attention : Danger de brûlures durant le nettoyage
du plan de cuisson encore chaud !
Attention : Ne nettoyez jamais le plan de cuisson
avec de la poudre abrasive ou des détergents
agressifs.
Attention : Ne nettoyez jamais le plan de
cuisson avec de la poudre abrasive ou des
FR
détergents agressifs.
1. Eteignez l’appareil et attendez que la température
atteigne environ 80° C.
2. Déposez l’un après l’autre les glaçons sur le plan
de cuisson ; simultanément, décollez la saleté avec
la palette et poussez-la dans la rainure après avoir
éliminé les résidus les plus importants. Eliminez les
résidus de la rainure (par exemple avec du papier de
cuisine). On peut utiliser de l’eau froide à la place des
glaçons.
3. Attendez que la température du plan de cuisson
atteigne environ 80 °C. Nettoyez-le vigoureusement
avec un chiffon propre et un peu d’eau froide.
4. Nettoyage à froid :
- Laissez agir les solvants contre la graisse pendant
environ 5 minutes.
- Enlevez les résidus de saleté avec une palette.
- Rincez à l’eau (chiffon humide)
5. Les taches éventuellement produites par du blanc
d’œuf ou des acides présents dans les aliments,
peuvent être éliminées avec du jus de citron et un
chiffon propre lorsque le plan de cuisson est froid.
Rincez soigneusement avec un chiffon humide.
Si le plan de cuisson était froid avant le nettoyage, le
chauffer jusqu’à 80° C puis l’éteindre.
Nettoyage du plan entre deux cuissons
Procédez tel qu’on l’indique aux points 2 et 3.
Nettoyage du panneau des commandes
1. Nettoyez l’appareil avec un chiffon humide et un peu
de détergent.
2. Séchez le détergent avec un chiffon propre.
30 31
Page 31

Instructions pour l’installateur
Installation
Les présentes instructions s’adressent aux installateurs
qualifiés et représentent un guide à l’installation, au réglage
et à l’entretien, conformément aux lois et aux normes
en vigueur. Toujours débrancher l’appareil avant toute
intervention.
Positionnement (Fig. 2)
L’appareil est prévu pour être encastré dans un plan de
travail tel que l’indique la figure. Disposer le produit de
scellage fourni sur tout le périmètre de la table. Il est
déconseillé de placer la table au-dessus d’un four ; le cas
échéant, s’assurer que :
- le four est équipé d’un système de refroidissement
efficace ;
- l’air chaud ne peut pas s’échapper du four vers la table ;
- des passages d’air sont prévus d’après la figure (Fig. 3).
Pour fixer le plan de cuisson au plan de travail, utilisez les
pattes de fixation et les vis fournies ainsi que l’adhésif à
appliquer sous le bord périmétral du plan de cuisson et le
plan de travail dans lequel il est installé (voir Fig. 4).
Branchement électrique (Fig. 5)
Avant de réaliser le branchement électrique, s’assurer que :
- les caractéristiques de l’installation correspondent à
celles indiquées sur la plaque appliquée sur le fond de la
table ;
- l’installation est munie d’un branchement de terre efficace
conforme aux normes et aux dispositions législatives en
vigueur. La mise à la terre est rendue obligatoire par la loi.
Au cas où l’appareil serait muni d’un câble et/ou de la fiche
correspondante, utiliser du matériel adapté à l’absorption
indiquée sur la plaque et à la température de fonctionnement.
Le câble ne devra atteindre en aucun point une température
supérieure à 50° C à la température ambiante.
Pour réaliser le branchement directement sur le réseau,
interposer un interrupteur omnipolaire dimensionné pour la
charge nominale en mesure d’assurer la déconnexion du
réseau avec une distance d’ouverture des contacts pour une
déconnexion complète dans les conditions de la catégorie
de surtension III, conformément aux consignes d’installation
(le câble de terre jaune/vert ne doit pas être interrompu).
La prise ou l’interrupteur omnipolaire doivent être facilement
accessibles après l’installation de l’appareil.
N.B. :
- Le constructeur décline toute responsabilité en cas
d’erreurs d’installation et de non respect des normes
habituelles de prévention des accidents.
Si le câble d’alimentation est endommagé, demander au
constructeur, à son service d’assistance technique ou
simplement à une personne possédant une qualification
similaire de le remplacer de manière à prévenir tout risque.
FR
Fig. 2
Page 32

JOINT DE SCELLAGE
GUARNIZIONE SIGILLANTE
FR
100
MIN.
380 100
AVANT
FRONTE
MIN.
600
MIN.
1,5
30
JOINT DE SCELLAGE
ARIA 100 Cm2 MIN.
AIR
( 2 X 50 )
20 MIN.
AIR
ARIA 100 Cm2 MIN.
( 2 X 50 )
50 MIN.
Fig. 3
GUARNIZIONE SIGILLANTE
1,5
40
Fig. 4
~230V
H05 RR–F 3x1.5
H05 VV–F 3x1.5
LN
Fig. 5
ADHESIF
PLAN DE TRAVAIL
Fig. 4
Page 33

DE
Sehr verehrte Kundin, sehr verehrter
Kunde,
wir danken Ihnen und beglückwünschen Sie
zu Ihrer Wahl.
Dieses neue, sorgfältig konzipierte und aus
erstklassigen Materialien hergestellte Produkt
wurde akkurat kontrolliert, um allen Ihren
Bedürfnissen für das perfekte Kochen zu
entsprechen.
Wir bitten Sie deshalb, diese leichten
Anleitungen zu lesen und einzuhalten, mit
denen Sie schon ab dem ersten Gebrauch
herausragende Resultate erzielen werden. Mit
diesem modernen Gerät möchten wir Ihnen
unsere besten Glückwünsche aussprechen.
DER HERSTELLER
I
GB
FR
DE
ES
Italiano
English
Français
Deutsch
Español
Inhalt
Sicherheitshinweise
Beschreibung des Geräts
Anleitungen für den Anwender
Anleitungen für den Installateur
DIESES PRODUKT WURDE FÜR DEN
HEIMISCHEN GEBRAUCH KONZIPIERT.
DER HERSTELLER HAFTET NICHT FPR
SACH- ODER PERSONENSCHÄDEN, DIE
AUS EINER FALSCHEN INSTALLATION ODER
DER UNSACHGEMÄSSEN, FALSCHEN ODER
ABSURDEN VERWENDUNG DES GERÄTS
ENTSTEHEN.
DAS GERÄT DARF NICHT VON PERSONEN
(EINSCHLIESSLICH KINDERN) MIT
EINGESCHRÄNKTEN KÖRPERLICHEN
ODER GEISTIGEN FÄHIGKEITEN ODER
EINSCHRÄNKUNG DER SINNE VERWENDET
WERDEN ODER VON PERSONEN, DIE NICHT
ÜBER DIE NOTWENDIGE ERFAHRUNG
ODER KENNTNIS VERFÜGEN, WENN DIESE
NICHT VON EINER FÜR IHRE SICHERHEIT
VERANTWORTLICHEN PERSON
BEAUFSICHTIGT WERDEN.
KINDER MÜSSEN KONTROLLIERT WERDEN
UM SICHERZUSTELLEN, DASS SIE NICHT
MIT DEM GERÄT SPIELEN.
33
PT
Português
Page 34

Sicherheitshinweise
Bitte beachten Sie diese Hinweise, denn deren
Missachtung hat den Verfall jeglicher Haftung für die
eintretenden Schäden zur Folge.
Bestimmungsgemäßer Gebrauch
• Entfernen Sie sich nicht wenn das Haushaltsgerät in
Funktion ist.
• Dieses Gerät darf nur zum Garen und Rösten von
Lebensmitteln für den häuslichen Gebrauch benutzt
werden.
• Das Gerät darf nicht als Arbeitsfläche oder Ablage
benutzt werden.
• Änderungen oder Manipulationen des Geräts sind
nicht zulässig.
• Keine brennbaren Flüssigkeiten, leicht entzündliche
Materialien oder Gegenstände, die schmelzen können
DE
(beispielsweise Frischhaltefolie, Plastik, Aluminium)
auf dem Gerät oder in dessen unmittelbarer Nähe
abstellen.
Kindersicherheit
• Kleine Kinder von dem Gerät fern halten.
• Größere Kinder nur unter Aufsicht an das Gerät
lassen.
• Um ein ungewolltes Einschalten durch Kinder
oder Haustiere zu vermeiden, empfehlen wir die
Aktivierung der Kindersicherung.
Allgemeine Sicherheitsvorschriften
• Die Montage und der Anschluss des Geräts dürfen
nur von qualifizierten und befugten Technikern
ausgeführt werden.
• Einbaugeräte dürfen erst in Betrieb genommen
werden nach deren Installation in angemessene und
normgerechte Arbeitsflächen und Einbaumöbel.
von 5 mm zwischen der Arbeitsfläche und dem
darunterliegenden Vorderteil des Möbels darf nicht
verdeckt werden.
• Keine Töpfe aus Grauguss oder mit beschädigtem,
unebenen Boden verwenden, da dieser die Fläche
bei Verschieben beschädigen kann.
Sicherheit bei der Reinigung
• Zum Reinigen des Geräts muss dieses ausgeschaltet
werden. Dann warten, bis es abgekühlt ist.
• Aus Sicherheitsgründen ist das Reinigen des Geräts
mit Dampf- oder Hochdruckreinigern verboten.
Um Beschädigungen des Geräts zu vermeiden
• Gegenstände, die schmelzen können und
überlaufende Flüssigkeiten können verbrennen
und auf der Kochfläche festbacken. Sie müssen
umgehend entfernt werden.
Besondere Hinweise für den Teppan Yaki
• Während des Betriebs kann die Ausdehnung des
Grills zu Geräuschentwicklung führen. Es handelt
sich nicht um ein Problem der Kochfläche und deren
Funktion, die in keiner Weise beeinträchtigt wird.
• Bei häufiger Verwendung der Kochfläche kann es
in der Mitte, auf der Höhe der Aufteilung der Zonen,
zu einer leichten Wölbung der Fläche kommen. Es
handelt sich nicht um ein Problem der Kochfläche und
deren Funktion, die in keiner Weise beeinträchtigt
wird. Deshalb:
- wird empfohlen, keine Töpfe an der Trennungsstelle
der Zonen abzustellen, da diese wackeln könnten;
- kann das Garen in dieser Zone ungleichmäßig
sein, beispielsweise bei Pfannkuchen.
Sicherheit bei Gebrauch
• Überhitztes Fett und Öle entzünden sich schnell.
Achtung” Brandgefahr!
• ACHTUNG! Verbrennungsgefahr! Später auf die
bereits heiße Kochfläche zugefügtes Öl oder Fett
erhitzt sich sehr schnell und kann spritzen.
• Bei einem fahrlässigen Gebrauch des Geräts kann es
zu Verbrennungen kommen.
• Aufkleber und Plastikfolien von der Oberfläche
entfernen und die Kochfläche ausbauen.
• Die Kabel von Elektrogeräten dürfen nicht auf der
warmen Oberfläche des Geräts oder auf warmen
Tellern abgelegt werden.
• Das Kochfeld nach dem Gebrauch ausschalten.
• Träger von Herzschrittmachern sollten einen
Mindestsicherheitsabstand von der Kochfläche von
mindestens 30 cm einhalten.
• Der erforderliche Freiraum für die Belüftung
34 35
Page 35

DE
Gerätebeschreibung
Die wichtigsten Merkmale Ihres Geräts
• Die Kochfläche ist 11 mm dick. Sie besteht aus
zwei Edelstahlschichten, in deren Mitte sich eine
Aluminiumschicht befindet. Die Kochfläche zeichnet
sich durch eine gute Wärmeansammlung aus, welche
das schnelle Absinken der Temperatur beispielsweise
während der Zubereitung von aus dem Kühlschrank
stammenden Fleisches verringert.
• Jede Oberfläche Teppan Yaki ist ein Einzelstück und
wird von Fachleuten von Hand gearbeitet und poliert.
Abweichungen im Poliermuster sind normal und
stellen keine Beeinträchtigung des Betriebs dar. Je
mehr er benutzt wird, desto wertvoller wird er.
• Die Kochfläche ist in zwei große und getrennt
regulierbare Zonen aufgeteilt.
• Der Teppan Yaki befindet sich in der Mitte einer
Edelstahlfläche und ist von der Fläche selbst
abgehoben, damit die Randtemperatur auf der
Edelstahlfläche nicht zu hohe Temperaturen erreicht.
• Die um den Teppan Yaki verlaufende Rinne dient
zum Sammeln kleiner Essensreste und Flüssigkeiten,
die nach Ende des Garvorgangs bequem entfernt
werden können.
• Die Leistungsstufe, auf der man die Einstellung
ablesen kann (siehe Abb. 1, Pos. 8), gestattet es, die
gewünschte Temperatur konstant zu halten. Auf diese
Weise wird ein Überhitzen der Gerichte vermieden,
zum Vorteil eines fettarmen Garen, welches den
Nährwert der Nahrungsmittel bewahrt.
• Die Gerichte werden direkt auf der Kochfläche
zubereitet oder erhitzt – mit oder ohne Fett. Man kann
auch mit Töpfen kochen.
• Die Kochfläche muss immer vorgeheizt werden.
Vor der ersten Verwendung
Erste Reinigung
• Die Schutzfolie entfernen.
• Bedientafel mit einem feuchten Tuch reinigen.
• Die abgekühlte Kochfläche mit einem feuchten Tuch
in Richtung der Schleifrichtung reinigen.
Achtung! Keine spitzen oder aggressiven
Reinigungsgeräte verwenden, welche die Oberfläche
beschädigen können.
Page 36

Anleitungen für den Anwender
Installation
Alle Installationsarbeiten (Stromanschluss) müssen
von qualifiziertem Personal nach den einschlägige
Vorschriften ausgeführt werden.
Für spezifische Anleitungen siehe die dem Installateur
vorbehaltenen Anleitungen.
Einschalten/Ausschalten des Bedienfelds
Touch Control (Abb. 1)
Die Touch Control Elektronik wird aktiviert, indem
I
die ON/ OFF-Taste betätigt wird und schaltet sich
von der Betriebsart OFF in den Wartemodus um. Dazu
müssen Sie die ON/OFF-Taste als einzige Taste über
einen Zeitraum von 1 s drücken. Es ertönt ein kurzer
Piepton.
DE
Im Wartemodus erscheint auf dem Display des
Kochfeldes die fixe Anzeige “0”.
Diese Anzeige kann in den Hintergrund treten, wenn
noch Restwärme oder ein Fehler angezeigt wird.
Wenn innerhalb der Dauer des Wartemodus (10 s) eines
Kochfeldes aktiviert wird, schaltet die Bedienung auf die
aktive Betriebsart um.
Wenn innerhalb von 10 s keine Eingabe erfolgt, dann
schaltet die Bedienung mit einem kurzen Piepton
automatisch auf die Betriebsart OFF um.
In der aktiven Betriebsart oder im Wartemodus kann
die Elektronik mit der ON/OFF-Taste jederzeit in die
Betriebsart OFF umgeschaltet werden.
Die Ausschaltfunktion hat immer Vorrang während
des Betriebs. Dies bedeutet, dass die Bedienung sich
ausschaltet, auch wenn mehrere Tasten gleichzeitig
gedrückt werden.
Einschalten eines Kochfeldes
Im Wartemodus oder in der aktiven Betriebsart kann ein
Kochfeld mit den Tasten Plus/Minus aktiviert werden,
es sei denn, dieses Kochfeld befindet sich zu dem
Zeitpunkt in der Timer-Programmierung (siehe Kapitel
Timer).
Wenn man mit der Taste “+” beginnt, geht die Kochstufe
von “0” auf “4”. Wenn man mit der Taste “-” beginnt, geht
die Kochstufe von “0” auf “9”.
Ausschalten einer Kochfeldes
a) Durch gleichzeitiges Betätigen der Taste “+” und “-”
des betroffenen Kochfeldes.
b) Durch Auswahl der Kochstufe “0” des betroffenen
Kochfeldes mit der Taste “-”.
Wenn das letzte Kochfeld ausgeschaltet wird, dann
schaltet die Bedienung nach 10s in die Betriebsart OFF
um, wenn keine anderen Betätigungen vorliegen.
Alle Kochfelder werden umgehend mit der ON/OFF
-Taste ausgeschaltet.
Koch- und Leistungsstufen
Die Gar- und Leistungsstufen der Kochzonen werden
über Display angezeigt (Pos. 8 Abb. 1).
Lt. Standard werden die Leistungsstufen mit den
Nummern von “1” bis “9” angezeigt.
Restwärmeanzeiger
Dieses dient dazu, dem Anwender zu zeigen, dass eine
Platte eine bei Berührung mit dem Bereich über der
Kochzone gefährliche Temperatur hat. Die Temperatur
wird nach einem mathematischen Modell bestimmt und
ggf. vorhandene Restwärme wird mit einem “H” auf dem
entsprechenden 7-stelligen Display angezeigt.
Erhitzen und Abkühlen werden berechnet bezogen
auf: - die gewählte Leistungsstufe (von “0” bis “9”); - die
Aktivierungszeit der Relais nach dem Ausschalten der
Kochfläche.
Das entsprechende Display zeigt “H” bis die Temperatur
der Fläche nicht gemäß dem mathematischen Modell
unter den kritischen Wert (< 60 °C) absinkt.
Timer-Funktion
Die Timer-Funktion kann als Timer
des Kochfeldes oder als unabhängiger
Wecker, nie aber für beide Funktionen
benutzt werden. Die beiden 7-stelligen Displays
des jeweiligen Kochfeldes dienen zur Anzeige der
verbleibenden Zeit in Minuten, bis der Alarm des Timers
ausgelöst wird.
Timer-Auswahl
- Um einen Timer programmieren zu können, muss
sich die Touch-Bedienung in dem Wartemodus oder
der aktiven Betriebsart befinden.
- Das Betätigen der Timer-Taste dient zur Auswahl der
Timer - Funktion für ein Kochfeld.
- Die Anzeige der Programmierung einer Zeitschaltuhr
mit den tasten Plus/Minus erfolgt mit der LED 8 bei
dem Induktionsmodell und der LED 6 für das WokInduktionsmodell. Die blinkende LED des Timers
weist darauf hin, dass sich der Wert des 7-stellign
Display auf den Timer bezieht und bearbeitet werden
kann. Wenn ein Zähler in der Betriebsart OFF
weiter funktioniert, dann leuchtet die Timer-LED
kontinuierlich. Dies weist darauf hin, dass der auf den
Displays angezeigte Wert zum Timer gehört aber
derzeit nicht direkt bearbeitet werden kann. Dazu
müssen Sie die Bedienung neu starten.
- Die Betätigung der Timer-Taste hängt von den zuvor
eingestellten Funktionsbedingungen ab:
a) Das dem Timer entsprechende Kochfeld ist
aktiviert (Kochstufe > 0): Der Timer wird bezogen
auf das Kochfeld programmiert. Wenn er auf Null
gesetzt wird, wird automatisch auch das Kochfeld
36 37
Page 37

DE
ausgeschaltet. es ist nicht möglich, einen Zähler
unabhängig auszuwählen. Ein weiteres Drücken der
Timer-Taste schaltet direkt auf die Einstellung der
Kochstufe uj.
b) Das dem Timer entsprechende Kochfeld ist nicht
aktiviert (Kochstufe = 0): Der Timer wird unabhängig
programmiert und funktioniert auch im Zustand OFF.
So lange der Zähler läuft, kann das Kochfeld nicht
aktiviert werden.
Einstellung des Timer-Werts
- Nach erfolgter Timer-Auswahl blinkt die
entsprechende LED wie oben genannt. Mit den
Tasten Plus/Minus können Sie jetzt die Zeit für den
Countdown des gewünschten Timers einstellen.
- Wenn Sie mit der Taste Plus beginnen, dann springt
der erste angezeigte Wert auf “01” und steigt
allmählich bis auf einen Höchstwert von “99” (obere
Grenze).
- Wenn Sie mit der Taste Minus beginnt, dann springt
der angezeigte Wert auf “30” und verringert sich in
1-er Schritte bis auf “01” (erste untere Grenze). Bei
Erreichen dieses Grenzwerts ertönt ein Signalton.
Um “00” zu erreichen, müssen Sie erst die Taste
Minus loslassen und dann erneut aktivieren. Bei
erneutem Drücken der Taste Minus ändert sich die
Anzeige “00” nicht (zweiter unterer Grenzwert).
- Die Einstellung kann auch durch dauerhaftes
Drücken der Tasten Plus oder Minus oder durch
einzelnes Drücken erfolgen (Auswählen: Taste
drücken, loslassen, drücken loslassen usw.).
- Bei ständigem Drücken der Taste beschleunigt sich
die Einstellgeschwindigkeit automatisch, d.h. die Zeit
zwischen zwei Schritten verringert sich, so lange die
Taste gedrückt wird.
- Wenn innerhalb von 10 s (Parameter) die Taste Plus
oder Minus nicht wieder gedrückt wird nachdem der
Timer des aktuellen Kochfeldes gewählt wurde (das
Display bleibt auf “00”), schaltet die Anzeige der
Tasten Plus/Minus automatisch auf das Kochfeld um.
- Wenn ein Timer als Zähler (Wecker) benutzt wird,
dann schalten die Anzeige und die Zuordnung der
Tasten nicht auf das Kochfeld um, da dieses nicht
aktiviert werden kann.
- Ein Timer startet normalerweise mit dem Countdown,
wenn dieser mit anderen Werten als 0 programmiert
wurde.
Beispiel: Der Timer startet mit Loslassen der Taste
Plus, nachdem ein Timer-Wert von “01” eingestellt
wurde.
- Die Timereinstellungen sind vorrangig bezogen auf
die Begrenzung der Betriebszeit in Anwesenheit von
Einstellungen hoher Kochstufen.
- Wenn nur ein Wecker programmiert wird, dann bleibt
die Bedienung zunächst im Wartemodus (es ist
kein anderes Kochfeld aktiv). Wenn keine anderen
neuen Werte eingegeben werden, verhält sich das
Bedienfeld wie oben beschrieben und schaltet auf
die Betriebsart OFF um.
Ablauf des Timers / Alarmton des Timers und
Bestätigung
- Die letzten 10 s vor dem Ablauf des Timers werden
auf dem Display angezeigt (Countdown bis zum
Alarmton).
- Nach Ablauf der für einen Timer eingestellten Zeit
ertönt der Timer-Alarm und das zugewiesene
Kochfeld wird sofort ausgeschaltet.
- Das Display blinkt zusammen mit der LED des
gewählten Timers und wechselt die Anzeige der
Kochstufe “00” mit “H”, im Falle von Restwärme.
- Der Alarm ertönt maximal 2 Minuten, wenn Sie diesen
nicht früher abschalten.
- Nach Ablauf der 2 Minuten oder bei Drücken einer
beliebigen Taste wird der Alarm unterbrochen.
Der Signalton (Pieper) sowie das Kontrolllicht des
Timers werden ausgeschaltet.
Timer ausschalten / Veränderung der TimerEinstellungen
- Sie können den eingestellten Timewert im
Wartemodus oder der aktiven Betriebsart jederzeit
nach der erfolgten Auswahl durch Aktivieren der
Taste Plus oder Minus verändern.
- Sie können den Timer ausschalten, indem Sie diesen
durch Drücken der Taste Minus oder ein einziges
gleichzeitiges Drücken der Tasten Plus oder Minus
auf “00” setzen.
Key Lock (Kindersicherung)
Key Lock sperren / aktivieren
Bei Drücken der Taste Key-Lock im Wartemodus
oder in der aktiven Betriebsart wird das Bedienfeld
gesperrt. Die LED Key-Lock “9” leuchtet fix.
Die Bedienung arbeitet weiter in der zuvor
eingestellten Betriebsart, kann aber nicht von anderen
Tasten gesteuert werden als von der Taste Key-Lock
oder der ON/OFF-Taste.
Das Ausschalten mit der ON/OFF-Taste kann auch im
gesperrten Zustand erfolgen. Die LED der Taste Key
Lock geht aus, wenn das Bedienfeld und die Funktion
Key Lock deaktiviert werden.
Die LED leuchtet wieder bei erneutem Einschalten
(innerhalb von 10 s) bis sie durch erneutes Drücken
der Taste Key-Lock ausgeschaltet wird. Das Ein-/
Ausschalten der Funktion Key-Lock ist in der Betriebsart
OFF nicht möglich.
Page 38

Key Lock freigeben/ausschalten
Das erneute Drücken der Taste Key-Lock im Wartemodus
oder in der aktiven Betriebsart hat die Freigabe des
Bedienfelds und das Ausschalten der zugeordneten
LED Key-Lock zur Folge. Alle Sensortasten können
erneut betätigt werden.
Key-Lock (Kindersicherung)
Aktivierung und Deaktivierung
Das Betatigen der Taste key-lock in der Betriebsart
Warten oder der aktiven Betriebsart hat das
Ausschalten der Leistungszufuhr beider Herdstellen
zur Folge.
Auf dem Display erscheint das Zeichen “11”.
Jetzt konnen Sie den Herd nur komple mit der Taste ON/
OFF ausschalten oder durch Betatigen des Symbols
DE
key-lock und anschließendes Drucken des Zeichens “+”
oder “-” nach dem Piepton freigeben.
Um die Einstellung einer Herdstelle sicher zu
sperren, betatigen Sie gleichzeitig das Zeichen
TIMER und das Zeichen “-” der betroffenen Herdstelle.
Die LED key-lock “9” leuchtet.
Die Steuerung lau weiter in der zuvor eingestellten
Betriebsart und kann nicht von anderen Tasten
angesteuert werden, außer das Ausschalten mit der
Taste key-lock.
Die Freigabe erfolgt durch erneutes und gleichzeitiges
Betatigen des Zeichens TIMER und des Zeichens “-”
1
2
1
1
1 KOCHZONE 1.400 W
2 KOCHZONE 1.400 W
2
2
3b
8
5
47 452 1
1. Ein-/Ausschalten – Ein/Aus
2. Kindersicherung (Key Lock)
3. Anzeigen Kochzone
4. Leistungssteigerung
5. Leistungsverringerung
6. Zeitschaltuhr (a)
7. Zeitschaltuhr (b)
8. LED Timer
9. Led Key Lock
8
6
3a
9
Abb. 1
38 39
Page 39

DE
EINSTELLUNG DER KOCHSTUFEN
KOCHSTUFEN TEMPERATUREN (°C)
1 50
2 75
3 100
4 125
5 150
6 170
7 190
8 205
9 220
Anm.: Die Kochfläche immer vorheizen!
Tipps zum Kochen mit Teppan Yaki
Verwendung von Fetten und Ölen
Bei der Verwendung von Fetten und Ölen ist die Wahl
der richtigen Temperatur sehr wichtig. Bei Einstellen
der richtigen Temperatur werden die wichtigsten
Bestandteile der Öle und Fette bewahrt. Ist die
Temperatur zu hoch, beginnt das Fett zu rauchen (der
sogenannte “Rauchpunkt”).
HÖCHSTTEMPERATUR und RAUCHPUNKT
FETT
BUTTER 130/4 150
SPECK 170/6 200
RINDERFETT 180/6 210
OLIVENÖL 180/6 200
SONNEBLUMENÖL 200/7 220
ERDNUSSÖL 200/7 235
KOKOSÖL 200/7 240
GERICHT TEMPERATUREN (°C) LEISTUNGSSTUFE
FISCH UND MEERESFRÜCHTE 170-180 6
KALB 160-180 6
RIND 200-210 8
SCHWEIN 180-210 7
LAMM 180-200 7
GEFLÜGEL 160-180 6
BRATWURST 200 7-8
SPIEGELEI 140 4-5
OMELETTE 140-160 5
OBST 140-160 5
GEMÜSE 140-160 5
VORGEKOCHTEN REIS GAREN 140-160 5
VORGEKOCHTE NUDELN
GAREN
EMPFOHLENE HÖCHSTTEMPERATUR
(°C) LEISTUNGSSTUFE
TIPPS IN DER KÜCHE
140-160 5
RAUCHPUNKT (°C)
Page 40

Reinigung und Wartung
Achtung: Verbrennungsgefahr bei Reinigen der
noch warmen Kochfläche!
Achtung: Die Kochfläche nie mit Scheuermittel oder
aggressiven Reinigungsmitteln reinigen.
Reinigung der Kochfläche mit Eiswürfeln
1. Das Gerät ausschalten und warten, dass es sich auf
circa 80° C abkühlt.
FR
2. Auf der Kochfläche nacheinander die Eiswürfel geben.
Gleichzeitig den Schmutz mit der Schaufel läsen und
in die Rinne schieben, bis die größten Ablagerungen
beseitigt sid. Die Reste aus der Rinne entfernen
(beispielsweise mit Küchenkrepp). Alternativ zu den
Eiswürfeln kann man auch kaltes Wasser benutzen.
3. Warten, dass sich die Kochfläche auf circa 80 °C
abkühlt. Mit einem sauberen Tuch und etwas kaltem
Wasser kräftig abreiben.
4. Kalt reinigen:
- Einen Fettlöser ca. 5 Minuten einwirken lassen.
- Die Schmutzreste mit einer Schaufel entfernen.
- Mit Wasser abwaschen (feuchtes Tuch).
5. Die ggf. von Eiweiß oder in den Nahrungsmitteln
vorhandenen Säuren erzeugte Flecken können –
wenn die Kochfläche abgekühlt ist – mit Zitronensaft
und einem sauberen Tuch entfernt werden. Sorgfältig
mit einem feuchten Tuch nachwischen.
Falls sich die Kochfläche vor dem Reinigen
abgekühlt haben sollte, erwärmen Sie diesen auf 80
°C und schalten Sie dann wieder aus.
Reinigung der Fläche zwischen zwei
Garvorgängen
So vorgehen, wie unter Punkt 2 und 3 beschrieben.
Reinigung der Bedientafel
1. Das Gerät mit einem feuchten Tuch und etwas
Reinigungsmittel reinigen.
2. Das Reinigungsmittel mit einem sauberen Tuch
abtrocknen.
Page 41

DE
Anleitungen für den Monteur
Installation
Diese Anleitungen sind für den qualifizierten Installateur
bestimmt und sollen als Installations-, Einstellungs- und
Instandhaltungsanleitung gemäß den einschlägigen
Gesetzen und Vorschriften dienen. Die Arbeiten müssen
immer bei elektrisch abgetrenntem Gerät ausgeführt werden.
Positionierung (Abb. 2)
Das Gerät ist für den Einbau in eine Arbeitsfläche
vorgesehen, wie in der entsprechenden Abbildung zu
sehen. Auf dem gesamten Umfang der Kochmulde
das mitgelieferte Dichtmittel auftragen. Es wird von
einer Installation über dem Ofen abgeraten, ansonsten
sicherstellen, dass:
- der Ofen über ein ausreichenden Kühlsystem verfügt;
- die warme Ofenluft auf keinen Fall zur Kochmulde
geleitet wird;
- Luftpassagen vorgesehen werden, wie in der Abbildung
zu sehen (Abb. 3).
Um die Fläche am Top (Auflage) zu befestigen, sind die
Bügel mit ihren Schrauben und die Dichtmasse zu benutzen,
die unter den Außenrand der Fläche und des Top angebracht
werden muss, wo dieses installiert wird (siehe Abb. 4).
Stromanschluss (Abb. 5)
Vor dem Stromanschluss sicherstellen, dass:
- die Anlagenmerkmale dem Kennschild auf der Unterseite
der Kochmulde entsprechen;
- die Anlage angemessen nach den einschlägigen
Vorschriften und gesetzlichen Auflagen geerdet ist. Die
Erdung ist gesetzlich vorgeschrieben.
Falls das Gerät nicht mit dem Kabel und/oder dem
entsprechenden Stecker versehen sein sollte, verwenden
Sie Material, das für die auf dem Kennschild genannte
Aufnahme und die Arbeitstemperatur geeignet ist. Das Kabel
darf auf keinen Fall Temperaturen erreichen, die über 50°C
über der Umgebungstemperatur liegen.
Für den direkten Anschluss an das Stromnetz muss ein
Schaltautomat eingebaut werden, der für die Kennlast
bemessen ist und der das Abtrennen vom Stromnetz mit
einem Öffnungsabstand der Kontakte für das komplette
Abtrennen unter den Bedingungen der Überspannungsklasse
III gemäß den Installationsvorschriften gestattet (das gelbgrüne Erdkabel darf nicht unterbrochen werden.
Die Steckdose oder der Schaltautomat müssen bei
installiertem Gerät leicht zu erreichen sein.
Bitte beachten:
- Der Hersteller haftet nicht, falls die obigen Anleitungen und
die üblichen Unfallschutzmaßnahmen nicht eingehalten
werden.
Wenn das Netzkabel beschädigt ist, muss es vom Hersteller
oder dessen technischen Kundendienst oder in jedem Fall
von einer Person mit ähnlicher Qualifizierung ausgewechselt
werden, um allen Gefahren vorzubeugen.
41
Abb. 2
Page 42

DICHTUNGEN
GUARNIZIONE SIGILLANTE
DE
100
MIN.
380 100
VORDERSEITE
FRONTE
MIN.
600
MIN.
1,5
30
DICHTUNGEN
ARIA 100 Cm2 MIN.
LUFT
( 2 X 50 )
20 MIN.
LUFT
ARIA 100 Cm2 MIN.
( 2 X 50 )
50 MIN.
Abb. 3
GUARNIZIONE SIGILLANTE
1,5
40
Abb. 4
~230V
H05 RR–F 3x1.5
H05 VV–F 3x1.5
LN
Abb. 5
DICHTMASSE
TOP
Abb. 4
Page 43

Estimado cliente,
Le agradecemos sinceramente y nos
complace que haya escogido uno de nuestros
productos.
Este nuevo producto, cuidadosamente
diseñado y construido con materiales
de primera calidad, se ha verificado
cuidadosamente para poder satisfacer todas
sus exigencias de una perfecta cocción.
Por lo tanto, le rogamos que lea y respete
estas sencillas instrucciones que le permitirán
conseguir resultados excelentes ya desde
su primera utilización. Con este moderno
aparato le deseamos lo mejor.
EL FABRICANTE
I
GB
FR
DE
ES
Italiano
English
Français
Deutsch
Español
ES
Sumario
Advertencias de seguridad
Descripción del aparato
Instrucciones para el usuario
Instrucciones para el instalador
ESTE PRODUCTO SE HA CONCEBIDO
PARA UN USO DE TIPO EXCLUSIVAMENTE
DOMÉSTICO.
EL FABRICANTE DECLINA CUALQUIER
RESPONSABILIDAD EN EL CASO DE
EVENTUALES DAÑOS A COSAS O
PERSONAS QUE DERIVEN DE UNA
INSTALACIÓN INCORRECTA O DE UN USO
IMPROPIO, ERRÓNEO O ABSURDO.
ESTE APARATO NO PUEDEN UTILIZARLO
PERSONAS (INCLUIDOS NIÑOS) CON
CAPACIDADES FÍSICAS, SENSORIALES
43
PT
Português
O MENTALES REDUCIDAS, O PERSONAS
QUE NO DISPONGAN DE LA EXPERIENCIA
Y DE LOS CONOCIMIENTOS NECESARIOS
A MENOS QUE SE ENCUENTREN BAJO LA
SUPERVISIÓN O HAYAN RECIBIDO LAS
INSTRUCCIONES NECESARIAS SOBRE
EL USO DEL APARATO POR PARTE DE
UNA PERSONA RESPONSABLE DE SU
SEGURIDAD.
LOS NIÑOS TIENEN QUE ESTAR
CONTROLADOS PARA ASEGURARSE QUE
NO JUEGAN CON EL APARATO.
Page 44

Advertencias de seguridad
Es necesario tener en cuenta estas indicaciones, ya que
de lo contrario se pierden los derechos de garantía por
los daños surgidos.
Empleo conforme a la finalidad prevista
• No ausentarse durante el funcionamiento del
electrodoméstico.
• Este aparato tiene que utilizarse sólo para la cocción
y el asado de alimentos para uso doméstico.
• El aparato no se tiene que utilizar como superficie de
trabajo o soporte.
• No se admiten transformaciones o modificaciones al
aparato.
• No apoye ni conserve líquidos inflamables, materiales
fáciles de incendiar u objetos que puedan fundirse
(por ej. película, plástico, aluminio) sobre el aparato o
en los alrededores.
Seguridad de los niños
• Mantener alejados del aparato a los niños pequeños.
• Permitir que los niños un poco más grandes se
ES
acerquen al aparato sólo bajo supervisión.
• Para evitar un encendido accidental provocado por
niños y animales domésticos, recomendamos activar
la seguridad para los niños.
Normas de seguridad generales
• El desmontaje y la conexión del aparato tiene que
llevarlo a cabo exclusivamente un técnico experto y
autorizado.
• Los aparatos empotrables tienen que ponerse en
función sólo tras la instalación en superficies de
trabajo y muebles empotrables adecuados y a norma
de ley.
• En caso de averías, el aparato tiene que apagarse
y desconectarse de la corriente eléctrica, para evitar
una posible descarga eléctrica.
Seguridad durante la utilización
• La grasa sobrecalentada y los aceites se incendian
con mucha rapidez. ¡Atención! ¡Peligro de incendio!
• ¡ATENCIÓN! ¡Peligro de quemaduras! Aceite o grasa
añadidos sucesivamente en la placa de cocción ya
caliente se inflaman con mucha rapidez y pueden
provocar salpicaduras.
• La falta de atención en el uso del aparato puede
acentuar el riesgo de quemaduras.
• Eliminar adhesivos y películas de la placa de
vitrocerámica y desmontar la placa de cocción.
• Los cables de los aparatos eléctricos no se pueden
colocar sobre la superficie caliente del aparato o
sobre vajilla caliente.
• Desconectar la zona de cocción después de cada
uso.
• Se recomienda a los portadores de marcapasos que
mantengan una distancia mínima entre el cuerpo y la
placa de cocción encendida de por lo menos 30 cm.
• El espacio necesario para la ventilación de 5 mm
entre la superficie de trabajo y la parte anterior del
mueble no tiene que cubrirse.
• No utilizar ollas de hierro fundido o con el fondo
estropeado, que no sea liso y que presente
salientes. Podrían rayar la superficie durante los
desplazamientos.
Seguridad durante la limpieza
• Para limpiar el aparato es necesario apagarlo y
esperar que se enfríe.
• Por motivos de seguridad queda prohibida la limpieza
del aparato con hidrolimpiadoras de vapor o de alta
presión.
Para evitar desperfectos en el aparato
• Objetos que pueden fundirse y líquidos que
rebosan pueden quemarse, permanecer pegados
a la superficie y se tienen que eliminar de forma
inmediata.
Indicaciones especiales para el Teppan Yaki
• Durante el funcionamiento la dilatación de la parrilla
puede provocar ruidos. No se trata de un problema
de la placa de cocción y su funcionamiento no se ve
comprometido en ningún caso.
• En caso de uso frecuente de la placa, en el centro,
justo en la zona de subdivisión, se puede formar
una ligera combadura de la placa de cocción. No
se trata de un problema de la placa de cocción y su
funcionamiento no se ve comprometido en ningún
caso. Por lo tanto:
- se aconseja no colocar las ollas en el punto de
división de las zonas, puesto que podrían resultar
inestables;
- la cocción en esta zona puede producir resultados
irregulares, por ejemplo en el caso de las crêpes.
44 45
Page 45

Descripción del aparato
Las características principales de su aparato
• La placa de cocción mide 11 mm de grosor. Está
formado por dos capas de acero inoxidable y uno de
aluminio colocado entre las dos de acero. La placa de
cocción se caracteriza por una buena acumulación
térmica que reduce la rápida disminución de la
temperatura de la placa de cocción, por ejemplo
durante la preparación de carne sacada del frigorífico.
• Las superficies Teppan Yaki son una pieza única,
trabajada a mano y pulida por especialistas.
Eventuales diferencias en el diseño del pulido son
normales y no conllevan ninguna limitación para el
funcionamiento. Más se utiliza y más valor adquiere.
• La placa de cocción está dividida en dos amplias
zonas regulables por separado.
• El Teppan Yaki se coloca en el centro de una placa
de acero inoxidable y separado de la placa de forma
que la temperatura perimetral en la placa de acero
inoxidable no alcance una temperatura demasiado
elevada.
• El canal perimetral alrededor del Teppan Yaki sirve
para acumular pequeños pedazos de comida y
líquidos que sucesivamente, al final de la cocción, se
pueden eliminar fácilmente.
• El nivel de potencia en el que se lee la configuración
(véase Fig. 1 posic. 8) permite mantener constante
la temperatura deseada. De esta forma se evita el
sobrecalentamiento de los platos, se cocina con poca
grasa y se conserva el contenido nutricional de los
alimentos.
• Los platos se preparan o se calientan directamente
en la placa de cocción, con o sin grasa. De todas
formas es posible cocinar también con las ollas.
• La placa de cocción se tiene que precalentar siempre.
ES
Antes del primer uso
Primera limpieza
• Eliminar la película protectora.
• Limpiar el panel de control con un trapo húmedo.
• Limpiar la placa de cocción fría con un trapo húmedo,
en la dirección del pulido.
¡Atención! Se recomienda no utilizar herramientas
puntiagudas o agresivas para la limpieza. Podrían
deteriorar la superficie.
Page 46

Instrucciones para el usuario
Instalación
Todas las operaciones relativas a la instalación
(conexión eléctrica) tiene que efectuarlas personal
cualificado según las normas vigentes.
Para las instrucciones específicas véase la parte
reservada al instalador.
Encendido / apagado del Touch Control (Fig. 1)
La electrónica Touch Control se activa accionando
I
la tecla ON/ OFF y conmuta de la modalidad OFF a
la modalidad de espera. Con esta finalidad es necesario
accionar la tecla ON/OFF como tecla única y durante 1
s. Se oirá un bip breve.
En la modalidad de espera, en el display de la zona de
cocción se visualizará “0” de forma estática.
Eventualmente esta visualización pasará a un segundo
plano a causa de un aviso de calor residual o de error.
Si antes de que pase el tiempo de la modalidad de
espera (10 s) se activa una zona de cocción, el control
conmutará a la modalidad activa.
ES
Si antes de que pasen 10 s no se efectúa ninguna
introducción, el control conmutará de forma automática
con un breve bip a la modalidad OFF.
En la modalidad activa o en la modalidad de espera, la
electrónica se puede conmutar en cualquier momento a
la modalidad OFF accionando la tecla
ON/OFF. La función de apagado tendrá siempre la
prioridad durante el funcionamiento; es decir, que el
control se apagará incluso activando varias teclas
contemporáneamente.
Encendido de una zona de cocción
En la modalidad de espera o en la modalidad activa,
una zona de cocción se puede activar mediante las
teclas Más/Menos, siempre que la zona de cocción
no se encuentre en ese momento en la programación
temporizador (véase capítulo temporizador). Si se inicia
con la tecla “+”, el nivel de cocción pasará de “0” a “4”.
Si se inicia con la tecla “-”, el nivel de cocción pasará
de “0” a “9”.
Apagado de una zona de cocción
a) Accionando contemporáneamente la tecla “+” y “-” de
la zona de cocción deseada.
b) Seleccionando el nivel de cocción “0” de la zona de
cocción deseada con la tecla “-”.
Si se apaga la última zona de cocción, el control
conmutará a la modalidad OFF después de 10 s si no se
efectúan otras activaciones.
Todas las zonas de cocción se apagan con efecto
inmediato accionando la tecla ON/OFF.
Niveles de cocción y de potencia
Los niveles de cocción y de potencia de las zonas de
cocción se visualizan mediante un display (posic. 8 Fig. 1).
Según los estándares se visualizan los niveles de
potencia con los números de “1” a “9”.
Indicador de calor residual
Sirve para indicar al usuario que la placa se encuentra
a una temperatura peligrosa en caso de contacto con
el área que se encuentra por encima de la zona de
cocción.
La temperatura se determina siguiendo un modelo
matemático y un eventual calor residual se indica con
una “H” mediante el correspondiente display de siete
segmentos.
El calentamiento y el enfriamiento se calculan en
relación con:
- el nivel de potencia seleccionado (de “0” a “9”);
- el periodo de activación de los relés después de
haber apagado la zona de cocción.
El correspondiente display muestra “H” hasta que la
temperatura de la zona no desciende por debajo del
nivel crítico (< 60 °C) según el modelo matemático.
Función Temporizador
La función Temporizador se puede
utilizar como temporizador para la
zona de cocción o como despertador
independiente, pero nunca para ambas funciones.
Los dos display de 7 segmentos de la respectiva zona
de cocción sirven para la visualización del tiempo
sobrante en minutos, hasta que no salta la alarma del
temporizador.
Selección temporizador
- Para programar un temporizador, el touch tiene
que encontrarse en la modalidad de espera o en la
modalidad activa.
- El accionamiento de la tecla temporizador sirve para
la selección de la función temporizador para una
zona de cocción.
- La señalación de la programación de un temporizador
mediante las teclas más/menos se produce a través
del led 8 para el modelo 2 inducción y a través
del led 6 para el modelo wok inducción. El led del
temporizador intermitente señala que el valor de los
display de 7 segmentos se refiere al temporizador y
se puede modificar.
Cuando un contador continúa funcionando en la
modalidad OFF, el led del temporizador se ilumina de
forma estática. Esto indica que el valor representado
en los display pertenece al temporizador, pero
momentáneamente no se puede modificar
directamente; para hacerlo sería necesario reactivar
46 47
Page 47

el control.
- El accionamiento de la tecla temporizador depende
de las condiciones de funcionamiento configuradas
precedentemente:
a) La zona de cocción correspondiente al
temporizador está activada (nivel de cocción > 0):
El temporizador se programa de acuerdo con la
zona de cocción; cuando se pone a cero se apaga
de forma automática la zona de cocción; no es
posible seleccionar un contador independiente.
Un accionamiento ulterior de la tecla temporizador
conmuta directamente a la configuración del nivel de
cocción.
b) La zona de cocción correspondiente al
temporizador está desactivada (nivel de cocción = 0):
El temporizador se programa independientemente y
continúa funcionando incluso en la posición de OFF.
Mientras el contador funciona no es posible activar la
zona de cocción.
Configuración del valor del temporizador
- Después de la selección del temporizador, el
led asignado parpadea tal como se ha descrito
anteriormente.
Con las teclas Más/Menos es posible configurar el
tiempo de count down del temporizador deseado.
- Iniciando con la tecla Más, el primer valor visualizado
pasa a “01” y aumenta de forma progresiva de 1
hasta un máximo de “99” (límite superior).
- Iniciando con la tecla Menos, el valor visualizado
pasa a “30” y disminuye con pasos de 1 hasta el
“01” (primer límite inferior). Cuando alcanza el valor
deseado emite una señal acústica.
Para llegar al “00” es necesario soltar primero la tecla
Menos y luego reactivarla. Accionando ulteriormente
la tecla Menos, la visualización “00” no se modificará
(segundo límite inferior).
- La configuración se puede efectuar también mediante
accionamientos permanentes de las teclas Más
o Menos o mediante accionamientos individuales
(seleccionar: accionamiento tecla, desactivación,
accionamiento, desactivación, etc.).
- En caso de accionamiento permanente de la tecla, se
verifica una aceleración automática de la velocidad
de ajuste, es decir, que el tiempo entre un paso y el
sucesivo se reducirá, mientras la tecla permanezca
pulsada.
- Si antes de que pasen 10 s (parámetro) la tecla Más
o la tecla Menos no se pulsa de nuevo, después de
haber seleccionado el temporizador de la zona de
cocción corriente (el display se queda en el “00”), la
indicación y la asignación de las teclas Más/Menos
conmutan de forma automática a la zona de cocción.
- Cuando un temporizador se utiliza como contador
(despertador), la indicación y la asignación de las
teclas no conmutan a la zona de cocción, puesto que
la zona de cocción no se puede activar.
- Un temporizador normalmente se pone en marcha
con el count down si se ha programado con valores
distintos de 0. Ejemplo: el temporizador se pone en
marcha cuando se suelta la tecla Más después de
haber configurado el valor temporizador “01”.
- Las configuraciones del temporizador son
prioritarias respecto a la delimitación del tiempo de
funcionamiento en presencia de configuraciones de
niveles altos de cocción.
- Si se programa sólo un despertador, el control
permanece primero en la modalidad de espera
(ninguna otra zona de cocción está activada).
Si no se introducen otros valores nuevos, el TC se
comporta tal como se ha descrito anteriormente y
conmuta a la modalidad de OFF.
Tiempo del temporizador/ alarma del temporizador
y confirmación
- Los últimos 10 s antes de que termine el tiempo del
temporizador se visualizan en el display (count down
hasta la alarma).
- Cuando el tiempo configurado de un temporizador ha
terminado, salta la alarma del temporizador y la zona
de cocción asignada se apaga enseguida.
- El display, junto con el led del temporizador
seleccionado, parpadea alternando el nivel de
cocción “00” con “H”, en caso de calor residual.
- El aviso de la alarma dura al máximo 2 minutos si el
usuario no interviene antes.
- Al final de los 2 minutos o accionando una tecla
cualquiera, el aviso de la alarma se detiene.La señal
acústica (timbre eléctrico) y el piloto de control del
temporizador se desactivan.
Apagado del teporizador / Modificación de
las configuraciones del temporizador
- Es posible modificar el valor configurado del
temporizador, en la modalidad de espera o activa, en
cualquier momento después de haber efectuado la
selección, activando la tecla Más o Menos.
- Es posible apagar el temporizador, situarlo en el valor
“00” pulsando la tecla Menos o pulsando una única
vez contemporáneamente las teclas Más o Menos.
Key Lock (seguridad niños)
Bloqueo/activación Key Lock
El accionamiento de la tecla Key-Lock en la
modalidad de espera o activa, comporta el bloqueo
del teclado; el led Key-Lock “9” se ilumina en
modalidad estática. El control continúa trabajando
en la modalidad configurada precedentemente, pero no
se puede controlar mediante otras teclas, sólo con la
tecla Key-Lock o con la tecla ON/OFF.
ES
Page 48

El apagado con la tecla ON/OFF es posible incluso en
estado de bloqueo.
El led correspondiente de la tecla key lock se apaga
cuando se desactiva el teclado y la función Key-Lock.
El led se encuentra de nuevo activo en caso de que se
encienda de nuevo (antes de que pasen 10 s) hasta que
se desactiva accionando de nuevo la tecla Key-Lock. La
activación/desactivación de la función Key-Lock en la
modalidad de OFF no es posible.
Desbloqueo/desactivación Key Lock
El nuevo accionamiento de la tecla Key-Lock en la
modalidad de espera o activa comporta el desbloqueo
del teclado y el apagado del led Key-Lock asignado.
Todas las teclas sensores se pueden accionar de nuevo.
Key-Lock (seguridad niños)
Mod. CPH 401 ID WK TC
Activación y desactivación
El accionamiento de la tecla Key-Lock en la
ES
modalidad de espera o activa, comporta la
desactivación de la potencia en ambos fogones. En
la pantalla de visualización aparece el símbolo “11”, es
posible el apagado total sólo con la tecla ON/OFF o el
desbloqueo accionando el símbolo key-lock y después
del bip el símbolo “+” o “-”.
Para bloquear con seguridad el ajuste de un fogón,
accionar de forma contemporánea el símbolo
TEMPORIZADOR y el símbolo “-” correspondientes
al fogón. El led key-lock “9” se encenderá. El control
continúa trabajando en la modalidad configurada
previamente y no se puede controlar mediante otras
teclas, menos el apagado que se controla con la tecla
Key-Lock. El desbloqueo se produce accionando
de nuevo de forma contemporánea el símbolo
TEMPORIZADOR y el símbolo “-”.
1
2
1
1
1 ZONA DE COCCIÓN 1.400 W
2 ZONA DE COCCIÓN 1.400 W
2
2
3b
8
5
47 452 1
1. Encendido/apagado - On/Off
2. Seguridad niños (Key Lock)
3. Indicaciones zona de cocción
4. Aumento potencia
5. Disminución potencia
6. Temporizador (a)
7. Temporizador (b)
8. Led temporizador
9. Led Key Lock
8
6
3a
9
Fig. 1
48 49
Page 49

CONFIGURACIÓN DE LOS NIVELES DE COCCIÓN
NIVELES DE COCCIÓN TEMPERATURAS (°C)
1 50
2 75
3 100
4 125
5 150
6 170
7 190
8 205
9 220
TEMPERATURA MÁXIMA y PUNTO DE HUMO
GRASA
MANTEQUILLA 130/4 150
MANTECA 170/6 200
GRASAS DE BUEY 180/6 210
ACEITE DE OLIVA 180/6 200
ACEITE DE GIRASOL 200/7 220
ACEITE DE CACAHUETES 200/7 235
ACEITE DE COCO 200/7 240
TIPOS DE ALIMENTOS TEMPERATURAS (°C) NIVELES DE POTENCIA
PESCADO Y MARISCO 170-180 6
TERNERA 160-180 6
BUEY 200-210 8
CERDO 180-210 7
CORDERO 180-200 7
AVES DE CORRAL 160-180 6
SALCHICHA 200 7-8
HUEVO FRITO 140 4-5
TORTILLA 140-160 5
FRUTA 140-160 5
VERDURAS 140-160 5
COCER EL ARROZ
PREVIAMENTE COCIDO
COCER LA PASTA
PREVIAMENTE COCIDA
TEMPERATURA MÁXIMA
RECOMENDADA (°C) NIVEL DE POTENCIA
CONSEJOS EN LA COCINA
Nota: ¡precalentar siempre la placa de cocción!
Sugerencias para la cocción con el
Teppan Yaki
Utilización de grasa y aceites
Cuando se utilizan grasas y aceites, es muy importante
seleccionar la temperatura correcta. Configurando la
temperatura correcta, los importantes componentes
de los aceites y la grasa se conservan. Si en cambio la
temperatura es demasiado elevada, la grasa empieza a
hacer humo (el llamado “punto de humo”).
PUNTO DE HUMO (°C)
140-160 5
140-160 5
ES
Page 50

Limpieza y mantenimiento
Atención: ¡Peligro de quemaduras durante la
limpieza de la placa de cocción todavía caliente!
Atención: No limpiar nunca la placa de cocción con
polvo abrasivo o detergentes agresivos.
Limpieza de la placa de cocción con cubitos
de hielo
1. Apagar el aparato y esperar que se enfríe hasta
aproximadamente 80° C.
2. Colocar sobre la placa de cocción los cubitos de hielo
uno detrás del otro; separar de forma contemporánea
la suciedad con la paleta y empujarla hacia las
ranuras, hasta eliminar los residuos más grandes.
Eliminar los residuos de las ranuras (por ejemplo con
papel de cocina). Como alternativa a los cubitos de
hielo se puede utilizar agua fría.
3. Esperar que la placa de cocción se enfríe hasta
ES
aproximadamente 80 °C. Con un trapo limpio y un
poco de agua fría limpiar vigorosamente.
4. Limpieza en frío:
- Dejar actuar un disolvente para grasas durante
aproximadamente 5 minutos.
- Eliminar los restos de suciedad utilizando una
paleta.
- Aclarar con agua (trapo húmedo).
5. Las manchas eventualmente provocadas por la
clara de huevo o ácidos presentes en los alimentos,
cuando la placa de cocción está fría, se pueden
eliminar con zumo de limón y un trapo limpio. Aclarar
con cuidado con un trapo húmedo.
Si la placa de cocción antes de la limpieza ya se
había enfriado, calentarla hasta 80 °C y apagarla de
nuevo.
Limpieza de la placa entre dos preparaciones
Seguir los puntos 2 y 3.
Limpieza del panel de controles
1. Limpiar el aparato con un trapo húmedo y un poco
de detergente.
2. Secar el detergente con un trapo limpio.
50 51
Page 51

Instrucciones para el instalador
Instalación
Las presentes instrucciones están dirigidas al instalador
cualificado como guía para la instalación, regulación y
mantenimiento según las leyes y las normativas en vigor. Las
intervenciones tienen que efectuarse siempre con el equipo
desconectado de la corriente eléctrica.
Emplazamiento (Fig. 2)
El aparato está previsto para ser empotrado en una
plataforma tal como se ilustra en la correspondiente figura.
Preparar previamente en todo el perímetro de la plataforma
el sellador que se entrega de serie. Se desaconseja la
instalación encima de un horno, en caso contrario:
- comprobar que el horno disponga de un eficaz sistema de
enfriamiento;
- comprobar que no se produzca en ningún caso un paso de
aire caliente del horno hacia la placa de cocción;
- prever pasos de aire tal como se indica en la figura (Fig.3).
Para fijar la placa sobre la encimera utilizar los estribos con
tornillo que se entregan de serie y el sellador que se tiene que
colocar debajo del borde perimetral de la placa y la encimera
donde se tiene que instalar (véase fig. 4).
Conexión eléctrica (Fig. 5)
Antes de efectuar la conexión eléctrica comprobar:
- que las características de la instalación sean tales que
satisfagan lo que se indica en la chapa con el número de
serie aplicada en el fondo de la placa de cocción;
- que la instalación disponga de una conexión de tierra
eficaz según las normas y las disposiciones legales en
vigor. La conexión a tierra es obligatoria según la ley.
Si el equipo no dispone de cable y/o de la correspondiente
clavija, utilizar material adecuado para la absorción, tal
como se indica en la chapa con el número de serie y para
la temperatura de trabajo. El cable no tiene que alcanzar
en ningún punto una temperatura superior de 50°C a la
ambiental.
Para la conexión directa a la red es necesario interponer un
interruptor omnipolar adaptado para la carga que aparece
en la chapa que asegure la desconexión de la red con
una distancia de apertura de los contactos que permita la
desconexión completa en las condiciones de la categoría
de sobretensión III, de forma conforme con las reglas de
instalación (el cable de tierra amarillo/verde no se tiene que
interrumpir).
El enchufe o interruptor omnipolar tienen que ser fáciles de
alcanzar con el equipo instalado.
N.B.:
- El fabricante declina cualquier responsabilidad en el caso
que lo que se acaba de describir y las normales normas
contra los accidentes no se respeten.
Si el cable de alimentación está deteriorado, será necesario
sustituirlo. Tendrá que ocuparse de la sustitución el fabricante,
su servicio de asistencia técnica o una persona con categoría
similar, de forma que sea posible prevenir cualquier riesgo.
ES
Fig. 2
Page 52

GUARNICIÓN SELLADOR
GUARNIZIONE SIGILLANTE
ES
100
MIN.
380 100
VISTA FRONTAL
FRONTE
MIN.
600
MIN.
1,5
30
GUARNICIÓN SELLADOR
ARIA 100 Cm2 MIN.
AIRE
( 2 X 50 )
20 MIN.
AIRE
ARIA 100 Cm2 MIN.
( 2 X 50 )
50 MIN.
Fig. 3
GUARNIZIONE SIGILLANTE
1,5
40
Fig. 4
~230V
H05 RR–F 3x1.5
H05 VV–F 3x1.5
LN
Fig. 5
SELLADOR
ENCIMERA
Fig. 4
Page 53

Prezado Cliente,
Agradecemos e congratulamo-nos pela sua
escolha. Este novo produto, cuidadosamente
projectado e fabricado com materiais de
primeiríssima qualidade, foi meticulosamente
testado para poder satisfazer todas as suas
exigências para uma perfeita cozedura.
Portanto, pedimos-lhe que leia e respeite as
fáceis instruções que lhe permitirão alcançar
excelentes resultados desde a primeira
utilização. Com este moderno aparelho
enviamos também as nossas felicitações.
O FABRICANTE
I
GB
FR
DE
ES
Italiano
English
Français
Deutsch
Español
Sumário
Advertências de segurança
Descrição do aparelho
Instruções para o utilizador
Instruções para o instalador
ESTE PRODUTO FOI CONCEBIDO PARA UM
USO DE TIPO DOMESTICO. O FABRICANTE
DECLINA QUALQUER RESPONSABILIDADE
EM CASO DE EVENTUAIS DANOS CAUSADOS
A PESSOAS OU COISAS DERIVANTES
DE UMA INSTALAÇÃO INCORRECTA
OU DE USO INADEQUADO, ERRADO OU
ABSURDO. O APARELHO NÃO DEVE
SER USADO POR PESSOAS (INCLUSIVE
CRIANÇAS) COM CAPACIDADES FÍSICAS,
SENSORIAIS E MENTAIS REDUZIDAS, OU
SEM EXPERIÊNCIA E CONHECIMENTOS
53
PT
Português
NECESSÁRIOS, A NÃO SER QUE SEJAM
SUPERVISIONADAS OU INSTRUÍDAS PARA
OUSO DO APARELHO, POR PESSOAS
RESPONSÁVEIS PELO DISPOSITIVO DE
SEGURANÇA DAS MESMAS.
AS CRIANÇAS DEVEM SER CONTROLADAS
PARA SE TER CERTEZA DE QUE NÃO
BRINQUEM COM O APARELHO.
PT
Page 54

Advertências de segurança
É obrigatório respeitar estas indicações. A sua não
observação, provoca a perda de qualquer direito de
garantia em caso de danos.
Emprego segundo o escopo previsto
• Não abandone o electrodoméstico durante o seu
funcionamento.
• Este aparelho deve ser empregado apenas para
cozer e assar alimentos para o uso domestico.
• O aparelho não deve ser utilizado como superfície de
trabalho ou apoio.
• Transformações ou modificações do aparelho não
são permitidas.
• Não apoie ou conserve líquidos inflamáveis, materiais
facilmente inflamáveis ou objectos que possam
derreter (como película aderente, plástico, alumínio)
sobre o aparelho ou muito próximo deste.
Segurança para as crianças
• Certifique-se que as crianças pequenas não se
aproximem do aparelho.
• As crianças maiores podem aproximar-se do
aparelho somente sob supervisão.
• Para evitar o accionamento acidental por parte de
crianças ou animais domésticos, recomendamos que
active o dispositivo de segurança para crianças.
PT
Normas de segurança generais
• A montagem e as ligações do aparelho devem ser
realizadas exclusivamente por técnicos qualificados
e autorizados.
• Os aparelhos de encastre devem ser colocados
em funcionamento somente após a sua instalação
em superfície de trabalho e móveis de encastre
adequados e segundo as normas relacionadas.
• Em caso de avarias do aparelho, deverá ser
desactivado e desligado da corrente eléctrica para
evitar riscos de choques eléctricos.
• Aconselha-se a portadores de marca-passo que
mantenham uma distância mínima entre o busto e a
superfície de cozedura acesa de pelo menos 30 cm.
• O espaço necessário para a ventilação de 5 mm
entre a superfície de trabalho e a parte do móvel em
que é apoiada não deve ser coberta.
• Não utilize caçarolas de ferro fundido ou com o
fundo avariado, não polido ou que possua saliências.
Podem arranhar a superfície quando deslocadas.
Segurança durante a limpeza
• Antes de limpar o aparelho, desligue-o e espere que
se resfrie.
• Por motivos de segurança, é proibido limpar o
aparelho com aparelhos de limpeza a vapor ou a alta
pressão.
Para evitar danos ao aparelho
• Objectos que podem derreter ou líquidos que
transbordam podem queimar e permanecer
pegados à superfície, portanto devem ser removidos
imediatamente.
Indicações espaciais para Teppan Yaki
• Durante o funcionamento a dilatação da grelha pode
provocar ruídos. Não se trata de um problema da
superfície de cozedura e o seu funcionamento não é,
de forma alguma, comprometido.
• Em caso de uso frequente da superfície, no centro,
entre a subdivisão das zonas, a superfície de
cozedura pode apresentar uma área levemente
convexa. Não se trata de um problema da superfície
de cozedura e o seu funcionamento não é, de forma
alguma, comprometido. Portanto:
- é desaconselhável colocar panelas sobre o ponto
de divisão das zonas para evitar instabilidades;
- a cozedura nesta zona pode ter resultados
irregulares, por exemplo em caso de panquecas.
Segurança durante a utilização
• A gordura aquecida e o óleo podem queimar muito
rapidamente. Atenção! Risco de incêndio!
• ATENÇÃO! Risco de queimaduras! Óleo ou gordura
acrescentados sucessivamente à superfície de
cozedura já aquecida queimam muito rapidamente e
podem provocar salpicos.
• O uso desatento do aparelho comporta o risco de
queimaduras.
• Remova os adesivos e as películas da superfície de
vitrocerâmica e desmonte a superfície de cozedura.
• Os cabos dos aparelhos eléctricos não devem ser
apoiados sobre a superfície quente do aparelho ou
sobre louças quentes.
• Desligue sempre a zona de cozedura após o uso.
54 55
Page 55

Descrição do aparelho
As características principais do seu aparelho
• A superfície de cozedura tem 11 mm de
espessura. É formada por duas camadas de aço
inox e uma de alumínio, colocada entre estas. A
superfície de cozedura é caracterizada por um
bom armazenamento térmico, que reduz a rápida
diminuição da temperatura da superfície de cozedura,
por exemplo durante a preparação de carne retirada
do refrigerador.
• Cada superfície Teppan Yaki é uma peça única
e é trabalhada a mão e polida por especialistas.
Eventuais diferenças do desenho de polimento são
normais e não provocam qualquer tipo de limitação
do funcionamento. Quanto mais é usado, mais ganha
valor.
• A superfície de cozedura é subdividida em duas
amplas zonas reguláveis separadamente.
• O Teppan Yaki é posicionado no centro de uma
superfície de aço inox e separado desta superfície
de forma que a temperatura perimétrica da superfície
de inox não alcance uma temperatura demasiado
elevada.
• O canal perimétrico ao redor do Teppan Yaki serve
para recolher pequenos pedaços de alimento
e líquidos que, sucessivamente, ao terminar a
cozedura, podem ser facilmente removidos.
• O nível de potência, no qual se pode ler a
programação (vide Fig. 1 pos. 8) permite manter
constante a temperatura desejada. Deste modo evitase o superaquecimento dos pratos, favorecendo
a cozedura com pouca gordura e preservando o
conteúdo nutricional dos alimentos.
• Os pratos são preparados ou aquecidos directamente
sobre a superfície de cozedura, com ou sem gordura.
Porém, também é possível cozer com panelas.
• A superfície de cozedura deve ser sempre préaquecida.
PT
Antes de utilizar pela primeira vez
Primeira limpeza
• Elimine a película de protecção.
• Limpe o painel de comando com um pano húmido.
• Limpe a superfície de cozedura fria com um pano
húmido, seguindo a direcção de polimento.
Atenção! Recomenda-se que não utilize para a
limpeza instrumentos pontiagudos ou agressivos.
Podem danificar a superfície.
Page 56

Instruções para o utilizador
Instalação
Todas as operações relativas à instalação (ligação
eléctrica) devem ser realizadas por pessoal qualificado
segundo as normas em vigor.
Para as instruções específicas ver a parte reservada ao
instalador.
Activação/Desactivação do Touch Control
(Fig. 2)
A electrónica Touch Control activa-se accionando
I
a tecla ON/ OFF e comuta a modalidade OFF
para a modalidade de espera. Para tal finalidade é
necessário accionar a tecla ON/OFF como tecla única e
por um tempo de 1 seg. Ouvir-se-á um breve bip.
Na modalidade de espera, no display da zona de
cozedura, visualiza-se estaticamente “0”. Eventualmente
esta visualização pode ser posta em segundo plano por
causa de uma sinalização de calor residual ou de erro.
Se dentro do tempo da modalidade de espera (10 s) for
activada uma zona de cozedura, o controlo comuta para
modalidade activa.
Se dentro de 10 seg. não for efectuada nenhuma
introdução, o controlo comuta automaticamente, com
um breve bip, para a modalidade OFF.
Na modalidade activa ou na modalidade de espera, a
PT
electrónica pode ser comutada em qualquer momento
para a modalidade OFF accionando a tecla ON/OFF. A
função de desactivação tem sempre prioridade durante
o funcionamento; quer dizer que o controlo se desactiva,
mesmo activando várias teclas simultaneamente.
Activação de uma zona de cozedura
Na modalidade de espera ou na activa, uma zona de
cozedura pode ser activada através das teclas mais/
menos, a não ser que a zona de cozedura não esteja,
naquele momento, na selecção Timer (ver o capítulo
Timer).
Ao iniciar com a tecla “+”, o nível de cozedura passa de
“0” a “4”. Ao iniciar com a tecla “-”, o nível de cozedura
passa de “0” a “9”.
Desactivação de uma zona de cozedura
a) Accionando simultaneamente a tecla “+” e “-” da zona
de cozedura desejada.
b) Seleccionando o nível de cozedura “0” da zona de
cozedura desejada com a tecla “-”.
Ao apagar a última zona de cozedura, o controlo comuta
para modalidade OFF após 10 seg. se não houverem
outras activações.
Todas as zonas de cozedura desactivam-se, com efeito
imediato, accionando a tecla ON/OFF.
Níveis de cozedura e de potência
Os níveis de cozedura e de potência das zonas de
cozedura são visualizados através de um ecrã (pos. 8
Fig. 1).
Segundo o standard visualizam-se os níveis de potência
de “1” a “9”.
Indicador de calor residual
Serve para indicar ao utilizador que a placa alcançou
uma temperatura perigosa em caso de contacto com
a área sobreposta à zona de cozedura. A temperatura
é determinada seguindo um modelo matemático e, um
eventual calor residual, será indicado com um “H” pelo
respectivo display de sete segmentos.
O aquecimento e o arrefecimento são calculados em
relação: - ao nível de potência seleccionado (da “0”
a “9”); - ao período de activação dos relés após ter
desactivado a zona de cozedura.
O respectivo display mostra “H” até a temperatura
da zona não descer abaixo do nível crítico (< 60 °C),
conforme o modelo matemático.
Função Timer
A função Timer pode ser utilizada
como Timer para a zona de cozedura
ou como despertador independente,
porém nunca para ambas as funções. Os dois displays
de 7 segmentos, da respectiva zona de cozedura,
servem para visualizar o tempo restante em minutos,
até quando o alarme do Timer não disparar.
Selecção do Timer
- Para seleccionar um Timer, o touch deve estar na
modalidade de espera ou na modalidade activa.
- O accionamento da tecla Timer serve para seleccionar
a função Timer para uma zona de cozedura.
- A sinalização da programação de um timer, mediante
as teclas Mais/Menos, realiza-se através do led 8
para o modelo 2 indução e o led 6 para o modelo wok
indução. Quando um contador continua a funcionar
na modalidade OFF, o led do Timer ilumina-se
estaticamente. Isto indica que o valor representado
nos displays pertence ao Timer, ma não pode ser
momentaneamente modificado directamente; para tal
finalidade seria necessário reactivar o controlo.
- O accionamento da tecla Timer depende das condições
de funcionamento anteriormente seleccionadas: a)
A zona de cozedura correspondente ao Timer está
activada (nível de cozedura > 0):
O Timer é seleccionado com referência na
zona de cozedura; quando se reseta, desactiva
automaticamente a zona de cozedura; não é
possível seleccionar um contador independente.
Um sucessivo accionamento da tecla Timer comuta
56 57
Page 57

directamente para a selecção do nível de cozedura.
b) A zona de cozedura correspondente ao Timer
está desactivada (nível de cozedura = 0): O Timer
é seleccionado independentemente e continua a
funcionar mesmo no estado de OFF. Enquanto o
contador estiver a funcionar, não é possível activar a
zona de cozedura.
Selecção do valor de Timer
- Após ter seleccionado o Timer, o respectivo led pisca
como acima descrito. Com as teclas mais/menos é
possível seleccionar o tempo de contagem regressiva
do Timer desejado.
- Iniciando com a tecla “mais”, o primeiro
valor visualizado pula para “01” e aumenta
progressivamente de 1, até um máximo de “99”
(limite superior).
- Iniciando com a tecla “menos”, o valor visualizado
na indicação pula para “30” e diminui em passos
de 1 até alcançar “01” (primo limite inferior). No seu
alcance emite-se um sinal sonoro. Para alcançar
“00”, é necessário antes soltar a tecla “menos” e
depois accioná-la outra vez. Accionando mais uma
vez a tecla “menos”, a visualização “00” não será
modificada (segundo limite inferior).
- A selecção pode ser realizada também através de
accionamentos permanentes das teclas “mais” ou
“menos” ou através de accionamentos individuais
(seleccionar: accionamento da tecla, largada,
accionamento, largada, etc.).
- Em caso de accionamento permanente da tecla,
realiza-se uma aceleração automática da velocidade
de regulagem, quer dizer que o tempo entre um passo
e o sucessivo se reduz, enquanto a tecla permanecer
pressionada.
- Se dentro de 10 seg. (parâmetro) a tecla “mais” ou a
tecla “menos” não for novamente pressionada, após
ter seleccionado o Timer da zona de cozedura em
questão (o display permanece em “00”), a indicação
e a designação das teclas mais/menos comutam
automaticamente para a zona de cozedura.
- Quando um Timer é utilizado como contador
(despertador), a indicação e a designação das teclas
não comutam para a zona de cozedura, dado que a
mesma não pode ser activada.
- Um Timer parte geralmente com a contagem
regressiva, se esta última tiver sido seleccionada
com valores diferentes de 0. Por exemplo: o Timer
parte largando a tecla “mais” após ter seleccionado o
valor Timer “01”.
- As selecções do Timer são prioritárias em relação à
delimitação do tempo de funcionamento em presença
de selecções de níveis altos de cozedura.
- Se for seleccionado só um despertador, o controlo
inicialmente permanece na modalidade de espera
(nenhuma outra zona de cozedura é activada). Se
não forem introduzidos outros valores novos, o TC
comporta-se como acima descrito e comuta para
modalidade de OFF.
Vencimento do Timer/ alarme do Timer e
confirmação
- Os últimos 10 seg., antes do vencimento do Timer,
visualizam-se no display (contagem regressiva até o
alarme).
- Uma vez vencido o tempo seleccionado de um Timer,
o alarme do Timer dispara, a zona de cozedura
designada apaga-se logo.
- O display, junto com o led do Timer seleccionado,
pisca alternando o nível de cozedura “00” com “H”,
em caso de calor residual.
- A sinalização do alarme dura no máximo 2 minutos,
se o utilizador não intervier antes.
- Passado os 2 minutos ou accionando uma tecla
qualquer, a sinalização do alarme é suspendida.
O sinal sonoro (campainha) como também o indicador
de controlo do Timer desactivam-se.
Desligar o Timer/ Modificar as selecções do
Timer
- É possível modificar o valor seleccionado do Timer,
na modalidade de espera ou activa, em qualquer
momento após a ter realizado a selecção, activando
a tecla “mais” ou “menos”.
- É possível desligar o Timer, posicionando-o no valor
“00” pressionando a tecla “menos” ou pressionando,
uma única vez, simultaneamente as teclas “mais” e
“menos”.
Key Lock (dispositivo de segurança para as
crianças)
Bloqueio/activação Key Lock
O accionamento da tecla Key-Lock na modalidade
de espera ou activa, provoca o bloqueio do teclado;
o led Key-Lock “9” ilumina-se de modo estático.
O controlo continua a trabalhar na modalidade
anteriormente seleccionada, ma não pode mais ser
comandado por outras teclas, excepto pela tecla KeyLock ou pela tecla ON/OFF. A desactivação com a
tecla ON/OFF pode ser feita também em estado de
bloqueio. O led correspondente da tecla key lock apagase quando se desactivam o touch e a função Key-Lock.
O led fica novamente activo em caso de reacendimento
(dentro de 10 seg.) até quando não for desactivado o
reacendimento accionando novamente a tecla KeyLock. A activação/ desactivação da função Key-Lock na
modalidade de OFF não é possível.
Desbloqueio/desactivação Key Lock
O novo accionamento da tecla Key-Lock na modalidade
PT
Page 58

de espera ou activa provoca o desbloqueio do teclado
e a desactivação do led Key-Lock designado. Todas as
teclas sensoras podem ser novamente accionadas.
Key Lock (dispositivo de segurança para as
crianças)
Activação e desactivação
O accionamento do botão key-lock, na modalidade
de espera ou activa, comporta o desligamento da
potência em ambos os fogos. No display aparece
o símbolo “11”.
É possível só o total desligamento com o botão ON/
OFF ou o desbloqueio accionando o símbolo key-lock e,
após o bip, o símbolo “+” o “-”
Para bloquear com segurança a regulação de um
fogo, accionar simultaneamente o símbolo TIMER
e o símbolo “-”, relativos ao próprio fogo. O led keylock “9” acende-se. O controlo continua a trabalhar na
modalidade anteriormente seleccionada e não pode ser
comandada por outros botões, excepto o desligamento
com o botão key-lock. O desbloqueio realiza-se
accionando de novo simultaneamente o símbolo TIMER
e o símbolo “-”.
PT
1
2
1
1
1 ZONA DE COZEDURA 1.400 W
2 ZONA DE COZEDURA 1.400 W
2
2
3b
8
5
1. Ligar/desligar - On/Off
2. Segurança para as crianças (Key Lock)
3. Indicações da zona de cozedura
4. Incremento da potência
5. Decremento da potência
6. Temporizador (a)
7. Temporizador (b)
8. Led temporizador
9. Led Key Lock
6
47 452 1
3a
8
9
Fig. 1
58 59
Page 59

CONFIGURAÇÃO DOS NÍVEIS DE COZEDURA
NÍVEIS DE COZEDURA TEMPERATURAS (°C)
1 50
2 75
3 100
4 125
5 150
6 170
7 190
8 205
9 220
TEMPERATURA MÁXIMA e PONTO DE FUMO
GORDURA
MANTEIGA 130/4 150
BANHA 170/6 200
GORDURA BOVINA 180/6 210
AZEITE 180/6 200
ÓLEO DE GIRASSOL 200/7 220
ÓLEO DE AMENDOIM 200/7 235
ÓLEO DE COCO 200/7 240
TIPOS DE ALIMENTOS TEMPERATURAS (°C) NÍVEL DE POTÊNCIA
PEIXE e FRUTOS DO MAR 170-180 6
CARNE DE VITELO 160-180 6
CARNE DE BOVINO 200-210 8
CARNE SUÍNA 180-210 7
CARNE DE CORDEIRO 180-200 7
CARNE DE AVES 160-180 6
CHOURIÇO 200 7-8
OVO FRITO 140 4-5
OMELETE 140-160 5
FRUTA 140-160 5
VERDURAS 140-160 5
COZER ARROZ
PREVIAMENTE COZIDO
COZER MASSA
PREVIAMENTE COZIDA
TEMPERATURA MÁXIMA
RECOMENDADA (°C) NÍVEL DE POTÊNCIA
CONSELHOS DE COZINHA
Nota: pré-aqueça sempre a superfície de cozedura!
Sugestões para a cozedura com o
Teppan Yaki
Utilização de gordura ou óleo
Ao utilizar gordura ou óleo, é muito importante
seleccionar a temperatura correcta. Desta forma, os
componentes importantes dos óleos ou das gorduras
são mantidos. Se a temperatura for demasiado elevada,
a gordura começa a fumar (o chamado “ponto de fumo”).
PONTO DE FUMO (°C)
140-160 5
140-160 5
PT
Page 60

Limpeza e manutenção
Atenção: Risco de queimaduras em caso de limpeza
da superfície de cozedura ainda quente!
Atenção: Nunca limpe a superfície de cozedura com
pó abrasivo o detergentes agressivos.
Limpeza da superfície de cozedura com
cubos de gelo
1. Desligue o aparelho e aguarde até que se resfrie e
alcance uma temperatura de cerca de 80° C.
2. Deposite sobre a superfície de cozedura os cubos
de gelo, um após o outro; simultaneamente, separe
a sujidade com a pá e empurre-a para a ranhura,
até eliminar os resíduos mais consistentes. Elimine
os resíduos da ranhura (por exemplo com papel de
cozinha). Como alternativa, ao invés de cubos de
gelo é possível utilizar água fria.
3. Aguarde até que a superfície de cozedura se resfrie
e alcance uma temperatura de cerca de 80 °C.
Com um pano limpo e um pouco de água fria, limpe
vigorosamente.
4. Limpeza a frio:
- Durante cerca de 5 minutos deixe agir um solvente
PT
para gordura.
- Remova os resíduos de sujidade utilizando a pá.
- Enxagúe com água (pano húmido).
5. Manchas provocadas por clara de ovo ou ácido
presente nos alimentos, se a superfície de cozedura
estiver fria, podem ser eliminadas com sumo de limão
e um pano limpo. Enxagúe com atenção e utilizando
um pano húmido.
Se a superfície de cozedura antes da limpeza
resfriou-se, aqueça-a até que alcance 80 °C e
desligue-a novamente.
Limpeza da superfície entre duas preparações
Proceda como indicado nos pontos 2 e 3.
Limpeza do painel de comandos
1. Limpe o painel com um pano húmido e um pouco de
detergente.
2. Enxugue com um pano limpo.
60 61
Page 61

Instruções para o instalador
Instalação
As presentes instruções dirigem-se ao instalador qualificado
como guia para a instalação, regulação e manutenção,
segundo as leis e as normativas em vigor. As intervenções
devem sempre ser efectuadas com a aparelhagem
desligada electricamente.
Posicionamento (Fig. 2)
O aparelho está previsto para ser encaixado num plano
como ilustrado na respectiva figura. Predispor ao longo de
todo o perímetro do plano o selante que vem fornecido. É
desaconselhável a instalação em cima de um forno, em
caso contrário, controlar que:
- o forno esteja equipado com um sistema de arrefecimento
eficaz;
- que não aconteça, em nenhum caso, passagem de ar
quente do forno para o plano;
- predispor passagens de ar como indicado na figura (Fig.
3).
Para fixar a superfície ao top, use os suportes com parafusos
fornecidos e o vedante, que deve ser colocado entre a borda
perimétrica da superfície e o top sobre o qual è instalada
(vide Fig. 4).
Ligação eléctrica (Fig. 5)
Antes de efectuar a ligação eléctrica controlar que:
- as características da instalação satisfaçam as indicações
da placa de matrícula aplicada no fundo do plano;
- que a instalação esteja equipada com uma eficaz ligação
à terra, segundo as normas e as disposições de lei em
vigor.
A ligação à terra é obrigatória nos termos de lei. No caso em
que a aparelhagem não estiver equipada com cabo e/ou com
relativa ficha, utilizar material adequado para a absorção
indicado na placa de matrícula e para a temperatura de
trabalho. O cabo, em nenhum ponto, deverá alcançar uma
temperatura superior a 50°C em relação à temperatura
ambiente. Para a ligação directa na rede é necessário
interpor um interruptor omnipolar dimensionado para a carga
indicada na plaqueta, que garanta a desconexão da rede
com uma distância de abertura dos contactos que permita
a desconexão completa nas condições da categoria de
sobretensão III, conforme as regras de instalação (o cabo de
terra amarelo/verde não deve ser interrompido). A tomada
ou interruptor omnipolar devem ser facilmente alcançáveis
com a aparelhagem instalada.
N.B.:
- O fabricante declina qualquer responsabilidade se, o
que acima dito e as usuais normas de segurança contra
acidentes, não forem respeitadas.
Se o cabo de alimentação estiver danificado, este deve ser
substituído pelo fabricante ou pelo seu serviço de assistência
técnica ou, todavia, por uma pessoa com qualificação
equivalente, de modo a prevenir qualquer risco.
PT
Fig. 2
Page 62

GUARNIÇÃO SELANTE
GUARNIZIONE SIGILLANTE
PT
100
MIN.
380 100
FRENTE
FRONTE
MIN.
600
MIN.
1,5
30
GUARNIÇÃO SELANTE
ARIA 100 Cm2 MIN.
AR
( 2 X 50 )
20 MIN.
AR
ARIA 100 Cm2 MIN.
( 2 X 50 )
50 MIN.
Fig. 3
GUARNIZIONE SIGILLANTE
1,5
40
Fig. 4
~230V
H05 RR–F 3x1.5
H05 VV–F 3x1.5
LN
Fig. 5
VEDANTE
TOP
Fig. 4
62
Page 63

Page 64

Page 65

Page 66

IMPORTANT: If your appliance appears not to be
operating correctly, then you should disconnect it from
your mains supply and then contact the Customer Care
Department.
DO NOT ATTEMPT TO REPAIR THE APPLIANCE YOURSELF.
Please note that if an engineer is asked to attend whilst the product is
under guarantee and finds that the problem is not the result of an
appliance fault, then you may be liable for the cost of the call out charge.
The appliance must be accessible for the engineer to perform any
necessary repair. If your appliance is installed in such a way that
an engineer is concerned that damage will be caused to the
appliance or your kitchen, then they will not complete a repair.
This includes situations where appliances have been tiled in,
sealed in with sealant, have wooden obstructions placed in front
of the appliance, like plinths. Or any installation other than the
one specified by the manufacturer has been completed.
IMPORTANT: The manufacturer operates a policy of continuous
improvement and reserves the right to adjust and modify its
products without prior notification.
Page 67

United Kingdom
Baumatic Ltd.,
Baumat
6 Bennet Road,
Reading, Berkshire
RG2 0QX
United Kingdom
ic Buildings,
Czech Re
Baumatic s.r.o.
Lípová 665/1
460 01 Liberec 4
Czech Republic
public/Slovakia
Sales Telephone
(0118) 933 6900
Sales Fax
(0118) 931 0035
Customer Care Telephone
(0118) 933 6911
Customer Care Fax
(0118) 986 9124
Spares Telephone
(01235) 437244
Advice Line Telephone
(0118) 933 6933
E-mail:
sales@baumatic.co.uk
customercare@baumatic.co.uk
spares@baumatic.co.uk
technical@baumatic.co.uk
Website:
www.baumatic.co.uk
Panens
811 03 Bratislava - Staré Mesto
Slovakia
+42
+421 255 640 618 (SK)
www.baumatic.
www.baumatic.sk
Germa
ká 34
0 483 577 200 (CZ)
cz
ny
Kundendienst & Ersatzteile
Deutschland 0049(0)180-5888975
Oesterreich +43 (0) 820 / 420423
www.baumatic.de
Italy
Baumat
Via Galvani N.3
35011 Campodarsego (PD)
ic Italia S.R.L.
Facebook
www.facebook.com/baumatic.uk
Republic of Ireland
Service T
1-890 812 724
Spares Telephone
091 756 771
:
elephone
904 9920 2297
+3
www.baumatic.it
Holland
Baumat
Dukdalfweg 15d
1332 BH ALMERE
Nederland
+31(0)36 549 1553/1555
www.baumatic.nl
ic Benelux B.V.
Page 68

40
 Loading...