

Baumatic BHI909TS.GWK User Manual

BHI909TS.GWK
90cm Induction & Gas
Hob
1
User Manual for your Baumatic
BHI909TS.GWK
90 cm
Induction & Gas Hob
NOTE: This User Instruction Manual contains important
information, including safety & installation points, which will
enable you to get the most out of your appliance. Please keep it
in a safe place so that it is easily available for future reference; for
you or any person not familiar with the operation of the appliance.
JW 17/05/13
2

Contents
Environmental note 4
Important safety information 5 – 8
Specifications 9 – 11
Product specifications 9
Standard accessories 10
Gas & Electrical details 10
Hob surface layout 11
Control panel layout 12
Using the induction hob 12 - 22
Before first use 12
Touch controls 13
Switching the hob on 13
Switching on a zone and setting a power level 14
Power levels 15
The boost function 15
Switching off a zone 16
Switching the hob off 16
Residual heat indicator 16
Pan sensor 17
Cookware that is suitable for an induction hob 17
The hob timer (minute minder) 18
The hob timer (linked to a cooking zone) 19-20
Locking the hob top 20
Safety cut-off 21
High temperature protection 21
Hob guidelines 21 - 22
Using the gas hob 23 - 25
Switching the hob on 23
Automatic ignition with flame failure device 24
Energy saving tips 25
Cleaning and maintenance 26 - 28
Cleaning the induction hob top 26
After each use 26
Cleaning table 26
Using a induction hob scraper 27
Using a specialist induction hob cleaner 27
Cleaning the gas hob burner 27
Maintaining the cast iron pan stand 28
Installation 29 - 40
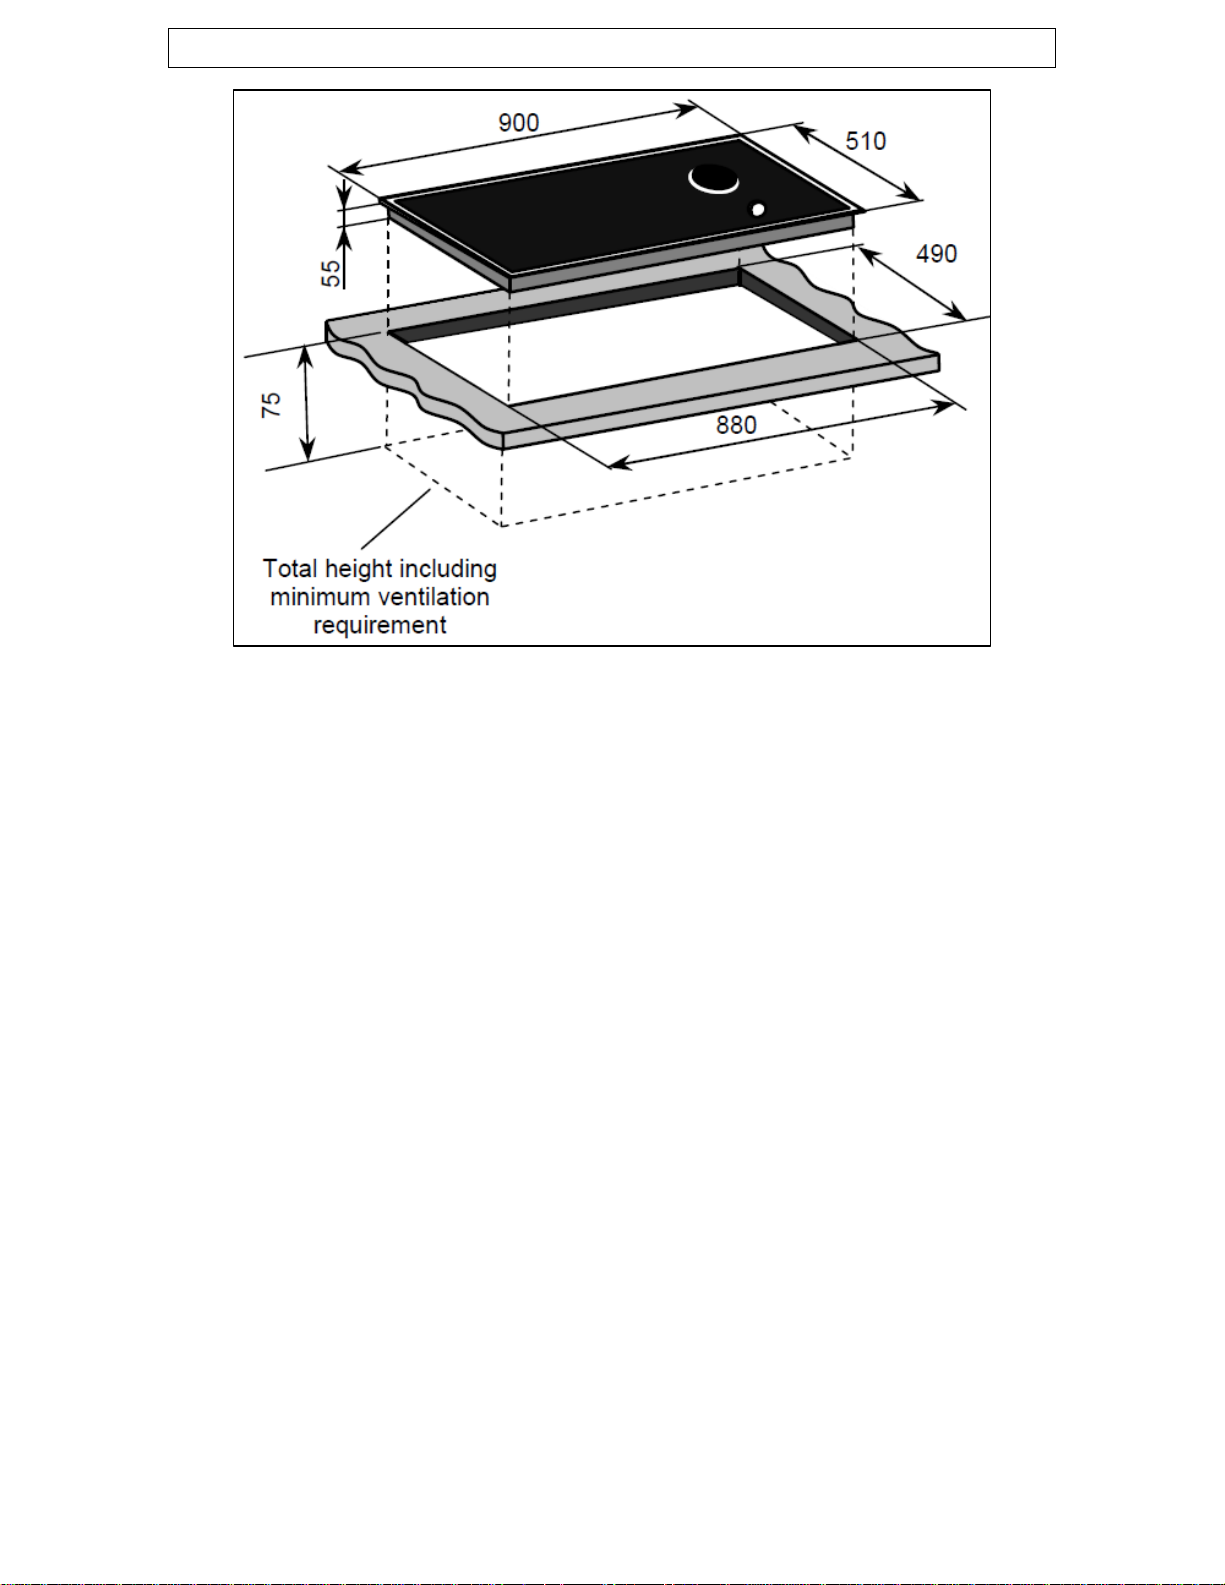
Positioning 29-31
Unpacking the appliance 31
Installing the appliance 31-32
Electrical connection 33-34
Connecting the mains supply cable 34
Replacing the mains supply cable 34
Gas connection 35
Ventilation requirements 35-36
Gas Safety (Installation and Use) Regulations 37
Gas Adjustment (Conversion to LPG) 38
Minimum flow adjustment for hob gas taps 39
Gas tap maintenance 40
My appliance isn’t working correctly 41 - 43
Error codes 42
Baumatic consumables 44
Contact details 47
3
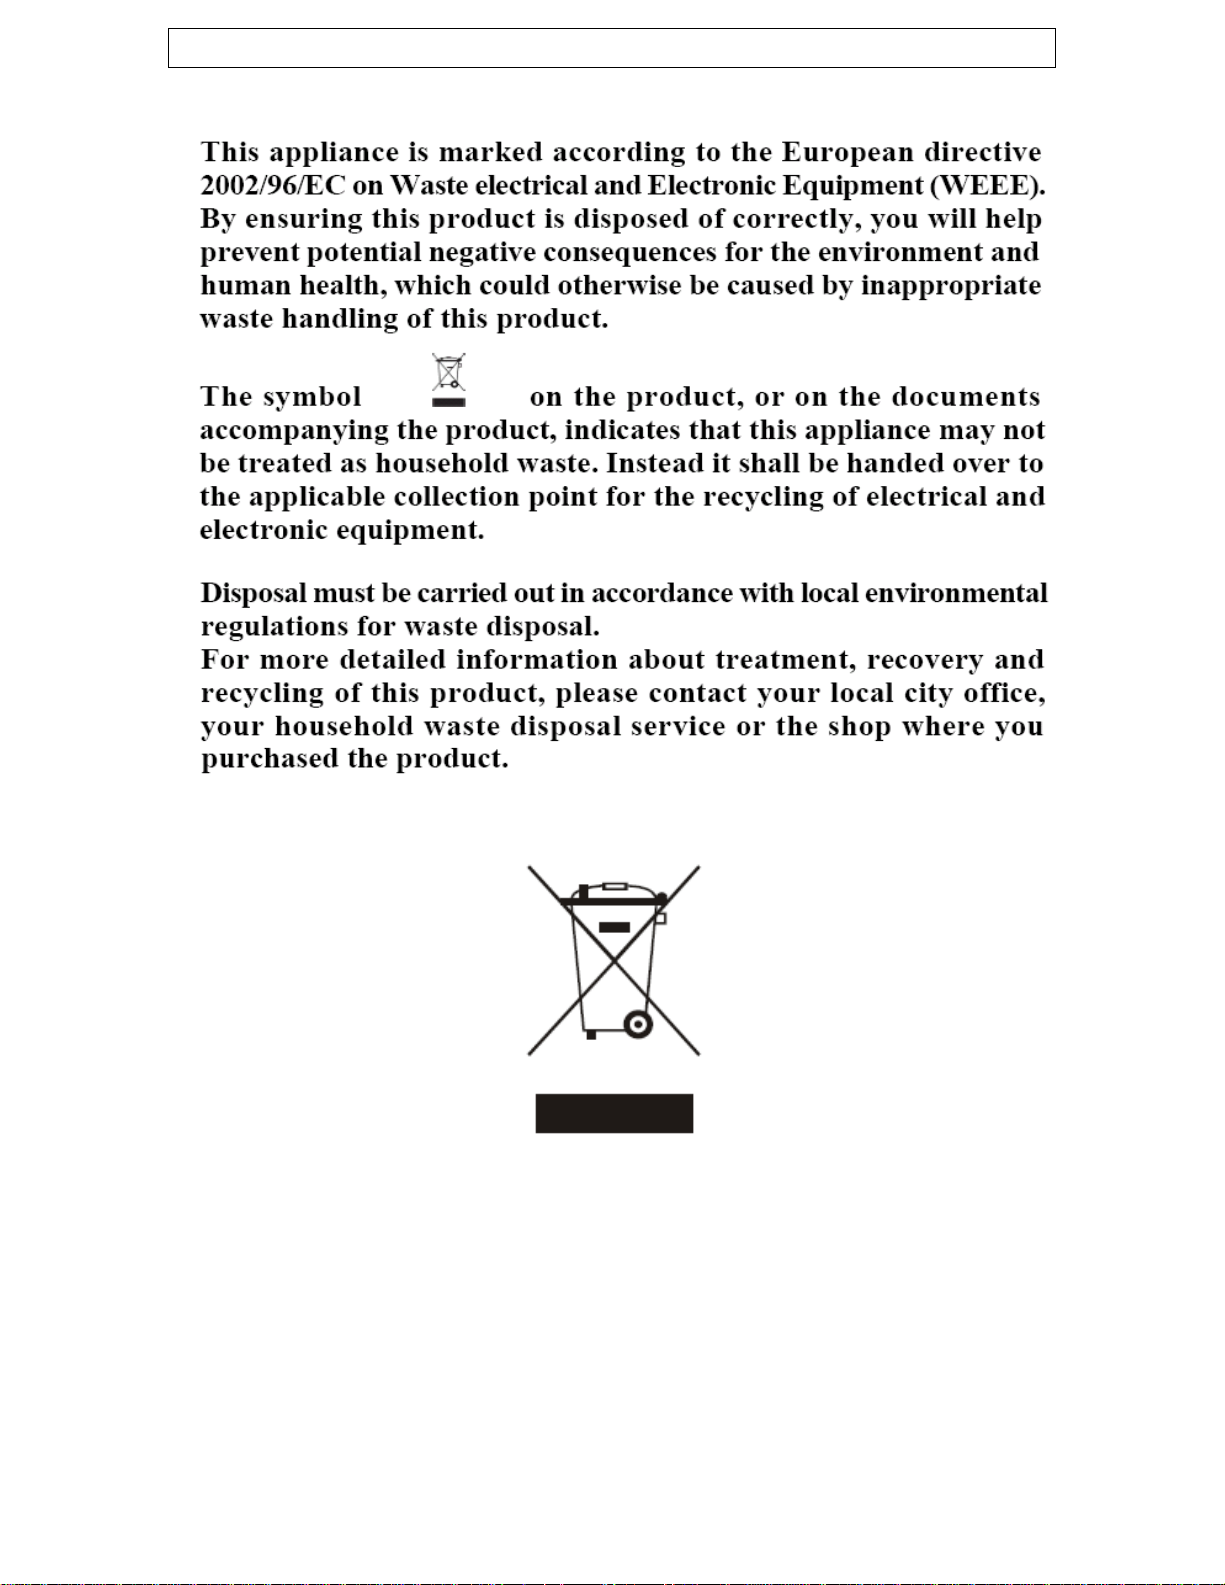
Environmental note
o The packaging materials that Baumatic uses are environmentally
friendly and can be recycled.
o Please discard
environment.
all packaging material with due regard for the
4 5

Important safety information
Your safety is of the utmost importance to Baumatic.
Please make sure that you read this instruction booklet
before attempting to install or use the appliance. If you
are unsure of any of the information contained in this
booklet, ple
General Information
This appliance is designed for domestic hoo
cooking and frying of domestic foodstuffs.
o IMPORTANT: The adjacent furniture and all materials used in the
installation must be able to withstand a minimum temperature of
85°C above th
whilst in use.
o Certain types of vinyl or laminate kitchen furniture are particularly
prone to heat damage o
guidelines given above.
o Any damage caused by the appliance being installed in
contrave
owner.
o Your new appliance is guaranteed against electrical or mechanical
defects, subject to certain exclusions that are noted in Baumatic’s
Conditions Of G
statutory rights.
o The use of this appliance for any other purpose or in any other
environment without the express agreem
invalidate any warranty or liability claim.
You shouo
surface.
o No modifications to the appliance are permitted by Baumatic Ltd.
o You should not store or place flammable or highly flammable
liquids/materials on top of or near the appliance. Items made from
aluminium, plastic or plastic film should also
appliance, as they may fuse to the surface.
Repairs may only be carried out by Bao
engineers or their authorised service agent.
ntion of this temperature limit, will be the liability of the
ld not use this appliance to store items on or as a work
e ambient temperature of the room it is located in,
ase contact Baumatic Customer Care.
usehold use and for the
r discolouration at temperatures below the
uarantee. The foregoing does not affect your
ent of Baumatic Ltd. will
be kept away from the
umatic service
5

hild Safety
C
o Baumatic strongly recommend that babies and young children are
prevented from being near to the appliance and not allowed to
touch the ap
will be hot.
o If it is necessary for younger family members to be in the kitchen,
please
times.
o Older childre
supervised.
eneral Safety
G
o The appliance sho
qualified person.
o Care should be taken to ensure that the units and work surfaces
that you build the appliance into, meet with the relevant standards.
o The appliance should
registered installer.
o If you notice any scratches, splits or cracks in the induction glass,
you should immediately switch off the appliance and disconnect it
from your m
occurring.
o CAUTION: This
heat after use.
uring use
D
o Any film or stickers that are present on t
delivered should be removed before use.
o Care should be taken when utili
is a risk of burns being caused.
o You should not allow the electrical connection cables to come in
contact with the hob surface when it is hot or any hot cookware.
o If fat and oil overheats, then it can ignite extremely quickly. For this
reason, when co
left unattended.
o Make su
ensure that they are kept under close supervision at all
pliance at any time. During and after use, all surfaces
n should only be allowed to utilise the appliance when
uld only be installed and connected by a suitably
only be installed and connected by a GASSAFE
ains supply. Otherwise there is the risk of electric shock
appliance will become hot during use and retain
he hob surface when it is
sing the appliance, otherwise there
to
oking with fat and oil the appliance should not be
re that all of the cooking zones are switched off after use.
6
leaning
C
Cleaning of the hob should be carried out on a regular basis.
o
o IMPORTANT: Before attempting to clean the applia
be disconnected from the mains and allowed to cool.
o Great care should be taken whils
following the cleaning procedure.
t using this appliance and when
nce, it should
o You should not use a steam jet or
equipment to clean the appliance.
Installatio
o Baumatic Ltd. declines any responsibility for injury or
damage, to person or property, as a resu
or incorrect installation of this appliance.
o If the appliance is being used in a Leisure Accommo
Vehicle, the requirements of N 721 MUST be followed.
o Baumatic Ltd DOES NOT recommend t
installed on any type of marine vessel.
eclaration of conformity
D
This appliance complies with the following European Directives:
-2006/95/CE General regulations / Low tension
-1935/2004/CE 90
contact with food
004/108/CE Electromagnetic compatibility
-2
o The manufacturer declares that the hob is built using certified
materials and requires the appliance to be installed in accordance
with the standards currently in force. This appli
by a trained person for domestic purposes only.
n
This appliance must be correctly installed by a
GASSAFE registered installer, strictly in accordance
with the manufacturer’s instructions. Please see
the specific
installation.
/128/EEC This appliance is suitable to come in
section of this booklet that refers to
any other high pressure cleaning
lt of improper use
dation
hat this appliance is
ance must be used
7

o IMPORTANT: The induction hob fully complies with current
legislation regarding electro-magnetic interference and is
designed not to interfere with other electronic appliances
providing these comply with the same legislation.
o As the induction hob generates magnetic fields in its
immediate vicinity, pacemakers and active heart implants
must be designed to comply with relevant regulations. If in
doubt, you should consult the manufacturer of your device or
your doctor. In this respect, Baumatic can only guarantee
the conformity of our own product.
o If an object made of metal, (e.g. saucepan lid, knife, fork or
spoon) is placed on a cooking zone that is switched on, it can
get hot.
To avoid damaging your appliance
o The induction glass can be damaged by objects falling onto it.
o The induction glass edge can be damaged by knocks from
cookware.
o Cast iron and cast aluminium cookware with damaged bases may
scratch the induction surface if they are dragged across it.
o Pans should be lifted on and off the hob surface and not dragged.
o Cooking zones should not be switched on without cookware placed
on it. Also the cookware should not be empty.
o Food or liquid that has high sugar content may damage the hob
top, if it comes into contact with the induction hob surface. Any
spillages should be wiped up immediately, however this may not
prevent the hob surface from becoming damaged.
8
Specifications
Product dimensions: Aperture dimensions:
Depth: 510 mm Depth: 490 mm
Width: 900 mm Width: 880 mm
Height: 55 mm Height: 20 mm (min)
Product specifications:
1 x 3.00 kW induction zone (Ø 210 mm)
1 x 2.30 kW induction zone with booster (3.00 kW) (Ø 210 mm)
1 x 1.40 kW induction zone with booster (1.85 kW) (Ø 160 mm)
1 x 1.40 kW induction zone (Ø 160 mm)
o Front touch control operation
o Safety lock
o 4 individual residual heat indicators
o 4 independent induction generators
o Electronic timer
o Pan compatibility detection
o Bevelled edges
1 x 4.00 kW triple crown (wok) burner
o Front control operation
o Heavy duty cast iron pan stand
o Automatic ignition
o Flame failure safety device on wok burner
9

Standard accessories
o Induction hob scraper
o LPG conversion jets
Electrical details
Rated Voltage: 220 - 240 Vac 50 / 60 Hz
Supply Connection: 40A (double pole switched fused
outlet with 3mm contact gap)
Max Rated Inputs: 7.40 kW
Mains Supply Lead: 3 core x 6 mm² (not supplied)
Gas details
Connection: Rp ½ (ISO R7)
Type: Natural Gas (20 mbar)
Alternative LPG G30 (28-30/37 mbar)
For future reference please record the following information which can
be found on the rating plate and the date of purchase which can be
found on your sales invoice. The rating plate of your hob is located on
the underneath of the appliance. Therefore it is a good idea to record
this information before you install your appliance.
Model Number ……………………………….
Serial Number ……………………………….
Date of Purchase ……………………………….
10
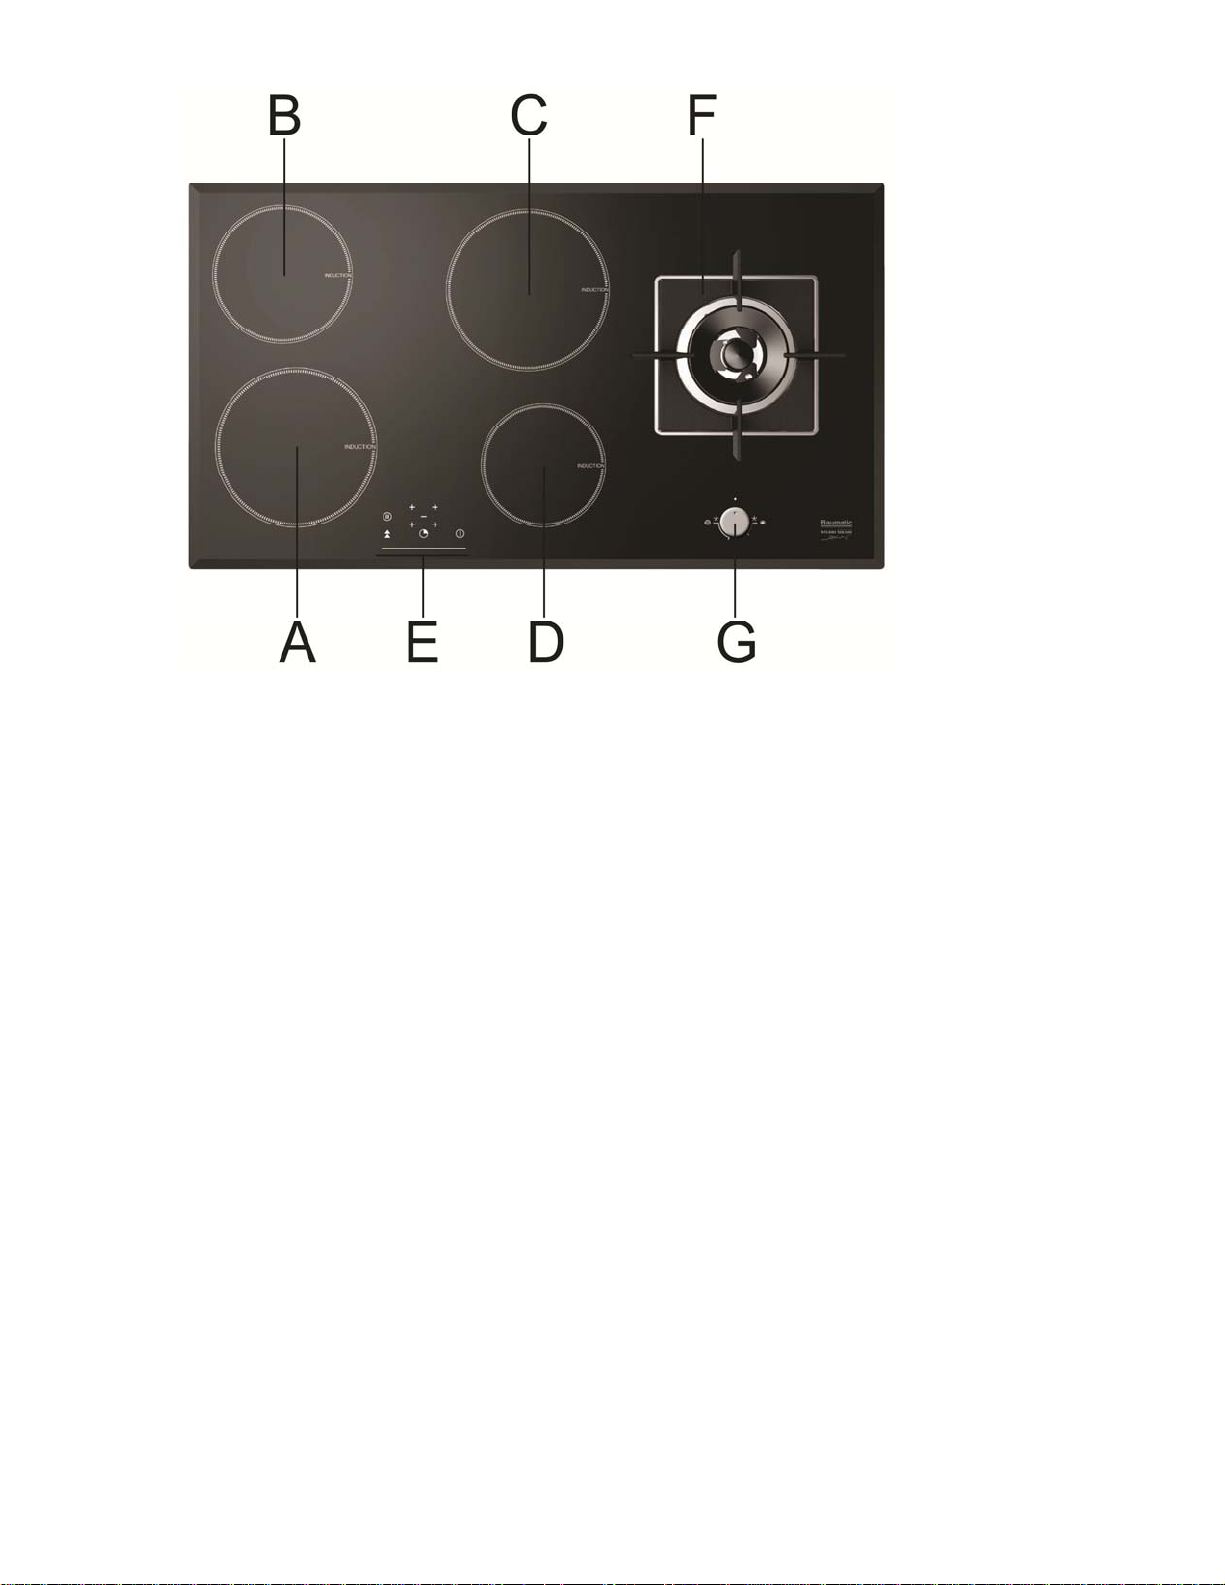
Hob surface layout
A) 3.00 kW induction zone (Ø 210 mm)
B) 1.40 kW induction zone (Ø 160 mm) (booster = 1.85 kW)
C) 2.30 kW induction zone (Ø 210 mm) (booster = 3.00kW)
D) 1.40 kW induction zone (Ø 160 mm)
E) Induction zone control panel
F) 4.00 kW triple crown gas burner
G) Gas wok zone control knob
11
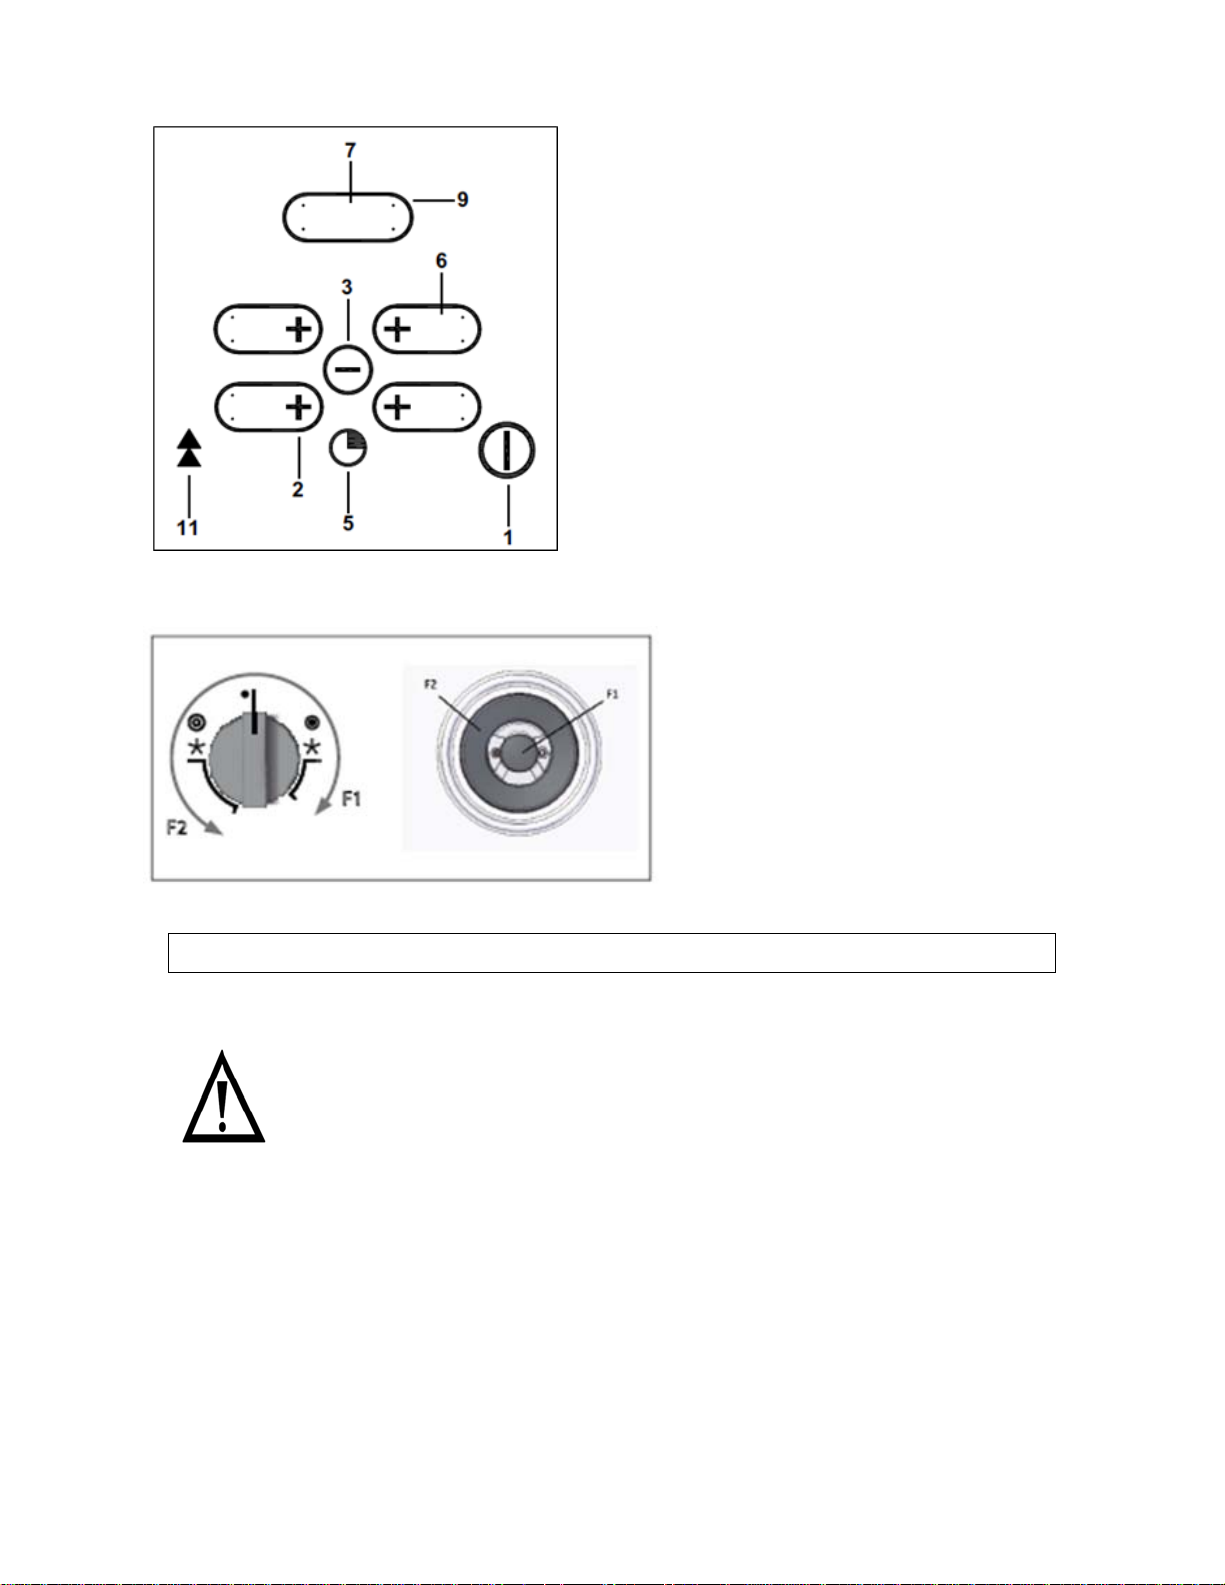
Control panel layout
Induction hob
1) ON / OFF button
2) Plus button(s) / cooking zone
selection button(s)
3) Minus button
4) –
5) Timer button
6) Zone temperature / status
display(s)
7) Timer display
8) –
9) Timer indicator LED
10) –
11) Booster button
Gas Hob
F1) Single (inner) flame
F2) Duel flame
Using the induction hob
Before first use
IMPORTANT: You should clean the induction hob surface
(see “Cleaning and maintenance” section).
o You should switch on one induction cooking zone at a time for 5
minutes at the maximum setting. This will help to eliminate any
new smell that exists and evaporate any humidity that has
formed on the heating elements during transit.
o Do not burn off more than one zone at once.
o You must place a saucepan filled half full with cold water on
each zone as you burn it off. Otherwise the induction zone will
not operate.
12
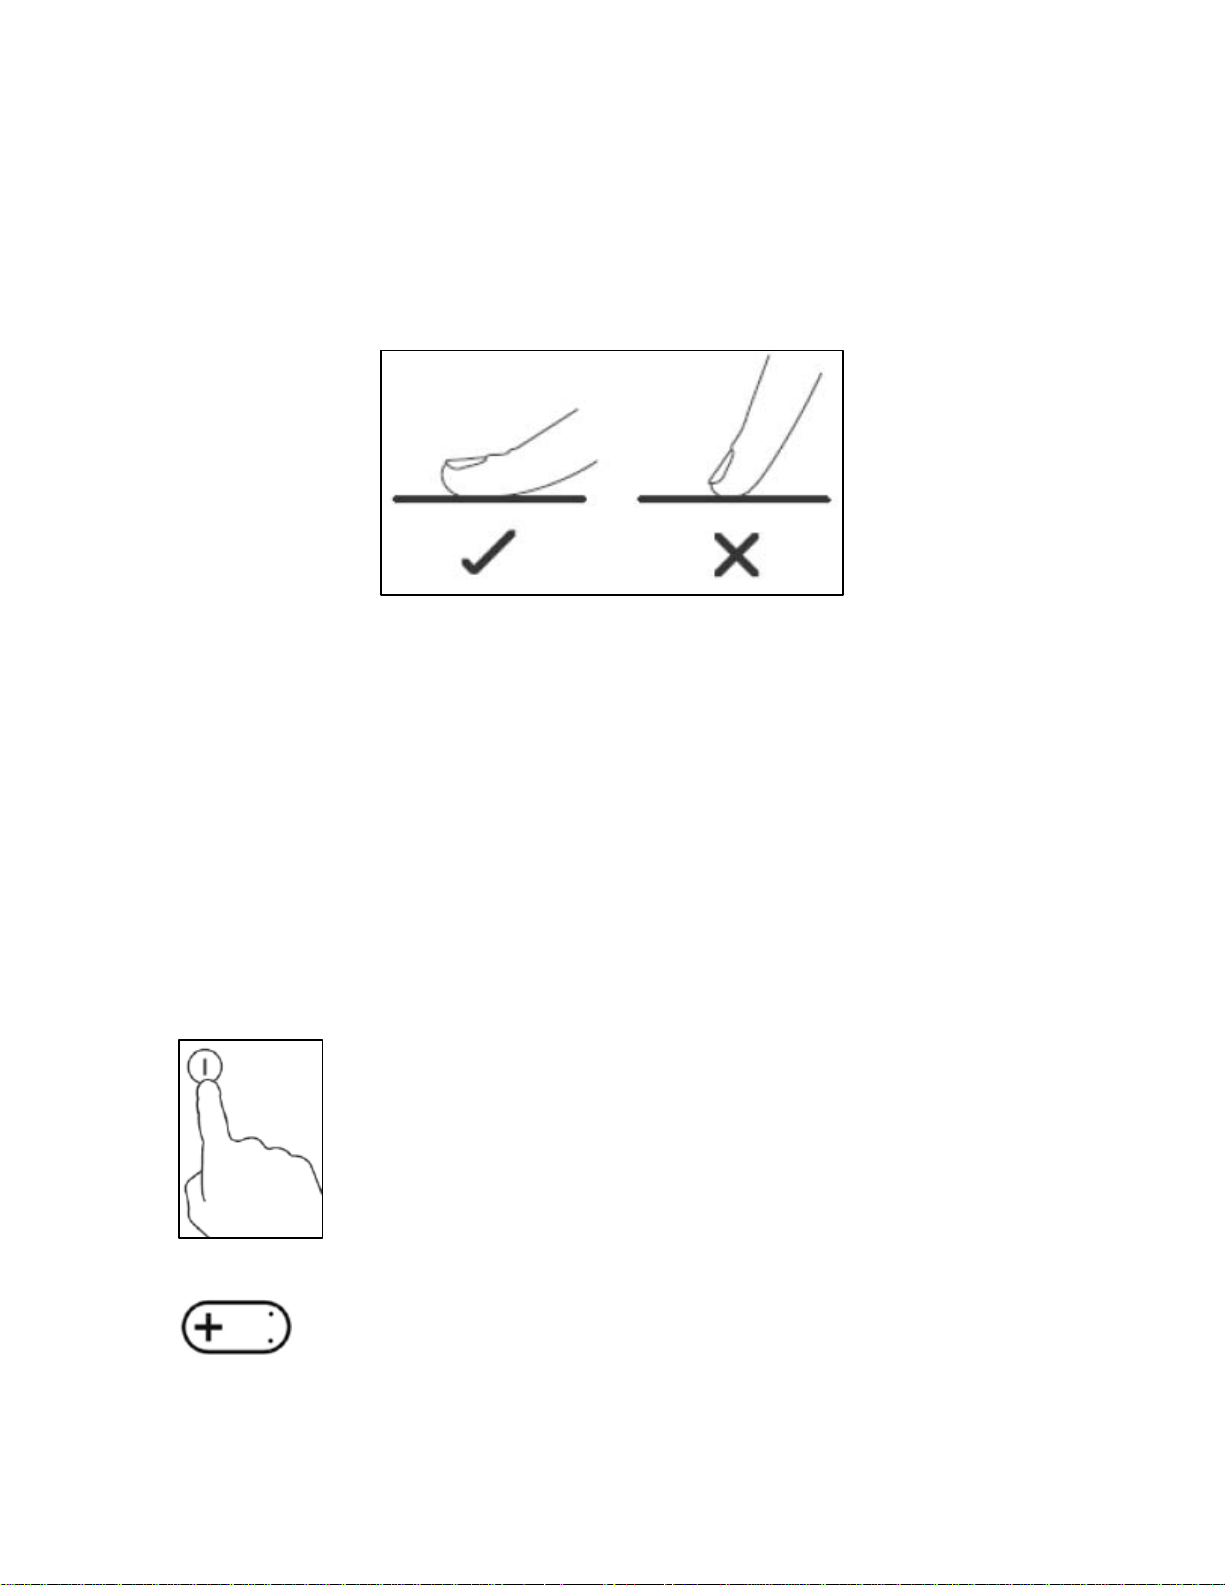
Touch controls
o All operations are performed by means of the touch controls that
can be found on the control panel.
o The controls respond to touch so you do not need to add any
pressure.
o You should use the ball of your finger not the tip when using the
controls.
o A beep will sound each time a touch is registered.
o You should ensure that the controls are kept clean, dry and that
no objects such as utensils or cloths cover them. Even a thin film
of water may make the controls difficult to operate.
Switching the hob on
o When the hob is connected to a power supply the control panel
will initialise for about 3 seconds. The LED lights will illuminate
and the controls will not be operational during this time. Once
the initialisation has completed the hob will go into stand-by
mode.
o To turn the hob on you should press the ON/OFF
button.
o NOTE: Only the ON/OFF button can be pressed
when turning the hob on. If the hob detects
any other key activation it will remain in
stand-by mode.
o All of the cooking zone indicators will show “0” and the
dot in the bottom corner of each cooking zone selector
(2) will flash to indicate that no zone has been selected.
13
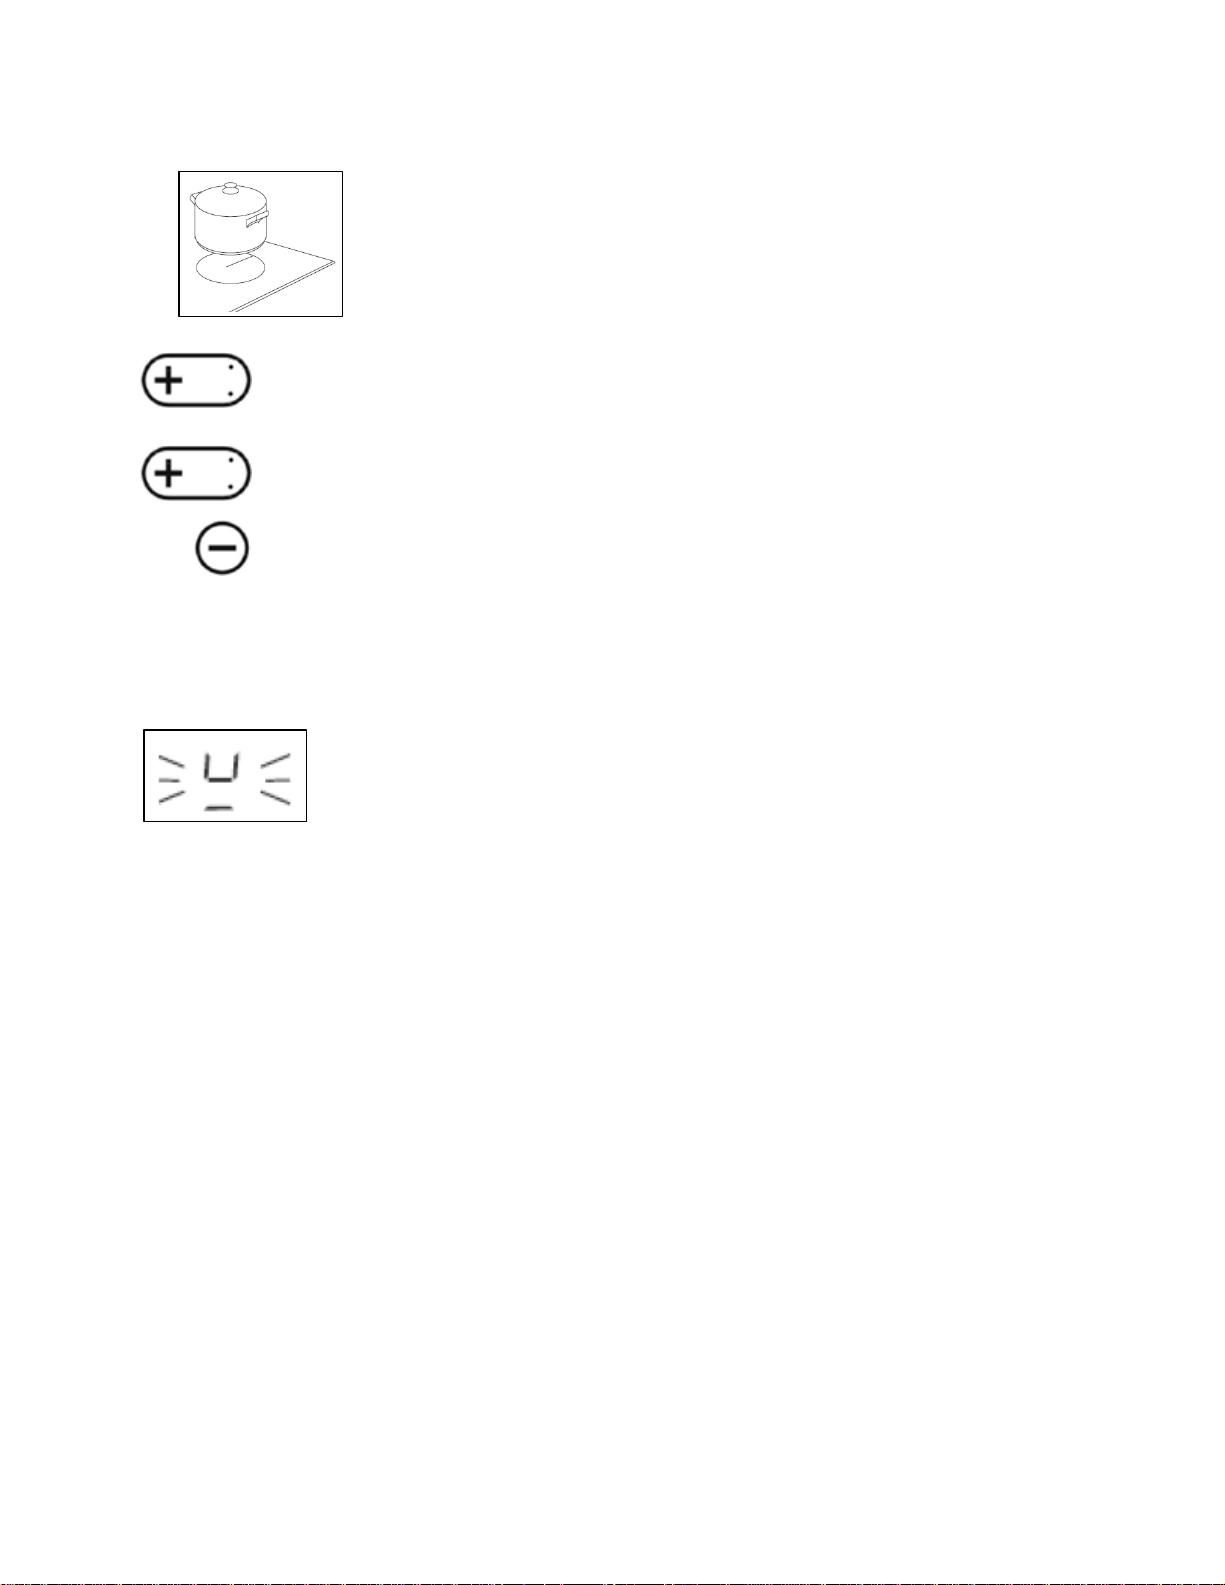
Switching on a zone and setting a power level
IMPORTANT: A zone must be selected within 20 seconds of turning
the hob on. After this time the hob will return to stand-by mode.
o Make sure that the bottom of the pan and the
surface of the hob are clean and dry before
placing a suitable pan on the cooking zone that
you wish to use.
o Press the cooking zone selection button (2) of the
cooking zone that you want to use.
o Select the power level for the cooking zone that you have
selected using the plus button of the zone you are using
and the minus button. If you do not choose a heat setting
within 20 seconds of turning the hob on, the hob will
switch off automatically.
o You can alter the power level at any time during cooking using
the plus and minus buttons.
o If the display flashes with the symbol shown
opposite, alternatively with the heat setting, this
means that:
You have not placed a pan on the correct cooking zone or,
The pan you are using is not suitable for induction cooking or,
The pan is too small or not properly centred on the cooking
zone.
o No heating will take place unless there is a suitable pan on the
cooking zone. The display will automatically turn off after 20
seconds if no suitable pan is placed on it.
14
Power levels
o For a general guide to cooking various foods at the different power
levels please refer to the table below.
o Please note that this table should be viewed as a guide only and
that other factors such as cookware, weight and amount of food
and personal preference will all influence the power level required.
Power
Recommended Use
Level
1 - 2 o Delicate warming of small amounts of food.
o Melting chocolate, butter and foods that burn
quickly.
o Gentle simmering.
o Slow warming.
3 - 4 o Reheating.
o Rapid simmering.
o Cooking rice.
5 - 6 o Cooking pancakes.
7 - 8 o Sautéing.
o Cooking pasta.
9 o Stir-frying.
o Searing.
o Bringing soup to the boil.
o Boiling water.
The boost function
To obtain a faster and more powerful heating speed, the power
booster function can be used for the top cooking zones.
o Press the zone selection button of one of the top zones
(B) or (C).
o Then press the booster button. The cooking zone indicator
will show “P” to indicate that the function has been
activated.
The boost function will operate the zone at maximum power for 10
minutes. After this time, the cooking zone will return to its original
power setting. The booster function can only be used on the back
cooking zones (Zone B = 1.40 kW induction zone + booster = 1.80 kW.
Zone C = 2.30 kW induction zone
+ booster = 3.00kW).
o The booster function can be de-activated by selecting the
relevant zone and then pressing either the booster button again,
or by selecting a new temperature from 1 – 9 on the control
panel by using the minus button.
15
 Loading...