

Page 1

Instruction manual
AS19SS-A Studio Solari
60 cm Multifunction oven
Page 2

ELECTRIC SINGLE
OVENS
USER AND INSTALLATION
INSTRUCTIONS
Page 3

For future reference please record the following
information which be found on the Rating Plate and the
date of purchase which can be found in the invoice:
Model Number …………………….
Serial Number …………………….
Date of Purchase …………………….
Page 4

CONTENTS
General Information pages 3-4
Warning and Safety Instructions pages 5-6
Instructions for Use pages 7-19
Instructions for Installation pages 20-23
Technical Data page 26
Conditions of Guarantee pages 27-28
European directive on Waste Electrical
and Electronic Equipment (WEEE) page 29
Maintenance pages 24-25
Page 5

GENERAL INFORMATION
Please read this booklet thoroughly before you use this appliance.
It is important that you understand all the control functions before
commencing to cook with your Baumatic appliance.
Please remember the advice and warnings shown on page 5 which
is headed ‘IMPORTANT – Warning and Safety Instructions’.
This appliance is designed for domestic household use and can be
built into a standard kitchen cabinet or housing unit.
NOTE: The adjacent furniture or the housing and all materials used
in the installation must be able to withstand a minimum
temperature rise of 85°C above ambient during periods of use.
Certain types of vinyl or laminate kitchen furniture are particularly
prone to heat damage or discolouration at temperatures below the
above guidelines.
Installing the appliance in contravention of this temperature limit
or the placing of adjacent cabinet materials closer than 4mm to the
appliance, will be at the liability of the owner.
For use in Leisure Accommodation Vehicles, notice must be taken
of the appropriate statement in the Installation Instructions.
The use for any other purpose or in any other environment without
the express agreement of Baumatic Ltd, would invalidate any
warranty or liability claim.
Your new appliance is guaranteed against electrical or mechanical
defects subject to certain exclusions noted in Baumatic Ltd
Conditions of Guarantee.
The foregoing does not affect your statutory rights.
3
Page 6

The Warranty applies to Great Britain and Northern Ireland only.
In the event that you require any After Sales Service or advice,
please contact the Baumatic Service Department on telephone
number –
0118 933 6911.
Before using this appliance ensure that any protective packaging or
coatings have been removed. To aid the protection of the
environment, please sort the packing materials into different types
and dispose of them in accordance with the local waste disposal
laws.
Any further information on waste disposal can be obtained from
your local Environmental Agency office.
When first used, an odour may be emitted by any residual
protective finish or moisture, which will cease after a short period
of time.
This Appliance has been Constructed and Distributed in
compliance with the essential requirements of the following EEC
DIRECTIVES and EUROPEAN NORMS:
CE Marking – 93/68 Low Voltage – 73/23 EMC – 89/336
Safety Standards – EN 60 335-1, EN 60 335 – 2 – 6.
As Baumatic have a policy of continued product improvement, the
right is reserved to adjust and make any modifications deemed
necessary without notification.
4
Page 7

IMPORTANT NOTE –
WARNING AND SAFETY INSTRUCTIONS
This appliance complies with all current European safety
legislation, however Baumatic do wish to emphasise that
compliance does not remove the fact that the appliance surfaces
will become hot during use and retain heat after operation.
Baumatic advise that this appliance is not intended for use by young
children or infirm persons unless they have been adequately supervised
by a responsible person to ensure that they can use the appliance
safely. Young children should be supervised to ensure they do not
play with the appliance. If it is necessary for younger family
members to be in the kitchen, please ensure that they are kept under
close supervision at all times. During use, the appliance becomes hot.
Care should be taken to avoid touching heating elements inside the oven.
Do not place heavy objects on (max 20Kg) or lean on the oven door
when open as this can cause damage to the hinges.
Do not leave heated oil or fat unattended as there is a risk of fire.
Do not place pans or baking trays on the bottom of oven cavities or
line any part of the oven cavity with aluminium foil.
Do not allow electrical fittings or cables to be in contact with hot
areas of the appliance.
Do not use the appliance for space heating or to dry clothes.
Do not install the appliance next to curtains or soft furnishings.
Do not attempt to lift or move cooking appliances by pulling on any
door or handle as this can cause damage.
Always use oven gloves when moving food in or out of the oven cavity.
Warning: this ap
pliance must be earthed.
Do not pour water directly into the inside of a hot oven:
the enamel coating could be damaged.
Before any cleaning operation inside the oven, wait until it has cooled
down.
Do not use a steam cleaner with this appliance.
.
WARNING: accessible parts will become hot when in use. To avoid
burns and scalds children should be kept away.
5
Page 8

NOTE: This appliance must be correctly installed by a suitably
qualified person, strictly in accordance with the manufacturer’s
instructions.
For electrical installations, NICEIC registration is recommended.
Baumatic Ltd declines any responsibility for injury or damage
to persons or property as a result of improper use or installation
of this appliance.
Heat, steam and moisture will be created during use, take care
to avoid injury and ensure that the room is adequately
ventilated. If prolonged use occurs, additional ventilation may
be required – please consult your Qualified Installer if you are
in any doubt about the amount required.
6
Please note that this appliance carries the CE mark for normal
domestic use and is not suitable for the marine environment.
Page 9

INSTRUCTIONS FOR USE
These User Instructions should be retained for future reference and
for use by a person who is perhaps unfamiliar with the appliance.
The following models are covered by these instructions:
AS19SS-A UK
AS19SK.X-A
7
Page 10

TEMPERATURE
DISPLAY
TIMER
DISPLAY
COOKING
FUNCTIONS
CONTROL PANEL
8
Page 11

FUNCTION BUTTONS
Decreases temperature
Increases temperature
ON/OFF and CHILDREN CARE
Minute minder
Cooking time
End time
- Minus setting
+ Plus setting
Program setting
Program setting
OPERATION
The timer flashes on the display when switched on for the first time and the oven cannot
be operated; follow the "Setting the time" procedure to start it.
SETTING THE TIME
Press buttons and simultaneously and use buttons - and + to set the exact time.
SWITCHING ON THE OVEN
Press button . The timer display will show ON while the bulb symbol on the timer display
lights up and the internal oven light goes on.
If no cooking mode has been selected in 1 minute, the bulb symbol and the oven light
go off. Then, the oven goes to the OFF position.
MINUTE MINDER
Switch on the oven; press button and set the time with buttons - and + to a maximum
of 23h59m. When the time has elapsed, an acoustic signal together with the flashing Pot symbol
will be emitted. To stop the sound and the flashing, press any of buttons: .
MANUAL OPERATION FOR AN INDEFINITE PERIOD OF TIME
Switch on the oven; select an available cooking function using buttons and :
the oven will suggest a preset temperature, which can be changed using buttons and ;
Wait until the 2 dots on the timer display stop flashing, than the timer shows the current
hour and the oven will start working: the symbol of the centigrade degree starts blinking,
.
COOKING TIME SEMIAUTOMATIC OPERATION (for fixed-time cooking)
Switch on the oven; press button and set the required cooking time with buttons - and +
to a maximum of 10h00m. After that, wait until the timer shows the current hour.
Then, select an available cooking function: the oven will suggest a preset temperature,
which can be changed using buttons and ; wait until the 2 dots on the timer display
stop flashing, than the timer shows the current hour and the oven will start working for
the set time. When the fixed time has elapsed, the oven stops cooking.
which means the preheating of the oven, and when the requested temperature is reached
this symbol stops blinking and the oven beeps; now you can put in the food you want to cook.
9
Page 12

END OF COOKING SEMIAUTOMATIC OPERATION
For fixed-time cooking
Switch on the oven; press button and set the end of cooking time, within the next 23h59m,
23h59m, with buttons - and +. Wait until the 2 dots on the timer display stop flashing and
the timer shows the current hour; then select an available cooking function: the oven will suggest
a preset temperature, which can be changed using buttons and ; wait until the 2 dots
on the timer display stop flashing, then the timer shows the current hour and the oven
starts cooking. When the fixed time has elapsed, the oven stops cooking.
AUTOMATIC OPERATION
For fixed-time cooking
Switch on the oven; press button and set the required cooking time with buttons - and +.
Wait until the 2 dots on the timer display stop flashing, then the timer shows the current hour;
then press button and set the end of cooking time with buttons - and +. Wait again until
the timer shows the current hour, then select an available cooking function: the oven will
suggest a preset temperature, which can be changed using buttons and . When the 2
dots on the timer display stop flashing, the oven begin the delayed start mode: then, it will
automatically start for the requested duration and stop at the requested time. During the delayed
start phase, both the temperature and the function will remain displayed and they can be changed.
When the time of cooking is over, a triple acoustic signal starts while temperature and functions
displays go off, the timer display shows the time and the two Pot and Auto symbols start flashing.
To reset the oven, press any of these buttons: ; the acoustic signal stops
and the oven is ready to receive new commands; it is possible to immediately select a new cooking
function, or switch the oven off.
TIMER DISPLAY SYMBOLS
Pot: when it lights up, it indicates that a cooking function is on, even in manual mode.
The pot does not light up when "light", "preheating" and "defrost" functions are activated.
When the pot is flashing, it indicates that the time cooking is over.
During the delayed start phase, it remains off and then lights up again when the cooking time
has been completed.
A (auto): when it lights up, it indicates that a cooking time setup has been selected (in other
words, the oven is not in manual mode). When flashing, it means that the cooking time is over.
Bell: when it lights up, it indicates that the minute minder is on. When flashing, it indicates
the end of the minute count.
SELECTING THE COOKING TEMPERATURE
When using buttons and , the temperature increases between the low and high setting
for each cooking mode with +/- 5 degrees increases (shown on the temperature display).
SELECTING THE COOKING MODE
When using buttons and , the program icons light up alternately from left to right.
10
Page 13

OVEN LIGHT
The internal oven light goes on. If no cooking mode is selected after 1 minute,
Cooking functions:
PRH PREHEATING
CONVECTION MODE
This provides traditional cooking with heat from the top and bottom
elements.
This function is intended for preheat the oven in a little faster time.
Step 1 - The grill and sole resistance, the radial fan and the oven light turn on.
A circular moving symbol is shown on the temperature display.
Preheating up to 210°C. When the temperature has been reached, a specific
acoustic signal will be emitted. The temperature cannot be changed.
Step 2 - The internal oven light goes on. It is the same as step 1, but the acoustic
signal keeps on during this phase.
LOWER ELEMENT MODE
This is for slow cooking or for warming up meals.
TOP ELEMENT MODE
This is for gentle cooking, browning or keeping cooked dishes warm.
GRILL HEATING ELEMENT
VENTILATED GRILL HEATING ELEMENT
11
Page 14

Cooking functions:
PIZZA FUNCTION
This kind of cooking is ideal for pizza and vegetable dishes.
With this function, lower heating element, circular heating
element and fan motor work at the same time.
FAN OVEN MODE
This provides even heating with the fan and allows different
dishes to be cooked at the same time on different levels.
DEFROST MODE
The fan runs without heat to reduce the defrost time for frozen
food.
The message " dEF " is shown on the temperature display.
AUTOMATIC AND SEMIAUTOMATIC COOKING RESTRICTIONS
The preheating and defrosting functions are not compatible with fixed-time cooking:
-after setting the function, it is not possible to set either the time or end of cooking.
-when it is in the delayed start mode, it will not be possible to choose the function
during the cyclic selection of the 10 icons.
12
Page 15

OTHER FUNCTIONS
OVEN OFF MODE
When no function is selected, the temperature and program displays are off and
the timer displays the time.
"CHILDREN CARE" - CONTROLS LOCK FUNCTION
Hold down button for at least 3 seconds: the oven will be set on "children care"
function; the display will show " " and then " On ".
The time is then displayed again.
If the locking function is activated after any one of the cooking setups (manual,
semiautomatic, automatic), it will be possible only to set the minute minder or to switch
off the oven. By pressing any other key, the " " display will remember the lock function
is activated. If manually or automatically switched off, the controls lock will not be deactivated.
To disable the key, press button for at least 3 seconds. The display will show " "
and then "OFF". The time is then displayed again.
when the oven is locked, it will not be possible to switch it on with button (ON/OFF).
OFF BUTTON
When used for switching off the oven, button (ON/OFF) has priority over any other
function, even over
the Controls Lock.
OVEN LIGHT CONTROL
When the required function is selected, the oven light will stay on during the preheating
and it will turn off 3 minutes after the ond of the preheating. The oven light will switch on
again when any of these buttons are pressed: and it will then turn off after
3 minutes. If the children care function is activated, the light goes on and the " "
symbol will start flashing.
PREHEATING
When preheating, in other words when the oven is heating up to reach the required
temperature without actually reaching it yet, the temperature indicator " ° " will flash.
This symbol " ° " will be on continuosly in all other cases, for example: when the oven
is holding the temperature previously reached, or when the oven is cooling to reach
a temperature set lower than the initial value.
.
TIMER RESET
With the oven switched on, it is possible to reset the settings of the timer (end of cooking
time and cooking time) by pushing together buttons and :
t
he oven automatically remains switched on manual operation for an indefinite time;
otherwise it is possible to switch off the oven to reset all settings.
13
Page 16

WARNING
• Ensure that the oven door is kept closed
when using the GRILL.
• Do not use aluminium foil to cover the grill pan or heat.
• Do not wrap items in aluminium foil and place under the
grill – the high reflectivity of the foil can damage the grill
element.
HELPFUL HINTS
• Before cooking, check that any unused accessories are removed
from the oven.
• Preheat the oven at cooking temperature before use.
• Place cooking trays in the centre of the oven and allow gaps
when using more than one tray for air to circulate.
• Try to open the door as little as possible to view food (the oven
light remains on during cooking).
• Be careful when opening the door to avoid contact with hot
parts and steam.
COOKING GUIDELINES
Please refer to the information on food packaging for guidance on
cooking temperatures and times. Once familiar with the performance
of your appliance, temperatures and times can be varied to suit
personal preferences.
Make sure that frozen foods are thoroughly thawed before cooking,
unless instructed otherwise.
14
Page 17

CLEANING THE APPLIANCE
Always allow the appliance to cool down before cleaning to avoid
a burn injury.
Do not use caustic or abrasive agents, coarse wire wool or hard
tools as these can damage the surface finishes.
Normally, wiping with a soft cloth dampened with hot detergent is
sufficient, but for stubborn marks the following is recommended:
VITREOUS ENAMEL PARTS
Use only a cleaner that is recommended for this type of material –
void chloride-based products such as bleach.
a
15
Page 18

REMOVING THE OVEN DOOR INNER GLASS PANEL (fig. 1-2)
Do not use any abrasive medium that could cause damage.
Remember that if the surface of the glass panel becomes scratched,
this could lead to a dangerous failure.
To remove the oven door inner glass panel, use a coin to perform
a levering action in the two grooves (A) until the two pins (B) are
released from their housing (fig. 1).
Then raise the glass as shown in fig. 2 and take it out from the top.
To refit the door, repeat the two previous operations in reverse.
Reinsert the glass by resting it on the inner door and pushing it in.
Press on the glass until the pins slot back into their initial position (fig. 2).
Care must be taken when cleaning between the door glasses, and
inside the inner frame as some of the edges maybe sharp due to
the manufacturing process.
16
Page 19

REMOVING THE OVEN DOOR
INNER GLASS PANEL (fig. 1-2)
Fig. 1
Fig. 2
17
Page 20

REMOVING AND REFITTING THE OVEN DOOR (1-6)
The door can be hooked on both sides
Block position
Release
position
1
2
3
18
Page 21

4
5
6
Release
position
Block
position
Warning: once completed
the operation, check the door
is correctly hooked.
19
Page 22

INSTRUCTIONS FOR INSTALLATION
This appliance must be installed by a competent person, in
accordance with the current version of the following UK
Regulations and Safety Standards or their European Norm
replacements:
Building Regulations (issued by the Department of Environment)
Building Standards (issued by the Scottish Development
Department)
IEE Wiring Regulations
Electricity at Work Regulations
PRE-COMMISSIONING THE APPLIANCE
When unpacked, check that the following parts are included
with the appliance:
• Baumatic Instruction and Installation Book.
• 2 oven shelves;
• 1 set comprising Grill Pan, Trivet and handle.
• Screws and plugs for fixing appliance into housing.
POSITIONING THE APPLIANCE
These appliances are classified as Class 1.
20
INSTALLATION NOTES
1. Ensure that the aperture for oven installation is the correct size
as the figure on the following page.
2. Ensure that the rear panel of the furniture housing has been
removed.
3. All ovens with which this instruction book is provided may be
installed without the need for any additional ventilation cutouts.
4. Ensure that the oven has been securely fixed into the housing.
The fixing of the oven in the cabinet is made by 4 screws
on each corner of the oven door-frame (please see pics. on page 22).
Page 23

85-90
85-90
592-593
550 min.
550 min.85-90
600
564
564
21
INSTALLATION
Page 24

12,9
25
4,6
597
560
525
575
591
25
520
22
Fixing screw
(1 on each corner)
Fixing screw
Oven door
(upper view)
Front panel
(side view)
Page 25

ELECTRICAL CONNECTION
Before connecting the appliance, make sure the supply voltage
marked on the Rating Plate corresponds with the mains supply
voltage.
WARNING – THIS APPLIANCE MUST BE EARTHED
This appliance should be wired into a 16A double pole switched
fused spur outlet having 3mm contact separation and placed in an
easily accessible position adjacent to the appliance.
IMPORTANT
The wires in the mains supply lead are coloured in accordance with
the following code:
Green and Yellow - Earth
Blue - Neutral
Brown - Live
The wire coloured Green and Yellow must be connected to the
terminal marked ‘E’ or with the earth symbol (⊥) or coloured green
and yellow.
The wire coloured Blue must be connected to the terminal marked
‘load’ and ‘N’.
The wire coloured Brown must be connected to the terminal
marked ‘load’ and ‘L’.
Care must be taken to ensure that the temperature of the mains
supply lead does not exceed 50°C.
23
Page 26

REPLACING THE MAINS LEAD
In the event it is necessary to replace the mains supply lead,
proceed as follows:
1. Disconnect the appliance from the supply, undo the fixing
screws and remove the back panel.
2. Undo the clamp screws and terminal screws to release the
existing lead.
3. Assemble the replacement lead that must conform to the
specification listed in the Technical Data, ensuring the correct
colour code connection and that all screws are tightened
correctly.
MAINTENANCE
Before carrying out any maintenance, disconnect the appliance
from the electricity supply.
During the guarantee period, in case of need all service
interventions should be referred back to the Baumatic Ltd
Service department. Please note that intervention or repair by
any unauthorised personnel will invalidate such guarantee.
24
Page 27
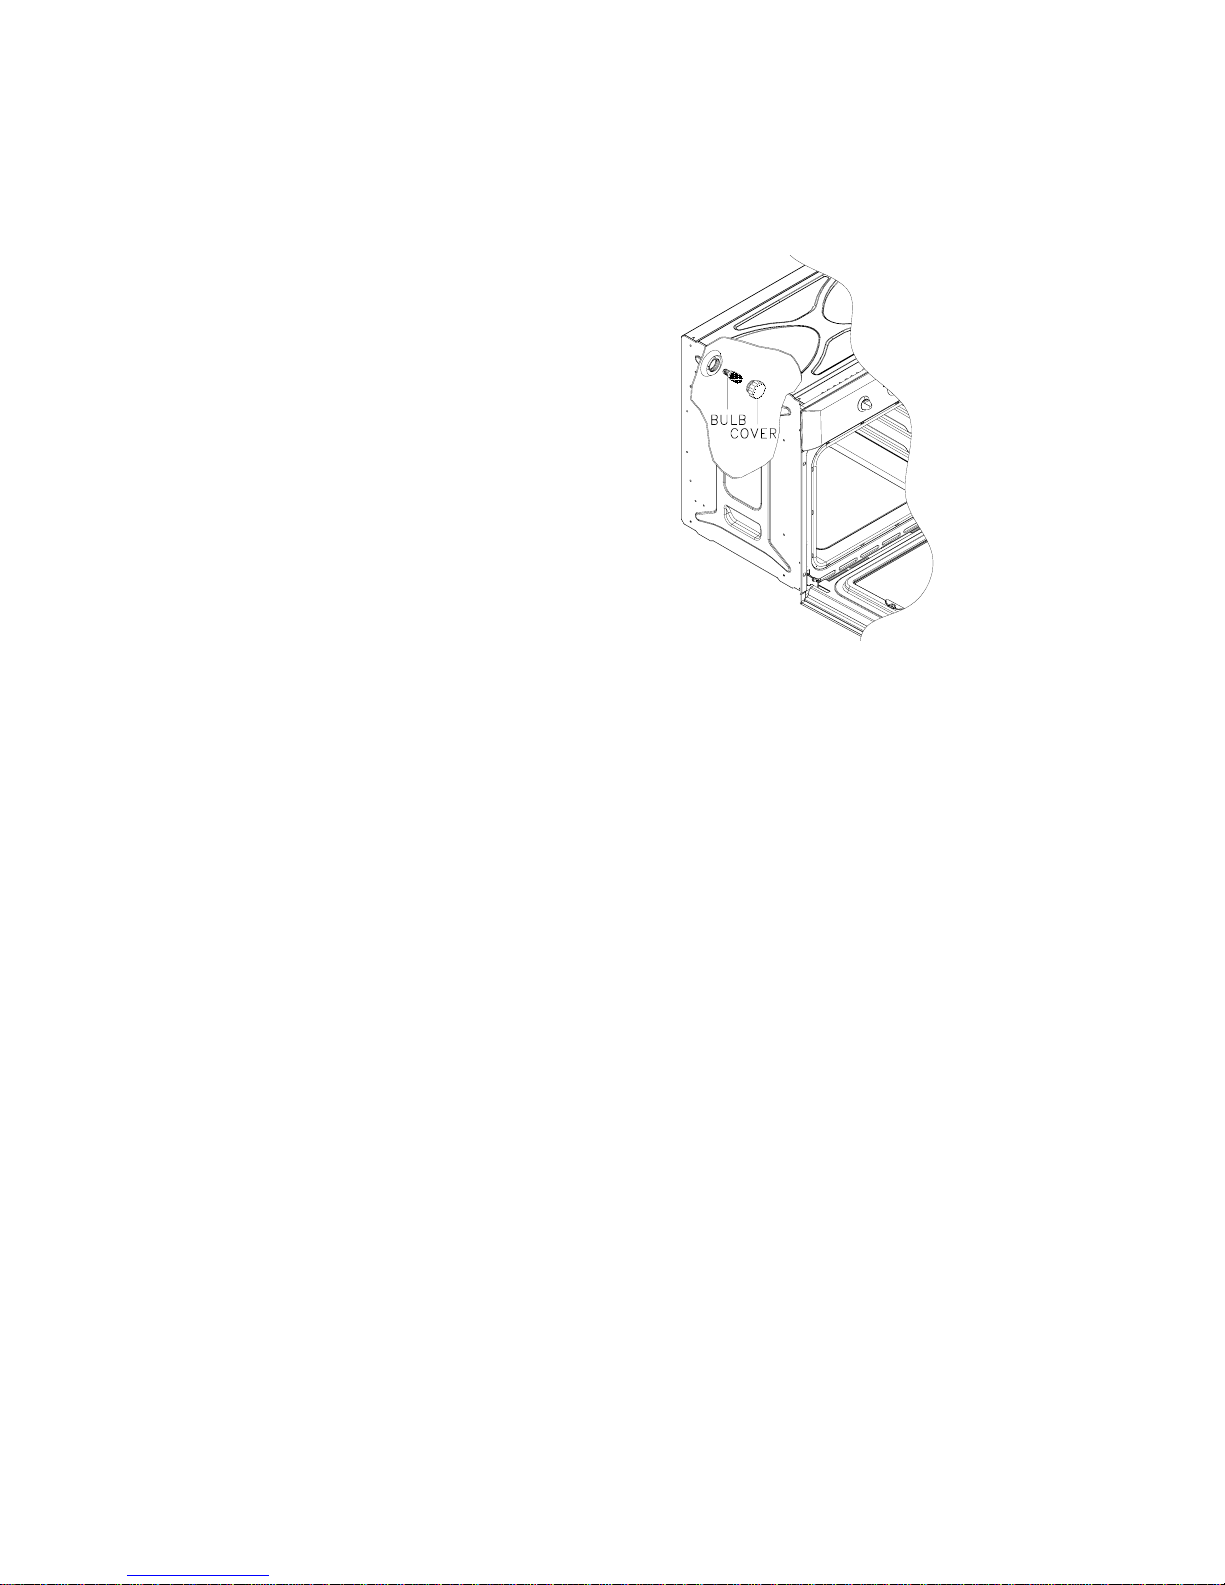
REPLACING THE OVEN LIGHT
(Not covered by the appliance
warranty)
Disconnect the appliance from the
electricity supply, remove the oven
door (as described previously) as
well as the oven shelves.
Remove the protective glass lightcover by twisting anti-clockwise.
Unscrew the old bulb and discard
safely, replace with the type
specified in the Technical Data and
refit the cover.
NOTE – The glass cover may be tight and may therefore
require a tight grip to release.
CARE AND REPLACEMENT OF CATALYTIC LINERS
(Where fitted, the liners are not covered by the appliance
warranty).
To keep the ‘stay clean’ liners operating effectively, the oven
should be heated to at least 200°C whenever heavy soiling has
occurred, in order to avoid permanent soiling.
If the liners are allowed to become black and shiny, they must be
replaced by new items. Remove all internal accessories to facilitate
replacement of the liners.
Replacement liners may be purchased directly from the Baumatic
Spares Department (details on page 28).
Please quote product-type references B600 and/or your appliance’s
serial number when placing your order.
25
Page 28

TECHNICAL DATA
DIMENSIONS
Height: 591mm
Width: 597mm
Depth: 525mm
COOLING FAN
A tangential cooling fan is fitted on the following models:
AS19SS-A UK, AS19SK.X-A
ELECTRICAL DETAILS
Rated Voltage: 230V a.c. 50Hz
Supply Connection: 16A (double pole switched fused outlet with
3mm contact gap)
Mains supply lead: 3x 1.5mm2 type H05 RR-F <HAR>
Oven Light Bulb: 25W/300°C Screw type pigmy
AS19SS-A UK, AS19SK.X-A 3,68kW
MAX RATED INPUTS:
26
Page 29

Baumatic Ltd. Conditions of guarantee
Dear Customer,
Your new Baumatic appliance comes complete with a free 12 month guarantee covering both parts and
labour costs resulting from defective materials or workmanship.
Baumatic also gives you the opportunity to automatically extend the guarantee period for a further 12
months at no extra cost, giving an initial guarantee period of 24 months. The extended guarantee period
applies to England, Scotland, Wales and Northern Ireland only.
To qualify for your full 24 months guarantee you must register your appliance within 28 days of purchase
to be covered under this guarantee. This can be done online via:
the guarantee card which can be found in each new Baumatic appliance.
* In addition, your appliance is covered by a 5 year parts warranty. Baumatic Ltd will provide free of
charge the parts required to repair the appliance, only if they are fitted by a Baumatic engineer, for any
defect that arises due to faulty materials or workmanship within a period of 5 years from the original
purchase date.
* An additional 1 to 3 year insurance scheme for labour is available should you wish to extend the
warranty period.
Should any person other than an authorised representative of Baumatic Ltd interfere with the appliance, the
policy is negated and Baumatic Ltd will be under no further liability.
The guarantee covers the appliance for normal domestic use only, unless otherwise stated.
Any claims made under the terms of the guarantee must be supported by the original invoice/bill of sale
issued at the time of purchase.
This guarantee is transferable only with the written consent of Baumatic Ltd.
If the appliance fails and is considered either not repairable or uneconomical to repair between 12 months
(2 years if registered) and five years, a free of charge replacement will not be offered.
The guarantee for any replacement will only be for the remainder of the guarantee on the original product
purchased.
The guarantee does not cover:
- Sinks and taps
- Failure to comply with the manufacturers instructions for use.
- The replacement of cosmetic components of accessories
- Accidental damage or wilful abuse.
- Subsequent loss or damage owing to the failure of the appliance or electrical supply
- Incorrect installation
- Losses caused by Acts of God, civil war, failure to obtain spare parts, strikes or lockouts
- Filters, fuses, light bulbs, external hoses, damage to bodywork, paintwork, plastic items, covers,
baskets, trays, shelves, burner bases, burner caps, decals, corrosion, rubber seals.
In the course of the work carried out it may be necessary to remove the appliance from it operating
position. Whilst all reasonable care will be taken, Baumatic Ltd cannot accept responsibility for damage
sustained to any property whatsoever in this process.
This guarantee is in addition to and does not diminish your statutory or legal rights.
Contacting Baumatic Ltd
Sales Service Spares Technical/Advice
TEL: 0118 933 6900 TEL: 0118 933 6911 TEL: 0118 933 6922 0118 933 6933
FAX: 0118 931 0035 FAX: 0118 986 9124 FAX: 0118 933 6942 0118 933 6942
For ROI (Republic of Ireland), please contact one of the numbers below:
TEL: 01 – 6266798 FAX: 01 - 6266634
Thanks you for buying Baumatic.
*
Applies to UK, Scotland, Wales & Northern Ireland only (Republic of Ireland has 1 year labour & 1 year parts warranty only)
www.baumatic.co.uk or through returning
Page 30

Headquarters
Baumatic Ltd.
Baumatic Buildings,
6 Bennet Road,
Reading,
Berkshire
RG2 0QX, United Kingdom
Sales Telephone
+44 118 933 6900
Sales Fax
+44 118 931 0035
Service Telephone
+44 118 933 6911
Service Fax
+44 118 986 9124
Spares Telephone
+44 118 933 6922
Technical / Advice Telephone
+44 118 933 6933
E-mail:
sales@baumatic.co.uk
technical@baumatic.co.uk
Http (Internet site):
www.baumatic.com
Page 31

This appliance is marked according to the European directive
2002/96/EC on Waste electrical and Electronic Equipment (WEEE).
By ensuring this product is disposed of correctly, you will help
prevent potential negative consequences for the environment and
human health, which could otherwise be caused by inappropriate
waste handling of this product.
The symbol on the product, or on the documents
accompanying the product, indicates that this appliance may not
be treated as household waste. Instead it shall be handed over to
the applicable collection point for the recycling of electrical and
electronic equipment.
Disposal must be carried out in accordance with local environmental
regulations for waste disposal.
For more detailed information about treatment, recovery and
recycling of this product, please contact your local city office,
your household waste disposal service or the shop where you
purchased the product.
29
Page 32

®
Baumatic
www.baumatic.com
 Loading...