

Bauknecht KSI 9GF2 operation manual

EN
Instructions for use
DE
FR
NL
IT
ES
SL
SK
HU
HR
CS
DA
Gebrauchsanweisung
Mode d’emploi
Gebruiksaanwijzing
Manuale per l’uso
Manual de Uso
Navodila za uporabo
Návod na použitie
Használati utasítás
Upute za uporabu
Návod k obsluze
Brugsanvisninger
SV
Bruksanvisning


ENGLISH
Instructions for use Page 4
DEUTSCH
FRANÇAIS
NEDERLANDS
ITALIANO
ESPAÑOL
SLOVENŠČINA
SLOVENSKY
MAGYAR
HRVATSKI
ČESKY
DANSK
SVENSKA
Gebrauchsanweisung Seite 22
Mode d’emploi
Gebruiksaanwijzing Pagina 58
Manuale per l’uso Pagina 76
Manual de Uso Página 94
Navodila za uporabo Strani 109
Návod na použitie Strana 127
Használati utasítás 141 Oldal
Upute za uporabu Stranica 158
Návod k obsluze Strana 176
Brugsanvisninger Side 190
Bruksanvisning Sidan 205
Page 40

SAFETY INSTRUCTIONS
IMPORTANT to be read and observed
Before using the appliance, read
these safety instructions. Keep them
nearby for future reference.
These instructions and the appliance
itself provide important safety
warnings, to be observed at all times.
The manufacturer declines any
liability for failure to observe these
safety instructions, for inappropriate
use of the appliance or incorrect
setting of controls.
Very young children (0-3 years)
should be kept away from the
appliance. Young children (3-8
years) should be kept away from
the appliance unless continuously
supervised. Children from 8 years
old and above and persons with
reduced physical, sensory or mental
capabilities or lack of experience and
knowledge can use this appliance
only if they are supervised or have
been given instructions on safe
use and understand the hazards
involved.
Children must not play with the
appliance. Cleaning and user
maintenance must not be carried out
by children without supervision.
PERMITTED USE
CAUTION: The appliance is not
intended to be operated by means
of an external switching device,
such as a timer, or separate remote
controlled system.
This appliance is intended to
be used in household and similar
applications such as: staff kitchen
areas in shops, ofces and other
working environments; farm houses;
by clients in hotels, motels, bed
& breakfast and other residential
environments.
professional use. Do not use the
appliance outdoors.
appliance is specically designed
for domestic appliances and is not
suitable for general room lighting
within the home (EC Regulation
244/2009).
operation in places where the
ambient temperature comes within
the following ranges, according to
the climatic class given on the rating
plate. The appliance may not work
properly if it is left for a long time at
a temperature outside the specied
range.
Climatic Class Amb. T. (°C)
SN: From 10 to 32 °C
ST: From 16 to 38 °C;
N: From 16 to 32 °C
T: From 16 to 43 °C
This appliance does not
appliance refrigerant circuit pipes.
openings, in the appliance enclosure
or in the built-in structure, clear of
obstruction.
This appliance is not for
The bulb used inside the
The appliance is designed for
contain CFCs. The refrigerant
circuit contains R600a (HC).
Appliances with Isobutane
(R600a): isobutane is a natural
gas without environmental
impact, but is ammable.
Therefore, make sure the
refrigerant circuit pipes are
not damaged, especially when
emptying the refrigerant circuit.
WARNING: Do not damage the
WARNING: Keep ventilation
4
WARNING: Do not use
mechanical, electric or chemical
means other than those
recommended by the Manufacturer
to speed up the defrost process.
WARNING: Do not use or
place electrical devices inside the
appliance compartments if they are
not of the type expressly authorised
by the Manufacturer.
WARNING: Ice makers and/
or water dispensers not directly
connected to the water supply must
be lled with potable water only.
Do not store explosive substances
such as aerosol cans and do not
place or use gasoline or other
ammable materials in or near the
appliance.
Do not swallow the contents (nontoxic) of the ice packs (provided with
some models). Do not eat ice cubes
or ice lollies immediately after taking
them out of the freezer since they
may cause cold burns.
For products designed to use
an air lter inside an accessible fan
cover, the lter must always be in
position when the refrigerator is in
function.
Do not store glass containers with
liquids in the freezer compartment
since they may break.
Do not obstruct the fan (if included)
with food items.
After placing the food check that the
door of the compartments closes
properly, especially the freezer door.
Damaged gaskets must be
replaced as soon as possible.
Use the refrigerator compartment
only for storing fresh food and the
freezer compartment only for storing
frozen food, freezing fresh food and
making ice cubes.
Avoid storing unwrapped food
in direct contact with internal
surfaces of the refrigerator or freezer
compartments.
Appliances could have special
compartments (Fresh Food
Compartment, Zero Degree Box,...).
Unless differently specied in the
specic booklet of product, they can
be removed, maintaining equivalent
performances.
C-Pentane is used as blowing
agent in the insulation foam
and it is a ammable gas.
INSTALLATION
The appliance must be handled
and installed by two or more persons
- risk of injury. Use protective gloves
to unpack and install - risk of cuts.
Installation, including water supply
(if any), electrical connections and
repairs must be carried out by a
qualied technician. Do not repair
or replace any part of the appliance
unless specically stated in the user
manual. Keep children away from
the installation site. After unpacking
the appliance, make sure that it has
not been damaged during transport.
In the event of problems, contact
the dealer or your nearest Aftersales
Service. Once installed, packaging
waste (plastic, styrofoam parts
etc.) must be stored out of reach of
children - risk of suffocation. The
appliance must be disconnected
from the power supply before any
installation operation - risk of electric
shock. During installation, make sure
the appliance does not damage the
power cable - risk of re or electric
shock. Only activate the appliance
5

when the installation has been
completed.
Be careful not to damage the
oors (e.g. parquet) when moving the
appliance. Install the appliance on
a oor or support strong enough to
take its weight and in a place suitable
for its size and use. Make sure the
appliance is not near a heat source
and that the four feet are stable and
resting on the oor, adjusting them
as required, and check that the
appliance is perfectly level using a
spirit level. Wait at least two hours
before switching the appliance on, to
ensure that the refrigerant circuit is
fully efcient.
All dimensions and spacing needed
for installation of the appliance are in
the Installation Instruction booklet.
WARNING: When positioning the
appliance, ensure the supply cord is
not trapped or damaged.
WARNING: To avoid a hazard
due to instability, positioning or xing
of the appliance must be done in
accordance with the manufacturer
instructions.
It’s forbidden to place the refrigerator
in such way that the metal hose of
gas stove, metal gas or water pipes,
or electrical wires are in contact with
the refrigerator back wall (condenser
coil).
ELECTRICAL WARNINGS
It must be possible to disconnect
the appliance from the power
supply by unplugging it if plug is
accessible, or by a multi-pole switch
installed upstream of the socket in
accordance with the wiring rules
and the appliance must be earthed
in conformity with national electrical
safety standards.
Do not use extension leads,
multiple sockets or adapters. The
electrical components must not
be accessible to the user after
installation. Do not use the appliance
when you are wet or barefoot.
Do not operate this appliance if it has
a damaged power cable or plug, if
it is not working properly, or if it has
been damaged or dropped.
If the supply cord is damaged, it
must be replaced with an identical
one by the manufacturer, its service
agent or similarly qualied persons
in order to avoid a hazard - risk of
electric shock.
WARNING: Do not locate multiple
portable socket-outlets or portable
power supplies at the rear of the
appliance.
CLEANING AND MAINTENANCE
WARNING: Ensure that the
appliance is switched off and
disconnected from the power supply
before performing any maintenance
operation; never use steam cleaning
equipment - risk of electric shock.
Do not use abrasive or harsh
cleaners such as window sprays,
scouring cleansers, ammable
uids, cleaning waxes, concentrated
detergents, bleaches or cleansers
containing petroleum products
on plastic parts, interior and door
liners or gaskets. Do not use paper
towels, scouring pads, or other harsh
cleaning tools.
6

DISPOSAL OF PACKAGING
MATERIALS
The packaging material is 100% recyclable
and is marked with the recycle symbol .
The various parts of the packaging must
therefore be disposed of responsibly and
in full compliance with local authority
regulations governing waste disposal.
DISPOSAL OF HOUSEHOLD
APPLIANCES
This appliance is manufactured with
recyclable or reusable materials.
Dispose of it in accordance with local waste
disposal regulations.
For further information on the treatment,
recovery and recycling of household
electrical appliances, contact your local
authority, the collection service for
household waste or the store where you
purchased the appliance. This appliance
is marked in compliance with European
Directive 2012/19/EU, Waste Electrical and
Electronic Equipment (WEEE).
By ensuring this product is disposed of
correctly, you will help prevent negative
consequences for the environment and
human health.
The symbol
accompanying documentation indicates
that it should not be treated as domestic
waste but must be taken to an appropriate
collection centre for the recycling of
electrical and electronic equipment.
on the product or on the
Frequent door opening might cause an
increase in Energy Consumption.
The internal temperature of the appliance
and the Energy Consumption may be
affected also by the ambient temperature,
as well as location of the appliance.
Temperature setting should take into
consideration these factors. Reduce door
opening to a minimum.
When thawing frozen food, place it in
the refrigerator. The low temperature of
the frozen products cools the food in the
refrigerator.
Allow warm food and drinks to cool down
before placing in the appliance.
Positioning of the shelves in the refrigerator
has no impact on the efcient usage of
energy. Food should be placed on the
shelves in such way to ensure proper air
circulation (food should not touch each other
and distance between food and rear wall
should be kept).
You can increase storage capacity of frozen
food by removing baskets and, if present,
Stop Frost shelf.
Do not worry about noises coming from the
compressor which are normal operation
noises.
The Gulf Conformity Marking on the
product indicates the conformity
with all the requirements of the
Gulf Technical Regulation for Low
Voltage Electrical Equipment and
Appliances BD-142004-01.
ENERGY SAVING TIPS
To guarantee adequate ventilation follow
installation instructions.
Insufcient ventilation at the back of the
product increases energy consumption and
decreases cooling efciency.
7
HOW TO OPERATE THE APPLIANCE
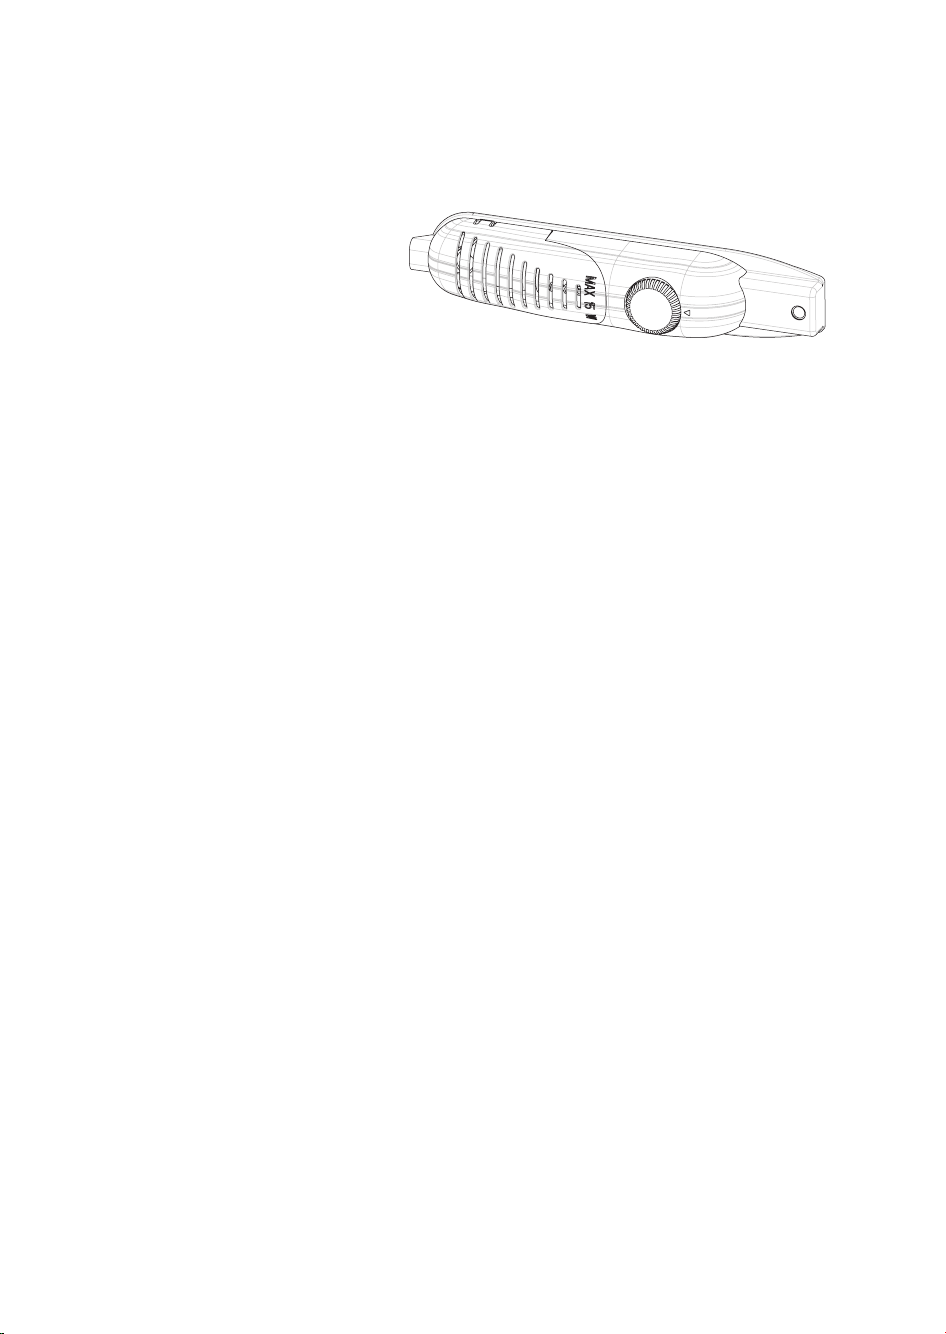
Thermostat setting
• The thermostat automatically
regulates the inside temperature
of the fridge. By rotating the
knob from position 1 to 5, colder
temperatures can be obtained.
• The “ • “ position shows
thermostat is closed and no
cooling will take place.
• For short-term storage of food in the fridge, you can set the knob between minimum and
medium positions (1-3).
• For long-term storage of food in the fridge, you can set knob to the medium position (3-
4).
Note that: The ambient temperature, temperature of the freshly stored food and how often
the door is opened, affects the temperature in the fridge. If required, change the temperature
setting.
• When you rst switch on the appliance, you should ideally try to run it without any food in
for 24 hours and not open the door. If you need to use it straight away, try not to store a
large quantity of food inside it.
• If the unit is switched off or unplugged, you must allow at least 5 minutes before
restarting in order not to damage the compressor.
• LARDERS (without star rating): Larders (coolers) do not have a freezer compartment but
can cool down to 4 - 6°C.
Warnings about temperature adjustments
• It is not recommended that you operate your fridge in environments colder than 10°C in
terms of its efciency.
• Temperature adjustments should be made according to the frequency of door openings
and the quantity of food kept inside the fridge.
• Your fridge should be operated up to 24 hours according to the ambient temperature
without interruption after being plugged in to be completely cooled. Do not open doors of
your fridge frequently and do not place much food inside it in this period.
• A 5 minute delaying function is applied to prevent damage to the compressor of your
fridge, when you take the plug off and then plug it on again to operate it or when an
energy breakdown occurs. Your fridge will start to operate normally after 5 minutes.
• Your fridge is designed to operate in the ambient temperature intervals stated in the
standards, according to the climate class stated in the information label. We do not
recommend operating your fridge out of stated temperatures value limits in terms of
cooling effectiveness.
• This appliance is designed for use at an ambient temperature within the 16°C - 32°C
range.
8
FOOD STORAGE IN THE APPLIANCE
• The fridge is used for storing fresh food for few days.
• Do not place food in direct contact with the rear wall of the refrigerator. Leave some
space around food to allow the circulation of air.
• Do not place hot food or evaporating liquid in the refrigerator.
• Always make sure food is wrapped or stored in closed containers.
• To reduce humidity and avoid formation of frost, never place liquids in unsealed
containers in the refrigerator.
• We recommend that you loosely wrap meat and store it on the glass shelf just above the
vegetable bin, where the air is cooler.
• Store fruit and vegetable items loose in the crisper containers.
• To prevent the cold air escaping, try not to open the door too often, and not leave the
door open for a long time.
CLEANING AND MAINTENANCE
• Disconnect the unit from the power supply before cleaning.
• Do not clean the appliance by pouring water.
• Make sure that no water enters the lamp housing and other electrical components.
• The refrigerator should be cleaned periodically using a solution of bicarbonate of soda
and lukewarm water.
• Clean the accessories separately with soap and water Do not clean them in the
dishwasher.
• Do not use abrasive products, detergents or soaps. After washing, rinse with clean water
and dry carefully. When you have nished cleaning, reconnect the plugto the mains
supply with dry hands.
• Clean the condenser with a broom at least twice a year. This will help you to save on
energy costs and increase productivity.
THE POWER SUPPLY MUST BE DISCONNECTED.
Defrosting
• Defrosting occurs automatically in the fridge
during operation; the water is collected by the
evaporation tray and evaporates automatically.
• The evaporation tray and the water drain hole
should be cleaned periodically with the defrost
drain plug to prevent the water from collecting at
the bottom of the fridge instead of owing out.
• You can also clean the drain hole by pouring ½ glass of water down it.
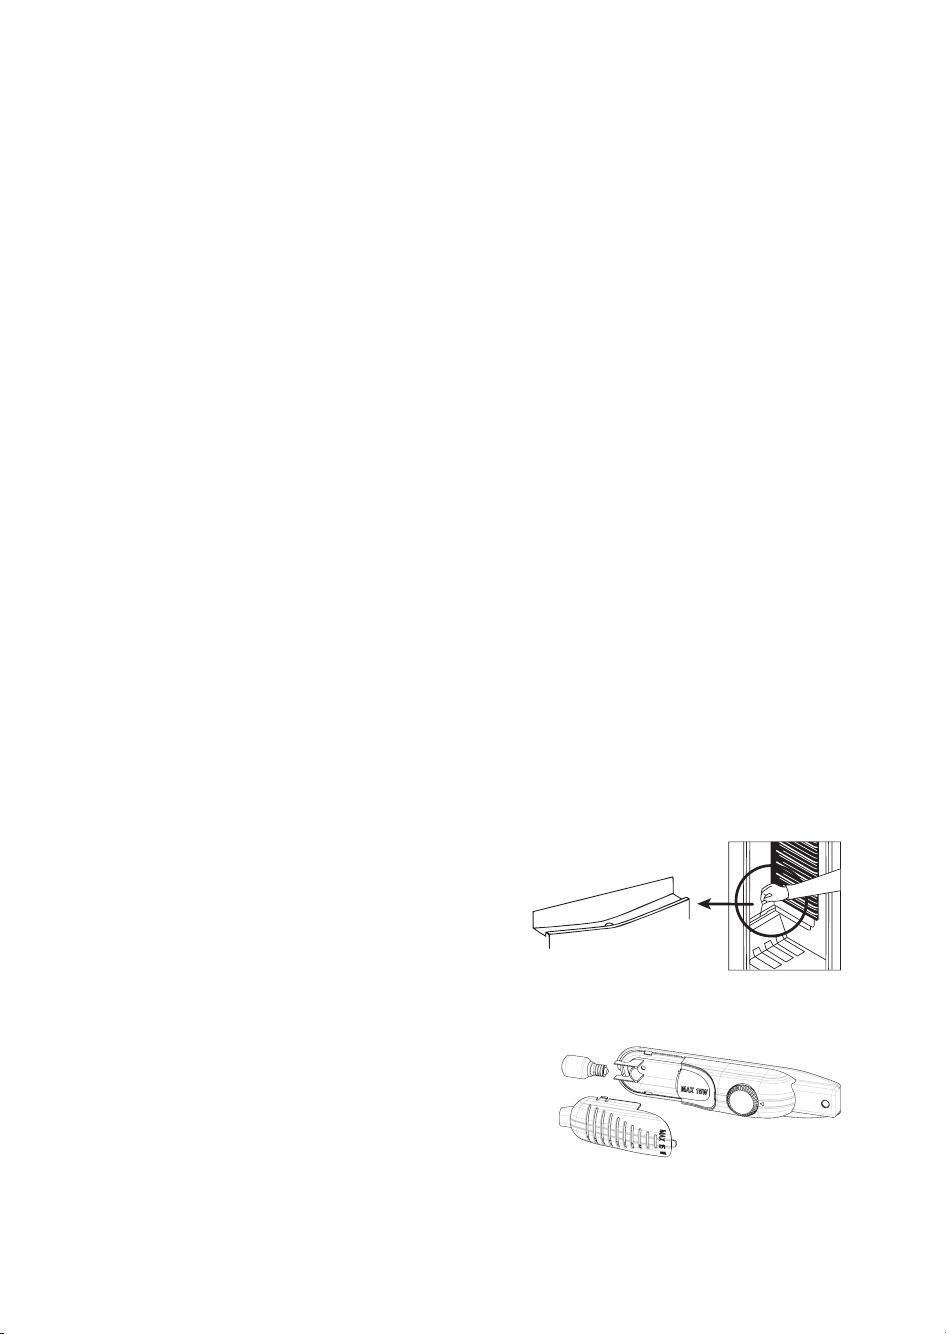
Replacing the light bulb
When replacing the bulb of the fridge;
1. Unplug the unit from the power supply,
2. Press the hooks on the sides of the light cover top
and remove the light cover
3. Change the present light bulb with a new one of not
more than 15 W.
4. Replace the light cover and after waiting 5 minutes plug the unit.
Replacing LED Lighting
If your fridge has LED lighting contact the help desk as this should be changed by
authorized personnel only.
9

TRANSPORTATION AND CHANGING OF INSTALLATION POSITION
Transportation and changing of Installation position
• The original packages and foamed polystyrene (PS) can be retained if required.
• During transportation, the appliance should be secured with a wide string or a strong
rope. The instructions written on the corrugated box must be followed while transporting.
• Before transporting or changing the installation position, all the moving objects
(ie,shelves,crisper…) should be taken out or xed with bands in order to prevent them
from getting damaged.
Carry your fridge in the upright position.
BEFORE CALLING YOUR AFTER SALES
SERVICE
If your fridge is not working properly, it may be a minor problem, therefore check the
following.
The appliance does not operate,
Check if:
• There is a power failure.
• The mains plug is not plugged in properly, or is loose.
• The thermostat setting is on position ““.
• The socket is defective. To check this, plug in another appliance that you know is working
into the same socket.
The appliance performs poorly,
Check if:
• You have overloaded the appliance.
• The door is not closed properly.
• There are not enough ventilation ducts in the kitchen unit as mentioned in the installation
manual.
If there is noise:
The cooling gas which circulates in the fridge circuit may make a slight noise (bubbling
sound) even when the compressor is not running. Do not worry, this is quite normal. If you
hear different sounds, check if:
• The appliance is installed rmly as described in the installation manual.
• Objects on the appliance are vibrating.
If there is water in the lower part of the fridge,
Check if:
• The drain hole for water is not clogged (use defrost drain plug to clean the drain hole).
10

Recommendations
• When there is no power, to prevent any damage to the compressor, you should unplug
the refrigerator. You should delay pluging in 5 – 10 minutes after power is restored.
• If you unplug the refrigerator for any reason you should wait at least 5 min to replug. This
will avoid damage to the refrigerator’s components.
• The cooling unit of your refrigerator is hidden at the rear of the appliance. Therefore,
water droplets or icing may form on the rear surface of your fridge due to the operation
of the compressor at specied intervals. This is normal, there is no need to perform a
defrosting operation unless the icing is excessive.
• If you do not intend to use your fridge for a long time (e.g. in summer holidays), turn the
thermostat to the «•» position. After defrosting, clean your fridge and leave the door open
to prevent humidity and smells.
• If the problem persists after you have followed all the instructions above, please consult
to the nearest Authorised Service Centre.
• The appliance you have purchased is designed for domestic use and can only be used
at home and for the stated purposes. It is not suitable for commercial or common use. If
the consumer uses the appliance in a way that does not comply with this, we emphasise
that the manufacturer and the dealer will not be responsible for any repair and failure
within the guarantee period.
Tips for saving energy
1. Install the appliance in a cool, well ventilated room , but not in direct sunlight and not
near a heat source (radiator, cooker ... etc). Otherwise use an insulating plate.
2. Allow warm food and drinks to cool down outside the appliance.
3. Cover drinks or other liquids when placing them in the appliance Otherwise humidity
increases in the appliance. Therefore, the working time gets longer. Also covering drinks
and other liquids helps to preserve smell and taste.
4. Try to avoid keeping the doors open for long periods or opening the doors too frequently
as warm air will enter the cabinet and cause the compressor to switch on unnecessarily
often.
5. Keep the covers of the different temperature compartments (crisper, chiller ... etc ) closed
6. Door gasket must be clean and pliable. Replace gaskets if worn.
11

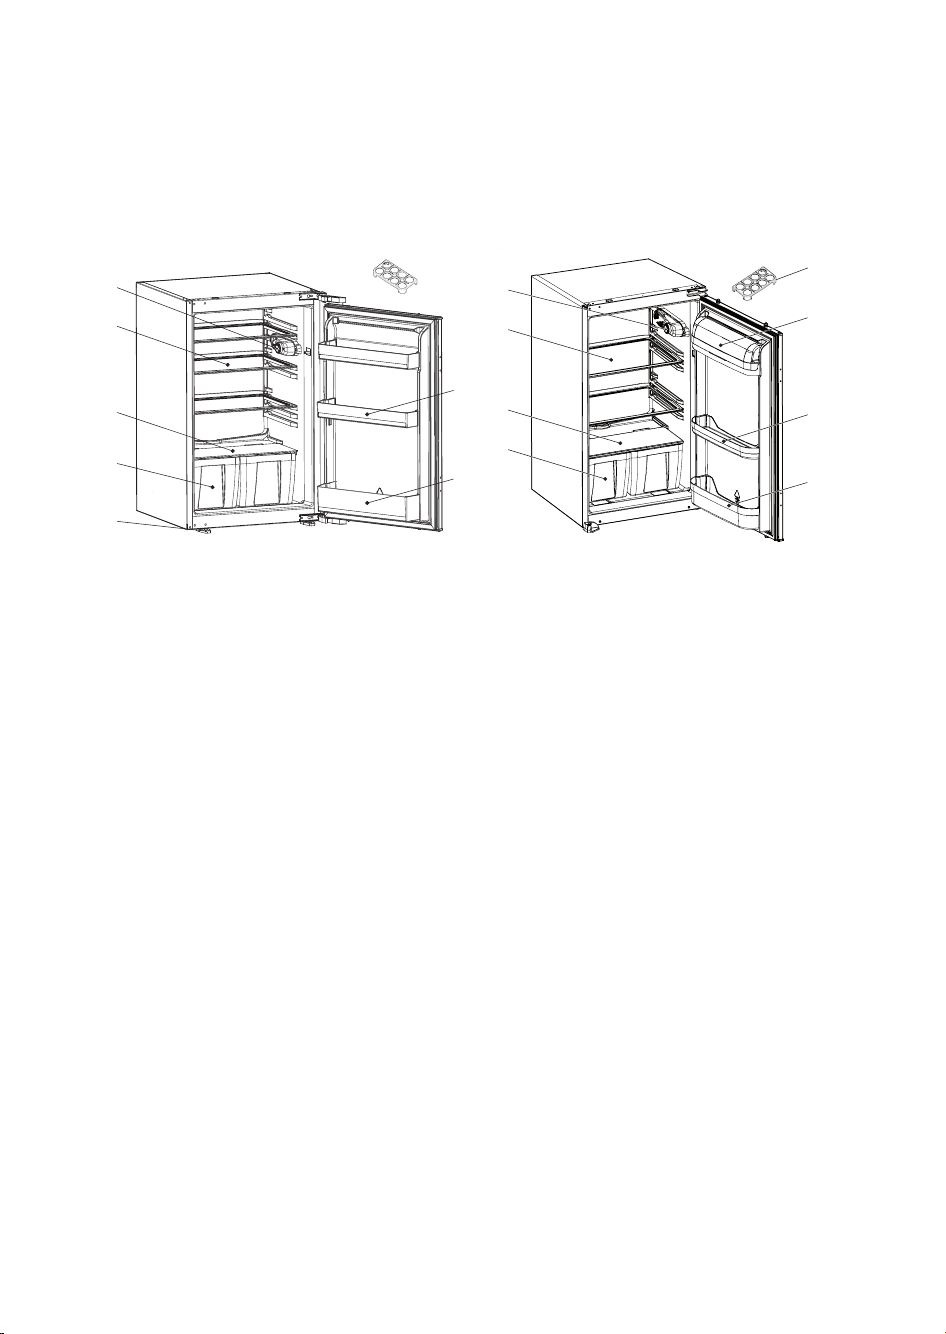
THE PARTS OF THE APPLIANCE AND THE
8
2
3
4
5
7
6
1
COMPARTMENTS
8
1
2
7
This presentation is only for information about the parts of the appliance.
1. Thermostat knob
2. Fridge shelves
3. Crisper cover
4. Crispers
5. Left & Right feet
6. Bottle shelf
7. Door shelves
8. Egg holder
3
4
Parts may vary according to the appliance model.
1. Thermostat knob
2. Fridge shelves
3. Crisper cover
4. Crispers
5. Bottle shelf
6. Door shelves
7. Butter shelf cover *
8. Egg holder
6
5
* In some models
12

Installation instructions and door reversibility for versions with Rail hinges
! It is recommended that the installation be performed by authorized technical staff
! Before installation, read the instructions carefully.
! Fit the refrigerator/freezer in stable kitchen units only.
! Cabinet dimensions are changed by material of trim flap
1
1. If material of trim ap
2. If material of trim ap
is plastic, look at (Table.1/B1) for cabinet dimensions.
1
is metal, look at (Table.1/B2) for cabinet dimensions.
1
.
! If necessary, reverse the door according to instructions.
1. See g.A for the necessary attachment components.
1
2. Insert trim flap
3. Pass the power cord through ventilation shaft and position it so that the appliance could
be easily plugged in once it has been installed. (g.B - g.C)
4. Take out the trim gasket
reverse side of the door hinges of the appliance. (g.D - g.E)
5. Raise the appliance and slide into the kitchen unit.
6. Push the appliance to the reverse side of the door hinges providing that the trim gasket
covers the space between the appliance and the kitchen unit.
7. Align the front feet with front surface of the kitchen unit. (g.F)
8. Screw the front feet by using screws
9. Screw trim flap
10. Screw guides
11. Lean appliance door to unit door as it is opened at right angle.
12. Slide rails4 into guides
13. Screw the rails
14. Set 1~2 mm gap on handle side between unit itself and unit door by adjusting guides
That is vital for appliance performance. (g.H)
into slot and screw by screws6. (g.D)
4
located on the side panel of the appliance and stick it on
5
. (g.F)
1
to kitchen unit using screws5. (g.G)
3
to appliance door with screws6. (g.H)
3
aligning the groove. (g.H)
4
to the unit door with screws5. (g.H)
3
.
2
13

Figure A
Figure B Figure C
mm
A B1 (Plastic) B2 (Metal)
875 875 - 895 875 - 883
Table 1
Table 1
6
1
2
2
Figure D Figure E
14

Figure GFigure F
Figure H
15

Figure J
Figure K
Door reversing
14
1. Open appliance door
2. Disassemble door hinge
3. Unscrew door hinge pin
. (g.J)
15
and take appliance door14 to safe place. (g.K)
16
and screw it to opposite side rmly and take to safe place.
(g.K.a)
18
4. Take door lower pin
5. Take hole plugs
6. Place appliance door
to opposite side. (g.K.b)
17
to opposite side. (g.K.c)
14
over door lower pin18 and insert door hinge pin16 into hinge
hole on appliance door14 and then screw door hinge15 rmly onto opposite side of
original position. (g.K)
16

Installation instructions for product with Hettich hinges
! It is recommended that this installation be performed by authorized technical stuff.
! Before installation, read the instructions carefully.
! Fit the refrigerator/freezer in stable kitchen units only.
! Cabinet dimensions are changed by material of trim flap
(1)
1. If material of trim ap
2. If material of trim ap
is plastic, look at (Table.1/B1) for cabinet dimensions.
(1)
is metal, look at (Table.1/B2) for cabinet dimensions.
1
.
! If necessary, reverse the door according to instructions.
1. See g.A for the necessary attachment components.
(9)
2. Open the package. Take gasket spacer
Themiddle part is door hang rail
(1)
3. Insert trim flap
into slot and screw by screws
(10)
4. Pass the power cord through ventilation shaft and position it so that the appliance could-
be easily plugged in once it has been installed. (g.B - g.C)
(4)
5. Cut trim gasket
to the height of the recess and stick it on reverse side of the doorhin-
ges of the appliance. (g.E)
6. Raise the appliance and slide into the kitchen unit.
7. Lean the appliance to the kitchen unit through the hinges and align the front feet with
frontsurface of the kitchen unit. (g.F)
8. Open the appliance door and screw the front feet by using screws
(1)
9. Screw trim flap
to kitchen unit using screws
10. Screw the hinges to the kitchen unit using screws
11. Close the appliance door. Unscrew and remove the nuts
12. Remove the liner for the adhesive part on the door hang rails
(12)
tbolts
rails
from the appliance door. (g.H)
(10)
on theappliance door by inserting the bosses on the holes of the appliance door,
aligning thefront surfaces of the door hang rails(
each other. Letthe door hang rails
(2)
13. Slide the door hang
into door hang rails
14. Take out the liners of the adhesive part on the front side of the door hang
15. Take out the liners of the adhesive part on the unit door spacers
onto theunit door(15), closer to the upper corners. (g.K)
(15)
16. Lean the unit door
to the door hang
left,right and top edges with the sides of the unit or the doors of the nearer and upper
kitchenunits. (g.K)
(15)
17. Make sure that the unit door
lowing the door hang
(2)
to slide out the door hang rails
stays stuck on the unit door
18. Lay down the unit door
screws
19. To overcome some of the furniture mistakes, there are plastic spacers
door hang
(7)
. (g.L)
(2)
. Remove these plastic spacers
(15)
sticks onto the door hang
(15)
. (g.L)
on the oor and screw the door hang
and brake into three as shown in gureD.
. The other two parts are unit door spacers
(8)
. (g.E)
(7)
. (g.G)
(7)
. (g.G)
(7)
. (g.G)
(14)
, washers
10)
(10)
, stick onto the appliance door. (g.H)
(10)
(2)
, aligning the unit door spacers(11) on the
and the appliance door parallel to
. (g.J - g.K)
(2)
. Pull the unit door
(10)
. Observe that the door hang
(A)
. (g.M)
(13)
and adjustmen-
(10)
. Place door hang
(2)
.
(11)
and and stick them
(2)
to the unit door
(A)
sticked on the
(11)
. (g.D)
(15)
al-
(15)
by
(2)
17

20. Remove the door hang rails
(12)
ts
to the holes on the appliance door by leaving the necessary space using unit door
(11)
spacer
. (g.N)
21. Open the appliance door. Place the unit door
ment bolts(12) into the slots on the door hang
(13)
22. Place the washers
and screw the nuts
23. 1~2 mm gap between the unit itself and unit door is vital for appliance performance.
Close the door and make the accurate adjustment of the unit door
screwing the adjustment bolts
the door hang
(2)
for other directions. (g.P1)
24. Place the door bottom fixings
pliance door and unit door
th screws
(6)
. (g.O)
25. Screw the door bottom fixings
26. For the adjustment of the space between the unit upper door
can unscrew the screws
and unit upper door
gback the screws
27. Slide the hang cover
(15)
(6)
.
(3)
(10)
from the appliance door. Screw the adjustment bol-
(15)
onto the appliance door insertingadjust-
(2)
. (g.N)
(14)
onto the adjustment bolts
(12)
for vertical adjustment and by the help of the slotson
(5)
to the bottom of the appliance door between theap-
(15)
. Screw the door bottom fixings
(5)
to the unit door
(6)
then adjust the space between the appliance upper door
(15)
by screws
(5)
(15)
by the spring effect of the door bottom fixings
onto the door hang
(2)
. (g.P2)
(12)
. (g.N)
(15)
by screwing orun-
to the appliance doorwi-
(7)
. (g.O)
and the unit itself, you-
(5)
while screwin-
(19)
18
1
5
2
3
4
mm
6
7
8
A B1 (Plastic) B2 (Metal)
875 875 - 895 875 - 883
Table 1
9
10
11
11
8
1
7
7
8
7
7
19

14
10
10
2
13
12
10
11
10
2
7
11
15
11
12
15
7
5
2
14
2
215
13
12
6
5
3
20

20
19
20
Door reversing
! Be careful about not to pinch your ngers in the
hinges (door upper hinge
(20-b)
hinge
).
1. Open the appliance door
2. Unscrew the screws on the front surface of the
appliance door
(20-a)
and door lower
(19)
. (g.P)
(19)
. Take the appliance door
(19)
toa
safe place. (g.S)
(19)
3. Move the hole plugs on the appliance door’s
front surface, to the holes on the reverse side.
(g.S)
(20-a)
4. Open the door upper hinge
19
hinge
(20-b)
. (g.S) and dissamble them. (g.T)
and door lower
5. Move the hole plugs to opposite side. (g.T)
(20-a)
6. Assemble the door upper hinge
lower hinge
(20-b)
to the opposite corners of theirori-
and door
ginal position. (g.T)
21

SICHERHEITSHINWEISE
WICHTIG - Durchlesen und beachten!
Diese Sicherheitshinweise vor dem
Gebrauch durchlesen. Diese für
spätere Nachschlagezwecke in der
Nähe aufbewahren.
In diesen Anweisungen sowie
auf dem Gerät selbst werden
wichtige Sicherheitshinweise
angegeben, die durchgelesen und
stets beachtet werden müssen.
Der Hersteller übernimmt keine
Haftung für die Nichtbeachtung
dieser Sicherheitshinweise, für
unsachgemäße Verwendung
des Gerätes oder falsche
Bedienungseinstellung.
Babys und Kleinkinder (0-3
Jahre) müssen vom Gerät fern
gehalten werden. Jüngere Kinder
(3-8 Jahre) müssen vom Gerät fern
gehalten werden, es sei denn, sie
werden ständig beaufsichtigt. Dieses
Gerät darf von Kindern ab 8 Jahren
sowie Personen mit herabgesetzten
physischen, sensorischen oder
geistigen Fähigkeiten und Mangel an
Erfahrung und Kenntnissen nur unter
Aufsicht oder nach ausreichender
Einweisung durch eine für ihre
Sicherheit verantwortliche Person
verwendet werden. Kinder dürfen
nicht mit dem Gerät spielen.
Die Reinigung und Pege des Gerätes
darf von Kindern nicht ohne Aufsicht
durchgeführt werden.
ZULÄSSIGE NUTZUNG
VORSICHT! Das Gerät ist nicht
für den Betrieb mit einer externen
Schaltvorrichtung, z. B. einem Timer
oder einer separaten Fernbedienung,
ausgelegt.
Dieses Gerät ist für
Haushaltsanwendungen und
ähnliche Anwendungen konzipiert,
zum Beispiel: Mitarbeiterküchen
im Einzelhandel, in Büros oder
in anderen Arbeitsbereichen;
Gasthäuser; für Gäste in Hotels,
Motels, Bed-and-BreakfastAnwendungen und anderen
Wohnumgebungen.
für den professionellen Einsatz. Das
Gerät ist nicht für die Benutzung im
Freien geeignet.
ist speziell für Elektrogeräte konzipiert
und ist nicht für die Beleuchtung von
Räumen geeignet (EU-Verordnung
244/2009).
in Räumen mit nachstehenden
Umgebungstemperaturbereichen
ausgelegt, die ihrerseits von der
Klimaklasse auf dem Typenschild
abhängig sind. Wird der vorgegebene
Temperaturbereich für das Gerät
für einen längeren Zeitraum unteroder überschritten, kann es zu
Funktionsstörungen kommen.
Klimaklasse
Umgebungstemperaturen:
SN: Von 10 bis 32 °C
ST: Von 16 bis 38 °C;
N: Von 16 bis 32 °C
T: Von 16 bis 43 °C
Dieses Gerät eignet sich nicht
Die im Gerät verwendete Lampe
Das Gerät ist für den Einsatz
Dieses Gerät ist FCKW-
frei. Der Kältemittelkreislauf
enthält R600a (HC). Hinweis
zu Geräten mit Isobutan
(R600a): Isobutan ist
ein umweltverträgliches,
natürliches Gas, es ist jedoch
leicht entammbar. Aus
diesem Grund sicherstellen,
dass die Leitungen des
Kühlmittelkreislaufs nicht
beschädigt sind, insbesondere
beim Entleeren des
22

Kühlmittelkreislaufs.
ACHTUNG: Beschädigen Sie
auf keinen Fall die Leitungen des
Kältemittelkreises.
ACHTUNG: Lüftungsöffnungen
in der Geräteverkleidung oder im
Einbaumöbel sind von Behinderungen
frei zu halten.
ACHTUNG: Zum Beschleunigen
des Abtauvorganges niemals zu
anderen mechanischen, elektrischen
oder chemischen Hilfsmitteln
greifen als zu den vom Hersteller
empfohlenen.
ACHTUNG: Verwenden Sie
keine elektrischen Geräte in den
Fächern des Gerätes, wenn deren
Einsatz nicht explizit vom Hersteller
zugelassen worden ist.
ACHTUNG: Eisbereiter und/oder
Wasserspender, die nicht direkt mit
der Wasserleitung verbunden sind,
dürfen nur mit Trinkwasser befüllt
werden.
Bewahren Sie keine
explosionsgefährdeten Stoffe wie
Spraydosen im oder in der Nähe
des Gerätes auf. Das gleiche gilt für
Benzin und sonstige entammbare
Stoffe und deren Verwendung.
Die in den Kühlakkus (bei
manchen Modellen vorhanden)
enthaltene (ungiftige) Flüssigkeit
darf nicht verschluckt werden.
Verzehren Sie Eiswürfel oder
Wassereis nicht unmittelbar nach der
Entnahme aus dem Gefrierfach, da
sie Kälteverbrennungen hervorrufen
können.
Bei Produkten, die für den
Gebrauch eines Luftlters hinter
einer zugänglichen Lüfterabdeckung
ausgelegt sind, muss der Filter
bei laufendem Kühlschrank stets
eingesetzt sein.
Bewahren Sie keine Glasbehälter
mit Flüssigkeiten im Gefrierfach, sie
könnten zerbrechen.
Blockieren Sie das Gebläse (falls
inbegriffen) nicht mit Lebensmitteln.
Prüfen Sie nach dem Ablegen von
Lebensmitteln, ob die Tür der Fächer
korrekt schließt, besonders die Tür
des Gefrierfachs.
Beschädigte Dichtungen müssen
so schnell wie möglich ausgetauscht
werden.
Verwenden Sie das Kühlfach
nur zur Aufbewahrung von frischen
Lebensmitteln und das Gefrierfach
nur zur Aufbewahrung von gefrorenen
Lebensmitteln, zum Einfrieren von
frischen Lebensmitteln und zur
Herstellung von Eiswürfeln.
Unverpackte Lebensmittel so
lagern, dass sie nicht mit den
Innenwänden des Kühl- bzw.
Gefrierfachs in Berührung kommen.
Möglicherweise verfügt das Gerät
über Sonderfächer (Frischefach, NullGrad-Box, ...).
Falls nicht anderweitig in der Anleitung
des Gerätes anders angegeben,
können diese für eine gleichmäßige
Funktion im gesamten Gerät
herausgenommen werden.
Das brennbare Gas C-Pentan
wird als Treibmittel im
Isolierschaum eingesetzt.
INSTALLATION
Zum Transport und zur Installation
des Gerätes sind zwei oder
mehrere Personen erforderlich Verletzungsgefahr. Schutzhandschuhe
zum Auspacken und zur
Installation verwenden - Risiko von
Schnittverletzungen.
Die Installation, einschließlich
der Wasserversorgung (falls
vorhanden), elektrische Anschlüsse
23

und Reparaturen müssen von einem
qualizierten Techniker durchgeführt
werden.
Reparieren Sie das Gerät nicht selbst
und tauschen Sie keine Teile aus,
wenn dies vom Bedienungshandbuch
nicht ausdrücklich vorgesehen ist.
Kinder vom Installationsort fern halten.
Prüfen Sie das Gerät nach dem
Auspacken auf Transportschäden.
Bei Problemen wenden Sie sich
bitte an Ihren Händler oder an
den nächsten Kundendienst.
Nach der Installation müssen
Verpackungsabfälle (Kunststoff,
Styroporteile usw.) außerhalb der
Reichweite von Kindern aufbewahrt
werden - Erstickungsgefahr. Das
Gerät vor Installationsarbeiten
von der Stromversorgung trennen
- Stromschlaggefahr. Während
der Installation sicherstellen, das
Netzkabel nicht mit dem Gerät
selbst zu beschädigen - Brand- oder
Stromschlaggefahr. Das Gerät erst
starten, wenn die Installationsarbeiten
abgeschlossen sind.
Achten Sie beim Bewegen des
Gerätes darauf, den Boden (z.
B. Parkett) nicht zu beschädigen.
Stellen Sie das Gerät auf dem
Boden oder einer für sein Gewicht
ausreichend starken Halterung auf.
Der Ort sollte der Größe und der
Nutzung des Geräts entsprechen.
Sicherstellen, dass sich das Gerät
nicht in der Nähe einer Wärmequelle
bendet und dass die vier Füße fest
auf dem Boden auiegen. Die Füße
entsprechend einstellen und mit einer
Wasserwaage kontrollieren, dass
das Gerät vollkommen eben und
standfest ist. Warten Sie mindestens
zwei Stunden, bevor Sie das Gerät
einschalten, um sicherzustellen, dass
der Kältemittelkreislauf einwandfrei
funktioniert.
Alle Abmessungen und
Abstandsächen die für die
Installation des Gerätes erforderlich
sind, benden sich in dem
Installationshandbuch.
WARNUNG: Stellen Sie beim
Aufstellen des Geräts sicher, dass
das Netzkabel nicht eingeklemmt oder
beschädigt wird.
WARNUNG: Um Gefahren
aufgrund von Instabilität zu
verhindern, muss das Gerät gemäß
Herstelleranweisungen platziert oder
befestigt werden.
Der Kühlschrank darf nicht so
aufgestellt werden, dass das
Metallrohr eines Gasherdes, Metallbzw. Wasserrohre oder elektrische
Verkabelungen mit der Rückwand des
Gerätes in Berührung kommen (oder
mit der Kondensatorschlange).
HINWEISE ZUR ELEKTRIK
Es muss gemäß den
Verdrahtungsregeln möglich sein, den
Netzstecker des Gerätes zu ziehen,
oder es mit einem Trennschalter,
welcher der Steckdose vorgeschaltet
ist, auszuschalten. Das Gerät muss
im Einklang mit den nationalen
elektrischen Sicherheitsbestimmungen
geerdet sein.
Verwenden Sie keine
Verlängerungskabel, Mehrfachstecker
oder Adapter. Nach der Installation
dürfen Strom führende Teile für den
Benutzer nicht mehr zugänglich sein.
Das Gerät nicht in nassem Zustand
oder barfuß verwenden.
Das Gerät nicht verwenden, wenn
das Netzkabel oder der Stecker
beschädigt sind, wenn es nicht
einwandfrei funktioniert, wenn
es heruntergefallen ist oder in
irgendeiner Weise beschädigt wurde.
Wenn das Netzkabel beschädigt
ist, muss es aus Sicherheitsgründen
24

vom Hersteller, von seinem
Kundendienstvertreter oder einer
ähnlich qualizierten Fachkraft mit
einem identischen Kabel ersetzt
werden - Stromschlaggefahr.
WARNUNG: Bringen Sie keine
Mehrfachstecker oder tragbare
Stromversorgungsgeräte an der
Geräterückseite an.
REINIGUNG UND WARTUNG
WARNUNG: Vor dem
Durchführen von Wartungsarbeiten
ist sicherzustellen, dass das
Gerät ausgeschaltet und von
der Stromversorgung getrennt
ist; Verwenden Sie keine
Dampfreinigungsgeräte Stromschlaggefahr.
Verwenden Sie keine
Scheuermittel wie Fensterspray,
Entfetter, entzündbare Flüssigkeiten,
Reinigungspaste, konzentrierte
Reinigungsmittel, Bleichmittel oder
benzinhaltige Reinigungsmittel
auf Kunststoffteilen, Innen- oder
Türablagen oder Dichtungen.
Benutzen Sie keine Papiertücher,
Topfreiniger oder scharfen
Gegenstände.
ENTSORGUNG VON
VERPACKUNGSMATERIALIEN
Das Verpackungsmaterial ist zu 100 %
wiederverwertbar und trägt das RecyclingSymbol
Werfen Sie das Verpackungsmaterial deshalb
nicht einfach weg, sondern entsorgen Sie es
gemäß den geltenden örtlichen Vorschriften.
.
ENTSORGUNG VON
HAUSHALTSGERÄTEN
Dieses Gerät wurde aus recycelbaren oder
wiederverwendbaren Werkstoffen hergestellt.
Entsorgen Sie das Gerät gemäß den
regionalen Vorschriften zur Abfallbeseitigung.
Genauere Informationen zu Behandlung,
Entsorgung und Recycling von elektrischen
Haushaltsgeräten sind bei der örtlichen
Behörde, der Müllabfuhr oder dem Händler
erhältlich, bei dem das Gerät gekauft wurde.
Dieses Gerät ist gemäß der Europäischen
Richtlinie 2012/19/EU für Elektro- und
Elektronik-Altgeräte (WEEE) gekennzeichnet.
Durch Ihren Beitrag zur korrekten Entsorgung
dieses Produkts schützen Sie die Umwelt
und die Gesundheit Ihrer Mitmenschen.
Das Symbol
dem beiliegenden Informationsmaterial
weist darauf hin, dass dieses Gerät kein
normaler Haushaltsabfall ist, sondern in einer
Sammelstelle für Elektro- und ElektronikAltgeräte entsorgt werden muss.
auf dem Gerät bzw. auf
ENERGIESPARTIPPS
Befolgen Sie die Aufstellanweisungen, um
angemessene Belüftung sicherzustellen.
Eine unzureichende Belüftung hinten am
Gerät erhöht den Energieverbrauch und
verringert die Kühlkapazität.
Häuges Öffnen der Tür kann zu einem
erhöhten Energieverbrauch führen.
Die Innentemperatur des Gerätes und
der Energieverbrauch können sowohl von
der Umgebungstemperatur als auch vom
Standort des Gerätes beeinusst werden.
Bei der Temperatureinstellung sind diese
Faktoren zu berücksichtigen. Öffnen Sie die
Tür nur so weit wie notwendig.
Platzieren Sie Lebensmittel zum Auftauen
im Kühlschrank. Die niedrige Temperatur der
gefrorenen Lebensmittel kühlt das Essen im
Kühlschrank.
Lassen Sie warme Speisen und Getränke
abkühlen, bevor Sie diese im Gerät
platzieren.
Die Position der Ablageächen im
Kühlschrank hat keinen Einuss auf den
efzienten Energieverbrauch. Lebensmittel
müssen so auf den Ablageächen platziert
werden, dass eine korrekte Luftzirkulation
sichergestellt wird (Lebensmittel dürfen sich
nicht berühren und zwischen Lebensmitteln
und Rückwand muss Abstand gehalten
werden).
Sie können die Lagerkapazität der
gefrorenen Lebensmittel durch Entnahme der
Körbe und, wenn vorhanden, der Stop-FrostAblage, erhöhen.
Es gibt keinen Grund zur Beunruhigung
im Falle von Geräuschen durch den
Kompressor, diese sind normale
Betriebsgeräusche.
25

BEDIENUNG DES GERÄTS
Einstellung des Thermostats
• Der Thermostat regelt
automatisch die Innentemperatur
des Kühlschranks. Durch Drehen
des Knopfes von 1 auf 5 können
kältere Temperaturen erzielt
werden.
• Die Stellung “ • “ zeigt, dass der
Thermostat geschlossen ist und keine Kühlung erfolgt.
• Für die kurzzeitige Lagerung von Lebensmitteln im Kühlschrank können Sie den Knopf
zwischen die niedrigste und mittlere Position (1-3) einstellen.
• Für die langfristige Lagerung von Lebensmitteln im Kühlschrank können Sie den Knopf
auf die mittlere Position (3-4) einstellen.
Bitte beachten: Raumtemperatur, Temperatur der frisch gelagerten Lebensmittel und
Häugkeit der Türöffnung beeinussen die Temperatur im Kühlschrank. Bei Bedarf die
Temperatureinstellung ändern.
• Wenn Sie das Gerät zum ersten Mal einschalten, wäre es ideal, wenn Sie es 24 Stunden
lang ohne Lebensmittel laufen lassen und die Tür nicht öffnen. Wenn eine sofortige
Verwendung notwendig ist, sollten Sie das Einlagern großer Lebensmittelmengen
vermeiden.
• Wenn das Gerät ausgeschaltet oder der Netzstecker gezogen wird, müssen Sie
mindestens 5 Minuten bis zum erneuten Einschalten warten, um den Kompressor nicht
zu beschädigen.
• VORRATSSCHRANK (ohne Sternekennzeichnung): Vorratsschränke (Kühler) haben
kein Gefrierfach, können jedoch auf 4 - 6 °C abkühlen.
Warnhinweise zu Temperatureinstellungen
• Es wird im Hinblick auf die Efzienz des Kühlschranks nicht empfohlen, diesen in
Umgebungen mit weniger als 10 °C zu betreiben.
• Die Temperatureinstellung sollte auf die Häugkeit der Türöffnungen und die im
Kühlschrank aufbewahrte Lebensmittelmenge abgestimmt werden.
• Ihr Kühlschrank sollte, nachdem der Netzstecker eingesteckt wurde, je nach
Raumtemperatur bis zu 24 Stunden ohne Unterbrechung laufen, damit er komplett
gekühlt ist. Vermeiden Sie das häuge Öffnen der Kühlschranktür und lagern Sie
während dieses Zeitraums nicht viele Lebensmittel ein.
• Es kommt eine Zeitverzögerung von 5 Minuten zur Anwendung, wenn Sie den
Netzstecker ziehen und dann wieder einstecken oder wenn ein Stromausfall eintritt, um
den Kompressor Ihres Kühlschranks vor Beschädigung zu schützen. Nach 5 Minuten
beginnt Ihr Kühlschrank wieder normal zu arbeiten.
• Ihr Kühlschrank wurde für den Betrieb innerhalb der in den Normen festgelegten
Umgebungstemperaturbereiche ausgelegt, die der auf dem Informationsschild
angegebenen Klimaklasse entsprechen. Im Hinblick auf die Kühlleistung empfehlen wir,
den Kühlschrank nicht außerhalb der festgelegten Temperaturgrenzwerte zu betreiben.
• Dieses Gerät ist für die Verwendung bei Raumtemperatur innerhalb des Bereiches von
16 °C - 32 °C ausgelegt.
26

LAGERUNG VON LEBENSMITTELN IM GERÄT
• Der Kühlschrank dient dazu, frische Lebensmittel für einige Tage aufzubewahren.
• Platzieren Sie die Lebensmittel nicht in direktem Kontakt mit der Rückwand des
Kühlschranks. Lassen Sie etwas Platz um die Lebensmittel, damit die Luft zirkulieren kann.
• Stellen Sie keine heißen Lebensmittel oder dampfenden Flüssigkeiten in den Kühlschrank.
• Stellen Sie sicher, dass die Lebensmittel stets eingepackt sind oder in geschlossenen
Behältern aufbewahrt werden.
• Zur Verringerung der Feuchtigkeit und zur Vermeidung von Eisbildung keine Flüssigkeiten in
offenen Behältern in den Kühlschrank stellen.
• Wir empfehlen Ihnen, Fleisch lose einzupacken und auf der Glasablage oberhalb des
Gemüsefachs aufzubewahren, wo die Luft kühler ist.
• Lagern Sie Obst und Gemüse lose in den Gemüsebehältern.
• Um das Entweichen der kalten Luft zu vermeiden, die Tür nicht zu oft öffnen und nicht
längere Zeit offen stehen lassen.
REINIGUNG UND PFLEGE
• Trennen Sie das Gerät vor dem Reinigen von der Stromversorgung.
• Gießen Sie beim Reinigen des Geräts kein Wasser hinein.
• Stellen Sie sicher, dass kein Wasser in das Lampengehäuse und sonstige elektrische
Bauteile eintritt.
• Der Kühlschrank sollte regelmäßig mit einer Lösung aus Natron und lauwarmem Wasser
gereinigt werden.
• Reinigen Sie Zubehörteile separat mit Wasser und Geschirrspülmittel. Reinigen Sie diese
nicht im Geschirrspüler.
• Verwenden Sie keine scheuernden Produkte, Reinigungsmittel oder Seifen. Nach dem
Reinigen mit klarem Wasser spülen und sorgfältig abtrocknen. Wenn Sie die Reinigung
beendet haben, stecken Sie den Netzstecker wieder mit trockenen Händen ein.
• Reinigen Sie den Kondensator mindestens zweimal pro Jahr mit einem Besen. Dies hilft
Ihnen Energiekosten zu sparen und die Leistungsfähigkeit zu steigern.
DIE STROMVERSORGUNG MUSS UNTERBROCHEN WERDEN.
Abtauen
• Abtauen ndet automatisch während des Betriebs
im Kühlschrank statt; das Wasser wird in der
Verdunstungsrinne gesammelt und verdunstet
automatisch.
• Die Verdunstungsrinne und die Wasserablauföffnung
sollten regelmäßig mit dem Stöpsel des Tauwasserablaufs gereinigt werden, um zu
verhindern, dass sich Wasser am Kühlschrankboden sammelt, anstatt abzuießen.
• Sie können die Ablauföffnung auch reinigen, indem Sie ½ Glas Wasser hineinleeren.
Austausch der Glühbirne
Zum Austauschen der Glühbirne des Kühlschranks:
1. Das Gerät von der Stromversorgung trennen.
2. Die Haken an den Seiten der Leuchtenabdeckung drücken
und die Leuchtenabdeckung abnehmen.
3. Ersetzen Sie die vorhandene Glühbirne durch ein neue mit max. 15 W.
4. Bringen Sie die Leuchtenabdeckung wieder an. Warten Sie 5 Minuten und stecken Sie das
Netzkabel des Geräts wieder ein.
Austausch der LED-Beleuchtung
Wenn Ihr Kühlschrank über eine LED-Beleuchtung verfügt, kontaktieren Sie bitten den Helpdesk,
da diese nur durch autorisiertes Personal getauscht werden darf.
27

TRANSPORT UND WECHSEL DES
AUFSTELLUNGSORTES
Transport und Wechsel des Aufstellungsortes
• Die Originalverpackung und Polystyrol (PS) können bei Bedarf einbehalten werden.
• Das Gerät sollte während des Transports mit einer breiten Schnur oder einem starken
Seil gesichert werden. Die Anweisungen auf dem Wellpappekarton sind während des
Transportes einzuhalten.
• Vor dem Transport oder dem Wechsel des Aufstellungsortes sollten alle beweglichen
Gegenstände (z. B. Ablagen, Gemüsebehälter…) aus dem Gerät entnommen oder mit
Bändern gesichert werden, damit sie nicht beschädigt werden.
Transportieren Sie den Kühlschrank in aufrechter Position.
BEVOR SIE DEN KUNDENDIENST RUFEN
Wenn Ihr Kühlschrank nicht ordnungsgemäß arbeiten sollte, könnte es sich um ein
geringfügiges Problem handeln. Prüfen Sie daher Folgendes.
Das Gerät arbeitet nicht.
Prüfen Sie, ob:
• ein Stromausfall vorliegt.
• der Netzstecker ist nicht richtig eingesteckt oder ist lose.
• die Thermostateinstellung ist auf ““.
• die Steckdose ist defekt. Stecken Sie zur Überprüfung ein anderes Gerät, von dem Sie
wissen, dass es funktioniert, in die gleiche Steckdose ein.
Das Gerät funktioniert schlecht.
Prüfen Sie, ob:
• Sie das Gerät zu voll geladen haben.
• die Gerätetür richtig geschlossen ist.
• zu wenige Belüftungsöffnungen im Küchenschrank vorhanden sind (siehe Angaben im
Installationshandbuch).
Geräuschentwicklung:
Das Kühlgas, das im Kühlkreis zirkuliert, kann leise Geräusche (Blubbern) erzeugen, selbst
wenn der Kompressor nicht läuft. Machen Sie sich keine Sorgen, dies ist normal. Wenn Sie
andere Geräusche hören, prüfen Sie Folgendes:
• Steht das Gerät fest, wie im Installationshandbuch beschrieben.
• Gegenstände auf dem Gerät vibrieren.
Wenn sich Wasser im unteren Teil des Kühlschranks befindet;
prüfen Sie, dass:
• die Wasserablauföffnung nicht verstopft ist (reinigen Sie mit dem Stöpsel des
Tauwasserablaufs die Ablauföffnung).
28

Austausch der Glühbirne
• Wenn kein Strom vorhanden ist, sollte zum Schutz vor Schäden am Kompressor der
Netzstecker des Kühlschranks gezogen werden. Das Einstecken des Netzsteckers sollte
5 – 10 Minuten, nachdem die Stromversorgung wiederhergestellt wurde, erfolgen.
• Wenn Sie aus irgendwelchen Gründen den Netzstecker des Kühlschranks ziehen,
sollten Sie vor dem erneuten Einstecken mindestens 5 Minuten warten. Dies verhindert
Schäden an den Kühlschrankbauteilen.
• Das Kühlaggregat Ihres Kühlschranks ist auf der Geräterückseite verborgen. Deshalb
können sich durch den Intervallbetrieb des Kompressors Wassertropfen oder Vereisung
an der rückwärtigen Fläche des Kühlschranks bilden. Dies ist als normal anzusehen und
es ist kein Abtauvorgang vorzunehmen, außer die Vereisung ist zu stark.
• Beabsichtigen Sie, Ihren Kühlschrank längere Zeit nicht zu benutzen (z. B.
Sommerferien), den Thermostat auf «•» drehen. Nach dem Abtauen den Kühlschrank
reinigen und die Tür offen lassen, um Feuchtigkeits- und Geruchsbildung zu vermeiden.
• Sollte das Problem bestehen bleiben, nachdem Sie oben genannte Anweisungen befolgt
haben, kontaktieren Sie bitte die nächstgelegene, autorisierte Servicestelle.
• Das von Ihnen erworbenen Gerät ist für die Verwendung im Haushalt ausgelegt und
darf nur zu Hause und für die genannten Zwecke eingesetzt werden. Es ist nicht
gewerbliche oder gemeinschaftliche Nutzung geeignet. Wenn der Käufer das Gerät nicht
dementsprechend verwendet, weisen wir darauf hin, dass der Hersteller und der Händler
nicht für Reparaturen oder Störungen während des Garantiezeitraums haften.
Energiespartipps
1. Das Gerät in einem kühlen, gut belüfteten Raum aufstellen. Keinem direkten Sonnenlicht
aussetzen und nicht neben Hitzequellen (Heizkörper, Herd usw.) stellen. Anderenfalls
eine Dämmplatte verwenden.
2. Lassen Sie warme Speisen und Getränke außerhalb des Geräts abkühlen.
3. Decken Sie Getränke oder Flüssigkeiten ab, wenn Sie diese in das Gerät stellen, ande-
renfalls steigt die Feuchtigkeit im Gerät an. Demzufolge verlängert sich dessen Arbeitszeit. Das Abdecken von Getränken und sonstigen Flüssigkeiten hilft auch, Geruch und
Geschmack zu bewahren.
4. Vermeiden Sie es, die Gerätetür längere Zeit offen stehen zu lassen oder diese zu häug
zu öffnen. Es tritt dabei warme Luft in den Kühlschrank ein und bewirkt, dass sich der
Kompressor unnötig oft einschaltet.
5. Halten Sie die Abdeckungen der unterschiedlichen Temperaturfächer (Gemüsefach,
Kühler usw.) geschlossen.
6. Die Türdichtung muss sauber und biegsam sein. Abgenutzte Dichtungen ersetzen.
29
GERÄTETEILE UND FÄCHER
8
2
3
4
5
7
6
1
1
2
8
7
Diese Darstellung dient nur zur Information über die Geräteteile.
Die Teile können je nach Gerätemodell unterschiedlich sein.
1. Thermostatregler
2. Kühlschrankablageächen
3. Gemüsefachabdeckung
4. Gemüsefächer
5. Linker & rechter Fuß
6. Abstellfach für Flaschen
7. Türablagen
8. Eierbehälter
3
4
1. Thermostatregler
2. Kühlschrankablageächen
3. Gemüsefachabdeckung
4. Gemüsefächer
5. Abstellfach für Flaschen
6. Türablagen
7. Butterfachabdeckung *
8. Eierbehälter
* Bei einigen Modellen
6
5
30
 Loading...