


Instructions for use
Before using the dishwasher/Connections
Electrical connection
Precautions and general recommendations
How to fill the salt container
How to fill the rinse aid dispenser
How to fill the detergent dispenser
Care and Maintenance
10

Before using the dishwasher/Connections
1. Removing the packaging
and con trols:
Af t er unpacking, make sure
that t he dishwasher is
undamaged and t hat the door
closes correctly. If in d ou bt ,
cont act a qual if ied t echnician
or your local retailer .
•
Keep t he packag in g
mat erials (plastic bags,
polystyrene part s, et c.) out of
reach of children, as they are
potent iall y dan ger ou s.
2. Water and e lectrical
connections:
All w at er an d electrical
connections must be carried
out by a qualif ied t echn ician
in compliance wit h t h e
manuf acturer' s in st r uct io ns
(ref er to t he enclosed
inst allat ion booklet ) and
curr ent local safet y
regul at ions.
The appliance must only be
used in the househ ol d f or
the prescribed uses.
Do not use t he dish wash er if it
has been damaged in transit.
Consult your local retailer or
our After-Sal es Service.
(Ref er t o t he separa te
installat ion instructions
booklet)
3. Water inlet and drain :
•
Observe any special
regulat ions issued by you r
local Wat er Board.
Wat er supply pressure:
0.3 - 10 bar.
•
Make sure t he inlet and dr ain
hoses are kink-f ree and are
not crushed.
•
If the hose length is not
su f ficien t , pl ease cont act
your local dealer or our
Af t er-Sales Service.
•
The inlet hose must be
securely clamped to the
water t ap to prevent leaks.
•
The inlet w ater t emperatu re
varies according to the model
inst alled. Inlet hose marked
“ 25° C M ax” : maximum
temperat ure 25° C.
All other models: maxim um
temperat ure 60° C.
•
When installing t h e
appliance, make sur e t he
drain wat er d ischarges
corr ectl y (if necessary,
remove t he wire gauze from
the sink si phon).
•
Fi x t he d rai n hose to t he
spigot w ith a clamp to
prevent it f rom coming o ff
during oper ation.
•
Fo r ap pl ian ces w it h w at erst op system only: If the water
connections are made
correctly, th e w ater-stop
system saf eguards your home
against damage caused by
flooding.
4. Electrical con ne ction:
•
Closely adhere t o l ocal
El ectr icity Board regulat ions.
Vol tag e inf or mation is sh ow n
on the rating plat e mount ed
insi de t h e door on the right
hand side.
•
The appliance must be
eart hed as prescr ib ed b y law .
•
Do not use ext ensi on leads o r
mult iple adapters.
•
Befo re carr yin g out
maint en ance, di sconnect the
mains plug.
•
The po wer cab le must only be
replaced b y aut h or ized
personnel.
Warning f or m odels
provided w ith LCD display:
The mains plug must be
positioned i n an easi ly
accessible place.
• For Austria:
is seri es connected to a f ault
curr ent swi tch, this m ust b e
sen si tive t o the pu lsating
curr ent .
if th e apparatus
11
Electrical connection
1) For Great Britain on ly
Warning - t his appliance
must be eart hed
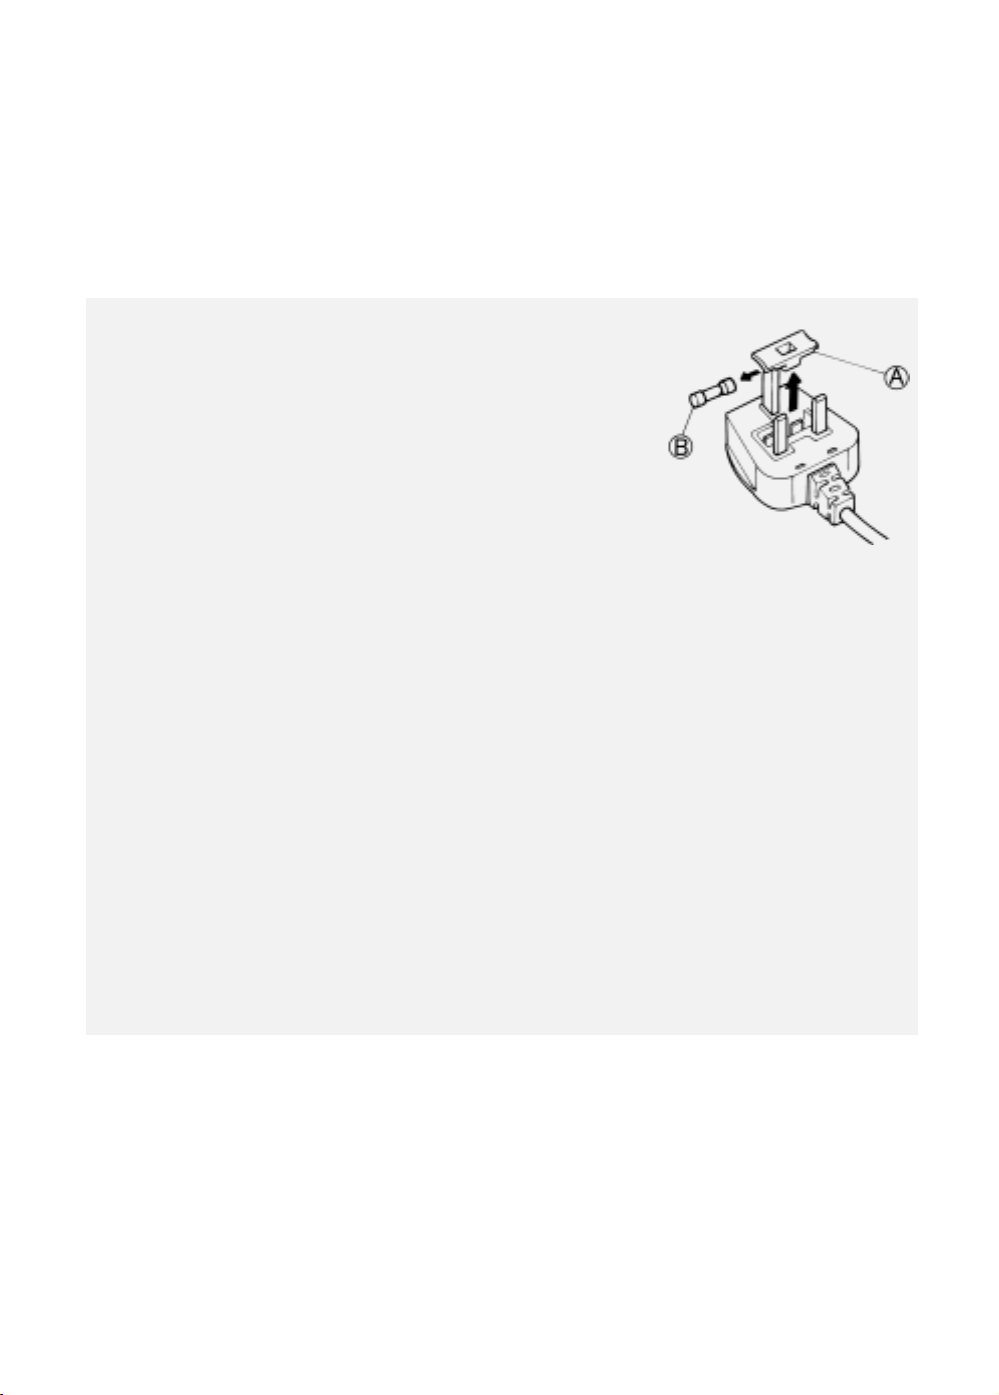
Fuse replacem ent
If the mains lead of this
appliance is fitted w ith a
BS 1363A 13amp f used plug,
to chan ge a fuse in t h is type
of plug u se an A.S.T.A.
approved f use t o BS 1362
type and proceed as follow s:
1.
Rem ove t h e f use cover (A)
and fuse (B).
2.
Fi t replacement 13A f use i nto
fuse co ver.
3.
Ref i t bo th int o plug.
Im por t an t :
The fuse co ver m ust b e
ref itted w hen changing a
fuse and if the f use cover is
lost t he plug must not be
used until a correct
replacemen t is fitted.
Co rr ect r epl acement are
ident ified by t he colour
inser t or the colour
emb ossed in words on the
base of the plug.
Rep lacement f use covers ar e
available from your local
electrical st ore.
2) For t he Republic of
Ireland only
The informat ion given in
respect o f Great Britain will
frequently apply, but a third
type of plug and socket is also
used, the 2-p in , side eart h type.
3) Socket outlet / plug
(valid for bot h
count ries)
If the f itted plug is not suit able
for your socket outlet , Please
cont act Wh ir lp oo l Ser vice f or
further inst r uct io n. Please do
not attem pt t o change plug
yourself. This procedure need s
to be carried out by a q ualif ied
Whirlpool t echnician in
compliance wit h t he
manuf act ur es i nstructions and
curr ent stan dard safety
regulations.
12

Precautions and general recommendations
1. Packing:
•
The packing box may be fully
recycled as confirmed by t h e
recyclin g symbo l.
2. Energy and w at e r saving
tips:
•
Do not rinse cro ckery u nd er
running w at er.
•
Always f ully load t he
dish w asher bef ore switching
on or set t h e w ash
programme t o Half Load/
Multizone (if available) if
one
rack only is loaded.
•
If ecological ener gy sour ces
are available such as solar
pan el heat ing, heat pumps or
cent ralised heat i ng system s,
the appliance may be
conn ected t o t h e ho t w at er
mains up t o a maximum
temperat ure of 60° C. M ak e
su re t he w at er i nl et ho se is of
the correct t ype. Refer t o th e
“ Connections” chapt er in
these user instructions.
3. Disposal:
The appliance is built f rom
reusab le m at eri als.
If you decide to scr ap the
dishwash er, it must be
disposed of in compliance
wit h local wast e disposal
regul at ions.
•
Befo re scrapping, cut of f t he
power cable so that t he
appliance cannot be
connected to t he mains.
4. Child saf ety:
•
Ch il dr en m ust n ot b e allow ed
to play w it h the di sh w ash er.
•
St or e t he d et erg ent , rin se aid
and sal t in a dr y pl ace out o f
the reach of children.
5. General
recommendati on s:
•
The open dishwasher door
can only support the w eight
of t he loaded rack w hen
pulled out . Do no t rest obj ect s
on the open door or sit or
st and on it:
may t op pl e over!
•
Do n ot use sol vents inside t he
dishwasher:
explosion!
•
Only use detergents, rinse
aids an d r egen eration salt s
sp eciall y recommended f or
use in dom est i c dishw ashers.
•
Before cleaning or carrying
out maint enan ce, swit ch off
the appliance, disconnect t he
mai ns plu g an d t u rn of f t he
wat er t ap.
•
If a fault o ccurs, swit ch off
the appliance and t urn of f
the w at er tap.
•
If necessary, the pow er cable
may b e repl aced wit h one t he
sam e obtained f rom our
Af t er-Sales Service. The
power cabl e mu st o nl y be
replaced by a qualified
technician.
•
On completion of t he
programme swi t ch of f t he
dish w asher and turn off the
wat er t ap.
6. For applian ces w ith w at er
stop system :
The water inlet hose and
plast ic casing contain
elect ri cal comp on ents.
Do not t heref ore cut t he
hose o r i mm erse th e pl astic
casin g in water. If t he hose is
damaged sw i t ch of f t he
appliance immediat ely.
the applia nce
risk of
EC Declaration o f
conf orm ity:
This appl ian ce has been
design ed, const ructed an d
dist ribut ed in com pliance
wit h the safet y requ ir emen t s
of EC Directives:
•
73/23/EC
•
89/336/EC
•
93/68/EC
Load capacit y:
12 place set t in gs.
13

How to fill the salt container
Fr om a w at er h ard ness
categ or y of 1-2 (medium),
bef ore usi ng the dishw ash er
for the f irst t ime, f ill the salt
cont ainer w it h reg enerat ion
sal t (t o f ind out the hardness
level of w at er in your area,
cont act your lo cal Wat er
Board or check t he l ast bill
you received).
If the w at er hardness level
does not correspond t o
position 3 on t he selector
(factory sett ing) or if t he
water hardness level changes:
Turn t he selector to th e
correct posit io n (f or
dishw ashers wit hout salt
sensor only ):
Set the w at er hard ness by t urning
the selector (if f itt ed) insi de t he
door (top lef t) usi ng a screwdriver.
Use t he table below to set the dial
to t he correct sett ing:
Hardne ss
catego ry
1 sof t 0 - 5 0 - 9 0 - 0.9 0 - 6.3 0
1 - 2 medium 6 - 10 10 - 18 1.0 - 1.8 7 - 12.6 1
2 medium 11 - 15 19 - 27 1.9 - 2.7 13.3 - 18.9 2
3 medium-har d 16 - 21 28 - 37 2.8 - 3.7 19.6 - 25.9 3
4 hard 22 - 28 38 - 50 3.8 - 5.0 26.6 - 35 4
4 very h ard 29 - 35 51 - 63 5.1 - 6.3 35.7 - 44.1 5
4 extremel y hard 36 - 60 64 - 107 6.4 - 10.7 44.8 - 74.9 6
How to f ill t he salt
cont ainer:
Warning: Only use
regenerati on salts f or use
in dom est ic dishw ashers!
Do not f il l t he salt cont ain er
wit h unsuit able substances,
su ch as det ergent, as t his wi ll
cause i rreparable damage t o
the w at er so f tener syst em.
1.
Rem ove t he lower rack.
2.
Unscr ew t he cap by turning it
counter-clockw ise.
3.
When f irst using the
dishwash er: f ill the salt
cont ainer to the rim wit h water.
Salt l ev el in di cat or:
The dish w ash er is equipped
wit h an electric or visual salt
level indicator (depending
on the model installed).
Electric ind icat o r:
The salt level indicator lamp
Germa n
degre es
°dH
French
degre es
°fH
mmo l/l Cla rke sca le
4.
or Engl ish
degre es
°eH
Fi ll the salt cont ain er t o the
rim w ith salt (using the f iller
provided) (wh en f illing f or
the f irst t ime use min. 1.5 kg
and max. 2 kg) and stir w ith a
sp oo n h andle.
5.
Screw t he cap b ack on by
turning it clockw ise.
6.
Fi t the low er rack.
7.
If regener at ion salt is to be
im m ediat el y
added,
wash programme (ri nsing
alone is not su fficient) in order
t o eli min ate an y resid ual salin e
so lu t io n straig ht aw ay an d
avoid corrosion.
Visual in di cat or :
The f loat is cl earl y visibl e in
the cap w indow w hen the salt
cont ainer is f ull.
The float low er s an d is no
longer visible when the salt
cont ainer is em pt y.
on the control panel light s
up when the salt container is
emp ty.
Adjust ing
the w at er
hardn ess
level sele ctor
st art a
For d ishw ashers w ith out sal t sensor
on ly! In app li ances pr ovide d w it h a
salt sensor , th e sele cto r aut omat ically
turn s to t he corre ct posit ion.
If the w ater hardn ess l evel f alls wi thin
category 1 (so f t), no sal t is required .
14

How to fill the rinse aid dispenser
1.
The rinse aid f acilit at es
drying an d p reven t s t h e
format io n of unsightl y sp ot s
and st r eaks on cro ckery.
Befo re u si ng t he d ishw asher
for the f irst t ime, fill t he rinse
aid dispenser.
Only use rinse aid s
recom men ded f or use in
domestic dishw ashers.
Pr ess but t on A to open the
cover (see drawing).
2.
Fi ll the dispenser w it h rinse
aid up to the dashed line
(about 100 ml. maximum).
Im m ediat ely w i pe aw ay
any r in se aid spilt
accident ally!
This prevents th e f ormat ion
of excess suds w hich may
sp oi l w ashin g r esults.
3.
Close the cover.
Thereaf t er , regularly check
the rinse aid level.
A
How to adjust t he rinse
aid dosag e regulator:
Factory set t ing: Posi tion 4.
If you are not satisf ied w ith
wash in g o r d rying result s,
chang e the rinse ai d d osage
set t i ng .
Rinse a id level indicator:
1.
Pr ess but t on A to open the
cover (see drawing).
2.
If crockery is prone to w hitish
st reaks: r educe the dosage by
turning the dial to a low er
set t ing (1-3) using a coin or
the like.
If crocker y is not p erf ect ly
dry: increase t h e do sage by
turning the dial to a higher
set t ing (5-6).
3.
Close the cover.
Visual indicat or :
light
dark
add rinse aid
su f f icien t rinse aid.
Do not add any!
Electric indicat or
(if provided):
The indicato r l amp on the
cont rol panel lights up w hen
more r in se aid needs t o be
added.
15

How to fill the detergent dispenser
A small compart ment and a
large compartment are
provided f or t he det erg ent .
The use of det er gen t in
excess of t he recommended
dosag e may cause pol lu t ion.
The recom men ded do sage
varies f o r d if f erent brands.
If you use det ergents in
pellet f orm, fo ll ow t he
manuf acturer' s directions
for use.
How to f ill t he det erge nt
dispenser:
Only use regen erat i on sal t s
for use in domest i c
dish w ashers.
Only fi ll t he det ergent
dispenser p rior t o st art ing
a w ash programme.
1.
Pr ess but t on C to open the
cover.
2.
How t o fill t he det ergent
disp enser:
Programmes w ith
pre-rinse:
Po ur 2/3 of t h e do sage
recom men ded by t h e
manuf acturer int o the large
compart m ent A
Po ur t he r emai ning t hi rd in
small com partment B
the
.
“ New g ener at io n” detergent s
cont ain enzymes th at give
bet t er wash in g r esults w hen
Bio programmes are used.
How ever, these programm es
are also suitable for all ot her
di shw asher detergent s.
Programmes w i t hout
pre-rinse:
Po ur t he en t ire
recom men ded do sage int o
the large compart m ent (A).
If the recommended dosage
on the detergent pack is over
45 ml (maximum capacit y of
the large comp art m ent ),
pour the remaining
det ergen t into t he small
comp art m ent (B).
For program m es w ith
additional “ Half load/
M ult izone” f unction
selected ( if pro vi de d):
.
Use a small er q uan t it y of
det er gen t .
3.
Close the cover.
A
C
B
16

Care and Maintenance
Befo re clean in g o r carr yin g
out maint enance, swit ch off
the appliance, disconn ect t he
mains plu g an d t urn of f t he
water t ap.
Upper spray arm :
1.
Slacken t he f ixing nut (A) (by
turning it counter-clockw ise)
and det ach t he sp ray arm (B)
by pulling i t down).
2.
Ri nse the nozzles.
3.
To remount the spray arm ,
align it and then tigh t en t he
fixing nut (by t urning it
clockw i se)
at t ent ion not t o bend it .
The fixing nut must be
tight ened u nt il i t clicks!
, paying
Low er spray arm :
1.
Slacken t he f ixing nut (C) (by
turning it counter-clockw ise)
and det ach the spray ar m (D)
by pulling i t upwards.
2.
Ri nse the nozzles.
3.
To remount the spray arm ,
align it and then tigh t en t he
fixing nut (by t urning it
clockw i se),
at t ent ion not t o bend it .
The fixing nut must be
tight ened u nt il i t clicks!
paying
Cleaning t he out side of
the applia nce:
To clean t h e ou t si de o f the
appliance, use a neutral
det ergen t and a damp cloth.
Clean t he cont rol panel using
a damp cloth alone.
Do not use ab rasive
det er gen t s.
M ake sure t he spray ar m
rotat es f reely.
M ake sure t he spray ar m
rotat es f reely.
Cleaning t he inside of t he
dishw asher:
Reg ularly wipe th e door seal
and inside of t he door wi th a
damp cloth t o remove any
food residue.
A
B
D
C
17
Care and Maintenance
E
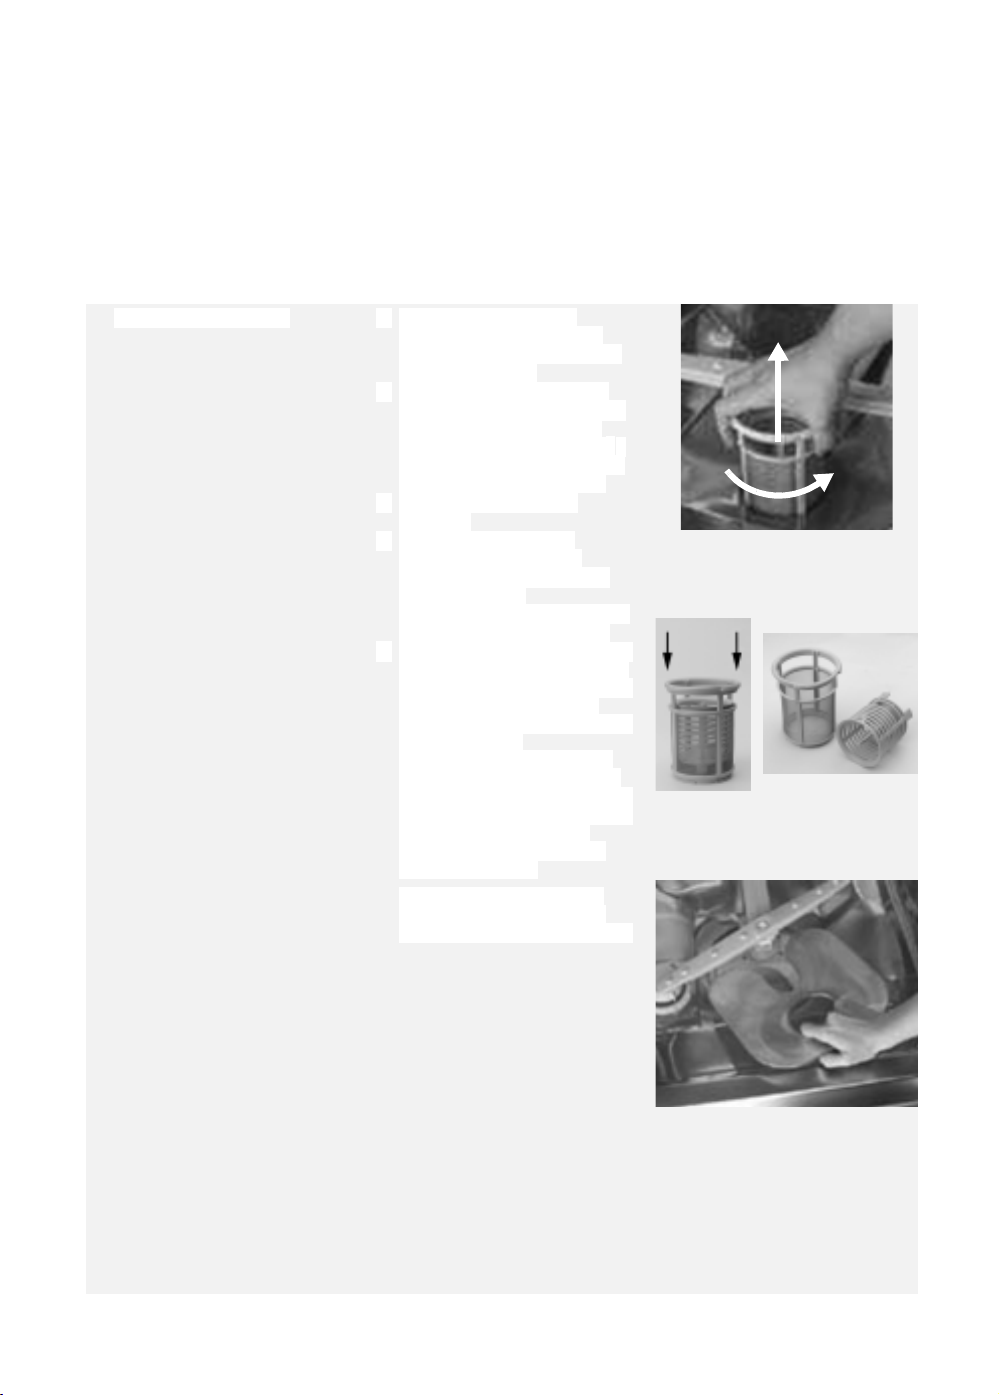
Cleaning t he f ilt er s: 1.
Rotate the microf ilt er
counter-clockw ise (in t he
direction of t he arro w
and extract i t (E).
2.
Place the microf ilt er/widemesh central filt er un it on a
flat surf ace and push t he
handle of t he microfilter (F).
Ext r act t h e w id e-mesh f il t er
by pushing it f orw ard (G).
3.
Rem ove t h e fine-mesh
filter (H).
4.
Cl ean al l f ilt ers u nd er
running w at er, paying
attent ion not to bend the
fine-mesh f ilt er.
Ch eck t hat n o i mp ur it i es ar e
lef t inside t h e dishw asher!
5.
Rem ou nt i ng : inser t t he w i demesh filter in t he m icrofilter
(click shou ld be heard! ) Insert
the f ine-mesh filter.
filter must be f itted un der
both t o ng ue s.
Insert the microfilter/w id emesh central filt er un it and
turn clockw ise to lo ck (in t he
direction of arrow “ 1” ), unt il
the dash ed l in es on the
microf ilt er an d f ine-mesh
filter are aligned.
The filt e r unit m ust b e
correctly assem bled t o
ensure go od w ash results!
The
“0”
)
F
G
H
18
 Loading...