

BAUKNECHT GKN 1958 A++ User Manual
Instructions for use

ENGLISH Instructions for use Page 3
2

INDEX
Chapter 1: INSTALLATION .......................................................................................................... 4
1.1. INSTALLING SINGLE APPLIANCE .............................................................................................................................4
1.2. INSTALLING TWO APPLIANCES ................................................................................................................................4
1.3. ADJUST DOORS IF AVAILABLE ...............................................................................................................................4
Chapter 2: FUNCTIONS ............................................................................................................... 5
2.1. SMART DISPLAY* .......................................................................................................................................................5
2.2. 6TH SENSE FREEZE CONTROL / PROFREEZE FREEZE CONTROL
2.3. ON/STAND BY ......................................................................................................................................... 5
2.4. BLACK OUT ALARM ...................................................................................................................................................5
2.5. TEMPERATURE ALARM ..............................................................................................................................................5
2.6. DOOR OPEN ALARM ..................................................................................................................................................5
2.7. PARTY MODE* ............................................................................................................................................................6
2.8. SHOCK FREEZE* .........................................................................................................................................................6
2.9. FAST FREEZE* ............................................................................................................................................................6
2.10. ECO NIGHT FUNCTION NIGHT TIME RATE * ........................................................................................................7
2.11. FREEZE CONTROL* ..................................................................................................................................................7
2.12. AUTOMATIC NO FROST ...........................................................................................................................................7
2.13. ICE MATE* .................................................................................................................................................................8
2.14. LED LIGHT SYSTEM* ................................................................................................................................................8
Chapter 3: USE ............................................................................................................................. 8
3.1. HOW TO INCREASE FREEZER STORAGE CAPACITY ................................................................................................8
3.2. NOTES ..........................................................................................................................................................................8
................................................................. 5
Chapter 4: FOODSTORAGE TIPS ............................................................................................... 9
4.1. STORAGE TIME OF FROZEN FOODS .........................................................................................................................9
4.2. TIPS FOR FREEZING AND STORING FRESH FOOD ................................................................................................10
4.3. USING ICE PACKS*....................................................................................................................................................10
4.4. FROZEN FOOD: SHOPPING TIPS .............................................................................................................................10
Chapter 5: FUNCTIONAL SOUNDS ........................................................................................... 11
Chapter 6: RECOMMENDATION IN CASE OF NO USE OF THE APPLIANCE .......................... 12
6.1. ABSENCE / VACATION ..............................................................................................................................................12
6.2. MOVING ....................................................................................................................................................................12
6.3. POWER FAILURE .......................................................................................................................................................12
Chapter 7: MAINTENANCE AND CLEANING............................................................................ 12
Chapter 8: TROUBLESHOOTING GUIDE .................................................................................. 13
8.1. BEFORE CONTACTING AFTERSALES SERVICE… .................................................................................................13
8.2. FAILURES ...................................................................................................................................................................14
Chapter 9: AFTERSALES SERVICE ........................................................................................... 14
NOTE:
The instructions apply to several models, so there may be differences. Sections which only apply to certain
appliances are indicated with an asterisk (*).
Functions which are dedicated specially for your already bought model of product you will find in QUICK
START GUIDE.
3
1. INSTALLATION
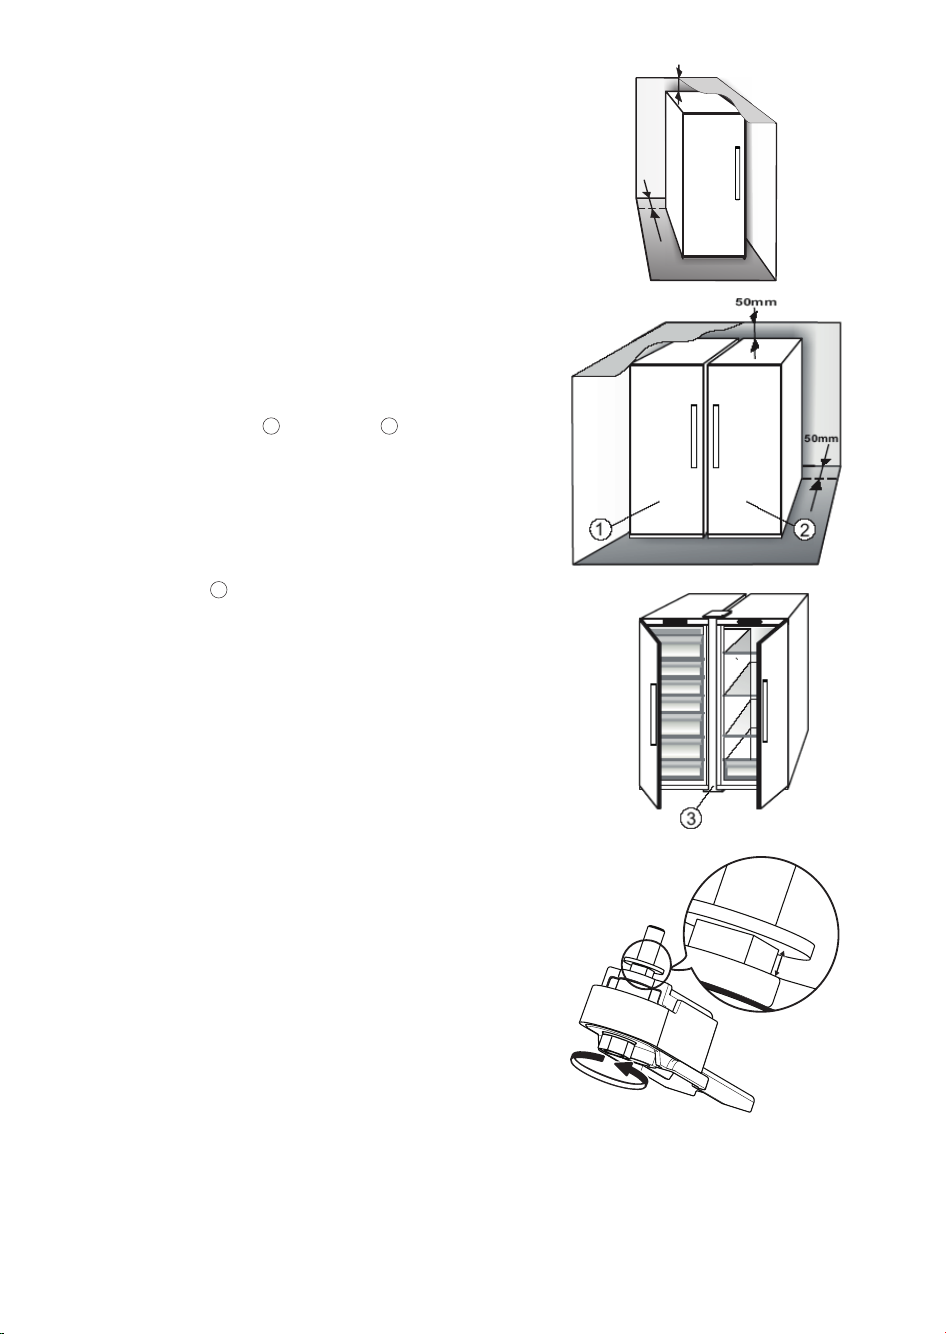
1.1. INSTALLING SINGLE APPLIANCE
50mm
To guarantee adequate ventilation, leave a space on both
sides and above the appliance.
The distance between the rear of the appliance and the
wall behind the appliance should be at least 50mm.
A reduction of this space will increase the Energy
consumption of product.
1.2. INSTALLING TWO APPLIANCES
During installing the freezer
1
and the fridge 2 together
ensure that the freezer is located on the left and the
fridge on the right (as shown on the drawing). Left side
of refrigerator is equipped with special device in order to
avoid condensation problems between appliances.
We recommended installing two appliances together
3
using the linking-kit
(as shown on the drawing). You
can buy it in Service.
50mm
1.3. ADJUST DOORS IF AVAILABLE
To level the doors using the adjustable lower hinge
(select models)
If the refrigerator door is lower than the freezer door, raise
the refrigerator door by turning the adjustment screw
counterclockwise using a M10 wrench.
If the freezer door is lower than the refrigerator door,
raise the freezer door by turning the adjustment screw
counterclockwise using a M10 wrench.
*Available on selected models only. Please check on the QUICK START GUIDE if this function is actually available on your model.
4
max
5 mm
2. FUNCTIONS
2.1. SMART DISPLAY*
This function can be used to save energy. Please follow
the instructions contained in the Quick Start Guide to
activate/deactivate the function. Two seconds after
activation of the Smart Display, the display goes off.
To adjust the temperature or use other functions, it is
necessary to activate the display by pressing any button.
After about 15 seconds without performing any action,
the display goes off again. When function is deactivated
the normal display is restored. The Smart Display is
automatically disabled after a power failure. Remember
that this function does not disconnect the appliance from
the power supply, but only reduce the energy consumed
by external display.
Note: The declared appliance energy consumption refers
to operation with the Smart Display function activated.
This function is available only on the model with User
Interface on the door.
2.2. 6TH SENSE FREEZE CONTROL
FREEZE CONTROL
The 6th Sense Freeze Control/ ProFreeze Freeze Control
function works to maintain the right temperature in the
following cases:
- Door opened for a while
The function activates when door opening causes the
internal temperature to increase to values that do not
ensure safe storage of food and remains active until
optimal storage conditions have been restored.
- Fresh food stored in the freezer
The function activates when fresh food is placed in
the freezer and remains active until optimal freezing
conditions are reached so as to ensure the best freezing
quality with the lowest power consumption.
Note: Besides the quantity of food loaded into the
freezer, ambient temperature and the quantity of food
already inside the freezer affect the duration of the 6th
Sense Freeze Control/ ProFreeze Freeze Control function.
Therefore significant duration variations are quite normal.
2.3. ON/STAND BY
This function turns On/Stand-by the freezer
compartments. To put the product in Stand-by, press &
hold the On/Stand-by button
the appliance is in Stand-by, the light inside the freezer
compartment does not work. Remember that this
operation does not disconnect the appliance from the
power supply. To switch the appliance On again, simply
press the On/Stand-By button
/ PROFREEZE
for 3 seconds. When
.
2.4. BLACK OUT ALARM
After a power blackout, your product is designed to
automatically monitor the temperature in the freezer
when electricity is resupplied. If the temperature in the
freezer rises above freezing level, the Black Out indicator
turns on, the Alarm indicator blinks and the
acoustical alarm sounds when electricity is resupplied.
To reset the alarm press the Stop Alarm button
once.
In case of Black Out Alarm, the following actions are
recommended:
• If the food in the freezer is unfrozen but still cold, all
the food in the freezer should be eaten within the next
24 hours.
• If the food in the freezer is frozen, this indicates the
food was thawed and then refrozen when electricity
was re-supplied which degrades taste, quality
and nutritional value and also could be unsafe. It
is recommended to not consume the food but to
dispose of the entire content of the freezer. The Black
Out Alarm is designed to provide guidance on food
quality in the freezer in the event of electricity black
out. This system does not guarantee food quality
or safety and consumers are advised to use their
own judgment in evaluating food quality in freezer
compartment.
2.5. TEMPERATURE ALARM
The acoustic alarm sounds and temperature indicator (°C)
blinks. The alarm is activated when:
• The appliance is connected to the power supply after
prolonged disuse
• The freezer compartment temperature is too high
• The quantity of fresh foods loaded into the freezer
exceeds that indicated on the rating plate
• The freezer door has been left open for a long time.
To mute the alarm buzzer press Stop Alarm button
once. The Alarm indicator
soon as the freezer compartment reaches a temperature
below -10°C and the temperature set indicator (°C) stop
blinking and shows the chosen setting.
2.6. DOOR OPEN ALARM
The Alarm icon
alarm sounds. The alarm is activated when the door is
left open for more than 2 minutes. To disengage the door
alarm close the door, or press once Stop Alarm button
to mute the acoustic alarm.
lights up blinking and the acoustic
is automatically turned-off as
just
just
*Available on selected models only. Please check on the QUICK START GUIDE if this function is actually available on your model.
5
 Loading...