


Instructions for use
Gebrauchsanweisung
Directives d’utilisation
Istruzioni per l’uso

ENGLISH Instructions for use Page 3
DEUTSCH Bedienungsanleitung Seite 15
FRANÇAIS Consignes d’utilisation Page 27
ITALIANO Istruzioni per l’uso Pagina 39
2

INDEX
Chapter 1: INSTALLATION ...................................................................................................4
1.1. INSTALLING SINGLE APPLIANCE ................................................................................................................4
1.2. INSTALLING TWO APPLIANCES ...................................................................................................................4
1.3. ADJUST DOORS (IF AVAILABLE) ..................................................................................................................4
Chapter 2: FUNCTIONS .......................................................................................................5
2.1. SMART DISPLAY* ............................................................................................................................................5
2.2. 6TH SENSE FREEZE CONTROL / PROFREEZE FREEZE CONTROL ........................................................5
2.3. ON/STAND BY .................................................................................................................................................5
2.4. BLACK OUT ALARM ......................................................................................................................................5
2.5. TEMPERATURE ALARM .................................................................................................................................5
2.6. DOOR OPEN ALARM ......................................................................................................................................5
2.7. PARTY MODE* ................................................................................................................................................6
2.8. SHOCK FREEZE* ...........................................................................................................................................6
2.9. FAST FREEZE* ...............................................................................................................................................6
2.10. ECO NIGHT FUNCTION (NIGHT TIME RATE) * ...........................................................................................7
2.11. FREEZE CONTROL* .....................................................................................................................................7
2.12. AUTOMATIC NO FROST ...............................................................................................................................7
2.13. ICE MATE* .....................................................................................................................................................8
2.14. LED LIGHT SYSTEM* ....................................................................................................................................8
Chapter 3: USE .....................................................................................................................8
3.1. HOW TO INCREASE FREEZER STORAGE CAPACITY .................................................................................8
3.2. NOTES .............................................................................................................................................................8
Chapter 4: FOOD-STORAGE TIPS ....................................................................................... 9
4.1. STORAGE TIME OF FROZEN FOODS ............................................................................................................9
4.2. TIPS FOR FREEZING AND STORING FRESH FOOD ................................................................................. 10
4.3. USING ICE PACKS* ...................................................................................................................................... 10
4.4. FROZEN FOOD: SHOPPING TIPS ............................................................................................................... 10
Chapter 5: FUNCTIONAL SOUNDS ...................................................................................11
Chapter 6: RECOMMENDATION IN CASE OF NO USE OF THE APPLIANCE ................12
6.1. ABSENCE / VACATION ................................................................................................................................ 12
6.2. MOVING ........................................................................................................................................................ 12
6.3. POWER FAILURE ......................................................................................................................................... 12
Chapter 7: MAINTENANCE AND CLEANING ...................................................................12
Chapter 8: TROUBLESHOOTING GUIDE ..........................................................................13
8.1. BEFORE CONTACTING AFTER-SALES SERVICE… ................................................................................. 13
8.2. FAILURES ..................................................................................................................................................... 14
Chapter 9: AFTER-SALES SERVICE .................................................................................14
Others:
REVERSE DOOR SWING VERSION_1 ...........................................................................................................................51
REVERSE DOOR SWING VERSION_2 ...........................................................................................................................53
REMOVING/INSERT THE FREEZER INTERIOR ...............................................................................................................55
NOTE:
The instructions apply to several models, so there may be differences. Sections which only apply to certain
appliances are indicated with an asterisk (*).
Functions which are dedicated specially for your already bought model of product you will find in QUICK
START GUIDE.
3
1. INSTALLATION
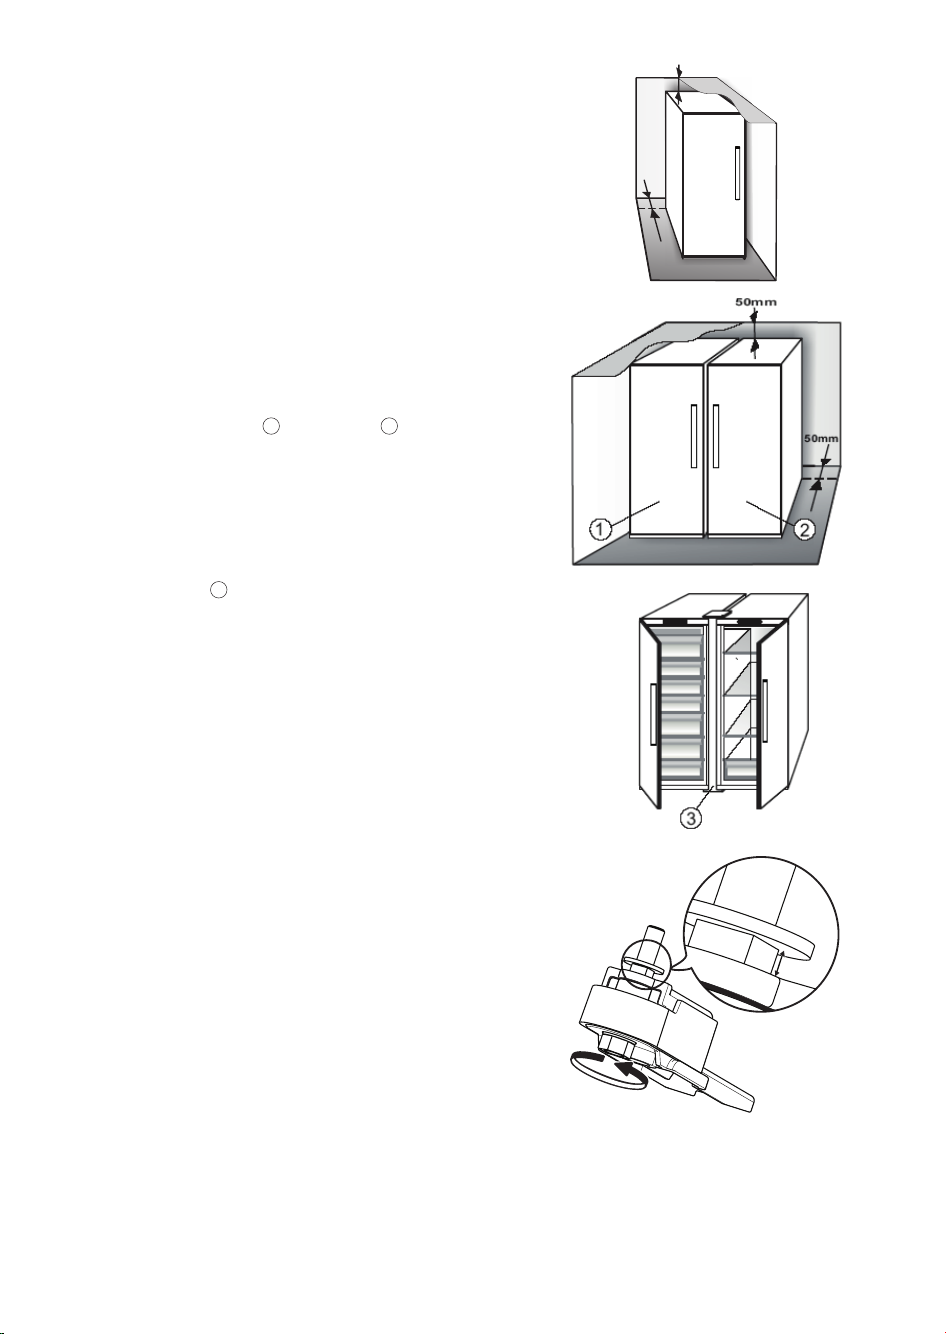
1.1. INSTALLING SINGLE APPLIANCE
50mm
To guarantee adequate ventilation, leave a space on both
sides and above the appliance.
The distance between the rear of the appliance and the
wall behind the appliance should be at least 50mm.
A reduction of this space will increase the Energy
consumption of product.
1.2. INSTALLING TWO APPLIANCES
During installing the freezer
1
and the fridge 2 together
ensure that the freezer is located on the left and the
fridge on the right (as shown on the drawing). Left side
of refrigerator is equipped with special device in order to
avoid condensation problems between appliances.
We recommended installing two appliances together
3
using the linking-kit
(as shown on the drawing). You
can buy it in Service.
50mm
1.3. ADJUST DOORS IF AVAILABLE
To level the doors using the adjustable lower hinge
(select models)
If the refrigerator door is lower than the freezer door, raise
the refrigerator door by turning the adjustment screw
counterclockwise using a M10 wrench.
If the freezer door is lower than the refrigerator door,
raise the freezer door by turning the adjustment screw
counterclockwise using a M10 wrench.
*Available on selected models only. Please check on the QUICK START GUIDE if this function is actually available on your model.
4
max
5 mm
2. FUNCTIONS
2.1. SMART DISPLAY*
This function can be used to save energy. Please follow
the instructions contained in the Quick Start Guide to
activate/deactivate the function. Two seconds after
activation of the Smart Display, the display goes off.
To adjust the temperature or use other functions, it is
necessary to activate the display by pressing any button.
After about 15 seconds without performing any action,
the display goes off again. When function is deactivated
the normal display is restored. The Smart Display is
automatically disabled after a power failure. Remember
that this function does not disconnect the appliance from
the power supply, but only reduce the energy consumed
by external display.
Note: The declared appliance energy consumption refers
to operation with the Smart Display function activated.
This function is available only on the model with User
Interface on the door.
2.2. 6TH SENSE FREEZE CONTROL
PROFREEZE FREEZE CONTROL
The 6th Sense Freeze Control / ProFreeze Freeze Control
function works to maintain the right temperature in the
following cases:
- Door opened for a while
The function activates when door opening causes the
internal temperature to increase to values that do not
ensure safe storage of food and remains active until
optimal storage conditions have been restored.
- Fresh food stored in the freezer
The function activates when fresh food is placed in
the freezer and remains active until optimal freezing
conditions are reached so as to ensure the best freezing
quality with the lowest power consumption.
Note: Besides the quantity of food loaded into the
freezer, ambient temperature and the quantity of food
already inside the freezer affect the duration of the 6th
Sense Freeze Control / ProFreeze Freeze Control function.
Therefore significant duration variations are quite normal.
2.3. ON/STAND BY
This function turns On/Stand-by the freezer
compartments. To put the product in Stand-by, press &
hold the On/Stand-by button
the appliance is in Stand-by, the light inside the freezer
compartment does not work. Remember that this
operation does not disconnect the appliance from the
power supply. To switch the appliance On again, simply
press the On/Stand-By button
/
for 3 seconds. When
.
2.4. BLACK OUT ALARM
After a power blackout, your product is designed to
automatically monitor the temperature in the freezer
when electricity is resupplied. If the temperature in the
freezer rises above freezing level, the Black Out indicator
turns on, the Alarm indicator blinks and the
acoustical alarm sounds when electricity is resupplied.
To reset the alarm press the Stop Alarm button
once.
In case of Black Out Alarm, the following actions are
recommended:
• If the food in the freezer is unfrozen but still cold, all
the food in the freezer should be eaten within the next
24 hours.
• If the food in the freezer is frozen, this indicates the
food was thawed and then refrozen when electricity
was re-supplied which degrades taste, quality
and nutritional value and also could be unsafe. It
is recommended to not consume the food but to
dispose of the entire content of the freezer. The Black
Out Alarm is designed to provide guidance on food
quality in the freezer in the event of electricity black
out. This system does not guarantee food quality
or safety and consumers are advised to use their
own judgment in evaluating food quality in freezer
compartment.
2.5. TEMPERATURE ALARM
The acoustic alarm sounds and temperature indicator (°C)
blinks. The alarm is activated when:
• The appliance is connected to the power supply after
prolonged disuse
• The freezer compartment temperature is too high
• The quantity of fresh foods loaded into the freezer
exceeds that indicated on the rating plate
• The freezer door has been left open for a long time.
To mute the alarm buzzer press Stop Alarm button
once. The Alarm indicator
soon as the freezer compartment reaches a temperature
below -10°C and the temperature set indicator (°C) stop
blinking and shows the chosen setting.
2.6. DOOR OPEN ALARM
The Alarm icon
alarm sounds. The alarm is activated when the door is
left open for more than 2 minutes. To disengage the door
alarm close the door, or press once Stop Alarm button
to mute the acoustic alarm.
lights up blinking and the acoustic
is automatically turned-off as
just
just
*Available on selected models only. Please check on the QUICK START GUIDE if this function is actually available on your model.
5

2.7. PARTY MODE*
Use this function to chill drinks inside the freezer
compartment. 30 minutes after selection (the time
required to chill a 0.75 l bottle without the glass breaking),
the symbol flashes, an acoustic alarm sounds: remove the
bottle from the freezer compartment and press the Stop
Alarm button to disable the alarm.
Important: do not leave the bottle inside the freezer
compartment longer than the time necessary for chilling.
2.8. SHOCK FREEZE*
The “Shock Freeze” compartment is specifically designed
to freeze up to 2 kg of fresh food extremely quickly. The
ultra-fast “Shock Freeze” function minimizes the formation
of ice crystals inside the food as it freezes, thus ensuring
it is of the best possible quality when defrosted prior
to consumption. When the “Shock Freeze” function is
not active, the compartment can be used as normal for
traditional freezing or for the storage of already frozen
foods.
Note: When the Shock Freeze function is active you may
hear a humming sound. This is absolutely normal and is
caused by airflow that permits optimum cold distribution
inside compartment.
Activating and deactivating the “Shock Freeze”
function:
1. Make sure at least 12 hours have passed since the last
time the “Shock Freeze” function was activated (if at
all). Do not activate the function more frequently than
once every 12 hours.
2. Make sure that the “Fast Freeze” function is not active:
“Shock Freeze” and “Fast Freeze” functions cannot be
active together at the same time.
3. Empty the “Shock Freeze” compartment.
4. Activate the “Shock Freeze” function by briefly touching
the button
on the control panel: the icon lights up
and the fans on the bottom of the compartment come
on, increasing the flow of cold air and accelerating the
freezing process as a result.
5. Place the food to be frozen inside the compartment,
a few centimeters (min. 2 cm) away from the fans on
the back of the compartment, so that cold air can
circulate.
6. To achieve maximum freezing speed, we recommend
not to deactivate the “Shock Freeze” function until its
automatic deactivation, keeping closed the door
7. The “Shock Freeze” function is automatically
deactivated 4-5 hours after its activation: the indicator
switches off and the fans are deactivated. The
“Shock Freeze” function may nevertheless be switched
off at any time as desired, by briefly pressing the
button
on the control panel: the indicator
switches off and the fans are deactivated.
Attention:
• Incompatibility with the “Fast Freeze” function
To guarantee optimal performance, the “Shock Freeze”
and “Fast Freeze” functions cannot be used at the same
time. Therefore, if the “Fast Freeze” function has been
already engaged, it has to be disengaged first to activate
the “Shock Freeze” function (and vice-versa).
• If the fans in the Shock Freeze compartment do not
start working
After the “Shock Freeze” function has been activated, it
may happen that the indicator
lights up as expected,
but the fans do not start working. This is normal and
means that freezer defrosting is in progress. At the end
of the defrosting phase (maximum duration: 1.5 hours),
the fans will automatically start working and the “Shock
Freeze” process will begin as normal.
• If the indicator
If, after the button
this case the
does not light up
is pressed, the icon lights up: in
button has been pressed for too long. To
activate the “Shock Freeze” function, first deactivate the
Fast Freeze function (holding the
then briefly touch the
button, without keeping it
button for 3 seconds,
pressed for more than 1 second.
2.9. FAST FREEZE*
The amount of fresh food (in kg) that can be frozen in
24 hours is indicated on the appliance rating plate.
This function can be used for optimum appliance
performance, 24 hours before placing fresh food in the
freezer Please follow the instructions contained in the
Quick Start Guide to activate/deactivate the function.
After placing fresh food in the freezer, 24 hours on Fast
Freeze function is generally sufficient; After 50 hours the
Fast Freeze function automatically deactivates.
Attention:
In order to save energy, when freezing small amounts of
food, the fast freeze function can be deactivated after a
few hours.
• Incompatibility with the “Shock Freeze” function
To guarantee optimal performance, the “Shock Freeze”
and “Fast Freeze” functions cannot be used at the same
time. Therefore, if the “Fast Freeze” function has been
already engaged, it has to be disengaged first to activate
the “Shock Freeze” function (and vice-versa).
*Available on selected models only. Please check on the QUICK START GUIDE if this function is actually available on your model.
6

2.10. ECO NIGHT FUNCTION
NIGHT TIME RATE *
The Eco Night function enables appliance energy
consumption to be concentrated in the reduced rate
hours (generally at night), when electricity is readily
available and costs less than during the daytime (only
in countries that utilise a time based multi-rate system check energy rates with the local electricity company).
To activate the function, press the button
at the
reduced rate start time (depending on the specific
rates plan). For example, if the reduced rate starts at
8p.m., press the button at that time. When the Eco
Night indicator
is ON, the function is ON. Once the
function is activated, the appliance automatically adapts
energy consumption according to the time selected, i.e.
consuming less energy during the day than at night.
IMPORTANT: To operate properly, the function must
be on during the night and day. The function remains
on until deactivated (or it is deactivated in case of a
power failure or appliance switch-off). To deactivate the
function, press the button
again. When the EcoNight
indicator is OFF, the function is OFF.
Note: The declared appliance energy consumption refers
to operation with the Eco Night function deactivated.
2.11. FREEZE CONTROL*
Freeze Control is an advanced technology that reduces
temperature fluctuations in the whole freezer compartment
to minimum, thanks to an innovative air system, totally
independent from the fridge. Freeze burns are significantly
reduced and food preserves its original quality and color.
To activate the Freeze Control choose the function from
the menu, set to >ON< and press OK button to confirm
the selection. To deactivate this function repeat the same
procedure setting to >OFF<.
The function works properly in a defined range of
temperature: between -22°C and -24°C.
When the function is engaged and the current temperature
in the freezer is set to the warmer set point than -22°C,
the temperature is automatically set to -22°C to match the
working range.
If the function is engaged and the user modify the freezer
temperature out of the working range, the function is
automatically switched off.
In case of Fast freezing is engaged, the function “Freeze
control” is inhibited until the Fast Freezing function
switched off.
2.12. AUTOMATIC NO FROST
This product is designed to defrost automatically according
to conditions of use and ambient humidity
No Frost freezers provide chilled air circulation around the
storage areas and prevent the formation of ice, thereby
completely eliminating the need for defrosting.
Frozen items don’t stick to the walls, labeling stays legible
and storage space remains neat and clear.
In combination with the 6th Sense Freeze Control / ProFreeze
Freeze Control, not only does it control the sensor, but directs
the cooling power exactly where it is needed, optimizing
energy efficiency.
*Available on selected models only. Please check on the QUICK START GUIDE if this function is actually available on your model.
7
2.13. ICE MATE*
HOW TO MAKE ICE CUBES
You can remove the ice cube tray by pulling it towards
you.
WARNING: fill with potable water only (maximum level =
2/3 of the overall capacity).
or
Place again the Ice Mate in freezer compartment, or
reinsert the ice cube tray within the Ice Mate. Take care
not to spill water.
Wait until the ice cubes are formed (it is recommended to
wait for about 4 hours).
NOTE: Ice Mate is removable. It can be placed in
horizontal position anywhere in the freezer compartment
or taken out of the appliance when ice-making is not
required.
HOW TO TAKE ICE CUBES
Make sure that the storage bin is in place under the ice
tray. If not, slide into place.
Twist one of levers firmly in the clockwise direction until
the tray twists slightly. The ice cubes fall into the storage
bin.
Repeat Step 2 for the other half of the tray, if necessary.
To get ice, slightly lift up the storage bin and pull it
towards you.
NOTE: if you prefer, you can remove the entire Ice Mate
from the appliance, to take the ice cubes wherever is
convenient for you (for example: directly on the table).
or
2.14. LED LIGHT SYSTEM*
The light system inside the freezer compartment uses
LEDs light, allowing a better lightning as well as very low
energy consumption. If the LED light system does not
work, please contact the Service to replace it.
3. USE
3.1. HOW TO INCREASE FREEZER STORAGE CAPACITY
You can increase storage capacity in the freezer
compartment by:
• removing the baskets / flaps* to allow the storage of
big products.
• placing the food products directly on the freezer
shelves.
• removing the Ice Mate* .
• removing bottle rack*.
*Available on selected models only. Please check on the QUICK START GUIDE if this function is actually available on your model.
3.2. NOTES
• Do not block the air outlet area (on the back wall
inside the product) with food products.
• If the freezer is provided with a flap, it is possible to
maximize the storage volume by removing the flap.
• All shelves, flaps and pull-out baskets are removable.
• The internal temperatures of the appliance may be
affected by the ambient temperature, frequency of
door opening, as well as location of the appliance.
Temperature setting should take into consideration
these factors.
• Unless otherwise specified the appliance accessories
are not dishwasher safe.
8

4. FOODSTORAGE TIPS
The freezer is the ideal storage location for store frozen
food, make ice cubes and freeze fresh food in the freezer
compartment.
The maximum number of kilograms of fresh food that
can be frozen within a 24-hour period is indicated on the
rating plate (…kg/24h).
If you have a little quantity of food to store in the freezer,
we recommend to use the coldest areas of your freezer
compartment, corresponding to the upper or the middle
area, depending on your model (see the product sheet to
know which is the area where is suggested to freeze fresh
food).
4.1. STORAGE TIME OF FROZEN FOODS
The table shows the recommended storage time for
frozen fresh foods.
FOODS STORAGE
TIME (months)
Meat
Beef 8 – 12
Pork, veal 6 – 9
Lamb 6 – 8
Rabbit 4 – 6
Mince / offal 2 – 3
Sausages 1 – 2
Poultry
Chicken 5 – 7
Turkey 6
Giblets 2 – 3
Fish
“fatty” ( salmon, herring, mackerel) 2 – 3
“lean” (cod, sole) 3 – 4
Stews
Meat, poultry 2 – 3
Dairy products
Butter 6
Cheese 3
Double cream 1 – 2
Ice-cream 2 – 3
Eggs 8
Soups and sauces
Soup 2 – 3
Meat sauce 2 – 3
Pate 1
Ratatouille 8
Pastry and bread
Bread 1 – 2
Cakes (plain) 4
Gateaux (cakes) 2 – 3
Crepes 1 – 2
Uncooked pastry 2 – 3
Quiche 1 – 2
Pizza 1 – 2
Crustaceans
Molluscs creab, lobster 1 – 2
Creab, lobster 1 – 2
Shellfish
Oyster, shucked 1 – 2
*Available on selected models only. Please check on the QUICK START GUIDE if this function is actually available on your model.
9

FRUITS AND VEGETABLES
FOODS STORAGE
Fruits
Apples 12
Apricots 8
Blackberries 8 – 12
Blackcurrants / Redcurrants 8 – 12
Cherries 10
Peaches 10
Pears 8 – 12
Plum 10
Raspberries 8 – 12
Strawberries 10
Rhubarb 10
Fruit juices (orange, lemon,
grapefruit)
Vegetables 8 – 10
Asparagus 6 – 8
Basil 12
Beans 8 – 10
Artichokes 8 – 10
Broccoli 8 – 10
Brussels sprout 8 – 10
Cauliflower 10 – 12
Carrots 6 – 8
Celery 8
Mushrooms (champignons) 6 – 8
Parsley 10 – 12
Peppers 12
Peas 12
Runner-beans 12
Spinach 8 – 10
Tomatoes 8 – 10
Zucchini
We recommend to label and date all your frozen food.
Adding a label will help you to identify foods and to
know when they should be used before their quality
deteriorates.Do not re-freeze defrosted food.
TIME (months)
4 – 6
4.2. TIPS FOR FREEZING AND STORING FRESH FOOD
• Before freezing, wrap and seal fresh food in:
aluminium foil, cling film, air and water-tight plastic
bags, polythene containers with lids or freezer
containers suitable for freezing fresh food.
• Food must be fresh, mature and of prime quality in
order to obtain high quality frozen food.
• Fresh vegetables and fruit should preferably be frozen
as soon as they are picked to maintain the full original
nutritional value, consistency, colour and flavor.
Some meat, especially game, should be hung before it is
frozen.
Note:
• Always leave hot food to cool before placing in the
freezer.
• Eat fully or partially defrosted foods immediately.
Do not refreeze unless the food is cooked after it
has thawed. Once cooked, the thawed food can be
refrozen.
• Do not freeze bottles with liquid.
4.3. USING ICE PACKS*
Ice packs helps in keeping frozen the foodstuffs in case
of power failure. For the best usage of them, place them
above food stored in the top of compartment.
4.4. FROZEN FOOD: SHOPPING TIPS
When purchasing frozen food products:
• Ensure that the packaging is not damaged (frozen
food in damaged packaging may have deteriorated).
If the package is swollen or has damp patches, it may
not have been stored under optimal conditions and
defrosting may have already begun.
• When shopping, buy frozen foods at the end of your
trip and transport them in a thermally insulated cool
bag.
• Once at home, place the frozen foods immediately in
the freezer.
• If food has defrosted even partially, do not re-freeze it.
Consume within 24 hours.
• Avoid or reduce temperature variations to the
minimum. Respect the best-before date on the
package.
• Always observe the storage information on the
package.
10

5. FUNCTIONAL SOUNDS
Sounds coming from your appliances are normal
since it has a number of fans and engines to regulate
performances that switch on and off automatically.
Some of the functional sounds can be reduced
through
• Leveling the appliance and installing it on an even
surface
• Separating and avoiding contact between the
appliance and furniture.
• Checking if the internal components are correctly
placed.
• Checking if bottles and containers are not in contact
with each other.
Some of the functional sounds you might hear:
A hissing sound when switching on
the appliance for the first time or
after a long pause.
Buzzing sound when water valve or
fan start working.
A gurgling sound when refrigerant
fluid enters into the pipes.
A cracking sound when
compressor starts or when ready
ice drops into ice box abrupt clicks
when compressor switches on and
off.
BRRR sound is from the
compressor running.
The CLICK is from the thermostat
which adjusts how often the
compressor is running.
11

6. RECOMMENDATION IN CASE OF NO USE OF THE APPLIANCE
6.1. ABSENCE / VACATION
In case longer absence its recommended to use up food
and to disconnect the appliance to save energy.
6.2. MOVING
1. Take out all internal parts.
2. Wrap them well, and fix them together with adhesive
tape so that they do not bang together or get lost.
3. Screw the adjustable feet so that they do not touch
the support surface.
4. Close and fix door with adhesive tape and, again using
adhesive tape, fix the power cable to the appliance.
6.3. POWER FAILURE
In the event of a power failure, call the local office of your
electricity supply company and ask how long it is going
to last.
Note: Bear in mind that a full appliance will stay cold
longer than a partially filled one.
If ice crystals are still visible on the food, it may be frozen
again, although flavour and aroma may be affected.
If food is found to be in a poor condition, it is best to
throw it away.
For power failures lasting up to 24 hours.
1. Keep the door of the appliance closed. This will allow
For power failures lasting more than 24 hours.
1. Empty the freezer compartment and arrange the
2. Empty the ice tray.
7. MAINTENANCE AND CLEANING
Before any cleaning or maintenance operation, unplug
the appliance from the mains or disconnect the electrical
power supply.
Periodically clean the appliance with a cloth and a
solution of lukewarm water and neutral detergent
specifically for refrigerator interiors. Never use abrasives.
Never clean refrigerator parts with flammable fluids. The
fumes can create a fire hazard or explosion. Clean the
outside of the appliance and the door seal with a damp
cloth and dry with a soft cloth.
the stored food to stay cold as long as possible.
food in a portable freezer. If this type of freezer is
not available and, likewise, no artificial ice packs are
available, try to use up the food, which is more easily
perishable.
Do not use steam cleaners.
Condenser placed in the rear of the appliance should be
cleaned regularly using a vacuum cleaner.
Important:
• The buttons and control panel display must not be
cleaned with alcohol or alcohol-derived substances,
but with a dry cloth.
• The refrigeration system pipes are located near the
defrost pan and can become hot. Periodically clean
them with a vacuum cleaner.
• To remove or insert the glass shelf, move up the front
part of the shelf to pass the stopper.
12

8. TROUBLESHOOTING GUIDE
8.1. BEFORE CONTACTING AFTERSALES SERVICE…
Performance problems often result from little things you can find and fix yourself without tools of any kind.
PROBLEM SOLUTION
The appliance is not working: • Is the power cable plugged into a live socket with the proper
If there is water in the defrost pan: • This is normal in hot, damp weather. The pan can even be half full.
If the edges of the appliance cabinet,
which come in contact with the door
seal, are warm to the touch:
If the light does not work: • Have you checked the protection devices and fuses of the electrical
If the motor seems to run too much: • Motor running time depends on different things: number of door
If the appliance temperature is too
high:
If the doors do not open and close
properly:
voltage?
• Have you checked the protection devices and fuses of the electrical
system in your home?
Make sure the appliance is level so that the water does not overflow.
• This is normal in hot weather and when the compressor is running.
system in your home?
• Is the power cable plugged into a live socket with the proper
voltage?
• In case the LEDs are broken the user must call the Service for
exchange of the same type available only at our After-sales Service
Centers or authorized dealers.
openings, amount of food stored, temperature of the room, setting
of the temperature controls.
• Is the condenser (back the appliance) free of dust and fluff?
• Are the door properly closed?
• Are the door seals properly fitted?
• On hot days or if the room is warm, the motor naturally runs longer.
• If the appliance door has been left open for a while or if large
amounts of food have been stored, the motor will run longer in order
to cool down the interior of the appliance.
• Are the appliance controls correctly set?
• Has a large amount of food been added to the appliance?
• Check that the door is not opened too often.
• Check that the door close properly.
• Check that food packages are not blocking the door.
• Check that the internal parts or automatic ice maker are not out of
position.
• Check that the door seals are not dirty or sticky.
• Ensure the appliance is level.
13
8.2. FAILURES
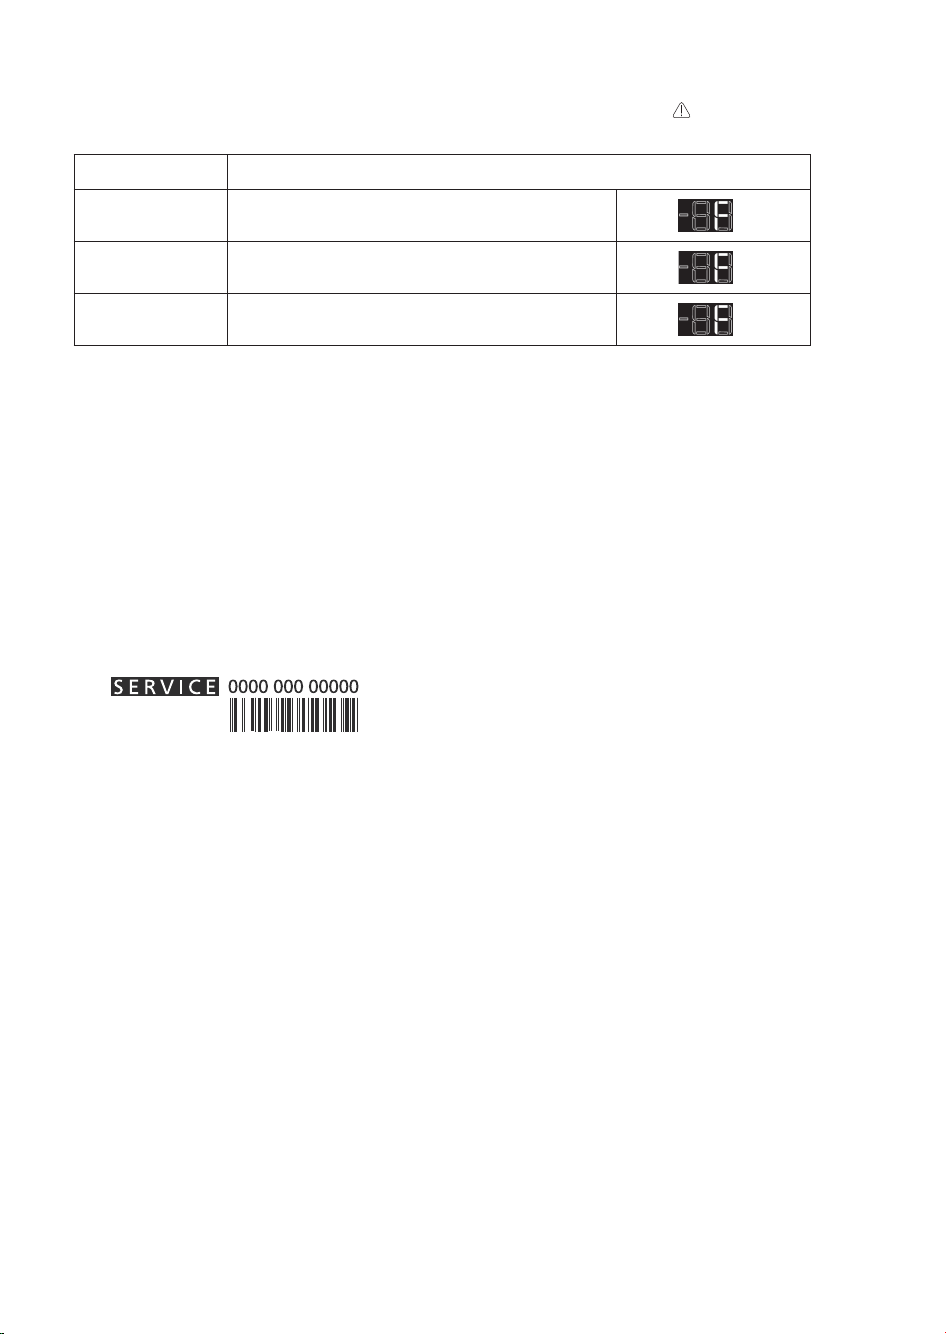
In the event of operation alarms, they will also be displayed in the digits LEDs, (e.g. Failure1, Failure2, etc...) call
After-sales Service and specify the alarm code. The acoustic alarm sounds, the Alarm icon
on the digit display blinks according to failure code described below:
Failure code Visualization
Error 2
Error 3
Error 6
F letter blink on/off at 0,5 sec. Blinks ON 2 times
then remain off for 5 seconds. Pattern repeats.
F letter blink on/off at 0,5 sec. Blinks ON 3 times
then remain off for 5 seconds. Pattern repeats.
F letter blink on/off at 0,5 sec. Blinks ON 6 times
then remain off for 5 seconds. Pattern repeats.
lights up and the F letter
x2
x3
x6
9. AFTERSALES SERVICE
Before contacting After-Sales Service:
Switch the appliance on again to see if the problem has been solved. If it has not, disconnect the appliance from the
power supply and wait for about an hour before switching on again.
If, after performing the checks described in the Troubleshooting Guide and switching the appliance on again, your
appliance still does not work properly, contact the After-sales Service, explain the problem.
Specify:
• the model and appliance serial number (stated on the rating plate),
• the nature of the problem,
• the Service number (the number after the word SERVICE on the data plate on the inside of the appliance),
• your full address,
• your telephone number and area code.
Note:
The direction of door opening can be changed. If this operation is performed by After-sales Service it is not covered by
the warranty.
14

INDEX
Kapitel 1: INSTALLATION ..................................................................................................16
1.1. INSTALLATION EINES EINZELGERÄTS ..................................................................................................... 16
1.2. INSTALLATION VON ZWEI GERÄTEN ........................................................................................................ 16
1.3. TÜREN EINSTELLEN (FALLS VORHANDEN) ............................................................................................. 16
Kapitel 2: FUNKTIONEN ....................................................................................................17
2.1. SMART-DISPLAY* ......................................................................................................................................... 17
2.2. 6TH SENSE GEFRIERKONTROLLE / PROFREEZE GEFRIERKONTROLLE ........................................... 17
2.3. EIN/STAND-BY ............................................................................................................................................. 17
2.4. STROMAUSFALL-ALARM ............................................................................................................................ 17
2.5. TEMPERATURALARM.................................................................................................................................. 17
2.6. ALARM TÜR OFFEN ..................................................................................................................................... 17
2.7. PARTY-MODUS ............................................................................................................................................ 18
2.8. SCHOCKGEFRIEREN* ................................................................................................................................ 18
2.9. SCHNELL EINFRIEREN* ............................................................................................................................. 18
2.10. ECO NIGHT-FUNKTION (NACHTSTROMNUTZUNG) * ............................................................................ 19
2.11. GEFRIERKONTROLLE* ............................................................................................................................. 19
2.12. NO-FROST-AUTOMATIK ............................................................................................................................ 19
2.13. ICE MATE* .................................................................................................................................................. 20
2.14. LED-LICHTSYSTEM* .................................................................................................................................. 20
Kapitel 3: GEBRAUCH .......................................................................................................20
3.1. KAPAZITÄT DES GEFRIERFACHS ERHÖHEN ........................................................................................... 20
3.2. HINWEISE ..................................................................................................................................................... 20
Kapitel 4: AUFBEWAHRUNGSTIPPS FÜR LEBENSMITTEL ...........................................21
4.1. AUFBEWAHRUNGSZEITRAUM VON TIEFKÜHLKOST .............................................................................. 21
4.2. TIPPS ZUM EINFRIEREN UND LAGERN VON FRISCHEN LEBENSMITTELN ......................................... 22
4.3. VERWENDUNG VON KÜHLAKKUS* ........................................................................................................... 22
4.4. TIEFKÜHLKOST: EINKAUFSTIPPS ............................................................................................................. 22
Kapitel 5: BETRIEBSGERÄUSCHE ...................................................................................23
Kapitel 6: EMPFEHLUNGEN BEI NICHTGEBRAUCH DES GERÄTS ..............................24
6.1. ABWESENHEIT / URLAUB .......................................................................................................................... 24
6.2. UMZUG ......................................................................................................................................................... 24
6.3. STROMAUSFALL .......................................................................................................................................... 24
Kapitel 7: WARTUNG UND REINIGUNG ...........................................................................24
Kapitel 8: ANLEITUNG ZUR FEHLERSUCHE ...................................................................25
8.1. BEVOR SIE DEN KUNDENDIENST KONTAKTIEREN… ............................................................................ 25
8.2. FEHLER ........................................................................................................................................................ 26
Kapitel 9: KUNDENDIENST ...............................................................................................26
Sonstiges:
TÜRANSCHLAG WECHSELN VERSION_1 ....................................................................................................................51
TÜRANSCHLAG WECHSELN VERSION_2 ....................................................................................................................53
GEFRIERFACHEINSÄTZE AUSBAUEN / EINBAUEN .......................................................................................................55
HINWEIS:
Die Anweisungen beziehen sich auf verschiedene Modelle, daher kann es zu Unterschieden kommen.
Abschnitte, die sich nur auf bestimmte Geräte beziehen, sind mit einem Sternchen (*) markiert.
Funktionen, die sich speziell auf das von Ihnen gekaufte Produktmodell beziehen, finden Sie in der
KURZANLEITUNG.
15

1. INSTALLATION
1.1. INSTALLATION EINES EINZELGERÄTS
50mm
Um eine ausreichende Belüftung sicherzustellen, muss an
beiden Seiten und über dem Gerät etwas Platz gelassen
werden.
Der Abstand zwischen der Geräterückwand und der Wand
hinter dem Gerät sollte mindestens 50 mm betragen.
Eine Verringerung dieses Abstands erhöht den
Energieverbrauch des Geräts.
1.2. INSTALLATION VON ZWEI GERÄTEN
Bei gemeinsamer Installation von Gefrierer
1
und
Kühlschrank 2 sicherstellen, dass der Gefrierer sich auf
der linken Seite und der Kühlschrank auf der rechten
Seite befindet (siehe Zeichnung). Die linke Seite des
Kühlschranks besitzt eine spezielle Vorrichtung, um
Probleme der Kondensation zwischen den Geräten zu
vermeiden.
Wir empfehlen, die beiden Geräte mit dem
3
Verbindungsbausatz
gemeinsam zu installieren (wie
abgebildet). Dieser ist im Kundenservice erhältlich.
50mm
1.3. TÜREN EINSTELLEN FALLS VORHANDEN
Um die Türen mit dem verstellbaren unteren Scharnier
auszurichten
(Modelle auswählen)
max
Wenn die Kühlschranktür niedriger ist als die Gefrierertür,
5 mm
drehen Sie die Stellschraube entgegen dem Uhrzeigersinn
mit einem M10-Schlüssel und erhöhen Sie die
Kühlschranktür.
Wenn die Gefrierertür niedriger ist als die Kühlschranktür,
drehen Sie die Stellschraube entgegen dem Uhrzeigersinn
mit einem M10-Schlüssel und erhöhen Sie die
Gefrierertür.
* Verfügbar nur bei ausgewählten Modellen. Bitte sehen Sie in der KURZANLEITUNG, ob diese Funktion auf Ihrem Modell verfügbar ist.
16
2. FUNKTIONEN
2.1. SMARTDISPLAY*
Mit dieser Funktion können Sie Energie sparen. Befolgen
Sie die Anweisungen in der Kurzanleitung, um die
Funktion zu aktivieren / zu deaktivieren. Zwei Sekunden
nach Aktivierung des Smart-Displays schaltet das Display
ab. Zum Einstellen der Temperatur oder für andere
Funktionen müssen Sie das Display durch Drücken
einer beliebigen Taste wieder einschalten. Nach etwa 15
Sekunden ohne Betätigung einer Funktion schaltet das
Display wieder ab. Bei deaktivierter Funktion wird das
normale Display wiederhergestellt. Das Smart-Display
wird nach einem Stromausfall automatisch deaktiviert.
Bitte beachten Sie, dass diese Funktion nicht die
Stromversorgung des Geräts unterbricht, sondern nur den
Stromverbrauch durch das externe Display verringert.
Hinweis: Der angegebene Energieverbrauch bezieht
sich auf den Betrieb mit aktiviertem Smart-Display. Diese
Funktion ist nur bei dem Modell mit Benutzerschnittstelle
an der Tür verfügbar.
2.2. 6TH SENSE GEFRIERKONTROLLE
PROFREEZE GEFRIERKONTROLLE
Die 6th Sense Gefrierkontrolle / ProFreeze Gefrierkontrolle
hält in den folgenden Fällen die korrekte Temperatur
aufrecht:
- Tür kurzfristig geöffnet
Die Funktion wird aktiviert, wenn die Innentemperatur
durch eine geöffnete Tür auf Werte ansteigt, bei
denen die sichere Lagerung von Lebensmitteln nicht
garantiert werden kann und sie bleibt aktiv, bis optimale
Lagerungsbedingungen wiederhergestellt sind.
- Frische Lebensmittel im Gefrierschrank platziert
Die Funktion wird aktiviert, wenn frische Lebensmittel im
Gefrierschrank platziert werden und sie bleibt aktiv, bis
optimale Gefrierbedingungen erreicht sind, um so die
beste Gefrierqualität bei niedrigstem Energieverbrauch zu
garantieren.
Hinweis: Abgesehen von der Menge an Lebensmitteln,
die in den Gefrierschrank gegeben wird, wirken sich auch
die Umgebungstemperatur und die Menge der bereits
im Gefrierschrank vorhandenen Lebensmittel auf die
Dauer der Funktion 6th Sense Gefrierkontrolle / ProFreeze
Gefrierkontrolle aus. Schwankungen in der Betriebsdauer
der Funktion sind somit völlig normal.
2.3. EIN/STANDBY
Diese Funktion schaltet die Gefrierfächer ein oder in den
Stand-by-Modus. Halten Sie die Taste Ein/Stand-by
Sekunden lang gedrückt, um das Gerät in den Stand-byModus zu schalten. Im Stand-by-Modus ist die Leuchte
im Gefrierfach nicht aktiv. Bitte beachten Sie, dass das
Gerät im Stand-by-Modus weiterhin mit Strom versorgt
wird. Drücken Sie die Taste Ein/Stand-by
wieder einzuschalten.
/
3
, um das Gerät
2.4. STROMAUSFALLALARM
Bei einem Stromausfall ist Ihr Gerät in der Lage, die
Temperatur im Gefrierraum nach Wiederaufnahme der
Stromversorgung automatisch zu überwachen. Steigt
die Temperatur im Gefrierraum über den Gefrierpunkt
an, leuchtet das Symbol Stromausfall auf, das
Alarmsymbol
die Stromversorgung wieder einsetzt.
Zum Rücksetzen des Alarms einmal die
Stoppen-Taste drücken.
Im Falle eines Stromausfallalarms sollten folgende
Maßnahmen getroffen werden:
• Verbrauchen Sie angetaute, aber noch kalte
Lebensmittel aus Gefrierfach innerhalb von 24
Stunden.
• Falls die Lebensmittel im Gefrierraum gefroren sind,
bedeutet dies, dass sie angetaut waren und nach
Wiederaufnahme der Stromversorgung wieder
gefroren sind. Dadurch werden nicht nur Geschmack,
Qualität und Nährwert der Lebensmittel verändert,
sondern sie sind auch potentiell gefährlich. Sie sollten
diese Lebensmittel nicht verzehren und den gesamten
Inhalt des Gefrierfachs wegwerfen. Der StromausfallAlarm liefert Ihnen Hinweise zur Qualität der im
Gefrierfach eingelagerten Lebensmittel im Falle eines
Stromausfalls. Dieses System stellt keine Garantie für
die Qualität und Unbedenklichkeit der Lebensmittel
dar, sondern weist lediglich darauf hin, dass der
einwandfreie Zustand der Lebensmittel im Gefrierfach
überprüft werden muss.
2.5. TEMPERATURALARM
Der Alarmton ertönt und die Temperaturanzeige (°C)
blinkt. Der Alarm wird in folgenden Fällen ausgelöst:
• Das Gerät wird nach längerer Zeit der Nichtbenutzung
an die Stromversorgung angeschlossen
• Die Gefrierraumtemperatur ist zu hoch
• Die Menge der eingelagerten frischen Lebensmittel
übersteigt die auf dem Typenschild angegebene
• Die Gefrierraumtür stand längere Zeit offen.
Zum Abschalten des Summers einmal die AlarmStoppen-Taste
automatisch, sobald im Gefrierfach die Temperatur unter
-10°C sinkt, die Anzeige der eingestellten Temperatur (°C)
nicht mehr blinkt und die gewählte Einstellung angezeigt
wird.
2.6. ALARM TÜR OFFEN
Das Alarmsymbol
Alarm wird aktiviert, wenn die Tür länger als 2Minuten
geöffnet bleibt. Schließen Sie die Tür oder drücken Sie die
Taste Alarm stoppen
blinkt und das Warnsignal ertönt, sobald
Alarm-
drücken. Die Alarmanzeige erlischt
blinkt und der Alarmton ertönt. Der
, um den Alarmton auszuschalten.
* Verfügbar nur bei ausgewählten Modellen. Bitte sehen Sie in der KURZANLEITUNG, ob diese Funktion auf Ihrem Modell verfügbar ist.
17
 Loading...