

BAUKNECHT BIK9 PP8TS2 PT CH Daily Reference Guide

Quick guide
EN
THANK YOU FOR BUYING A BAUKNECHT PRODUCT
In order to receive a more complete assistance, please
register your product on www . bauknecht . eu / register
PRODUCT DESCRIPTION
1
2
5
4
3
3
2
1
4
Before using the appliance carefully read the Safety
Instruction.
1. Control panel
2. Fan and Circular heating
element
(not visible)
5
5
4
6
7
3. Shelf guides
(the level is indicated on the
front of the oven)
4. Door
5. Upper heating element/grill
3
2
1
8
9
6. Lamp
7. Food probe insert point
8. Identification plate
(do not remove)
9. Lower heating element
(not visible)
CONTROL PANEL DESCRIPTION
1
2 3
1. ON / OFF
For switching the oven on and off.
2. HOME
For gaining quick access to the
main menu.
4
3. FAVORITE
For retrieving up the list of your
favorite functions.
4. DISPLAY
5. TOOLS
To choose from several options
and also change the oven settings
and preferences.
65
7
6. REMOTE CONTROL
To enable use of the Bauknecht
Home Net App.
7. CANCEL
To stop any oven function except
the Clock, Kitchen Timer and
Control Lock.
1
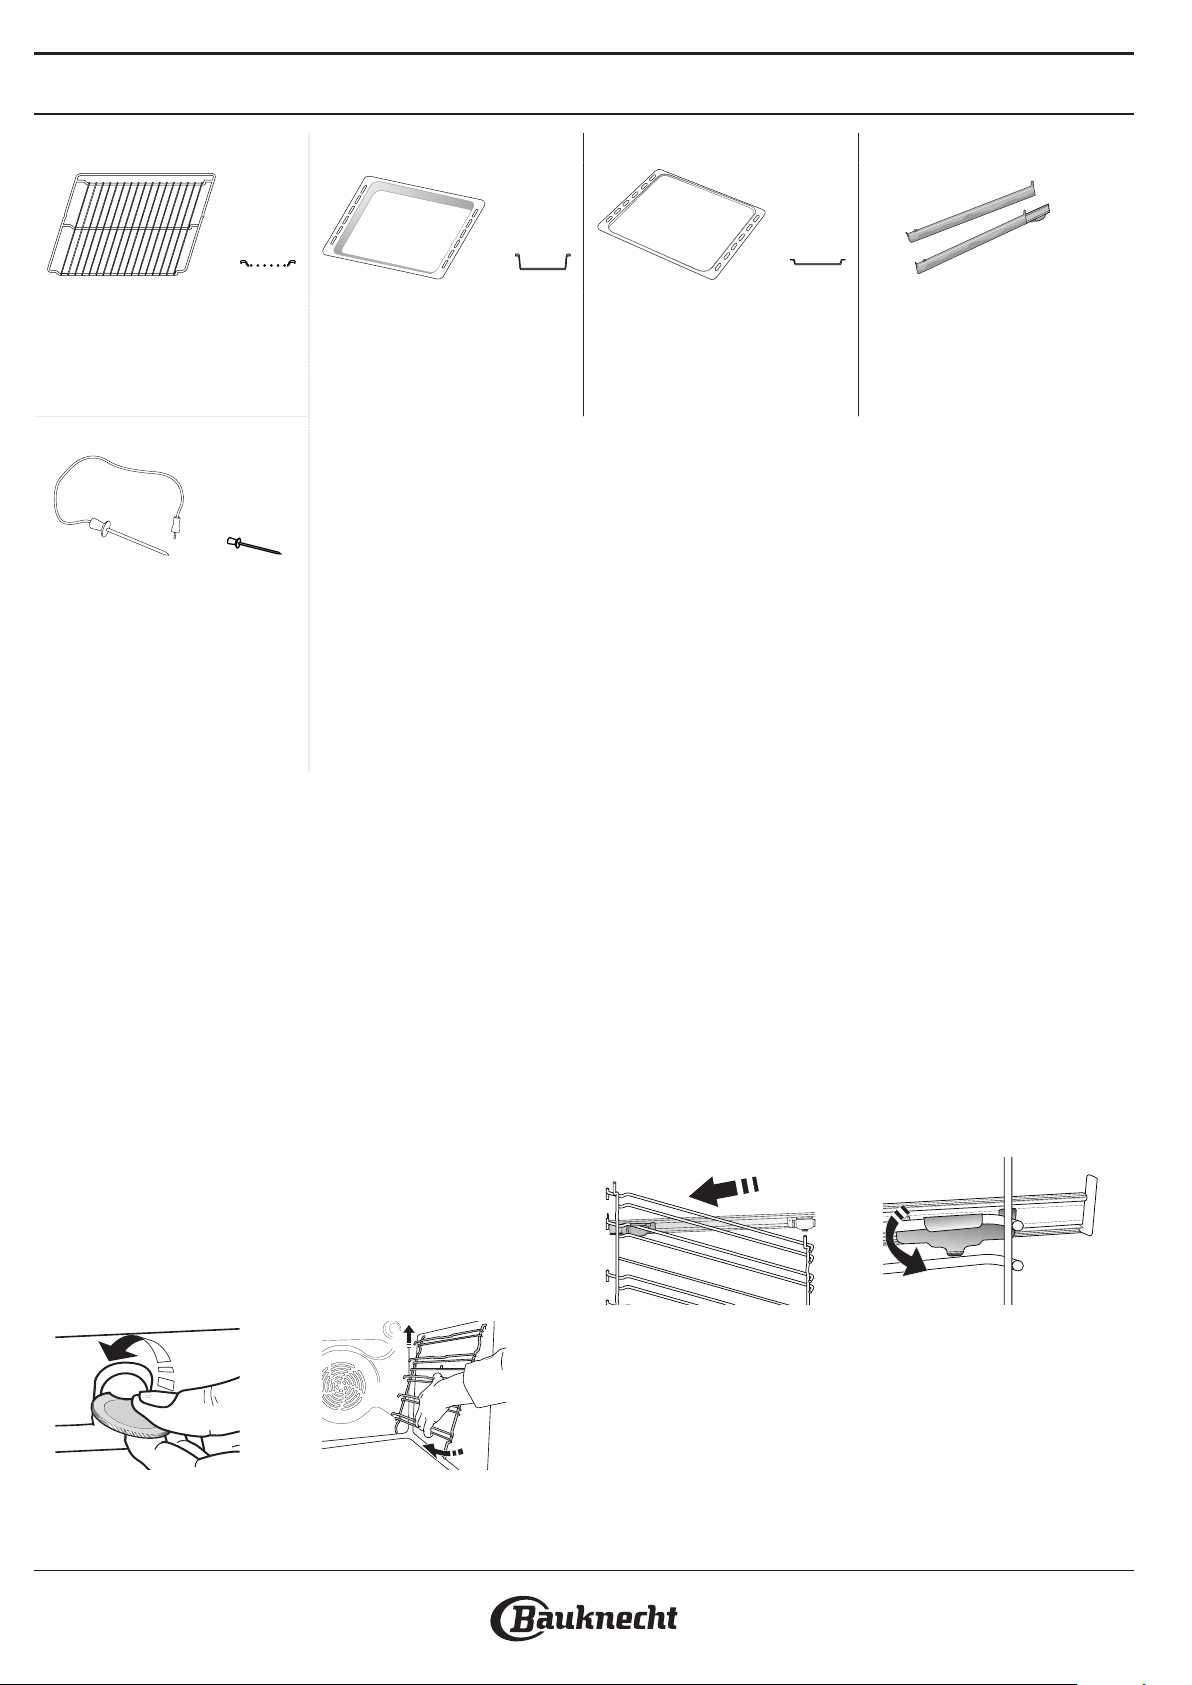
ACCESSORIES
2
WIRE SHELF DRIP TR AY BAKING TRAY SLIDING RUNNERS *
Use to cook food or as a
support for pans, cake tins
and other ovenproof items of
cookware
Use as an oven tray for
cooking meat, sh,
vegetables, focaccia, etc. or
position underneath the wire
shelf to collect cooking juices.
Use for cooking all bread and
pastry products, but also for
roasts, sh en papillotte, etc.
FOOD PROBE
To accurately measure the
core temperature of food
during cooking. Thanks to its
four sensing points and rigid
support, it can be used for
meat and sh, and also for
bread, cakes and baked
pastries.
* Availble only on certain models
The number and the type of accessories may vary depending on which model is purchased.
Other accessories can be purchased separately from the After-sales Service.
To facilitate inserting or
removing accessories.
INSERTING THE WIRE SHELF AND OTHER
ACCESSORIES
Insert the wire shelf horizontally by sliding it across
the shelf guides, making sure that the side with the
raised edge is facing upwards.
Other accessories, such as the drip tray and the
baking tray, are inserted horizontally in the same way
as the wire shelf.
REMOVING AND REFITTING THE SHELF GUIDES
• To remove the shelf guides, lift the guides up and
then gently pull the lower part out of its seating:
The shelf guides can now be removed.
• To refit the shelf guides, first fit them back into
their upper seating. Keeping them held up, slide
them into the cooking compartment, then lower
them into position in the lower seating.
1
FITTING THE SLIDING RUNNERS IF PRESENT
Remove the shelf guides from the oven and remove
the protective plastic from the sliding runners.
Fasten the upper clip of the runner to the shelf guide
and slide it along as far as it will go. Lower the other
clip into position. To secure the guide, press the lower
portion of the clip firmly against the shelf guide.
Make sure that the runners can move freely. Repeat
these steps on the other shelf guide on the same
level.
Please note: The sliding runners can be tted on any level.
2

COOKING FUNCTIONS
EN
MANUAL FUNCTIONS
• CONVENTIONAL
For cooking any kind of dish on one shelf only.
• CONVECTION BAKE
For cooking meat, baking cakes with fillings on
one shelf only.
• FORCED AIR
For cooking different foods that require the
same cooking temperature on several shelves
(maximum three) at the same time. This function
can be used to cook different foods without
odours being transferred from one food to
another.
• GRILL
For grilling steaks, kebabs and sausages, cooking
vegetables au gratin or toasting bread. When
grilling meat, we recommend using a drip tray to
collect the cooking juices: Position the tray on any
of the levels below the wire shelf and add 500 ml
of drinking water.
• TURBO GRILL
For roasting large joints of meat (legs, roast beef,
chicken). We recommend using a drip tray to
collect the cooking juices: Position the pan on any
of the levels below the wire shelf and add 500 ml
of drinking water.
• FAST PREHEAT
For preheating the oven quickly.
• MULTIFLOW MENU
For cooking different foods that require the same
cooking temperature on four levels at the same
time. This function can be used to cook cookies,
tarts, round pizzas (also frozen) and to prepare a
complete meal. Follow the cooking table to obtain
the best results.
• SPECIAL FUNCTIONS
» DEFROST
To speed up defrosting of food. Place food on
the middle shelf. Leave food in its packaging
to prevent it from drying out on the outside.
» KEEP WARM
For keeping just-cooked food hot and crisp.
» RISING
For optimal proving of sweet or savoury
dough. To maintain the quality of proving, do
not activate the function if the oven is still hot
following a cooking cycle.
» CONVENIENCE
To cook ready-made food, stored at room
temperature or in the refrigerator (biscuits,
cake mix, muffins, pasta dishes and bread-type
products). The function cooks all the dishes
quickly and gently and can also be used to
heat food already cooked. The oven does not
need to be pre-heated. Follow the instructions
on the packaging.
» MAXI COOKING
For cooking large joints of meat (above 2.5 kg).
It is advisable to turn the meat over during
cooking, to obtain even browning on both
sides. It is best to baste the meat every now
and again to prevent it from drying out.
» ECO FORCED AIR
For cooking stuffed roasting joints and fillets of
meat on a single shelf. Food is prevented from
drying out excessively by gentle, intermittent
air circulation. When this ECO function is in
use, the light will remain switched off during
cooking. To use the ECO cycle and therefore
optimise power consumption, the oven
door should not be opened until the food is
completely cooked.
• MY FROZEN FOOD
The function automatically selects the ideal
cooking temperature and mode for 5 different
types of ready frozen food. The oven does not
have to be preheated.
MY MENU
These enable all types of food to be cooked fully
automatically. To use at best this function, follow the
indications on the relative cooking table.
The oven does not have to be preheated.
3

HOW TO USE THE TOUCH DISPLAY
To select or confirm:
Tap the screen to select the value or menu item
you require.
12:3 5
Manual Functions
My Menu
To scroll through a menu or a list:
Simply swipe your finger across the display to
scroll through the items or values.
Manual Functions
Conventional
Forced Air
Select a forced air
temperature.
Convection
Bake
Grill
To confirm a setting or go to the next screen:
Tap “SET” or “NEXT”.
Select a forced air temperature.
Set Cook T ime
NEXT
To go back to the previous screen:
Tap .
Forced Air
COOKING
INSTRUCTION:
For cooking different foods that
require the same cooking
temperature on several shelves
(maximum three) at the same
DE LAY
time. This function can be used
STA RT
Set Cook Time
NEXT
4

FIRST TIME USE
EN
You will need to configure the product when you
switch on the appliance for the first time.
The settings can be changed subsequently by pressing to
access the “Tools” menu.
1. SELECT THE LANGUAGE
You will need to set the language and the time when
you switch on the appliance for the first time.
• Swipe across the screen to scroll through the list of
available languages.
• Tap the language you require.
Tapping will take you back to the previous screen.
2. SELECT SETTINGS MODE
Once you have selected the language, the display
will prompt you to choose between “STORE DEMO”
(useful for retailers, for display purposes only) or
continue by tapping “NEXT”.
3. SETTING UP WIFI
The My Menu feature allows you to operate the
oven remotely from a mobile device. To enable the
appliance to be controlled remotely, you will need to
complete the connection process successfully first.
This process is necessary to Register your appliance
and connect it to your home network.
• Tap “SETUP NOW” to proceed with setup
connection.
Otherwise, tap “SKIP” to connect your product later.
HOW TO SET UP THE CONNECTION
To use this feature you will need: A smartphone
or tablet and a wireless router connected to the
Internet. Please use your smart device to check that
your home wireless network’s signal is strong close to
the appliance.
Minimum requirements.
Smart device: Android with a 1280x720 (or higher) screen or
iOS.
See on app store the app compatibility with Android or iOS
versions.
Wireless router: 2.4Ghz WiFi b/g/n.
1. Download the Bauknecht Home Net App
step to connecting your appliance is to download the
app on your mobile device. Bauknecht Home Net App
will guide you through all the steps listed here. You
can download the Bauknecht Home Net App from the
App Store or the Google Play Store.
2. Create an account
If you haven’t done so already, you’ll need to Create
an account. This will enable you to network your
appliances and also view and control them remotely.
3. Register your appliance
Follow the instructions in the app to register your
appliance. You will need the Smart Appliance
IDentifier (SAID) number to complete the registration
process. You can find its unique code the number on
The first
the identification plate attached to the product.
4. Connect to WiFi
Follow the scan-to-connect setup procedure. The app
will guide you through the process of connecting
your appliance to the wireless network in your home.
If your router supports WPS 2.0 (or higher), select
“MANUALLY”, then tap “WPS Setup”: Press the
WPS button on your wireless router to establish a
connection between the two products.
If necessary, you can also connect the product
manually using “Search for a network”.
The SAID code is used to synchronise a smart device with
your appliance.
The MAC address is displayed for the WiFi module.
The connection procedure will only need to be
carried out again if you change your router settings
(e.g. network name or password or data provider)
. SETTING THE TIME AND DATE
Connecting the oven to your home network will set
the time and date automatically. Otherwise you will
need to set them manually
• Tap the relevant numbers to set the time.
• Tap “SET” to confirm.
Once you have set the time, you will need to set the
date
• Tap the relevant numbers to set the date.
• Tap “SET” to confirm.
4. SET THE POWER CONSUMPTION
The oven is programmed to consume a level of electrical
power that is compatible with a domestic network that
has a rating of more than 3 kW (16 Ampere): If your
household uses a lower power, you will need to
decrease this value (13 Ampere).
• Tap the value on the right to select the power.
• Tap “OKAY” to complete initial setup.
5. HEAT THE OVEN
A new oven may release odours that have been left
behind during manufacturing: this is completely
normal. Before starting to cook food, we therefore
recommend heating the oven with it empty in order
to remove any possible odours.
Remove any protective cardboard or transparent
film from the oven and remove any accessories from
inside it. Heat the oven to 200 °C for around one hour.
It is advisable to air the room after using the appliance for the
rst time.
5
 Loading...