


DAILY REFERENCE
WWW
GUIDE
EN
THANK YOU FOR PURCHASING A
BAUKNECHT PRODUCT
To receive more comprehensive help and
support, please register your product at
www . bauknecht . eu/ register
Before using the appliance carefully read the Health and Safety guide.
PRODUCT DESCRIPTION
1
2
3
5
4
3
4
2
1
5
You can download the Safety Instructions
and the Use and Care Guide by visiting our
website docs . bauknecht . eu and following
the instructions on the back of this booklet.
1. Control panel
2. Fan
3. Circular heating element
(not visible)
6
5
4
7
4. Shelf guides
(the level is indicated on the front
of the oven)
5. Door
6. Upper heating element/grill
3
2
1
8
9
7. Lamp
8. Identification plate
(do not remove)
9. Lower heating element
(not visible)
CONTROL PANEL DESCRIPTION
1
1. SELECTION KNOB
For switching the oven on by
selecting a function. Turn to the “0”
position to switch the oven off.
2. BACK
For returning to the previous screen.
During cooking, allows settings to
be changed.
2 3 4 5 6 7
3. STOP
For stopping the function that is
currently active.
4. DISPLAY
5. START
For immediately starting a function.
6. CONFIRM
For confirming a selected function
or a set value.
7. ADJUSTMENT KNOB
For scrolling through the menus and
applying or changing settings.
Please note: The knobs are retractable.
Press the knobs in the middle and they
pop up.
1
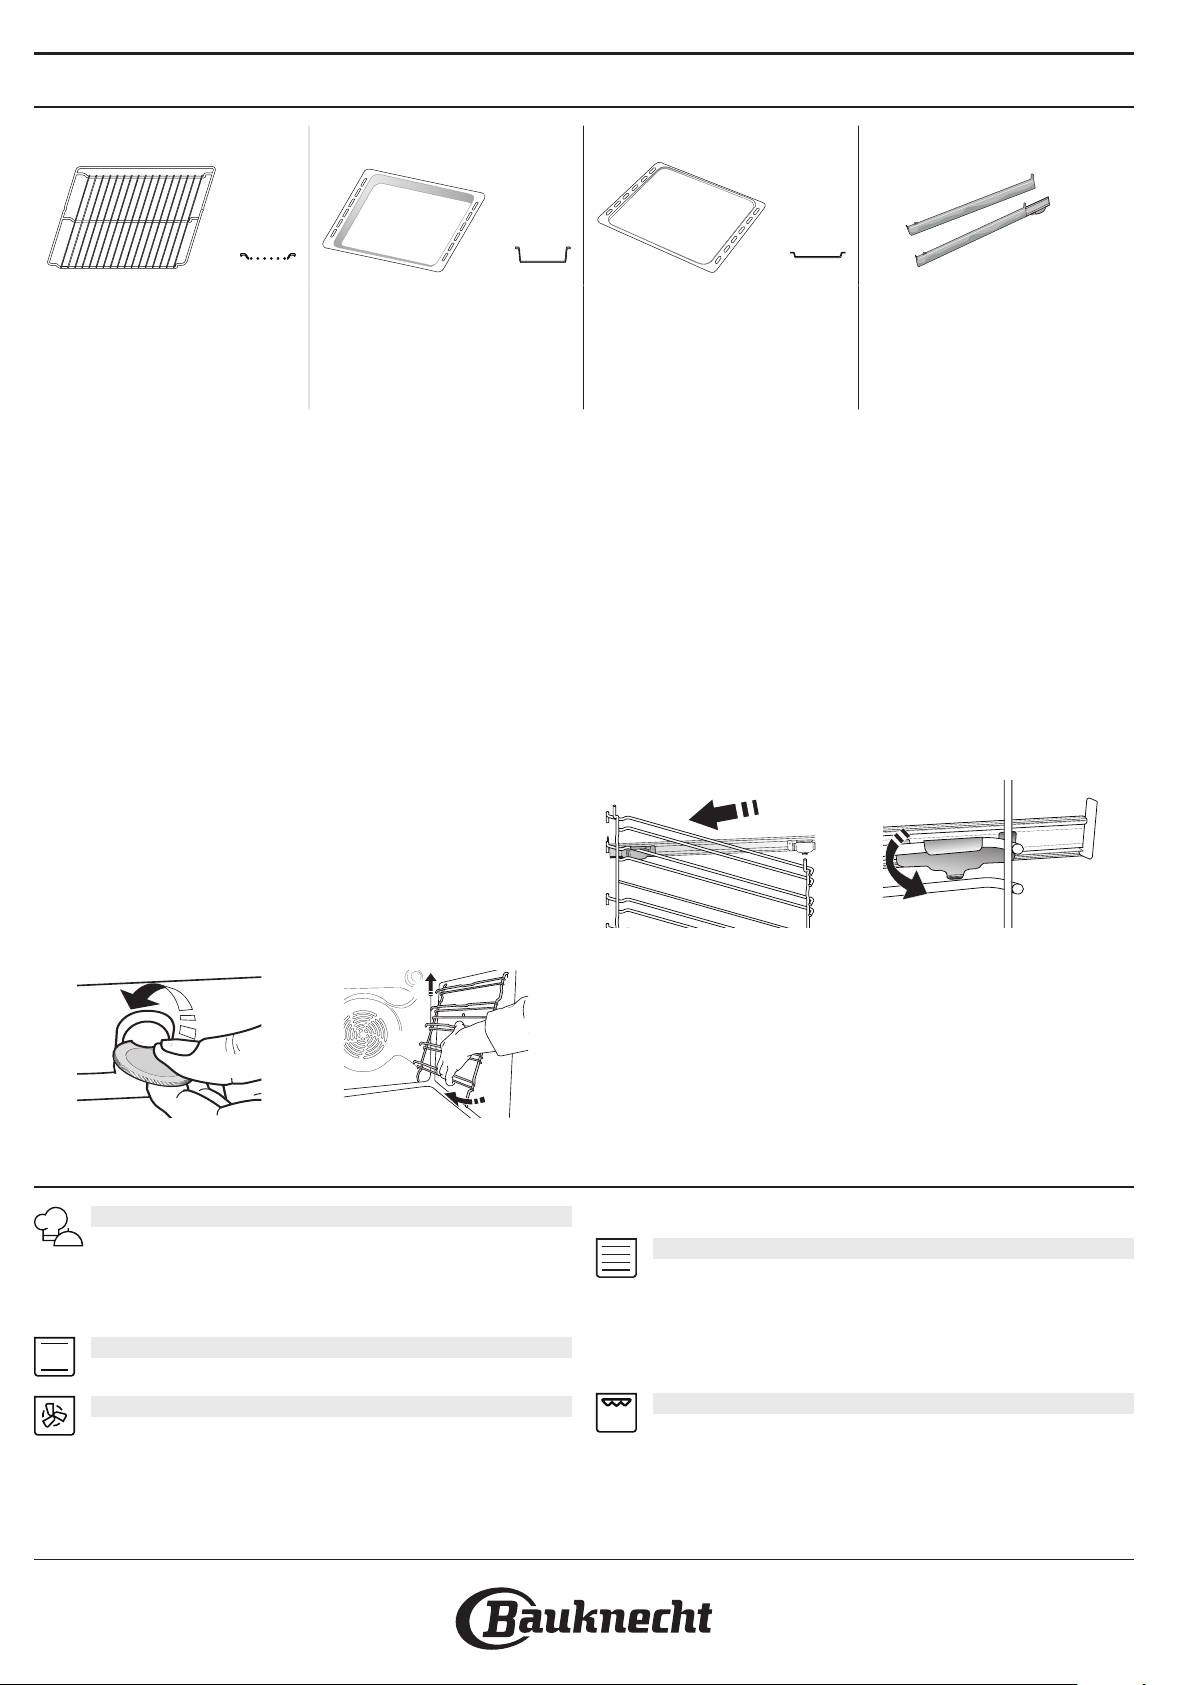
ACCESSORIES
2
WIRE SHELF DRIP TR AY BAKING TRAY SLIDING RUNNERS *
Use to cook food or as a
support for pans, cake tins
and other ovenproof items of
cookware
* Available only on certain models
The number and the type of accessories may vary depending on which model is purchased.
Other accessories can be purchased separately from the After-sales Service.
INSERTING THE WIRE SHELF AND OTHER
ACCESSORIES
Insert the wire shelf horizontally by sliding it across the
shelf guides, making sure that the side with the raised
edge is facing upwards. Other accessories, such as the
drip tray and the baking tray, are inserted horizontally
in the same way as the wire shelf.
REMOVING AND REFITTING THE SHELF GUIDES
• To remove the shelf guides, remove the xing screws
(if present) on both sides with the aid of a coin of a
tool. Lift the guides up and pull the lower parts out of
their seatings: The shelf guides can now be removed.
• To refit the shelf guides, first fit them back into their
upper seating. Keeping them held up, slide them
into the cooking compartment, then lower them into
position in the lower seating. Refit the fixing screws.
Use as an oven tray for
cooking meat, sh,
vegetables, focaccia, etc. or
position underneath the wire
shelf to collect cooking juices.
Use for cooking all bread and
pastry products, but also for
roasts, sh en papillote, etc.
FITTING THE SLIDING RUNNERS IF PRESENT
Remove the shelf guides from the oven and remove the
protective plastic from the sliding runners.
Fasten the upper clip of the runner to the shelf guide
and slide it along as far as it will go. Lower the other
clip into position. To secure the guide, press the lower
portion of the clip firmly against the shelf guide. Make
sure that the runners can move freely. Repeat these
steps on the other shelf guide on the same level.
Please note: The sliding runners can be tted on any level.
To facilitate inserting or
removing accessories.
1
FUNCTIONS
MY MENU
These allow a fully automatic cooking for all types
of food (Lasagna, Meat, Fish, Vegetables, Cakes & Pastries,
Salty cakes, Bread, Pizza). To use at best this function,
follow the indications on the relative cooking table.
CONVENTIONAL
For cooking any kind of dish on one shelf only.
FORCED AIR
For cooking different foods that require the same
cooking temperature on several shelves (maximum
three) at the same time. This function can be used to
cook different foods without odours being transferred
from one food to another.
MULTIFLOW MENU
For cooking different foods that require the same
cooking temperature on four levels at the same time.
This function can be used to cook cookies, cakes, round
pizzas (also frozen) and to prepare a complete meal.
Follow the cooking table to obtain the best results.
GRILL FUNCTIONS
• GRILL
For grilling steaks, kebabs and sausages, cooking
vegetables au gratin or toasting bread. When grilling
2
meat, we recommend using a drip tray to collect the
cooking juices: Position the tray on any of the levels
below the wire shelf and add 500 ml of drinking water.
• TURBO GRILL
For roasting large joints of meat (legs, roast beef,
chicken). We recommend using a drip tray to collect
the cooking juices: Position the pan on any of the levels
below the wire shelf and add 500 ml of drinking water.
CONVECT BAKE
For cooking meat, baking cakes with fillings on
one shelf only.
SPECIALS
• FAST PREHEAT
For preheating the oven quickly.
• DEFROSTING
To speed up defrosting of food. Place food on the
middle shelf. Leave food in its packaging to prevent it
from drying out on the outside.
• KEEP WARM
For keeping just-cooked food hot and crisp.
• RISING
For optimal proving of sweet or savoury dough. To
maintain the quality of proving, do not activate the
function if the oven is still hot following a cooking cycle.
• MAXI COOKING
For cooking large joints of meat (above 2.5 kg). It is
advisable to turn the meat over during cooking, to obtain
even browning on both sides. It is best to baste the meat
every now and again to prevent it from drying out.
• ECO FORCED AIR
For cooking stuffed roasting joints and filletsof meat
on a single shelf. Food is prevented from drying out
excessively by gentle, intermittent air circulation.
When this ECO function is in use, the light will remain
switched off during cooking. To use the ECO cycle and
EN
therefore optimise power consumption, the oven door
should not be opened until the food is completely
cooked.
• SLOW COOKING
To gently cook meat and fish. This function cooks food
slowly to keep it tender and succulent. Due to the low
temperature, the food does not brown on the outside
and the end result is similar to steam cooking. We
recommend searing roast meat in a pan first to brown
the meat and help seal in its natural juices. For best
results, keep the oven door closed during cooking in
order to avoid heat dispersion.Suggested cooking times
ranges for fish (300 g - 3 kg) are between 2-5 hours, for
meat (1-3 kg) between 4-7 hours.
• MY FROZEN FOOD
The function automatically selects the ideal cooking
temperature and mode for 5 different types of ready
frozen food. The oven does not have to be preheated.
DIAMOND CLEAN
The action of water vapor released during this
special cycle of cleaning by means of a low temperature,
facilitates removal of grime. Place 200 ml of drinking
water on the bottom of the cavity and activate the
function when the oven is cold.
SETTINGS
For adjust the oven settings.
When “ECO” mode is active the brightness of the display will
be reduced to save energy and lamp switches o after 1
minute. It will be reactivated automatically whenever any of
the buttons are pressed.
When “DEMO” is “On” all commands are active and menues
available but the oven doesn’t heat up. To deactivate this
mode, acceed “DEMO” from “SETTINGS” menu and select “O”.
By selecting “FACTORY RESET”, the product switches o and
then it returns to rst switch on. All settings will be deleted.
MY FAVORITES
For retrieving up the list of 10 favorite functions.
FIRST TIME USE
1. SELECT THE LANGUAGE
You will need to set the language and the time when
you switch on the appliance for the first time: “English”
will show on the display.
1.English
Turn the adjustment knob to scroll through the list of
available languages and select the one you require.
Press
Please note: The language can subsequently be changed by
selecting “LANGUAGE” in “SETTINGS” menu, available by
turning the selection knob on
to confirm your selection.
.
2. SET THE POWER CONSUMPTION
The oven is programmed to consume a level of
electrical power that is compatible with a domestic
network that has a rating of more than 3 kW (16): If
your household uses a lower power, you will need to
decrease this value (13).
POWER
Turn the adjustment knob to select 16 “High” or 13 “Low”
and press
to confirm.
3
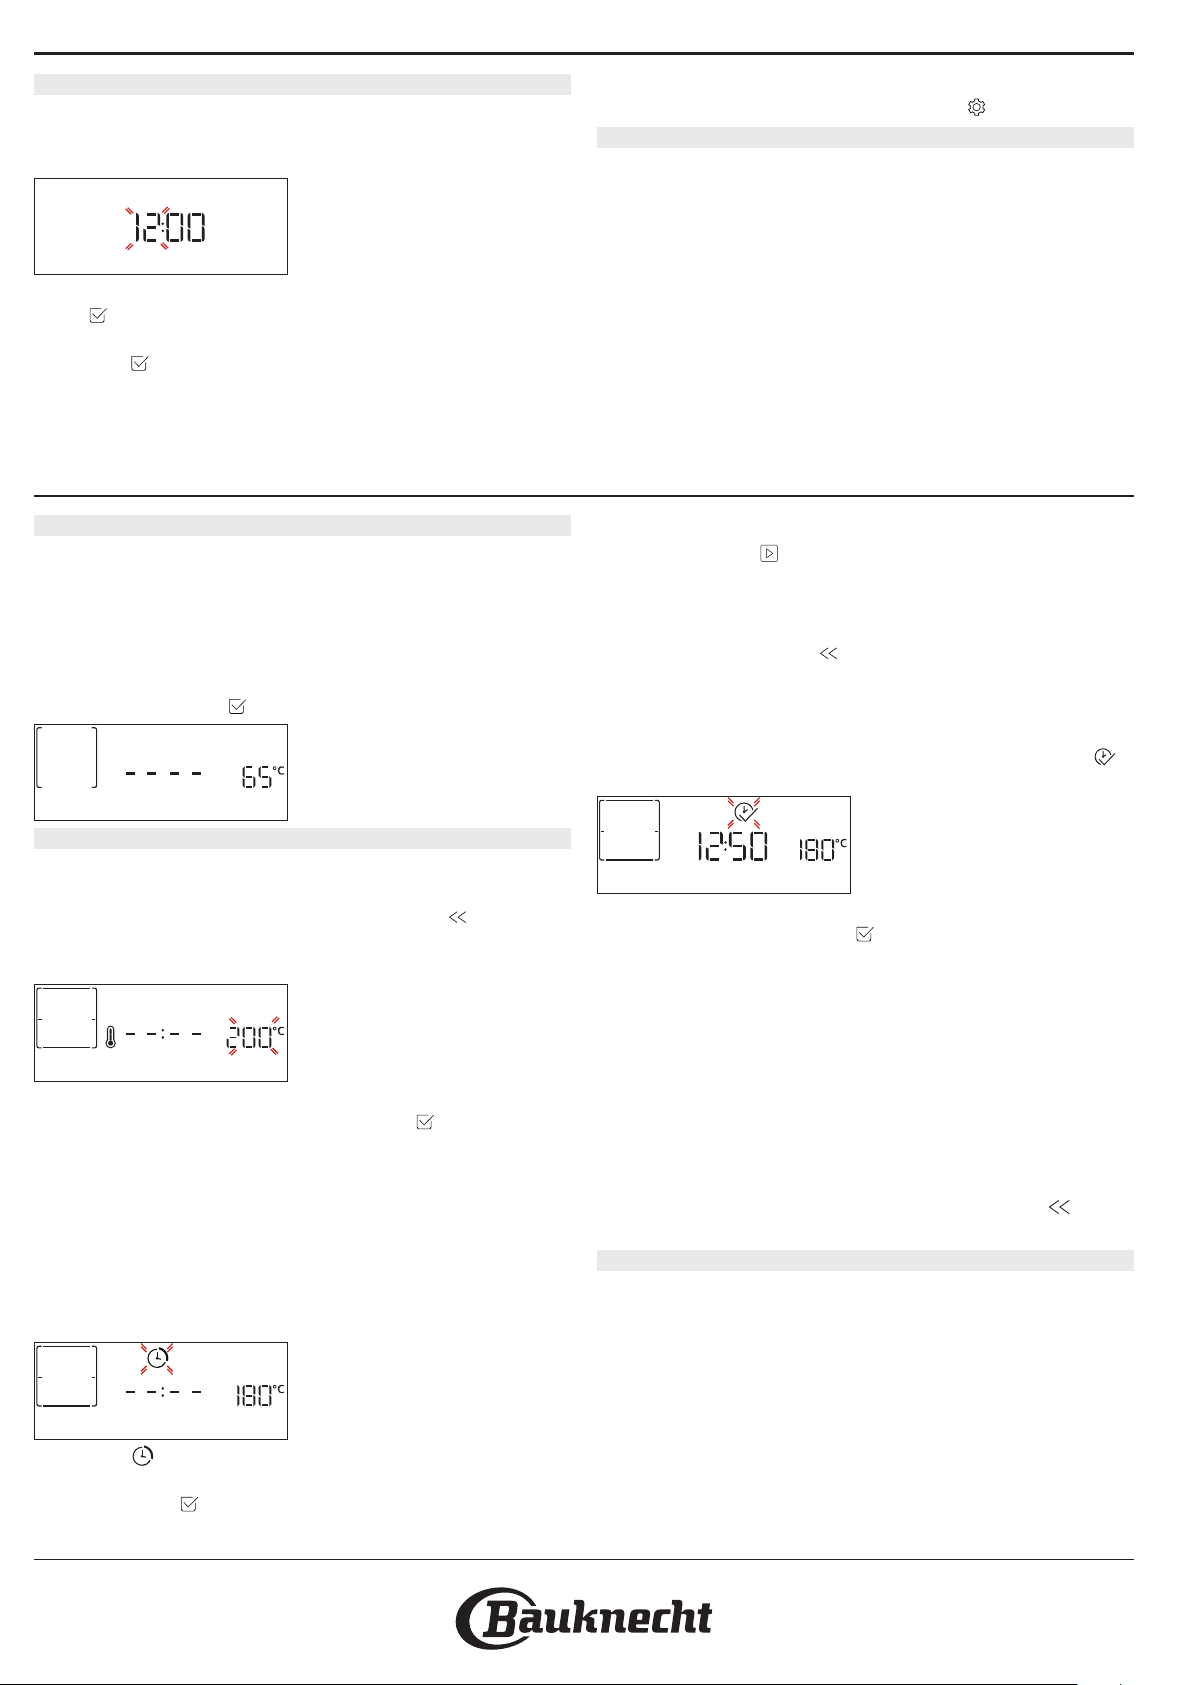
3. SET THE TIME
After selecting the power, you will need to set the
current time: The two digits for the hour will flash on
the display.
CLOCK
Turn the adjustment knob to set the current hour and
press
display. Turn the adjustment knob to set the minutes
and press
Please note: You may need to set the time again following
: The two digits for the minutes will flash on the
to confirm.
DAILY USE
lengthy power outages. Select “CLOCK” in “SETTINGS” menu,
available by turning the selection knob on
.
4. HEAT THE OVEN
A new oven may release odours that have been left
behind during manufacturing: this is completely normal.
Before starting to cook food, we therefore recommend
heating the oven with it empty in order to remove any
possible odours. Remove any protective cardboard
or transparent film from the oven and remove any
accessories from inside it. Heat the oven to 200 °C
for around one hour, ideally using a function with air
circulation (e.g. “Forced Air” or “Convection Bake”).
Please note: It is advisable to air the room after using the
appliance for the rst time.
1. SELECT A FUNCTION
Turn the selection knob to switch on the oven and show
the function you require on the display.
To select an item from a menu (the display will show the
first available item), turn the adjustment knob until the
item you require is shown.
The display will show the name of the function and its
basic settings: Press
to confirm.
6. Keep Warm
2. SET THE FUNCTION
After having selected the function you require, you can
change its settings. The display will show the settings
that can be changed in sequence. Pressing
you to change the previous setting again.
TEMPERATURE / GRILL LEVEL
allows
TEMPERATURE
When the value ashes on the display, turn the
adjustment knob to change it, then press
and continue to alter the settings that follow (if possible).
Please note: Once the function has been activated, the
temperature/grill level can be changed using the adjustment
knob.
In the same way, it is possible to set the grill level: There
are three defined power levels for grilling: 3 (high), 2
(mid), 1 (low).
DURATION
to conrm
cooking time if you want to manage cooking manually
(untimed): Press
In this case, you cannot set the end cooking time by
programming a delayed start.
Please note: You can adjust the cooking time that has been
set during cooking: press
END TIME (START DELAY)
In many functions, once you have set a cooking time
you can delay starting the function by programming its
end time. The display shows the end time while the
icon flashes.
to confirm and start the function.
to change the settings.
END TIME
Turn the adjustment knob to set the time you want
cooking to end, then press
the function.
Place the food in the oven and close the door: The
function will start automatically after the period of time
that has been calculated in order for cooking to finish at
the time you have set.
Please note: Programming a delayed cooking start time will
disable the oven preheating phase: The oven will reach the
temperature your require gradually, meaning that cooking
times will be slightly longer than those listed in the cooking
table. During the waiting time, you can use the adjustment
knob to amend the programmed end time or press
change the settings.
. MY MENU
These functions automatically select the best cooking
mode, temperature and duration to cook, roast or bake
all the dishes available.
When required, simply indicate the characteristic of
food to obtain an optimal result.
to confirm and activate
to
DURATION
When the icon flashes on the display, use the
adjustment knob to set the cooking time you require
and then press
4
to confirm. You do not have to set the
 Loading...