


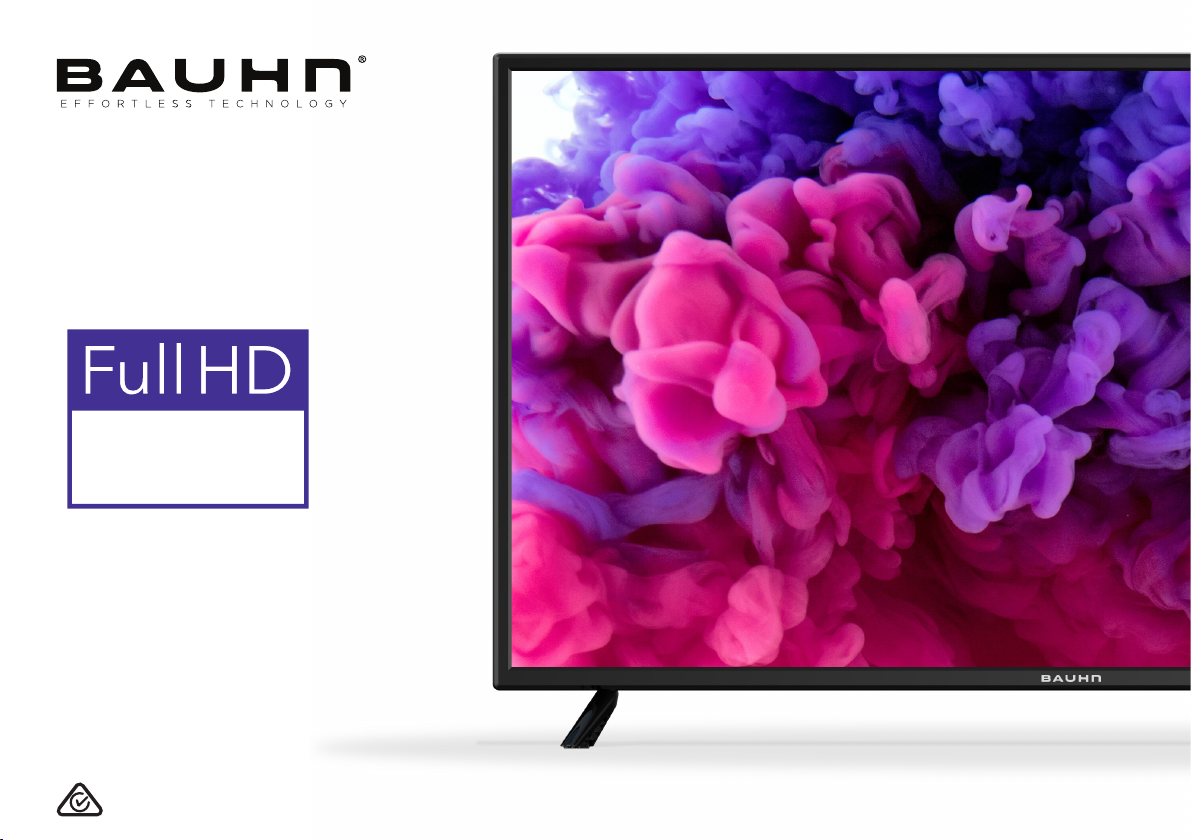
ATV43FHDC-0120
User Manual
MODEL: ATV43FHDC-0120
43
”
TV with Built-In
DVD Player

2
Welcome
Congratulations on your purchase!
This manual tells you all you need to know about using your new Bauhn
®
product.
Please take special note of any important safety and usage information presented with the symbol.
All products brought to you by BAUHN
®
are manufactured to the highest standards of performance and safety and,
as part of our philosophy of customer service and satisfaction, are backed by our comprehensive 1 Year Warranty.
We hope you will enjoy using your purchase for many years to come.

3
On-Screen Set Up 16
TV Setting Menus 17
Picture 19
Sound 21
Channel (DTV and ATV) 23
Lock 25
Setup 27
TV Guide 31
Recording 32
Recording Live TV 33
Scheduled recording 33
Playback 33
Pause Live TV (Time-shift) 34
USB Mode 35
Set up 35
DVD Mode 38
Basic DVD Movie Playback 38
Media File Playback 41
Menu Navigation 44
Contents
Welcome 2
Contents 3
Unpack and Prepare 4
What's in the box 4
Important Tips 5
Attaching the stand 6
Wall-mounting the TV 7
Connect to power 8
Connect your antenna 8
Controls and Connections 9
Get to know your TV 9
Buttons on the TV 9
Ports on the TV 10
Remote Control 12
Setup 12
Using the Remote Control 13
Standard Remote 14
Troubleshooting 46
Specications 49
Compliance and
Responsible Disposal 50
Warranty Information 51
Repair and Refurbished Goods
or Parts Notice 52

4 | UNPACK AND PREPARE
Unpack and Prepare
What's in the box
Before installing your new TV, check you have everything needed.
In the box you will find:
A. 43"Full HD TV with Built-In DVD Player
B. Remote Control
C. AAA Activ Energy Batteries
D. AV Cable
E. Quick Start Guide
F. Warranty Certificate
G. TV Stand
H. Screws for TV Stand
I. User Manual
You will need:
• Phillips-head screwdriver (for stand installation)
• Antenna cable (to watch live TV)

UNPACK AND PREPARE | 5
Important Tips
• Place the TV on a level surface.
• Place the TV away from any source that may generate heat or vibrations.
• Make sure there is enough space around vents for airflow.
• The remote control works up to 6 metres away from the TV.
• Unplug the TV before cleaning it.
• Clean using a dry cloth only - do not use water or chemicals.
• Use only the power supply provided.
• It is highly recommended to use safety straps for securing the TV in place.
• Keep liquid, children and pets away from the TV at all times.
6 | UNPACK AND PREPARE
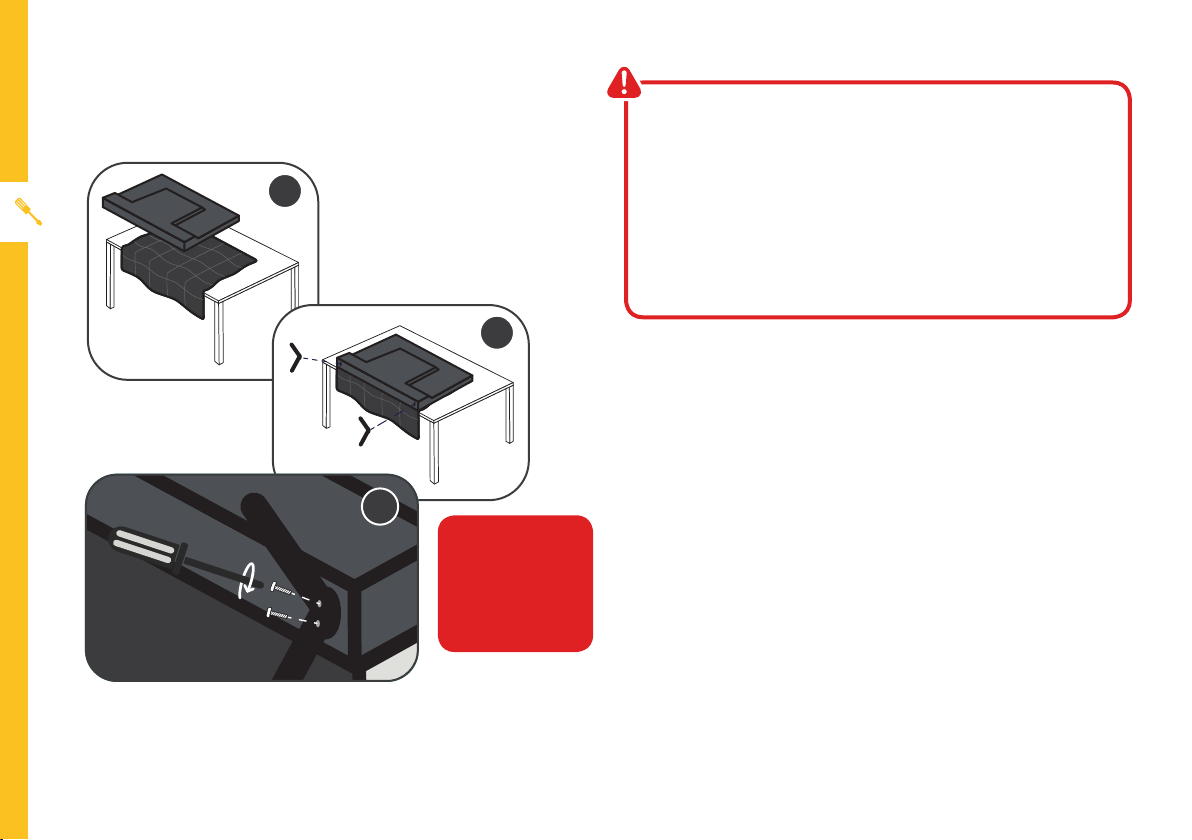
Unless you are wall-mounting the TV, you will need to
attach its stand/legs.
1. Lay the TV face-down on a soft, flat surface (like the
sofa, or a towel on a table).
2. See the ‘L’ and ‘R’ markings on the stand? Match
them to the installation points on the underside of
the TV.
3. Attach the stand to the TV at the installation points
using the screws provided. (Grab a screwdriver for
this bit). Make sure the legs are facing away from
each other (not leaning inwards).
Attaching the stand
• This TV is heavy! We recommend asking
someone to help you lift it.
• Unplug the TV from the power outlet before
installing or removing the stand.
• Only touch the frame, not the screen.
• It is highly recommended to use safety straps for
securing the TV.
CAUTION!
Do not apply
excessive force as
you might damage
the screw holes.
1
2
3
UNPACK AND PREPARE | 7
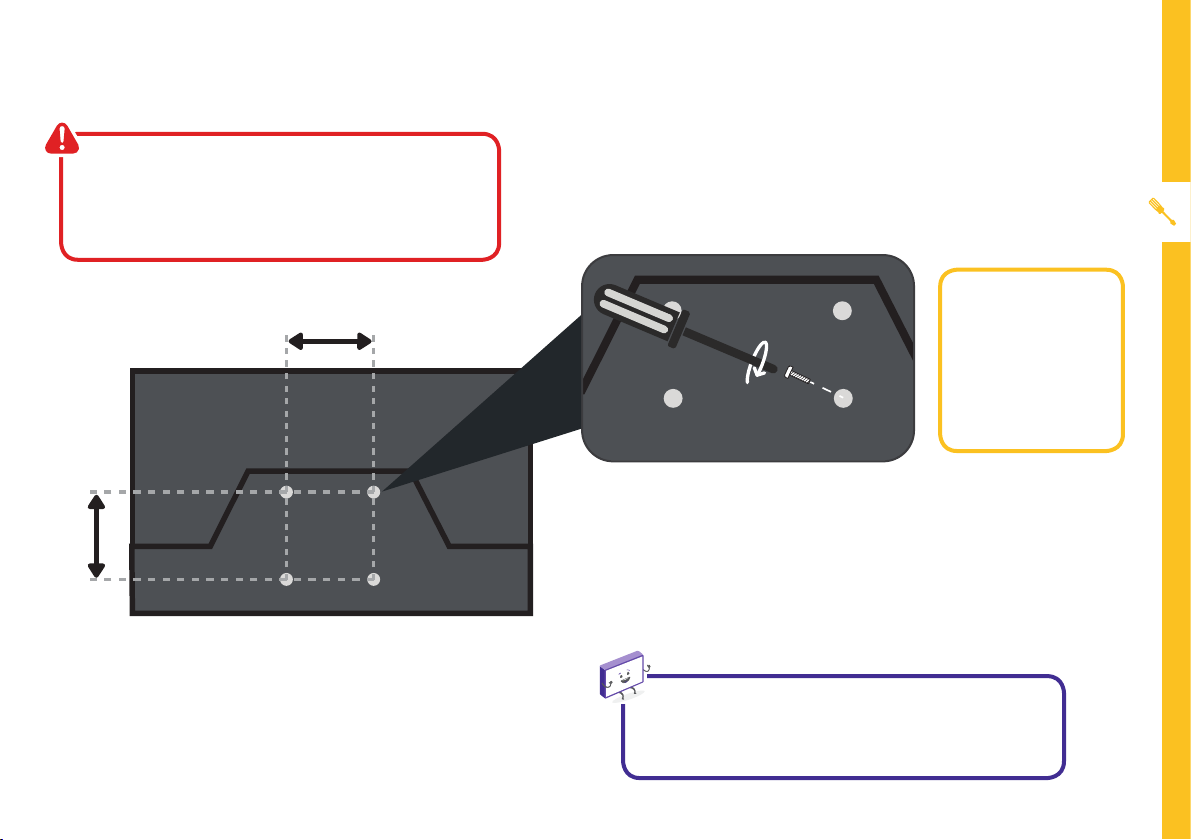
200mm
Back of the TV
200mm
Wall-mounting the TV
The TV comes with holes on the back panel for use with
wall-mounting brackets (bracket not included).
Use four standard M6*12mm screws (or longer,
depending on the mounting bracket) to wall-mount this
TV (screws are not included).
• Unplug the TV from the power outlet
before wall-mounting.
• Contact a professional for assistance with
wall-mounting the TV.
Required
• VESA Mounting
Bracket
• 4 x M6*12mm
screws (or longer
as required)
The screws in the package are for securing the TV stand
only. If you are wall-mounting the TV, consult a qualified
installer for advice on bracket support and wall support.
8 | UNPACK AND PREPARE
Free-to-airTVinHD(HighDenition)
High Definition (HD) channels
provide the best viewing quality and
are available with a digital antenna
connection.
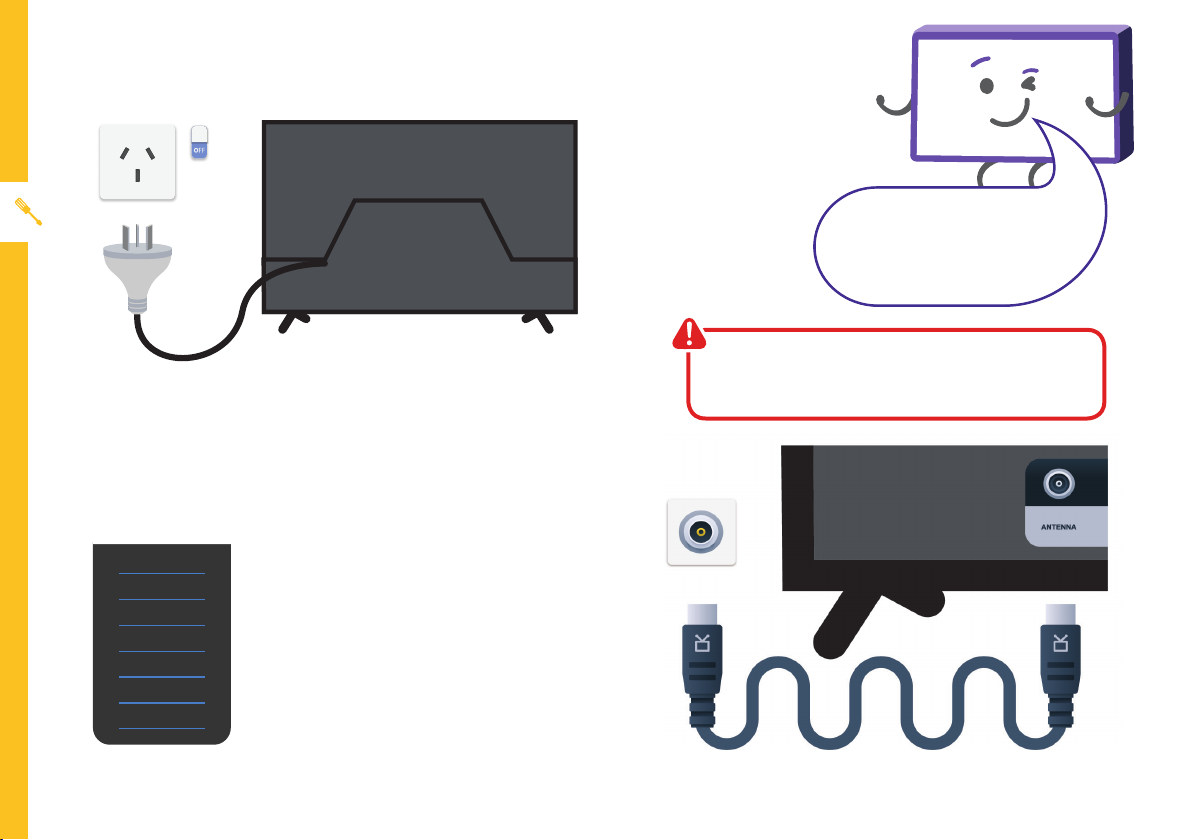
Connect to power
Make sure the TV is switched off at the power outlet
until you have finished connecting your cables.
Connect your antenna
Antenna cable not included.
ABC HD
SBS ONE HD
7HD
9HD
10 HD
PRIME7 HD
WIN HD
Example
HD Channels
Don't forget to plug in the TV
to the power outlet. Leave
the power switched off until
installation is finished.
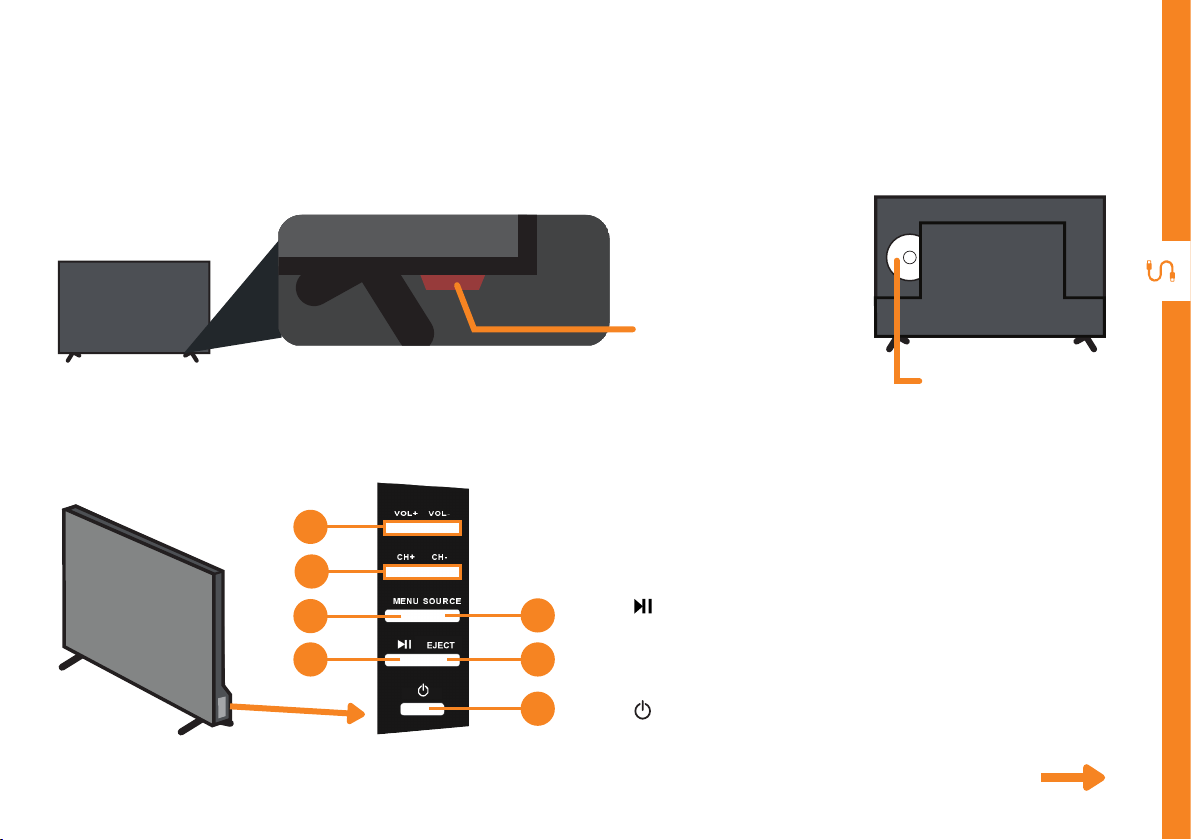
CONTROLS AND CONNECTIONS | 9
See next page for more info on the connections.
1. VOL + / VOL - : Increase or decrease the volume.
2. CH + / CH - : Select the next or previous channel.
3. MENU : Enter the settings menu.
4. : Play or pause playback.
5. SOURCE : Change the input source.
6. EJECT: Eject a disc from the DVD player.
7. : Switch the TV On or to Standby.
Controls and Connections
1
3
2
4
5
6
7
Buttons on the TV
Get to know your TV
On/Standby light
and Remote sensor
DVD Slot
10 | CONTROLS AND CONNECTIONS
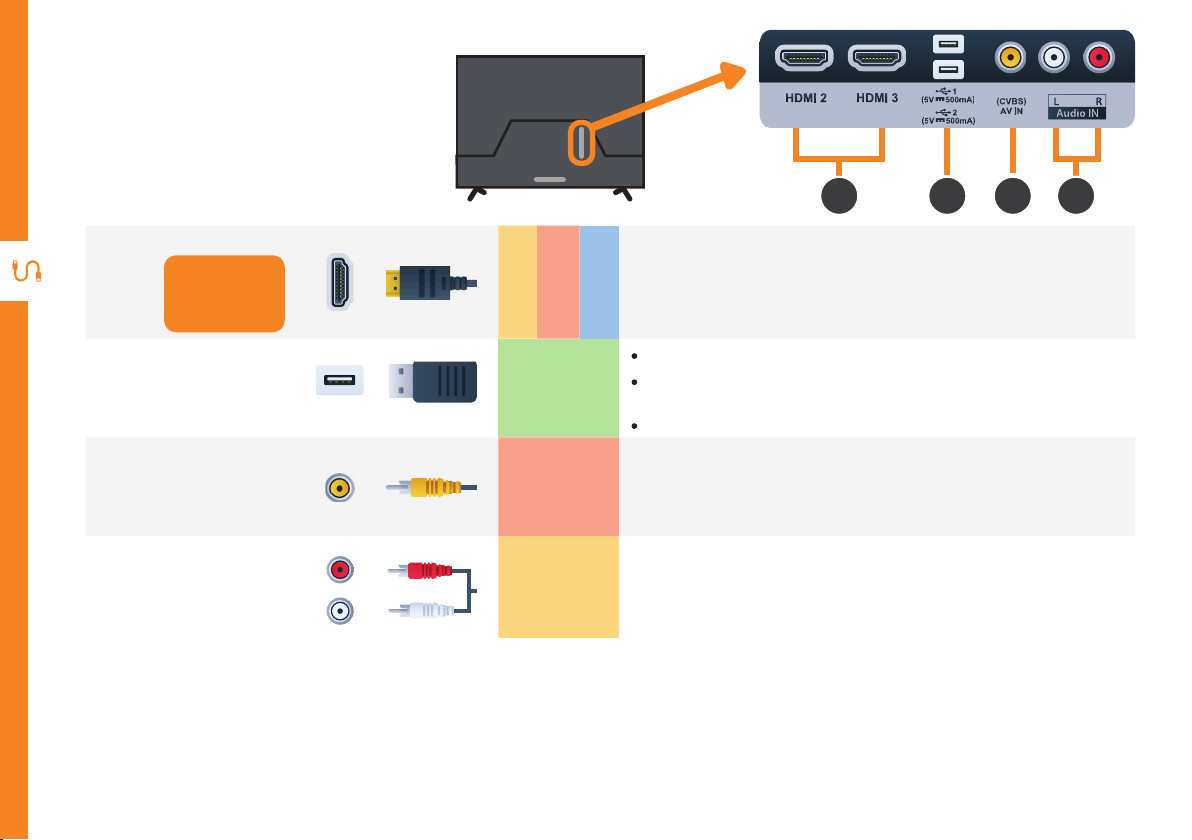
1
HDMI
Use a HDMI
cable for best
picture and
sound quality.
SOUND
PICTURE
COMPUTER
All-digital connection between the TV and any HDMI device.
Supports Full HD. Requires a HDMI cable (not included).
2
USB
STORAGE
» PVR record and pause live TV
» Play your stored media files (supported file codecs and
extensions may vary)
» Software updates
3
AV IN
(CVBS)
PICTURE
You can use this to connect your DVD player. Supports Standard
Definition (SD) picture quality. Requires an AV cable (included).
4
Audio IN
SOUND
You can use this to connect Audio to your TV for AV or Component
video inputs. Requires an AV cable (included).
Ports on the TV
2 31 4
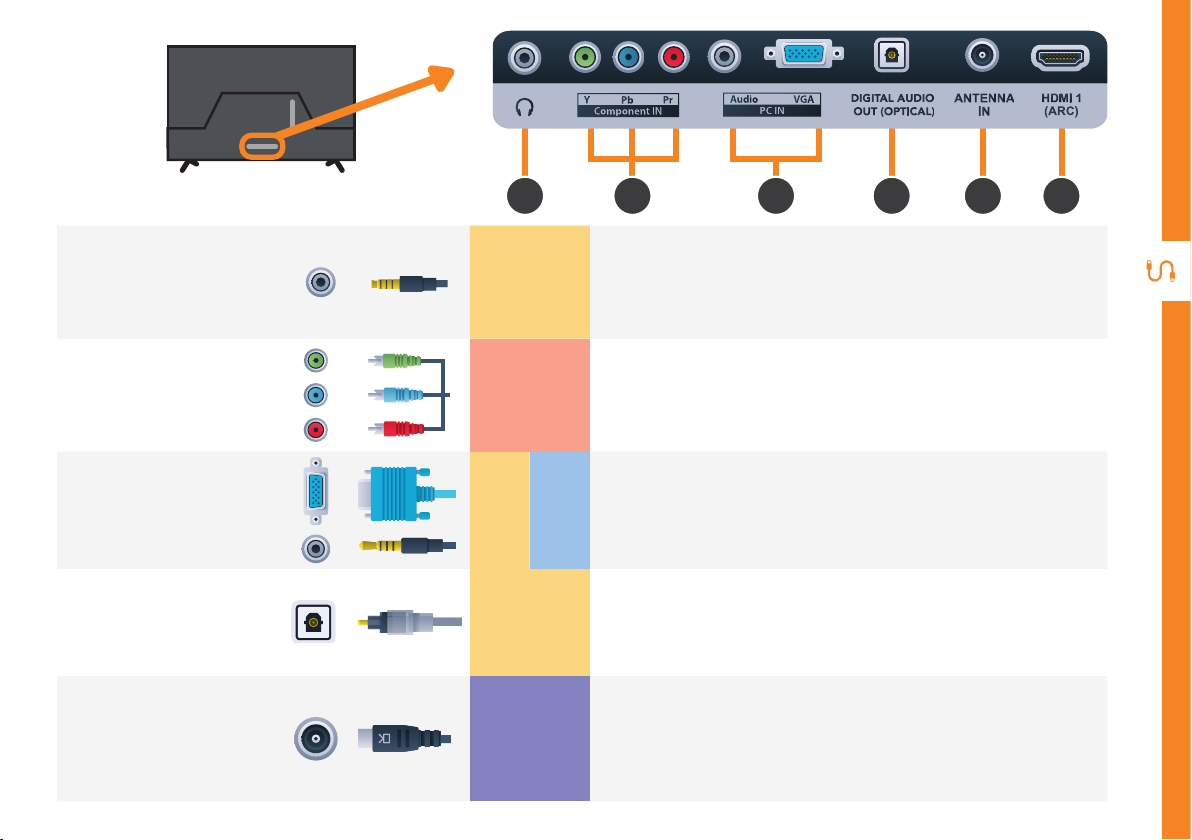
CONTROLS AND CONNECTIONS | 11
5
8 9 1
6 7
5
Headphone
Jack
SOUND
Connect to your headphones, amplifier or audio device, using an
AUX cable (not included).
6
Component
IN
PICTURE
You can use this to connect your DVD player. Supports Full High
Definition (FHD) picture quality. This also requires Requires a
component cable (not included).
7
PC IN
SOUND
COMPUTER
Connect your PC and its Audio to your TV. Requires VGA and
AUX Cable (not included).
8
DIGITAL
AUDIO OUT
(OPTICAL)
SOUND
Connect an external digital audio device. Use an Optical cable (not
included) to connect the unit with an amplifier, soundbar or other
audio decoding device for digital audio signal output.
9
ANTENNA IN
FREE-TO-AIR
TV
Connect your antenna for live TV. (Antenna cable not included.)
12 | REMOTE CONTROL
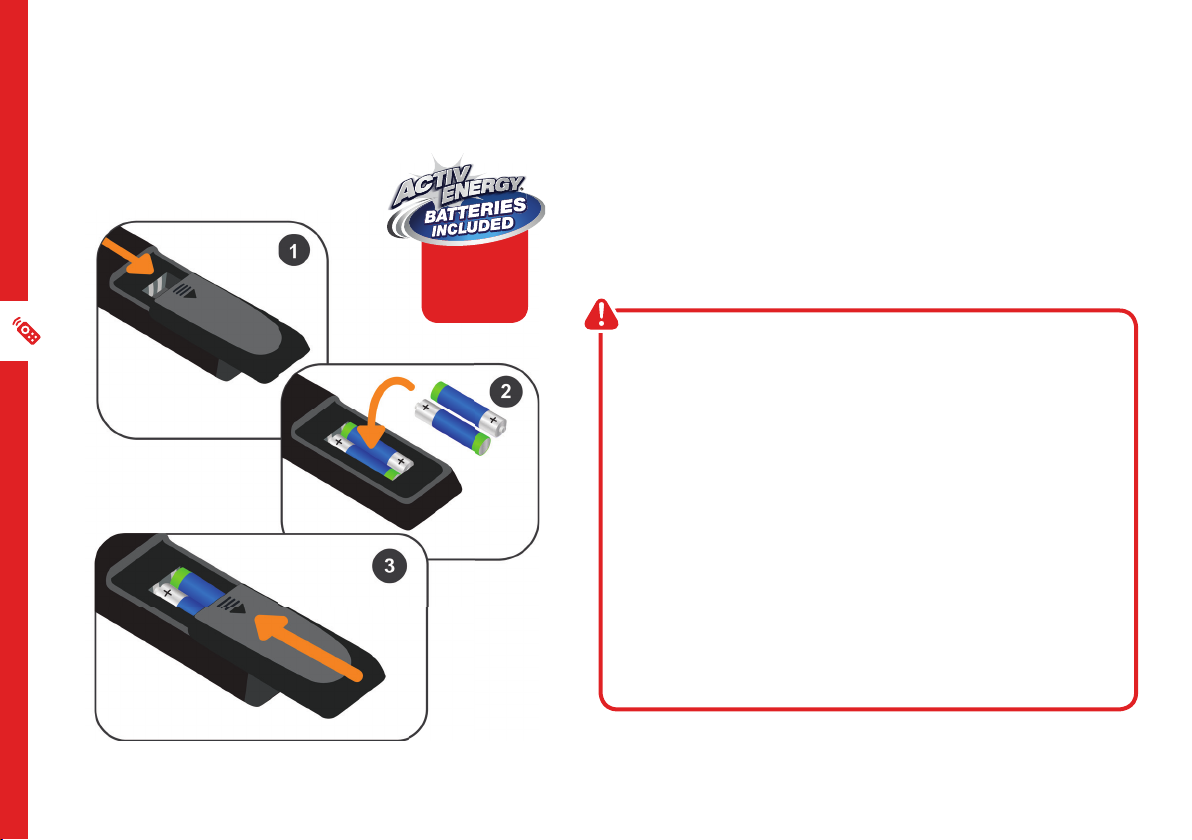
Setup
Insert two AAA size batteries according to the polarity
markings (+ / -) inside the compartment. Make sure the
batteries are correctly aligned and properly pushed into
place.
Precautions When Using Batteries
• Do not use old and new batteries together.
• Do not use different types of batteries (e.g.
Manganese and Alkaline batteries) together.
• Remove the batteries from the remote if you do not
intend to use it for a long time.
• When discarding used batteries, follow any
guidelines for recycling and disposal of batteries
that apply in your local area.
• Keep batteries away from children and pets.
• Never throw batteries into a fire or expose them to
extreme heat.
Remote Control
AAA size
batteries
included
REMOTE CONTROL | 13
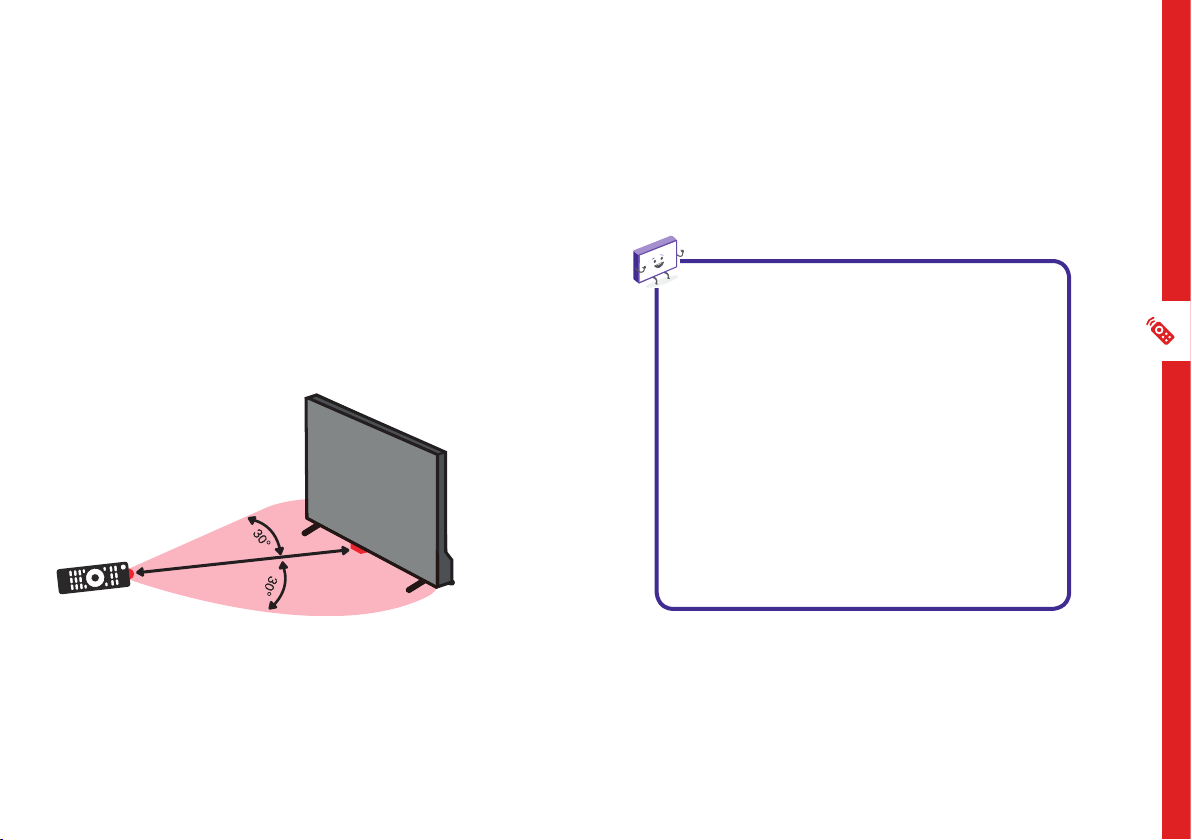
Using the Remote Control
To use the remote, point it towards the remote sensor
at the front of the TV. The remote will not operate if its
path is blocked.
The remote has a range of up to about 6 metres from
the TV at an angle of up to 30 degrees to either side of
the sensor, as illustrated below.
Image is an
example only.
Remote sensor
location on TV
may vary.
6m
Remote Hints and Tips
• Do not drop, step on or otherwise
impact the remote control. This
may damage the parts or lead to
malfunction.
• Do not place objects between the
remote control and the remote
sensor.
• Do not use this remote control while
simultaneously operating a remote
control for other devices.
14 | REMOTE CONTROL
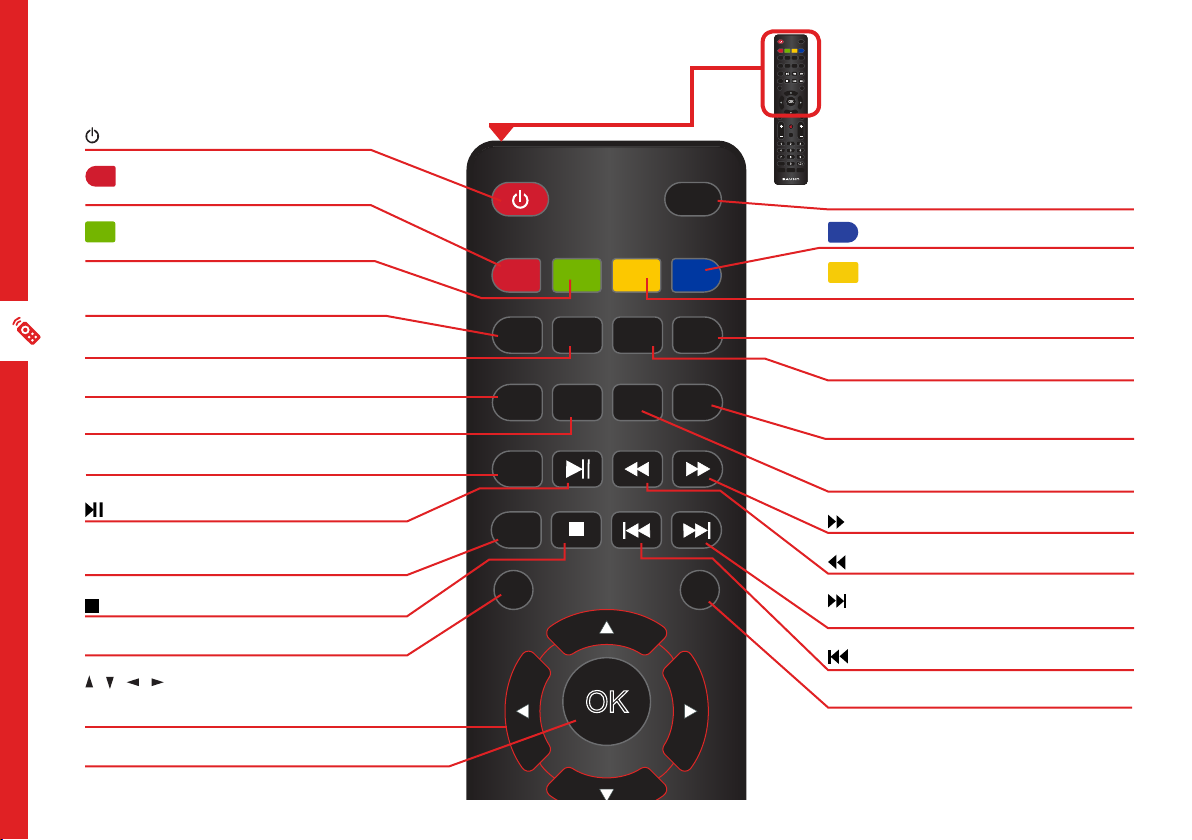
OK
EJECT
TV/RADIOPOWER
GOTO
FAV TEXT HOLD
FREEZE
SLEEP
ZOOM
REC
ANGLE REPEAT A-B
SUBTITLE
MEDIA
D.SETUP
MENU
SOURCE
D.MENU
TITLE
EXIT
INDEX
SIZE ASPECT SUBPAGE
POWER: Switch the TV to On or Standby.
GOTO: Jump to a different chapter of the
DVD.
ANGLE: View DVD playback from different
angles, if the DVD has this feature.
FAV: Press to display your favourite program in
DTV mode.
TEXT: Switch between TV and Teletext mode.*
SUBTITLE: Enable/disable subtitles.
SIZE/ZOOM: Change the picture size.
MEDIA: Select USB mode.
: PLAY/PAUSE in TIMESHIFT and USB mode.
REC / D.SETUP : Record program in DTV mode /
Display the main disc menu.
: Stop playback.
MENU: Display the main TV menu.
/ / / : Press the UP/DOWN/LEFT/RIGHT
buttons to navigate the on-screen menus and
adjust the system settings.
OK: Display the channels list (DTV).
Standard Remote
TV/RADIO / EJECT: Switch between TV or radio
/ Eject a disc (DVD).
A-B: Repeat selected DVD scenes.
REPEAT: Repeat playback of a selected
chapter, title, or the entire DVD.
SLEEP: Set the TV sleep timer.
FREEZE/HOLD: Hold the picture temporarily.
SUBPAGE: Manually jump to the previous or
next subpage of Teletext.*
ASPECT: Change the size of the image on your
screen.
: Move fast forward.
: Move fast backward.
/INDEX: Play next file./ Display the recorded
programs list (DTV).
: Play the previous file.
TITLE/EXIT: Display the DVD title menu.
OK
EJECT
TV/RADIOPOWER
GOTO
FAV TEXT HOLD
FREEZE
SLEEP
ZOOM
REC
ANGLE REPEAT A-B
SUBTITLE
MEDIA
D.SETUP
MENU
SOURCE
VOL CH
D.MENU
MUTE
DISPLAY
TITLE
EXIT
GUIDE
INDEX
SIZE ASPECTSUBPAGE
1 2
3
4
5
7 8
0
6
9
-/- -
LANG
AUDIO P-MODE S-MODE
* Teletext is no longer available in
Australia.
OK
EJECT
TV/RADIOPOWER
GOTO
FAV TEXT HOLD
FREEZE
SLEEP
ZOOM
REC
ANGLE REPEAT A-B
SUBTITLE
MEDIA
D.SETUP
MENU
SOURCE
VOL CH
D.MENU
MUTE
DISPLAY
TITLE
EXIT
GUIDE
INDEX
SIZE ASPECTSUBPAGE
1 2
3
4
5
7 8
0
6
9
-/- -
LANG
AUDIO P-MODE S-MODE
REMOTE CONTROL | 15
OK
MENU
SOURCE
VOL CH
D.MENU
MUTE
DISPLAY
EXIT
GUIDE
1 2
3
4
5
7 8
0
6
9
-/- -
LANG
AUDIO P-MODE S-MODE
SOURCE: Switch the input source.
MUTE: Mute the sound. Press again or
press VOL + to restore the sound.
VOL +/-: Turn the volume up/down.
NUMBER BUTTONS (0-9): Press to select a
TV channel directly when watching TV.
-/--: Switch the digits.
AUDIO/LANG: Switch the available sound-
track language (DTV/DVD).
P-MODE: Cycle through the different
picture modes.
D.MENU/GUIDE: Launch the TV Guide
(DTV).
CH +/- : Change to the next or previous
channel.
DISPLAY: Display information of the
current program.
: Return to the previous channel.
S-MODE: Cycle through the different
sound modes.
OK
EJECT
TV/RADIOPOWER
GOTO
FAV TEXT HOLD
FREEZE
SLEEP
ZOOM
REC
ANGLE REPEAT A-B
SUBTITLE
MEDIA
D.SETUP
MENU
SOURCE
VOL CH
D.MENU
MUTE
DISPLAY
TITLE
EXIT
GUIDE
INDEX
SIZE ASPECTSUBPAGE
1 2
3
4
5
7 8
0
6
9
-/- -
LANG
AUDIO P-MODE S-MODE
OK
EJECT
TV/RADIOPOWER
GOTO
FAV TEXT HOLD
FREEZE
SLEEP
ZOOM
REC
ANGLE REPEAT A-B
SUBTITLE
MEDIA
D.SETUP
MENU
SOURCE
VOL CH
D.MENU
MUTE
DISPLAY
TITLE
EXIT
GUIDE
INDEX
SIZE ASPECTSUBPAGE
1 2
3
4
5
7 8
0
6
9
-/- -
LANG
AUDIO P-MODE S-MODE

16 | ON-SCREEN SET UP
First Time Setup menu
When you turn the TV on for the first time, the First Time
Setup menu will appear.
Follow the prompts using the / / / / OK buttons
to select your preferences. You will be able to adjust:
If you make an error, you can update your preferences in
the settings menu later.
On-Screen Set Up
Make sure equipment is properly connected (as shown on pages
10-11) before connecting the TV to power.
On/Standby light is
WHITE in standby mode.
On/Standby light is
OFF when the TV is on.
OSD Language Country Auto Scan
Make sure the TV is plugged in at
the power socket and switched
on. Press the (ON) button to
turn on the TV.
OK
EJECT
TV/RADIOPOWER
GOTO
FAV TEXT HOLD
FREEZE
SLEEP
ZOOM
REC
ANGLE REPEAT A-B
SUBTITLE
MEDIA
D.SETUP
MENU
SOURCE
VOL CH
D.MENU
MUTE
DISPLAY
TITLE
EXIT
GUIDE
INDEX
SIZE ASPECTSUBPAGE
1 2
3
4
5
7 8
0
6
9
-/- -
LANG
AUDIO P-MODE S-MODE
OK
EJECT
TV/RADIOPOWER
GOTO
FAV TEXT HOLD
FREEZE
SLEEP
ZOOM
REC
ANGLE REPEAT A-B
SUBTITLE
MEDIA
D.SETUP
MENU
SOURCE
VOL CH
D.MENU
MUTE
DISPLAY
TITLE
EXIT
GUIDE
INDEX
SIZE ASPECTSUBPAGE
1 2
3
4
5
7 8
0
6
9
-/- -
LANG
AUDIO P-MODE S-MODE
TV SETTING MENUS | 17
Menus Index
Picture 19
• Picture Mode
• Brightness
• Contrast
• Sharpness
• Saturation
• Hue
• Colour Temp
• Aspect Ratio
• Screen Mode (HDMI mode only)
• PC Settings
• Auto Adjust, H Position, V Position,
Phase, Clock
• Advanced Settings
• NR (Noise Reduction), MPEG NR
(MPEG Noise Reduction), Dynamic
Contrast
TV Setting Menus
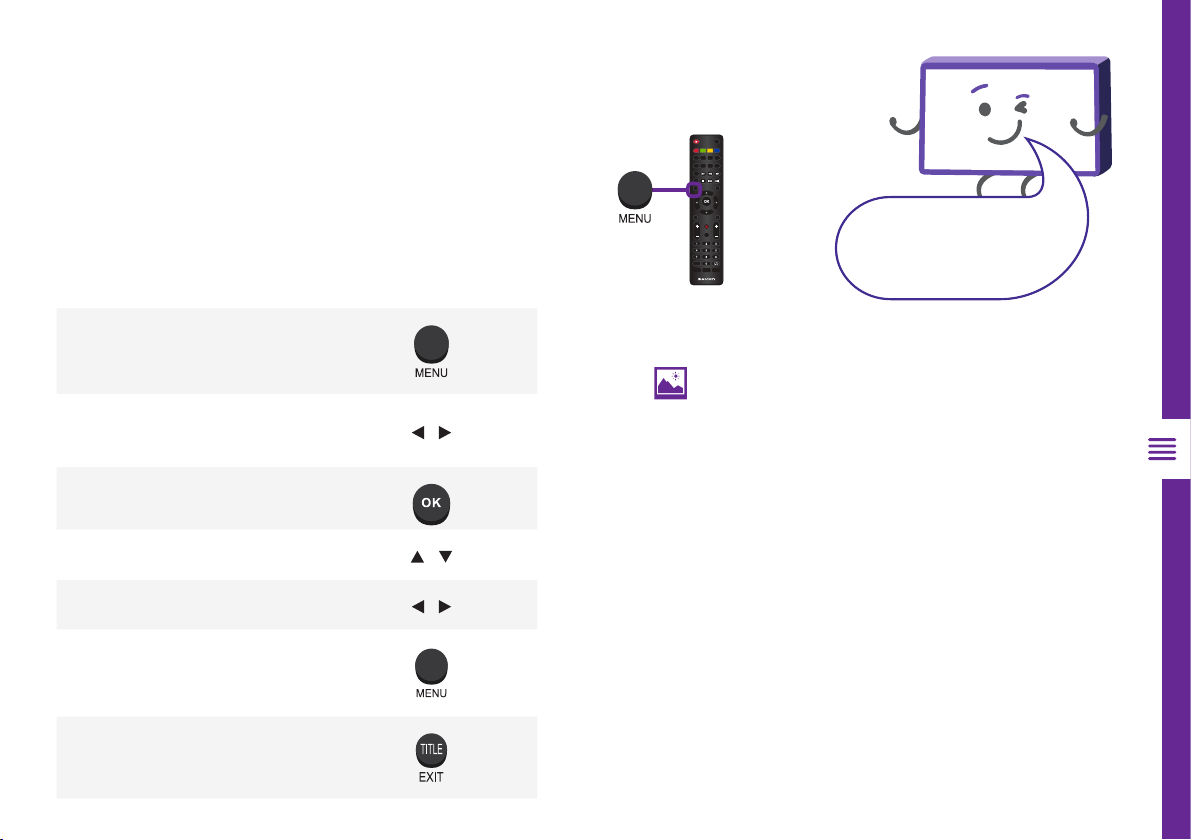
Menu Navigation Buttons
Function Remote Button
Display the main menu
Select different sub-menus /
Enter a sub-menu
Select preferred option /
Adjust a value /
Return to the previous menu
Exit a menu
Press the MENU button to display the TV settings menu.
See the guide below for all the other buttons you'll need
to use to adjust and change your settings.
Once you have program any
settings, the unit will retain them in
its memory until you change them,
even after turning the TV off.
OK
EJECT
TV/RADIOPOWER
GOTO
FAV TEXT HOLD
FREEZE
SLEEP
ZOOM
REC
ANGLE REPEAT A-B
SUBTITLE
MEDIA
D.SETUP
MENU
SOURCE
VOL CH
D.MENU
MUTE
DISPLAY
TITLE
EXIT
GUIDE
INDEX
SIZE ASPECTSUBPAGE
1 2
3
4
5
7 8
0
6
9
-/- -
LANG
AUDIO P-MODE S-MODE
OK
EJECT
TV/RADIOPOWER
GOTO
FAV TEXT HOLD
FREEZE
SLEEP
ZOOM
REC
ANGLE REPEAT A-B
SUBTITLE
MEDIA
D.SETUP
MENU
SOURCE
VOL CH
D.MENU
MUTE
DISPLAY
TITLE
EXIT
GUIDE
INDEX
SIZE ASPECTSUBPAGE
1 2
3
4
5
7 8
0
6
9
-/- -
LANG
AUDIO P-MODE S-MODE
 Loading...