

Page 1
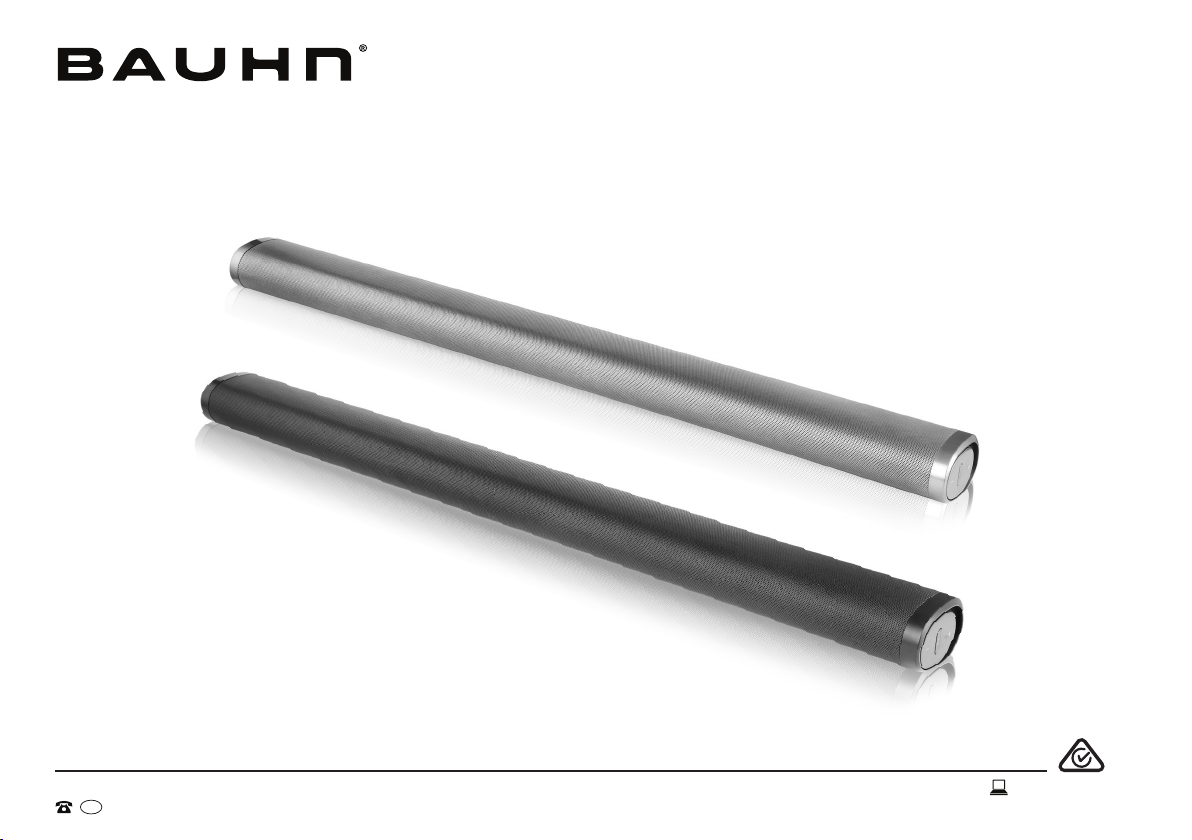
2.0 Premium Bluetooth® Soundbar
with Enhanced Bass
MODEL: ASBEB-0121
User Manual
AFTER SALES SUPPORT
AUS
1300 886 649
MODEL: ASBEB-0121 PRODUCT CODE: 704551 01/2021
Page 2

Welcome
Congratulations on your purchase!
This manual tells you all you need to know about using your new BAUHN® product.
Please take special note of any important safety and usage information presented with the symbol.
All products brought to you by BAUHN® are manufactured to the highest standards of performance and safety and,
as part of our philosophy of customer service and satisfaction, are backed by our comprehensive 1 Year Warranty.
Domestic use only: This product is intended for indoor domestic use only. It is not suitable for commercial, industrial
or outdoor use. Do not use this product for anything other that its intended purpose, and only use it as described in
this manual.
We hope you will enjoy using your purchase for many years to come.
2
Page 3

Contents
Welcome 2
Unpack and Prepare 4
What's in the Box 4
Important Tips 5
Installation 6
Wall Mounting Instructions 8
Connect to Power 10
Controls and Connections 11
Get to know your Soundbar 11
Buttons on the Soundbar 11
Rear Ports on the Soundbar 12
Remote Control 14
Setup 14
Using the Remote Control 15
Remote Overview 16
Operation 17
General Operation 17
Input Modes 17
Bluetooth® 18
Pairing Bluetooth® Devices 18
Bluetooth® Playback 19
Troubleshooting 20
Specications 22
Compliance and Responsible Disposal 23
Warranty Information 24
Repair and Refurbished
Goods or Parts Notice 25
3
Page 4
Unpack and Prepare
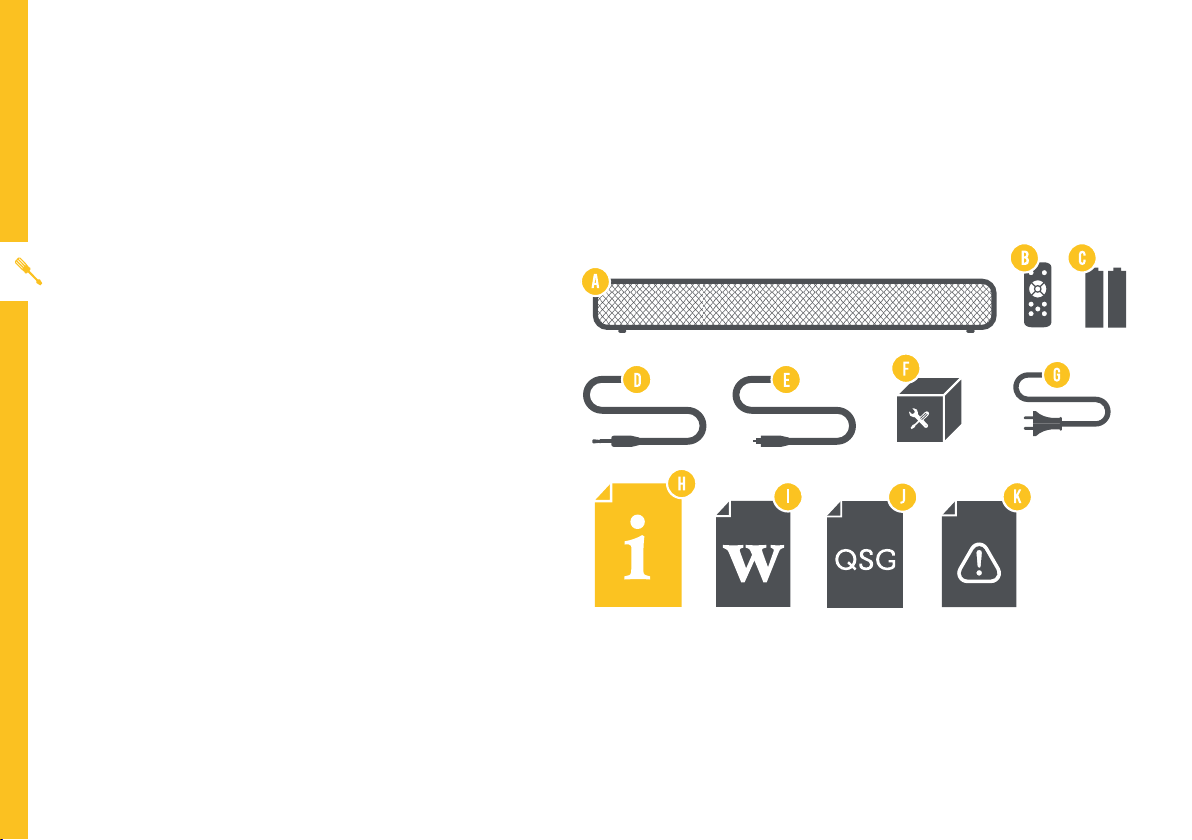
What's in the Box
Before setting up your new Soundbar, check you have everything:
A. 2.0 Channel Soundbar
B. Remote Control
C. AAA Activ Energy Batteries (2)
D. 3.5mm Audio Cable
E. Optical Cable
F. Wall Mount Installation Kit
G. Power Cable
H. User Manual
I. Warranty Certificate
J. Quick Start Guide
K. General Safety Warnings
You will need:
• Phillips-head screwdriver and a drill (for wall mount installation)
• HDMI Cable, if you want to set up and use HDMI CEC. (Otherwise you can use the included optical cable if you
don't use HDMI.)
4 | UNPACK AND PREPARE
Page 5

Important Tips
• Place the Soundbar on a level surface.
• Place the Soundbar away from any source that may generate heat or vibrations.
• Make sure there is enough space around the Soundbar for airflow.
• The remote control works up to 6 metres away from the Soundbar.
• Unplug the Soundbar before cleaning it.
• Clean using a dry cloth only - do not use water or chemicals.
• Use only the power supply provided.
• Keep liquid, children and pets away from the Soundbar at all times.
UNPACK AND PREPARE | 5
Page 6
Installation
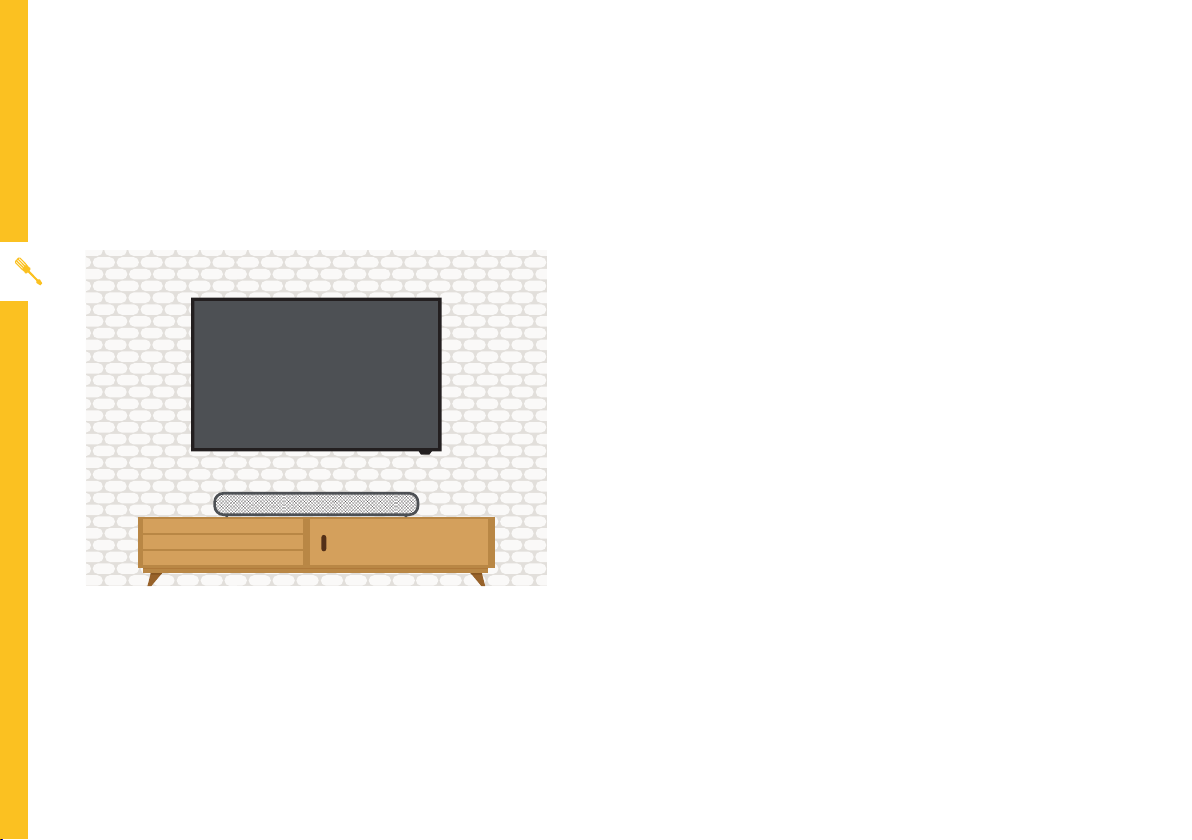
This soundbar can sit free-standing on a surface, or it can be mounted to a wall.
Place on a secure, flat surface. Make sure the soundbar
is standing on its rubber pads (on the left and right sides
of the soundbar) and no other area of the bottom of
soundbar is touching the surface.
Free-standing
6 | UNPACK AND PREPARE
Page 7
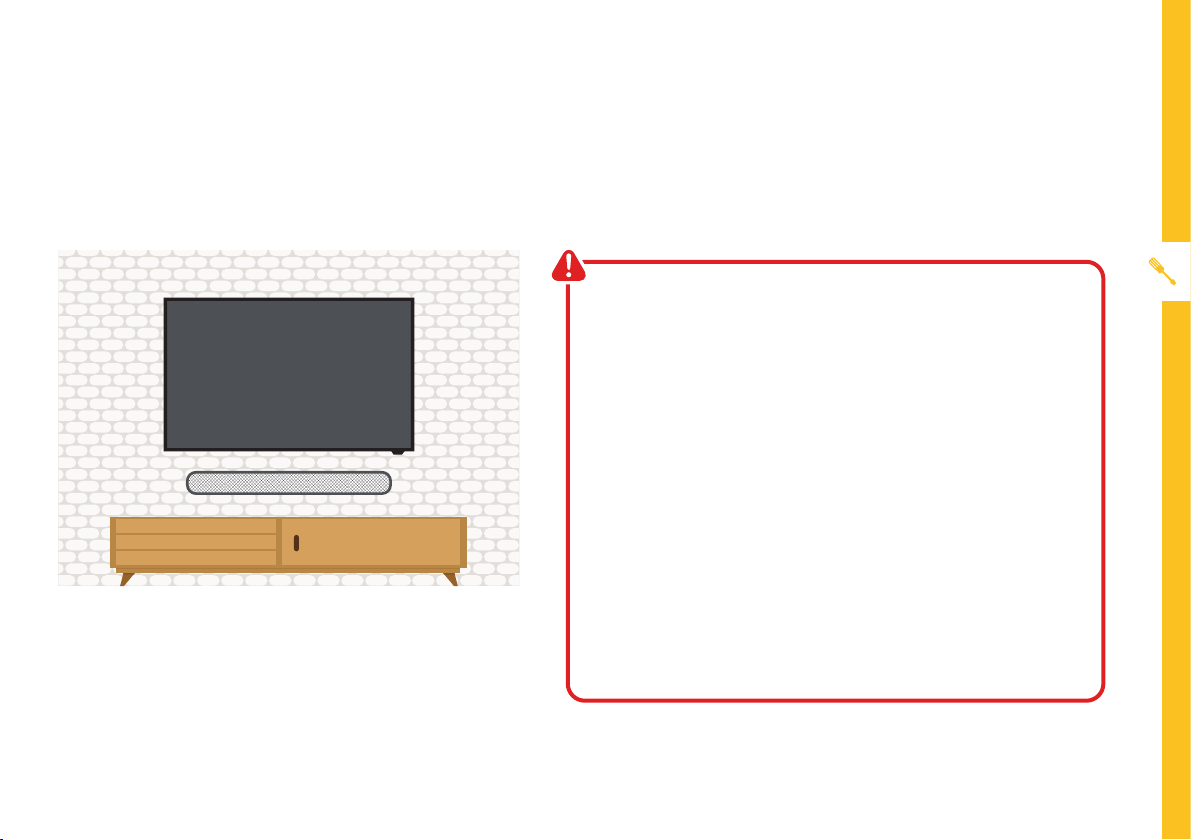
Wall mounting instructions are on the following pages.
• Wall-mounted installation must be carried out
by qualified personnel only. Incorrect assembly
can result in severe personal injury and property
damage! If you intend to install this product yourself,
you must check for installations such as electrical
wiring and plumbing, which may be hidden inside or
behind the wall.
• It is the installer’s responsibility to verify and confirm
that the wall will safely support the total load of the
soundbar and wall brackets.
• Additional tools (not included) are required for the
installation.
Wall mounted
• Do not overtighten screws.
• Use an electronic stud finder to check the wall type
before drilling and mounting.
UNPACK AND PREPARE | 7
Page 8
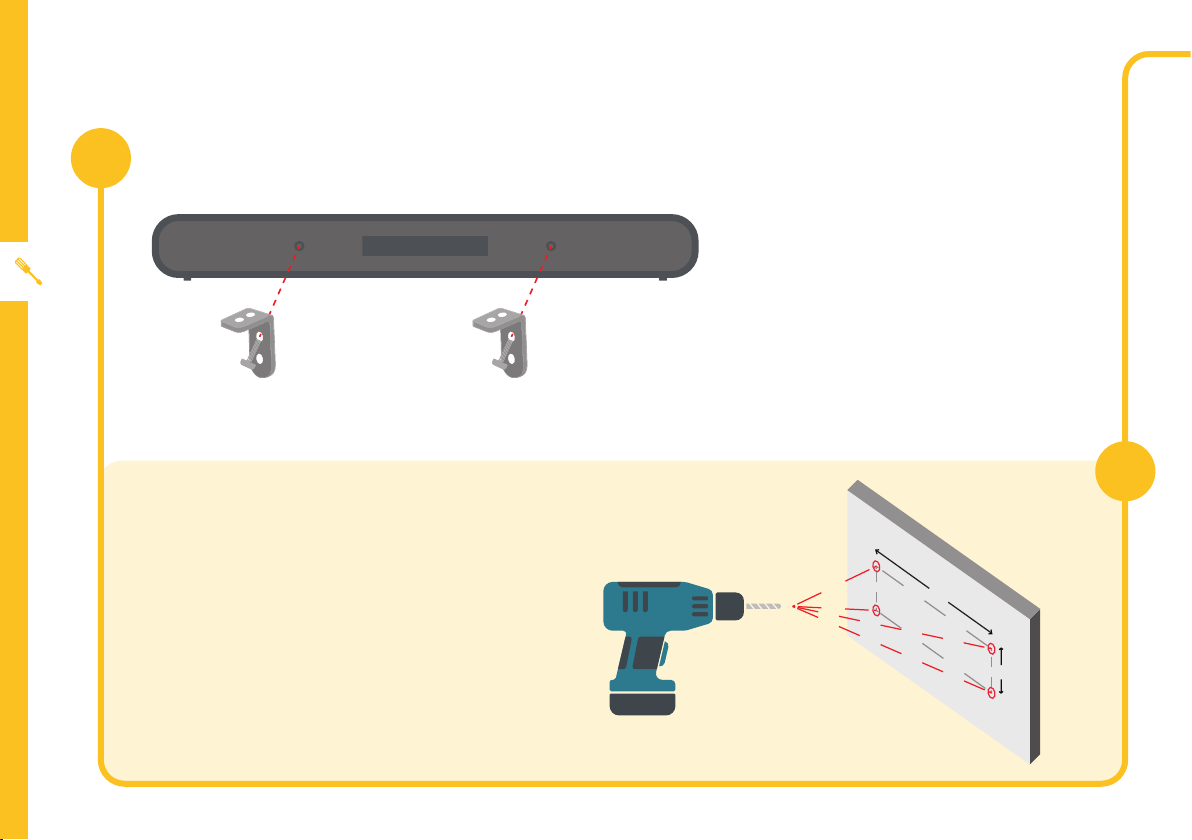
Wall Mounting Instructions
1
Fix the supplied wall-mounting
brackets (marked with "s") to the
bracket fixing holes on the back
of the soundbar with the supplied
short screws. Affix the brackets as
shown in the illustration (left).
2
Use a pencil to make drill hole marks on the
wall for the anchors. Make sure the marks are
level before drilling. Use a 6mm bit and power
drill (not supplied) to drill holes on the marks.
8 | UNPACK AND PREPARE
350mm
18mm
Page 9
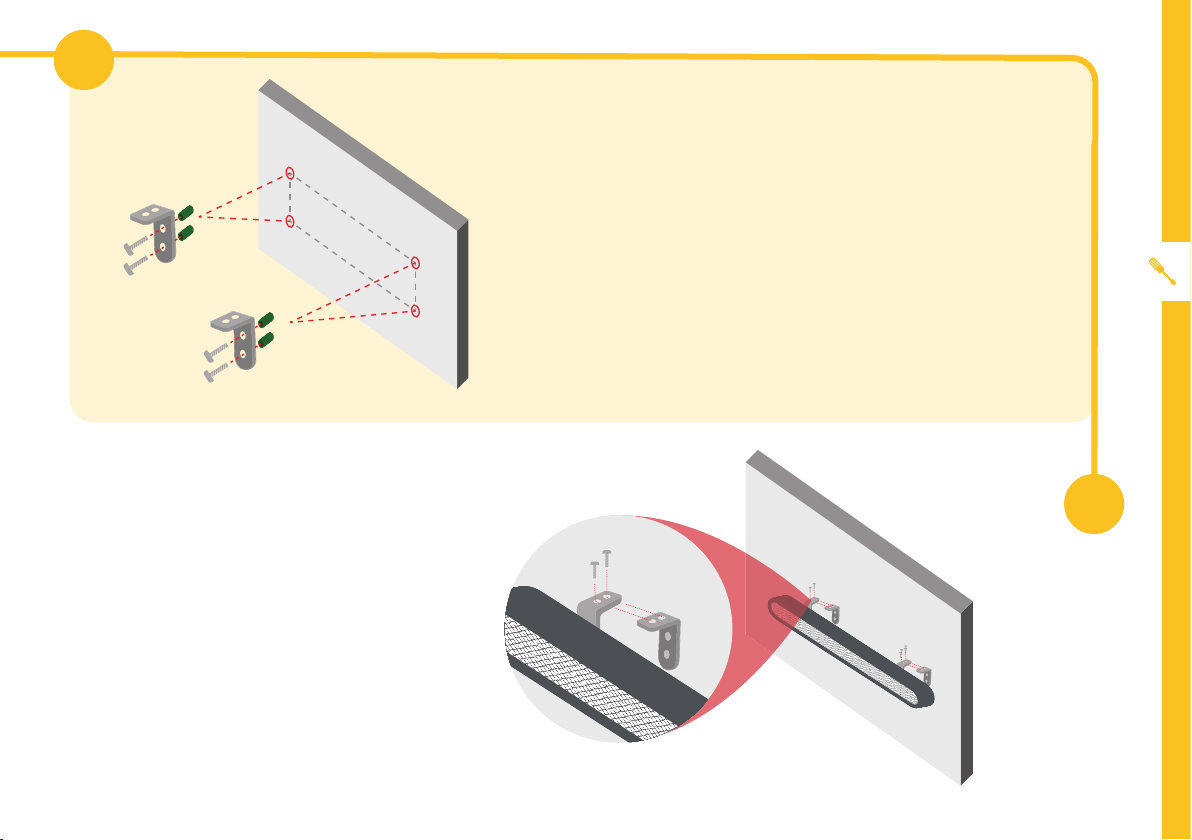
3
Place the soundbar with wallmounting brackets (marked with
"S") onto the mounting brackets
(marked with "W"), which are fixed
to the wall. Use the included short
screws to tighten them. Make sure
the soundbar is attached firmly to
the wall.
Insert the included plastic anchors into
the holes and push in until they are flush
with the wall. Secure the supplied metal
brackets (marked with "W") to the wall by
screwing the included tapping screws into
the anchors and tighten until the screw
head is fully inserted and flush with the
metal bracket.
4
UNPACK AND PREPARE | 9
Page 10
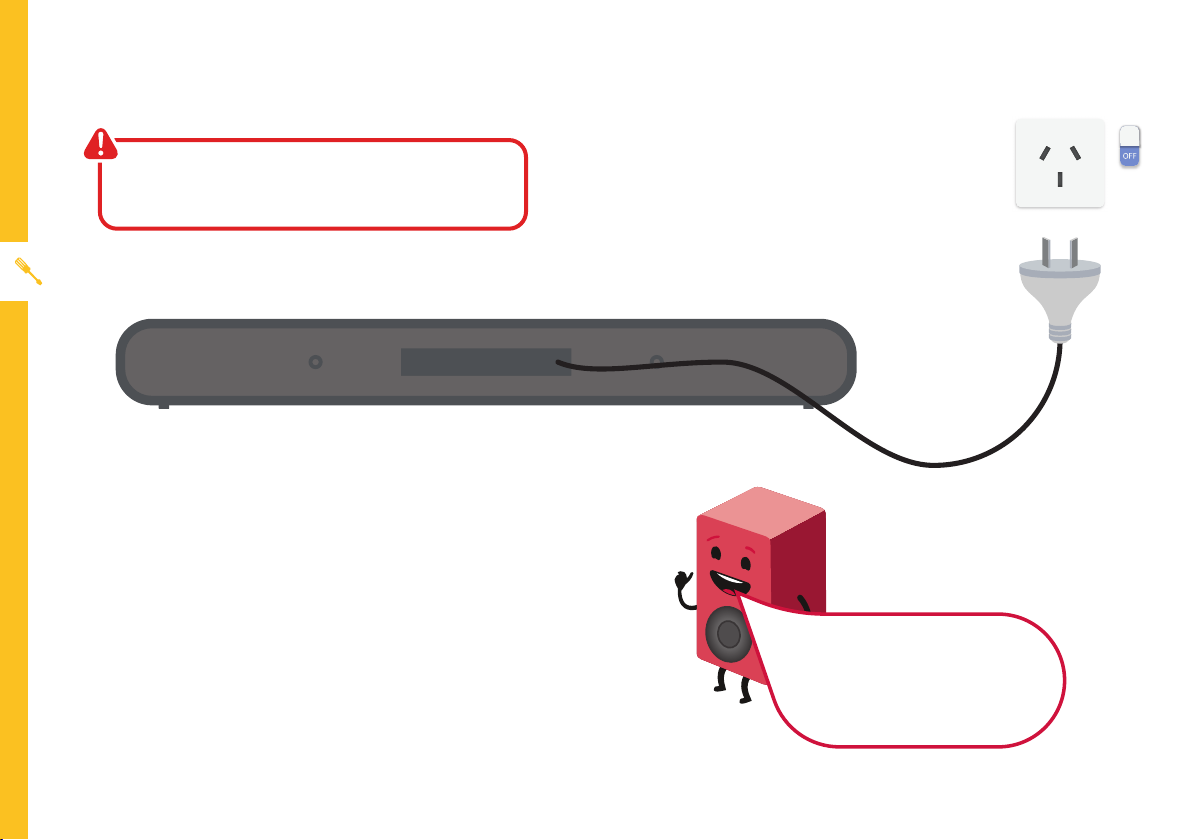
Connect to Power
Make sure the soundbar is switched off at the power
outlet until you have finished connecting your cables.
Don't forget to plug in the
soundbar to the power outlet.
Leave the power switched off until
installation is finished.
10 | UNPACK AND PREPARE
Page 11
Controls and Connections
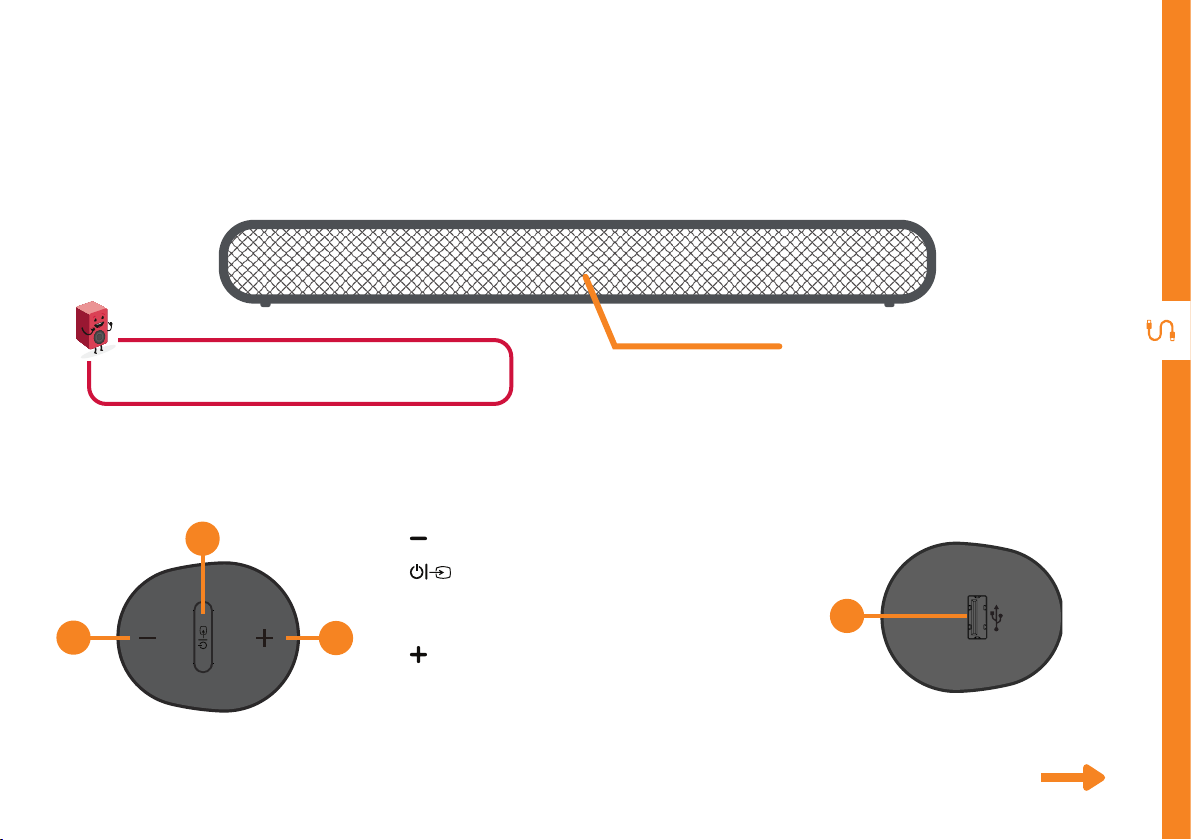
Get to know your Soundbar
Front
Good to know: The LED display on the soundbar will
turn off automatically after 5 minutes of no operation.
Buttons on the Soundbar
2
1
Right side
1. : Decrease the volume level.
2. (Power button/Mode): Press to turn on.
Press to select your preferred input source.
Press and hold to put in Standby mode.
3
3. : Increase the volume level.
4. USB Port : Insert a USB device for audio
playback.
LED status/input display
4
Left side
See next page for more info on the connections.
CONTROLS AND CONNECTIONS | 11
Page 12
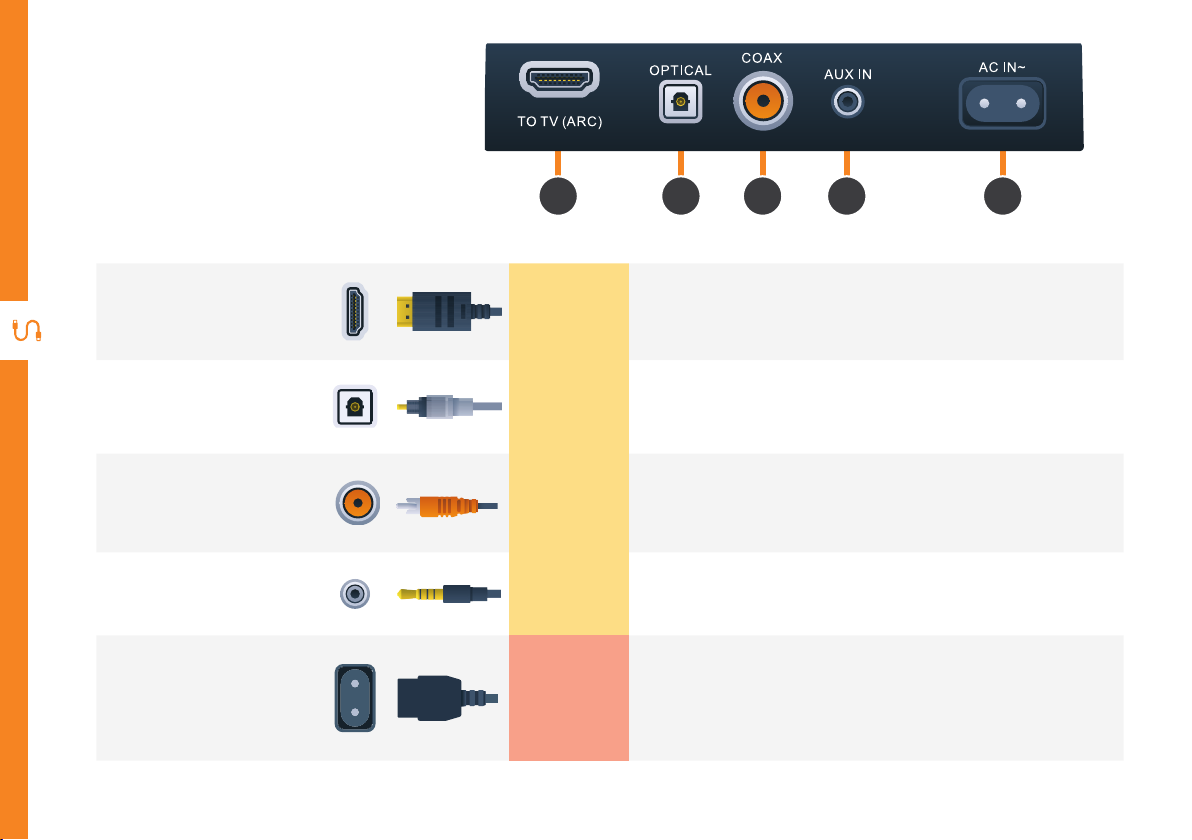
Rear Ports on the
Soundbar
1 2 3
The ARC (Audio Return Channel) function allows you to send
1
2
3
4
5
HDMI (ARC)
Optical
Coaxial
AUX In
AC In
SOUND
SOUND
SOUND
SOUND
POWER
audio input from an ARC-compliant TV to an ARC-compliant
audio device (e.g. soundbar) without the need for an additional
audio cable connection.
Connect an OPTICAL cable (included) to the OPTICAL OUT
socket of your device (e.g. TV, DVD player) and the OPTICAL
socket on the soundbar.
Connect a COAXIAL cable (not included) to the COAXIAL OUT
socket of your device (e.g. TV, DVD player) and the COAXIAL
socket on the soundbar.
Use the supplied 3.5mm audio cable to connect the headphone
socket of the connected audio device, such as a media player, to
the AUX socket on the unit.
Before connecting the AC power cable, ensure you have
completed all other connections.
Connect the power cable to the soundbar AC IN socket first,
then plug in the power cable to the mains supply socket.
4 5
12 | CONTROLS AND CONNECTIONS
Page 13
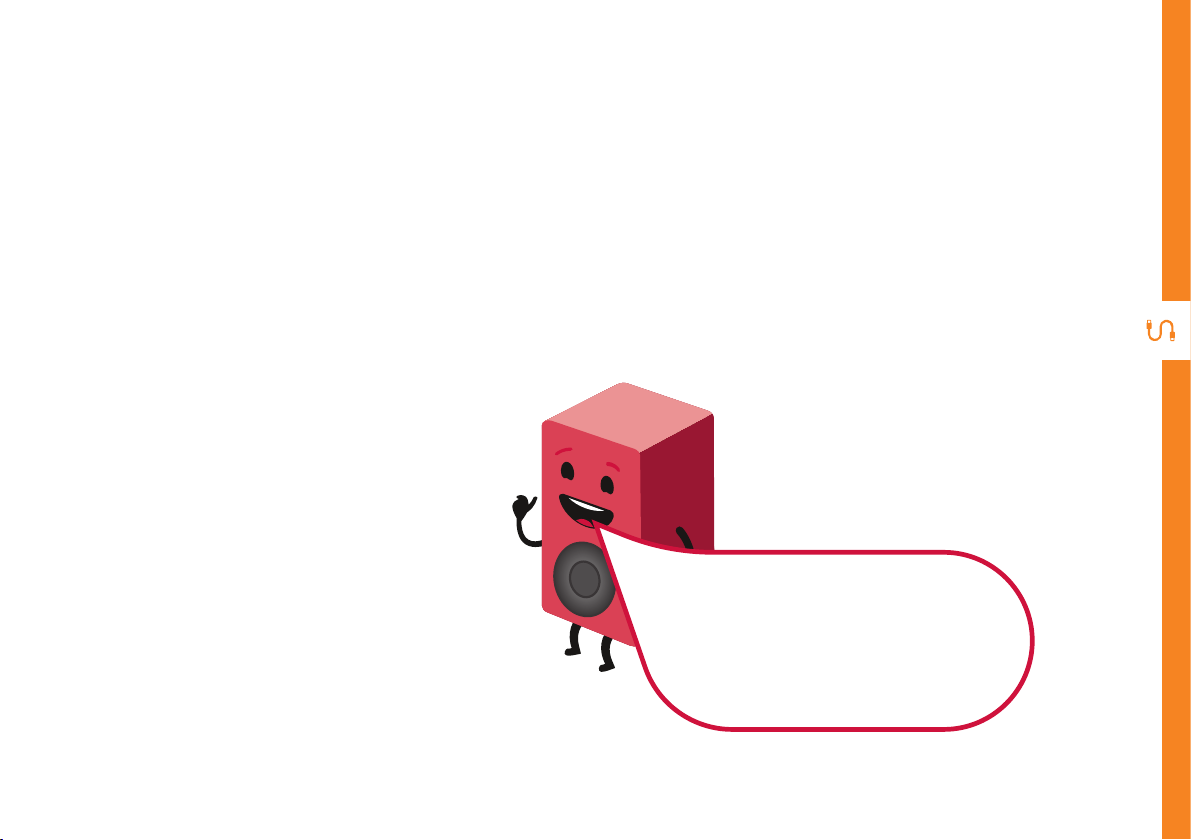
Rear Ports on the Soundbar
HDMI (ARC)
To use the ARC function, make sure the soundbar's
TO TV (ARC) socket is connected via HDMI cable
(not included) to the HDMI (ARC) socket of your ARC
compliant TV. Then just use your TV remote control to
adjust the volume output (VOL +/– and MUTE) of the
connected audio device. In the TV settings menu, turn
on the ARC and CEC function (when CEC is turned on,
the sound bar will turn on/off automatically when the TV
is turned on/off).
When you use ARC, Optical or
Coaxial connection to your TV or
DVD, the audio output in the TV
or DVD settings menu must be
set to PCM mode (instead of Auto
mode, RAW mode or etc.).
CONTROLS AND CONNECTIONS | 13
Page 14
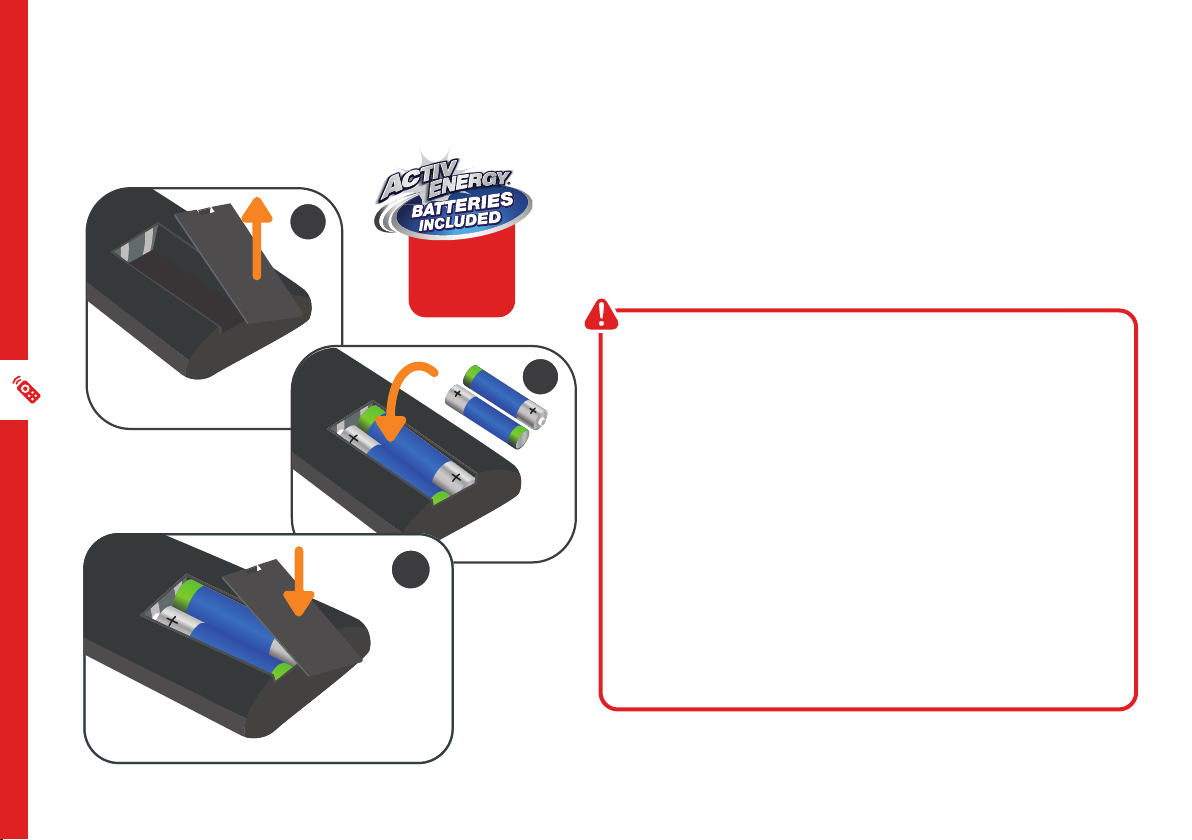
Remote Control
1
3
AAA size
batteries
included
Setup
Insert two AAA size batteries according to the polarity
markings (+ / -) inside the compartment. Make sure the
batteries are correctly aligned and properly pushed into
place.
Precautions When Using Batteries
2
• Do not use old and new batteries together.
• Do not use different types of batteries (e.g.
Manganese and Alkaline batteries) together.
• Remove the batteries from the remote if you do not
intend to use it for a long time.
• When discarding used batteries, follow any
guidelines for recycling and disposal of batteries
that apply in your local area.
• Keep batteries away from children and pets.
• Never throw batteries into a fire or expose them to
extreme heat.
14 | REMOTE CONTROL
Page 15
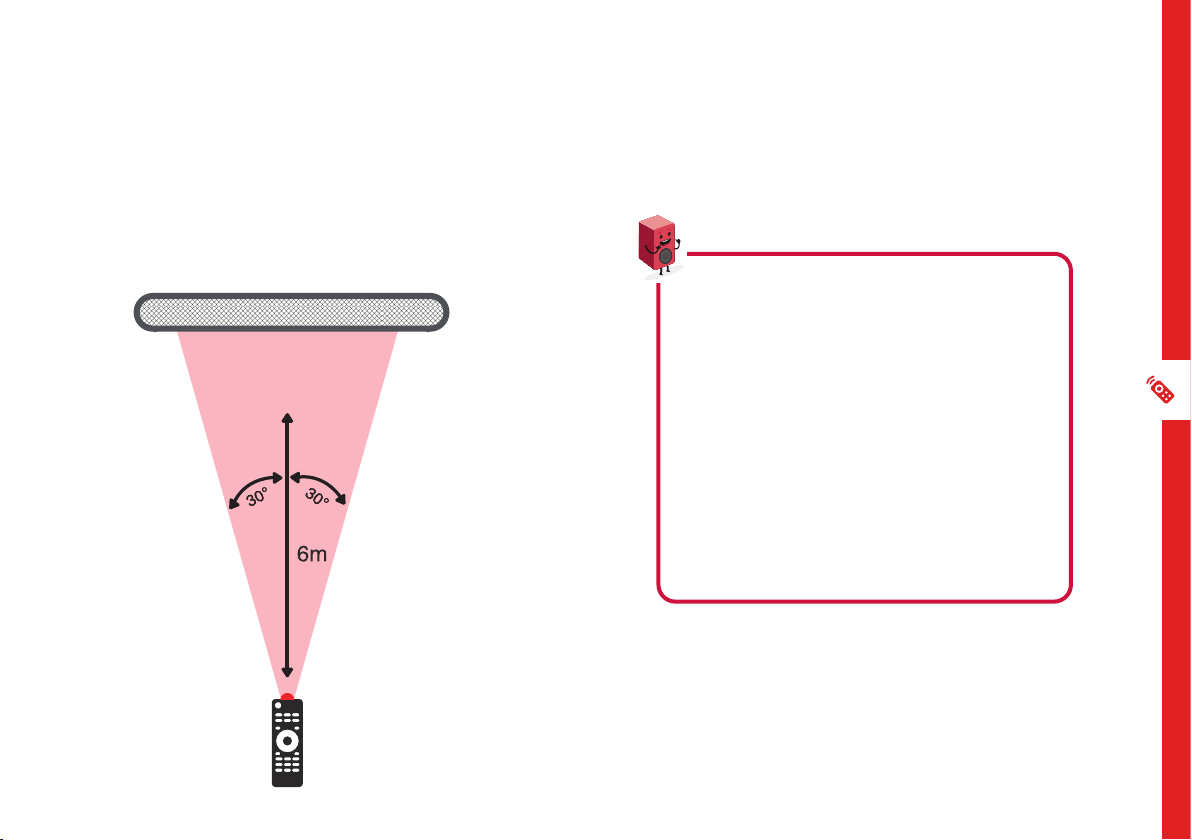
Using the Remote Control
To use the remote, point it towards the remote sensor at
the front of the soundbar. The remote will not operate if
its path is blocked.
The remote has a range of up to about 6 metres from
the soundbar at an angle of up to 30 degrees to either
side of the sensor, as illustrated below.
Remote Use
• Do not drop, step on or otherwise
impact the remote control. This
may damage the parts or lead to
malfunction.
• Do not place objects between the
remote control and the remote
sensor.
• Do not use this remote control while
simultaneously operating a remote
control for other devices.
REMOTE CONTROL | 15
Page 16
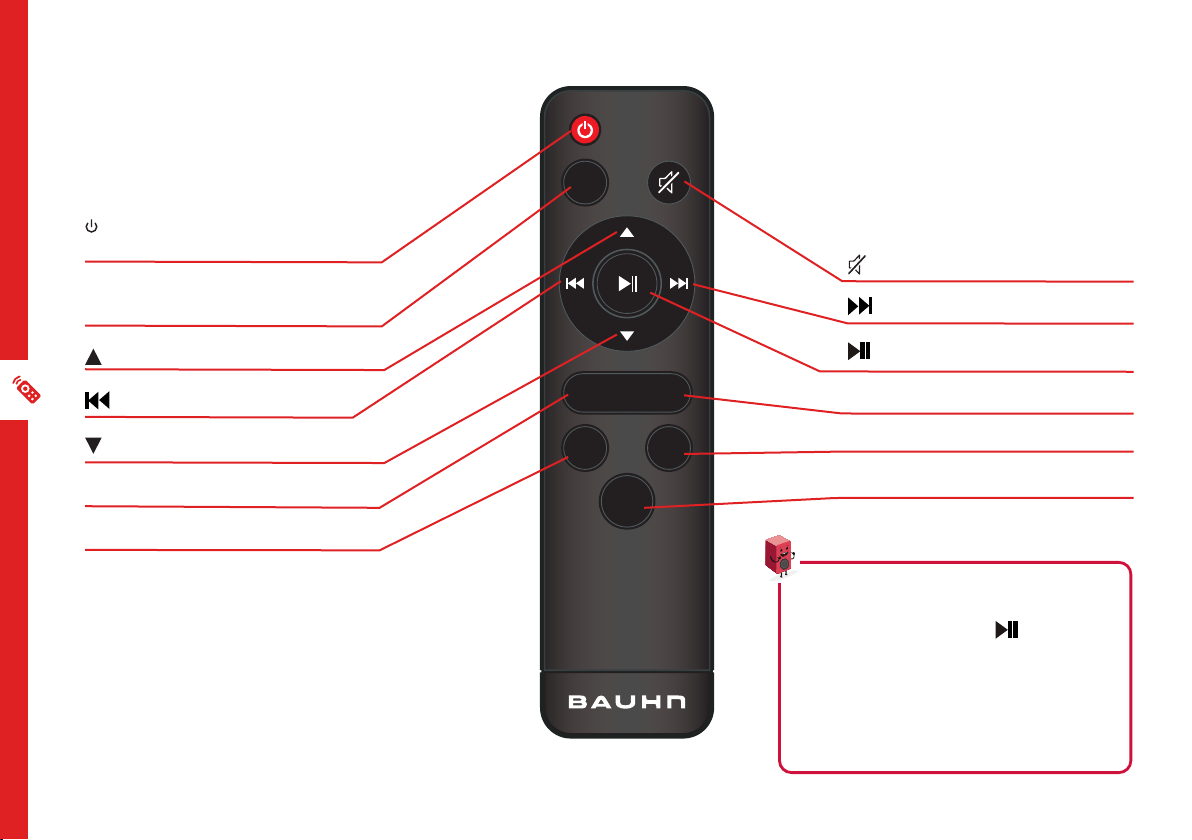
Remote Overview
POWER: Switch the unit to ON
or Standby.
MODE: Switch between the input
sources.
MODE
: Mute the sound.
: Skip to the next track.
: Increase the volume level.
: Skip to the previous track
: Decrease the volume level.
TREBLE --: Decrease the treble.
BASS --: Decrease the bass.
16 | REMOTE CONTROL
-
BASS-
TREBLE
EQ
+
BASS+
: Start or pause playback.
TREBLE +: Increase the treble.
BASS +: Increase the bass.
EQ: Change the equaliser preset.
Tips
• Press and hold the button for
3 seconds to un-pair a Bluetooth®
device.
• Press the TREBLE button and
hold for 6 seconds to reset the
audio settings (volume and EQ).
Page 17
Operation
General Operation
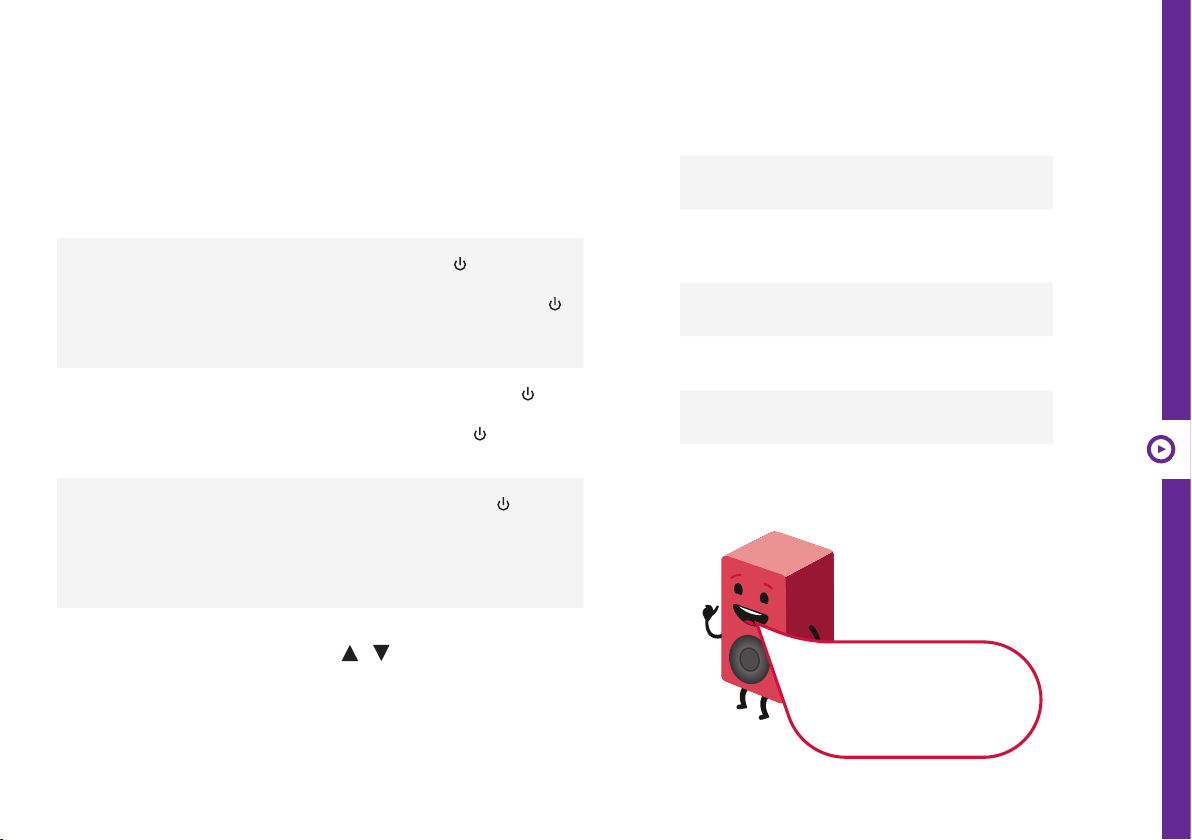
Function Action
Input Modes
Input Display
Bluetooth®
BT
Turn the soundbar ON
Turn the soundbar OFF
Change the input
source/mode
Increase/Decrease the
volume
Press the POWER /MODE
button on the right side of the
soundbar, or press the POWER
button on the remote control to
switch the soundbar on.
Press and hold the POWER /
MODE button on the sound bar
or press the POWER button on
the remote control.
Short press the POWER /
MODE button repeatedly on the
soundbar, or press the MODE
button on the remote repeatedly
to change the input source.
Press the + / - buttons on the unit
or / on the remote control
to adjust the volume level.
Optical
Coaxial
HDMI
AUX
USB
When you turn on your
soundbar, the LED display
will light up and show the last
used mode.
OPT
COX
ARC
AUX
USB
OPERATION | 17
Page 18
Bluetooth
®
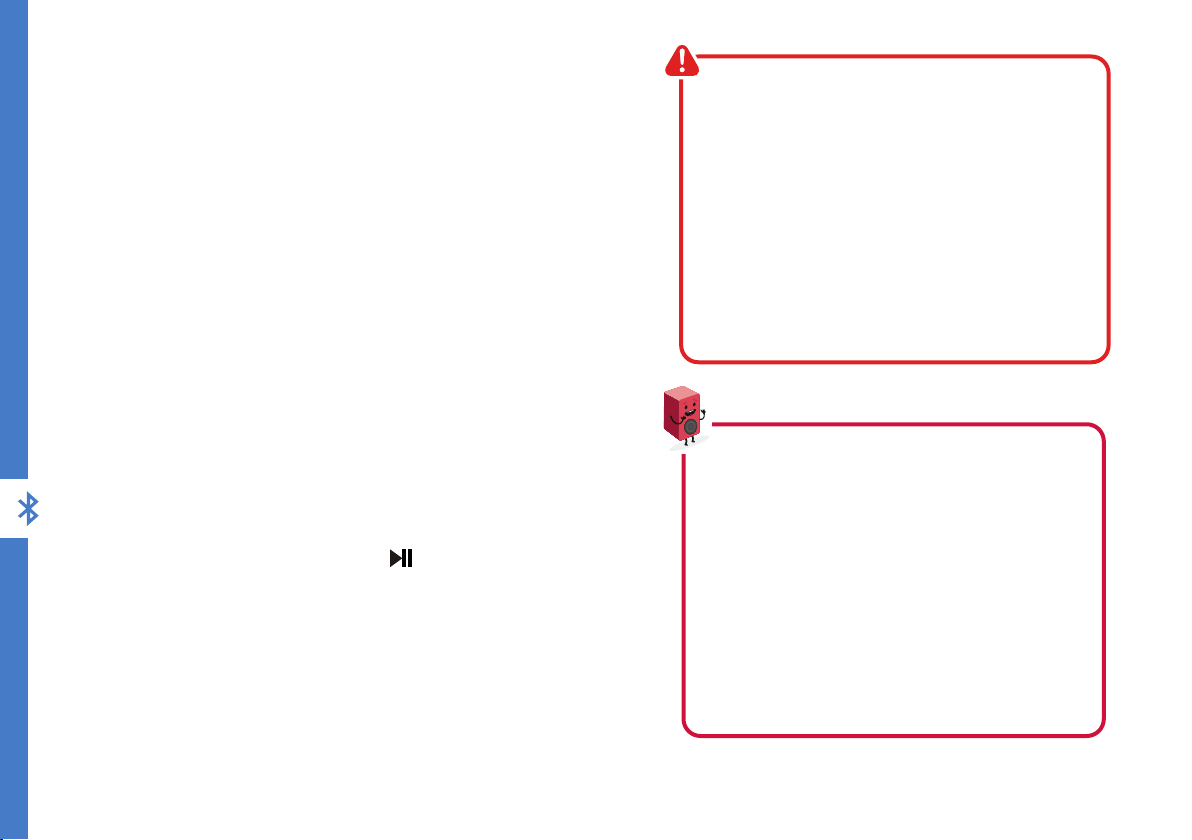
You can listen to tracks from a media device if connected
to the unit via Bluetooth® Wireless Technology.
Pairing Bluetooth® Devices
The first time you use your Bluetooth® device with the
soundbar, you will need to pair them with one another.
Activate Bluetooth® on your compatible device, and set
it to search for compatible devices.
Select the speaker name: 'BAUHN ASBEB-0121' from
the list of found devices.
Note: Only one playback unit can be connected to
the speaker. If the speaker is already connected to
another playback unit, the speaker will not appear in
the Bluetooth® selection list. To disconnect the existing
paired device, press and hold the button on the
remote for 3 seconds.
If your device asks for a passkey (depending on the
device manufacturers, model, and software version),
then enter digits “0000” and press OK.
The operational range between this player and
a Bluetooth® device is approximately 10 metres
(without any object between the Bluetooth enabled
device and the unit). Any obstacle between the
devices can reduce the operational range.
Before you connect a Bluetooth® enabled device to
this unit, ensure you know the device’s capabilities.
Compatibility with all Bluetooth devices is not
guaranteed.
If the signal strength is weak, your Bluetooth®
receiver may disconnect, but it will re-enter pairing
mode automatically.
If a mobile phone on which you are playing music
receives a call, the music will be interrupted.
The phone call audio however is not played via
the speaker. Once you end the call, the devices
are connected to each other again and playback
resumes.
Your device will also be disconnected when your
device is moved beyond the operational range. If
you want to reconnect your device, place it within
the operational range.
If the connection is lost, follow the instructions (left)
to pair your device to the player again.
18 | BLUETOOTH
®
Page 19
Bluetooth® Playback
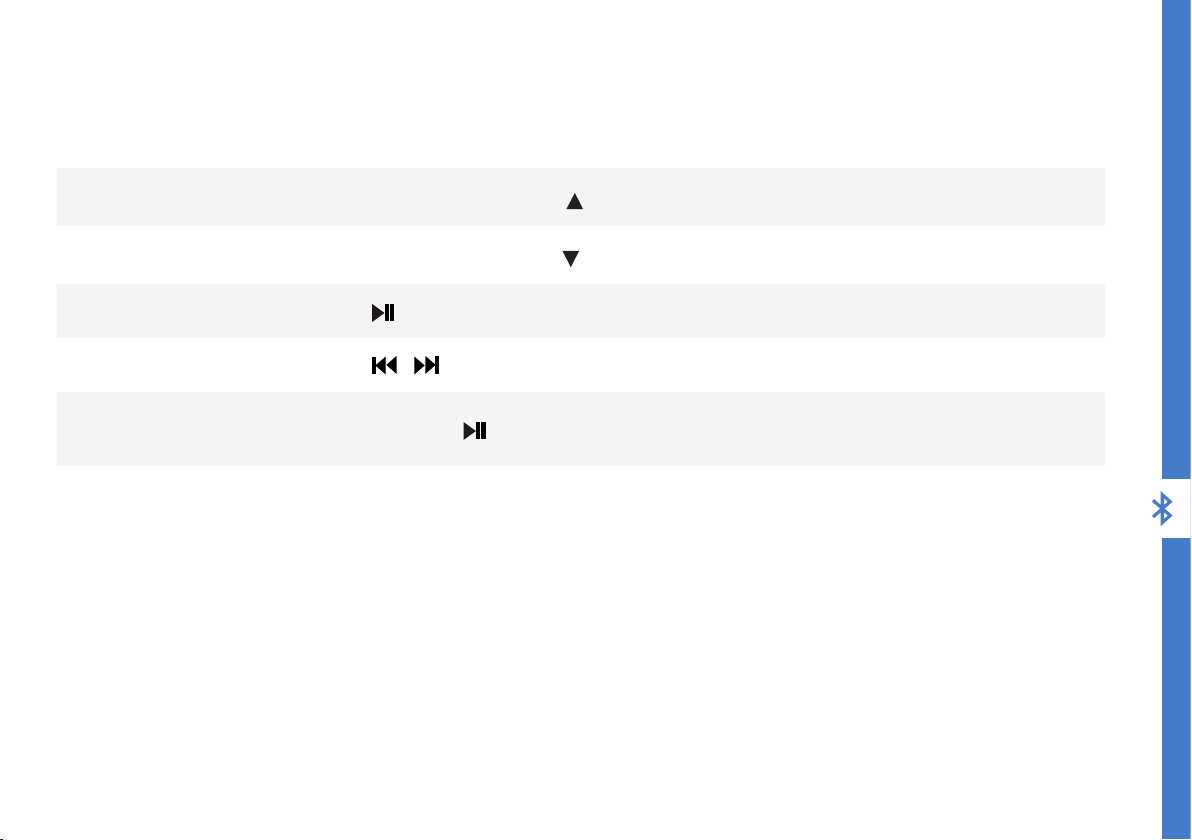
Function Action
Increase the Volume
Decrease the Volume
Press the + button on the unit or on the remote.
Press the - button on the unit or on the remote.
Play/Pause Press on the remote.
Skip/Rewind
Un-pair a Bluetooth®
device
Press / on the remote to skip tracks.
Press and hold the button on the remote for 3 seconds.
BLUETOOTH® | 19
Page 20

Troubleshooting
If you have problems with the soundbar, check below for advice. If you don't find a solution here, contact After Sales Support on 1300 886 649.
Problem Solution
• Ensure that the AC power cable is properly connected.
No power
Remote control
does not work
• Ensure that there is power at the AC outlet.
• Press the POWER button on the soundbar or remote to turn the unit on.
• Use the remote control closer to the unit. Aim directly at the sensor on the front of the unit
• Insert the battery with its polarities (+/) aligned as indicated. Please check the battery is installed correctly.
• Replace the battery.
No response from
the unit
Soundbar not
found in the
Bluetooth device
list when pairing
General sound
issues
No sound from
Netflix/other apps
20 | TROUBLESHOOTING
Disconnect and reconnect the AC power cable, then turn the unit on again.
• Ensure you have unpaired the previously paired Bluetooth device from the soundbar.
• Ensure the Bluetooth function is activated on your Bluetooth enabled device.
• Make sure the soundbar is connected to power and turned on (LED display on), and that it’s set to the
correct mode; use the mode button on the unit or remote to change the input mode.
• To check the system hasn't frozen, press the volume buttons; the number in the LED display should change
accordingly.
• If only a specific input mode is not working, it’s likely the setting is wrong or the cable used is not working.
Go to the TV settings menu, find Audio Output settings, and change the audio output mode to 'PCM' mode
(instead of Auto, RAW, etc.)
Page 21

Problem Solution
• Make sure the input source is set to ARC; the LED will display 'ARC'.
• Make sure your TV or external device supports ARC function and connect the HDMI cable to the ARC
port of the TV or external device.
No sound in HDMI ARC
mode
No sound in Optical/
Coaxial mode
No sound in BT mode
No sound in AUX IN
mode
• In the TV or external device setting menu, turn on the ARC function and the CEC function.
• In the TV or external device setting menu, find the audio output settings and change the audio output
mode to 'PCM' mode (instead of Auto, RAW, etc.)
• Make sure both ends of the HDMI cable are fully plugged into the sockets.
• If none of these solutions work, try changing the HDMI cable.
• Make sure the input source is set to the correct mode; the LED will display 'Opt' or 'COX'.
• Increase the volume of the soundbar to make sure it’s not muted.
• In the TV or external device settings menu, find the audio output settings and change the audio
output mode to 'PCM' mode (instead of Auto, RAW, etc.)
• For Optical, make sure you remove the small caps on either end of the Optical cable, and both ends
are fully plugged into the sockets.
• If none of these solutions work, try changing the optical or coaxial cable.
• Increase the volume of the soundbar to make sure it's not muted. Make sure Bluetooth is connected
successfully - if not connected, the LED will flash 'BT'; once connected, the LED will display solid 'BT'.
• Make sure the external Bluetooth device is playing normally and its volume is turned up.
• Make sure the LED screen is displaying 'AUX'. Turn up the volume on the soundbar.
• Turn up the volume on the external device and make sure it’s not paused or muted.
• Make sure the audio cable is properly plugged in at both ends.
No sound in USB mode
• Make sure the USB drive is in FAT32 file format, and it’s no greater than 32GB;
• Make sure the music file is mp3 or flac format.
TROUBLESHOOTING | 21
Page 22

Specications
Power supply AC 100-240V, 50/60 Hz
Power consumption 45W
Speaker output 2 x 20W RMS
Remote control operation range –
distance, angle
Bluetooth pairing operation range
– distance
Bluetooth pairing name BAUHN ASBEB-0121
Bluetooth pairing password 0000
Bluetooth version 5.0
USB output
Media codecs supported in USB
mode
Dimensions (W x H x D) 893mm x 56mm x 85mm
Weight 1.9kg
22 | SPECIFICATIONS
6 metres, 30 degrees
(either side of sensor)
Up to 10 metres
DC 5V, 200mA (for
playback only, not for
charging external devices)
mp3, flac
For Technical Support:
Ph: 1300 886 649
W: www.tempo.org
Distributed by Tempo (Aust) Pty Ltd,
PO Box 6056, Frenchs Forest DC 2086
Page 23

Compliance and Responsible Disposal
Packaging
The packaging of your product has been
selected from environmentally friendly
materials and can usually be recycled. Please ensure
these are disposed of correctly. Plastic wrapping can
be a suffocation hazard for babies and young children,
please ensure all packaging materials are out of
reach and are safely disposed of. Please recycle these
materials rather than throwing them away.
Product
At the end of its working life, do not throw this
product out with your household rubbish. An
environmentally friendly method of disposal will ensure
that valuable raw materials can be recycled. Electrical
and electronic items contain materials and substances
which, if handled or disposed of incorrectly, could
potentially be hazardous to the environment and
human health.
Compliance
This product complies with the Australian Safety
Standard AS/NZS 60065 to ensure the safety of the
product.
Bluetooth
The Bluetooth® word mark and logos are registered
trademarks owned by Bluetooth SIG, Inc., and any use
of such marks by Hands (IP) Holdings Pty Ltd is under
license. Other trademarks and trade names are those of
their respective owners.
®
SPECIFICATIONS | 23
Page 24

Warranty Information
The product is guaranteed to be free from defects in workmanship and parts for a period of 12 months from the date of
purchase. Defects that occur within this warranty period, under normal use and care, will be repaired, replaced or refunded at
our discretion, solely at our option with no charge for parts and labour. The benefits conferred by this warranty are in addition
to all rights and remedies in respect of the product that the consumer has under the Competition and Consumer Act 2010 and
similar state and territory laws.
Our goods come with guarantees that cannot be excluded under the Australian Consumer Law. You are entitled to a
replacement or refund for a major failure and to compensation for any other reasonably foreseeable loss or damage. You are
also entitled to have the goods repaired or replaced if the goods fail to be of acceptable quality and the failure does not amount
to a major failure.
24
Page 25

Repair and Refurbished Goods or Parts Notice
Unfortunately, sometimes faulty products are manufactured, which need to be returned to the supplier for repair.
Please be aware that if your product is capable of retaining user-generated data (such as files stored on a computer hard drive,
telephone numbers stored on a mobile telephone, songs stored on a portable media player, games saved on a games console or
files stored on a USB memory stick) during the process of repair, some or all of your stored data may be lost. We recommend you
save this data elsewhere prior to sending the product for repair.
You should also be aware that rather than repairing goods, we may replace them with refurbished goods of the same type or use
refurbished parts in the repair process.
Please be assured though, refurbished parts or replacements are only used where they meet ALDI’s stringent quality specifications.
If at any time you feel your repair is being handled unsatisfactorily, you may escalate your complaint. Please telephone us on
1300 886 649 or write to us at:
Tempo (Aust) Pty Ltd ABN 70 106 100 252
PO Box 6056, Frenchs Forest, NSW 2086, Australia
Telephone: 1300 886 649 (Aust) - Fax: (02) 9975 2688
Tempo Help Desk: 1300 886 649 (Aust)
(Operating Hours: Mon-Fri 8:30am-6pm; Sat 9am-6pm AEST)
Email: [email protected]
25
Page 26

26
Page 27

27
Page 28
Warranty returns
Should you for any reason need to return this product
for a warranty claim, make sure to include all accessories
with the product.
Product does not work?
If you encounter problems with this product, or if it fails
to perform to your expectations, please contact our
After Sales Support Centre on 1300 886 649.
ALDI guarantees that our products are developed to our stringent quality
specications. If you are not entirely satised with this product, please return
it to your nearest ALDI store within 60 days from the date of purchase for a full
refund or replacement, or take advantage of our after sales support by calling
the supplier's Customer Service Hotline.
AFTER SALES SUPPORT
AUS
MODEL: ASBEB-0121 PRODUCT CODE: 704551 01/2021
[email protected]1300 886 649
W
2
1
YEAR WARRANTY
 Loading...