

Batavus C2 User Manual [de]
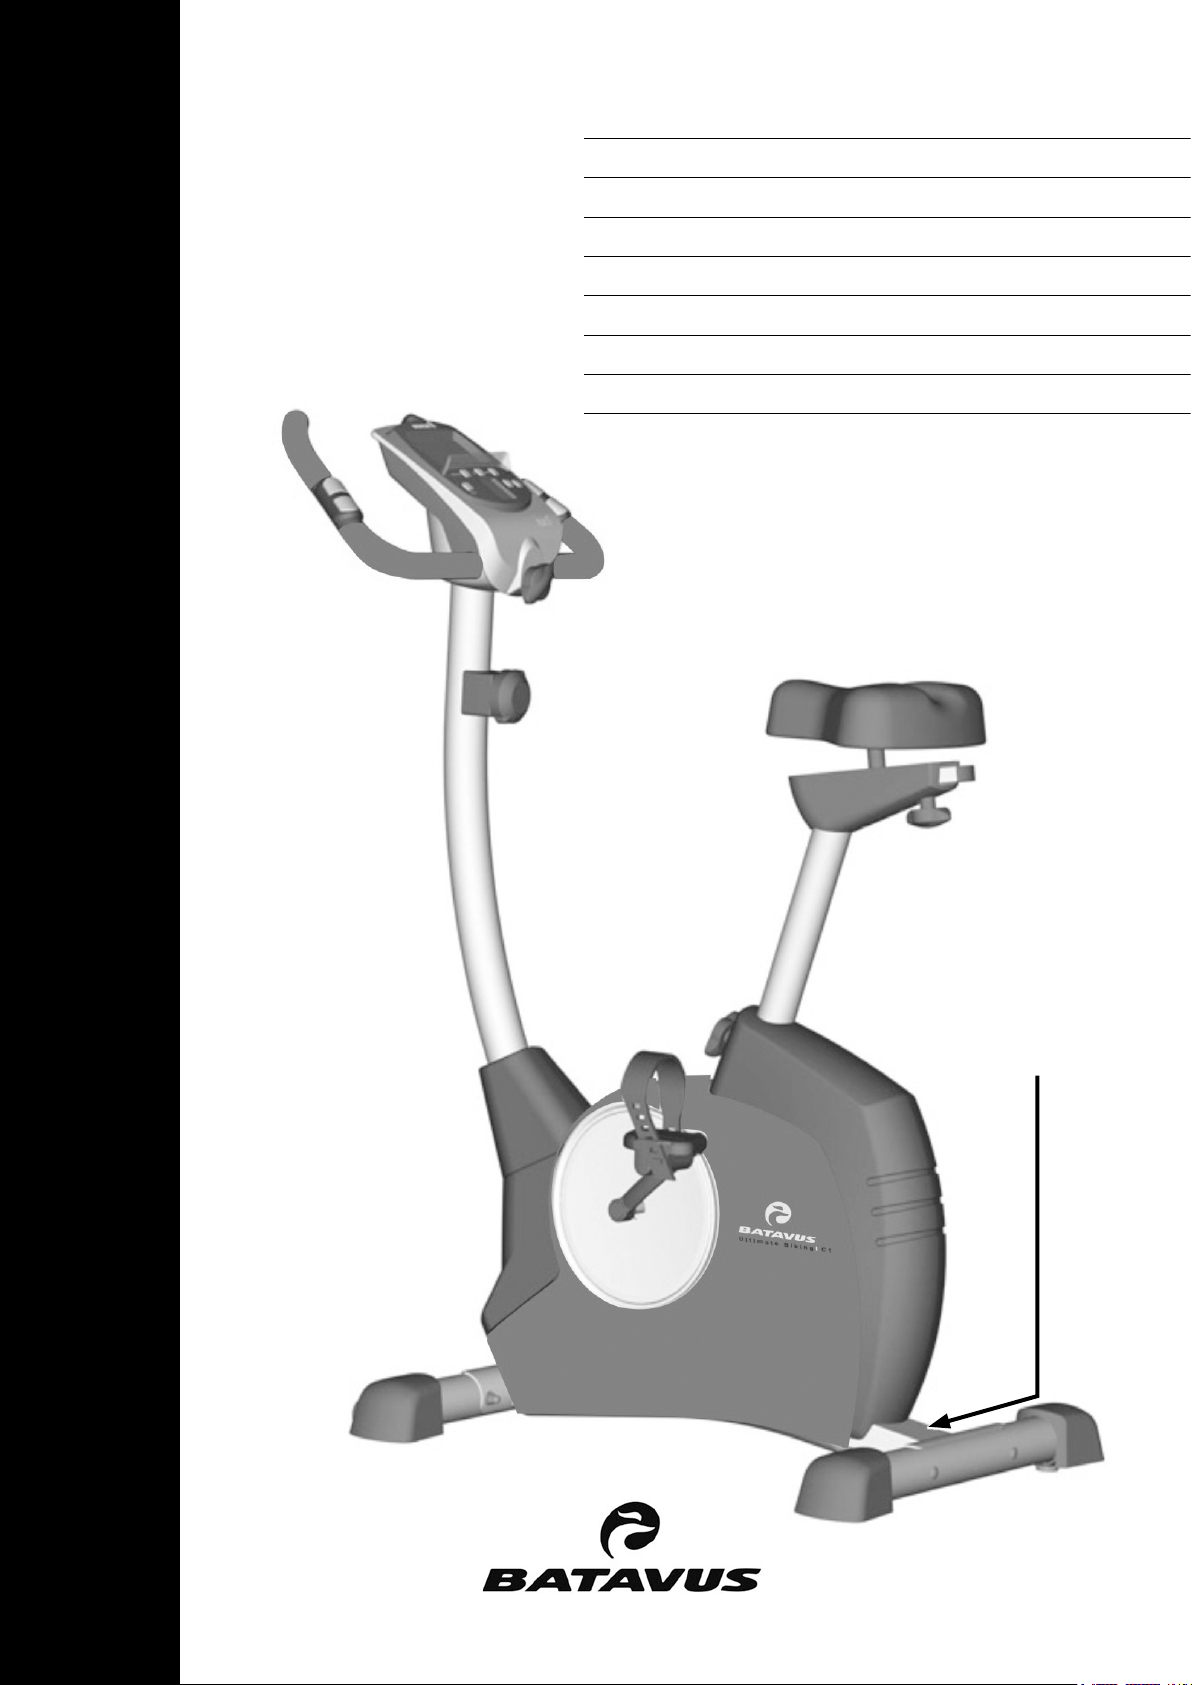
BATAVUS C2
OWNE R ' S M A N UA L p. 2- 1 0
BETR I E B SA N L EI T U NG S. 1 1 - 1 9
MODE D ' EM p L OI p. 20 - 2 8
HAND L E I DI N G p. 29 - 3 7
MANU A L E D ' U SO p. 38 - 4 7
MANU A L DE L US U A RI O p. 48 - 5 5
BRUK S A N VI S N IN G S. 5 6 - 6 3
KÄYT T Ö O HJ E S. 6 4 - 7 1
SER IAL NU MBER
SER IENN UMME R
NUM ERO DE S ERIE
SER IENU MMER
NUM ERO DI S ERIE
NÚM ERO DE S ERIE
SER IENN UMME R
SAR JANU MERO

CONTENTS
ASSEMBLY ................................................................3
EXERCISING .............................................................5
HEART RATE .............................................................6
CONSOLE ..................................................................7
TRANSPORT AND STORAGE...................................9
MAINTENANCE .........................................................9
MALFUNCTIONS ....................................................... 9
TECHNICAL SPECIFICATIONS .................................9
IMPORTANT SAFETY
INSTRUCTIONS
protective base to avoid any damages to
the floor beneath the equipment.
Make sure that the exercising
•
environment has adequate ventilation.
To avoid catching cold, do not exercise
in a draughty place.
In training, the equipment tolerates
•
an environment measuring +10°C to
+35°C. The equipment can be stored in
temperatures ranging between -15°C
and +40°C. Air humidity in the training or
storage environment must never exceed
90 %.
Read this guide through carefully
before assembling, using or servicing
your fitness equipment. Please keep
the guide somewhere safe; it will
provide you now and in the future with
the information you need to use and
maintain your equipment. Always follow
these instructions with care. Please
note that the warranty does not cover
damage due to shipping or negligence of
adjustment or maintenance instructions
described in this manual.
NOTE ABOUT YOUR
HEALTH
Before you start any training, consult a
•
physician to check your state of health.
If you experience nausea, dizziness
•
or other abnormal symptoms while
exercising, stop your workout at once
and consult a physician.
To avoid muscular pain and strain,
•
begin each workout by warming up and
end it by cooling down (slow pedaling at
low resistance). Don’t forget to stretch at
the end of the workout.
NOTE ABOUT USING
THE EQUIPMENT
If children are allowed to use the
•
equipment, they should be supervised
and taught to use the equipment
properly, keeping in mind the child’s
physical and mental development and
their personality. Also make sure that
pet animals keep a safe distance to the
product when it is transporting or used
for training.
Before you start using the equipment,
•
make sure that it functions correctly
in every way. Do not use a faulty
equipment.
Press the keys with the tip of the
•
finger; your nails may damage the key
membrane.
Never lean on the meter.
•
Never remove the side covers. Do not
•
step on the frame casing.
Only one person may use the
•
equipment at a time.
Wear appropriate clothing and shoes
•
when exercising.
NOTE ABOUT
Protect the meter from sunlight and
B A TA V US C 2
•
THE EXERCISING
ENVIRONMENT
•
always dry the surface of the meter if
there are any drops of sweat on it.
The equipment is not to be used
•
outdoors.
Place the equipment on a firm, level
•
surface. Place the equipment on a
O W N E R ' S M A N U A L
2
The equipment must not be used by
•
persons weighing over 135 kg.
The equipment has been designed for
•
home use. The Batavus warranty applies
only to faults and malfunctions in home
use (24 months). Further information on
warranty terms can be obtained from
your national Batavus distributor. Please
note that the warranty terms may vary
from one country to another.
Do not attempt any servicing or
•
adjustments other than those described
in this guide. Everything else must
be left to someone familiar with the
maintenance of electromechanical
equipments and authorised under the
laws of the country in question to carry
out maintenance and repair work.
SAVE THIS INSTRUCTION MANUAL
ASSEMBLY
Start by unpacking the equipment. Two people are
needed for the assembly.
O W N E R ' S M A N U A L • B A TA V US C 2
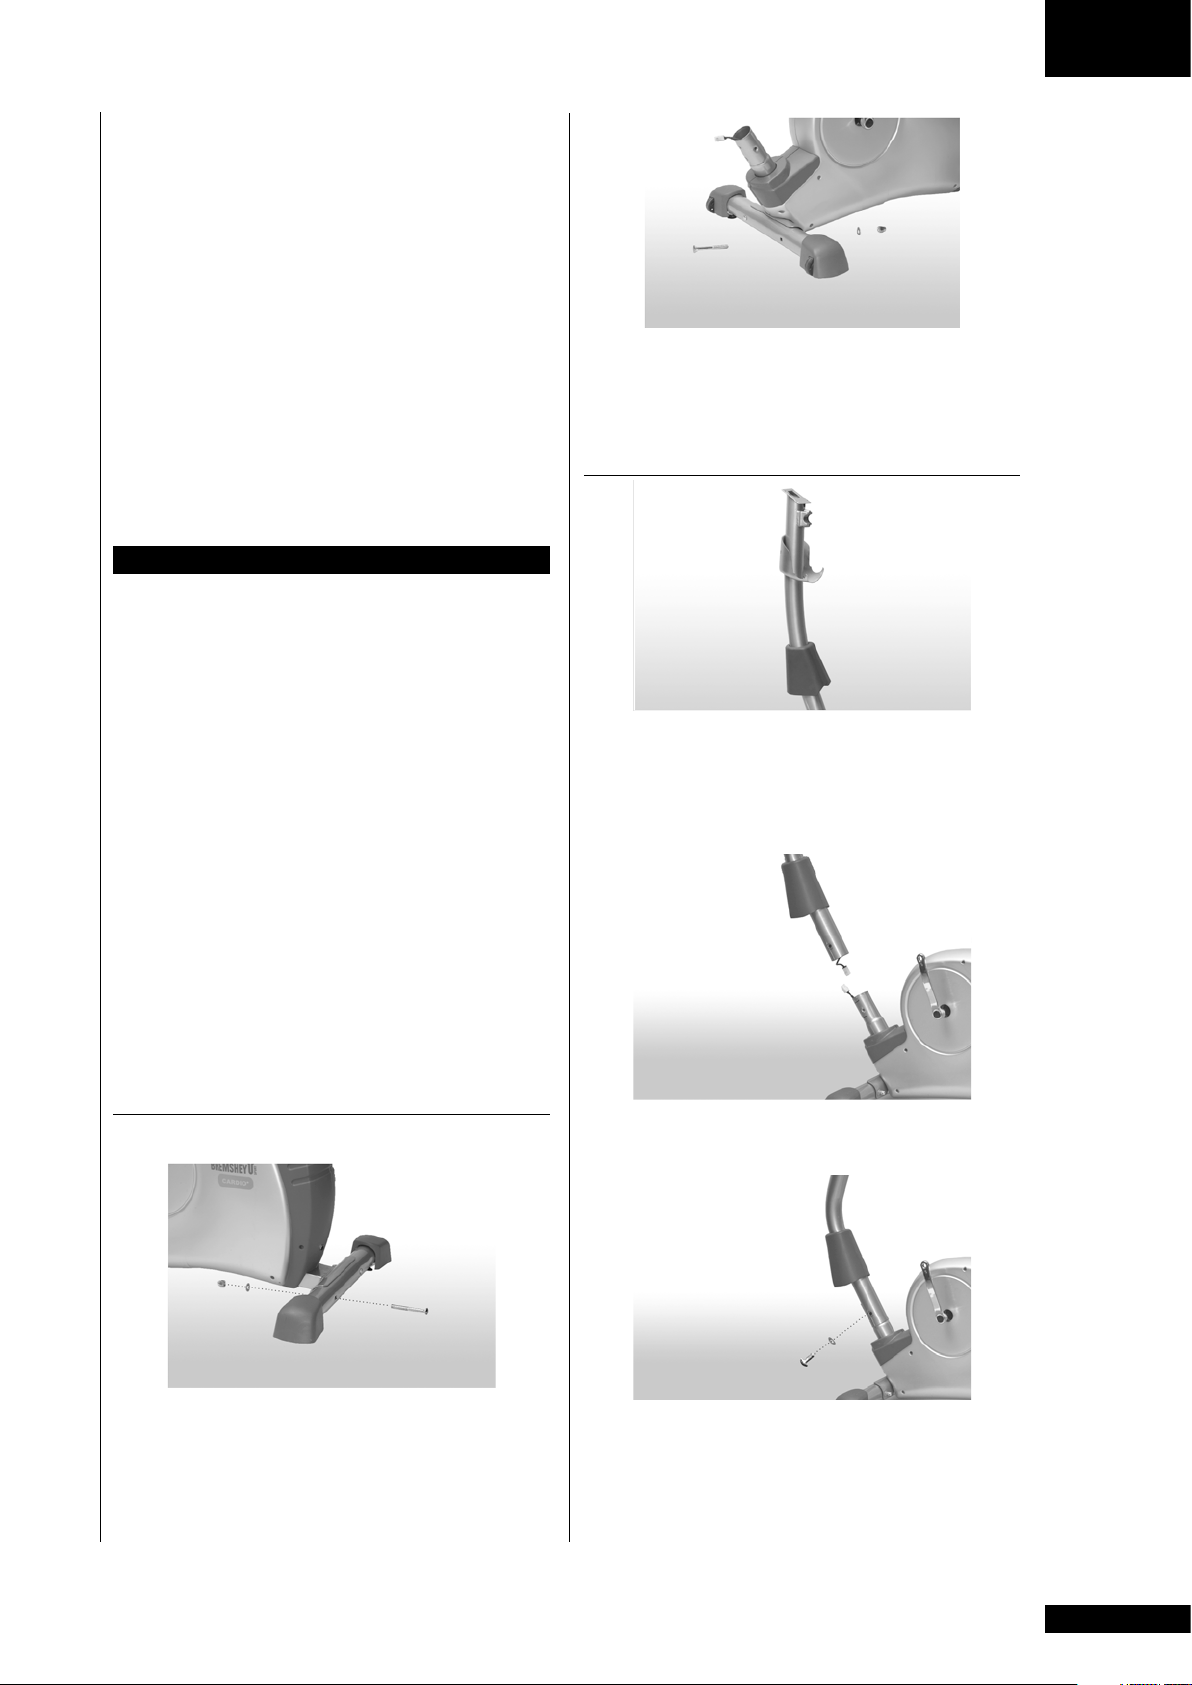
Mount the front foot tube to the base frame in the
same way. Make sure that the rollers for the foot
caps face forward and down during assembly
FRONT TUBE
G B
Assembly kit (contents marked with * in the spare
part list): keep the assembly tools, as you may need
them e.g. for adjusting the equipment
If necessary, please contact your dealer with the
model, equipment serial no. and spare part no.
of the missing part. You’ll find a spare part list at
the back of this guide. The packaging includes a
silicate bag for absorbing moisture during storage
and transportation. Please dispose of the bag once
you have unpacked the equipment. The directions
left, right, front and back are defined as seen
from the exercising position. Allow at least 100
cm of clearance around the equipment. We also
recommend opening the package and assembling
the product on a protective base.
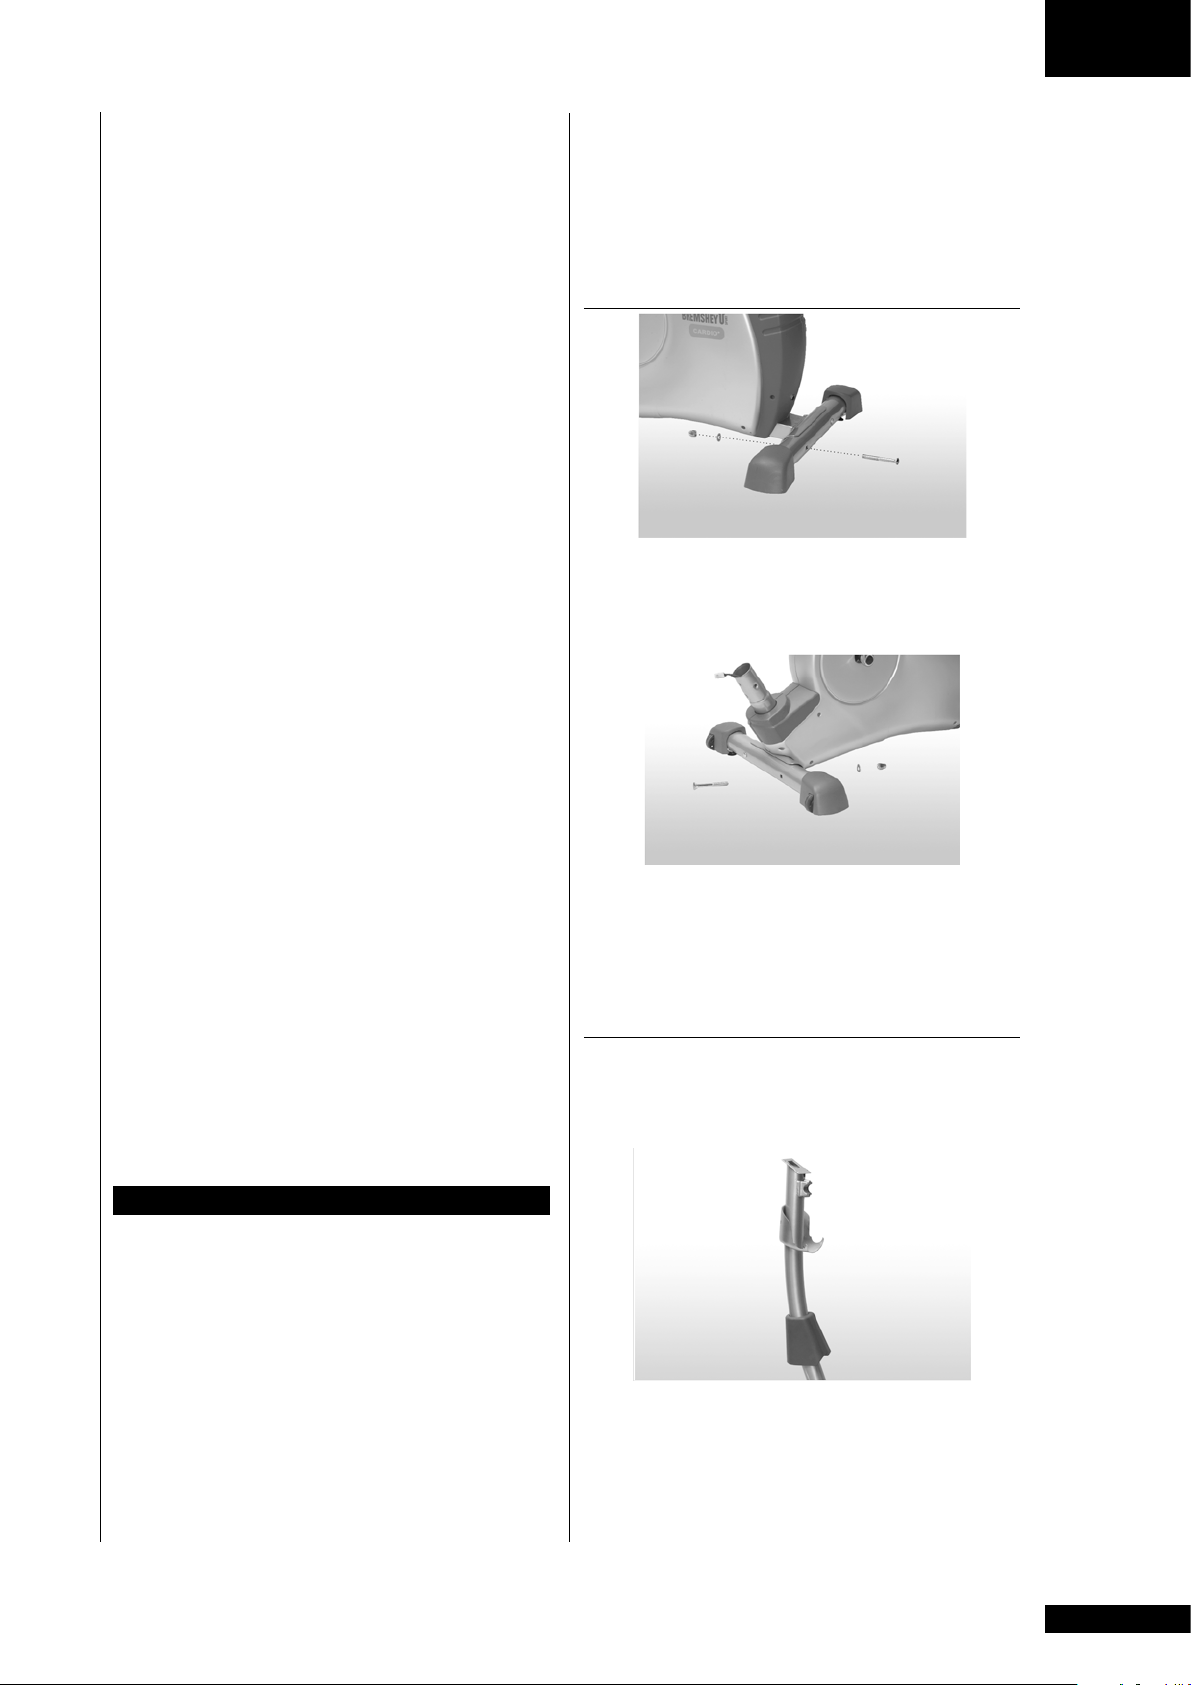
REAR AND FRONT SUPPORT
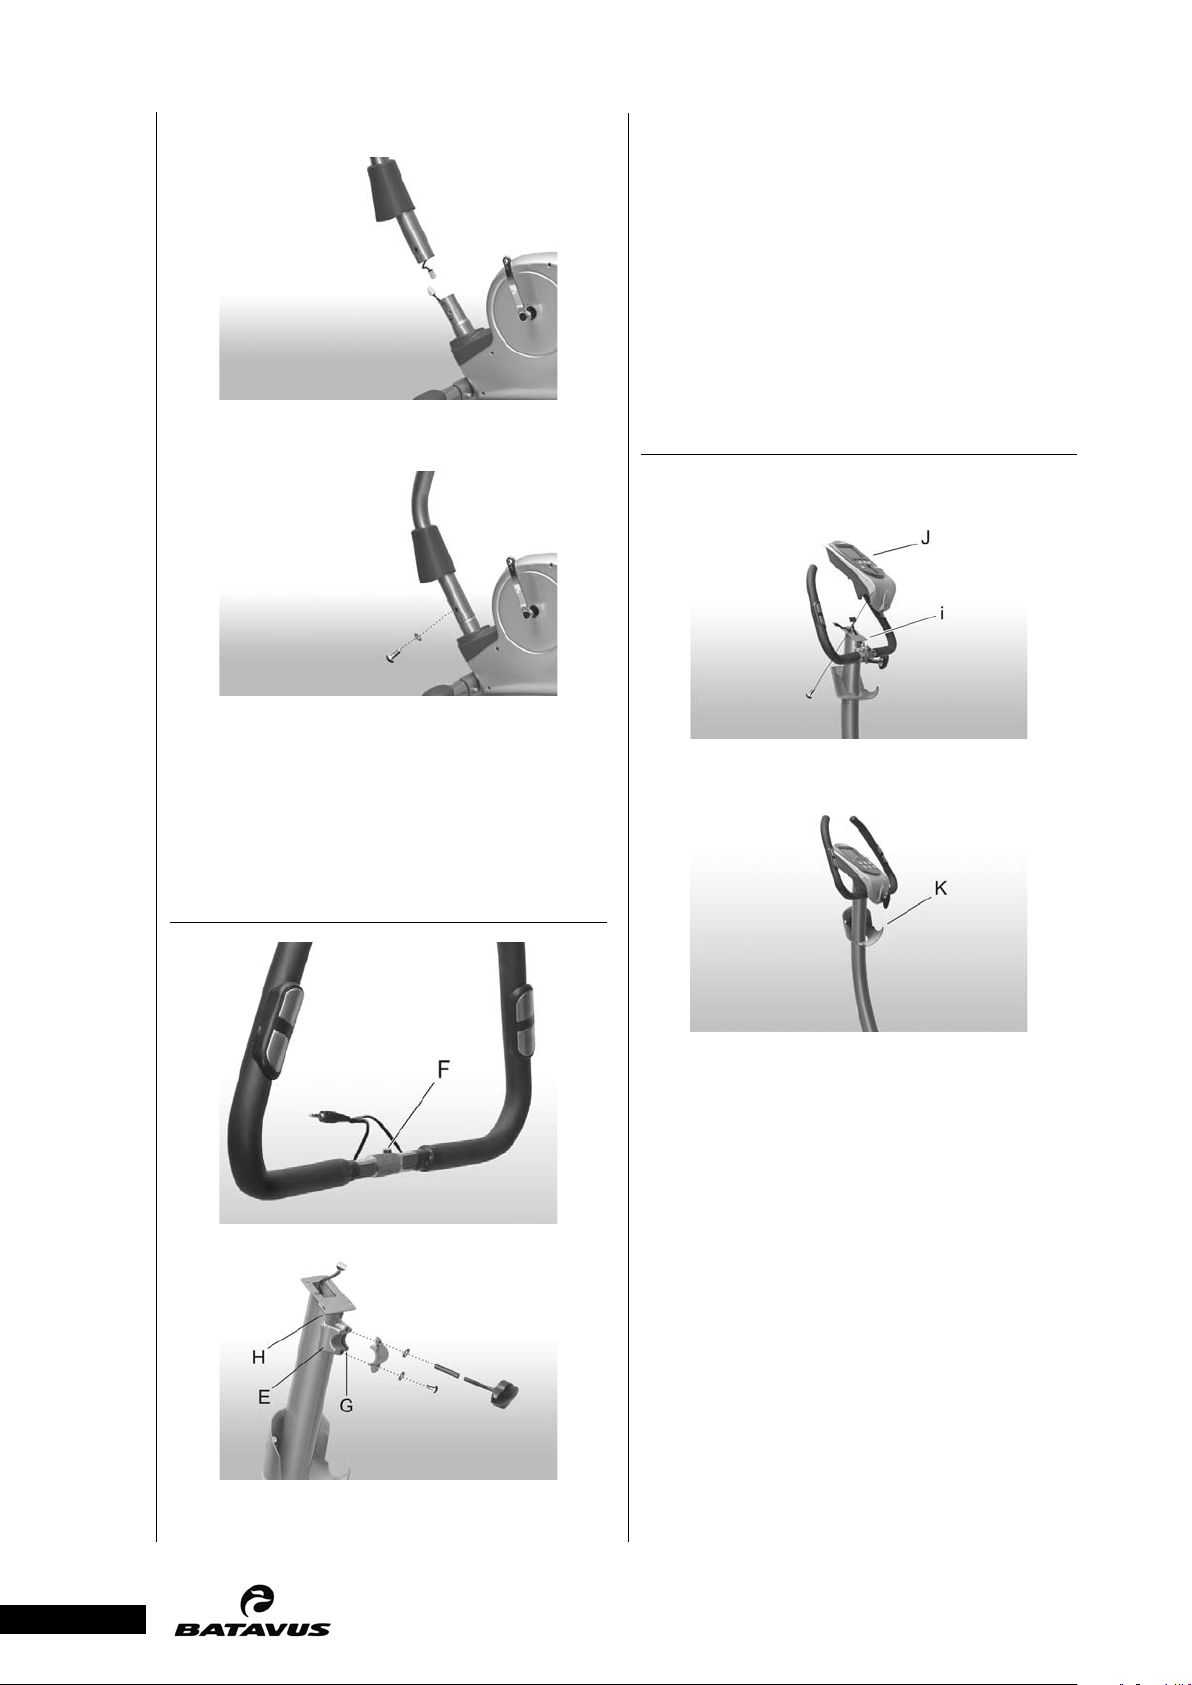
Push the console cap, which will later be mounted
beneath the console, and the tube cover for the
handlebar shaft onto the handlebar shaft. Then,
push the foam ring for the tube cover onto the
handlebar shaft and push upward.
Connect the top cable to the bottom cable
protruding from the frame tube of the base frame.
Mount the rear foot tube to the base frame using
the screws, the washers and the cap nuts.
Place the handlebar shaft onto the frame tube on
the base frame and fasten it using the screws and
the washers. CAUTION: Do not pinch the cable!
Push the tube cover together with the housing
foam ring downward onto the housing.
3
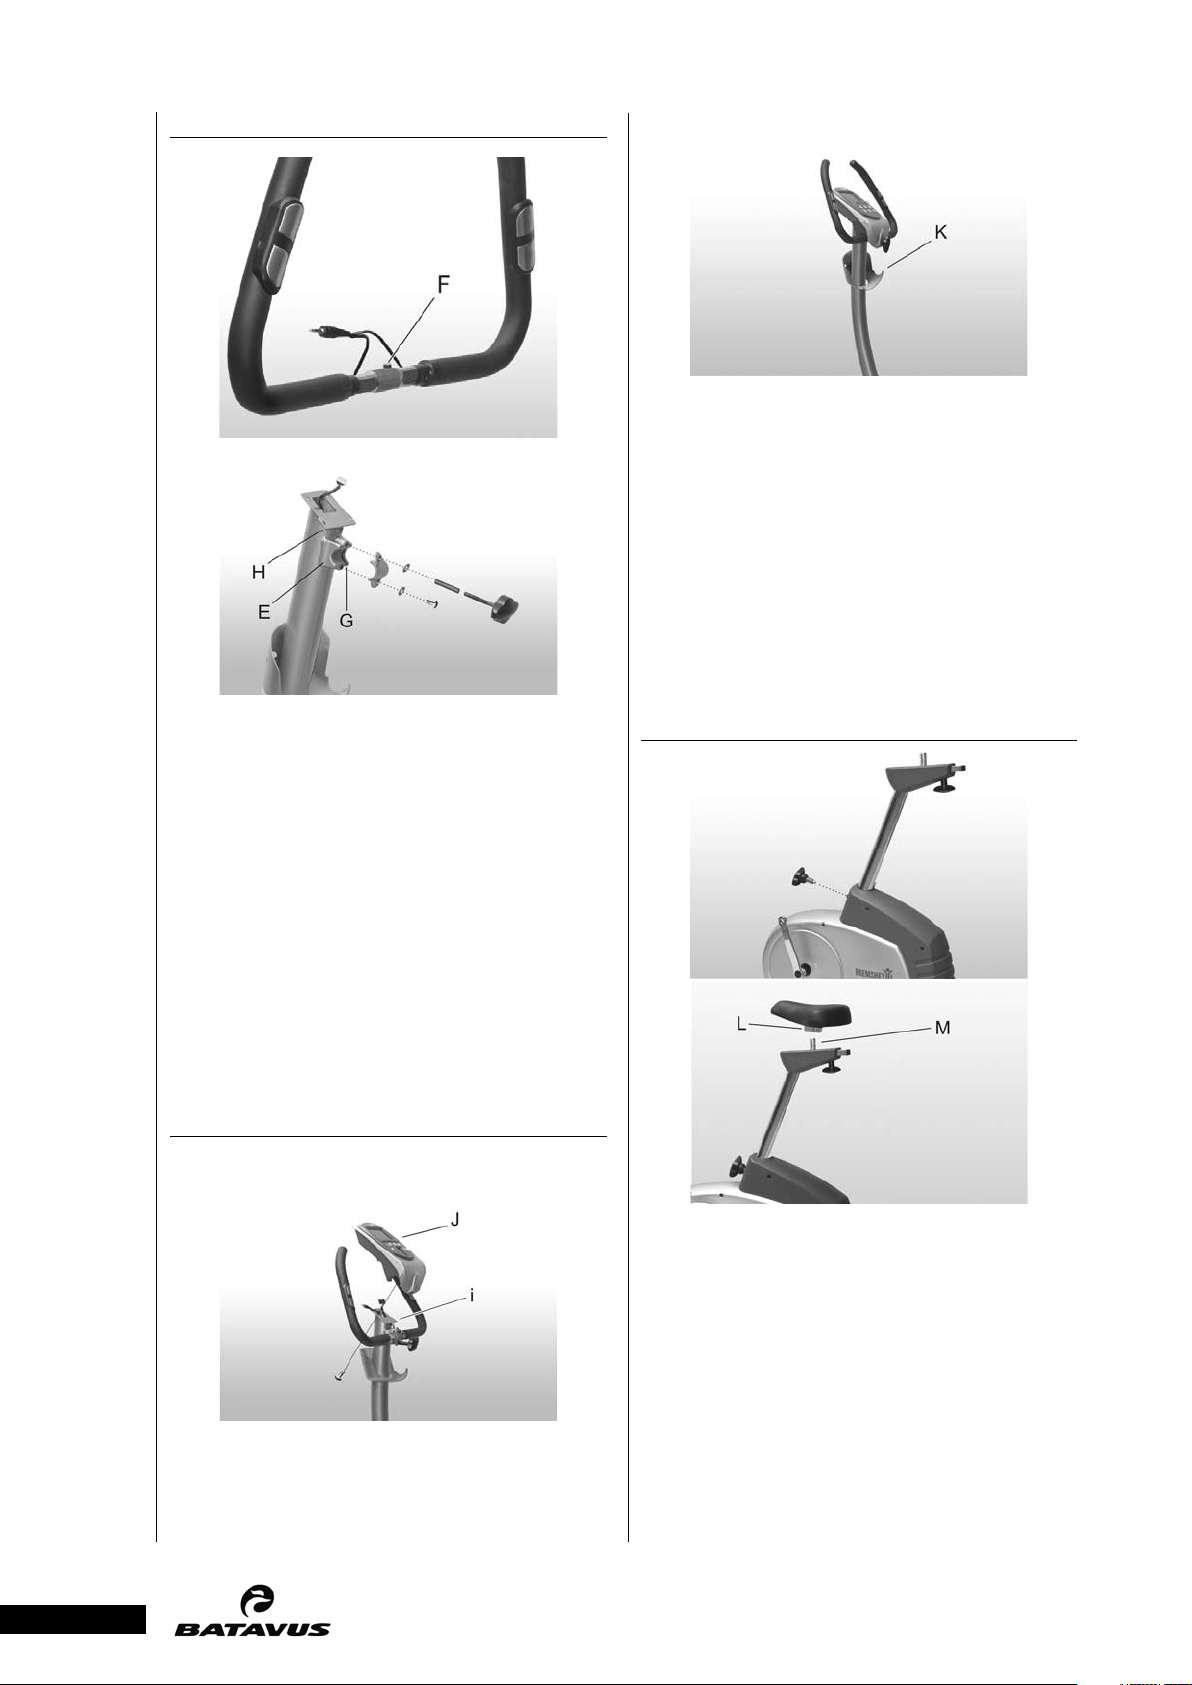
HANDLEBAR
To assemble the console, you must first connect the
top cable and the cable for the hand pulse sensors
to the console cables. Then push the console
downward onto the mounting plate (i) on the
handlebar shaft. CAUTION: Do not pinch the cable!
Then, fasten the console using the screws. Do
not tighten the screws too much. If you wish, you
may insert the book holder into the slot (J) on the
console. Push the console cap upward beneath the
console until it latches into place. Make sure that
the latching pins (K) seat properly.
Assemble the handlebar tube together with the
handlebar clamp, the screw, the washer, the
SEAT
spacer sleeve and the hand wheel for adjusting
the handlebars. To do this, place the handlebar
tube into the mount (E) on the handlebar shaft.
CAUTION: The pin (F) for the handlebar tube must
be inserted into the groove (G). Then push the
handlebar clamp over the handlebar tube and first
loosely insert the lower screw with the washer. The
handlebar clamp should uniformly wrap around
the handlebar tube. CAUTION: Do not pinch the
cable! Insert the spacer sleeve into the upper hole
and tighten. Next, push the cable for the hand
pulse sensors through the opening (H) beneath the
mounting plate and thread it upward out of the
handlebar shaft.
CONSOLE
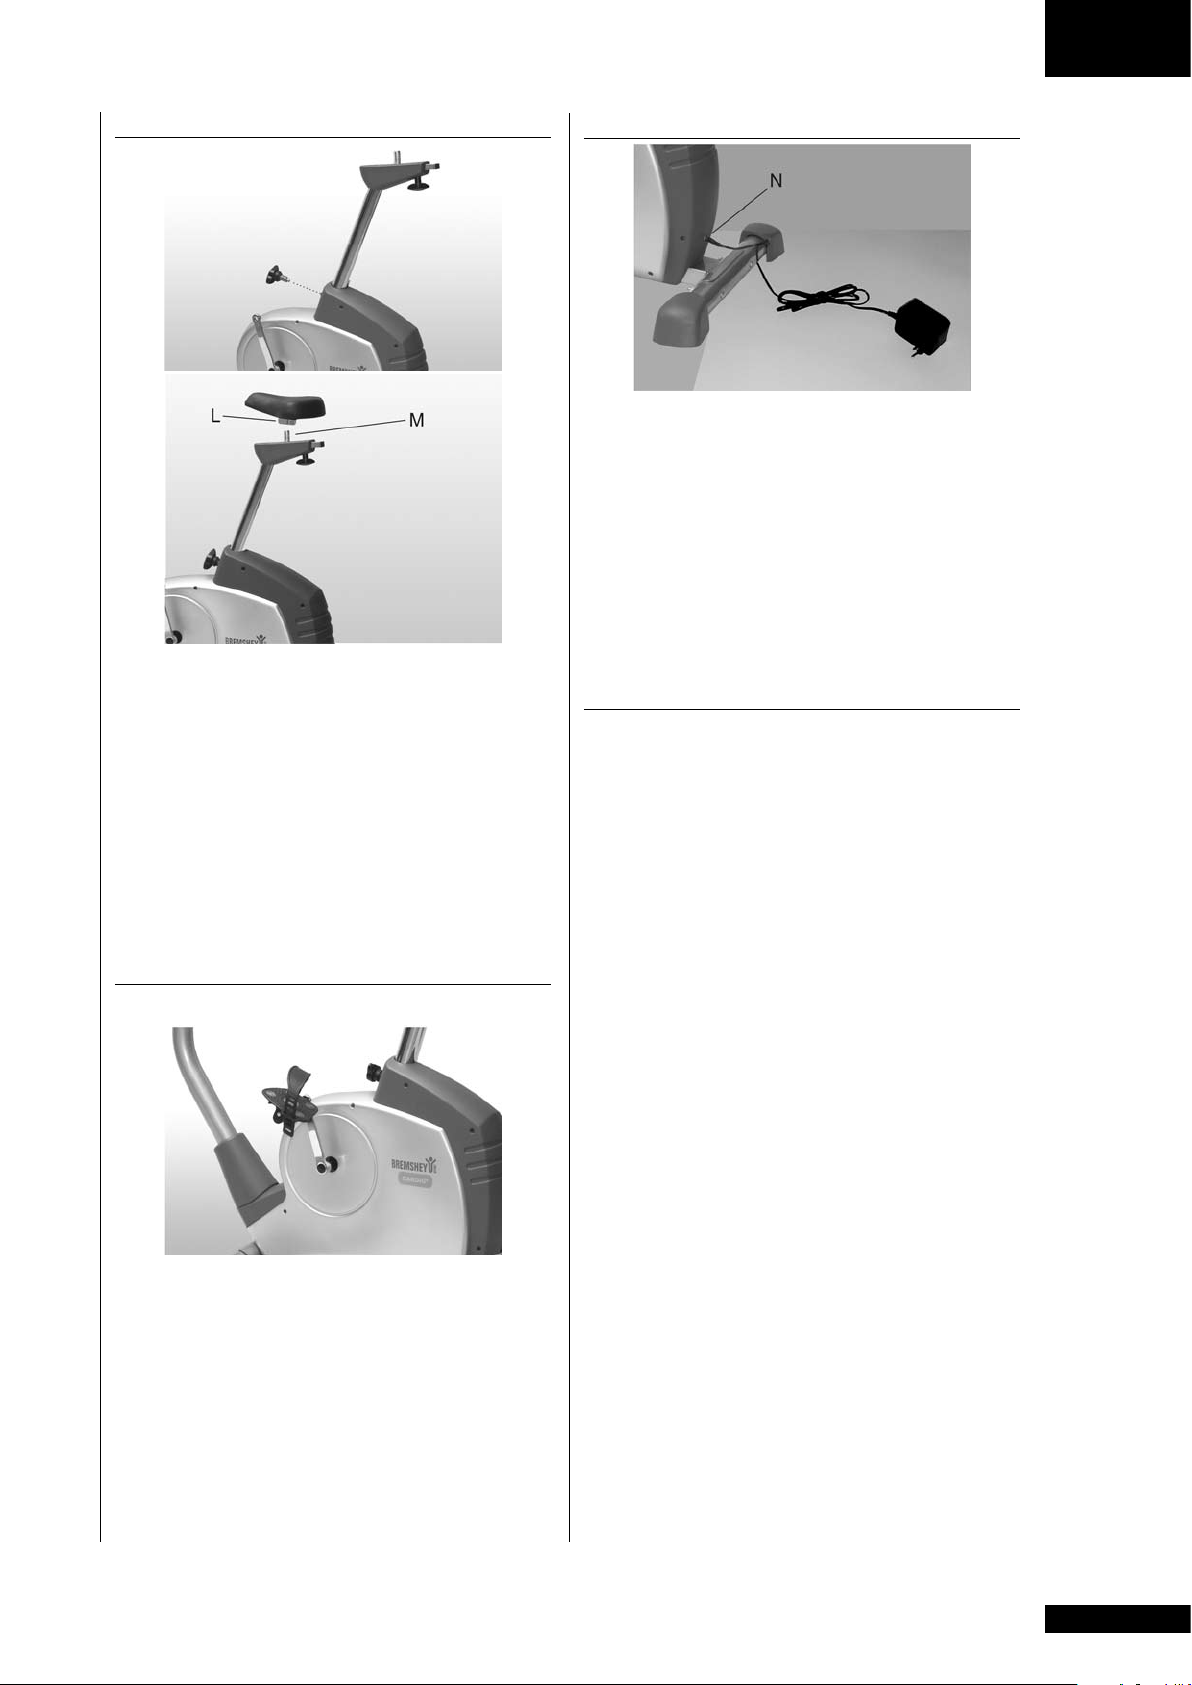
Insert the seat support. Insert the hand wheel for
adjusting the seat and latch the pin of the hand
wheel into a hole in the seat support. Then tighten
the hand wheel. To attach the seat to the seat
support, push the previously assembled clamp (L,
B A TA V US C 2
•
beneath the seat) onto the mounting tube (M) on
the seat holder. Align the seat and screw it tight in
the desired position using the clamping screw. You
can now set the horizontal distance between the
handlebars and the seat using the hand wheel for
setting the seat depth.
O W N E R ' S M A N U A L
4
O W N E R ' S M A N U A L • B A TA V US C 2
G B
PEDALS
Screw the pedals into the crank arms. Screw the
left pedal (marked L for left-hand thread) into
the left crank arm. Use the wrench and rotate
it counterclockwise. Then screw the right pedal
(marked R for right-hand thread) tightly clockwise
into the right crank arm. Now attach the pedal
straps to the pedals and adjust as desired.
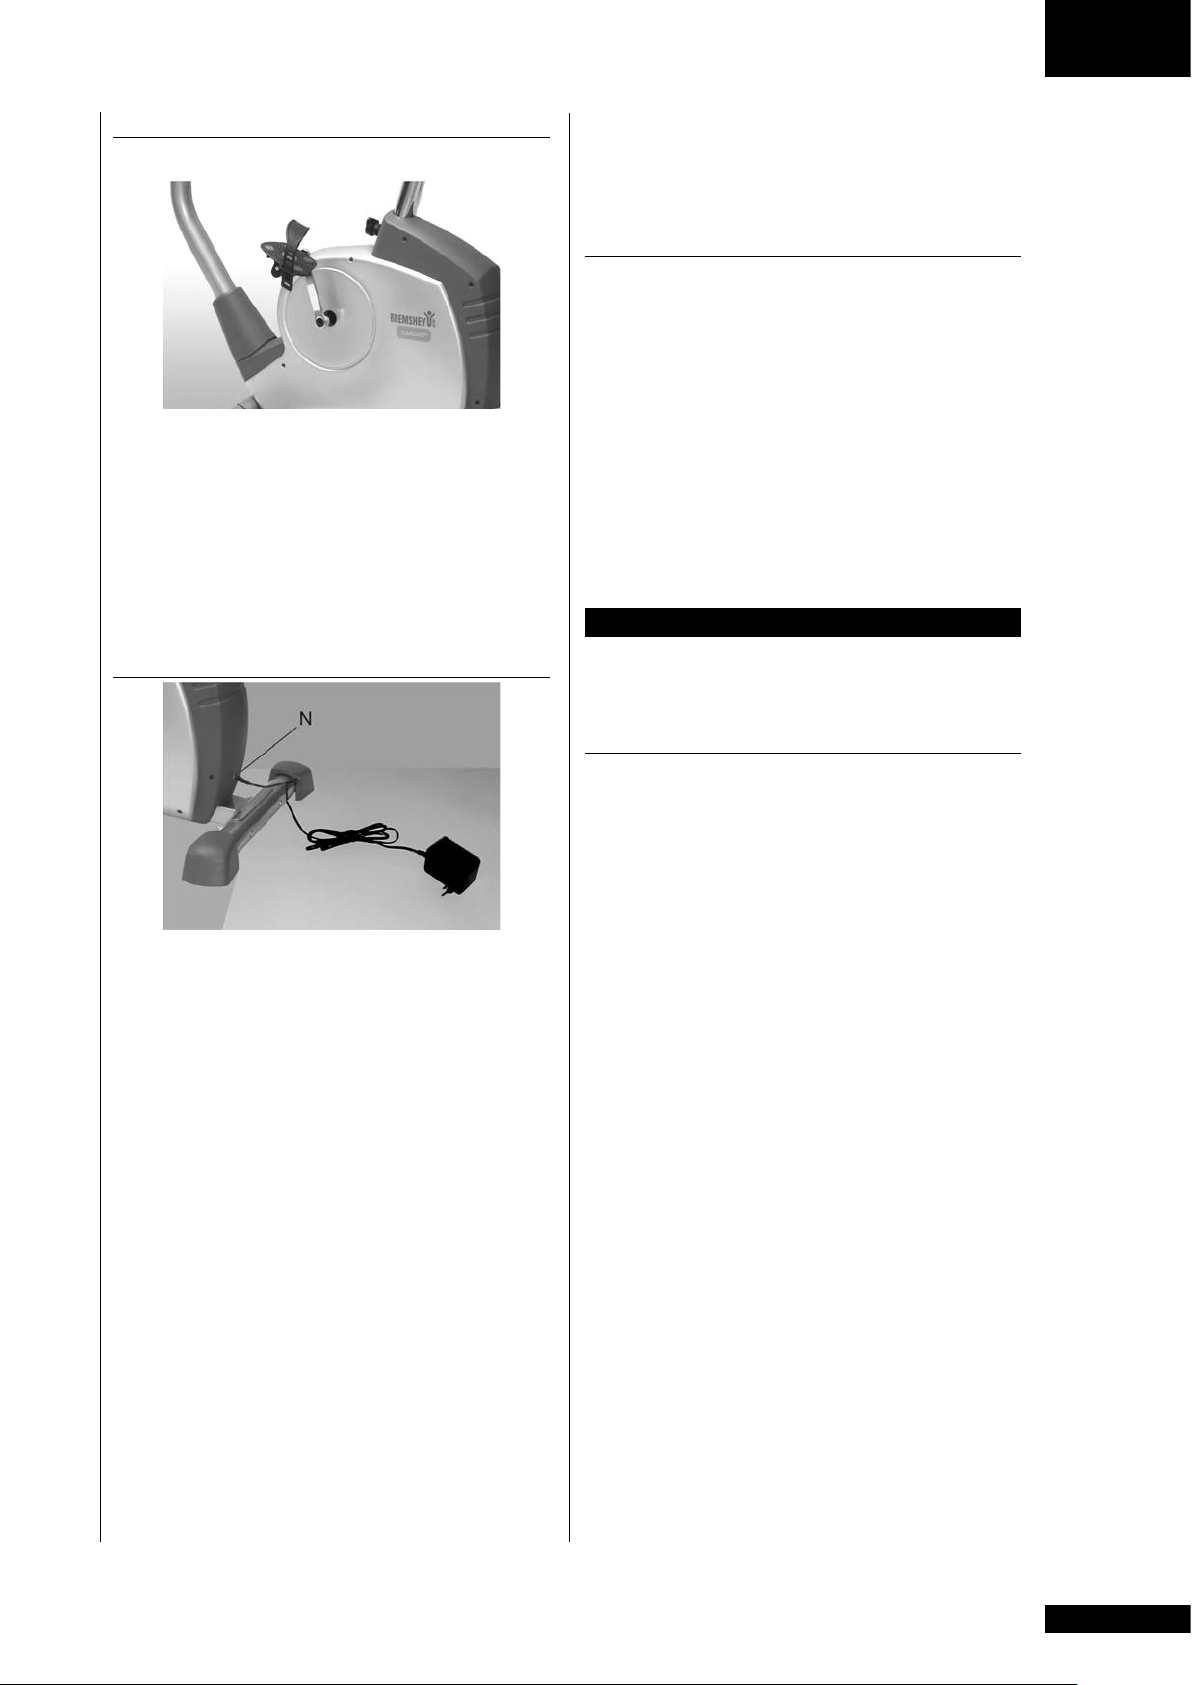
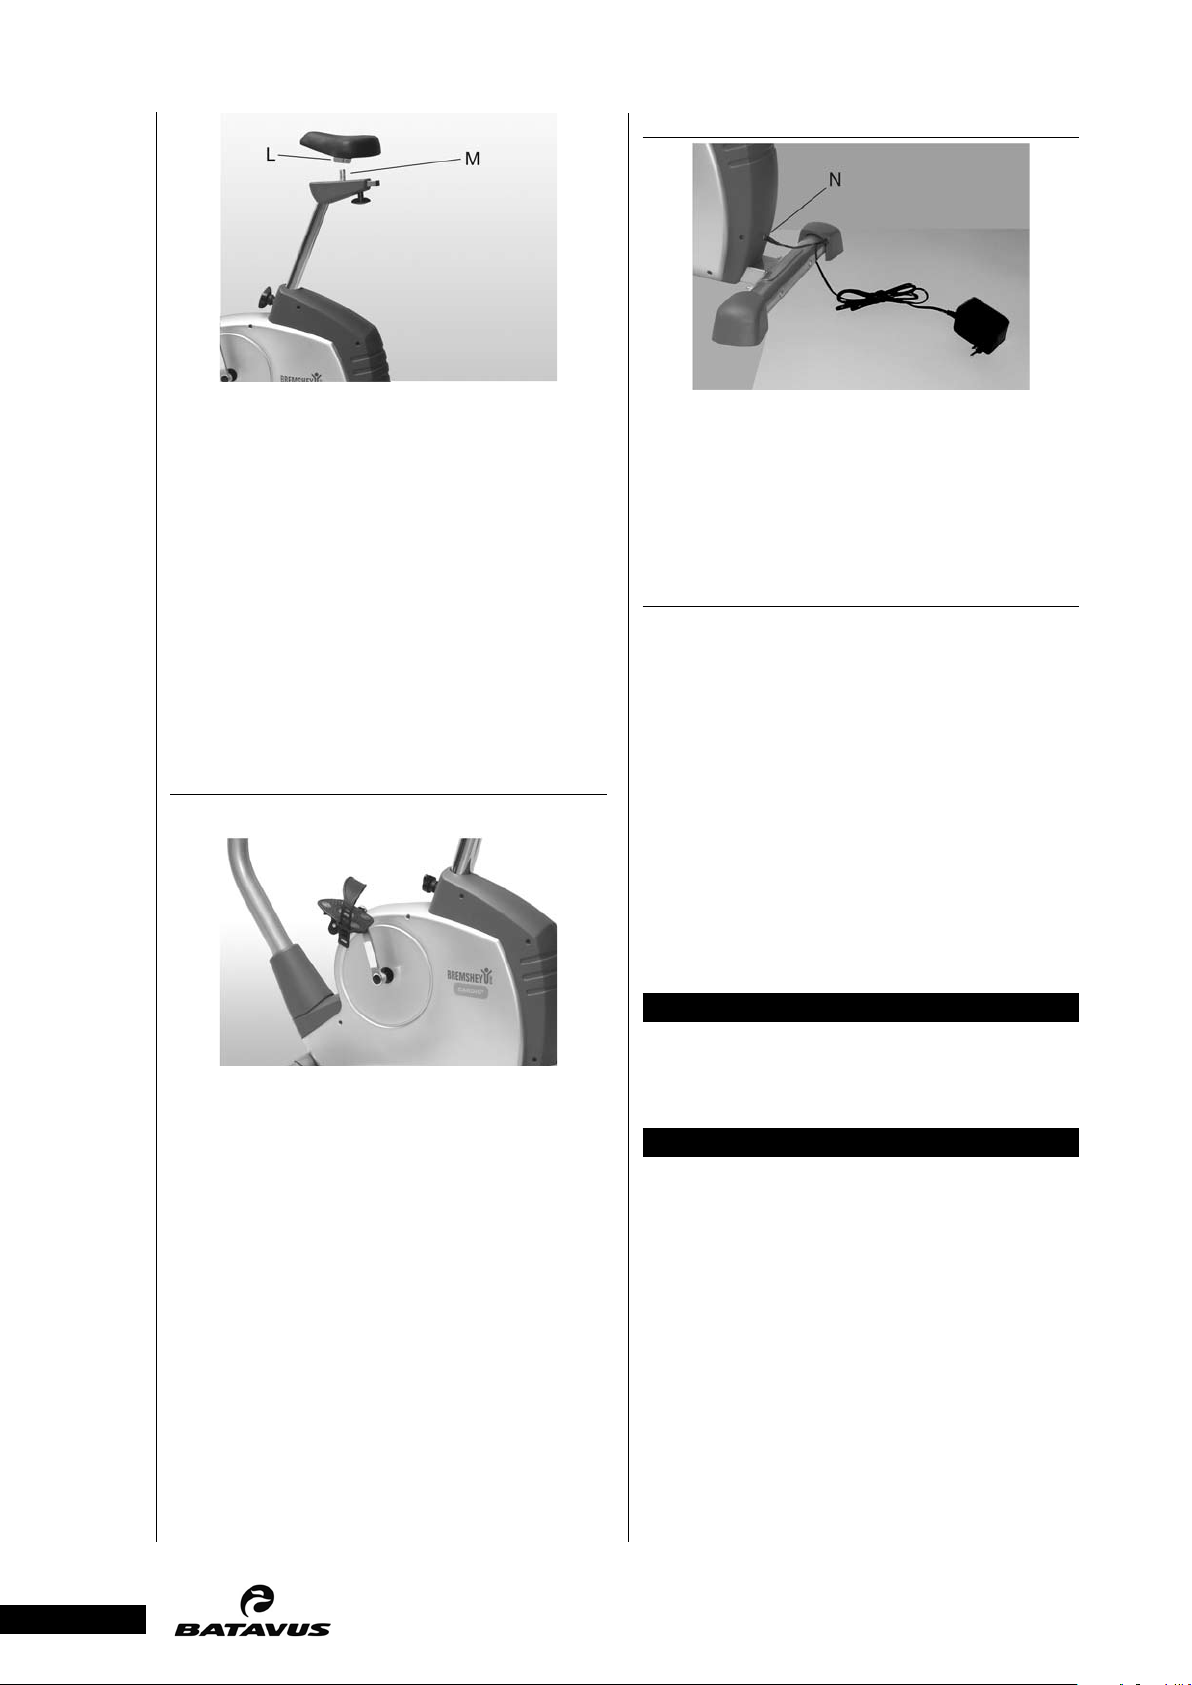
TRANSFORMER
2) Do not operate under blanket or other
combustive material. Excessive heating can occur
and cause fire, electric shock, or injury to persons.
SAFETY NOTICE FOR UNITS WITH ELECTRIC
POWER
Do not use your home exercise unit if there is
•
any sort of damage to the power cord or to the
unit.
Keep the power cord away from hot objects.
•
Do not use your exercise unit out of doors or in
•
damp locations.
Do not route the power cord beneath a carpet
•
and do not place any objects on the cord.
Disconnect the plug from the power outlet
•
before you move the unit, perform any needed
maintenance or open the housing.
Do not alter (for example, lengthen) the cord
•
between the transformer and the unit.
EXERCISING
If the product is not stable, adjust the stabilizing
screws under the rear support appropriately.
Insert the small connector into the receptacle (N)
on the unit housing. Then connect the transformer
to a 230 volt power outlet. The unit is now ready
to use.
Before connecting the equipment to a power
source, make sure that local voltage matches that
indicated on the type plate: the equipment operates
at either 230 V or 115 V (North American
version). NOTE! The equipment must be connected
to a grounded wall socket. Do not use extension
wires when connecting the equipment to the power
source. Make sure the power cord does not run
underneath the equipment.
DANGER: Always switch off the power and
unplug this appliance from the electrical outlet
immediately after using.
WARNING: To reduce the risk of burns, fire, electric
shock, or injury to persons:
1) An appliance should never be left unattended
when plugged in. Unplug from outlet when not in
use, and before carrying out any maintenance or
repair procedures.
EXERCISE LEVEL
Working out using an exercise cycle is excellent
aerobic exercise, the principle being that the
exercise should be suitably light, but of long
duration. Aerobic exercise is based on improving
the body’s maximum oxygen uptake, which in turn
improves endurance and fitness. The ability of the
body to burn fat as a fuel is directly dependent on
its oxygen uptake capacity. Aerobic exercise should
above all be pleasant. You should perspire, but you
should not get out of breath during the workout.
You must, for example, be able to speak and not
just pant while pedaling. You should exercise at
least three times a week, 30 minutes at a time, to
reach a basic fitness level. Maintaining this level
requires a few exercise sessions each week. Once
the basic condition has been reached, it is easily
improved, simply by increasing the number of
exercise sessions. Exercise is always rewarding for
weight loss, because it is the only way of increasing
the energy spent by the body. This is why it is
always worthwhile to combine regular exercise
with a healthy diet. A dieter should exercise daily
- at first 30 minutes or less at a time, gradually
increasing the daily workout time to one hour.
You should start slowly at a low pedaling speed
and low resistance, because strenuous exercise
may subject the heart and circulatory system to
excessive strain. As fitness improves, resistance and
pedaling speed can be increased gradually. Exercise
efficiency can be measured by monitoring the
pulse. The pulse meter helps you monitor your
pulse easily
5

during exercise, and thus to ensure that the exercise
is sufficiently effective but not overstrenuous.
HEART RATE
No matter what your goal, you’ll get the best
results by training at the right level of effort, and
the best measure is your own heart rate.
First find your maximum heart rate i.e. where the
rate doesn’t increase with added effort. C2’s meter
calculates your approximate maximum pulse level
using the following formula:
MEASURING PULSE WITH HAND SENSORS
C2 measures pulse with sensors which are located
in the hand supports and which measure the
pulse each time the user touches both sensors
simultaneously.
For reliable pulse measurement, the skin must be
in continuous contact with the sensors and the
skin in contact with the sensors should be slightly
moist. Too dry or too moist skin will impair hand
pulse measurement. Please note also that active
use of the upper body muscles during exercise may
interfere with hand pulse measurement: active
220 – AGE
muscles transmit similar electronic signals as the
heart muscle. Therefore, we recommend that arms
The maximum varies from person to person. The
be kept relaxed during pulse measurement.
maximum heart-rate diminishes on average by one
point per year. If you belong to a risk group, ask
a doctor to measure your maximum heart rate for
you.
We have defined three different heart-rate zones to
help you with targeted training.
BEGINNER
50-60 % of maximum heart-rate.
•
Also suitable for weight-watchers, convalescents
and those who haven’t exercised for a long time.
Three sessions a week of at least a half-hour each
is recommended. Regular exercise considerably
improves beginners’ respiratory and circulatory
performance and you will quickly feel your
improvement.
EAR PULSE MEASUREMENT
1. Fit the ear sensor wire plug into the connecting
point of the meter.
2. Attach the ear sensor to the earlobe.
If the sensor does not immediately start measuring
your pulse or if the earlobe is cold, rub the
earlobe with the fingers to speed up circulation.
Physiological differences between different people
may also cause disturbances in pulse measurement.
In these cases, try measuring on the inside
surface of the ear or on the tip of your finger. If
measuring disturbances appear while training,
test the functioning of the sensor while stationary.
Strong, unintentional swaying while training
may also disturb measurement. If pulse values
TRAINER
60-70 % of maximum heart-rate.
•
rise above 150 beats/min., earlobe measurement
may be affected by the speeding up of circulation.
Perfect for improving and maintaining fitness.
Even reasonable effort develops the heart and lungs
effectively, training for a minimum of 30 minutes
at least three times a week. To improve your
condition still further, increase either frequency or
effort, but not both at the same time!
ACTIVE TRAINER
70-80 % of maximum heart-
•
rate.
Exercise at this level suits only the fittest and
presupposes long-endurance workouts.
Sometimes a strong light source, e.g. a fluorescent
tube, in the immediate vicinity of the user may
cause disturbances in pulse measurement. In this
case, test the functioning of the sensor by turning
the ear sensor the other way round on the earlobe.
Pulse reading can also be affected, if the battery
power of the meter is too low. Clean the ear sensor
after use with a damp cloth.
TELEMETRIC HEART RATE MEASUREMENT
This equipment has a built in pulse receiver, which
is compatible with a telemetric Batavus Pro Check
The heart rate is measured in three ways:
•
A) Using the handgrip heart rate sensors
B) Using an ear clip with cable (available as an
B A TA V US C 2
•
optional extra)
C) Using a chest strap (wireless, telemetric),
pulse transmitter.
NOTE! If you are fitted with a pacemaker, please
consult a physician before using a wireless heart
rate monitor.
optional
If you want to measure your heart rate this way
The chest strap and receiver/adapter are available as
optional extras.
during your workout, moisten the grooved
electrodes on the transmitter belt with water.
Fasten the transmitter just below the chest with the
Do not use more than one measuring system at the
same time.
elastic belt, firmly enough so that the electrodes
remain in contact with the skin while training, but
O W N E R ' S M A N U A L
6
O W N E R ' S M A N U A L • B A TA V US C 2
G B
not so tight that normal breathing is prevented.
If you wear the transmitter and belt over a light
shirt, moisten the shirt slightly at the points where
the electrodes touch the shirt. The transmitter
automatically transmits the heart-rate reading to
the meter up to a distance of about 1 meter. The
heart-rate value is displayed in the meter. Follow
your heart rate during the training.
REMARKS ON TELEMETRIC MEASUREMENT
If the electrode surfaces are not moist, the heart
rate reading will not appear on the display. If the
electrodes are dry, they must be moistened again.
Allow the electrodes to warm up properly to
ensure accurate heart-rate measurement. If there
are several telemetric heart rate measurement
equipments next to each other, the distance
between them should be at least 1,5 m. Similarly,
if there is only one receiver and several transmitters
in use, only one person with a transmitter should
be within transmission range. The transmitter is
switched to an active state only when it is being
used for measurement. Sweat and other moisture
can, however, keep the transmitter in an active state
and waste battery energy. Therefore it is important
to dry the electrodes carefully after use. When
selecting training attire, please note that some
fibers used in clothes (e.g. polyester, polyamide)
create static electricity, which may prevent reliable
heart rate measurement.
Please note that a mobile phone, television and
other electrical appliances form an electro-magnetic
field around them, which will cause problems in
heart rate measurement.
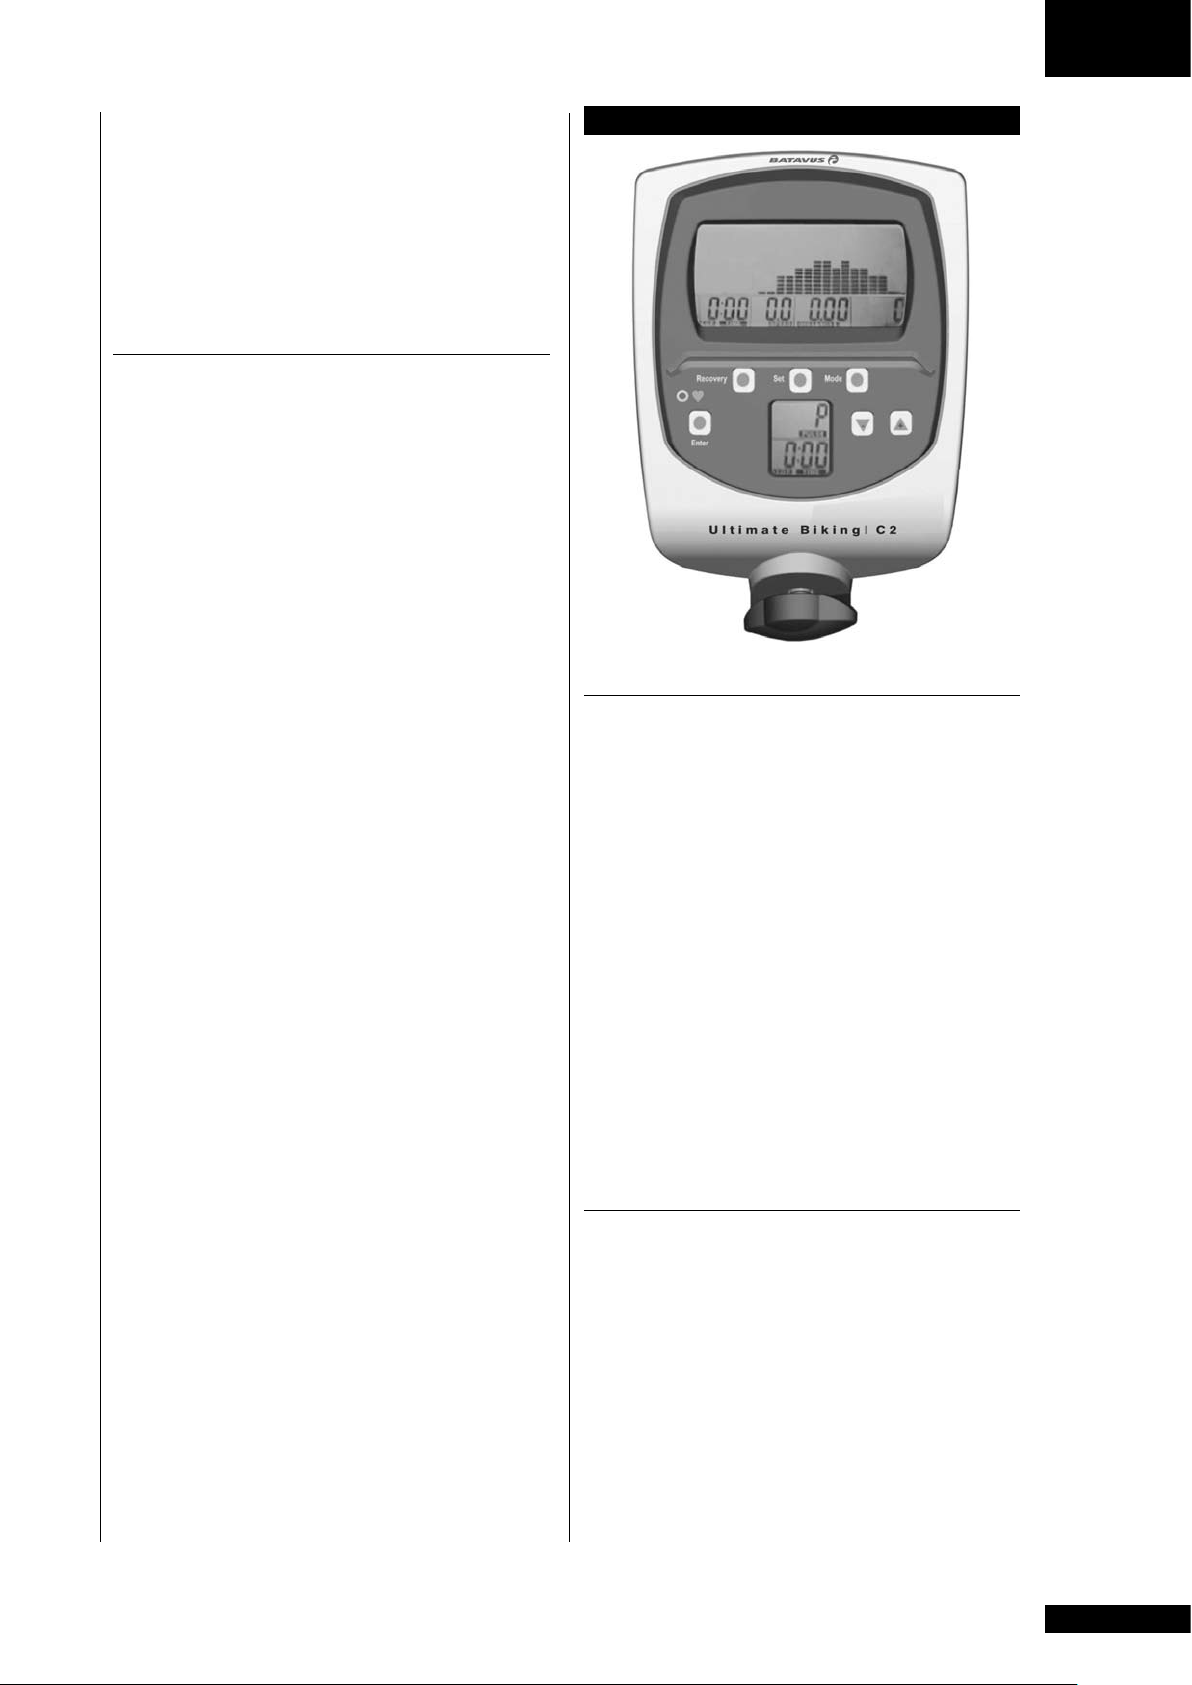
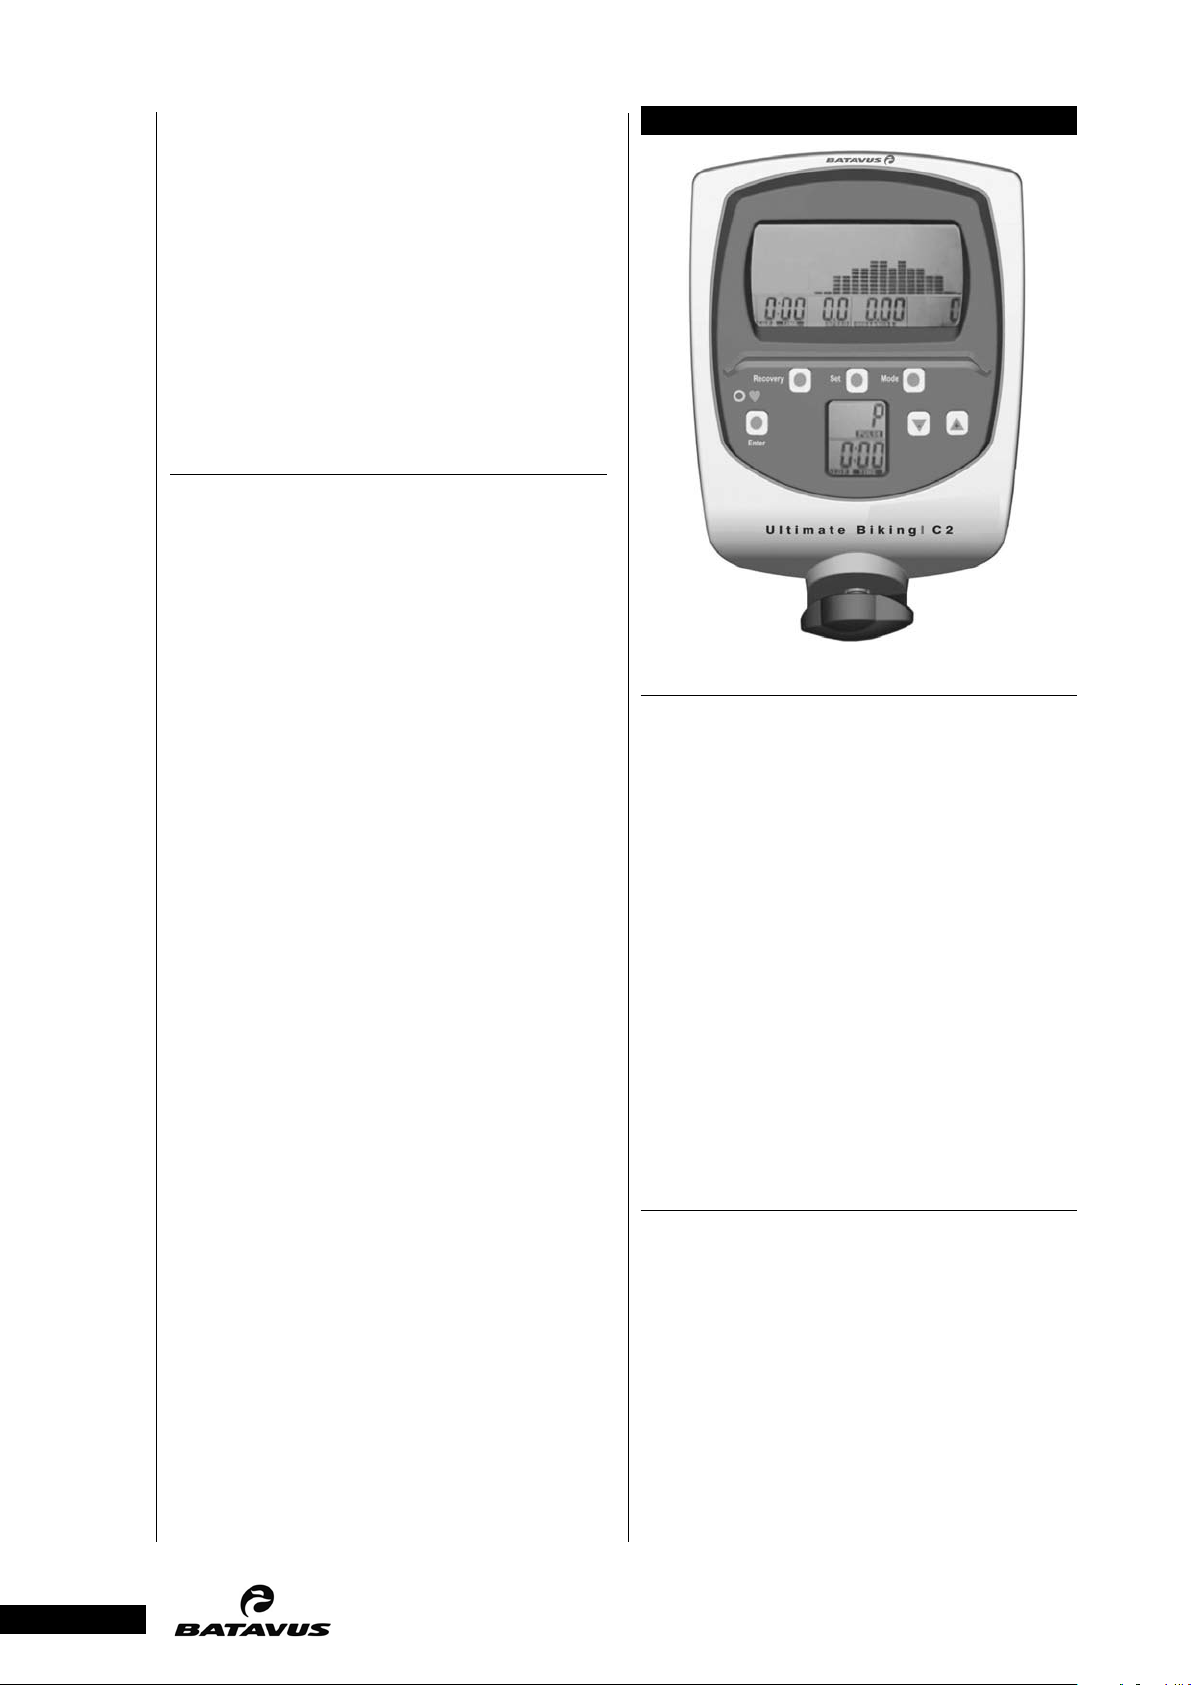
CONSOLE
BUTTONS
1. ENTER
Selects control panel functions and resets the
training data to zero
2. SET
Sets values
3. +/-
Adjusts the training intensity (Level), training
values and profile selection
4. SELECT
Confirms set values
5. RECOVERY
After finishing your training session, press this
button to start recovery pulse measurement
FUNCTIONS
1. CALENDAR, TIME OF DAY AND ROOM
TEMPERATURE
If you are not training and you have not pressed a
button, the control panel switches into the Sleep
mode after about four minutes. The time of day,
date, day of the week and room temperature are
shown on the display.
2. DISPLAY CHANGE (SCAN)
The display changes every 6 seconds:
7

The main display A shows: Scan -- Speed --
•
Time -- Distance -- Calories -- Pulse
While you are exercising, display B shows: RPM
•
(revolutions), resistance (level) and the program
profile.
3. TIME
The training time counts up, starting at 00:00, and
runs to 99:59 minutes. Then the time begins again
at 00:00. The colon (:) blinks once per second.
which you are currently training blinks next to the
pulse rate.
Example: If you wish to train in the 75% range,
but the currently displayed range is lower or
higher, you must decrease or increase your
performance appropriately so that your pulse
decreases or increases. You achieve this by changing
the resistance or the pedaling speed. To adjust the
resistance, please use the +/- buttons on the control
panel.
4. SPEED
The speed is displayed up to 99.9 km/h.
5. REVOLUTIONS
The crank arm revolutions are displayed in rpm
(revolutions per minute).
6. DISTANCE
The distance is displayed in kilometers (km) and, if
not preset, counts upward from 0.01 to 99.99.
If the distance is preset, this function counts down
to 0.00 km. The total distance is added from all
training sessions and shown on the display even if
the current data have been erased using the Reset
button. The total distance is only erased when the
batteries are replaced.
7. CALORIES
Calories can be set to count up or down just like
time or distance and are calculated during training.
A maximum of 9999 calories are displayed per
training session.
NOTE ON MEASURING CALORIES:
In this unit, energy consumption is calculated
based on average values. Only the revolutions
are used to calculate the values. However,
because each person has different capabilities for
producing energy (known as efficiency), the energy
consumption displayed can, by necessity, only
be an approximation of the actual consumption
and cannot be used for therapeutic purposes. The
energy consumption during a training session is
displayed in kcal (kilocalories). To convert this into
joules, use this formula: 1 kcal = 4.187 kJ.
If you wish to train using values other than
the preset values, ignore the % numbers and
concentrate only on your actual pulse rate.
NOTE: Before the control panel can display the
pulse rate or the pulse ranges, it needs at least 10
seconds for calculation purposes.
9. INTENSITY (LEVEL)
The training intensity is shown on Display B as a
bar diagram (levels 1 -- 8) during training.
10. PROGRAMS
The control panel contains the following:
•
M: A manual program (8 levels)
•
P: A program with profiles in levels (10
different profiles)
SWITCHING ON AND PROGRAMMING
When you switch on the control panel, the
Calendar mode is displayed.
DATA ENTRY
If you do not wish to make any changes to, for
example, the time or date, press the ENTER
button until the training time of 00:00 appears on
Display A.
At the same time, M for the manual program
appears on Display B.
You can switch to the programming selection of P
= program profiles using the + button.
A. TRAINING WITH THE MANUAL PROGRAM M
Press the SELECT button.
8. PULSE RATE RANGES
B A TA V US C 2
•
While training using pulse rates, the control panel
computes three pulse rate ranges in accordance
with your maximum pulse rate based on your
personal data.
•
Display B then shows the intensity as a flat bar
diagram and a number (1 -- 8). Alternately, the
speed and intensity (1 -- 8) are displayed.
Without entering training data such as Time /
Distance, you may now start training. Select the
intensity levels using the +/-buttons.
When you begin your training session, the display
switches from the preset pulse to the actual pulse
rate. The % number of the heart rate range in
O W N E R ' S M A N U A L
8
For training using the manual program with
preset data, select the range using the ENTER
button.

O W N E R ' S M A N U A L • B A TA V US C 2
G B
Set the values using the SET button (Figure 7).
•
The values are always adjusted upward.
Press the ENTER button until the time display
•
is selected again. Select the time. Then start
training.
B. TRAINING USING PROGRAM PROFILES (“P”)
After changing from M to P, press the SELECT
•
button. Using the +/- buttons, select the
program 1 -- 10. Confirm using the SELECT
button. The level profile is shown on Display B.
You can now increase the base intensity (Level)
•
using the +/- buttons. If desired, use the
ENTER button to switch to training value
entry mode. If you do not wish to enter values,
you may begin training immediately.
SETTING THE TIME OF DAY TIME AND
CALENDAR
After plugging the unit in, or by pedaling and
pressing the ENTER button, you can set these
values. The year 2005 will blink.
Set the year using the SET button.
•
Confirm by pressing the ENTER button.
•
The number for the month M will blink.
Set the month using the SET button.
•
Press the ENTER button.
•
The time of day (hours) D will blink.
Set the time using the SET button.
•
Press the ENTER button.
•
The minutes will blink.
Set using the SET button.
•
Press the ENTER button.
•
You can now enter the training data.
ADDITIONAL NOTES:
TRANSPORT AND STORAGE
Please follow these instructions when carrying
and moving the equipment about, because lifting
it incorrectly may strain your back or risk other
accidents:
The device is easy to move by pushing along on
the integrated transport wheels. Tilt the device
from the front and push along the floor on the
wheels at the front support. We recommend that
you use a protective base when transporting the
equipment.
To prevent the equipment malfunctioning, store
in a dry place with as little temperature variation
as possible and protected from dust.
MAINTENANCE
The equipment requires very little maintenance.
Check, however, from time-to-time that all screws
and nuts are tight.
After exercising, clean the equipment with a
•
soft, absorbent cloth. Do not use solvents. Sweat
may cause corrosion: we recommend therefore
that you protect all metal surfaces outside the
plastic covers with teflon.
Never remove the equipment’s protective casing.
•
MALFUNCTIONS
NOTE! Despite continuous quality control,
defects and malfunctions caused by individual
components may occur in the equipment. In
most cases it’s unnecessary to take the whole
device in for repair, as it’s usually sufficient to
replace the defective part. Always give the model,
serial number of your equipment and in case of
malfunctions also conditions of use, nature of
malfunction and any error code.
Quick start
1.
With the transformer connected, start pedaling
to switch the control panel from the Sleep mode
into the input mode.
You can enter values on Display A when one of
2.
the bars is displayed on the left edge.
Adjustment (Target Setting) is only possible if
3.
the Park symbol P is visible on Display A.
The resistance (Level) can be adjusted using the
4.
+/- buttons during training.
If you have set several functions to count down,
5.
a signal sounds when the first function reaches
zero. Press the + button to switch the sound
off. If you continue training, the function
automatically begins counting upward from
zero.
When you encounter unusual behavior from
the device, contact your local Batavus dealer for
service.
If you require spare parts, always give the model,
serial number of your equipment and the spare
part number for the part you need. The spare part
list is at the back of this manual. Use only spare
parts mentioned in the spare part list.
TECHNICAL SPECIFICATIONS
Length.............. ........................................ 102 cm
Width .............. ........................................55 cm
Height............. .........................................146 cm
Weight............. .........................................37 kg
The C2 meets the requirements of the EU’s
9

EMC Directives on electromagnetic compatibility
(89/336/EEC). This product therefore carries the
CE label.
The C2 meets EN precision and safety standards
(EN-957).
Due to our continuous policy of product
development, Batavus reserves the right to change
specifications without notice.
NOTE! The instructions must be followed carefully
in the assembly, use and maintenance of your
equipment. The warranty does not cover damage
due to negligence of the assembly, adjustment
and maintenance instructions described herein.
Changes or modifications not expressly approved
by Batavus will void the user’s authority to operate
the equipment!
We wish you many enjoyable trainings!
10
B A TA V US C 2
•
O W N E R ' S M A N U A L

B E T R I E B S A N L E I T U N G • B A TA V US C 2
D
INHALT
MONTAGE ................................................................ 12
BENUTZUNG ........................................................... 14
TRAINIEREN MIT Batavus .......................................14
HERZFREQUENZ ....................................................15
COCKPIT ..................................................................16
TRANSPORT UND LAGERUNG .............................18
WARTUNG ...............................................................18
BETRIEBSSTÖRUNGEN .........................................18
TECHNISCHE DATEN .............................................18
WICHTIGE
SICHERHEITSHINWEISE
Dieses Handbuch ist ein wesentlicher
Bestandteil Ihrer Trainingsausrüstung.
Lesen Sie dieses Handbuch bitte
sorgfältig durch, bevor Sie Ihr
Trainingsgerät montieren, mit ihm
trainieren oder es warten. Bitte
bewahren Sie dieses Handbuch; es
wird Sie jetzt und zukünftig darüber
informieren, wie Sie Ihr Gerät benutzen
und warten. Befolgen Sie diese
Anweisungen immer sorgfältig. Für
Schäden, die durch Missachtung der
beschriebenen Einstellungs- und
Wartungsanweisungen entstehen,
besteht kein Garantie-Anspruch!
Vor Beginn eines
•
Trainingsprogrammes einen Arzt
konsultieren.
Bei Übelkeit, Schwindelgefühl oder
•
anderen anomalen Symptomen sollte
das Training sofort abgebrochen und
unverzüglich ein Arzt aufgesucht
werden.
vor allem auf die richtige Benutzung des
Gerätes hinweisen.
Vergewissern Sie sich, dass während
•
des Trainings oder beim Bewegen des
Geräts kein Haustier in der Nähe ist.
Das Gerät sollte grundsätzlich nur von
•
einer Person benutzt werden.
Der Anwendungsbereich dieses
•
Trainingsgerätes ist der Heimbereich.
Das Gerät daft nur in Innenräumen
•
benutzt werden.
Das Gerät auf möglichst ebenen
•
Untergrund stellen.
Stützen Sie sich nie gegen das
•
Cockpit ab!
Bedienen Sie die Tasten mit der
•
Fingerkuppe. Ein Fingernagel kann die
Membrane der Tasten beschädigen.
Das Gerät nie ohne die seitlichen
•
Abdeckungen benutzen.
Dieses Gerät ist nicht für den Einsatz
•
in Feuchträumen (Sauna, Schwimmbad)
vorgesehen.
Beim Training muss die
•
Umgebungstemperatur zwischen +10°C
und +35°C liegen. Zur Aufbewahrung
kann das Gerät bei Temperaturen
zwischen -15°C und +40°C gelagert
werden. Die Luftfeuchtigkeit darf nie 90
% überschreiten.
Vor Beginn des Trainings sicherstellen,
•
dass das Gerät völlig intakt ist. Auf
keinen Fall mit einem fehlerhaften Gerät
trainieren.
Aufgrund des natürlichen Spieltriebes
•
und der Experimentierfreudigkeit
der Kinder können Situationen und
Verhaltensweisen entstehen, für die
das Trainingsgerät weder gebaut
noch abgesichert ist und die eine
Verantwortung seitens des Herstellers
ausschliessen.Wenn Sie dennoch
Kinder an das Trainingsgerät lassen,
müssen Sie deshalb deren geistige und
körperliche Entwicklung und vor allem
deren Temperament berücksichtigen, sie
gegebenenfalls beaufsichtigen und sie
Zur Benutzung des Gerätes stets
•
angemessene Kleidung und Schuhwerk
tragen.
Nie die Hände in die Nähe von
•
beweglichen Teilen bringen.
Zur Vermeidung von Muskelkater Auf-
•
und Abwärmtraining nicht vergessen.
Keine anderen als die in dieser
•
Betriebsanleitung beschriebenen
Wartungsmassnahmen und
Einstellungen vornehmen. Die
angegebenen Wartungsanweisungen
11
sind einzuhalten.
Das Gerät darf nicht von Personen
•
benutzt werden, deren Gewicht über 135
kg liegt.
Ihr neuer Heimtrainer von Batavus
•
wurde für das Heimtraining entwickelt.
Die Garantie dieses Gerätes beträgt
24 Monate für das Heimtraining.
Nähere Informationen zur Garantie
bekommen Sie von Ihrem nationalen
Batavus Vertreter. Bitte beachten Sie,
dass die Bedingungen der Garantie
je nach Verkaufsbereich variieren
können. Sowohl Batavus Sport, als
auch seine nationalen Vertretungen
übernehmen keine Haftung für
Verletzungen oder Geräteschäden, die
sich bei Dauereinsatz in gewerblichen
Fitnesscentern, Sportvereinen und
vergleichbaren Einrichtungen ergeben.
MONTAGE
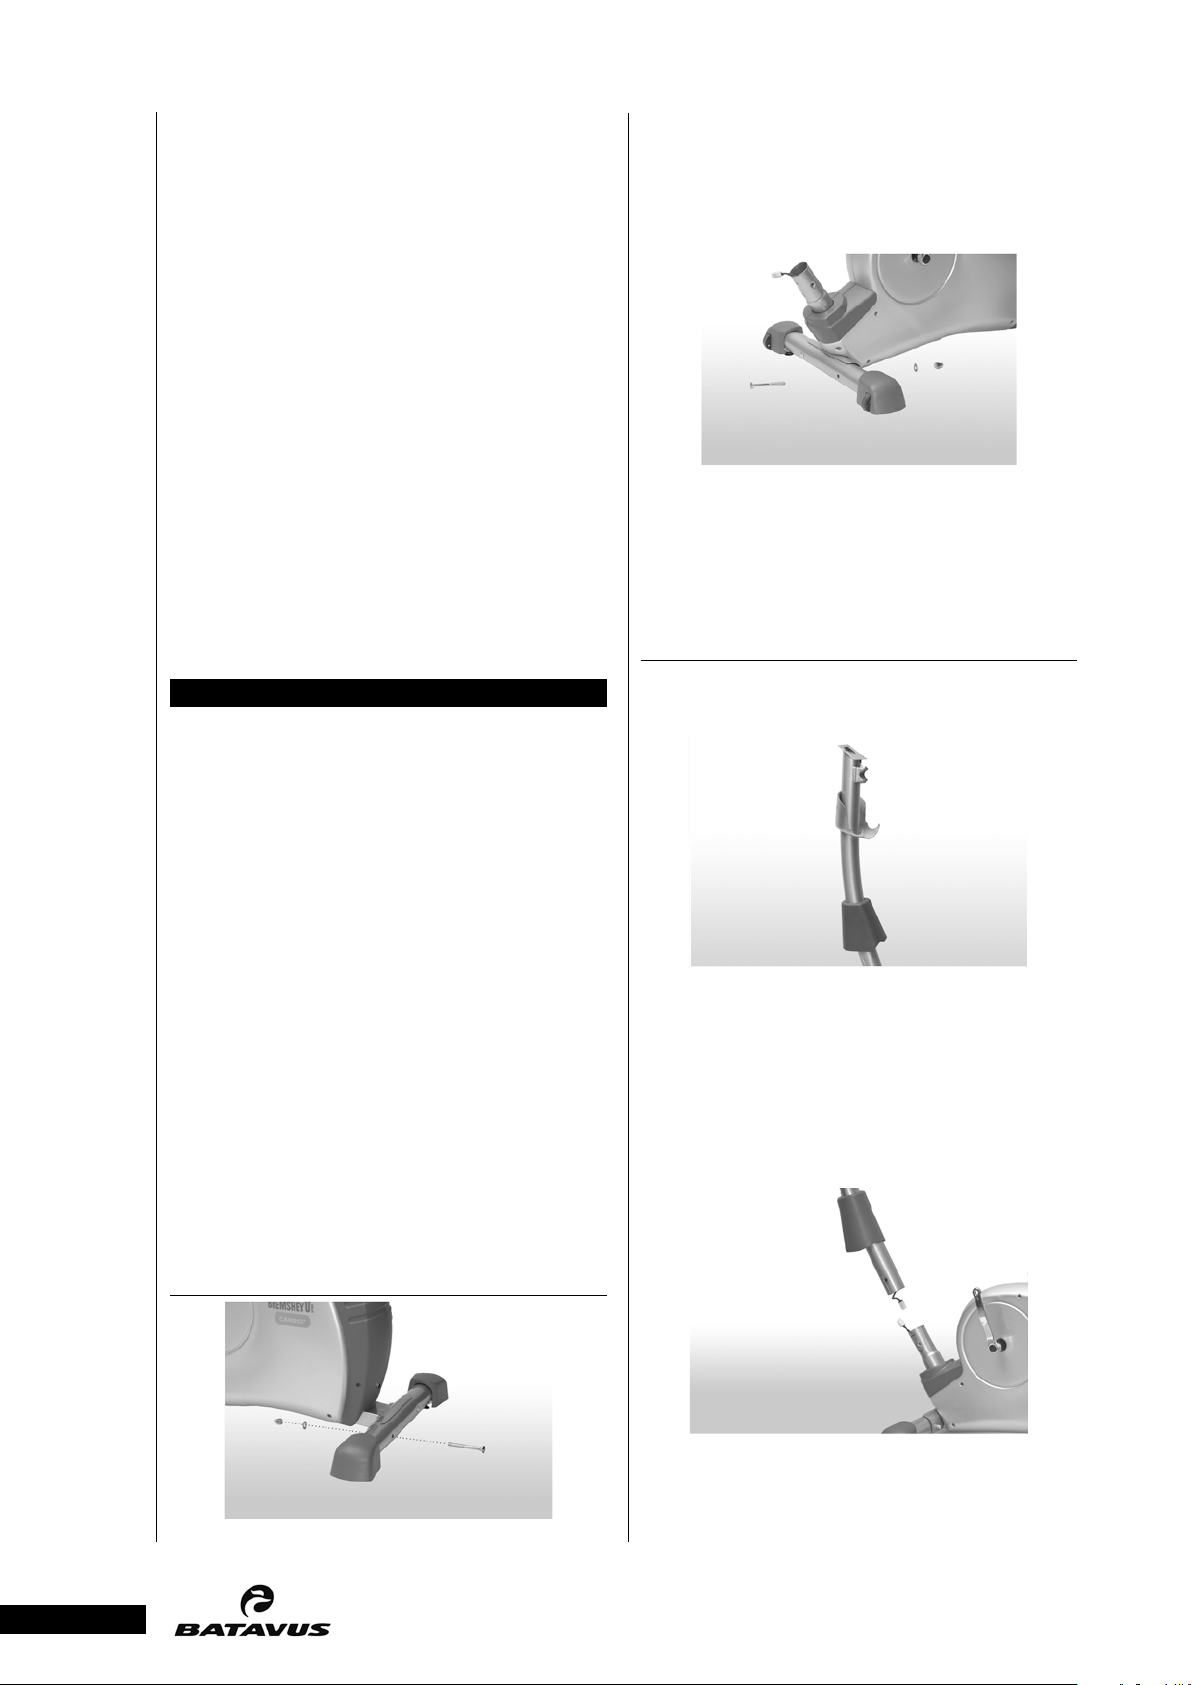
Befestigen Sie das hintere Fußrohr mit den
Schrauben, den Scheiben und den Hutmuttern am
Grundrahmen. Die Fußkappen, ohne Rollen sind
bereits vormontiert.
Das Fußrohr vorne in gleicher Weise am
Grundrahmen montieren. Achten Sie darauf, dass
die Rollen der Fußkappen, die bereits am Fußrohr
vormontiert sind, bei der Montage nach vorne und
nach unten weisen.
VORDERES RAHMENROHR
Montieren Sie das Gerät mit einer weiteren Person.
Beutel mit Montagezubehör (Inhalt mit * im
Ersatzteilverzeichnis gekennzeichnet): Bewahren
Sie dieMontageteile sorgfältig auf, denn Sie können
sie später u.a. zur Justierung benötigen
Sollte Ihr Gerät unvollständig sein, wenden Sie sich
bitte unter Angabe des Modells, der Seriennummer
und Nummer des fehlenden Teiles an Ihren
Batavus-Händler. Die Ersatzteilnummer geht aus
der Liste am Ende dieser Betriebsanleitung hervor.
Der beiliegende Beutel mit Granulat dient als
Klimaschutz während des Transportes und soll
nach Montage beseitigt werden. Die Beschreibung
der Lage von Teilen (rechts, links, vorne, hinten)
geht von der Blickrichtung beim Training aus. Es
wird empfohlen, das Gerät auf einer geschützten
Oberfläche auszupacken und aufzubauen. Bitte
beachten Sie beim Aufstellen des Gerätes, dass
in jede Richtung wenigstens 100 cm Freiraum
vorhanden ist.
HINTERES UND VORDERES STÜTZBEIN
Die Cockpit-Kappe, die später unter das
Cockpit montiert wird, und die Rohrabdeckung
für den Lenkerschaft auf den Lenkerschaft
schieben. Danach den Schaumstoffring für die
Rohrabdeckung ebenfalls auf den Lenkerschaft
schieben und nach oben drücken.
12
B A TA V US C 2
•
Verbinden Sie nun das Kabel, oben und das
Kabel, unten , das aus dem Rahmenrohr des
Grundrahmens ragt, miteinander.
B E T R I E B S A N L E I T U N G
Setzen Sie den Lenkerschaft auf das Rahmenrohr
am Grundrahmen auf und befestigen Sie es mit
den Schrauben und den Scheiben. ACHTUNG: Kabel
nicht einklemmen! Dann die Rohrabdeckung
inklusive dem Gehäuseschaumring nach unten auf
das Gehäuse schieben.
GRIFFSTANGE
B E T R I E B S A N L E I T U N G • B A TA V US C 2
MESSGERÄT
D
Die Montage des Lenkerrohres wird mit
der Lenkerklemme und der Schraube, den
Scheiben, der Distanzhülse und dem Handrad
für Lenkerverstellung vorgenommen. Setzen
Sie dazu das Lenkerrohr in die Aufnahme (E)
am Lenkerschaft. ACHTUNG: Der Stift (F) des
Lenkerrohres muss in die Rille (G) eingesteckt
werden. Dann die Lenkerklemme über das
Lenkerrohr schieben und zuerst die untere
Schraube mit der Scheibe locker einsetzen. Die
Lenkerklemme soll das Lenkerrohr gleichmäßig
umschlingen. ACHTUNG: Kabel nicht einklemmen!
Jetzt das Handrad für Lenkerverstellung mit
der Scheibe und der Distanzhülse in die obere
Bohrung einsetzen und festziehen. Danach das
Kabel von den Handpulssensoren durch die
Öffnung (H) unter der Aufnahmeplatte schieben
und nach oben aus dem Lenkerschaft führen.
Um das Cockpit zu montieren, müssen Sie
zuerst das Kabel, oben und das Kabel für die
Handpulssensoren mit den Cockpit-Kabeln
verbinden. Dann das Cockpit von oben auf
die Halteplatte (i) am Lenkerschaft schieben.
ACHTUNG: Kabel nicht einklemmen. Dann das
Cockpit mit den Schrauben befestigen. Schrauben
bitte nicht zu fest anziehen. Wenn Sie es wünschen,
dann können Sie jetzt die beigefügte Buchstütze
in den Spalt (J) am Cockpit einsetzen. Jetzt kann
die Cockpit-Kappe unter dem Cockpit nach oben
geschoben und eingerastet werden. Achten Sie
dabei auf den richtigen Sitz der Raststifte (K).
SATTEL
13
TRANSFORMATOR
Setzen Sie die Sattelstütze ein. Das Handrad
für Sattelverstellung einstecken und den Stift
des Handrades in eine Bohrung der Sattelstütze
einrasten lassen und dann das Handrad fest
anziehen. Um den Sattel an die Sattelstütze zu
montieren, schieben Sie die bereits vormontierte
Klemme (L, unter dem Sattel) auf das Halterohr
(M) an dem Sattelhalter. Richten Sie den
Sattel aus und schrauben Sie Ihn mit Hilfe der
Spannschraube in der gewünschten Position fest.
Mit dem Handrad für Satteltiefenverstellung
können Sie dann auch noch den horizontalen
Abstand zwischen Lenker und Sattel einstellen.
PEDALROHRE
Stecken Sie zuerst den kleinen Stecker in die
Aufnahme (N) am Gerätegehäuse. Dann den Trafo
an einer 230 Volt Steckdose anschließen. Jetzt ist
das Gerät zum Training bereit
SICHERHEITSHINWEISE FÜR GERÄTE MIT
ELEKTRISCHEM ANSCHLUSS
Benutzen Sie Ihr Heimtrainingsgerät nicht,
•
wenn es irgendwelche Beschädigungen am
Kabel oder am Gerät gibt.
Das Stromkabel von heißen Gegenständen
•
fernhalten.
Benutzen Sie Ihr Trainingsgerät nicht im Freien
•
oder in Feuchträumen.
Führen Sie das Stromkabel nicht unter einem
•
Teppich hindurch und stellen Sie keine
Gegenstände auf das Kabel.
•
Ziehen Sie den Stecker aus der Steckdose, bevor
•
Sie das Gerät transportieren, eventuell eine
Wartung durchführen oder das Gehäuse öffnen.
Das Kabel zwischen Trafo und Gerät darf nicht
•
verändert (z.B. verlängert) werden.
BENUTZUNG
14
Sollte das Gerät nicht stabil sein, die
Einstellschrauben unter dem hinteren Fussrohr
entsprechend einstellen.
Drehen Sie jetzt die Pedale, in die Kurbelarme.
Das linke Pedal (Markierung L = Linksgewinde)
an den linken Kurbelarm schrauben. Benutzen
Sie den Schraubenschlüssel und drehen Sie gegen
den Uhrzeigersinn. Das rechte Pedal (Markierung
R = Rechtsgewinde) dann am rechten Kurbelarm
im Uhrzeigersinn festdrehen. Jetzt noch die
Pedalschlaufen an den Pedalen befestigen und wie
B A TA V US C 2
•
B E T R I E B S A N L E I T U N G
gewünscht einstellen.
TRAINIEREN MIT BATAVUS
Treten ist eine ausgezeichnete aerobe
Trainingsform, d. h. das Training ist zwar leicht,
erfordert aber eine lange Trainingsdauer. Das
aerobe Training basiert auf einer Verbesserung der
max. Sauerstoffaufnahmefähigkeit, was zu einer
Verbesserung der Kondition und Ausdauer führt.
Treten ist auch eine angenehme Trainingsform.
Man soll war schwitzen, aber nicht ausser Atem
kommen. So sollte man während des Trainings
normal sprechen können. Das Training sollte
aus mindestens drei 30-minütigen Einheiten pro
Woche bestehen. So wird eine Grundkondition
erreicht. Die Aufrechterhaltung der Kondition setzt
zirka zwei Trainingssätze pro Woche voraus. Ist die
Grundkondition erreicht, kann diese leicht durch

B E T R I E B S A N L E I T U N G • B A TA V US C 2
D
Erhöhen der Trainingsfrequenz verbessert werden.
Körperliche Betätigung ist ein wichtiges
Hilfsmittel zur Reduzierung des Körpergewichtes,
denn Training ist das einzige Mittel, den
Energieverbrauch des Körpers zu erhöhen. Dabei
ist es neben einer kalorienarmen Diät wichtig,
regelmässig zu trainieren. Die tägliche Trainingszeit
sollte am Anfang 30 Minuten entweder auf einmal
oder in kleineren Intervallen betragen und sollte
langsam auf 60 Minuten erhöht werden. Lassen
Sie das Training mit geringem Tretwiderstand
beginnen. Eine grosse Anstrengung bei einem
hohen Körpergewicht kann zu einer gefährlichen
Belastung des Herzens und des Kreislaufs
führen. Die Trainingseffizienz kann mit Hilfe der
Pulsfrequenz geschätzt und die Tretgeschwindigkeit
der Kondition entsprechend langsam erhöht
werden. Mit der Anzeige Ihres Gerätes können
Sie ihre Pulsfrequenz während des Trainings
beobachten und sicherstellen, dass das Training
effektiv genug aber nicht zu anstrengend ist.
HERZFREQUENZ
Egal, welches Ziel Sie erreichen wollen, die besten
Resultate erzielen Sie mit einem Training auf dem
richtigen Leistungsniveau, und das beste Mass ist
dabei Ihre eigene Herzfrequenz.
Ermitteln Sie zuerst Ihre maximale Herzfrequenz.
Das Messgerät des C2 berechnet Ihr ungefähres
Pulsniveau mit der folgenden Formel:
220 - A LTER
Das Maximum unterscheidet sich von Mensch zu
Mensch. Die maximale Herzfrequenz verringert
sich pro Jahr durchschnittlich um einen Punkt.
Wenn Sie zu einer Risikogruppe zählen, bitten
Sie den Arzt, Ihre maximale Herzfrequenz
festzustellen. Wir haben drei Herzfrequenzbereiche
definiert, die Sie bei Ihrem zielgerichteten Training
unterstützen.
ANFÄNGER
50-60 % der maximalen
•
Herzfrequenz.
Perfekt geeignet zur Verbesserung und Erhaltung
der Fitness. Damit stärken Sie Ihr Herz und
Ihre Lungen mehr, als auf dem Anfängerniveau.
Wir empfehlen mindestens 3 Trainingseinheiten
pro Woche mit jeweils mindestens 30 Minuten.
Wenn Sie Ihr Fitnessniveau noch weiter erhöhen
möchten, trainieren Sie häufiger oder intensiver,
aber nicht beides zugleich.
AKTIVE SPORTLER
70-80 % der maximalen
•
Herzfrequenz.
Das Training auf diesem Niveau ist nur für
durchtrainierte Sportler geeignet und setzt ein
Langzeit-Ausdauertraining voraus.
Die Pulsmessung kann in 3 Arten erfolgen:
•
A) Mit den Handpulssensoren an den Griffen
B) mit Ohrclip über Kabel (optional als Zubehör
erhältlich)
C) mit Brustgurt (drahtlos, telemetrisch), optional
Brustgurt und Empfänger-Adapter sind als
Zubehör erhältlich.
Benutzen Sie nicht mehrere Systeme gleichzeitig.
PULSMESSUNG MIT HANDSENSOREN
Der C2 misst den Puls mit Sensoren, die in den
Handstutzen sitzen und jedes Mal dann den
Puls messen, wenn der Benutzer beide Sensoren
gleichzeitig berührt. Für eine verlässliche
Pulsmessung sollte die Haut ständigen Kontakt mit
den Sensoren haben und an den Kontaktstellen
leicht feucht sein. Eine zu trockene oder zu feuchte
Haut beeinträchtigt die Handpulsmessung.
Beachten Sie bitte, dass auch ein aktiver Einsatz der
oberen Körpermuskeln während des Trainings die
Pulsmessung über die Hand beeinträchtigen kann:
Aktive Muskeln übertragen ähnliche, elektronische
Signale wie der Herzmuskel. Daher wird
empfohlen, die Arme während der Pulsmessung
entspannt zu halten.
PULSABNAHME ÜBER EINEN OHRCLIP
1. Den Stecker am Ende des Ohrclipkabels in die
der Anzeige befindliche Buchse einstecken.
2. Den Ohrclip am Ohrläppchen befestigen.
Sie ist ausserdem für Übergewichtige und
Rekonvaleszenten geeignet sowie für diejenigen,
die seit langem nicht mehr trainiert haben.
Drei Trainingseinheiten pro Woche von
jeweils einer halben Stunde Dauer sind
angemessen. Regelmässiges Training verbessert
die Leistungsfähigkeit der Atmungs- und
Kreislauforgane ganz entscheidend.
FORTGESCHRITTENE
60-70 % der maximalen
•
Herzfrequenz.
Reagiert die Elektronikanzeige nicht unmittelbar
auf den Puls oder wenn das Ohrläppchen kalt
ist, das Ohrläppchen zur Verbesserung der
Durchblutung etwas mit den Fingerspitzen
reiben. Die individuellen physiologischen
Eigenschaften, wie z. B. Verknorpelungen oder
schwache Blutzirkulation im Ohrläppchen und
Ohrläppchengrösse, können die Pulsmessung
beeinträchtigen. In diesem Fall den Puls vom
Inneren der Ohrmuschel bzw. von der
15
Fingerspitze abnehmen. Erfolgt die Pulsmessung
COCKPIT
nicht ordnungsgemäss, die Messung ohne Training
ausprobieren, denn die Pulsmessung kann durch
unbeabsichtigte Bewegungen des Ohrclips während
des Trainings beeinträchtigt werden. Überschreitet
die Pulsfrequenz 150 Schläge/min, kann die
Messung vom Ohrläppchen durch beschleunigte
Blutzirkulation beeinträchtigt werden. Die
Pulsmessung kann ausserdem durch eine
starke Lichtquelle, z. B. eine Leuchtstofflampe,
beeinträchtigt werden. In diesem Fall den Ohrclip
am Ohrläppchen umdrehen. Nach dem Training
den Ohrclip mit einem feuchten Tuch reinigen.
DRAHTLOSE HERZFREQUENZMESSUNG
Die Herzfrequenzmessung erfolgt drahtlos mit
einem Herzfrequenzmessgerät Batavus Pro Check.
Der Empfänger ist bereits eingebaut.
BITTE BEACHTEN! Falls Sie einen Herzschrittmacher
tragen, lassen Sie sich von Ihrem Arzt bestätigen,
dass Sie die drahtlose Herzfrequenzmessung
benutzen können.
TASTEN
Als zuverlässigste Art der Herzfrequenzmessung hat
sich die drahtlose Herzfrequenzabnahme erwiesen,
bei der die Herzschläge mit einem Elektrodengurt
von der Brust abgenommen werden. Vom
1. ENTER
Zur Auswahl der Cockpit-Funktionen und zur
Zurücksetzung der Trainings-Daten auf Null
Gurt werden die Impulse danach über ein
elektromagnetisches Feld an den Empfänger in
der Elektronikanzeige übertragen. Zur drahtlosen
Herzfrequenzmessung während des Trainings
die gegen die Haut kommenden Elektroden am
Elektrodengurt sorgfältig mit Wasser anfeuchten.
Wird der Elektrodengurt über einem dünnen
Hemd getragen, sind die gegen die Elektroden
2. SET
Verstellt die Werte
3. +/-
Verstellung von Trainingsintensität (Level),
Trainingswerten und der Profil-Auswahl
gerichteten Flächen ebenfalls zu befeuchten. Den
Sender mit Hilfe des Gurtes fest unterhalb der
Brustmuskulatur befestigen und darauf achten,
4. SELECT
Bestätigung der eingestellten Werte
dass der Gurt beim Training nicht verrutscht.
Den Elektrodengurt jedoch nicht so festziehen,
dass z. B. die Atmung erschwert wird. Der Sender
kann den Pulswert bis zu einer Entfernung von
zirka 1 m an den Empfänger übertragen. Der
Herzfrequenzwert wird in der Anzeige angezeigt.
Achten Sie bei Ihrer Trainingskleidung darauf, dass
bestimmte für Kleidungsstücke verwendete Fasern
(z.B. Polyester, Polyamid) statische elektrische
Ladungen verursachen, die ein Hindernis für
B A TA V US C 2
•
eine zuverlässige Herzfrequenzmessung sein
können. Beachten Sie auch, dass durch Handys,
Fernsehgeräte und andere elektrische Geräte
5. RECOVERY
Die Erholungspulsmessung wird durch Drücken
der Taste nach Beendigung des Trainings gestartet
FUNKTIONEN
1. KALENDER, UHRZEIT UND
RAUMTEMPERATUR
Wenn ca. 4 Minuten nicht trainiert und keine
Taste betätigt wird, schaltet sich das Cockpit in
die Ruheposition und zeigt im Display Uhrzeit,
Datum, Wochentag und Raumtemperatur an.
elektromagnetische Felder entstehen, die Probleme
bei der Herzfrequenzmessung verursachen können.
2. ANZEIGENWECHSEL (SCAN)
Alle 6 Sekunden wechselt die Anzeige:
16
das Hauptdisplay “A” zeigt: Scan-Speed-RPM-
•
Time-Distance-Calories-Pulse
B E T R I E B S A N L E I T U N G

B E T R I E B S A N L E I T U N G • B A TA V US C 2
D
das Display “B” zeigt beim Training: RPM
•
(Umdrehungen), Widerstand (Level) und das
Programm-Profil.
3. ZEIT
Die Trainingszeit, aufwärts, beginnt bei 00:00 und
läuft bis 99:59 Minuten. Dann beginnt die Zeit
wieder bei 00:00. Der Doppelpunkt (:) blinkt im
Sekundentakt.
4. GESCHWINDIGKEIT
Die Geschwindigkeit (Speed) wird bis 99,9 km/h
angezeigt.
5. UMDREHUNGEN
Die Kurbelarm-Umdrehungen werden in U/min
(Umdrehungen pro Minute) angezeigt
6. ENTFERNUNG
Die Strecke wird in Kilometern (km) angezeigt
und zählt ohne Voreinstellung ab 0,5 aufwärts
bis 99,59. Bei vorgegebener Strecke (Distance)
erfolgt die Zählung abwärts bis 0,00 km. Die
Gesamtstrecke wird von allen Trainingseinheiten
zusammengezählt und im Display angezeigt,
auch wenn die aktuellen Daten mit der ResetTaste gelöscht worden sind. Nur bei einem
Batteriewechsel wird auch der Wert der
Gesamtstrecke gelöscht.
7. KALORIEN
Die Kalorien können wie bei der Zeit oder der
Strecke auf- bzw. abwärts zählend eingestellt
werden und werden während des Trainings
berechnet. Maximal werden pro Training 9999
Kalorien angezeigt.
HINWEIS ZUR KALORIENMESSUNG:
Bei diesem Gerät wird der Energieverbrauch
aufgrund von durchschnittlichen Werten
berechnet. Zur Berechnung der Werte werden
nur die Umdrehungen verwendet. Da jedoch
jeder unterschiedliche Fähigkeiten hat, Energie
zu produzieren (sog. Wirkungsgrad), kann der
angezeigte Energieverbrauch zwangsläufig nur
eine Annäherung an den tatsächlichen Verbrauch
sein und kann nicht für therapeutische Zwecke
verwendet werden. Der Energieverbrauch während
des Trainings wird in kcal (Kilokalorien) angezeigt.
Für die Umrechnung in Joule benutzen Sie bitte
diese Formel: 1 Kcal = 4,187 kJ.
8. PULSFREQUENZBEREICHE
entsprechend Ihres max. Pulswert.
Beim Trainingsbeginn wechselt die Anzeige
von der Pulsvorgabe zum aktuellen Pulswert.
Neben dem Pulswert blinkt die %-Zahl des
Herzfrequenzbereiches in dem Sie gerade
trainieren.
Beispiel: Wenn Sie im 75%-Bereich trainieren
möchten, der aktuell angezeigte Bereich aber
niedriger oder höher ist, müssen Sie Ihre Leistung
entsprechend vermindern oder erhöhen, damit
Ihr Puls fällt oder steigt. Das erreichen Sie durch
Änderung des Bremswertes oder der Drehzahl. Zur
Verstellung des Bremswertes benutzen Sie bitte die
“+/-”-Tasten am Cockpit.
Wenn Sie mit anderen Werten, als vorgegeben,
trainieren möchten, dann orientieren Sie sich nicht
an den %-Zahlen, sondern nur an Ihrem aktuellen
Pulswert.
HINWEIS: Bevor das Cockpit den Pulswert oder
die Pulsbereiche anzeigen kann, benötigt es zur
Berechnung mindestens 10 Sekunden.
10. INTENSITÄT (LEVEL)
Die Trainingsintensität wird im “Display B” als
Balkendiagramm (Stufe 1-8) während des Trainings
angezeigt.
11. PROGRAMME
Das Cockpit beinhaltet:
“M” Ein manuelles Programm (8 Stufen/Levels)
•
“P” Programm mit Profilen in Stufen (10
•
unterschiedliche Profile)
EINSCHALTEN UND PROGRAMMIEREN
Wenn Sie das Cockpit einschalten, wird der
Kalender-Modus gezeigt.
DATENEINGABE
Wenn Sie jetzt keine Veränderung von z.B. Zeit
oder Datum vornehmen möchten, betätigen Sie
die “ENTER”-Taste so oft, bis die Trainingszeit
00:00 im Display “A” erscheint.
Im Display “B” erscheint gleichzeitig ein “M” für
das manuelle Programm.
Mit der “+”-Taste können Sie zu der
Programmauswahl, “P” = Programmprofile,
wechseln.
Während des Trainings mit Pulswerten errechnet
das Cockpit unter Berücksichtigung Ihre
persönlichen Daten 3 Pulsfrequenzbereiche
17

A. TRAINING MIT DEM MANUELLEN
PROGRAMM “M”
“SELECT”-Taste betätigen.
•
Display “B” zeigt dann die Intensität als
flaches Balkendiagramm und als Zahl (1-
8). Abwechselnd wird die Drehzahl und
Intensität (1-8) gezeigt. Ohne Eingabe von
Trainingsdaten, z.B. Zeit / Entfernung, können
Sie jetzt mit dem Training beginnen.
Mit den “+/-”-Tasten die Intensitätsstufen
•
wählen.
Für das Training im “Manuellen Programm”
•
mit Vorgabe von Daten mit der “ENTER”Taste den Bereich wählen.
Mit der “SET”-Taste die Werte einstellen. Die
•
Verstellung der Werte erfolgt immer aufwärts.
Die “ENTER”-Taste so oft betätigen, bis wieder
•
die Zeitanzeige ausgewählt ist. Die Zeit wählen.
Dann mit dem Training beginnen.
B. TRAINING MIT PROGRAMM-PROFILEN “P”
Nach dem Wechsel von “M” zu “P” die
•
“SELECT”-Taste drücken. Mit den “+/-”Tasten das Programm 1 - 10 auswählen. Mit der
“SELECT”-Taste bestätigen. Das Stufen-Profil
wird im Display “B” angezeigt.
Jetzt ist es möglich mit den “+/-”-Tasten
•
die Basis-Intensität (Level) zu erhöhen. Mit
der “ENTER”-Taste, wenn gewünscht, zur
Eingabe der Trainingswerte wechseln. Ohne
Werteeingabe können Sie sofort mit dem
Training beginnen.
EINSTELLUNG VON TAGESZEIT UND
KALENDER
Nach Verbindung mit dem Netz oder durch Treten
der Pedale und Drücken der “ENTER”-Taste wird
die Eingabe ermöglicht. Die Jahreszahl “2005”
blinkt.
WEITERE HINWEISE:
Schnell-Start
1.
Betätigen Sie bei angeschlossenem Trafo die
Pedale um das Cockpit aus dem Ruhemodus in
den Eingabemodus umzuschalten.
Im Display “A” ist jeweils die Eingabe von
2.
Werten möglich wenn einer der Balken am
linken Rand angezeigt wird.
Die Verstellung ist nur möglich, wenn das
3.
Park-Symbol “P” im Display “A” sichtbar ist.
Während des Trainings kann der Widerstand
4.
(Level) mit den “+/-”-Tasten verstellt werden.
Wenn mehrere Abwärts-Funktionen
5.
eingestellt wurden, dann ertönt ein Signal
bei der Funktion, die zuerst auf “Null” steht.
Durch Drücken der “+”-Taste wird der Ton
abgeschaltet. Wenn Sie jetzt weiter trainieren,
beginnt die Zählung der Funktion automatisch
von “Null” an aufwärts.
TRANSPORT UND LAGERUNG
Bitte befolgen Sie diese Hinweise, wenn Sie
das Gerät tragen oder bewegen, denn falsches
Anheben kann zu Rückenverletzungen oder
anderen Unfällen führen:
Dank eingebauter Transportrollen ist der C2 leicht
zu bewegen. Dazu um das Gerät herumgehen, an
den Handstützen festhalten, leicht ankippen und
auf den Transportrollen im vorderen Fussrohr
fortbewegen. Ein Verschieben des Gerätes kann
manche Fussbodenmaterialien beschädigen, z.B.
Holzparkettböden. In diesem Fall müssen Sie den
Boden vorher schützen.
Lagern Sie das Gerät an einem trockenen,
staubfreien Ort mit möglichst geringen
Temperaturschwankungen.
18
Mit der “SET”-Taste das Jahr einstellen
•
“ENTER”-Taste zur Bestätigung drücken
•
Die Monatszahl “M” blinkt
Mit der “SET”-Taste den Monat einstellen
•
“ENTER”-Taste drücken
•
Die Tageszeit (Stunden) “D” blinkt
Mit der “SET”-Taste die Zeit einstellen
•
“ENTER”-Taste drücken
•
Die Minuten blinken
B A TA V US C 2
•
B E T R I E B S A N L E I T U N G
Mit der “SET”-Taste einstellen
•
“ENTER”-Taste drücken
•
Jetzt ist die Eingabe der Trainingsdaten möglich.
WARTUNG
Das Gerät braucht nur sehr wenig Wartung.
Prüfen Sie dennoch von Zeit zu Zeit, dass alle
Schrauben und Muttern fest sitzen.
Bitte trocknen Sie nach jedem Training alle
•
Teile des Gerätes mit einem weichen, saugfähigen
Tuch. Verwenden Sie keine Lösungsmittel. Da
Schweiss Korrosion verursachen kann, empfehlen
wir, dass Sie alle Metalloberflächen, die mit
Schweiss in Berührung kommen können, mit
Teflon zu schützen.
Entfernen Sie niemals die Schutzverkleidung
•
des Gerätes.

BETRIEBSSTÖRUNGEN
BITTE BEACHTEN: Trotz kontinuierlicher
Qualitätsüberwachung können vereinzelt an den
Geräten durch einzelne Komponenten verursachte
Funktionsstörungen auftreten. Dabei ist es nicht
angebracht, das ganze Gerät zur Reparatur zu
bringen, da der Fehler meistens durch Austauschen
der defekten Komponente behoben werden kann.
Falls Sie Funktionsstörungen an Ihrem Gerät
feststellen, Kontakt mit Ihrer nationalen BatavusVertretung aufnehmen.
Wenden Sie sich an Ihre nationale BatavusVertretung, wenn Sie Ersatzteile benötigen
oder Funktionsstörungen an Ihrem Gerät
feststellen. Beschreiben Sie das Problem und die
Einsatzbedingungen und teilen Sie das Kaufdatum
und die Seriennummer des Gerätes mit. Die
Ersatzteilnummern finden Sie in der Liste am Ende
dieser Anweisung. Nur Teile in der Ersatzteilliste
dürfen verwendet werden.
B E T R I E B S A N L E I T U N G • B A TA V US C 2
D
TECHNISCHE DATEN
Länge ...........................................102 cm
Breite ...........................................55 cm
Höhe ............................................146 cm
Gewicht .......................................37 kg
Der C2 wurde nach den Richtlinien der EU für
elektromagnetische Einheitlichkeit, EMC (89/336/
EWG) gestaltet und trägt das CE KonformitätsZeichen.
Der C2 erfüllt die EN-Präzisions- und
Sicherheitsstandards (EN-957).
Aufgrund unserer kontinuierlichen
Produktentwicklung behält sich Batavus das Recht
vor, Spezifikationen ohne vorherige Ankündigung
zu verändern.
BITTE BEACHTEN: Die Hinweise bezüglich der
Montage, der Benutzung und der Wartung Ihres
Geräts müssen sorgfältig beachtet werden. Die
Garantie schliesst keine Beschädigungen ein, die
auf Fahrlässigkeit bei der Montage, Einstellung
und Wartung, wie sie in diesem Handbuch
beschrieben wurden, zurückzuführen sind.
Werden Modifizierungen ohne das Einverständnis
der Batavus vorgenommen, erlischt jeglicher
Garantieanspruch!
Wir wünschen Ihnen viele angenehme
Trainingsstunden mit Ihrem neuen Batavus
Trainingspartner
19

TABLE DES MATIERES
AVERTISSEMENTS
ASSEMBLAGE .........................................................21
UTILISATION ............................................................ 24
UNITE DES COMPTEURS ......................................26
TRANSPORT ET RANGEMENT ..............................28
MAINTENANCE .......................................................28
CARACTERISTIQUES TECHNIQUES ....................28
CONSEILS ET
AVERTISSEMENTS
Lisez attentivement ce mode d’emploi
avant d’assembler, d’utiliser ou
d’effectuer l’entretien de votre appareil
sportif. Veuillez conserver ce guide, il
contient les renseignements dont vous
aurez besoin, maintenant et C2 tard,
pour utiliser et entretenir votre appareil.
Suivez toujours les instructions très
rigoureusement. Veuillez noter que la
garantie ne couvre pas les dommages
causes par un manque de precaution
quant aux instructions de montage
et d’entretien decrites dans ce mode
d’emploi.
AVERTISSEMENTS LIES
A VOTRE SANTE
Consultez votre médecin avant de
•
commencer vos exercices.
Si vous êtes pris de nausées ou de
•
vertiges ou sentez d’autres symptômes
anormaux pendant l’entraînement,
interrompez immédiatement la session
et consultez votre médecin.
LIES A VOTRE MILIEU
D’ENTRAINEMENT
L’appareil ne doit pas être utilisé à
•
l’exterieur.
Placez l’appareil sur une surface
•
aussi plane que possible. Placez une
protection sous l’appareil.
Assurez-vous d’une ventilation
•
suffisante, mais evitez toutefois les
courants d’air.
En entraînement, l’appareil supporte
•
des températures de 10°C à 35°C.
L’appareil peut aussi être rangée à
une température comprise entre 15°C et +40°C. L’hygrométrie du
local d’utilisation ou de rangement de
l’appareil ne doit jamais excéder 90 %.
AVERTISSEMENTS LIES
A L’UTILISATION DE
L’APPAREIL
Si vous décidez de laisser un
•
enfant utiliser l’appareil, prenez
toujours en considération l’état de son
développement physique et mental ainsi
que son caractère. Donnez à l’enfant les
conseils nécessaires pour une bonne
utilisation de l’appareil et ne le laissez
jamais seul. Veillez également à ce
qu’aucun animal de compagnie ne se
trouve à proximité de l’appareil pendant
le déplacement ou pendant l’utilisation.
Commencez par vérifier que l’appareil
•
est en parfait état de marche. N’utilisez
jamais un appareil défectueux.
20
Afin d’éviter toutes douleurs
•
musculaires, commencez et terminez
vos sessions par des mouvements
d‘échauffement (pédalage lent avec une
résistance faible). N’oubliez pas non C2
B A TA V US C 2
•
M O D E D ' E M p L O I
d’effectuer des mouvements d’étirement
pour terminer votre session.
Ne vous accoudez jamais à l’unite des
•
compteurs!
Appuyez sur les touches du bout des
•
doigts: vos ongles risquent d’abîmer la
membrane des touches.
N’utilisez jamais l’appareil avec les
•
protections latérales démontées.
Ne montez jamais à deux ou à
•
plusieurs sur l’appareil.
M O D E D ' E M p L O I • B A TA V US C 2
F
Portez des vêtements et chaussures
•
appropriés.
Protégez l’unite des compteurs d’une
•
exposition au soleil et séchez toujours la
surface de l’unite des compteurs si des
gouttes de sueur sont tombées dessus.
N’effectuez jamais d ‘autres opérations
•
de réglage et d ‘entretien que celles
mentionnées dans ce guide et suivez
bien les conseils d’entretien qui y sont
donnés.
L’appareil ne doit pas être utlisé par
•
des personnes pesant C2 de 135 kg.
Cet appareil peut être utilisé à la
•
maison. La garantie de la societe
Batavus Sport ne couvre que les defauts
ou imperfections s’etant manifestes
pendant l’utilisation à la maison (24
mois). Pour information complémentaire
sur la garantie de votre équipement
de fitness, veuillez consulter votre
distributeur national de Batavus.
Attention ! Les conditions de la garantie
peuvent varier selon les pays.
Nous recommandons également de déballer et
d’assembler l’appareil dans un lieu sûr. Les termes
gauche, droite, devant et derrière sont utilisés
comme si vous étiez en position d’exercice sur
l’appareil. Laissez au moins 100 cm d’espace libre
devant, derrière et sur les côtés.
TUBES D’APPUI ARRIèRE ET AVANT
Fixez le tube de pied arrière à l’aide des vis, des
rondelles et des écrous borgnes au cadre principal.
N’essayez pas d’effectuer d’autres
•
entretiens ou réglages que ceux décrits
dans ce mode d’emploi. Les autres
opérations doivent être laissées aux
soins des personnes compétentes
dans l’entretien des dispositifs
électromagnétiques et autorisées, aux
regards des lois du pays concerné (ou
équivalent) à accomplir les travaux
de maintenance et de réparations.
Les instructions de maintenance de
ce mode d’emploi doivent être suivies
scrupuleusement.
ASSEMBLAGE
Pour l’assemblage, il faut deux personnes.
Kit d’assemblage (le contenu avec * dans la liste des
pièces détachées) : Conservez les outils de montage,
vous pourrez en avoir besoin pour régler l’appareil
par exemple
Si vous remarquez qu’il manque une pièce à
votre appareil, veuillez prendre contact avec
votre vendeur et lui indiquer le modèle, le
numéro de fabrication et le numéro de la pièce
manquante (voir derniere page de ce manuel). En
l’emballage il y a aussi un sachet destiné à absorber
l’humidité pendant le transport et le stockage.
Fixez le tube de pied avant au cadre principal de
la même manière qu’à l’arrière. Veillez à ce que les
roulettes des pieds soient tournées vers l’avant et
vers le bas.
TUBE DU CHâSSIS AVANT
Tirez le capot du tableau de commande, qui sera
monté par la suite sous ledit tableau, et le couvercle
du tube sur le tube du guidon, ainsi que la bague
en mousse du couvercle du tube sur le tube du
guidon et poussez-la vers le haut.
21
Reliez maintenant le câble d’en haut et le câble
d’en bas, qui sort du tube du cadre principal.
d’écartement et de la mollette de réglage. Posez
la barre du guidon dans la cavité (E) du tube.
ATTENTION: la cheville (F) doit être enfichée dans
la fente (G)! Tirez ensuite la pince du guidon
sur le tube du guidon et fixez tout d’abord la vis
inférieure avec la rondelle. La pince du guidon
doit s’entortiller de manière égale autour du tube.
Insérez la mollette de réglage avec la rondelle et
la douille d’écartement dans l’orifice supérieur et
serrez. Tirez ensuite le câble de mesure du pouls par
l’ouverture (H) en dessous de la plaque de support
(J) et faites-le sortir du tube du guidon.
COMPTEUR
Posez le tube du guidon sur le tube du cadre
principal et fixez-le à l’aide des vis et des rondelles.
Faites attention à ne pas endommager les câbles.
Tirez le couvercle du tube et la bague en mousse,
qui reste dans le couvercle du tube, sur le boîtier,
vers le bas.
GUIDON
Pour monter le tableau de commande, vous devez
tout d’abord relier le câble d’en haut et le câble
de mesure du pouls aux câbles du tableau de
commande. Tirez ensuite le tableau de commande
depuis le haut sur la plaque de support (I) du tube
du guidon. Faites attention à ne pas endommager
les câbles. Fixez le tableau de commande à l’aide
des vis. Ne serrez pas les vis trop fort. Si vous
le souhaitez, vous pouvez maintenant insérer le
porte-livres fourni dans la fente (J) du tableau de
commande. Vous pouvez maintenant tirer le capot
du tableau de commande vers le haut et le loger
B A TA V US C 2
•
dans la partie inférieure du tableau de commande.
Veillez à bien ajuster les broches d’arrêt (K).
22
Le montage du guidon se fait à l’aide de la pince
du guidon et de la vis, des rondelles, de la douille
M O D E D ' E M p L O I
M O D E D ' E M p L O I • B A TA V US C 2
F
SELLE
Posez le renfort de selle et ensuite la mollette
de réglage et faites encliqueter la cheville de la
mollette de réglage dans un des orifices du renfort
de selle. Serrez la mollette de réglage. Pour monter
la selle sur le renfort de selle, faites glisser la pince
prémontée (L, sous la selle) sur le tube de support
(M) du support de selle. Orientez la selle et vissezla à l’aide de la vis de serrage. Vous pouvez encore
régler la distance horizontale entre le guidon et la
selle à l’aide de la mollette de réglage.
PÉDALES
TRANSFORMATEUR
Avant de brancher l’appareil à une source
d’alimentation, assurez-vous que la tension locale
correspond à celle indiquée sur la plaque de type.
Le C2 fonctionne soit en 230 V soit en 115 V
(modèles américains).
Branchez d’abord la petite fiche dans la prise
(N) du boîtier de l’appareil. Raccordez ensuite le
transformateur à une prise 230 volts. L’appareil est
maintenant prêt à être utilisé.
CONSIGNES DE SÉCURITÉ POUR
L’UTILISATION D’APPAREILS ÉLECTRIQUES
N’utilisez pas votre appareil d’exercice si le câble
•
ou l’appareil sont endommagés.
Protégez le câble d’alimentation des sources de
•
chaleur.
N’utilisez pas votre appareil d’exercice en plein
•
air ou dans des endroits humides.
Ne faites pas passer le câble d’alimentation sous
•
un tapis et ne mettez pas d’objets sur le câble.
Retirez la fiche de la prise avant de transporter
•
l’appareil, de procéder à une intervention
d’entretien ou d’ouvrir le boîtier.
Le câble reliant le transformateur à l’appareil ne
•
doit pas être modifié (par exemple, allongé).
Vissez maintenant les pédales sur les pas de vis de
la manivelle. Vissez la pédale gauche (marquée
d’un L) à la manivelle gauche. Utilisez un tournevis
et tournez dans le sens contraire des aiguilles d’une
montre. Vissez la pédale droite (marquée d’un R)
à la manivelle droite en tournant dans le sens des
aiguilles d’une montre. Fixez ensuite les cale-pieds
aux pédales et réglez-les comme souhaité.
ATTENTION !
L’appareil doit être branché sur une prise à la
•
terre. N’utilisez pas de rallonge.
Assurez-vous que le cordon ne passe pas
•
pardessous l’appareil.
DANGER: il faut toujours couper l’alimentation
et débracher l’appareil immédiatement apr’es
utilisation.
ATTENTION ! Pour réduire le risque de brûlure,
de feu, de choc électrique ou de blessures sur les
personnes:
1) Un appareil ne doit jamais être laissé sans
surveillance quand il est branché.
2) Ne faîtes pas fonctionner l’appareil sous une
ouverture ou avec des matériaux combustibles. Une
chaleur excessive peut avour pour conséqunce un
feu, un choc électrique ou blesser quelqu’un.
23
 Loading...