

Page 1
DIGITAL INCLINOMETER
EASY TO USE
Range-of-motion can be read directly after the joint has been taken through its range.
Place inclinometer near the joint to be measured; set the “alternate zero”; move joint
through its range; press the “hold” button. Read range-of-motion.
Digital Inclinometer Operating Instructions
12-1057
ver 03/14
Fabrication Enterprises, Inc.
PO Box 1500
White Plains, NY 10602 (USA)
tel: +1-914-345-9300
fax: +1-914-345-9800
www.FabEnt.com
FEI
Authorized CE representative
RMS UK Ltd.
28 Trinity Road
Nailse, Somerset BS48 4NU (UK)
© 2014 FEI, all rights reserved
Baseline® is a registered trademark of Goldberg
Page 2
absolute zero and alternate (relative) zero
absolute zero mode: when in absolute zero mode, there is no REF icon on LCD. If REF icon is
present, short press on / off / alternate zero button to enter absolute zero mode. LCD displays
angle of absolute horizontal level. If unit is rotated clockwise from absolute zero a + sign is present in front of values. If unit is rotated counterclockwise from absolute zero a - sign is present.
For absolute (horizontal zero) measurement, put the unit near the joint needed to be measured.
The inclinometer shows the angle between the inclinometer plane and the horizontal plane. Allow
the reading to settle before noting the angle.
alternate (relative) zero mode: Setting an alternate reference point allows you to set any angle
to ZERO. This new ZERO is now a reference point from which to take measurements. For instance, you may want a surface that is actually 25° off absolute zero (horizontal) displayed as
ZERO so you can measure all other angles relative to that benchmark. See the example below
for Relative angle measurement:
1. If the unit is in absolute zero mode, the REF icon will not appear on the LCD. Put the inclinometer on the surface that is actually 20° off the horizontal plane. The unit reads 20°.
2. Press the on / off / alternate zero button to toggle to alternate zero mode (the icon REF is now
visible and the angle readout is now ZERO).
3. Put the inclinometer on the surface that is actually 30° off the horizontal. The “10.0°” shown
on the display is relative to the 20° off the horizontal plane.
REF icon is
visible
This angle readout is 20° in
absolute zero mode
This angle readout is 0° in
alternate zero mode
This angle readout is 10° in
alternate zero mode
Change to
relative measurement
mode by pressing
alternate zero button
Horizontal plane
Operating Instructions:
NOTE: If the unit has been dropped, follow calibration and set-up instructions on following page.
on / off / alternate zero button
Press once to turn the LCD display screen on. Press the button again to toggle the screen measurement between absolute zero and alternate (relative) zero mode. REF icon displays when unit
is operating in alternate zero mode. Long press to turn off the LCD.
hold button
If you want to lock the reading while performing a measurement, simply press the hold button
once the measurement settles. The angle reading will freeze and you can record the reading. An
H icon will appear on the LCD. You can cancel this function by pressing the hold button a second time. You will now be viewing live angle measurements. Note: changing from relative to absolute zero mode cannot be done when the H icon is visible.
light button
Press once to open / close the back light.
+
-
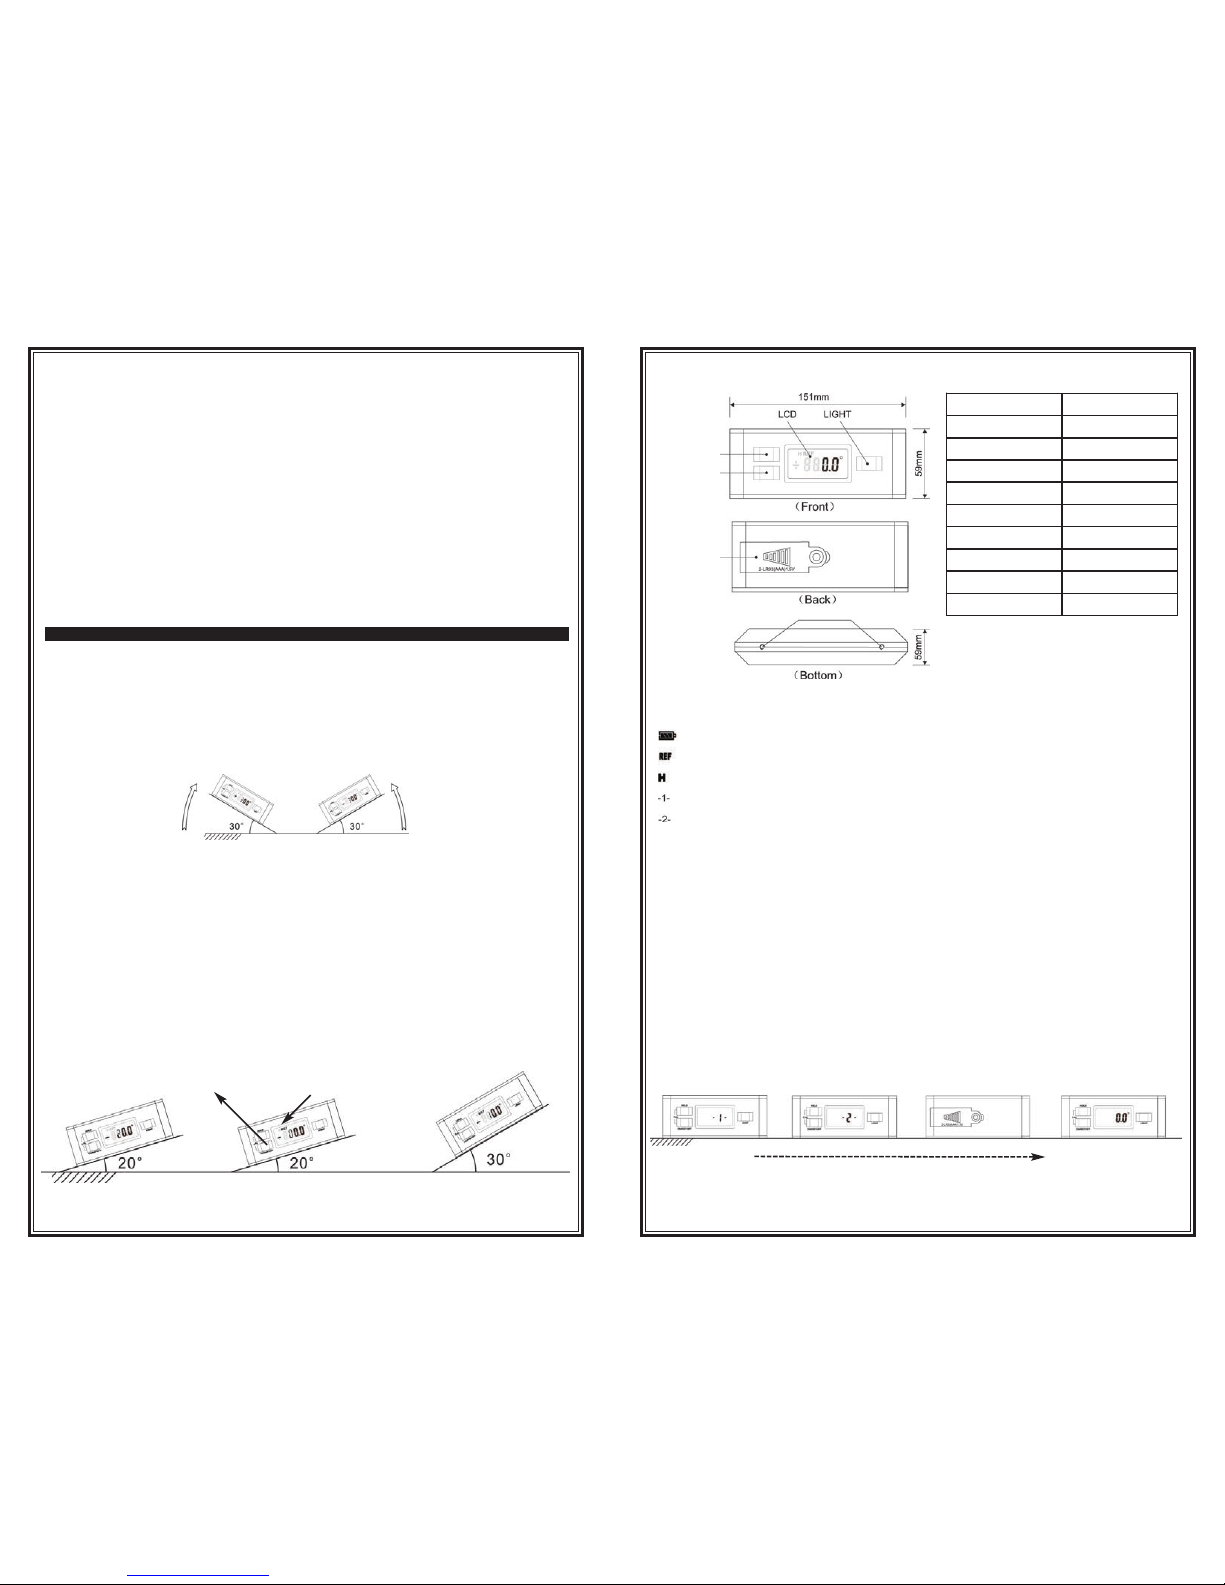
Appearance and technical data
hold
on / off /
alternate zero
battery
compartment
screw-holes for leveling feet
measuring range 0~360°
resolution 0.1°
accuracy
+/- 0.5°
power DC3V (AAA x 2)
battery life
100 hours continuous
working without back-light
working temperature
-10°C to 50°C
working humidity
<85%
transportation and storage
temperature
-20°C to 70°C
IP level
IP65
low battery indicator
battery sign flashing when
voltage below 2.2V
LCD screen icons
Replace batteries when the Battery Power icon is flashing. Only flashing when voltage below 2.2V.
Indicates that the inclinometer is measuring in alternate zero (relative) mode.
This icon appears on the screen when the HOLD function is activated.
Indicates that the inclinometer is calibrated for one direction.
Indicates that the inclinometer is calibrated for another direction
Calibration
The digital inclinometer has been pre-calibrated at the factory. The product should only be recalibrated if it has been dropped. (see steps below)
1. Place the unit on a flat horizontal surface, press hold button and on / off / alternate zero button at the same time. The calibration mode is activated and a “-1” will be displayed.
2. Press on / off / alternate zero button again, “-1-” will flash briefly. Do not move unit until “-2-”
displays.
3. Rotate unit 180 degrees in the same location and press on / off / alternate zero button, “-2-”
will flash briefly. Do not move until the unit has completed the calibration and reset the display
to the current level.
calibration completestart calibration
 Loading...