


Easy iCAM

Easy iCAM
Video Surveillance Camera
Remote Wireless
User's Manual
Manuel de l'utilisateur
Manual del Usuario
Bedienungsanleitung
Manuale d'uso
ENGLISH
FRANÇAIS
ESPAÑOL
DEUTSCH
ITALIANO
Please read carefully before using this equipment.
Watch
anytime and anywhere
the things that matter to you
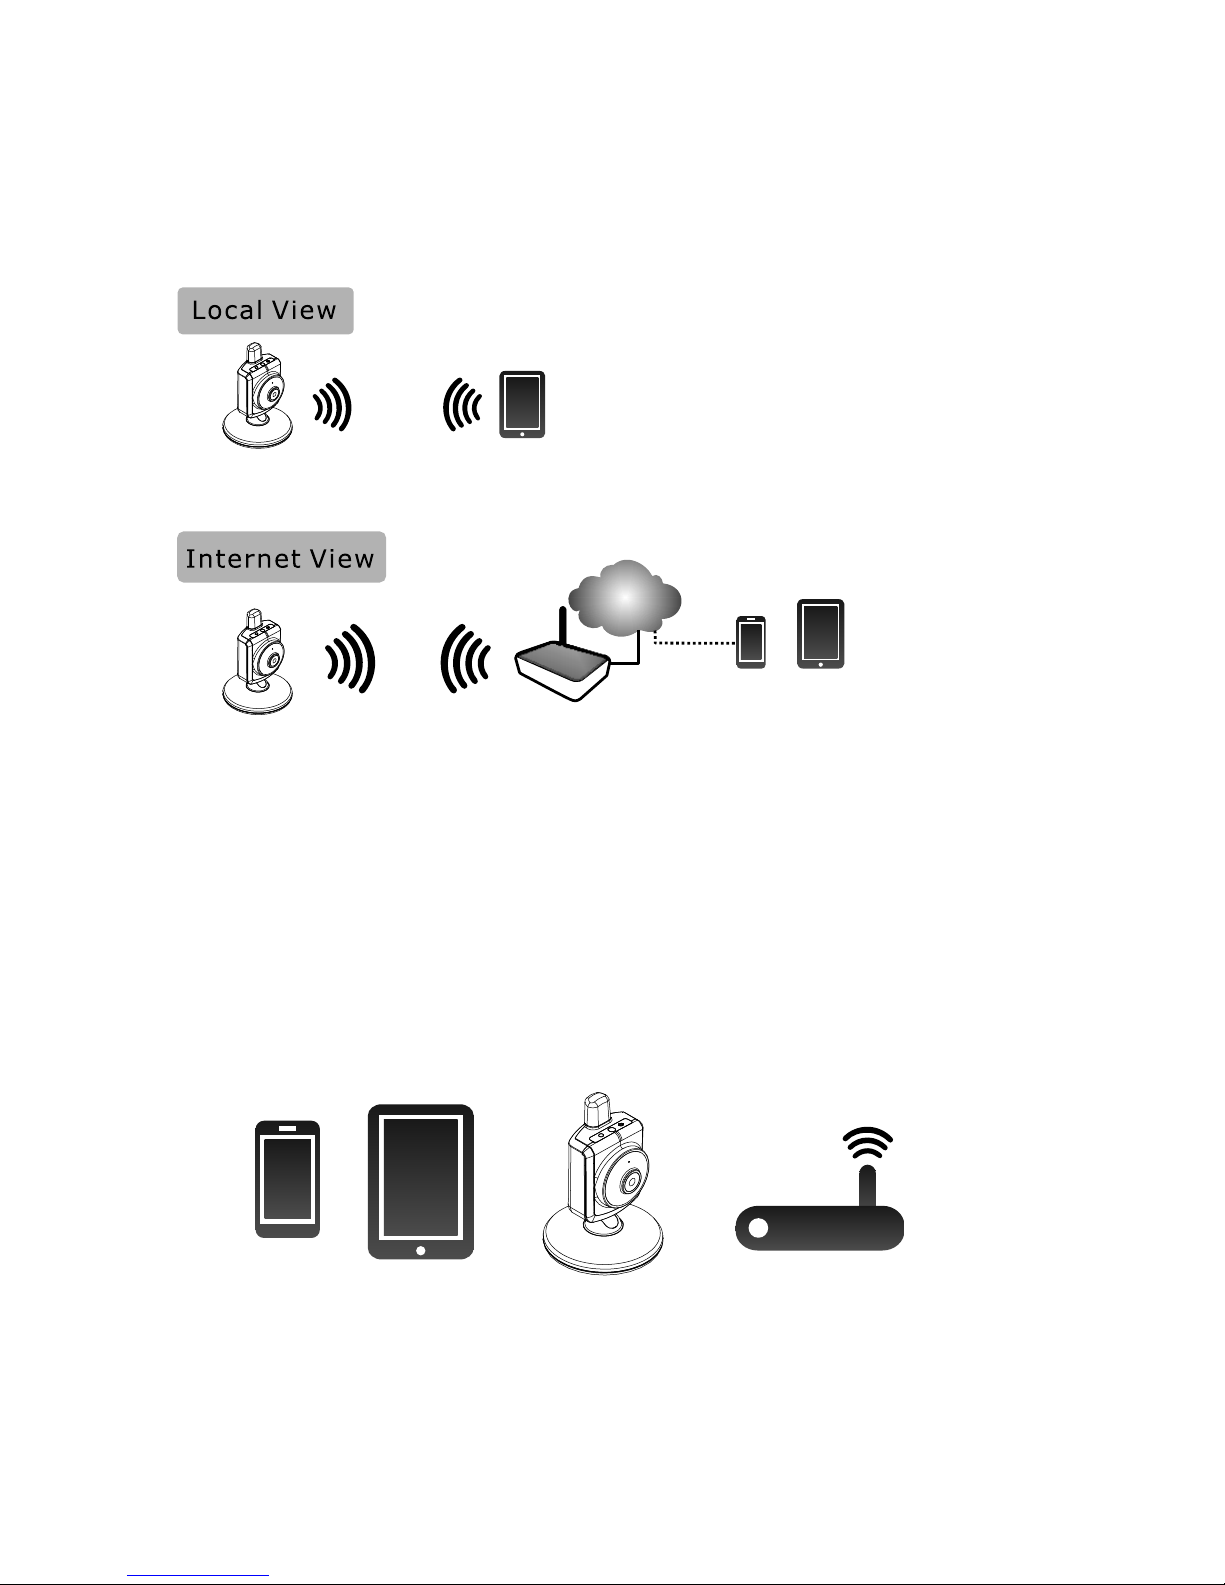
Easy iCAM is a wireless network camera. It can connect with your
smartphone or tablet wireless technology, and monitor everything
on your smartphone or tablet anywhere and anytime.
via
that matters to you
Before you start you need:
iPhone, iPad,
Android smartphone
or Android tablet
Wi-Fi router
(for remote access)
Smartphone,TabletEasy iCAM
1
Easy iCAM
Easy iCAM
Smartphone,Tablet
Wi-Fi Router
Internet
2
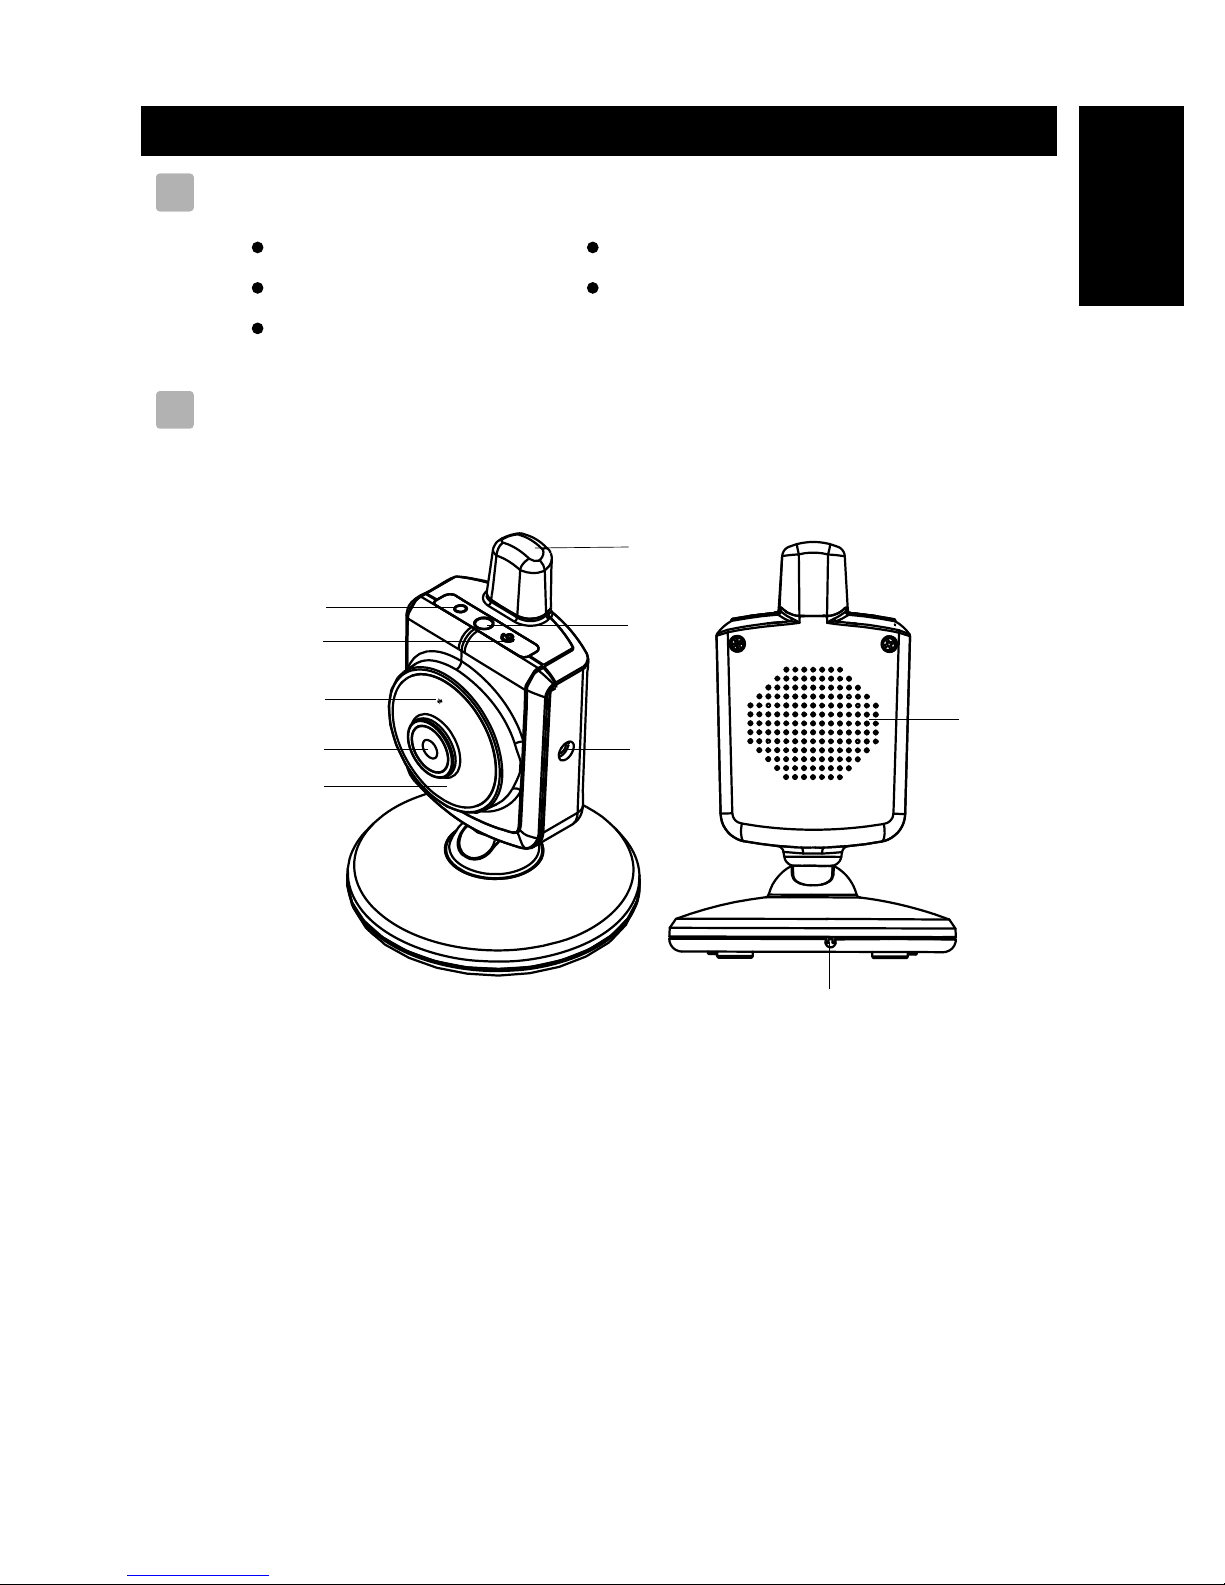
Product Layout
Camera
Package Contents
One Camera
One Adapter
Two Screws and Two Wall Anchors
EN
ENGLISH
This User's Manual
Two Cable Clips
2
11
1.
2.Power/status LED
3.Light sensor
4.Reset to factory default button
5.Microphone
6.Camera lens
7.Infrared LEDs
8.Power adapter plug
9.Speaker
10.Temperature sensor
Antenna
9
10
2
4
5
6
1
7
3
8
3
First-time Setup
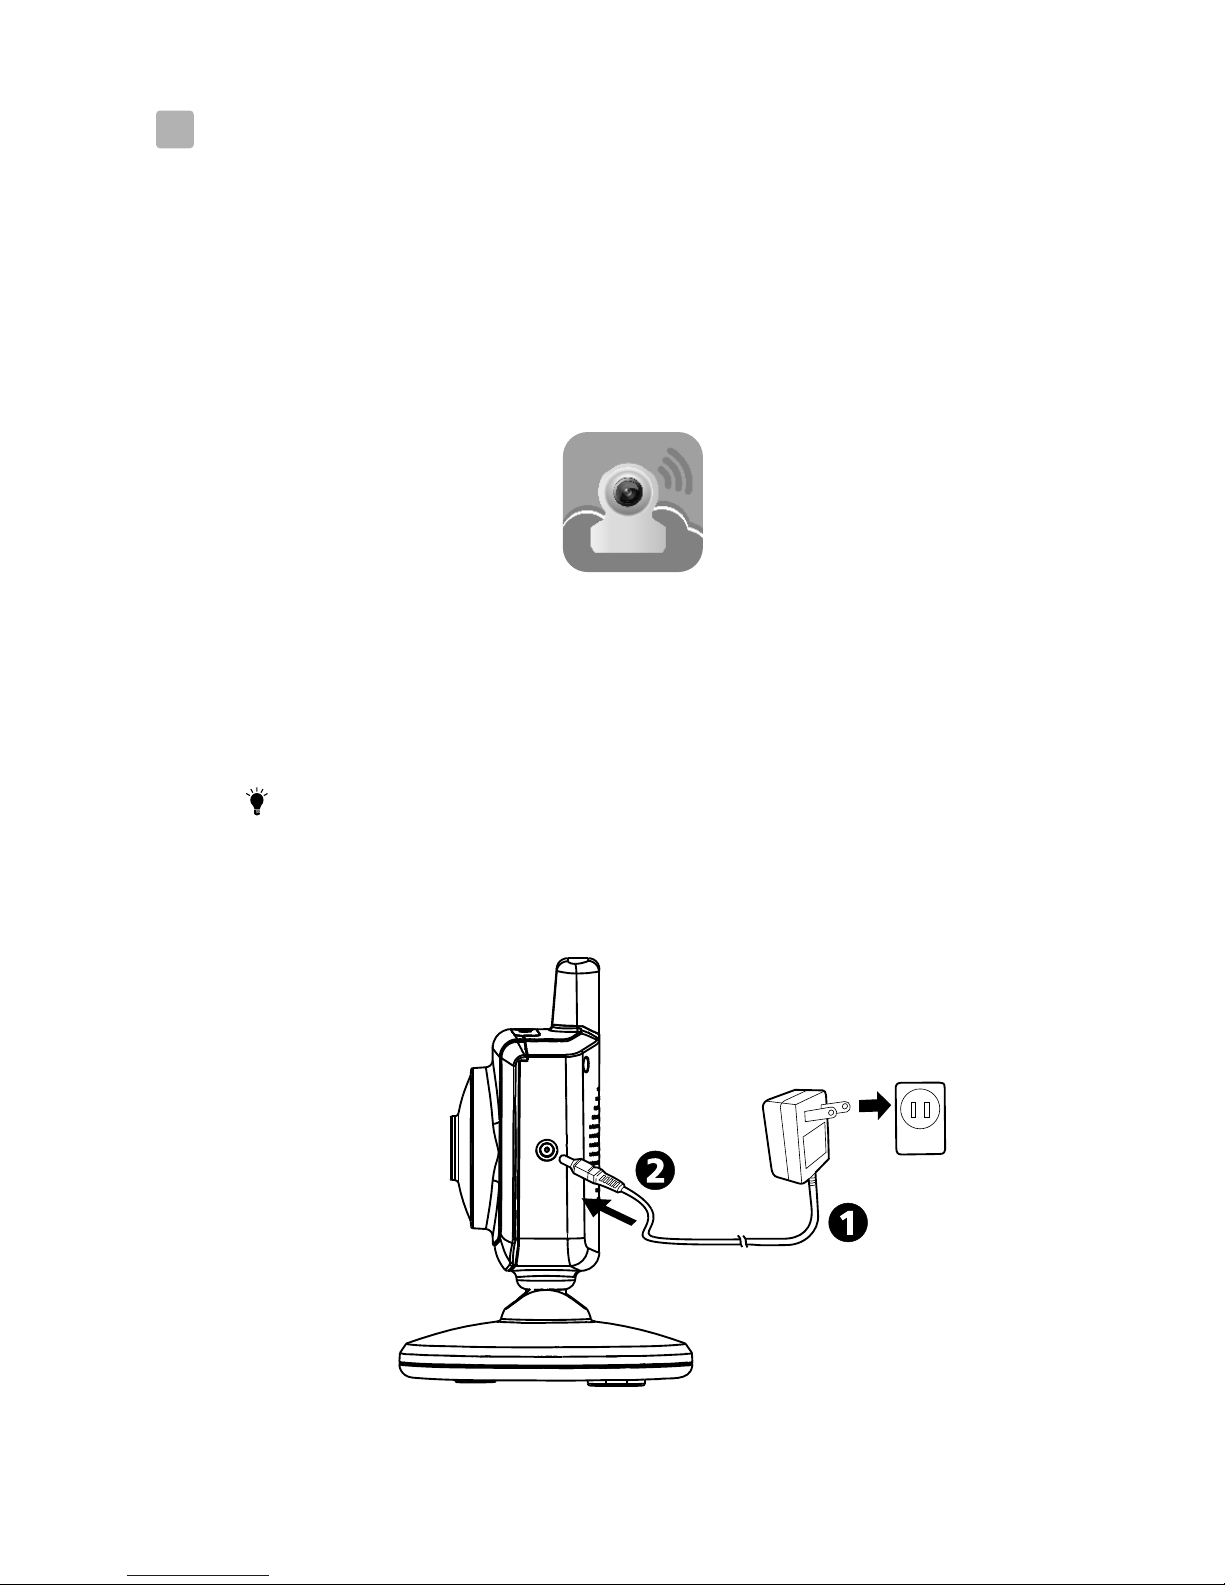
Power on the camera
Before setting up
1. Make sure your Wi-Fi router is turned on and it can connect
to the Internet.
2. Download Easy iCAM app:
Key in the keyword “Easy iCAM” and download the
app from the Apple App Store or Android Market
(Google Play).
3.2
3.1
3
Plug one end of the provided power adapter into a wall outlet and the
other end into the back of the camera. The LED on the camera will
glow orange and then change to red.
Note 1: Use the adapter labeled OUTPUT:6V DC with the camera.
2: When you power the camera on, it takes around
40 to 60 seconds for initial setup.

4
Connect your smartphone or tablet to the camera
1. Turn on the Wi-Fi of your smartphone or tablet.
2. Tap the screen to select “Easy_iCAM_XXXXXX”
under Wi-Fi Networks.
3. Enter the password for
“Easy_iCAM_XXXXXX”. The default password is
“12345678”.
iPhone/iPad Android system
iPhone/iPad Android system
3.3

5
Setting up the camera and Internet connection
1. Launch the Easy iCAM App on your smartphone or tablet.
2. Follow the on-screen app instructions.
3. Setting up the camera name (SSID) or password:
The screen will show a message that reminds you to
change the Wi-Fi camera name (SSID) or password.
a. If you select “Yes”, you can change the Wi-Fi camera
name or password. When you complete the setup of
camera name or password and tap the ok icon, the app
will ask you if you want to set up an Internet connection.
If you select “Yes”, Internet setup will be started.
If you select “No”, the camera will restart to change the
camera name and password automatically.
At this stage please make sure your smartphone or tablet
is connected to the camera because the camera name or
password is changed.
Note: The password must contain at least eight characters.
b. If you select “No”, the app will ask you if you want to
set up an Internet connection.
4. Setting up an Internet connection:
The screen will show a message asking if you want to set up
an Internet connection.
a. If you select “Yes”, the camera will scan for available
Wi-Fi networks in range. Tap the name of your Wi-Fi
network, and enter the password of your Wi-Fi router if
necessary. Then the first-time setup is done.
Note 1: If the camera cannot find the Wi-Fi network
you want to connect to, please tap the scan icon to
rescan for available Wi-Fi networks.
2: If you complete the Internet setup successfully,
the power/status LED will glow green after
1 to 2 minutes.
b. If you select “No”, the first-time setup is done.
Note: If you don’t set up an Internet connection, you can
only get live video feeds by connecting the camera
with your smartphone or tablet directly.
3.4
6
Easy-iCAM is a wireless network camera. It can connect with your
smartphone or tablet by wireless technology directly, and you can
watch live video feeds on your smartphone or tablet in local view
mode. In Internet view mode, your smartphone or tablet needs to
connect to the camera through a Wi-Fi router or 3G/4G mobile
network, then you can access a live stream of video and audio on
your smartphone or tablet from anywhere in the world.
Note: Local view – Your smartphone or tablet connects to
the camera directly.
Internet view – Your smartphone or tablet connects
to the camera through a Wi-Fi router or 3G/4G mobile
network.
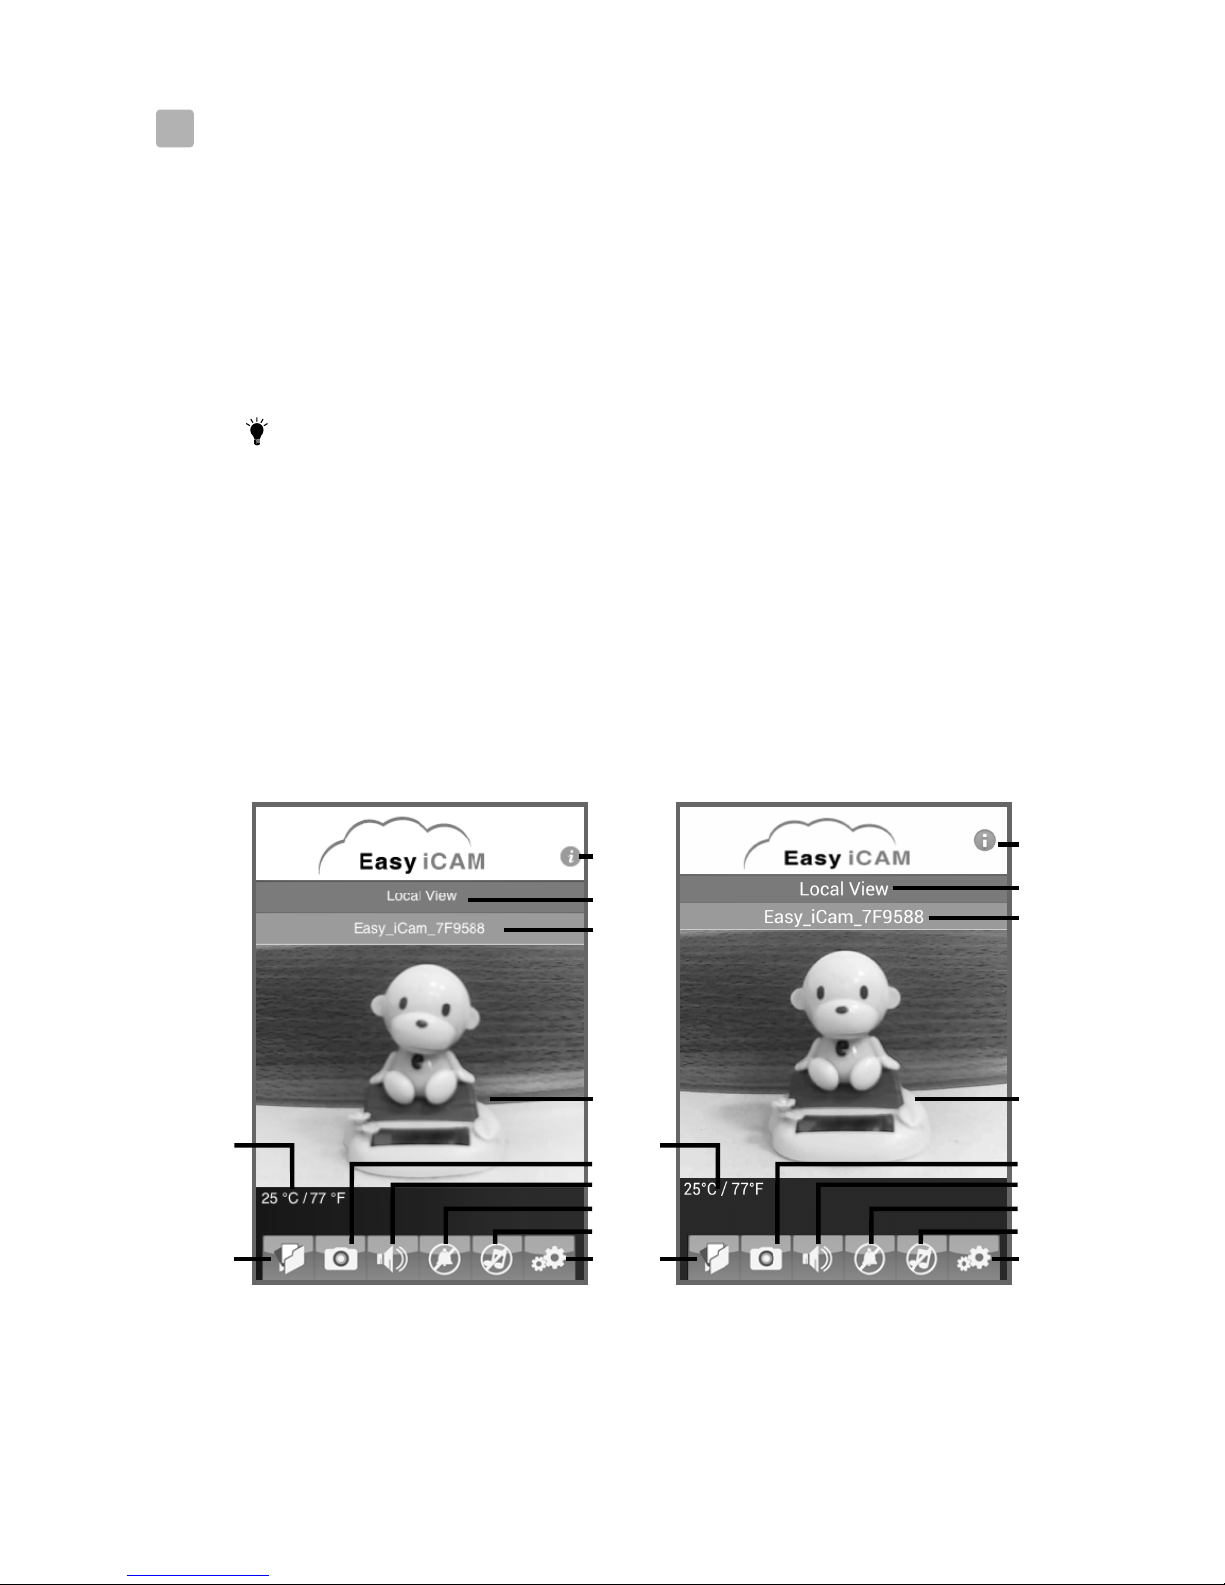
Operation Mode – Local View/Internet View:
Local view
When your smartphone or tablet connects with the camera
directly through Wi-Fi, you can launch the Easy iCAM app to
operate it in local view mode.
iPhone/iPad
1. Information
Tap the icon to get information about the camera.
2. Operation mode
This row shows the current operation mode of the app.
4
4.1
Android system
1
2
3
4
6
9
10
7
5
11
8
1
2
3
4
6
9
10
7
5
11
8

7
3. Camera name (SSID)
This row shows the camera name, which is the same as the Wi-Fi
Network (SSID).
4. Image display area
Touch the image display area of the screen with two fingers and
move them apart for zoom function. You also can slide on the
screen for digital pan-tilt function.
5. Photo
Tap the icon to see all of the photos you have taken.
6. Snapshot
Tap the icon to save a snapshot of the camera on your smartphone
or tablet.
7. Audio ON/OFF
Tap the icon can turn on or off the sound.
8. Voice activation function (VOX)
Tap the icon to turn on the voice activation function, tap it again to
turn the function off. If you turn on the function and then press the
home button on your smartphone or tablet to exit the app, the screen
will show a reminder message when the volume level from camera
unit is higher than the volume setting level. Tapping or sliding the
reminder message icon can launch the app directly.
Note 1: If you turn on the voice activation function and press the
home button on your smartphone or tablet to exit the
app, the VOX function can still work and remind you of
audio events from the camera.
2: If you want to exit the app completely, please double-
click the home button on your iPhone/iPad when it is in
home screen status, and then tap the Easy iCAM icon
until the cancel symbol appears. When you exit the
app completely, the voice activation function can’t work.
3: If you want to exit the app completely, please press the
back button on your Android system. When you exit
the app completely, the voice activation function can’t work.
4: The voice activation function can only work in local view
mode.
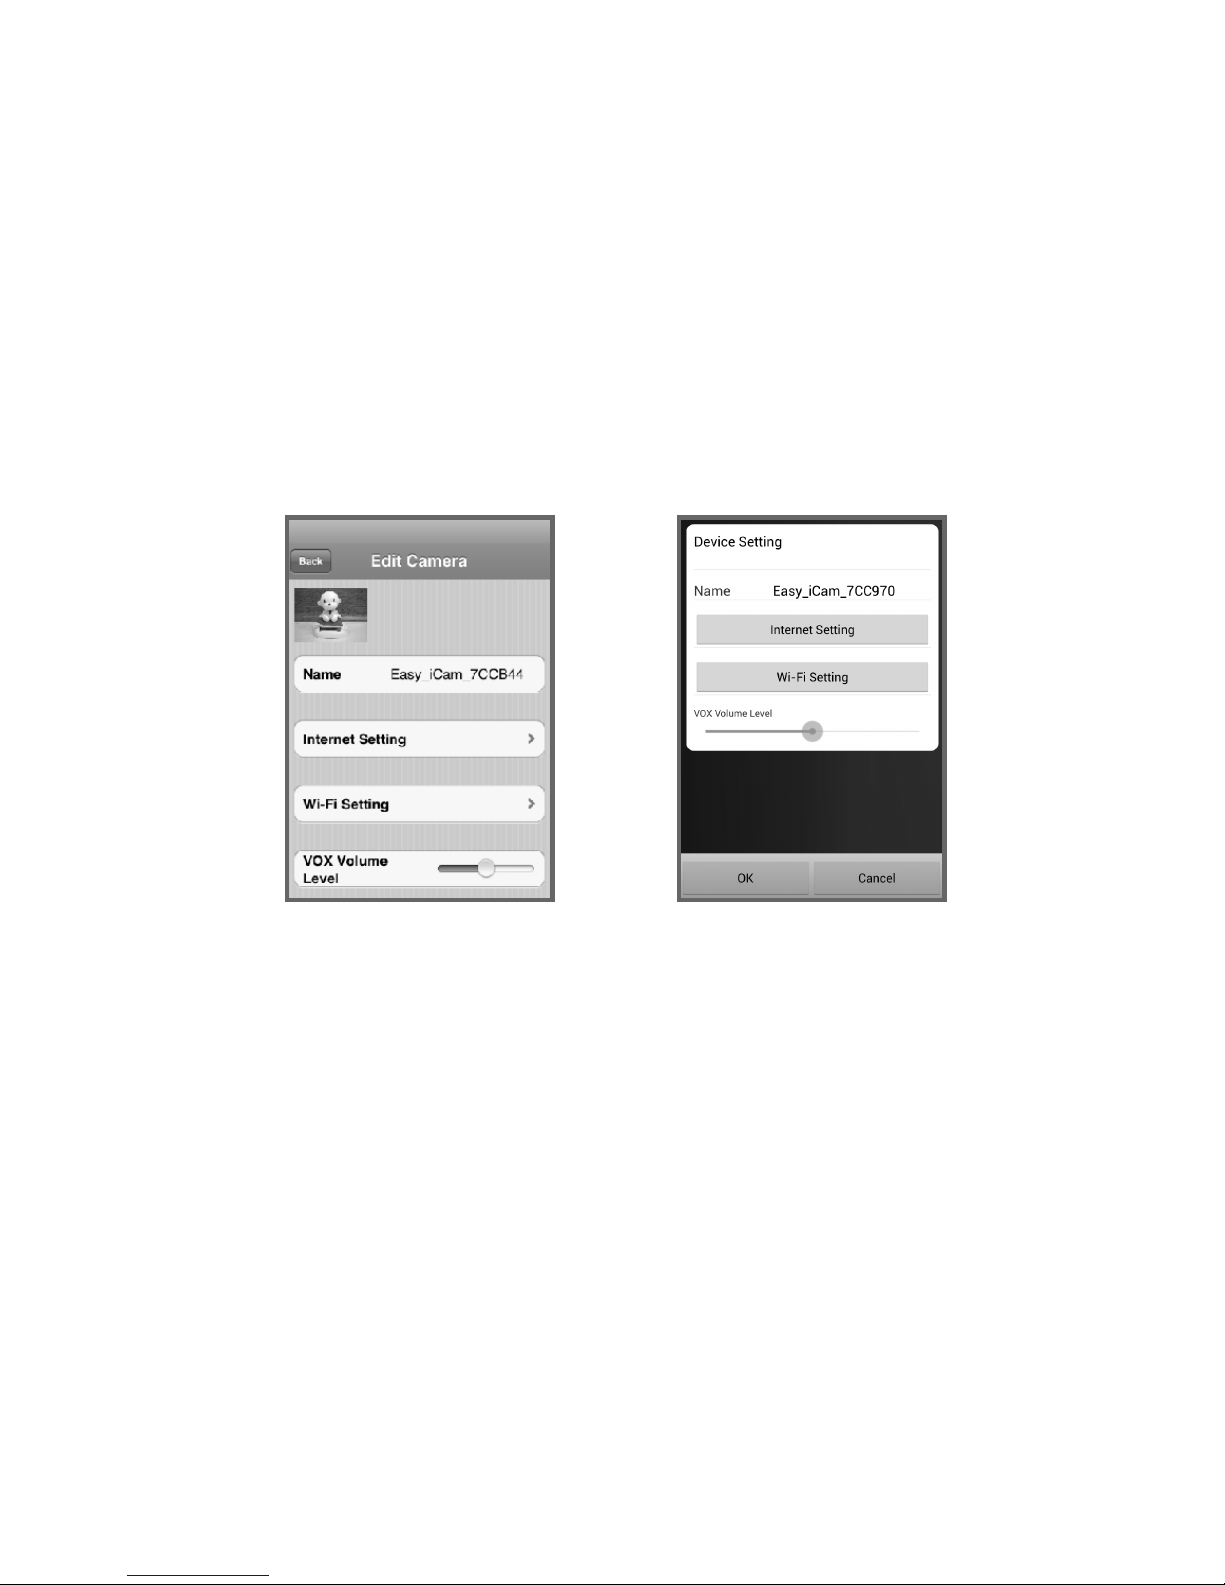
9. Setting
Tap the icon to set up camera functions.
a. Internet Setting
You can setup an Internet connection, or change the camera
connection to another Wi-Fi router.
b. Wi-Fi Setting
If you want to change the camera name (Wi-Fi SSID) or
password, please tap this row to carry out the change.
c. VOX Level (volume trigger level)
Tap and slide the VOX Level bar to adjust the volume trigger level.
iPhone/iPad
Android system
8
Internet view
If the Internet connection of your camera has been setup and
the Power/Status LED glows green, the camera can link to the
Internet and you can access a live stream of video and audio on
your smartphone or tablet in Internet view from anywhere in
the world. Please make sure your smart phone or tablet can link
to the Internet by a Wi-Fi router or 3G/4G mobile network, and
then launch the Easy iCAM app.
4.2
10. Music function
You can play the music with the camera (three piece of music).
Tap the icon to play the music. Tap the icon again to play the next
music.
11. Temperature display
Internet view for
iPhone/iPad
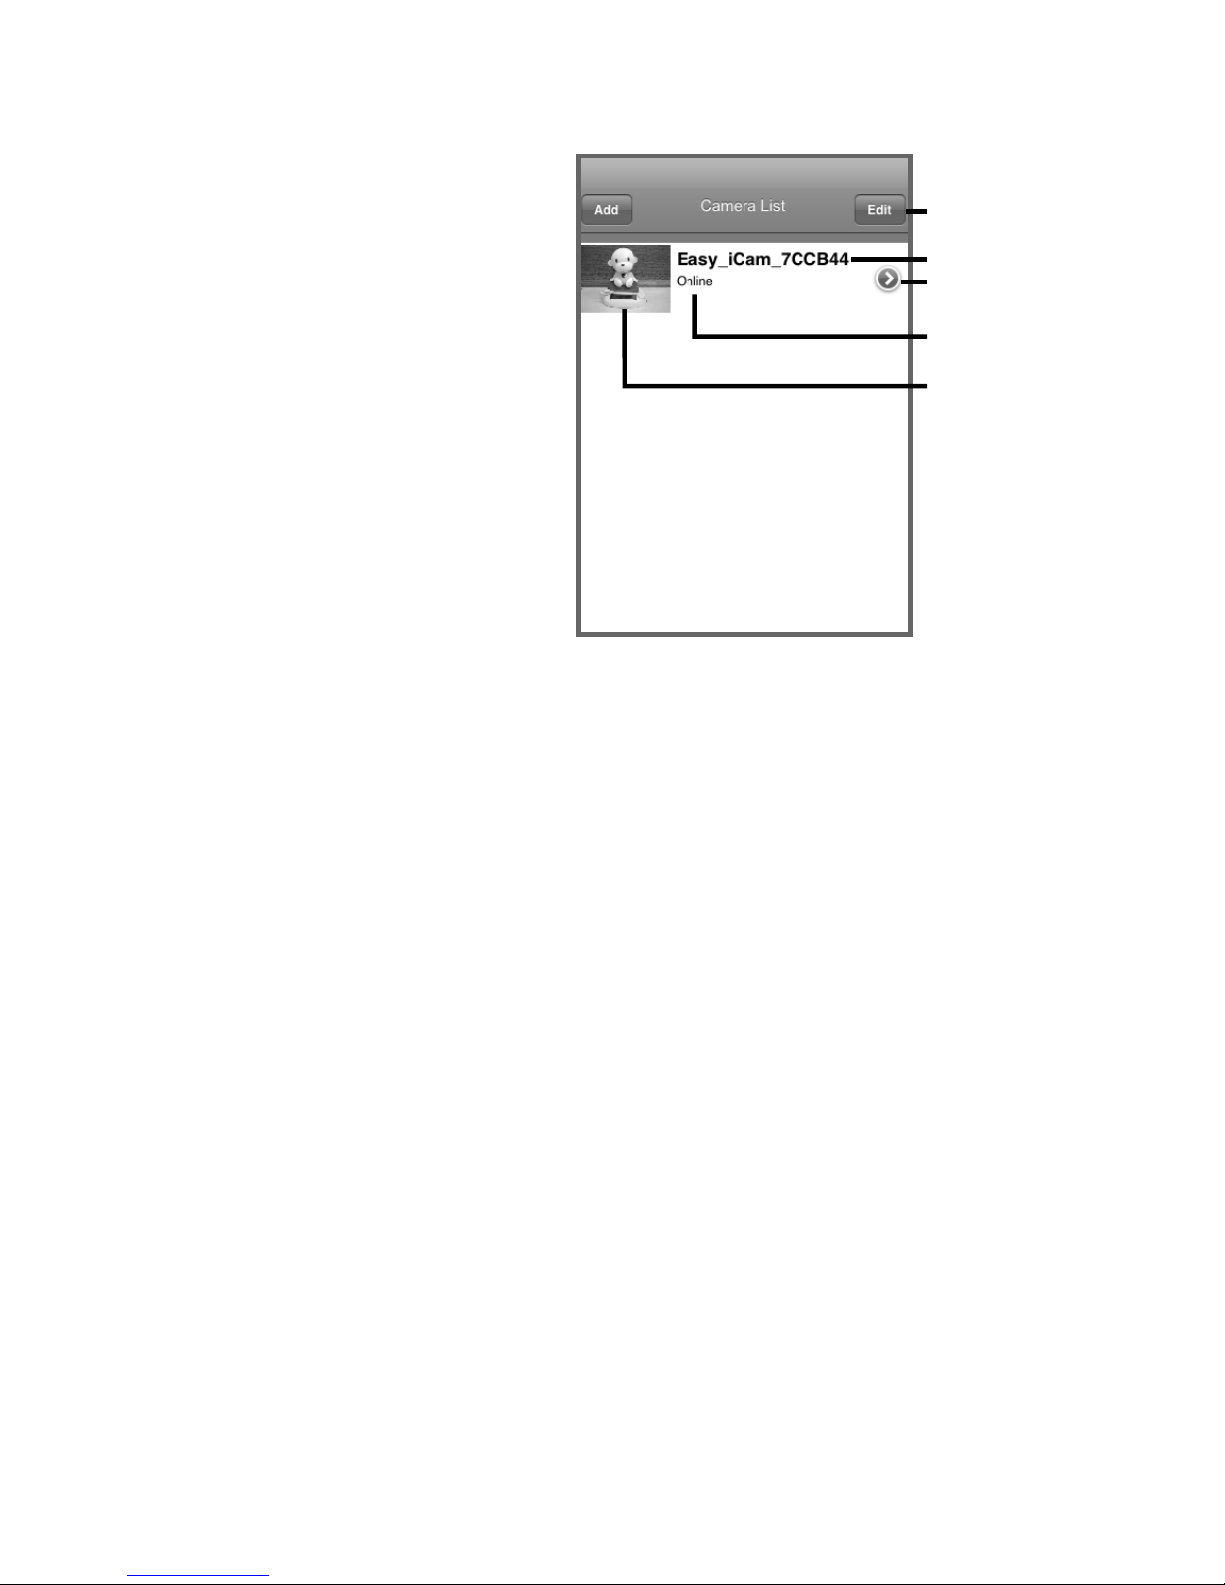
1. Camera name (SSID)
When you launch the app, all the Easy-iCAM cameras you
have added will be shown on the screen.
2. Camera status:
a. Online
If the camera status shows “online” you can tap the
camera photo to see the video of the camera.
b. Connecting
If the camera status shows “connecting” you need to wait
until the status changes to online, and then tap the camera
photo to see the video of the camera.
c. Offline
If the camera status shows “offline”; you need to tap the
arrow icon beside the camera name, and then tap
“Reconnect” to re-confirm the Internet connection.
3. Tap the arrow icon and you can see the screen shown below.
a. Password
If you have changed the camera password with another
smartphone or tablet, you need to tap the row to correct the
password for Internet connection.
iPhone/iPad
5
1
3
4
2
9
4.2.1
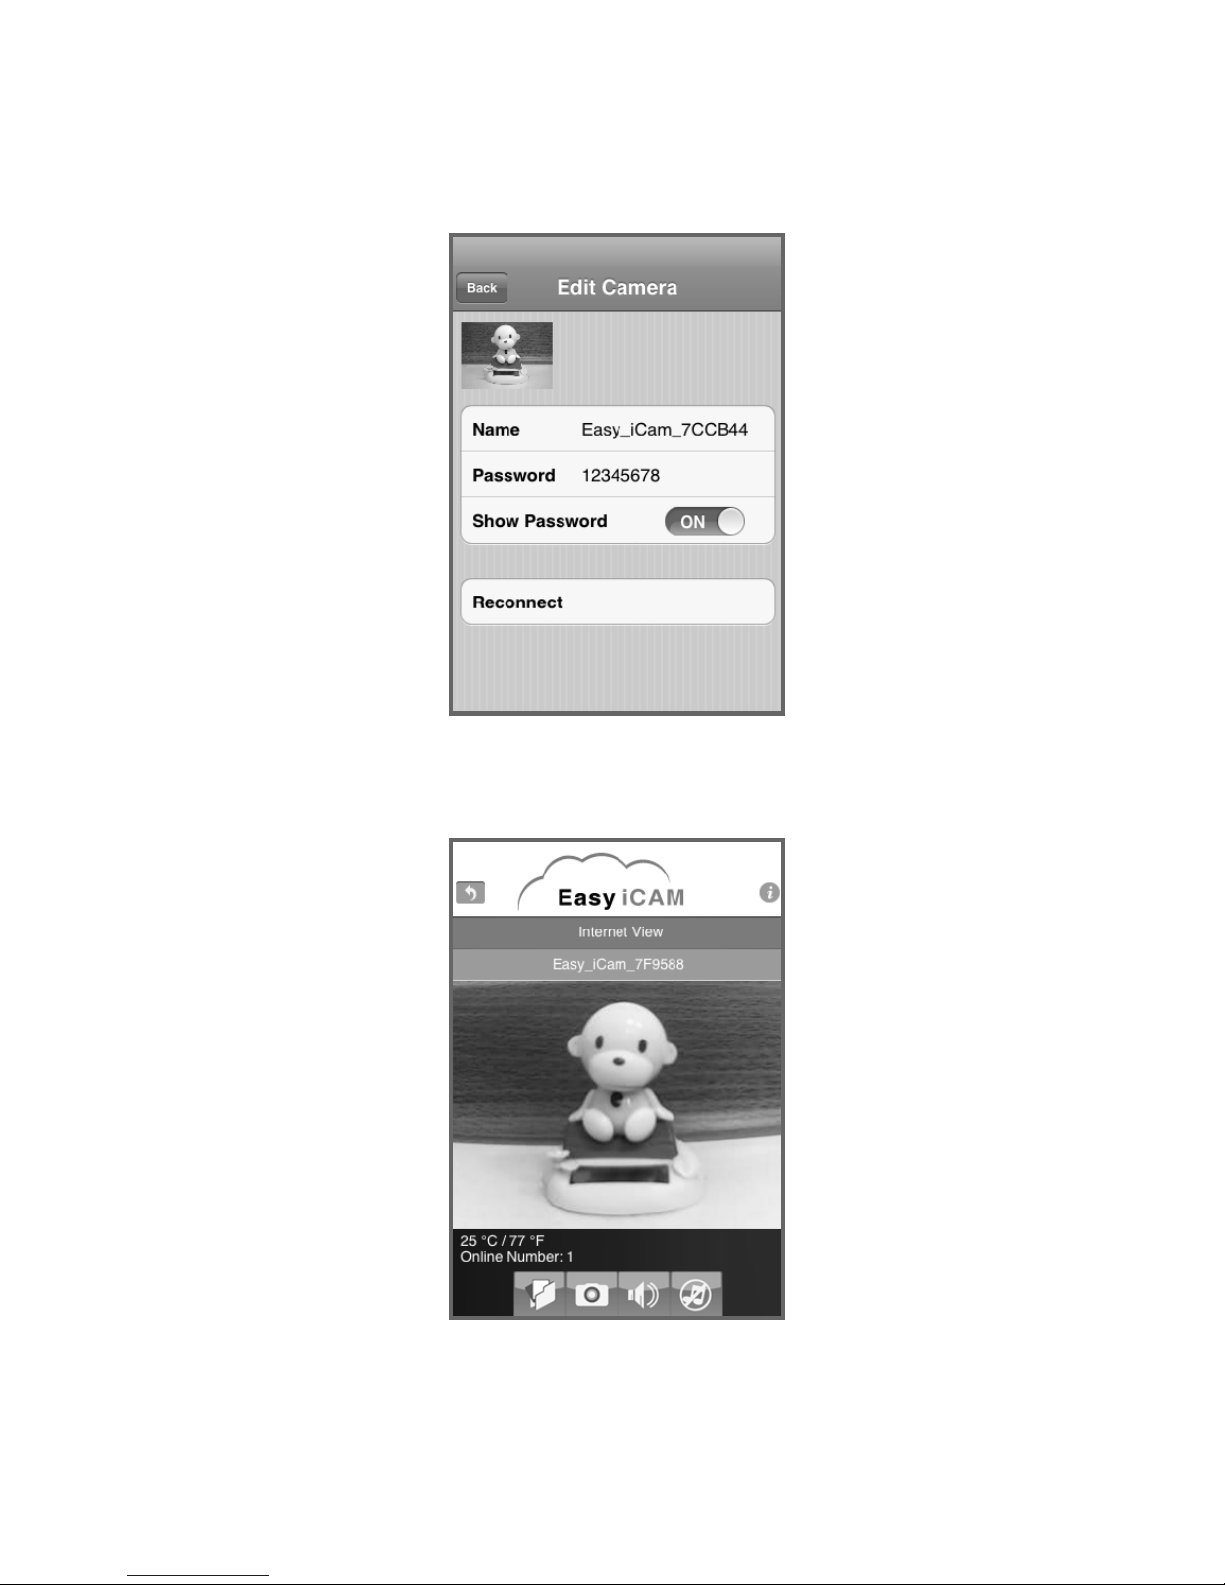
b. Reconnect
You need to tap “Reconnect” to re-confirm the Internet
connection if the camera status shows offline.
4. Camera photo
Tap the camera photo to see the video of the camera.
5. Edit
Tap the Edit icon to select which camera you want
to delete.
10
Internet view for
Android system
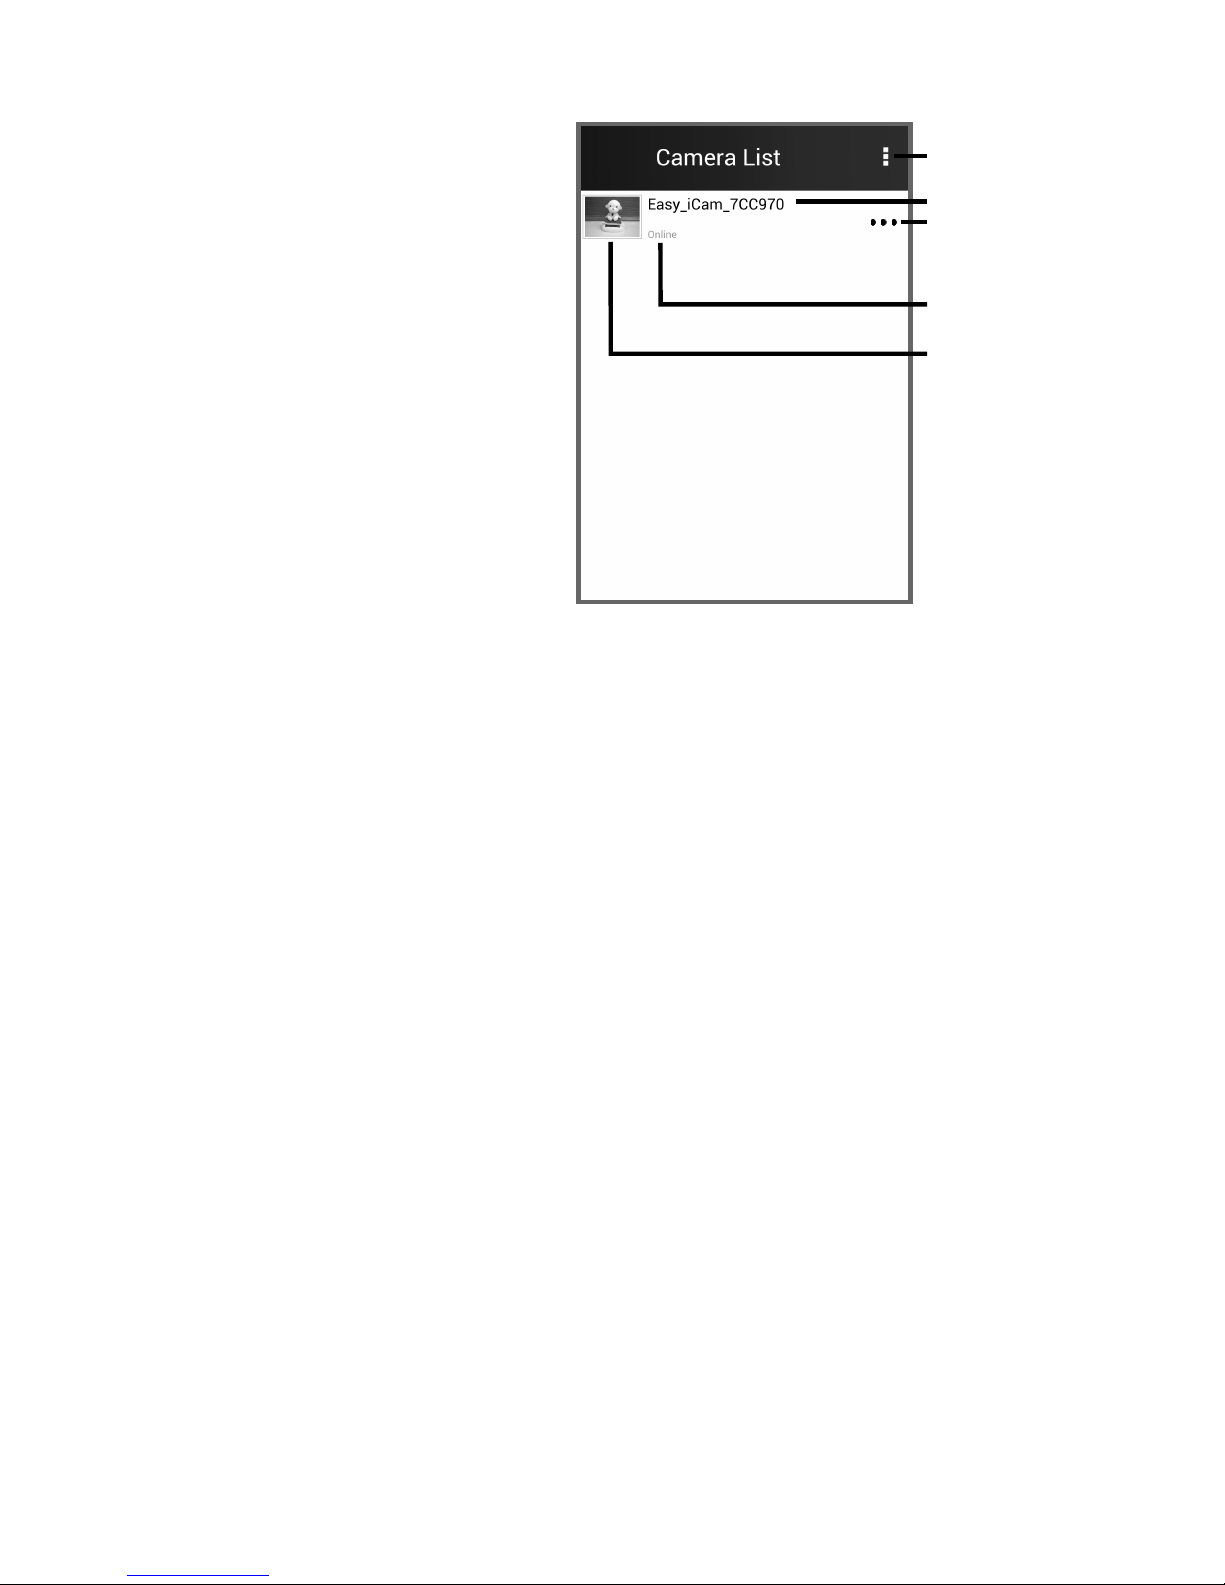
1. Camera name (SSID)
When you launch the app, all the Easy-iCAM cameras you have
added will be shown on the screen.
2. Camera status:
a. Online
If the camera status shows “online” you can tap the
camera photo to see the video of the camera.
b. Connecting
If the camera status shows “connecting” you need to wait
until the status change to online, and then tap the camera
photo to see the video of the camera.
c. Offline
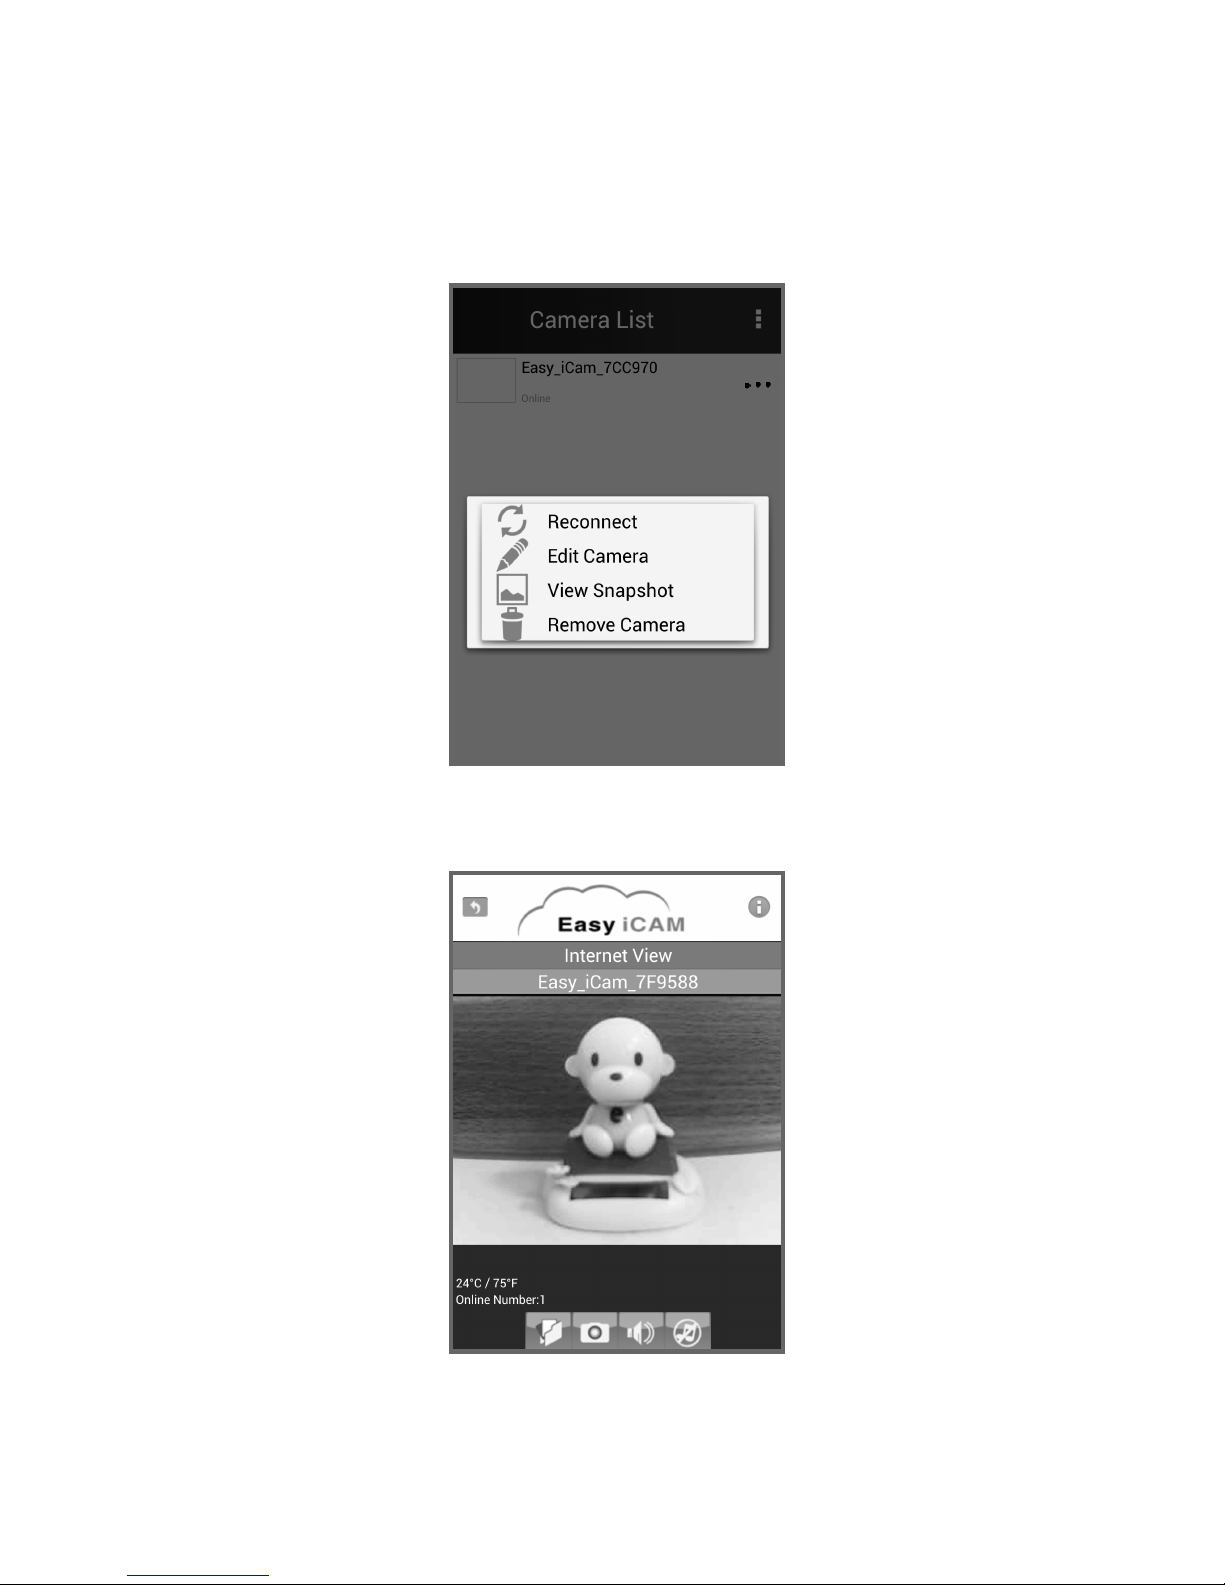
If the camera status shows “offline” you need to tap the
dots icon (…) beside the camera name, and then tap
“Reconnect” to re-confirm the Internet connection.
3. Tap the icon to see the screen shown below.
a. Reconnect
You need to tap “Reconnect” to re-confirm the Internet
connection if the camera status shows off line.
b. Edit Camera
If you have changed the camera password with another
smartphone or tablet, you need to tap the row to correct the
password for Internet connection.
11
Android system
1
3
4
2
5
4.2.2
12
4. Camera photo
Tap the camera photo and you can see the video of the camera.
5. Tap the icon and select “Exit” if you want to exit the app.
c. View Snapshot
Tap the row and you can see all of the photos you have taken.
d. Remove Camera
Tap the row if you want to remove the camera.
If Internet setup has been carried out for the camera and you
want to add the camera to a second or even more smartphones or
tablets, you just need to follow the step “3.3 Connect your
smartphone or tablet to the camera”, and then the smartphone
or tablet can connect with the camera through a Wi-Fi router or
3G/4G mobile network.
Add camera to second or more other
smartphones or tablets
If Internet setup has been carried out for the camera and you
want to add the camera to a second or even more smartphones or
tablets through remote setup, you need to follow the procedure
as below.
Add camera through remote setup
Add camera through remote setup for iPhone/iPad
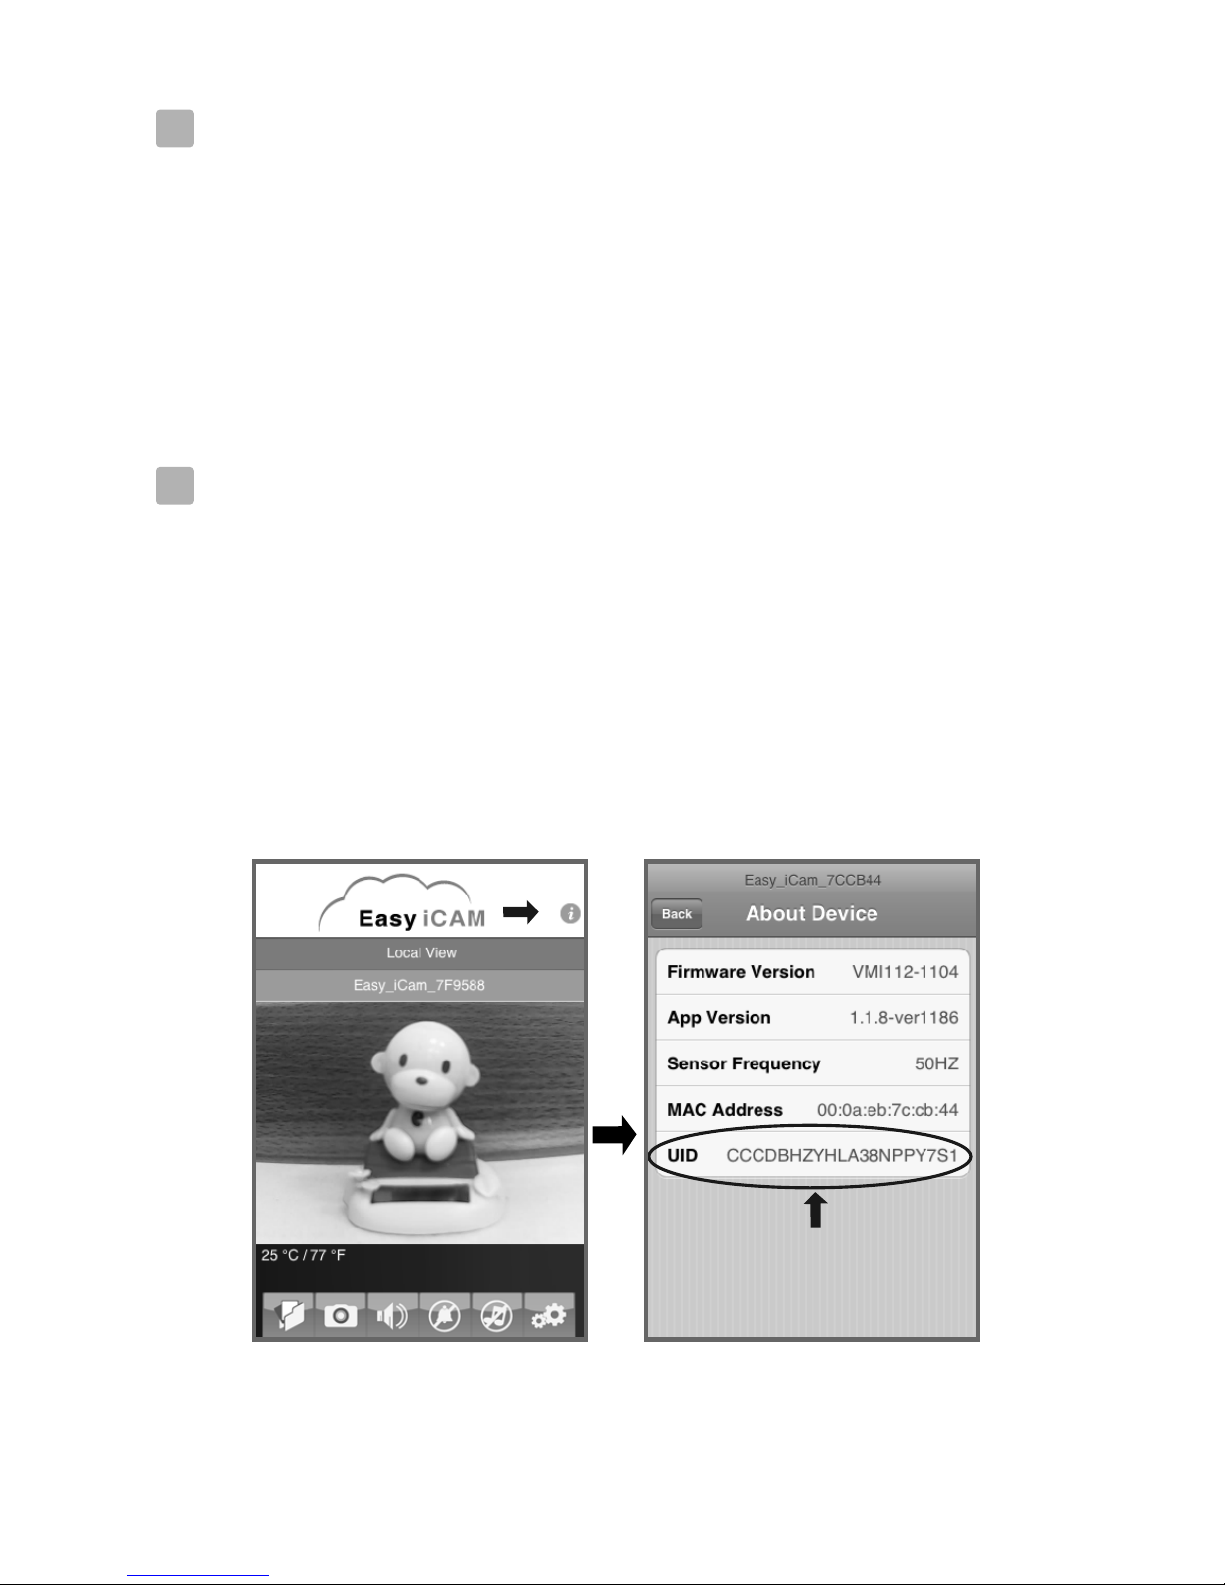
Get UID information
Tap the i (information) icon in local view to get UID
information.
13
5
6
6.1
6.1.1
14
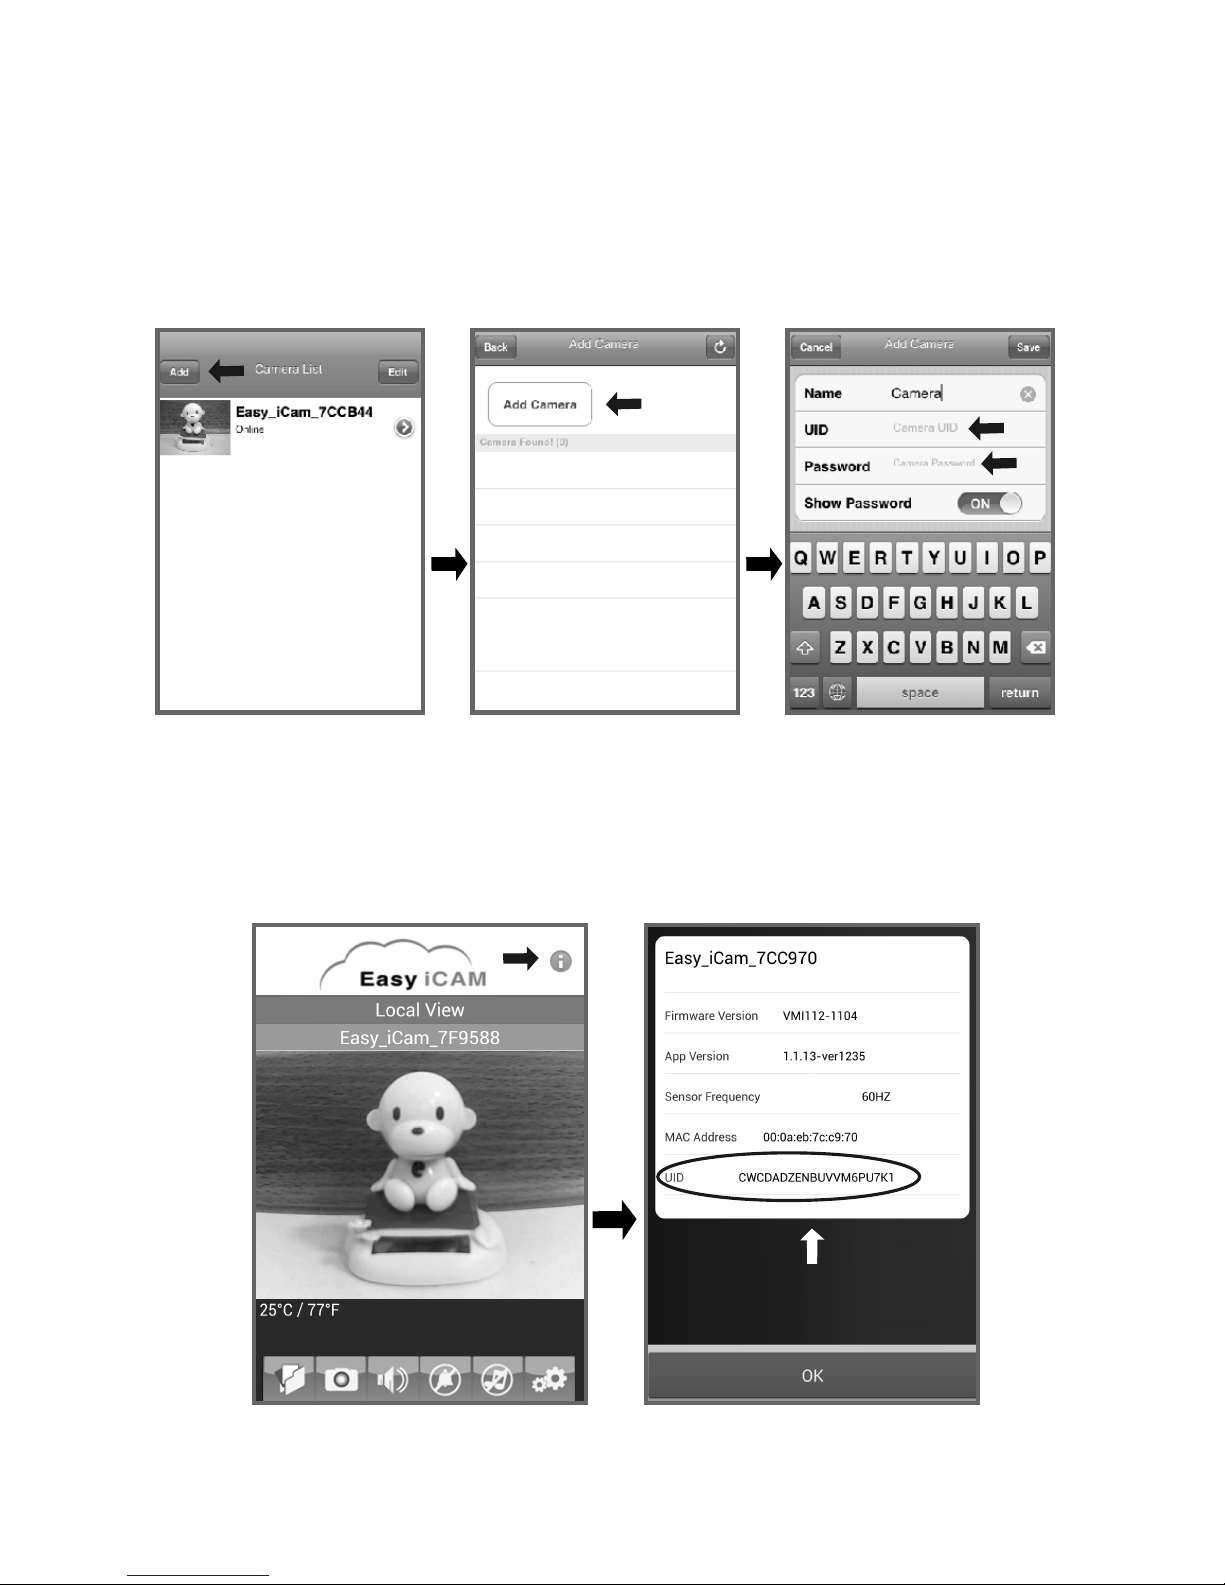
Add camera
Tap the Add icon in the camera list of Internet view and
then tap the Add icon in the next page. Type in UID and
password information of the camera and then tape OK icon
to finish the setup.
Add camera through remote setup for Android system
Get UID information
Tap the i (information) icon in local view to get UID
information.
6.1.2
6.2
6.2.1
15
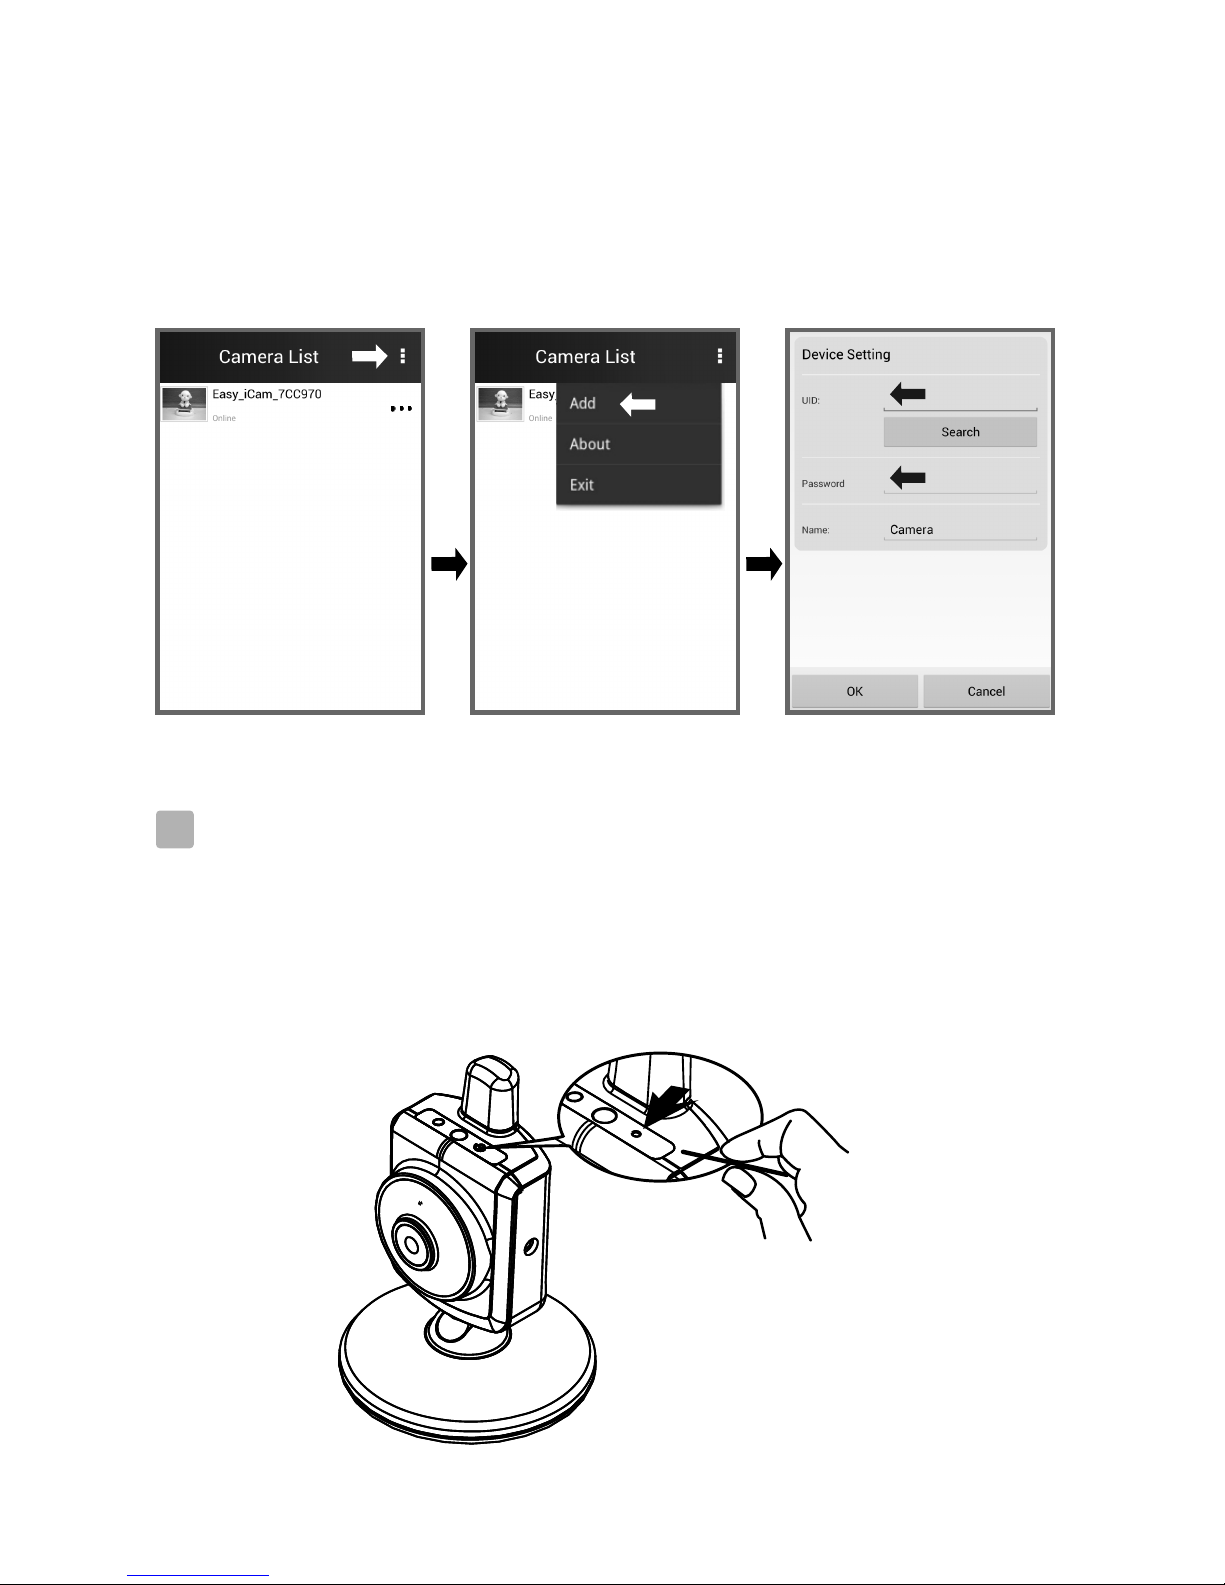
Add camera
Tap the dots icon in the camera list of Internet view and
then tap the Add icon in the next page. Type in UID and
password information of the camera and then tap the Save
icon to finish the setup.
While the camera is powered on for at least 1 minute, press the reset button
(using a small object or a pin) for at least 3 seconds, the power/status LED
will start blinking. The camera will be reset to factory default, which is
useful if you forget the password of the camera.
Reset the camera to factory defaults
6.2.2
7

16
Troubleshooting
Make sure the power plug is pushed all the way in.
Make sure the camera is turned on and power/status LED glows red or green.
Make sure the camera and your smartphone/tablet are within range of
each other.
Make sure you have entered the right password of the camera on your
smartphone/tablet.
You may need to reset the camera by pressing the reset button with a
thin object (i.e. paper clip). Please refer to 7 - Reset the camera to
factory default of this user manual.
Make sure the power plug is pushed all the way in.
Make sure the camera is turned on and power/status LED glows green.
Make sure you type in the right password for the Wi-Fi router in Internet
setting. Please refer to 3.4 - Setting up the camera and Internet connection
of this user manual.
Make sure the camera and the Wi-Fi router are within range of each other.
Make sure your smartphone/tablet is connected to the Internet through
Wi-Fi or 3G/4G mobile network.You may need to reset the camera by
pressing the reset button with a thin object (i.e. paper clip).
Please refer to 7 - Reset the camera to factory defaults of this user
manual and then refer to 3.4 - Setting up the camera and Internet
connection of this user manual.
Cannot connect the camera to your smartphone/tablet through
Wi-Fi router or 3G/4G mobile network in Internet view
If there is a microwave oven in use near the camera or Wi-Fi router,
remove the microwave oven or turn it off.
Make sure the camera and the Wi-Fi router are within range of each other.
The speed of video feed from the camera depends highly on
the speed of the connection you are using.
The Internet speed either from your Wi-Fi network or 3G/4G mobile
network has a high impact on the performance of the product. The
faster and more stable connection speed, the faster you can see the
video from the camera.
Video streaming is slow or lags
Cannot connect the camera to your smartphone or tablet in local view

Keep all parts and accessories out of children's reach.
Fingerprints or dirt on the lens surface can adversely affect camera
performance. Avoid touching the lens surface with your fingers.
Should the lens become dirty, use a blower to blow off dirt and dust,
or a soft, dry cloth to wipe off the lens.
Keep the camera dry. Precipitation, humidity, and other liquids
containing minerals will corrode electronic circuits.
Do not use or store in dusty, dirty areas.
Do not store in hot areas. High temperatures can shorten the life of
electronic devices and warp or melt certain plastics.
Do not store in very cold areas. When the system warms up
(to its normal temperature), moisture can form inside the case,
which may damage electronic circuit boards.
Do not attempt to open the case. Non-expert handling of the device
may damage the system.
Avoid dropping or strong shocks.
Operate this product using only the power supply included or
provided as an accessory.
Do not overload electrical outlets or extension cords as this can result in
fire or electric shocks.
Care and Maintenance
17

Caution
FCC Statement
This equipment has been tested and found to comply with the limits for a Class B
digital device, pursuant to Part 15 of the FCC Rules. These limits are designed to
provide reasonable protection against harmful interference in a residential
installation. This equipment generates, uses and can radiate radio frequency
energy and, if not installed and used in accordance with the instructions, may
cause harmful interference to radio communications. However, there is no
guarantee that interference will not occur in a particular installation. If this
equipment does cause harmful interference to radio or television reception, which
can be determined by turning the equipment off and on, the user is encouraged to
try to correct the interference by one or more of the following measures:
Reorient or relocate the receiving antenna
Increase the separation between the equipment and receiver
Connect the equipment into an outlet on a circuit different from that to
which the receiver is connected
Consult the dealer or an experienced radio/TV technician for help
This device complies with Part 15 of the FCC Rules. Operation is subject to the
following two conditions: (1) this device may not cause harmful interference,
and (2) this device must accept any interference received, including interference
that may cause undesired operation.
To comply with FCC RF exposure compliance requirements, a separation
distance of at least 20 cm must be maintained between the antenna of this
device and all persons.
This Transmitter must not be co-located or operating in conjunction with
any other antenna or transmitter.
Changes or modifications to this unit not expressly approved by
the party responsible for compliance could void the user authority to operate
the equipment.
18

19
Following the safety tips
To prevent deaths and injuries associated with camera cords,
make sure the camera and AC adapter cords are always out of
reach of the baby by least 3 feet (1 meter).
Note : This is important even if your baby is not yet standing
or mobile.
Never use extension cords with AC adapters. Only use the
AC adapters provided.
Specifications are subject to change without prior notice.
Camera
Frequency
Antenna
Modulation
Image Sensor
Lens
IR LED
Video compression
Audio
Dimensions
Weight
Power
Operating temperature
2.4 GHz
Dipole antenna
DBPSK, DQPSK, CCK and OFDM
Color CMOS
f 3.0mm, F 2.4
8 pcs
MJPEG (Motion JPEG )
One-way audio
80(W) x 117.2(H) x 80(D) mm
114g
DC 6V, 800mA
0℃ ~ 40℃ (32℉ ~ 104℉)
This item is in compliance with the essential requirements and other relevant
provisions of Directive 1999/5/EC.
Specifications
* iPh on e, iPa d ar e tradema rks of Ap ple Inc ., regist ered in the U.S. an d ot her co un tries .
* Goo gl e Play is a tradema rk of Goo gle Inc.

Easy iCAM
1
Easy iCAM
Easy iCAM
Internet
Regardez à tout moment et partout les
choses qui comptent pour vous
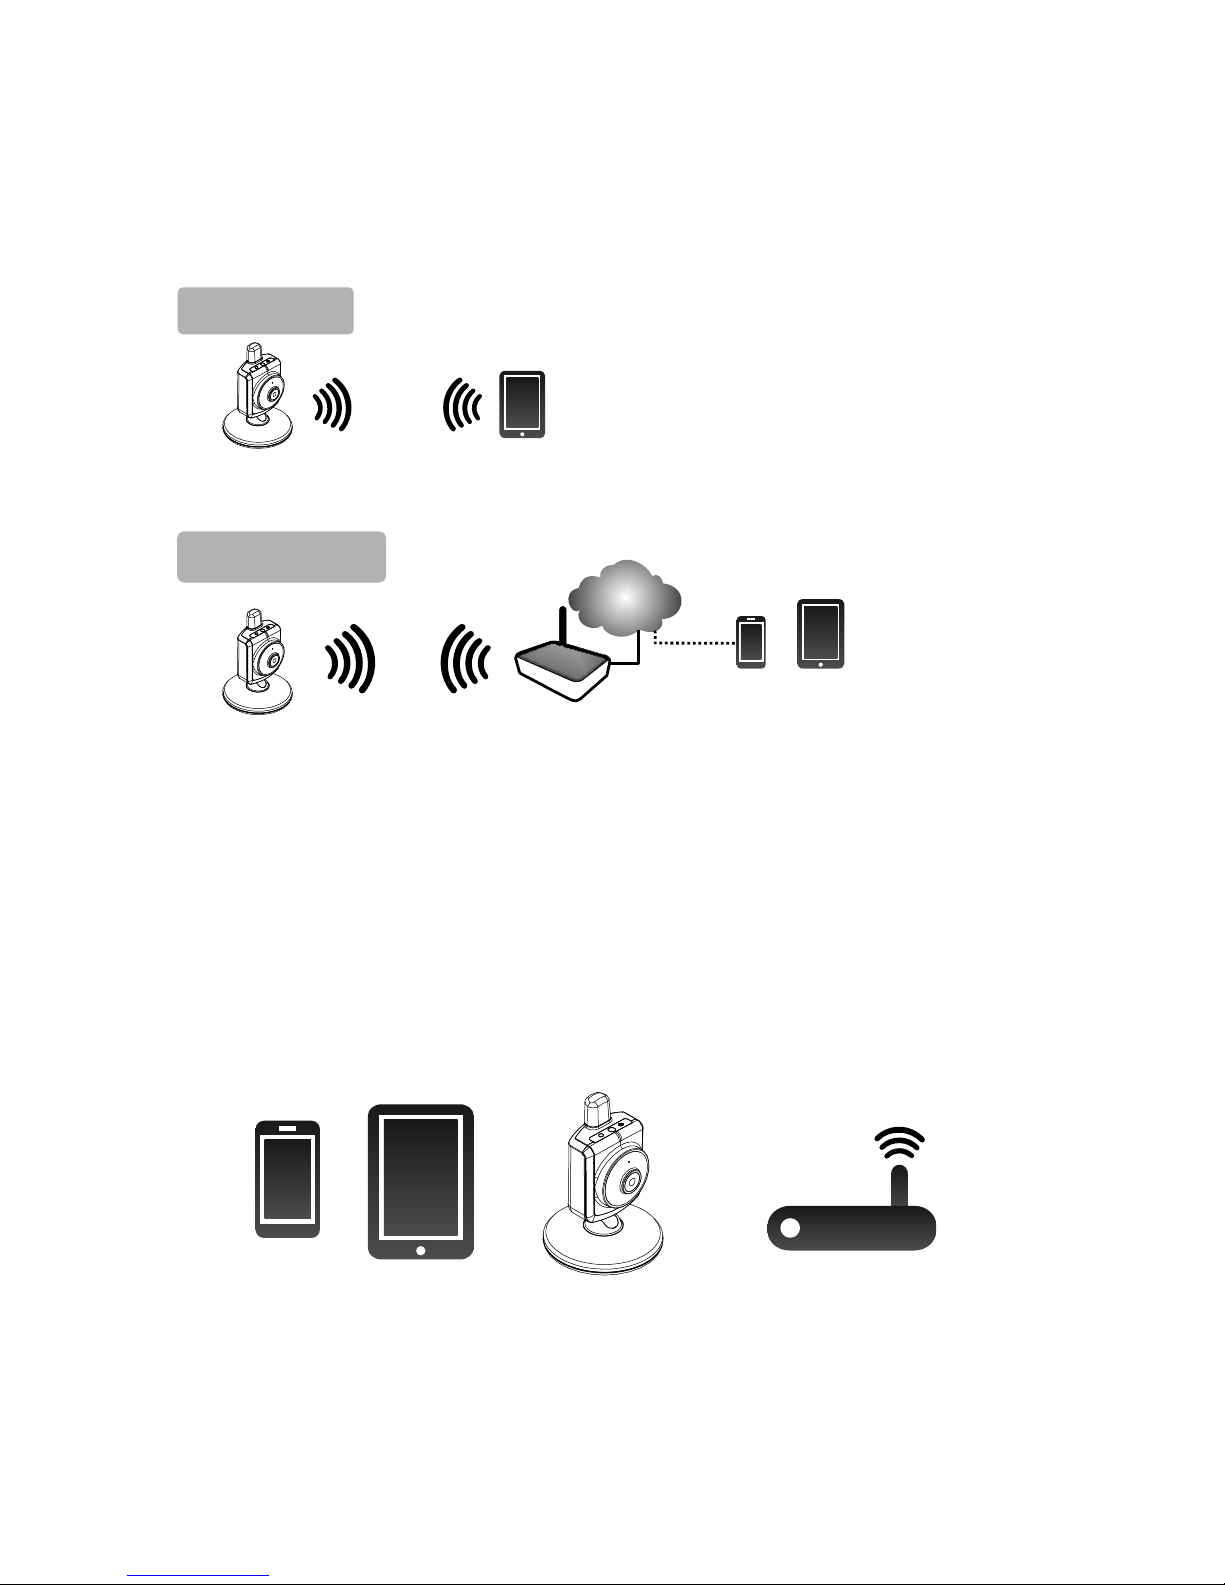
Avant de démarrer, il vous faut :
Vue locale
Vue Internet
Routeur Wi-Fi
Smartphone, tablette
Un iPhone, iPad,
smartphone Android
ou tablette Android
Routeur Wi-Fi
(pour l'accès distant)
Smartphone, tablette
Easy iCAM est une caméra réseau sans fil. Elle peut se connecter à votre
smartphone ou tablette par technologie sans fil et surveiller tout ce qui
compte pour vous sur votre smartphone ou tablette partout et à tout
moment.

2
FR
1.Antenne
2.DEL d'alimentation/d'état
3.Capteur de lumière
4.Bouton de réinitialisation aux paramètres d'usine
5.Microphone
6.Objectif de la caméra
7.LED infrarouge
8.Prise de l'adaptateur de courant
9.Haut-parleur
10.Capteur de température
FRANÇAIS
Contenu de la boîte
• Une caméra • Deux clips de câble
• Un adaptateur • Ce Manuel de l'utilisateur
• Deux vis et deux ancrages de mur
1
Description du produit
Caméra
2
9
10
2
4
5
6
1
7
3
8

3
Première configuration
Avant la configuration
1. Assurez-vous que votre routeur Wi-Fi est allumé et qu'il peut
se connecter à Internet.
2. Télécharger l'application Easy iCAM :
Saisissez le mot-clé « EASY iCAM » et téléchargez
l'application sur l'App Store d'Apple ou sur Google Play
(Android Market).
3.1
3
Branchez un coté de l'adaptateur d'alimentation fourni sur une prise de
courant et l'autre coté sur la prise derrière la caméra. La DEL de la
caméra s'éclairera en orange puis passera au rouge.
Remarque 1: Utilisez l'adaptateur indiqué SORTIE :
6 V c.c avec la caméra.
2: Lorsque vous allumez la caméra, la configuration
initiale prend environ 40 à 60 secondes.
Allumer la caméra
3.2

4
Connecter votre smartphone ou tablette à la caméra
1. Allumez le Wi-Fi de votre smartphone ou tablette.
2. Touchez l'écran pour sélectionner
«Easy_iCAM_XXXXXX » sous les réseaux Wi-Fi.
3. Saisissez le mot de passe pour « Easy_iCAM_XXXXXX ».
Le mot de passe par défaut est « 12345678 ».
iPhone/iPad Système Android
Système Android
iPhone/iPad
3.3

5
Configurer la caméra et la connexion à Internet
1. Lancez l'application Easy iCAM sur votre smartphone ou tablette.
2. Suivez les instructions de l'application à l'écran.
3. Configurer le nom de la caméra (SSID) et son mot de passe :
Cet écran affichera un message vous rappelant que vous devez
modifier le nom de la caméra (SSID) ou son mot de passe.
a. Si vous sélectionnez «Oui», vous pourrez modifier le nom de la
caméra Wi-Fi ou son mot de passe. Lorsque vous terminez la
configuration du nom de la caméra ou de son mot de passe, touchez
l'icône OK, l'application vous demandera alors si vous souhaitez
configurer une connexion à Internet.
Si vous sélectionnez «Oui», la configuration de la connexion à
Internet sera lancée.
Si vous sélectionnez «Non», la caméra redémarrera pour modifier
le nom de la caméra et son mot de passe automatiquement.
Lors de cette étape, veuillez vous assurer que votre smartphone
ou tablette dispose d'une connexion à Internet car le nom de la
caméra ou son mot de passe peuvent avoir été modifiés.
Remarque : Le mot de passe doit contenir au moins huit
caractères.
b. Si vous sélectionnez «Non», l'application vous demandera si vous
souhaitez configurer une connexion à Internet.
4. Configurer une connexion à Internet :
L'écran affichera un message demandant si vous souhaitez
configurer une connexion à Internet.
a. Si vous sélectionnez «Oui», la caméra recherchera les réseaux
Wi-Fi disponibles à portée. Saisissez le nom de votre réseau WiFi et le mot de passe de votre routeur Wi-Fi si nécessaire. La
première configuration est alors effectuée.
Remarque 1: Si la caméra ne peut pas trouver le réseau Wi-Fi
auquel vous souhaitez vous connecter, veuillez
toucher l'icône de recherche pour vérifier à
nouveau les réseaux Wi-Fi disponibles.
2 : Si la configuration de l'accès à Internet a bien été
effectuée, la DEL d'alimentation/état passera au
vert après 1 à 2 minutes.
b. Si vous sélectionnez «Non», la première configuration est
effectuée.
Remarque : Si vous ne configurez pas de connexion à Internet,
vous ne pouvez obtenir des flux vidéo en direct
qu'en branchant directement la caméra à votre
smartphone ou tablette.
3.4

6
Easy-iCAM est une caméra réseau sans fil. Elle peut se
connecter directement à votre smartphone ou tablette sans fil,
et vous pouvez voir les flux vidéo sur votre smartphone ou
tablette en mode vue locale. En mode vue Internet, votre
smartphone ou tablette doit accéder à la caméra via un routeur
Wi-Fi ou réseau mobile 3G/4G, puis vous pouvez accéder à un
flux en direct de vidéo et d'audio sur votre smartphone ou
tablette à tout endroit dans le monde.
Remarque : Vue locale - Votre smartphone ou tablette se
connecte directement à la caméra.
Vue Internet - Votre smartphone ou tablette
se connecte à la caméra via un routeur Wi-Fi
ou un réseau mobile 3G/4G.
Mode de fonctionnement - Vue locale/Vue Internet :
Vue locale
Lorsque votre smartphone ou tablette se connecte à la caméra
directement par Wi-Fi, vous pouvez lancer l'application Easy
iCAM pour l'utiliser en mode vue locale.
iPhone/iPad
1. Informations
Touchez cette icône pour obtenir des informations sur la caméra.
2. Mode de fonctionnement
Cette ligne présente le mode de fonctionnement actuel de l'application.
Système Android
4
4.1
1
2
3
4
6
9
10
7
5
11
8
1
2
3
4
6
9
10
7
5
11
8

7
3. Nom de la caméra (SSID)
Cette ligne affiche le nom de la caméra, le même que celui du réseau Wi-Fi
(SSID).
4. Zone d'affichage de l'image
Touchez la zone d'affichage de l'image de l'écran avec deux doigts et
déplacez-les pour utiliser le zoom. Vous pouvez aussi les faire glisser sur
l'écran pour utiliser les fonctions de panorama/inclinaison numérique.
5. Photo
Touchez l'icône pour voir toutes les photos que vous avez prises.
6. Capture
Touchez l'icône pour enregistrer une capture de la caméra sur votre
smartphone ou tablette
7. Audio ON/OFF
Touchez l'icône pour activer ou désactiver le son.
8. Fonction d'activation vocale (VOX)
Touchez l'icône pour activer la fonction d'activation vocale, et une fois de
plus pour la désactiver. Si vous activez la fonction puis appuyez sur le
bouton d'accueil de votre smartphone ou tablette pour quitter l'application,
l'écran affichera un message de rappel si le niveau de volume de la caméra
est plus élevé que le niveau de volume paramétré. Vous pouvez lancer
l'application directement en touchant ou en faisant glisser l'icône du message
de rappel.
Remarque 1: Si vous activez la fonction d'activation vocale puis
appuyez sur le bouton d'accueil de votre smartphone ou
tablette pour quitter l'application, la fonction VOX peut
continuer à fonctionner et vous rappeler des événements
audio de la caméra.
2: Si vous souhaitez quitter l'application complètement,
veuillez appuyer deux fois sur le bouton d'accueil de votre
iPhone/iPad si vous êtes sur l'écran d'accueil, puis touchez
l'icône d'Easy iCAM jusqu'à ce que le symbole
d'annulation s'affiche. Lorsque vous quittez l'application
complètement, la fonction d'activation vocale ne peut pas
fonctionner.
3: Si vous souhaitez quitter l'application complètement,
veuillez appuyer sur le bouton retour de votre système
Android. Lorsque vous quittez l'application
complètement, la fonction d'activation vocale ne peut pas
fonctionner.
4: La fonction d'activation vocale ne peut fonctionner qu'en
mode vue locale.
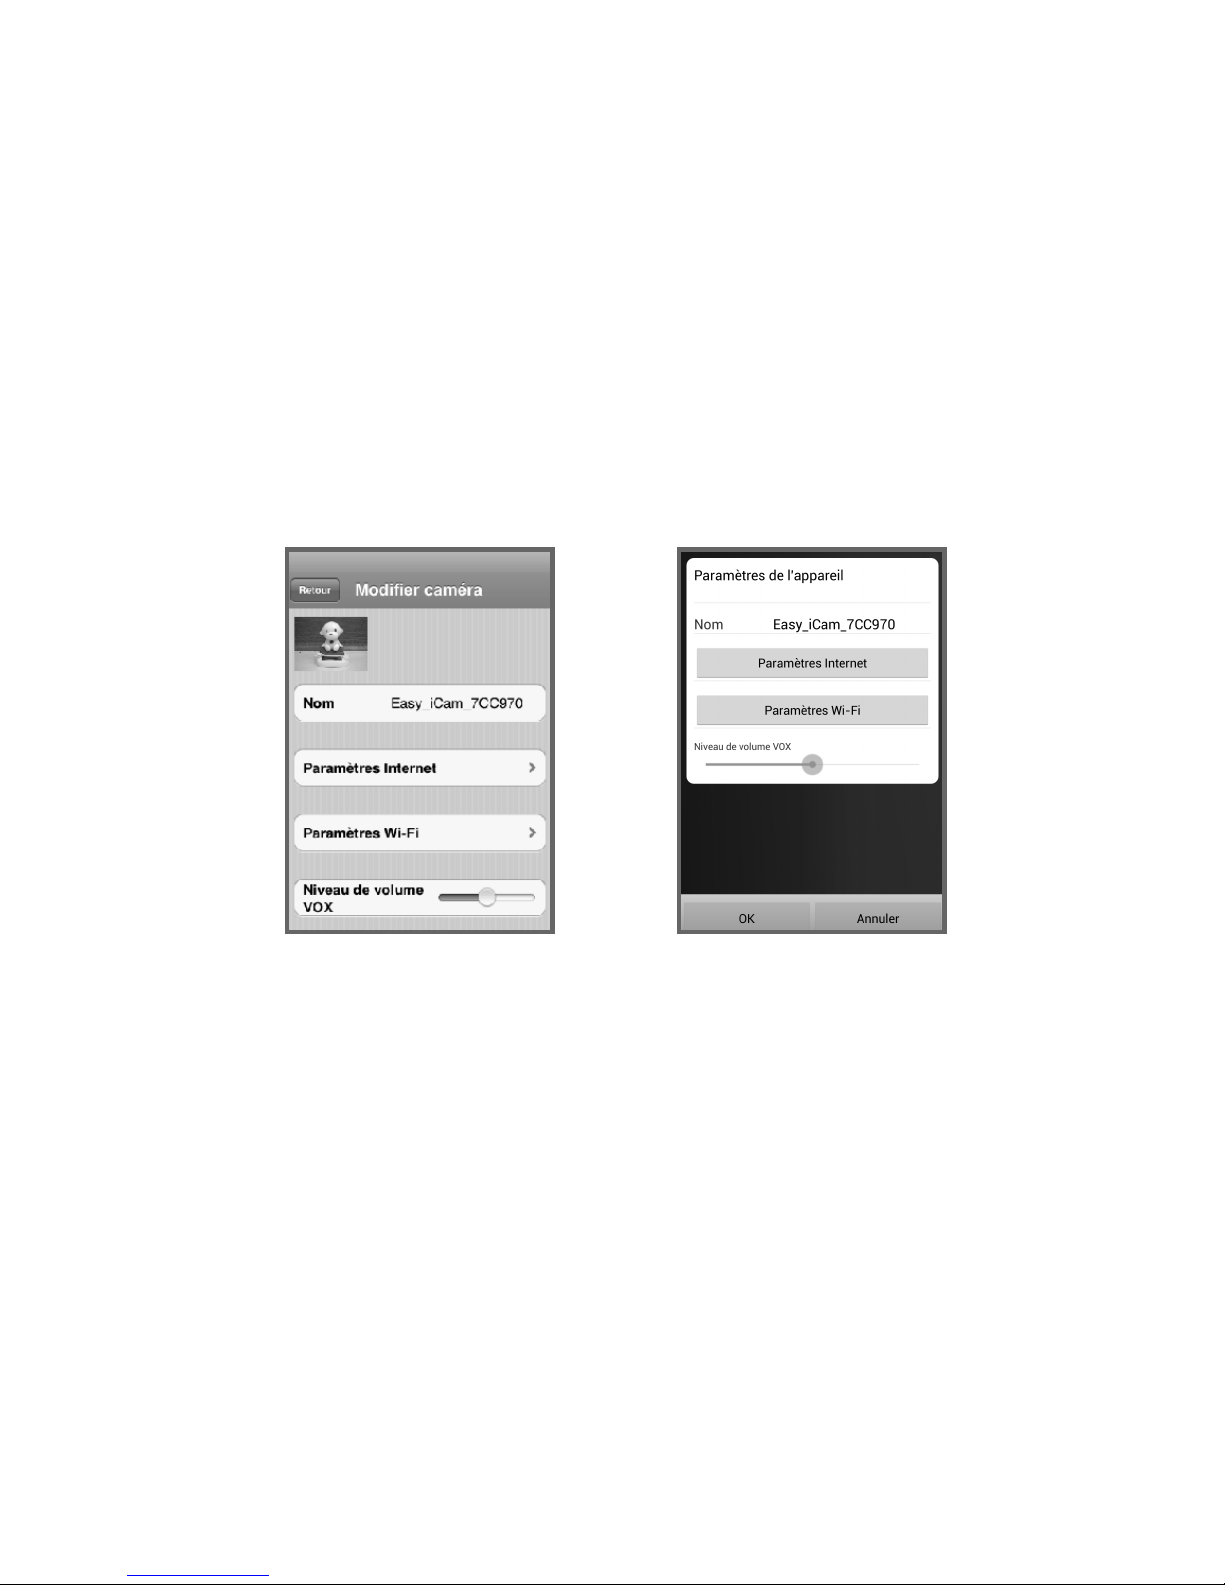
9. Paramètre
Touchez l'icône pour configurer les fonctions de la caméra.
a. Paramètres Internet
Vous pouvez configurer une connexion à Internet ou modifier
la connexion de la caméra vers un autre routeur Wi-Fi.
b. Paramètres Wi-Fi
Si vous souhaitez modifier le nom (SSID Wi-Fi) ou le mot de
passe de la caméra, touchez cette ligne pour le faire.
c. Niveau de VOX (niveau sonore de déclenchement)
Touchez et faites glisser la barre d'ajustement du niveau de
VOX pour ajuster le niveau sonore de déclenchement.
8
iPhone/iPad
Système Android
Vue Internet
Si la connexion à Internet de votre caméra a été configurée et
que la DEL d’alimentation/d'état s'allume en vert, la caméra
peut se connecter à Internet et vous pouvez accéder à un flux
audio et vidéo en direct sur votre smartphone ou tablette en vue
Internet partout dans le monde. Vérifiez que votre smartphone
ou tablette peut se connecter à Internet via un routeur Wi-Fi ou
un réseau mobile 3G/4G, puis lancez l'application Easy iCAM.
4.2
10.
11. Affichage de la température
Fonction musique
Vous pouvez lire de la musique avec l’appareil photo (trois
morceaux différents). Appuyez sur l’icône pour lire la musique.
Appuyez à nouveau sur l’icône pour lire la suivante.
 Loading...