

Page 1
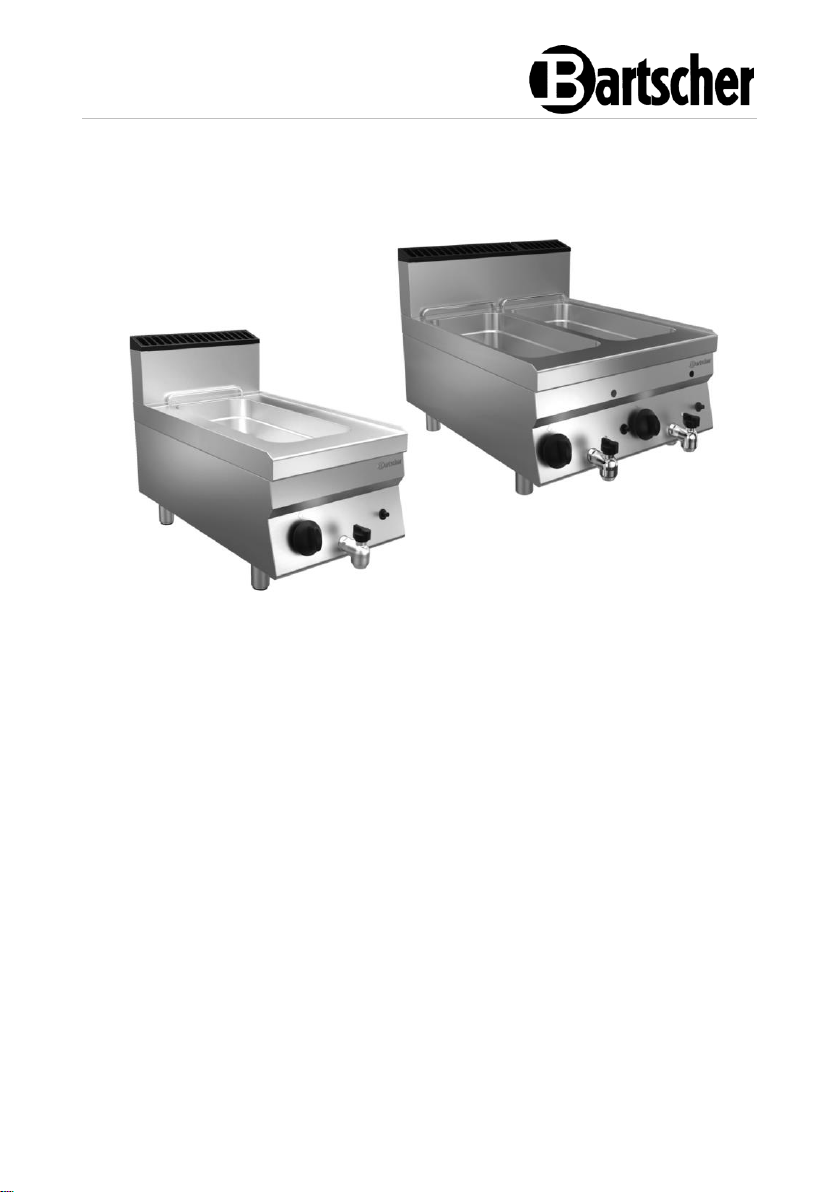
700FX-G180 / 700FX-G280
2839171 - 2839221
Page 2

Bartscher GmbH
Franz-Kleine-Str. 28
D-33154 Salzkotten
Germany
Phone: +49 5258 971-0
Fax: +49 5258 971-120
Service hotline: +49 5258 971-197
www.bartscher.com
0085DL0223
Version: 1.0
Date of preparation: 2023-06-07
EN
2
Page 3

Original instruction manual
1 Safety ............................................................................................................ 2
1.1 Explanation of Signal Words .................................................................... 2
1.2 Safety instructions.................................................................................... 3
1.3 Residual Risks ......................................................................................... 6
1.4 Personal Protective Equipment ................................................................ 8
1.5 Intended Use ........................................................................................... 9
1.6 Unintended Use ....................................................................................... 9
2 General information ..................................................................................... 10
2.1 Liability and Warranty ............................................................................ 10
2.2 Copyright Protection .............................................................................. 10
2.3 Declaration of Conformity ...................................................................... 10
3 Transport, Packaging and Storage .............................................................. 11
3.1 Delivery Check ....................................................................................... 11
3.2 Packaging .............................................................................................. 11
3.3 Storage .................................................................................................. 11
4 Technical Data ............................................................................................. 12
4.1 Technical Specifications ........................................................................ 13
4.2 List of Components of the Appliance ..................................................... 20
4.3 Functions of the Appliance ..................................................................... 21
5 Installation Instructions ................................................................................ 22
5.1 Installation .............................................................................................. 22
5.2 Gas Connection ..................................................................................... 25
6 Operating Instruction ................................................................................... 29
7 Cleaning and Maintenance .......................................................................... 34
7.1 Safety Instructions for Cleaning ............................................................. 34
7.2 Cleaning ................................................................................................. 35
7.3 Maintenance .......................................................................................... 35
8 Possible Malfunctions .................................................................................. 37
9 Disposal ....................................................................................................... 38
2839171 1 / 38
Page 4
Safety
EN
Read this instruction manual before using and keep it available
at all times!
DANGER!
The signal word DANGER warns against hazards that lead to severe
injuries or death if the hazards are not avoided.
Diese Bedienungsanleitung beschreibt di e Installation, Bedienung und Wartung des Geräts und gilt als wichtige Inform ationsquelle und Nachschlagewerk. Die Ke nntnis aller enthaltenen Sicherheitshinw eise und Handlungsanweisungen sch afft die Voraussetzung für das sichere und sachgerechte Arbeiten mit de m Gerät. Darüber hinaus müssen die für de n Einsatzbereich des Geräts geltende n örtlichen Unfallverhütungsvorschriften u nd allgemeinen Sicherheitsbestimmunge n eingehalten werden. Diese Bedien ungsanleitung ist Bestandteil des Produ kts und muss in unmittelbarer Nähe des Geräts für das In¬stallations-, Bedi enungs-, Wartungs- und Reinigungspers onal jederzeit zugänglich auf¬bewahrt werd en. Wenn das Gerät an eine dritte Pers on
weitergegeben wird, muss die Bedienungsa nleitung mit ausgehändigt werden.
This instruction manual contains information about installation, operation and
maintenance of the appliance and constitutes an important source of information
and reference guide. The knowledge of all operational and safety instructions
included in this manual is a prerequisite for safe and proper handling of the
appliance. Additionally, accident prevention, occupational health and safety, and
legal regulations in force in the area the appliance is used apply.
Before you start using the appliance, especially before turning it on, read this
instruction manual in order to avoid personal injuries and property damages.
Improper use may cause damage.
This instruction manual forms and integral part of the product and must be stored in
an immediate vicinity of the appliance and be available at all times. The instruction
manual should be transferred together with the appliance.
1 Safety
This appliance has been manufactured in accordance with technical standards
currently in force. However, the appliance may be a source of hazards if used
improperly or contrary to its intended purpose. All persons using the appliance must
consider information included in this instruction manual and observe safety
instructions.
1.1 Explanation of Signal Words
Important safety instructions and warning information are indicated in this
instruction manual with appropriate signal words. You must strictly follow the
instructions, to prevent accidents, personal injuries and property damages.
2 / 38 2839171
Page 5
Safety
EN
WARNING!
The signal word WARNING warns against hazards that may lead to
moderate or severe injuries or death if the hazards are not avoided.
CAUTION!
The signal word CAUTION warns against hazards that may lead to
light or moderate injuries if the hazards are not avoided.
IMPORTANT!
The signal word IMPORTANT indicates possible property damages,
which may occur if safety instructions are not observed.
NOTE!
The symbol NOTE indicates subsequent information and guidelines
for the user on usage of the appliance.
, die
1.2 Safety instructions
Safety of Gas Supplied Appliances
• Do not use a gas supplied appliance in the event of a malfunction or damage or
in the case of a suspected malfunction or damage. In such a case set the
knob(s) to 'O' and close the main gas valve. Contact the service company
immediately.
• Regularly conduct tightness checks using suds (a spray for detecting leakages).
Do not use open flame for checking tightness of gas installation!
WARNING!
Suffocation and explosion hazard due to leaking gas!
• When you sense gas odour, observe the following rules:
– immediately close the knob(s) and the main gas valve;
– provide for sufficient venting of rooms: open wide all doors and windows;
– do not light up any open flame, quench flames;
– do not smoke;
2839171 3 / 38
Page 6

Safety
EN
– do not produce sparks, do not actuate any electric switches, do not use
phones (irrespective of it being landline phone or mobile phone);
– do not operate any electric appliances in the vicinity of a gas supplied
appliance;
– if needed, notify all persons in a building by calling loud and knocking on
doors;
– leave building;
– when outside of a building, contact the service company. If it is
impossible to precisely locate gas leak, immediately phone fire fighters
and notify gas supplier.
Flammable Materials
• Never use the appliance near flammable or easily combustible materials (e.g.:
petrol, spirit, alcohol). High temperature triggers evaporation of these materials,
and, as a result of contact with sources of ignition, an explosion may occur.
• Use the appliance only with materials designed to this end and with correct
temperature settings. Materials, food products and left-overs of food products
remaining in the appliance may catch fire.
• To avoid fire hazard, clean the appliance regularly.
• Never leave the appliance unattended, especially when cooking with fats or oils
as they may cause fire.
• Close the gas shut-off valve should the fire emerge. Never put the flame out with
water; to suppress fire, use a lid or a fire-blanket. Following extinction of fire,
ensure sufficient fresh air inflow.
Safety during deep fat frying
• Never leave the operating appliance without supervision. Possible malfunctions
may lead to overheating and ignition of frying oil / fat in cubes (blocks).
• If due to overheating, the frying oil / fat in cubes (blocks) catches fire, put the lid
on and disconnect the appliance from the power supply.
• Spatters or outbursts of hot oil/fat may cause scalding of hands, arms and face.
Use protective kitchen mitts.
• Do not use wet nor humid products. Dry them before use. Remove excess of ice
from deep frozen products prior to frying them.
• Do not hang frozen food in the basket over the tank filled with hot frying oil / fat
in cubes (blocks). When deep frying in fat, even the smallest drop of water may
cause spatters of hot oil or even small outbursts.
Hot Surfaces
4 / 38 2839171
Page 7
Safety
EN
• Surfaces of the appliance become hot during operation. Burning hazard! High
temperature remains for some time after switching the appliance off.
• Do not touch any hot surfaces of the appliance. Use the provided handling
elements and holders.
• You may transport and clean the appliance after it cools down entirely.
• It is prohibited to sprinkle hot surfaces with cold water or flammable liquids.
Health hazard due to burnt food products
• Acrylamides that are present in burnt food products are hazardous to health and
may cause cancer. In order to avoid or reduce acrylamide content, products
should always be fried to the point, when their colour is golden–yellowish, and
not dim and dark nor brown.
• Burnt left-overs and scrubs should be regularly removed from frying oil.
• Products containing starch — cereals and potato products in particular —
should be fried in a maximum temperature of 180 °C.
Operating Personnel
• The appliance may only be operated by qualified personnel and trained
specialist personnel.
• This appliance may not be operated by persons (including children) with limited
physical, sensory or mental capabilities, nor by persons with limited experience
and/or limited knowledge.
• Children should be supervised to ensure that they are not playing with or
switching on the appliance.
2839171 5 / 38
Page 8

Safety
EN
Residual Risks
Dangerous situation
Warning
Danger of slipping
or falling
User may slip on the floor due to
the presence of water or dirt.
Wear non-skid safety
shoes when using the
device.
Burn
Operator is deliberately touches
the machine components.
Operator is deliberately touching
hot substances (oil, water, steam,
...).
Danger of falling
Operator performs actions on the
upper part of the device using
inappropriate aids (e.g. a ladder
with rungs or climbs the device).
Do not work on the top
of the device with
unsuitable aids (e.g.
ladders with rungs or by
climbing on the device).
Danger of the load
tipping over
Moving the device or its elements
with inappropriate aids.
Appropriate lifting aids or
equipment must be used
when moving the device
or its packaging.
Improper Use
• Unintended or prohibited use may cause damage to the appliance.
• The appliance may only be used when its technical condition is flawless and
allows for safe operation.
• The appliance may only be used when all connections are executed according
to rules of law in force.
• The appliance may only be used when it is clean.
• Use only original spare parts. Never attempt to repair the appliance on your own.
• Do not introduce any changes in the appliance nor modify it.
1.3 Residual Risks
6 / 38 2839171
Page 9

Safety
EN
Residual Risks
Dangerous situation
Warning
Chemicals
Operator is dealing with
chemicals (e.g. cleaners,
descaling agents, etc.)
Appropriate precautions
should be taken. Always
follow the instructions on
the safety data sheets
and labels for the
products you use. Use
personal protection
measures recommended
in the safety data
sheets.
Danger of injury
There is a risk of injury during
maintenance work if you touch
the internal parts of the machine
frame.
Maintenance work may
only be performed by
qualified personnel,
equipped with
appropriate personal
protective equipment
(cut-resistant protective
gloves, forearm
protectors).
Danger of crushing
The personnel may crush their
fingers or hands when moving
parts.
Maintenance work may
only be performed by
qualified personnel,
equipped with personal
protective equipment.
Ergonomics
Operator works on the device
without using the necessary
personal protective equipment.
Operator working on the
device must use
personal protective
equipment.
2839171 7 / 38
Page 10
Safety
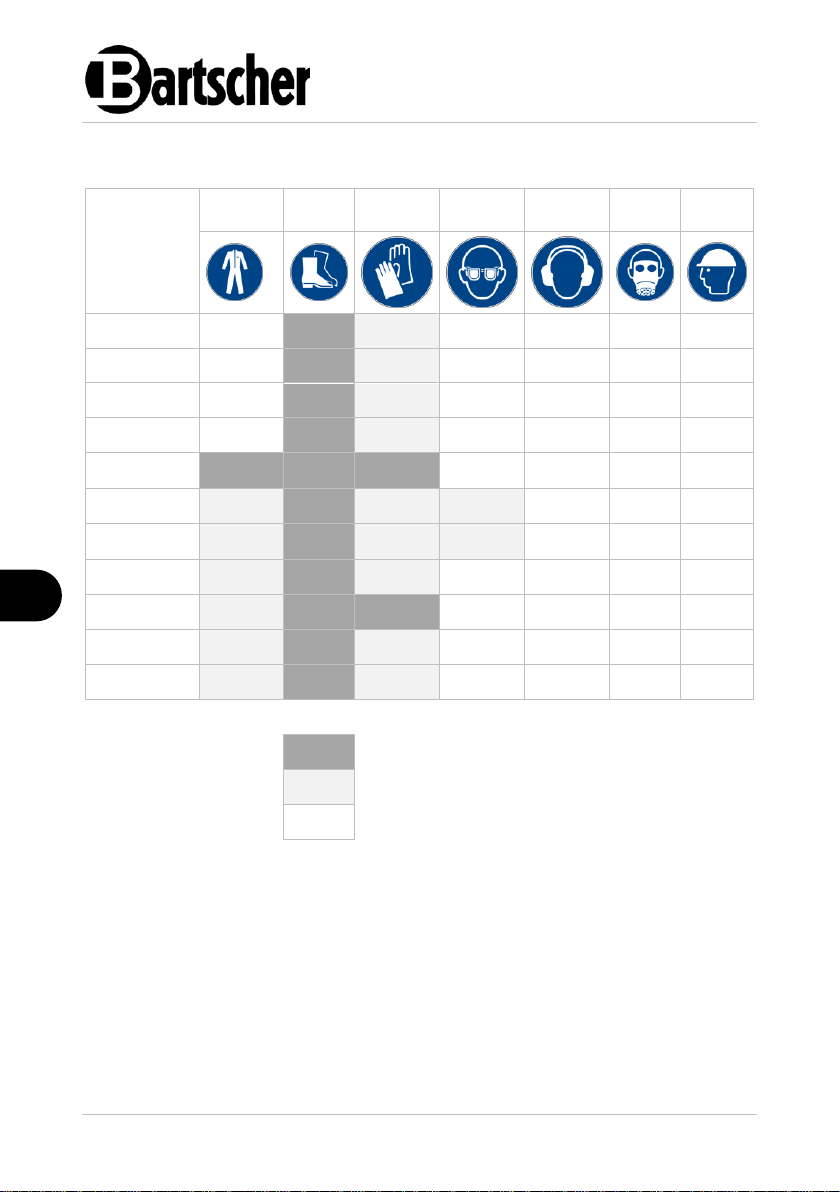
EN
Phase
Safety
clothing
Safety
footwear
Gloves
Eye protection
Hearing
protection
Respiratory
tract
protection
Head
protection
Transport
X
Moving
X
Unpacking
X
Assembly
X
Standard usage
X X X (*)
Settings
X
Standard
cleaning
X
Special cleaning
X X
Maintenance
X X (*)
Dismantling
X
Disposal
X
X Personal protective equipment provided
Personal protective equipment is available or
must be used if required
Personal protective equipment not provided
1.4 Personal Protective Equipment
* Gloves intended for standard usage and maintenance works must be resistant to
high temperatures to protect operator's hands when the operator touches hot
elements of the appliance or hot substances (oil, water, steam, etc.).
8 / 38 2839171
Page 11
Safety
EN
1.5 Intended Use
As described below, every use of the appliance for a purpose differing and/or
diverging from its intended standard use, is prohibited and considered to be an
unintended use.
The following is an intended use:
– Deep fat frying of adequate food products.
1.6 Unintended Use
An unintended use may lead to personal injuries or property damages caused by
hazardous voltage, fire or high temperature. The appliance may only be used to
perform tasks described in this instruction manual.
The following is an unintended use:
– Deep fat frying of inadequate food products.
– Deep fat frying of wet or humid food products.
– Do not hang frozen food in the fryer’s basket over the hot frying oil/fat.
2839171 9 / 38
Page 12

General information
EN
2 General information
2.1 Liability and Warranty
All information and instructions in this instruction manual account for legal
regulations in force, current level of technical engineering knowledge as well as our
expertise and experience, developed over the years. If special models or additional
options are ordered, or state-of-the-art technical solutions were implemented, the
actual scope of delivery of the appliance may, in some circumstances, differ from
descriptions and numerous drawings in this instruction manual.
The manufacturer is not liable for any damages nor faults stemming from:
– failure to observe instructions,
– unintended use,
– technical alterations introduced by the user,
– usage of unapproved spare parts.
We reserve the right to introduce technical modifications to the product, intended for
improvement of the appliance and its performance.
2.2 Copyright Protection
This instruction manual, and texts, drawings and images included in it, as well as its
other components are copyright protected. It is prohibited to reproduce this
instruction manual (including its excerpts), in any form and by any means, and to
use and/or transfer its content to third parties without manufacturer’s written
permission. Violation of the above results in obligation to pay compensation. We
reserve the right to claim further damages.
2.3 Declaration of Conformity
The appliance meets the currently applicable standards and guidelines of the
European Union. We confirm the above in the EC Declaration of Conformity. We
may provide relevant Declaration of Conformity upon request.
10 / 38 2839171
Page 13
Transport, Packaging and Storage
EN
3 Transport, Packaging and Storage
3.1 Delivery Check
Immediately upon reception, check the delivery for completeness and possible
shipping damage. In the case of visible transport damage refuse to accept the
appliance or accept it conditionally. Mark and note the scope of damage in shipping
documents/consignment list of the shipping company and lodge a complaint.
Concealed damage must be reported immediately upon its discovery, as
compensation claims may only be filed within applicable time limits.
If you find that parts or accessories missing, please contact our Customer Service
Department.
3.2 Packaging
Do not dispose of the appliance cardboard box. It may be used to store the
appliance when relocating or when shipping the appliance to our service point in the
case of any damages.
The packaging and its elements are made of recyclable materials. Particularly,
these are: plastic films and bags, cardboard box.
When disposing of the packaging, observe applicable domestic regulations.
Recyclable packaging materials should be recycled.
3.3 Storage
Leave the packaging closed until installation of the appliance; observe external
indications concerning method of placing and storage. Store the packaging in the
following conditions only:
– in closed rooms;
– in dry and dust-free surrounding;
– away from aggressive agents;
– in a location protected against sunlight;
– in a location protected against mechanical shocks.
In the case of extended storage (over three months), make sure you check the
condition of the packaging and the parts regularly. If needed, replace the packaging
with a new one.
2839171 11 / 38
Page 14

Technical Data
EN
4 Technical Data
Version / Characteristics
• Type: table-top appliance
• Supply type: gas
• Gas type:
– natural gas E
– propane nozzles included
• Ignition type: piezoelectric ignition
• Material: Scotch-Brite polish
• Basin with V-shaped bowl
• Basin with large cold zone
• Grease drain tap
• Safety thermostat
• Control: knob
• Temperature control: manual
• May be used as a table-top appliance or in connection with the base as a free-
standing appliance
• It can be combined and installed in series with other 700FX series appliances
We reserve the right to implement technical modifications.
12 / 38 2839171
Page 15
Technical Data
EN
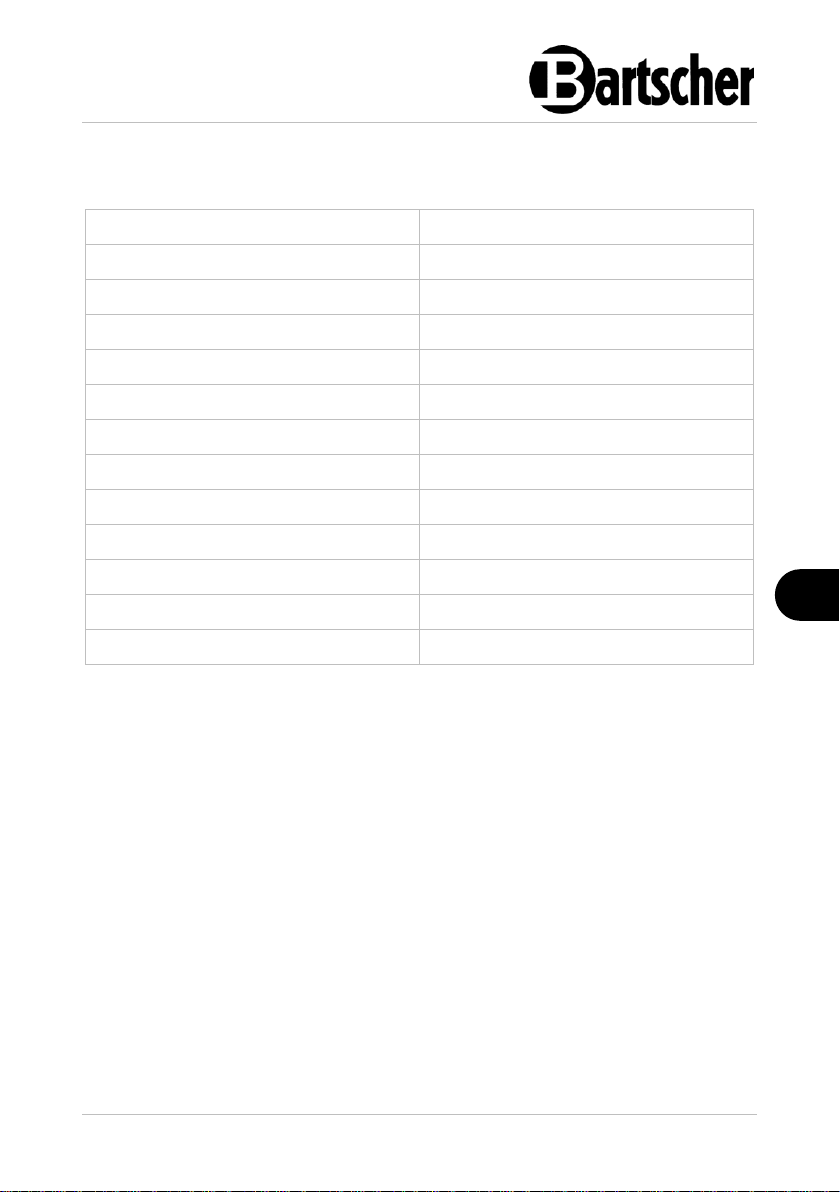
Name:
Deep fat fryer 700FX-G180
Art. No.:
2839171
Material:
CNS 18/10
Number of basins:
1
Basin volume, in litres:
8
Basin dimensions (W x D x H), in mm:
255 x 520 x 200
Number of baskets:
1
Basket dimensions (W x D x H), in mm:
190 x 340 x 110
Basket filling capacity in kg:
0,8
Temperature range, min.–max., in °C:
100 - 185
Connected load:
7 kW
Dimensions (W x D x H), in mm:
400 x 700 x 295
Weight, in kg:
32,0
4.1 Technical Specifications
The set includes:
– 1 basket
– 1 lid
– 1 sieve for breadcrumb coating
2839171 13 / 38
Page 16
Technical Data
EN
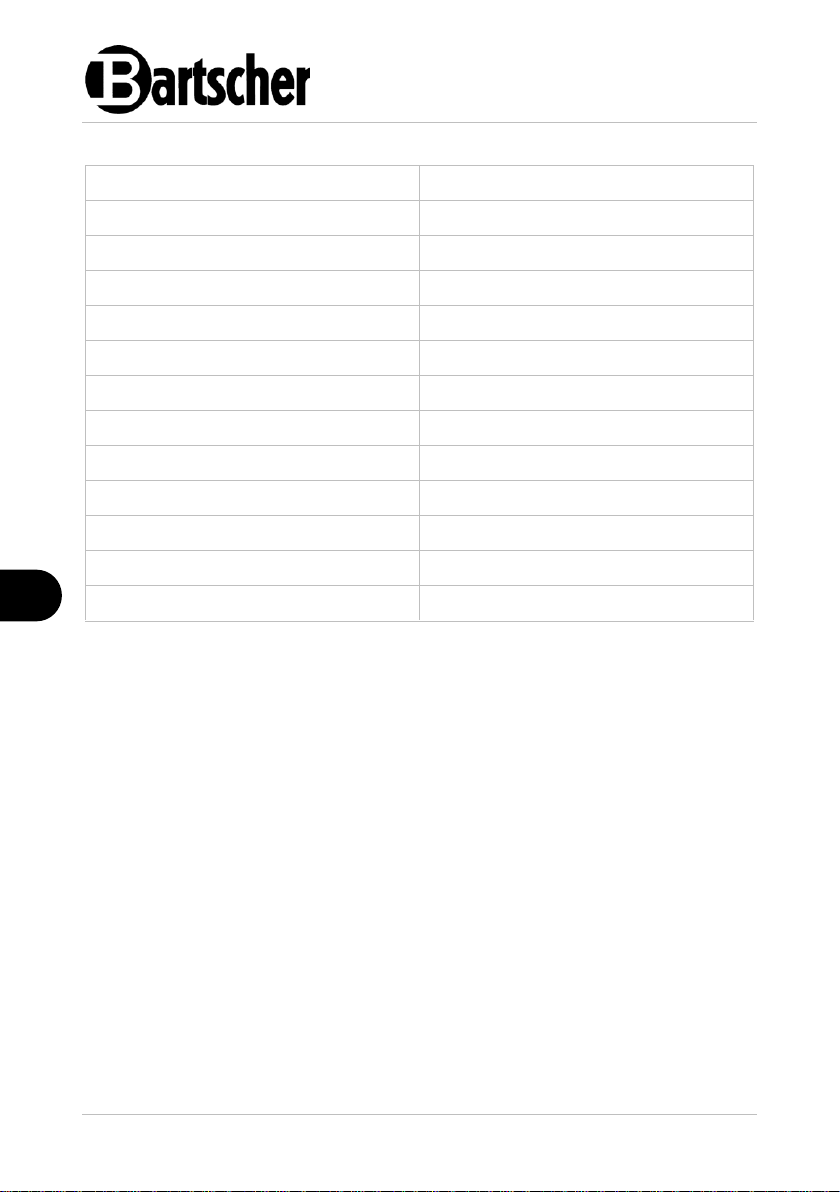
Name:
Deep fat fryer 700FX-G280
Art. No.:
2839221
Material:
CNS 18/10
Number of basins:
2
Basin volume, in litres:
8
Basin dimensions (W x D x H), in mm:
255 x 520 x 200
Number of baskets:
2
Basket dimensions (W x D x H), in mm:
190 x 340 x 110
Basket filling capacity in kg:
0,8
Temperature range, min.–max., in °C:
100 - 185
Connected load:
14 kW
Dimensions (W x D x H), in mm:
600 x 700 x 295
Weight, in kg:
37,0
The set includes:
– 2 baskets
– 2 lids
– 2 sieves for breadcrumb coating
14 / 38 2839171
Page 17
Technical Data
EN
Countries
Appliance
categories
Gas
pressure
(mbar)
Connection pressure (mbar)
Rated
Min.
Max.
LU-PL
I2E
G20
20
17
25
NO
I2H
G20
20
17
25
NL
I2L
G25
25
20
30
NL
I2EK
G20
20
17
25
G25.3
25
20
30
NO-NL-CYMT
I3B/P
G30/G31
28-30
25
35
PL
I3B/P
G30/G31
37
25
45
BE-FR
II2E+3+
G20/G25
20/25
17
25/30
G30/G31
28-30/37
20/25
35/45
DE
II2ELL3B/P
G20
20
17
25
G25
20
18
25
G30/G31
50
42.5
57.5
ES-GB-GR-IEIT-PT-SK
II2H3+
G20
20
17
25
G30/G31
28-30/37
20/25
35/45
DK-FI-SE-BGEE-LV-LT-CZSI-TR-HR-RO
II2H3B/P
G20
20
17
25
G30/G31
28-30
25
35
AT-CH
II2H3B/P
G20
20
17
25
G30/G31
50
42.5
57.5
HU
II2HS3B/P
G20
25
18
33
G25.1
25
18
33
G30/G31
28-30
25
35
HU
II2HS3B/P
G20
25
18
33
G25.1
25
18
33
G30/G31
50
42.5
57.5
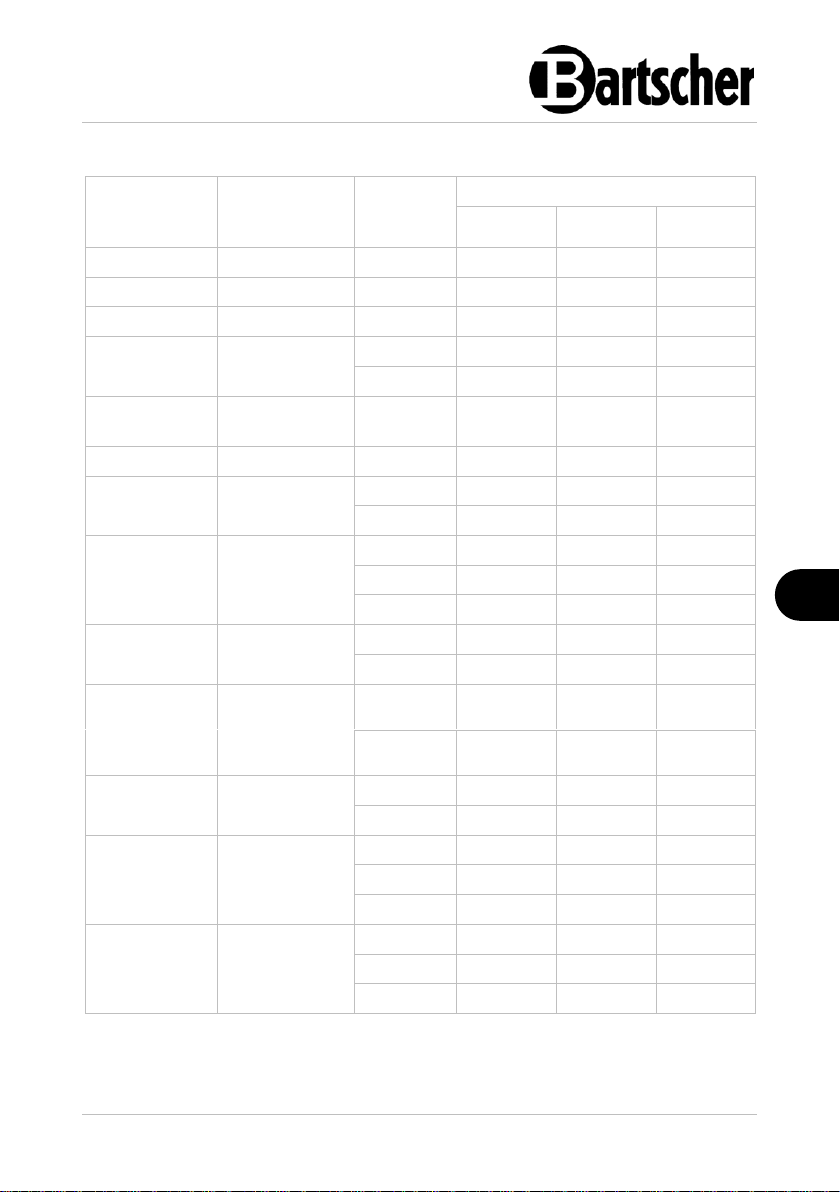
Gas Pressure Table
2839171 15 / 38
Page 18
Technical Data
EN
Countries
Appliance
categories
Gas
pressure
(mbar)
Connection pressure (mbar)
Rated
Min.
Max.
DK-SE
III1a2H3BP
G20
20
17
25
G30/G31
28-30
25
35
G110 8 6
15
IT-CH
II1a2H
G20
20
17
25
G110 8 6
15
NL
II2EK3B/P
G20
20
17
25
G25.3
25
20
30
G30/G31
28-30
25
35
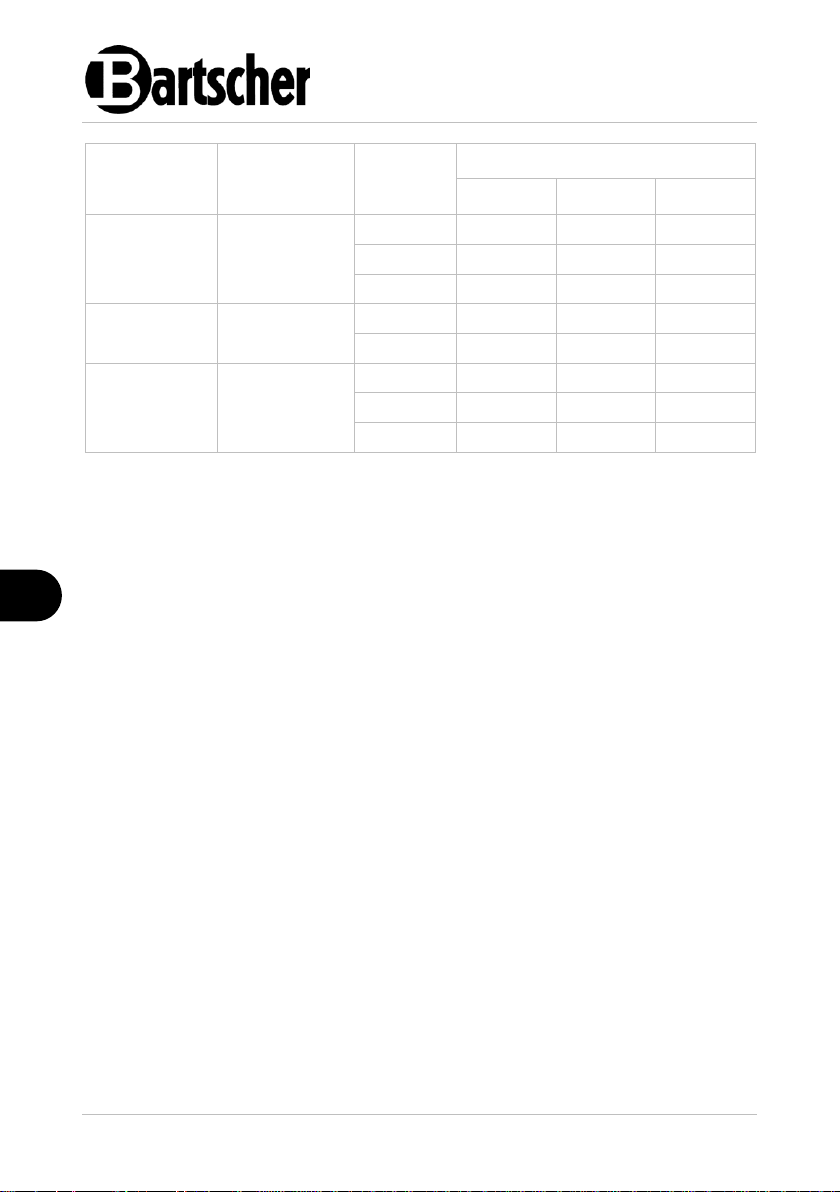
Tab. 1
16 / 38 2839171
Page 19
Technical Data
EN
Countries
Gas type
Pa
(mbar)
Ref.
Art. No.
2839171 / 74GFRT
2839221 / 76GFRT
AT-BE-BG-CH-CZDE-DK-EE-ES-FIFR-GB-GR-HR-IEIT-LT-LU-LV-NO-PLPT-RO-SE-SI-SK-TR
G20
G20/ G25
20
20/25
UM
145
UP
41
A(mm)
0
Um
-
DE
G25
20
UM
160
UP
41
A(mm)
0
Um
-
NL
G25.3
25
UM
145
UP
41
A(mm)
0
Um
-
HU
G20
25
UM
135
UP
41
A(mm)
0
Um
-
HU
G25.1
25
UM
150
UP
41
A(mm)
0
(1)
Um
-
BE-BG-CY-CZ-DKEE-ES-FI-FR-GBGR-HR-HU-IE-IT-LTLU-LV-MT-NL-NOPT-RO-SE-SI-SK-TR
G30/ G31
28-30 /37
28-30
UM
95
UP
25
A(mm)
0
Um
-
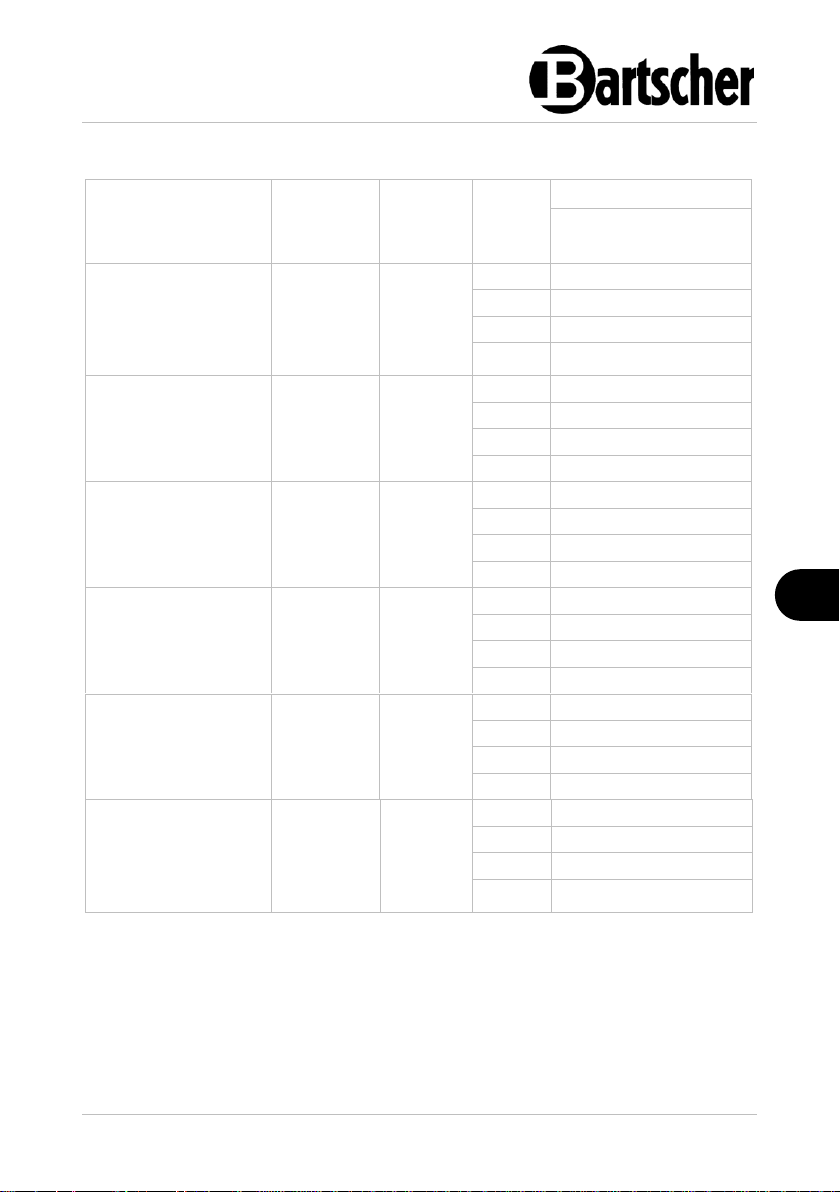
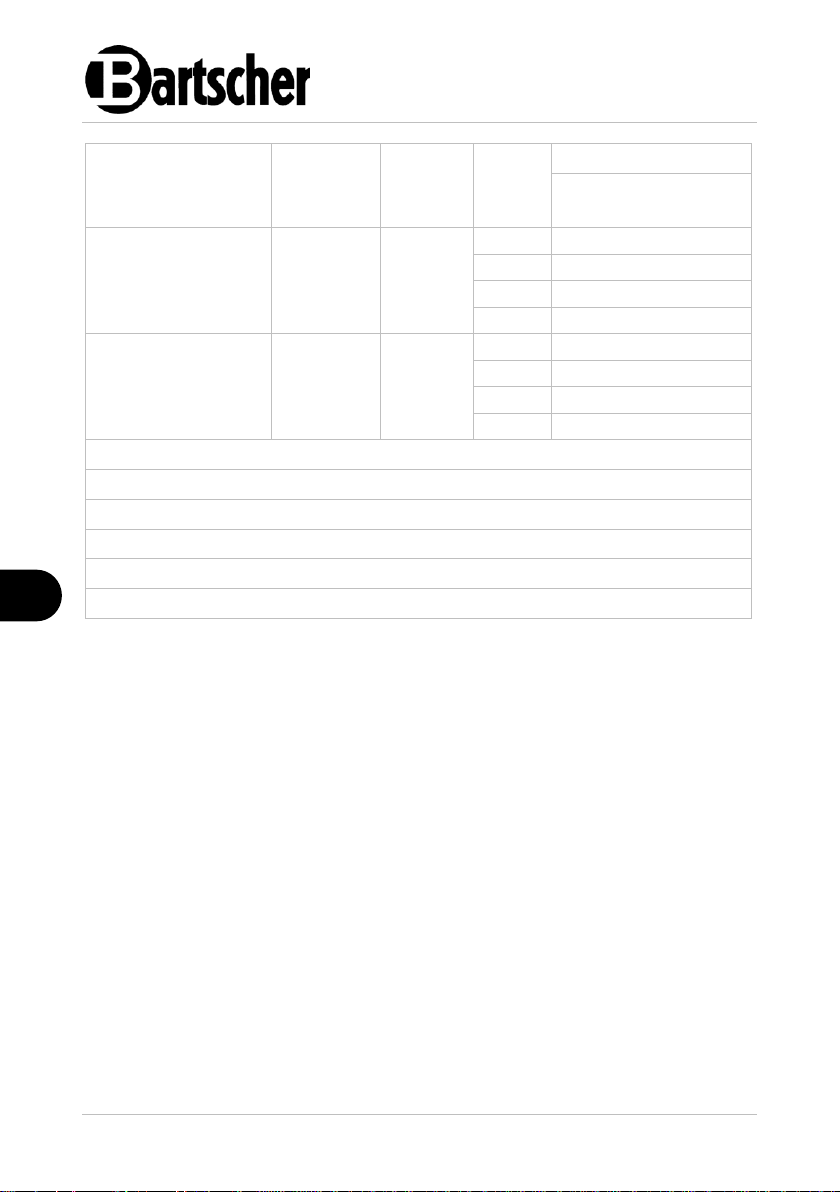
Nozzles and settings
2839171 17 / 38
Page 20
Technical Data
EN
Countries
Gas type
Pa
(mbar)
Ref.
Art. No.
2839171 / 74GFRT
2839221 / 76GFRT
PL
G30/ G31
37
UM
90
UP
25
A(mm)
0
Um
-
AT-CH-DE-HU
G30/ G31
50
UM
83
UP
20
A(mm)
0
Um
-
UM: MAX nozzle
Um: MIN nozzle
UP: Ignition burner
A: Open the air ring
Pa: Connection pressure
(1)
Ventilation grill with 8 openings, Ø4.2 mm
Tab. 2
18 / 38 2839171
Page 21
Technical Data
EN
Art. No. / Model
2839171 / 74GFRT
2839221 / 76GFRT
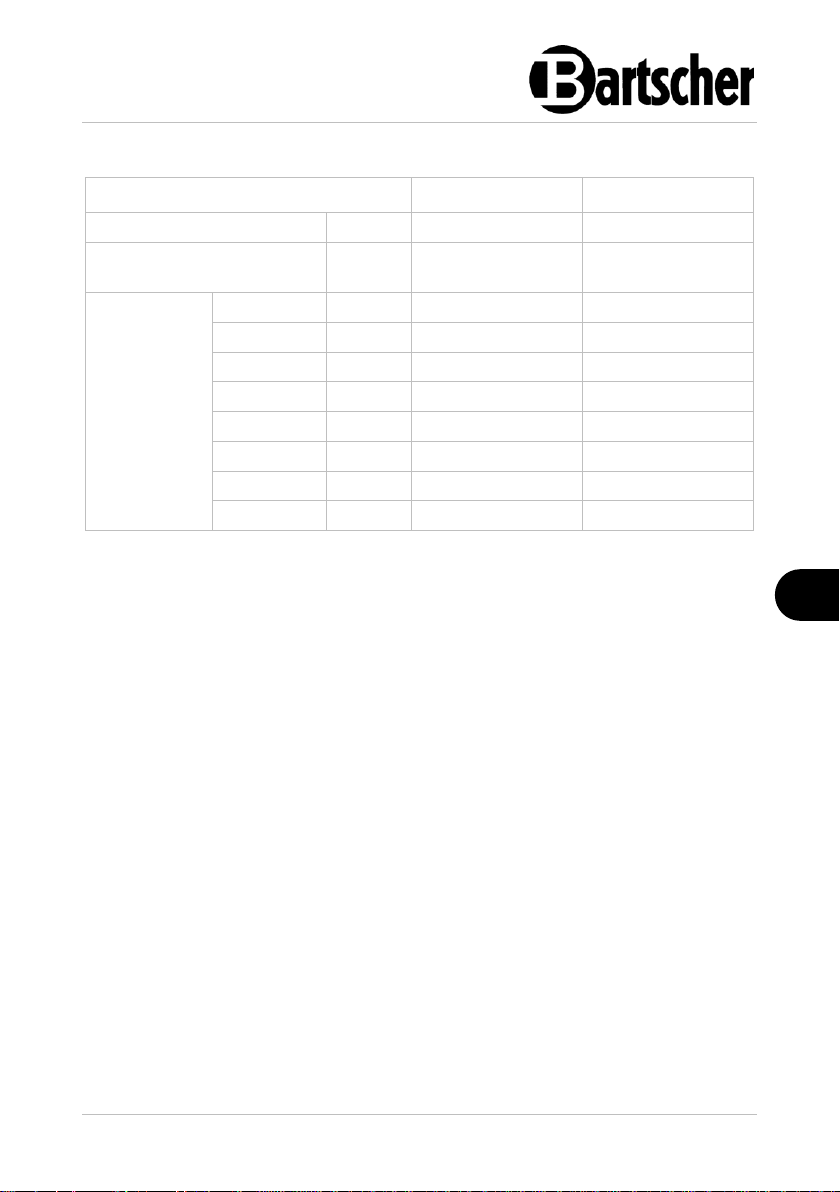
Rated heat load, Qn
kW
7,0
14,0
Rated heat load, Qn G25.3
(25)
kW
6,65
13,3
Total gas
consumption
G20 (20)
m3/h
0,74
1,48
G25.3 (25)
m3/h
0,80
1,60
G25 (20)
m3/h
0,86
1,72
G20 (25)
m3/h
0,74
1,48
G25.1 (25)
m3/h
0,86
1,72
G30 (29)
kg/h
0,55
1,10
G30 (37)
kg/h
0,55
1,10
G30 (50)
kg/h
0,55
1,10
Tab. 3
Gas Consumption
2839171 19 / 38
Page 22
Technical Data
EN
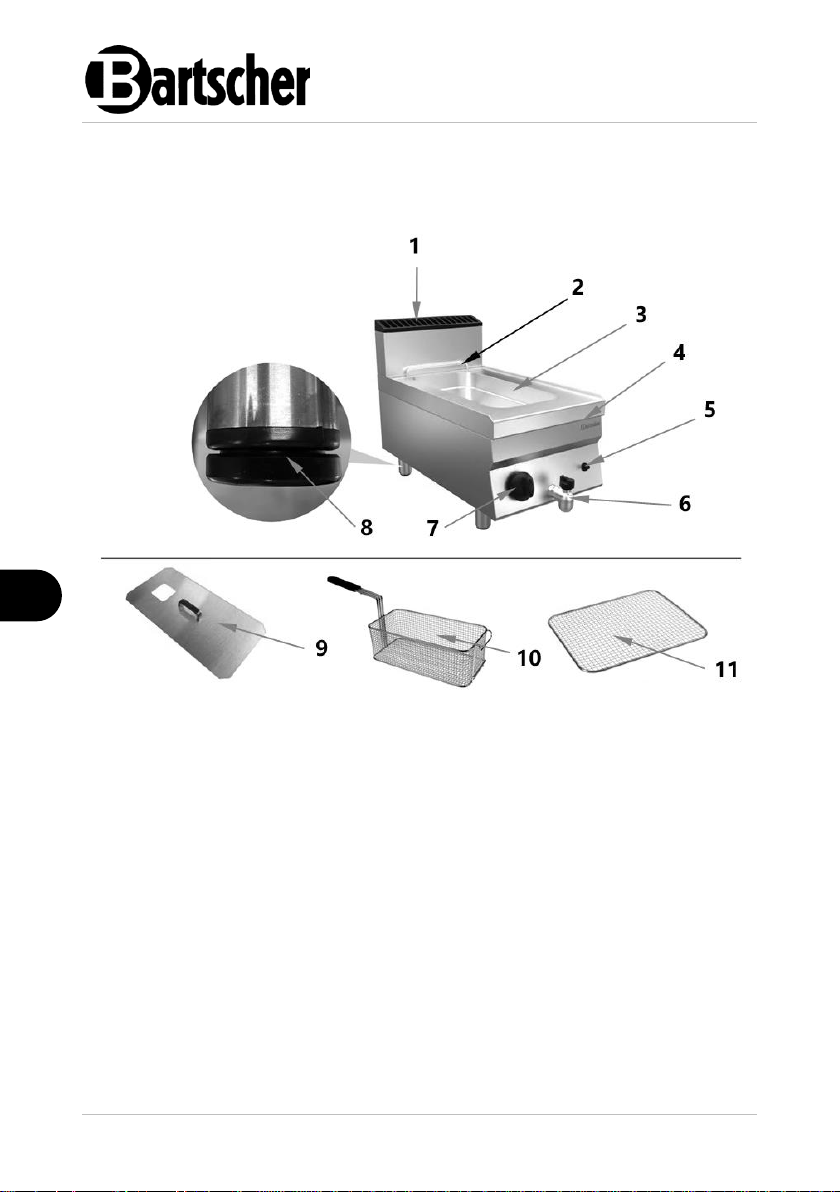
Fig. 1
1. Ventilation chimney
2. Bracket for hanging the deep
frying basket
3. Basin
4. Housing
5. Piezoelectric igniter
6. Grease drain tap
7. Knob
8. Height-adjustable feet (4 pcs)
9. Lid
10. Basket
11. Sieve for breadcrumb coating
4.2 List of Components of the Appliance
2839171
20 / 38 2839171
Page 23
Technical Data
EN
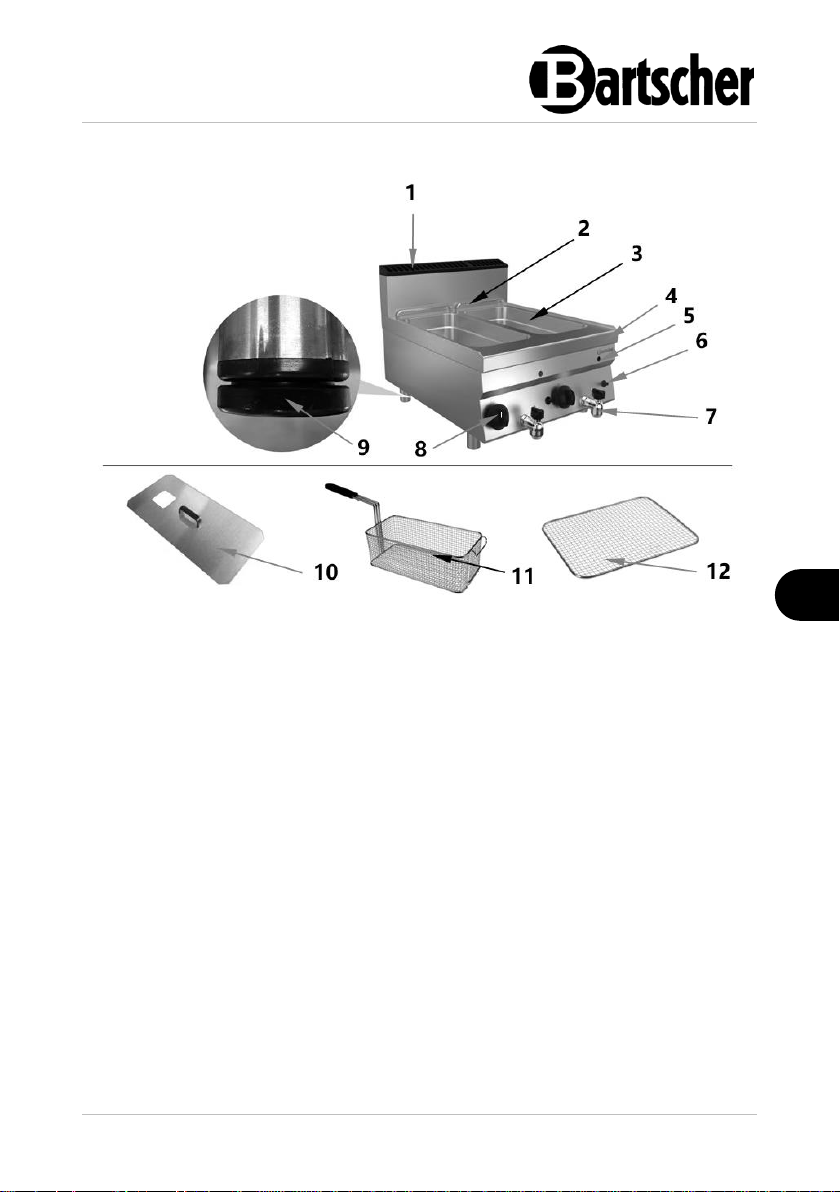
Fig. 2
1. Ventilation chimney
2. Bracket for hanging the deep
frying basket (2 pcs)
3. Basin (2 pcs)
4. Housing
5. Burner sight glass (2 pcs)
6. Piezoelectric igniter (2 pcs)
7. Grease drain tap (2 pcs)
8. Knob (2 pcs)
9. Height-adjustable feet (4 pcs)
10. Lid (2 pcs)
11. Deep frying basket (2 pcs)
12. Sieve for breadcrumb coating
(2 pcs)
2839221
4.3 Functions of the Appliance
The deep fat fryer is used to fry suitable food products in hot fat at a suitable
temperature setting. The deep fat fryer — being a robust table-top appliance — is
perfectly adapted to using especially i professional kitchens, foremost, thanks to 8litre basin. The grease drain tap and removable sieve for breadcrumbs coating
facilitate cleaning.
2839171 21 / 38
Page 24
Installation Instructions
EN
CAUTION!
Incorrect installation, positioning, operation, maintenance or misuse of
the appliance may lead to personal injury or property damage.
Positioning and installation, as well as repairs may be performed by
authorised technical service only and in compliance with the applicable
national law.
NOTE!
The manufacturer disclaims all liability and provides no warranty for
damages, which may be attributed to non-observance of regulations or
incorrect installation.
5 Installation Instructions
5.1 Installation
Observe all provisions of law, guidelines and regulations during installation:
– Regional or local safety regulations and construction law provisions
– Accident prevention acts in force
– Fire prevention provisions
– Respective IEC provisions
– DVGW G600 (TRGI), 'Technical regulations for gas installations'
– TRF, 'Technical regulations for liquid gas'
– Directive and regulations of a gas supplying company (EUV)
– DVGW G 631, 'Installation of commercial kitchen appliances for
combustion of gas fuels'
– Respective legal regulations
22 / 38 2839171
Page 25
Installation Instructions
EN
CAUTION!
Choking hazard!
Prevent children from accessing package materials, for instance: plastic
bags and EPS.
Place of Installation
• This appliance are A1 type appliances, which means that they do not have to be
connected to a fume extraction system. In order to provide venting in the place
of installation, follow indications included in DVGW G631 data sheet.
• Place the appliance in a well-ventilated room, under a fume extractor, if
possible, in order to eliminate fumes or odours generated when food is prepared
(see DVGW G631 data sheet).
• A room, in which the appliance is installed, should contain the amount of air
necessary for burning gas according to regulations in force. For proper burning,
the required fresh air inflow may not be lower than 2 m3/h per kW of appliance's
rated power (see appliance's rated plate). Additionally, accident prevention
regulations should be observed.
• Make sure that there are no objects near or under the appliance that may
restrict the amount of air necessary for burning.
• Before placing the appliance, check the dimensions and exact position of gas
connections.
Unpacking / Positioning
• Unpack the appliance, remove all external and internal packaging elements and
shipment safeguards.
• If the appliance is covered with a protective film, remove it. Remove the film
slowly, so no glue residues are left. Remove any glue residues with the use of a
suitable solvent.
• Be careful not to damage the rating plate and warning labels fixed on the
appliance.
• Never place the appliance in humid or wet environment.
• Place the appliance in a way making the connections easily accessible, so that
they may be quickly disconnected if such a need arises.
• The appliance should be placed on surfaces that are:
– even, with sufficient bearing capacity, resistant to water, dry and resistant
to high temperatures;
– sufficiently large, and thus enabling usage of the appliance with no
problems;
2839171 23 / 38
Page 26

Installation Instructions
EN
– easily accessible;
– well ventilated.
• Never place the appliance directly next to walls, furniture, or other objects made
of flammable materials. Maintain minimum clearance of 200 mm between side
and rear walls and the said objects and walls. Maintain clearance of at least
600 mm between the appliance's surface and horizontal surfaces over the
appliance.
• If keeping the minimum clearance is not possible, walls should be isolated with
non-combustible, thermo-insulation materials (e.g., films made of heat resistant
materials, which may sustain temperature of at least 65°C). Follow fire
protection regulations in force.
• Maintain sufficient lateral clearance for service purposes should maintenance
and repair works be required.
• Screw 4 feet in.
– To level the appliance, you may adjust the height of feet.
IMPORTANT!
Never use the appliance without feet.
24 / 38 2839171
Page 27
Installation Instructions
EN
5.2 Gas Connection
Connection to Gas Installation
• Before making the connection to gas installation, make sure that the appliance
is set to gas and pressure is available in the installation location (see rating plate
on the appliance and packaging). If factory default settings are not suitable, the
appliance must be adapted to the available gas type (section 'Resetting to
Other Type of Gas / Required Adjustments').
• The attested gas shut-off valve must be installed in an easily accessible location
between the gas supply installation and the appliance, so that, if needed, gas
supply may be interrupted at any time.
• Check if the gas cylinder (if it is included) is correctly set up and secured, and if
it is located in a dry place.
• Connect the appliance to the gas supply installation, using rigid connection
tubes or flexible steel hoses, with section suitable for the given rated power and
length.
• Use only connection tubes with, at least, diameters equalling the diameter of the
appliance's gas connection. Gas connection stub is found at the back of the
appliance.
• Make sure that flexible hoses do not run on or near hot surfaces, are not subject
to stress or pressure and do not come into contact with sharp edges or other
objects that could damage the tube.
• After connecting the appliance, all connection points between the installation
and the appliance must be subject of tightness check. To this end, use spray for
detecting leakages or foam producing agents, which do not spur corrosion.
Connection points should be covered with an agent - no air bubbles should be
produced. Also the gas shut-off valves should be subject of this check.
WARNING!
Do not use open fire to test tightness.
Checking Gas Pressure and Rated Heat Load
• With first installation, the gas installation technician must verify the appliance's
rated heat load, as well as conduct maintenance, and, if needed, resetting to
other type of gas.
• DO NOT attempt to increase the power nor rated heat load specified by the
manufacturer.
2839171 25 / 38
Page 28

Installation Instructions
EN
• Check the rated heat pressure with gas meter and a stop watch. Measure
exactly the amount of gas flowing per unit of time the appliance is consuming
with maximum power.
• Compare the measured value with data on consumption in section 'Technical
Specifications', Table 3. Admissible deviation is ±5%.
• Check the gas supply pressure observing indication in section 7.3
„Maintenance / Gas Supply Pressure Check“.
Resetting to Other Type of Gas / Required Adjustments
The appliances are set to the following gas type:
Natural gas E
Check the type of the supplied gas in the country of installation, and, if needed,
reset the appliance to the other gas type.
Tables 1 and 2 in section 'Technical Specifications' provide, depending on the
country of installation:
– what gas types may be used to power the appliance;
– nozzles and settings for each gas type that is used.
The number provided in Table 2 for proper nozzles is pressed on nozzles' bodies.
In order to adapt the appliance to the gas type, with which it may be effectively
operated, collect data from Table 2 and perform the following actions:
– exchange main burner's nozzle (UM)
– fit main burner air controller within the distance (A)
– exchange ignition burner's nozzle (UP)
– perform air adjustment of ignition burner (if needed).
– Affix a suitable sticker to the appliance, stating the new type of gas
supply. The nozzles and stickers are part of the supplied set.
26 / 38 2839171
Page 29
Installation Instructions
EN
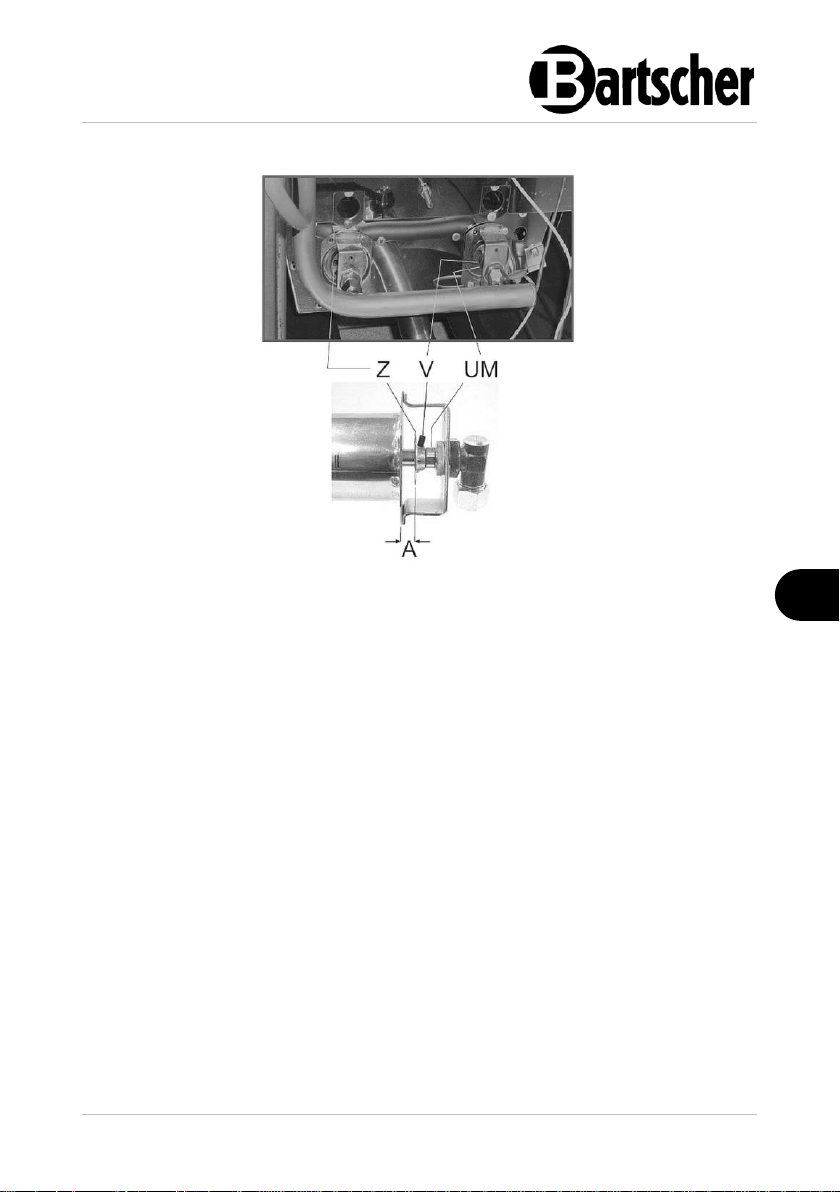
Fig. 3
Replacement of Main Burner Nozzle
1. Remove the knob(s).
2. Unscrew front guard (operation panel) and remove it from the appliance.
3. Remove the nozzle handle ramp.
4. Loosen V bolt (Fig. 3).
5. Remove main burner's nozzle, UM (Fig. 3), and exchange it with a nozzle
suitable for the new type of gas (part of the delivery). Follow information
provided in Table 2.
6. Re-tighten main burner's nozzle, UM.
7. Set the air controller Z (Fig. 3) within the distance of A, as provided in Table 2.
8. Re-tighten firmly the V bolt.
2839171 27 / 38
Page 30
Installation Instructions
EN
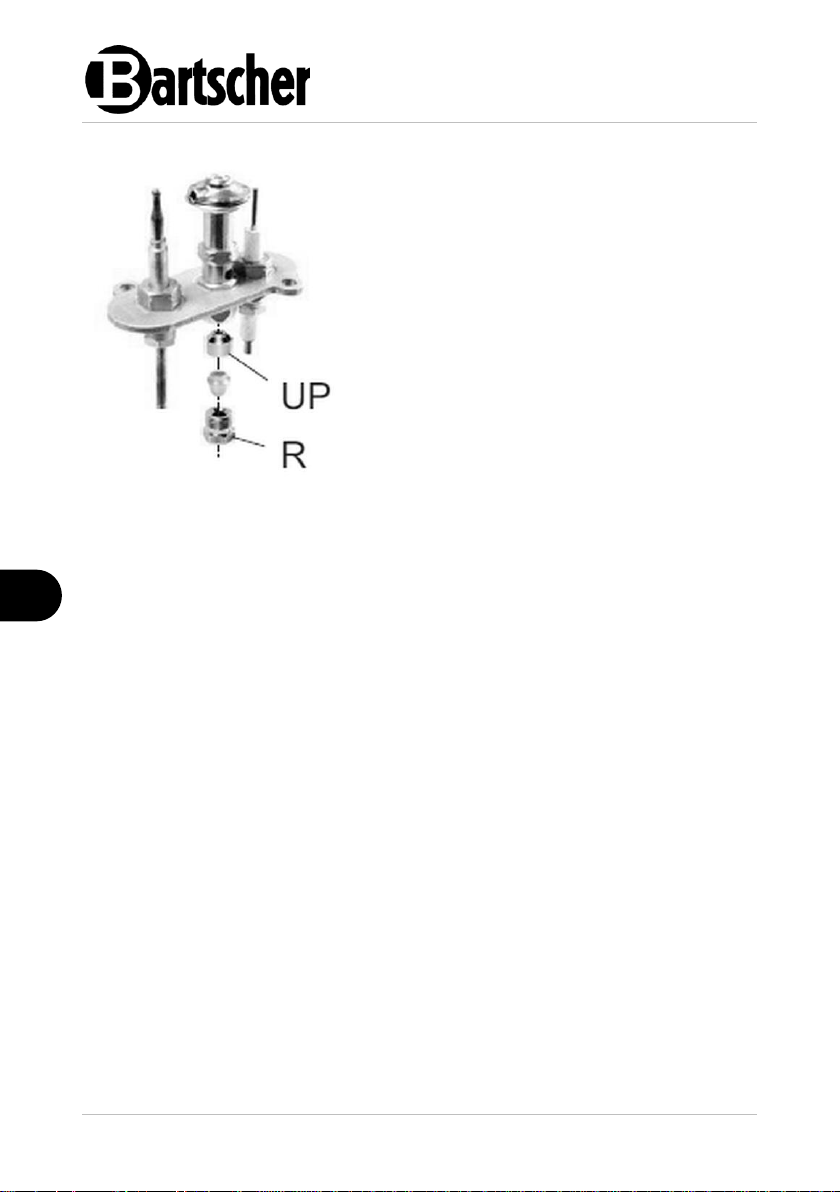
1. Remove the front guard / operation
panel.
2. Screw out the R connection (Fig. 4).
3. Remove the UP nozzle and exchange it
with a nozzle provided in Table 2 (part
of the delivery).
4. Re-tighten the R connection firmly
(Fig. 4).
5. Re-install removed elements in reverse
order.
Fig. 4
Exchange of Ignition Burner Nozzle
• When the nozzles are exchanged, it is necessary to verify functions of the
appliance, as set forth in section 'Verification of Functions'.
• To end with, exchange the old rating plate to a new one, included in the delivery,
and containing different data and indication of the new type of gas.
Functional Check
• Before test-running, install the appliance in a well ventilated room and remove
any flammable materials from the vicinity of the appliance.
• Before starting, perform the tightness test using soapsuds. Cover connections
and pipe fittings with suds. Leakages are revealed when bubbles are produced
on couplings and pipe connections. Other method involves observation of gas
meter. No reaction of gas meter indicates that there are no gas leakages.
WARNING!
Do not use open flame for checking tightness of gas installation!
• Restart the appliance, observing indications in section 'Appliance Start-up'.
• Check the appliance for gas tightness (see DVGW data sheets, TRGI/TRF).
• Verify burner's ignition.
• Verify flame shape.
28 / 38 2839171
Page 31
Operating Instruction
EN
WARNING!
Fire hazard!
Operation of the appliance with the oil level below MIN mark may lead to
overheating of frying oil and cause oil to catch fire.
The oil level should be between MIN and MAX marks on the side wall of a
tank.
If overheated during operation, the frying oil or fat in cubes (blocks)
may catch fire.
The appliance should not remain in use for extended periods of time.
During breaks between subsequent frying processes, the temperature
control knob should be set to lower values.
WARNING!
Risk of burns!
Due to lower flashpoint, old oil that had already been used for frying,
exhibits a tendency for self-ignition and favours frothing.
Do not use old oil for frying. Regularly change frying oil.
When the oil level is above the MAX mark during operation of the
appliance, hot oil may spill out.
The oil level should be between MIN and MAX marks on the side wall of a
tank.
If the basket is overfilled with products for frying, the frying oil or fat in
cubes (blocks) may boil over.
Observe the maximum allowable level of filling the basket with products
for frying.
If water enters hot frying oil, it may cause spatters of oil and scalding.
Use only dry products for frying.
When deep frying in fat, even drops of water under the lid may cause
spatters of hot oil or even small outbursts.
Never place the lid on during or immediately after the frying process.
The lid is used only for protection against dirt or for keeping the
temperature of frying oil / fat in cubes (blocks) in the case of possible
interruptions of operation.
6 Operating Instruction
• Setzen Sie die Boden-Abdeckung in das Becken ein. The cover acts as a spacer b etween the heating element and left- over food tray.
Ostrożnie osadzić skrzynkę rozdzielczą z elementem gr zewczym na t ylnej krawędzi urz ądzenia. Sworz eń w dolnej częś ci skrzynki r ozdzielczej m usi wchodzić w otwór w urządz eniu głównym. W t aki sposób s krzynka roz dzielcza jest pr awidłowo ustawi ona.
2839171 29 / 38
Page 32
Operating Instruction
EN
Before placing the lid, make sure that it is dry, so that no water drips into
the tank.
When pouring hot frying oil / fat in cubes (blocks) be aware of the risk
of burns.
Cool the frying oil / fat in cubes (blocks) before pouring.
CAUTION!
The deep fat fryer can only be used by individuals who have been
instructed in the proper use of the appliance and hazards that may arise
during the frying process.
Appliance Preparation
1. Remove the equipment from the appliance (lid, deep frying basket, sieve for
breadcrumb coating).
2. Before use, thoroughly clean the appliance and equipment according to
instructions in section 6 'Cleaning'.
3. Then, thoroughly dry the appliance and the entire equipment.
4. Insert sieve(s) for breadcrumb coating in basin(s).
30 / 38 2839171
Page 33
Operating Instruction
EN
Instructions for using frying oil or fat in cubes (blocks)
• Always use oil suitable for frying (e.g. vegetable oil, sunflower oil, peanut oil,
etc.) or fat in cubes/blocks only.
NOTE!
Melt (dissolve) the fat in cubes (blocks) beforehand in a separate dish!
• Use only oils and fats that are suitable for frying in high temperatures.
• Never mix different types of oil or fat as their boiling points may vary.
Filling the Basin with Frying Oil or Fat in Cubes (Blocks)
CAUTION!
Prior to filling with the frying oil or liquid fat in cubes (blocks), the tank
must be clean and dry.
1. Make sure the fat drain tap is closed.
2. Prior to switching on, the basin must be filled carefully with the required amount
of liquid frying oil or fat in cubes (blocks).
The oil level should be between MIN and MAX marks on the side wall of the basin.
The marks are at the side wall of the basin.
3. During operation observe the level of oil in the basin and, if needed, top up with
frying oil or fat in cubes (blocks).
WARNING!
Never use the appliance if there is no oil for frying or fat in cubes (blocks)
in the basin.
2839171 31 / 38
Page 34
Operating Instruction
EN
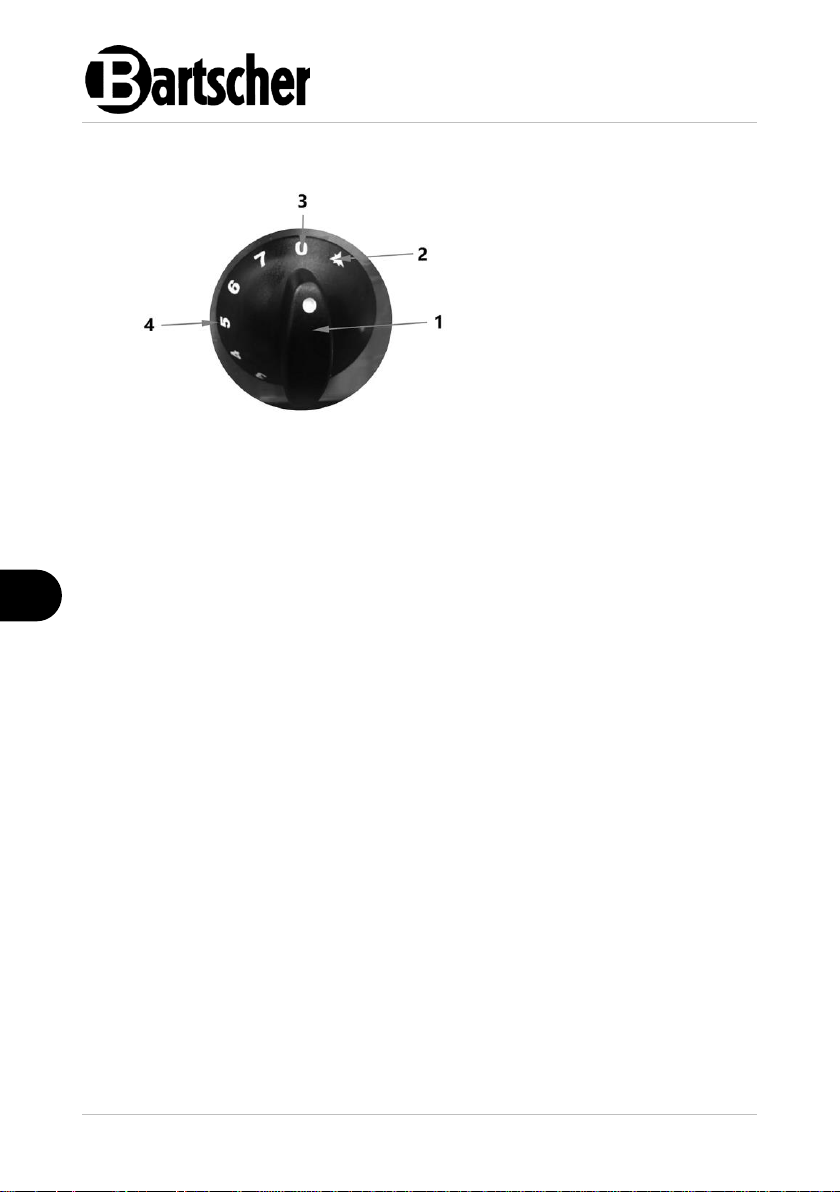
1. Knob
2. Switching ignition burner
on
3. OFF position (0)
4. Control range 1–7
Fig. 5
Control Panel
Settings
The appliance (temperature) is controlled steplessly, using the knob.
The knob features the following operating positions:
– Switching off (0)
– Switching the ignition burner on (Pos. 2)
– Setting 1 = 100°C (min. frying temperature)
– Setting 7 = 185°C (max. frying temperature)
Appliance Start-Up
Switching Ignition Burner On
1. Press the knob (1) and rotate it to position (2).
2. Press the knob (1) fully and switch the ignition burner on, using the piezoelectric
igniter's button.
3. Keep the knob (1) pressed for approx. 20 seconds, and then release it. If the
ignition flame is out, repeat the process.
The ignition flame may be observed via the sight glass.
Switching Main Burner On
1. Rotate the knob (1) from OFF position (3) to position (2).
2. Depending on the desired thermal processing temperature, rotate the knob (1)
to the required position (4).
3. For best results, wait until the appliance reaches the required temperature and
then place food products in the frying basket in the basin.
32 / 38 2839171
Page 35
Operating Instruction
EN
WARNING!
Do not use frying oil / fat in cubes (blocks) for an extended period of time
in too low a temperature, as they cease to be suitable for use.
In the case of longer interruptions between the frying processes, set the
knob to lower value.
Switching Off
1. To switch the main burner off, rotate the knob to position (2).
2. To switch the ignition burner off, press and hold the knob, while rotating it to off
position (3).
Deep Fat Frying of Food Products
1. Put the prepared food products in the enclosed deep frying basket.
NOTE!
In the case of overfilling, the temperature of the frying oil / fat in cubes
(blocks) in the basin drops, and fried products become very greasy.
Never overfill the deep fat frying basket with products.
2. Slowly lower the deep fat drying basket into the basin with frying oil.
3. Place the deep frying basket on the sieve for breadcrumbs coating.
4. Prepare food products in the deep fat fryer.
5. When the frying process is finished, lift the deep frying basket carefully, using
the handle.
6. Using hooks, hang the deep frying basket on the bracket for hanging the basket
on the control box of the appliance.
7. Soak the ready products well.
8. Rotate the knob to '0' position as soon as the frying process is finished and the
appliance will be no longer used.
2839171 33 / 38
Page 36

Cleaning and Maintenance
EN
Exchange and removal of frying oil / liquid fat in cubes (blocks)
1. The frying oil / liquid fat in cubes (blocks) should be replaced regularly when it
no longer fulfils legal requirements.
2. After cooling, the frying oil / fat in cubes (blocks) should be drained from the
basin via fat drain tap into a suitable container.
3. Make sure that the container is placed stably.
NOTE!
Remove used frying oil / fat with care for environment and according to
the valid regulations.
7 Cleaning and Maintenance
7.1 Safety Instructions for Cleaning
• Close the gas supply valve before cleaning.
• Leave the appliance to cool down completely.
• Do not clean the appliance with a pressurized water jet.
• Do not use any sharp or pointed, nor metal implements (knife, fork, etc.). Sharp
or pointed objects may damage the appliance.
• For cleaning, do not use any scouring agents that contain solvents nor corrosive
cleaning agents. They may damage the surface.
34 / 38 2839171
Page 37

Cleaning and Maintenance
EN
ATTENTION!
Any works interfering in the appliance must be performed by
professional and qualified personnel.
7.2 Cleaning
1. At the end of a working day, clean the appliance thoroughly.
2. Remove the deep frying basket from the basin.
3. Drain the cooled frying oil from the basin.
NOTE!
Observe instructions in section 'Exchange and Removal of Frying Oil /
Liquid Fat in Cubes (Blocks)'.
4. Remove the sieve for breadcrumbs coating from the basin.
5. Wash the basin with warm water and mild cleaning agent. Use a soft cloth or
sponge. Drain the water after washing to a suitable container using the fat drain
tap. Then rinse the basin with fresh water and drain it using the fat drain tap
(tube) again.
6. Wipe the surface of the appliance and the control panel only with a slightly damp
cloth.
7. Wash the frying basket, lid and sieve for breadcrumb coating in hot water with a
mild cleaning agent. Rinse in fresh water.
8. Finally, dry all appliance components thoroughly.
9. Refit the removed appliance components back in the appliance.
7.3 Maintenance
We recommend to order the maintenance of the appliance with the qualified and
authorised maintenance technician at least twice a year.
Perform the following maintenance works:
– Operation verification of the available control elements and protective
devices;
– Verification of the flame;
– Verification of the ignition;
– Verification of the flame's safety;
– Verification of functions.
2839171 35 / 38
Page 38

Cleaning and Maintenance
EN
Operate the appliance observing the instruction manual and indications in section
'Indications for the User' and check:
– gas supply pressure (see next section).
– correct switching of burners and operation of the fume extractor
(chimney).
Gas Supply Pressure Check
Use a suitable manometer with 0.1 mbar minimum pitch.
– Remove operating panels.
– Remove the retaining screw from the pressure connection.
– Connect the manometer.
– Perform the measurement with an operating appliance.
– Disconnect the manometer and re-tighten the retaining screw back to the
pressure connection.
ATTENTION!
If the gas supply pressure is outside the limit values range (min. – max.) in
Table 2, interrupt the appliance's operation and contact local gas supply
operator.
Cleaning Performed by the Maintenance Technician
At least twice a year, have the authorised maintenance technician perform the
cleaning of the appliance's interior.
36 / 38 2839171
Page 39
Possible Malfunctions
EN
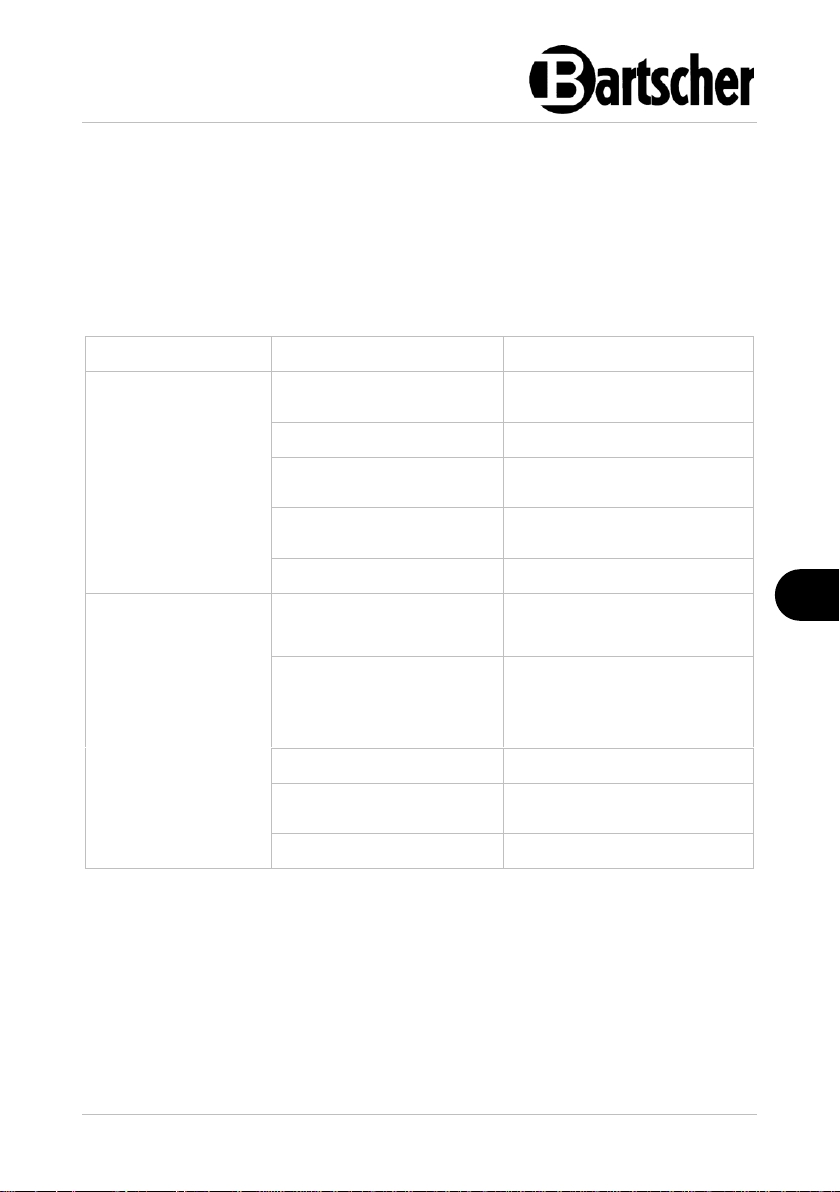
Problem
Possible Cause
Solution
Ignition burner does
not switch on
Insufficient gas supply
pressure
Check gas supply
Clogged line or nozzles
Contact the service company
Spark plug is incorrectly
connected or damaged
Connect spark plug or
replace it
Igniter or spark plug line is
damaged
Contact the service company
Damaged knob
Contact the service company
Ignition burner does
not switch on or goes
out when the knob or
piezoelectric igniter
is released
Thermo-element is
incorrectly connected to
the knob
Contact the service company
Thermo-element is
damaged or insufficiently
heated up by the ignition
burner
Repeat the ignition process
Damaged knob
Contact the service company
Knob has not been
pressed sufficiently long
Keep the knob pressed for
approx. 20 seconds
Damaged gas fittings
Contact the service company
8 Possible Malfunctions
Mögliche
The table below contains descriptions of possible causes and solutions to
malfunctions or errors during operation of the appliance. When malfunction cannot
be removed, contact the technical service.
In such a case, provide article number, model name and serial number. These data
may be found in the rating plate.
2839171 37 / 38
Page 40
Disposal
EN
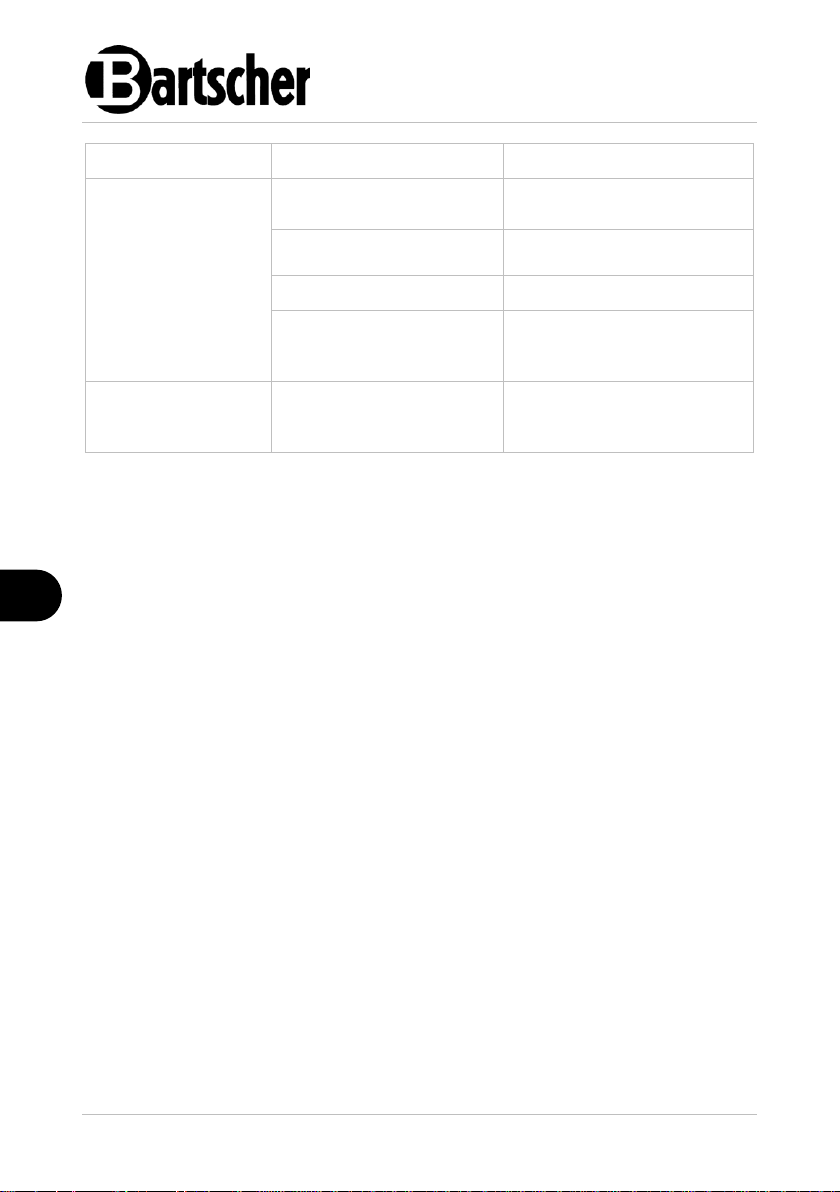
Problem
Possible Cause
Solution
Main burner does not
switch on when the
ignition burner is on
Loss of pressure in gas
supply line
Check gas supply
Clogged line or nozzles
Contact the service company
Damaged knob
Contact the service company
Main burner is damaged or
gas outlet openings are
clogged
Contact the service company
Heating power output
control is not
possible
Damaged knob
Contact the service company
9 Disposal
At the end of the appliance's operational life cycle, dispose of the appliance,
observing national and local regulations. To this end, we recommend contacting a
professional company or local authorities' unit, proper for utilisation matters.
Before disposing of the appliance make sure that the appliance cannot be restarted
to prevent any abuse and related risks, and then deliver it to the local collection
point.
Used frying oil
Dispose of the used frying oil according to provisions of natural environment
protection law in force.
38 / 38 2839171
 Loading...