

Page 1
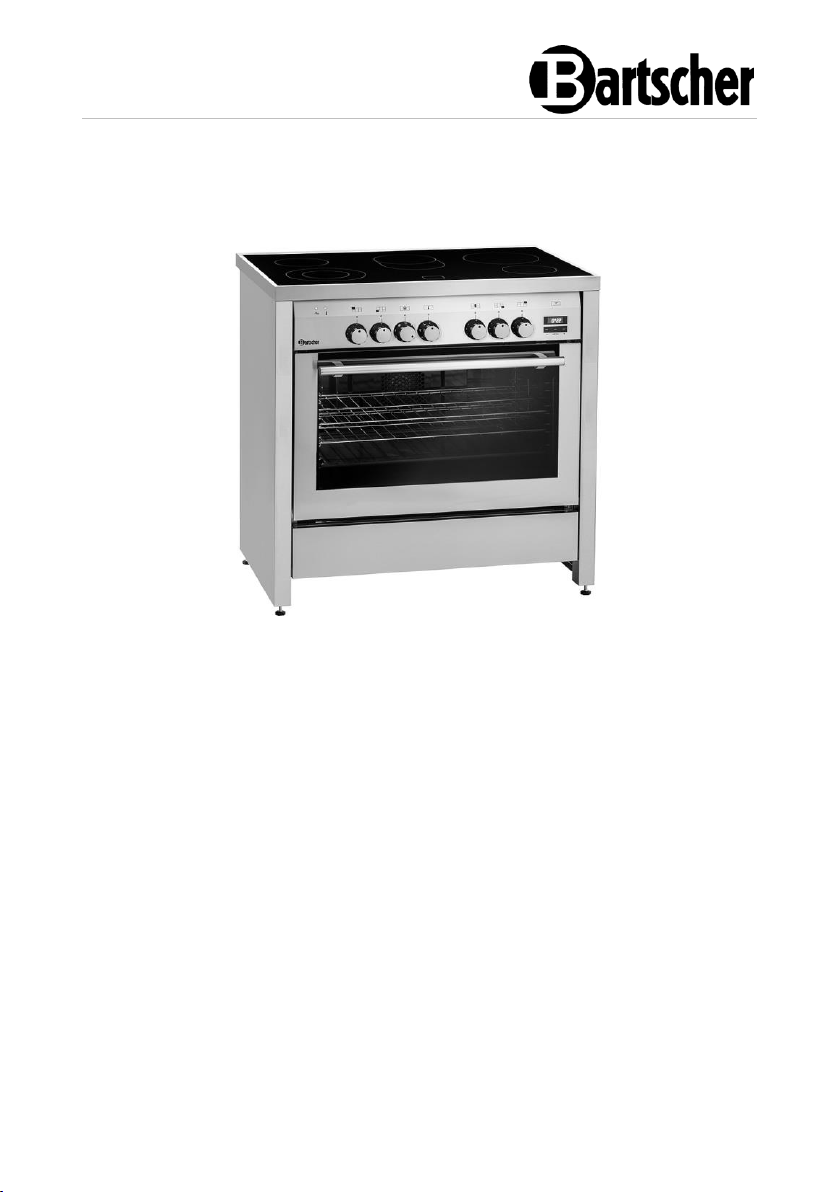
5K-EBMF
155670
Page 2

Bartscher GmbH
Franz-Kleine-Str. 28
D-33154 Salzkotten
Germany
Phone: +49 5258 971-0
Fax: +49 5258 971-120
Technical Support Hotline: +49 5258 971-197
www.bartscher.com
Version: 1.0
Date of preparation: 2023-12-12
EN
2
Page 3

Original instruction manual
1 Safety ............................................................................................................ 2
1.1 Explanation of Signal Words .................................................................... 2
1.2 Safety instructions.................................................................................... 3
1.3 Residual Risks ......................................................................................... 6
1.4 Personal Protective Equipment ................................................................ 8
1.5 Intended Use ........................................................................................... 9
1.6 Unintended Use ....................................................................................... 9
2 General information ..................................................................................... 10
2.1 Liability and Warranty ............................................................................ 10
2.2 Copyright Protection .............................................................................. 10
2.3 Declaration of Conformity ...................................................................... 10
3 Transport, Packaging and Storage .............................................................. 11
3.1 Delivery Check ....................................................................................... 11
3.2 Packaging .............................................................................................. 11
3.3 Storage .................................................................................................. 11
4 Technical Data ............................................................................................. 12
4.1 Technical Specifications ........................................................................ 12
4.2 Functions of the Appliance ..................................................................... 13
4.3 List of Components of the Appliance ..................................................... 14
5 Installation Instructions ................................................................................ 15
5.1 Installation .............................................................................................. 15
5.2 Electrical Connection ................................ ............................................. 19
6 Operating Instruction ................................................................................... 20
6.1 Switching-On ......................................................................................... 20
6.2 Operation of electric hob ........................................................................ 21
6.3 Operating Multi-Functional Oven ........................................................... 22
7 Cleaning and Maintenance .......................................................................... 31
7.1 Safety Instructions for Cleaning ............................................................. 31
7.2 Cleaning ................................................................................................. 32
7.3 Maintenance .......................................................................................... 35
8 Disposal ....................................................................................................... 36
155670 1 / 36
Page 4
Safety
EN
Read this instruction manual before using and keep it available
at all times!
DANGER!
The signal word DANGER warns against hazards that lead to severe
injuries or death if the hazards are not avoided.
Diese Bedienungsanleitung beschreibt di e Installation, Bedienung und Wartung d es Geräts und gilt als wichtige Inform ationsquelle und Nachschlagewer k. Die Kenntnis aller enthaltenen Sicherheits hinweise und Handlungsanweisungen sch afft die Voraussetzung für das sich ere und sachgerechte Arbeiten mit dem Gerät. Darüber hinaus müssen die für den Einsatzbereich des Geräts gelte nden örtlichen Unfallverhütungsvorsc hriften und allgemeinen Sicherheitsb estimmungen eingehalten werden. Diese Bedienungsanleitung ist Bestandt eil des Produkts und muss in unmitt elbarer Nähe des Geräts für das In¬stall ations-, Bedienungs-, Wartungs- und R einigungspersonal jederzeit zugängli ch auf¬bewahrt werden. Wenn das Gerät a n eine dritte Person
weitergegeben wird, muss die Bedienungsa nleitung mit ausgehändigt werden.
This instruction manual contains information about installation, operation and
maintenance of the appliance and constitutes an important source of information
and reference guide. The knowledge of all operational and safety instructions
included in this manual is a prerequisite for safe and proper handling of the
appliance. Additionally, accident prevention, occupational health and safety, and
legal regulations in force in the area the appliance is used apply.
Before you start using the appliance, especially before turning it on, read this
instruction manual in order to avoid personal injuries and property damages.
Improper use may cause damage.
This instruction manual forms and integral part of the product and must be stored in
an immediate vicinity of the appliance and be available at all times. The instruction
manual should be transferred together with the appliance.
1 Safety
This appliance has been manufactured in accordance with technical standards
currently in force. However, the appliance may be a source of hazards if used
improperly or contrary to its intended purpose. All persons using the appliance must
consider information included in this instruction manual and observe safety
instructions.
1.1 Explanation of Signal Words
Important safety instructions and warning information are indicated in this
instruction manual with appropriate signal words. You must strictly follow the
instructions, to prevent accidents, personal injuries and property damages.
2 / 36 155670
Page 5
Safety
EN
WARNING!
The signal word WARNING warns against hazards that may lead to
moderate or severe injuries or death if the hazards are not avoided.
CAUTION!
The signal word CAUTION warns against hazards that may lead to
light or moderate injuries if the hazards are not avoided.
IMPORTANT!
The signal word IMPORTANT indicates possible property damages,
which may occur if safety instructions are not observed.
NOTE!
The symbol NOTE indicates subsequent information and guidelines
for the user on usage of the appliance.
, die
1.2 Safety instructions
Electrical Current
• Too high a mains voltage or incorrect installation may cause electric shock.
• The appliance may be connected only if data on the rating plate correspond with
the mains voltage.
• To avoid short-circuit, the appliance should be kept dry.
• If there are malfunctions during operation, disconnect the appliance from the
power supply.
• Do not touch the appliance’s plug with wet hands.
• Never take hold of the appliance if it has fallen into water. Immediately
disconnect the appliance from the power supply.
• Any repairs or housing opening may be carried out by professionals and
relevant workshops only.
• Do not transport the appliance, holding it by the power cord.
• Do not allow the power cord to come into contact with heat sources or sharp
edges.
• Do not bend, pinch nor knot the power cord.
155670 3 / 36
Page 6

Safety
EN
• Always completely unwind the power cord.
• Never place the appliance or other objects on the power cord.
• Always take hold of the plug to disconnect the appliance from the power supply.
• Check the power cord regularly for damage. Do not use the appliance if the
power cord is damaged. If this cable is damaged, it must be replaced by
customer service or a qualified electrician in order to avoid dangers.
Flammable Materials
• Never subject the appliance to contact with high temperature sources, e.g.:
oven, furnace, open flame, heat generating devices, etc.
• To avoid fire hazard, clean the appliance regularly.
• Do not cover the appliance with, e.g., aluminium foil or cloths.
• Use the appliance only with materials designated to this end and with correct
temperature settings. Materials, groceries and left-overs remaining in the
appliance may catch fire.
• Never use the appliance near flammable or inflammable materials, e.g.: petrol,
spirit, alcohol, etc. High temperature triggers evaporation of these materials,
and, as a result of contact with sources of ignition, an explosion may occur.
• In case of fire, disconnect the appliance from the power supply before
attempting suitable fire-extinguishing actions.
• Never attempt to extinguish fire with water if the appliance is connected to the
power supply. Following extinction of fire, ensure sufficient fresh air inflow.
Hot Surfaces
• Surfaces of the appliance become hot during operation. Burning hazard! High
temperature remains for some time after switching the appliance off.
• Do not touch any hot surfaces of the appliance. Use the provided handling
elements and holders.
• You may transport and clean the appliance after it cools down entirely.
• It is prohibited to sprinkle hot surfaces with cold water or flammable liquids.
4 / 36 155670
Page 7

Safety
EN
Supervised Usage only
• Only supervised appliance may be used.
• Always remain in an immediate vicinity of the appliance.
Halten Sie Verpackungsmaterialien und S tyroporteile von Kindern fern. They ma y get embroiled and suffocate.
Operating Personnel
• The device can be used by children of 8 years old and older, as well as by
people with reduced physical, sensory or mental abilities and those with limited
experience/knowledge as long as they are under supervision or have been
instructed on safe use of the device and possible risks. Children should not play
with the device.
• Cleaning and user maintenance may not be performed by children.
Improper Use
• Unintended or prohibited use may cause damage to the appliance.
• The appliance may only be used when its technical condition is flawless and
allows for safe operation.
• The appliance may only be used when all connections are executed according
to rules of law in force.
• The appliance may only be used when it is clean.
• Use only original spare parts. Never attempt to repair the appliance on your own.
• Do not introduce any changes in the appliance nor modify it.
• Alcoholic vapours in the hot oven chamber could catch fire. Do not use the oven
to prepare food with large quantities of beverages with high alcohol content.
• Add only small quantities of beverages with high alcohol content to the food.
• Carefully open the oven door.
155670 5 / 36
Page 8

EN
Residual risks
Hazardous situation
Warning
Slipping and falling
hazard
The user may slip on the floor
due to the presence of water or
dirt.
Wear non-slip protective
footwear when using the
appliance.
Burns and scalding
The operator intentionally
touches the appliance.
Operator intentionally comes in
contact with hot substances (oil,
water, steam, etc.).
Electrical injury
(Electric shock)
Touching electrically conductive
parts of the equipment during
maintenance without first
disconnecting the electrical
supply. The operator carries out
operations (using a power tool or
without interrupting the electrical
supply to the machine) while lying
on a wet floor.
Maintenance of the
machine must only be
carried out by qualified
personnel, equipped
with personal protective
equipment providing
protection against
electric shock.
Electric shock caused by a faulty
earthing system or faulty
electrical protective equipment.
Protective devices in
accordance with relevant
standards must be
installed upstream of the
appliance.
Falling hazard
The operator performs activities
on the upper part of the appliance
using inappropriate aids (such as
a ladder with rungs, or climbing
onto the appliance).
Do not carry out any
work on the upper part
of the appliance using
unsuitable aids (such as
ladders with rungs or
climbing on the
machine).
Tipping over
hazard
Carrying the appliance or
appliance parts without suitable
aids.
When moving the
appliance or its
packaging, it is
necessary to use
suitable aids or lifting
equipment.
1.3 Residual Risks
Safety
6 / 36 155670
Page 9

Safety
EN
Residual risks
Hazardous situation
Warning
Chemical materials
The operator is handling
chemicals (e.g.: cleaning agents,
descaling agents, etc.).
Take appropriate
precautions. Always
follow the instructions on
the safety data sheets
and labels of the
products used. Use
personal protective
equipment
recommended in safety
data sheets.
Injury hazard
There is an injury hazard during
maintenance work if internal parts
of the appliance frame are
touched.
Maintenance work may
only be carried out by
qualified personnel
equipped with suitable
protective equipment
(cut-resistant gloves,
forearm protectors).
Crushing hazard
Personnel are at risk of crushing
fingers or hands when handling
moving parts.
Maintenance work may
only be carried out by
qualified personnel
equipped with protective
equipment (safety
gloves).
Ergonomics
The operator works on the
appliance without wearing the
required personal protective
equipment.
The operator must wear
personal protective
equipment when working
on the appliance.
155670 7 / 36
Page 10
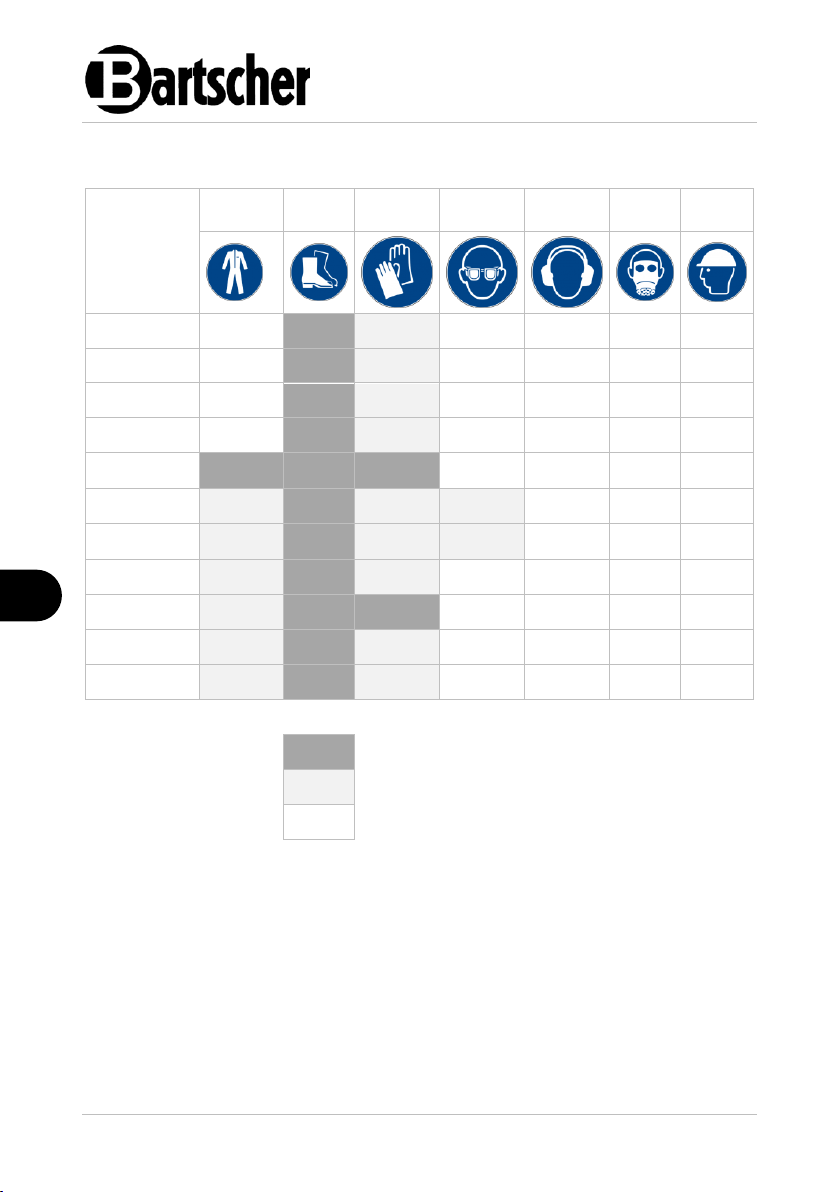
Safety
EN
Phase
Safety
clothing
Safety
footwear
Gloves
Eye protection
Hearing
protection
Respiratory
tract
protection
Head
protection
Transport
X
Moving
X
Unpacking
X
Assembly
X
Standard usage
X X X (*)
Settings
X
Standard
cleaning
X
Special cleaning
X X
Maintenance
X X (*)
Dismantling
X
Disposal
X
X Personal protective equipment provided
Personal protective equipment is available or
must be used if required
Personal protective equipment not provided
1.4 Personal Protective Equipment
* Gloves intended for standard usage and maintenance works must be resistant to
high temperatures to protect operator's hands when the operator touches hot
elements of the appliance or hot substances (oil, water, steam, etc.).
8 / 36 155670
Page 11

Safety
EN
1.5 Intended Use
As described below, every use of the appliance for a purpose differing and/or
diverging from its intended standard use, is prohibited and considered to be an
unintended use.
The following is an intended use:
- Preparation and heating up food (roasting meat, cooking, simmering,
fermenting, baking cakes etc.) with the use of appropriate cookware and
accessories.
This appliance is intended for use in households and similar places, e.g.:
– in employee canteens in shops, offices, and similar areas;
– on farms;
– by customers in hotels, motels, and other typical accommodation
establishments;
– in lodging-houses.
1.6 Unintended Use
An unintended use may lead to personal injuries or property damages caused by
hazardous voltage, fire or high temperature. The appliance may only be used to
perform tasks described in this instruction manual.
The following is an unintended use:
– Heating of rooms.
– Heating-up flammable, hazardous to health and volatile, etc. liquids and
materials.
155670 9 / 36
Page 12

General information
EN
2 General information
2.1 Liability and Warranty
All information and instructions in this instruction manual account for legal
regulations in force, current level of technical engineering knowledge as well as our
expertise and experience, developed over the years. If special models or additional
options are ordered, or state-of-the-art technical solutions were implemented, the
actual scope of delivery of the appliance may, in some circumstances, differ from
descriptions and numerous drawings in this instruction manual.
The manufacturer is not liable for any damages nor faults stemming from:
– failure to observe instructions,
– unintended use,
– technical alterations introduced by the user,
– usage of unapproved spare parts.
We reserve the right to introduce technical modifications to the product, intended for
improvement of the appliance and its performance.
2.2 Copyright Protection
This instruction manual, and texts, drawings and images included in it, as well as its
other components are copyright protected. It is prohibited to reproduce this
instruction manual (including its excerpts), in any form and by any means, and to
use and/or transfer its content to third parties without manufacturer’s written
permission. Violation of the above results in obligation to pay compensation. We
reserve the right to claim further damages.
2.3 Declaration of Conformity
The appliance meets the currently applicable standards and guidelines of the
European Union. We confirm the above in the EC Declaration of Conformity. We
may provide relevant Declaration of Conformity upon request.
10 / 36 155670
Page 13

Transport, Packaging and Storage
EN
3 Transport, Packaging and Storage
3.1 Delivery Check
Immediately upon reception, check the delivery for completeness and possible
shipping damage. In the case of visible transport damage refuse to accept the
appliance or accept it conditionally. Mark and note the scope of damage in shipping
documents/consignment list of the shipping company and lodge a complaint.
Concealed damage must be reported immediately upon its discovery, as
compensation claims may only be filed within applicable time limits.
If you find that parts or accessories missing, please contact our Customer Service
Department.
3.2 Packaging
Do not dispose of the appliance cardboard box. It may be used to store the
appliance when relocating or when shipping the appliance to our service point in the
case of any damages.
The packaging and its elements are made of recyclable materials. Particularly,
these are: plastic films and bags, cardboard box.
When disposing of the packaging, observe applicable domestic regulations.
Recyclable packaging materials should be recycled.
3.3 Storage
Leave the packaging closed until installation of the appliance; observe external
indications concerning method of placing and storage. Store the packaging in the
following conditions only:
– in closed rooms;
– in dry and dust-free surrounding;
– away from aggressive agents;
– in a location protected against sunlight;
– in a location protected against mechanical shocks.
In the case of extended storage (over three months), make sure you check the
condition of the packaging and the parts regularly. If needed, replace the packaging
with a new one.
155670 11 / 36
Page 14

Technical Data
EN
Name:
Cerane stove 5K-EBMF
Art. No.:
155670
Material:
stainless steel, glass
Number of hobs:
5
Distribution of hobs:
1 x 0,7/2,1 kW, 1x 1,4/2,2 kW, 1 x 2,2
kW, 2 x 1,2 kW
Size of hobs, in mm:
1 x Ø 125/215 mm, 1x Ø 175/275
mm, 1 x 215 mm, 2 x 150 mm
Number of ovens:
1
Oven volume, in litres:
104
Oven dimensions (W x D x H), in mm:
670 x 435 x 360
Oven chamber material:
steel, enamelled
Number of guide rail pairs:
4
Distance between guide rail pairs, in mm:
35 | 60 | 65
Temperature range, min.-max., in °C:
50 - 250
Oven connection:
2.5 kW
Energy efficiency class:
A (EU Nr. 65 / 2014)
Energy efficiency index:
95,3
Power consumption by top/bottom heating
element, in kWh / cycle:
0,94
Power consumption by convection, in kWh
/ cycle:
0,96
Power load:
11.5 kW | 400 V | 50/60 Hz
Dimensions (W x D x H), in mm:
900 x 600 x 890
Weight, in kg:
72,4
4 Technical Data
4.1 Technical Specifications
We reserve the right to implement technical modifications.
12 / 36 155670
Page 15

Technical Data
EN
Version / characteristics
• Equipment connection: 3 NAC
• Type: standing appliance
• Operating mode: electric
• Oven type: electric
• Multi-functional oven
• Oven functions:
– defrosting with the use of hot air
– grill
– grill + hot air
– hot air
– top/bottom heat
– convection heat
– bottom heating element with hot air
• Oven characteristics:
– triple glazing
– oven lighting
– timer
– sealed oven chamber
– storage compartment under the oven: W 660 x D 450 x H 120 mm
• Height-adjustable feet
• Height adjustment: 890–915 mm
• Features: stainless steel handles
• The set includes:
– 1 baking tray
– 2 racks
4.2 Functions of the Appliance
Electric cooker with 5 hobs for cooking, frying or simmering on a ceramic glass
plate. Multi-functional oven with timer stands out with the variety of functions such
as hot air, top/bottom heat, convection heat and grill. Thanks to the sealing of the
cooking space, the oven is also extremely energy-efficient and is really easy to
clean.
155670 13 / 36
Page 16
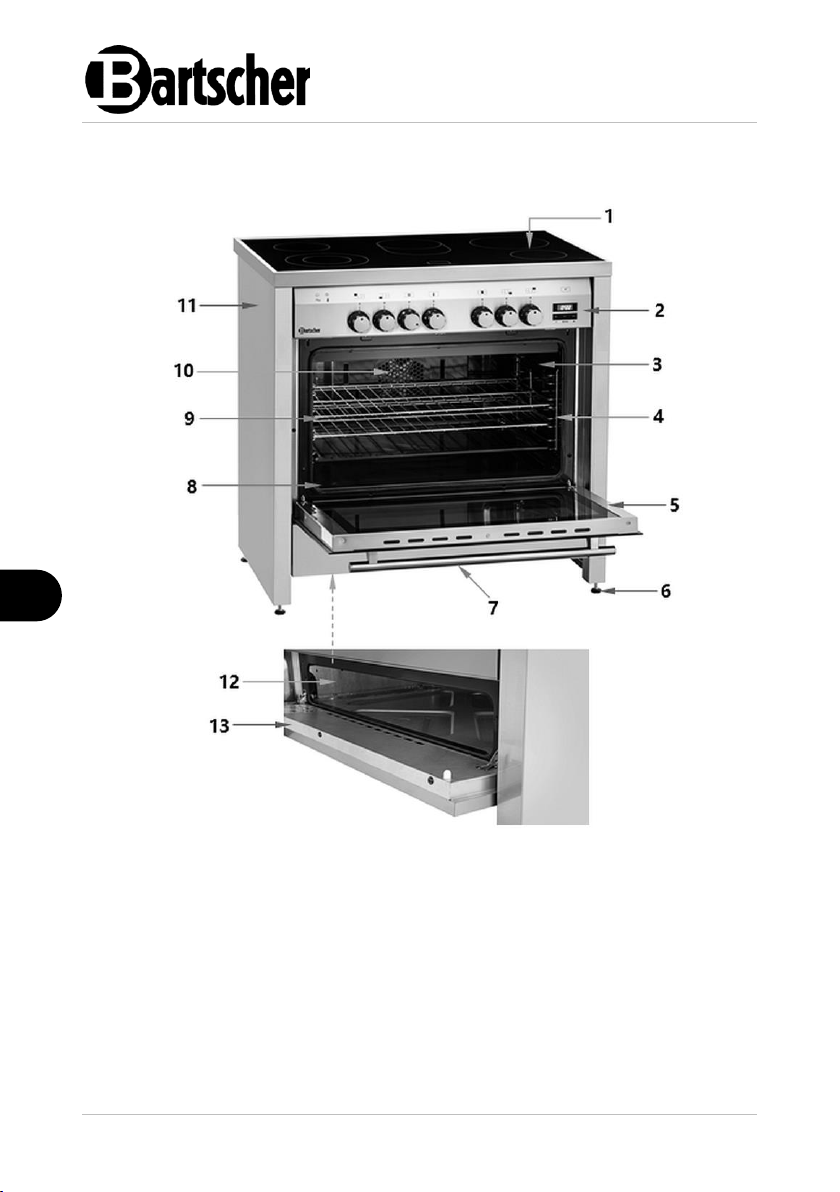
Technical Data
EN
Fig. 1
1. Heating plate
2. Control panel
3. Oven's thermal processing chamber
4. Guide rails
5. Oven door
6. Height adjustable feet (4x)
7. Oven door handle
8. Baking tray (1x)
9. Rack (2x)
10. Fan
11. Housing
12. Storage compartment
13. Storage compartment flap
4.3 List of Components of the Appliance
14 / 36 155670
Page 17
Installation Instructions
EN
CAUTION!
Incorrect installation, positioning, operation, maintenance or misuse of
the appliance may lead to personal injury or property damage.
Positioning and installation, as well as repairs may be performed by
authorised technical service only and in compliance with the applicable
national law.
NOTE!
The manufacturer disclaims all liability and provides no warranty for
damages, which may be attributed to non-observance of regulations or
incorrect installation.
CAUTION!
Choking hazard!
Prevent children from accessing packaging materials, for instance: plastic
bags and EPS elements.
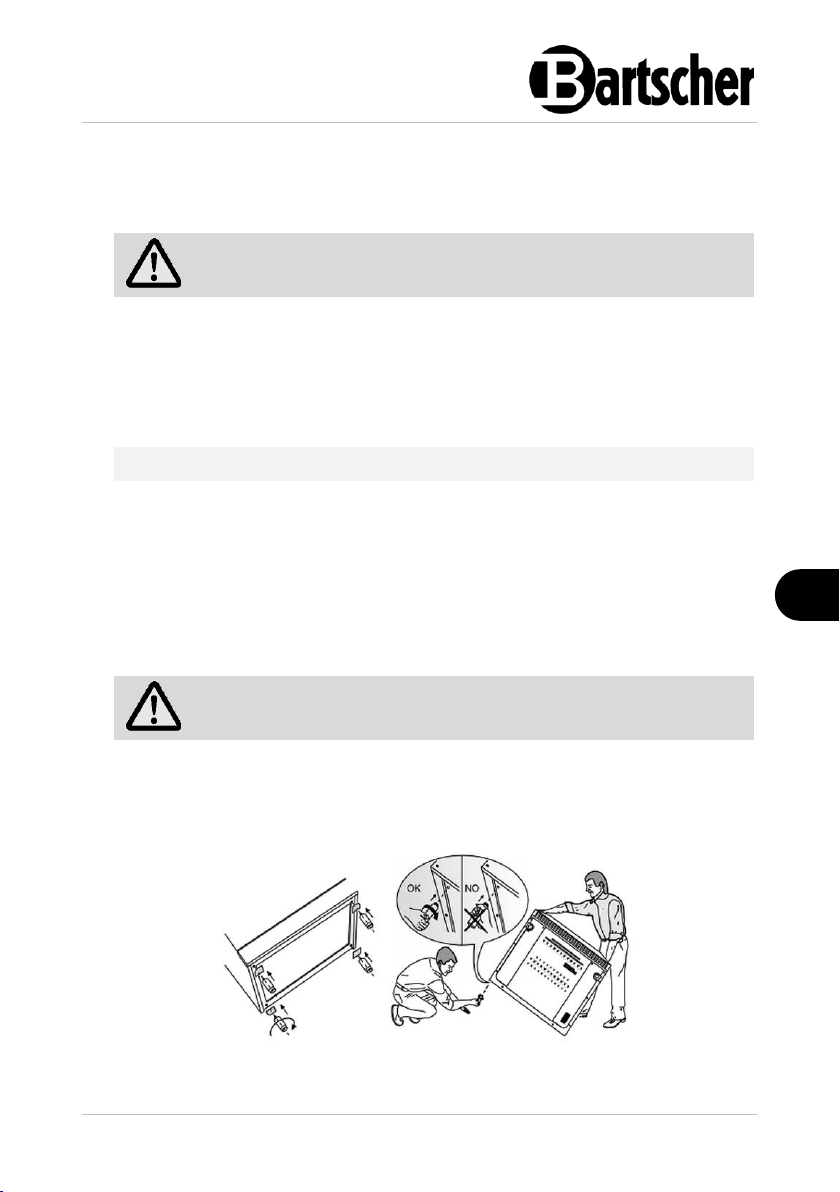
Fig. 2
5 Installation Instructions
5.1 Installation
Unpacking
• Unpack the appliance, remove all external and internal packaging elements and
transport guards.
155670 15 / 36
Page 18
Installation Instructions
EN
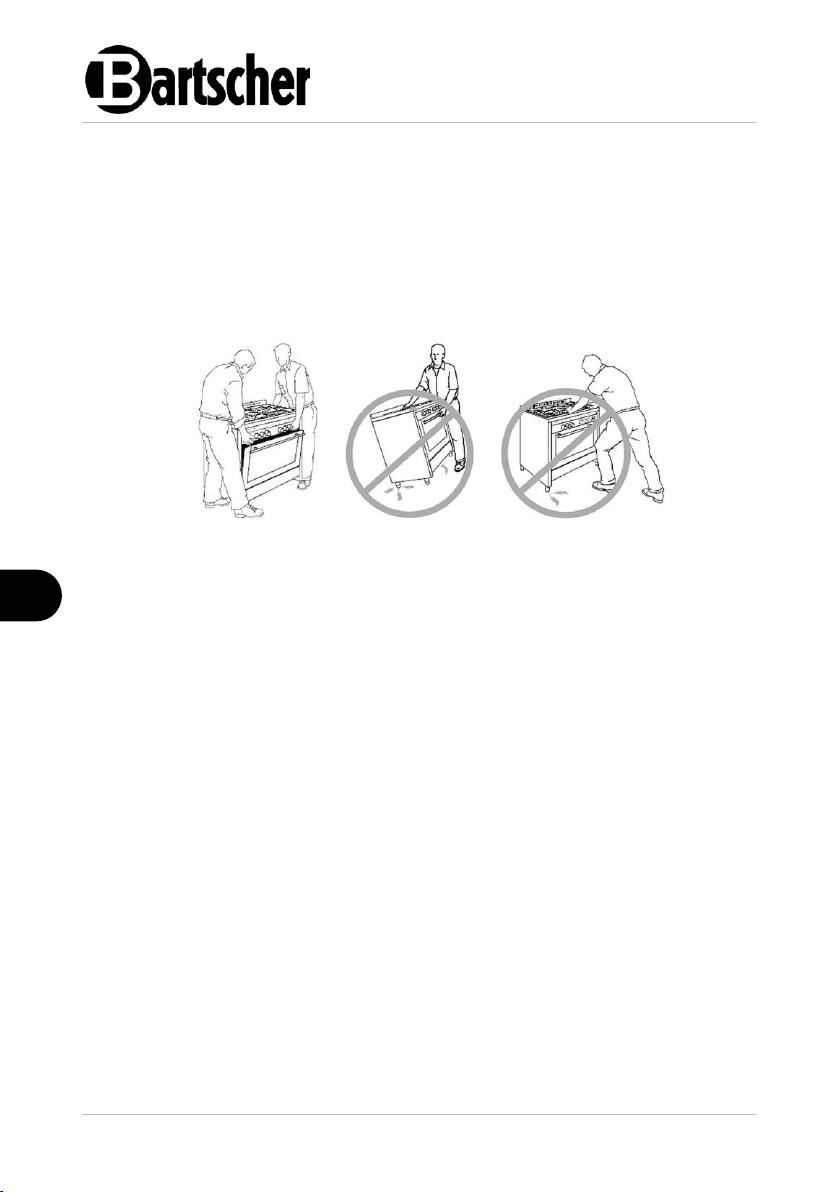
Fig. 3
• Mount the supplied feet by screwing them into the designed holes under the
appliance (Fig. 2)
IMPORTANT!
Never use the appliance without feet.
Moving of the device
1. The appliance may only be lifted and moved by two persons working together.
2. Do not lift the appliance by gripping the oven handle, instead open the oven
doors and lift the appliance by gripping the upper part of the oven chamber (Fig.
3).
3. Never push or drag the appliance.
16 / 36 155670
Page 19

Installation Instructions
EN
Installation
• Never place the appliance in humid or wet environment.
• Place the appliance in a way making the connections easily accessible, so that
they may be quickly disconnected if such a need arises.
• The appliance should be placed on a surface that is:
– even, with sufficient load-bearing capacity, resistant to water, dry and
resistant to high temperatures
– sufficiently large, and thus enabling usage of the appliance with no
problems;
– easily accessible;
• Never place the appliance directly next to walls, furniture, or other objects made
of flammable materials.
• Maintain the minimum clearance of 150 mm between side and rear walls and
the said objects and walls. Maintain clearance of at least 750 mm between the
appliance's surface and horizontal surfaces over the appliance.
• If keeping the minimum clearance is not possible, walls should be isolated with
non-combustible, thermo-insulation materials (e.g., films made of heat resistant
materials, which may sustain temperature of at least 65°C). Follow fire
protection regulations in force.
• Maintain sufficient lateral clearance for service purposes should maintenance
and repair works be required.
• If the appliance is covered with a protective film, remove it. Remove the film
slowly, so no glue residues are left. Remove any glue residues with the use of a
suitable solvent.
• Be careful not to damage the rating plate and warning labels affixed to the
appliance.
• Compensate for smaller unevennesses of flooring in the place of installation
through screwing in and out of the height-adjustable feet.
HINWEIS
IMPORTANT!
The appliance is not suitable for built-in installation.
155670 17 / 36
Page 20
Installation Instructions
EN
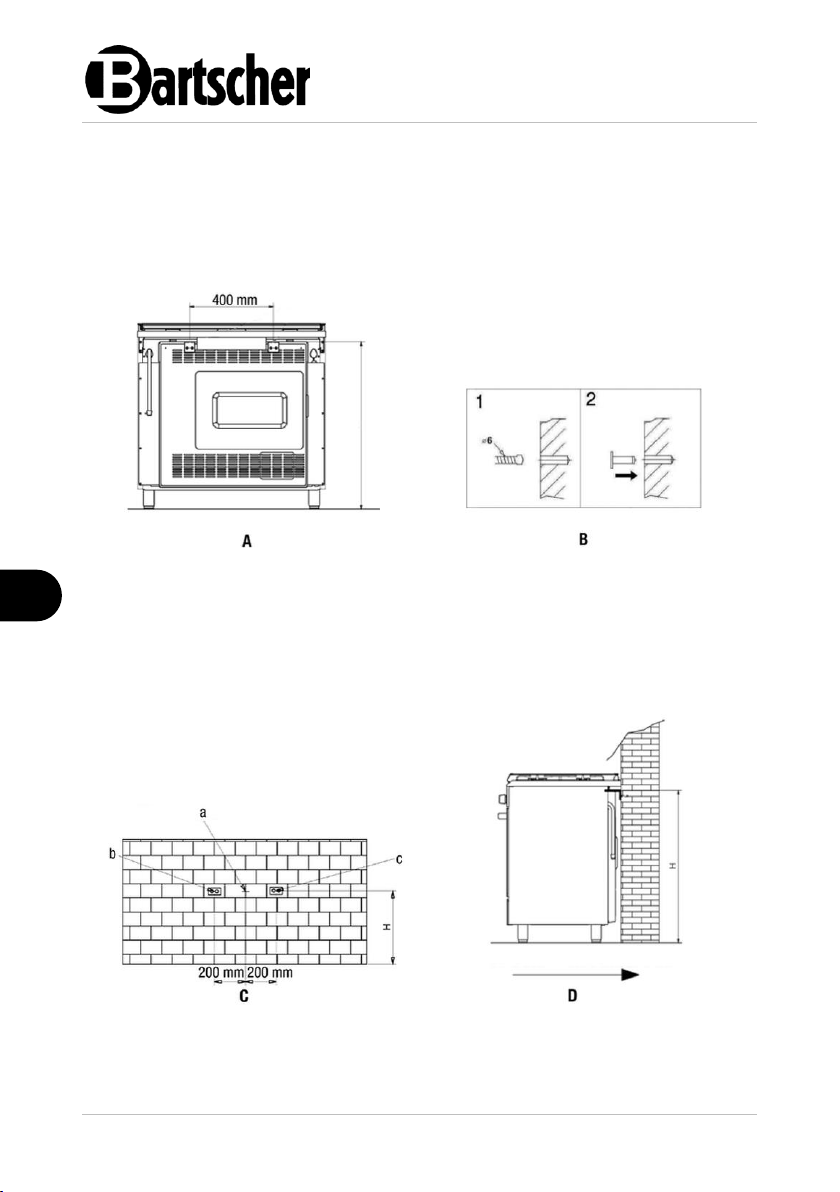
Fig. 4
Fig. 5
The oven protection wall is located at
the rear of the appliance.
1. Carefully measure the H distance to
the highest point of the protection
wall from the floor (A).
2. Use the measured H value to mark
the drill holes for dowels on the wall
at which the appliance will be
installed (B).
Fig. 6
Fig. 7
Stabilizing device
ATTENTION!
Under load the appliance may tilt forward.
Attach the enclosed stabilizing device (mounting brackets, dowels and screws)
to the wall, as appropriate.
18 / 36 155670
Page 21

Installation Instructions
EN
3. Furthermore, mark the centre of the
cooker on the wall at the same
height as the previously measured
H value (C).
• Drill holes in the wall.
4. Now, mount both spacer brackets
with 400 mm distance (200 mm from
the centre) with 2 screws each.
5. Place the cooker against the wall,
under both brackets (D).
5.2 Electrical Connection
• Electrical connection of the appliance to mains power supply must be executed
by a qualified electrician, according to international, national and local
regulations in force.
• Before connecting the appliance to mains power supply make sure that the
voltage and frequency values on the rating plate are conforming to the
parameters of local electric installation. The allowable voltage deviation is ±10%.
• A protective switch of sufficient power must be installed in front of the appliance
in an easily accessible place for disconnecting all poles from the power supply,
with a contact opening width of at least 3 mm and complying with the applicable
installation regulations (the grounding wire must not be interrupted by a circuit
breaker).
• Connect the protective conductor to the terminal marked with the earth symbol
next to the input terminal strip.
• Connect the metal casing of the electrical appliance with the protective device
for potential equalization.
• Connect the cord with the clamp marked with the potential equalization symbol
on the rear side of the appliance.
• This symbol indicates that the device must be integrated with the potential
equalization system and connected in compliance with the applicable
regulations.
• The power cord should be laid in a way preventing anyone from threading on it
or tripping against it.
• Arrange the power cord so that it is not exposed to ambient temperatures
exceeding 50°C.
• Do not use the appliance with an external timer or remote control.
155670 19 / 36
Page 22
Operating Instruction
EN
Fig. 8
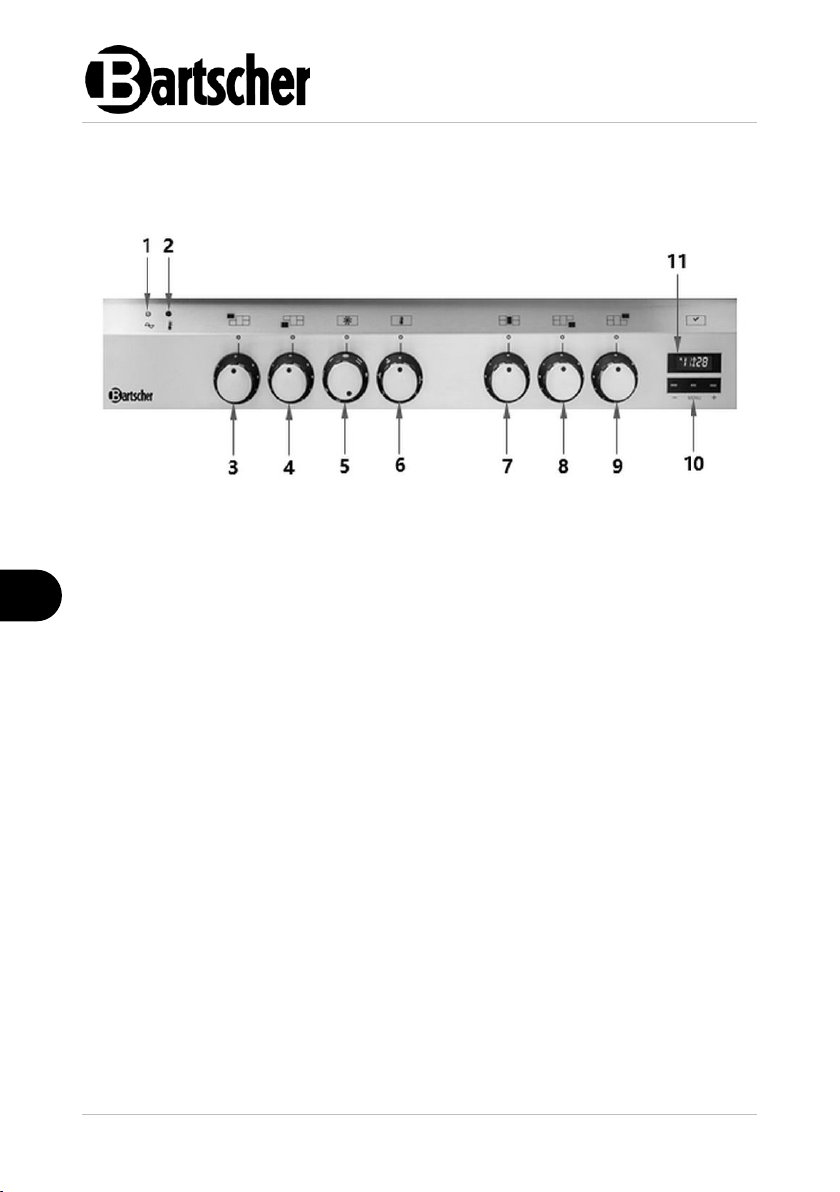
1. Operation indicator light (orange)
2. Heating up indicator light (orange)
3. Rear left hob rotary adjustment knob
4. Front left hob rotary adjustment
knob
5. Oven functional controller
6. Oven temperature controller
7. Middle hob rotary adjustment knob
8. Front right hob rotary adjustment
knob
9. Rear right hob rotary adjustment
knob
10. Timer
11. Digital display
6 Operating Instruction
Control elements
6.1 Switching-On
1. Before use, clean the appliance following the instructions in section 'Cleaning'.
2. Dry the appliance thoroughly.
3. Connect the appliance to the power supply.
20 / 36 155670
Page 23

Operating Instruction
EN
6.2 Operation of electric hob
Indications for the User
• Use cookware/frying pans with flat bottom and with a diameter suitable for a
given hob.
• The bottom of cookware must be clean, smooth and dry, so that the glass
ceramic surface is not scratched.
• Do not place aluminium film nor plastic containers onto a hot hob of the
appliance.
• Do not use the heating plate as a surface for placing any objects.
• Do not put or leave any objects near the hobs.
• In case the ceramic glass surface cracks, turn the appliance off to avoid electric
shock.
• Never leave the appliance unattended when cooking fat or oil on it.
Preparation / Keeping food warm
ATTENTION!
Do not place an empty cookware on the hob, as otherwise, this may result
in damage to the appliance and cookware.
HINT!
To ensure optimum performance of the hobs, do not use cookware with
diameters less than the diameter of the hob.
4. Place a suitable cookware with the contents on the appropriate hob(s).
5. Set the required temperature for the selected hob(s) with the appropriate rotary
control knob, within the range from 1 to 9 (rotating clockwise).
The orange indicator light lights up and is lit until the rotary control knob(s) is/are set
to '0'.
6. Prepare food.
7. While cooking, observe the food and control the temperature, adjusting it to the
cooking phase, by increasing or decreasing it.
155670 21 / 36
Page 24
Operating Instruction
EN
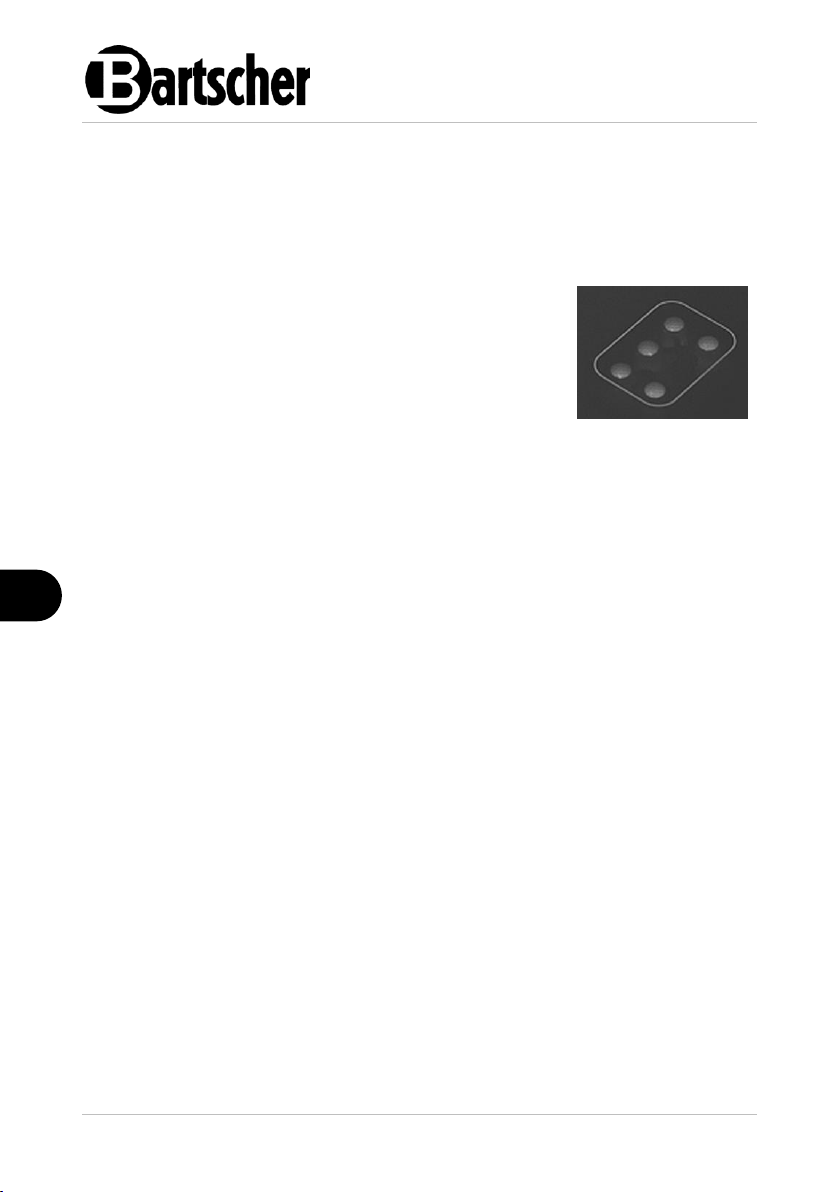
The heating plate is equipped with residual heat
indicators for respective hobs.
The indicators light up after the hobs are turned on,
and stay on for the entire operation time. They are
warning the user that the hob is hot and must not be
touched to avoid scalding.
After the hob(s) is/are turned off the residual heat
indicators stay on until the temperature drops below
50°C.
Fig. 9
Turning the electric cooker off
1. If the appliance is no longer in use, rotate the rotary control knob to '0' position.
2. Disconnect the appliance from mains power supply.
Residual heat indicator for the hobs
6.3 Operating Multi-Functional Oven
Before the first use
1. Before the first use remove all accessories and materials from within the oven
chamber.
2. Heat the empty oven up for at least an hour, at the highest temperature level,
with the oven door closed (do not use the grill function).
3. Switch the appliance off.
4. Open the oven door.
5. Ventilate the room.
HINT!
The resulting odour is caused by the evaporation the substances sealing
and securing the oven.
Indications and tips
• Varied sizes of food product chunks and use of containers made of different
materials and of varied thickness (terracotta, glass, aluminium, steel) may lead
to a deviation from recipe data for thermal processing time.
• If possible, in the case of delicate food and food prepared with the use of raising
agents, avoid opening oven door in order not to change the internal
temperature.
• To save power during a long cooking time, switch the oven off a few minutes
before the end time stated in the recipe and keep the oven door closed, to utilize
22 / 36 155670
Page 25
Operating Instruction
EN
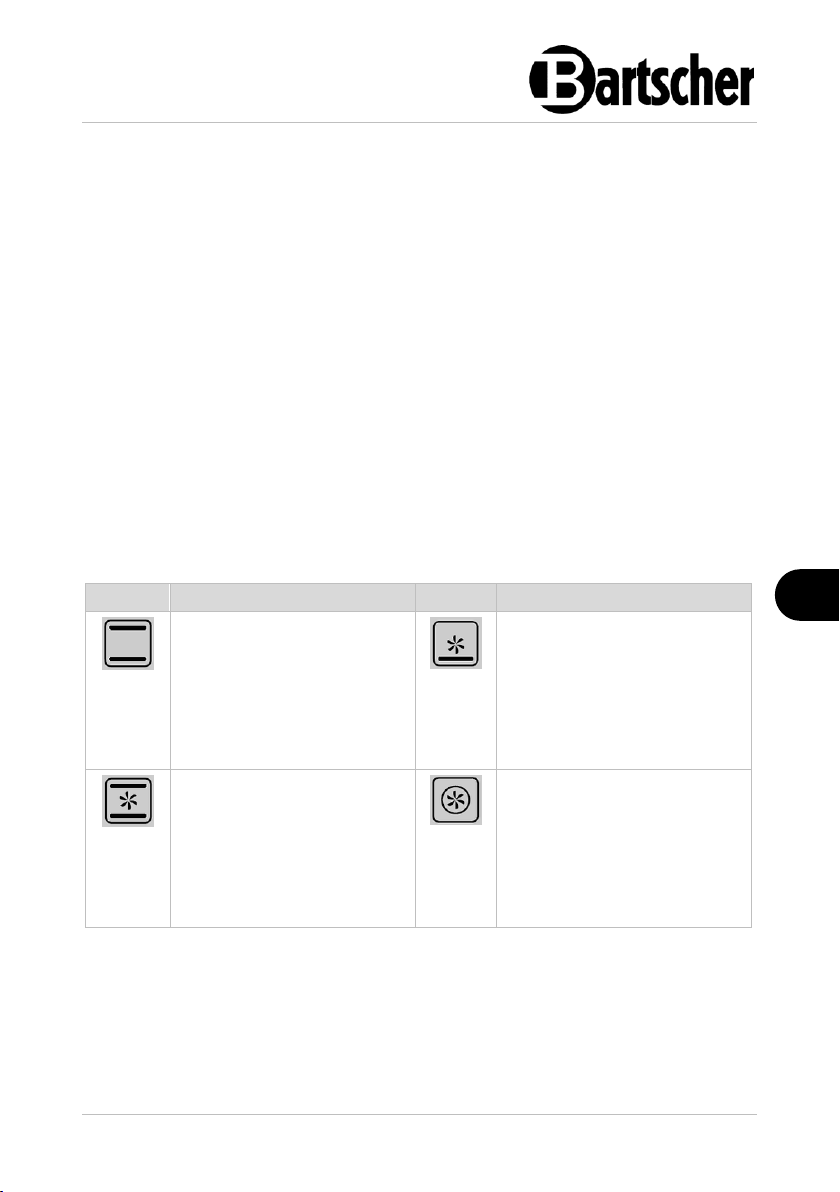
Symbol
Function
Symbol
Function
Top / bottom heat
The heat is produced by
heating resistors in the
bottom and top part of the
oven. Suitable for baking
cakes and traditional
recipes.
Bottom heat with hot air
The heat from the bottom
heating resistor is circulating.
It is recommended for
finishing off the cooking
process, and for sterilization.
Hot air
The heat from the bottom
and top heating resistor and
the fan allow optimum heat
distribution and cooking
several dishes
simultaneously.
Convection heat
The fan ensures the air
circulation inside the oven
chamber and allows for even
heat treatment at all levels
without the transfer of smells.
the residual heat. The isolation of the oven interior, guarantees perfect cooking
results.
Settings
The multi-functional oven may be set with the use of the function control,
temperature control and timer on the control panel.
Functions
The appliance features various functions. Applications of the respective functions
are described in the table below.
1. To prepare a specific food in the oven, first set the appropriate function with the
use of the function controller.
ATTENTION!
While operating the oven the oven door must be kept closed, regardless of
the cooking methods used.
155670 23 / 36
Page 26
Operating Instruction
EN
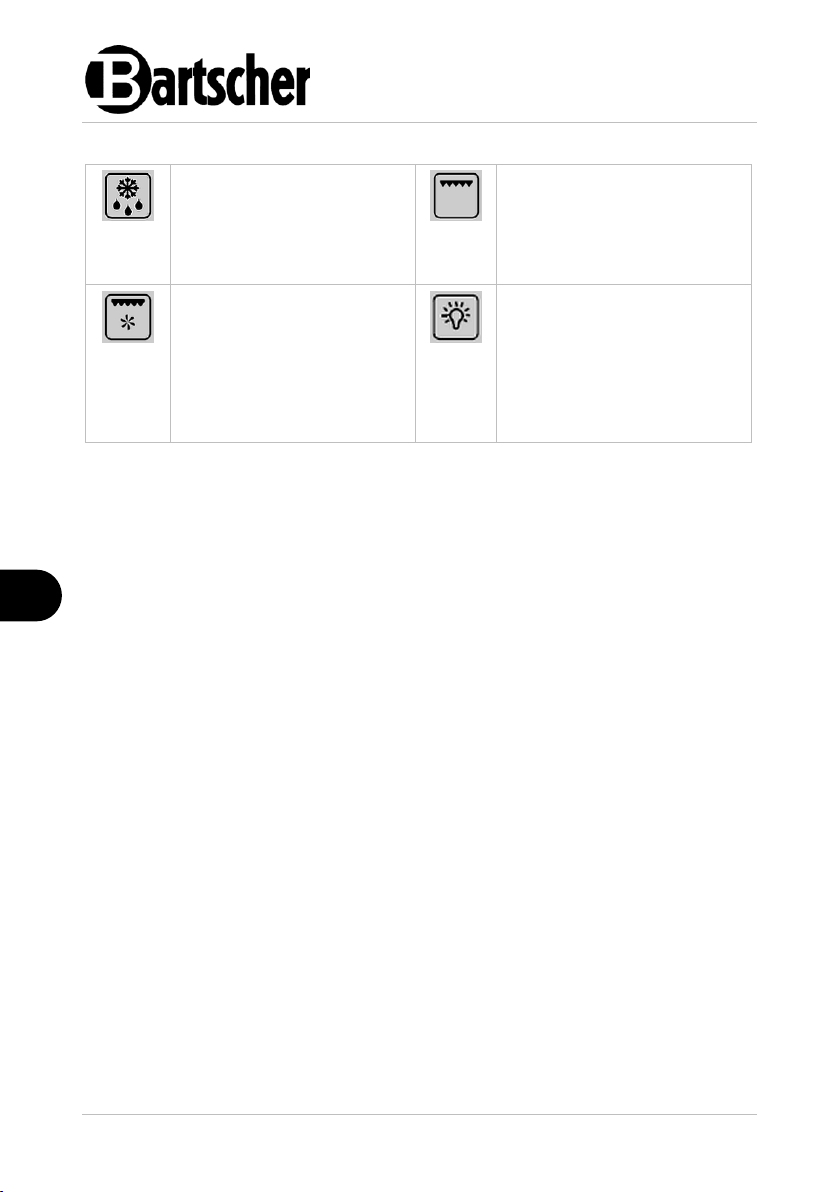
Defrosting with the fan
The fan is switched on
without heating resistors.
Fast and optimal defrosting
within a few minutes.
Grill
Optimal for cooking au gratin
and processing thin slices of
meat.
Grill + hot air
With the use of the fan, the
grill distributes the heat
evenly. It is ideal for medium
size/ large chunks of meat to
be crispy outside and soft
inside.
Oven light
Lights up the cooking
chamber. Usable for
monitoring the progress of
cooking.
Tab. 1
Temperature
1. With the use of temperature controller set the temperature of cooking/ baking as
appropriate for a given dish.
Temperature is adjustable within the range from 50°C to 250°C. It can be modified
any time by rotating the temperature controller clockwise or anti-clockwise.
The heating indicator on the control panel stays on while the appliance is heating
up, and goes off when the set temperature has been reached.
2. Put the dish into the oven.
When the temperature in the oven decreases, the orange heating-up indicator light
comes on again and the appliance heats up again to the set temperature.
ATTENTION!
Each of the following functions may only be used in combination with the
appropriate temperature settings.
You must observe the instructions concerning temperature setting included in
the following chapters.
24 / 36 155670
Page 27

Operating Instruction
EN
Grill
Temperature setting: 60°C – ca. 250°C
The grill function is intended for roasting and toasting of dishes. Thermal
processing time should not exceed 5 minutes.
Grill + hot air
Temperature setting: 60°C – 200°C
Choose this function to grill meat, vegetables and poultry. While grilling on the
rack, place the backing tray with a small quantity of water at the level below to
prevent fat splashing and smoke formation.
Convection heat
Temperature setting: 60°C – 250°C
When this function is selected, the hot air inside the oven is evenly distributed at
all levels which ensures optimum results of simultaneous cooking/ baking of
different dishes, with the appropriate cooking time at multiple levels.
Before putting the dishes into the oven, the oven must be heated up.
This function is particularly usable for cake baking and preparation of larger
quantities of food.
Defrosting
To fasten up the meat, fish and bakery products defrosting, set the temperature to
80°C – 100°C.
This function is used to defrost any type of food products.
It is particularly recommended for delicate food products which do not need heat, as
for example: a cream or vanilla sauce, desserts, fruit cakes, etc.
When defrosting with the use of this function, thanks to the fan the defrosting time is
reduced approximately by half.
Oven light
Oven light comes on as soon as the oven control knob is activated. The light is on
during oven operation, and goes off when the appliance is switched of.
Cooking/ baking time
Cooking/ baking time depends on the type and quantity of food, personal
preferences and experience.
HINT!
When setting the cooking time, consider the time required to pre-heat the
oven.
155670 25 / 36
Page 28
Operating Instruction
EN
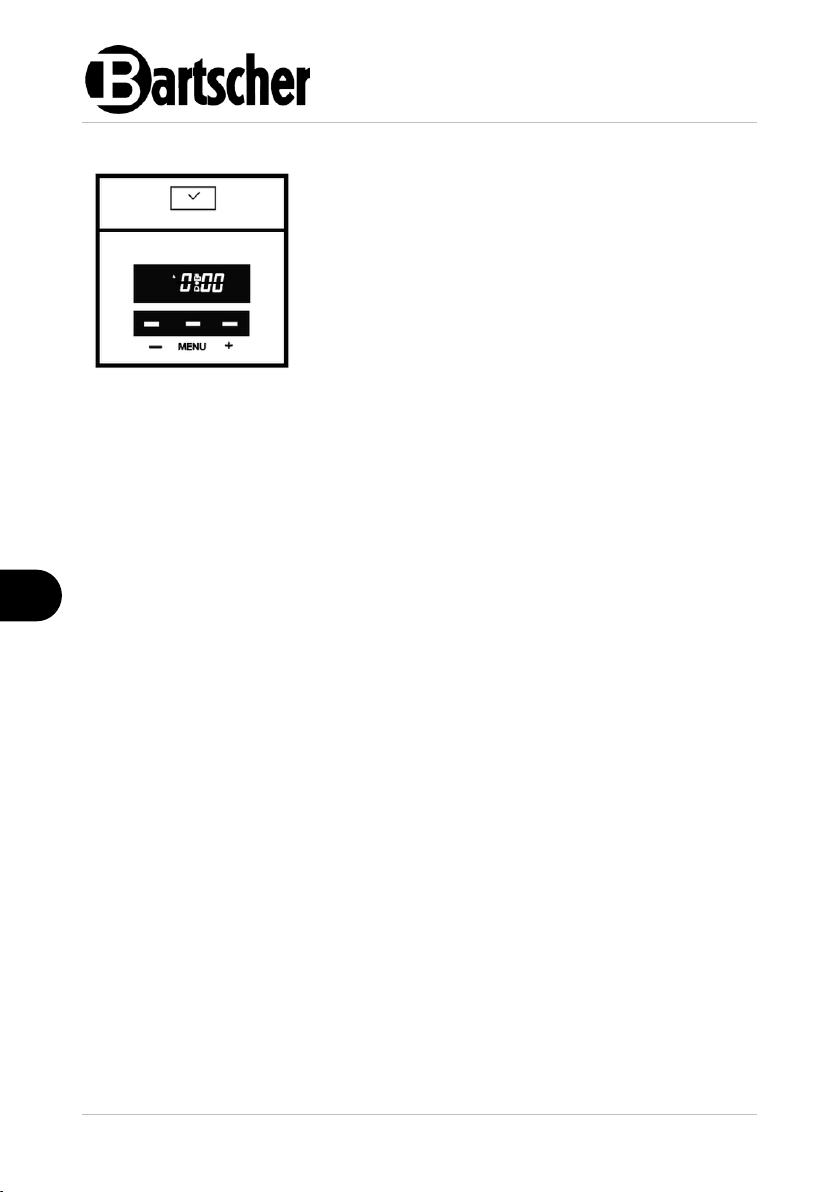
Touch control has three modes of operation:
1. Minutes counter: After the required cooking/
baking time is set, the timer starts counting down
the time, and when the time is up, an acoustic
signal sounds.
2. Automatic termination of the cooking/baking
time: After the set operating time has elapsed,
the appliance automatically turns off and an
acoustic signal sounds.
3. Delayed start: After the cooking/baking time and
the turning off time is set, the oven turns on and
off automatically.
Fig. 10
Keypad lock: The timer is equipped with an automatic keypad lock when there is
no operation within 7 seconds. To release the lock keep any button pressed for 2
seconds.
Controller time setting: Press and hold the buttons '+' and '-' pressed until the
cursor between hours and minutes starts blinking. Press '+' or '-' to set the time.
When the time is set, do not press any other buttons. After a few seconds an
acoustic signal will confirm the setting.
Countdown setting (minutes counter function): the minutes counter can be
operated separately from the oven, and may be used for all cooking functions. Keep
pressing the ‘Menu’ button until the digital display changes.
Release the button and set the time (minutes) with '+' and '-' buttons. After you
reach the desired time, release the button and wait for the acoustic signal to confirm
the setting. The bell icon appears on the display. After the minutes elapse, the
acoustic signal sounds. To cancel it, press any button. To delete the bell icon from
the digital display keep the ‘Menu’ button pressed.
Checking the remaining time (before it has elapsed): keep the ‘Menu’ button
pressed. To cancel the set time, press the ‘Menu’ button until the digital display
changes, and then press '+' and '-' simultaneously. Thus, the set time will be
cancelled.
Setting the automatic turning off: Turn on the oven and set the function and
temperature. Press ‘Menu’ button until the digital display changes, and then press
the same button again. Letters ‘DUR’ will be displayed (which denote the duration
time). Keep pressing '+' and '-'’ buttons to set cooking/baking time. Then wait for the
acoustic signal without pressing other buttons. After the set operating time has
elapsed, the oven automatically turns off and an acoustic signal sounds. To cancel
it, press any button.
26 / 36 155670
Page 29
Operating Instruction
EN
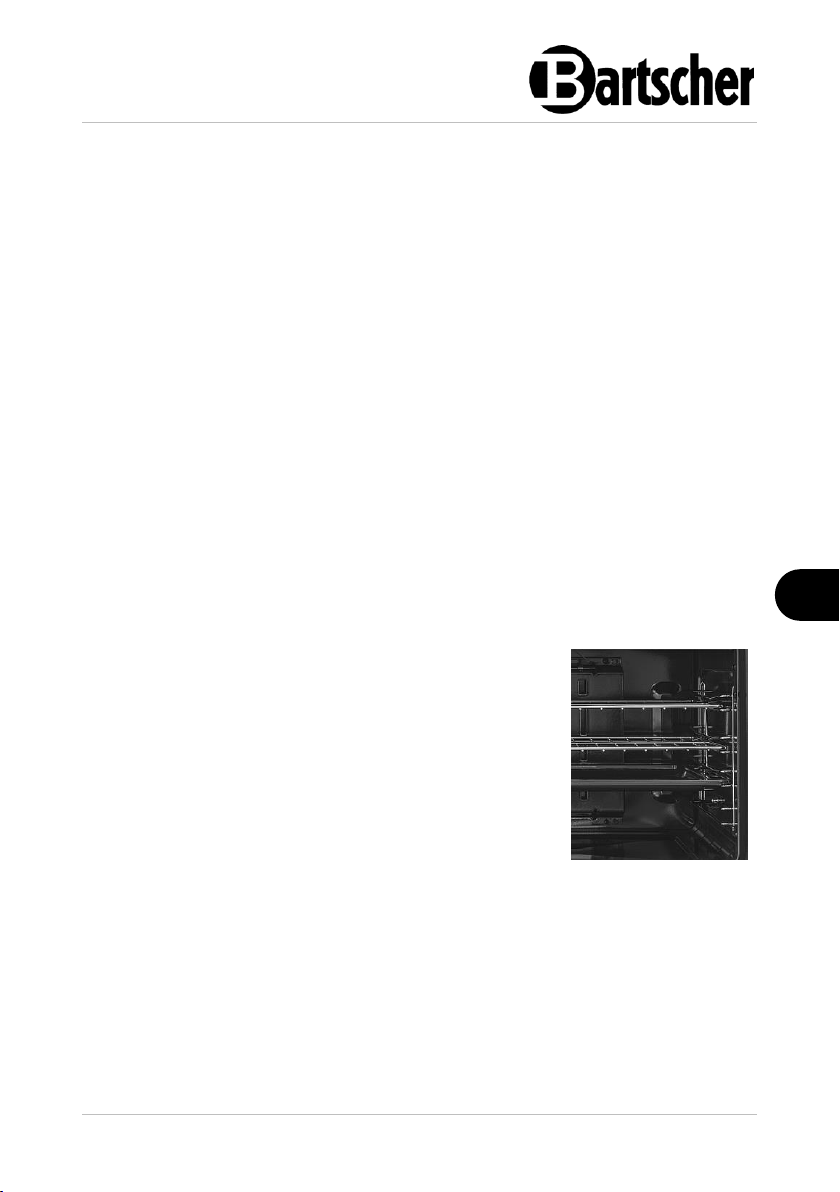
Middle levels are suitable for most cooking processes
because the temperature set with the temperature
controller is perfectly stable in this area.
Clearances between the levels are as follows:
– 35 mm
– 60 mm
– 65 mm
Fig. 11
Circulation fan for cooling down the appliance
Circulation fan allows decreasing the appliance surface temperature through air
circulation between the oven door, the control panel and the internal part under the
cooking level. The circulation fan between the cooking levels and the upper part of
the oven turns on automatically several minutes after the oven has been turned on.
The appliance keeps it running even after the oven has been turned off, until the
external surface is cooled down.
Storage compartment under oven door
This appliance is equipped with a storage compartment, where you can store metal
accessories when they are not in use.
ATTENTION!
Do not store any flammable materials, such as paper, kitchen cloths et. in
the storage compartment.
Oven levels
This oven has four levels: 1 bottom, 2 middle and 1 top level.
HINT!
Select the levels as appropriate for the dishes.
155670 27 / 36
Page 30

Operating Instruction
EN
Food for baking/cooking
Shelf level
Temperat-
ure in °C
Cooking /
baking time
in minutes
Pastry and cakes
Shortcrust pastry
2 (1-3)
180-190
30-35
Kneaded dough
2 (1-3)
190-200
30-35
Shortcrust bake
2 (1-3)
180-190
30-35
Plum cake
2 (1-3)
180-190
30-35
Fruit cake
2 (1-3)
165-180
35-45
Nut cake
2 (1-3)
180-190
40-45
Strudel
2 (1-3)
185-195
35-45
Pound cake
2 (1-3)
185
35-45
Caramel pudding
2 (1-3)
130
30-35
Chocolate cake
2 (1-3)
180
35-40
Brioche
2 (1-3)
180-190
25-30
Cookies
2 (1-3)
165
20
Bread/rolls
2 (1-3)
200-230
10-15
Sweet buns with jam
1 (1-2)
180-190
20
Muffins
2 (1-3)
185-200
25-35
Bread and pizza
Pizza
2 (1-3)
195-210
20-30
Flatbread
2 (1-3)
190-210
20-30
Bread
3 (2-3)
215-230
40-50
Switching off the oven
1. If the oven is no longer in use, rotate the function controller and temperature
controller to '0' position.
2. Disconnect the appliance from mains power supply.
Cooking tables
28 / 36 155670
Page 31

Operating Instruction
EN
Food for baking / cooking
Shelf level
Temperat-
ure in °C
Cooking/bak-
ing time in
minutes
Soufflé/au gratin
Lasagne
2 (2-4)
165-180
30-40
Pasta au gratin
2 (2-4)
180-190
35-45
Vegetable au gratin
2 (1-3)
170-180
30-40
Meat roast
Beef 1 kg
2 (1-3)
200-220
50-60
Lamb 1 kg
2 (1-3)
180-200
50-60
Pork 1 kg
2 (1-3)
180-200
60-70
Veal 1 kg
2 (1-3)
180-200
60-70
Poultry
2 (1-3)
195-210
40
Duck
2 (1-3)
195-210
120-180
Goose
2 (1-3)
195-210
120
Turkey
2 (1-3)
195-210
120
Rabbit
2 (1-3)
200-210
40
Pheasant
2 (1-3)
195-210
40-50
Fish
Fillets and chunks
2 (1-3)
160-170
20-30
Roast
2 (1-3)
180-190
25-35
Roasting in foil
2 (1-3)
190-200
25-35
Tab. 2
Remarks concerning cooking/baking
• The information given above is for guidance. You may and should adjust it to
your own taste and habits.
• Cooking/baking times given in the table do not include the time required for
heating up the oven, which is always recommended.
• The cooking/baking times refer to the average quantity of food (1/1.5 kg of meat,
dessert cake, pizza, 0.5/0.8 kg of bread).
• Multiple heat processing is required at different levels, with the use of cookware
on the middle shelf.
155670 29 / 36
Page 32

Operating Instruction
EN
Grilled product
Shelf level
Temperat-
ure in °C
Cooking/bak-
ing time in
minutes
Toasts
3-4
200
3-4
Hamburger
3-4
200
5-7
Fish skewers
3-4
200
6-8
Shellfish
3-4
200
6-8
Sausages
3-4
200
7-10
Ribs
3-4
200
7-10
Meat skewers
3-4
200
8-10
Steaks
3-4
200
8-12
Poultry
3-4
200
30-35
Tab. 3
Grilling table
Remarks concerning grilling
• For recipes requiring pre-heating, 5-10 minutes should suffice.
• The given time refers to processing one side of the dish, therefore it requires
flipping.
• Place the backing tray filled with a small quantity of water (approximately 0.2 L)
at the bottom level of the oven to catch the excess fat and smoke.
30 / 36 155670
Page 33

Cleaning and Maintenance
EN
7 Cleaning and Maintenance
7.1 Safety Instructions for Cleaning
• Before cleaning, disconnect the appliance from the power supply.
• Leave the appliance to cool down completely.
• Make sure water does not enter the appliance. Do not immerse the appliance in
water or other liquids during cleaning. Do not clean the appliance with a
pressurized water jet.
• Do not use any sharp or pointed, nor metal implements (knife, fork, etc.). Sharp
or pointed implements may damage the appliance, and when in contact with live
parts, they may cause electric shock.
• For cleaning, do not use any scouring agents that contain solvents nor corrosive
cleaning agents. They may damage the surface.
ATTENTION!
Usage of improper cleaning agents may cause oxidation of the appliance
or surface damage.
For cleaning stainless steel surfaces (housing, hobs, sliding rack, oven door,
guide rails and rack) use special cleaning agents for stainless steel only.
When using steel wool, steel brushes or steel squeegees, particles of iron may
deposit, thus causing oxidation and rust spots.
For cleaning the oven chamber do not use scrubbing cloths or other products
which could damage the enamel surface inside the oven chamber. Use suitable
cleaning agents.
Do not use cleaning agents containing chlorine (bleach, hydrochloric acid, etc.).
Observe instructions of such cleaning agents' manufacturers.
155670 31 / 36
Page 34

Cleaning and Maintenance
EN
7.2 Cleaning
To ensure proper functionality, hygiene and efficiency, the appliance must be
thoroughly cleaned at the end of a working day (or more frequently, if necessary).
Thus you may avoid burning food residues.
Hob/housing
1. Everyday soiling of the hobs and the surface (fingerprints, food stains or glass
soiling that does not contain sugar) should be cleaned off with a soft, damp dishwashing cloth or sponge.
2. Wipe the housing and the appliance control panel with a soft, damp cloth.
3. Wipe with a soft cloth soaked in fresh water.
4. Dry the washed surfaces.
Multifunction oven
To keep the oven in good condition, it needs to be cleaned on regular basis after it
is cooled down.
1. Remove all removable parts and accessories from the oven.
2. Wash the racks (or baking trays used) with warm water and non-abrasive
cleaning agent.
3. Rinse the cleaned racks (or baking trays used) with fresh water and leave them
to dry or dry with a soft cloth.
4. Shelf guides and oven chamber should be thoroughly cleaned with warm water,
soft cloth or sponge and a mild cleaning agent suitable for enamelled surfaces.
5. Thoroughly rinse with fresh water, paying attention not to leave any cleaning
agent residues.
6. Then, dry the oven chamber and shelf guides.
ATTENTION!
After cleaning with specialist cleaning agents turn the oven on at
maximum power setting for 20 minutes to remove the residuals from the
oven chamber.
Oven door
1. To facilitate cleaning of the oven chamber, the oven door can be dismounted.
Proceed as follows (see Fig. below):
32 / 36 155670
Page 35
Cleaning and Maintenance
EN
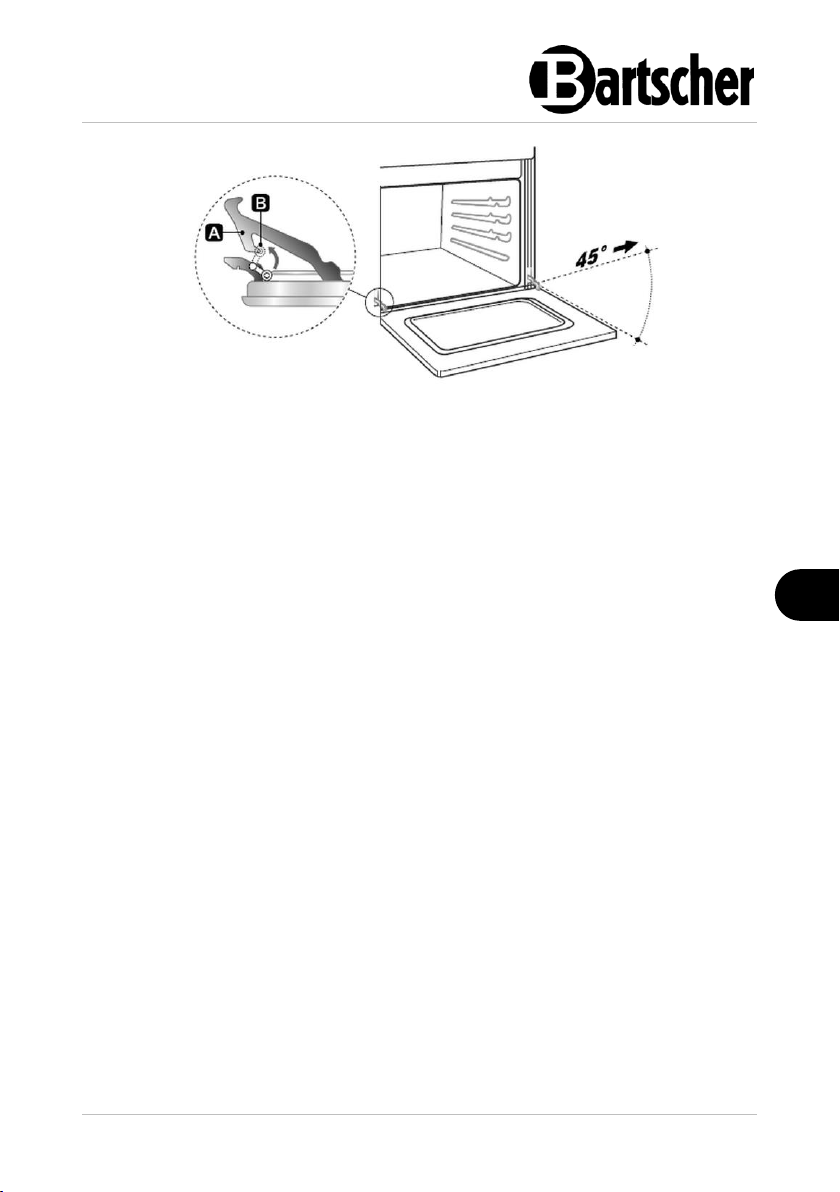
Fig. 12
– open the oven door wide;
– lift the lever B and grab the oven door with both hands near the hinges
A;
– lift the oven door so that the angle between the door and the oven is 45°,
– pull out the oven door;
2. Clean the oven door with a soft cloth and a mild cleaning agent. Wipe with a dry
cloth.
3. After cleaning, reinstall the oven door by placing the hinges A into the grooves
at the bottom and locking the lever B.
Internal pane of the oven door
ATTENTION!
Do not use abrasive cleaning agents or sharp metal scrapers to clean the
oven door pane, because they can scratch the glass surface and break the
pane.
1. If necessary, you may take out the inner pane of the oven door for cleaning.
This action may only be performed when the device is cold.
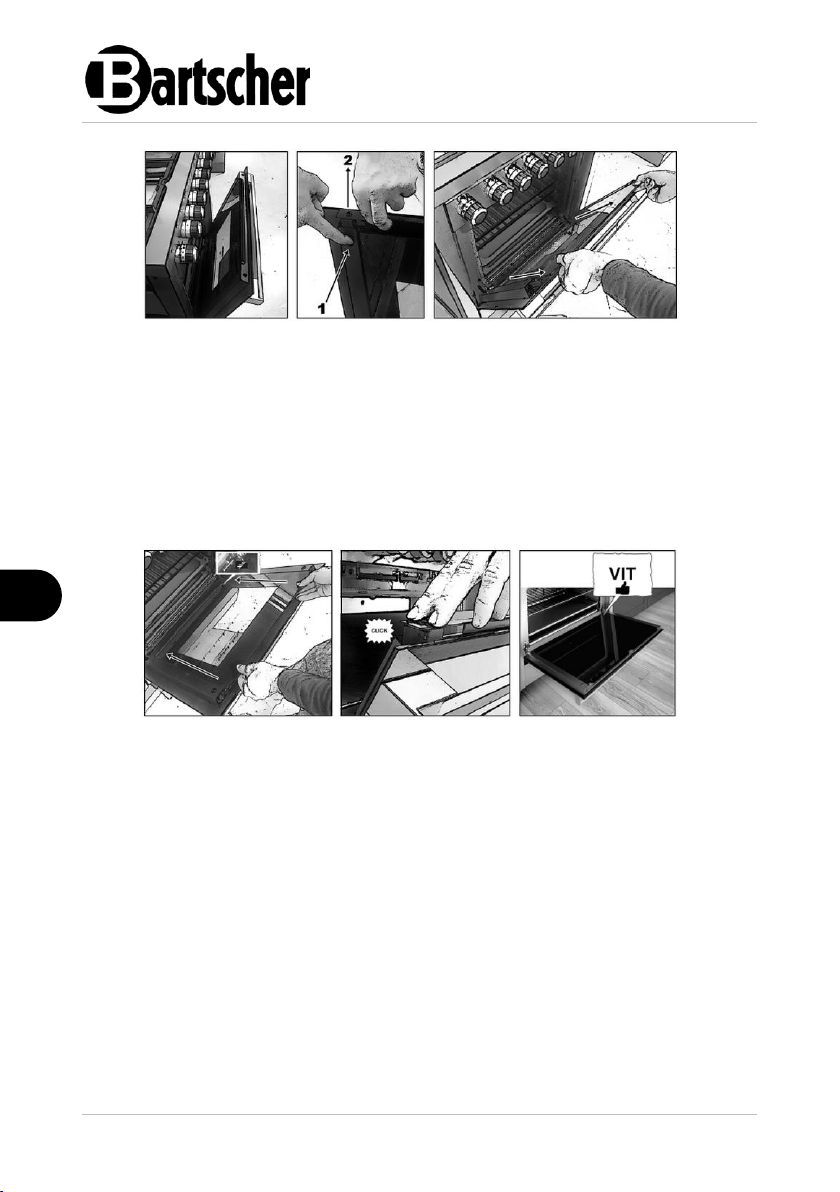
To remove the inner pane from the oven door, perform the following steps (see
Fig. below):
– slightly open the oven door;
– simultaneously press the black buttons near the side brackets of the
oven glazed door and move them up;
– remove the upper profile of the oven door;
– pull out the inner pane by pulling it towards you.
155670 33 / 36
Page 36
Cleaning and Maintenance
EN
Fig. 13
Fig. 14
2. Clean the inner pane of the oven door with a soft, moist cloth and mild cleaning
agent.
3. Thoroughly dry the internal glass pane from both sides.
4. To reinstall the inner pane proceed in the reverse order (see Fig. above).
5. Make sure that the inner pane is installed correctly as regards the side brackets
and that VIT inscription is in the lower corner marked with an arrow, and then
reinstall the profile of the oven door.
34 / 36 155670
Page 37
Cleaning and Maintenance
EN
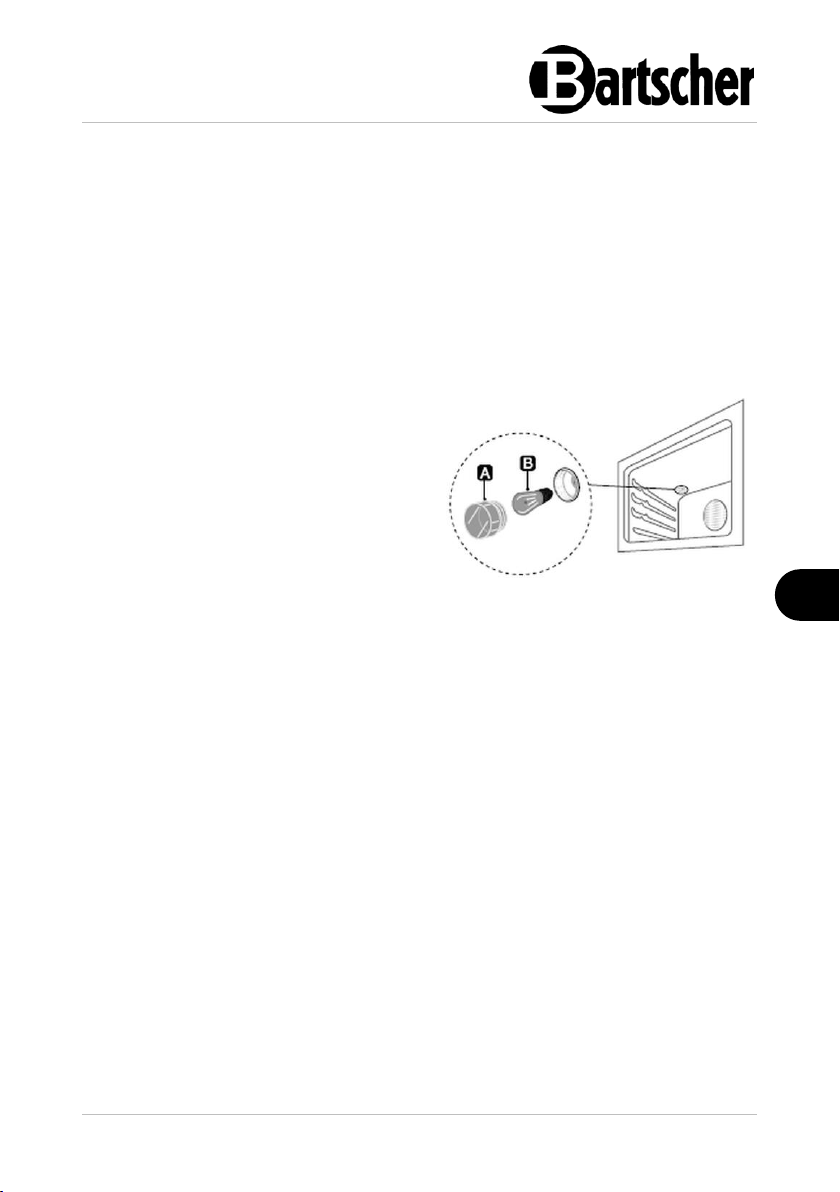
– unscrew the protective cap A of the
oven lamp.
– remove the damaged oven lamp B;
– replace the damaged oven lamp with
an oven lamp resistant to high
temperatures (300 °C) of the same
power;
– screw the protective cap A of the oven
lamp back on by turning it clockwise.
Fig. 15
7.3 Maintenance
Let the appliance to be inspected by professional technician at least once a year or
as required.
Oven lamp replacement
1. If the lighting inside the oven does not work, replace the oven lamp in the
following way:
– make sure the device is disconnected from the power supply;
– leave the appliance to cool down completely;
155670 35 / 36
Page 38
Disposal
EN
Electric appliances are marked with this symbol. Electrical
appliances must be disposed of and recycled in a correct
and environmentally friendly manner. You must not dispose
of electric appliances with household waste. Disconnect the
appliance from the power supply and remove power cord
from the appliance.
8 Disposal
Electrical Appliance
Electrical appliances should be returned to designated collection points.
36 / 36 155670
 Loading...