

Page 1
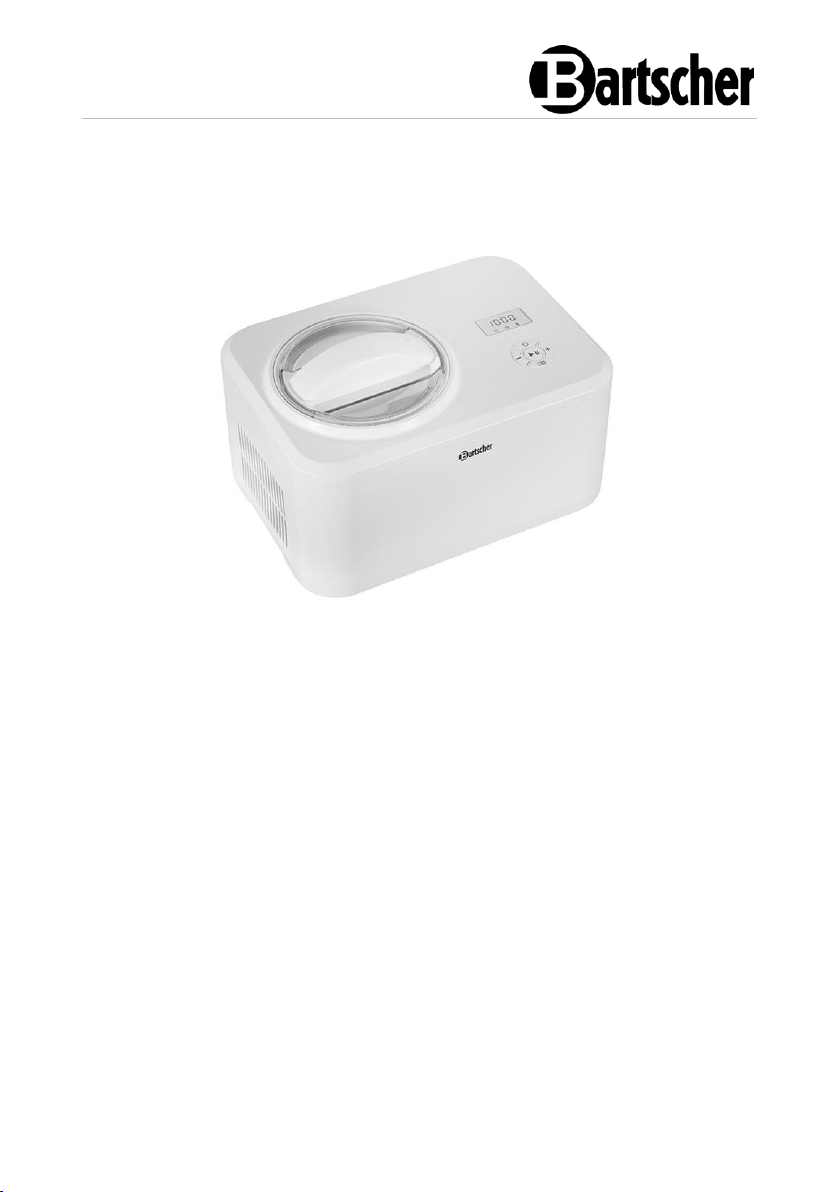
1500
135028
Page 2
Bartscher GmbH
Franz-Kleine-Str. 28
D-33154 Salzkotten
Germany
Phone: +49 5258 971-0
Fax: +49 5258 971-120
Technical Support Hotline: +49 5258 971-197
www.bartscher.com
Version: 1.0
Date of preparation: 2023-10-11
EN
2
Page 3

Original instruction manual
1 Safety ............................................................................................................ 2
1.1 Explanation of Signal Words .................................................................... 2
1.2 Safety instructions.................................................................................... 3
1.3 Intended Use ........................................................................................... 6
1.4 Unintended Use ....................................................................................... 6
2 General information ....................................................................................... 7
2.1 Liability and Warranty .............................................................................. 7
2.2 Copyright Protection ................................................................................ 7
2.3 Declaration of Conformity ........................................................................ 7
3 Transport, Packaging and Storage ................................................................ 8
3.1 Delivery Check ......................................................................................... 8
3.2 Packaging ................................................................................................ 8
3.3 Storage .................................................................................................... 8
4 Technical Data ............................................................................................... 9
4.1 Technical Specifications .......................................................................... 9
4.2 List of Components of the Appliance ..................................................... 10
4.3 Functions of the Appliance ..................................................................... 11
5 Installation and operation ............................................................................ 11
5.1 Installation .............................................................................................. 11
5.2 Operation ............................................................................................... 13
6 Cleaning ...................................................................................................... 24
6.1 Safety Instructions for Cleaning ............................................................. 24
6.2 Cleaning ................................................................................................. 24
7 Possible Malfunctions .................................................................................. 25
8 Disposal ....................................................................................................... 26
135028 1 / 26
Page 4
Safety
EN
Read this instruction manual before using and keep it available
at all times!
DANGER!
The signal word DANGER warns against hazards that lead to severe
injuries or death if the hazards are not avoided.
Diese Bedienungsanleitung beschreibt di e Installation, Bedienung und Wartung des Geräts und gilt als wichtige Infor mationsquelle und Nachschlagewer k. Die Kenntnis aller enthaltenen Sicherh eitshinweise und Handlungsanweisunge n schafft die Voraussetzung für d as sichere und sachgerechte Ar beiten mit dem Gerät. Darüber hinaus müssen die für den Einsatzbereich des Geräts geltenden örtlichen Unfall verhütungsvorschriften und allgemeine n Sicherheitsbestimmungen eingehalt en werden. Diese Bedienungsanleitung is t Bestandteil des Produkts und muss in unmittelbarer Nähe des Ger äts für das In¬stallations-, Bedienu ngs-, Wartungs- und Reinigungspers onal jederzeit zugänglich auf¬bewahrt werd en. Wenn das Gerät an eine dritt e Person
weitergegeben wird, muss die Bedienungsa nleitung mit ausgehändigt werden.
This instruction manual contains information about installation, operation and
maintenance of the appliance and constitutes an important source of information
and reference guide. The knowledge of all operational and safety instructions
included in this manual is a prerequisite for safe and proper handling of the
appliance. Additionally, accident prevention, occupational health and safety, and
legal regulations in force in the area the appliance is used apply.
Before you start using the appliance, especially before turning it on, read this
instruction manual in order to avoid personal injuries and property damages.
Improper use may cause damage.
This instruction manual forms and integral part of the product and must be stored in
an immediate vicinity of the appliance and be available at all times. The instruction
manual should be transferred together with the appliance.
1 Safety
This appliance has been manufactured in accordance with technical standards
currently in force. However, the appliance may be a source of hazards if used
improperly or contrary to its intended purpose. All persons using the appliance must
consider information included in this instruction manual and observe safety
instructions.
1.1 Explanation of Signal Words
Important safety instructions and warning information are indicated in this
instruction manual with appropriate signal words. You must strictly follow the
instructions, to prevent accidents, personal injuries and property damages.
2 / 26 135028
Page 5
Safety
EN
WARNING!
The signal word WARNING warns against hazards that may lead to
moderate or severe injuries or death if the hazards are not avoided.
CAUTION!
The signal word CAUTION warns against hazards that may lead to
light or moderate injuries if the hazards are not avoided.
IMPORTANT!
The signal word IMPORTANT indicates possible property damages,
which may occur if safety instructions are not observed.
NOTE!
The symbol NOTE indicates subsequent information and guidelines
for the user on usage of the appliance.
, die
1.2 Safety instructions
Electrical Current
• Too high a mains voltage or incorrect installation may cause electric shock.
• The appliance may be connected only if data on the rating plate correspond with
the mains voltage.
• To avoid short-circuit, the appliance should be kept dry.
• If there are malfunctions during operation, disconnect the appliance from the
power supply.
• Do not touch the appliance’s plug with wet hands.
• Never take hold of the appliance if it has fallen into water. Immediately
disconnect the appliance from the power supply.
• Any repairs or housing opening may be carried out by professionals and
relevant workshops only.
• Do not transport the appliance, holding it by the power cord.
• Do not allow the power cord to come into contact with heat sources or sharp
edges.
• Do not bend, pinch nor knot the power cord.
135028 3 / 26
Page 6

Safety
EN
• Always completely unwind the power cord.
• Never place the appliance or other objects on the power cord.
• Always take hold of the plug to disconnect the appliance from the power supply.
• Check the power cord regularly for damage. Do not use the appliance if the
power cord is damaged. If this cable is damaged, it must be replaced by
customer service or a qualified electrician in order to avoid dangers.
Incorrect operation of the appliance ma y cause fire or explosion hazard due to igniti on of its content.
Fire hazard / flammable materials hazard / explosion hazard!
• Do not use any electric devices in the appliance.
• Do not store nor use petrol or other flammable liquids and gases in the vicinity of
this or any other appliance. Those gases may cause fire or explosion hazard.
• Do not put into the appliance any explosive materials, like sprays filled with
flammable propellants. Contents of containers filled with flammable gases and
liquids may leak in low temperatures, and the contents may catch fire from
sparks generated by an electric appliance. Explosion hazard!
• In the case of coolant leakage, pull the plug from the socket. Remove all
sources of ignition in the vicinity, ventilate room and contact technical service.
Avoid coolant getting in contact with eyes, as it may cause serious eye damage.
• Never use any flammable liquids for cleaning the appliance or its parts. Gases
released may cause fire or explosion hazard.
• In the case of fire, disconnect the appliance from the power supply before
attempting adequate fire-extinguishing actions.
• Never attempt to extinguish fire with water if the appliance is connected to the
power supply. Following extinction of fire, ensure sufficient fresh air inflow.
• Defrosting process may not be sped up with mechanical means or heat energy
sources (candles or heaters) nor with any other means. Vapour produced may
cause short-circuit and too high temperatures may damage the appliance.
• All ventilation slots should not be obstructed during operation.
• Never attempt to damage cooling installation of the appliance.
4 / 26 135028
Page 7
Safety
EN
Halten Sie Verpackungsmaterialien und S tyroporteile von Kindern fern. They ma y get embroiled and suffocate.
Operating Personnel
• The device can be used by children of 8 years old and older, as well as by
people with reduced physical, sensory or mental abilities and those with limited
experience/knowledge as long as they are under supervision or have been
instructed on safe use of the device and possible risks. Children should not play
with the device.
• Cleaning and maintenance may not be carried out by children unless they are at
least 8 years old and supervised.
• Children that are below 8 years old may not get close to the appliance nor the
power cord.
Improper Use
• Unintended or prohibited use may cause damage to the appliance.
• The appliance may only be used when its technical condition is flawless and
allows for safe operation.
• The appliance may only be used when all connections are executed according
to rules of law in force.
• The appliance may only be used when it is clean.
• Use only original spare parts. Never attempt to repair the appliance on your own.
• Do not introduce any changes in the appliance nor modify it.
• To avoid damaging the compressor, do not switch the appliance on with the
ON/OFF switch too often. Intervals should last at least 5 minutes.
• In order not to cause a fire or short circuit, do not insert any metal sheets or
electrical objects into the appliance.
• Do not switch the appliance on until the component set of motor, cover, and
stirrer have been fitted.
135028 5 / 26
Page 8

Safety
EN
1.3 Intended Use
As described below, every use of the appliance for a purpose differing and/or
diverging from its intended standard use, is prohibited and considered to be an
unintended use.
The following is an intended use:
– Preparing ice cream, frozen yoghurt, sorbets, semi-frozen desserts.
The appliance is not designed for continuous operation in industrial
applications.
This appliance is intended for use in households and similar places, e.g.:
– in employee canteens in shops, offices, and similar areas;
– on farms;
– by customers in hotels, motels, and other typical accommodation
establishments;
– in lodging-houses.
1.4 Unintended Use
An unintended use may lead to personal injuries or property damages caused by
hazardous voltage, fire or high temperature. The appliance may only be used to
perform tasks described in this instruction manual.
6 / 26 135028
Page 9
General information
EN
2 General information
2.1 Liability and Warranty
All information and instructions in this instruction manual account for legal
regulations in force, current level of technical engineering knowledge as well as our
expertise and experience, developed over the years. If special models or additional
options are ordered, or state-of-the-art technical solutions were implemented, the
actual scope of delivery of the appliance may, in some circumstances, differ from
descriptions and numerous drawings in this instruction manual.
The manufacturer is not liable for any damages nor faults stemming from:
– failure to observe instructions,
– unintended use,
– technical alterations introduced by the user,
– usage of unapproved spare parts.
We reserve the right to introduce technical modifications to the product, intended for
improvement of the appliance and its performance.
2.2 Copyright Protection
This instruction manual, and texts, drawings and images included in it, as well as its
other components are copyright protected. It is prohibited to reproduce this
instruction manual (including its excerpts), in any form and by any means, and to
use and/or transfer its content to third parties without manufacturer’s written
permission. Violation of the above results in obligation to pay compensation. We
reserve the right to claim further damages.
2.3 Declaration of Conformity
The appliance meets the currently applicable standards and guidelines of the
European Union. We confirm the above in the EC Declaration of Conformity. We
may provide relevant Declaration of Conformity upon request.
135028 7 / 26
Page 10

Transport, Packaging and Storage
EN
3 Transport, Packaging and Storage
3.1 Delivery Check
Immediately upon reception, check the delivery for completeness and possible
shipping damage. In the case of visible transport damage refuse to accept the
appliance or accept it conditionally. Mark and note the scope of damage in shipping
documents/consignment list of the shipping company and lodge a complaint.
Concealed damage must be reported immediately upon its discovery, as
compensation claims may only be filed within applicable time limits.
If you find that parts or accessories missing, please contact our Customer Service
Department.
3.2 Packaging
Do not dispose of the appliance cardboard box. It may be used to store the
appliance when relocating or when shipping the appliance to our service point in the
case of any damages.
The packaging and its elements are made of recyclable materials. Particularly,
these are: plastic films and bags, cardboard box.
When disposing of the packaging, observe applicable domestic regulations.
Recyclable packaging materials should be recycled.
3.3 Storage
Leave the packaging closed until installation of the appliance; observe external
indications concerning method of placing and storage. Store the packaging in the
following conditions only:
– in closed rooms;
– in dry and dust-free surrounding;
– away from aggressive agents;
– in a location protected against sunlight;
– in a location protected against mechanical shocks.
In the case of extended storage (over three months), make sure you check the
condition of the packaging and the parts regularly. If needed, replace the packaging
with a new one.
8 / 26 135028
Page 11
Technical Data
EN
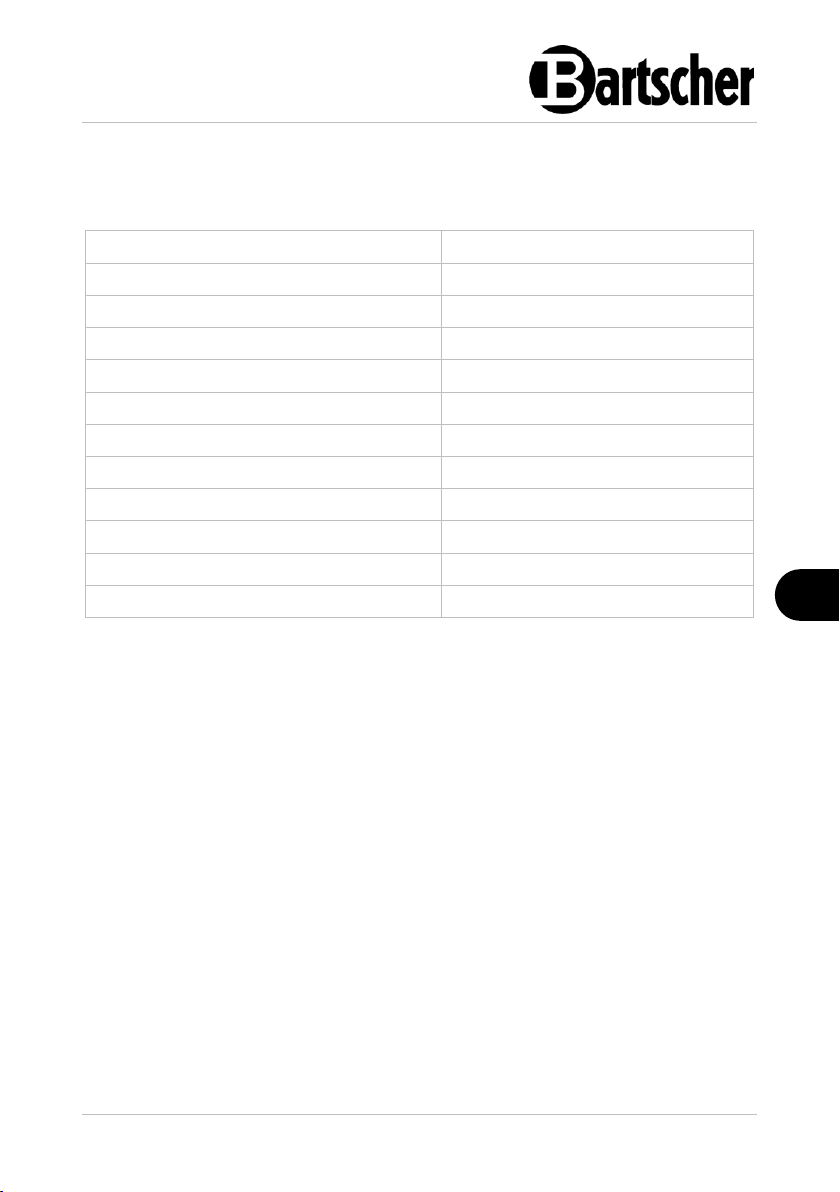
Name:
Ice-cream maker 1500
Art. No.:
135028
Material:
plastic
Ice cream container version::
stainless steel, removable
Ice cream container capacity, in litres:
1,5
Ice cream preparation cycle, in minutes:
30 - 60
Cooling:
compressor
Amount of coolant, in kg:
R600a | 0,023
Temperature range, min. – max., in °C:
-10 - -25
Connected load:
0,12 kW | 220-240 V | 50 Hz
Dimensions (W x D x H), in mm:
380 x 270 x 245
Weight, in kg:
8,7
4 Technical Data
4.1 Technical Specifications
We reserve the right to implement technical modifications.
Version / Characteristics
• Colour: white
• Designed for: ice cream | frozen yoghurt | sorbets | semi-frozen desserts
• Control: electronic
• Digital display
• ON/OFF switch
• The set includes: 1 ice cream scoop | 1 measuring cup
135028 9 / 26
Page 12
Technical Data
EN
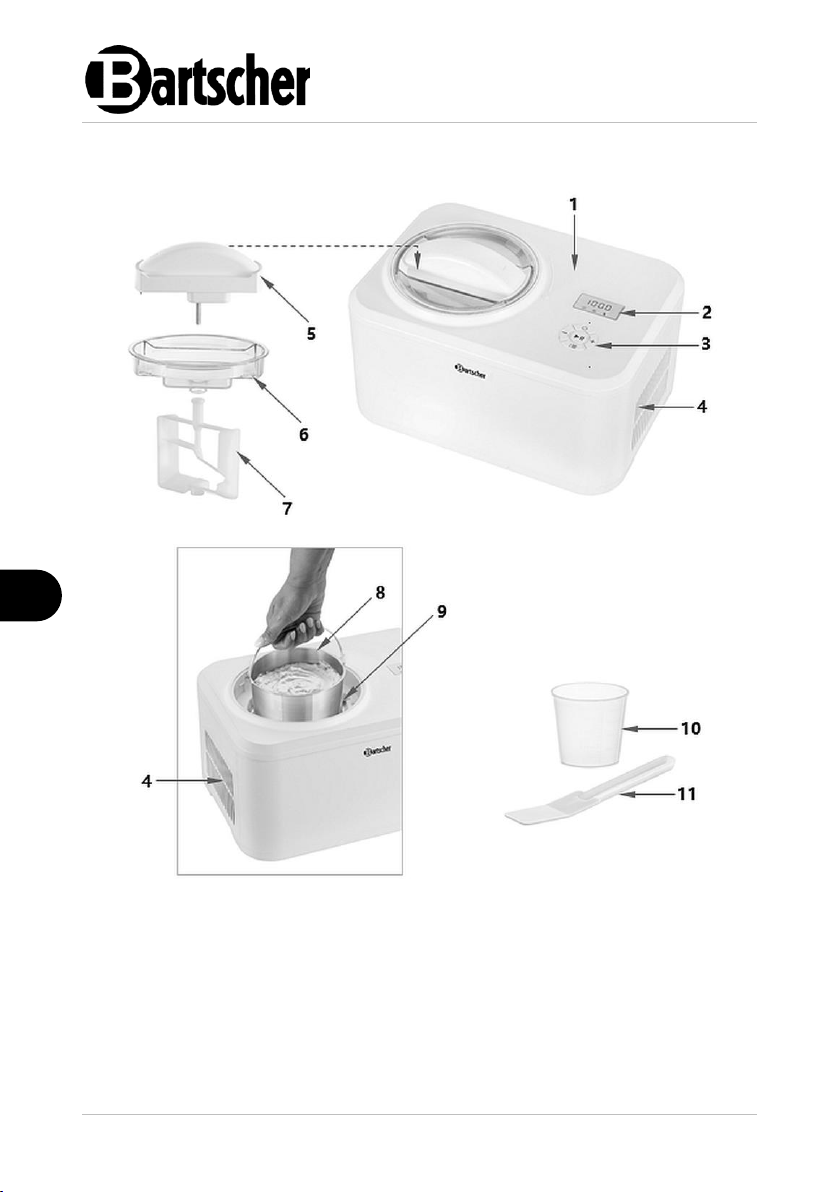
Fig. 1
1. Housing
2. Digital display
3. Control keys
4. Ventilation openings
5. Motor
6. Transparent cover
7. Stirrer
8. Ice container
9. Cooling cylinder
10. Measuring cup
11. Ice cream scoop
4.2 List of Components of the Appliance
10 / 26 135028
Page 13
Installation and operation
EN
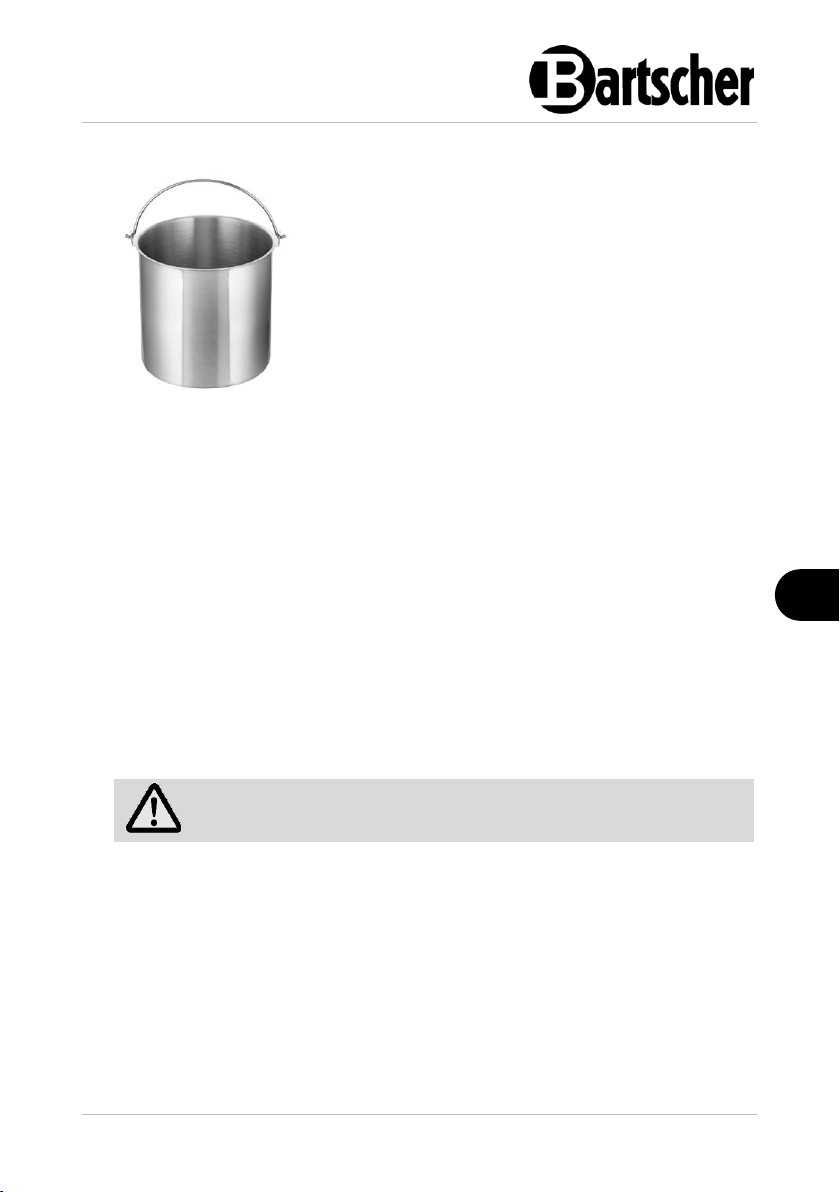
Ice Cream Container 1500
Material: Stainless steel
Content: 1.5 litres
Dimensions: W 155 x D 138 x H 140 mm
Weight: 0.34 kg
Art. no. 135029
CAUTION!
Choking hazard!
Prevent children from accessing package materials, for instance: plastic
bags and EPS.
Additional Equipment (not included in the delivery)
4.3 Functions of the Appliance
The ice cream maker with the capacity of 1.5 litres is designed for individual
preparation of fresh ice cream variations, such as ice cream, frozen yoghurt,
sorbets and semi-frozen desserts. With simple key operation on the control panel,
you can set various functions and the operating time, which appears on the digital
display.
5 Installation and operation
5.1 Installation
Unpacking / Positioning
• Unpack the appliance, remove all external and internal packaging elements and
shipment safeguards.
• If the appliance is covered with a protective film, remove it. Remove the film
slowly, so no glue residues are left. Remove any glue residues with the use of a
suitable solvent.
• Be careful not to damage the rating plate and warning labels fixed on the
appliance.
• Never place the appliance in humid or wet environment.
135028 11 / 26
Page 14

Installation and operation
EN
• Place the appliance in a way making the connections easily accessible, so that
they may be quickly disconnected if such a need arises.
• The appliance should be placed on surfaces that are:
– even, with sufficient bearing capacity, resistant to water, dry and resistant
to high temperatures;
– sufficiently large, and thus enabling usage of the appliance with no
problems;
– easily accessible;
– well ventilated.
• Maintain sufficient clearance from table edges. The appliance might turn over
and fall down.
• Nie należy umieszczać urządzenia w gorąc ym otoczeniu a ni w pobliżu m ateriałów łat wopalnych.
• The appliance requires sufficient airflow f or proper operation. Assure a minimu m lateral clearance of the appliance of 10 cm.
• Die Öffnungen am Gerät niemals abdec ken oder blockieren.
• Do not position the appliance in high humidity locations. Air relative humidity
should not exceed 70%.
• Do not place the appliance in direct sunlight or in the vicinity of heat sources
(cooker, radiator, heating devices, etc.). Heat sources may negatively affect
power consumption, and restrict functions of the appliance, too.
• In order to avoid damage to the compressor, do not tilt the appliance more than
45° when positioning or transporting it.
• The electric socket should be easil y accessible so it is possible to quickly discon nect the power cord when necessar y. The electric socket should be easil y accessible so it is possible to quickly discon nect the power cord when necess ary. The electric socket should be easily accessi ble so it is possible to quickly discon nect the power cord when necessar y.
• Do not place the appliance in hot environ ment nor in the vicinity of flammable m aterials.
• The appliance requires sufficient airflow f or proper operation. Assure a minimu m lateral clearance of the appliance of 10 cm.
• Never cover nor block ventilation openings of the appliance.
• Place the appliance so that sufficient air circulation is ensured. Do not obstruct
nor cover ventilation openings of the appliance.
• Leave at least 10 cm clearance from walls and other objects.
Power supply connection
• Verify if technical data of the appliance (see rating plate) correspond with the
local electric power grid specification.
• Connect the appliance to a single, properly grounded mains socket with
protective contact. Do not connect the appliance to a multi-socket.
• The power cord should be laid in a way preventing anyone from threading on it
or tripping against it.
12 / 26 135028
Page 15
Installation and operation
EN
5.2 Operation
Indications and tips for making ice-cream
• Most recipes consist of cream, milk, eggs and sugar. For best results when
making ice cream, we recommend that you beat the eggs and sugar with an
electric blender beforehand to increase the volume of the ice cream.
• The taste and consistency of ice-cream depend very much on the selected
ingredients: the higher the fat content, the thicker the ice cream. Fat whipped
cream contains a minimum of 35% fat, light whipped cream 10-18% fat.
• Always keep the same amount of liquid, e.g. the lightest ice cream can be made
using more milk than cream, or using only milk.
• You can of course also use skimmed milk, but the consistency of the ice cream
will be different.
• To sweeten ice cream during preparation, do not put sugar or sweetener directly
into the ice cream container (it will not dissolve). Instead, the sugar should be
dissolved in a little water or skimmed milk and the resulting syrup (chilled)
poured into the ice cream container.
• If fruits are used in the recipe, they must always be washed and dried first, fruits
with stones must always be peeled and the stones removed. Before adding
these ingredients to the ice cream, make a separate mixture using a blender.
• If eggs are used, make sure they are fresh.
• Cooking is required in many recipes. Prepare these ingredients the day before
to make sure they are cold.
Before Use
1. Prior to first operation, clean the appliance and its equipment observing
instructions in section 6 'Cleaning'.
2. To end with, dry the appliance and accessories thoroughly.
3. Set the appliance on a flat surface.
135028 13 / 26
Page 16

Installation and operation
EN
Preparation of Ingredients
1. Prepare all ingredients for making ice cream according to an individual recipe or
recipe suggestions in this instruction manual. Follow the instructions in chapter
'Tips and Hints for Making Ice Cream'.
NOTE!
Never place warm nor hot ingredients in the ice cream container;
ingredients must always be cooled beforehand.
The optimum temperature of ingredients is approximately 20(±3)°C.
Do not place ingredients in a freezer to pre-freeze, otherwise the stirrer will
block during ice cream preparation.
Proposed Recipe for Chocolate Ice Cream
Ingredients:
500 ml of cream
250 ml of whole milk
100 g of sugar
100 g of melted chocolate
4 egg yolks
Place egg yolks in a bowl, add sugar gradually while stirring constantly. Mix
ingredients until a homogeneous mass is formed.
While mixing, gradually add cream and milk until all the ingredients are well
blended.
While mixing add the melted chocolate.
The recipe can be varied in different ways, adding ingredients of choice according
to your taste.
14 / 26 135028
Page 17
Installation and operation
EN
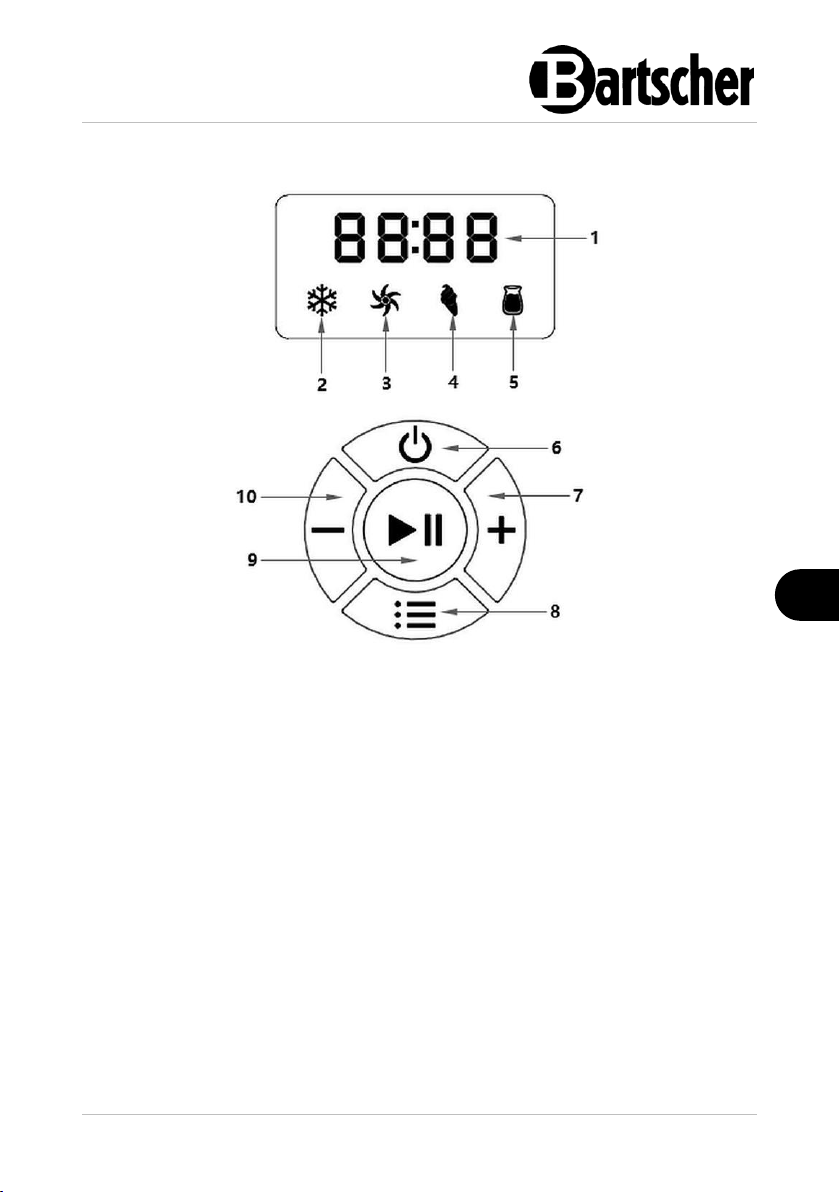
Fig. 2
1. Operating time indicator light
2. Cool mode indicator light
3. Blending mode indicator light
4. Ice cream indicator light
5. Frozen yoghurt indicator light
6. ON/OFF key
7. Operating time extension key
8. Function selection key
9. START / PAUSE key
10. Operating time shortening key
Indicator Lights / Control Keys
135028 15 / 26
Page 18
Installation and operation
EN
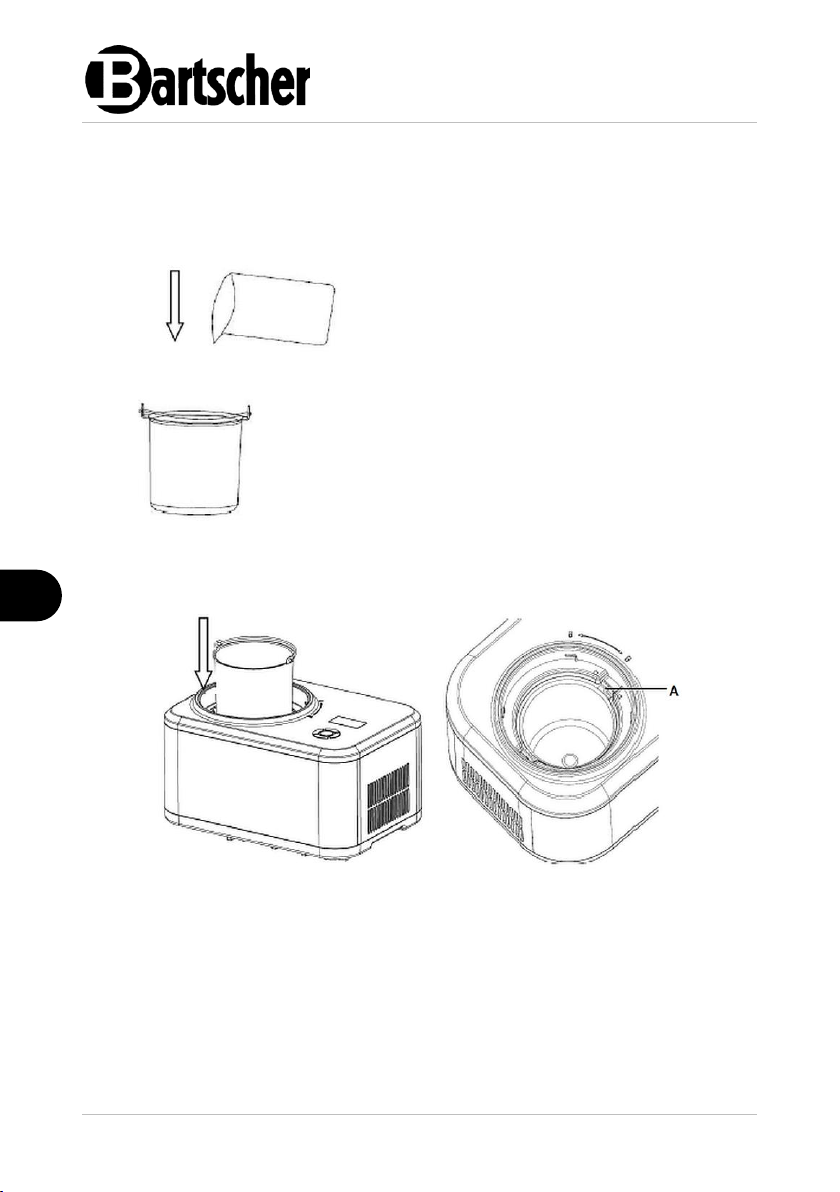
2. As indicated in a recipe, place wellprepared ingredients in a removable ice
cream container.
3. Stir the prepared ingredients in the ice
cream container.
Fig. 3
Fig. 4
Ice Cream Preparation Steps
1. To prepare ice cream, follow the steps below.
Step 1
Step 2
4. Then place the ice cream container in the cooling cylinder.
5. Ensure that the fixings of the ice cream container handles fit into the designated
grooves (A) on the top edge of the cooling cylinder.
16 / 26 135028
Page 19
Installation and operation
EN
Step 3
Step 4
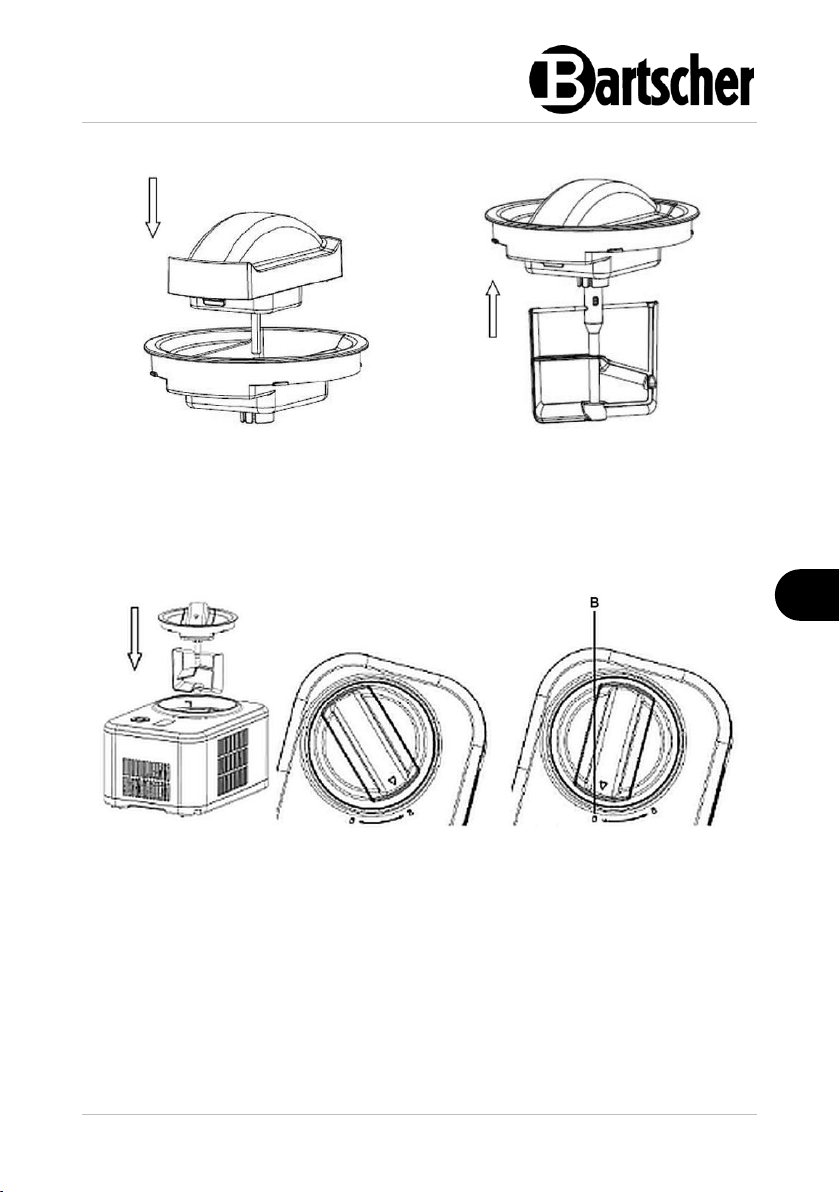
Fig. 5
Fig. 6
6. Install the transparent cover and
motor.
7. Install the stirrer on the cover with
the motor.
Fig. 7
Step 5
8. Place the components installed in steps 3 and 4 into the ice cream maker.
9. Make sure they are correctly placed in the ice cream container.
10. Lock the components in a clockwise direction, making sure that the triangular
mark on the components is facing towards the 'LOCK' mark (B).
135028 17 / 26
Page 20
Installation and operation
EN
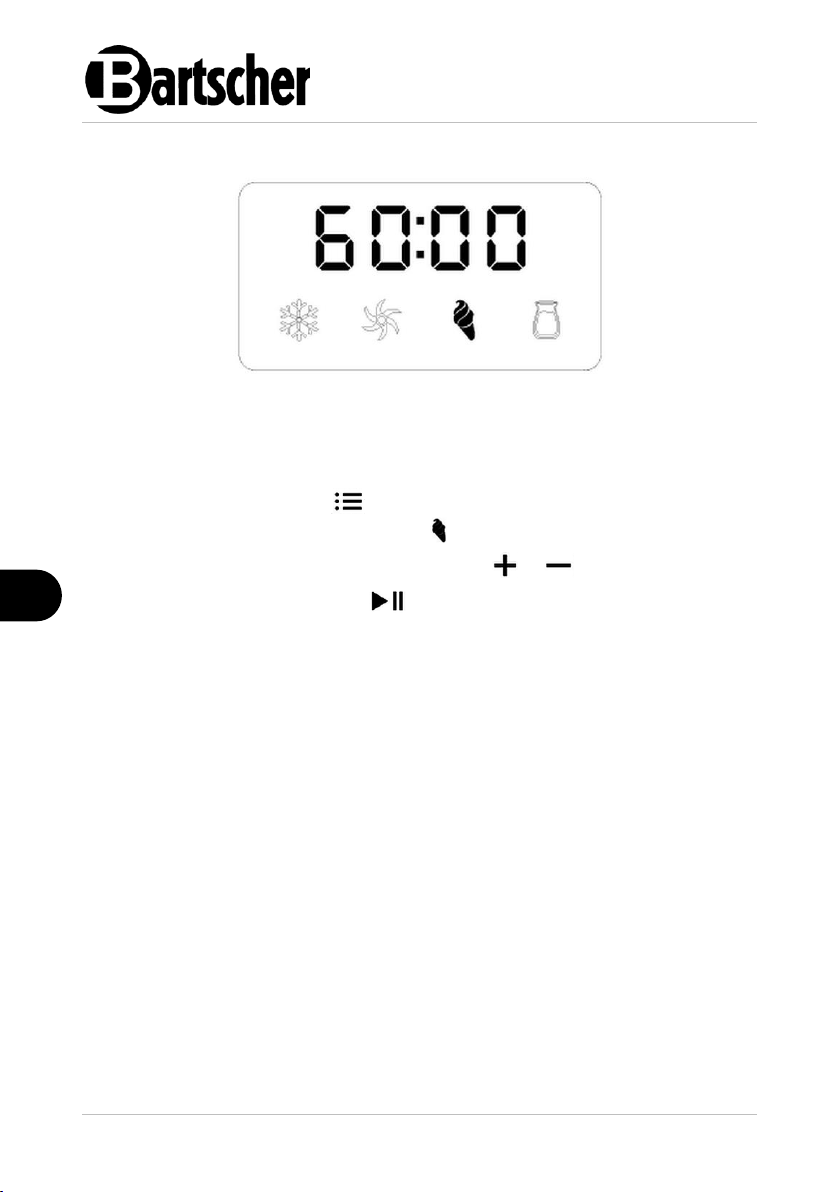
Fig. 8
Step 6
11. Connect the connection cable to the appliance.
12. Plug the appliance into a single grounded socket.
13. By pressing repeatedly the function key, select the ice cream preparation
function until the corresponding symbol lights up.
14. Set the required operating time by pressing the or key.
15. Then press the START/PAUSE key to start preparing ice cream.
Step 7
When ice cream is ready, an audible signal will be heard.
18 / 26 135028
Page 21
Installation and operation
EN
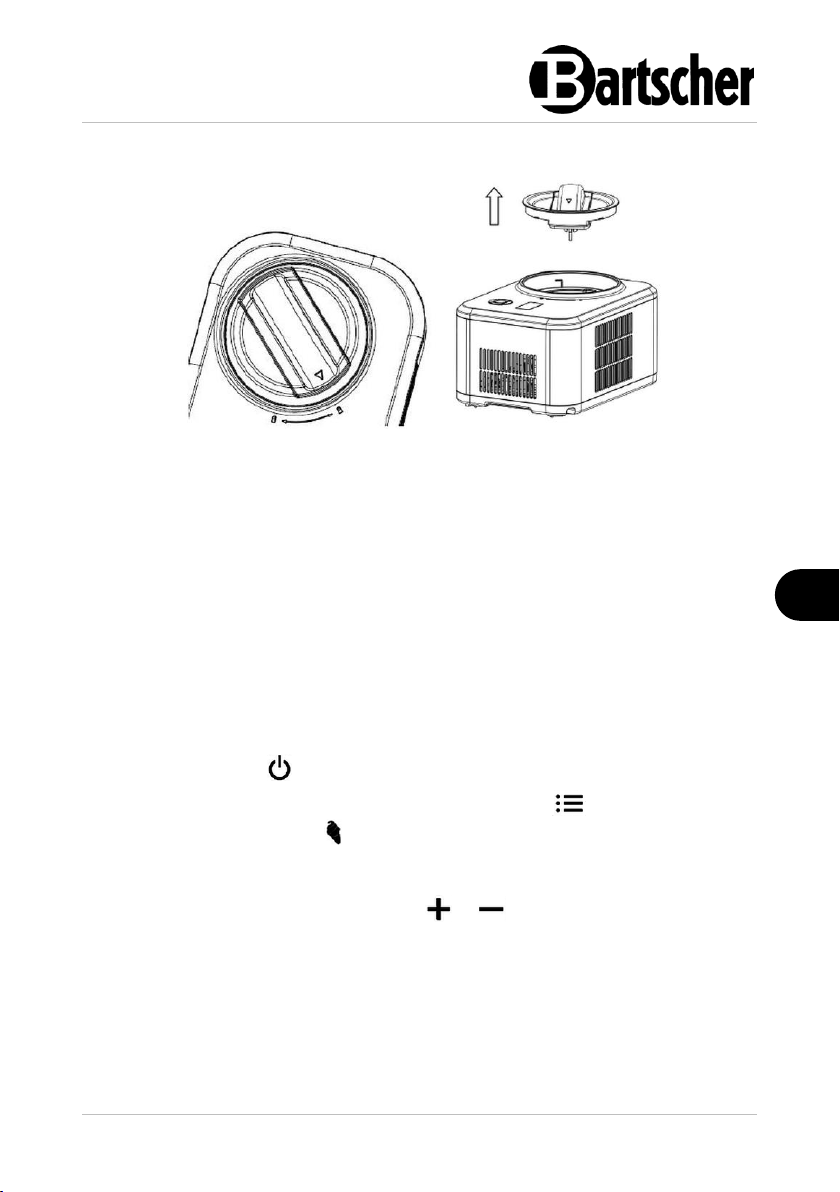
Fig. 9
Step 8
16. Rotate the transparent cover with the motor and stirrer counter-clockwise to the
unlock mark.
A slight rubbing sound can be heard as you rotate it out, which is normal thing.
17. When the triangular mark on the motor aligns with the unlock mark (UNLOCK),
pull out the component set of motor, cover, and stirrer.
18. Then pull out the ice cream container with ice cream.
19. Serve ice cream using the supplied ice cream scoop or place ice cream in a
refrigerator to chill for a while.
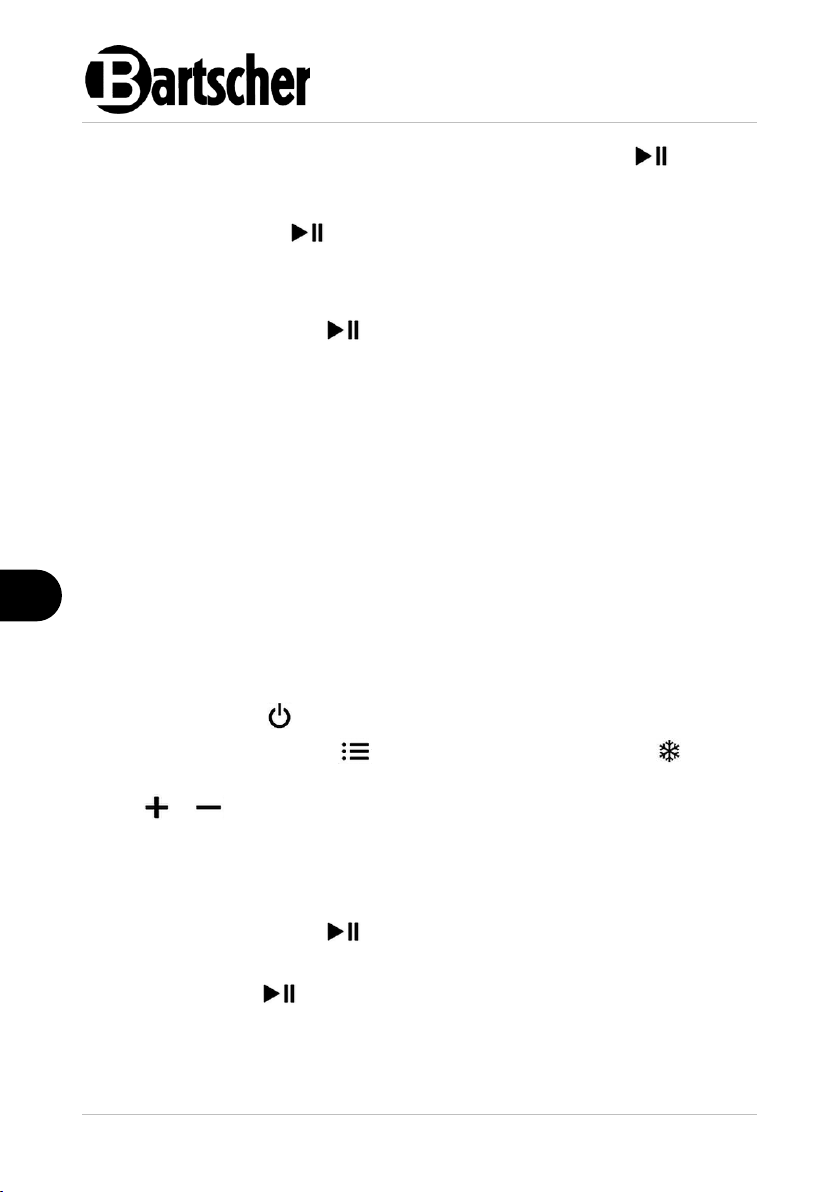
Ice Cream Preparation Process
1. Press the ON/OFF key to switch the ice cream maker on.
2. To select the ice cream preparation function, press the function key until
the corresponding symbol lights up.
The standard [ice cream] production mode is 60 minutes.
3. To adjust the operating time, press the or key until the desired operating
time appears on the digital display.
The operating time can be increased or decreased in 1-minute increments
by pressing the corresponding key once.
To quickly change the operating time, hold down the corresponding key for 2
seconds.
135028 19 / 26
Page 22
Installation and operation
EN
4. Once the operating time has been set, press the START/PAUSE key to
start preparing ice cream.
5. If the START/PAUSE key is pressed during ice cream preparation, the ice
cream maker will stop its operation.
The digital display shows the remaining operating time.
6. Press the START/PAUSE key again to continue the preparation process.
The appliance will continue to operate according to the set function and the
remaining time.
When the set operating time has elapsed, an acoustic signal is heard.
The preparation process is complete.
When the preparation process is complete and no further settings are made, the
appliance automatically switches to cooling mode.
7. Remove the cover with the motor and stirrer from the appliance.
8. Remove the required ice cream from the ice cream container or the ice cream
container from the cooling cylinder.
9. Serve ice cream using the supplied ice cream scoop or store ice cream in a
refrigerator so that it does not melt.
Cooling Function
1. Press the ON/OFF key to switch the appliance on.
2. Press the function selection key and select the cooling function .
3. Once the function has been selected, set the operating time by briefly pressing
the or key once to make the setting in 1-minute increments.
4. To quickly set the operating time to 60 minutes, press the corresponding key for
2 seconds.
The set operating time appears on the digital display.
5. Press the START/PAUSE key to start cooling.
The set operating time counts down.
If the START/PAUSE key is pressed during the cooling process, the appliance
switches off and the digital display shows the remaining operating time.
20 / 26 135028
Page 23
Installation and operation
EN
6. When the START/PAUSE key is pressed again, operation continues
according to the set function and the remaining operating time.
When the set operating time has elapsed, the appliance stops and an audible signal
is heard. The preparation process is complete.
Blending Mode Function
1. Press the ON/OFF key to switch the appliance on.
2. Press the function selection key, and select the mixing mode function .
3. To set the operating time after selecting the mixing mode function, press the
or key once to make the setting in 1-minute increments.
4. To quickly set the operating time to 60 minutes, press the corresponding key for
2 seconds.
5. After setting the operating time, press the START/PAUSE key to start the
blending process.
The set operating time appears on the digital display and counts down.
6. If the START/PAUSE key is pressed during the blending process; the
appliance switches off and the digital display shows the remaining operating
time.
7. When the START/PAUSE key is pressed again, operation continues
according to the set function and the remaining time.
When the set operating time has elapsed, the appliance stops the blending process
and an audible signal is heard.
135028 21 / 26
Page 24
Installation and operation
EN
Frozen Yoghurt Function
1. Press the ON/OFF key to switch the appliance on.
2. Press the function selector key, and select the frozen yoghurt function .
3. To set the operating time after selecting this function, press the or key
once to make the setting in 1-minute increments.
4. To quickly set the operating time to 24 hours, press the corresponding key for 2
seconds.
5. After setting the operating time, press the START/PAUSE key to start the
frozen yoghurt preparation process.
The set operating time appears on the digital display and counts down.
6. If the START/PAUSE key is pressed during operation, the appliance
switches off and the digital display shows the remaining operating time.
7. When the START/PAUSE key is pressed again, operation continues
according to the set function and the remaining time.
When the set operating time has elapsed, the appliance stops the frozen yoghurt
preparation process and an audible signal is heard.
The preparation process is complete.
Keep Cool Function (Ice Cream Isolation Function)
In order to prevent you from being away from the appliance while making ice cream,
ice cream cannot be eaten or stored after it is made and will have melt, the
appliance is equipped with an isolation function. If the ice cream making process is
finished and no settings are made in the appliance, the appliance automatically
switches to the isolation programme. The isolation time is 1 hour. After 1 hour, the
ice cream appliance switches to Standby mode.
Motor Self-Protection Function
In the blending and ice cream preparation functions, as the operating time
increases, the ice cream becomes harder and harder, which can cause the stirrer to
block. A circuit board monitors the motor and automatically shuts it down to ensure
the life of the stirrer motor.
22 / 26 135028
Page 25
Installation and operation
EN
Compressor Self-Protection Function
When the compressor is stopped in ice cream preparation mode or cooling mode,
or when the operation is stopped in the cooling mode, the compressor protection
time is approximately 3 minutes.
When the connection cable is inserted, the ice cream maker will restart by default.
At this point, there is no delay in selecting the ice cream making mode or the
cooling only mode.
Switching the Appliance OFF
1. If the appliance is no longer in use, switch it off with the ON/OFF key.
2. Disconnect the appliance from power supply by pulling the plug out.
Storage of prepared ice-cream
• Frozen ice-cream can be stored for some time in the closed container; however,
with longer storage, ice cream loses its taste and quality. The structure of the ice
cream disintegrates and the freshness is lost after approximately one to two
weeks of storage.
• Store ice cream at a temperature of at least -12 °C. Mark the date of
manufacture and describe the type of ice-cream on the container.
CAUTION!
Ice-cream is a good nutrient for bacteria.
Always keep the ice cream maker and storage container perfectly clean
and dry. Never freeze again any thawed or partially thawed ice-cream.
• About 20 minutes before serving, the ice-cream should be taken out of the
freezer and the container should be placed in the refrigerator for 10 minutes.
• Ice-cream can be kept for 10 to 15 minutes at room temperature to allow it to
reach the right temperature for consumption.
135028 23 / 26
Page 26

Cleaning
EN
6 Cleaning
6.1 Safety Instructions for Cleaning
• Before cleaning, disconnect the appliance from the power supply.
• Leave the appliance to cool down completely.
• Make sure water does not enter the appliance. Do not immerse the appliance in
water or other liquids during cleaning. Do not clean the appliance with a
pressurized water jet.
• Do not use any sharp or pointed, nor metal implements (knife, fork, etc.). Sharp
or pointed implements may damage the appliance, and when in contact with live
parts, they may cause electric shock.
• For cleaning, do not use any scouring agents that contain solvents nor corrosive
cleaning agents. They may damage the surface.
6.2 Cleaning
1. Clean the appliance thoroughly after each use.
2. Remove the transparent cover with the motor and stirrer from the appliance and
dismantle it.
3. Remove the ice-cream container from the cooling cylinder.
4. Transfer the ice cream into a suitable container.
5. Clean the ice cream container thoroughly with warm water, a mild detergent and
a soft cloth or sponge.
ATTENTION!
The ice cream container can become deformed by impact or careless
handling, which can affect the operation.
Be very careful when cleaning the ice cream container.
6. Clean the removed parts (cover, stirrer) as well as the accessories (ice cream
scoop, measuring cup) with warm water and a soft cloth or sponge. Use a mild
cleaning agent when required.
7. All cleaned parts should be rinsed thoroughly with fresh water.
8. Wipe the motor with a slightly damp cloth only.
9. Dry all parts with a soft, lint-free cloth or allow it to air dry.
10. Regularly, wipe the stirrer and ice cream container after cleaning with a food
grade disinfectant. Observe instructions of such a cleaning agent's
manufacturer.
11. Wipe the housing and power cord with a slightly damp, soft cloth.
24 / 26 135028
Page 27

Possible Malfunctions
EN
Error
Possible cause
Solution
After preparing ice
cream, the ice cream
container is hard to
pull out
Ice formation between the
ice cream container and the
cooling cylinder, e.g. from
water droplets
Wait for 3–8 minutes, then
pull out the ice cream
container
The stirrer lifts the
transparent cover, it
cannot be closed
The stirrer has not been
correctly inserted into the
ice-cream container
Re-insert the stirrer; pay
attention to the correct
connection between the
motor mount and the stirrer
The ice cream
container cannot be
put into the cooling
cylinder
Deformed ice cream
container
Contact the service
company
Replace the ice cream
container
12. Place individual components back into the appliance:
– place the ice cream container in the cooling cylinder,
– reassemble the stirrer, transparent cover and motor together,
– place this set in the ice cream container.
7 Possible Malfunctions
Mögliche
The table below contains descriptions of possible causes and solutions to
malfunctions or errors during operation of the appliance. When malfunction cannot
be removed, contact the technical service.
In such a case, provide article number, model name and serial number. These data
may be found in the rating plate.
135028 25 / 26
Page 28
Disposal
EN
Error
Possible cause
Solution
The ice cream
preparation cycle is
not finished, the
stirrer stops
When the stirrer is blocked
by hardening ice cream, the
safety device stops the
motor
Pull the stirrer and ice
cream container out
Place the ice cream
container back in the
cooling cylinder, reassemble
the stirrer with the cover and
motor and continue with the
ice cream preparation
through restarting
Electric appliances are marked with this symbol. Electrical
appliances must be disposed of and recycled in a correct
and environmentally friendly manner. You must not dispose
of electric appliances with household waste. Disconnect the
appliance from the power supply and remove power cord
from the appliance.
8 Disposal
Electrical Appliance
Electrical appliances should be returned to designated collection points.
Coolant
The propellant used in the appliance is flammable. It should be utilised pursuant to
national regulations in force.
26 / 26 135028
 Loading...