

Bartlett Genesis LT3140, Genesis Mini LT1120 Operation Manual

Operation Manual
Genesis
Model LT3140
&
Genesis Mini
Model LT1120
BARTLETT
INSTRUMENT COMPANY
1032 Avenue H
Fort Madison, IA 52627
319-372-8366
www.bartinst.com

1
Table of Contents
Introduction .................................................................................................................................................. 2
Precautions ................................................................................................................................................... 2
Home Screen Overview ................................................................................................................................. 3
Quick Start ..................................................................................................................................................... 4
First Firing of the Kiln .................................................................................................................................... 5
Program the Controller ............................................................................................................................. 5
Review Program Before the Firing ............................................................................................................ 5
Start The First Test Firing .......................................................................................................................... 6
Review the Results .................................................................................................................................... 6
Ceramics Programming (Bisc or Glaze) ......................................................................................................... 7
Glass Programming ....................................................................................................................................... 9
Custom Programming ................................................................................................................................. 10
Calculating Ramp Rates for Custom Firing .............................................................................................. 12
Custom Ceramics Program ...................................................................................................................... 13
Start A Firing................................................................................................................................................ 13
Operation of the Controller During A Firing ........................................................................................... 13
Adjustments During a Firing .................................................................................................................... 15
End of Firing – COMPLETE ....................................................................................................................... 16
Care of Thermocouple ............................................................................................................................ 17
Menu Screen ............................................................................................................................................... 17
Data Menu .............................................................................................................................................. 17
Diagnostics .............................................................................................................................................. 18
Adjustments ............................................................................................................................................ 18
Configuration .......................................................................................................................................... 19
Restore Presets ....................................................................................................................................... 22
Customization ......................................................................................................................................... 22
Factory Configuration ............................................................................................................................. 22
Appendix A: Error Codes ............................................................................................................................. 23
Full Power Test ........................................................................................................................................ 24
Appendix B: Cone Fire Temperature Profiles.............................................................................................. 25
Appendix C: Custom Firing Default Programs ............................................................................................. 26
Appendix D: Blank Firing Program .............................................................................................................. 29
Appendix E: Common Questions and Situations ........................................................................................ 30
Appendix F: Zone Control ........................................................................................................................... 31
1. Features and Enhancements........................................................................................................... 31
2. General Description ........................................................................................................................ 31
3. Automatic Lag Function .................................................................................................................. 31
4. Thermocouple Offsets..................................................................................................................... 31
5. Three Thermocouples ..................................................................................................................... 32
Appendix G: Genesis Connection Diagram ................................................................................................. 33
Appendix H: Genesis Mini Connection Diagram ......................................................................................... 34

2
Introduction
This manual covers the operation of the Genesis 3140 & Genesis 1120 kiln controllers. The Genesis
is a versatile touch screen controller that regulates the temperature in your kiln so you can fire a variety
of products like ceramics, glass, jewelry, and more. The Genesis has preset ceramic programs with cone
fire programming, preset glass firing profiles, and 30 custom programs, along with Wi-Fi capabilities for
software updating, built in diagnostics, and maintenance logging among other new features.
Precautions
The controller is used to control temperature; it is not a safety device.
Do not operate the controller in temperatures above 160ᴼ F.
Always supervise your kiln during a firing.
The controller contains electronic components which are sensitive to static electricity.
Before handling the controller dissipate any static charge you may have by touching metal or
a screw on the controller panel, the electrical box, the kiln lid, or some other grounded
object.
Always check the position of the thermocouple probe before starting a firing. The current
temperature displayed on the controller is measured at the end of the thermocouple which
must be in the firing chamber about 1” to 1-1/2”. Seal the opening around the thermocouple
with kaowool or similar material if necessary.
Always review the current program before firing to ensure the correct profile is
programmed.
Ensure the kiln and the areas around the kiln are clear of combustible material. See kiln
manufacturer’s recommendation on required clearances.
3
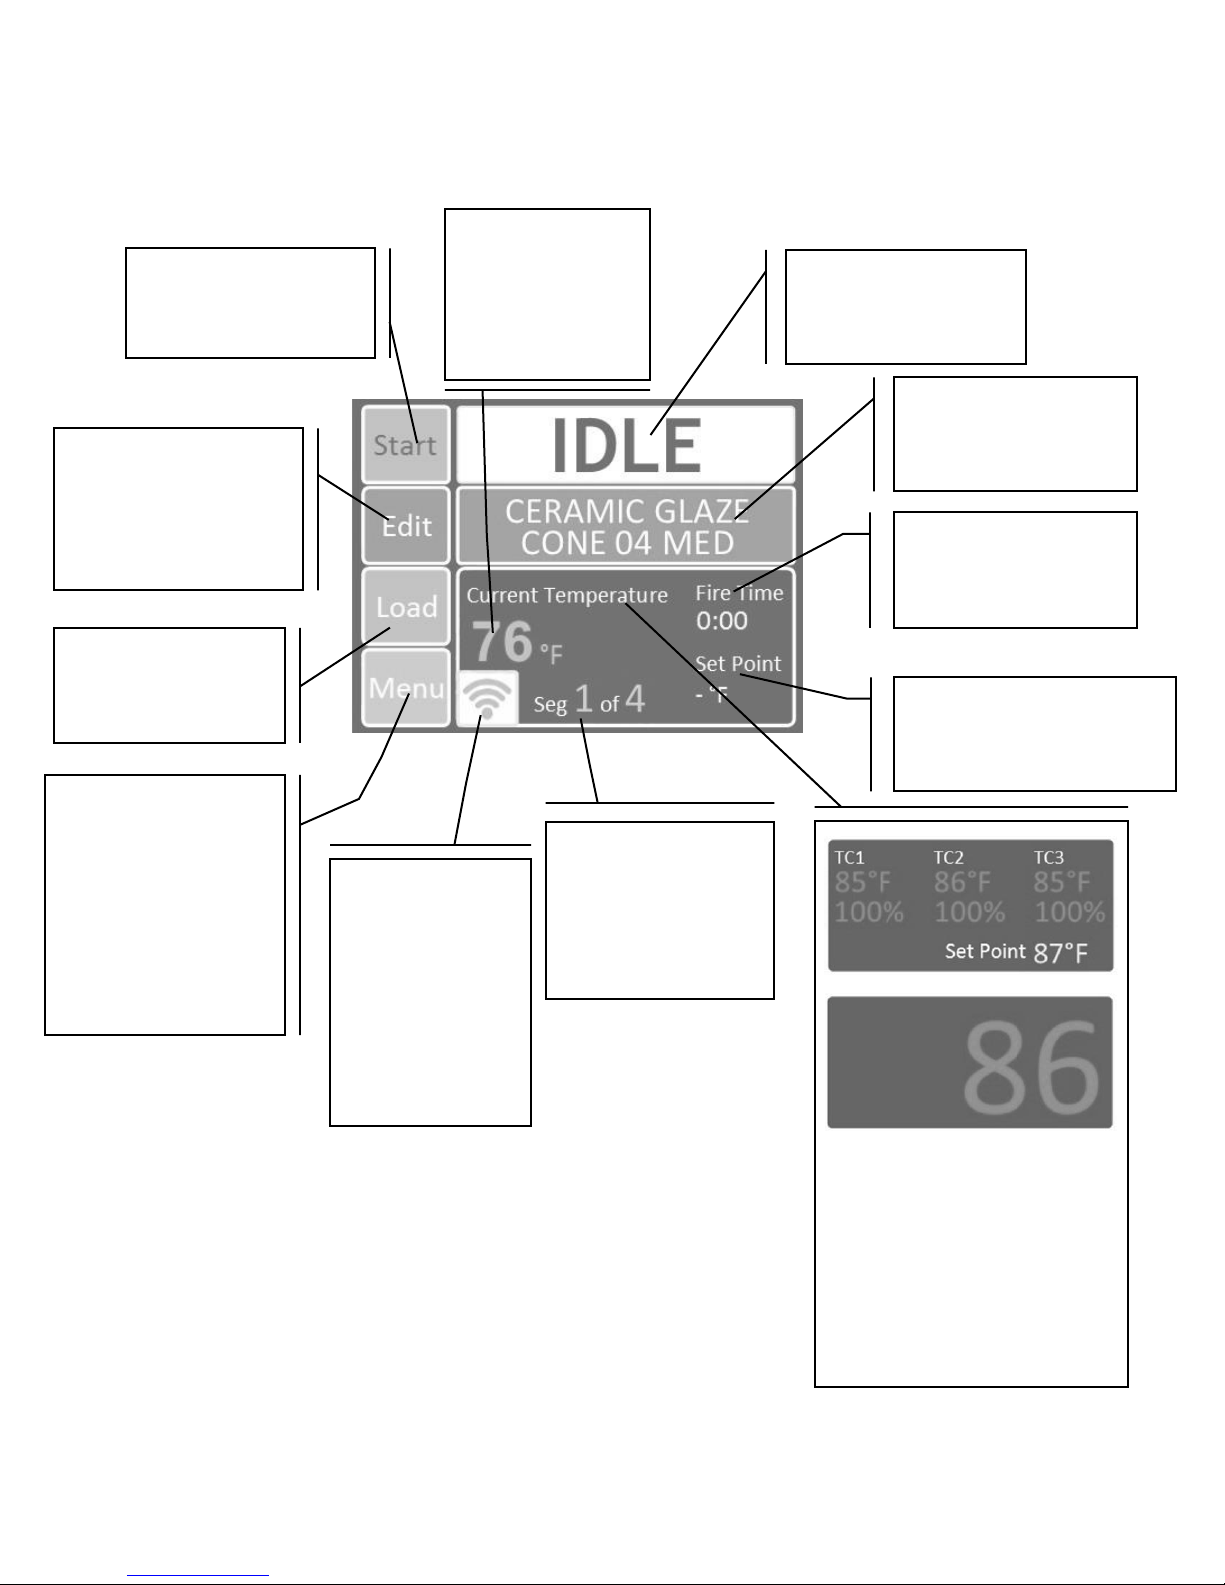
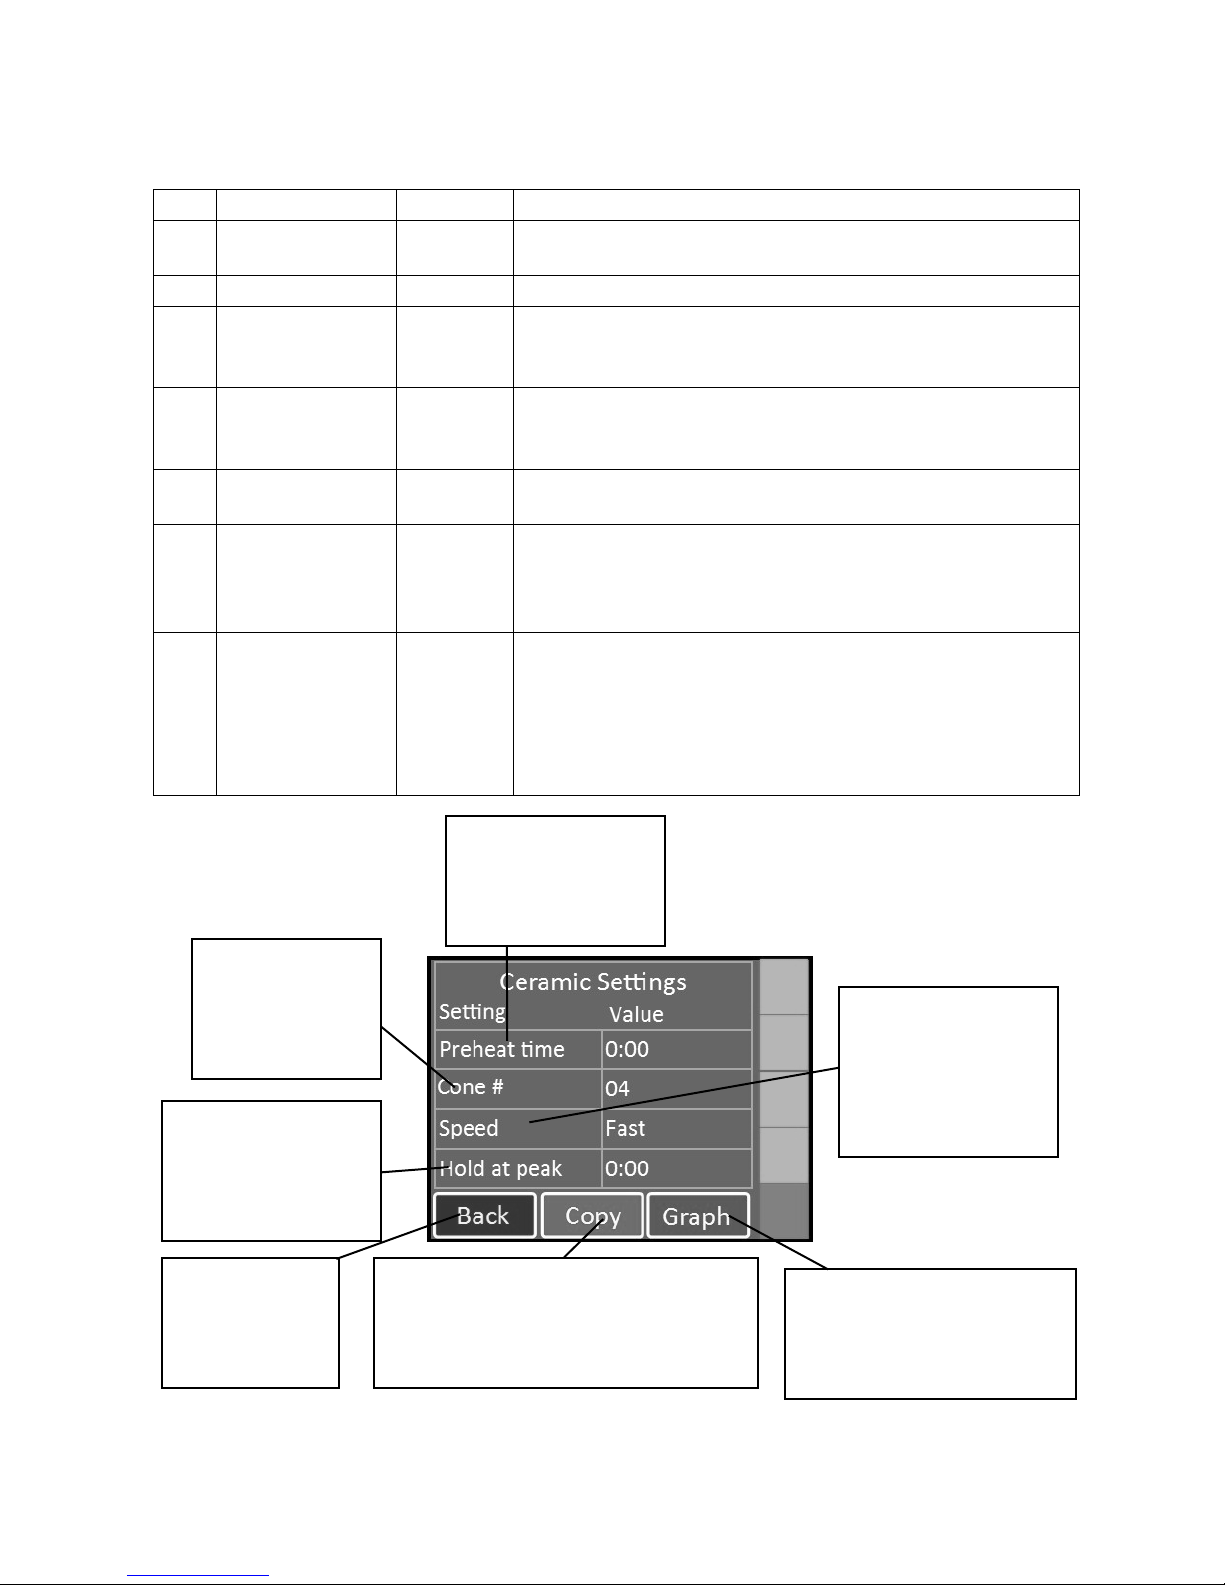
Home Screen Overview
Figure 1: Home Screen Overview
Status
Displays the current
status of the kiln.
Current Program
Displays the program
currently loaded
Start
Press to begin firing
process.
Edit or View Menu
Press to edit or view
(novice mode) the
currently loaded
program
Load
Press to load a new or
saved program
Menu Options
Data Menu
Diagnostics
Adjustments
Configuration
Restore Presets
Customization
Factory Config
Current
Temperature
Displays the current
temperature of the
kiln.
Segment
Displays the segment
the firing currently is in
and the total number
of segments
Fire Time
The firing time in
hours:minutes
Wi-Fi
Indicates the Wi-Fi
signal strength. An
Exclamation mark
by the Wi-Fi symbol
indicates connected
to Wi-Fi but not to
the internet
Set Point
Displays the temperature
the kiln is trying to fire to
Toggle Status
Press anywhere in the square to
toggle status to see each
thermocouples temperature,
percentage of power to each
element, and the set point. The
single temperature is TC2’s
reading

4
Quick Start
Step 1: Load A Program (See Pages 7-13)
Press the Load button.
Select the type of program.
o Ceramic (Bisc or Glaze)
o Glass
o Custom
Step 2: Review or Edit the Program (See Pages 7-13 )
Press the Edit or View button.
Review and confirm the program selection.
Step 3: Start the Firing (See Page 13)
Press the Start button.
Enter the start code.
Press Start.
5
First Firing of the Kiln
The purpose of the first firing is to put a protective oxide layer on the elements and thermocouple.
The first firing is done without ware in the kiln that might give off fumes that contaminate the elements.
This first firing should have shelves and witness cones. The witness cones should be on the middle of the
shelf nearest the center of the kiln. If your kiln is supplied with cones, the programmed cone number
should match the cones provided, or you may use a cone of your own choice for the first firing. The
example below is for a cone 04 firing, but if you use a cone other than 04, substitute that cone number
in the programming. Note: The first firing should be done according to the kiln manufacturer’s
specifications if they are different from these instructions.
Program the Controller
This example is for a Fast Glaze to cone 04 with no hold time at the end of the firing. The example below
is for programming in Novice Mode (See page 19 for more info).
Step
Display Shows
Key Press
What This Selection Means
1
Home Screen
Load
You’re ready to load the Ceramics program
into the controller
2
What Are You
Firing?
Ceramics
Choose from Ceramics, Glass, or Other.
Choose Ceramics for the first firing of the kiln.
3
Cone Number
04
Temperature
1945
Next
Use the scroll bar on the right until Cone 04 is
displayed.
4
What Speed?
Fast - Glaze thin pieces
The firing time for a Fast Glaze firing generally
ranges between 4 to 5 hours.
5
Preheat time?
None - Thin, bone dry
bisc or glaze
No preheat time is needed.
6
Program loaded:
CERAMIC GLAZE
CONE 04 FAST
OK
Returns to Home Screen at IDLE.
Review Program Before the Firing
Press the View key to review the loaded program. Check that the settings are correct. If you’d
like to change the alarm, go to Adjustments under Menu (See page 18 for instruction). When ready to
fire, press BACK to return to the Home Screen.
Figure 2: First firing program example. Use the green scroll bar on the right to see more options.
6
Start The First Test Firing
Step
Display Shows
Key Press
What This Selection Means
1
Home Screen
Start
The kiln is ready to be fired.
2
Start Firing
CERAMIC BISC
CONE 04 FAST
1-Start
Now
This kiln is ready to be fired and the start code must be
entered.
3
Enter Start Code
1
The controllers default start code is 1. To change the Start
Code, see page 21 for more details.
4
Enter Start Code
Start
Upon pushing Start, the firing will begin. You will hear clicking
when the relays cycle power to the elements to regulate the
temperature. This firing will take around 6 to 7 hours.
5
COMPLETE – Clear
returns to idle.
Clear
The firing has gone to complete. The current temperature, fire
time, segment, and set point is displayed.
6
Home Screen
Pressing clear returns the controller to IDLE. You may open the
kiln when the temperature has cooled to 150°F.
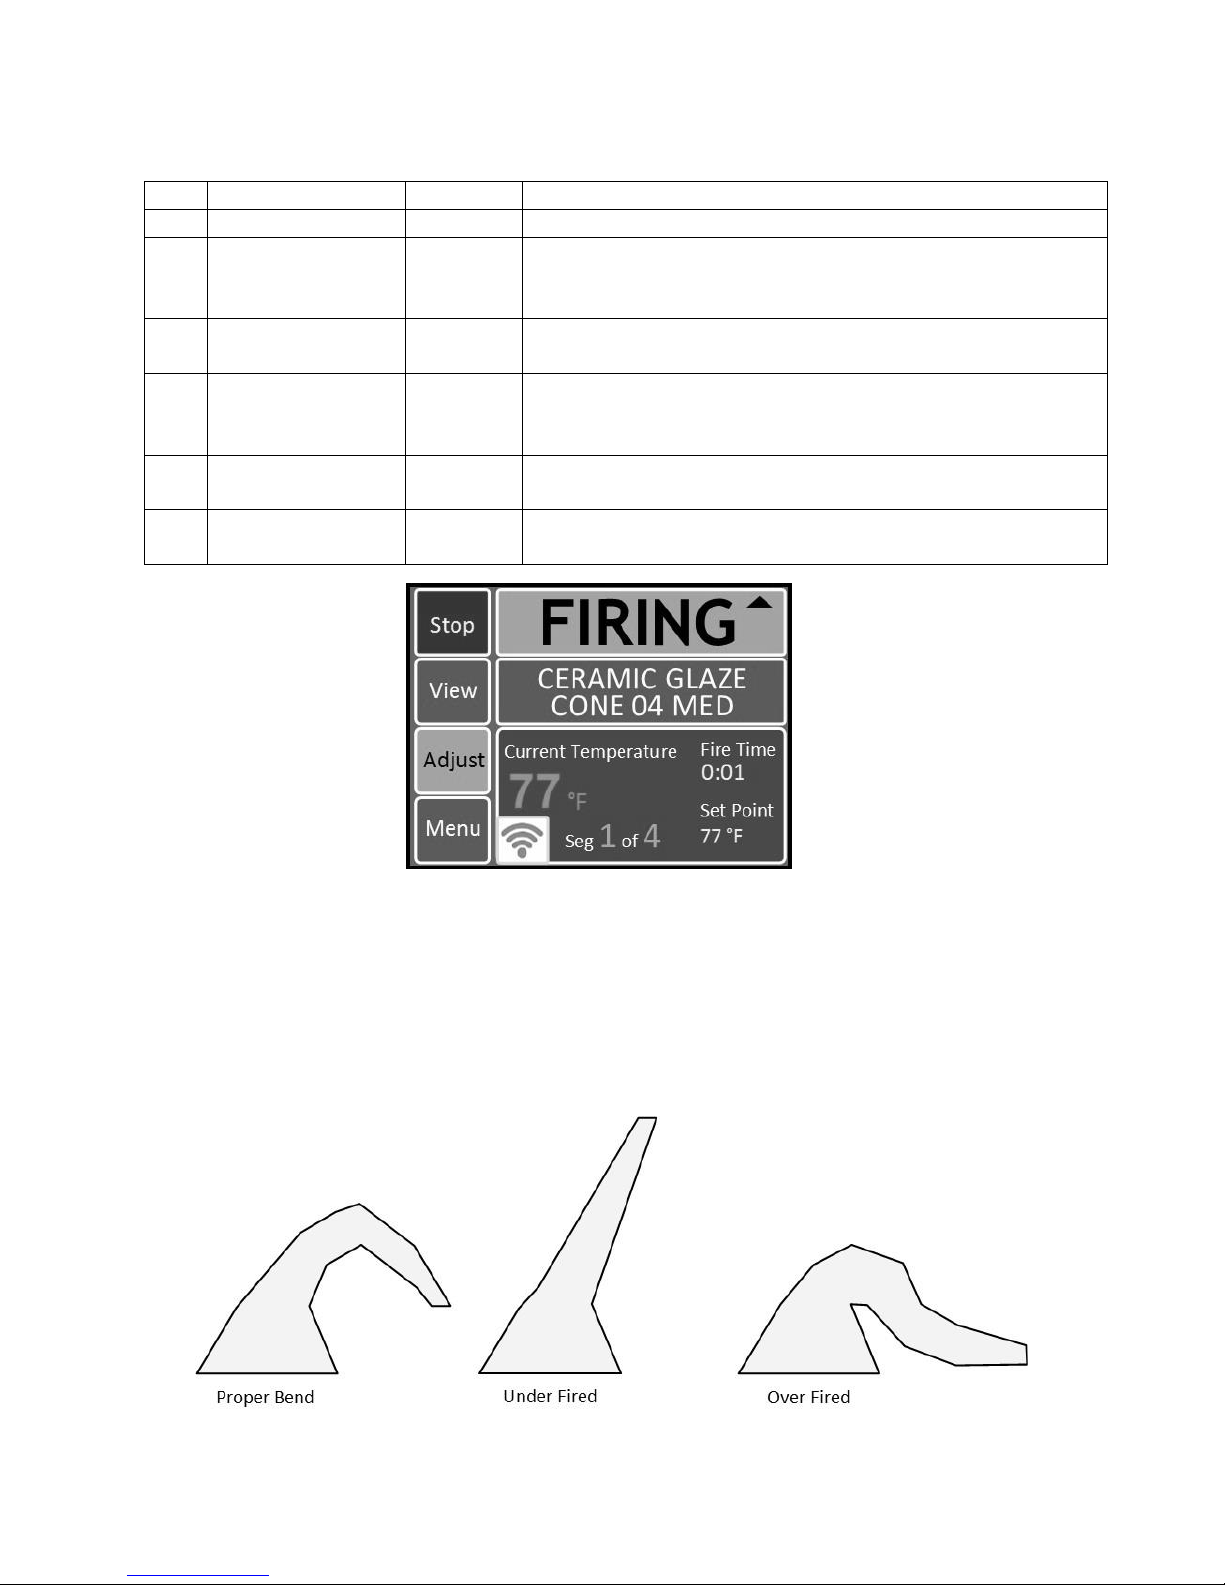
Review the Results
A properly bent cone indicates that the kiln is functioning properly and accurately. The tip of the
cone will be level with the top of the cone’s base when fired properly. The diagram below will give you
an idea of a properly fired, under fired, and over fired cone. Some variations from a proper bend is
expected and can be compensated for with the cone offset adjustment for each particular cone number
based on test firings.
Figure 3: Sample firing screen. For more information about a firing in progress, see Adjustments During A Firing
on Page 15.
Figure 4: Samples of a properly fired, under fired, and over fired cone.
7
Ceramics Programming (Bisc or Glaze)
Programming in Novice mode is the easiest method to program the controller to fire ceramics.
Programming consists of choosing a cone number, firing speed, and a preheat time. The firing speed is
chosen by the type of firing and thickness of the clay used. All 4 speeds below will calculate the firing
rate at the end of a firing and adjust the final temperature for correct heat-work.
Ceramics Programming – Novice Mode ON:
Step
Display Shows
Key Press
What This Selection Means
1
Home Screen
Load
You’re ready to load a different program into the controller
memory.
2
What are you
firing?
Ceramics
Choose from Ceramics, Glass, and Other. Choose Ceramics
for a bisc or glaze firing.
3
Cone Number
XX
Temperature
XXXX
Next
Use the scroll bar to choose the desired cone number for the
firing. Remember, cone numbers starting with a 0 are a
lower temperature than cone numbers not starting with a 0.
For example, don’t mistake a cone 6 for a cone 06!
4
What speed?
Choose the firing speed either Fast, Medium, MedSlo, or
Slow.
Fast
Fast is the fastest firing speed and is used for glaze firings on
thin ware, china paint firings, and decal firings. Firing times
range from 4 to 5 hours.
Or
Medium
Medium is used for firing glaze on thicker ware or for bisque
firing very thin ware. Typical firing time is 6-8 hours
depending on the cone number.
Or
MedSlo
MedSlo is used to bisque medium pieces or thinner ware
that requires less time for water smoking and carbon burn-
out. Typical firing time is 9-11 hours, depending on cone
number.
Or
Slow
Slow is used to bisc thicker, hand thrown ware. The slow
speed gives extra time for release of water and carbon burn-
out. Typical firing times range from 13-17 hours depending
on the cone number. Hand built pieces may need a preheat
stage.
5
Preheat Time?
Choose the preheat time, either None, 4 Hr, 8 Hr, or 12 Hr.
None
No preheat time is needed when the pieces are a thin, bone
dry bisc or glaze.
Or
4 Hr
Use a 4 hour preheat time for thicker, slightly wet pieces.
Or
8 Hr
Use an 8 hour preheat time for thick, wet pieces.
Or
12 Hr
Use a 12 hour preheat time for hand built, kids pieces.
6
Program Loaded:
OK
Return to Home Screen at IDLE.
8
Ceramics Programming - Novice Mode Off:
Step
Display Shows
Key Press
What This Selection Means
1
Home Screen
Load
You’re ready to load a different program into the controller
memory.
2
Load Program
Choose between 1-Bisc, 2-Glaze, 3-Glass, or 4-Custom
1-Bisc
The default bisc program will be loaded to the controller.
Any saved changes made to the bisc program will overwrite
the default program.
Or
2-Glaze
The default glaze program will be loaded to the controller.
Any saved changes made to the glaze program will overwrite
the default program.
3
Program Loaded:
OK
Returns to Home Screen. To make changes to the loaded
program, go into the edit menu.
4
Home Screen
Edit
Displays the current settings for the firing. To change the
settings, press the setting to be changed and select the new
setting. For example: To change the preheat time, press
Preheat Time, type in the new preheat time, and press str.
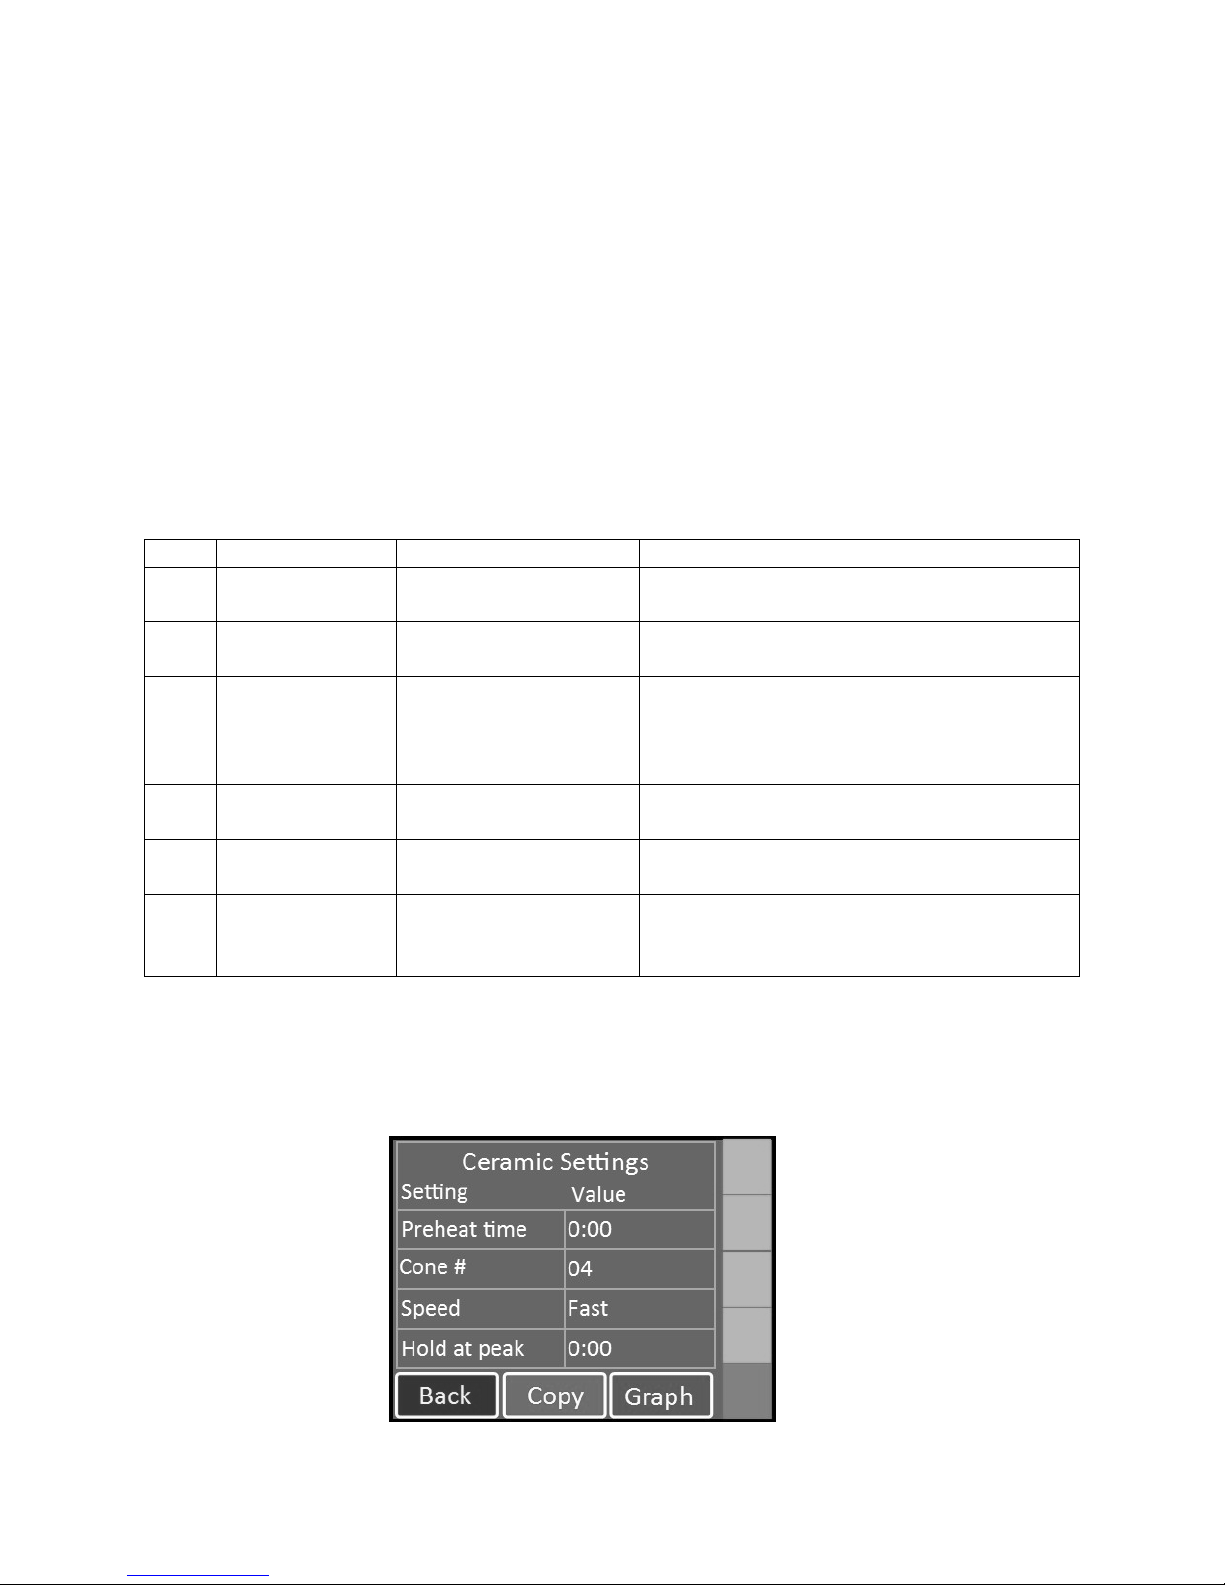
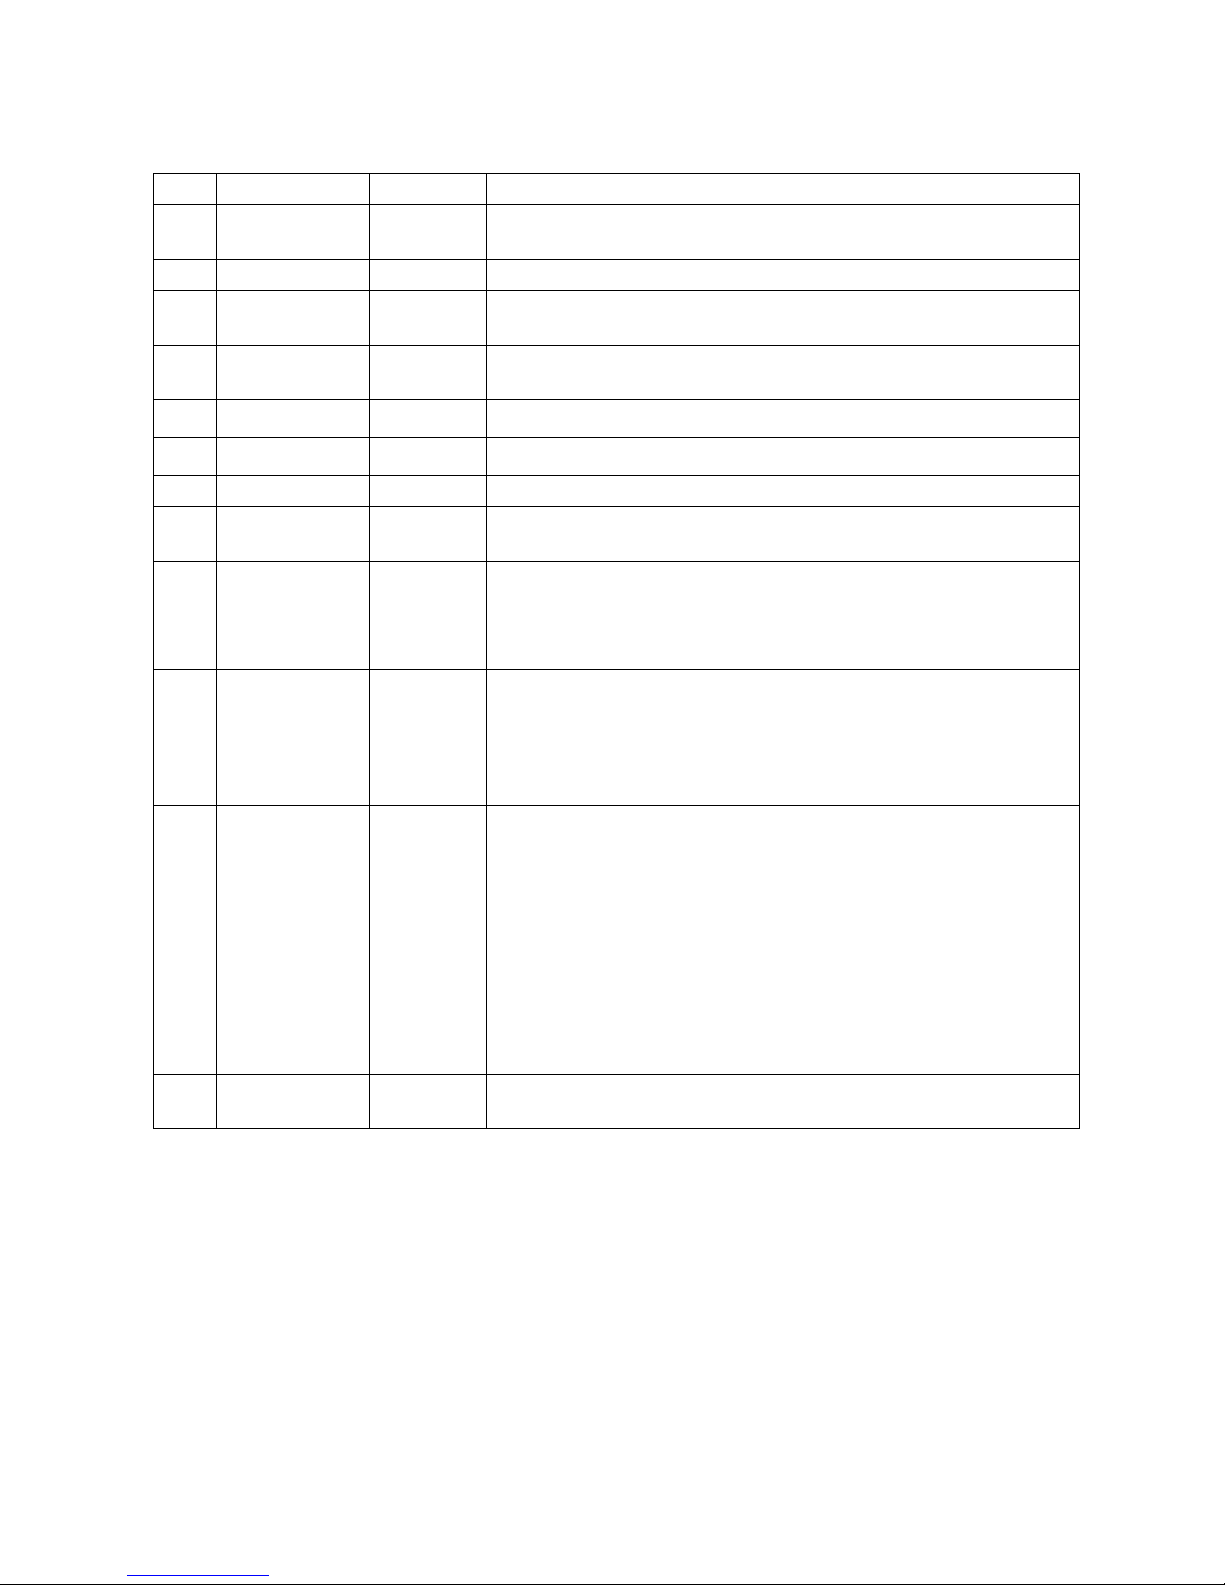
5
Ceramics Settings
Preheat Time
Cone #
Speed
Hold at Peak
Cooling
Back
Returns to Home Screen at IDLE.
Press Preheat time
to change value.
Min: 0:00
Max: 24:00
Press Cone # to
change the value.
Min: Cone 022
Max: Cone 12
Press Speed to
change the value.
Options: Fast,
Medium, MedSlo,
and Slow
Press Hold at Peak
to change value.
Min: 0:00
Max: 24:00
Press to graph and see a
table of the loaded program.
Includes time, temperature,
and segments.
Press BACK to
return to the
Home Screen
Press Copy to copy the loaded program
to one of the custom user programs.
The list of user programs will appear
when Copy is pressed.
Figure 5: Ceramics programming sample.

9
Note: When a preheat is selected, the temperature ramps up at 60°F/hour (33°C/hr) to 200°F (93°C) for
the amount of time programmed.
When the copy function is used and Copy is selected, the controller will return to the IDLE screen. The
loaded program will become the copied program in its new user location.
Notes for Cooling (Not Pictured): Scroll down to select Cooling. Cooling is set to Off unless changed by
the user. With cooling turned on, it adds 2 segments on to the end of the firing. The first segment cools
the kiln from the top temperature down to 1900°F at a rate of 9999 (As fast as possible). The 2nd and
final segment cools the kiln from 1900°F down to 1500°F at a rate of 150°F per hour.
Glass Programming
Programming in Novice mode is the easiest method to program the controller for glass firings.
Programming consists of choosing the type of firing, firing speed, and COE (Coefficient of Expansion).
The firing speed is chosen by the size of the glass being fired.
Glass Programming – Novice Mode ON:
Step
Display Shows
Key Press
What This Selection Means
1
Home Screen
Load
You’re ready to load a different program into the controller
memory.
2
What are you
firing?
Glass
Choose from Ceramics, Glass, and Other. Choose Glass for
slumping, fusing, or casting glass.
3
What type of
firing?
Choose the type of firing, either Slump, Tac Fuse, Full Fuse, or
Cast.
Slump
Slump is used for firing glass pieces that you want to conform
to a mold.
Tac Fuse
Tac Fuse is used for fusing glass that result in softened edges
Full Fuse
Full Fuse is used for fusing glass that result in soft, round edges
Cast
Cast is used for melting glass pieces together.
4
What speed?
Choose the firing speed, either Fast, Medium, MedSlo, or Slow.
Fast
Fast is the fastest firing speed and is used for glass pieces that
are either under 2in. x 2in. or very thin
Medium
Medium is used for glass pieces that are under 4in. x 4in. or
very thick.
MedSlo
MedSlo is used for glass pieces that are under 8in. x 8 in. or 2 to
3 layers thick.
Slow
Slow is the slowest firing speed and is used for glass pieces that
are over 8in. x 8in. or multiple sheets thick.
5
Program
Loaded:
OK
Return to Home Screen at IDLE.
10
Glass Programming – Novice Mode OFF:
Step
Display Shows
Key Press
What This Selection Means
1
Home Screen
Load
You’re ready to load a different program into the controller
memory.
2
Load Program
3-Glass
Choose between 1-Bisc, 2-Glaze, 3-Glass, or 4-Custom
3
Glass
Choose the type of glass firing, either Slump, Tac Fuse, Full
Fuse, or Cast.
Slump
Slump is used for firing glass pieces that you want to conform
to a mold.
Tac Fuse
Tac Fuse is used for fusing glass that result in softened edges
Full Fuse
Full Fuse is used for fusing glass that result in soft, round edges
Cast
Cast is used for melting glass pieces together.
4
Program
Loaded:
OK
Returns to Home Screen. To make changes to the loaded
program, go into the edit menu.
5
Home Screen
Edit
Displays the current settings for the firing. To change the
settings, press the setting to be changed and select the new
setting. For example: To change the speed, press Speed, select
the desired speed, and press Save.
6
Glass Settings
Temperature
Hold Time
Speed
Glass COE
Graph
Press to graph the currently loaded program.
7
Graph
Table
Press TABLE to view and edit each individual segment of the
firing. Use the scroll bar at the right side of the screen to view
each segment in the loaded program. Displays the current
settings for each segment of the firing (rate, temperature, and
hold time for each segment). To change the settings, press the
setting to be changed and select the new setting. For example:
To change the rate for Segment 1, press the temperature listed
under Segment 1’s rate, type in the new temperature, and
press Save. Any saved changes made to the Custom user
program will overwrite the default program.
8 Back
Returns to Home Screen at IDLE.
Custom Programming
The default custom programs are listed in Appendix C: Custom Firing Default Programs. The
Genesis has 30 Custom user programs to store and reuse. User programs 1-12 have 32 segments each,
while 13-30 have 8 segments each. Each segment has a firing rate, a soak temperature and a hold time.
Custom programs can only be edited with Novice Mode set to OFF. See page 19 for more information.
 Loading...