

4x30 IR, Multi-Rail Electro Sight
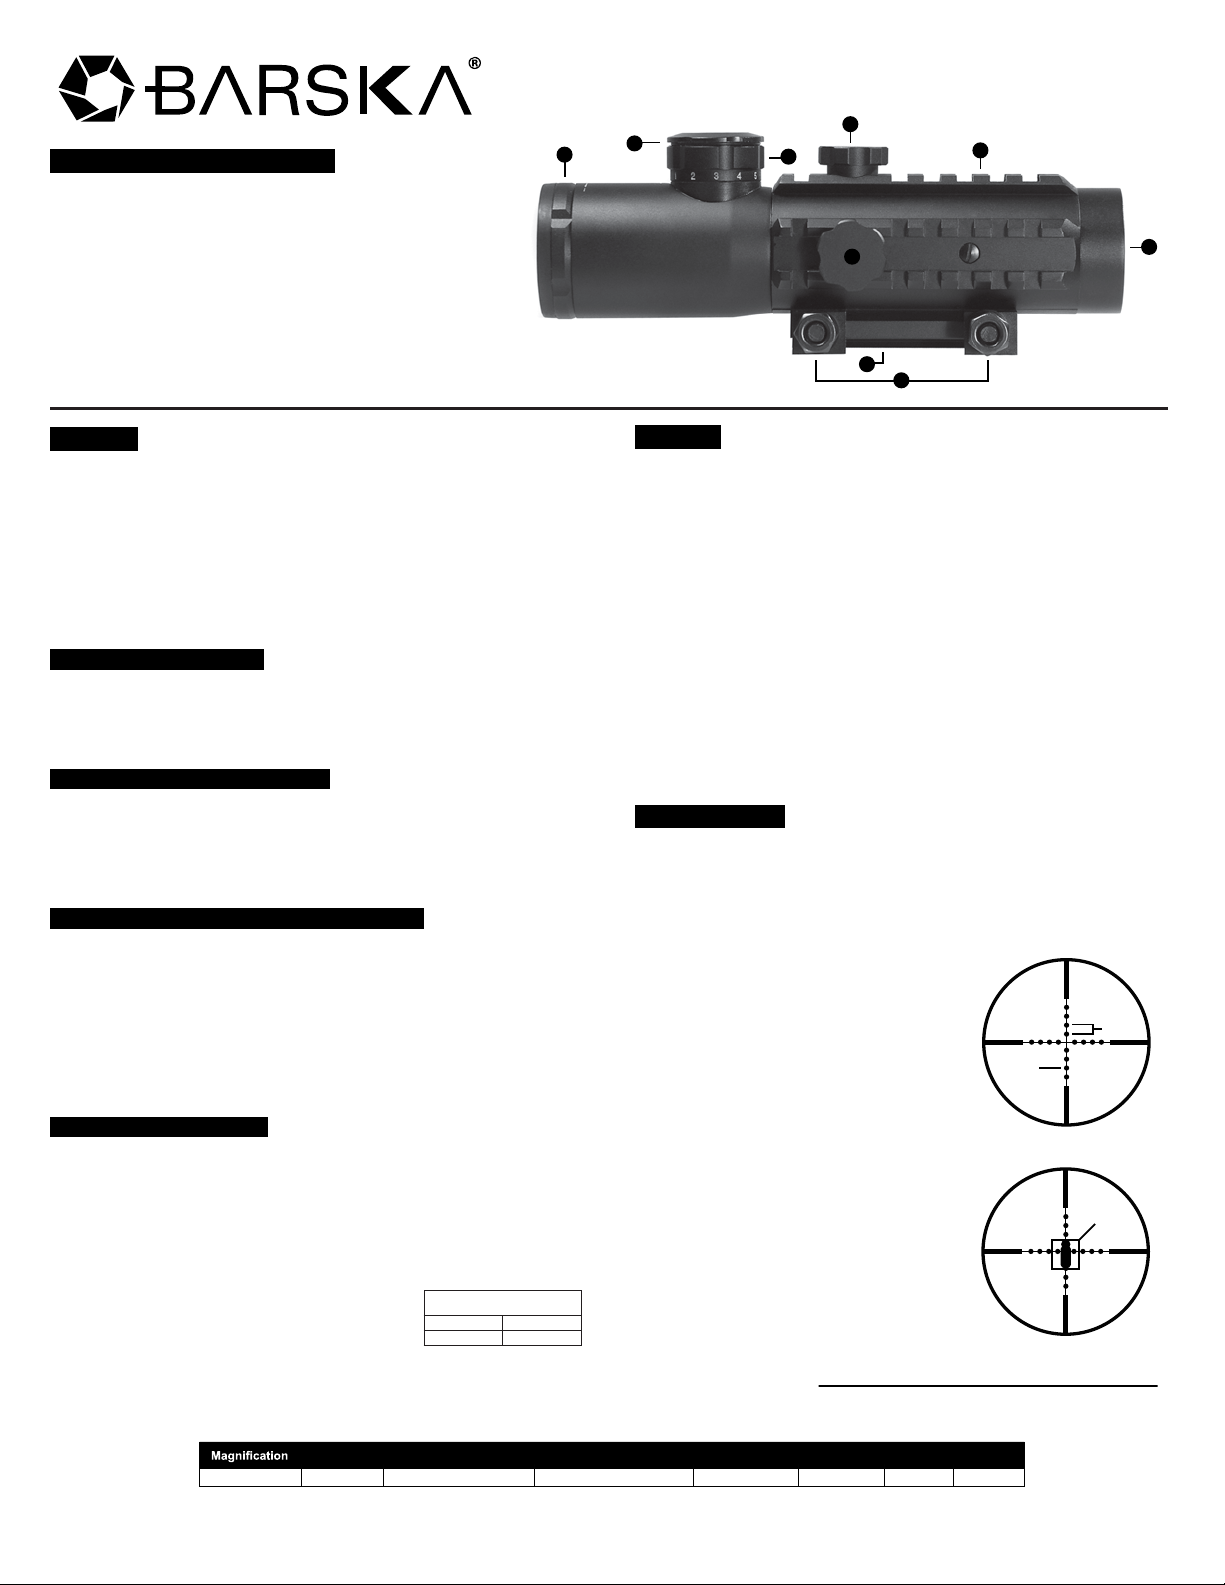
Parts of the Multi-Rail Electro Sight
1
1. Fast Focus Eyebell
2. Battery Compartment
3. Rheostat Knob with 5-position settings for each color
4. Elevation Adjustment Cap
5. Windage Adjustment Cap
6. Weaver Picatinny Mounting Base
7. Locking Nuts
8. Integrated Weaver Picatinny Rails
9. Objective Lens
CAUTION:
1. BE SURE THAT THE FIREARM IS NOT LOADED. PRACTICE SAFE
FIREARM HANDLING PROCEDURES AT ALL TIMES.
2. ALL DISCHARGING OF FIREARMS SHOULD BE DONE AT AN
APPROVED RANGE OR EQUALLY SAFE AREA. USE OF EYE AND
EAR PROTECTION IS RECOMMENDED.
3. DIRECT VIEWING OF THE SUN CAN CAUSE PERMANENT EYE
DAMAGE. DO NOT ATTEMPT TO VIEW THE SUN DIRECTLY WITH
EITHER THIS PRODUCT OR THE NAKED EYE.
INSTALLING THE BATTERY
To install batteries, unscrew the Battery Compartment (2) and insert the
one CR2032 3V Lithium battery positive ("+") side up. Replace the battery
cover. If the reticle dims or does not illuminate at all, replace the batteries.
Only use one CR2032 3V Lithium Battery.
MOUNTING YOUR ELECTRO SIGHT
Position the electro sight so that the Objective Lens (9) is facing in the
same direction as the muzzle of the firearm. Loosen each of the Locking
Nuts (7). Align the integrated Weaver Picatinny Mounting Base (6) of the
electro sight onto the rail of your firearm, and slide electro sight into place.
Tighten each of the Locking Nuts (7).
MOUNTING ADDITIONAL AIMING ACCESSORIES
The electro sight features integrated Weaver Picatinny Rails which allow
you to customize your scope with additional aiming accessories. Easily
attach and use in combination with laser sight, flashlight and or secondary
sight (not included).
Align the grooves of your additional aiming accessory (not included) to the
grooves on the integrated Weaver Picatinny Rail (8) of the electro sight
and securely mount additional aiming accessory to the integrated Weaver
Picatinny Rail (8) of the electro sight.
WINDAGE AND ELEVATION
You can find the windage on the right side of the sight. This adjusts the
horizontal axis of the sight. The elevation is located on the top of the sight.
This adjusts the vertical axis of the sight.
To access the windage and elevation turrets, remove the caps that cover
the turrets (4 and 5). Turn counter clockwise to loosen the caps. Once the
turrets are exposed, use a small coin to turn the turrets.
Windage
Turn the turret counter clockwise to raise the
reticle. Turn the turret clockwise to lower the reticle.
WINDAGE / ELEVATION
(inches per click or movement)
50yds 100yds
1/4 inch
1/2 inch
Elevation
Turn the turret counter clockwise to make the reticle move to the right.
Turn the turret clockwise to make the reticle move to the left.
2
3
8
5
6
7
ZEROING
Remove the windage and elevation adjustment caps (4 and 5) from the
scope.
With the scope mounted, rest the gun on a solid support. Sight along the
barrel and aim at a target 50 to 100 yards away. Sight through your
electro sight. Using a small coin turn the adjustment dial(s) in either
direction to align the reticle with the target as seen along the barrel.
Reattach the adjustment caps and tighten securely to help moisture
stay out.
NOTE: Each click of adjustment changes bullet strike at a shooting
distance of 100 yards by the amount indicated by the following
formula: Divide the distance (number of yards) by 100. The resulting
number, when multiplied by the click value (1/2), will yield the actual click
value of the scope at the shooting distance.
FORMULA: Distance / 100 = N
N x Stated Click Value = Actual Click Value
MIL-DOT RETICLE
The electro sight is equipped with a dual color illuminated red and green
Mil-Dot Reticle. With the battery properly in place, turn the Rheostat Knob
(3) clockwise to activate the illuminated green reticle and counter
clockwise at activate the illuminated red reticle. The lower numbers
represent dimmer settings and the higher numbers represent brighter
settings of illumination. The "0" position indicated that the unit is OFF. If
your reticle isn’t sharp, turn the Fast Focus
Eyebell (1) in either direction until the reticle
appears in sharp focus.
4
What is a Mil-Dot?
The dots in the reticle are known as
Mil-Dots. Mils are the increments measured
Mil-Dot
Mil
between the centers of a Mil-Dot
Distance Between You And Your Target
1 Mil equals 10.8 inches @100yds. this can
vary. Let’s say that a 6ft target covers 4 mils
in your reticle. Convert your target to yards,
now you have 2yds. Now multiply your
2yds. by 1000. Now you have 2000yds.
Target
Now divide 2000yds. by the number of mils
that covers the target (4). You’re left with
500yds, that is the distance between you
and the Target. (see the figure to the Right)
Below is the formula for calculating the
distance between you and the target.
Distance to Target =
Height of Target (yards) x 1000 = Range (yards)
Height Of Target (Mils)
9
Objective
4x 30 Green & Red IR Mil-Dot 24.1/8.05 7.4 3.93 16 7
1/11 BC178
Lens (mm)
Reticle
©2011 BARSKA
®
| La Verne, CA 91750 | w ww.b a r sk a . co m
Field of View
(ft@100yds/m@100m)
Exit
Pupil (mm)
Eye Relief
(inch)
Weight
(oz.)
Length
(inch)
 Loading...