


Congratulations, you are the proud owner of the finest Production crossbow in the world!
Please follow all safety, assembly and trouble shooting instructions contained in the manual. It is extremely important to read and follow the instructions before attempting to use your crossbow. Serious injuries to yourself or others, damage to your crossbow or poor performance from your crossbow could result from failure to thoroughly read and understand these instructions. If any part of this manual is unclear to you contact the service department at 800-237-4507. After assembly of your crossbow, please keep manual for future reference.
As with any other high performance equipment, meticulous care and a regular maintenance schedule must be maintained.
Manual Contents
Specifications |
3 |
Parts Checklist |
3 |
Safety Guidelines |
4 |
Crossbow Breakdown |
5 |
Parts Picture |
5 |
Assembly |
|
Custom Fitting |
6-8 |
Crossbow Operation |
8-11 |
Troubleshooting |
12-13 |
Care and Maintenance |
14 |
Warranty |
15 |
Warranty Registration |
Back Cover |
|
|
2

Specifications |
|
|
|
Feet per Second |
345 |
Power Stroke |
15.5” |
Draw Weight |
150 lbs |
Physical Weight |
7.7 lbs |
Width |
27” |
Length |
37.5” |
String Length |
39 5/8” |
Number of Strands |
24 |
String Stock Number |
16200 |
|
|
Parts List
Before beginning to assemble your crossbow, take a moment to organize these parts and ensure you have everything you need.
If you are missing any of the below parts, contact the Barnett Sales Department at 1-800-237-4507.
1* Front Sight Bracket
2* Brass Sight Pints w/ Nut, Washer &Barrel
2* Front Sight Bracket Screws
1* Rear Peep Sight
1 Hex Keys 5/32, 3/16, 3/32
1Lubewax
*ITEMS ARE NOT INCLUDED WHEN BOW IS PURCHASED AS A PACKAGE WITH SCOPE.
3

Safety Guidelines
The Revolution AVi is equipped with an automatic, ambidextrous safety, which engages every time the crossbow is cocked. The safety must be released before each shot. This, as with any other mechanical device, does not guarantee total safety, as no safety device is a substitute for common sense and safe handling. The crossbow trigger is only to be pulled when the safety is in “fire” position and NEVER when it is in the “safe”
position or anywhere between “safe” and “fire.” Do not attempt to alter or modify the safety or the trigger mechanism.
The following rules should be followed at all times:
EXTREME CAUTION SHOULD BE USED AT ALL TIMES WHEN HANDLING A CROSSBOW. FAILURE TO FOLLOW THESE RULES COULD RESULT IN SERIOUS INJURY OR DEATH.
•Always keep your fingers below the flight track and out of the path of cables and strings when firing the crossbow. The velocity of the string striking your fingers as the string travels forward could cause severe personal injury.
•Never dry-fire the crossbow (shooting without an arrow or too light of an arrow). Dry firing will void the warranty and can
result in damage to the limb assembly and possibly cause personal injury.
•Never fire the crossbow until you are sure of your target.
•Always use an adequate target and backstop when target shooting.
•Always use suitable crossbow arrows, such as Barnett’s 22” Carbon Arrows with half moon nocks made by BARNETT for the Revolution AVi. Arrows of improper stiffness or mass weight
may damage the limb and cable assembly, voiding the warranty and possibly cause personal injury.
•Always inspect the crossbow and arrows before firing. Bent or damaged arrows are not safe to fire and should be discarded or repaired.
4
Crossbow Breakdown
4 |
3 |
1 |
2 |
|
|
6
7
9
5
810
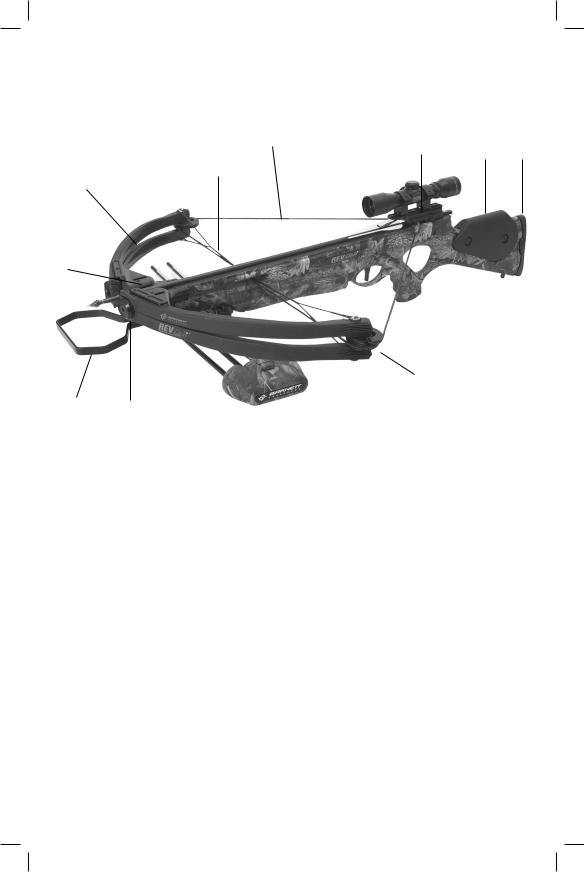
1.Adjustable Cheek Piece
2.Adjustable Rear Stock
3.Scope Mount
4.String
5.Cams
6.Cables
7.AVi Limbs
8.Foot Stirrup
9.AVi Limb Retainer, Bezel, and Limb Bolt
10.Limb Button
11.Front Sight Bracket with hardware (Not Shown. Not included if package with scope is purchased.)
12.Peep Sight (Not Shown. Not included if package with scope is purchased.)
5
Assembly Guide
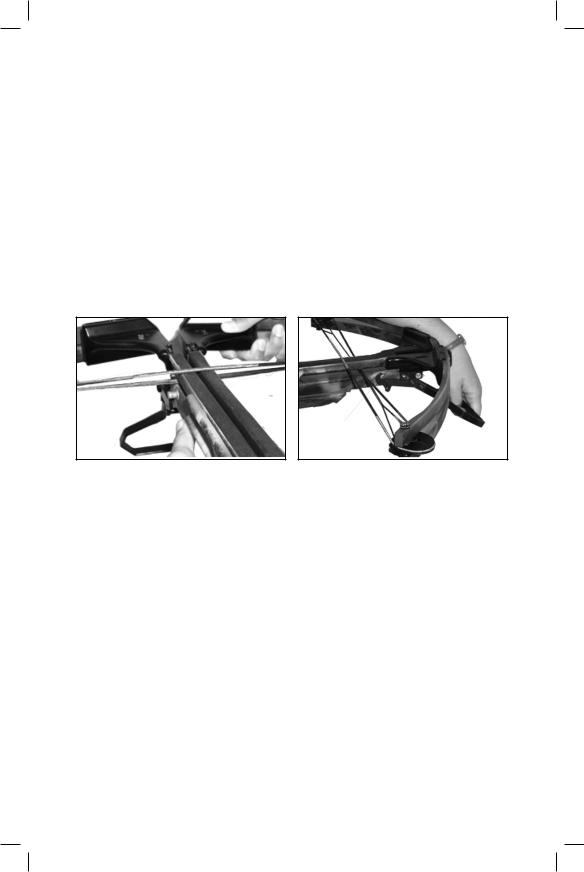
Attaching Prod Housing to Stock
•Place bowstring on top of the flight track . Place cables under front edge of flight track and push prod until it seats securely over pins. See Figure 1 (See warnig below)
•Turn bow over and engage prod, locking hooks over locking pin on the side of the flight track.
•The latch unlock switch will click into place over the foot stirrup crossbar and prevent the foot stirrup from unlatching. See
Figure 2
Fig 1 |
Fig 2 |
NOTE: This procedure should require some strength to ensure the prod housing locks onto the flight track firmly. If the latch mechanism feels loose or too easy to latch STOP and call the service department immediately. 800-237-4507.
•Double check to see that the prod housing is securely seated on flight track and the foot stirrup is securely locked down by the latch unlock switch.
WARNING:
•When installing the Revolution AVi prod housing onto the gun body, the prod housing will angle upward as shown in Figure 3. You must push the prod housing downward so it sits flat on the nose of the gun body as shown in Figure 4.
•Do not engage the foot claw when the prod housing is at the
6
 Loading...