


User Guide
Version 1.5

Barnes & Noble, Inc. 122 Fifth Avenue, New York, NY 10011 USA.
© 2009-2010 Barnes & Noble, Inc. All rights reserved. NOOK and the NOOK logo are
trademarks of Barnes & Noble, Inc. or its aliates. Patent pending.
Screenshots and product images are simulated and for instructional purposes only. They may dier
from the actual product and are subject to change without notice. Your use of the NOOK is subject
to the NOOK Terms of Service in “NOOK™ Terms of Service” on page 185. The Terms of service
can also be found here:
www.nook.com/legal
For warranty information, see “One Year Limited Warranty” on page 205.
Customer Service
You can reach Customer Service for your NOOK by sending an email to nook@barnesandnoble.com, or
at these telephone numbers:
• Within the United States: 1-800-THE-BOOK (1-800-843-2665)
• Outside the United States: 1-201-438-1834
How to Use this Guide
This NOOK User Guide documents all features of your NOOK. It is available as an eBook in the
My Documents section of your NOOK Library. It is also available for download from the support
section of the NOOK website in PDF format:
www.nook.com/support
If you want a printed copy of the User Guide, you can print the PDF on your own printer from
Adobe Acrobat Reader.
Quick Start Guide
The Quick Start Guide covers the basics needed to get you started. It is printed and in the package
with your NOOK, as well as at the above website.
Tour
Get the most out of your NOOK. The NOOK Tour takes you on a tour of your NOOK’s key
features. We highly recommend that you take the tour during the welcome process when you first
turn on your NOOK. The NOOK Tour is also in the My Documents section of your Library and at
the above website.
NOOK User Guide 2

Using this Guide
To find specific information in this guide, you can use the table of contents or search the guide. In
the EPUB version, tap Go to > Chapter on the touchscreen to go to a chapter. To search the User
Guide for a specific word or phrase, tap Find, type the word or phrase, and then tap Submit.
The User Guide on your NOOK is an eBook, so you can try out NOOK features like bookmarks and
notes using the User Guide.
Conventions
Following are conventions used in the User Guide:
This is a caution. Cautions contain important information, for example about safety and
the loss of data.
This is a note. Notes contain helpful information that we highlight to draw your attention
to it.
Menu choices on the touchscreen are shown in gray type, with greater than signs indicating
successive choices. For example: Tap Bookmarks > Go to bookmark.
Guide Updates
If needed, new versions of the User Guide and Tour will be automatically downloaded to the My
Documents section of your library through software updates.
Guide updates are also posted on the support section of the NOOK website:
www.nook.com/support
More Information Online
More information is available online:
• FAQs
• Video tutorials
This information is available on the Support website:
www.nook.com/support
Guide Revision 1.5.0.1
NOOK User Guide 3

Contents
Customer Service . . . . . . . . . . . . . . . . . . . . . . . . . . . . . . . . . . . . . . . . . . . . . . . . . . . . . . . . . . . . . . 2
How to Use this Guide . . . . . . . . . . . . . . . . . . . . . . . . . . . . . . . . . . . . . . . . . . . . . . . . . . . . . . . . . . 2
More Information Online . . . . . . . . . . . . . . . . . . . . . . . . . . . . . . . . . . . . . . . . . . . . . . . . . . . . . . . . 3
Getting Started . . . . . . . . . . . . . . . . . . . . . . . . . . . . . . . . . . . . . . . . . . . . . . . 10
In the Package . . . . . . . . . . . . . . . . . . . . . . . . . . . . . . . . . . . . . . . . . . . . . . . . . . . . . . . . . . . . . . . . 10
Charge your NOOK . . . . . . . . . . . . . . . . . . . . . . . . . . . . . . . . . . . . . . . . . . . . . . . . . . . . . . . . . . . . . . . . . . . 11
Learn the Controls . . . . . . . . . . . . . . . . . . . . . . . . . . . . . . . . . . . . . . . . . . . . . . . . . . . . . . . . . . . . 11
Register your NOOK . . . . . . . . . . . . . . . . . . . . . . . . . . . . . . . . . . . . . . . . . . . . . . . . . . . . . . . . . . . . . . . . . . 13
Explore. . . . . . . . . . . . . . . . . . . . . . . . . . . . . . . . . . . . . . . . . . . . . . . . . . . . . . . . . . . . . . . . . . . . . . 13
Power and Charging . . . . . . . . . . . . . . . . . . . . . . . . . . . . . . . . . . . . . . . . . . . . 15
Device States . . . . . . . . . . . . . . . . . . . . . . . . . . . . . . . . . . . . . . . . . . . . . . . . . . . . . . . . . . . . . . . . . 15
Power Button . . . . . . . . . . . . . . . . . . . . . . . . . . . . . . . . . . . . . . . . . . . . . . . . . . . . . . . . . . . . . . . . . 16
Power Management . . . . . . . . . . . . . . . . . . . . . . . . . . . . . . . . . . . . . . . . . . . . . . . . . . . . . . . . . . . . 17
Low Charge Alerts . . . . . . . . . . . . . . . . . . . . . . . . . . . . . . . . . . . . . . . . . . . . . . . . . . . . . . . . . . . . 17
Battery Charge and Charging Indicators . . . . . . . . . . . . . . . . . . . . . . . . . . . . . . . . . . . . . . . . . . . . 18
Charging your NOOK . . . . . . . . . . . . . . . . . . . . . . . . . . . . . . . . . . . . . . . . . . . . . . . . . . . . . . . . . . . . . . . . . 19
Wall Charging . . . . . . . . . . . . . . . . . . . . . . . . . . . . . . . . . . . . . . . . . . . . . . . . . . . . . . . . . . . . . . . . 20
USB Charging . . . . . . . . . . . . . . . . . . . . . . . . . . . . . . . . . . . . . . . . . . . . . . . . . . . . . . . . . . . . . . . . . 20
Charging Recommendations . . . . . . . . . . . . . . . . . . . . . . . . . . . . . . . . . . . . . . . . . . . . . . . . . . . . . 22
Hard Reset . . . . . . . . . . . . . . . . . . . . . . . . . . . . . . . . . . . . . . . . . . . . . . . . . . . . . . . . . . . . . . . . . . . 22
Your NOOK . . . . . . . . . . . . . . . . . . . . . . . . . . . . . . . . . . . . . . . . . . . . . . . . . . . . . . . . . 24
Hardware Highlights . . . . . . . . . . . . . . . . . . . . . . . . . . . . . . . . . . . . . . . . . . . . . . . . . . . . . . . . . . . 24
NOOK Models . . . . . . . . . . . . . . . . . . . . . . . . . . . . . . . . . . . . . . . . . . . . . . . . . . . . . . . . . . . . . . . 25
Feature Highlights . . . . . . . . . . . . . . . . . . . . . . . . . . . . . . . . . . . . . . . . . . . . . . . . . . . . . . . . . . . . . 25
Home Menu . . . . . . . . . . . . . . . . . . . . . . . . . . . . . . . . . . . . . . . . . . . . . . . . . . . . . . . . . . . . . . . . . . 27
Home Screen . . . . . . . . . . . . . . . . . . . . . . . . . . . . . . . . . . . . . . . . . . . . . . . . . . . . . . . . . . . . . . . . . 28
Back Cover . . . . . . . . . . . . . . . . . . . . . . . . . . . . . . . . . . . . . . . . . . . . . . . . . . . . . . . . . . . . . . . . . . 28
SIM Card . . . . . . . . . . . . . . . . . . . . . . . . . . . . . . . . . . . . . . . . . . . . . . . . . . . . . . . . . . . . . . . . . . . . 31
Built-in Storage . . . . . . . . . . . . . . . . . . . . . . . . . . . . . . . . . . . . . . . . . . . . . . . . . . . . . . . . . . . . . . . 32
Battery . . . . . . . . . . . . . . . . . . . . . . . . . . . . . . . . . . . . . . . . . . . . . . . . . . . . . . . . . . . . . . . . . . . . . . 32
Optional Accessories . . . . . . . . . . . . . . . . . . . . . . . . . . . . . . . . . . . . . . . . . . . . . . . . . . . . . . . . . . . 33
NOOK User Guide 4

International Use and Languages . . . . . . . . . . . . . . . . . . . . . . . . . . . . . . . . . 35
Using your NOOK abroad . . . . . . . . . . . . . . . . . . . . . . . . . . . . . . . . . . . . . . . . . . . . . . . . . . . . . . . 35
Languages . . . . . . . . . . . . . . . . . . . . . . . . . . . . . . . . . . . . . . . . . . . . . . . . . . . . . . . . . . . . . . . . . . . . 36
Safety and Care . . . . . . . . . . . . . . . . . . . . . . . . . . . . . . . . . . . . . . . . . . . . . . . 37
Safety . . . . . . . . . . . . . . . . . . . . . . . . . . . . . . . . . . . . . . . . . . . . . . . . . . . . . . . . . . . . . . . . . . . . . . . 37
Use on Airplanes . . . . . . . . . . . . . . . . . . . . . . . . . . . . . . . . . . . . . . . . . . . . . . . . . . . . . . . . . . . . . 38
Caring for Your NOOK . . . . . . . . . . . . . . . . . . . . . . . . . . . . . . . . . . . . . . . . . . . . . . . . . . . . . . . . . . . . . . . . 39
Warranty Coverage and the B&N Protection Plan . . . . . . . . . . . . . . . . . . . . . . . . . . . . . . . . . . . . 41
Operating the Controls . . . . . . . . . . . . . . . . . . . . . . . . . . . . . . . . . . . . . . . . . 42
Home Button . . . . . . . . . . . . . . . . . . . . . . . . . . . . . . . . . . . . . . . . . . . . . . . . . . . . . . . . . . . . . . . . . 42
Turning Pages . . . . . . . . . . . . . . . . . . . . . . . . . . . . . . . . . . . . . . . . . . . . . . . . . . . . . . . . . . . . . . . . . 42
Page Indicators for Lists and Feeds . . . . . . . . . . . . . . . . . . . . . . . . . . . . . . . . . . . . . . . . . . . . . . . . 43
Color Touchscreen . . . . . . . . . . . . . . . . . . . . . . . . . . . . . . . . . . . . . . . . . . . . . . . . . . . . . . . . . . . . 44
Gestures . . . . . . . . . . . . . . . . . . . . . . . . . . . . . . . . . . . . . . . . . . . . . . . . . . . . . . . . . . . . . . . . . . . . 44
Menus . . . . . . . . . . . . . . . . . . . . . . . . . . . . . . . . . . . . . . . . . . . . . . . . . . . . . . . . . . . . . . . . . . . . . . 46
Navigation on the Reading Screen . . . . . . . . . . . . . . . . . . . . . . . . . . . . . . . . . . . . . . . . . . . . . . . . 48
Form Navigation and Data Entry . . . . . . . . . . . . . . . . . . . . . . . . . . . . . . . . . . . . . . . . . . . . . . . . . 49
Keyboards and Typing . . . . . . . . . . . . . . . . . . . . . . . . . . . . . . . . . . . . . . . . . . . . . . . . . . . . . . . . . . 50
D-pad . . . . . . . . . . . . . . . . . . . . . . . . . . . . . . . . . . . . . . . . . . . . . . . . . . . . . . . . . . . . . . . . . . . . . . . 52
Browsing . . . . . . . . . . . . . . . . . . . . . . . . . . . . . . . . . . . . . . . . . . . . . . . . . . . . . . . . . . . . . . . . . . . . 52
Searching . . . . . . . . . . . . . . . . . . . . . . . . . . . . . . . . . . . . . . . . . . . . . . . . . . . . . . . . . . . . . . . . . . . . 52
Sorting Lists . . . . . . . . . . . . . . . . . . . . . . . . . . . . . . . . . . . . . . . . . . . . . . . . . . . . . . . . . . . . . . . . . . 53
Filtering Lists . . . . . . . . . . . . . . . . . . . . . . . . . . . . . . . . . . . . . . . . . . . . . . . . . . . . . . . . . . . . . . . . . 54
Viewing a Gallery of Covers . . . . . . . . . . . . . . . . . . . . . . . . . . . . . . . . . . . . . . . . . . . . . . . . . . . . . 54
Status Bar . . . . . . . . . . . . . . . . . . . . . . . . . . . . . . . . . . . . . . . . . . . . . . . . . . . . . . . . . . . . . . . . . . . . 54
Wireless Connectivity . . . . . . . . . . . . . . . . . . . . . . . . . . . . . . . . . . . . . . . . . . 57
Wi-Fi . . . . . . . . . . . . . . . . . . . . . . . . . . . . . . . . . . . . . . . . . . . . . . . . . . . . . . . . . . . . . . . . . . . . . . . 58
B&N Fast & Free Wireless . . . . . . . . . . . . . . . . . . . . . . . . . . . . . . . . . . . . . . . . . . . . . . . . . . . . . . 62
Dropped Connections and Lost Wi-Fi Connectivity . . . . . . . . . . . . . . . . . . . . . . . . . . . . . . . . . . 63
In Areas with No Wireless Connectivity . . . . . . . . . . . . . . . . . . . . . . . . . . . . . . . . . . . . . . . . . . . 63
Registering your NOOK . . . . . . . . . . . . . . . . . . . . . . . . . . . . . . . . . . . . . . . . . . . . . . 64
Account Creation . . . . . . . . . . . . . . . . . . . . . . . . . . . . . . . . . . . . . . . . . . . . . . . . . . . . . . . . . . . . . 64
Registration . . . . . . . . . . . . . . . . . . . . . . . . . . . . . . . . . . . . . . . . . . . . . . . . . . . . . . . . . . . . . . . . . . 64
Initial Library Synchronization and Downloads . . . . . . . . . . . . . . . . . . . . . . . . . . . . . . . . . . . . . . . 66
NOOK User Guide 5

An Unregistered NOOK . . . . . . . . . . . . . . . . . . . . . . . . . . . . . . . . . . . . . . . . . . . . . . . . . . . . . . . . . . . . . . . 66
Unregistering your NOOK . . . . . . . . . . . . . . . . . . . . . . . . . . . . . . . . . . . . . . . . . . . . . . . . . . . . . . . . . . . . . 67
Re-registering your NOOK . . . . . . . . . . . . . . . . . . . . . . . . . . . . . . . . . . . . . . . . . . . . . . . . . . . . . . . . . . . . . 68
Personalizing your NOOK . . . . . . . . . . . . . . . . . . . . . . . . . . . . . . . . . . . . . . . . . . . . 70
Wallpaper Images . . . . . . . . . . . . . . . . . . . . . . . . . . . . . . . . . . . . . . . . . . . . . . . . . . . . . . . . . . . . . 70
Screensaver Images . . . . . . . . . . . . . . . . . . . . . . . . . . . . . . . . . . . . . . . . . . . . . . . . . . . . . . . . . . . . 71
Reader Settings . . . . . . . . . . . . . . . . . . . . . . . . . . . . . . . . . . . . . . . . . . . . . . . . . . . . . . . . . . . . . . . 72
Settings . . . . . . . . . . . . . . . . . . . . . . . . . . . . . . . . . . . . . . . . . . . . . . . . . . . . . . . . . . . . . . . . . . . . . 72
The Daily . . . . . . . . . . . . . . . . . . . . . . . . . . . . . . . . . . . . . . . . . . . . . . . . . . . . 73
Message Types . . . . . . . . . . . . . . . . . . . . . . . . . . . . . . . . . . . . . . . . . . . . . . . . . . . . . . . . . . . . . . . . 73
Feeds . . . . . . . . . . . . . . . . . . . . . . . . . . . . . . . . . . . . . . . . . . . . . . . . . . . . . . . . . . . . . . . . . . . . . . . 73
Notifications . . . . . . . . . . . . . . . . . . . . . . . . . . . . . . . . . . . . . . . . . . . . . . . . . . . . . . . . . . . . . . . . . 74
Procedures for The Daily . . . . . . . . . . . . . . . . . . . . . . . . . . . . . . . . . . . . . . . . . . . . . . . . . . . . . . . 74
Shop . . . . . . . . . . . . . . . . . . . . . . . . . . . . . . . . . . . . . . . . . . . . . . . . . . . . . . . . 76
Shopfront . . . . . . . . . . . . . . . . . . . . . . . . . . . . . . . . . . . . . . . . . . . . . . . . . . . . . . . . . . . . . . . . . . . . 76
Magazines and Newspapers . . . . . . . . . . . . . . . . . . . . . . . . . . . . . . . . . . . . . . . . . . . . . . . . . . . . . 77
Indicators . . . . . . . . . . . . . . . . . . . . . . . . . . . . . . . . . . . . . . . . . . . . . . . . . . . . . . . . . . . . . . . . . . . . 77
Browsing the Shop . . . . . . . . . . . . . . . . . . . . . . . . . . . . . . . . . . . . . . . . . . . . . . . . . . . . . . . . . . . . . 77
Searching the Shop . . . . . . . . . . . . . . . . . . . . . . . . . . . . . . . . . . . . . . . . . . . . . . . . . . . . . . . . . . . . 78
Result Lists . . . . . . . . . . . . . . . . . . . . . . . . . . . . . . . . . . . . . . . . . . . . . . . . . . . . . . . . . . . . . . . . . . . 79
Browsing a Gallery of Covers . . . . . . . . . . . . . . . . . . . . . . . . . . . . . . . . . . . . . . . . . . . . . . . . . . . . 79
Viewing Item Details . . . . . . . . . . . . . . . . . . . . . . . . . . . . . . . . . . . . . . . . . . . . . . . . . . . . . . . . . . . 80
Password Protection for Purchases . . . . . . . . . . . . . . . . . . . . . . . . . . . . . . . . . . . . . . . . . . . . . . . . 80
Making Purchases . . . . . . . . . . . . . . . . . . . . . . . . . . . . . . . . . . . . . . . . . . . . . . . . . . . . . . . . . . . . . . 80
Payment . . . . . . . . . . . . . . . . . . . . . . . . . . . . . . . . . . . . . . . . . . . . . . . . . . . . . . . . . . . . . . . . . . . . . 81
Orders . . . . . . . . . . . . . . . . . . . . . . . . . . . . . . . . . . . . . . . . . . . . . . . . . . . . . . . . . . . . . . . . . . . . . . 82
Ordering from your NOOK . . . . . . . . . . . . . . . . . . . . . . . . . . . . . . . . . . . . . . . . . . . . . . . . . . . . . . . . . . . . 82
Content Delivery . . . . . . . . . . . . . . . . . . . . . . . . . . . . . . . . . . . . . . . . . . . . . . . . . . . . . . . . . . . . . . 84
eWish List . . . . . . . . . . . . . . . . . . . . . . . . . . . . . . . . . . . . . . . . . . . . . . . . . . . . . . . . . . . . . . . . . . . 85
In-Store Experience . . . . . . . . . . . . . . . . . . . . . . . . . . . . . . . . . . . . . . . . . . . . 87
Welcome . . . . . . . . . . . . . . . . . . . . . . . . . . . . . . . . . . . . . . . . . . . . . . . . . . . . . . . . . . . . . . . . . . . . 87
Shopfront . . . . . . . . . . . . . . . . . . . . . . . . . . . . . . . . . . . . . . . . . . . . . . . . . . . . . . . . . . . . . . . . . . . . 87
Read in Stores . . . . . . . . . . . . . . . . . . . . . . . . . . . . . . . . . . . . . . . . . . . . . . . . . . . . . . . . . . . . . . . . 88
NOOK User Guide 6

Library . . . . . . . . . . . . . . . . . . . . . . . . . . . . . . . . . . . . . . . . . . . . . . . . . . . . . . 90
My B&N Library . . . . . . . . . . . . . . . . . . . . . . . . . . . . . . . . . . . . . . . . . . . . . . . . . . . . . . . . . . . . . . 90
Reading Something . . . . . . . . . . . . . . . . . . . . . . . . . . . . . . . . . . . . . . . . . . . . . . . . . . . . . . . . . . . . 92
Library Synchronization . . . . . . . . . . . . . . . . . . . . . . . . . . . . . . . . . . . . . . . . . . . . . . . . . . . . . . . . . 92
Downloading Content . . . . . . . . . . . . . . . . . . . . . . . . . . . . . . . . . . . . . . . . . . . . . . . . . . . . . . . . . . 93
Organizing Your Library . . . . . . . . . . . . . . . . . . . . . . . . . . . . . . . . . . . . . . . . . . . . . . . . . . . . . . . . 95
Finding What You Want to Read in My B&N Library. . . . . . . . . . . . . . . . . . . . . . . . . . . . . . . . . . 99
Searching My B&N Library . . . . . . . . . . . . . . . . . . . . . . . . . . . . . . . . . . . . . . . . . . . . . . . . . . . . . 101
Browsing a Gallery of Covers . . . . . . . . . . . . . . . . . . . . . . . . . . . . . . . . . . . . . . . . . . . . . . . . . . . 102
Viewing Item Details for B&N Content . . . . . . . . . . . . . . . . . . . . . . . . . . . . . . . . . . . . . . . . . . . 103
Archiving B&N Digital Content . . . . . . . . . . . . . . . . . . . . . . . . . . . . . . . . . . . . . . . . . . . . . . . . . . 104
Managing Subscriptions . . . . . . . . . . . . . . . . . . . . . . . . . . . . . . . . . . . . . . . . . . . . . . . . . . . . . . . . 106
Managing Periodical Issues . . . . . . . . . . . . . . . . . . . . . . . . . . . . . . . . . . . . . . . . . . . . . . . . . . . . . . 106
Deleting B&N Content . . . . . . . . . . . . . . . . . . . . . . . . . . . . . . . . . . . . . . . . . . . . . . . . . . . . . . . . 109
My Documents . . . . . . . . . . . . . . . . . . . . . . . . . . . . . . . . . . . . . . . . . . . . . . . . . . . . . . . . . . . . . . 110
Adobe Digital Editions . . . . . . . . . . . . . . . . . . . . . . . . . . . . . . . . . . . . . . . . . . . . . . . . . . . . . . . . . 114
Reading . . . . . . . . . . . . . . . . . . . . . . . . . . . . . . . . . . . . . . . . . . . . . . . . . . . . . 115
Supported File Formats . . . . . . . . . . . . . . . . . . . . . . . . . . . . . . . . . . . . . . . . . . . . . . . . . . . . . . . . 115
Orientation . . . . . . . . . . . . . . . . . . . . . . . . . . . . . . . . . . . . . . . . . . . . . . . . . . . . . . . . . . . . . . . . . 115
Ergonomics . . . . . . . . . . . . . . . . . . . . . . . . . . . . . . . . . . . . . . . . . . . . . . . . . . . . . . . . . . . . . . . . . 116
Beginning Reading . . . . . . . . . . . . . . . . . . . . . . . . . . . . . . . . . . . . . . . . . . . . . . . . . . . . . . . . . . . . 117
Resuming Reading . . . . . . . . . . . . . . . . . . . . . . . . . . . . . . . . . . . . . . . . . . . . . . . . . . . . . . . . . . . . 119
Turning Pages . . . . . . . . . . . . . . . . . . . . . . . . . . . . . . . . . . . . . . . . . . . . . . . . . . . . . . . . . . . . . . . . 119
Navigating . . . . . . . . . . . . . . . . . . . . . . . . . . . . . . . . . . . . . . . . . . . . . . . . . . . . . . . . . . . . . . . . . . 120
Reader Text Fonts . . . . . . . . . . . . . . . . . . . . . . . . . . . . . . . . . . . . . . . . . . . . . . . . . . . . . . . . . . . . 121
Reader Text Sizes . . . . . . . . . . . . . . . . . . . . . . . . . . . . . . . . . . . . . . . . . . . . . . . . . . . . . . . . . . . . 122
Images . . . . . . . . . . . . . . . . . . . . . . . . . . . . . . . . . . . . . . . . . . . . . . . . . . . . . . . . . . . . . . . . . . . . . 124
Opening DRM-secured Digital Content . . . . . . . . . . . . . . . . . . . . . . . . . . . . . . . . . . . . . . . . . . . 124
Opening Password-Secured PDF Files. . . . . . . . . . . . . . . . . . . . . . . . . . . . . . . . . . . . . . . . . . . . . 125
Reading Status Bar . . . . . . . . . . . . . . . . . . . . . . . . . . . . . . . . . . . . . . . . . . . . . . . . . . . . . . . . . . . . 125
Reading Progress and Page Numbers . . . . . . . . . . . . . . . . . . . . . . . . . . . . . . . . . . . . . . . . . . . . . 126
Page Numbering . . . . . . . . . . . . . . . . . . . . . . . . . . . . . . . . . . . . . . . . . . . . . . . . . . . . . . . . . . . . . 126
Synchronizing Reading Across Devices . . . . . . . . . . . . . . . . . . . . . . . . . . . . . . . . . . . . . . . . . . . . 127
Finding Words and Phrases . . . . . . . . . . . . . . . . . . . . . . . . . . . . . . . . . . . . . . . . . . . . . . . . . . . . . 128
Looking up Words . . . . . . . . . . . . . . . . . . . . . . . . . . . . . . . . . . . . . . . . . . . . . . . . . . . . . . . . . . . . 129
NOOK User Guide 7

Lending eBooks . . . . . . . . . . . . . . . . . . . . . . . . . . . . . . . . . . . . . . . . . . . . . . 131
Rules . . . . . . . . . . . . . . . . . . . . . . . . . . . . . . . . . . . . . . . . . . . . . . . . . . . . . . . . . . . . . . . . . . . . . . 131
Determining Whether an eBook Can Be Lent . . . . . . . . . . . . . . . . . . . . . . . . . . . . . . . . . . . . . . 132
Lending an eBook . . . . . . . . . . . . . . . . . . . . . . . . . . . . . . . . . . . . . . . . . . . . . . . . . . . . . . . . . . . . 132
Borrowing an eBook on a NOOK . . . . . . . . . . . . . . . . . . . . . . . . . . . . . . . . . . . . . . . . . . . . . . . . . . . . . . 134
Bookmarks, Highlights, and Notes . . . . . . . . . . . . . . . . . . . . . . . . . . . . . . . 137
Bookmarks . . . . . . . . . . . . . . . . . . . . . . . . . . . . . . . . . . . . . . . . . . . . . . . . . . . . . . . . . . . . . . . . . . 137
Highlights and Notes . . . . . . . . . . . . . . . . . . . . . . . . . . . . . . . . . . . . . . . . . . . . . . . . . . . . . . . . . . 138
Rating . . . . . . . . . . . . . . . . . . . . . . . . . . . . . . . . . . . . . . . . . . . . . . . . . . . . . . 141
Rating eBooks and Periodicals . . . . . . . . . . . . . . . . . . . . . . . . . . . . . . . . . . . . . . . . . . . . . . . . . . . 141
Web Browsing . . . . . . . . . . . . . . . . . . . . . . . . . . . . . . . . . . . . . . . . . . . . . . . 142
Using a Browser on Two Screens . . . . . . . . . . . . . . . . . . . . . . . . . . . . . . . . . . . . . . . . . . . . . . . . 142
Tool Bar . . . . . . . . . . . . . . . . . . . . . . . . . . . . . . . . . . . . . . . . . . . . . . . . . . . . . . . . . . . . . . . . . . . . 143
Choosing a Web Page . . . . . . . . . . . . . . . . . . . . . . . . . . . . . . . . . . . . . . . . . . . . . . . . . . . . . . . . . 144
Zooming In and Out . . . . . . . . . . . . . . . . . . . . . . . . . . . . . . . . . . . . . . . . . . . . . . . . . . . . . . . . . . 145
Managing Favorites . . . . . . . . . . . . . . . . . . . . . . . . . . . . . . . . . . . . . . . . . . . . . . . . . . . . . . . . . . . 145
Browser Settings . . . . . . . . . . . . . . . . . . . . . . . . . . . . . . . . . . . . . . . . . . . . . . . . . . . . . . . . . . . . . 146
Browser Status Bar . . . . . . . . . . . . . . . . . . . . . . . . . . . . . . . . . . . . . . . . . . . . . . . . . . . . . . . . . . . 147
Games . . . . . . . . . . . . . . . . . . . . . . . . . . . . . . . . . . . . . . . . . . . . . . . . . . . . . . 148
Chess . . . . . . . . . . . . . . . . . . . . . . . . . . . . . . . . . . . . . . . . . . . . . . . . . . . . . . . . . . . . . . . . . . . . . . 148
Sudoku . . . . . . . . . . . . . . . . . . . . . . . . . . . . . . . . . . . . . . . . . . . . . . . . . . . . . . . . . . . . . . . . . . . . . 151
USB Connectivity . . . . . . . . . . . . . . . . . . . . . . . . . . . . . . . . . . . . . . . . . . . . 155
Connecting your NOOK to your Computer . . . . . . . . . . . . . . . . . . . . . . . . . . . . . . . . . . . . . . . 155
Disconnecting your NOOK from your Computer . . . . . . . . . . . . . . . . . . . . . . . . . . . . . . . . . . . 156
One Drive or Two . . . . . . . . . . . . . . . . . . . . . . . . . . . . . . . . . . . . . . . . . . . . . . . . . . . . . . . . . . . 157
Protection from Viruses and Other Malware . . . . . . . . . . . . . . . . . . . . . . . . . . . . . . . . . . . . . . . 158
Audio . . . . . . . . . . . . . . . . . . . . . . . . . . . . . . . . . . . . . . . . . . . . . . . . . . . . . . 159
Speaker and Headphones . . . . . . . . . . . . . . . . . . . . . . . . . . . . . . . . . . . . . . . . . . . . . . . . . . . . . . 159
Supported File Types . . . . . . . . . . . . . . . . . . . . . . . . . . . . . . . . . . . . . . . . . . . . . . . . . . . . . . . . . . 159
Managing Audio Files . . . . . . . . . . . . . . . . . . . . . . . . . . . . . . . . . . . . . . . . . . . . . . . . . . . . . . . . . . 159
Playlist . . . . . . . . . . . . . . . . . . . . . . . . . . . . . . . . . . . . . . . . . . . . . . . . . . . . . . . . . . . . . . . . . . . . . 160
Playing an Audio File . . . . . . . . . . . . . . . . . . . . . . . . . . . . . . . . . . . . . . . . . . . . . . . . . . . . . . . . . . 160
NOOK User Guide 8

Viewing what is Currently Playing . . . . . . . . . . . . . . . . . . . . . . . . . . . . . . . . . . . . . . . . . . . . . . . . 161
Audio Player . . . . . . . . . . . . . . . . . . . . . . . . . . . . . . . . . . . . . . . . . . . . . . . . . . . . . . . . . . . . . . . . 161
Files and Folders . . . . . . . . . . . . . . . . . . . . . . . . . . . . . . . . . . . . . . . . . . . . . 163
Where You Can Put Files . . . . . . . . . . . . . . . . . . . . . . . . . . . . . . . . . . . . . . . . . . . . . . . . . . . . . . 163
USB Access and microSD Card Access . . . . . . . . . . . . . . . . . . . . . . . . . . . . . . . . . . . . . . . . . . . 164
Managing Files . . . . . . . . . . . . . . . . . . . . . . . . . . . . . . . . . . . . . . . . . . . . . . . . . . . . . . . . . . . . . . . 164
Adding Storage . . . . . . . . . . . . . . . . . . . . . . . . . . . . . . . . . . . . . . . . . . . . . . . . . . . . . . . . . . . . . . 166
Platforms . . . . . . . . . . . . . . . . . . . . . . . . . . . . . . . . . . . . . . . . . . . . . . . . . . . 172
Software Updates . . . . . . . . . . . . . . . . . . . . . . . . . . . . . . . . . . . . . . . . . . . . 173
Wireless Updates . . . . . . . . . . . . . . . . . . . . . . . . . . . . . . . . . . . . . . . . . . . . . . . . . . . . . . . . . . . . 173
USB Updates . . . . . . . . . . . . . . . . . . . . . . . . . . . . . . . . . . . . . . . . . . . . . . . . . . . . . . . . . . . . . . . . 173
Update Stages . . . . . . . . . . . . . . . . . . . . . . . . . . . . . . . . . . . . . . . . . . . . . . . . . . . . . . . . . . . . . . . 174
Settings . . . . . . . . . . . . . . . . . . . . . . . . . . . . . . . . . . . . . . . . . . . . . . . . . . . . . 176
Settings Summary . . . . . . . . . . . . . . . . . . . . . . . . . . . . . . . . . . . . . . . . . . . . . . . . . . . . . . . . . . . . 176
All Settings . . . . . . . . . . . . . . . . . . . . . . . . . . . . . . . . . . . . . . . . . . . . . . . . . . . . . . . . . . . . . . . . . . 177
Procedures for Contacts . . . . . . . . . . . . . . . . . . . . . . . . . . . . . . . . . . . . . . . . . . . . . . . . . . . . . . . 179
Security Settings . . . . . . . . . . . . . . . . . . . . . . . . . . . . . . . . . . . . . . . . . . . . . . . . . . . . . . . . . . . . . . 180
Resetting to Factory Settings . . . . . . . . . . . . . . . . . . . . . . . . . . . . . . . . . . . . . . . . . . . . . . . . . . . . 183
Policies . . . . . . . . . . . . . . . . . . . . . . . . . . . . . . . . . . . . . . . . . . . . . . . . . . . . . 184
Legal Notices . . . . . . . . . . . . . . . . . . . . . . . . . . . . . . . . . . . . . . . . . . . . . . . . . . . . . . . . . . . . . . . . 184
NOOK™ Terms of Service . . . . . . . . . . . . . . . . . . . . . . . . . . . . . . . . . . . . . . . . . . . . . . . . . . . . 185
One Year Limited Warranty . . . . . . . . . . . . . . . . . . . . . . . . . . . . . . . . . . . . . . . . . . . . . . . . . . . . 205
AT&T Terms of Service & Acceptable Use Policy . . . . . . . . . . . . . . . . . . . . . . . . . . . . . . . . . . . 209
FCC Notices . . . . . . . . . . . . . . . . . . . . . . . . . . . . . . . . . . . . . . . . . . . . . . . . . . . . . . . . . . . . . . . . 222
NOOK User Guide 9
Getting Started
This section gives an overview of what you need to do to start using your NOOK.
In the Package
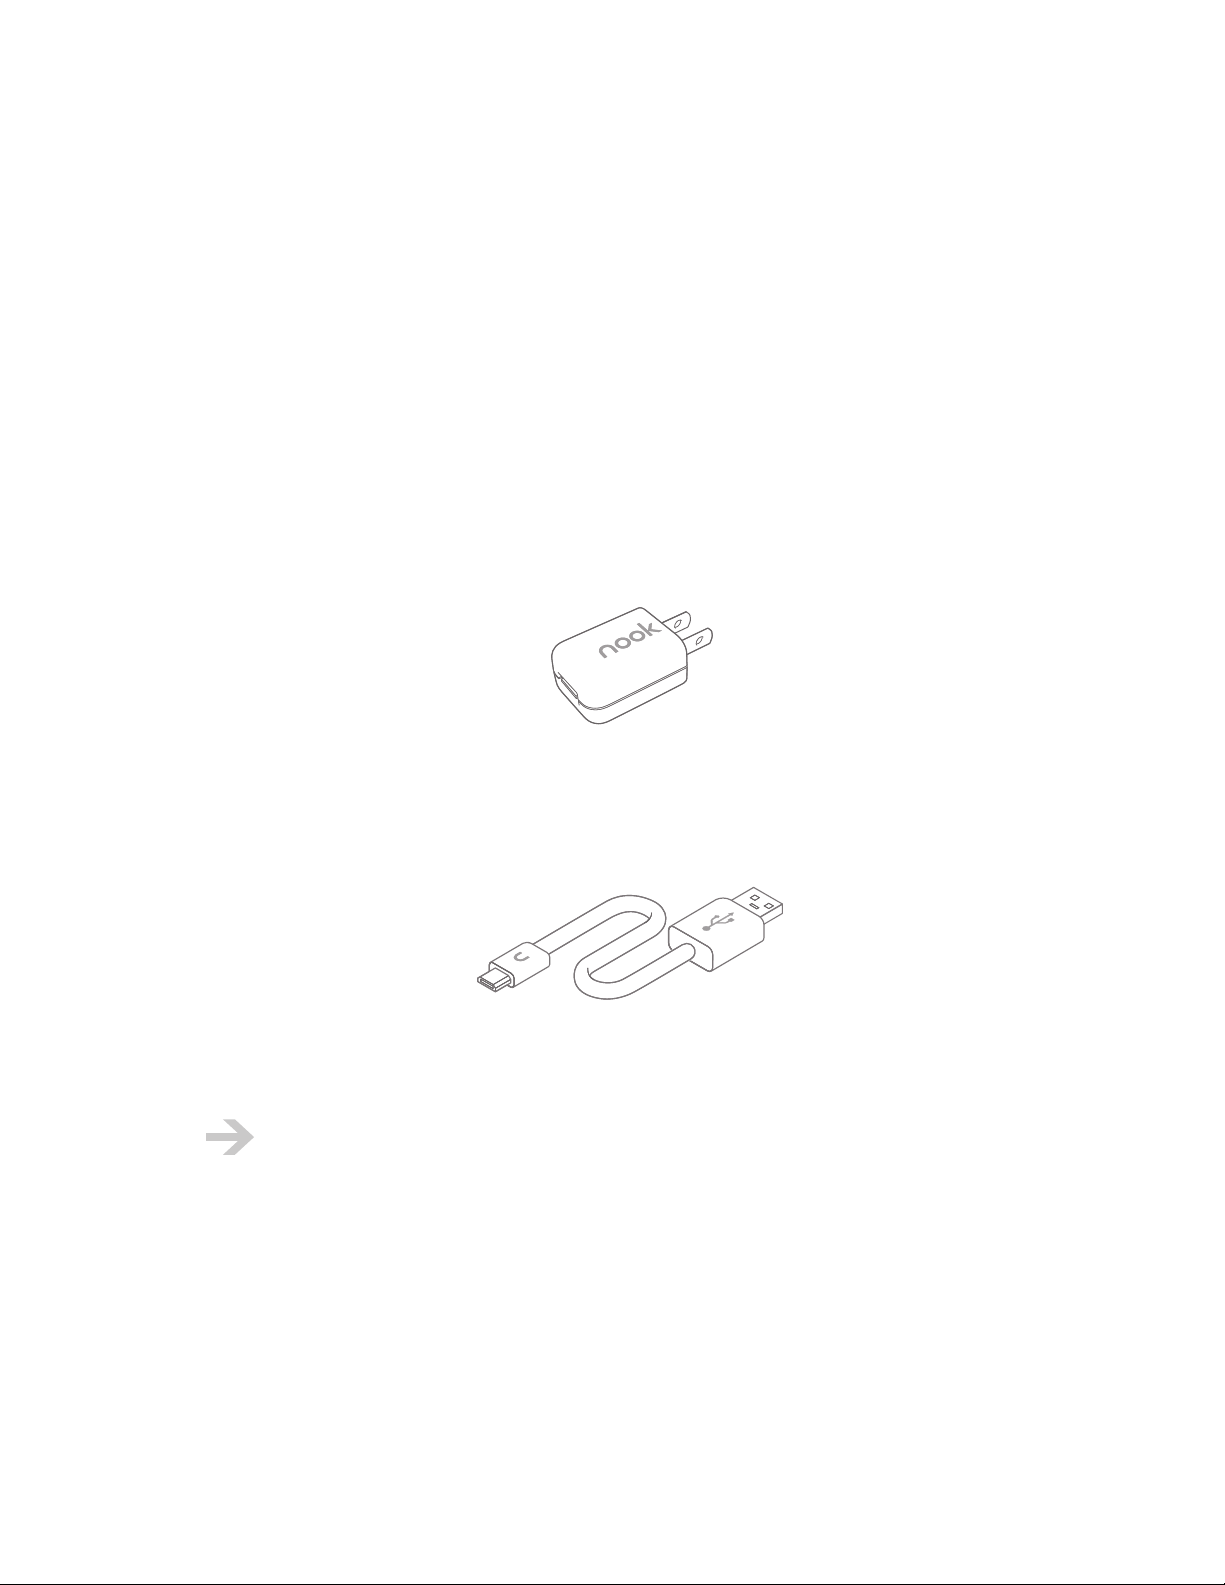
The package your NOOK comes in contains four things:
• Your NOOK
• A power adapter that can be plugged into an electrical outlet. It has a nonpolarized type-A
plug for use in North America. The standard-A plug on the USB cable (the big end) fits into the
power adapter to connect the power adapter to your NOOK.
• A USB cable for transferring files to and from a personal computer, and for charging from a
wall outlet or computer. The USB cable has a micro-B plug on the NOOK end and a standard-A
plug on the computer end. It is a shielded USB 2.0 cable.
• A printed Quick Start Guide
The battery is preinstalled in your NOOK.
You can save the package as a convenient place to store your NOOK when not in use, and as an
inner shipping box in the event you need to send your NOOK in for repairs or replacement.
NOOK User Guide Getting Started 10
Charge your NOOK
Wall
Charge your NOOK with the supplied power adapter and USB cable until the yellow charging
indicator light goes out. Your NOOK will turn on when you plug it in. Do not turn it o. A typical
charging time using a wall outlet is 3.5 hours.
Outlet
Learn the Controls
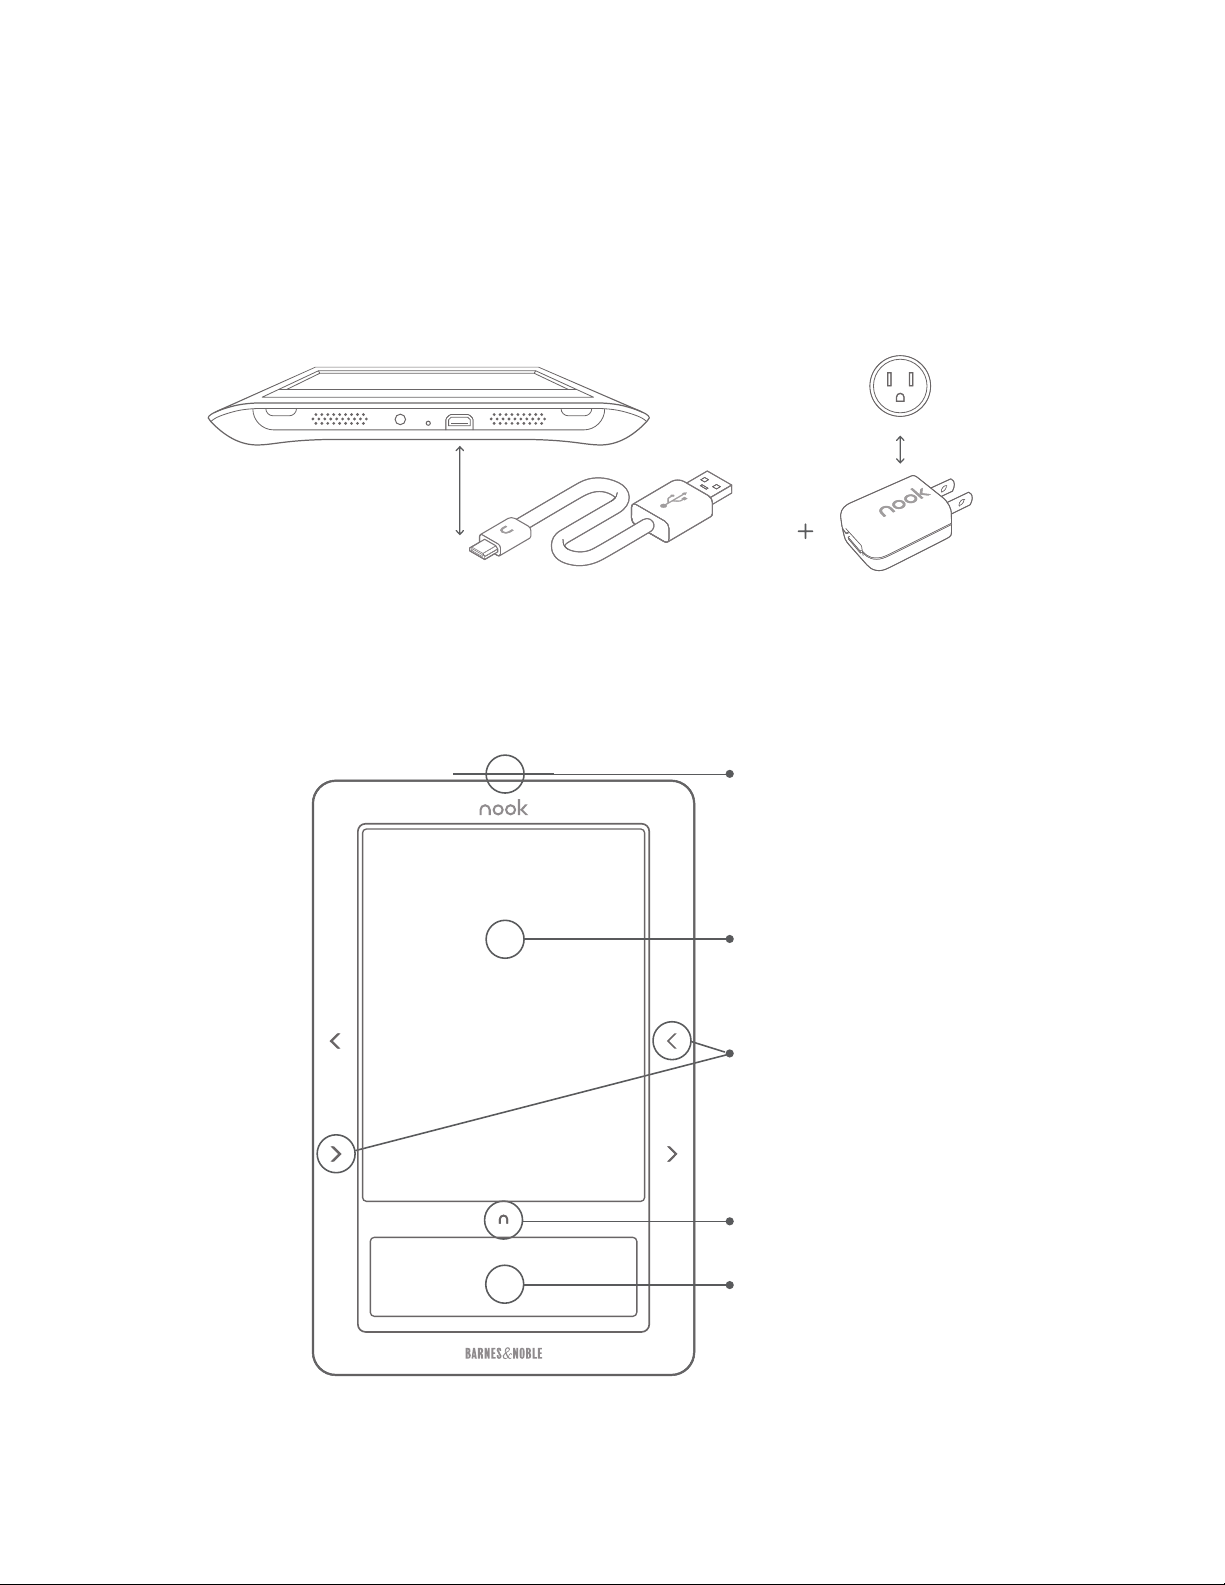
These are the main controls for your NOOK:
USB
Cable
Power Button
Reading Screen
Page Turn Buttons
Power
Adapter
Home Button
Color Touchscreen
NOOK User Guide Getting Started 11

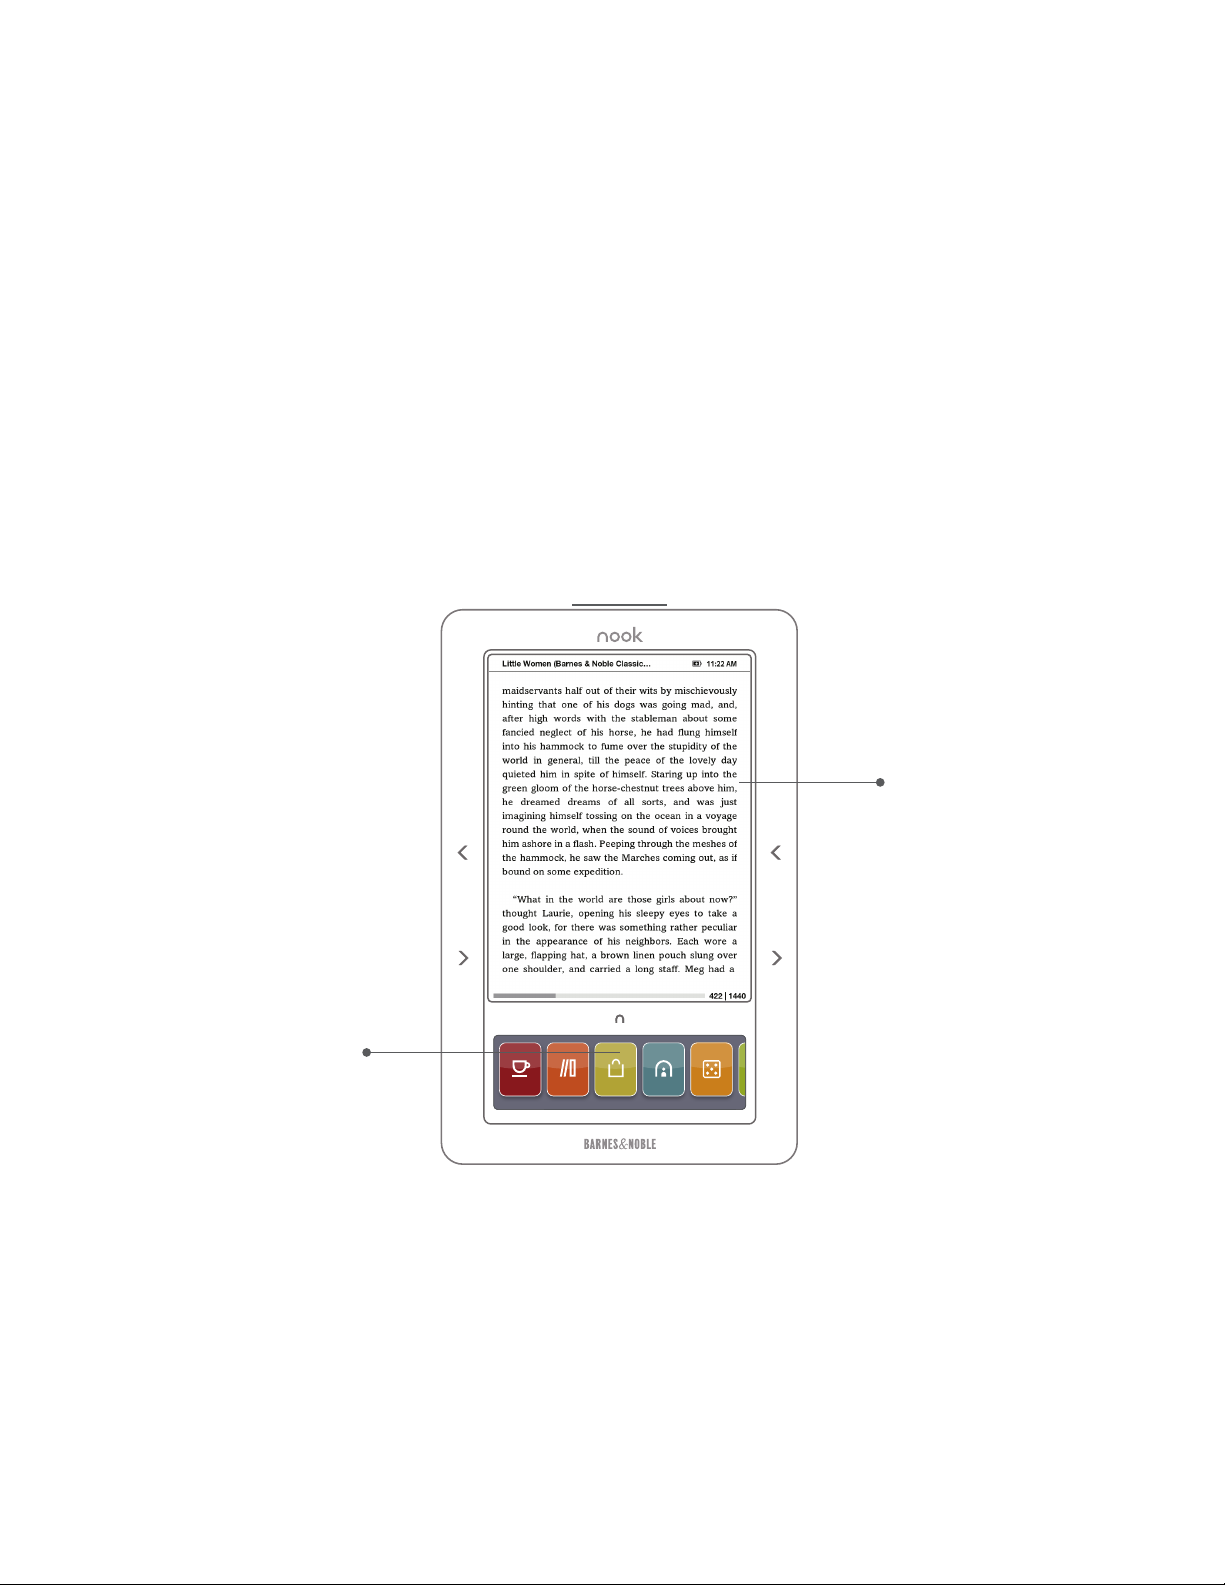
• Power button: Press and release the power button to turn on your NOOK. When your NOOK
is on, tap the power button to awaken it and to cause it to sleep. Press and hold the power
button for 5 seconds to turn o your NOOK fully.
• Reading screen: This is where you read your eBooks, magazines, and newspapers. The
reading screen is a 600 x 800, 3.57 x 4.82 inch (6-inch diagonal), reflective high-resolution E Ink
electronic paper display. The reading screen is not a touchscreen; you navigate on the reading
screen using the color touchscreen.
• Page turn buttons: Press the Next Page and Previous Page buttons to turn pages in digital
content and in a paginated list.
• Home button: Tap the Home button to display the Home menu and Home screen, which
displays your wallpaper. If you have new periodical issues or lending oers, a bubble on the
Home screen tells you. If the touchscreen is dark, tap the Home button or touchscreen to light
up the touchscreen.
• Color touchscreen: Tap an icon on the Home menu to display The Daily, your library, the
Shop, what you are reading now, games, Wi-Fi® settings, the audio player, the web browser,
or settings. Swipe the Home menu to the left and right to see all of the icons. Tap menu items
to do things like buying an eBook and selecting something to read. Swipe the touchscreen to
browse a gallery of covers, and to turn pages in an eBook or periodical when the touchscreen is
not lit.
Here are a few pointers about using the touchscreen:
• To light it up: The touchscreen dims to save power, and because you do not need to look
at it while reading. When you are reading and the touchscreen is not lit, you can turn pages by
swiping your finger on the touchscreen. To light up the touchscreen, tap it. If your NOOK is
sleeping (you will see a screensaver image); press and release the power button to wake it.
• Tap: Most of the time, when you choose things in menus and touch buttons on the
touchscreen, you “tap”: touch a menu or button and then immediately raise your finger.
• Swipe and scroll: To browse the gallery of covers, swipe your finger from left to right and
from right to left. Touch the touchscreen, move your finger to the left or right, and then raise
your finger. If there are more than four menu choices, a scrollbar is displayed. To scroll, touch a
menu choice (not the scrollbar), move your finger up or down, and then raise your finger. When
you swipe to turn pages while reading, your finger should already be moving to the left or right
when it first touches the touchscreen.
NOOK User Guide Getting Started 12
• Navigating on the reading screen: Use the Up and Down buttons to move a
highlight, often indicated by a symbol, up and down on the reading screen. This is an example:
• Selecting an item on the reading screen: Tap the Select button to select the
highlighted item on the reading screen. The result is an action that depends on the context, for
example, opening an eBook or displaying item details.
• Backing up: In some places in the menus, there is a Back button: . Tap the Back button to
back up a step. You can also use the Back button to return to the jumping-o page when you
navigate using a link.
Register your NOOK
Registration is associating your NOOK with a Barnes & Noble online account, an account on the
BN.com website (www.barnesandnoble.com or www.BN.com). If you do not have a Barnes &
Noble online account, create one online at BN.com. You should register your NOOK, because
doing so allows you to buy digital content from the Barnes & Noble eBookstore and provides other
benefits.
To register your NOOK, you need a wireless connection.
You register from your NOOK, not on the Barnes & Noble website. When you first turn on your
NOOK, your NOOK leads you through registration. If you defer registration, you can register later
by tapping settings > Device > Register your nook.
Explore
Now that your NOOK is charged and registered, you can explore its features. For example:
• Visit The Daily: Tap the Home button and then tap the daily. The Daily is a message center
for daily B&N feeds and notifications. Check back daily to read feeds and to learn about special
oers, deliveries to your Library, subscriptions, lending oers, and software updates.
• Shop: Tap the Home button and then tap shop. With your NOOK, it is easy to buy eBooks,
magazines, and newspapers from the Barnes & Noble eBookstore. Some content is even free!
You can also download eBooks to your NOOK from your personal computer.
NOOK User Guide Getting Started 13

• Visit your library: Tap the Home button and then tap my library. Your library provides access
to your B&N eBooks, magazines, and newspapers. It also provides access to your other eBooks.
For B&N content, you have a unified view of the content on your NOOK and in your online
digital library. You can browse and search for content in your library.
• Read: On your new NOOK, you will find some eBooks are already in your library. You can read
those, eBooks and periodicals you purchase from the Barnes & Noble eBookstore, and digital
content you copy to your NOOK from a personal computer. Navigate to an item in your library
and tap Select to read it.
• Read in stores: While in Barnes & Noble Bookstores, you can read many eBooks free of
charge. These are not samples, but are entire eBooks. Read an eBook for up to one hour per
day.
• Browse the World Wide Web: When connected to a Wi-Fi hotspot, you can browse the
World Wide Web on your NOOK.
• Play games: Play games on your NOOK. Play chess and Sudoku.
• Add personal content and music: You are not limited to B&N content on your NOOK.
You can download digital content to your NOOK from your personal computer. To download
personal content to your NOOK, connect it to a personal computer using the USB cable. Put
your own eBooks and digital reading content in the folder my documents. Put music in the
folder my music.
• Listen to music: You can listen to music while reading. Tap audio on the Home menu or
Open Audio Player in the Reader to listen to music.
• Personalize your NOOK: You can download screensaver and wallpaper images to your NOOK
and choose among several text fonts and six text sizes for reading. Put screensaver images in
first-level subfolders of the folder my screensavers. Put wallpaper images in the top-level
folder my wallpapers. You can also set settings to your liking. Tap settings.
NOOK User Guide Getting Started 14

Power and Charging
This section explains your NOOK’s power management and charging.
Device States
Your NOOK is in one of five states:
O:
Your NOOK is o. Nothing is running.
When you first take your NOOK out of the package, it is o. We recommend that you also turn
your NOOK o when in checked baggage on an airplane. After 72 hours of sleep, your NOOK turns
o automatically to conserve battery charge.
To turn your NOOK o, press and hold the power button for about 5 seconds, until the reading
screen is white and the touchscreen is dark. Then release the power button.
Do not turn o your NOOK while it is plugged into a power adapter or USB. If you do, it
will not charge.
On:
Your NOOK is on. When your NOOK is on, everything works. The main and touch screens are both
lit, and you can read content and listen to music or audiobooks. If Airplane mode is on, you cannot
do things that require the radio, such as shopping at the B&N eBookstore.
To turn your NOOK on, press the power button briefly (for a second or so) and release it, connect
your NOOK to a personal computer using the USB cable, or begin charging your NOOK using a wall
outlet.
When your NOOK powers on, it takes you to the Home screen. It also connects to the network
and scans the microSDTM card to check for changes in content.
If you are just charging your NOOK and don’t need it to be on, don’t worry. It will go to sleep.
Touchscreen backlight dimmed and then turned o:
To save power, your NOOK automatically dims the touchscreen and then turns it o when the
touchscreen is not being used. Everything else is still on. You can continue turning pages with the
Next Page and Previous Page buttons, or by swiping your finger on the unlit touchscreen. You
can continue listening to music or an audiobook. Configure the touchscreen timer in Settings. Tap
settings > Display > Touchscreen timer.
NOOK User Guide Power and Charging 15
When the touchscreen is dimmed, you can still use it. Tap a menu choice or button, that action will
be carried out, and the touchscreen will brighten.
To light up the touchscreen, tap the touchscreen, tap the Home button, or press and release the
power button.
Sleep:
To save power, your NOOK sleeps after a period of inactivity. It turns o its touchscreen and
wireless circuitry. While your NOOK is sleeping it displays a screensaver image on the reading
screen. Configure the sleep timer in Settings. Tap settings > Display > Sleep timer.
Do not rely on sleep mode when you should turn on Airplane mode (for example, on an
airplane).
To wake your NOOK from sleep, press the power button briefly (for a second or so) and release it.
When your NOOK awakens from sleep, you are right where you were when it went to sleep.
After 72 hours of sleep, your NOOK turns o automatically to conserve battery charge.
For normal use, because the reading screen does not consume power, just let your NOOK
sleep. It takes longer for your NOOK to turn on from o than it does to wake from sleep.
Also, by letting it sleep instead of turning it o, your NOOK wakes up periodically to
perform tasks like downloading new content.
USB drive mode:
When you plug your NOOK into a personal computer, it connects to USB. This puts your NOOK in
USB drive mode. In this mode, you can access files on your NOOK from your personal computer,
but your NOOK is locked until you disconnect it from USB.
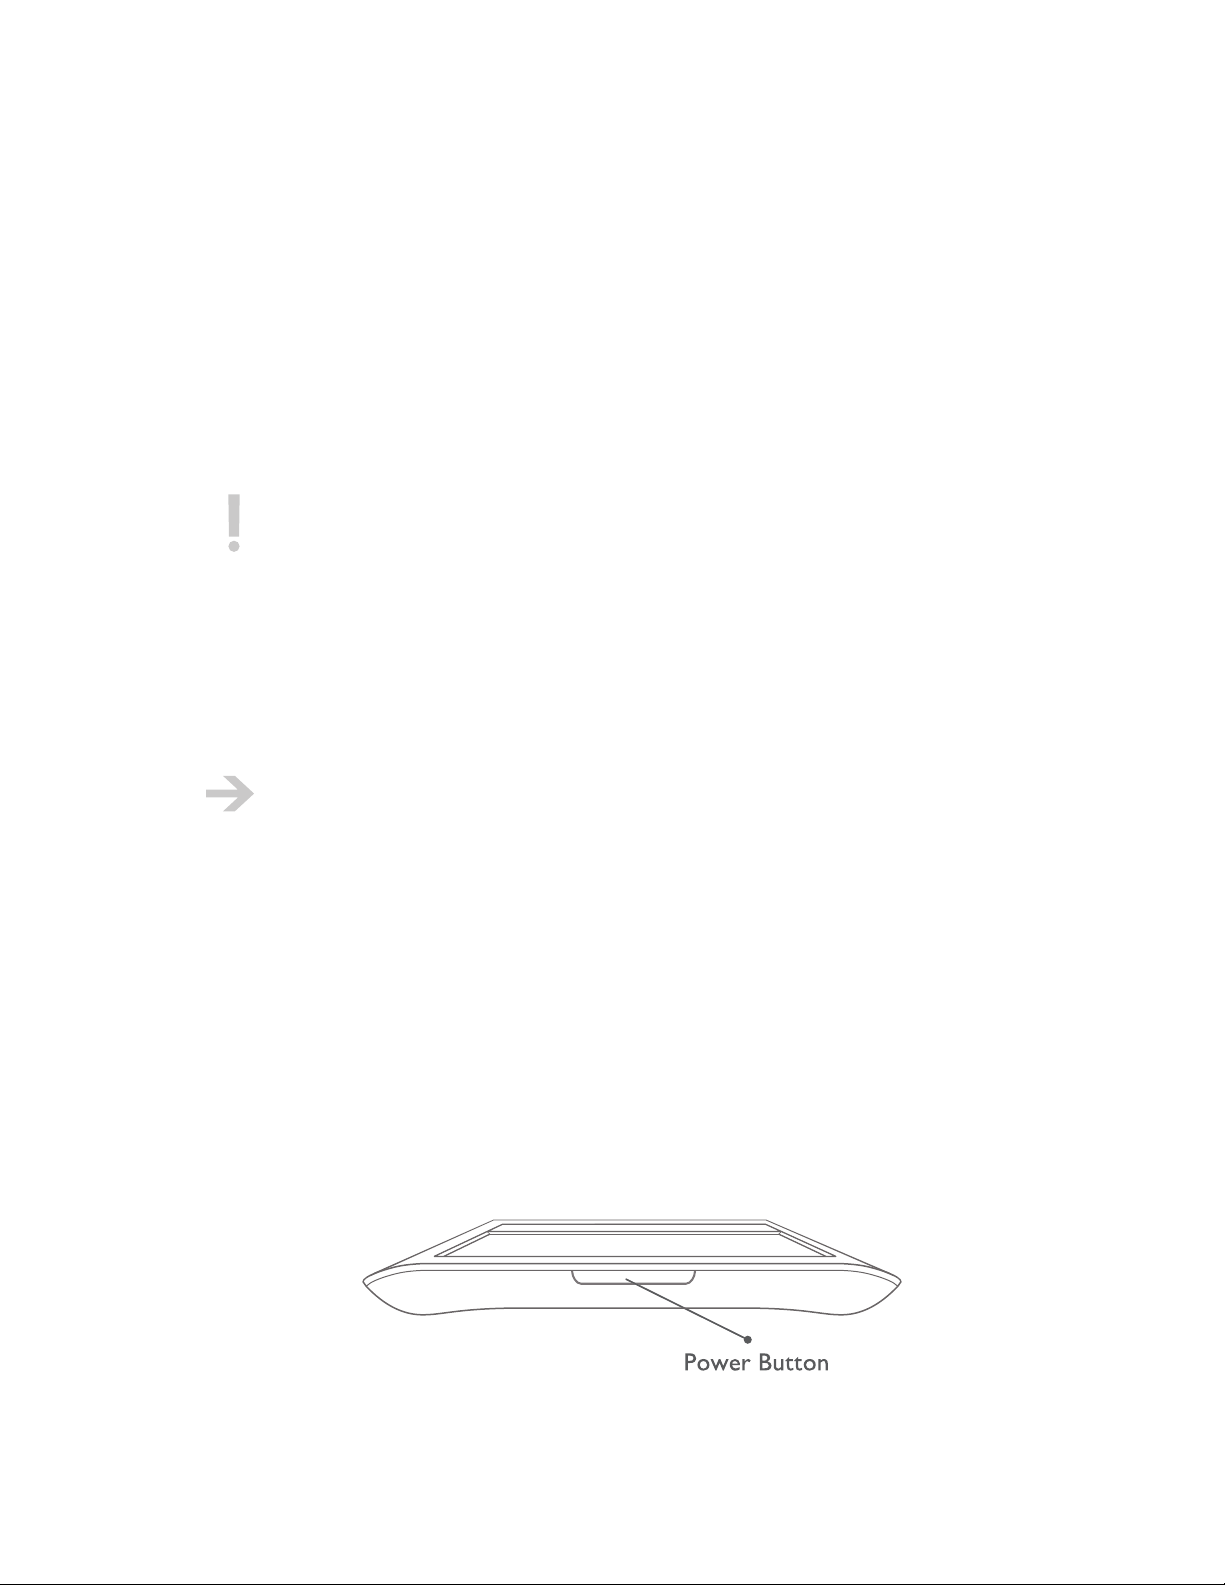
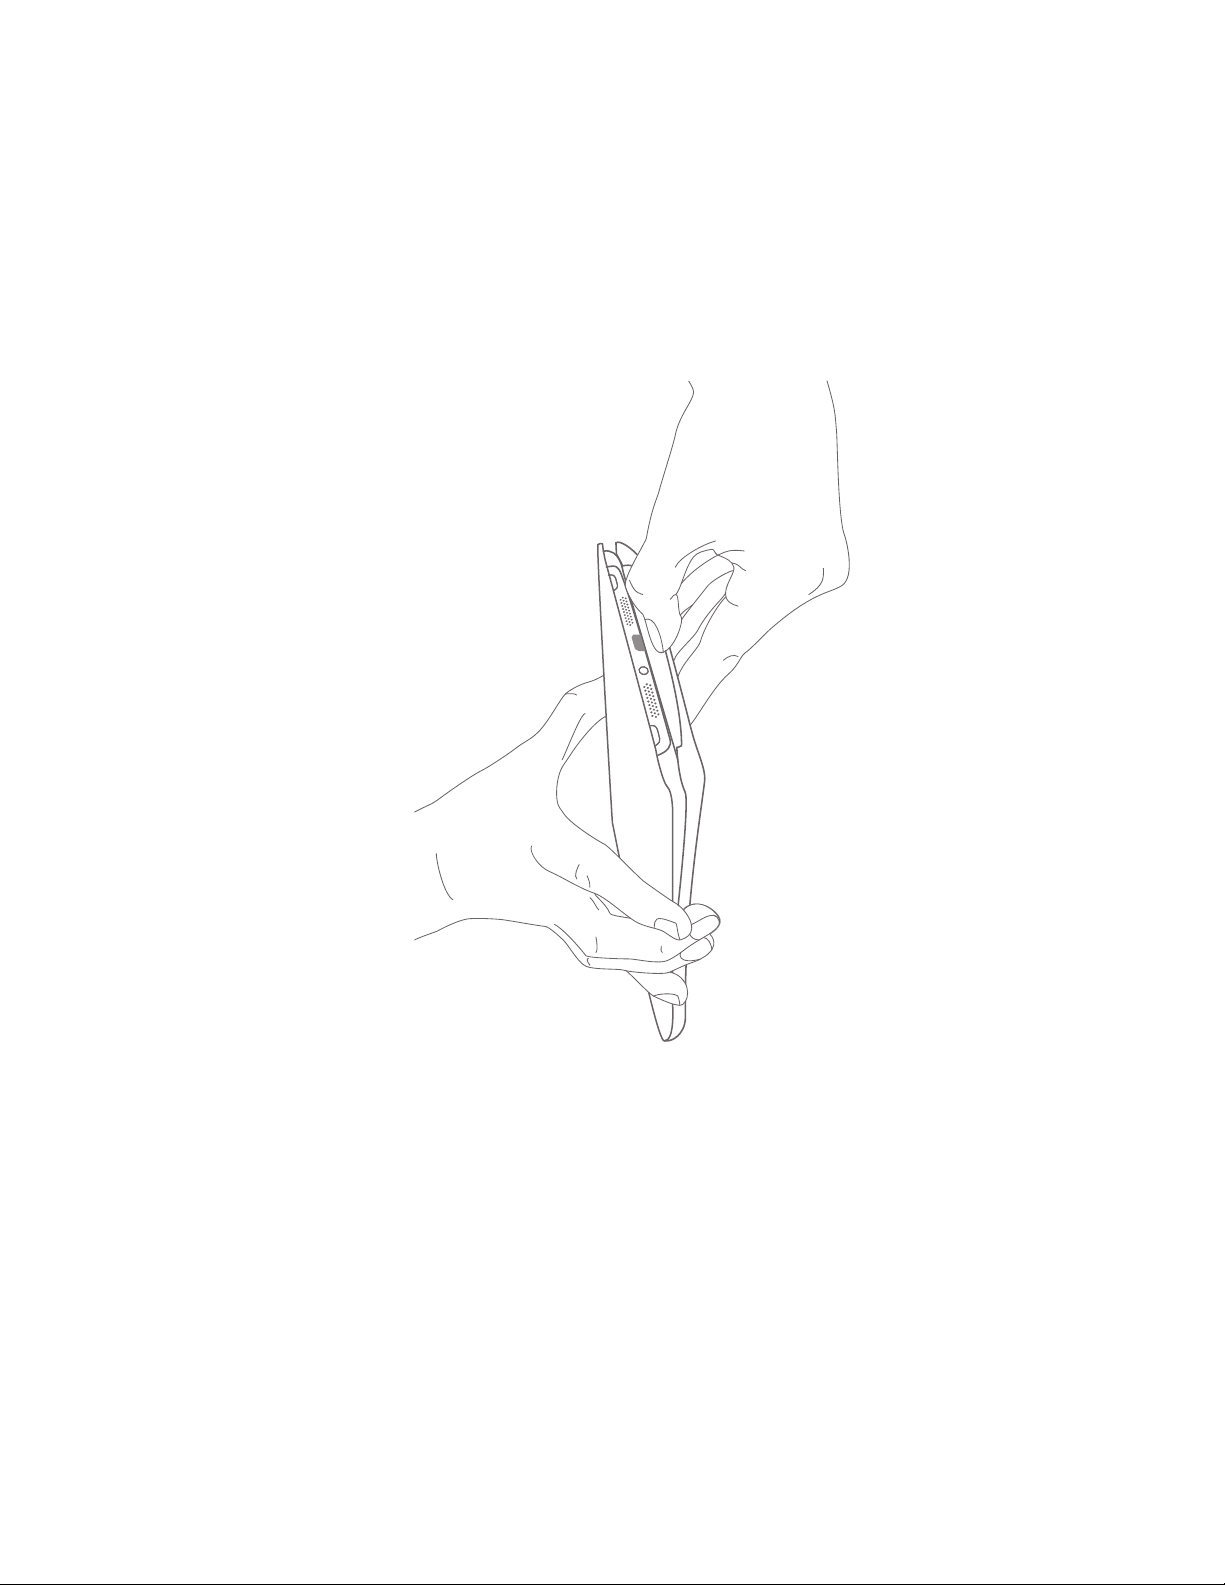
Power Button
The shiny metal strip at the top of your NOOK is the power button:
NOOK User Guide Power and Charging 16

To turn your NOOK on, display the touchscreen, awaken your NOOK from sleep, or cause your
NOOK to sleep, press the power button for about 1 second and then release it.
To turn your NOOK o, press and hold the power button for about 5 seconds, until the reading
screen is white and the touchscreen is dark. Then release the power button.
Power Management
Your NOOK uses quite modest amounts of power compared to a laptop computer. It uses a small
amount of power to turn a page on the reading screen, but no power to keep the page displayed.
The touchscreen does use power when it is lit. After 72 hours of sleep, your NOOK turns o
automatically to conserve battery charge.
To allow you to manage power use, and to give you the experience that suits your reading habits,
you can configure two inactivity periods:
• Touchscreen timer: Time from last touchscreen activity until the touchscreen backlight
is turned o. You can choose among 10, 30 (the default), and 60 seconds. The touchscreen
backlight is dimmed by 50% after half of this time period (5, 15, or 30 seconds). To set the
touchscreen timer, tap settings > Display > Touchscreen timer.
• Sleep timer: Time from last activity (touchscreen or button presses) until your NOOK sleeps.
During sleep, a screensaver image is displayed on the reading screen and the touchscreen is unlit.
You can choose among 2, 5 (the default), 10, 15, and 20 minutes. To set the sleep timer, tap
settings > Display > Sleep timer.
Low Charge Alerts
Your NOOK has two low-charge alerts:
Low charge alert:
When the battery charge is rather low (about 15% charge), your NOOK displays a message to
charge it. You can dismiss the message and continue using your NOOK, but you should charge it as
soon as possible. To extend the time that the charge lasts, you can turn Airplane mode on, which
disables all wireless connectivity. If you turn Airplane mode on, you cannot access your online digital
library, The Daily, the Shop, or browse the web.
After your NOOK displays the low charge alert, it might turn o wireless connectivity.
When it does, you will not be able to access the your online digital library, The Daily, the
Shop, or browse the web until you charge your NOOK.
Critically low charge alert:
NOOK User Guide Power and Charging 17
When the battery charge is critically low (too low for continued operation), your NOOK displays a
message to charge it and shuts down. The critically low battery level is about 5%.
You must charge your NOOK before using it. It will charge faster using the power adapter. When
your NOOK has enough charge to run, it will start, but remember that it still has very little charge.
You can use it, but should continue charging it.
Battery Charge and Charging Indicators
Your NOOK ships with a partially charged battery. We recommend that you charge your NOOK
before using it.
Your NOOK has the following indicators of the battery charge and charging.
Battery Charge Indicators
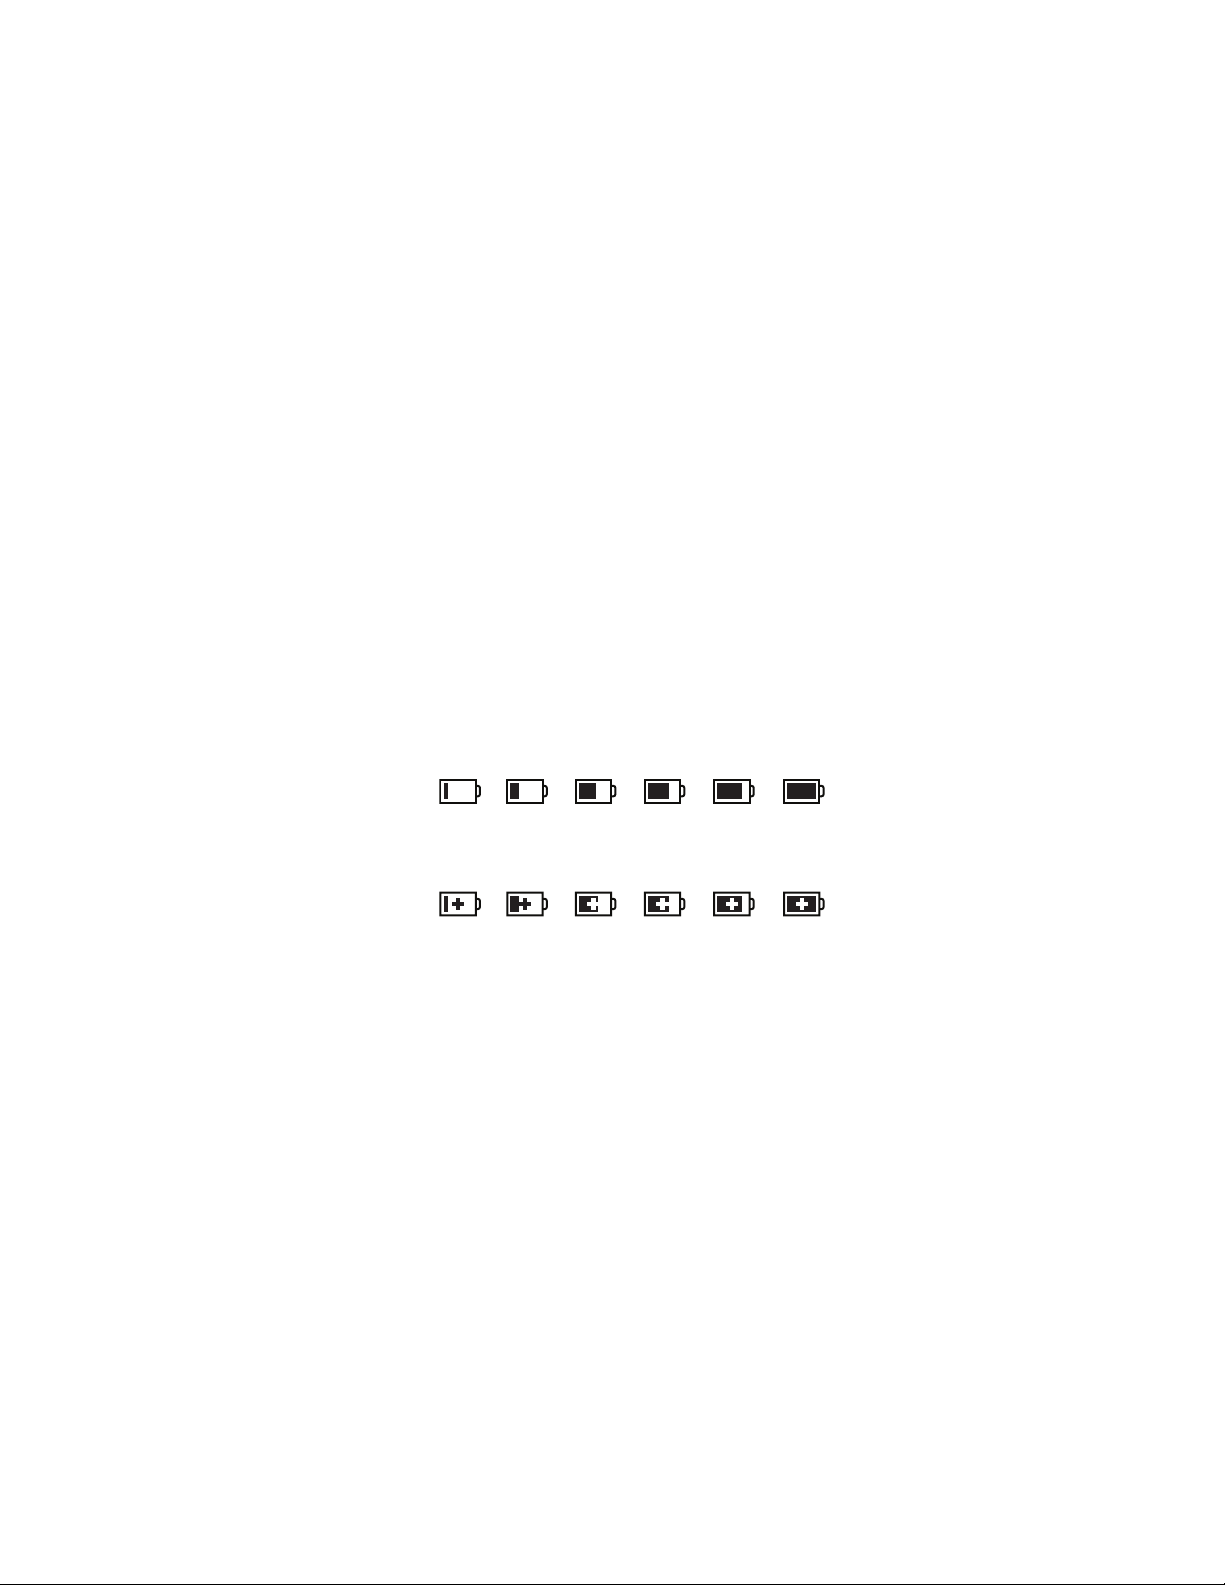
Your NOOK indicates in two places the amount of charge remaining in the battery:
• With an icon in the status bar:
Battery charge levels when your NOOK is not charging (from low to full charge):
Battery charge levels when your NOOK is charging (from low to high):
• With a percentage of full charge on the Settings page. The percentage is updated when
the battery charge changes.
In some cases, the Battery Charge on the Settings summary reads Not available. This is normal.
It means that the software that reads the charge got some readings that it could not interpret.
After a few minutes, your NOOK will get more readings and display the battery charge.
Charging Indicators
Your NOOK indicates in two places when it is charging the battery:
• With a charging indicator light next to the data/charging port. When your NOOK
is charging, the charging indicator light to the left of the USB port lights up yellow. When the
device is not charging or is fully charged, the charging indicator light is not lit.
NOOK User Guide Power and Charging 18
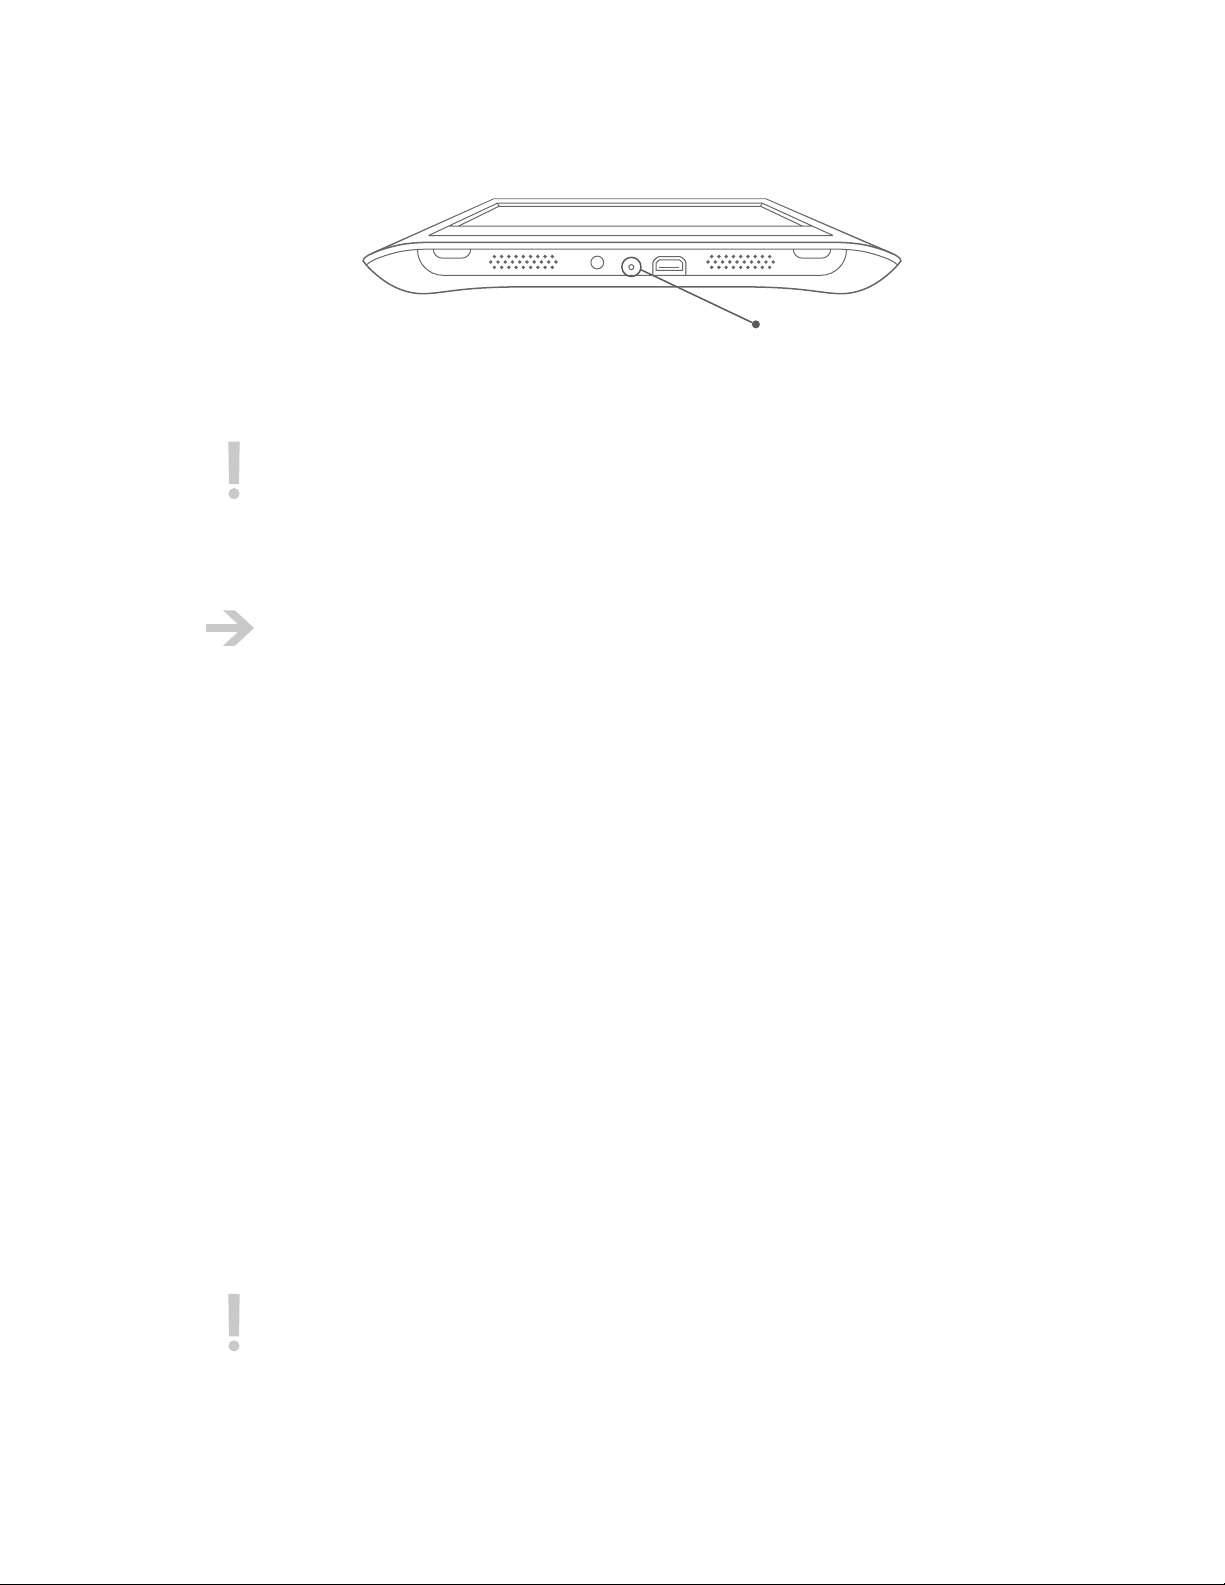
Charging
Indicator Light
If the charge in your NOOK’s battery is very low, it can take up to about 15 minutes before
the charging indicator light turns on. If it does not turn on after half an hour, make sure the
USB cable is firmly seated.
• With a plus sign in the battery charge icon in the status bar (shown above)
It can take up to about 15 seconds before the battery charge icon in the status bar is
updated to reflect plugging in or unplugging your NOOK.
Charging your NOOK
Charge your NOOK using:
• A power adapter. Use the supplied power adapter connected to your NOOK through the
supplied USB cable.
• A USB cable (the supplied one or a dierent one)
Wall charging is faster than USB charging. Approximate charging times from fully discharged to fully
charged are:
• Wall charging: 3.5 hours
• USB charging: 6 hours
A fully discharged NOOK will turn on after charging for about 15 minutes or less in most cases, but
the charge is still low. When your NOOK does turn on, it will charge most quickly if you do not use
it while it charges. However, you can use it if you keep it plugged in and charging while you do. If
the battery charge is very low, it can take an hour before your NOOK turns on.
Your NOOK must be on or sleeping to charge. When your NOOK is o and you plug it in
to charge it, your NOOK turns on. Do not turn it o again; it needs to be on to charge. If
you are not using your NOOK, it will sleep and continue to charge.
NOOK User Guide Power and Charging 19
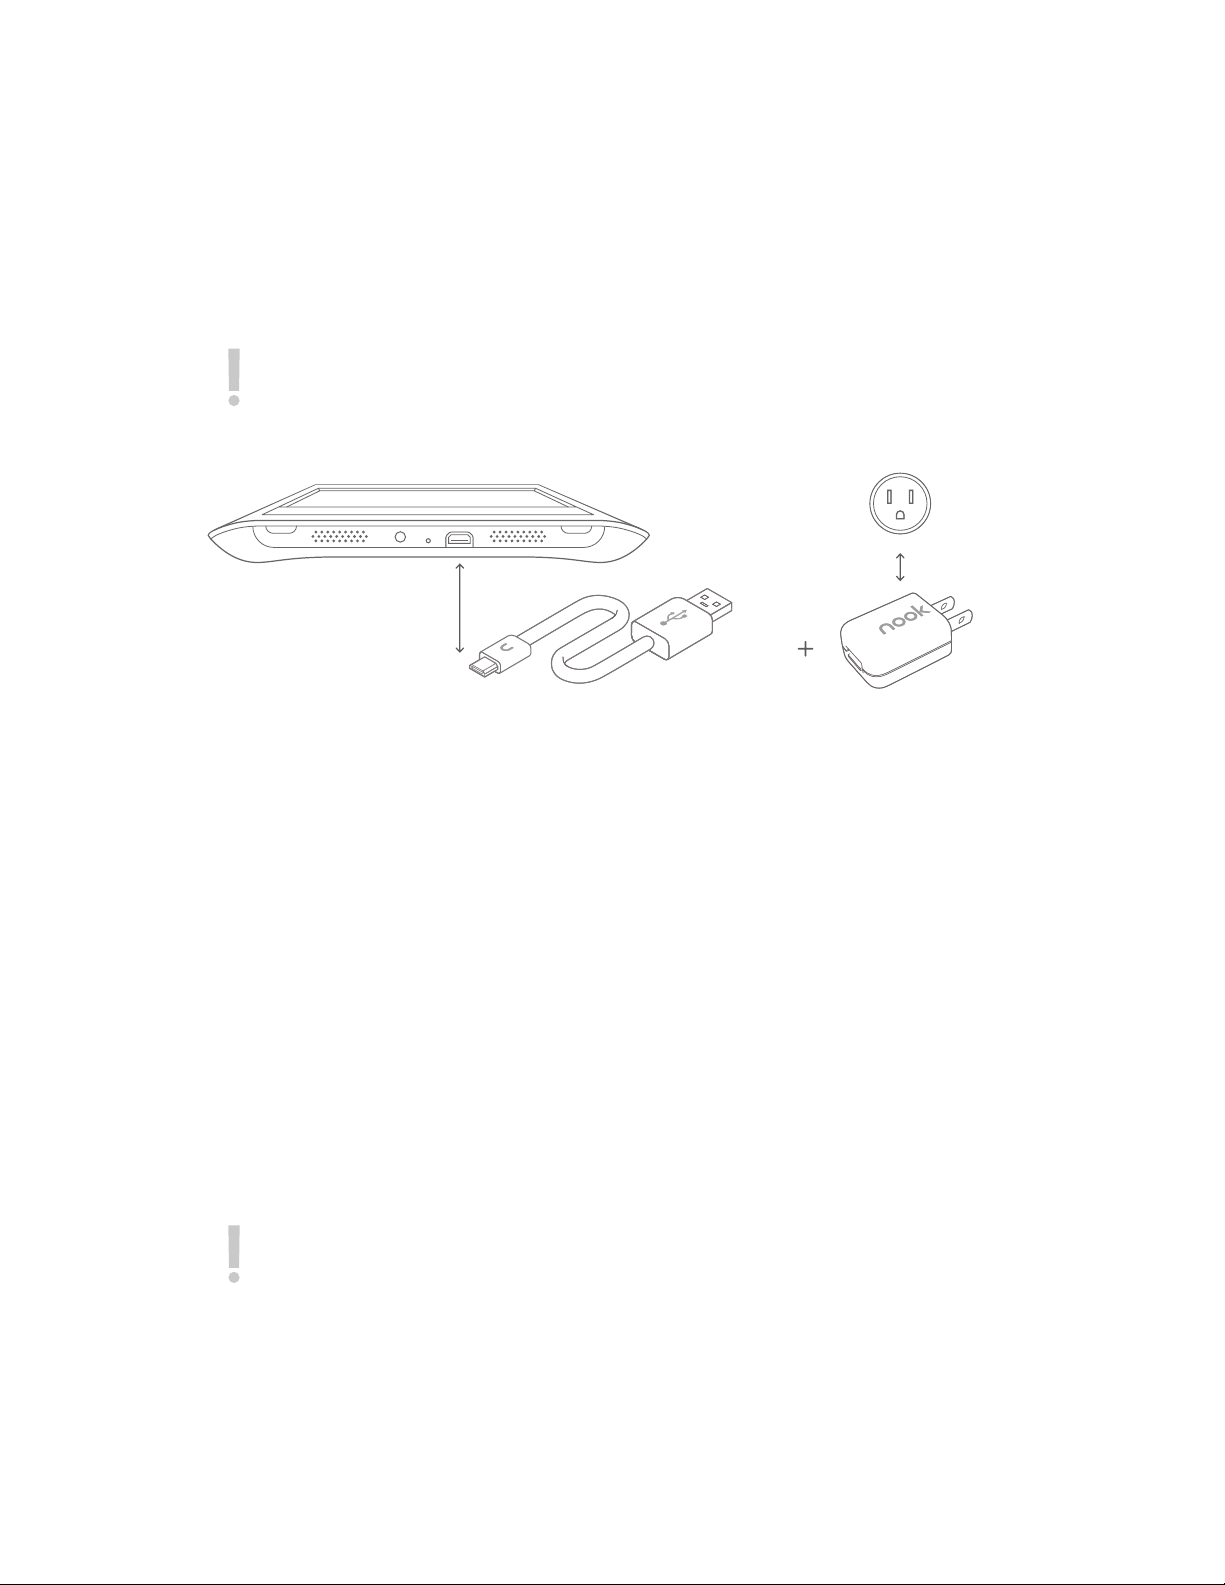
Wall Charging
Wall
Wall charging is the recommended way to charge your NOOK, because it is faster than USB
charging. You can charge your NOOK when it is on or sleeping. If your NOOK is o, it turns on
when you plug it in. You can use your NOOK while it is charging.
Only use the supplied NOOK power adapter. Other power adapters might damage your
battery and NOOK.
Outlet
USB
Cable
To charge your NOOK using the power adapter:
1 Assemble the power adapter and USB cable. Insert the large end of the USB cable into the
matching receptacle on the power adapter.
2 Plug the NOOK end of the USB cable into your NOOK.
3 Plug the power adapter into a compatible electrical outlet. If your NOOK was o, it turns on.
Do not turn it o again. Your NOOK charges.
4 When charging, the charging indicator light to the left of the USB port lights up yellow.
5 When your NOOK is fully charged, the charging indicator light goes out.
6 Unplug the power adapter from the electrical outlet and unplug the USB cable from your NOOK.
Power
Adapter
USB Charging
While your NOOK is charging through USB, you can use it as a USB drive, or you can eject/
unmount the NOOK drive and a supplemental microSD card drive if present and use your
NOOK for reading. We recommend that you do not shop or download content while USB
charging.
You can charge your NOOK from a USB port on a personal computer. This is convenient if you are
using USB drive mode on your NOOK to transfer files, or if you are using a personal computer for
NOOK User Guide Power and Charging 20
other things. It is not, however, the fastest way to charge your NOOK. You can charge your NOOK
Computer / USB
through USB when it is on or sleeping. If your NOOK is o, it will not charge, so it turns on when
you plug it in.
If your personal computer sleeps or hibernates, it will probably stop charging your NOOK.
To charge your NOOK, adjust the settings on your computer so that it does not sleep or
hibernate.
We recommend that you turn your NOOK on before plugging it into USB. If you plug your NOOK
into USB when it is o, your personal computer might have trouble recognizing your NOOK while it
is starting. Your computer should recognize your NOOK after your NOOK has completed its startup.
The first time you connect your NOOK to a personal computer, your NOOK should be
on. The computer will install USB drivers for your NOOK, and display a message that this
operation is in progress. It will also display a message when it completes installing drivers.
You can ignore these messages. They do not aect charging.
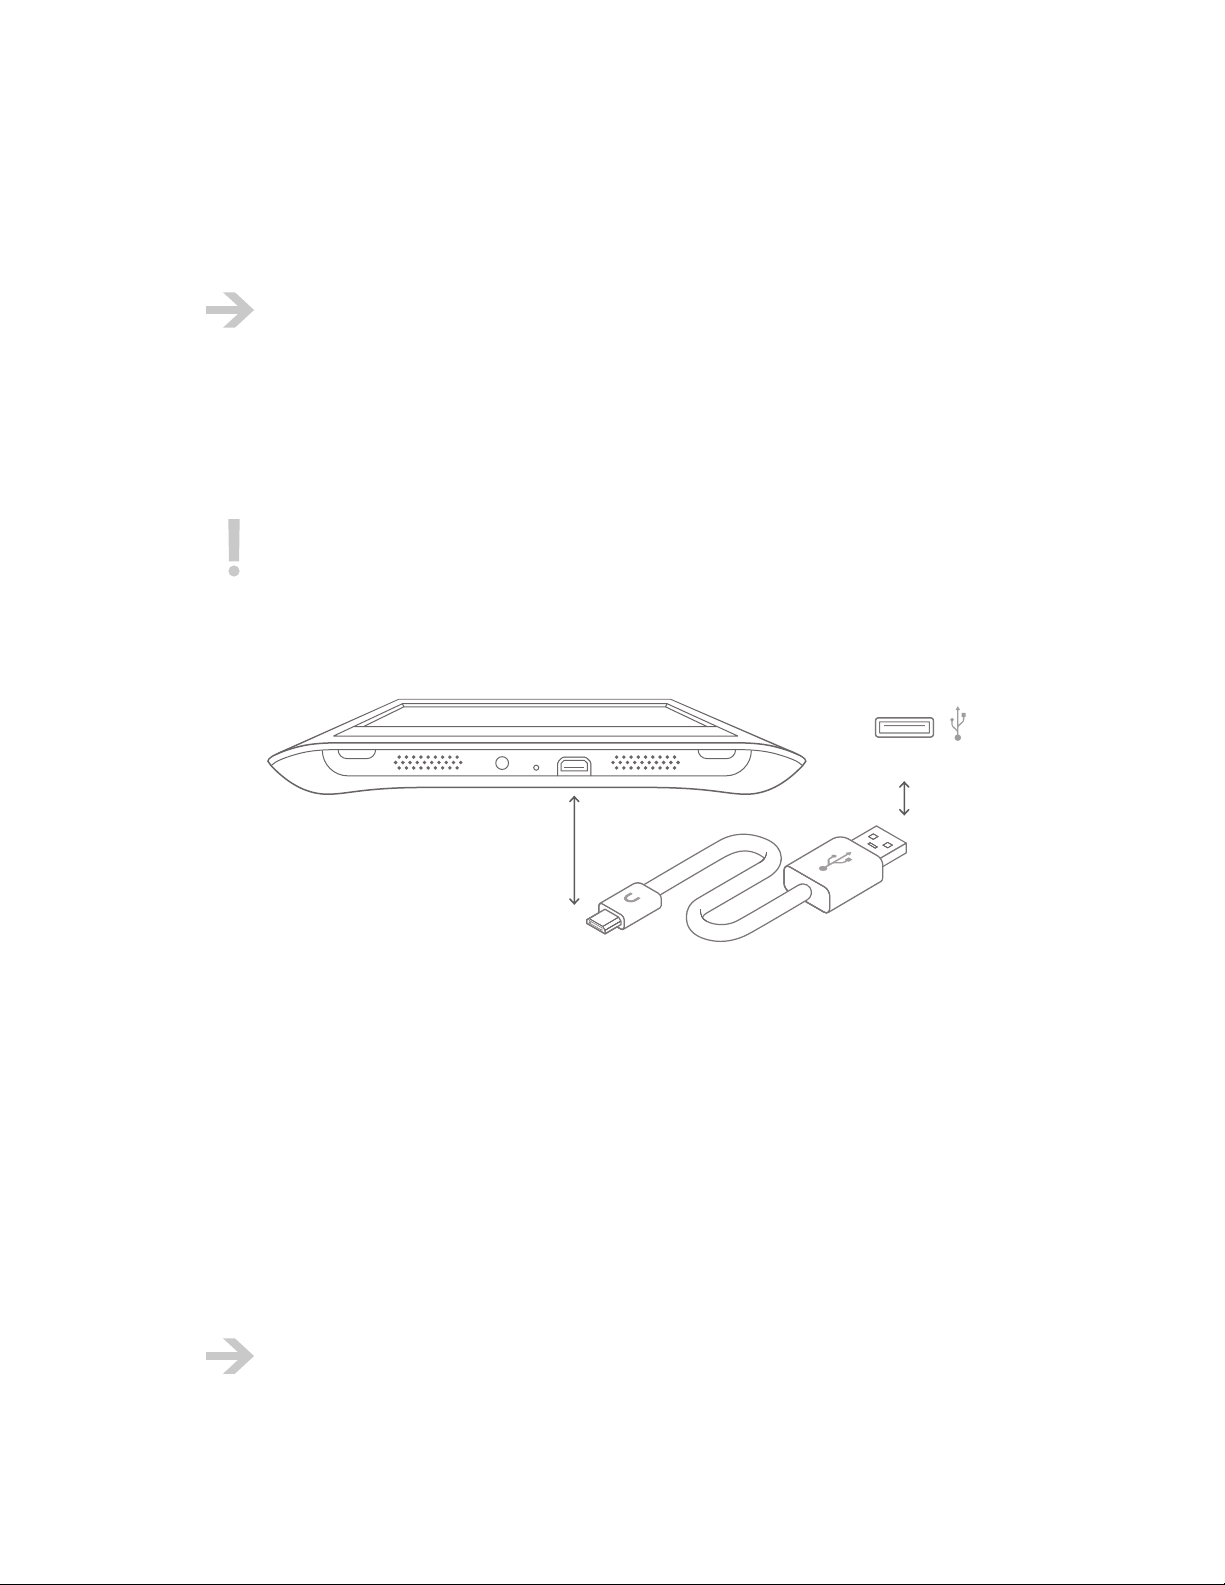
USB
Cable
To charge your NOOK using USB:
1 Power on your personal computer.
2 Plug the smaller end of the USB cable into the USB/charging port on your device.
3 Plug the larger end of the USB cable into a USB port on your computer. The USB cable
connections are shown in the drawing above.
What happens now depends on power state your NOOK is in:
O: Your NOOK turns on and charges. Do not turn it o again. After it starts, it displays a pop-
up message that indicates USB is available.
While your NOOK is starting, your computer might try to recognize your NOOK as
a USB device and fail. When this happens, your computer displays a message about an
unrecognized USB device. You can ignore and dismiss the message.
NOOK User Guide Power and Charging 21

Sleeping: Your NOOK charges and enters USB drive mode.
On (including when the touchscreen backlight is o ): If the touchscreen backlight is o, it is
turned on. Your NOOK charges and enters USB drive mode.
When charging, the charging indicator light to the left of the USB port lights up yellow. You can
use your NOOK for reading while it is charging by ejecting/unmounting the NOOK drive, and a
supplemental drive if present. For more information, see “USB Connectivity” on page 155.
4 When your NOOK is fully charged, the charging indicator light goes out.
5 If you have not already ejected/unmounted the NOOK drive from your computer, and a
supplemental drive if present, do so now.
6 Unplug both ends of the USB cable.
Charging Recommendations
Your NOOK contains a lithium polymer battery. To maximize battery life:
• Partially discharge the battery rather than fully discharging it. For example, charge
your NOOK when you see the low charge alert, rather than continuing to use it until it turns
itself o.
• Avoid high temperatures if possible for charging, use, and storage. For more information,
see “Temperature Ranges” on page 40.
• Charge the battery half way before storing your NOOK for a week or more.
• Turn your NOOK o for storage. If you are going to store your NOOK for more than a
week, turn it o.
Hard Reset
A hard reset is a more aggressive way of turning o your NOOK. It is not resetting your
NOOK to factory settings, which is explained in “Security Settings” on page 180.
A hard reset turns your NOOK o. It also clears some state information. No content or metadata is
deleted. You should generally not need to perform a hard reset of your NOOK.
You might want to perform a hard reset in these circumstances:
• If your NOOK is not charging
• If your NOOK is on but not responsive
NOOK User Guide Power and Charging 22

• When asked to do so by Customer Service
To perform a hard reset:
1 Get a clock or watch that shows seconds.
2 Press and hold the power button of your NOOK for 20 seconds, then release the power button.
3 Press and release the power button to turn on your NOOK.
If you remove the battery and leave it out for 10 seconds, put it back in, and then turn on your
NOOK, your NOOK also performs a hard reset.
NOOK User Guide Power and Charging 23
Your NOOK
This section explains your NOOK hardware. It also summarizes key features and explains the Home
menu.
Hardware Highlights
Your NOOK has:
• Reading screen: This is where you read your eBooks, magazines, and newspapers. The
reading screen is a 600 x 800, 3.57 x 4.82 inch (6-inch diagonal), reflective high-resolution E Ink
electronic paper display. The reading screen displays 16 levels of gray. The reading screen is not
a touchscreen; you navigate on the reading screen using the color touchscreen.
Reading Screen
Touchscreen
the daily my library shop reading now
• Color touchscreen: A 480 x 144 color touchscreen is used for menu navigation, D-pad
navigation, a keyboard, and display of cover thumbnail graphics. The touchscreen supports
gestures (for example, tapping your finger to choose a menu item and swiping your finger to
scroll through eBook covers). The screen brightness is controlled by an ambient-light sensor (or
you can set a fixed level). When you are reading and the touchscreen is not lit, you can turn
pages by swiping your finger on the touchscreen.
• Wireless connectivity: Your NOOK or NOOK Wi-Fi can use Wi-Fi connectivity to connect
to the Barnes & Noble eBookstore, to synchronize with your online digital library, and for
games
NOOK User Guide Your NOOK 24
other tasks that require Wi-Fi (for example, using the web browser or downloading large files,
including software updates). Your NOOK or NOOK Wi-Fi can connect to Wi-Fi hotspots in
Barnes & Noble Bookstores, AT&TTM hotspots in the United States, and many other Wi-Fi
hotspots. The NOOK (Wi-Fi + 3G model) can also use B&N Fast & Free Wireless (a fast cellular
data network) for all connectivity that does not require a Wi-Fi hotspot connection.
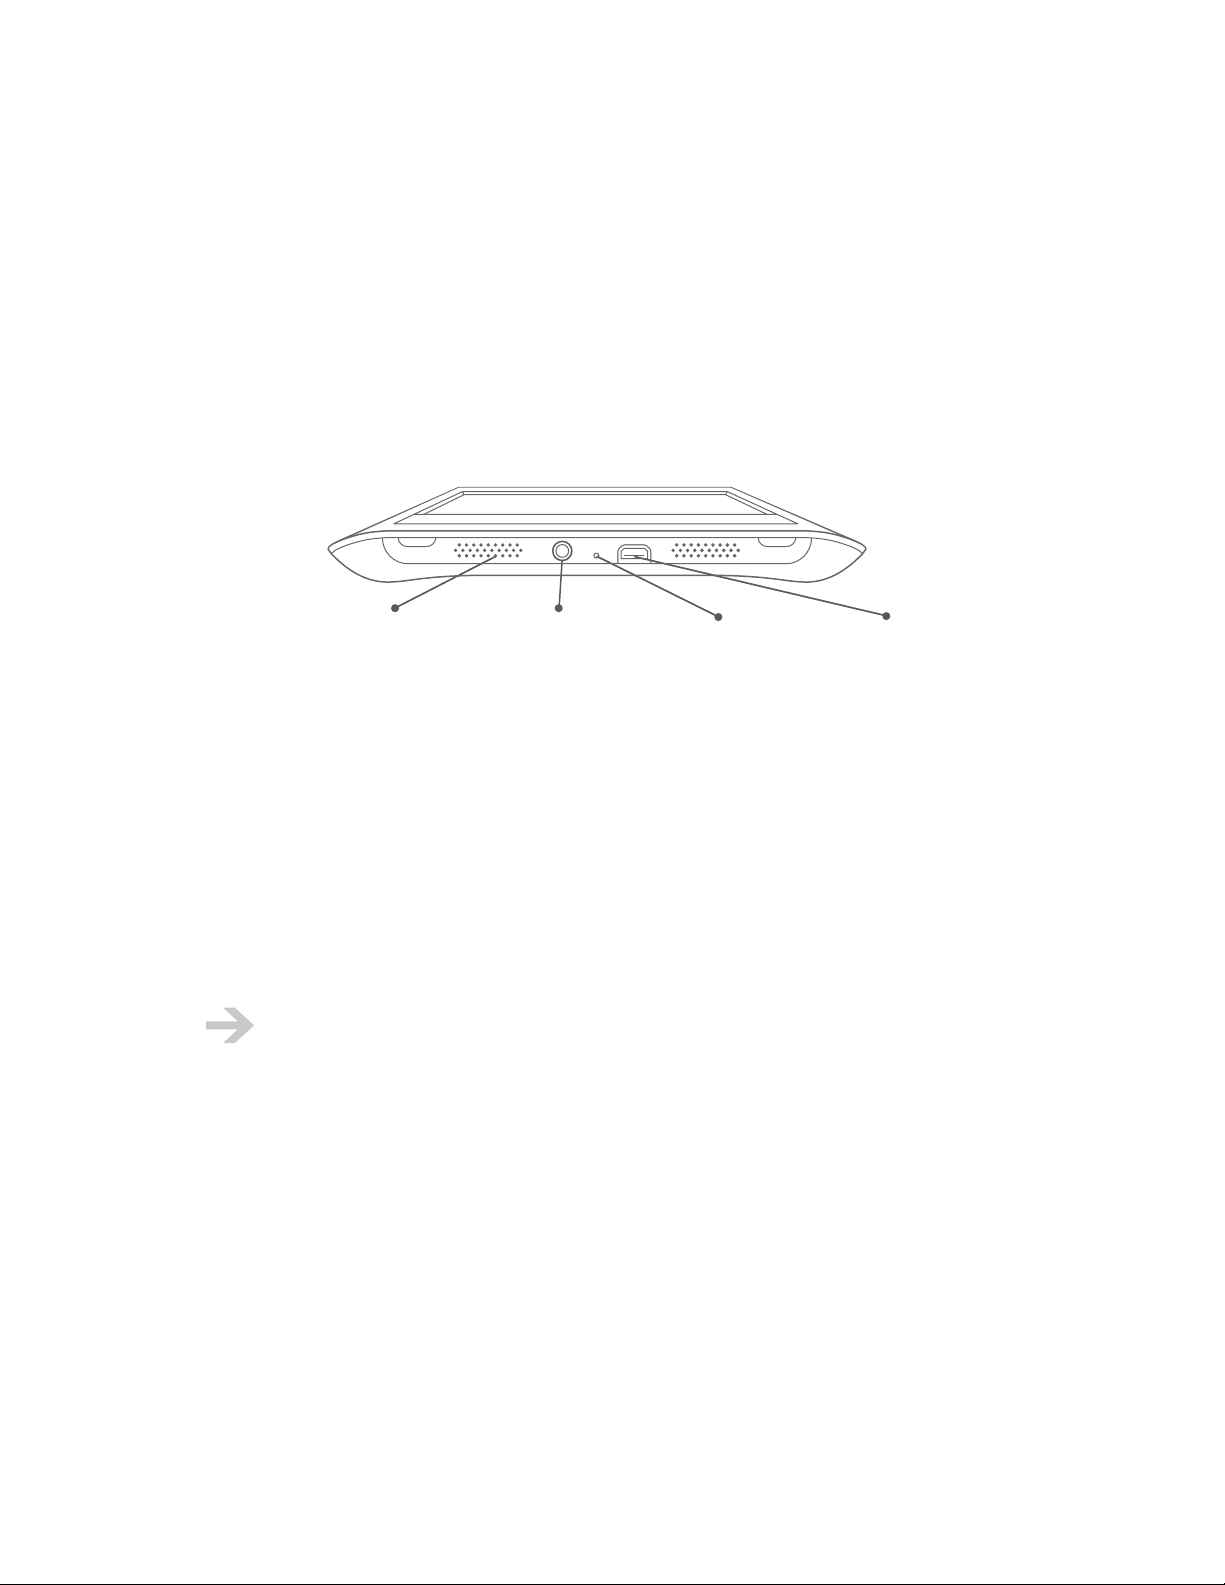
• Speakers and a headphone jack: Your NOOK has a speaker for audio. For better sound
quality, you can use headphones.
• A USB socket: Your NOOK has a micro-B USB socket for managing files from a personal
computer. It is also used for charging.
Speaker
Headphone
Jack
Charging
Indicator Light
USB Port
NOOK Models
There are two NOOK models:
• A NOOK Wi-Fi can connect to Wi-Fi hotspots only.
• A NOOK (Wi-Fi + 3G model) can connect to Wi-Fi hotspots and the B&N Fast & Free
Wireless network (a cellular data network).
Most of the time when this guide refers to a NOOK, it means any NOOK (both models).
When there is a need to distinguish between a NOOK (meaning any NOOK) and a NOOK
(meaning the Wi-Fi + 3G model), we add “Wi-Fi + 3G model” to the latter.
Feature Highlights
What can you do with your NOOK? Here are some highlights:
• The Daily: The Daily is a message center for daily B&N feeds and notifications. Check
back daily to read issues of feeds and to learn about special oers, deliveries to your library,
subscriptions, lending oers, and software updates.
NOOK User Guide Your NOOK 25

• Shopping: With your NOOK, it is easy to buy eBooks, magazines, and newspapers from the
Barnes & Noble eBookstore. Some digital content is even free! You can also download eBooks
to your NOOK from your personal computer.
• In-Store content and merchandising: When you bring your NOOK into a Barnes & Noble
Bookstore, you can access in-store content and merchandising. Merchandising content includes
in-store, exclusive editorial content, promotion coupons, and information about in-store events.
• Library: Your library provides access to your B&N eBooks, magazines, and newspapers. It also
provides access to your other eBooks. For B&N content, you have a unified view of the content
on your NOOK and in your online digital library. You can browse and search for content in your
library. The My Documents part of your library provides access to your other eBooks in ePub,
PDB, and PDF formats.
• Lending eBooks: You can lend many eBooks in your library to friends. You can lend a book
that can be lent one time for 14 days.
• Reading: You can read eBooks, newspapers, magazines, and feeds in The Daily on your
NOOK. Your NOOK supports ePub and PDB files (like those you’ll get from the Barnes & Noble
eBookstore), as well as PDF files. You can load reading matter from your computer using the
included USB cable. In addition to reading on your NOOK, you can read the same content on
B&N eReader applications on a wide range of platforms.
• In-store reading: While in Barnes & Noble Bookstores, you can read many eBooks free of
charge. These are not samples, but are entire eBooks. Read an eBook for up to one hour per
calendar day.
• Browsing: When connected to a Wi-Fi hotspot, you can browse the World Wide Web on
your NOOK.
• Games: Play games on your NOOK. Play chess and Sudoku.
• Bookmarking, highlighting, and annotating: While reading an eBook, you can bookmark
pages, highlight text, and add notes.
• Ratings: Are you reading a good eBook or periodical? You can rate the eBook or periodical
from your NOOK.
• Personal content and audio: You are not limited to B&N content on your NOOK. You can
download digital content to your NOOK from your personal computer using USB.
• Music and audiobooks: You can listen to music while reading. You can also listen to
audiobooks.
• Personalize your NOOK: You can download screensaver and wallpaper images to your
NOOK and choose among several text fonts and six text sizes for reading.
NOOK User Guide Your NOOK 26
Home Menu
The starting point for everything is the Home menu. You see the Home menu when you first power
on your NOOK, and can reach at other times by tapping the Home button between the reading
screen and touchscreen (it has the NOOK logo on it: ).
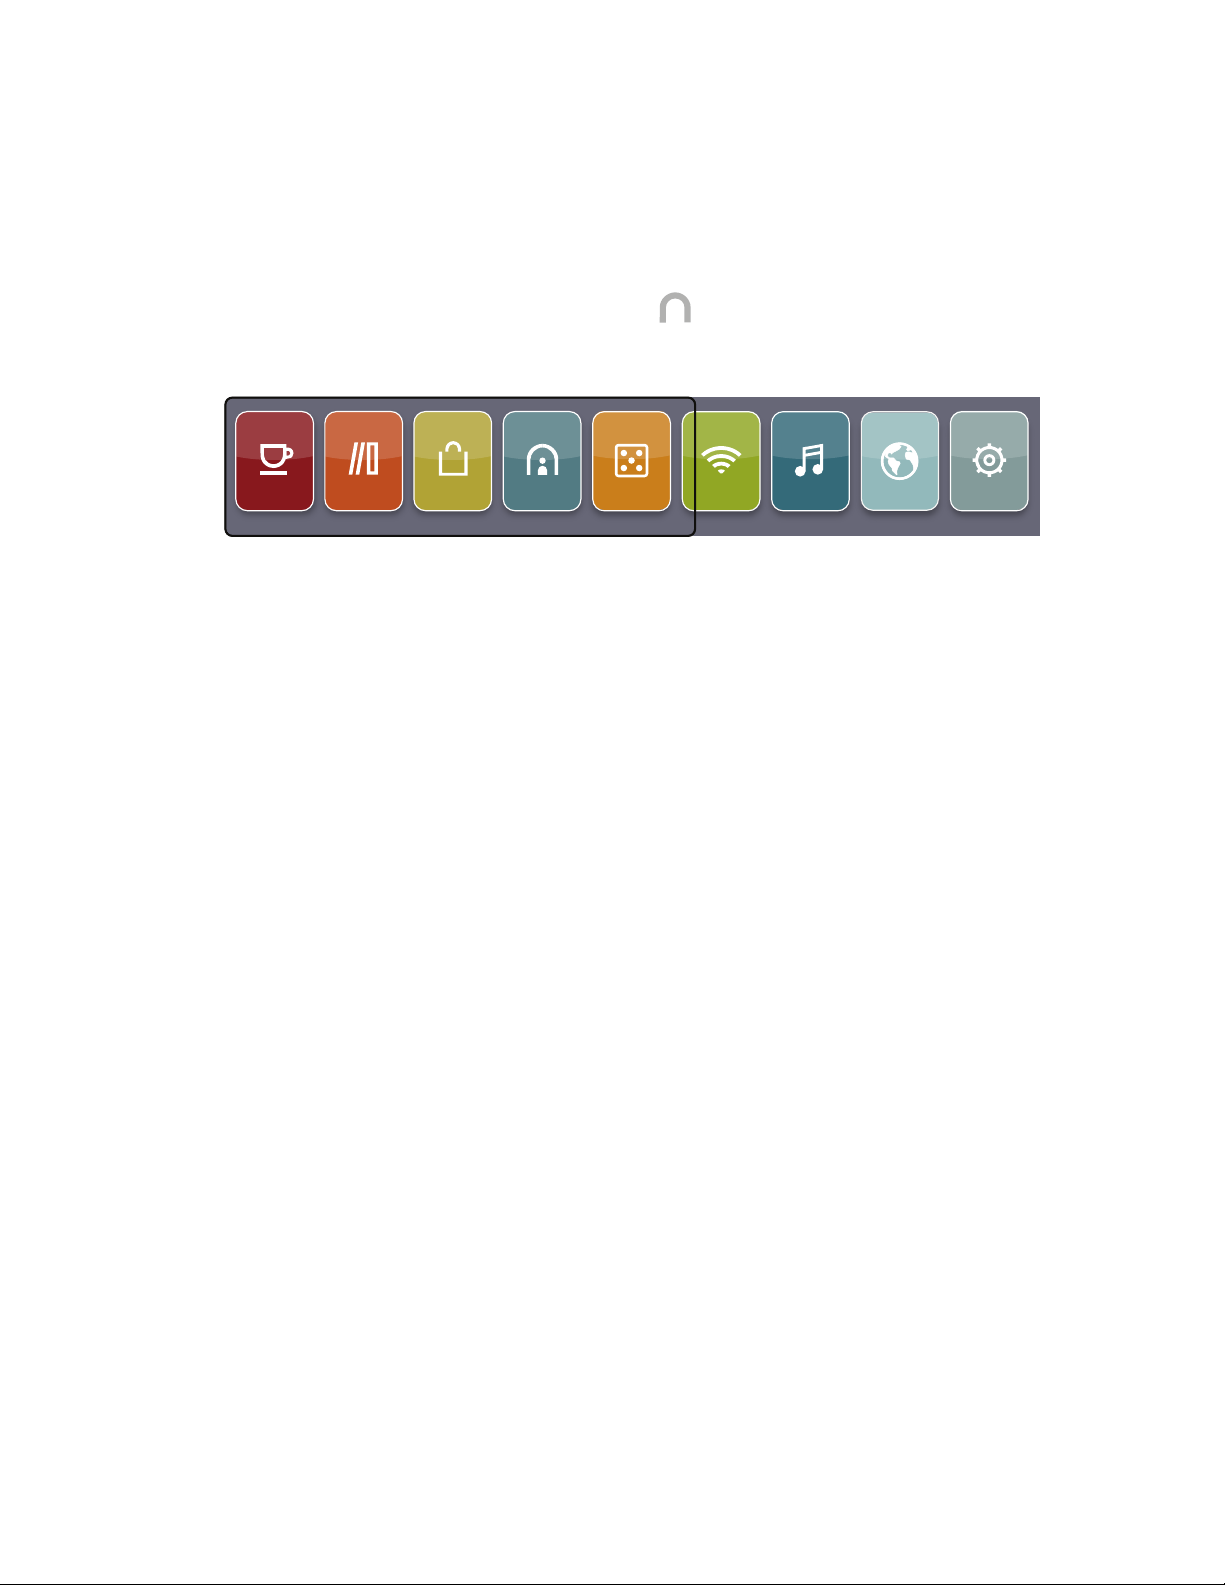
The Home menu looks like this:
the daily my library shop reading now
web
settingsaudiogames wi-fi
The Home menu has 9 buttons. The black frame above indicates the part of the Home menu you
can see without scrolling. Scroll the Home menu to the left and right to reveal all of the buttons.
From the Home menu, choose one of the main areas of your NOOK and follow the menus to
accomplish your goal:
• the daily: Receive exclusive new content in The Daily. Daybook presents a digest of B&N
review content, an article of the day, and a significant event that occurred on this date in literary
history. Unbound is a NOOK and B&N eReader blog. Look for daily posts on great new
eReads, bestselling eBooks, and eBook oers (including free downloads). The Daily is also a
message center. You receive notifications about delivery of periodical issues, oers from friends
to lend you eBooks, and free software updates and enhancements.
• my library: Your library gives you easy access to your eBooks, magazines, and newspapers.
Your NOOK has lots of space for eBooks (about 1500), which can be expanded by adding your
own microSD card. Your library keeps online back-up copies of all of the eBooks you have
previously purchased from BN.com or your NOOK.
• shop: Access the eBookstore at Barnes & Noble.com from your NOOK anytime. The
eBookstore has the world’s largest selection of electronic books and periodicals. You can
wirelessly purchase and download eBooks, subscribe to newspapers and magazines, purchase
single issues of newspapers and magazines, and download free samples of eBooks so you can
try before you buy. When in a Barnes & Noble Bookstore, select eBooks and current issues of
periodicals to read in the store.
• reading now: Your NOOK remembers where you are reading in each eBook or periodical. Tap
reading now on the Home menu to pick up right where you left o.
• web: When connected to a Wi-Fi hotspot, you can browse the World Wide Web on your
NOOK.
• wi-fi: Connect to Wi-Fi hotspots.
• games: Play games on your NOOK. Play chess and Sudoku.
NOOK User Guide Your NOOK 27

• audio: Listen to music, audiobooks, and other audio files such as podcasts.
• settings: Personalize your NOOK to suit your taste. Choose your own wallpaper and
screensavers. Store email addresses of friends and family to help you share great books easily.
Register your NOOK to take advantage of its full functionality. You’ll want to connect your
NOOK to your BN.com account so that you can make purchases and download free samples.
Home Screen
The Home screen is on the reading screen when the Home menu is on the touchscreen. The Home
screen displays your wallpaper.
A tip bubble might be displayed in the lower left corner of the reading screen. The tip bubble gives:
• The number of new periodical issues, that is, the number of periodical issues delivered to your
online digital library during the last 48 hours that you have not opened and read.
• The number of new oers to lend you eBooks, that is, the number of oers to lend you eBooks
received during the last 48 hours that you have neither accepted nor declined.
Back Cover
This section explains how to remove and re-attach the back cover of your NOOK.
You should almost never have to remove the back cover. The only times when you need to remove
the back cover are:
• To insert a microSD card to add storage capacity to your NOOK
• To replace the battery
Removing the Back Cover
The first time you do this, you might want to do it over a soft surface such as a sofa
cushion, in case you drop your NOOK. The back cover is biased toward staying on, rather
than toward coming o.
To remove the back cover:
1 Unplug your NOOK from the power adapter or USB cable.
2 Press the power button for about 5 seconds to turn o your NOOK.
3 Hold your NOOK in one hand with the front facing your hand and the bottom edge up.
NOOK User Guide Your NOOK 28
4 Locate the tab protruding from near the center of the bottom of the back cover, adjacent to the
USB port (see the drawing below).
5 Place a finger of your other hand on the tab and pull the tab away from the device, as shown.
The back cover will start to separate from your NOOK. The tab will move away from your
NOOK, as will one or both of the adjacent corners of the back cover. As the back cover
separates from your NOOK, you will hear unsnapping sounds.
6 Separate the other adjacent corner if it did not already separate.
7 Move the fingers holding the cover 1/3 of the distance down the cover. Apply outward pressure
(away from your NOOK) on the cover. You can insert your fingers between your NOOK and
back cover as you do this. You will hear more unsnapping sounds and the cover will come free.
NOOK User Guide Your NOOK 29

Attaching the Back Cover
This section explains how to attach the back cover of your NOOK.
To attach the back cover:
1 Place your NOOK face down with the bottom facing you on a hard, flat surface, for example on
a table or desk.
2 Line up the bottom of the cover with the bottom of your NOOK, as shown in the drawing
below.
3 Moving your hands up the edges of the back cover (where the raised parts of the back are),
press down gently in the places shown. You should hear snapping sounds.
NOOK User Guide Your NOOK 30

Removable
Back Cover
Do not press on the middle of the back cover or bend your NOOK. Doing so might
damage the screens.
4 Look around the edges of your NOOK to see that the back cover is securely attached. If the
back cover is not securely attached, press edges together that did not seat correctly. If that does
not work, remove the back cover and repeat this procedure.
SIM Card
This section applies to the NOOK (Wi-Fi + 3G model) only.
The SIM card in your NOOK (Wi-Fi + 3G model) is pre-installed. It is used when your NOOK
connects to the Barnes & Noble eBookstore and NOOK data services over B&N Fast & Free
Wireless. You will never need to remove or change the SIM card. Specifically, please note the
following about the SIM card:
• You cannot use your NOOK’s SIM card in a dierent mobile device, for example, a mobile
phone.
• You cannot use a dierent SIM card, for example, from a mobile phone, in your NOOK.
NOOK User Guide Your NOOK 31

• The SIM card in your NOOK is associated with your NOOK, whether registered or not. Do not
swap SIM cards between NOOKs. There is no reason to, and afterwards they will not be able to
connect to B&N Fast & Free Wireless.
Built-in Storage
Your NOOK has 2 GB of built-in flash memory. Of this, about 1.3 GB is available for storage of
your digital content. This is enough storage space for about 1500 eBooks or 300 periodical issues.
Periodicals tend to be larger because they have more graphical content.
The storage capacity for eBooks and other digital content will be aected by how many
personal files (for example, music files) you download onto your NOOK.
For information about how to add a supplemental microSD or microSDHC card, see “Adding
Storage” on page 166.
Battery
You do not install the battery. It is pre-installed and should last for years.
Replacing the Battery
If necessary, the battery can be replaced. A replacement battery must be of the following type:
Barnes & Noble Lithium Polymer battery
Model Number BNRB1530
Rating: 3.7V, 1530mAh, 5.66Wh
Replacement batteries are available in the Accessories section of the www.nook.com website. You
will need a small Phillips head screw driver (size 0 or 00).
To replace the battery:
1 Unplug your NOOK from the power adapter or USB cable.
2 Turn o your NOOK.
3 Carefully remove the back cover. Full instructions are given in “Removing the Back Cover” on
page 28.
NOOK User Guide Your NOOK 32

Screw
Back (Inside)
Battery
4 With the back facing you, turn your NOOK so that the top is directed away from you. The
screw and tab holding the battery in place are at the top of the battery, as shown in the drawing
above.
5 Unscrew and remove the screw that holds the battery in place. Sit it down where it won’t get
lost. You will need it in a moment.
6 Lift the battery out as if it has a hinge long the bottom edge. Insert your finger nail in the
semicircular space at the upper left of the battery, press against the top of the battery (pressure
toward the bottom of your NOOK), and move your finger upward. The top edge of the battery
should rise up out of the slot that holds the battery.
7 Grasp the battery with your other hand, and lift it out.
8 Insert the replacement battery. Insert the two tabs on the bottom edge of the battery in
matching slots in the bottom edge of the battery compartment. Lower the top edge into place.
The battery should lie flat.
9 Screw in the screw.
10 Replace the back cover. Full instructions are given in “Attaching the Back Cover” on page 30.
Optional Accessories
Optional accessories are available at your local Barnes & Noble Bookstore and online at BN.com.
Some are only available online. If you purchase an accessory from a vendor other than BN.com,
ensure that it is compatible with your NOOK. For NOOK accessories on the BN.com website, direct
your browser to:
www.barnesandnoble.com/nook/accessories/
NOOK User Guide Your NOOK 33

B&N and Designer Covers
You can purchase a B&N cover for your NOOK at your local Barnes & Noble Bookstore or online
from BN.com. The cover helps protect your NOOK from daily wear and tear. For example, it
keeps dust from accumulating on the screens, reducing the need to clean them. It provides some
protection against spills.
Device Backs and Frames
Add color to your nook by changing the device back or adding a device frame.
Lights
Add a clip-on light or light case to read where there is otherwise not enough light.
Power Adapter and USB Cable Kit
You can purchase an additional or replacement NOOK power adapter and USB cable online at
BN.com.
Only use the NOOK power adapter. Other power adapters might damage your battery and NOOK.
You can use any USB 2.0 compatible USB cable that has a standard-A and micro-B plug. If you use a
dierent USB cable than the one in the box, we recommend a shielded one.
microSD and microSDHC cards
You can purchase 2 GB microSD and 4, 8, and 16 GB microSDHC cards to add storage space to
your NOOK.
NOOK User Guide Your NOOK 34

International Use and Languages
This chapter summarizes information about using your NOOK outside of the United States and
explains your NOOK’s support of languages.
Using your NOOK abroad
Your NOOK is designed for use in the United States, Canada, and the United States territories. You
can use it to read anything already on your NOOK when travelling anywhere in the world.
If you live or travel outside of the United States, be aware of the following points regarding using
your NOOK:
• Purchasing a NOOK: You can only purchase a NOOK if you have a billing address in the
United States, U.S. territories, or Canada. You cannot purchase a NOOK if you have an
international or APO/FPO (Army Post Oce / Fleet Post Oce) billing address.
• B&N Fast & Free Wireless Coverage: Cellular coverage for the NOOK (Wi-Fi + 3G
model) is available in specific areas of the continental United States, Alaska, Hawaii, Puerto Rico,
and the U.S. Virgin Islands. Coverage is provided by AT&TTM Wireless. A coverage map can be
found on the web (look for data coverage).
Coverage does not extend to other networks through roaming.
• Pre-ordering eBooks: You can only pre-order eBooks if you have a billing address in the
United States or Canada. You cannot pre-order eBooks if you have an international, U.S.
territory, or APO/FPO (Army Post Oce / Fleet Post Oce) billing address. You can only
pre-order digital content when physically within the United States (including Alaska and Hawaii),
American Samoa, Guam, Puerto Rico, Palau, the U.S. Virgin Islands, and Canada. Some items are
not available for purchase in Canada.
• Purchasing digital content from the Barnes & Noble eBookstore on your NOOK:
You can only purchase digital content if you have a billing address in the United States, U.S.
territories, or Canada. You cannot purchase digital content if you have an international or APO/
FPO billing address. You can only purchase digital content when physically within the United
States (including Alaska and Hawaii), American Samoa, Guam, Puerto Rico, Palau, the U.S. Virgin
Islands, and Canada. When you travel outside of these areas, you can download digital content
to your NOOK that you have already purchased (if you have a Wi-Fi connection), but you
cannot buy digital content. Some items are not available for purchase in Canada.
• Purchasing items on the BN.com website: You can only purchase digital content if you
have a billing address in the United States, U.S. territories, or Canada. You cannot purchase
digital content if you have an international or APO/FPO (Army Post Oce / Fleet Post Oce)
billing address. You can only purchase digital content when physically within the United States
(including Alaska and Hawaii), American Samoa, Guam, Puerto Rico, Palau, the U.S. Virgin
Islands, and Canada. Some items are not available for purchase in Canada.
NOOK User Guide International Use and Languages 35

• Automatic connection to AT&T hotspots: Automatic connection to AT&T hotspots only
happens in the United States. In other places, you can connect to AT&T hotspots manually.
• Registering and unregistering your NOOK: You can register and unregister your NOOK
from anywhere that you have a Wi-Fi hotspot that your NOOK can use.
• Downloading previously purchased items: You can download previously purchased items
to your NOOK from anywhere that you have a Wi-Fi hotspot that your NOOK can use.
• Lending and borrowing eBooks: You can lend and borrow eBooks from anywhere that you
have a Wi-Fi hotspot that your NOOK can use.
• Automatic delivery of periodicals: Periodicals are automatically downloaded to your NOOK
from anywhere that you have a Wi-Fi hotspot that your NOOK can use.
• Archiving and unarchiving content: You can archive and unarchive items from anywhere
that you have a Wi-Fi hotspot that your NOOK can use.
Languages
Your NOOK has fonts with Latin character sets that support the following languages when reading
eBooks and other digital content, when fonts are not embedded:
Afrikaans, Basque, Catalan, Danish, Dutch, English, Finnish, French, German, Icelandic,
Indonesian, Italian, Norwegian, Portuguese, Spanish, and Swedish
Your NOOK can display eBooks in other languages if the fonts are embedded in the eBook files.
Language support in other parts of the NOOK, for example in the Library and Audio Player, is variable.
NOOK User Guide International Use and Languages 36

Safety and Care
This section explains important information about safety and about caring for your NOOK.
Safety
If you follow some straightforward precautions, your NOOK is a safe device.
Electricity
Your NOOK is an electrical device. Only use an approved power adapter. If you open the back
cover, unplug the device from the power adapter and turn it o first.
Water
Your NOOK is not a waterproof device. If it starts to rain, get under cover or put your NOOK
away. Don’t read in the bathtub. You could ruin your NOOK.
Situations that Demand Your Attention
Some situations demand your attention. If you shouldn’t be reading a book while doing them, then
you shouldn’t be reading on your NOOK either. Driving? Don’t even think about it. Operating a
train? Don’t be daft. Watching children? Yes, but only if you can do it in a way that fairly divides
your attention and does not endanger them. Use common sense—the eBook will still be on your
NOOK to read tomorrow.
Airplanes
To use your NOOK on an airplane, set it to Airplane mode. For more information about use on
airplanes, see “Use on Airplanes” on page 38.
Electronic Equipment
If you are around sensitive electronic equipment, for example in a hospital, ask if you may use your
NOOK. You probably can if you set it to Airplane mode, except in an intensive care setting.
Battery
Please note the following safety information about the battery:
• Do not disassemble or open, crush, bend or deform, puncture or shred the battery.
• Do not modify or remanufacture the battery, attempt to insert foreign objects into the battery,
immerse the battery in or expose it to water or other liquids, or expose the battery to fire,
explosions, or other hazards.
NOOK User Guide Safety and Care 37

• Only use the battery for the system for which it is specified.
• Only use the battery with a charging system that has been qualified with the system per this
standard. Use of an unqualified battery or charger may present a risk of fire, explosion, leakage,
or other hazards.
• Do not short circuit a battery or allow metallic conductive objects to contact battery terminals.
• Replace the battery only with another battery that has been qualified with the system. Use of an
unqualified battery may present a risk of fire, explosion, leakage, or other hazards.
• Promptly dispose of used batteries in accordance with local regulations.
• Battery usage by children should be supervised.
• Avoid dropping the device or battery. If the device or battery is dropped, especially on a hard
surface, and the user suspects damage, take it to a service center for inspection.
• Improper battery use may result in a fire, explosion, or other hazards.
• For battery charging through USB, only connect your NOOK to products that bear the USB-IF
logo or have completed the USB-IF compliance program.
Use on Airplanes
Your NOOK is a portable electronic device, and as its use on airplanes is regulated. Here is the
story:
• Always obey the instructions of the flight crew. They will inform you when you can and cannot
use portable electronic devices.
• Before pushback from the gate, you can use your NOOK with Airplane mode on or o. This is
the time to set Airplane mode to on, if you haven’t already done so.
• During takeo, your NOOK must be turned o (not just asleep) and stowed. You cannot use it.
• At cruising altitude, when instructed by the flight crew that portable electronic devices are
permitted, you can use your NOOK with Airplane mode on.
• During landing, your NOOK must be turned o and stowed. You cannot use it.
• After landing, you can use your NOOK with Airplane mode on or o.
Also remember that, on an airplane, material you read should be appropriate for a public setting.
Turning Airplane mode On and O
Turning Airplane mode on turns the wireless circuitry o. Your NOOK will not send or receive
radio signals until Airplane mode is turned o.
NOOK User Guide Safety and Care 38

Turn Airplane mode on for the duration of an airplane flight, from take-o through landing.
Turn Airplane mode on in other settings where radio signal broadcasting is prohibited. Ask
someone whether Airplane mode should be turned on in other settings such as hospitals.
Turning Airplane mode o (the default setting) lets your NOOK manage when the wireless circuitry
is turned on and o, so that your NOOK can send and receive radio signals when it needs to.
When Airplane mode is on, the status bar contains this icon:
To turn Airplane mode on or o:
1 On the Home menu, tap wi-fi. The current setting is displayed in the Airplane mode menu.
2 Tap the Airplane mode menu to toggle between On and O.
You can also toggle Airplane mode on and o from the settings > Airplane mode menu.
On the NOOK (Wi-Fi + 3G model), when you turn Airplane mode o, Wi-Fi remains o if
it was o prior to Airplane mode being turned on, and Wi-Fi is turned on if it was on prior
to Airplane mode being turned on.
Checked Baggage
You will want to use your NOOK on the flight, of course, but we have to mention this. Rules
are rules. If you travel on an airplane with your NOOK in checked baggage, the Federal Aviation
Administration requires that:
• Your NOOK is turned o (fully o, not just asleep).
• Your NOOK is packed to prevent it from being turned on inadvertently. It should be packed
so that nothing can press against the power button. This might take a bit of care. Packing your
NOOK with its optional B&N cover on will help.
Caring for Your NOOK
Here are some recommendations about caring for your NOOK. If you follow them, your NOOK
should have a long productive life.
NOOK User Guide Safety and Care 39

Temperature Ranges
Your NOOK should function as designed in these temperature ranges:
Use Fahrenheit Celsius
Charging 41– 95 ºF 5 – 35 ºC
Operation 32 – 104 ºF 0 – 40 ºC
Storage 5 – 113 ºF -15 – 45 ºC
Outside of these ranges, your NOOK might develop power, display, and/or software issues. If
temperatures are extremely cold or hot, permanent physical damage can result. Such damage is
not covered by the warranty. Storage applies to temporary locations like the trunk of your car (or
other motor vehicle) as well as long-term storage.
Even on a day that is not very hot, the passenger compartment or trunk of a car can be
extremely hot. Do not leave your NOOK in a car.
High storage temperatures reduce battery life. For more information, see “Charging
Recommendations” on page 22.
Water and Weather
Your NOOK has a degree of water resistance, for example, to a misty fog. (We do want San
Francisco residents to buy NOOKs.) If your NOOK gets damp, just dry the surface with a clean, dry
cloth before you put it away. But don’t let your NOOK get too wet. It is not water proof. If it does
get wet, let it dry completely before using it.
Reading Screen
You do not need to touch the reading screen, and should try to not do so. Fingerprints can
permanently damage the reading screen if they are not removed. If the screen gets fingerprints,
grime, dust, or water on it (or for that matter, red wine, spaghetti sauce, or mustard), you should
clean it with a damp soft cloth (for example, a micro-fiber cloth). Do not use any chemicals to clean
the reading screen.
The reading screen has a scratch-resistant coating, but it is possible to scratch the screen, so you
should clean it carefully. Keeping the screen clean in the first place is a better strategy than cleaning
it. You should clean it infrequently, not often.
Color Touchscreen
The color touchscreen is meant for touching, but you should also clean it. You might clean it after
several days of use, or if you notice the screen needs cleaning. Clean the touchscreen with a damp
soft cloth (for example, a micro-fiber cloth). Do not use any chemicals to clean the touchscreen.
NOOK User Guide Safety and Care 40

B&N and Designer Covers
You can purchase an optional B&N or designer cover for your NOOK at your local Barnes & Noble
Bookstore or online from BN.com. The cover helps protect your NOOK from daily wear and tear.
For example, it keeps dust from accumulating on the screens, reducing the need to clean them. It
provides some protection against spills.
For more information about the covers, see “B&N and Designer Covers” on page 34.
Warranty Coverage and the B&N Protection Plan
Your NOOK is backed by a one year manufacturer’s warranty against defects in materials and
workmanship. For a copy of this warranty, see “One Year Limited Warranty” on page 205. The
warranty is also available at:
www.barnesandnoble.com/nook/protectionplan
You can extend your NOOK’s coverage by purchasing a two-year B&N Protection Plan to help
safeguard NOOK against spills, drops, and other accidents. The B&N Protection Plan can only be
purchased together with a NOOK, not later.
Information about the B&N Protection Plan can be found at:
www.barnesandnoble.com/nook/protectionplan
NOOK User Guide Safety and Care 41

Operating the Controls
This section explains all the buttons and menus you use to control your NOOK. For information
about the power button, see “Power Button” on page 16.
Home Button
The Home button has the NOOK logo on it: . It uses a capacitive touch sensor, which can detect
a light touch. Tap or touch it; you do not need to press it, and nothing moves up and down.
Use the Home button as follows:
• When your NOOK is awake, tap the Home button to display the Home menu on the
touchscreen. On the reading screen you see your wallpaper. If you have new issues of
periodicals or lending oers, their numbers appear in a tip bubble.
• When the touchscreen is dark but your NOOK is not sleeping, you can tap the Home button
one time to light up the touchscreen. You can also tap the touchscreen.
Turning Pages
You can turn pages using the Next Page and Previous Page buttons. Turn pages while reading, and in
The Daily, the Shop, and your Library. In the Browser, turn to the next and previous web pages in a
series of pages you have visited.
While reading, you can also swipe your finger on the dark touchscreen to turn pages.
When browsing a list of items (for example, in your library or the Shop), if you are on the
last item on a page, you can tap (the Down button) to turn to the next page. If you are
on the first item on a page, you can tap (the Up button) to turn to the prior page.
Next Page and Previous Page Buttons
On each side of your NOOK, there are two buttons for turning pages:
(Previous Page): Display the previous page of content or of a paginated list
(Next Page): Display the next page of content or of a paginated list.
The Next Page and Previous Page buttons are typical buttons. When you press one, it moves down.
You can immediately raise your finger.
NOOK User Guide Operating the Controls 42

The Next Page and Previous Page buttons have a small dimple next to them; just to the right of the
buttons on the right side of your NOOK and just to the left of the buttons on the left side of your
NOOK. The touch dimples help you find the buttons by touch while reading.
Swiping Your Finger
When the touchscreen is dark, you can swipe your finger to turn pages:
forward back
Touch a spot on the touchscreen with your finger already moving sideways. The
swipe does not need to be a long one (it can be about 3/4 inch long), and it can be
anywhere on the touchscreen.
Page Indicators for Lists and Feeds
When you are turning pages in a list of items in The Daily, your library, the Shop, or in a feed, the
current page number and total number of pages are displayed in the upper right corner of the
reading screen. If there are between two and twelve pages, the current page is displayed graphically
at the bottom of the reading screen. For example, this indicates that you are on page 2 of 7:
NOOK User Guide Operating the Controls 43

Color Touchscreen
The color touchscreen displays menus, navigation controls, and when needed, a keyboard.
Reach areas of your NOOK including your library, the Shop, and the Reader from the Home menu.
Submenus allow you to use all of your NOOK’s features.
To light up the touchscreen when it is unlit, but your NOOK is not sleeping, tap the touchscreen, tap
the Home button, or press and release the power button.
Gestures
The touchscreen recognizes several gestures.
Touch
This is the most basic gesture for the touchscreen. When you touch a Home menu button, menu
choice, button, or key, the touchscreen highlights the chosen item. But your NOOK does not
perform the requested action until you raise your finger.
To move quickly to the top or bottom of a list in your library or the Shop, touch the Up or Down
button and hold it for about a second, and then raise your finger.
Tap
Briefly touch a Home menu button, menu choice, button, or key and then immediately raise your
finger. Your NOOK performs the action. If you tap very quickly, your NOOK might not register the
tap (and the highlighting does not happen). If what you expect to happen doesn’t, try a longer tap.
Double-Tap
Tap the same button twice in rapid succession. This is used for the Previous button in the audio
player to play the previous track.
Swipe
You can swipe to scroll through the Home menu and the covers in the gallery (Show Covers).
When you are reading and the touchscreen is not lit, you can swipe to turn pages.
How you swipe is slightly dierent for lit and dark touchscreens:
• Lit touchscreen: Touch a spot on the touchscreen, move your finger to another point, and
then raise your finger. Your finger can be moving laterally when you touch, or not. You can move
your finger a short distance or a long one. As you do, what is displayed on the touchscreen will
move.
NOOK User Guide Operating the Controls 44

• Dark touchscreen: Touch a spot on the touchscreen with your finger already moving
sideways. The swipe does not need to be a long one (it can be about 3/4 inch long), and it can
be anywhere on the touchscreen.
Scroll
If a context has more than four menu choices, not all of them fit on the touchscreen at the same
time. The first four are displayed, along with a scroll bar. You can scroll up and down in the menus
NOOK User Guide Operating the Controls 45

by swiping your finger. Swipe up to scroll down and vice versa. Place your finger on a menu choice
to scroll, not on the scrollbar. You also swipe to scroll the Home menu, as explained above.
Find
Go to
Bookmark s
Highligh ts and note s
Throw
If you swipe quickly in the gallery (Show Covers) and your finger is still moving when you raise it,
the covers continue to scroll for a little while. This is called “momentum,” and the gesture is to
throw. It also applies to scrolling in menus.
Menus
For everything that you are doing with your NOOK—reading, browsing the Shop, buying a
subscription, searching your library, and so forth—the touchscreen displays context-sensitive menus.
You use the menus to control what happens.
For example, here is the menu you see while viewing the My B&N Library section of your library:
Go to My Documents
Show Covers
Change view
Manage shelves
In this menu, you can:
• Go to My Documents (the other section of the library)
NOOK User Guide Operating the Controls 46

• View the gallery of covers
• Change view options:
• Showing and hiding shelves
• Sorting items in the library by most recent, title, or author
• Filtering what is displayed by content type (all, eBooks, magazines, or newspapers)
• Showing and hiding archived items
• Manage shelves
In the remainder of the menu, which you can scroll to, you can:
• View item details and options such as lending, rating, and archiving
• Check for new B&N content
• Search for items in the My B&N Library section of your library
Navigating the Menus
To display a lower-level menu:
A menu item with a sign near the right edge has submenus. Tap the menu item to display the
submenus. The higher level menu slides to the left.
To move back to a higher-level menu:
When you are below the top level of the menus, tap (the Back button) to return to the
immediately higher menu. The Back button is also used to return to the jumping-o page after
navigating using a link when reading.
To scroll when there are more than four menus:
When there are more than four menus, a scrollbar is displayed to the right of the menus:
To scroll in the menus, swipe your finger up and down on the menu items (not on the scrollbar).
To make a choice in the menus:
A menu choice without a sign near the right edge does not have submenus. Tap it to cause
something to happen. For example, tap Search to display a data-entry form on the main screen and
a keyboard on the touchscreen.
NOOK User Guide Operating the Controls 47

A menu choice with a sign near the right edge has submenus. Tap the menu choice to display the
submenus. For example, tap Preferences in the Reader to display the submenus Text size, Text font,
and Auto Save Page on BN.com.
Menus with On/O choices toggle when you tap them. In Settings, tap Airplane mode to turn
Airplane mode on. Tap Airplane mode again to turn Airplane mode o.
You will sometimes see a menu item that is gray. This means that you cannot choose that
menu item. The choice might not be relevant; for example, you cannot change the font for
a PDF file, so the Text font menu item is gray. This can also indicate that an operation is in
progress. For example, when your NOOK is automatically checking for new content in My
B&N Library, the Check for new B&N content menu item is gray until it has completed the
operation.
Navigation on the Reading Screen
Some content on the reading screen is navigable. That is, it has on-the-page navigation. These cases
are:
• Navigable lists, including ones that span more than one page. Examples include your library and
eBooks in the Shop.
• Navigable parts of documents, including tables of contents in books, magazines, and newspapers
and links from one part of a periodical to another part.
When you navigate on the reading screen, where you are is highlighted by a line above and below
and a in the left margin:
Text content of books, magazines, and newspapers is navigable when creating highlights and notes,
and when looking up words. For information about this navigation, see “D-pad” on page 52.
To move up and down in a navigable list on the reading screen:
Tap (the Up button) to move up. Tap (the Down button) to move down. Touch and hold
the Up button for 2 seconds to move directly to the top of the page. Touch and hold the Down
button for 2 seconds to move directly to the bottom of the page.
NOOK User Guide Operating the Controls 48

If you are on the last item on a page, you can tap (the Down button) to turn to the next page.
If you are on the first item on a page, you can tap (the Up button) to turn to the prior page.
In some cases, navigation on the reading screen uses the D-pad. For more information, see “D-pad”
on page 52.
To select the highlighted item in a list:
Tap (the Select button). The result is an action that depends on the context, for example,
opening an eBook or displaying item details.
Form Navigation and Data Entry
When you need to enter data, for example to register your NOOK or search, your NOOK displays a
data entry form on the main screen and a keyboard on the touchscreen.
Use the keyboard to type in the form, and to submit what you typed. Here is some information
about navigation in forms. More information about the keyboard is given below.
Single-page Form
Use the following controls to navigate on a single-page form:
To move to the right in a text entry box on a form: Tap the Right Arrow key.
To move to the left in a text entry box on a form: Tap the Left Arrow key.
To delete a character: Tap the Backspace key.
To clear the current text entry box on a form: Tap the Clear key.
or
or
To move up one field on a multi-field form: Tap the Up Arrow key or Up button.
To move down one field on a multi-field form: Tap the Down Arrow key or Down
button.
To move down one field on a multi-field form: As an alternative to the Down Arrow key,
you can tap the Return key to move down one line in a multi-line form. When on the
last line, pressing Return does nothing; it does not submit the form.
To cancel data entry: Tap Cancel. This cancels data entry and returns you to the menus.
To submit the entered data: Tap Submit.
NOOK User Guide Operating the Controls 49

Fields that Require a Choice
Some fields in data entry forms require a choice among specific values, for example among Wi-Fi
security types (Auto, None, WEP, WPA, or WPA2). When you navigate to such a field on a form,
the choices appear as touchscreen menu items. Tap your choice, and then use the Down button or
Down Arrow key to move to the next field.
Multi-page Form
Navigation on each page of a multi-page form is the same as for a single-page form. Use the
following controls to navigate between pages of a multi-page form:
To turn to the next page in a multi-page form: Press the Next Page button on the right
or left side of your NOOK.
To turn to the previous page in a multi-page form: Press the Previous Page button on the
right or left side of your NOOK.
Complete all pages of a multi-page form before submitting it, or an error will result. Submit the
form by tapping the Submit button.
Keyboards and Typing
When you choose a task that requires data entry, your NOOK displays a keyboard. There are
actually four keyboards, shown and described below.
Slight variations of these keyboards are used in specific circumstances. For example, the
keyboard for entering email addresses substitutes the underscore, @ sign, and period for
the Clear key.
Uppercase
A standard keyboard that displays the uppercase alphabet. Switch to this keyboard from the
lowercase keyboard by tapping . On any other keyboard, tap ABC and then . To lock the
uppercase keyboard (Caps Lock), tap on the uppercase keyboard.
123Cancel SubmitClear
NOOK User Guide Operating the Controls 50

Lowercase
A standard keyboard that displays the lowercase alphabet. This is the keyboard that is displayed
first. Switch to this keyboard from the uppercase keyboard by tapping twice. Switch to it from
other keyboards by tapping ABC.
123Cancel SubmitClear
Numbers and Symbols
A keyboard that displays the numbers and some symbols. Switch to this keyboard from the
lowercase or uppercase keyboard by tapping 123. Switch to it from the Additional Symbols
keyboard by tapping 123.
#+=
“ . , ? ! ‘
Cancel SubmitClear
ABC
Additional Symbols
A keyboard that displays the remaining symbols. Switch to this keyboard from the lowercase or
uppercase keyboard by tapping 123 and then #+=. From the Numbers and Symbols keyboard, tap
#+=.
][ { } # % ^ * + =
/_ | ` < > € £ ¥
123
“ . , ? ! ‘
Cancel SubmitClear
ABC
Number Pad
For data entry in a field that can only contain numbers, your NOOK displays a number pad:
NOOK User Guide Operating the Controls 51

D-pad
The D-pad (directional pad) control is displayed when you add highlights or annotations, and to
navigate on a page to look up a word. It lets you move the cursor in all four directions in the text,
so you can choose start and end points for highlights. It is also used to highlight a word to look up.
When navigating in an EPUB file, the up and down arrows on the D-pad controller
sometimes skip lines (for example, the last line in a paragraph if that line contains only one
word). You can reach every word using the left and right arrows.
Browsing
Browse content in your library and the Shop using navigation controls on the touchscreen and the
Next Page and Previous Page buttons.
Searching
You can search in your library (in the section of the library where you currently are, My B&N
Library or My Documents) and in the Shop. The procedure is the same.
In My B&N Library and the Shop, the search looks for items with all of the terms in any of the
following metadata fields:
• Title
• Contributors
• Author
• Publisher
• Subjects
In My Documents, the search looks for items with all of the terms in any of the following metadata
fields:
• Title
• Author
NOOK User Guide Operating the Controls 52

To search:
1 In the library (in My B&N Library or My Documents) or Shop, tap Search. Search is available
from the top-level menus, as well as from some submenus. If you want to search, and search is
not in the menu, use the Back button to move up a level.
2 Your NOOK displays a form on the main screen and a keyboard on the touchscreen.
3 Type the word or words for which you want to search. This is not a phrase search. The search
must match all of the words, but in any order and in any of the fields that are searched.
4 Tap Search.
5 Your NOOK displays a list of items that match your search. The search is for all content types.
If the list is longer than one page, it is paginated; you can navigate between pages with the Next
Page and Previous Page buttons.
6 (Optional) Tap Change view > Show and choose one of the content types: All, eBooks,
Magazines, or Newspapers.
Sorting Lists
In the My B&N Library part of the library, you can sort lists of items. You can sort by:
• Most recent (default): The list is sorted by how recently you have read the content. Content
that you have not read is sorted by how recently it was downloaded.
• Title: The list is sorted by the item’s title. The sort is a “smart” one, discounting the leading
words “A” and “The.”
• Author: The list is sorted by the last name of the first author.
You cannot sort a list of items after a search. A list of items found in a search is always
sorted by relevance. The algorithm gives more importance to title and author matches and
considers the numbers of matches in the fields searched.
To sort a list:
1 On the Home menu, tap my library.
2 (Optional) Tap Change view > Show and choose one of the content types: All, eBooks,
Magazines, or Newspapers.
3 Tap Change view > Sort by and choose a sorting order: Most recent, Title, or Author.
NOOK User Guide Operating the Controls 53

Filtering Lists
In the My B&N Library part of your library, you can filter lists my content type. (In the Shop, you
can browse by content type, but you cannot filter lists by content type.) You can show:
• All
• eBooks
• Magazines
• Newspapers
To filter a list:
1 On the Home menu, tap my library.
2 (Optional) Perform a search.
3 Tap Change view > Show and choose one of the content types: All, eBooks, Magazines, or
Newspapers.
4 (Optional; if you did not perform a search) Tap Change view > Sort by and choose a sorting
order: Most recent, Title, or Author.
Viewing a Gallery of Covers
In the My B&N Library section of your library and when browsing in the Shop, you can browse a
gallery of covers on the touchscreen.
The procedure for displaying and using the gallery of covers is documented in “Shop” on page 76 and
“Library” on page 90.
Status Bar
Your NOOK has a status bar at the top of the reading screen. The information displayed in the
status bar is the same everywhere except when you are reading. When you are reading, the status
bar displays dierent information. For information about the status bar when reading, see “Reading
Status Bar” on page 125.
NOOK User Guide Operating the Controls 54

This is the information displayed at all times except when you are reading:
Your NOOK is connected to a Wi-Fi hotspot in a Barnes & Noble Bookstore:
Airplane mode is on:
B&N Fast & Free Wireless signal strength (from low to high) if your NOOK (Wi-Fi + 3G model) is
connected to a B&N Fast & Free Wireless network:
Wi-Fi signal strength (from low to high) if your NOOK is connected to a Wi-Fi hotspot:
Battery charge levels when your NOOK is not charging (from low to full charge):
Battery charge levels when your NOOK is charging (from low to high):
The current time is displayed in 12-hour or 24-hour format, for example: 3:25 PM or 15:25. Tap
settings > Display > Clock > Clock format to set the clock format.
The current time can be incorrect on a NOOK Wi-Fi, and on a NOOK (Wi-Fi + 3G model)
in an area without access to a B&N Fast & Free Wireless network. If the time is not
correct, first connect to a Wi-Fi hotspot. This sets the minutes value. If the hour or AM/
PM value is not correct, tap settings > Display > Clock > Time zone to set the time zone
and settings > Display > Clock > Daylight Saving Time to turn Daylight Saving Time on or
o.
B&N Fast & Free Wireless Signal Strength Indicator
This section applies to the NOOK (Wi-Fi + 3G model) only.
NOOK User Guide Operating the Controls 55

Note the following about the B&N Fast & Free Wireless signal strength indicator:
• When Airplane mode is on: no B&N Fast & Free Wireless signal indicator is displayed, but the
Airplane mode indicator is displayed.
• When your NOOK is able to connect to a Wi-Fi hotspot, it preferentially uses the Wi-Fi
hotspot. It does not connect to B&N Fast & Free Wireless, and it does not display a B&N Fast &
Free Wireless signal strength indicator.
When Airplane mode is o and your NOOK is not connected to a Wi-Fi hotspot:
• When no compatible B&N Fast & Free Wireless network is detected, no B&N Fast & Free
Wireless signal strength indicator is displayed.
• When a compatible B&N Fast & Free Wireless network is detected, but the signal strength is
too low to permit a connection to the network, no B&N Fast & Free Wireless signal strength
indicator is displayed.
• When a B&N Fast & Free Wireless network connection has been established: the B&N Fast &
Free Wireless signal indicator shows a signal strength that ranges from one to four bars.
Wi-Fi Signal Strength Indicator
Note the following about the Wi-Fi signal strength indicator:
When Airplane mode is on: no Wi-Fi signal strength indicator is displayed, but the Airplane mode
indicator is displayed.
When Airplane mode is o:
• When Wi-Fi is o: no Wi-Fi signal strength indicator is displayed.
• When Wi-Fi is on but your NOOK is not connected to a Wi-Fi hotspot: no Wi-Fi signal strength
indicator is displayed.
• When Wi-Fi is on and a Wi-Fi connection has been established: the Wi-Fi indicator shows a
signal strength that ranges from one dot to one dot and three waves.
NOOK User Guide Operating the Controls 56

Wireless Connectivity
While reading and during most tasks, the radio in your NOOK is not on. It does not need to be,
and it would consume power. Even browsing your library, including B&N content in your online
digital library, is done on your NOOK. However, some tasks, such as browsing or searching the B&N
eBookstore, do require a wireless connection.
NOOK Models
There are two NOOK models:
• A NOOK Wi-Fi can connect to Wi-FiTM hotspots only.
• A NOOK can connect to Wi-Fi hotspots and the B&N Fast & Free Wireless network (a cellular
data network).
Most of the time when this guide refers to a NOOK, it means any NOOK (both models).
When there is a need to distinguish between a NOOK (meaning any NOOK) and a NOOK
(meaning the Wi-Fi + 3G model), we write NOOK Wi-Fi for the former and add “Wi-Fi +
3G model” to the latter.
Choosing a Connection
When your NOOK needs a connection, it starts the radio, determines the best network to connect
to, and connects. When it no longer needs the connection, it disconnects.
Your NOOK uses the best network it can find, considering network speed and signal strength. From
top priority to lowest priority, the choices are:
• In a Barnes & Noble store, your NOOK uses the store’s Wi-Fi hotspot.
• When within range of an AT&T hotspot in the United States, your NOOK uses the AT&T
hotspot.
• If you instruct your NOOK to use other Wi-Fi hotspots (by connecting to detected hotspots or
configuring hotspots), it uses one of those when it needs a network connection (if the signal
strength is OK).
• (Wi-Fi + 3G model NOOKs only) If none of the abovementioned Wi-Fi hotspots are
available, your NOOK uses B&N Fast & Free Wireless (a cellular data network). It picks the best
B&N Fast & Free Wireless connection based on speed and signal strength.
Some operations require a Wi-Fi connection. These include downloads of very large
eBooks, periodicals, and magazines; and some software updates.
NOOK User Guide Wireless Connectivity 57

Wi-Fi
Your NOOK can connect to Wi-Fi hotspots (places that oer wireless Internet access) that use the
802.11b or 802.11g standard.
Display menus for managing Wi-Fi hotspots by tapping wi-fi on the Home menu:
wi-fi
Alternatively, tap settings on the Home menu, then tap Wi-Fi. The menus are the same. Here we
will assume that you tap wi-fi on the Home menu.
Connecting to Wi-Fi Hotspots
Your NOOK can connect to Wi-Fi hotspots as follows:
• Your NOOK automatically detects and connects to Wi-Fi hotspots in Barnes & Noble
Bookstores.
• Your NOOK automatically detects and connects to AT&T Wi-Fi hotspots in the United States.
• Your NOOK automatically detects Wi-Fi hotspots that broadcast their network name (Service
Set Identifier, or SSID). It does not automatically connect to them, but in Settings you can
choose to connect to one of them. After you have chosen to connect to a hotspot, your
NOOK connects to it automatically in the future. If you no longer want to connect to a hotspot
automatically, you can ask your NOOK to forget the hotspot.
• You can configure one or more Wi-Fi hotspots, irrespective of whether they broadcast their
SSIDs. For example, you can configure Wi-Fi settings for a home network or the coee shop
around the corner. If you configure other Wi-Fi hotspots, your NOOK automatically connects to
them.
For a secured hotspot, you must provide the credentials needed to connect—the network
name (SSID), security type, and security code.
• Your NOOK can use most Wi-Fi hotspots that require acceptance of terms and conditions or
that require you to enter additional information for authentication (such as an account number
or a room number at a hotel) or payment information. When you attempt to connect to such a
hotspot, you are prompted to launch the web browser to supply the required information. After
you complete that step, your NOOK connects to the hotspot.
NOOK User Guide Wireless Connectivity 58

Automatic detection of hotspots requires three things:
• Airplane mode is o
• Wi-Fi is on
• Your NOOK has a sucient battery charge to continue running the Wi-Fi circuitry. When the
battery level is very low, your NOOK turns o wireless circuitry.
Your NOOK always automatically connects to Wi-Fi hotspots in Barnes & Noble Bookstores and
AT&T Wi-Fi hotspots. If your NOOK connects to one of these hotspots and you want to connect
to a dierent hotspot, navigate to the other hotspot in the Wi-Fi hotspot menu, choose the
hotspot, and tap Connect.
For hotspots other than Barnes & Noble Bookstore and AT&T hotspots, your NOOK automatically
connects to any detected Wi-Fi hotspot that you have either configured or previously connected to
and not asked your NOOK to forget. It does not automatically connect to other detected hotspots.
To connect to a hotspot for the first time:
1 Tap wi-fi > Wi-Fi hotspot.
2 After your NOOK scans for and displays detected hotspots, tap the hotspot in the menu. If no
password is needed to connect, your NOOK connects to the hotspot.
3 If a password is needed to connect, your NOOK prompts for it. Type the password and then tap
Submit. You only need to enter the password for a secure hotspot one time.
4 If terms and conditions or similar information is needed to connect, your NOOK displays a
message to that eect. Tap Launch Browser. Your NOOK opens the page on which you supply
that information in the web browser. Enter the required information and submit it. Your NOOK
connects to the hotspot.
Turning Wi-Fi On and O
This section applies to the NOOK (Wi-Fi + 3G model). To turn Wi-Fi on and o on a
NOOK Wi-Fi, turn Airplane mode on and o. For that procedure, see “Turning Airplane
mode On and O” on page 38.
If you don’t have a Wi-Fi hotspot to connect to and are not visiting a Barnes & Noble Bookstore,
you can turn Wi-Fi o. Doing so will give you longer battery life. Remember to turn Wi-Fi back on
when visiting a Barnes & Noble Bookstore. You also might need Wi-Fi for some software updates
(or you can obtain them from the www.nook.com/support website).
Your NOOK is smart about when it automatically turns Wi-Fi o. For example, it does so
when you are reading.
NOOK User Guide Wireless Connectivity 59

To turn Wi-Fi on or o:
On the Home menu, tap wi-fi. The current setting is displayed in the Wi-Fi menu. Tap the Wi-Fi
submenu to toggle between On and O.
Viewing Wi-Fi Hotspots
With Airplane mode o and Wi-Fi on, your NOOK displays a Wi-Fi hotspot menu. When you tap
Wi-Fi hotspot, your NOOK scans for hotspots. While it is scanning, the uppermost menu item reads
Scanning, please wait....When your NOOK has finished scanning, it displays a list of Wi-Fi hotspots
that are detected (in range and that have sucient signal strength to connect to).
At the bottom of the hotspot list, your NOOK displays hotspots that are not in range, but that are
remembered. Remembered hotspots include those that have been detected before or configured,
and that have been connected to. If your NOOK is currently connected to a Wi-Fi hotspot, that
hotspot has the word connected next to it.
Hotspots have the following indicator icons next to them:
• An icon that gives the Wi-Fi signal strength (from low to high):
• If the hotspot is secured, a lock icon is displayed:
A string next to the hotspot name describes the status of the hotspot:
• connected: Your NOOK is currently connected to this hotspot.
• connecting: Your NOOK is in the process of connecting to this hotspot.
• remembered: This hotspot has either been detected before and connected to or has been
manually configured. It is in range, but your NOOK is not connected to it.
• not in range, remembered: This hotspot has either been detected before and connected to
or has been manually configured, but it is not in range.
When Multiple Hotspots are In Range
When multiple Wi-Fi hotspots are in range, if you connect to more than one hotspot, your NOOK
will preferentially use the last hotspot connected to. If you want to use a dierent hotspot, have
your NOOK forget the most recently defined hotspot.
For example:
1 Your NOOK detects your home hotspot, and you choose to connect to it.
NOOK User Guide Wireless Connectivity 60

2 Later, you have issues with your own hotspot, and you choose to connect to a neighbor’s
hotspot (after asking politely).
3 You fix your hotspot, and want to use it again. To do so, tap wi-fi > Wi-Fi hotspot > neighbor’s
hotspot name > Forget.
4 Your NOOK will forget your neighbor’s hotspot (remember to thank him) and automatically
connect to your home hotspot.
Configuring and Using Wi-Fi Hotspots
This section explains procedures for configuring and using Wi-Fi hotspots.
To determine the Wi-Fi connection status and signal strength:
If your NOOK is connected to a Wi-Fi hotspot, the status bar contains an icon that gives the Wi-Fi
signal strength (from low to high):
The connection status and signal strength are also shown at the top level of the Wi-Fi application
on the reading screen, and in the Wi-Fi hotspot menu.
To view the currently connected Wi-Fi hotspot:
If your NOOK is connected to a Wi-Fi hotspot, the name is displayed at the top level of the Wi-Fi
application on the reading screen, next to Wi-Fi hotspot on the Settings summary, and in the
Wi-Fi hotspot menu in the Wi-Fi application and in Settings.
To connect to a detected Wi-Fi hotspot:
Your NOOK automatically connects to AT&T hotspots, including those in Barnes & Noble
Bookstores, and to detected Wi-Fi hotspots that you have previously connected to or configured.
For other hotspots, tap wi-fi > Wi-Fi hotspot. After your NOOK scans for and displays detected
hotspots, tap the hotspot in the menu and then tap Connect. If no password is needed to connect,
your NOOK connects to the hotspot. If a password is needed to connect, your NOOK prompts
for it. Type the password and then tap Submit. You only need to enter the password for a secure
hotspot one time.
NOOK User Guide Wireless Connectivity 61

To manually add and connect to a Wi-Fi hotspot:
To manually add a Wi-Fi hotspot, you must be within range of the hotspot. Your NOOK
connects to the hotspot when you add it. If it fails to connect, it does not add the hotspot.
You will need the following information:
• Network SSID (Service Set Identifier, that is, the network name for the hotspot)
• Security (Auto, None, WEP, WPA, or WPA2)
• Password: A code needed when connecting to a secured hotspot
Tap wi-fi > Wi-Fi hotspot > Other hotspot.... In the data-entry form, type the SSID, select the
security, and then tap Submit. If a password is needed, your NOOK prompts for it. Enter the
password and then tap Submit.
To disconnect from and forget a Wi-Fi hotspot:
Tap wi-fi > Wi-Fi hotspot. Tap the hotspot, and then tap Forget. This does two things. It
disconnects your NOOK from the hotspot, and it removes it from the list of networks to which
your NOOK connects automatically.
B&N Fast & Free Wireless
This section applies to the NOOK (Wi-Fi + 3G model) only.
Your NOOK (Wi-Fi + 3G model) can connect to B&N Fast & Free Wireless networks in the United
States (including Alaska and Hawaii), Canada, Puerto Rico, and the U.S. Virgin Islands. These
networks are AT&T cellular data networks that are available in specific areas of the continental
United States, Alaska, Hawaii, Puerto Rico, and the U.S. Virgin Islands. Coverage is provided by
AT&T Wireless. A coverage map can be found on the web (look for data coverage). You are not
charged for access to these wireless networks.
In areas without B&N Fast & Free Wireless coverage, you can rely on Wi-Fi to access network
services. Wi-Fi access is available in all Barnes & Noble Bookstores.
Your NOOK cannot connect to other cellular data networks. Wi-Fi connectivity is possible
globally. Purchasing is not possible globally. For more information about purchasing, see
“Ordering from your NOOK” on page 82.
The cellular radio connectivity is 850/1900 MHz dual band. Your NOOK can use GPRS, EDGE,
NOOK User Guide Wireless Connectivity 62

UMTS W-CDMA (3G), and HSDPA B&N Fast & Free Wireless networks. Your NOOK automatically
connects to the fastest network present that has sucient signal strength.
When not in the Reader, if your NOOK is connected to B&N Fast & Free Wireless, the status bar
contains an icon that gives the B&N Fast & Free Wireless signal strength (from low to high):
In Areas Without B&N Fast & Free Wireless
In areas without B&N Fast & Free Wireless, your NOOK can connect to supported Wi-Fi hotspots.
For information about Wi-Fi hotspots, see “Configuring and Using Wi-Fi Hotspots” on page 61.
If you use your NOOK in an area without B&N Fast & Free Wireless coverage:
1 If you have never been in an area with B&N Fast & Free Wireless coverage, connect to a Wi-Fi
hotspot. This sets the minutes value of the time.
2 Set the time zone in which you use your NOOK. Tap settings > Display > Clock > Time zone
and choose your time zone and settings > Display > Clock > Daylight Saving Time to turn
Daylight Saving Time on or o.
If you choose a time zone from the menus, and then travel somewhere with B&N Fast & Free
Wireless coverage, your NOOK will switch to the time zone indicated by the wireless network
connection, and Daylight Saving Time will be taken into account.
If you travel back to an area without coverage, choose the time zone again and set Daylight Saving
Time if necessary.
Dropped Connections and Lost Wi-Fi Connectivity
If your NOOK is performing an action over the air and the B&N Fast & Free Wireless connection is
dropped (for example, if the signal strength is poor), or if the Wi-Fi network goes down, it will do
its best to resume what it is doing. If it can resume, it will not inform you about the lost connection.
If it cannot resume, it will inform you that you should repeat the operation in an area with better
signal strength or when the Wi-Fi network is up again.
In Areas with No Wireless Connectivity
In areas with no wireless connectivity (no B&N Fast & Free Wireless, no Barnes & Noble Bookstore
hotspot, and no manually configured Wi-Fi hotspot), you can still use your NOOK as an eReader.
You can read anything that is in the local library on your NOOK. You can also obtain new B&N
content through an Internet connection on your personal computer (buy digital content from the
Barnes & Noble online store), and then transfer the files from your computer to the My Documents
part of your library on your NOOK using the USB cable.
NOOK User Guide Wireless Connectivity 63

Registering your NOOK
When you first turn on your NOOK, it leads you through registration. If you do not have
a Barnes & Noble online account, you must create one online at www.nook.com/setup.
After registration, your NOOK downloads information about the digital content in your
online digital library.
Registration is associating your NOOK with a Barnes & Noble online account (an account on the
BN.com website (www.barnesandnoble.com or www.BN.com). You must do this on your NOOK.
By registering your NOOK, you agree to the NOOK Terms of Service in “NOOK™ Terms of
Service” on page 185. The Terms of Service can also be found here:
www.nook.com/legal
A specific NOOK can be associated with only one Barnes & Noble online account.
Account Creation
Creating a Barnes & Noble online account precedes registration. During the welcome, you
are asked to choose an existing Barnes & Noble online account. You can also choose to defer
registration (for example, until after you create an account on the BN.com website).
If you cancel or otherwise do not complete registration from the welcome pages, you can
register later by tapping settings > Device > Register your nook.
You can create an account by directing your browser to www.nook.com/setup and clicking the Sign
in or create account image.
Your password can be 6 to 15 characters long. It can only contain alphanumeric characters (letters
A-Z and a-z and numbers 0-9), with no symbols, punctuation marks, special characters, or spaces.
Your password is case sensitive.
Default Credit Card and Billing Information
When you create an account online, specify a default credit card and billing information. This
information is required for you to make purchases from your NOOK. It is also required to borrow
eBooks.
Registration
This section explains how to register your NOOK. You also use these procedures to re-register a
NOOK that has been unregistered.
NOOK User Guide Registering your NOOK 64

Your NOOK leads you through the welcome pages that include registration the first time you turn it
on.
To register your NOOK (Wi-Fi + 3G model) using the welcome pages, you must be in an
area with B&N Fast & Free Wireless network coverage, in a Barnes & Noble Bookstore in
the United States, or at an AT&T hotspot in the United States. Alternatively, tap Register
later and register after connecting to any Wi-Fi hotspot.
To register your NOOK Wi-Fi using the welcome pages, you can be in a Barnes & Noble
Bookstore in the United States, at an AT&T hotspot in the United States, or you can
connect to any other Wi-Fi hotspot.
You can register either nook model later from Settings if the abovementioned circumstances are
true, as well as after connecting to any Wi-Fi hotspot.
The information you need during registration is:
• BN.com account email address
• BN.com account password
If your NOOK informs you that your account information is not valid, double check the information
you entered. You might have mistyped something.
To register your NOOK (Wi-Fi + 3G model):
1 When you first power on your NOOK, it displays pages and menus for registration.
2 Tap Tap here to get started.
3 Tap Register with your existing account.
4 Enter the email address and password for your Barnes & Noble online account, and tap Submit.
5 Tap OK to close the message about successful registration.
6 You are given the chance to take a quick tour, to learn about your NOOK’s controls and
features. Tap Take the tour.
To register your NOOK Wi-Fi:
1 When you first power on your NOOK, it displays pages and menus for registration.
2 Tap Tap here to get started.
3 (NOOK Wi-Fi) If you are not already connected to a Wi-Fi hotspot in a Barnes & Noble
Bookstore or an AT&T hotspot in the United States, your NOOK Wi-Fi prompts you to
connect to a local Wi-Fi hotspot. Tap Go to Wi-Fi Settings.
NOOK User Guide Registering your NOOK 65

4 Tap Wi-Fi hotspot and connect to a Wi-Fi hotspot. If a Barnes & Noble Bookstore or AT&T
hotspot is in range, connection will be automatic. Procedures for connecting to a detected
hotspot and for defining and connecting to a hotspot are in “Configuring and Using Wi-Fi
Hotspots” on page 61.
5 After connecting to a Wi-Fi hotspot, tap the Back button twice to return to the welcome pages.
6 Tap Register with your existing account.
7 Enter the email address and password for your Barnes & Noble online account, and tap Submit.
8 Tap OK to close the message about successful registration.
9 Tap OK to close the message about setting the clock.
10 You are given the chance to take a quick tour, to learn about your NOOK’s controls and
features. Tap Take the tour.
Initial Library Synchronization and Downloads
Immediately after registration, your NOOK downloads a local copy of the catalog from your online
digital library. It uses this catalog copy when searching your library. Your NOOK keeps the local
catalog in sync with the online catalog. For more information about synchronization, see “Library
Synchronization” on page 92.
Your NOOK does not assume that you want to download all of the content in your library to
your NOOK. It downloads content when you ask it to, or when you ask to read it. Your NOOK
does automatically download the five most recently purchased eBooks that were purchased from
BN.com within the 30 days prior to registering your NOOK.
Later, when you make purchases from the Barnes & Noble eBookstore, what you buy is
downloaded automatically to your NOOK.
An Unregistered NOOK
Fewer features are supported on an unregistered NOOK than on a registered one. On an
unregistered NOOK:
• You can browse the Shop, but not buy anything (including free eBooks and samples). If you try
to buy something, you will be prompted to register.
• You can read, bookmark, highlight, and take notes
• You cannot rate eBooks and periodicals.
• You can manage personal files and listen to music and audiobooks.
NOOK User Guide Registering your NOOK 66

• In Barnes & Noble Bookstores, you receive in-store special oers, but you cannot purchase
eBooks or periodicals until you register your NOOK. You also cannot use Read In Store to read
many eBooks in Barnes & Noble Bookstores.
Unregistering your NOOK
You should not need to unregister your NOOK. But in three cases you would want to:
• If you change the email address and/or password of your BN.com account. In this case,
unregister your NOOK, then make the account changes, and then re-register your NOOK with
the new information. Read the information below about the impact of unregistration and
re-registration.
• If you are giving your NOOK to a family member or friend, but do not want that person to
make purchases.
• If your NOOK is lost or stolen.
If you plan to sell your NOOK, we recommend that you back up your B&N and personal content,
unregister your NOOK, and then reset your NOOK to factory settings. For more information, see
“Resetting to Factory Settings” on page 183.
Unregistering your NOOK does not delete B&N or personal content, but it does delete
other information, as explained here. Note, however, that if you re-register your NOOK,
B&N content is deleted at that point. If you want to save the B&N content, you must copy
it to a location for personal content, for example, the my documents folder or to a
supplemental microSD card if present. Before re-registering your NOOK, also back up your
B&N content to your personal computer.
Unregistering your NOOK:
• Unregisters your NOOK, severing the association between your NOOK and your
Barnes & Noble online account
• Does not delete B&N content or personal content from the internal memory
• Does not delete personal content from a supplemental microSD card if present
• Moves B&N content from the my B&N downloads folder to the my documents folder in
the internal memory
• Deletes all metadata (for example, bookmarks, highlights, notes, and current reading position).
Information about shelves and shelving of items in your library is also deleted.
• Deletes information used to unlock DRM-secured content. To open the content on the
unregistered NOOK, you will need to enter your first name, last name, and default credit card
one time. If you purchased the content with dierent default credit cards, you will need to enter
NOOK User Guide Registering your NOOK 67

each credit card one time. For example, if you bought 10 eBooks last year with a credit card
ending in 1111, and another 10 eBooks this year with a credit card ending in 2222, then when
you open one of the eBooks from last year, you will need to supply the credit card ending in
1111, and when you open one of the eBooks from this year, you will need to enter the credit
card ending in 2222. After that, you can open all of the eBooks.
• Deletes the owner and device profile, information about Wi-Fi hotspots, contacts, and choices
of screensavers and wallpaper, from Settings
• Does not change other settings. For example, the settings for sleep and touchscreen timers and
Reader fonts are not changed.
To unregister your NOOK:
1 On the Home menu, tap settings.
2 Tap Device > Unregister your nook.
3 Tap Confirm.
Re-registering your NOOK
Re-registering a NOOK that has been reset to factory settings is exactly the same process as
registering a NOOK that has never been registered. For information about that process, see
“Registration” on page 64.
This section explains what happens during re-registration of a NOOK that has been unregistered.
Re-registering your NOOK deletes B&N content (the contents of the My B&N Library
section of your library, which is in the my B&N downloads folder on your NOOK). If you
want to save the B&N content, you must copy it to a location for personal content, for
example, the my documents folder or to a supplemental microSD card if present. Before
re-registering your NOOK, also back up your B&N content to your personal computer.
Re-registering your NOOK:
• Associates your NOOK with a Barnes & Noble online account (the same one as before or a
dierent one)
• Does not aect My B&N Library (B&N content in the my B&N downloads folder on
your NOOK), because there are no contents in My B&N Library on an unregistered NOOK.
If contents were present in the my B&N downloads folder, they were moved to the my
documents folder when your NOOK was unregistered.
• Does not delete personal content in the internal memory (documents, music, audiobooks,
screensavers, and wallpaper), or on a supplemental microSD card (documents, music, and
audiobooks) if present
NOOK User Guide Registering your NOOK 68

• Deletes all metadata (for example, bookmarks, highlights, notes, and current reading position).
Information about shelves and shelving of items in your library is also deleted.
• Deletes information used to unlock DRM-secured content
• Deletes the owner and device profile, information about Wi-Fi hotspots, contacts, and choices
of screensavers and wallpaper, from Settings
• Does not change other settings. For example, the settings for sleep and touchscreen timers and
Reader fonts are not changed.
After re-registration, you can download content from the online digital library for the new account.
If metadata for the current reading page and rating is associated with the content, it is downloaded
too.
NOOK User Guide Registering your NOOK 69

Personalizing your NOOK
Your NOOK is yours, and you can personalize it. You can:
• Choose among predefined wallpaper images, or supply your own. The wallpaper image is
displayed on the Home screen.
• Use one of the predefined screensaver sets, or provide your own sets of screensaver images. A
screensaver is a single, static image displayed on the reading screen when your NOOK is asleep.
• Customize settings. For example, you can change the text font and text size for the Reader. You
can also change the sleep and touchscreen timers.
• Add accessories, including covers, colored device backs and frames, and lights. For more
information, see “Optional Accessories” on page 33.
Wallpaper Images
To use your own wallpaper images, copy them from your personal computer to the folder
my wallpapers. You cannot place wallpaper images in other locations in the internal
memory, or on a supplemental microSD card. For more information, see “Files and
Folders” on page 163.
Choose among predefined wallpaper images, or choose one of your own images. Wallpaper images
must have file types JPG (or JPEG), GIF, PNG, and BMP.
To copy wallpaper images to your NOOK:
1 On your computer, prepare the files you want to use as wallpaper images. You can pick images
from dierent locations on your computer, but it simplifies the procedure to collect them into
one folder on your computer.
2 Connect your NOOK to your computer. For that procedure, see “Connecting your NOOK to
your Computer” on page 155.
3 Open the nook drive by double-clicking on its icon. Then open the my wallpapers folder.
4 Open the folder on your computer that contains the images you want to use as wallpaper
images.
5 Select the images in the folder on your computer and drag and drop them (or copy and paste
them) to the my wallpapers folder on the nook drive.
If images are in zip/archive files, extract them. If space on your computer is a consideration,
you can extract the images directly to the my wallpapers folder on the nook drive.
6 Close the window that displays the contents of the my wallpapers folder.
NOOK User Guide Personalizing your NOOK 70

7 Eject/unmount the nook drive and disconnect your NOOK from your computer. For that
procedure, see “Disconnecting your NOOK from your Computer” on page 156.
To choose a wallpaper image:
1 On the Home menu, tap settings.
2 Tap Display > Wallpaper.
3 Tap the wallpaper image you want to use.
4 Tap the Home button to view the wallpaper.
Screensaver Images
To use your own screensaver images, copy them from your personal computer to top-level
sub-folders of the folder my screensavers. The names of the sub-folders are displayed
in the Screensaver menu. You cannot place screensaver images in other locations in the
internal memory, or on a supplemental microSD card. For more information, see “Files and
Folders” on page 163.
Use one of the predefined screensaver sets Authors, Cityscape, or Nature, or provide your own
sets of screensaver images and then choose a set in Settings. Screensaver images must have file
types JPG (or JPEG), GIF, PNG, and BMP.
To copy screensaver images to your NOOK:
1 On your computer, prepare the files you want to use as screensaver images. Collect them into
one folder on your computer, or into several folders (for example, “beaches,” “mountains,”
and “cats.” Give each folder the name for the screensaver set. If images are in zip/archive files,
extract them. (You can also extract them directly to the destination folders on your NOOK.)
2 Connect your NOOK to your computer. For that procedure, see “Connecting your NOOK to
your Computer” on page 155.
3 Open the nook drive by double-clicking on its icon. Then open the my screensavers folder.
4 Open the folder on your computer above the one that contains the screensaver-set folder(s).
5 Select the screensaver-set folder(s) on your computer and drag and drop (or copy and paste)
the folder(s) to the my screensavers folder on the nook drive. The screensaver images must
not be in the my screensavers folder, but rather in top-level subfolders.
6 Close the window that displays the contents of the my screensavers folder.
7 Eject/unmount the nook drive and disconnect your NOOK from your computer. For that
procedure, see “Disconnecting your NOOK from your Computer” on page 156.
NOOK User Guide Personalizing your NOOK 71

To choose a screensaver set:
1 On the Home menu, tap settings.
2 Tap Display > Screensaver.
3 Tap the screensaver set you want to use. The names correspond to folder names in the folder
my screensavers in the internal memory. When your NOOK sleeps, you will see the next
screensaver image in the set.
Reader Settings
You can choose a text font and text size in the Reader:
• Preferences > Text font: You can choose among several text fonts, including serif and sans
serif style fonts. For more information about text font choices, see “Reader Text Fonts” on page
121.
• Preferences > Text size: You can choose among six text sizes: Extra small, Small, Medium
(the default), Large, Extra large, and Extra extra large. For more information about text size
choices, see “Reader Text Sizes” on page 122.
Settings
You can configure settings to make your reading experience the best for you. Several of the key
settings are explained here. For the full list, see “Settings” on page 176.
• Sleep timer (Display > Sleep timer): Time from last activity (touchscreen or button presses)
until your NOOK sleeps. During sleep, a screensaver picture is displayed on the main screen. The
touchscreen backlight will already be unlit. You can choose among 2, 5 (default), 10, 15, and 20
minutes.
• Touchscreen timer (Display > Touchscreen timer): Time from last touchscreen activity until
touchscreen backlight is turned o. You can choose among 10, 30 (default), and 60 seconds.
• Owner and NOOK names (Device > Edit your profile): You can specify your name and your
NOOK’s name. Tap settings > Device > Edit profile, fill in the form, and tap Submit. The name
of your NOOK is displayed in the status bar on the Home screen and on the Settings summary
page. If you specify only your name, that is used to name your NOOK (for example, Je ’s
NOOK).
NOOK User Guide Personalizing your NOOK 72

The Daily
The Daily is a bulletin-board style message center. You automatically receive daily editorial content
and notifications.
Read The Daily by tapping the daily on the Home menu:
the daily
When you visit The Daily, your NOOK retrieves up-to-date information from the data service,
unless it has already done so within the last 3 hours.
Message Types
The Daily lists four kinds of messages:
• Feeds: Also referred to as blogs, these are short pieces of writing.
• Notifications: Notifications inform you about events such as special oers and lending oers.
• Subscriptions: Subscription messages inform you about the delivery of issues of subscriptions.
The number of new issues is displayed in a tip bubble on the Home screen.
• Software Updates: Software update messages inform you about device software updates that
require Wi-Fi or a web download and USB transfer to your NOOK.
Tap Show and then tap the kind of messages you want to display: All (the default), Feeds,
Notifications, Subscriptions, or Software Updates.
Feeds
The Daily is where you receive issues of Barnes & Noble feeds. These include:
• Daybook presents a digest of B&N review content and an article of the day. It can also include
this day in literature. Did you know that on December 27th, 1831 Charles Darwin set sail on
H.M.S. Beagle, a journey that he would record in The Voyage of the Beagle, and that would
provide the foundation for his writings about evolution? Writing of his stay in the Galapagos
Islands, Darwin remarks:
NOOK User Guide The Daily 73

“I had not yet noticed by far the most remarkable feature in the natural history of this
archipelago; it is that the dierent islands to a considerable extent are inhabited by a dierent set
of beings.” He goes on to write “I never dreamed that islands, about 50 or 60 miles apart, and
most of them in sight of each other, formed of precisely the same rocks, placed under a quite
similar climate, rising to a nearly equal height, would have been dierently tenanted; but we shall
soon see that this is the case.”
• Unbound is a NOOK and B&N eReader blog. Look for daily posts on great new eReads,
bestselling eBooks, and eBook oers (including free downloads).
Notifications
Notifications include:
• Notifications about promotions and special oers
• Notifications about the expiration of the trial period for subscriptions
• Notifications about oers from friends to lend you books. The number of lending oers is
displayed in a tip bubble on the Home screen.
• Notifications regarding your NOOK or account
Procedures for The Daily
Following are procedures for The Daily:
To open The Daily and view messages:
On the Home menu, tap the daily. Your NOOK communicates with the data service and retrieves
up-to-date information.
To read an issue of a feed:
Navigate to the issue of the feed using the Up and Down buttons, and the Next Page and Previous
Page buttons if the issue is on a dierent page. Then tap Select. If the issue is longer than one page,
use the Next Page and Previous Page buttons to turn pages. (You cannot swipe your finger to turn
pages.) To return to The Daily, tap the Back button.
To read an issue of a periodical:
Navigate to the periodical issue using the Up and Down buttons, and the Next Page and Previous
Page buttons if the issue is on a dierent page. Then tap Select. If the periodical issue has already
NOOK User Guide The Daily 74

been downloaded, it opens in the Reader. If it has not been downloaded, tap Download. After the
issue downloads, tap Read.
To filter items:
Tap Show and then tap the kind of messages you want to display: All (the default), Feeds,
Notifications, Subscriptions, or Software Updates.
To sort items:
Tap Sort by and then tap a sorting order: Most Recent (the default), Type, or Author.
To view details for an item:
Navigate to the item using the Up and Down buttons, and the Next Page and Previous Page buttons
if the item is on a dierent page. Then tap Select.
To act on a notification:
Navigate to the notification using the Up and Down buttons, and the Next Page and Previous Page
buttons if the notification is on a dierent page. Then tap the menu choice for the intended action,
for example, Yes, Borrow This.
NOOK User Guide The Daily 75

Shop
Your NOOK’s wireless connectivity lets you shop for eBooks, magazines, and newspapers from the
Barnes & Noble eBookstore from your NOOK. There is no need to visit a website. You can buy
subscriptions to magazines and newspapers, or single issues.
What you buy is delivered to your online digital library immediately and downloaded to your NOOK
within about a minute. For a subscription, the current issue is delivered and downloaded.
For the NOOK (Wi-Fi + 3G model), downloads of very large eBooks, periodicals, and
magazines require a Wi-Fi connection.
Enter the Shop by tapping shop on the Home menu:
shop
You can browse and search in the Shop on an unregistered NOOK. You just can’t buy anything. If
you try to buy something from an unregistered NOOK, your NOOK will prompt you to register.
Shopfront
The first page of the Shop is the shopfront. It is a navigable page with three parts:
• Content types (eBooks, Magazines, and Newspapers) allow you to browse items of each
content type. Within a content type, you can browse subjects, for example, Romance and
Historical Fiction.
• Collections contains lists of content, such as Bestsellers and New Releases.
• A merchandising area at the bottom of the reading screen displays B&N corporate
promotions such as special oers. When you are in a Barnes & Noble Bookstore, the
merchandising area also displays in-store special oers (look for More in Store). The
merchandising area can span several pages. Use the Next Page and Previous Page buttons to
turn pages.
NOOK User Guide Shop 76

Magazines and Newspapers
You can purchase subscriptions to magazines and newspapers, as well as single issues. Issues
delivered by subscription and single issues have the same content. They are digital versions of the
magazines and newspapers that are delivered by Barnes & Noble to your NOOK. They dier from
print versions of the magazines and newspapers, and from web versions that are in some cases
available directly from publishers. For example, advertisements are not present.
Barnes & Noble subscriptions and web subscriptions are dierent. Purchasing one does not get you
the other.
Issues of periodicals purchased singly and delivered by subscription behave dierently in your
library. For more information, see “Managing Periodical Issues” on page 106.
Indicators
Items in the Shop can have the following indicators displayed:
An item that can be pre-ordered but that is not yet available
An item that has been available for purchase for less than one month
An eBook that can be lent
Occasionally, you will see items in the Shop that are displayed in gray. These items are in the Shop’s
catalog but for some reason are not currently available. You can check the BN.com website for
more information.
Browsing the Shop
You can browse the Shop to look for content. In any list of content, you can also sort and filter the
list, to make it easier to find what you are looking for.
To browse a content type or collection:
1 Navigate up and down the shopfront with the Up and Down buttons. When you reach the area
you want to browse, tap Select.
2 Navigate to an item using the Up and Down buttons, and the Next Page and Previous Page
buttons if the contents of the area fill more than one page.
3 Tap Select to view details about an item. From the details page, you can act on the item (for
example, you can purchase it).
NOOK User Guide Shop 77

To browse subjects:
1 From the shopfront, select one of the content types—eBooks, Magazines, or Newspapers.
2 Tap Browse subjects and then tap a subject.
3 Within a subject, there might be subordinate subjects. If so, you will see the Browse subjects
menu, and can tap Browse subjects and make another choice.
To browse the merchandising area:
1 Navigate from page to page of the merchandising area using the Next Page and Previous Page
buttons.
2 If an item in the merchandising area can be selected, View Promotion appears in the menus. Tap
View Promotion.
Alternatively:
1 Navigate from page to page of the merchandising area using the Next Page and Previous Page
buttons.
2 Move the highlight to the merchandising area using the Down button.
3 Tap Select to select an item in the merchandising area. This displays details about the item. From
the details page, you can act on the item (for example, you can purchase it). In some cases,
choosing an item in the merchandising area performs a search and displays matching items, for
example, all books by a specific author.
Searching the Shop
From the Shop on your NOOK you can search the Barnes & Noble eBookstore for eBooks,
newspapers, and magazines that can be downloaded to your NOOK. You cannot search for printed
books, digital audiobooks, NOOKs, or accessories. For those, visit the BN.com website or a Barnes
& Noble Bookstore.
The search looks for items with all of the search words in any of the following metadata fields:
• Title
• Contributors
• Author
• Publisher
• Subject
No matter where you are in the Shop, a search is throughout the entire Shop.
NOOK User Guide Shop 78

To search the Shop:
1 In the Shop, tap Search.
2 Use the keyboard to enter one or more search words in the form.
3 Tap Search. Your NOOK performs the search.
4 To return to the Shop, tap the Back button.
Result Lists
When a search completes, your NOOK displays the items that matched your search criteria. If no
items matched, a message indicates that.
Navigate up and down the search results list with the Up and Down buttons. Turn pages in a multipage list using the Next Page and Previous Page buttons. Tap Select to select an item.
Browsing a Gallery of Covers
When browsing a content type or collection, or when displaying a list of search results in the Shop,
you can browse a gallery of covers on the touchscreen.
To use the gallery of covers:
1 On the Home menu, tap shop.
2 Navigate to the part of the Shop where you want to browse covers. You can browse covers
for any list of content: a content type (for example, eBooks), a collection (for example, Best
Sellers), or a subject (for example, Children’s Books). Alternatively, tap Search, enter search
words, and tap Search to find items that match the search words.
3 Tap Show Covers. The cover for the item that is highlighted on the reading screen is in the
center.
4 Swipe your finger to the left and right to browse through the covers. If your finger is still moving
when you lift it, covers continue to move briefly (the “throw” gesture). Tap a cover to center
it in the gallery. As you move through the gallery, the reading screen is updated to highlight the
item in the center of the gallery. You can also use the Next Page and Previous Page buttons
NOOK User Guide Shop 79

to move through the paginated list. In this case, the covers on the touchscreen are updated to
correspond to the new pages.
5 Tap the cover in the center of the gallery to select the item and display item details. From the
item details, you can tap Buy for $n.nn or Get a free sample, amongst other choices.
To close the gallery of covers:
Tap the in the upper right corner of the touchscreen.
Viewing Item Details
You can view details about the items in the Shop.
To view item details:
In the Shop, when you navigate to and select an item, your NOOK displays a page with detailed
information about the item.
From that page, you can:
• Tap View > Overview to view a synopsis of the item, as well as information about the author if
available. If the overview is longer than a page, use the Next Page and Previous Page buttons to
turn pages.
• Tap View > Editorial reviews to view editorial reviews.
• Tap View > Reader reviews to view reader reviews.
• Tap View > Product details to view all of the data about the item, for example, the ISBN,
publisher, number of pages, etc.
Password Protection for Purchases
You can configure your NOOK to require entry of the Barnes & Noble account password when
making a purchase. By default, you do not need to enter a password. For information, see
“Requiring an Account Password for All Purchases” on page 182.
Making Purchases
Making purchases in the Shop is simple. The process described here applies to eBooks and
periodicals, to content that costs money and that is free.
NOOK User Guide Shop 80

To make a purchase:
1 On the Home menu, tap shop.
2 Browse to or search for content:
Use the Browse and Collections menus and navigation buttons (Up, Down, and Select) to
browse content types and collections. In a content type, you can also Browse subjects.
Or use the Search menu to search for what you want. Details on browsing and searching follow
this section.
3 Tap Select to select the item you want to buy. Your NOOK displays a detail page for the item
that includes pricing information.
4 Tap Buy for $amount.
5 Tap Buy Now to confirm your purchase. The item is immediately delivered to your online digital
library and downloaded to your NOOK.
6 If you are prompted to enter the password for your Barnes & Noble online account, type the
password and tap Submit.
7 Tap OK to dismiss the message about a successful purchase.
8 To read what you just bought, go to the My B&N Library section of your library, navigate to the
item, and tap Select. If the item has not been downloaded to your NOOK, your NOOK displays
item details when you tap Select. Tap Download. When the item has finished downloading, tap
Read.
Payment
Payment for purchases occurs as follows:
• eBooks and single issues of periodicals, including eBook pre-orders: If you have a
gift-card balance, the purchase is charged to your gift card, with any remainder being charged to
your default credit card. If you do not have a gift-card balance, the purchase is charged to your
default credit card. The charge is processed when the purchase is made.
• Periodical subscriptions: The first monthly charge is charged to your default credit card
on the 15th calendar day after the purchase is made. There is a 14 day free trial. For example,
for a subscription purchased on March 1st, the free trial is March 1st through 14th, and your
credit card is charged on March 15th. Subsequent monthly charges are charged to your default
credit card on the same day of the month (or the last day for a shorter month), the 15th of
each month in this example. A subscriptions continues, and you are charged, until you cancel
the subscription. If you cancel a subscription, you will receive a prorated refund to your default
credit card, based on the number of remaining issues in the billing period.
NOOK User Guide Shop 81

Orders
From your NOOK you can make the following kinds of orders:
eBook Periodical single
issue
Purchase Yes Yes Yes
Pre-order Yes No No
Download free item Yes No No
Download free sample Yes No No
Free trial period No No Yes
Periodical
subscription
Ordering from your NOOK
Note the following about ordering from your NOOK:
• Your NOOK must be registered. If you try to order content from an unregistered NOOK, you
will be asked to register.
• Only customers with billing addresses in the United States, U.S. territories, and Canada can
purchase digital content. It cannot be purchased by customers with International or APO/FPO
(Army Post Oce / Fleet Post Oce) billing addresses.
• Only customers with billing addresses in the United States and Canada can pre-order eBooks.
Pre-orders cannot be placed by customers with International, U.S. territory, or APO/FPO billing
addresses.
• You can only purchase or pre-order digital content when physically within the United States,
American Samoa, Guam, Puerto Rico, Palau, the U.S. Virgin Islands, and Canada. When you
travel outside of these areas, you can download digital content to your NOOK that you have
already purchased (if you have a Wi-Fi connection), but you cannot buy digital content. An
exception to this is free eBook samples, which can be purchased from anywhere there is
supported Wi-Fi connectivity.
• Some items are not available for purchase in Canada.
• Purchases made from your NOOK are charged to your default credit card, or gift card and
default credit card, as explained in “Payment” on page 81.
• If your default credit card has expired when you try to order an item (including a free eBook),
you will be asked to update the expiration date. Go to www.nook.com/account to update the
expiration date.
• Have you ever bought a book twice? I have. Your NOOK prevents you from ordering content
that you have previously ordered.
NOOK User Guide Shop 82

Pre-Ordering eBooks
You can pre-order eBooks that are not currently available, but that will be available soon. When the
eBook becomes available, it is delivered to your online digital library, you are charged for it, and you
receive a notification in The Daily that it is available.
You can only pre-order eBooks if you have a billing address in the United States or Canada. You
cannot pre-order eBooks if you have an international, U.S. territory, or APO/FPO (Army Post
Oce / Fleet Post Oce) billing address. You can only pre-order digital content when physically
within the United States (including Alaska and Hawaii), American Samoa, Guam, Puerto Rico, Palau,
the U.S. Virgin Islands, and Canada. Some items are not available for purchase in Canada.
Ordering Periodicals
For periodicals, you can purchase a single issue or a subscription:
• When you purchase a single issue, the current issue is delivered and downloaded to your
NOOK.
• When you purchase a subscription, you begin a 14-day free trial period. The current issue is
delivered and downloaded to your NOOK. On the 15th day, your default credit card is charged.
• You cannot order back issues of periodicals, or begin subscriptions in the past.
• You cannot pre-order periodical issues or subscriptions.
Downloading Free eBooks
When you view item details for an eBook and the eBook is free, you “purchase” it just as you
would for an eBook that costs something. The only dierence is that there is no charge.
Downloading Free Samples
Some eBooks have a free sample you can download. The free sample is typically the first part of the
book.
If there is a free sample for an eBook, Get free sample is a choice in the menus. If you have already
downloaded the free sample, you cannot download it again (you don’t need to).
If you own an eBook, including one that is currently lent to a friend, you cannot download the free
sample.
Free Trials for Periodicals
When you purchase a subscription to a periodical for the first time, you automatically get a 14-day
free trial.
NOOK User Guide Shop 83

During the free trial period, your credit card is not charged. During the free trial period, you can
cancel your subscription and you will not be charged. If you cancel the subscription, you cannot
restart the free trial (but you can purchase the subscription).
If you do not cancel your subscription during the free trial period, you will continue to receive
issues and you will be charged for the subscription.
Content Delivery
eBooks and just-purchased issues of periodicals are delivered to your online digital library
immediately.
Subsequent issues of periodicals are delivered to your online digital library once a day between 2
AM and 5 AM local time, approximately.
Pre-ordered eBooks are visible in your on-line digital library but are not available for download.
eBooks that you borrow are delivered when you accept the lending oers.
Late Deliveries
Has content you expected not arrived? Perhaps it is late. We hope content is never late, but we
also live in the real world. If content has not arrived, other possible explanations include:
• Your NOOK was o when the delivery attempt was made.
• A content-delivery server went down.
When B&N is able to deliver the content, we will. And you will receive a notification about its
delivery.
New Content
For new content, including purchases and current issues of subscriptions:
• The content is delivered to your online digital library.
• New content is flagged in the library with a indicator. The indicator is removed when
you read an item.
• A notice about the content delivery is sent to your NOOK. You can view it in The Daily.
• Some content is automatically downloaded to your NOOK. For other content, you must request
a download.
NOOK User Guide Shop 84

eWish List
Your eWish list is a list of books, magazines, and newspapers you would like to read. When a friend
recommends a book, add it to your eWish list. While searching for the book you are buying today,
you found others that intrigue you? Add them to your eWish list. You can revisit them later, and
decide whether you want to buy them. Are you over budget for book purchases this month? Well,
there is always next month, or your birthday. Add them to your eWish list.
Your eWish list is associated with your online digital library. It is the same eWish list as
the one on the Barnes & Noble.com website. To manage your eWish list on the website,
choose My B&N > Visit your eBooks library > View your eBooks Wish List.
To view your eWish list:
In the top-level menu for the Shop, tap My eWish List.
To add an item to your eWish list:
Navigate to the item in the Shop and tap Select to view item details. Then tap Add to eWish list.
To remove an item from your eWish list while viewing your eWish list:
1 In the top-level menu for the Shop, tap My eWish List.
2 Navigate to the item you want to remove from your wish list, and then tap Remove from eWish
list.
To remove an item from your eWish list while viewing the item:
Navigate to the item in the Shop and tap Select to view item details. Then tap Remove from eWish
list.
To buy an item on your eWish list:
1 In the Shop, tap My eWish List to view your wish list.
2 Using the Up and Down buttons, navigate to the item you want to buy and tap Select. Your
NOOK displays details for the item.
3 Tap Buy.
4 Tap Buy Now to confirm your purchase. The item is immediately delivered to your online digital
library and downloaded to your NOOK.
5 If you are prompted to enter the password for your Barnes & Noble online account, type the
password and tap Submit.
NOOK User Guide Shop 85

6 Tap OK to dismiss the message about a successful purchase.
7 To read what you just bought, go to the My B&N Library section of your library, navigate to the
item, and tap Select. If the item has not been downloaded to your NOOK, your NOOK displays
item details when you tap Select. Tap Download. When the item has finished downloading, tap
Read.
NOOK User Guide Shop 86

In-Store Experience
Special things are in store for you when you visit a Barnes & Noble Bookstore with your NOOK:
• You receive information on local events, unique content, special oers, and coupons.
• You can read many eBooks for free, for up to one hour per eBook per day.
Your Barnes & Noble Bookstore also has NOOKs, NOOK accessories, and paperback and hardback
books, magazines, and newspapers.
Welcome
When you enter a Barnes & Noble Bookstore, your NOOK automatically connects to a Barnes &
Noble Wi-Fi hotspot so you can access the eBookstore. It also displays a welcome message that
alerts you to in-store content.
When you are in a Barnes & Noble Bookstore, the shop button on the Home menu has an in store
badge:
re
n sto
i
shop
If you are in a Barnes & Noble Bookstore and the shop button does not have an in store badge,
check that Airplane mode is o and Wi-Fi is on.
Shopfront
In a Barnes & Noble Bookstore, More in Store is added to the merchandising area of the Shop on
your NOOK. It includes in-store oers and announcements.
All NOOKs, whether registered or not, display the welcome message and add More in
Store to the merchandising area. To be able to make purchases or read an eBook for free,
your NOOK must be registered.
NOOK User Guide In-Store Experience 87

Read in Stores
You can read many eBooks in a Barnes & Noble Bookstore free of charge. Read a specific eBook
for a maximum of one hour every calendar day.
The time period of one hour is of active reading. After two minutes of not turning a
page (and not going to dierent parts of the eBook using the Go to menu), your NOOK
stops the clock, and starts it again when you resume actively reading. For example, if you
read an eBook for half an hour, then go out for lunch, and return to the store to read,
about 28 minutes of reading time for the eBook will remain today.
Several restrictions apply to reading free content:
• Read in Store is only available on registered NOOKs.
• Read In Store is limited to eBooks.
• Reading time is limited to one hour per calendar day.
• You cannot save or archive free content. At the end of the hour or when you leave the store, it
will no longer be available. You can read it another time (tomorrow or later).
• You cannot bookmark, highlight, or annotate free content.
• You cannot change the font or text size while reading free content.
The eBooks that you have read in stores are available in the Recently Read In Store menu in the
Shop, with the most recently read eBooks at the top.
To read an eBook in a store:
1 Go to a Barnes & Noble Bookstore.
2 On the Home menu, tap shop.
3 Browse to or search for an eBook that you want to read in the store and tap Select. If the
eBook can be read in the store, Read in Store is among the menus. If Read in Store is not in the
menus, you cannot read the eBook in the store (unless you buy it).
4 Tap Read in Store. Your NOOK displays the eBook in the Reader. Not all reader features are
available.
To browse recent in-store reading:
1 On the Home menu, tap shop.
2 Tap Recently Read In Store. The next level of menus lists the eBooks that you have read in
Barnes & Noble Bookstores.
NOOK User Guide In-Store Experience 88

3 Tap an eBook to display item details and menus with actions such as Read in Store, Buy, and Get
free sample.
To buy an eBook you are reading in a store:
While reading an eBook in a store, Buy is a menu option. Tap Buy to buy the eBook. At the end of
the one-hour reading period, a message is displayed and you can also buy the eBook.
NOOK User Guide In-Store Experience 89

Library
Your library is where all of your eBooks, magazines, and newspapers reside. Enter your library by
tapping my library on the Home menu:
my library
Your library has two sections:
• My B&N Library (tap my library > Go to My B&N Library) provides access to the eBooks,
magazines, and newspapers that you have purchased from the Barnes & Noble eBookstore,
including purchases made from your NOOK and on the BN.com website. You have a unified
view of the B&N digital content on your NOOK and in your online digital library. You can show
or hide archived B&N content, that is, content that is in your online digital library but not on
your NOOK.
• My Documents (tap my library > Go to My Documents) provides access to your personal
eBooks and periodicals in EPUB, PDB, and PDF formats.
You can create shelves to organize the items in your library. Shelves span the two sections of your
library. For that procedure, see “Organizing Your Library” on page 95.
My B&N Library
My B&N Library is the section of your library that stores your B&N content, including eBooks and
issues of magazines and newspapers. You select content to read from your library. You can also
lend and rate content from the My B&N Library section of your library.
Digital content in My B&N Library is in one of two states:
• Local and online: This content has been purchased, delivered to your online digital library, and
downloaded to your NOOK.
• Online only: This content has not yet been downloaded to your NOOK (through automatic
synchronization or request), or has been but has subsequently been archived, which removes
the copy from your NOOK.
By default, My B&N Library on your NOOK shows you all B&N content in both your online digital
library and on your NOOK. You can choose to hide content that is only in the online digital library.
NOOK User Guide Library 90

Previously Purchased Content
If you purchased content before registering your NOOK, this is what happens with it:
• eBooks purchased from BN.com are automatically delivered to your online digital library a short
time after you register your NOOK.
• The five most recently purchased eBooks that were purchased from BN.com within the 30 days
prior to registering your NOOK are automatically downloaded to your NOOK.
• Other eBooks purchased from BN.com are not automatically downloaded to your NOOK. You
can download them manually from My B&N Library (select an item and tap Download), or just
leave them in the online digital library. They will be there to download in the future.
• eBooks not purchased from BN.com, including those from Fictionwise and eReader.com,
are not delivered to your online digital library or downloaded to your NOOK. You can copy
these eBooks from your personal computer to your NOOK using USB. They will be in the My
Documents section of your library.
• The current issue of a periodical subscription is automatically downloaded to your NOOK.
• Individually purchased issues of periodicals are automatically downloaded to your NOOK.
Indicators
Items in My B&N Library can have the following indicators displayed:
An item that has been delivered to your online digital library within the
previous 48 hours and that you have not read
An eBook sample
An eBook that you can lend
An eBook that you have lent to a friend
An eBook for which there is a lending oer from a friend
An eBook that is borrowed from a friend
An eBook that you pre-ordered but is not yet available
on page X of Y For items you are reading, the current reading page is displayed after the
author’s name. This is the current reading page in the item on your NOOK. If
you are saving the current reading page on BN.com, a dierent current reading
page might have been saved on BN.com. For information, see “Synchronizing
Reading Across Devices” on page 127.
Archived items (items that are in your online digital library but that are no longer on your NOOK
because they have been archived) are indicated by being displayed in gray, if archived items are
shown.
NOOK User Guide Library 91

Reading Something
To read something in My B&N Library:
1 On the Home menu, choose my library.
2 If you are viewing My Documents, tap Go to My B&N Library.
3 Navigate to what you want to read. Browse to the item you want to read, or search and then
browse. Flip pages in the list using the Next Page and Previous Page buttons. Move the selection
indicator up and down on the reading screen and from page to page using the Up and Down
buttons. Details about choosing something to read are in “Finding What You Want to Read in
My B&N Library” on page 99.
4 Tap Select. If the item has already been downloaded, it opens in the Reader. If it has not been
downloaded, tap Download. After the item downloads, tap Read.
5 Read is also a choice if you are viewing item details. Navigate to the item, tap Item details &
options, and then tap Read.
Library Synchronization
Immediately after registration, your NOOK downloads a local copy of the catalog from your online
digital library. It uses this catalog copy when searching your library. Your NOOK keeps the local
catalog in sync with the online catalog.
Your NOOK also synchronizes the current reading position, so that you can return to the page you
are reading across multiple devices.
Library synchronization occurs:
• Once every three days between 2:00 AM and 6:00 AM. If you subscribe to periodicals, the
morning synchronization happens daily.
• When you buy something in the Shop
• When you send, accept, or reject a lending oer
• When a Wi-Fi connection is established and it has been 12 or more hours since the last library
synchronization
• When your NOOK powers on from fully o
• When you tap Check for new B&N content in your library.
If you want to be sure that the My B&N Library information on your NOOK is up-to-date,
tap Check for new B&N content.
NOOK User Guide Library 92

Downloading Content
To download content from your online digital library:
• Your NOOK must be registered.
• Your NOOK must have established a wireless connection.
For the NOOK (Wi-Fi + 3G model), downloads of very large eBooks, periodicals, and
magazines require a Wi-Fi connection.
When you download DRM-secured content that was purchased from your NOOK or on the
BN.com website, it is encrypted using your first and last name and default credit card number.
Usually, you do not need to enter this information to open DRM-secured content. In rare
circumstances, you might have to enter this information.
If you transfer DRM-secured content to your NOOK using USB, you must enter your first and last
name and default credit card number the first time you open digital content secured with a specific
name and credit card. You only need to enter the information one time, not for every eBook.
Automatic Downloads
eBooks, just-purchased single issues of periodicals, and current issues of subscriptions are
downloaded to your NOOK automatically after delivery to your online digital library. Just-purchased
content should be available on your NOOK a minute or two after you purchase it.
eBooks you borrow are also downloaded immediately following delivery to your online digital
library.
Manual Downloads
In several cases, you might need to manually download digital content:
• If you have previously purchased digital content, and it was not automatically downloaded to
your NOOK, according to the rules in “Previously Purchased Content” on page 91
• If you have subscribed to a periodical, and your NOOK has not been able to automatically
download current issues (for example, if you were travelling outside areas with connectivity)
• If you unregister and re-register your device to the same Barnes & Noble online account
• If you archive content. How to unarchive content is explained in “Unarchiving B&N Digital
Content” on page 105.
• If your NOOK automatically deleted content when My B&N Library was approaching full
You can download content from your online digital library to your NOOK an unlimited number of
times.
NOOK User Guide Library 93

If you cannot download recently purchased content, some problem might have occurred
during the purchase process. Check notifications in The Daily to see if there is a problem.
For DRM-secured content, the default credit card used to secure the content is the one that is
current when you download the content. In general, you will not need to enter the credit card
information.
To manually download content:
1 On the Home menu, tap my library.
2 If you are viewing My Documents, tap Go to My B&N Library.
3 Navigate to the content item you want to download.
4 Tap Select.
5 Tap Download.
Download Retries
If an automatic or manual download fails, for example, because of wireless connectivity problems,
your NOOK retries the download several times over several minutes. If after three minutes, the
download has not succeeded, wait a few more minutes and then try a manual download request.
Checking for New Content in Your Online Digital Library
When you shop from your NOOK, and when issues of magazines and newspapers are delivered to
your NOOK, they appear in your library on your NOOK. You do not need to check for them.
When you buy eBooks from the BN.com website, they are delivered to your online digital library,
but they are not automatically delivered to your NOOK. The library on your NOOK is not updated
immediately to list the new items. The library is updated every morning, when your NOOK checks
for new issues of periodicals.
If you have purchased eBooks online and do not see them in My B&N Library, you can instruct your
NOOK to check for new content in your online digital library.
This requires a wireless connection.
Other reasons that you might not see content that you expect to see are:
• Content might not have been delivered yet.
• Older issues of periodicals might have been automatically deleted.
NOOK User Guide Library 94

• Content might have been archived (deleted from your NOOK but kept in your online digital
library) and the archived items are hidden. Tap Change view > Show archived items to show
archived items.
To check for new content in your online digital library:
1 On the Home menu, tap my library.
2 If you are viewing My Documents, tap Go to My B&N Library.
3 Tap Check for new B&N content.
Organizing Your Library
This section applies to both sections of your library (My B&N Library and My Documents), with
dierences noted.
You can place the items in your library on shelves that you create. For example, you might want
to create SCIENCE FICTION and ROMANCE shelves. Or you could place your favorite eBooks on a
FAVORITES shelf. Before being placed on a shelf, items are unshelved.
Shelves span the two sections of your library (My B&N Library and My Documents). When
you create, re-order, or delete a shelf, that action eects both sections of your library.
Items place on a shelf remain in one section of your library or the other.
Shelf names are displayed on the reading screen in all uppercase letters above the items on the
shelf, for example, CLASSICS and FANTASY here:
Note the following about shelves:
• You can shelve eBooks, newspapers, and magazines.
NOOK User Guide Library 95

• (My B&N Library) For issues of newspapers and magazines, whether purchased as single issues
or by subscription, the issue you place on a shelf remains on the shelf. For newspapers and
magazines delivered by subscription, the most recently delivered issue is not placed on the shelf
automatically. Shelved issues of newspapers and magazines are still subject to automatic deletion
unless you archive them.
• You can place a single item on multiple shelves, if that helps you to organize your B&N library.
For example, you could create both SCIENCE FICTION and SCI-FI CLASSICS shelves. You could
place The War of the Worlds by H.G. Wells on both shelves.
• When you first create a shelf, it is displayed at the beginning of your B&N library. You can
change the order of shelves. After all of your shelves, your NOOK displays unshelved items
under the heading UNSHELVED.
• You can show or hide the shelves.
When the shelves are hidden, all items in your library (or for My B&N Library a subset based on
the Change view > Show choice, for example, eBooks) are displayed in the chosen Change view
> Sort by order.
When the shelves are shown, the items on each shelf (or for My B&N Library a subset based on
the Change view > Show choice, for example, eBooks) are displayed in the chosen Change view
> Sort by order. Unshelved items are displayed last (also subject to the Change view > Show
and Change view > Sort by choices).
• You can create, reorder, rename, and remove shelves.
• You can go to a shelf. This takes you to the start of the shelf; it does not re-order shelves.
• Shelf names can contain any letters, numbers, special characters, and spaces. Shelf names are
not case sensitive and are displayed in entered case in the menus and in uppercase on the
reading screen. For example, you could create the shelf “Science Fiction,” “Science fiction,”
“science fiction,” or “SCIENCE FICTION.” The shelf would be displayed as entered in the menus
and as “SCIENCE FICTION” on the reading screen.
• Shelf names are limited in length to 36 characters.
• Removing a shelf does not remove or delete the items on it. They remain in your library, but
become unshelved, or remain on other shelves if you have placed them on more than one shelf.
• If you unregister your NOOK and re-register it (to the same Barnes & Noble online account or
a dierent one), information about shelves and the shelving of items in your B&N library is not
retained.
Managing Shelves
You can create, reorder, rename, and remove shelves.
NOOK User Guide Library 96

Before managing shelves, you might want to show them if they are hidden. Tap Change
view > Show shelves.
To create a shelf:
1 On the Home menu, tap my library.
2 You can create a shelf from either section of your library. Optionally, tap Go to My Documents
or tap Go to My B&N Library to change to the other section.
3 Tap Manage shelves > Create a new shelf.
4 Type the name of the new shelf, and then tap Submit.
To reorder shelves:
1 On the Home menu, tap my library.
2 You can reorder shelves from either section of your library. Optionally, tap Go to My
Documents or tap Go to My B&N Library to change to the other section.
3 Tap Manage shelves > Reorder shelves. On the reading screen, you will see a list of your shelves
in the current order, with the first shelf highlighted.
4 To move the highlighted shelf up, tap Move this shelf up. To move the highlighted shelf down,
tap Move this shelf down.
5 To choose a dierent shelf, tap the Up and Down arrows.
6 When you have finished reordering shelves, tap the Back button.
To rename a shelf:
1 On the Home menu, tap my library.
2 You can rename a shelf from either section of your library. Optionally, tap Go to My Documents
or tap Go to My B&N Library to change to the other section.
3 Tap Manage shelves > Rename shelf, and then tap the shelf you want to rename.
4 Type the new name of the shelf, and then tap Submit.
To remove a shelf:
1 On the Home menu, tap my library.
2 You can remove a shelf from either section of your library. Optionally, tap Go to My Documents
or tap Go to My B&N Library to change to the other section.
3 Tap Manage shelves > Remove shelf, and then tap the shelf you want to remove.
NOOK User Guide Library 97

4 Tap OK to confirm that you want to remove the shelf.
Placing Items on and Removing Them from Shelves
To start with, all items in your B&N library and My Documents are unshelved (not on a specific
shelf ). After you create one or more shelves, you can place items in your library on them. You can
also remove items from shelves.
Unlike a physical book, you can place a digital item (eBook, newspaper, or magazine) on
more than one shelf, if that helps you to organize items. For example, you could create a
FANTASY shelf and a WIZARDS shelf, and put books that feature wizards on both shelves.
To place an item on or remove it from a shelf or shelves:
1 On the Home menu, tap my library.
2 Go to the section of your library that contains the item you want to shelve.
3 Tap Manage shelves > Place on or remove from shelf.
4 Using the Up and Down arrows, navigate to each item in your B&N library that you want to
place on a shelf or unshelve. The item is highlighted on the reading screen.
5 Tap a shelf or shelves as follows. If a scroll bar is present, scroll the menus to see all of the
shelves.
• The item is already on every shelf that has a check mark on the menu. To remove the item
from that shelf, tap the menu and the check mark disappears.
• The item is not already on a shelf without a check mark on the menu. To add the item to a
shelf, tap the menu and a check mark appears.
6 Repeat steps 4 and 5 for all of the items that you want to shelve or unshelve.
7 When you have finished shelving and unshelving items, tap the Back button. You are returned to
the beginning of your library with shelves shown.
Going to a Shelf
Shelves are in the order in which you arrange them. There are two ways of going to a shelf:
• By paging through your library
• By going directly to the shelf. Tap Manage shelves > Go to shelf, and then navigate to and tap
the shelf name.
NOOK User Guide Library 98

Showing and Hiding Shelves
You can show or hide shelves. Shelves are shown by default.
To show shelves:
1 On the Home menu, tap my library.
2 If you are viewing My Documents, tap Go to My B&N Library.
3 Tap Change view > Show shelves.
Shelves are also shown automatically after you place items on or remove them from shelves.
To hide shelves:
1 On the Home menu, tap my library.
2 If you are viewing My Documents, tap Go to My B&N Library.
3 Tap Change view > Hide shelves.
Finding What You Want to Read in My B&N Library
There are several ways to find what you want to read in the My B&N Library section of your
library:
• You can browse, turning from page to page with the Next Page and Previous Page buttons.
• You can filter by content type, for example, to show only eBooks or newspapers.
• You can sort your library, for example, by title or author.
• You can search for one or more words, for example, for words in the title or the author’s name.
You can filter the search results by content type.
• You can browse a gallery of covers. For information, see “Browsing a Gallery of Covers” on
page 102.
• You can place items in your B&N library on shelves. For more information, see “Organizing Your
Library” on page 95.
Browsing My B&N Library
Digital content in My B&N Library is displayed as a paginated list. The order of items in the list is
determined by the value of Change view > Sort by and whether or not shelves are used.
When the content type is not filtered, the top-level list contains:
NOOK User Guide Library 99

• eBooks
• The most recent issues of periodicals, whether purchased singly or delivered by subscription
• All singly purchased issues of periodicals
For periodicals, an additional paginated list displays all issues of a periodical.
To browse My B&N Library:
1 On the Home menu, tap my library.
2 Browse up and down the list using the Up and Down buttons.
3 Move from page to page using the Next Page and Previous Page buttons. If you are on the last
item on a page, you can tap the Down button to turn to the next page. If you are on the first
item on a page, you can tap the Up button to turn to the prior page.
To browse all issues of a periodical in My B&N Library:
Only the most recent issue of a periodical is visible in the top-level paginated list in My B&N Library.
This is true for singly purchased issues and issues delivered by subscription. To view all issues:
1 Navigate to any issue of the periodical in the My B&N Library section of your library.
2 Tap View older issues.
Filtering My B&N Library
You can filter the items presented when browsing and searching My B&N Library, to view all
content types (the default) or only each of the following:
• eBooks
• Newspapers
• Magazines
To filter My B&N Library:
1 On the Home menu, tap my library.
2 If you are viewing My Documents, tap Go to My B&N Library.
3 (Optional) Tap Search, enter search words, and tap Search to narrow the item list by searching.
4 Tap Change view > Show and choose one of the content types: All, eBooks, Magazines, or
Newspapers.
NOOK User Guide Library 100
 Loading...