

Barnes & Noble Nook Tablet 7 User Manual
Tablet® 7”
User Guide
Barnes & Noble NOOK Tablet User Guide01

Nook Digital, LLC. 1166 Avenue of the Americas, 18th Floor, New York, NY 10036
© 2016 Nook Digital, LLC. All rights reserved. NOOK, NOOK Tablet, NOOK Store, B&N
Readouts and the NOOK logos are trademarks or registered trademarks of Nook Digital, LLC
or its afliates. Patent Pending. Wi-Fi is a registered trademark of the Wi-Fi Alliance. All trademarks or registered trademarks that are not the property of Nook Digital, LLC or its afliates
are the property of their respective owners. Screenshots and product images are simulated;
they may differ from the actual product and are subject to change. Use of NOOK is subject
to the Terms of Service and Privacy Policy located in the Settings area of your NOOK and at
www.NOOK.com/legal. Contains Reader® Mobile technology by Adobe Systems Incorporated.
Model: BNTV450 Version: 1.0.0.
Barnes & Noble NOOK Tablet User Guide02

Table of Contents
Introduction –––––––––––––––––––––––––––––––––––––––––––––––––––––– 04
Getting to Know Your NOOK –––––––––––––––––––––––––––––––––––––––– 05
Buttons & Ports ––––––––––––––––––––––––––––––––––––––––––––––––––– 06
Charge the Battery –––––––––––––––––––––––––––––––––––––––––––––––– 08
Getting Started ––––––––––––––––––––––––––––––––––––––––––––––––––– 11
Initial Setup of Your NOOK ––––––––––––––––––––––––––––––––––––––––––– 12
Setting Up Your NOOK Account ––––––––––––––––––––––––––––––––––––––– 17
Home Screen –––––––––––––––––––––––––––––––––––––––––––––––––––– 19
NOOK by Barnes & Noble –––––––––––––––––––––––––––––––––––––––––– 23
NOOK Home Screen ––––––––––––––––––––––––––––––––––––––––––––––– 24
NOOK Home App –––––––––––––––––––––––––––––––––––––––––––––––– 26
How to Read a Book ––––––––––––––––––––––––––––––––––––––––––––––– 28
NOOK Shop –––––––––––––––––––––––––––––––––––––––––––––––––––– 31
NOOK Library ––––––––––––––––––––––––––––––––––––––––––––––––––– 34
NOOK Proles ––––––––––––––––––––––––––––––––––––––––––––––––––– 36
NOOK Settings –––––––––––––––––––––––––––––––––––––––––––––––––– 40
NOOK Search ––––––––––––––––––––––––––––––––––––––––––––––––––– 42
Sideloading Files –––––––––––––––––––––––––––––––––––––––––––––––––– 42
Adding More Storage to Your NOOK –––––––––––––––––––––––––––––––––––– 44
Applications & Customizing Your NOOK Home Screen ––––––––––––––––––––– 46
Apps List ––––––––––––––––––––––––––––––––––––––––––––––––––––––– 47
NOOK Apps –––––––––––––––––––––––––––––––––––––––––––––––––––– 47
Google Apps –––––––––––––––––––––––––––––––––––––––––––––––––––– 49
Customizing Your NOOK Home Screen –––––––––––––––––––––––––––––––––– 51
Android Settings ––––––––––––––––––––––––––––––––––––––––––––––––––– 53
Legal Information –––––––––––––––––––––––––––––––––––––––––––––––––– 63
Barnes & Noble NOOK Tablet User Guide03

Introduction
This User Guide is designed to help you get the most enjoyment out of your NOOK Tablet® 7”.
Contact Us
If you have questions about your NOOK® that this guide doesn’t answer, be sure to visit the
NOOK online support center at: http://www.nook.com/support
The online support center offers additional information about your NOOK, including:
• A PDF version of this NOOK User Guide that you can download to your computer
• Frequently Asked Questions
You can also contact Barnes & Noble Customer Support by sending email to
NOOK@barnesandnoble.com or by calling +1-800-843-2665 (1-800-THE-BOOK) and selecting
the option for Digital Technical Support. Outside the United States, please call +1-201-438-1834.
Stay in Touch
Follow us on Facebook and Twitter to receive daily reviews, exclusive offers, and free NOOK Books
®
.
http://www.facebook.com/nookBN
http://www.twitter.com/nookbn
Barnes & Noble NOOK Tablet User Guide04

Getting to Know Your NOOK
Barnes & Noble NOOK Tablet User Guide 05
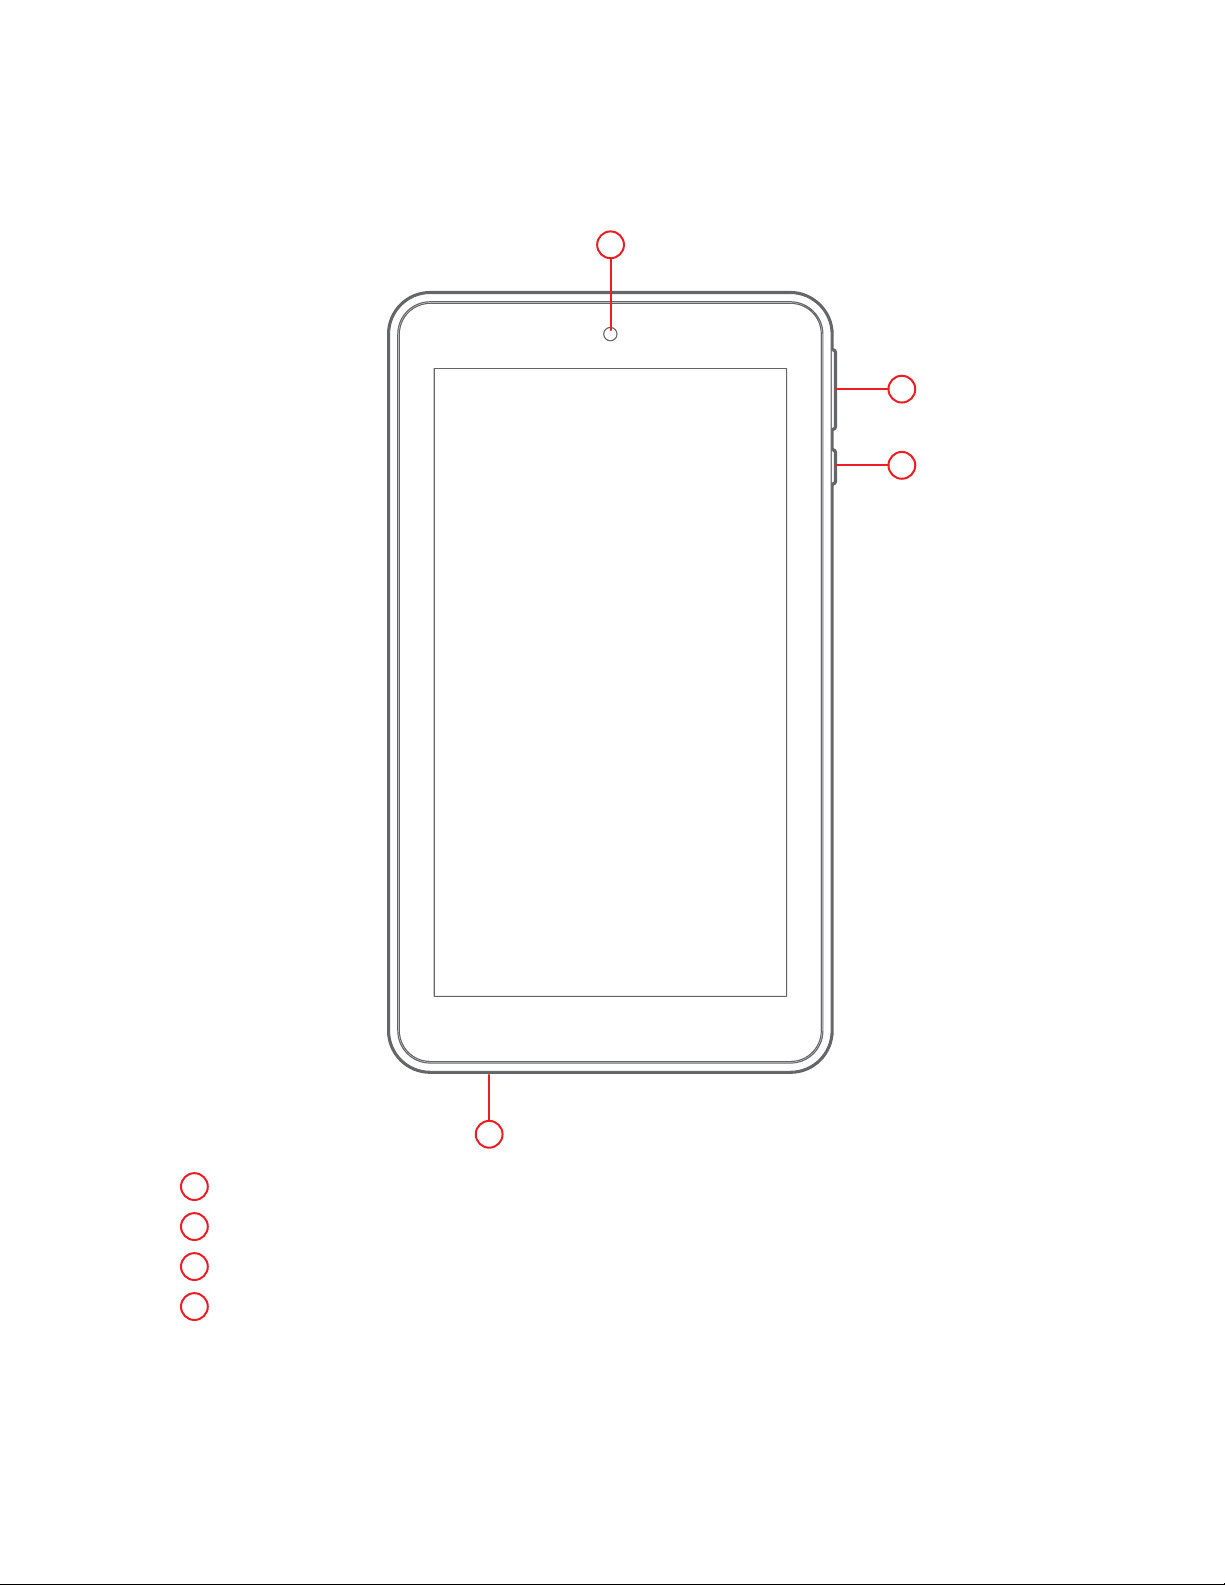
Buttons & Ports
Front View
3
2
1
1
Power Button
2
Volume Buttons
3
Front Camera
4
Microphone
4
Barnes & Noble NOOK Tablet User Guide06
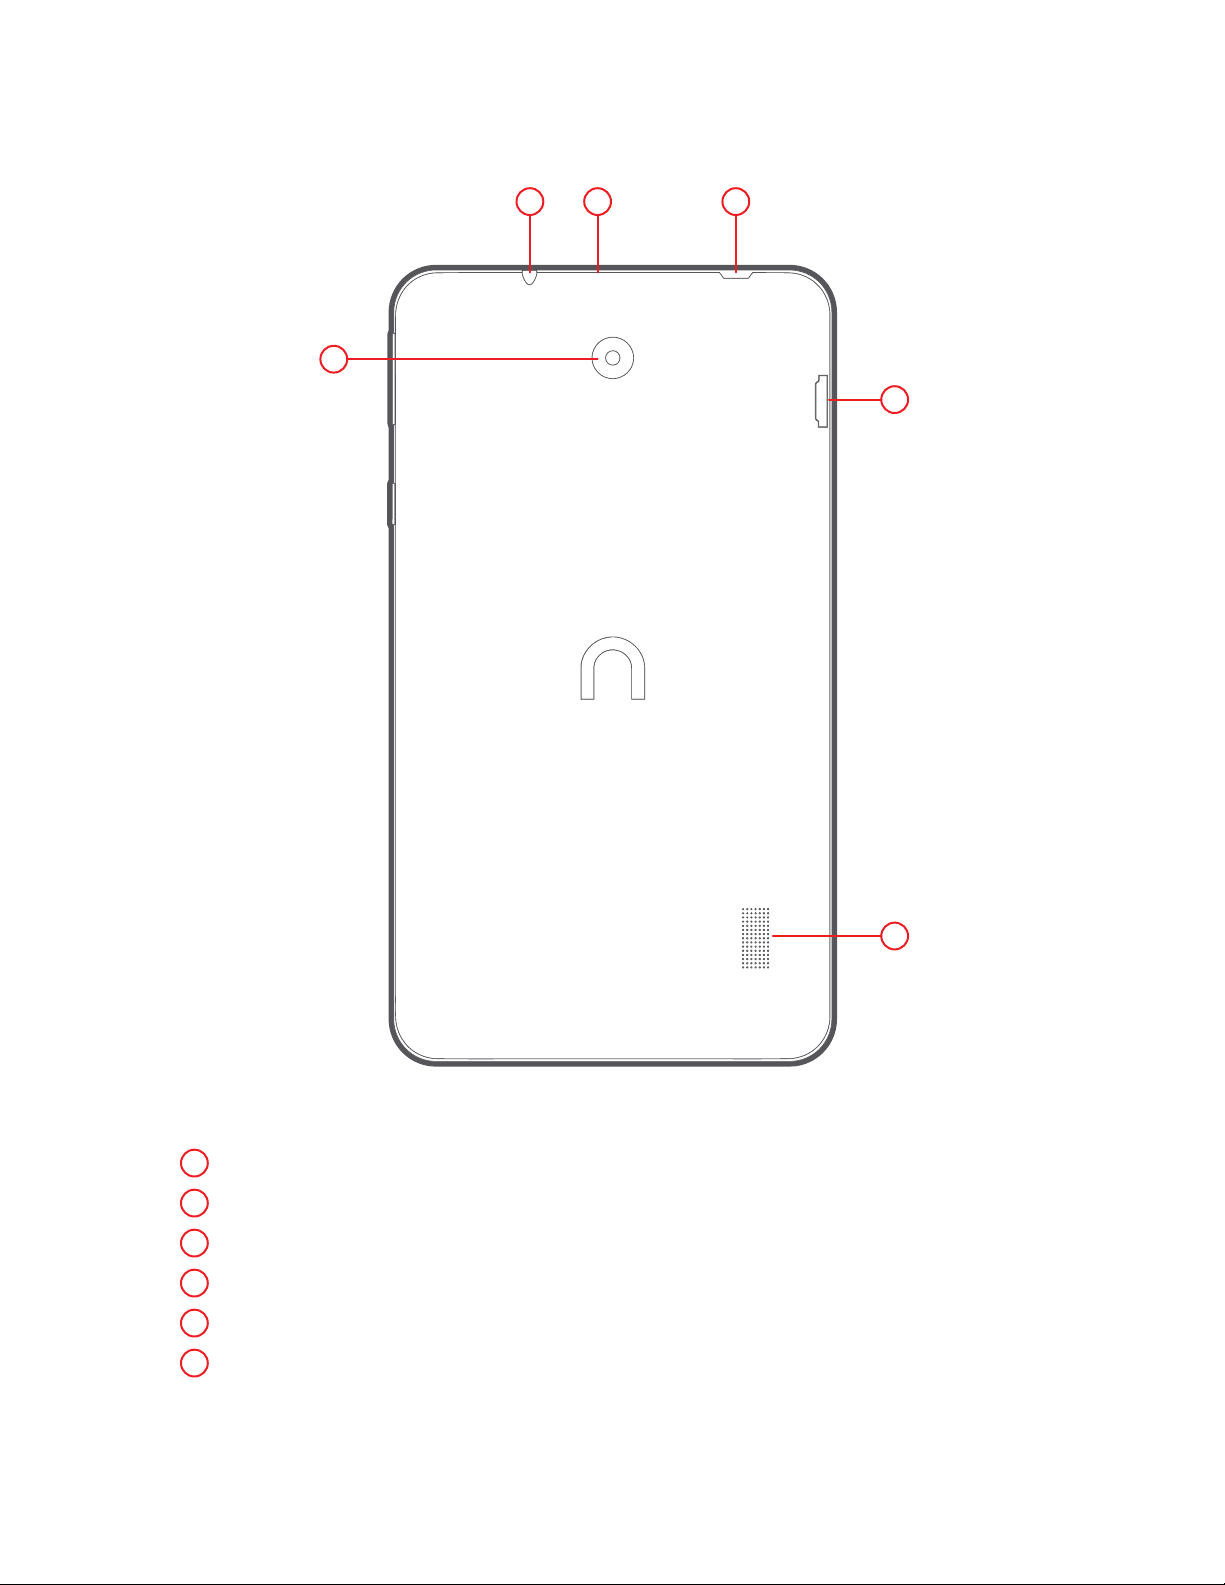
Back View
5 6 7
8
9
10
5
Headphone Jack
6
Reset Button
7
Micro USB/Charger Port
8
Rear Camera
9
microSD Card Slot
10
Speaker
Barnes & Noble NOOK Tablet User Guide 07
Reset Button
If the tablet is not responding to button presses or screen touches, you can quickly restart the tablet
by pressing the reset button located on the top of the tablet adjacent to the headphone jack.
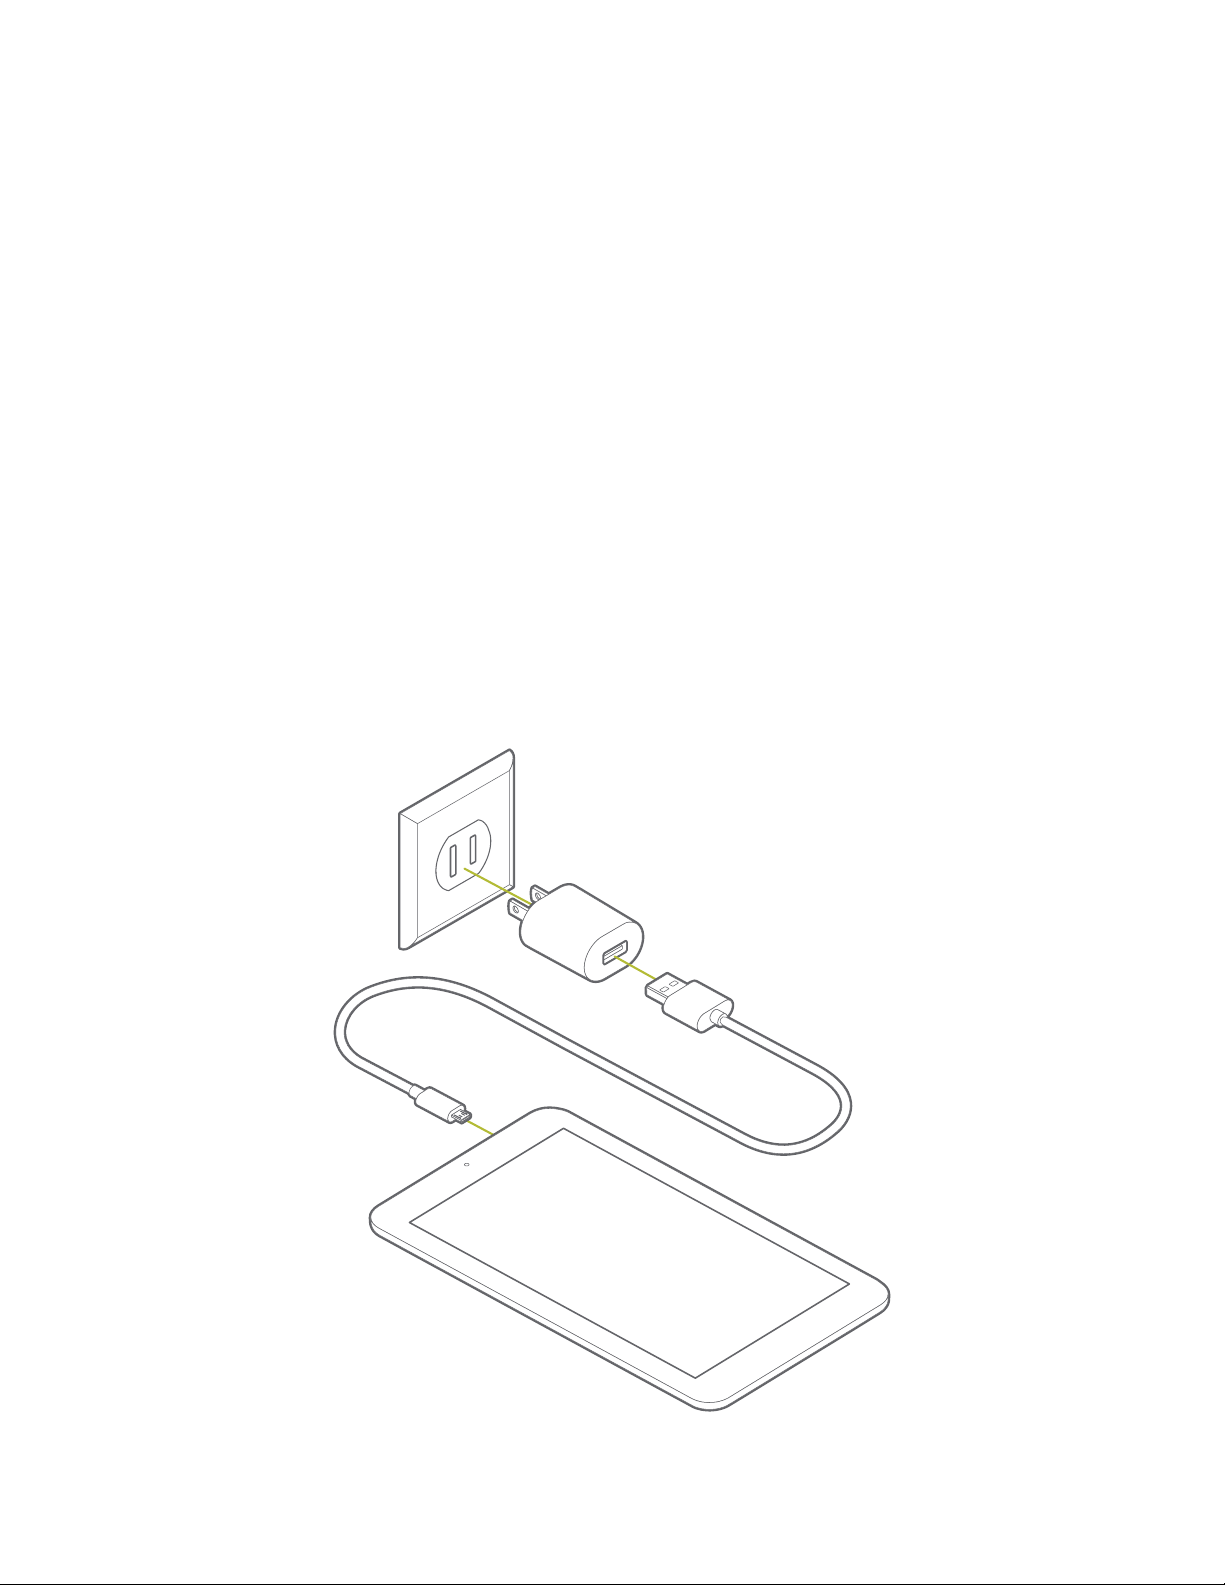
Charge the Battery
Your NOOK is powered by a rechargeable, standard Li-Ion battery. A Wall/USB Charger.
The battery comes partially charged. A fully discharged battery requires up to four hours of
charge time.
1. Insert the Micro USB Cable into your NOOK Tablet’s Micro USB Port.
2. Connect the Micro USB Cable to the Power Adapter provided with your NOOK Tablet 7”,
then plug the Power Adapter into a standard AC power outlet.
3. When charging is complete, unplug the Power Adapter from the power outlet and remove
the Micro USB Cable from your NOOK.
NOOK Tablet
Wall outlet
Power Adapter
Micro USB Cable
Barnes & Noble NOOK Tablet User Guide08

Safety and Care
This section explains important information about safety and about caring for your NOOK.
Water
CAUTION:
Your NOOK device, cables, and adapters are not waterproof. To avoid risk of electric shock,
overheating, melting, burns or other injury or damage, keep the device and all accessories
away from water and other liquids.
Do not use the cable if either end of the cable gets wet or is exposed to liquid spray or excessive
moisture. Do not expose your NOOK device, cables, and power adapter to wet or damp conditions.
Avoid exposing the device to liquid or food. If liquid is spilled on the device while it is on, turn
it off immediately. Clean the screen of your NOOK with a soft, lint-free or microber cloth
and avoid using spray or liquid cleaners on the screen.
Electricity
Your NOOK is an electrical device. Follow the same basic safety procedures you would follow
with any electrical device.
When charging your NOOK, use only the custom USB cable and power adapter included
with your NOOK.
Airplanes
When using your NOOK on an airplane, be sure to follow the instructions of the ight crew.
To turn your NOOK’s wireless networking on or off, do this:
1. Tap the gear icon in the Status Bar to open the Quick Settings window.
2. Slide the Wi-Fi switch on or off. Or slide the Airplane Mode switch to on. Airplane Mode
turns off wireless networking but allows other features on your NOOK to work as usual.
3. Tap anywhere outside the Quick Settings window to close it.
Electronic Equipment
If you are around sensitive electronic equipment–for example, if you are in a hospital–ask if
you may use your NOOK. Settings such as intensive care units might forbid the use of any
electronic device, with or without networking.
Battery
Your NOOK includes a non-replaceable lithium ion battery. Do not attempt to replace the
battery. If you suspect your battery is having problems, please contact Customer Service.
Caution About High Audio Volume
WARNING:
Exposure to loud noise from any source for extended periods of time may affect your hearing.
Barnes & Noble NOOK Tablet User Guide 09

The louder the volume, the faster your hearing may be affected. To protect your hearing:
• Limit the amount of time you use headsets or headphones at high volume.
• Avoid turning up the volume to block out noisy surroundings.
• Turn the volume down if you can’t hear people speaking near you. If you experience
hearing discomfort, including the sensation of pressure or fullness in your ears, ringing in
your ears, or muted speech, you should stop listening to the device through your headset
or headphones and have your hearing checked.
Caring for the Touchscreen
You should clean the touchscreen on your NOOK from time to time. Clean the screen with
a damp soft cloth, such as a micro-ber cloth. Micro-ber cloths are available from Barnes &
Noble stores and from par tner retailers. Do not use any chemicals to clean the screen.
Barnes & Noble NOOK Tablet User Guide10
Getting Started
Turn Your NOOK On and Off
Turning On
To turn on your NOOK, press the Power
Button on your NOOK. Hold the button
down for 2 seconds and release it.
Turning Off
1. Press and hold the Power Button until
your NOOK options menu displays.
2. Tap Power off.
3. On the window that appears, tap POWER
OFF.
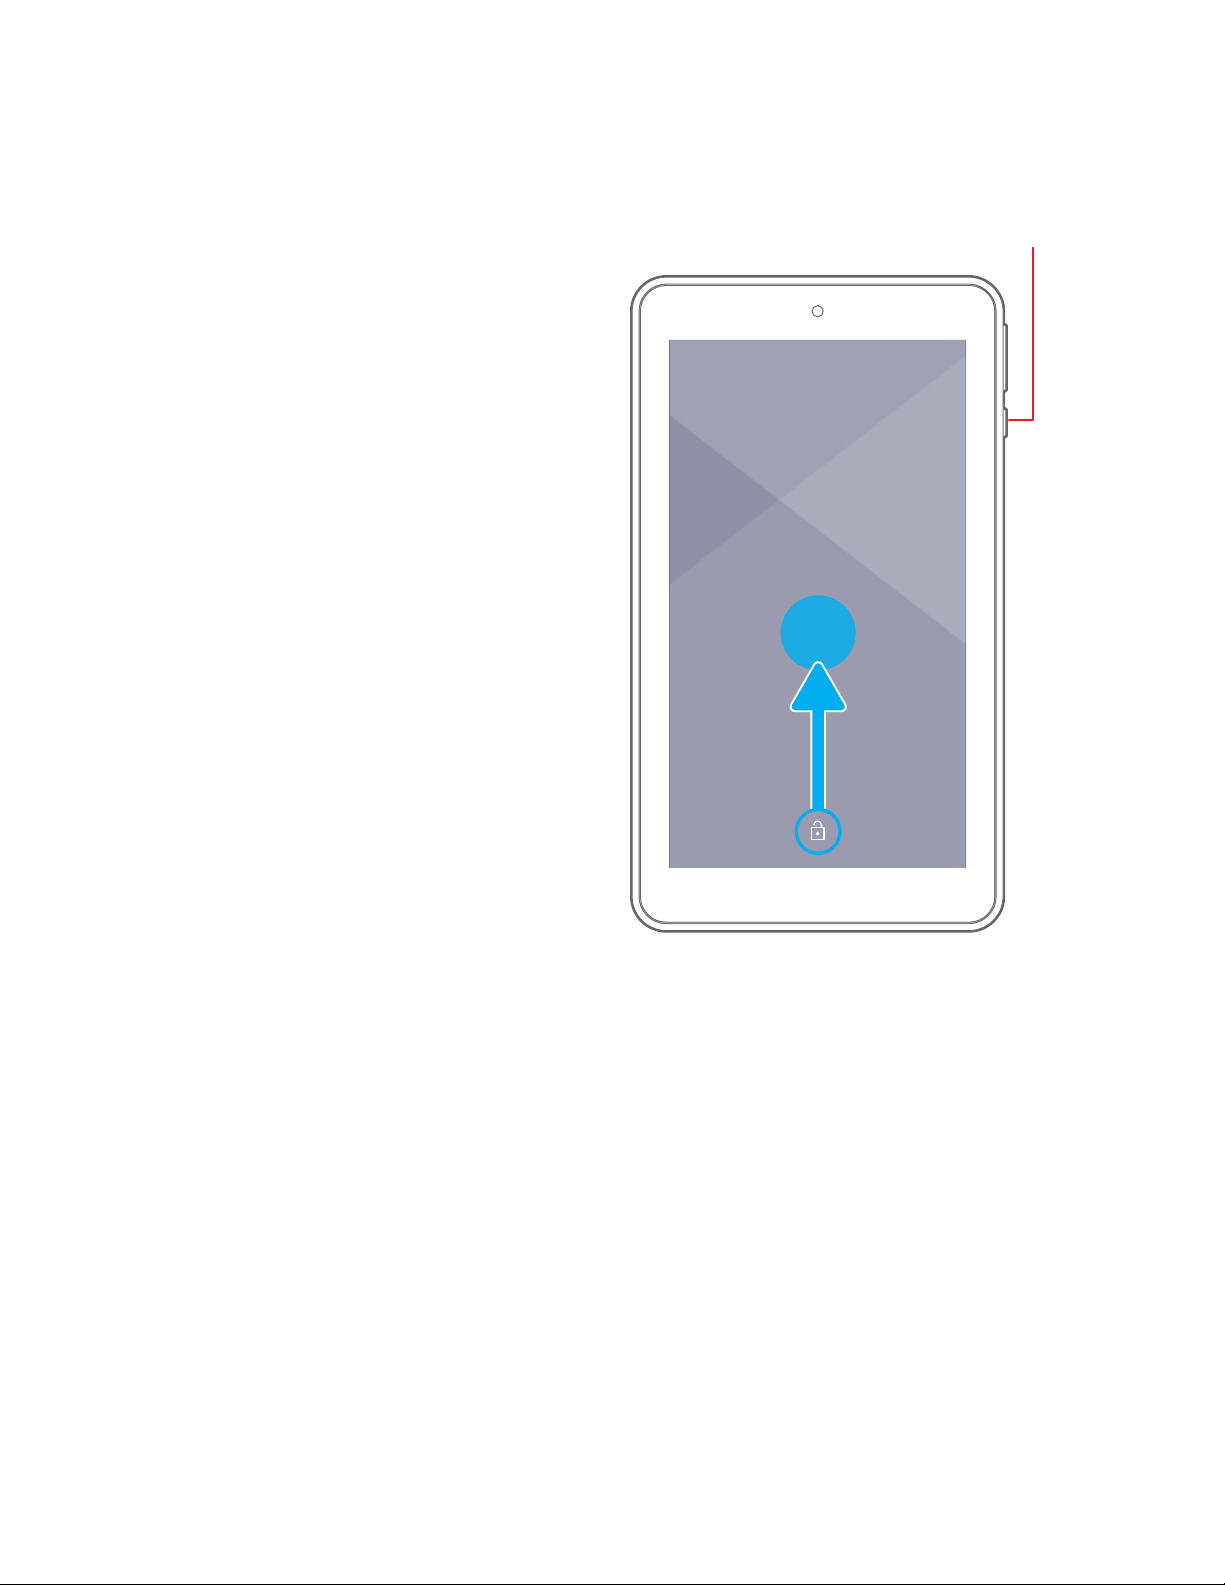
Unlock and Lock Your NOOK
Unlock Your NOOK
To unlock your NOOK, press the Power or
Home Button, then touch and drag the Lock
icon with your nger across the screen as
shown below.
Power
12:00AM
WEDNESDAY, FEBRUARY 22
Lock Your NOOK
By default, your NOOK locks automatically
when the screen times out.
To lock your NOOK manually, press the Power Button.
Secure Your NOOK
Use your NOOK’s screen lock features to secure your NOOK.
Set Up a Secure Screen Lock
The default Screen lock is Swipe, which offers no security. To choose a more secure screen
lock, see Set a Screen Lock.
Barnes & Noble NOOK Tablet User Guide 11
Initial Setup of Your NOOK
The initial setup process for your NOOK Tablet® 7” guides you through setting up two types of
accounts:
• A Google account for accessing the Google Play Store.
• A NOOK account for accessing the NOOK Store® and NOOK content such as NOOK
Books®, and the NOOK Newsstand®.
You have to connect to a Wi-Fi network to set up your NOOK.
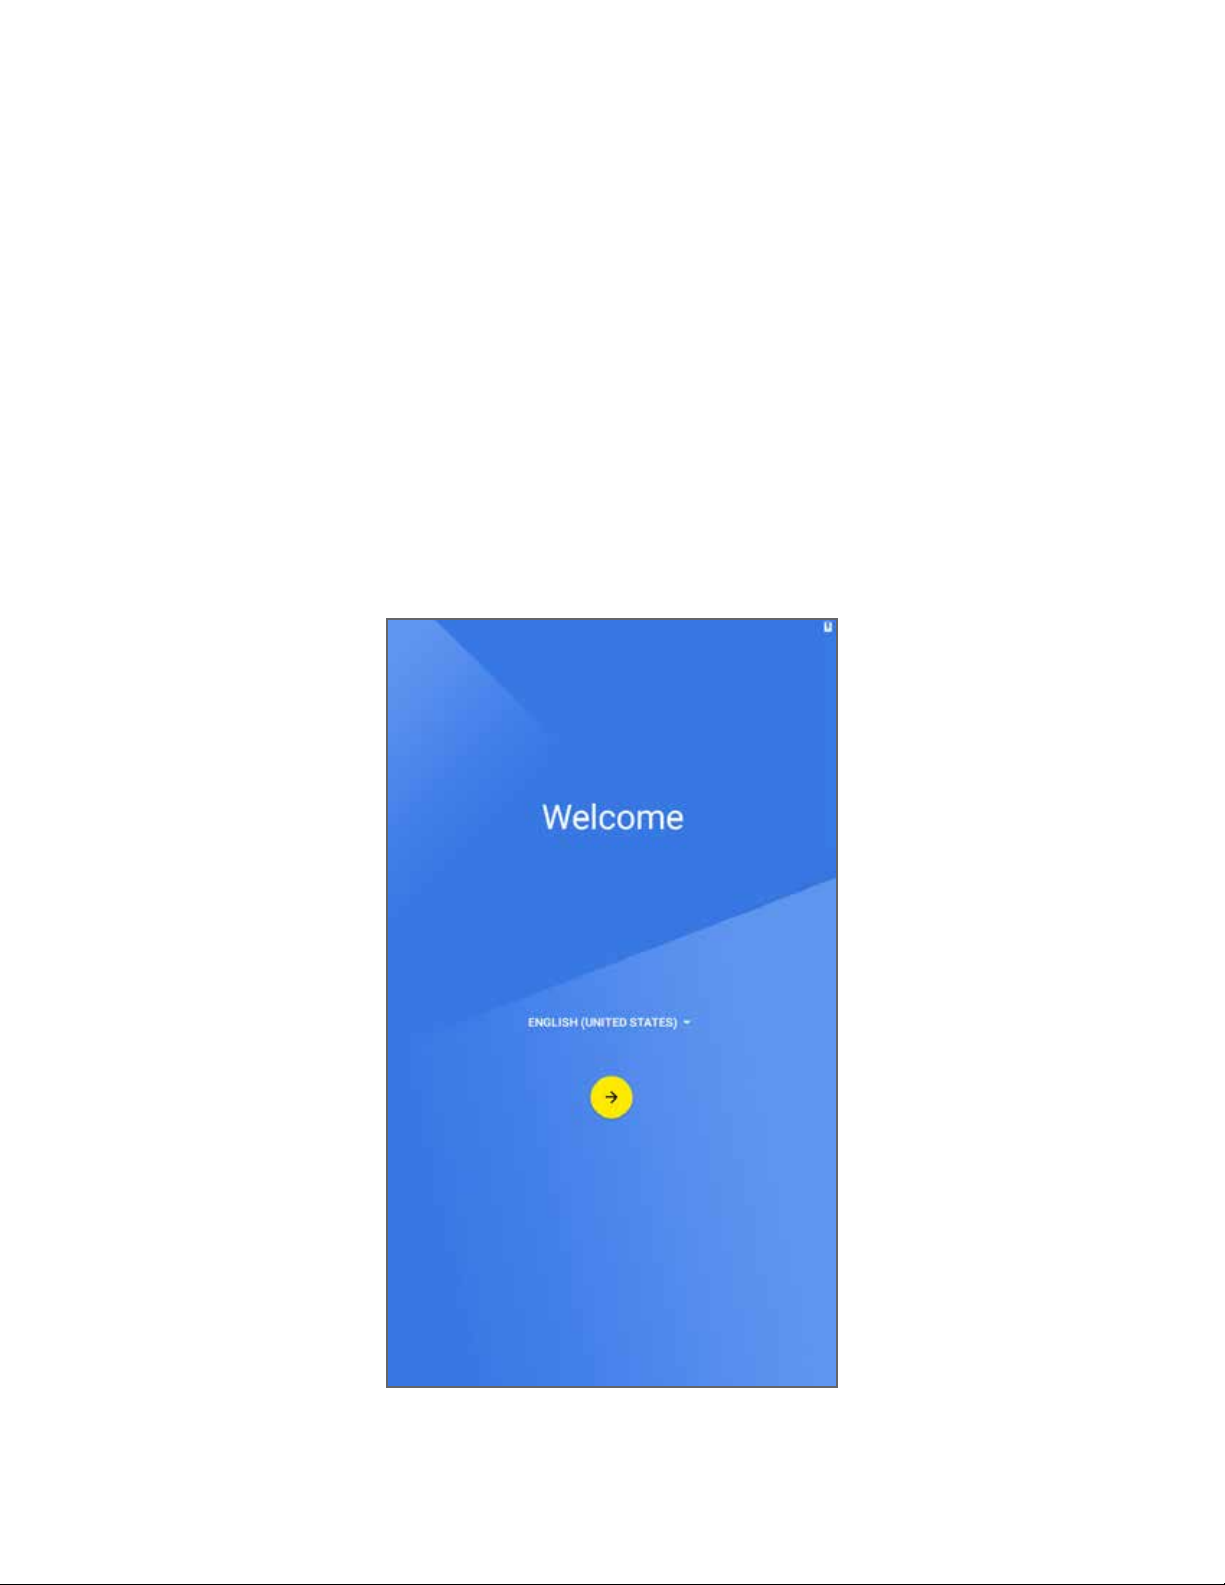
Selecting a Language
When you rst turn on your NOOK, it displays a NOOK Tablet welcome screen.
Select your preferred language and tap the yellow arrow to continue.
Barnes & Noble NOOK Tablet User Guide12
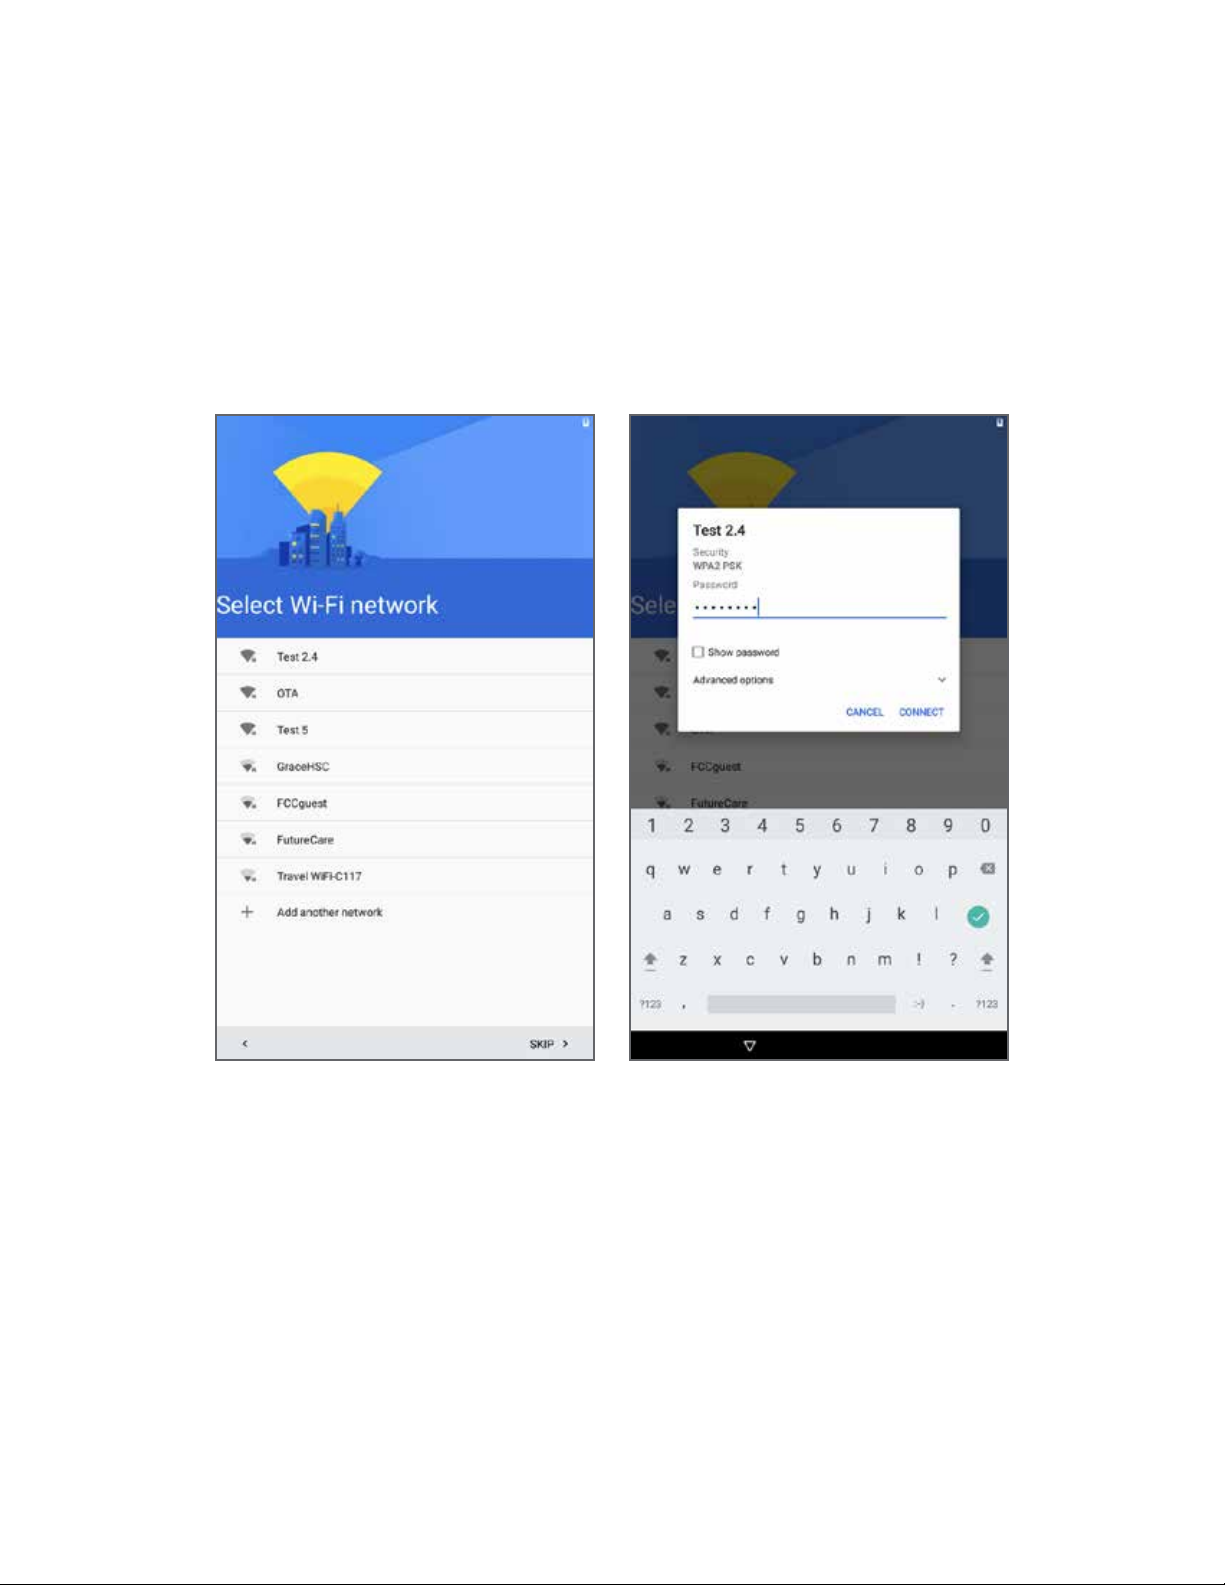
Selecting a Wi-Fi Network
Tap the name of the Wi-Fi network to which you want to connect. If the network displays a lock
symbol, you are prompted to enter a password to connect to the network.
If you do not know the password, ask the network administrator.
Once you have entered the password in the password dialog box, tap Connect.
Barnes & Noble NOOK Tablet User Guide 13
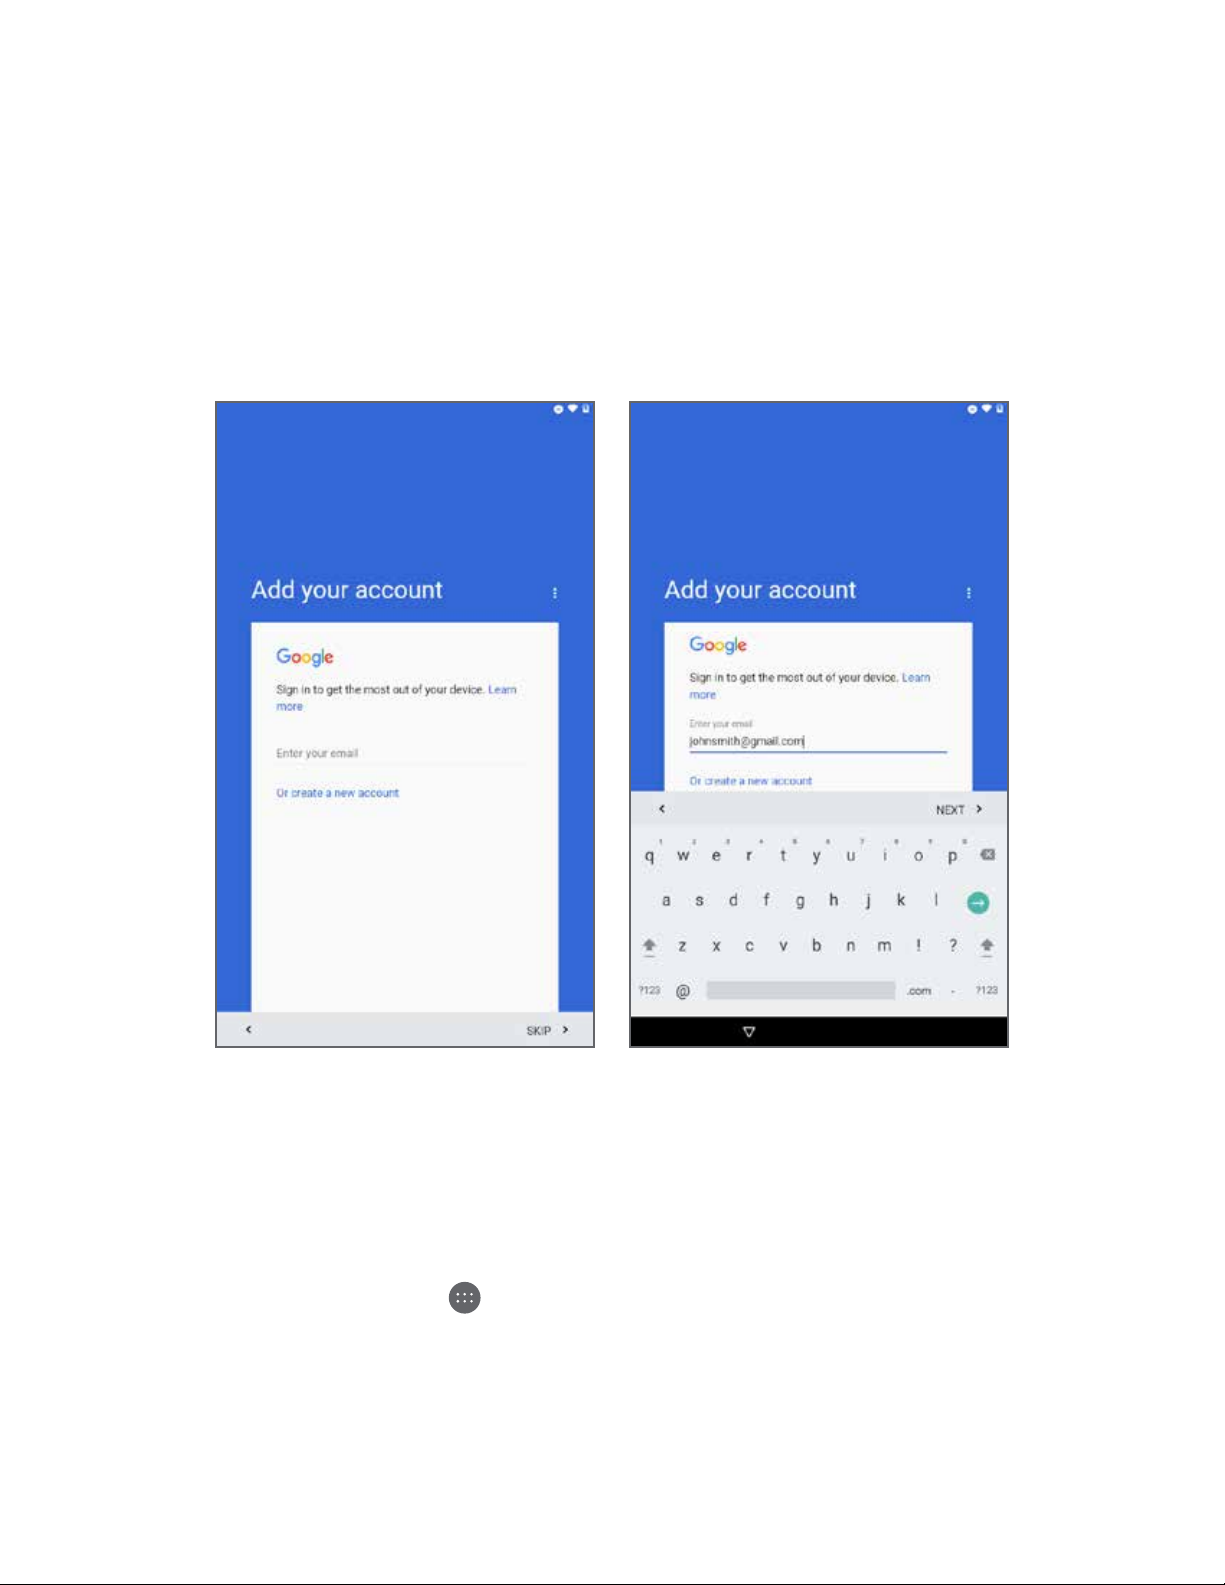
Setting up Google Account
Your NOOK prompts you to sign in to your Google account or to create a Google account if
you do not have one.
Your NOOK uses your Google Account to fully utilize its Android features, including Gmail,
Google Hangouts, and the Google Play Store.
To create a new Google Account or set up your Google Account on your NOOK at any time,
use Accounts settings. For more information, see Accounts.
From the Home screen, tap Apps > Settings > Accounts > Add account > Google.
Barnes & Noble NOOK Tablet User Guide14
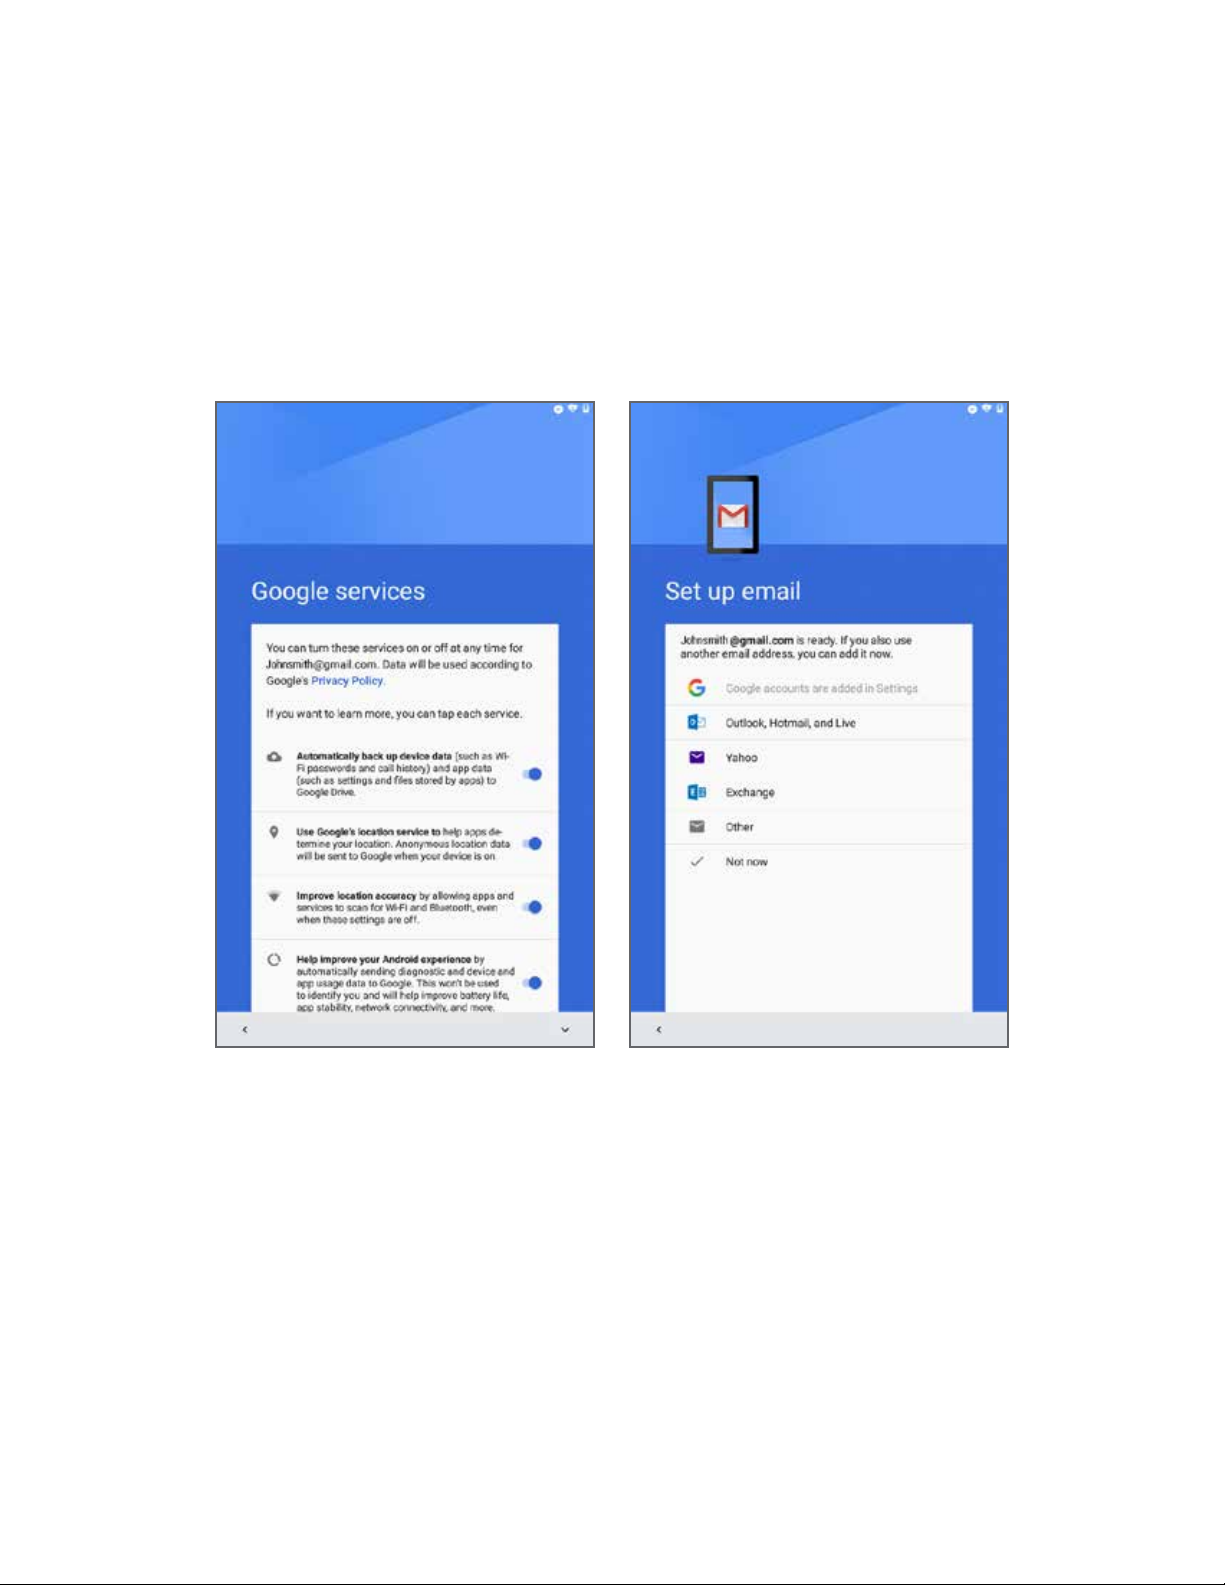
Select what Google services you wish to participate in by tapping on each checkbox to select/
deselect.
Barnes & Noble NOOK Tablet User Guide 15
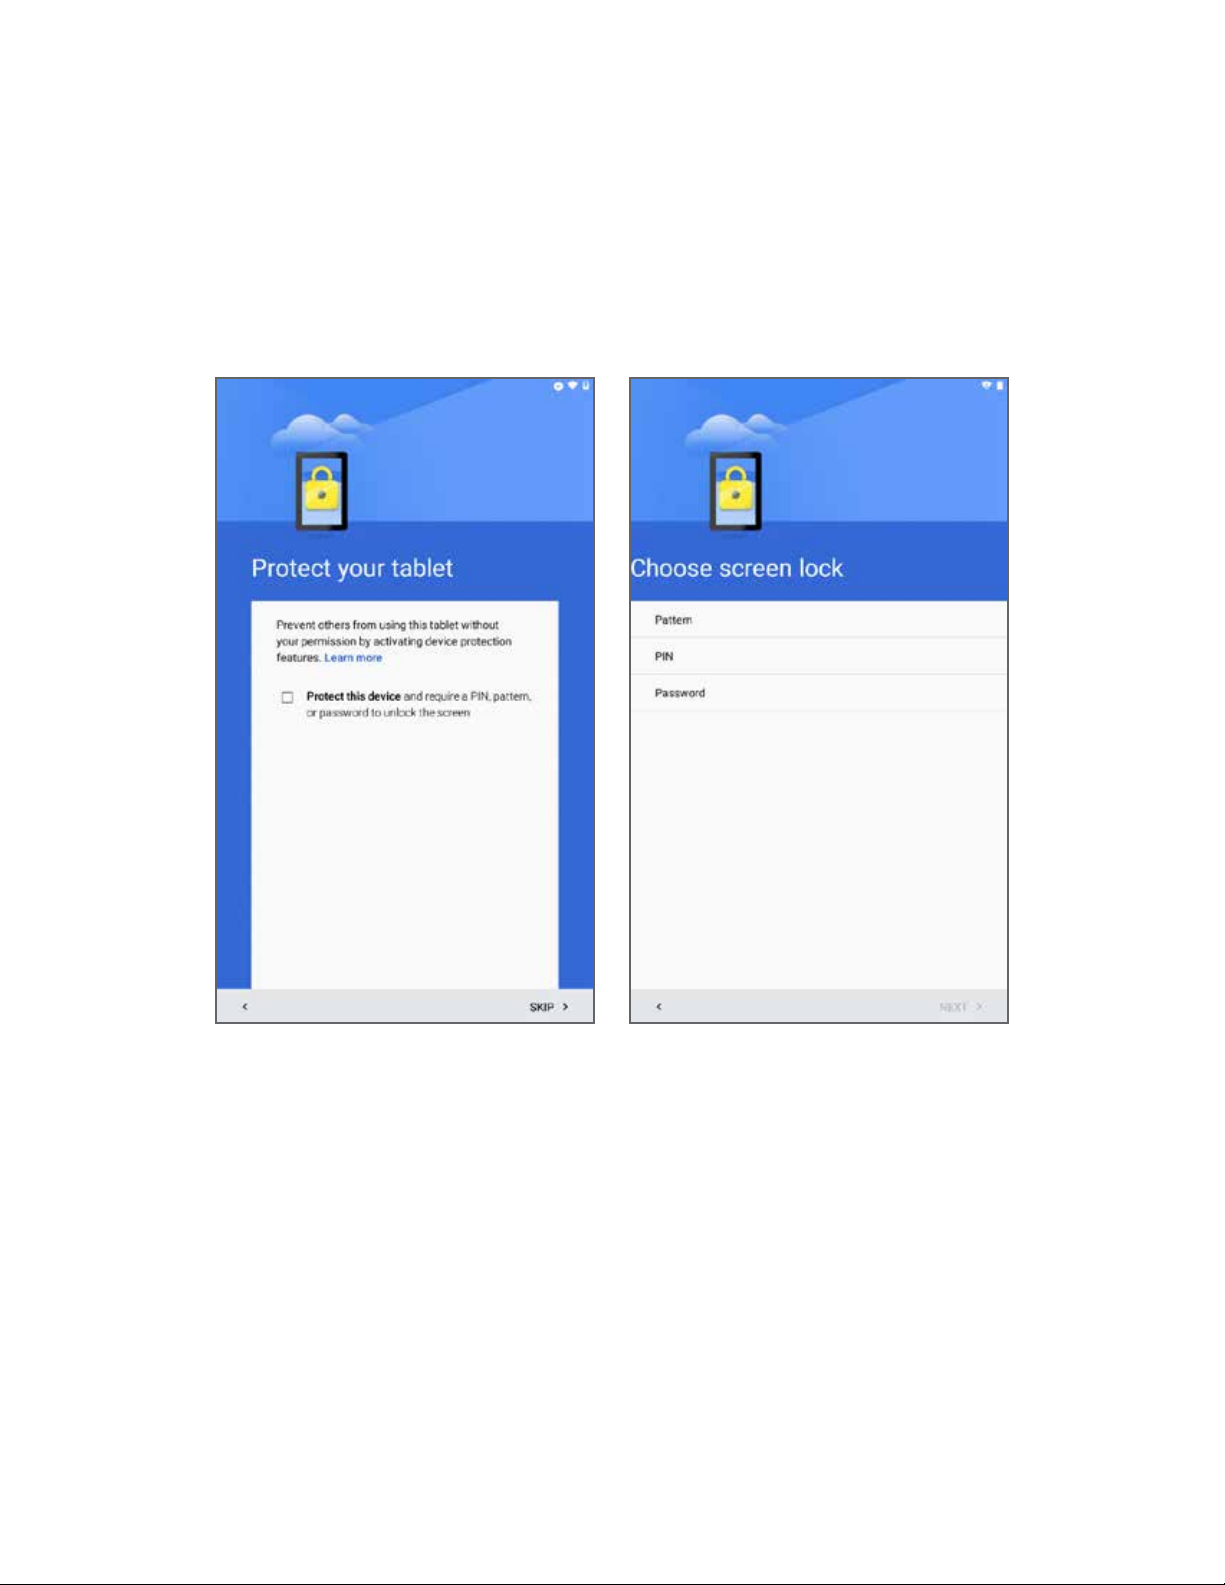
Options to protect your NOOK.
v
Barnes & Noble NOOK Tablet User Guide16

Setting Up Your NOOK Account
NOOK Account
Use your existing NOOK account or create a new one to make the best use of the NOOK
features on your NOOK. For more information, see Setting Up Your NOOK.
For more information about the NOOK features, see NOOK.
NOOK Legal Information
To read the NOOK Device Terms of Service, the NOOK Store Terms of Service, and the
NOOK Privacy Policy, open the NOOK Settings app and tap Legal Information. Your NOOK
displays links to popup windows with each of these documents.
To view NOOK legal information online, visit: NOOK.com/legal.
Registering an Existing NOOK Account
If you already have a Barnes & Noble or NOOK account, tap Sign In.
1. On the Sign In screen, enter the email address and password for your account.
2. Tap Sign In.
Barnes & Noble NOOK Tablet User Guide 17

Creating a New NOOK Account
If you do not already have a Barnes & Noble or NOOK account, tap Create Account.
1. On the screen for creating your account, enter:
• Your rst name
• Your last name
• The email address you want to use for your NOOK account
• A password
• A security question
2. Tap Submit. Your NOOK opens a dialog box with links to legal notices, including the NOOK
Device Terms of Service, the NOOK Store Terms of Service, and the NOOK Privacy Policy.
To read any of these notices, tap its link.
3. If you have read the legal notices and accept them, tap “Accept”.
If you do not accept the legal terms, you cannot use your NOOK.
Next you will set up a credit card for your account. You have the option of skipping this step,
but you will not be able to make any purchases in the NOOK Shop until a credit card has been
added to your account.
4. Add credit card information for your account. Enter:
• The rst name on the credit card account.
• The last name on the credit card account.
5. Tap the pop-up menu to select the card type.
Choose from:
• Visa
• MasterCard
• American Express
• Discover
• DinersClub
• JCB
6. Tap pop-up menus to select the expiration date for the credit card, and then tap Next.
7. Enter the billing address for the credit card, and then tap Submit.
Enter:
• Street address
• City
• State
• ZIP Code
• Country (either the United States or Canada)
Your NOOK enters this information and creates your account.
Barnes & Noble NOOK Tablet User Guide18
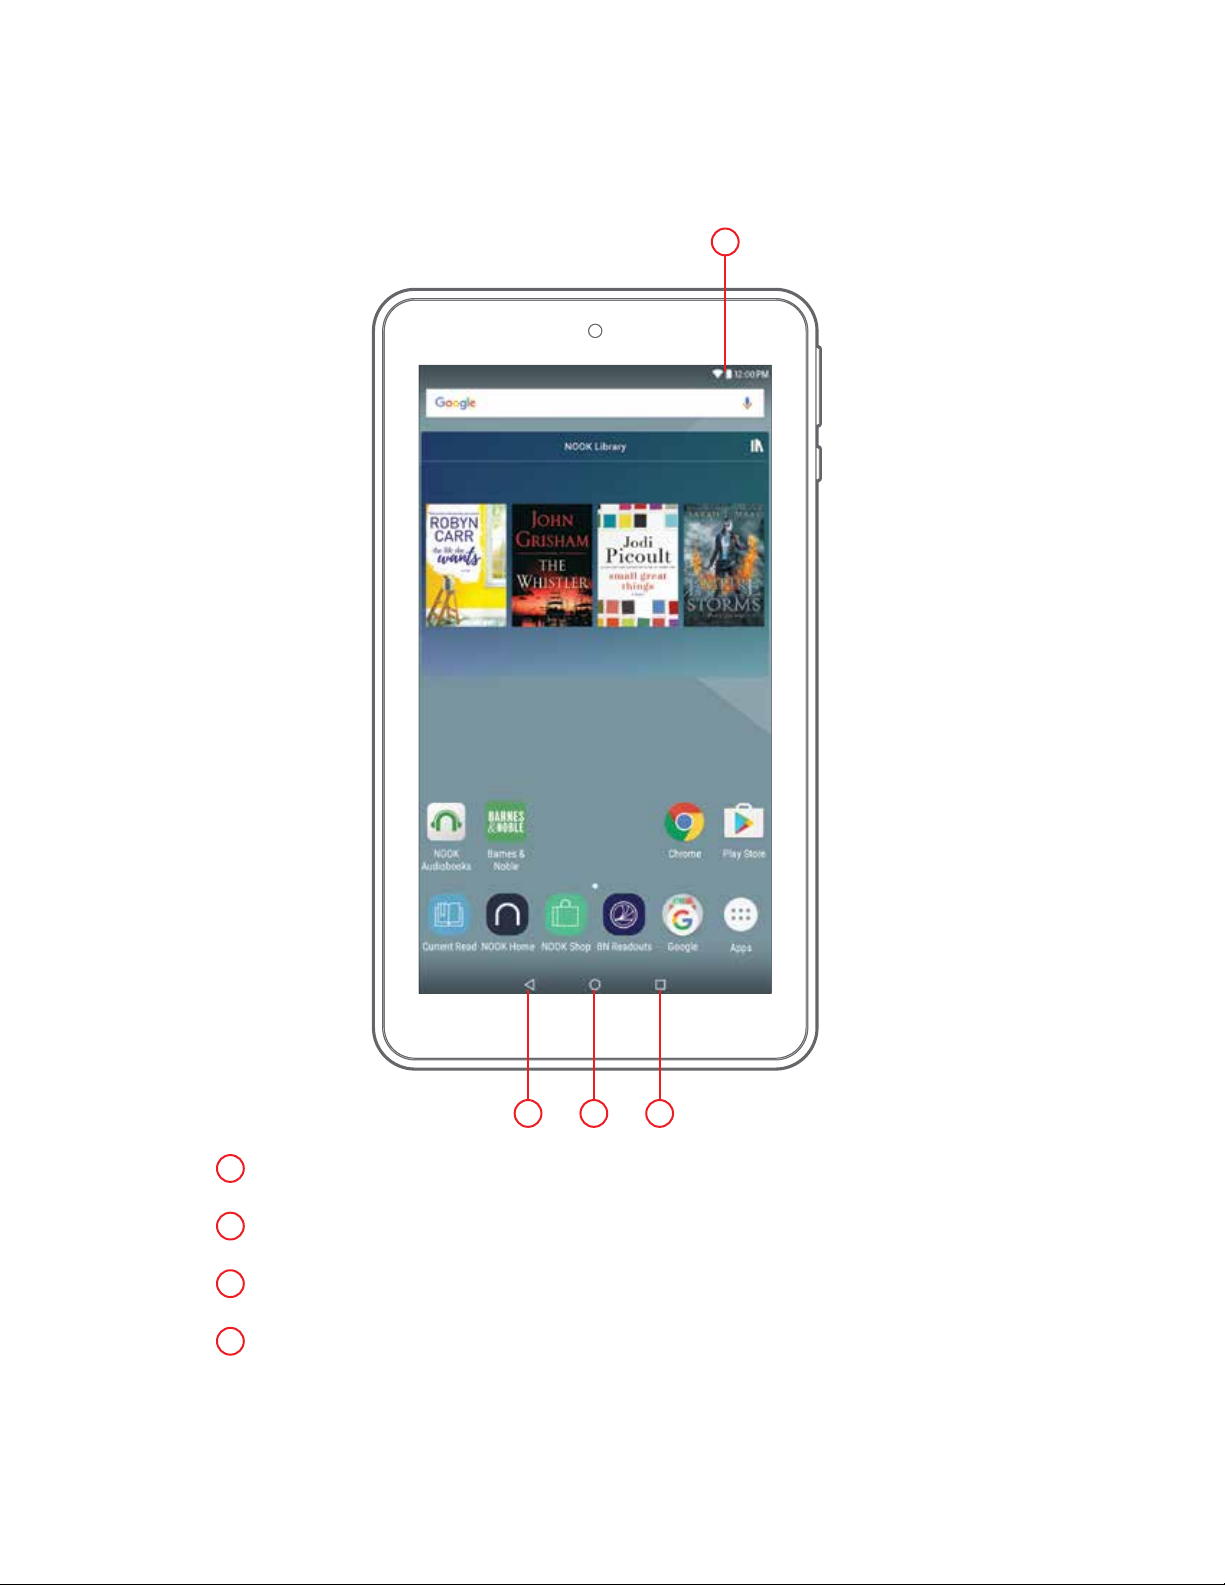
Home Screen
Once the initial setup is completed, the Home screen appears.
4
3
1
Home Button
2
Multi-Task Button
3
Back Button
4
Status Bar
Barnes & Noble NOOK Tablet User Guide 19
21
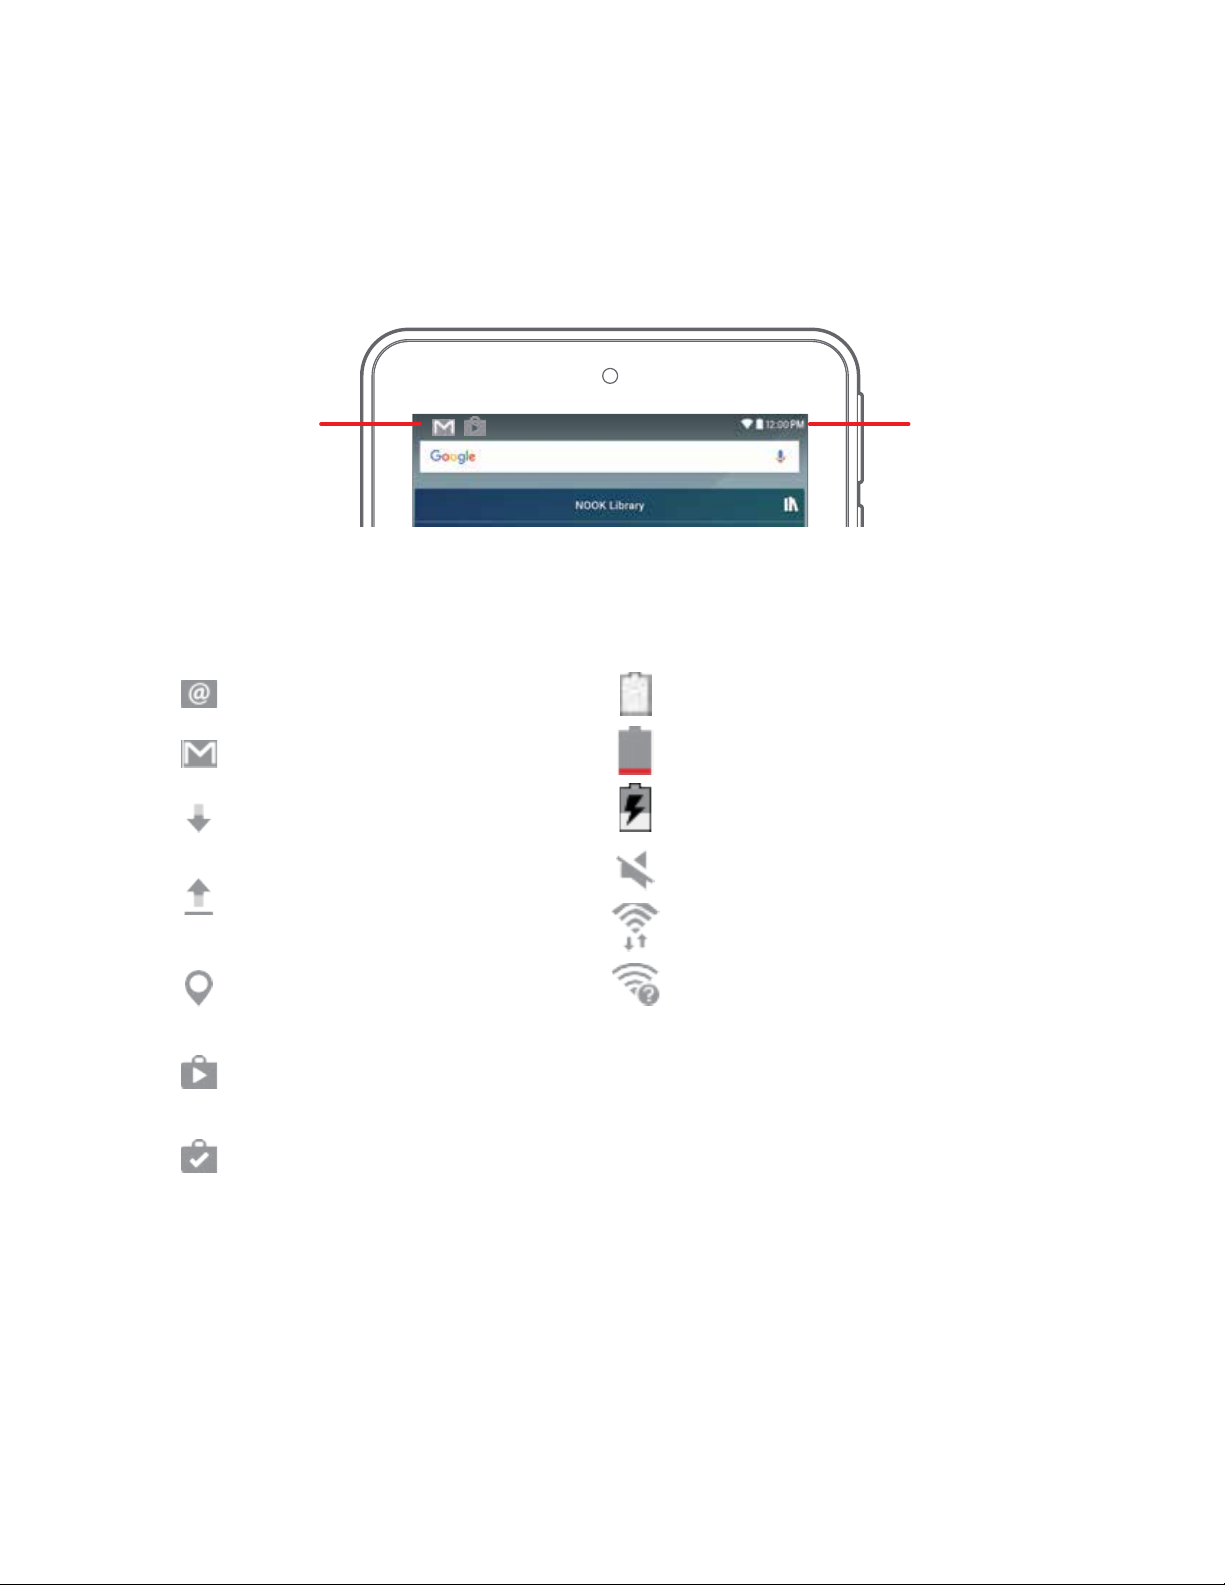
Status Bar
The Status bar at the top of the Home screen provides device information (such as network
status, battery charge, and time) on the right side and notication alerts on the left.
Notication
Icons
Notication Icons
New email: New email has arrived.
New Gmail: New Gmail has arrived.
File download in progress: Download
of a le or app is in progress.
File upload in progress: File is being
uploaded or sent.
GPS active: Location service (GPS) is
active and acquiring a signal.
Status Icons
Status Icons
Battery full: Battery is fully charged.
Battery low: Battery is low.
Battery charging: Battery is charging.
Mute mode: Mute mode is enabled.
Wi-Fi active: Wi-Fi is active.
Wi-Fi available: A Wi-Fi network is
available.
App updates available: App updates are
available from the Google Play store.
App updates complete: App installation
or updates are complete.
Barnes & Noble NOOK Tablet User Guide20
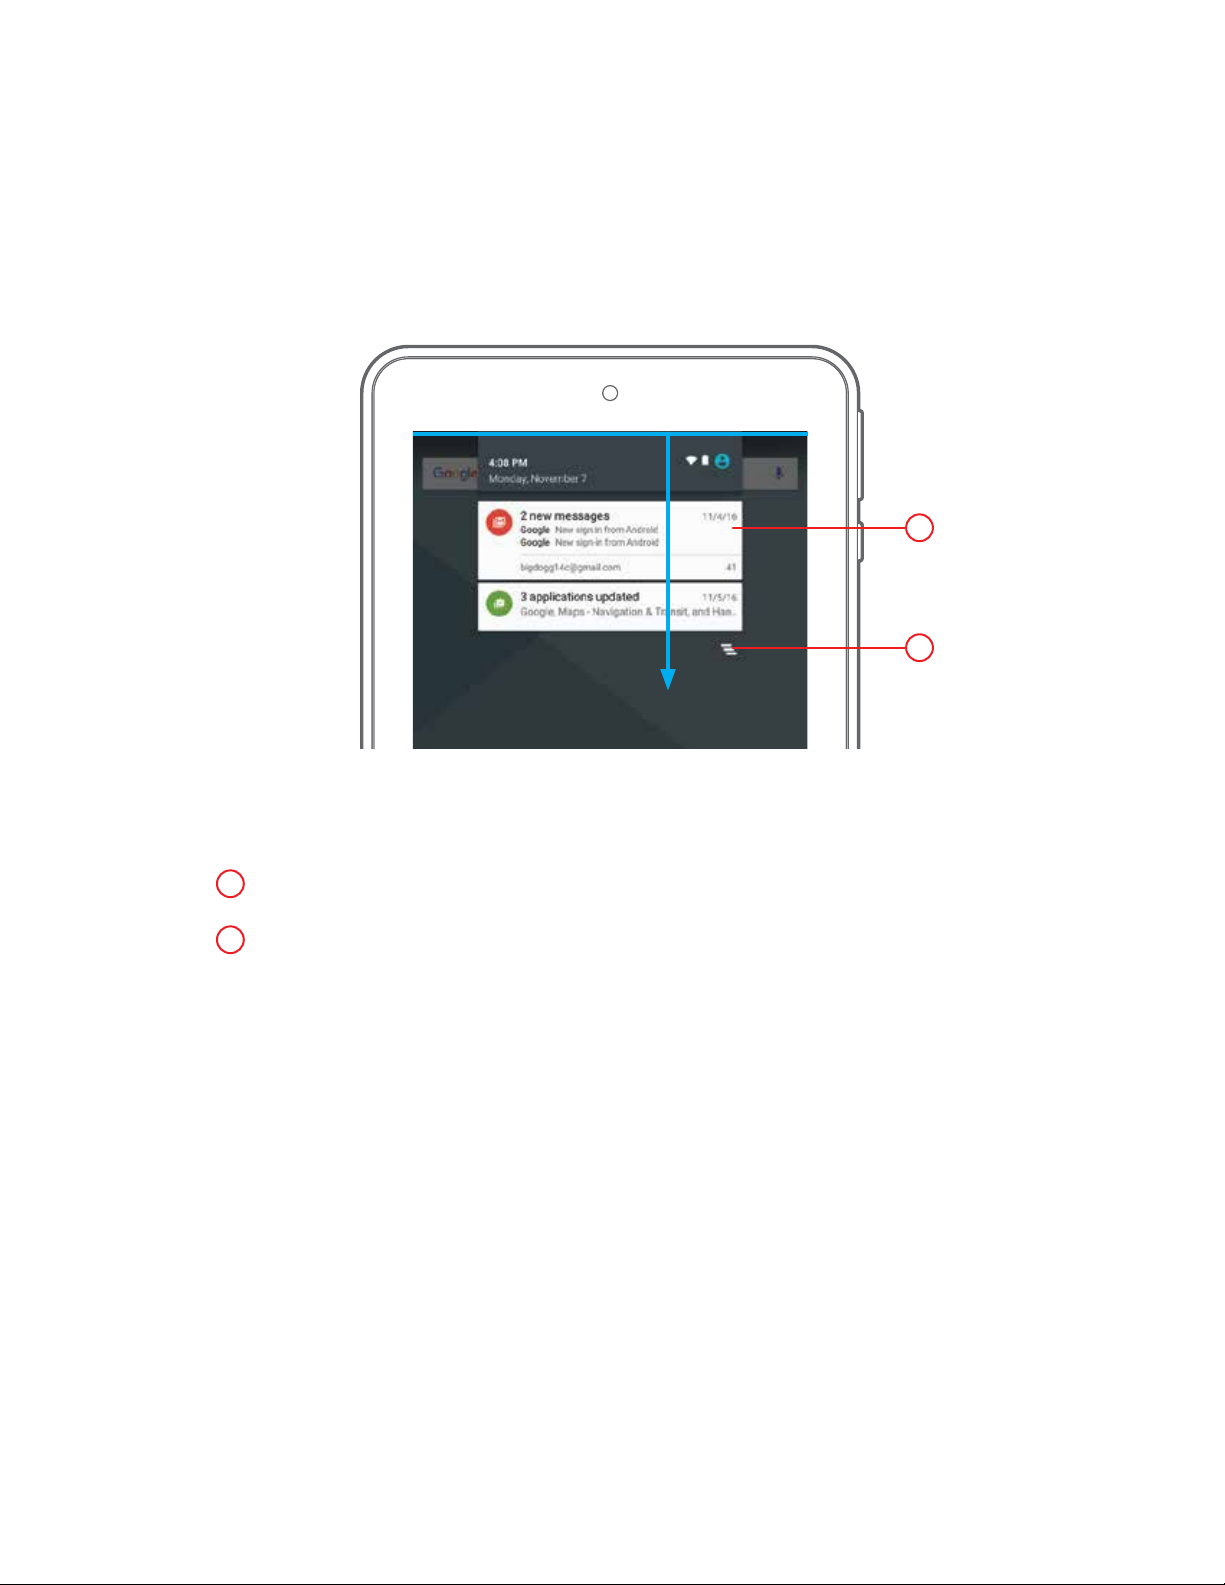
Notications Panel
To display the Notication Panel, swipe down from the top edge of the screen.
Swipe down
1
2
1
Notication Panel
2
Clear Notications
Barnes & Noble NOOK Tablet User Guide 21
 Loading...