

Barnes & Noble BNRV300 User Manual

Barnes & Noble, Inc. 122 Fifth Avenue, New York, NY 10011 USA.
© 2010-2011 Barnes & Noble, Inc. All rights reserved. NOOK™, NOOK Color™, NOOK Book™, NOOK
Bookstore™, NOOK Friends™, NOOK Kids™, NOOK Newsstand™, NOOK Store™, NOOK Study™, Read In
Store™, More In Store™, Free Friday™, LendMe®, PubIt!™, Lifetime Library™, Read What You Love. Anywhere
You Like™, The Simple Touch Reader™, and Read Forever™ are trademarks of Barnes & Noble, Inc. Patent Pending. Screenshots and product images are simulated and for instructional purposes only. They may dier from the actual product and are subject to change without notice. Your use of NOOK is subject to the NOOK Terms of Service
located in this User Guide and here: www.nook.com/legal. Contains Reader® Mobile technology by Adobe Systems
Incorporated. All trademarks or registered trademarks that are not the property of Barnes & Noble or its aliates
are the property of their respective owners.
Model BNRV300
Version: 1.0.0.E

Table of Contents
Introduction .................................................................................................................................................... 7
Contact Us ........................................................................................................................................................................................ 7
Getting to Know Your NOOK ........................................................................................................................................................ 7
Getting Started with Your NOOK .............................................................................................................. 10
Registering Your NOOK ................................................................................................................................................................ 11
Power and Charging ........................................................................................................................................................................ 13
Safety and Care ............................................................................................................................................................................... 15
Caring for Your NOOK .................................................................................................................................................................. 16
Locking and Unlocking Your NOOK ............................................................................................................................................. 17
Using Gestures to Control Your NOOK .................................................................................................... 18
Tap ................................................................................................................................................................................................... 18
Double Tap ...................................................................................................................................................................................... 18
Press and Hold ............................................................................................................................................................................... 19
Swipe ............................................................................................................................................................................................... 19
Scroll ................................................................................................................................................................................................ 20
The Quick Nav Bar ...................................................................................................................................... 21
The Status Bar ................................................................................................................................................................................. 22
The Home Screen ........................................................................................................................................ 23
The Reading Now Panel ................................................................................................................................................................. 23
The New Reads List ........................................................................................................................................................................ 24
The What to Read Next Shelf ....................................................................................................................................................... 24
Reading Books on Your NOOK ................................................................................................................... 26
Opening a Book .............................................................................................................................................................................. 26
Page Layout ..................................................................................................................................................................................... 26
Turning Pages .................................................................................................................................................................................. 26
The Reading Tools Menu ................................................................................................................................................................ 27
Reading Magazines and Newspapers on Your NOOK .............................................................................. 50
The Library on Your NOOK ....................................................................................................................... 51
Pull-down Menus ............................................................................................................................................................................. 51
The Sync Button .............................................................................................................................................................................. 53
The Search Tool for Your Library .................................................................................................................................................. 53
Memory Card .................................................................................................................................................................................. 54
Viewing and Sorting the Contents of Your Library ....................................................................................................................... 54
Organizing Your Library on Shelves ............................................................................................................................................... 55

Archiving Books and Periodicals ..................................................................................................................................................... 56
Unarchiving Books and Periodicals ................................................................................................................................................. 57
Opening Files on an SD Memory Card .......................................................................................................................................... 57
Transferring Files from Your Personal Computer to Your NOOK .............................................................................................. 57
Using the LendMe Program ........................................................................................................................ 59
Lending and Borrowing Books ....................................................................................................................................................... 59
Guidelines for Lending and Borrowing Books ............................................................................................................................... 59
Determining whether a Book Can Be Lent ................................................................................................................................... 60
Lending a Book ................................................................................................................................................................................ 60
Borrowing a Book ........................................................................................................................................................................... 60
Shopping on Your NOOK ............................................................................................................................ 62
Introduction ..................................................................................................................................................................................... 62
Browsing Lists and Categories ........................................................................................................................................................ 63
Searching for Titles, Authors, or Topics ......................................................................................................................................... 63
Buying a Book .................................................................................................................................................................................. 64
Buying a Single Issue of a Magazine or Newspaper ...................................................................................................................... 65
Buying a Subscription to a Magazine or Newspaper ..................................................................................................................... 65
What Happens When You Buy an Item in the Shop? ................................................................................................................... 65
Using Your WishList........................................................................................................................................................................ 65
Using Your NOOK in a Barnes & Noble Store .......................................................................................... 67
Read In Store™: Reading Books in a Barnes & Noble Store ...................................................................................................... 67
Searching Your NOOK ................................................................................................................................ 68
Searching in Your Library ................................................................................................................................................................ 68
Searching from the Quick Nav Bar ................................................................................................................................................ 68
Searching for Words with Accents and Other Diacritical Marks.................................................................................................. 68
Configuring Your NOOK ............................................................................................................................. 69
Viewing and Configuring Device Info ............................................................................................................................................. 70
Configuring Wireless Settings ......................................................................................................................................................... 72
Configuring Screen Settings ............................................................................................................................................................ 73
Configuring Time Settings ............................................................................................................................................................... 75
Configuring Navigation Buttons in the Reader .............................................................................................................................. 77
Configuring the Shop ...................................................................................................................................................................... 78
Configuring Social Features ............................................................................................................................................................ 79
Configuring Search .......................................................................................................................................................................... 86
Using Your NOOK at Wi-Fi Hotspots ........................................................................................................ 87
Wi-Fi Networks in Barnes & Noble Stores ................................................................................................................................... 87

Unsecured Wi-Fi Networks ........................................................................................................................................................... 87
Secured Wi-Fi Networks ................................................................................................................................................................ 87
Updating the Software on Your NOOK ..................................................................................................... 88
Using an SD Memory Card ......................................................................................................................... 89
Types of Memory Cards Supported .............................................................................................................................................. 89
Installing a Memory Card ................................................................................................................................................................ 89
Removing a Memory Card ............................................................................................................................................................. 91
Tips and Troubleshooting ............................................................................................................................ 92
Solving Problems ............................................................................................................................................................................. 92
Appendix A: Page Numbering and File Formats ...................................................................................... 94
Appendix B: International Use and Languages ......................................................................................... 95
Appendix C: One Year Limited Warranty ............................................................................................... 97
ONE YEAR LIMITED WARRANTY ............................................................................................................................................. 97
Appendix D: Trademarks and Copyrights ............................................................................................... 100
Adobe Reader Mobile Software ................................................................................................................................................... 100
AT&T ............................................................................................................................................................................................. 100
Dictionary ...................................................................................................................................................................................... 100
Fonts .............................................................................................................................................................................................. 100
microSD and microSDHC ............................................................................................................................................................ 100
Wi-Fi .............................................................................................................................................................................................. 100
Additional Information .................................................................................................................................................................. 100
Appendix E: FCC Notices ......................................................................................................................... 101
FCC IDs ........................................................................................................................................................................................ 101
FEDERAL COMMUNICATIONS COMMISSION (FCC) STATEMENT INFORMATION TO THE USER ............................ 101
FCC/IC Radiation Exposure Statement ...................................................................................................................................... 101
Other Information Related to the Radio ..................................................................................................................................... 101
Appendix F: Industry Canada Notice ..................................................................................................... 103
Appendix G: NOOK™ Terms of Service ................................................................................................. 104
Appendix H: AT&T Terms of Service & Acceptable Use Policy ........................................................... 105


Introduction
This User Guide is designed to help you get the most enjoyment out of your NOOK eReader.
Contact Us
If you have questions about your NOOK that this guide doesn’t answer, be sure to visit the NOOK online support
center at:
http://www.nook.com/support
The online support center oers additional information about your NOOK, including:
• A PDF version of this NOOK User Guide that you can download to your computer
• Tutorial videos
• Frequently Asked Questions
You can also contact Barnes & Noble Customer Support by sending email to NOOK@barnesandnoble.com or
by calling 1-800-843-2665 (1-800-THE-BOOK) and selecting the option for Digital Technical Support. Outside the
United States, please call 1-201-438-1834.
Stay in Touch
Follow us on Facebook and Twitter to receive daily reviews, exclusive oers, and free NOOKbooks.
http://www.facebook.com/nookBN
http://www.twitter.com/nookbn
Now, let’s get started with a quick tour of your NOOK and its main features.
Getting to Know Your NOOK
Your NOOK is an eReader with a grayscale touchscreen.
On your NOOK, you can:
• Read books, magazines, and newspapers
• Shop over two million titles. Buy books, single issues of magazines and newspapers, as well as subscriptions to
magazines and newspapers
• Store hundreds of books, along with magazines, newspapers, and personal files
• Sample books for free
• Lend, borrow, share, and recommend books to friends via Facebook®, Twitter®, or Google® using Barnes &
Noble’s exclusive LendMe® technology
• Store and read files, including PDFs
Your NOOK is small enough to hold easily with one hand and to slip into a bag or a purse.
Barnes & Noble NOOK User Guide 7

The picture below shows the features on the front of your NOOK.
The front of your NOOK.
E-Ink® Touchscreen Display
Your NOOK features a high-resolution 6-inch E-Ink touchscreen for easy navigation and page turns.
Page-Turn Buttons
Built into the black frame on either side of the E-Ink touchscreen display are two narrow buttons for paging forward
and backward in books and periodicals. You can also use the buttons for scrolling up and down lists and shelves in the
Library and Shop.
By default, the upper button on each side of the screen turns the page backward, and the lower button turns the
page forward. You can change these settings on the Reader settings screen, which you can access through the Settings
button on the Quick Nav Bar.
These buttons also can be used to scroll through scrollable pages in the Library and the Shop. Press either of the
lower page-turn buttons to scroll down. Press either of the upper page-turn buttons to scroll up.
Quick Nav Button
This NOOK symbol on the lower front of your NOOK is called the Quick Nav button.
8 Barnes & Noble NOOK User Guide

If your NOOK is sleeping, press the Quick Nav button to wake your NOOK up and turn it on.
Power Button
If your NOOK is already on, press this button to open the Quick Nav Bar, a navigation menu that appears at the bottom of the NOOK touchscreen and lets you jump to features such as the Library or Shop.
microUSB Port
Your NOOK features a microUSB port for charging and for connecting to a personal computer.
The image below shows the back of your NOOK.
microSD™
Memory
Card Slot
The back of your NOOK.
Power Button
The power button for your NOOK is located near the top of the back panel. Press and hold the button for 2 seconds
to turn on your NOOK. To learn more about power management for your NOOK, see “Power and Charging”.
microSD Memory Card Slot
Your NOOK features enough built-in memory to hold hundreds of books, along with many magazines, newspapers,
and personal files such as PDFs.
You can add more storage to your NOOK for your personal files by installing a standard microSD Memory card. The
card fits into a slot on the upper right side of your NOOK. A microSD Memory Card can hold up to 32 GB of books,
magazines, newspapers, and other files.
NOTE: The files on a Memory Card appear in the My Files section of your Library. They do not appear in the
Books or Newsstand sections.
To learn about installing a microSD Memory Card in your NOOK, see “Using an SD Memory Card”.
Barnes & Noble NOOK User Guide 9

Getting Started with Your NOOK
The first time you use your NOOK, you’ll need to go through a short set-up process that will take about 5 to 10 minutes. Make sure that you’re in an area that has a Wi-Fi® connection (a wireless connection to the Internet), because
part of the process is registering your NOOK with your Barnes & Noble account on BN.com.
NOTE: You will not be able to set up your NOOK without a Wi-Fi connection.
In the set-up process, you will do the following:
• Turn on your NOOK by pressing the power button on the back panel.
• Accept the Terms of Service.
• Set the time zone.
• Connect to a Wi-Fi network.
• Register your NOOK to a Barnes & Noble account.
NOTE: If you don’t already have a Barnes & Noble account, you’ll have an opportunity to create one during the
registration step.
Your Barnes & Noble Account
A Barnes & Noble account allows you to purchase and download books, magazines, and newspapers on your
NOOK, and from the Barnes & Noble Web site.
The account also allows you to synchronize your NOOK with any other NOOK eReaders you have, such as NOOK
eReader software applications installed on your tablet (for example, an iPad® or an iPod touch®), PC, or smartphone (for example, an iPhone® or an Android phone).
If you don’t have a Barnes & Noble account, you can set one up in a few minutes on the NOOK Web site. Just open
a browser on your computer, and visit the page: www.nook.com/setup. You’ll also have the opportunity to set up an
account during the registration process for your NOOK.
Your Barnes & Noble account is ready for use once you have set up the following:
• An email address
• A default credit card number
• A valid expiration date for the credit card
• A current U.S. billing address
If you have any questions about setting up an account, please call Customer Service at 1-800-THE-BOOK (1-800-
843-2665).
10 Barnes & Noble NOOK User Guide

Registering Your NOOK
NOTE: You will need to connect to a Wi-Fi network to complete your registration.
1. Read the Welcome screen. Tap the Next in the lower right corner of the screen.
Your NOOK displays its Terms of Service.
2. Read the NOOK Terms of Service. If you agree to them, tap the Agree button.
If you do not accept the Terms of Service, you will not be able to use your NOOK.
If you tapped the Agree button, your NOOK displays a list of time zones.
3. Select your Time Zone by tapping its button. Tap Next.
4. Connect to a Wi-Fi network.
To register your NOOK and to purchase and download books and periodicals, you need to be connected to
a Wi-Fi network. If you’re in a Barnes & Noble store, your NOOK will automatically connect to the store’s
Wi-Fi network. If you’re in some other location with Wi-Fi access, your NOOK will list all the networks it
finds. Tap on the name of the network you want to connect to. If you see a lock symbol beside the network’s name, it’s a secure network. You’ll need to enter a password to connect to the network. If you do
not know the network password, ask for the network administrator for help. If you have problems connecting, visit http://nook.com/wifi for more troubleshooting tips.
5. Once you have connected to a network, tap Next (if you are in a Barnes & Noble store and connected to its
network) or Continue with Setup (if you are connected to any other Wi-Fi network.)
Your NOOK displays a messaging saying it is registering your device. When the registration has completed,
your NOOK displays a Sign In screen with an email field, a password field, and a keyboard at the bottom of
the screen.
6. Sign in to your BN.com account.
When you register your NOOK, you link it to your Barnes & Noble account and give it access all the books
and periodicals in your Barnes & Noble library. You also make it possible to shop for new books and periodicals on your NOOK.
If you already have a Barnes & Noble account, do this:
a. On the Sign In screen, enter the email address and password for your Barnes & Noble account.
(As a security precaution, if you enter your password incorrectly five times, you will be locked
out of your BN.com account for half an hour. If you like, you can reset your account by visiting
BN.com.)
b. Tap the Sign In button below the password field.
c. When a dialog box appears, saying “Registration successful,” tap the OK button.
If you do not already have a Barnes & Noble account, do this:
a. Tap the Create Account button.
Your NOOK displays a form for creating a Barnes & Noble account.
b. Enter the information requested, including your name, password, credit card type, number, and
expiration date, and a security question.
c. Tap Submit.
Your NOOK creates your Barnes & Noble account and registers your NOOK to your account.
That’s it. You’ve registered your NOOK.
You’re ready to read books, magazines, and newspapers, and to shop in the NOOK Store.
Barnes & Noble NOOK User Guide 11

Tutorial Videos
The Barnes & Noble Web site oers tutorial videos and other useful information about your NOOK. To watch the
videos on your personal computer, visit http://www.nook.com/support
12 Barnes & Noble NOOK User Guide

Power and Charging
Turning Your NOOK On and O
Turning On Your NOOK
To turn on your NOOK, press the power button on the back of your NOOK. Hold the button down for 2 seconds
and release it.
Your NOOK starts up.
Turning O Your NOOK
You do not need to turn your NOOK o when you stop using it.
With a fully charged battery and Wi-Fi turned o, your NOOK has enough power to support up to two months of
casual reading. With a fully charged battery and Wi-Fi turned on, your NOOK has enough power to support 3 weeks
of casual reading.
If you are carrying your NOOK without a cover in a bag or purse, you might want to turn o your NOOK to avoid it
being accidentally turned on from its “sleeping” state. You also might want to turn o your NOOK simply to conserve power.
To turn o your NOOK, do this:
1. Press the power button and hold it down for 5 seconds.
A window appears, asking if you really want to turn your NOOK completely o.
2. Tap the Power o button in the dialog box.
Your NOOK turns o.
NOTE: If you ignore the window asking you to confirm that you want to power o your NOOK, after several
seconds the window disappears and your NOOK resumes whatever it was doing before you pressed
the power button.
Barnes & Noble NOOK User Guide 13

Wall Charging
To charge your NOOK, plug it into a wall socket. Plug the small end of the microUSB cable into the microUSB slot on
the bottom of your NOOK. Plug the large end of the microUSB cable into the power adapter. Plug the adapter into a
wall outlet.
Wall Outlet
microUSB Port
USB
Cable
Power
Adapter
CAUTION: Only use the Barnes & Noble power adapter and custom microUSB cable supplied with your NOOK.
Other power adapters might damage your NOOK and its battery. Do not use a power adapter and
cable intended for other models of NOOK eReader. Use only a NOOK power adapter and cable.
To charge your NOOK from a wall outlet, do this:
1. Assemble the power adapter and microUSB cable. Insert the large end of the USB cable into the matching receptacle on the power adapter.
2. Plug the NOOK end of the USB cable into your NOOK.
3. Plug the power adapter into a compatible electrical outlet. If your NOOK was turned o, it will now turn itself
on.
NOTE: Depending on how much power remains in the battery, it might take around 3 hours to fully recharge
your NOOK. Do not turn o your NOOK while it is charging.
NOTE: Once your NOOK has enough power to turn on, you can see how much power remains in the battery
by checking the battery charge indicator in the right corner of the Status Bar.
4. Once your NOOK has fully charged, unplug the power adapter from the electrical outlet. Unplug the USB cable
from your NOOK.
14 Barnes & Noble NOOK User Guide

Resetting Your NOOK
Performing a Soft Reset
If for some reason your NOOK becomes unresponsive, you can perform a soft reset to restart the device.
1. Press and hold the power button for 20 seconds, then release the power button.
2. Press the power button again for 2 seconds to turn on your NOOK.
Low Power
You can see how much power remains in your battery by checking the battery icon in the Status Bar, or by checking
the Battery indicator on the Device Info settings screen. (To see the Device Info screen, tap the Quick Nav button,
tap settings, and on the Settings screen tap the Device Info menu choice.)
If you turn on your NOOK when its battery charge is almost depleted, a warning appears on the screen, suggesting
that you begin charging your NOOK before trying to use it.
If the battery is depleted, your NOOK will shut down until it has been suciently recharged.
Charging Recommendations
Your NOOK contains a rechargeable battery. To maximize battery life:
• Avoid fully discharging the battery. Charge your NOOK after several hours of use or when you see the low
charge alert, rather than continuing to use it until it turns itself o.
• Avoid high temperatures for charging, use, and storage. For more information, see “Temperature Ranges.”
• Charge the battery half way before storing your NOOK for a week or more.
Safety and Care
This section explains important information about safety and about caring for your NOOK.
Water
CAUTION: Your NOOK, cables, and adapters are not waterproof. To avoid risk of overheating, melting, and burns,
keep the device and all accessories away from water and other liquids.
Do not use the cable if either end of the cable gets wet or is exposed to liquid spray. Allow the
end(s) of the cable to dry thoroughly before trying to use the cable. Do not expose your NOOK
to wet or damp conditions. Avoid exposing the device to liquid or food. If liquid is spilled on the
device, make sure to unplug the charging cable and allow the device to dry thoroughly before
reusing. Do NOT attempt to dry out your NOOK with an external heat source such as a dryer or
microwave oven. Clean the screen of your NOOK with a soft cloth and avoid using liquid cleaners
on the screen.
Electricity
Your NOOK is an electrical device. Follow the same basic safety procedures you would follow with any electrical
device.
When charging your NOOK, use only the custom USB cable and power adapter included with your NOOK.
Barnes & Noble NOOK User Guide 15

Airplanes
When using your NOOK on an airplane, be sure to follow the instructions of the flight crew.
To turn your NOOK’s wireless networking on or o, do this:
1. Tap on the right end of the Status Bar to open the Quick Settings dialog box.
2. Slide the Wireless switch on or o.
3. Tap anywhere outside the Quick Settings dialog box to close it.
Electronic Equipment
If you are around sensitive electronic equipment–for example, if you are in a hospital–ask if you may use your
NOOK. Settings such as intensive care units might forbid the use of any electronic device, with or without networking.
Battery
Your NOOK includes a non-replaceable, rechargeable battery. Do not attempt to replace the battery. If you suspect
your battery is having problems, please contact Customer Service at 1-800-THE-BOOK (1-800-843-2665).
Caring for Your NOOK
To take the best possible care of your NOOK, please follow the recommendations below.
Temperature Ranges
Your NOOK should function as designed in these temperature ranges:
• Operation: 0 C to 40 C, 32 F to 104 F
• Storage: -25 C to 60 C, -13 F to 140 F
Outside of these ranges, your NOOK might develop power, display, and/or software issues. If temperatures are
extremely cold or hot, permanent physical damage can result. Such damage is not covered by the warranty. Storage
applies to temporary locations like the trunk of your car (or other motor vehicle) as well as long-term storage.
Even on a day that is not very hot, the passenger compartment or trunk of a car can be extremely hot. Do not leave
your NOOK in a car.
High storage temperatures reduce battery life. For more information, see “Charging Recommendations”.
Caring for the Touchscreen
You should clean the touchscreen on your NOOK from time to time. Clean the screen with a damp soft cloth, such
as a micro-fiber cloth. Micro-fibre cloths are available from Barnes & Noble stores and from partner retailers. Do not
use any chemicals to clean the screen.
B&N and Designer Covers
You can purchase an optional B&N or designer cover for your NOOK at your local Barnes & Noble Bookstore, at
partner retailers, and online at BN.com. The cover helps protect your NOOK from daily wear and tear. It keeps dust
from accumulating on the screen, reducing the need to clean it. The cover also provides some protection against
spills.
16 Barnes & Noble NOOK User Guide
Warranty Coverage and the B&N Protection Plan
Your NOOK is backed by a one-year manufacturer’s warranty against defects in materials and workmanship. For a
copy of this warranty, see “One Year Limited Warranty”. The warranty is also available at:
www.nook.com/warranty
In the event of any changes to the warranty, the version in eect on the Web site as of the date of purchase shall
apply.”
You can extend your NOOK’s coverage by purchasing a two-year B&N Protection Plan to help safeguard NOOK
against spills, drops, and other accidents. The B&N Protection Plan can only be purchased together with a NOOK,
not later.
Information about the B&N Protection Plan can be found on the Web page listed above.
Locking and Unlocking Your NOOK
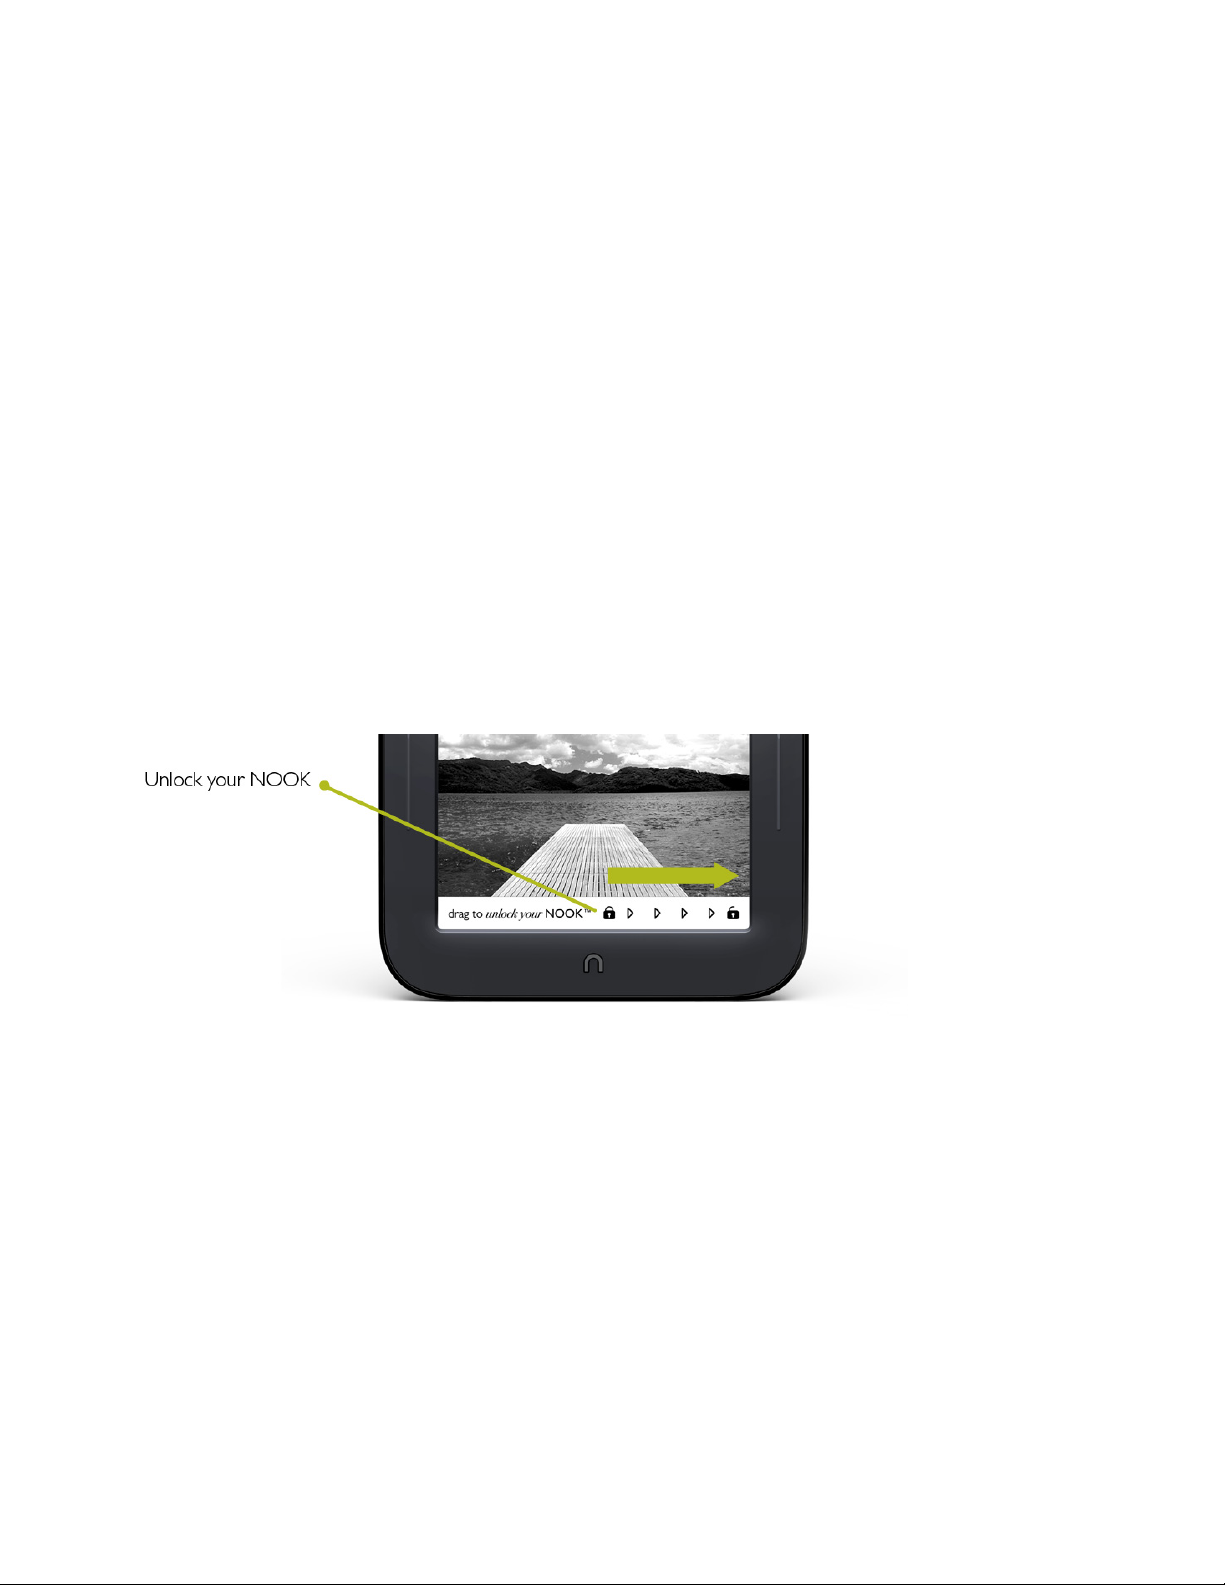
When your NOOK has been idle, your NOOK goes to “sleep.” Your NOOK displays a screensaver on the screen
(by default, a portrait of an author). It also locks the screen so that accidental touches do not perform actions.
To wake up your NOOK, do this:
1. Press the Quick Nav button (the raised NOOK symbol on the lower front panel of your NOOK).
2. Unlock your NOOK. Swipe your finger across the rightward pointing arrows between the closed lock symbol
and the unclosed lock symbol on the screen.
Sliding your finger across the row of locks on the screen to unlock your NOOK.
Barnes & Noble NOOK User Guide 17
Using Gestures to Control Your NOOK
Your NOOK puts great reading material right at your fingertips. To read that material, to share it, to rate it, and so
on, you’ll use your fingers in dierent ways.
Your NOOK recognizes these dierent gestures:
• Tap
• Double tap
• Press and hold
• Swipe
• Scroll
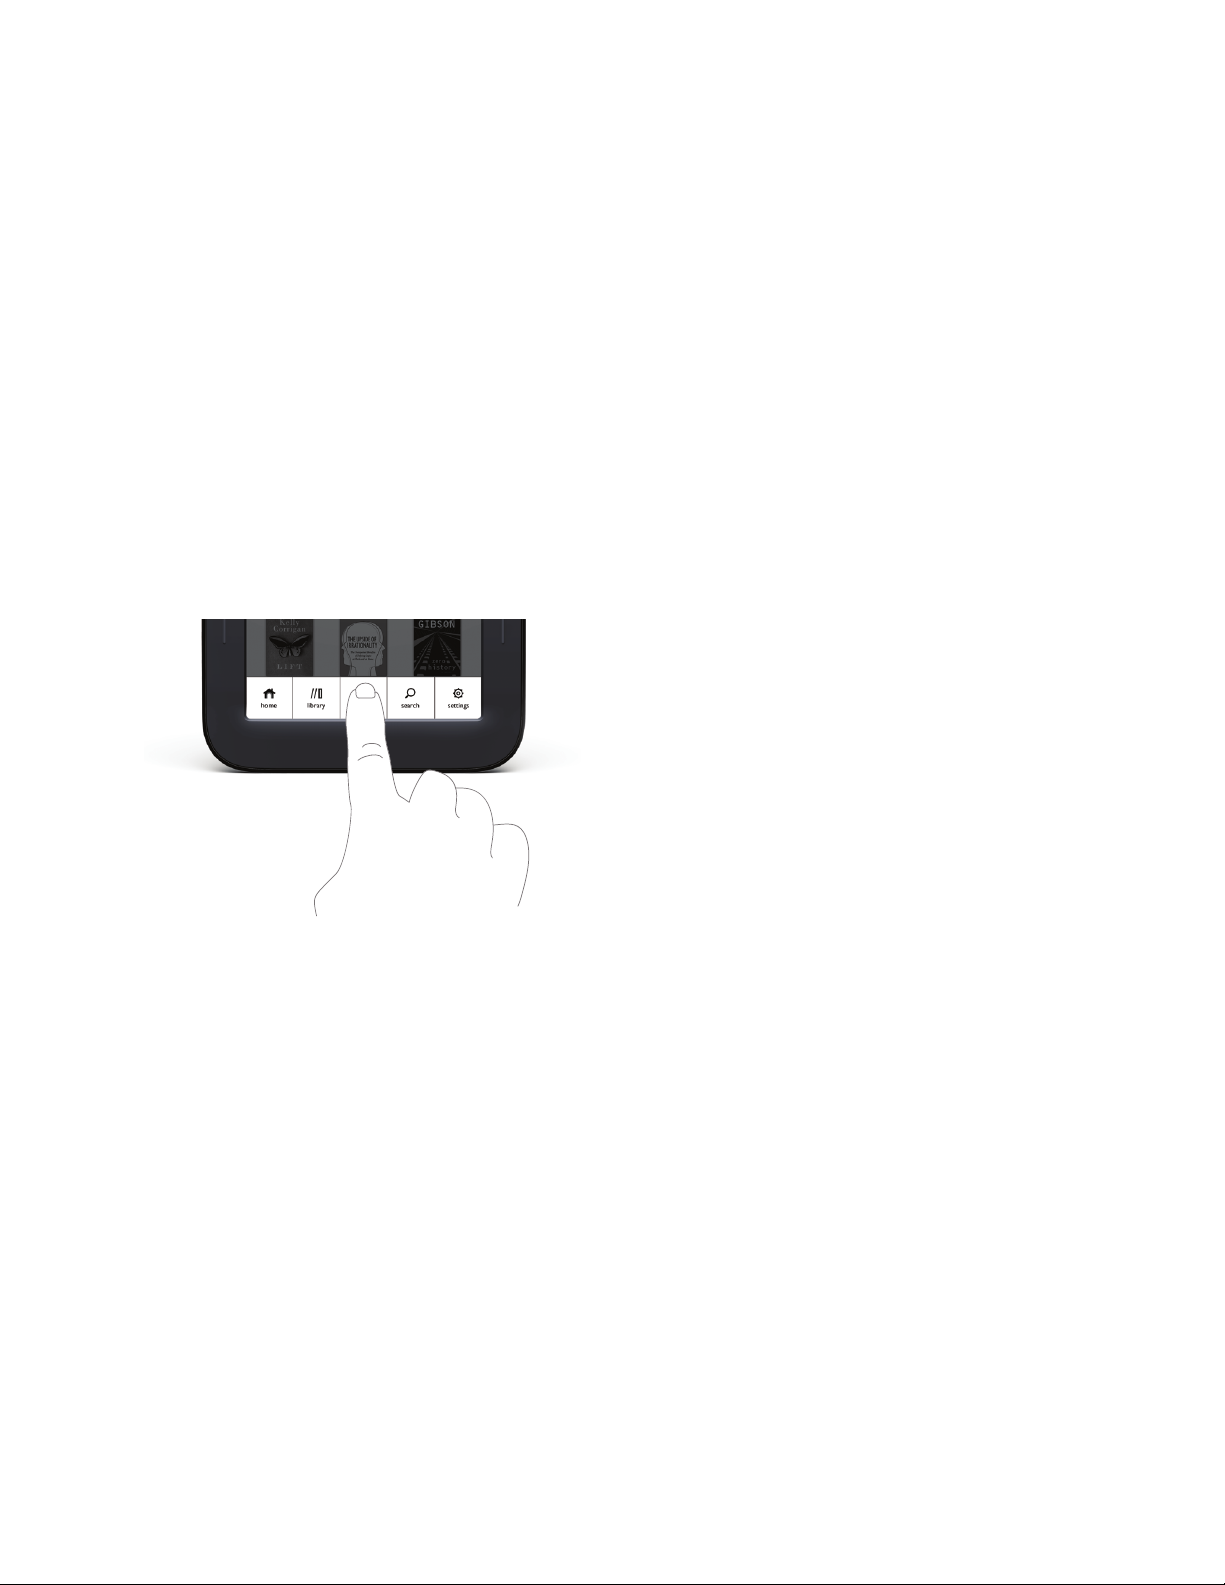
Tap
A tap on the screen is a quick touch of your fingertip. It’s the same gesture you use when you tap a key on a computer keyboard.
Tapping on an icon in the Quick Nav Bar.
Double Tap
Tapping twice quickly on the screen is a useful short-cut for many features.
In the Library or the Shop, double-tapping on the cover of a book or periodical opens a window with details about
the item.
18 Barnes & Noble NOOK User Guide
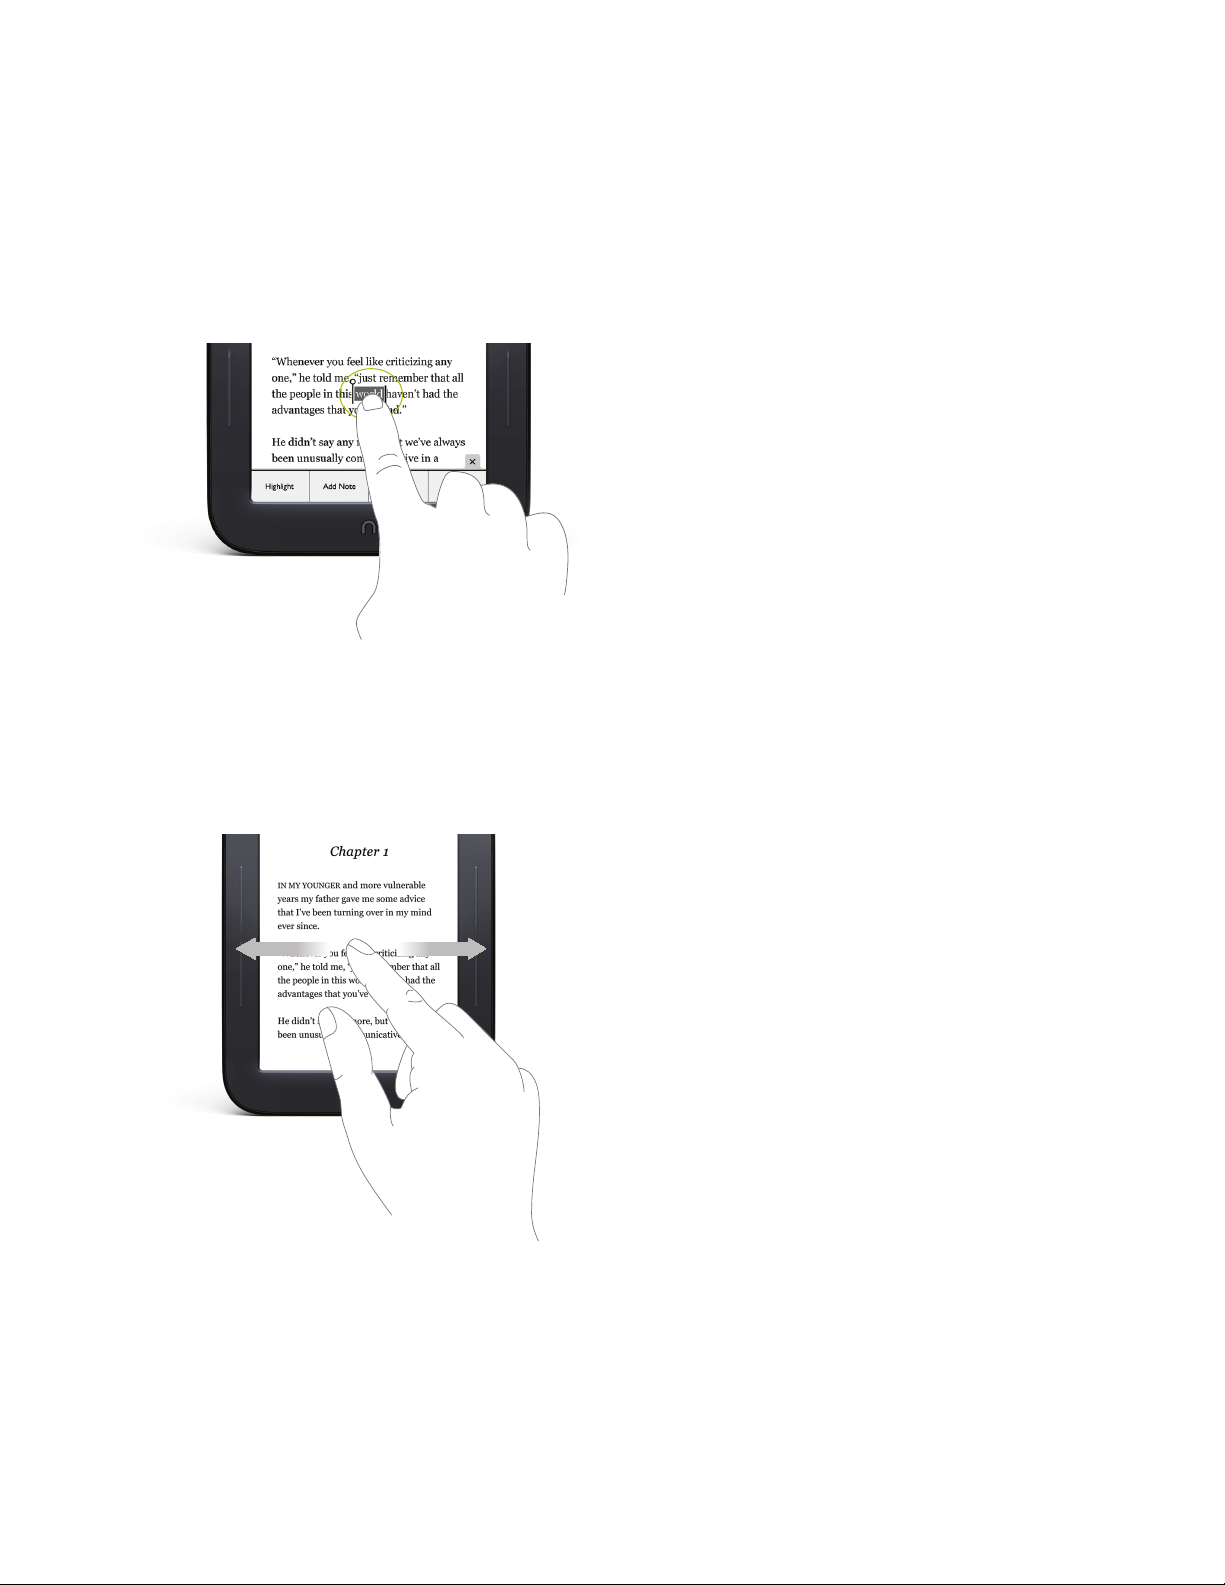
Press and Hold
Pressing and holding means touching your finger to the screen and holding it there for 2 seconds.
In many situations, pressing and holding causes your NOOK to open menu at the bottom of the screen. The menu
oers you choices about the image your finger is resting on.
For example, if you press and hold on a word in a book, your NOOK opens a menu oering you choices of things
you can do with that book: highlight the word, write a note, look the word up in a dictionary, and so on.
Pressing and holding on a word in a book and then lifting your finger opens the Text Selection Toolbar.
Swipe
To swipe is to slide your finger across the screen, usually to the left or right.
You can swipe to turn pages in a book you are reading.
Swiping to scroll left and right.
If you swipe left on the Status Bar, your NOOK goes back to your previous activity. The Status Bar is a narrow black
bar that displays icons at the top of your NOOK screen in Home, Library, Shop, Search, and Settings.
Barnes & Noble NOOK User Guide 19
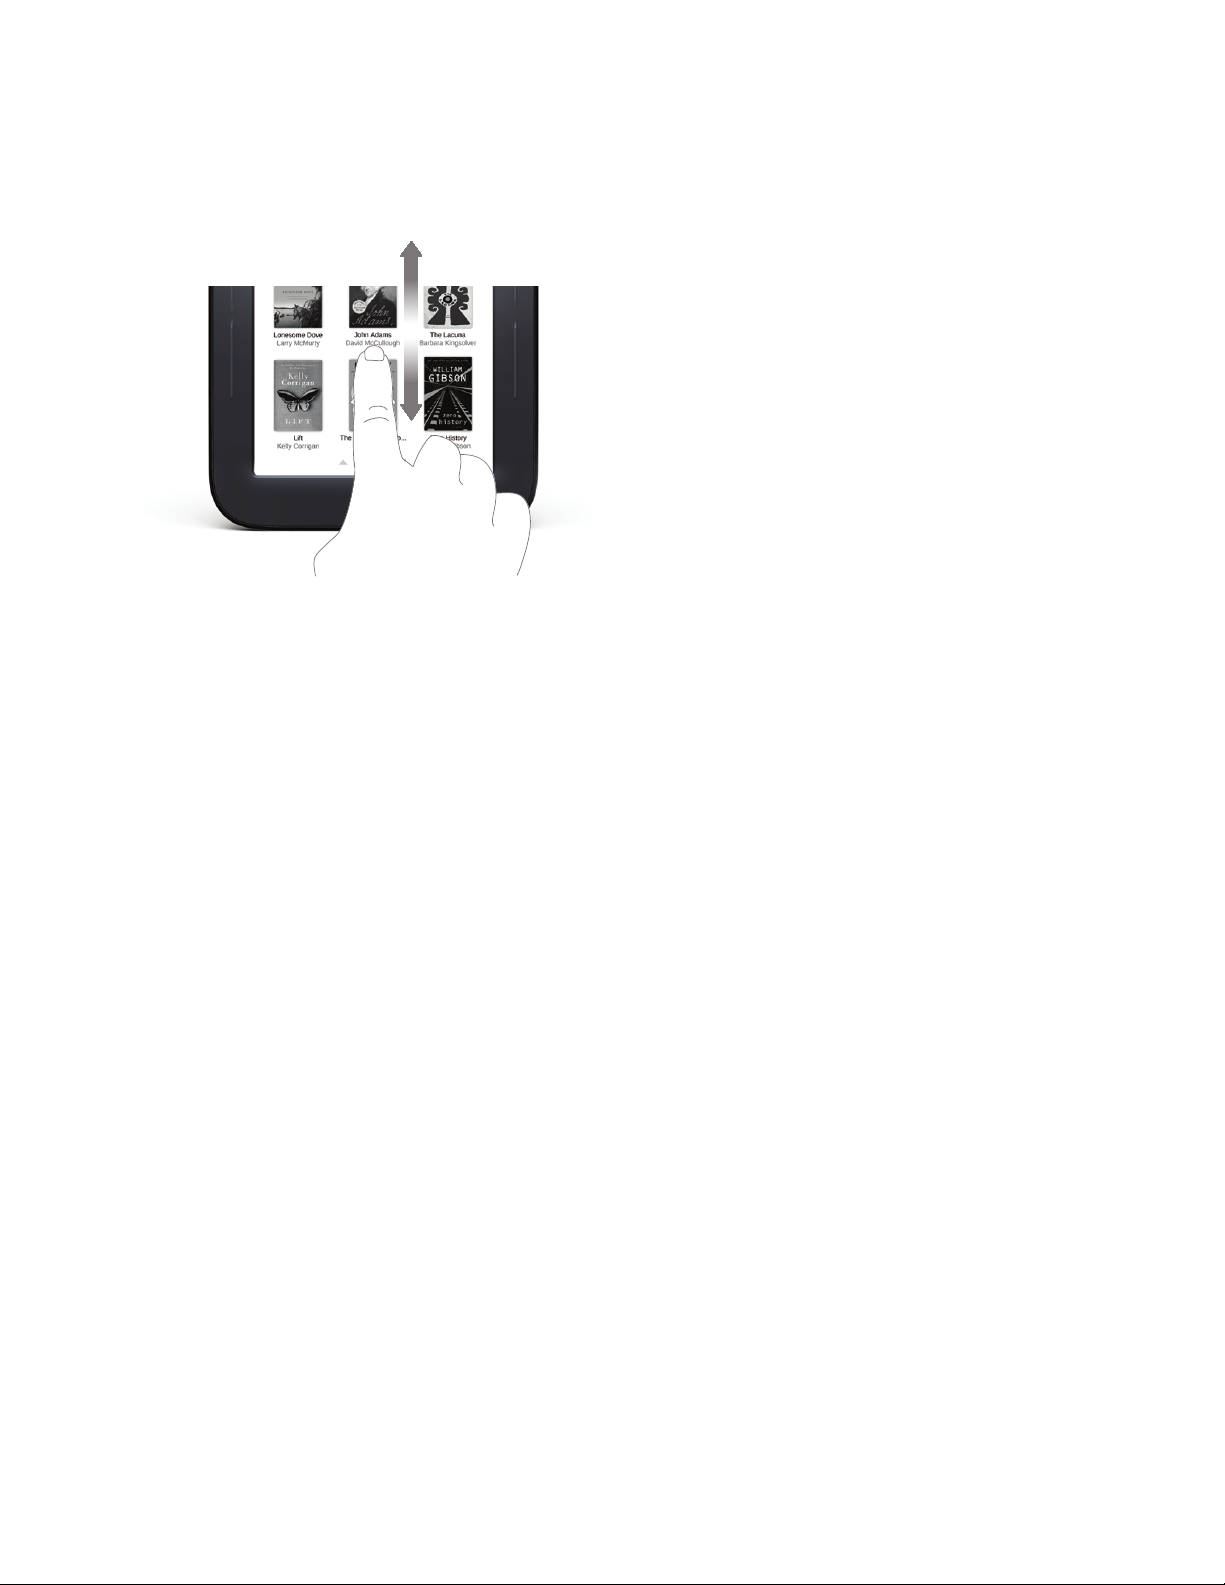
Scroll
Slide your finger up or down the screen to scroll through any list displaying up and down arrows at the bottom of the
screen. A scroll gesture is like a vertical swipe.
You can scroll up and down through shelves of books and periodicals.
20 Barnes & Noble NOOK User Guide
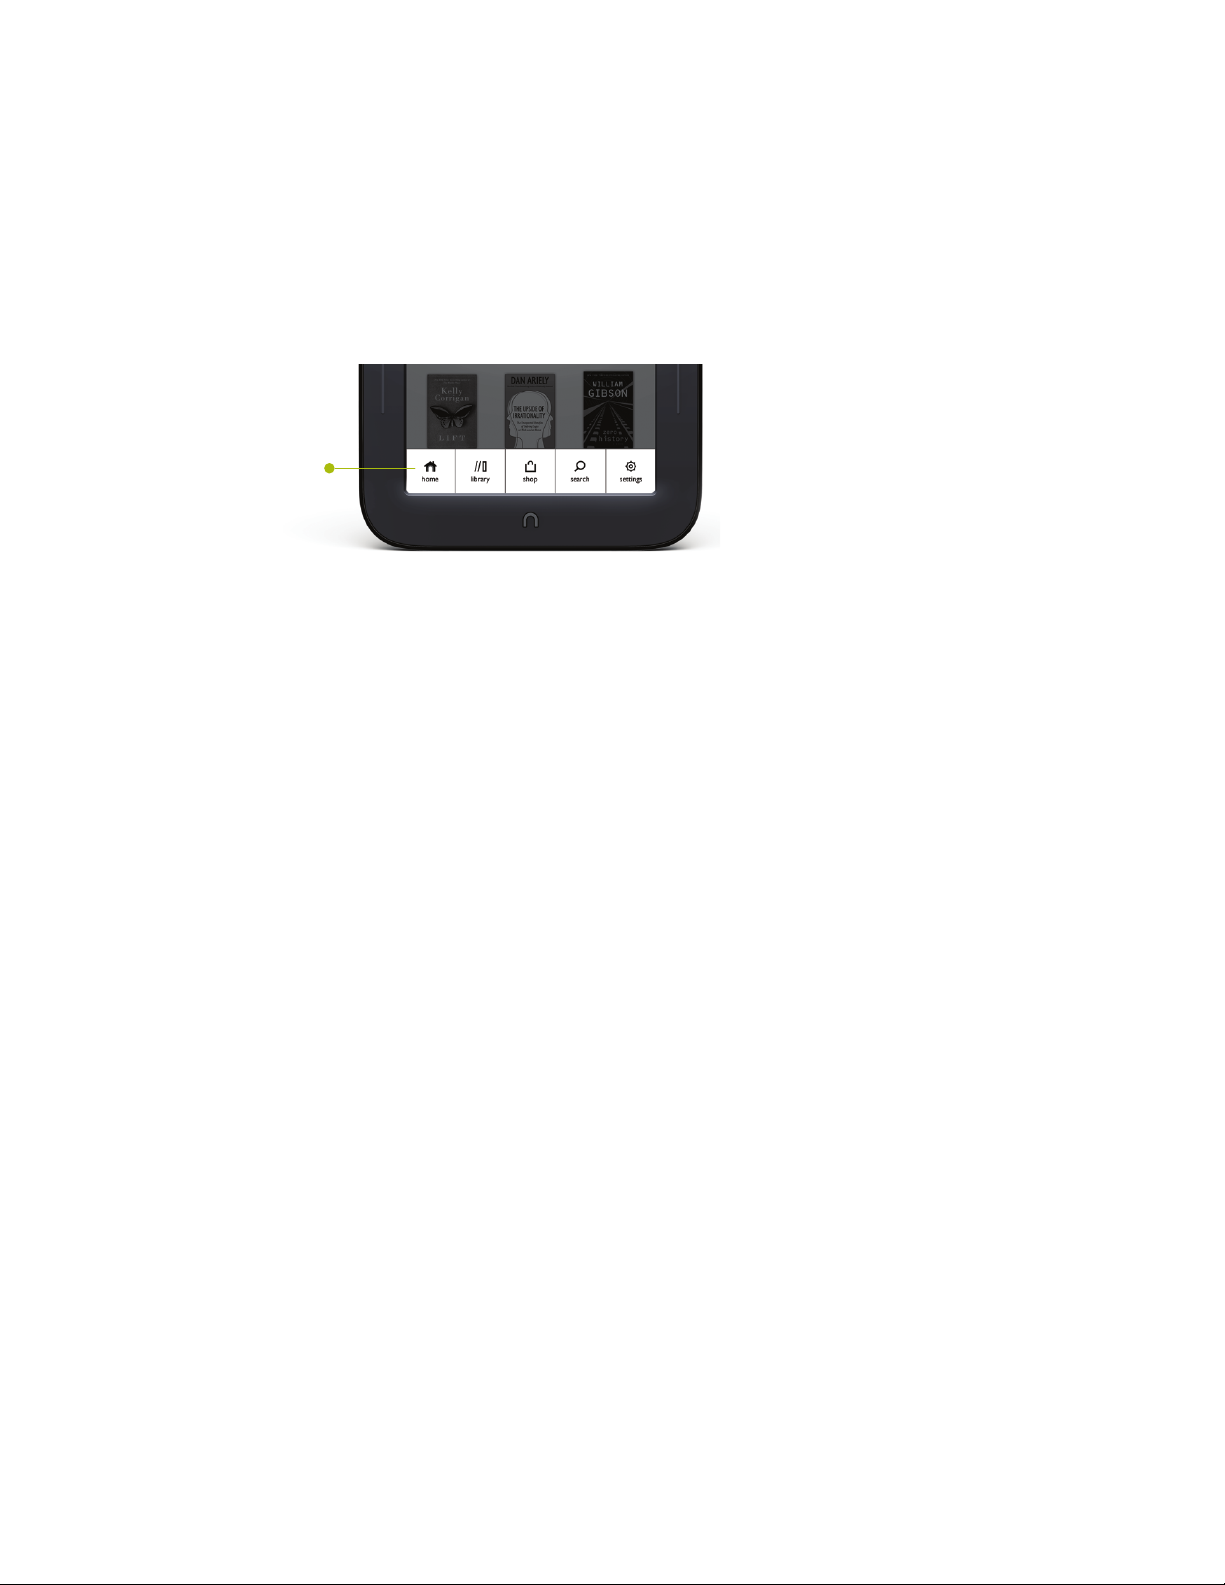
The Quick Nav Bar
The Quick Nav Bar is a row of five icons that appears at the bottom of the NOOK touchscreen and enables you to
navigate from one feature to another.
If your NOOK is turned on and active, you can make the Quick Nav Bar appear by pressing the Quick Nav button
below the touchscreen. After you tap on one of its buttons, the Quick Nav Bar disappears.
The Quick Nav Bar looks like this:
Quick Nav Bar
The Quick Nav Bar.
If you don’t see the Quick Nav Bar, tap the Quick Nav button, and the Quick Nav Bar will appear.
The Quick Nav Bar shows five navigation buttons:
• Home - a screen showing the books and periodicals you have most recently read or purchased
• Library - your personal library of books, magazines, and newspapers
• Shop - the NOOK Store on your NOOK, where you shop for books, magazines, and newspapers
• Search - a search engine for finding books and periodicals in your Library and in the Shop
• Settings - configuration settings
Barnes & Noble NOOK User Guide 21

The Status Bar
A Status Bar runs along the top of the NOOK touchscreen. The Status Bar looks like this:
The Status Bar
The Left Side of the Status Bar
The left side of the Status Bar presents:
• A NOOK symbol that appears when new software updates have been installed
• An open book icon that returns you to the book, magazine, or newspaper you were most recently reading.
• An envelope icon with a number inside it indicating that you have received that number of notifications; tapping
on the envelope opens the notifications.
The Right Side of the Status Bar
The right side of the status bar presents:
• A wireless connection indicator
• A battery charge indicator
• A digital clock showing the current time
The wireless connection indicator displays a stack of concentric curves, indicating the strength of your NOOK’s
connection to a local Wi-Fi network. The higher the stack of curves, the stronger the connection. In general, it’s best
to have at least 2 or 3 curves showing to have a reliable connection. If no curves are shown, the NOOK is not connected to a network.
By default, the NOOK status bar displays time on a 12-hour clock. To change the time or to switch to a 24-hour
clock, set the 24-hour clock option on the Time Settings screen.
Swiping Left on the Status Bar
If you swipe left across the Status Bar, your NOOK goes back to the feature or function you were previously using.
22 Barnes & Noble NOOK User Guide
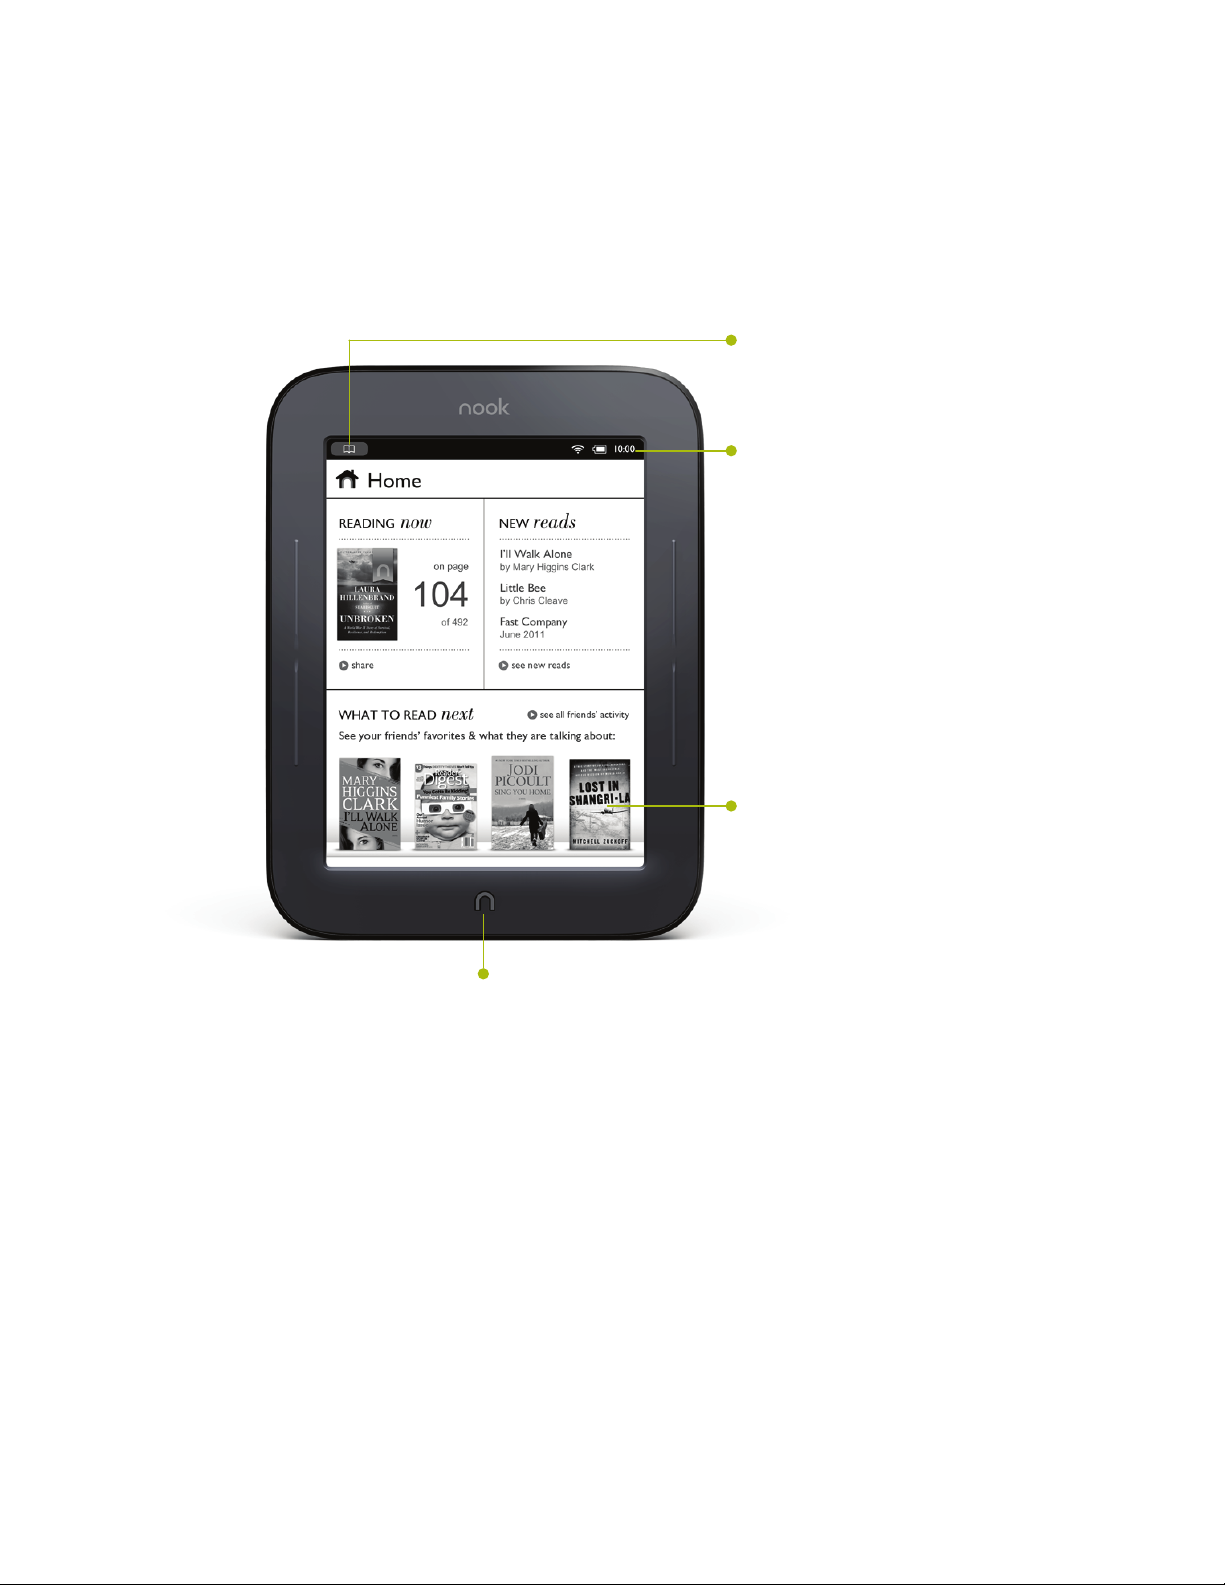
The Home Screen
The Home screen gives you easy access to the books and periodicals you have recently read or purchased.
In the top portion of the screen, you’ll see the cover of the most recent book or periodical you’ve been reading.
Here’s an example of a Home screen:
Reading Now
Status Bar
What to Read Next
Quick Nav Button
The Reading Now Panel
The Reading Now panel shows the cover of the book or periodical you were most recently reading. If you have not
read a book or periodical, yet, the Reading Now panel shows the cover of the NOOK User Guide. This guide is automatically included in your Library.
To open the book or periodical shown in the Reading Now panel, tap on its cover.
To share information about the book–for example, to rate or review it or to recommend it to friends–tap the share
link at the bottom of the panel.
Barnes & Noble NOOK User Guide 23

The New Reads List
To the right of that item, you’ll see the New Reads list–a list of three books or periodicals that you have recently
purchased or received. The Recent Reads list includes:
• books and periodicals you have recently purchased
• new issues of periodicals you have subscribed to
To view your complete Library, tap the see library link at the bottom of the New Reads list.
The What to Read Next Shelf
At the bottom of the screen, you’ll see a shelf with four book recommendations for you. The recommendations
come from the B&N Top 100 list or, if you have linked your NOOK to your Contact, Facebook, or Google email accounts, the recommendations come from your friends.
To learn more about a book on the What to Read Next shelf, tap on its cover. Your NOOK opens a detailed description of the book, including an overview, a list of reviews, a list of related titles, and a button for purchasing the book.
The details page might also include a button for downloading a free sample of the book.
24 Barnes & Noble NOOK User Guide
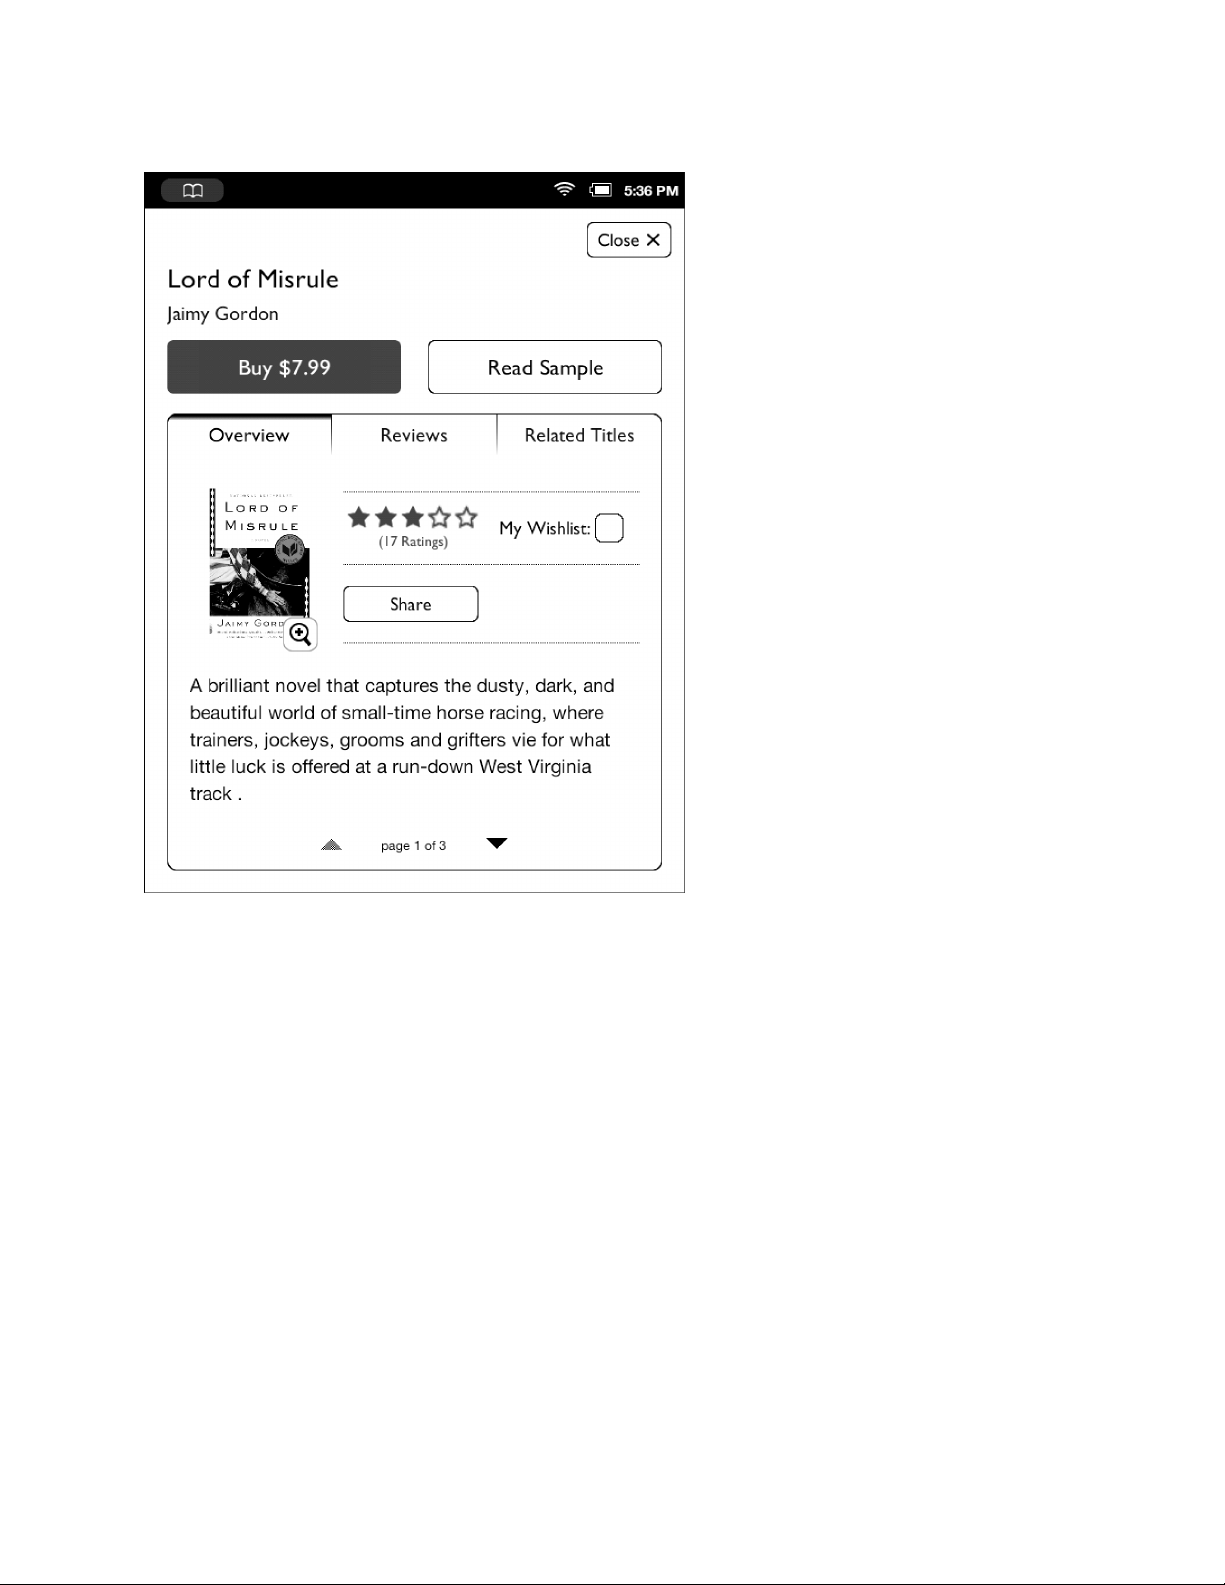
The picture below shows an example of a details page about a recommended book.
The Details page for a book.
Returning to the Home Screen
You can return to the Home screen at any time by pressing the Quick Nav button (the raised button in the shape of
the NOOK logo) on the lower front of your NOOK to open the Quick Nav Bar and then tapping the Home icon.
Barnes & Noble NOOK User Guide 25

Reading Books on Your NOOK
You can read books, magazines, and newspapers on your NOOK. You can make notes about what you’re reading,
highlight and annotate favorite passages, and share your thoughts and recommendations with friends on social sites
such as Facebook.
Your NOOK makes reading books fun. To start reading, simply tap on a book’s cover. The book opens and fills the
page. Then you can use the features described in this section to get the most out of your reading experience.
While you’re reading, you can customize the look of the page. You can switch fonts, make type bigger or smaller, and
adjust line-spacing and margins. You can switch between page designs whenever you like.
Opening a Book
To open a book, tap on its cover. Or if you’re displaying a list of titles in the Library, tap on the book’s title.
Page Layout
When you’re reading content on NOOK, the text fills most of the page.
The title of the book you’re reading appears in the upper left.
Page numbers appear at the bottom of the screen.
Turning Pages
Turning to the Next Page
To turn to the next page, either:
• Tap anywhere along the right edge of the page.
• Swipe to the left. (To swipe left, you place your finger on the right side of the page and slide it quickly to the left,
as though you were flipping the page of a printed book.)
• Tap either of the upper page-turn keys built into the frame of your NOOK.
NOTE: On the Reader settings screen, you can control whether the upper or the lower page-turn key turns the
page forward. See “Configuring Navigation Buttons in the Reader”.
To move forward quickly through the book, press and hold the page-turn key that turns pages forward.
Turning to the Previous Page
To turn to the previous page, either:
• Tap anywhere along the left edge of the page.
• Swipe to the right. (To swipe right, you place your finger on the left side of the page and slide it quickly to the
right, as though you were flipping a page backwards in a printed book.)
• Tap the lower long narrow buttons to the side of the screen.
NOTE: On the Reader settings screen, you can control whether the upper or the lower page-turn key turns the
page forward. See “Configuring Navigation Buttons in the Reader”.
To move backward quickly through the book, press and hold the page-turn key that turns pages backward.
26 Barnes & Noble NOOK User Guide
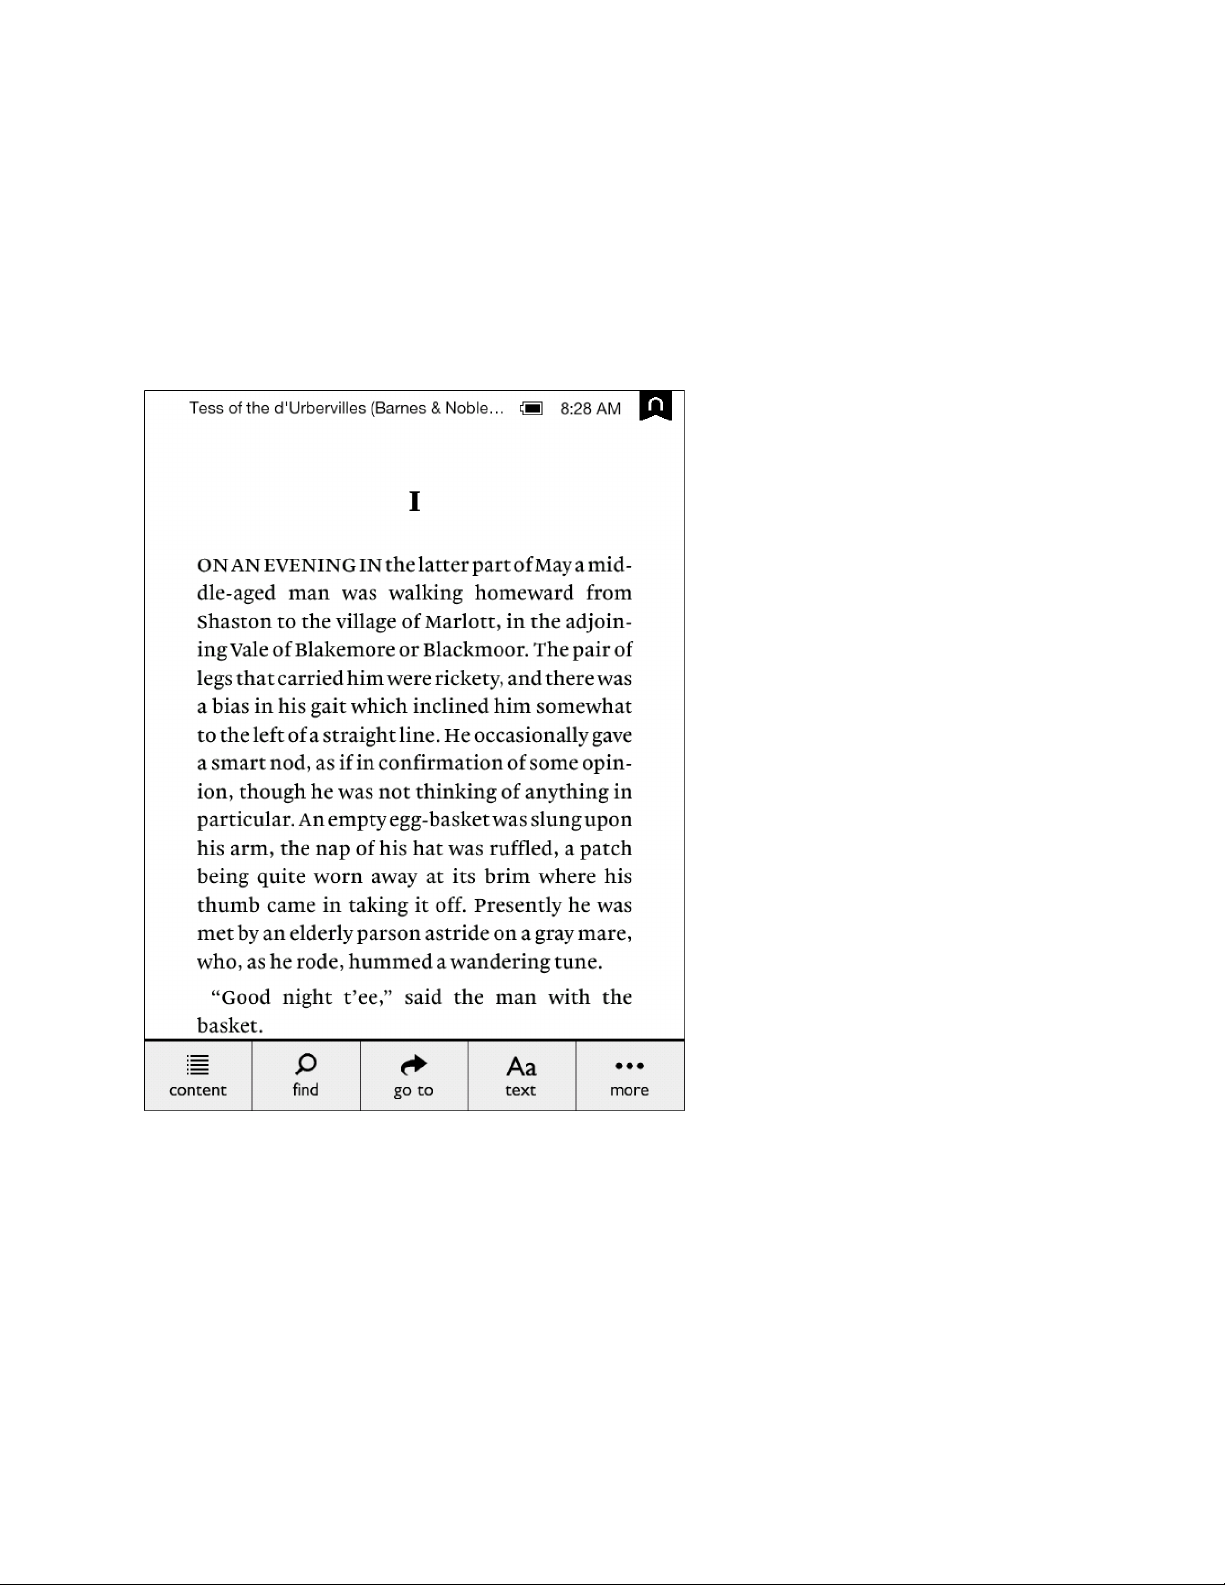
The Reading Tools Menu
The Reading Tools menu makes it easy to move through a book, to search for content, share content, adjust the
display of text, and adjust the brightness of the screen.
To call up the Reading Tools menu, tap anywhere in the center of the page or tap on the small dark arrow at the bottom of the page.
The Reading Tools menu appears at the bottom of the screen. When the Reading Tools appear, your NOOK also
displays a battery status indicator and a digital clock in the upper right corner of the screen, as shown in the figure
below.
The Reading Tools menu.
There are five tools in the Reading Tools menu. Here’s a quick look at what they do.
• Content - opens a table of contents for the book. Also displays tabs that give you access to Notes & Highlights
and to Bookmarks
• Find - lets you search the book you are reading
• G o To - lets you skip forward or backward to a specific page
• Text - lets you adjust the font size, line spacing, and other stylistic attributes of the page
• More - opens a page with details about the book and tools for sharing, archiving, and more
Barnes & Noble NOOK User Guide 27
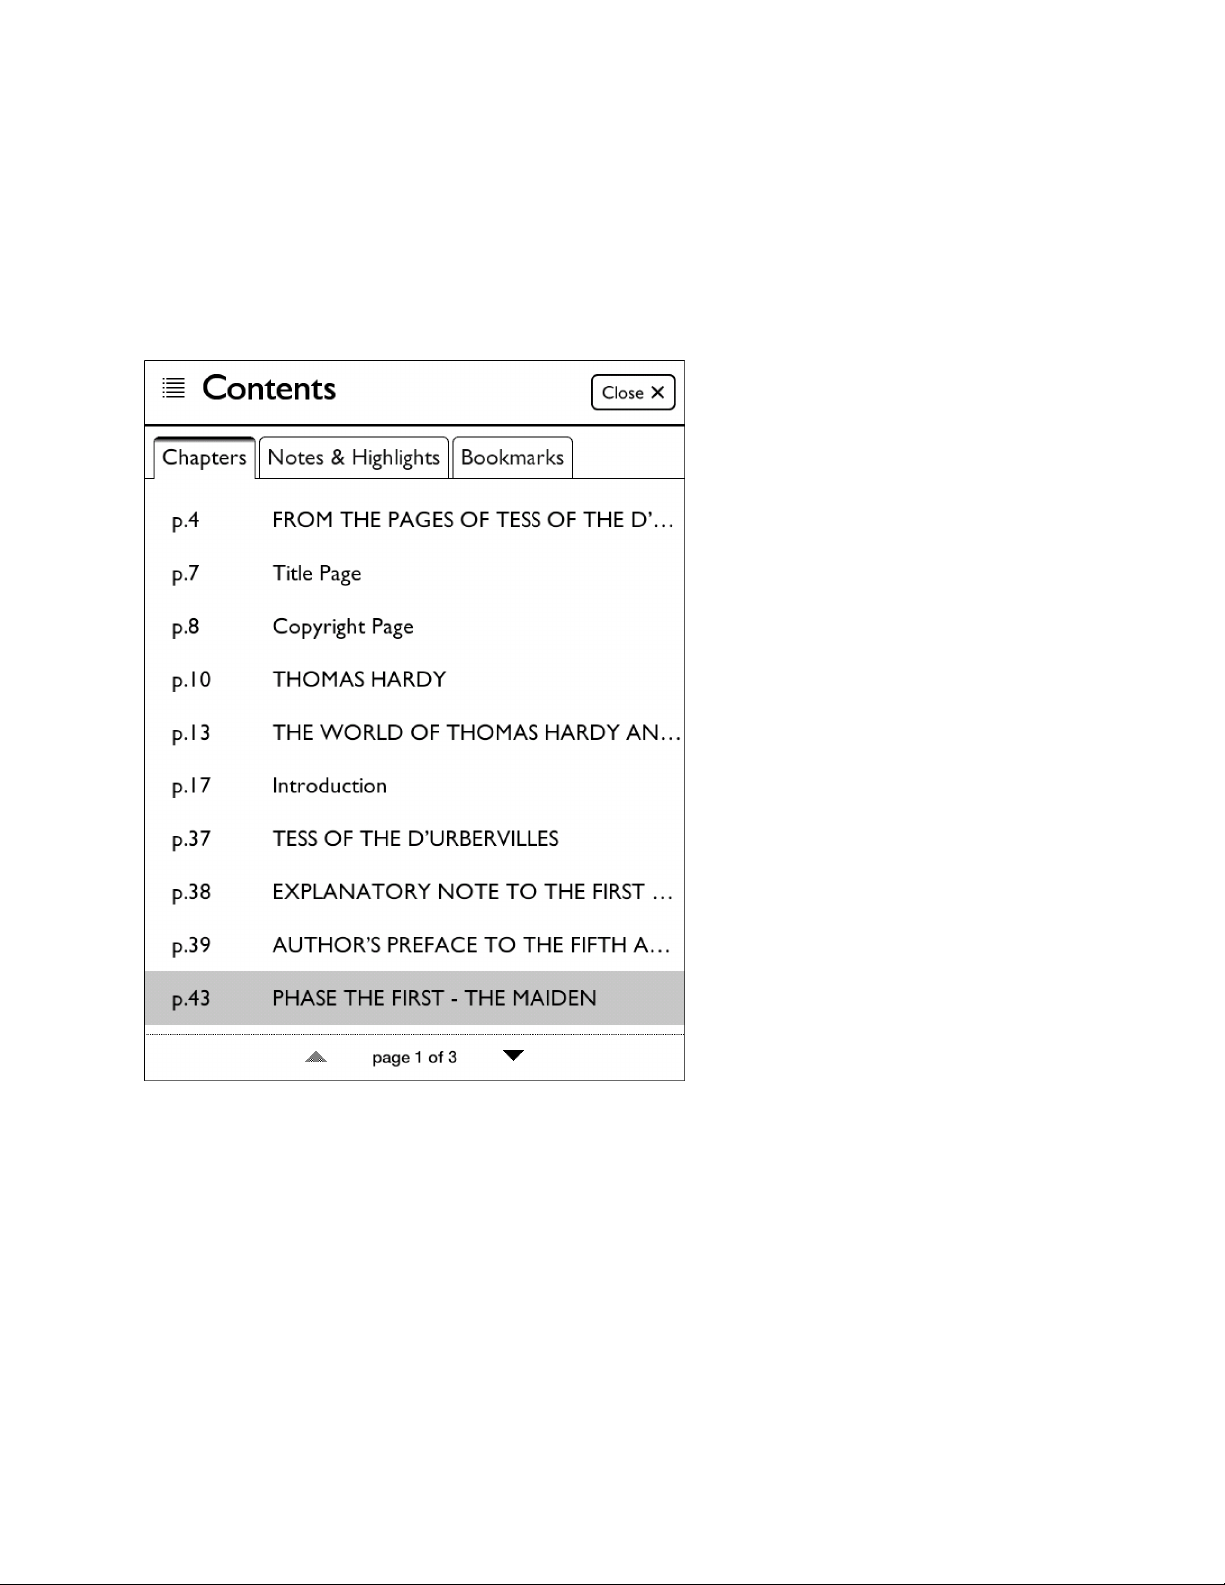
Reading Tools: content
Tap on the content icon in the Reading Tools to open a window with three tabs:
• Chapters - a Table of Contents listing chapters or sections
• Notes & Highlights - list of all the passages you have highlighted or written notes about
• Bookmarks - a list of all the bookmarks you have set
Tap on any title, highlighted passage summary, or bookmark on these tabs to jump to that location in the book.
The Contents dialog box.
When the dialog box opens, it displays the Chapters tab, which lists all the chapters in the book. If the list of chapters
runs longer than one screen, you can tap the arrows at the bottom of the screen to scroll down and up through the
list.
Tapping on any chapter number or title closes the dialog box and moves you to the beginning of that chapter in the
book.
28 Barnes & Noble NOOK User Guide
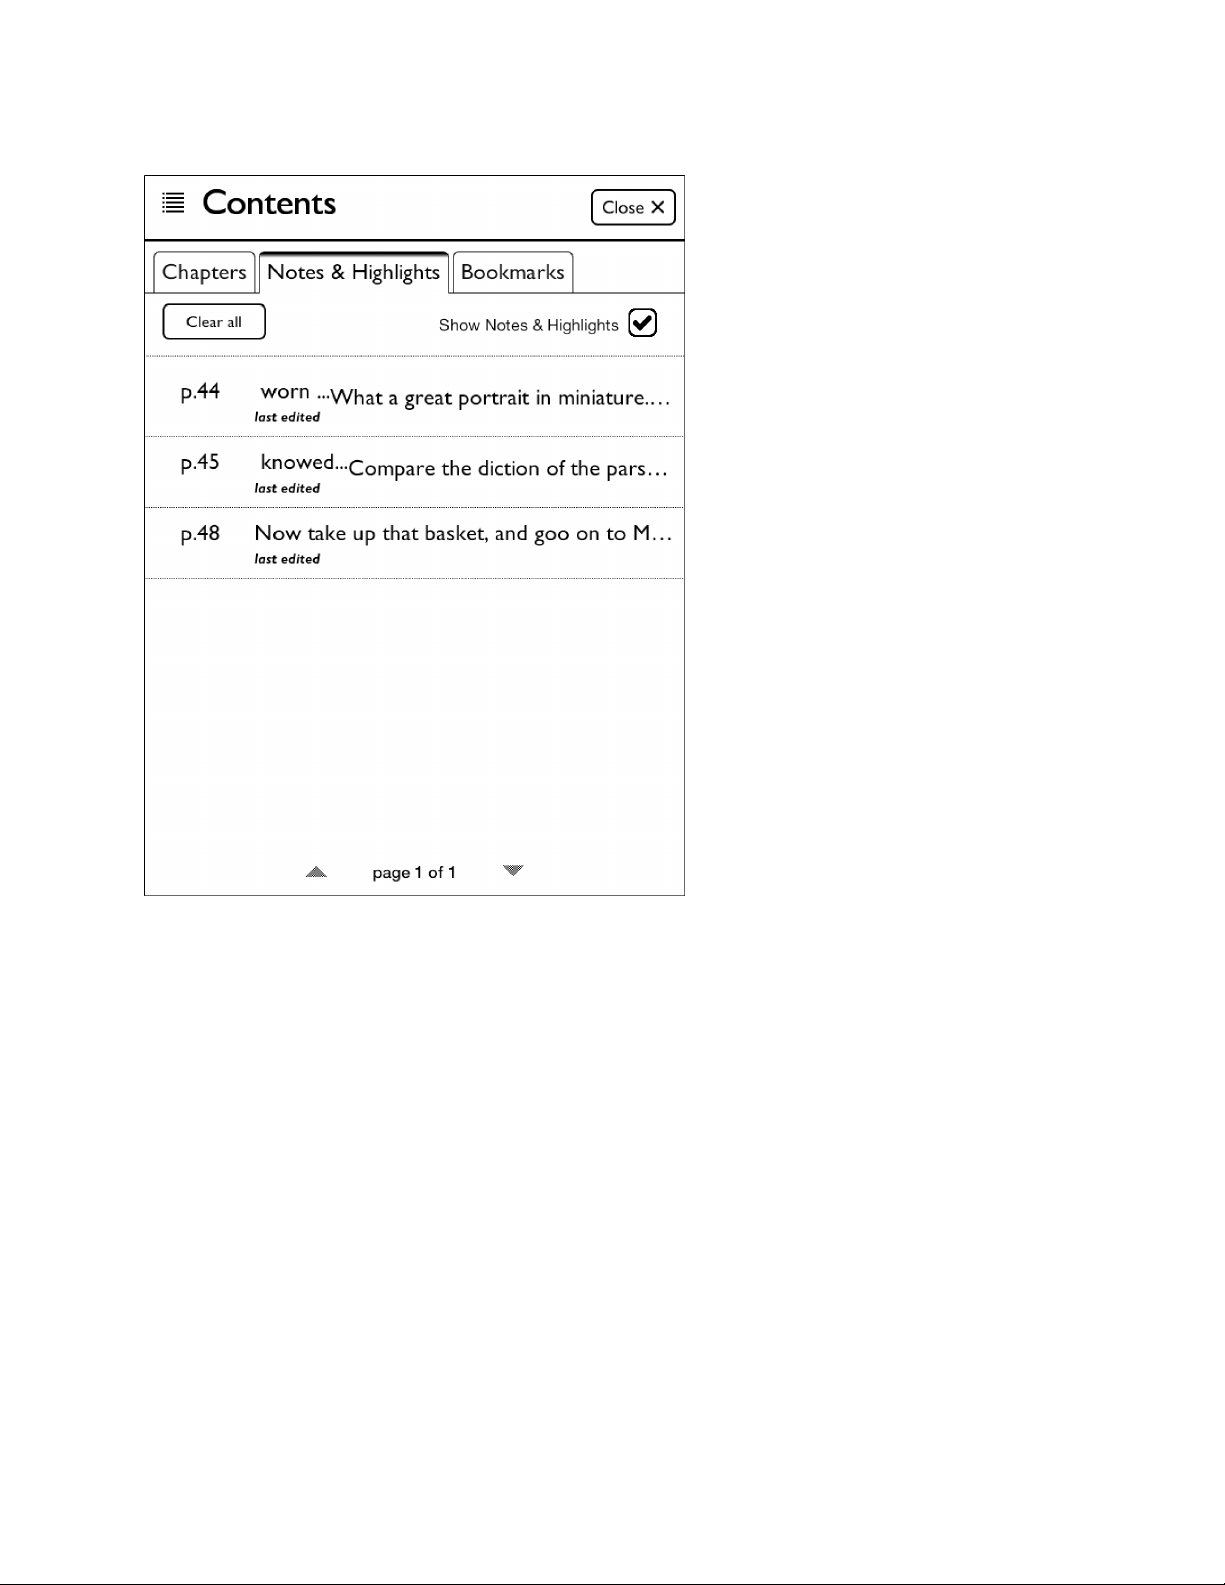
Tapping on the Notes & Highlights tab displays the Notes & Highlights screen.
The Notes & Highlights screen.
The Notes & Highlights screen lists all the passages you have highlighted or written notes about. Each passage is identified by its page number and opening line. If the list of notes and highlights runs longer than one screen, you can tap
the arrows at the bottom of the screen to scroll down and up through the list.
To jump to a particular passage, tap on it.
To erase all the notes and clear all the highlights, tap the Clear all button.
You can control whether or not your NOOK shows highlighted passages and note symbols in the NOOK Book
you’re reading. Tap the check box labeled Show Notes & Highlights. Leave the box checked to show Notes & High-
lights. Leave it unchecked to hide them.
NOTE: When you hide Notes & Highlights, they are still visible on the Notes & Highlights screen, but in the
pages of the NOOK Book, highlighted passages no longer appear with a tinted background, and Note
symbols do not appear in the margin.
To close the window without making a selection, tap the Close button in the upper right.
Barnes & Noble NOOK User Guide 29
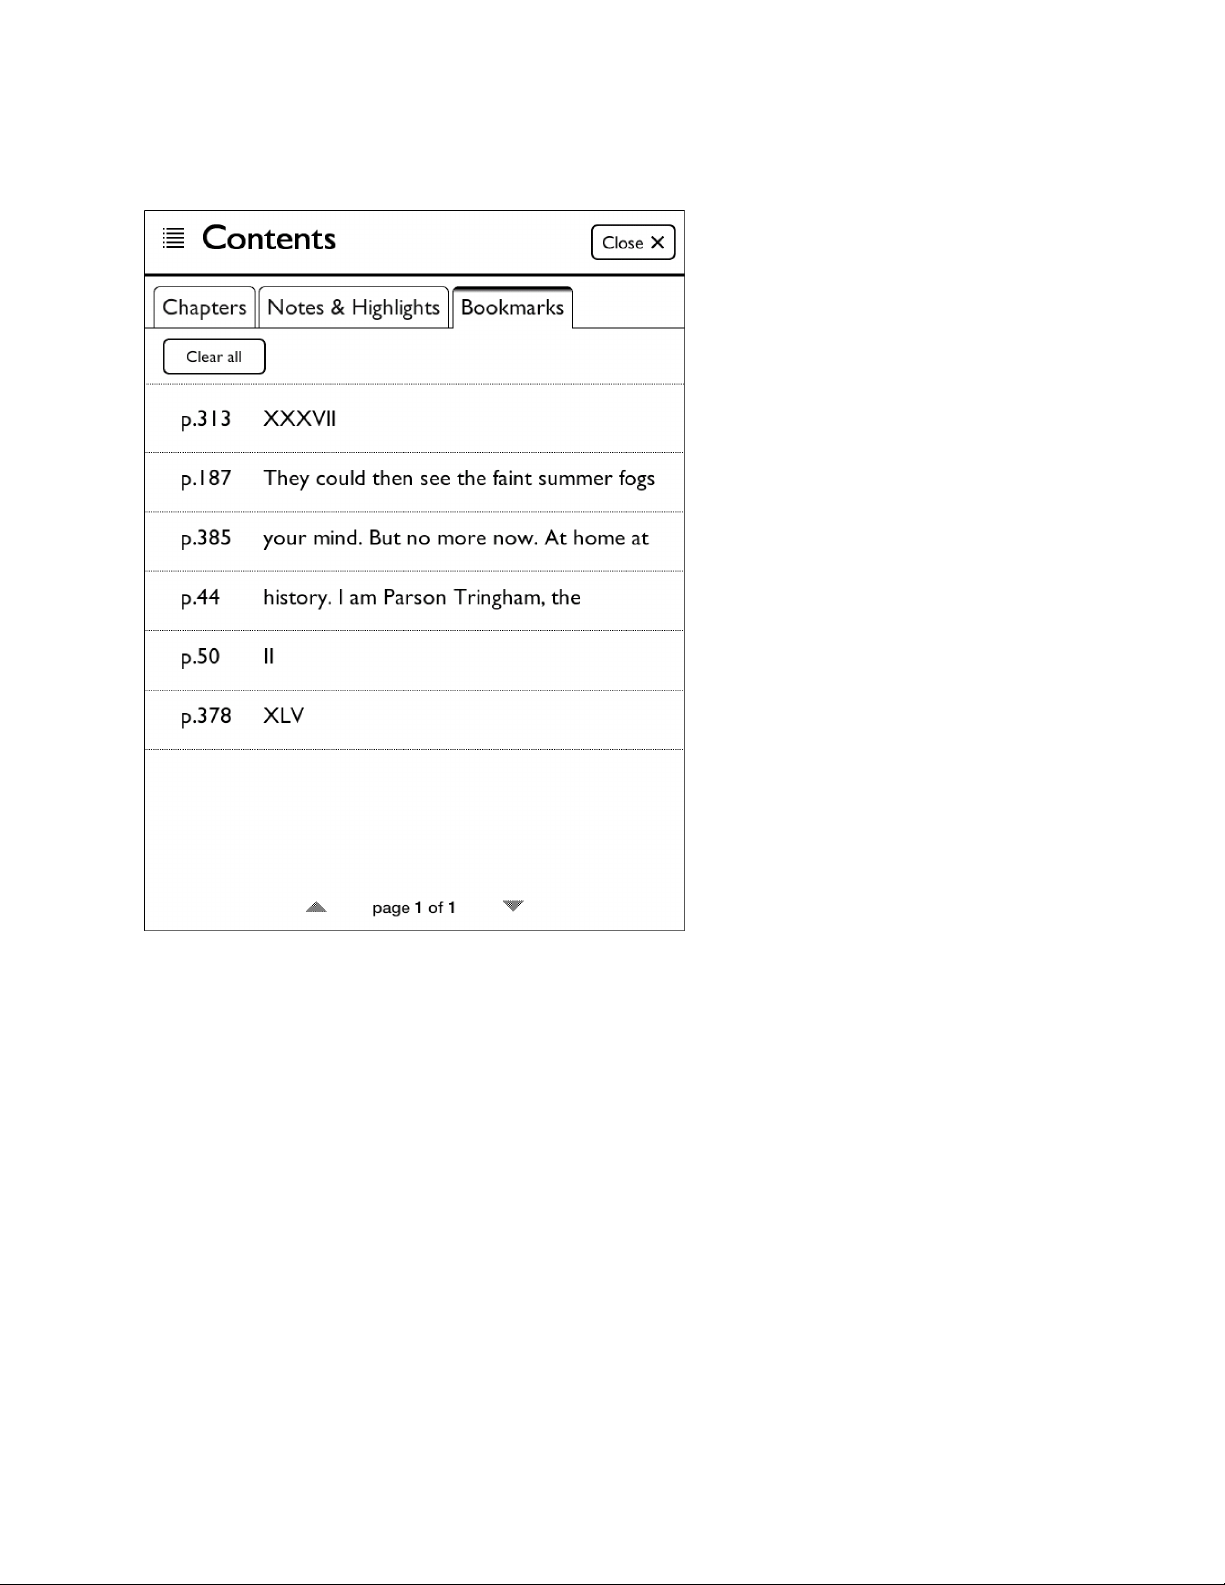
Tapping on the Bookmarks tab displays the Bookmarks screen.
Here’s an example of a Bookmarks screen.
The Bookmarks screen.
For each bookmarked page, the screen lists the page number and either the chapter number (if you bookmarked the
first page of a chapter) or the first line of text that appears on the page (if you bookmarked any page other than the
first page of a chapter).
To clear all the bookmarks, tap the Clear all button.
To clear an individual bookmark, tap the bookmark to visit its page, and then tap the bookmark ribbon in the upper
right corner.
30 Barnes & Noble NOOK User Guide
 Loading...