Barksdale UAS3 User Manual

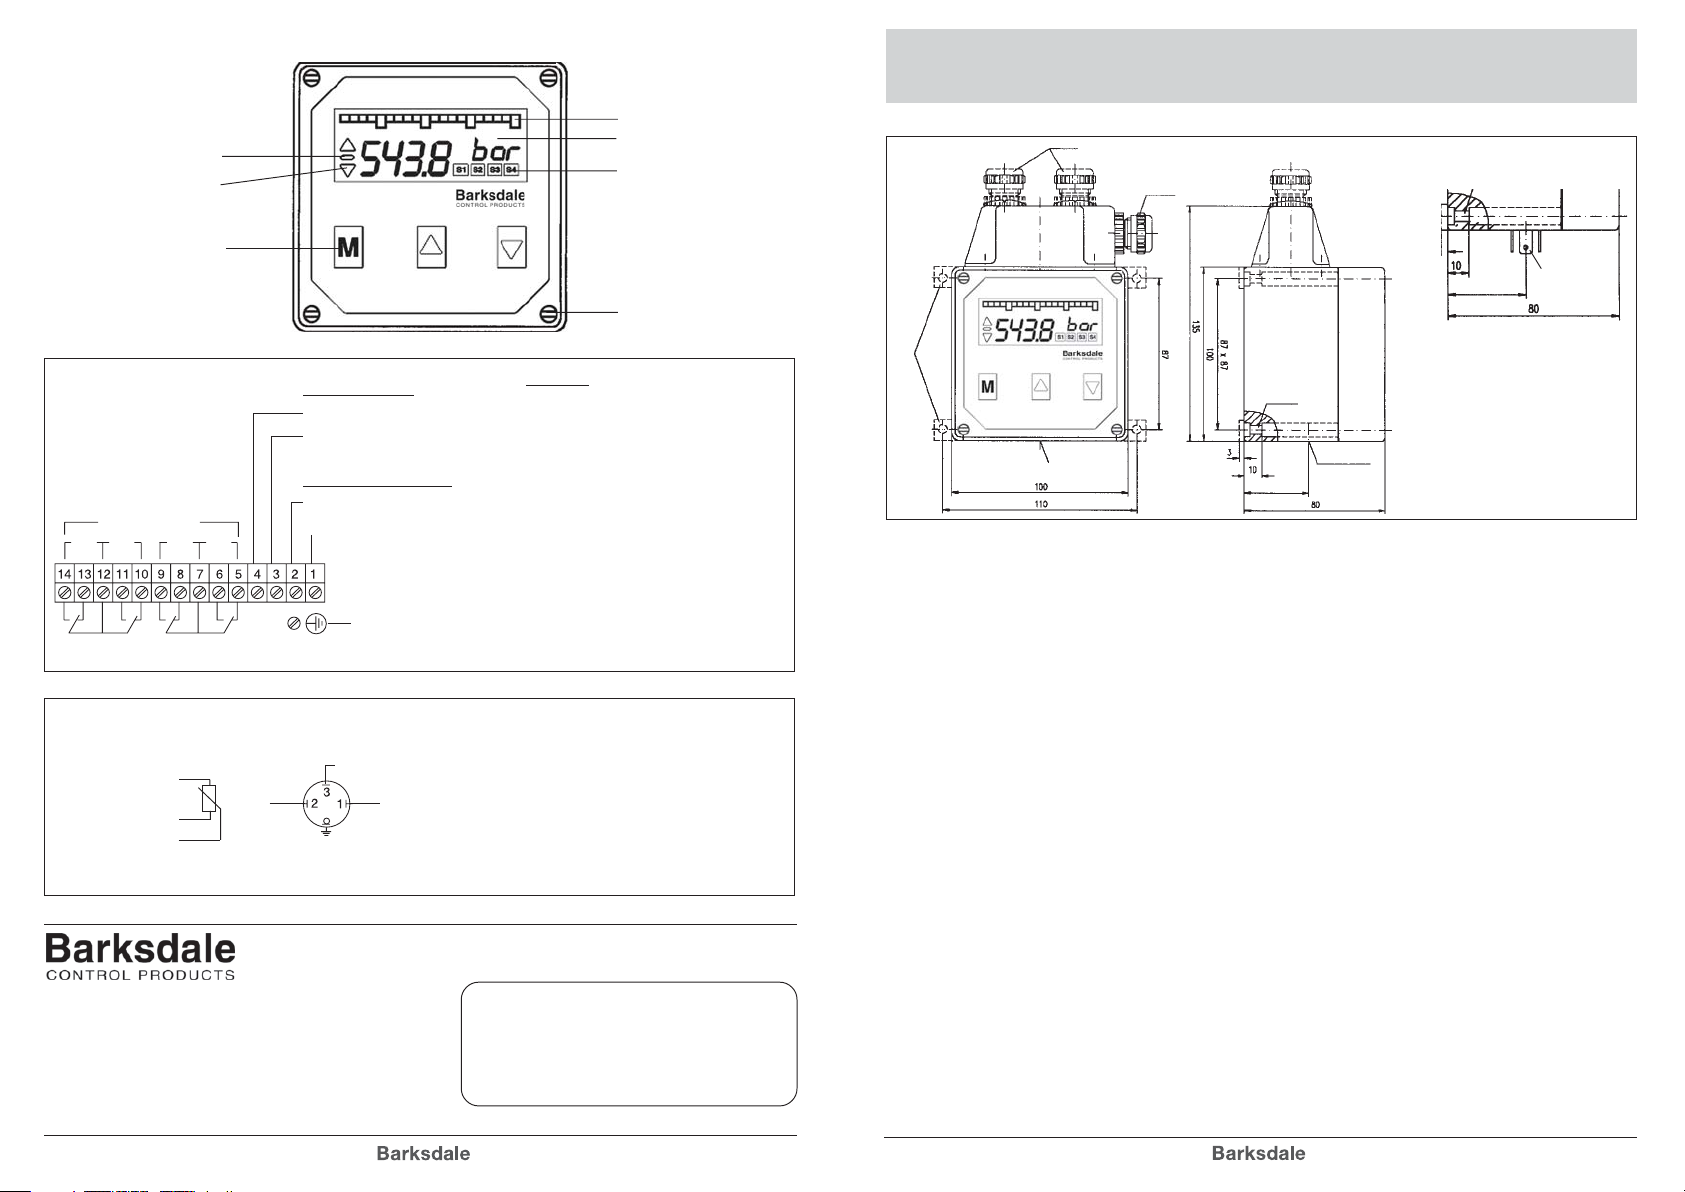
3. Operating elements
Operating Instructions Pressure Switch UDS 3 with 4 Relay Outputs
and Trip Amplifier UAS 3
Sign
Trend arrows
Menu buttons
Electrical
connection
Switch contacts
S2S3S4
S1
S2S3S4
S1
Analog output
Analog-GND (0 V)
4...20 mA (0...10 V)
Current supply
0 V
+18 V DC...+30V DC
M4
Sensor connection UAS 3
acc. DIN 43650
gn
1 = +Ub
2 = –Ub (*)
3 = Signal
(*) in combination with 2-wire circuit pin 2 is not required.
1
bn
2
ws
3
–Ub
Barksdale GmbH
Dorn-Assenheimer Strasse 27
D-61203 Reichelsheim / Germany
Tel.: +49 - 60 35 - 9 49-0
Fax: +49 - 60 35 - 9 49-111 and 9 49-113
e-mail: info@barksdale.de
www.barksdale.de
Signal
Protective
load
+Ub
20-part bargraph
8-digit 14-segment display
Switchpoint display SP1...SP4
Cover screws
max. RL =
(max. 10 mA)
Contact rating : max. 120 V DC / 250 V AC
Switching power : max. 120 W / 1250 V AC
Switching capacitiy : 220 V AC / 3 A VDE 0660 T.2
Constant current : max. 5 A
Switching rate : max. 20/s
Analog measuring input
By choice:
Current input : 4...20 mA
Voltage input : 0...10 V DC
Resistance input : Poti (500 Ohm...100 kOhm)
UB –12 V
20 mA
Item-Nr.: 923-1196
Software version: V1. or higher
Index C, 08. 06. 2004
Specifications are subject to
changes without notice.
Dimensions (in mm)
UDS 3
Fixing lugs (for M4 screws)
optional Pg 13,5
Pressure conn.
Pg 13,5
4 x ø4,5
38,5
Pressure conn.
Connection UAS 3
Plug 3-pin
38,5
DIN 43650
1. Product description
Intended applications
- The pressure switch / trip amplifier is a device to monitor system pressure, temperature, flow, level,
etc. and has four switching outputs and one analog output.
- The pressure switch is only to be installed in systems where the maximum pressure Pmax is not
exceeded (according to the values on the type label).
- The trip amplifier is only to be connected to input signals according to the values on the type label at
the bottom side of the device.
- Attention: This device is not designed to be used as the only safety relevant element in pressurized
systems according PED 97/23/EC.
2. Starting operations
Only assemble or disassemble the device when depressurized!
- The pressure switch should be installed and operated only by authorized personel.
- Front cover and device bottom form a function unit. Exchanging the parts can result in measuring errors
or malfunctioning. See serial number inside the front cover. For wall mounting remove the four front cover
screws and the front cover. Then fasten the device with four screws to the wall and finally remount the
front cover. To damp strong vibrations shock mounts must be used.
- Mount the pressure connection (G 1/4 female) of the UDS 3 to the pressure system with a flexible pipe
and tighten with a 45 Nm torque. For pressure peaks damping screws must be used.
- UAS 3: Connect the sensor to the 3-pin cube plug at the bottom side of the device.
- The electrical connection (supply, analog output switching contacts) must be carried out according to
the connection tables depicted on the top of the device by removing the cover cap and insert the cable
through the cable gland PG 13,5. If required, additional cable glands can be installed in the cover cap
by breaking out the perforated cavities.
- The electrical connection must be carried out in accordance with the VDE 0100 regulations. In order to
ensure trouble-free operation it is essential to connect the protective lead.
When operating from 230 V AC loads at the switch contacts independent cables must be installed for
supply and switches (cover cap with two cable screw connections).
- If inductive loads (magnets, contactors, etc.) are connected to the switch relays, suitable protective
devices (varistors etc.) must be provided.
12

List of functions
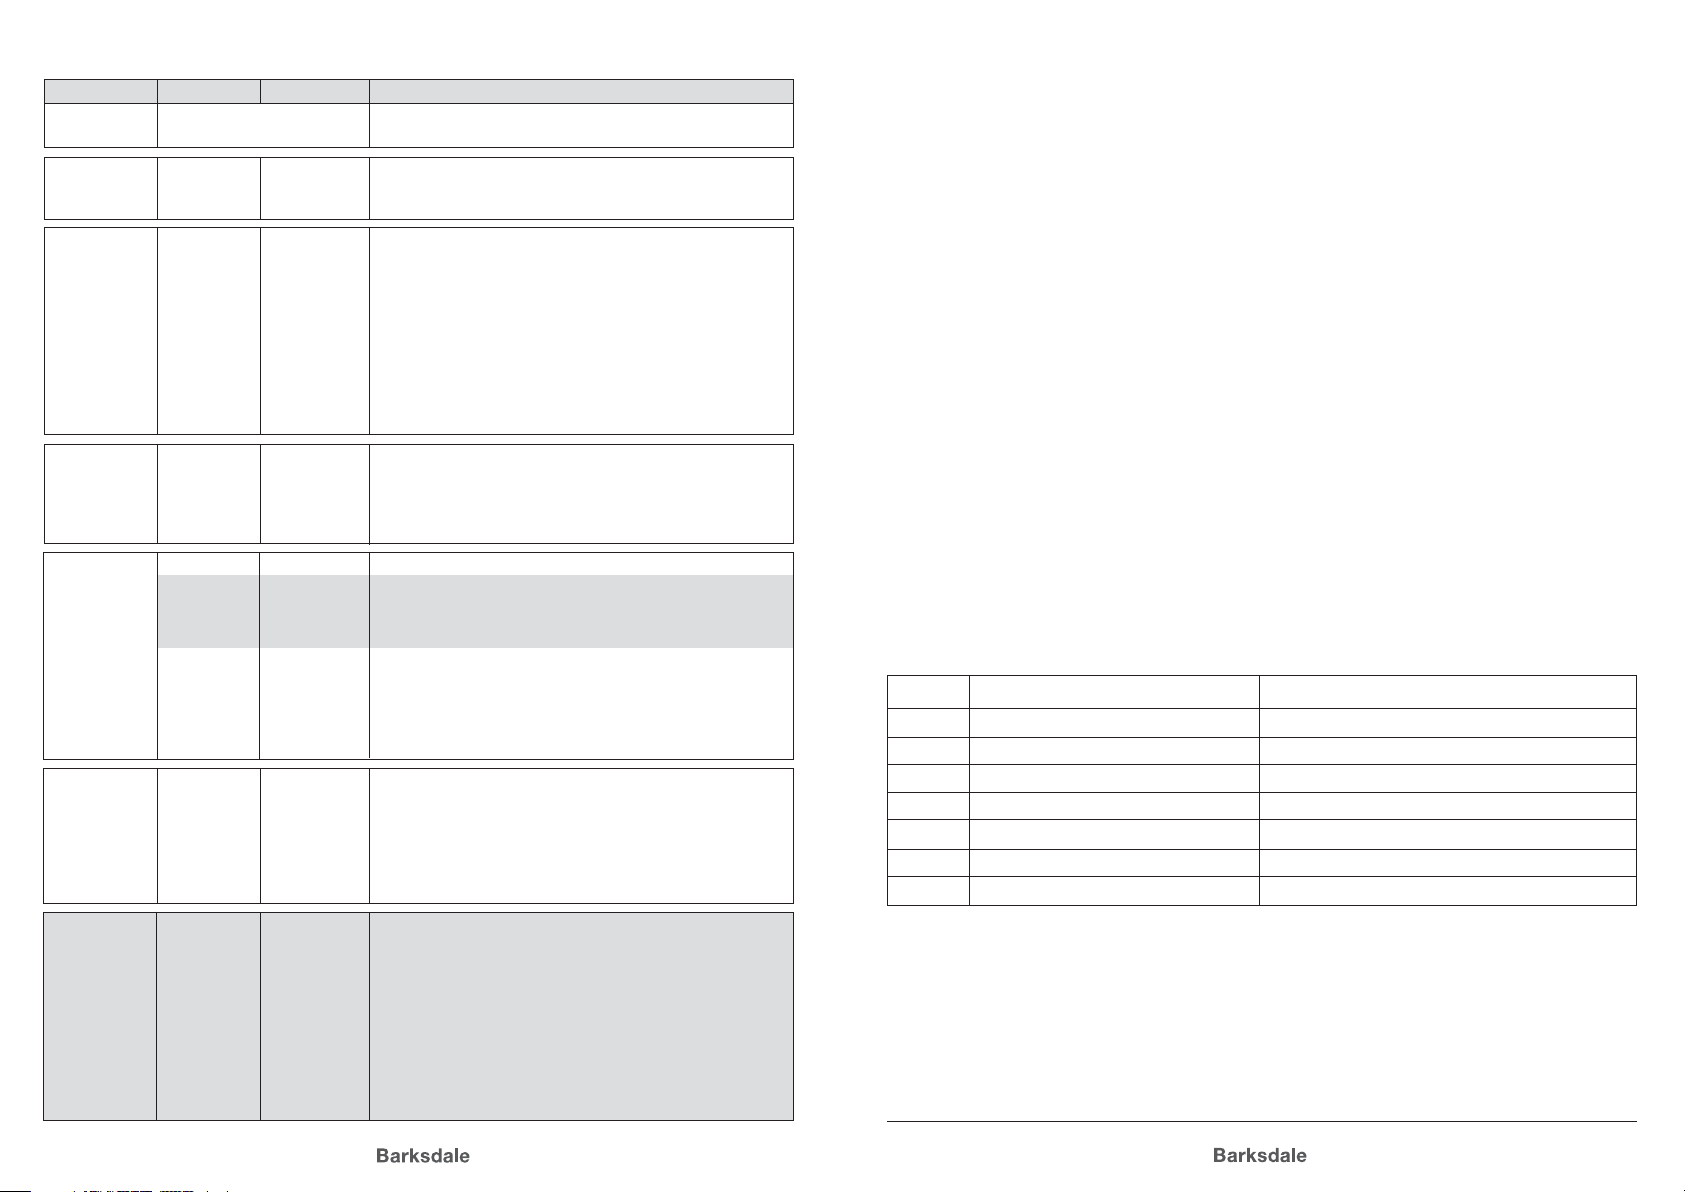
4. Operation
Main Menu Sub Menu Value Description
Measuring .... Display of the actually measured value
mode and the measuring unit
MENU Display keylock
UNLK No keylock, all parameters can be adjusted
LOCK Keylock active, all parameters visibal but can not be changed
SP.1 ... SP.4 Switchpoint menu SP1..SP4
MODE STND Standard evaluation (rising/falling)
WIND Window technology
ERRO Error output
ON .... Switch-on value for SP1..SP4; if the ON-value is smaller
than the OFF-value, the switch evaluatiuon is falling
OFF .... Switch-off value SP1..SP4
LEV Inversion of the switching output SP1...SP4
HLFS High-level-fail-safe (Normally Open function)
LLFS Low-level-fail-save (Normally Closed function)
DEL 0,0s..9,9 s Switch-on / switch-off delay for SP1...SP2 in seconds
ANOP Analog output menu
ANOP ON Analog output in operation
OFF Analog output switched off
AOZS .... Scale the analog output - start value (e.g. 0 bar=4mA)
AOFS Scale the analog output - end value (e.g. 400bar=20mA)
DISP Display menu
UNIT bar Adjustment of the measuring unit, the recalculation to the new
(only PSI unit value is done automatically
UDS3) MPa
:
DAMP 0,0s..9,9 s Damping of the displayed measuring value in seconds
OFFS .... Measuring value -Offset, means shifting the display range
CUT .... Cut-Off, means signal-surpression within the cut-off range
BGZS .... Scale the bargraph - start value
BGFS .... Scale the bargraph - end value
PEAK Peakholding menu
MIN .... Display the peak value „Min“
CLRM NO no deletion
YES delete „Min“-value
MAX .... Display the peak value „Max“
CLRX NO no deletion
YES delete „Max“-value
After the unit is switched on, the unit starts an automatic self-test.
The device is menu operated and configured by the three keys on the front.
With the „M“ key (= mode) you change between the operation / indicating level to the dialog values and the
adjusted / actual values. With the keys („⇑“ = up) and („⇓“= down) you change between the dialog values
in the menu or change the values / functions in the menus.
A change of any configuration starts always with the M-Mode and indicated by the flashing cursor. After a
change has been made the M-mode key must be pressed to confirm each configuration; to set numbers,
each digit has to be confirmed with the M-Mode before adjusting the next one. By confirming the last digit
the new configuration will be stored in the memory.
Pushing the down key at the end of the sub-menu the software will switch automatically to the main-menu.
For a quick termination of programming you can change into the measuring mode from any level in the
menu by pressing the M-key for 5 seconds.
If the dialog is not continued within two minutes the device automatically returns to the measuring mode
without accepting the new values (see also: „List of functions“).
5. Key lock
Activating the („⇑“ = up) and („⇓“ = down) keys together for more than 5 seconds will block any changings
in all menues; shown by „LOCK“ in the display.
In this mode, all configuration values can be checked only, but not changed.
Repeating this action will unlock the configuration menu and shown by „UNLK“ in the display.
6. Error handling
The internal self-check software will monitor the proper functioning of the unit. When any of the following
failures will occur, the flashing display will indicate the following text:
Display Error Cause
max Positive excess of the measuring range The measured value exceeds the max. of the range
min Negative excess of the measuring range The measured value is lower than the min. of the range
anao Failure of the analog output Output loop is not closed or short circuited
sens Sensor failure (internal) Sensor bridge not in balance, might be been overloade
data Stored data failure (EEProm) (internal) Memory failure
prog Processor failure (internal) Microcontroller failure
cal Calibration failure (internal) Calibration values are wrong
CAL Calibration menu
(only UAS3) DECP 0000..0,000 Declaration of the decimal-point for the measuring value
ZSCL .... Scale the measuring-value indication - start value
FSCL .... Scale the measuring-value indication - end value
UNIT bar Declaration of the measuring unit
PSI
:
TEXT Enables the indication of the measuring-unit whitch is defined
in the UTXT menu
UTXT ABCD Programm a free configurable text for the measuring unit
CODE Calibration menu for the manufacturer
43
 Loading...