

Page 1
English
*
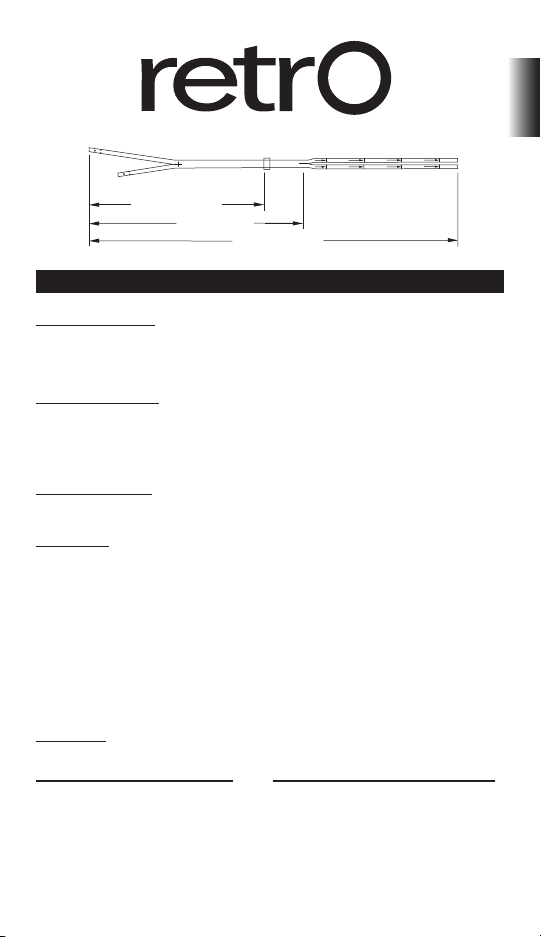
Long-Term Hemodialysis Catheter
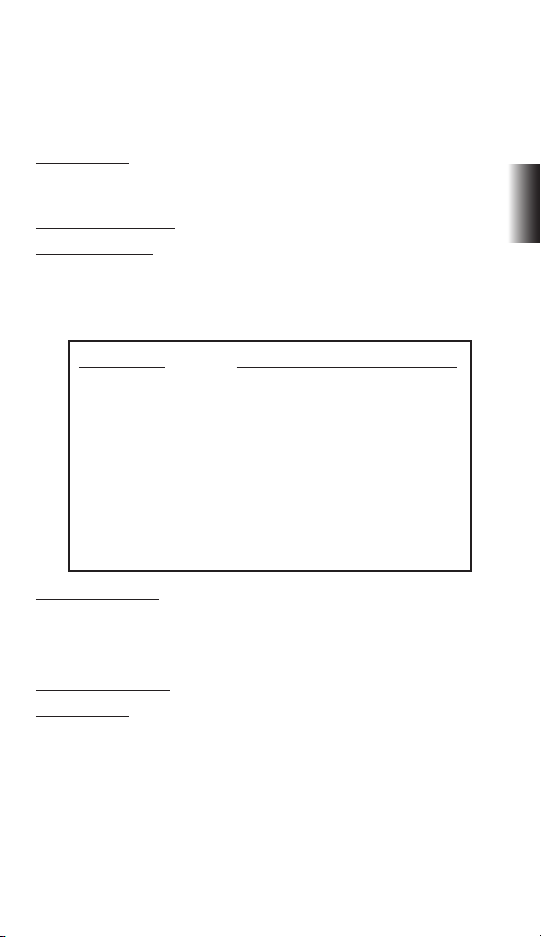
Implant Length
Body Length
Overall Length
32cm
32cm
35cm
35cm
40cm
40cm
45cm
45cm
50cm
50cm
INSTRUCTIONS FOR USE
INDICATIONS FOR USE
Retro* Silicone Twin Lumen Chronic Hemodialysis Catheter with Separated Tips is designed
for chronic hemodialysis and apheresis. It is a radiopaque silicone catheter designed for
percutaneous insertion or insertion via a cutdown. Catheters longer than 40 cm are intended
for femoral vein insertion.
CATHETER PLACEMENT
The catheter can be placed percutaneously using a modied “Seldinger Technique” or open
venotomy.
Fluoroscopic or ultrasonic guidance is recommended to ensure proper tip orientation and
placement within the right atrium.
CONTRAINDICATIONS
This catheter is intended for long-term vascular access only and should not be used for any
purpose other than that indicated in these instructions.
DESCRIPTION
The Retro* Twin Lumen Chronic Hemodialysis Catheter with Separated Tips is constructed of
radiopaque medical grade silicone. Its oval shape and silicone material composition provide
improved exibility and kink resistance.
To reduce recirculation during hemodialysis, the arterial lumen of the catheter is shorter than
the venous lumen at the catheter’s distal end. The catheter has a felt cu and has separate
color-coded extension adapters.
The proximal ends of the catheter are tunneled retrograde to the exit site after the tips have
been positioned. This design allows the catheter tips to be precisely positioned. The two
proximal ends of the catheter, namely, arterial and venous, are connected to the colorcoded
extension adapters. Each extension adapter has a compression sleeve, compression cap,
clamp and luer.
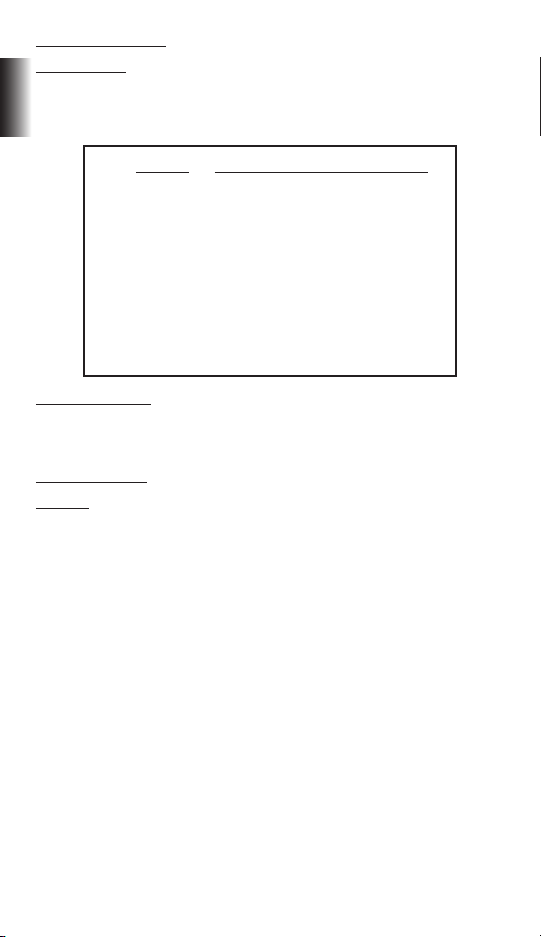
DIMENSIONS
Implant Body Overall
Length Length Length
19 cm 24 cm 52 cm
23 cm 28 cm 52 cm
27 cm 32 cm 52 cm
31 cm 36 cm 52 cm
35 cm 40 cm 52 cm
50 cm 55 cm 67 cm
Operational Lengths
30 cm 35 cm 40 cm 45 cm 50 cm
- 35 cm 40 cm 45 cm 50 cm
- - 40 cm 45 cm 50 cm
- - 40 cm 45 cm 50 cm
- - - 45 cm 50 cm
- - - 60 cm 65 cm
1
Page 2
PRIMING VOLUMES
Priming volumes are printed on the catheter at operational lengths of 30 cm, 35 cm, 40 cm, 45
cm, 50 cm, 60 cm and 65 cm for the corresponding catheters.
English
CAUTION
Federal (U.S.A.) law restricts this device to sale by or on the order of a physician.
WARNINGS
For the 24 cm body length catheter do not cut before the 30 cm mark
For the 28 cm body length catheter do not cut before the 35 cm mark
For the 32 cm body length catheter do not cut before the 40 cm mark
For the 36 cm body length catheter do not cut before the 40 cm mark
For the 40 cm body length catheter do not cut before the 45 cm mark
For the 55 cm body length catheter do not cut before the 60 cm mark
Operational
Length Arterial Venous
30 cm 1.6 cc 1.7 cc
35 cm 1.8 cc 1.9 cc
40 cm 2.0 cc 2.1 cc
45 cm 2.2 cc 2.3 cc
50 cm 2.4 cc 2.5 cc
60 cm 2.8 cc 2.9 cc
65 cm 3.0 cc 3.1 cc
READ ALL INSTRUCTIONS, WARNINGS AND CAUTIONS CAREFULLY PRIOR TO USE
COMPLICATIONS
Air Embolism
Arterial Cannulation
Bacteremia
Bleeding
Brachial Plexus Injury
Cardiac Arrhythmia
Cardiac Tamponade
Catheter Tip Embolus or
Thrombotic Embolus
Central Venous Thrombosis/Stenosis
Chylothorax
Endocarditis
Hematoma (subcutaneous)
Hemorrhage
Note: Femoral vein insertion increases the risk of infection compared to other insertion locations.
Additional complications include:
Femoral Artery Bleeding
Femoral Nerve Damage
WARNINGS
The catheter should be inserted or removed by a qualied, licensed physician.
Prior to treatment, physician should discuss with patient the risks and benets of and alternatives to catheterization (if any).
Hemothorax
Infection (exit site)
Laceration (of the Thoracic Duct)
Lumen Thrombosis
Pneumothorax
Pulmonary Emboli
Puncture (Subclavian Artery, Right
Arterial, Superior Vena Cava)
Septicemia
Trauma to Right Atrium or Major Vessel
Tunnel infection (subcutaneous)
Vessel Laceration, Trauma
Puncture (femoral vein or artery)
Retroperitoneal Bleeding
Venous Stenosis
2
Page 3

Catheter tip placement and proper length selection is left to the discretion of the physician.
However, routine x-ray should always follow the initial insertion to conrm proper placement
of the catheter tips prior to use. The recommended tip location is at or in the right atrium, or
the junction of the superior vena cava/right atrium (SVC/RA).
Examine the lumen and extensions before and after each treatment for any signs of damage
or wear.
1
Do not over tighten catheter connectors. Over tightening can crack connectors.
Observe proper sterile techniques at all times when handling this catheter and all sterile items.
Do not use catheter or kit components if the sterile seal is broken.
Do not use a damaged catheter (e.g., crushed, crimped, cut) or any damaged kit components
including connectors with stripped threads.
To avoid air embolism, keep the catheter clamped at all times except when connected to
bloodlines or a syringe during treatment.
Do not clamp catheter lumens; clamps are to be applied to tube extensions only.
Use only smooth or jawed forceps when not using the supplied catheter clamps. Alternate
the clamping location to prevent the potential for adversely aecting tube performance and
shortening useful life. Avoid clamping near the adapters and catheter body.
Use care when using sharp instruments near the catheter. Do not use sharp instruments or
scissors to remove dressing.
Tape injection caps between treatments to prevent accidental removal.
Intended for Single Use. DO NOT REUSE. Reuse and/or repackaging may create a risk of
patient or user infection, compromise the structural integrity and/or essential material and
design characteristics of the device, which may lead to device failure, and/or lead to injury,
illness or death of the patient.
Do not re-sterilize catheter kit accessories. The manufacturer shall not be liable for any damage
resulting from re-sterilization of catheter or kit components.
Do not force guidewire, dilators, or peel away introducer during insertion due to the potential
for vessel perforation and damage.
Avoid prolonged exposure to ultraviolet lights to prevent catheter damage.
Do not insert the peel away introducer further than necessary. It may not be necessary to
extend the introducer the entire length due to patient size and access site.
To insert the “J” guidewire end into the introducer needle, use the guidewire straightener. Do
not force the “J” guidewire during insertion or removal of any component because the wire
could break.
Use only threaded luer-lock connectors (including syringes, bloodlines and injection caps) with
the catheter adapters.
Do not nick or puncture the catheter lumens or extensions when suturing.
Do not tie the suture too tightly when suturing.
Irrigate the catheter with saline and then clamp the extensions.
When infusing heparin, ush quickly and clamp immediately to ensure that the heparin
reaches the distal end of the lumen. Do not infuse against a closed clamp or forcibly infuse a
blocked catheter. Forcibly infusing a blocked catheter could create backpressure force that
could cause the adapter to come out of the tubing.
Do not use Acetone or Iodine solutions on any part of the catheter tubing. Exposure may cause
catheter damage.
Remove the catheter when it is no longer needed.
3
English
Page 4
Do not use catheter after the expiration date listed on the package.
IV
V
VI
I
II
III
Physician discretion is strongly advised when inserting this catheter in patients who are unable
to take or hold a deep breath. Patients on ventilators or requiring ventilator support are at an
increased risk of pneumothorax during internal jugular subclavian cannulation.
All medically accepted protocols or instructions are not listed within this document nor are
English
they intended as a substitute for the physician’s experience and judgment in treating any
specic patient. However, the procedures, cautions and warnings should be reviewed prior to
product use.
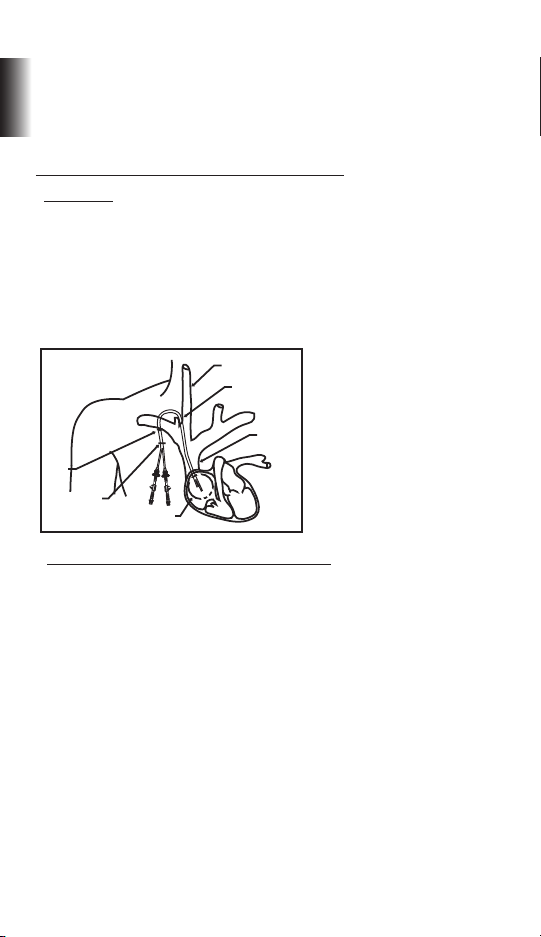
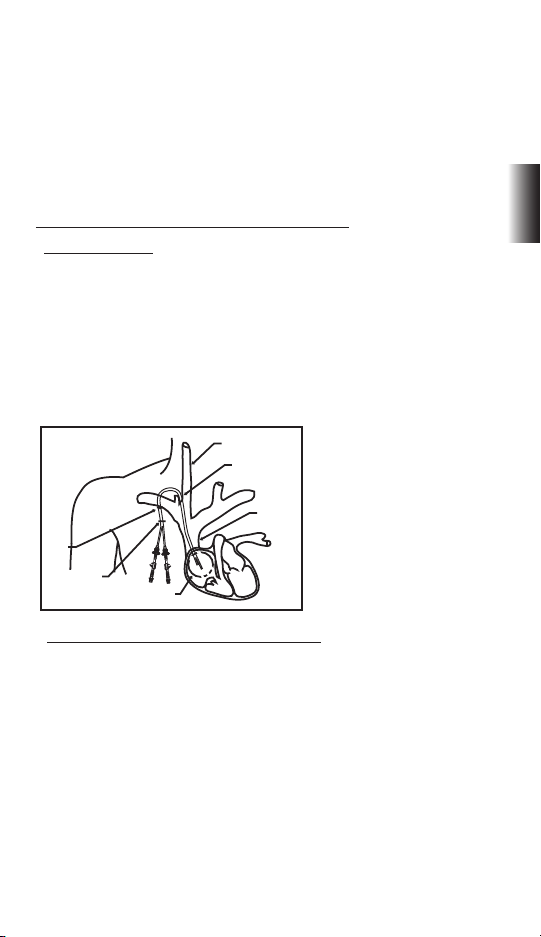
INSERT ION OF THE RETR O* CUFFED SIL ICONE CATHETER
I. Insertion Site
The internal jugular vein is the preferred insertion site for the catheter, since it permits easier
positioning of the catheter tip in the right atrium.
The subclavian vein can also be used for insertion. However, note that use of the subclavian
vein is associated with subclavian vein stenosis. This can preclude in the future the creation of
an arteriovenous access on the upper limb.
The catheter may be inserted into the femoral vein (see Section IV). However, femoral vein
insertion is associated with a higher risk of infection.
I - INTERNAL JUGULAR VEIN
II - INSERTION SITE
III - SUPERIOR VENA CAVA
IV - CUFF
V - EXIT SITE
VI - RECOMMENDED TIP
LOCATION IN THE
RIGHT ATRIUM (RA)
II. Insertion Using Sheath/Dilator via Seldinger Technique
A. Site-Preparation
A sterile “Operating Room” location is recommended during catheter placement. Sterile
drapes, instruments and accessories are also required. A surgical scrub, protective gown, cap,
gloves and mask are required.
Shave the patient’s skin above and below the insertion site if needed. The patient should
be draped before administering sucient local anesthetic to completely anesthetize the
insertion site.
Recommended positioning is with the patient in a slight Trendelenberg position.
Make a small incision following the skin lines over the desired vessel.
B. Vessel Puncture
Attach a syringe to the introducer needle and insert into the target vein with ultrasonic guidance if available. Aspirate to ensure proper placement. Free blood ow indicates vessel entry.
If the blood is bright red or pulsating return is encountered, withdraw and redirect the needle.
Remove the syringe and place thumb over the end of the introducer needle to prevent blood
loss or air embolism. Once blood has been aspirated, slide the exible end of the guidewire
back into advancer so that only the end of the guidewire is visible. Insert advancer’s distal end
into the needle hub.
4
Page 5

Advance the exible guidewire with forward motion into and past the needle hub into the
target vein. Insertion length is dependent upon the patient size.
Caution: Do not pull the guidewire back through any component.
Caution: Use uoroscopy or ultrasonic guidance to assure proper guidewire insertion
and placement.
Cardiac arrhythmias can result if the guidewire is allowed to enter the right atrium. Use
cardiac rhythm monitoring to detect arrhythmias.
Remove the needle over the guidewire, making sure the guidewire is securely held throughout removal of the needle.
C. Vessel Dilation and Catheter Insertion
Vessel Dilation and Sheath Insertion
Slide a vein dilator onto the wire and advance it through the skin and into the vein. Be sure
not to advance the guidewire. The guidewire must be stationary during dilator advancement.
Serial dilation is preferred. If other dilators are used, thread dilator(s) over guidewire into the
vessel. Remove dilator(s) when vessel is suciently dilated, leaving guidewire in place.
Caution: Do not leave vessel dilators in place any longer than necessary to avoid possible
vessel wall perforation.
Slide the peel away introducer/sheath over the guidewire into the vein while maintaining the
guidewire position.
Caution: Fluoroscopic guidance must be used to avoid vessel puncture.
Remove guidewire.
Caution: Do not leave sheath in place any longer than necessary to avoid damaging the
vein.
Catheter Insertion
WARNING: NEVER ATTEMPT TO SEPARATE LUMENS.
Remove dilator from previously inserted sheath.
To avoid blood leakage, clamp the proximal extensions of the catheter with the supplied at
clamps before inserting the catheter into the sheath.
Insert distal tips of catheter into and through the sheath until catheter tips are correctly
positioned into the target vein.
Caution: Quickly insert catheter in the sheath to prevent blood loss or air embolism.
Caution: Catheter tip placement in the appropriate location produces optimal blood ow
as outlined in KDOQI guidelines.
Caution: Serious trauma or fatal complications can result from failure to verify catheter
placement.
Gently and slowly, pull the peel away sheath out of the vessel.
Catheter placement adjustments should be made under uoroscopy or ultrasonic guidance.
The venous distal tip should be positioned at the level of the superior part of the right atrium,
at or beyond the caval atrial junction.
Caution: To avoid vessel damage when removing the peel away sheath, pull back the
sheath as far as possible and tear the sheath only a few centimeters at a time. Do not pull
on the portion of the sheath that remains in the vessel.
5
English
Page 6

D. Tunneling Retro* Catheter
Make a small incision at the exit site of the subcutaneous tunnel. The catheter is marked to
indicate a theoretical hub. This marking should be just outside the exit site. Make the incision
just wide enough to accommodate the catheter. Administer sucient local anesthetic to
completely anesthetize the tissue.
English
Using blunt dissection with the tunneling stylet, create a subcutaneous tunnel directly
towards the entry site.
When the tunneling stylet emerges from the entry site, place the tapered end of the tunneling sleeve over the exposed tunneler. If necessary, push the sleeve to start a tract for the cu
to slide through the subcutaneous tunnel.
Thread or snap the catheter adapter/tunneler onto the stylet so that it is rmly attached
(depends on which tunneler is used).
Remove the proximal clamps on the catheter and cut the catheter at the 50 cm mark on the
venous side and 47.5 cm mark on the arterial lumen.
For femoral catheters (67 cm overall length), cut the catheter at the 65 cm mark on the venous
side and 62.5 cm on the arterial lumen.
Attach the end of the catheter to the adapter, and push the tunneling sleeve over the
catheter.
Pull the tunneling stylet until the catheter is clear of the exit site and the catheter marking is
visible.
Remove the catheter carefully from the stylet by pulling the tunneling sleeve then gently
twisting the stylet out of the catheter.
Reattach the clamps to the proximal ends of the catheter.
If desired, the proximal ends of the catheter may be cut to achieve the desired length. Cuts
should be made at the marked lengths, since the priming volumes for these lengths are
documented.
WARNINGS
WARNING: NEVER ATTEMPT TO SEPARATE CATHETER LUMENS.
Do not tunnel through muscle.
Do not pull catheter tubing. Pulling could elongate and damage the catheter.
Do not over-expand subcutaneous tissue during tunneling. Over expansion may delay/
prevent cu in-growth, and can increase bleeding.
Additional blunt dissection may facilitate insertion if resistance is encountered.
III. Sheathless (SafeTrac* Kit) Insertion via Seldinger Technique
A. Site Preparation
A sterile “Operating Room” location is recommended during catheter placement. Sterile
drapes, instruments and accessories are also required. A surgical scrub, protective gown, cap,
gloves and mask are required.
Shave the patient’s skin above and below the insertion site if needed. The patient should
be draped before administering sucient local anesthetic to completely anesthetize the
insertion site.
Recommended positioning is with the patient in a slight Trendelenberg position.
Make a small incision following the skin lines over the desired vessel.
6
Page 7

B. Vessel Puncture
Attach a syringe to the introducer needle and insert into the target vein with ultrasonic guidance if available. Aspirate to ensure proper placement. Free blood ow indicates vessel entry.
If the blood is bright red or pulsating return is encountered, withdraw and redirect the needle.
Remove the syringe and place thumb over the end of the introducer needle to prevent blood
loss or air embolism. Once blood has been aspirated, slide the exible end of the guidewire
back into advancer so that only the end of the guidewire is visible. Insert advancer’s distal end
into the needle hub.
Advance the exible guidewire with forward motion into and past the needle hub into the
target vein. Insert the guidewire until the tip passes into and through the right atrium into the
inferior vena cava. Insertion length is dependant upon the patient size. Place the patient on a
cardiac monitor during the procedure to detect any sign of arrhythmia.
Caution: Do not pull the guidewire back through any component.
Caution: Use uoroscopy or ultrasonic guidance to assure proper guidewire insertion
and placement.
Cardiac arrhythmias can result if guidewire is allowed to enter the right atrium. Use cardiac
rhythm monitoring to detect arrhythmias.
Remove the needle over the guidewire, making sure the guidewire is securely held throughout removal of the needle.
Slide a 6 Fr sheath/dilator onto the wire and advance it through the skin and into the vein.
Be sure not to advance the guidewire. The guidewire must be stationary during the sheath/
dilator advancement.
Remove the dilator. Insert another wire through the sheath. Remove the sheath.
C. Vessel Dilation and Catheter Insertion
WARNING: NEVER ATTEMPT TO SEPARATE CATHETER LUMENS
Place the two intracatheter dilators provided into the lumens of the catheter. The intracatheter dilators have luers that lock onto the proximal end of the respective arterial and venous
luers on the catheter.
Slide the exposed end of one of the wires through the venous intracatheter dilator until it
exits the proximal venous end of the dilator.
Slide the appropriate vein dilator(s) over the other wire and advance them through the skin.
Serial dilation is preferred.
Remove dilator(s).
Caution: Do not leave vessel dilators in place any longer than necessary to avoid possible
vessel wall perforation.
Slide the exposed wire through the arterial intracatheter dilator until it exits the proximal
arterial end of the catheter.
Advance the wires until there is no slack in the wires between the distal end of the catheter
and the entry site.
Advance the catheter through the skin into the vessel. A slight torque in either direction may
be necessary to advance the catheter into the vein.
Ultrasonic guidance or uoroscopy is highly recommended for proper placement.
Caution: Catheter tip placement in the appropriate location produces optimal blood ow
as outlined in KDOQI guidelines.
English
7
Page 8

Caution: Serious trauma or fatal complications can result from failure to verify catheter
placement.
Remove the intracatheter dilators and guidewires.
D. Tunneling Retro* Catheter
English
Make a small incision at the exit site of the subcutaneous tunnel. The catheter is marked to
indicate a theoretical hub. This marking should be just outside the exit site. Make the incision
just wide enough to accommodate the catheter. Administer sucient local anesthetic to
completely anesthetize the tissue.
Using blunt dissection with the tunneling stylet, create a subcutaneous tunnel directly
towards the entry site.
When the tunneling stylet emerges from the entry site, place the tapered end of the tunneling sleeve over the exposed tunneler. If necessary, push the sleeve to start a tract for the cu
to slide through the subcutaneous tunnel.
Thread or snap the catheter adapter/tunneler onto the stylet so that it is rmly attached
(depends on which tunneler is used).
Remove the proximal clamps on the catheter and cut the catheter at the 50 cm mark on the
venous side and 47.5 cm mark on the arterial lumen.
For femoral catheters (67 cm overall length), cut the catheter at the 65 cm mark on the venous
side and 62.5 cm on the arterial lumen.
Attach the end of the catheter to the adapter, and push the tunneling sleeve over the
catheter.
Pull the tunneling stylet until the catheter is clear of the exit site and the catheter marking is
visible.
Remove the catheter carefully from the stylet by pulling the tunneling sleeve then gently
twisting the stylet out of the catheter.
Reattach the clamps to the proximal ends of the catheter.
If desired, the proximal ends of the catheter may be cut to achieve the desired length. Cuts
should be made at the marked lengths since the priming volumes for these lengths are
documented.
WARNINGS
WARNING: NEVER ATTEMPT TO SEPARATE LUMENS.
Do not tunnel through muscle.
Do not pull catheter tubing. Pulling could elongate and damage the catheter.
Do not over-expand subcutaneous tissue during tunneling. Over-expansion may delay/
prevent cu in-growth, and can increase bleeding.
Additional blunt dissection may facilitate insertion if resistance is encountered.
IV. Femoral Vein Placement Procedure
WARNING: THE RISK OF INFECTION IS INCREASED WITH FEMORAL VEIN INSERTION. Other
access sites such as the pelvic area should be considered rather than the traditional inguinal area to decrease the risk of infection.
Assess both left and right femoral areas to select the better of the two veins for catheter
placement. Use of ultrasonic visualization is recommended.
8
Page 9
For sheath/dilator insertion, follow procedures in Section II, “Insertion Using Sheath/ Dilator
A
B
C
A
C
via Seldinger Technique.”
For sheathless insertion, follow procedures in Section III, “Sheathlless (SafeTrac* Kit) Insertion
via Seldinger Technique.”
Femoral insertion is the same as listed in Section II and III with the following exceptions
(see 1, 2 and 3 below):
1) The patient should not be placed in the slight Trendelenberg position
2) The tip of the catheter should be placed at the mid inferior vena cava (IVC) or at the junction of the iliac vein and the inferior vena cava.
3) The catheter should be cut at the 65 cm mark on the venous lumen and 62.5 cm mark on
the arterial lumen before tunneling.
2
Guidewires should not be allowed to enter the right atrium. Cardiac arrhythmias may result.
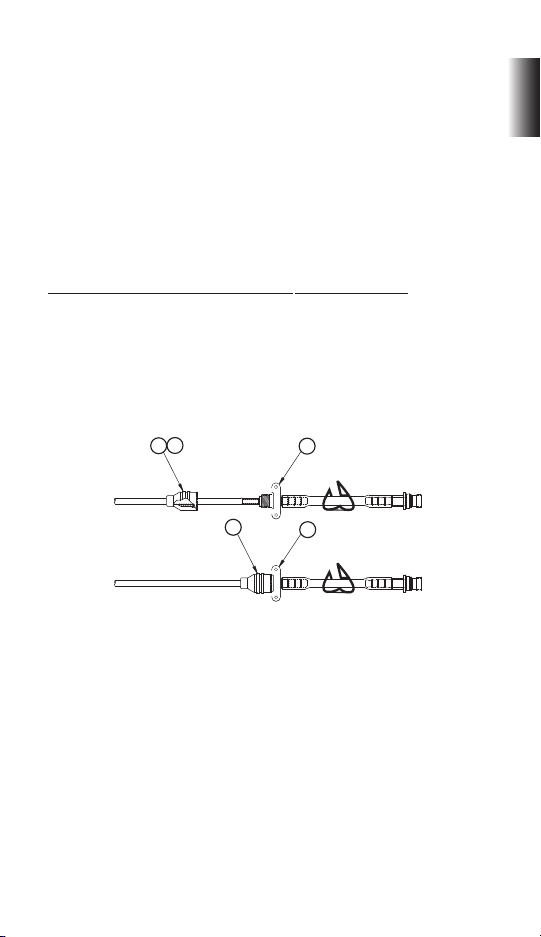
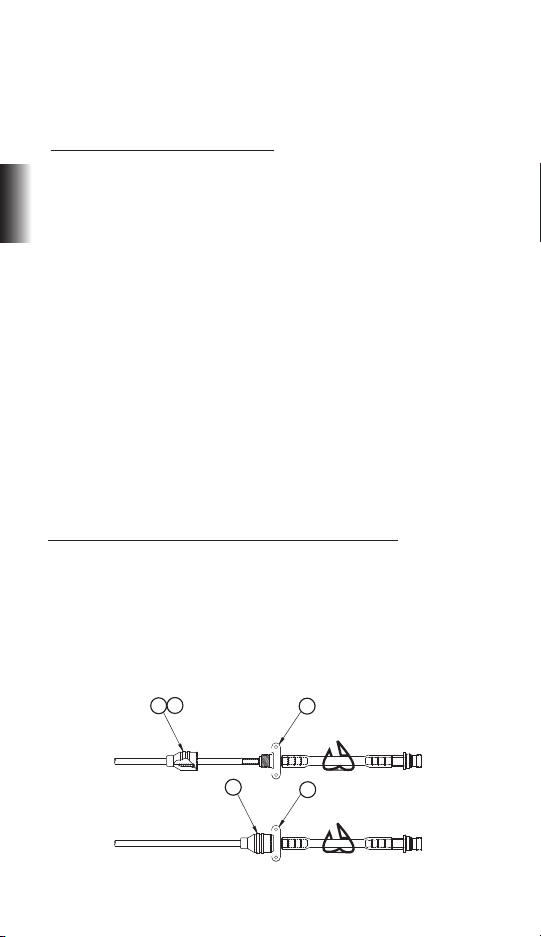
V. Catheter Extension Adapter Assembly or Retro* Repair Kit Application
Use the at clamps provided with the catheter kit to clamp the catheter when necessary and
when replacing worn or damaged extension adapters with “Retro* Repair Kit” extensions.
Do not use serrated forceps.
When cutting to desired length or for replacement of worn or damaged extension adapters,
make sure that the catheter is square and that the remaining catheter lumen is not damaged.
Reference “operational length” and corresponding priming volume.
English
Slide the red catheter cap (A) over the proximal end of the catheter that has red markings.
Check to ensure that the red cap has a gasket (B) inside the cap. Slide the inside diameter of
the arterial (red) catheter lumen over the stainless steel tube (which is part of (C) and forms
the beginning of the extension tube) until it meets the shoulder. Thread the cap (A) towards
part (C) until it stops on the adapter body. Repeat the procedure for the blue extension
adapter.
Caution: To avoid cracking, do not overtighten the caps.
Remove the at clamps from the arterial (red) and venous (blue) lumens.
Attach syringes to both extensions and open clamps. Blood should aspirate easily from both
arterial and venous sides. If excessive resistance to blood aspiration occurs, reposition the
catheter to obtain adequate blood ows.
Irrigate both lumens with saline-lled syringes once adequate aspiration has been achieved
using quick bolus technique. Check to ensure that the extension clamps are open during
irrigation procedure.
Close the extension clamps, remove the syringes, then place an injection cap on each luer
lock connector.
9
Page 10

VI. Catheter Securement and Wound Care
An attachable suture wing is provided to suture the catheter at the exit site. Squeeze lightly
the attachable suture wings to open the split underside of the suture wing body. Place the
suture wing at the catheter size mark at the exit site and release. Secure wing by suturing it in
English
place through the holes provided.
Suture insertion and exit sites closed. Next, suture the catheter adapters to the skin using the
suture wing. Do not suture the catheter tubing.
Caution: Avoid nicking catheter during suturing.
Caution: Sharp objects may cause catheter failure due to punctures or cuts in the catheter
lumen.
Cover the insertion and exit sites with occlusive dressings.
Record catheter length and catheter lot number on patient’s chart.
HEPARINIZATION
Follow catheter patency guidelines if the catheter is not to be used immediately for treatment.
To maintain patency between treatments, create a heparin lock in each lumen of the catheter.
Follow hospital protocol for heparin concentration.
Draw heparin into two syringes, corresponding to the amount designated on the arterial and
venous extensions. Assure that the syringes are free of air.
Remove injection caps from the extensions.
Attach a syringe containing heparin solution to the female luer of each extension.
Open extension clamps.
Caution: Aspirate to insure that no air will be forced into the patient.
Inject heparin into each lumen using quick bolus technique.
Caution: Each lumen should be completely lled with heparin to ensure eectiveness.
Close extension clamps.
Caution: Extension clamps should only be open for aspiration, ushing, and dialysis treatment.
Remove syringes.
Attach a sterile injection cap onto the female luers of the extensions.
Tape injection caps to prevent accidental removal.
Heparin is not necessary for the next 48 to 72 hours, provided that the lumens have not been
aspirated or ushed.
HEMODIALYSIS TREATMENT
Caution: To avoid air embolism, keep the extension tubing clamped at all times, when not
in use.
Caution: To prevent systematic heparinization, the heparin solution must be removed from
each lumen prior to patient treatment.
10
Page 11

Aspirate and irrigate the catheter with saline prior to each use. Purge any air from the catheter
and all connecting tubing and caps upon tubing connection changes.
Aspiration procedure should comply with dialysis unit protocol.
Before beginning dialysis, check all catheter connections and extracorporeal circuits carefully.
Caution: Always tape luer locks to bloodlines during treatment to safeguard against accidental disconnection.
Visually inspect the catheter and its connections for signs of leakage to prevent blood loss
or air embolism. If necessary, take remedial action prior to the continuation of the dialysis
treatment.
Caution: Excessive blood loss may lead to patient shock.
Hemodialysis should be performed under physician’s instructions.
POST DIALYSIS
Prepare syringes with sterile normal saline and heparin.
Stop the blood pump. Close the clamp on the arterial extension. Clamp the arterial bloodline
at the connection site.
Disconnect the arterial bloodline from the adapter of the catheter and connect a syringe lled
with sterile normal saline to the arterial adapter. Open the clamp on the arterial extension and
ush the blood from the arterial lumen of the catheter. Reclamp the extension.
Heparinize the lumen with the appropriate volume/concentration of heparin (see above).
Rinse back the blood in the extra-corporeal circuit via the venous lumen.
After rinsing back the patient’s blood, turn the blood pump o. Clamp the venous extension
and disconnect the venous bloodline from the venous adapter of the catheter.
Connect a syringe lled with sterile normal saline to the venous adapter. Open the clamp on
the venous extension and ush all remaining blood from the venous lumen of the catheter.
Reclamp and then heparinize the lumen with the appropriate volume/concentration of
heparin.
Ensure that the clamps are closed on both extensions. Remove syringes and attach an injection sealing cap to each adapter. Tape the injection sealing caps to the extensions to prevent
accidental removal.
WARNING
Keep the catheter clamped at all times except when connected to bloodlines or syringe
during treatment.
English
11
Page 12
CATHETER BLOOD FLOW
Insucient Flows
Insucient blood ow may be caused by occluded arterial holes due to clotting or brin
sheath or occlusion of the arterial side holes due to contact with the vein wall.
English
Table: Flow vs. Pressure Characteristics for all Retro* Catheters
Flow Rate Average range of Inner Lumen Pressure
(ml/min) (mm Hg)
100 24 - 34
150 39 - 50
200 58 - 70
250 79 - 93
300 104 - 121
350 129 - 152
400 157 - 186
450 192 - 233
500 224 - 267
Arterial and venous pressure ranges are listed above.
Note: The above results were obtained using deionized water.
One Way Obstructions
One-way obstructions exist when a lumen can be ushed easily but blood cannot be aspirated. This is usually caused either by clotting, brin sheath or tip malposition. In this last case,
the poor ow occurs soon after placement.
CATHETER REMOVAL
WARNING
Only a physician familiar with the appropriate techniques should perform catheter
removal.
Palpate the catheter near the exit site to locate the catheter cu.
Anesthetize the catheter cu and exit site area by administering sucient local anesthetic.
Cut sutures from the suture wing. Applicable hospital procedures should be followed.
Make a small incision over the cu, parallel to the catheter.
Dissect down to the cu using a blunt or sharp dissection.
Grasp the cu with a clamp when visible.
Clamp the catheter between cu and insertion site. Make sure that the clamp is suciently
tight to prevent blood ow in either lumen.
To free the catheter from the tissue, gently pull the catheter in a slow continuous motion being careful not to jerk or apply excessive force to prevent tearing the cu.
Caution: Do not pull catheter if there is resistance. Instead, perform a cutdown and remove
all sutures at the venotomy site.
Apply pressure to the proximal tunnel until bleeding has stopped.
Suture incision and apply dressing to promote healing.
12
Page 13

Check catheter integrity for tears and measure catheter when removed. Check the length
against the applicable product specication to ensure that the entire catheter has been successfully removed.
1
National Kidney Foundation, Kidney Disease Outcomes Quality Initiative (KDOQI) Guidelines,
Guideline 5, “Type and Location of Tunneled Cu Catheter Placement.” (2000)
2
GX Zaleski, B. Funaki, JM Lorenz, RS Garofolo, MA Moscatel, JD Rosenblum and JA Leef.
Department of Radiology, The University of Chicago Hospital, IL 60637, USA. “Experience
with tunneled femoral hemodialysis catheters. Am J Rcmtgenol. 1999 Feb; 172 (2)c 493-496.
Close extension clamps.
Bard Access Systems, Inc. warrants to the original purchaser that this product will be free from
defects in material and workmanship for a period of one (1) year from the date of purchase. If
this product proves to be so defective, purchaser may return same to Bard Access Systems, Inc.
for repair or replacement, at Bard Access Systems, Inc.’s option. All returns must be authorized
in advance in accordance with Bard Access Systems, Inc.’s Returned Goods Policy found in its
then current Price List. The liability of Bard Access Systems, Inc. under this limited product warranty does not extend to any abuse or misuse of this product or its repair by anyone other than
an authorized Bard Access Systems, Inc. representative.
THIS LIMITED PRODUCT WARRANTY IS IN LIEU OF ALL OTHER WARRANTIES, EXPRESS OR
IMPLIED (INCLUDING, WITHOUT LIMITATION ANY WARRANTY OF MERCHANTABILITY OR
FITNESS FOR A PARTICULAR PURPOSE). THE LIABILITY AND REMEDY STATED IN THIS LIMITED
PRODUCT WARRANTY WILL BE THE SOLE LIABILITY OF BARD ACCESS SYSTEMS, INC. AND
REMEDY AVAILABLE TO PURCHASER FOR THIS PRODUCT, WHETHER IN CONTRACT, TORT
(INCLUDING NEGLIGENCE) OR OTHERWISE, AND BARD ACCESS SYSTEMS, INC. WILL NOT
BE LIABLE TO PURCHASERS FOR ANY INDIRECT, SPECIAL, INCIDENTAL OR CONSEQUENTIAL
DAMAGES ARISING OUT OF ITS HANDLING OR USE.
© 2010 C. R. Bard, Inc. All rights reserved.
Revision date: February 2010
English
13
Page 14

GEBRUIKSAANWIJZING
Implant Length
Body Length
Overall Length
32cm
32cm
35cm
35cm
40cm
40cm
45cm
45cm
50cm
50cm
GEBRUIKSINDICATIES
De Retro* Silicone Twin Lumen Chronic Hemodialysis Catheter met aparte tips is ontworpen
voor chronische hemodialyse en aferese. Het is een radiopake katheter van siliconen,
Nederlands
ontworpen voor percutane insertie of insertie via een incisie. Katheters die langer zijn dan 40
centimeter, zijn bedoeld voor insertie in aders van het dijbeen.
KATHETER PLAATSEN
De katheter kan percutaan worden geplaatst door middel van een aangepaste “Seldingertechniek” of open venotomie.
Fluoroscopische of ultrasone sturing is aanbevolen voor de juiste richting van de tip en de
plaatsing binnen het rechteratrium.
CONTRA-INDICATIES
Deze katheter is alleen bestemd voor langdurige vasculaire toegang en mag voor geen enkel
ander doeleinde dan het doeleinde dat in deze aanwijzingen staat vermeld worden gebruikt.
BESCHRIJVING
De Retro* Twin Lumen Chronic Hemodialysis Catheter met aparte tips is gemaakt van radiopake, medische siliconen. De ovale vorm en het siliconenmateriaal zorgen voor verbeterde
exibiliteit en bestendigheid tegen knikken.
Om hercirculering tijdens hemodialyse te voorkomen, is het arteriële lumen van de katheter
korter dan het veneuze lumen aan het distale uiteinde van de katheter. De katheter heeft een
vilten manchet en afzonderlijke kleurgecodeerde extensieadapters.
De proximale uiteinden van de katheter zijn achterwaarts getunneld naar de uitgang nadat
de tips zijn geplaatst. Met deze vormgeving kunnen de kathetertips op precieze wijze in
positie worden gebracht. De twee proximale uiteinden van de katheter, namelijk de arteriële
en veneuze, zijn aangesloten op de kleurgecodeerde extensieadapters. Elke extensieadapter
heeft een compressiekoker, een compressiekap, een klem en luer.
AFMETINGEN
Implantaat Lichaams- Algehele
lengte lengte lengte
19 cm 24 cm 52 cm
23 cm 28 cm 52 cm
27 cm 32 cm 52 cm
31 cm 36 cm 52 cm
35 cm 40 cm 52 cm
50 cm 55 cm 67 cm
Operationale lengtes
30 cm 35 cm 40 cm 45 cm 50 cm
- 35 cm 40 cm 45 cm 50 cm
- - 40 cm 45 cm 50 cm
- - 40cm 45 cm 50 cm
- - - 45 cm 50 cm
- - - 60cm 65 cm
INSPUITVOLUMES
De inspuitvolumes zijn gedrukt op de katheter, met operationele lengtes van 30 cm, 35 cm,
40 cm, 45 cm, 50 cm, 60 cm en 65 cm voor de overeenkomstige katheters.
14
Page 15
Operationele
lengte Arterieel Veneus
30 cm 1,6 cc 1,7 cc
35 cm 1,8 cc 1,9 cc
40 cm 2,0 cc 2,1 cc
45 cm 2,2 cc 2,3 cc
50 cm 2,4 cc 2,5 cc
60 cm 2,8 cc 2,9 cc
65 cm 3,0 cc 3,1 cc
VOORZICHTIG
Volgens de federale (VS) wet mag dit instrument alleen door of in opdracht van een arts
worden verkocht.
WAARSCHUWINGEN
De katheter met 24 cm lichaamslengte niet insnijden voor de markering van 30 centimeter
De katheter met 28 cm lichaamslengte niet insnijden voor de markering van 35 centimeter
De katheter met 32 cm lichaamslengte niet insnijden voor de markering van 40 centimeter
De katheter met 36 cm lichaamslengte niet insnijden voor de markering van 40 centimeter
De katheter met 40 cm lichaamslengte niet insnijden voor de markering van 55 centimeter
De katheter met 55 cm lichaamslengte niet insnijden voor de markering van 60 centimeter
LEES ALLE AANWIJZINGEN, WAARSCHUWINGEN EN
INSTRUCTIES ZORGVULDIG VOOR GEBRUIK
COMPLICATIES
Luchtembolie
Arteriële cannulatie
Bacteremie
Bloeding
Letsel aan brachiale plexus
Cardiale aritmie
Cardiale tamponade
Kathetertipembolus of
trombotische embolus
Centraal veneuze trombose/stenose
Chylothorax
Endocarditis
Hematoom (subcutaan)
Hemorragie
Hemothorax
Infectie (uitgangslocatie)
Laceratie (van de borstbuis)
Lumentrombose
Pneumothorax
Pulmonaire embolie
Punctie (subclaviculaire arterie, rechts
arterieel, vena cava superior)
Septicemie
Trauma aan rechteratrium of
hoofdvat
Tunnelinfectie (subcutaan)
Vaatlaceratie, trauma
Punctuur (ader van dijbeen of slagader)
Nederlands
Opmerking: insertie in de ader van het dijbeen verhoogt het risico op infectie ten opzichte
van andere insertieplaatsen. Bovendien kunnen de volgende complicaties optreden:
Bloeding van dijbeenarterie
Schade aan dijbeenzenuw
WAARSCHUWINGEN
De katheter mag alleen door een gekwaliceerde, gediplomeerde arts worden geplaatst of
verwijderd.
Voor de behandeling moet de arts met de patiënt de risico’s, voordelen en alternatieven van
katheterisatie bespreken (indien van toepassing).
Het plaatsen van de kathetertip en de selectie van de juiste lengte wordt aan het inzicht van
de arts overgelaten. Echter, na het plaatsen van de kathetertips moeten routinematig röntgenfoto’s worden genomen om te controleren of de kathetertips op de juiste plaats zitten voordat
Retroperitoneale bloeding
Venueze stenose
15
Page 16

deze worden gebruikt. De aanbevolen plaats voor de tip is op of in het rechteratrium, of het
verbindingspunt van de vena cava superior/rechteratrium (SVC/RA).
Controleer het lumen en de extensies voor en na elke behandeling op tekenen van schade of
slijtage.
1
Maak de katheterconnectoren niet te stevig vast. Hierdoor kunnen de connectoren breken.
Volg altijd de juiste steriele technieken wanneer u deze katheter en alle steriele items gebruikt.
Gebruik de katheter of de onderdelen van de set niet als het steriele zegel is verbroken.
Gebruik geen beschadigde katheter (bijvoorbeeld een geplette, gekrompen of ingesneden
katheter) of beschadigde onderdelen van de set, zoals connectoren met gestripte draden.
Om luchtembolie te voorkomen moet de katheter altijd zijn vastgeklemd, behalve wanneer
Nederlands
een aansluiting met een bloedlijn is gemaakt of tijdens een behandeling met een spuit.
Klem de katheterlumina niet vast. U moet de klemmen alleen vastmaken aan de slangextensies.
Gebruik alleen zachte forceps of forceps met klauwen wanneer u de bijgeleverde katheterklemmen niet gebruikt. Wissel de plaats van de klem af om te voorkomen dat de prestaties van de slang afnemen en om de levensduur te verlengen. Plaats de klemmen niet nabij de
adapters en het katheterlichaam.
Wees voorzichtig wanneer u scherpe instrumenten in de buurt van de katheter gebruikt.
Gebruik geen scherpe instrumenten of een schaar om gaas te verwijderen.
Tape injectiedoppen tussen de behandelingen om ongewenste verwijdering te voorkomen.
Bedoeld voor eenmalig gebruik. NIET OPNIEUW GEBRUIKEN. Opnieuw gebruiken en/of
opnieuw verpakken kan het risico op infectie van de patiënt of de gebruiker creëren, de structurele integriteit en/of essentieel materiaal en ontwerpkarakteristieken van het instrument
in gevaar brengen, wat kan leiden tot storing van het instrument, en/of tot letsel, ziekte of de
dood van de patiënt.
Steriliseer de accessoires in de katheterset niet opnieuw. De fabrikant kan niet aansprakelijk
worden gehouden voor schade die veroorzaakt is door het opnieuw steriliseren van de katheter of de onderdelen van de set.
Forceer de geleidedraad, de dilatators, of “peel away”-introducer tijdens de insertie niet omdat
de mogelijkheid tot vaatperforatie en schade bestaat.
Voorkom te lange blootstelling aan ultraviolet licht om schade aan de katheter te voorkomen.
Plaats de “peel away”-introducer niet verder dan nodig. Het is misschien niet nodig om de
introducer volledig in te brengen vanwege de grootte van de patiënt en de toegangssite.
Gebruik het apparaat om de geleidedraad recht te houden om de J-geleidedraad in de introducernaald in te brengen. Forceer de J-geleidedraad niet tijdens het inbrengen of verwijderen
omdat de draad kan breken.
Gebruik alleen bedrade luer-lock-connectoren (waaronder spuiten, bloedlijnen en injectiedoppen) met de katheteradapters.
Bekerf of doorprik de katheterlumina of extensies niet tijdens het hechten.
Maak de hechtingen niet te vast.
Irrigeer de katheter met een zoutoplossing en klem vervolgens de extensies vast.
Wanneer u met heparine infuseert, usht u snel en maakt u de klemmen onmiddellijk vast
zodat de heparine het distale uiteinde van het lumen bereikt. Infuseer niet met een gesloten
klem of infuseer niet met kracht een geblokkeerde katheter. Wanneer u met kracht een geblokkeerde katheter infuseert, kan er achterdruk ontstaan en kan de adapter uit de slang komen.
Gebruik voor geen enkel onderdeel van de katheterlijn een aceton- of jodiumoplossing. Dit
kan schade aan de katheter veroorzaken.
16
Page 17
Verwijder de katheter als deze niet meer nodig is.
IV
V
VI
I
II
III
Gebruik de katheter niet na de uiterste houdbaarheidsdatum die op de verpakking staat.
De arts dient zijn of haar eigen inzicht te gebruiken bij het inbrengen van de katheter bij
patiënten die niet diep kunnen inademen of hun adem niet kunnen inhouden. Patiënten die
aan ventilatoren liggen of die ventilatorsteun nodig hebben, lopen een verhoogd risico op
pneumothorax tijdens de interne jugulaire subclaviculaire cannulatie.
Niet alle medisch aanvaarde protocollen of aanwijzingen staan in dit document en de
aanwijzingen in dit document zijn niet bedoeld ter vervanging van de ervaring en het inzicht
van de arts voor de behandeling van een specieke patiënt. Echter, u moet de procedures,
waarschuwingen en aanwijzingen lezen voordat u het product gebruikt.
DE RETR O* RS CUFFE D SILICONE CATHET ER INBRENGE N
I. Plaats van inbrengen
De interne jugulaire ader is de plaats waaraan de voorkeur voor het inbrengen van de
katheter wordt gegeven, omdat de kathetertip dan gemakkelijker in het rechteratrium kan
worden gepositioneerd.
Ook de subclaviculaire ader kan voor het inbrengen worden gebruikt. Merk echter op dat
het gebruik van de subclaviculaire ader het risico van subclaviculaire aderstenose met zich
meebrengt. Dit kan in de toekomst voorkomen dat arterioveneuze toegang tot het bovenste
ledemaat wordt verkregen.
De katheter kan in de ader van het dijbeen worden ingebracht (zie sectie IV). Echter, aan het
inbrengen van de katheter in de dijbeenader is een hoger risico op infectie gebonden.
I - INTERNE JUGULAIRE ADER
II - PLAATS VAN INBRENGEN
III - VENA CAVA SUPERIOR
IV - MANCHET
V - PLAATS VAN UITGANG
VI - AANBEVOLEN
TIPLOCATIE IN HET
RECHTERATRIUM (RA)
II. Inbrengen met schede/dilator via Seldinger-techniek
A. Plaats voorbereiden
Voor het inbrengen van de katheter wordt een steriele operatiekamer aanbevolen. Steriele
lakens, instrumenten en accessoires zijn ook nodig. Een chirurgische reiniging, beschermend
operatieschort, kap, handschoenen en masker zijn nodig.
Scheer indien nodig de huid van de patiënt boven en onder de plaats waar de katheter wordt
ingebracht. De patiënt moet met een laken zijn bedekt voordat voldoende lokale anesthesie
wordt toegepast om de plaats van inbreng volledig te anestheseren.
De aanbevolen positie is met de patiënt in een lichte Trendelenberg-ligging.
Maak een kleine incisie. Volg de huidlijnen boven het gewenste vat.
Nederlands
17
Page 18

B. Vatpunctie
Sluit een spuit op de introducernaald aan en breng deze in de doelader in, indien mogelijk
met ultrasone sturing. Aspireer zodat de naald op de juiste plaats wordt ingebracht. Een vrije
bloedstroom geeft aan dat de naald in de ader zit. Als het bloed helderrood is of als u een
pulserende retour constateert, trekt u de naald terug en brengt u deze op de juiste plaats aan.
Verwijder de spuit en plaats uw duim over het einde van de introducernaald om bloedverlies
of luchtembolie te voorkomen. Nadat het bloed is geaspireerd, schuift u het exibele uiteinde
van de geleidedraad terug in de advancer zodat alleen het einde van de geleidedraad zichtbaar is. Breng het distale uiteinde van de advancer in de naaldhub in.
Schuif de exibele geleidedraad vooruit met een voorwaartse beweging in en voorbij de
naaldhub in de doelader. De insertielengte is afhankelijk van de grootte van de patiënt.
Nederlands
Voorzichtig: Trek de geleidedraad door geen enkel onderdeel terug.
Voorzichtig: Gebruik uoroscopie of ultrasone sturing om de geleidedraad goed in te
brengen en te plaatsen.
Er kan cardiale aritmie optreden als de geleidedraad in het rechteratrium terechtkomt.
Gebruik een hartritmemonitor om aritmie te controleren.
Verwijder de naald over de geleidedraad en zorg dat u de geleidedraad tijdens het verwijderen van de naald goed vasthoudt.
C. Vatdilatatie en inbrengen van de katheter
Vatdilatatie en inbrengen van de schede
Schuif een aderdilatator op de draad en schuif deze door de huid en in de ader. Zorg dat u de
geleidedraad niet verder verplaatst. De geleidedraad moet tijdens het vooruitschuiven van de
dilatator niet bewegen.
Er wordt de voorkeur gegeven aan seriële dilatatie. Als u andere dilatators gebruikt, schuift
u de dilatator(s) over de geleidedraad in de ader. Verwijder de dilatator(s) wanneer de ader
voldoende is gedilateerd en laat de geleidedraad zitten.
Voorzichtig: Laat de vatdilatators niet langer zitten dan nodig is om perforatie van de
vaatwand te voorkomen.
Schuif de “peel away”-introducer/schede over de geleidedraad in de ader en houd de geleidedraad op zijn plaats.
Voorzichtig: Gebruik uoroscopische sturing om punctie van de ader te voorkomen.
Verwijder de geleidedraad.
Voorzichtig: Laat de schede niet langer zitten dan nodig is om schade aan de ader te
voorkomen.
Katheter inbrengen
WAARSCHUWING: PROBEER NOOIT DE LUMINA TE SCHEIDEN.
Verwijder de dilatator uit de eerder ingebrachte schede.
Om het lekken van bloed te voorkomen, klemt u de proximale extensies van de katheter vast
met de bijgeleverde platte klemmen voordat u de katheter in de schede inbrengt.
Breng de distale tips van de katheter in en door de schede totdat de kathetertips correct zijn
gepositioneerd in de doelader.
Voorzichtig: Breng de katheter snel in de schede in om bloedverlies of luchtembolie te
voorkomen.
18
Page 19

Voorzichtig: Wanneer de kathetertip op de juiste locatie is aangebracht, wordt een optimale bloedstroom geproduceerd volgens de richtlijnen van KDOQI.
Voorzichtig: Wanneer niet wordt gecontroleerd of de katheter goed is geplaatst, kan dit
ernstig trauma veroorzaken of fatale complicaties hebben.
Trek voorzichtig en langzaam de “peel away”-schede uit de ader.
Wijzig de plaats van de katheter onder uoroscopische of ultrasone sturing. De veneuze
distale tip moet op het niveau van het bovenste deel van het rechteratrium worden geplaatst,, op of achter het cavale atriale verbindingspunt.
Voorzichtig: Om schade te voorkomen bij het verwijderen van de “peel away”-schede,
trekt u de schede zo ver mogelijk terug en trekt u de schede slechts een paar centimeter
tegelijk terug. Trek niet aan het deel van de schede dat in de ader blijft.
D. De Retro* Catheter tunnelen
Maak een kleine incisie aan de uitgang van de subcutane tunnel. Op de katheter staat een
markering, die een theoretisch centrum aangeeft. Deze markering moet zich net buiten de
uitgang bevinden. Maak de incisie net breed genoeg om de katheter te kunnen plaatsen.
Dien voldoende lokale anesthesie toe om het weefsel volledig te anestheseren.
Maak een subcutane tunnel rechtstreeks in de richting van de ingang met een stompe
dissectie met het tunnelingstilet.
Wanneer het tunnelingstilet uit de ingang komt, plaatst u het taps toelopende einde van de
tunnelingkoker over de blootgelegde tunnelaar. Indien nodig drukt u op de koker om een
kanaal voor de manchet te starten via de subcutane tunnel.
Draai of klik de katheteradapter-tunnelaar op het stilet en maak deze goed vast (afhankelijk
van de tunnelaar die u gebruikt).
Verwijder de proximale klemmen op de katheter en snij de katheter door op de 50 cmmarkering van de veneuze zijde en de 47,5 cm-markering op het arteriële lumen.
Bij dijbeenkatheters (67 cm algehele lengte) snijdt u de katheter af bij de markering 65 cm op
de veneuze zijde en 62,5 cm op het arteriële lumen.
Sluit het uiteinde van de katheter aan op de adapter en druk de tunnelaarkoker over de
katheter.
Trek het tunnelaarstilet uit totdat de katheter van de uitgang is verwijderd en de kathetermarkering zichtbaar is.
Verwijder de katheter voorzichtig van het stilet door de tunnelaarkoker uit te trekken en
vervolgens het stilet zachtjes uit de katheter te draaien.
Maak de klemmen opnieuw vast aan de proximale uiteinden van de katheter.
Indien nodig kunnen de proximale uiteinden van de katheter worden afgesneden om de
gewenste lengte te bereiken. U moet alleen de gemarkeerde lengte afsnijden aangezien de
inspuitvolumes voor deze lengtes zijn gedocumenteerd.
WAARSCHUWINGEN
WAARSCHUWING: PROBEER NOOIT DE KATHETERLUMINA TE SCHEIDEN.
Tunnel niet door spieren.
Trek niet aan de katheterslang. Hierdoor kan de katheter langer worden en beschadigd
raken.
Laat subcutaan weefsel niet te veel uitzetten tijdens het tunnelen. Dit kan ingroei van de
manchet vertragen/verhinderen, en de bloeding kan toenemen.
Extra stompe dissectie kan het inbrengen vergemakkelijken als u weerstand voelt.
19
Nederlands
Page 20

III. Inbrengen zonder schede (SafeTrac*) via Seldinger-techniek
A. Plaats voorbereiden
Voor het inbrengen van de katheter wordt een steriele operatiekamer aanbevolen. Steriele
lakens, instrumenten en accessoires zijn ook nodig. Een chirurgische reiniging, beschermend
operatieschort, kap, handschoenen en masker zijn nodig.
Scheer indien nodig de huid van de patiënt boven en onder de plaats waar de katheter wordt
ingebracht. De patiënt moet met een laken zijn bedekt voordat voldoende lokale anesthesie
wordt toegepast om de plaats van inbreng volledig te anestheseren.
De aanbevolen positie is met de patiënt in een lichte Trendelenberg-ligging.
Maak een kleine incisie. Volg de huidlijnen boven de gewenste ader.
Nederlands
B. Vatpunctie
Sluit een spuit op de introducernaald aan en breng deze in de doelader in, indien mogelijk
met ultrasone sturing. Aspireer zodat de naald op de juiste plaats wordt ingebracht. Een vrije
bloedstroom geeft aan dat de naald in de ader zit. Als het bloed helderrood is of als u een
pulserende retour constateert, trekt u de naald terug en brengt u deze op de juiste plaats aan.
Verwijder de spuit en plaats uw duim over het einde van de introducernaald om bloedverlies
of luchtembolie te voorkomen. Nadat het bloed is geaspireerd, schuift u het exibele uiteinde
van de geleidedraad terug in de advancer zodat alleen het einde van de geleidedraad zichtbaar is. Breng het distale uiteinde van de advancer in de naaldhub in.
Schuif de exibele geleidedraad vooruit met een voorwaartse beweging in en voorbij de
naaldhub in de doelader. Breng de geleidedraad in totdat de tip in het rechteratrium komt
en dit passeert in de vena cava inferior. De insertielengte is afhankelijk van de grootte van
de patiënt. Plaats de patiënt op een cardiale monitor tijdens de procedure om tekenen van
aritmie te detecteren.
Voorzichtig: Trek de geleidedraad door geen enkel onderdeel terug.
Voorzichtig: Gebruik uoroscopie of ultrasone sturing om de geleidedraad goed in te
brengen en te plaatsen.
Er kan cardiale aritmie optreden als de geleidedraad in het rechteratrium terechtkomt.
Gebruik een hartritmemonitor om aritmie te controleren.
Verwijder de naald over de geleidedraad en zorg dat u de geleidedraad tijdens het verwijderen van de naald goed vasthoudt.
Schuif een 6Fr schede/dilatator op de draad en schuif deze door de huid en in de ader. Zorg
dat u de geleidedraad niet verder verplaatst. De geleidedraad moet tijdens het vooruitschuiven van de schede/dilatator niet bewegen.
Verwijder de dilatator. Breng nog een draad via de schede in. Verwijder de schede.
C. Vatdilatatie en inbrengen van de katheter
WAARSCHUWING: PROBEER NOOIT DE KATHETERLUMINA TE SCHEIDEN
Plaats de twee bijgeleverde intrakatheterdilatators in de lumina van de katheter. Deze
intrakatheterdilatators hebben luers die zich op het proximale uiteinde van de respectieve
arteriële en veneuze luers op de katheter vergrendelen.
Schuif het zichtbare uiteinde van een van de draden door de veneuze intrakatheterdilatator
totdat het uit het proximale veneuze uiteinde van de dilatator komt.
Schuif de relevante aderdilatator(s) over de andere draad en schuif deze door de huid. Er
wordt de voorkeur gegeven aan seriële dilatatie.
Verwijder de dilatator(s).
20
Page 21

Voorzichtig: Laat de vatdilatators niet langer zitten dan nodig is om perforatie van de
vaatwand te voorkomen.
Schuif de zichtbare draad door de arteriële intrakatheterdilatator totdat de draad voor het
proximale arteriële uiteinde van de katheter komt.
Schuif de draden totdat er geen speling in de draden meer is tussen het distale uiteinde van
de katheter en de ingang.
Schuif de katheter door de huid in het vat. Er is misschien lichte torsie in een van beide richtingen nodig om de katheter in de ader in te brengen.
Voor de juiste plaatsing raden wij ten zeerste ultrasone sturing of uoroscopie aan.
Voorzichtig: Wanneer de kathetertip op de juiste locatie is aangebracht, wordt een optimale bloedstroom geproduceerd volgens de richtlijnen van KDOQI.
Voorzichtig: Wanneer niet wordt gecontroleerd of de katheter goed is geplaatst, kan dit
ernstig trauma veroorzaken of fatale complicaties hebben.
Verwijder de intrakatheterdilatators en geleidedraden.
D. De Retro* Catheter tunnelen
Maak een kleine incisie aan de uitgang van de subcutane tunnel. Op de katheter staat een
markering, die een theoretisch centrum aangeeft. Deze markering moet zich net buiten de
uitgang bevinden. Maak de incisie net breed genoeg om de katheter te kunnen plaatsen.
Dien voldoende lokale anesthesie toe om het weefsel volledig te anestheseren.
Maak een subcutane tunnel rechtstreeks in de richting van de ingang met een stompe dissectie met het tunnelingstilet.
Wanneer het tunnelingstilet uit de ingang komt, plaatst u het taps toelopende einde van de
tunnelingkoker over de blootgelegde tunnelaar. Indien nodig drukt u op de koker om een
kanaal voor de manchet te starten via de subcutane tunnel.
Draai of klik de katheteradapter-tunnelaar op het stilet en maak deze goed vast (afhankelijk
van de tunnelaar die u gebruikt).
Verwijder de proximale klemmen op de katheter en snij de katheter door op de 50 cmmarkering van de veneuze zijde en de 47,5 cm-markering op het arteriële lumen.
Bij dijbeenkatheters (67 cm algehele lengte) snijdt u de katheter af bij de markering 65 cm op
de veneuze zijde en 62,5 cm op het arteriële lumen.
Sluit het uiteinde van de katheter aan op de adapter en druk de tunnelaarkoker over de
katheter.
Trek het tunnelaarstilet uit totdat de katheter van de uitgang is verwijderd en de kathetermarkering zichtbaar is.
Verwijder de katheter voorzichtig van het stilet door de tunnelaarkoker uit te trekken en
vervolgens het stilet zachtjes uit de katheter te draaien.
Maak de klemmen opnieuw vast aan de proximale uiteinden van de katheter.
Indien gewenst kunnen de proximale uiteinden van de katheter worden afgesneden om de
gewenste lengte te bereiken. U moet alleen de gemarkeerde lengte afsnijden aangezien de
inspuitvolumes voor deze lengtes zijn gedocumenteerd.
WAARSCHUWINGEN
WAARSCHUWING: PROBEER NOOIT DE LUMINA TE SCHEIDEN.
Tunnel niet door spieren.
Nederlands
21
Page 22
Trek niet aan de katheterslang. Hierdoor kan de katheter langer worden en beschadigd
A
B
C
A
C
raken.
Laat subcutaan weefsel niet te veel uitzetten tijdens het tunnelen. Dit kan ingroei van de
manchet vertragen/verhinderen, en de bloeding kan toenemen.
Extra stompe dissectie kan het inbrengen vergemakkelijken als u weerstand voelt.
IV. Procedure voor plaatsing in de dijbeenader
WAARSCHUWING: HET RISICO OP INFECTIE NEEMT TOE BIJ PLAATSING IN HET DIJBEEN.
Neem andere toegangsplaatsen zoals het pelvis in overweging in plaats van de traditionele liesstreek om het risico op infectie te verlagen.
Onderzoek de linker- en rechterdijbeengebieden en selecteer de beste van de twee aders
Nederlands
voor het inbrengen van de katheter. Hierbij wordt het gebruik van ultrasone visualisatie
aanbevolen.
Voor het plaatsen van schede/dilatator volgt u de procedures in sectie II, “Inbrengen met
schede/dilatator via Seldinger-techniek.”
Voor het plaatsen zonder schede volgt u de procedures in sectie III, “Inbrengen zonder schede
(SafeTrac*) via Seldinger-techniek.”
Inbrengen in het dijbeen gaat op dezelfde manier als vermeld in sectie II en III, met de volgende uitzonderingen (zie hieronder punt 1, 2 en 3):
1) De patiënt mag niet in een lichte Trendelenburg-ligging worden gelegd.
2) De tip van de katheter moet in het midden van de vena cava inferior (IVC) of op de verbinding van de darmbeenader en de vena cava inferior worden geplaatst.
3) De katheter moet worden afgesneden bij de markering 65 cm op het veneuze lumen en de
markering 62,5 cm op de arteriële lumen alvorens u gaat tunnelen.
Geleidedraden mogen niet in het rechteratrium worden ingebracht. Dit kan cardiale aritmie
tot gevolg hebben.
2
V. Katheterextensieadapterconstructie of Retro* Repair Kit-toepassing
Gebruik de platte klemmen die bij de katheterset zijn geleverd om de katheter vast te klemmen wanneer dat nodig is en versleten of beschadigde extensieadapters worden vervangen
met “Retro* Repair Kit”-extensies.
Gebruik geen getande forceps.
Wanneer u de gewenste lengte afsnijdt, of bij de vervanging van versleten of beschadigde
extensieadapters, controleert u of de katheter vierkant is en of het resterende katheterlumen
niet is beschadigd. Zie “operationele lengte” en het bijbehorende inspuitvolume.
22
Page 23

Schuif de rode katheterdop (A) over het proximale uiteinde van de katheter, die rode markeringen heeft. Controleer of de rode dop een pakking (B) in de dop heeft. Schuif de binnendiameter van het arteriële (rode) katheterlumen over de roestvrijstalen buis (die een
onderdeel is van (C) en het begin van de extensiebuis vormt) totdat de schouder wordt
bereikt. Draai dop (A) in de richting van onderdeel (C) totdat deze op het adapterlichaam
stopt. Herhaal de procedure voor de blauwe extensieadapter.
Voorzichtig: Maak de doppen niet te strak vast om breuk te voorkomen.
Verwijder de platte klemmen van de arteriële (rode) en veneuze (blauwe) lumina.
Sluit spuiten op beide extensies aan en open de klemmen. Bloed zou nu gemakkelijk uit de
arteriële en veneuze zijde moeten worden geaspireerd. Als er een excessieve weerstand tegen
bloedaspiratie optreedt, positioneert u de katheter opnieuw om een adequate bloedstroom
te verkrijgen.
Irrigeer beide lumina met spuiten die met een zoutoplossing zijn gevuld nadat de adequate
aspiratie met een snelle bolustechniek is bereikt. Controleer of de extensieklemmen tijdens
de irrigatieprocedure open zijn.
Sluit de extensieklemmen, verwijder de spuiten en plaats vervolgens een injectiedop op elke
luerlockconnector.
VI. Katheter vastzetten en wondverzorging
Er is een bevestigbare hechtvleugel aanwezig om de katheter aan de uitgang vast te
hechten. Druk de bevestigbare hechtvleugels licht samen om de gespleten onderkant van
de hechtvleugel te openen. Plaats de hechtvleugel op de kathetergroottemarkering bij de
uitgang en laat de vleugel los. Maak de vleugel vast door deze vast te hechten met de daartoe
bestemde openingen.
Insertie hechten en uitgangen gesloten. Hecht vervolgens de katheteradapters aan de huid
met de hechtvleugel. Hecht niet de katheterbuis.
Voorzichtig: Voorkom dat de katheter tijdens het hechten knikt.
Voorzichtig: Scherpe objecten kunnen de katheter doen falen vanwege puncties of incisies
in het katheterlumen.
Sluit de in- en uitgangen af met occlusief wondverband.
Noteer de katheterlengte en het katheterlotnummer op de kaart van de patiënt.
HEPARINISATIE
Volg de katheterdoorgankelijkheidsrichtlijnen als de katheter niet onmiddellijk voor behandeling wordt gebruikt.
Om doorgankelijkheid tussen de behandelingen te behouden, maakt u een heparineslot in
elk lumen van de katheter.
Volg het ziekenhuisprotocol voor de heparineconcentratie.
Trek heparine in twee spuiten in overeenstemming met de hoeveelheid die op de arteriële en
veneuze extensies staat aangegeven. Controleer of de spuiten luchtvrij zijn.
Verwijder de injectiedoppen van de extensies.
Sluit een spuit met heparineoplossing aan op de vrouwelijke luer van elke extensie.
Open de extensieklemmen.
Voorzichtig: Aspireer om te voorkomen dat er lucht in de patiënt terechtkomt.
Injecteer heparine in elke lumen door middel van de snelle-bolustechniek.
Nederlands
23
Page 24

Voorzichtig: Elk lumen moet volledig worden gevuld met heparine om de eciëntie te
waarborgen.
Sluit de extensieklemmen.
Voorzichtig: Extensieklemmen moeten alleen voor aspiratie, ushing en dialysebehandeling worden geopend.
Verwijder de spuiten.
Sluit een steriele injectiedop aan op de vrouwelijke luers van de extensies.
Tape injectiedoppen om ongewenste verwijdering te voorkomen.
Voor de komende 48 à 72 uur is geen heparine nodig, vooropgesteld dat de lumina niet zijn
Nederlands
geaspireerd of geushd.
HEMODIALYSEBEHANDELING
Voorzichtig: Om luchtembolie te voorkomen, houdt u de extensiebuis altijd dichtgeklemd wanneer deze niet wordt gebruikt.
Voorzichtig: Om systematische heparinisatie te voorkomen, moet de gebruikte heparineoplossing uit elk lumen worden verwijderd voordat de patiënt wordt behandeld.
Aspireer en irrigeer de katheter met een zoutoplossing voorafgaand aan het gebruik. Verwijder lucht uit de katheter en alle aangesloten buizen en doppen wanneer de buisverbinding wordt gewijzigd.
De aspiratieprocedure moet overeenkomen met het dialyse-eenheidprotocol.
Voordat de dialyse begint, controleert u zorgvuldig alle katheterverbindingen en alle extracorporeale circuits.
Voorzichtig: Gebruik altijd tapeluerlocks naar bloedlijnen tijdens de behandeling om
ongewenste afsluiting te voorkomen.
Inspecteer de katheter en de aansluitingen visueel op tekenen van lekkage om bloedverlies of
luchtembolie te voorkomen. Indien nodig onderneemt u actie voordat u de dialysebehandeling voortzet.
Voorzichtig: Excessief bloedverlies kan shock bij de patiënt tot gevolg hebben.
Hemodialyse moet onder instructie van de arts worden uitgevoerd.
POSTDIALYSE
Bereid spuiten met een steriele, normale zoutoplossing en heparine voor.
Stop de bloedpomp. Sluit de klem op de arteriële extensie. Klem de arteriële bloedlijn op de
aansluiting af.
Sluit de arteriële bloedlijn af van de adapter van de katheter en sluit een spuit gevuld met een
steriele, normale zoutoplossing op de arteriële adapter aan. Open de klem op de arteriële extensie en ush het bloed van het arteriële lumen van de katheter. Klem de extensie weer vast.
Hepariniseer het lumen met het juiste volume/de juiste concentratie heparine (zie boven).
Spoel het bloed in het extracorporeale circuit terug via het veneuze lumen.
Nadat het bloed van de patiënt is teruggespoeld, schakelt u de bloedpomp uit. Klem de veneuze extensie vast en sluit de veneuze bloedlijn van de veneuze adapter van de katheter af.
24
Page 25
Sluit een spuit gevuld met een steriele, normale zoutoplossing op de veneuze adapter aan.
Open de klem op de veneuze extensie en ush al het bloed van het veneuze lumen van de
katheter. Klem weer vast en hepariniseer het lumen met het juiste volume/de juiste concentratie heparine.
Zorg dat de klemmen op beide extensies zijn gesloten. Verwijder spuiten en sluit een
injectieverzegelende dop op elke adapter aan. Tape de injectieverzegelende doppen op de
extensies om abusievelijke verwijdering te voorkomen.
WAARSCHUWING
Houd de katheter altijd vastgeklemd, behalve bij aansluiting op bloedlijnen of spuit
tijdens behandeling.
KATHETERBLOEDSTROOM
Onvoldoende stromen
Onvoldoende bloedtoevoer kan worden veroorzaakt door verstopte arteriële openingen vanwege klontering of brineomhulsels, of verstopping van de arteriële zijopeningen vanwege
contact met de aderwand.
Tabel: Stroming versus drukkenmerken voor alle Retro* Catheters
Stroomsnelheid Gemiddeld bereik van binnenlumendruk
(ml/min) (mm Hg)
100 24 - 34
150 39 - 50
200 58 - 70
250 79 - 93
300 104 - 121
350 129 - 152
400 157 - 186
450 192 - 233
500 224 - 267
Arteriële en veneuze drukbereiken staan hierboven. Opmerking:
de bovenstaande resultaten zijn met gede-ioniseerd water bereikt.
Eénrichtingsobstructies
Eénrichtingsobstructies treden op wanneer een lumen gemakkelijk kan worden geushd
maar geen bloed kan worden geaspireerd. Dit wordt meestal veroorzaakt door klontering,
brineomhulsels of slechte plaatsing van de tip. In het laatste geval treedt de slechte stroming kort na de plaatsing op.
KATHETER VERWIJDEREN
WAARSCHUWING
Alleen een arts die bekend is met de juiste techniek mag de katheter verwijderen.
Palpeer de katheter bij de uitgang om de kathetermanchet te vinden.
Anestheseer het gebied van de uitgang en de kathetermanchet door voldoende plaatselijk
anestheticum toe te dienen.
Snij de hechtingen van de hechtvleugel door. Volg de geldende ziekenhuisprocedures.
Nederlands
25
Page 26

Maak een kleine incisie boven de manchet, parallel aan de katheter.
Snij omlaag naar de manchet met een stompe of scherpe dissectie.
Pak de manchet met een klem wanneer de manchet zichtbaar is.
Klem de katheter tussen de manchet en de inbrengplaats. Zorg dat de klem voldoende vastzit
om te voorkomen dat bloed in een van de lumina terechtkomt.
Verwijder de katheter uit het weefsel door de katheter met een langzame, continue
beweging er zacht uit te trekken en ruk niet of trek niet te hard om te voorkomen dat de
manchet scheurt.
Voorzichtig: Trek niet aan de katheter als u een weerstand voelt. Snij in plaats daarvan
omlaag en verwijder alle hechtingen op de plaats van de venotomie.
Nederlands
Pas druk toe op de proximale tunnel totdat het bloeden is gestopt.
Hecht de incisie en pas wondverband toe om de genezing te bevorderen.
Controleer of de katheter niet is gescheurd en meet de katheter nadat deze is verwijderd.
Controleer de lengte aan de hand van de desbetreende productspecicatie om te controleren of de katheter in zijn geheel is verwijderd.
1
National Kidney Foundation, Kidney Disease Outcomes Quality Initiative (KDOQI) Guidelines,
Guideline 5, “Type and Location of Tunneled Cu Catheter Placement.” (2000)
2
GX Zaleski, B. Funaki, JM Lorenz, RS Garofolo, MA Moscatel, JD Rosenblum and JA Leef.
Department of Radiology, The University of Chicago Hospital, IL 60637, USA. “Experience
with tunneled femoral hemodialysis catheters. Am J Rcmtgenol. 1999 Feb; 172 (2)c 493-496.
Close extension clamps.
Bard Access Systems, Inc. garandeert de oorspronkelijke koper van dit product dat dit product
vrij is van materiaal- en fabricagefouten gedurende een periode van één (1) jaar vanaf de
datum van aankoop. Als dit product defect blijkt te zijn kan de koper het aan Bard Access
Systems, Inc. retourneren. Bard Access Systems, Inc kan het naar eigen goeddunken repareren
of ver vangen. Alle retourzendingen moeten tevoren zijn goedgekeurd in overeenstemming
met het beleid van Bard Access Systems, Inc. met betrekking tot teruggezonden goederen,
zoals vermeld in de op dat moment geldende prijslijst. De aansprakelijk heid van Bard Access
Systems, Inc. volgens deze beperkte productgarantie dekt geen misbruik of verkeerd gebruik
van dit product of de reparatie ervan door een ander dan een gemachtigde vertegenwoordiger
van Bard Access Systems, Inc.
DEZE BEPERKTE PRODUCTGARANTIE VERVANGT ALLE ANDERE GARANTIES DIE UITDRUKKELIJK
OF STILZWIJGEND ZIJN VERSTREKT (WAARONDER, MAAR NIET BEPERKT TOT ENIGE GARANTIE
TEN AANZIEN VAN DE VERKOOPBAARH EID OF DE GESCHIKTH EID VOOR EEN BEPAALD
DOEL). DE IN DEZE BEPER KTE PROD UCTGARANTIE VE RMELDE AANS PRAKELIJKHEID EN
VERHAAL ZIJN DE ENIGE AANSPRAKELIJKHEID VAN BARD ACCESS SYSTEMS, INC. EN DE
ENIGE VERHAALMOGELIJKHEID VOOR DE KOPER VAN DIT PRODUC T, HE TZIJ GEBASEERD OP
CONTRACTBREUK, EEN ONRECHTMATIGE DAAD (INCLUSIEF NALATIGHEID) OF IETS ANDERS,
EN BARD ACCESS SYSTEMS, INC. ZAL JEGENS KOPERS NIE T AANSPRAKELIJK ZIJN VOOR ENIGE
ONRECHTSTREEKSE, SPECIALE, INCIDENTELE OF GEVOLGSCHADE DIE HET GEVOLG IS VAN DE
HANTERING OF HET GEBRUIK ER VAN.
© 2010 C. R. Bard, Inc. Alle rechten voorbehouden.
Revisiedatum februari 2010
26
Page 27
MODE D’EMPLOI
Implant Length
Body Length
Overall Length
32cm
32cm
35cm
35cm
40cm
40cm
45cm
45cm
50cm
50cm
INDICATIONS
Le cathéter d’hémodialyse chronique en silicone à double lumière et extrémités séparées
Retro* de est conçu pour l’hémodialyse chronique et l’hémaphérèse. Il s’agit d’un cathéter en
silicone radio-opaque, conçu pour être inséré par voie percutanée ou incision. Les cathéters
de plus de 40 cm peuvent être utilisés pour réaliser une insertion par la veine fémorale.
IMPLANTATION DU CATHÉTER
Le cathéter peut être implanté par voie percutanée en utilisant une technique de Seldinger
modiée ou par phlébotomie.
Le contrôle radioscopique ou échographique est recommandé pour garantir la bonne orientation et le positionnement adéquat de l’extrémité dans l’oreillette droite.
CONTRE-INDICATIONS
Ce cathéter est conçu exclusivement pour un accès vasculaire de longue durée et ne doit pas
être utilisé autrement qu’indiqué dans ce mode d’emploi.
DESCRIPTION
Le cathéter d’hémodialyse chronique à double lumière et extrémités séparées Retro* est constitué de silicone radio-opaque de qualité médicale. Sa forme ovale et sa composition silicone
lui confèrent une plus grande souplesse et une résistance accrue à la pliure.
Pour réduire la recirculation au cours de l’hémodialyse, la lumière artérielle du cathéter est
plus courte que la lumière veineuse à l’extrémité distale du cathéter. Le cathéter possède une
gaine feutre et des adaptateurs de prolongateur à code de couleurs.
Les extrémités proximales du cathéter sont tunnellisées de façon rétrograde jusqu’au site
sortie une fois que les extrémités sont en place. Cette conception permet un positionnement
précis des extrémités du cathéter. Les deux extrémités proximales du cathéter (artérielle et
veineuse) sont branchées sur les adaptateurs de prolongateur à code de couleurs. Chaque
adaptateur de prolongateur comporte un manchon de compression et un bouchon de
compression, ainsi qu’un clamp et un embout Luer-lock.
DIMENSIONS
Longueur Longueur Longueur
de l’implant du corps totale
19 cm 24 cm 52 cm
23 cm 28 cm 52 cm
27 cm 32 cm 52 cm
31 cm 36 cm 52 cm
35 cm 40 cm 52 cm
50 cm 55 cm 67 cm
Longueurs opérationnelles
30 cm 35 cm 40 cm 45 cm 50 cm
- 35 cm 40 cm 45 cm 50 cm
- - 40 cm 45 cm 50 cm
- - 40cm 45 cm 50 cm
- - - 45 cm 50 cm
- - - 60cm 65 cm
Français
VOLUMES D’AMORÇAGE
Les volumes d’amorçage sont imprimés sur le cathéter aux longueurs opérationnelles de
30 cm, 35 cm, 40 cm, 45 cm, 50 cm, 60 cm et 65 cm pour les cathéters correspondants.
27
Page 28
Longueur
opérationnelle Artère Veine
30 cm 1,6 cc 1,7 cc
35 cm 1,8 cc 1,9 cc
40 cm 2,0 cc 2,1 cc
45 cm 2,2 cc 2,3 cc
50 cm 2,4 cc 2,5 cc
60 cm 2,8 cc 2,9 cc
65 cm 3,0 cc 3,1 cc
ATTENTION:
La loi fédérale (E.-U.) n’autorise la délivrance de ce système qu’à un médecin ou sur
prescription d’un médecin.
AVERTISSEMENTS
Si le corps du cathéter mesure 24 cm, ne pas couper avant le trait de repère de 30 cm.
Si le corps du cathéter mesure 28 cm, ne pas couper avant le trait de repère de 35 cm.
Si le corps du cathéter mesure 32 cm, ne pas couper avant le trait de repère de 40 cm.
Français
Si le corps du cathéter mesure 36 cm, ne pas couper avant le trait de repère de 40 cm.
Si le corps du cathéter mesure 40 cm, ne pas couper avant le trait de repère de 45 cm.
Si le corps du cathéter mesure 55 cm, ne pas couper avant le trait de repère de 60 cm.
LIRE ATTENTIVEMENT L’ENSEMBLE DES INSTRUCTIONS, DES
AVERTISSEMENTS ET DES MISES EN GARDE AVANT L’EMPLOI
COMPLICATIONS
Embolie gazeuse
Cathétérisme artériel
Bactériémie
Saignement
Lésion du plexus brachial
Arythmie cardiaque
Tamponnade cardiaque
Embolie à l’extrémité du cathéter
ou embolie thrombotique
Thrombose veineuse centrale/ sténose
Chylothorax
Endocardite
Hématome (sous-cutané)
Hémorragie
Remarque : l’insertion par la veine fémorale accroît le risque d’infection comparativement à
d’autres sites d’insertion. Les autres complications comprennent:
Saignement de l’artère fémorale
Atteinte des nerfs fémoraux
AVERTISSEMENTS
Le cathéter doit être implanté et explanté par un médecin spécialement formé.
Avant l’intervention, le médecin devra évoquer avec le patient les avantages et les inconvénients du cathétérisme et envisager les alternatives éventuelles.
Le positionnement de l’extrémité du cathéter et le choix de la longueur adéquate incombent
au médecin. Cependant, une radiographie de routine doit toujours suivre l’insertion initiale
pour vérier le bon positionnement des extrémités du cathéter avant l’emploi. L’emplacement
recommandé de l’extrémité du cathéter est au niveau ou dans l’oreillette droite ou à la jonction
de la veine cave supérieure et de l’oreillette droite (VCS/OD).
Hémothorax
Infection au site de sortie du cathéter
Déchirure (du canal thoracique)
Thrombose des lumières
Pneumothorax
Embolie pulmonaire
Perforation (artère sous-clavière, artérielle
droite, veine cave supérieure)
Septicémie
Trauma de l’oreillette droite
ou d’un gros vaisseau
Infection du tunnel sous-cutané
Déchirure vasculaire, trauma
Perforation (veine ou artère fémorale)
Saignement rétropéritonéal
Sténose veineuse
1
28
Page 29

Inspecter la lumière et les prolongateurs avant et après chaque traitement pour s’assurer qu’ils
ne sont pas endommagés ou usés.
Ne pas serrer exagérément les raccords du cathéter. Un raccord serré exagérément risque de
se ssurer.
Manipuler en conditions aseptiques le cathéter et les instruments stériles.
Ne pas utiliser le cathéter ou les éléments du kit si le sceau de stérilité est brisé.
Ne pas utiliser un cathéter endommagé (p. ex., écrasé, croqué, entaillé) ni aucun élément
endommagé du kit, notamment les raccords à letage dénudé.
Pour minimiser le risque d’embolie gazeuse, maintenir le cathéter clampé en permanence,
excepté lorsqu’il est relié à la tubulure de circulation du sang ou à une seringue pendant le
traitement.
Ne pas clamper les lumières du cathéter ; clamper uniquement les tubes prolongateurs
Utiliser uniquement une pince lisse ou à mors à la place des clamps à cathéter fournis. Clamper
en un endroit diérent à chaque fois pour ne pas compromettre les performances du tube et
abréger sa durée de vie. Éviter de clamper à proximité des adaptateurs et du corps du cathéter.
Prendre garde en utilisant des instruments tranchants à proximité du cathéter. Ne pas utiliser
d’instruments tranchants ou de ciseaux pour retirer le pansement.
Fixer les bouchons d’injection entre les traitements avec une bande adhésive pour éviter leur
perte accidentelle
Conçu pour un usage unique. NE PAS RÉUTILISER. Le réemploi et/ou le reconditionnement
peut entraîner un risque d’infection au patient ou à l’utilisateur, compromettre l’intégrité structurelle et/ou les caractéristiques élémentaires de la conception et des matériaux de fabrication
du dispositif, ce qui peut entraîner la défaillance du dispositif et/ou donner lieu à une lésion,
une maladie, ou au décès du patient.
Ne pas réutiliser ni restériliser les accessoires du kit. Le fabricant décline toute responsabilité
pour tous dommages résultant d’une restérilisation du cathéter ou des éléments du kit
Ne pas forcer le l-guide, les dilatateurs ou l’introducteur pelable pendant l’insertion en raison
du risque d’atteinte ou de perforation vasculaire.
Éviter une exposition prolongée aux rayonnements ultraviolets pour ne pas endommager le
cathéter.
Ne pas insérer l’introducteur pelable plus loin qu’il n’est nécessaire. Suivant le site d’accès et la
taille du patient, il ne sera peut-être pas nécessaire de développer l’introducteur sur toute sa
longueur.
Pour insérer le l-guide en « J » dans l’aiguille de l’introducteur, utiliser le redresseur de lguide. Ne pas forcer le l-guide en « J » pendant l’insertion ou le retrait d’un élément en raison
du risque de rupture du l.
Utiliser uniquement des raccords à embout Luer-lock letés (notamment pour les seringues, la
tubulure de circulation du sang et les bouchons d’injection) avec les adaptateurs à cathéter.
Ne pas entailler ni perforer les lumières du cathéter ou les prolongateurs en suturant.
Ne pas suturer trop fermement.
Irriguer le cathéter avec du sérum physiologique, puis clamper les prolongateurs.
Pour une perfusion d’héparine, rincer rapidement et clamper immédiatement an que
l’héparine parvienne à l’extrémité distale de la lumière. Ne pas perfuser à l’encontre d’un clamp
fermé, ni perfuser en force un cathéter bloqué. La perfusion en force d’un cathéter bloqué
peut créer une pression rétrograde susceptible de provoquer l’éjection de l’adaptateur de la
tubulure.
Ne pas utiliser d’acétone ni de solution iodée sur la tubulure du cathéter. Le cathéter pourrait
être endommagé.
29
Français
Page 30
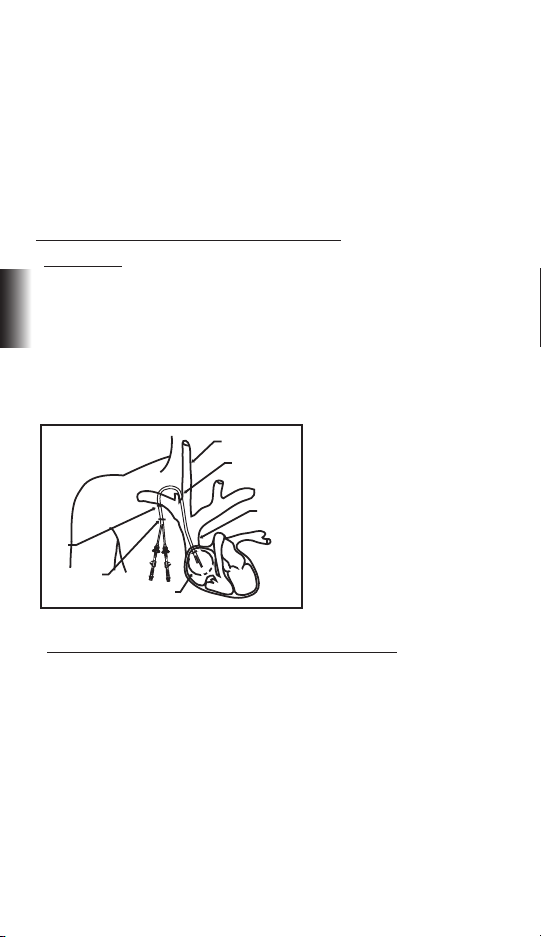
Explanter le cathéter lorsqu’il n’est plus nécessaire.
IV
V
VI
I
II
III
Ne pas utiliser le cathéter après la date de péremption indiquée sur l’emballage.
Le médecin doit se montrer particulièrement prudent si l’insertion de ce cathéter est envisagée
chez un patient qui n’est pas en mesure d’inspirer profondément ou de bloquer une inspiration
profonde. Les patients sous ventilateur ou nécessitant une assistance respiratoire encourent
un risque accru de pneumothorax lors du cathétérisme dans la veine jugulaire interne ou
sous-clavière.
Ce document ne répertorie pas la totalité des consignes ou des protocoles médicalement
acceptables et n’est pas conçu pour se substituer à l’expérience et au jugement du médecin
pour la prise en charge d’un patient. Cependant, il convient de prendre connaissance des
procédures, des mises en garde et des avertissements avant d’utiliser ce produit.
INSERTION DU CATHÉTER EN SILICONE À GAINE RETRO*
I. Site d’insertion
La veine jugulaire interne est le site d’insertion privilégié du cathéter, car elle permet un
positionnement plus aisé de l’extrémité du cathéter dans l’oreillette droite
La veine sous-clavière peut également être utilisée pour l’insertion. Il convient de noter
Français
cependant que l’utilisation de la veine sous-clavière est associée à une sténose de la veine
sous-clavière. Ceci peut interdire la création future d’un accès artérioveineux dans le membre
supérieur.
Le cathéter peut être inséré dans la veine fémorale (voir Section IV). Cependant, l’insertion par
la veine fémorale est associé à un risque accru d’infection.
I - VEINE JUGULAIRE INTERNE
II - SITE D’INSERTION
III - VEINE CAVE SUPERIEURE
IV - GAINE
V - SITE DE SORTIE
VI - EMPLACEMENT
RECOMMANDÉ DE
L’EXTRÉMITÉ DANS
L’OREILLETTE DROITE (OD)
II. Insertion à l’aide du dilatateur à gaine par la technique de Seldinger
A. Préparation du site
Une salle d’opération stérile est recommandée pour l’implantation du cathéter. Des champs,
instruments et accessoires stériles sont également nécessaires. Un lavage chirurgical des
mains, une blouse de laboratoire, une calotte, des gants et un masque sont nécessaires.
Raser la peau du patient au-dessus et au-dessous du site d’insertion si nécessaire. Disposer
des champs stériles sur le patient avant de procéder à une anesthésie locale susante pour
anesthésier complètement le site d’insertion.
Il est recommandé de placer le patient en légère position de Trendelenburg.
Pratiquer une courte incision suivant les lignes cutanées au-dessus du vaisseau souhaité.
B. Insertion vasculaire
Monter une seringue sur une aiguille d’introducteur et insérer dans la veine cible sous
30
Page 31

contrôle échographique, si possible. Aspirer pour assurer un bon positionnement. Un écoulement libre de sang indique l’entrée du vaisseau. Si le sang est rouge vif ou en cas de retour
pulsatoire, retirer et réorienter l’aiguille.
Retirer la seringue et placer le pouce sur l’embout de l’aiguille pour minimiser la perte de
sang et le risque d’embolie gazeuse. Une fois le sang aspiré, faire coulisser l’extrémité souple
du l-guide dans le dispositif d’avancement an que seule l’extrémité du l-guide soit visible.
Introduire l’extrémité distale du dispositif d’avancement dans le pavillon de l’aiguille.
Avancer le l-guide souple par le pavillon de l’aiguille jusque dans la veine cible. La longueur
d’insertion dépend de la taille du patient.
Attention : ne pas tirer le l-guide par l’un des éléments.
Attention : utiliser un contrôle radioscopique ou échographique pour garantir la bonne
insertion du l-guide et son positionnement adéquat.
Une arythmie cardiaque risque de se produire si le l-guide pénètre dans l’oreillette droite.
Utiliser un système de monitorage du rythme cardiaque pour détecter les arythmies.
Retirer l’aiguille du l-guide en veillant à bien maintenir le l-guide pendant le retrait de
l’aiguille.
C. Dilatation vasculaire et insertion du cathéter
Dilatation vasculaire et insertion de la gaine
Faire coulisser un dilatateur veineux sur le guide et l’avancer à travers la peau jusque dans
la veine. Veiller à ne pas avancer le l-guide. Le l-guide doit rester immobile pendant la
progression du dilatateur.
Une dilatation séquentielle est préférable. Si d’autres dilatateurs sont utilisés, visser les
dilatateurs sur le l-guide dans le vaisseau. Retirer les dilatateurs lorsque le vaisseau est sufsamment dilaté en laissant le l-guide en place.
Attention : ne pas laisser les dilatateurs vasculaires en place plus longtemps que nécessaire pour ne pas risquer de perforer la paroi vasculaire.
Faire coulisser l’introducteur à gaine pelable sur le l-guide dans la veine en maintenant la
position du l-guide.
Attention : le contrôle radioscopique est impératif pour éviter la perforation vasculaire.
Retirer le l-guide.
Attention : ne pas laisser la gaine en place plus longtemps que nécessaire pour ne pas
endommager la veine.
Insertion du cathéter
AVERTISSEMENT : NE JAMAIS TENTER DE SÉPARER LES LUMIÈRES.
Retirer le dilatateur de la gaine précédemment insérée.
Pour minimiser la perte de sang, clamper les prolongateurs proximaux du cathéter avec les
clamps plats fournis avant d’insérer le cathéter dans la gaine.
Insérer les extrémités distales du cathéter par la gaine jusqu’à ce que les extrémités du cathéter soient correctement positionnées dans la veine cible.
Attention : insérer rapidement le cathéter dans la gaine pour minimiser la perte de sang et
le risque d’embolie gazeuse.
Attention : le bon positionnement de l’extrémité du cathéter permet un débit optimal du
sang comme décrit dans les directives KDOQI.
Français
31
Page 32

Attention : un trauma grave ou des complications mortelles sont possibles si le
positionnement du cathéter n’est pas contrôlé.
Tirer doucement et lentement la gaine pelable pour la sortir du vaisseau.
Ajuster le positionnement du cathéter sous contrôle radioscopique ou échographique.
L’extrémité veineuse distale doit être positionnée au niveau de la partie supérieure de
l’oreillette droite, au niveau ou au-dessous de la jonction de l’oreillette avec la veine cave.
Attention : pour ne pas risquer une atteinte vasculaire lors du retrait de la gaine, tirer la
gaine aussi loin que possible et déchirer la gaine sur quelques centimètres à la fois seulement. Ne pas tirer sur la partie de la gaine qui demeure dans le vaisseau.
D. Cathéter de tunnellisation Retro*
Pratiquer une courte incision au niveau du site de sortie du tunnel sous-cutané. Le cathéter
comporte un repère au niveau d’un pavillon théorique. Ce repère doit se situer immédiatement à l’extérieur du site de sortie. Pratiquer une incision juste assez large pour recevoir le
cathéter. Procéder à une anesthésie locale susante pour anesthésier complètement le tissu.
À l’aide du stylet de tunnellisation, réaliser une dissection non tranchante pour créer un tunnel sous-cutané directement vers le site d’entrée.
Français
Lorsque le stylet de tunnellisation émerge du site d’entrée, placer l’extrémité rétrécie du
manchon de tunnellisation sur le tunnellisateur exposé. Si nécessaire, pousser le manchon
pour amorcer la gaine dans le tunnel sous-cutané.
Visser ou emboîter l’adaptateur de cathéter/tunnellisateur sur le stylet en veillant à xer
solidement l’ensemble (suivant le type de tunnellisateur utilisé).
Retirer les clamps proximaux du cathéter et couper le cathéter au niveau du repère de 50 cm
de la lumière veineuse et au niveau du repère de 47,5 cm de la lumière artérielle.
Pour les cathéters fémoraux (longueur totale de 67 cm), couper le cathéter à la marque repère
de 65 cm du côté veineux et à la marque repère de 62,5 cm de la lumière artérielle.
Monter l’extrémité du cathéter sur l’adaptateur et pousser le manchon de tunnellisation sur
le cathéter.
Tirer le stylet de tunnellisation jusqu’à ce que le cathéter émerge du site de sortie et que le
repère sur le cathéter soit visible.
Retirer délicatement le cathéter du stylet en tirant sur le manchon de tunnellisation, puis en
tordant légèrement le stylet pour le sortir du cathéter.
Clamper de nouveau les extrémités proximales du cathéter.
Éventuellement, il est possible de couper les extrémités proximales du cathéter à la longueur
souhaitée. Couper le cathéter au niveau des repères de longueur car les volumes d’amorçage
correspondant à ces longueurs sont connus.
AVERTISSEMENTS
AVERTISSEMENT : NE JAMAIS TENTER DE SÉPARER LES LUMIÈRES DU CATHÉTER.
Ne pas tunnelliser à travers le muscle.
Ne pas tirer la tubulure du cathéter pour ne pas risquer de l’étirer et de l’endommager
Ne pas sur-dilater le tissu sous-cutané pendant la tunnellisation. Une sur-dilatation peut
retarder/empêcher la colonisation tissulaire de la gaine et accroître le saignement.
Une dissection complémentaire à l’aide d’un instrument non tranchant peut faciliter
l’insertion si une résistance est rencontrée.
32
Page 33

III. Insertion sans gaine (Kit SafeTrac*) par la technique de Seldinger
A. Préparation du site
Une salle d’opération stérile est recommandée pour l’implantation du cathéter. Des champs,
instruments et accessoires stériles sont également nécessaires. Un lavage chirurgical des
mains, une blouse de laboratoire, une calotte, des gants et un masque sont nécessaires.
Raser la peau du patient au-dessus et au-dessous du site d’insertion si nécessaire. Disposer
des champs stériles sur le patient avant de procéder à une anesthésie locale susante pour
anesthésier complètement le site d’insertion.
Il est recommandé de placer le patient en légère position de Trendelenburg.
Pratiquer une courte incision suivant les lignes cutanées au-dessus du vaisseau souhaité.
B. Insertion vasculaire
Monter une seringue sur une aiguille d’introducteur et insérer dans la veine cible sous
contrôle échographique, si possible. Aspirer pour assurer un bon positionnement. Un écoulement libre de sang indique l’entrée du vaisseau. Si le sang est rouge vif ou en cas de retour
pulsatoire, retirer et réorienter l’aiguille.
Retirer la seringue et placer le pouce sur l’embout de l’aiguille pour minimiser la perte de
sang et le risque d’embolie gazeuse. Une fois le sang aspiré, faire coulisser l’extrémité souple
du l-guide dans le dispositif d’avancement an que seule l’extrémité du l-guide soit visible.
Introduire l’extrémité distale du dispositif d’avancement dans le pavillon de l’aiguille.
Avancer le l-guide souple par le pavillon de l’aiguille jusque dans la veine cible. Insérer le
l-guide jusqu’à ce que son extrémité parvienne à la veine cave inférieure en ayant traversé
l’oreillette droite. La longueur d’insertion dépend de la taille du patient. Placer le patient sous
surveillance du cœur pendant l’intervention pour détecter tout signe d’arythmie.
Attention : ne pas tirer le l-guide par l’un des éléments.
Attention : utiliser un contrôle radioscopique ou échographique pour garantir la bonne
insertion du l-guide et son positionnement adéquat.
Une arythmie cardiaque risque de se produire si le l-guide pénètre dans l’oreillette droite.
Utiliser un système de monitorage du rythme cardiaque pour détecter les arythmies.
Retirer l’aiguille du l-guide en veillant à bien maintenir le l-guide pendant le retrait de
l’aiguille.
Faire coulisser un dilatateur à gaine 6 Fr sur le guide et l’avancer à travers la peau jusque
dans la veine. Veiller à ne pas avancer le l-guide. Le l-guide doit rester immobile pendant la
progression du dilatateur à gaine.
Retirer le dilatateur. Introduire un autre guide à travers la gaine. Retirer la gaine.
C. Dilatation vasculaire et insertion du cathéter
AVERTISSEMENT : NE JAMAIS TENTER DE SÉPARER LES LUMIÈRES DU CATHÉTER
Placer les deux dilatateurs intracathéters fournis dans les lumières du cathéter. Les dilatateurs
intracathéters possèdent des embouts Luer-lock qui permettent un assemblage à l’extrémité
proximale des embouts Luer-lock artériel et veineux du cathéter.
Faire coulisser l’extrémité exposée de l’un des guides par le dilatateur intracathéter veineux
jusqu’à ce qu’il ressorte par l’extrémité veineuse proximale du dilatateur.
Faire coulisser le ou les dilatateurs veineux appropriés sur l’autre guide et les avancer à travers
la peau. Une dilatation séquentielle est préférable.
Retirer le ou les dilatateurs.
Français
33
Page 34

Attention : ne pas laisser les dilatateurs vasculaires en place plus longtemps que nécessaire pour ne pas risquer de perforer la paroi vasculaire.
Faire coulisser l’extrémité exposée par le dilatateur intracathéter artériel jusqu’à ce qu’il ressorte par l’extrémité artérielle proximale du cathéter.
Faire progresser les guides jusqu’à ce qu’il n’y ait plus de mou dans les guides entre l’extrémité
distale du cathéter et le site d’entrée.
Avancer le cathéter à travers la peau dans le vaisseau. Il est parfois nécessaire d’imprimer un
léger couple pour avancer le cathéter dans la veine.
Le contrôle échographique ou radioscopique est hautement recommandé pour garantir un
positionnement adéquat.
Attention : le bon positionnement de l’extrémité du cathéter permet un débit optimal du
sang comme décrit dans les directives KDOQI.
Attention : un trauma grave ou des complications mortelles sont possibles si le positionnement du cathéter n’est pas contrôlé.
Retirer les dilatateurs intracathéters et les ls-guides.
Français
D. Cathéter de tunnellisation Retro*
Pratiquer une courte incision au niveau du site de sortie du tunnel sous-cutané. Le cathéter
comporte un repère au niveau d’un pavillon théorique. Ce repère doit se situer immédiatement à l’extérieur du site de sortie. Pratiquer une incision juste assez large pour recevoir le
cathéter. Procéder à une anesthésie locale susante pour anesthésier complètement le tissu.
À l’aide du stylet de tunnellisation, réaliser une dissection non tranchante pour créer un tunnel sous-cutané directement vers le site d’entrée.
Lorsque le stylet de tunnellisation émerge du site d’entrée, placer l’extrémité rétrécie du
manchon de tunnellisation sur le tunnellisateur exposé. Si nécessaire, pousser le manchon
pour amorcer la gaine dans le tunnel sous-cutané.
Visser ou emboîter l’adaptateur de cathéter/tunnellisateur sur le stylet en veillant à xer
solidement l’ensemble (suivant le type de tunnellisateur utilisé).
Retirer les clamps proximaux du cathéter et couper le cathéter au niveau du repère de 50 cm
de la lumière veineuse et au niveau du repère de 47,5 cm de la lumière artérielle.
Pour les cathéters fémoraux (longueur totale de 67 cm), couper le cathéter à la marque repère
de 65 cm du côté veineux et à la marque repère de 62,5 cm de la lumière artérielle.
Monter l’extrémité du cathéter sur l’adaptateur et pousser le manchon de tunnellisation sur
le cathéter.
Tirer le stylet de tunnellisation jusqu’à ce que le cathéter émerge du site de sortie et que le
repère sur le cathéter soit visible.
Retirer délicatement le cathéter du stylet en tirant sur le manchon de tunnellisation, puis en
tordant légèrement le stylet pour le sortir du cathéter.
Clamper de nouveau les extrémités proximales du cathéter.
Éventuellement, il est possible de couper les extrémités proximales du cathéter à la longueur
souhaitée. Couper le cathéter au niveau des repères de longueur car les volumes d’amorçage
correspondant à ces longueurs sont connus.
AVERTISSEMENTS
AVERTISSEMENT : NE JAMAIS TENTER DE SÉPARER LES LUMIÈRES.
Ne pas tunnelliser à travers le muscle.
34
Page 35

Ne pas tirer la tubulure du cathéter pour ne pas risquer de l’étirer et de l’endommager.
A
B
C
A
C
Ne pas sur-dilater le tissu sous-cutané pendant la tunnellisation. Une sur-dilatation peut
retarder/empêcher la colonisation tissulaire de la gaine et accroître le saignement.
Une dissection complémentaire à l’aide d’un instrument non tranchant peut faciliter
l’insertion si une résistance est rencontrée.
IV. Procédure d’implantation dans la veine fémorale
AVERTISSEMENT : L’INSERTION PAR LA VEINE FÉMORALE ACCROÎT LE RISQUE
D’INFECTION. D’autres sites d’accès comme la région pelvienne doivent être envisagés à la
place de la région inguinale habituelle pour diminuer le risque d’infection.
Évaluer les régions fémorales gauche et droite pour sélectionner la meilleure des deux veines
pour l’implantation du cathéter. Le contrôle échographique est recommandé.
Pour l’insertion à l’aide du dilatateur à gaine, suivre les procédures décrites à la section II :
“ Insertion à l’aide du dilatateur à gaine par la technique de Seldinger. ”
Pour l’insertion sans gaine , suivre les procédures décrites à la section III : “ Insertion sans gaine
(Kit SafeTrac*) par la technique de Seldinger. ”
L’insertion fémorale est identique à celle décrite aux sections II et III avec les exceptions
suivantes (voir les points 1, 2 et 3 ci-dessous) :
1) Ne pas placer le patient en légère position de Trendelenburg.
2) Placer l’extrémité du cathéter dans la veine cave inférieure (IVC) moyenne ou à la jonction
de la veine iliaque et de la veine cave inférieure.
3) Couper le cathéter à la marque repère de 65 cm de la lumière veineuse et à la marque
repère de 62,5 cm de la lumière artérielle avant de procéder à la tunnellisation.
Ne pas laisser les ls-guides pénétrer dans l’oreillette droite sous peine de provoquer une
arythmie cardiaque.
V. Montage de l’adaptateur de prolongateur de cathéter ou mise en œuvre du kit de
réparation Retro*
Utiliser les clamps plats fournis avec le kit du cathéter pour clamper le cathéter, si nécessaire,
et lors du remplacement des adaptateurs de prolongateur usés ou endommagés avec les
prolongateurs du kit de réparation Retro*.
2
Ne pas utiliser de pinces crénelées.
En coupant à la longueur désirée, ou lors du remplacement d’un adaptateur de prolongateur
usé ou endommagé, s’assurer que le cathéter est coupé d’équerre et que la lumière du cathéter restant n’est pas endommagée. Consulter les longueurs opérationnelles et les volumes
d’amorçage correspondants.
Français
35
Page 36

Faire coulisser le bouchon rouge (A) du cathéter sur l’extrémité proximale du cathéter qui
comporte les repères rouges. S’assurer que le bouchon rouge comporte une garniture
intérieure (B). Faire coulisser le diamètre intérieur de la lumière du cathéter artériel (rouge) sur
le tube en acier inoxydable (qui est une partie de (C) et forme le début du tube prolongateur)
jusqu’à ce qu’il rencontre l’épaulement. Visser le bouchon (A) vers la partie (C) jusqu’à ce qu’il
s’arrête sur le corps de l’adaptateur. Répéter l’opération pour l’adaptateur de prolongateur
bleu.
Attention : ne pas serrer exagérément les bouchons pour ne pas risquer de les ssurer.
Déclamper les lumières artérielle (rouge) et veineuse (bleue).
Monter les seringues sur les deux prolongateurs et ouvrir les clamps. Le sang doit être aspiré
facilement à partir des extrémités artérielle et veineuse. En cas de résistance importante à
l’aspiration du sang, repositionner le cathéter pour obtenir une bonne circulation du sang.
Une fois qu’une aspiration satisfaisante est obtenue, irriguer les deux lumières avec des
seringues remplies de sérum de physiologique en utilisant la technique du traitement minute.
S’assurer que les clamps en place sur les prolongateurs sont ouverts pendant l’irrigation.
Fermer les clamps des prolongateurs, retirer les seringues, puis placer un bouchon d’injection
sur chaque raccord à embout Luer-lock.
Français
VI. Fixation du cathéter et soins de la plaie
Une ailette de suture est prévue pour suturer le cathéter au niveau du site de sortie. Pincer
légèrement les ailettes de suture pour ouvrir la gorge située au dessous du corps des ailettes.
Placer l’ailette de suture sur le repère de longueur du cathéter au niveau du site de sortie et
relâcher les ailettes. Fixer les ailettes en place en passant le l de suture dans les trous des
ailettes.
Suturer pour fermer les sites d’insertion et de sortie. Puis, suturer les adaptateurs du cathéter
sur la peau en utilisant une ailette de suture. Ne pas suturer la tubulure du cathéter.
Attention : prendre garde de ne pas entailler le cathéter avec l’aiguille de suture.
Attention : les objets tranchants peuvent provoquer des perforations ou des entailles dans
la lumière du cathéter et sa défaillance.
Couvrir les sites d’insertion et de sortie de pansements occlusifs.
Consigner la longueur du cathéter et son numéro de lot dans le dossier du patient.
HÉPARINISATION
Suivre les consignes de perméabilité du cathéter si celui-ci ne doit pas être utilisé immédiatement pour le traitement.
Pour préserver la perméabilité entre les traitements, créer un raccord à embout Luer-lock à
héparine dans la lumière de chaque cathéter.
Se conformer aux directives en vigueur les établissements pour la concentration d’héparine.
Aspirer l’héparine dans deux seringues correspondant à la quantité prévue pour les prolongateurs artériel et veineux. Vérier l’absence de bulle d’air dans les seringues.
Retirer les bouchons d’injection des prolongateurs.
Monter une seringue contenant la solution d’héparine sur le raccord à embout Luer-lock
femelle de chaque prolongateur.
Ouvrir les clamps des prolongateurs.
Attention : aspirer pour s’assurer qu’aucune bulle d’air ne sera injectée dans le patient.
36
Page 37

Injecter la solution d’héparine dans chaque lumière en utilisant la technique du traitement
minute.
Attention : chaque lumière doit être complètement remplie de solution d’héparine pour
garantir l’ecacité.
Fermer les clamps des prolongateurs.
Attention : les clamps des prolongateurs doivent être ouverts uniquement pour
l’aspiration, le rinçage et la dialyse.
Retirer les seringues.
Monter un bouchon d’injection stérile sur les raccords à embout Luer-lock femelles des
prolongateurs.
Fixer avec une bande adhésive les bouchons d’injection pour éviter leur perte accidentelle.
L’héparinisation n’est pas nécessaire pendant les 48 à 72 heures qui suivent, à condition que
les lumières n’aient pas été aspirées ou rincées.
HÉMODIALYSE
Attention : pour minimiser le risque d’embolie gazeuse, maintenir la tubulure du prolongateur clampée en permanence, même lorsqu’elle n’est pas utilisée.
Attention : pour ne pas provoquer une héparinisation systémique, la solution d’héparine
doit être retirée de chaque lumière avant le traitement du patient.
Aspirer et irriguer le cathéter avec du sérum physiologique avant chaque utilisation. Purger le
cathéter et l’ensemble de la tubulure et des bouchons des bulles d’air après toute modication des branchements de la tubulure.
La procédure d’aspiration doit se conformer au protocole du dialyseur.
Avant de procéder à la dialyse, vérier attentivement l’ensemble des branchements et des
circuits extracorporels.
Attention : toujours xer avec du ruban adhésif les raccords à embout Luer-lock à la tubulure de circulation du sang pendant le traitement pour éviter leur perte accidentelle.
Vérier l’absence de fuite au niveau du cathéter et de ses branchements pour minimiser
la perte de sang et le risque d’embolie gazeuse. Si nécessaire, prendre des mesures pour
remédier à une anomalie avant de poursuivre la dialyse.
Attention : une perte de sang importante peut entraîner un choc opératoire.
L’hémodialyse doit être eectuée conformément aux consignes données par le médecin.
APRÈS DIALYSE
Préparer des seringues remplies de sérum physiologique stérile et d’héparine.
Arrêter la pompe à sang. Fermer le clamp du prolongateur artériel. Clamper la tubulure de
circulation du sang artériel au niveau du site de branchement.
Débrancher la ligne de circulation du sang artériel de l’adaptateur du cathéter et monter
une seringue remplie de sérum physiologique stérile à l’adaptateur artériel. Ouvrir le clamp
du prolongateur artériel et rincer le sang de la lumière artérielle du cathéter. Clamper de
nouveau le prolongateur.
Hépariniser la lumière avec une solution d’héparine de concentration et de volume adéquats
(voir plus haut).
Rincer le sang du circuit extracorporel par la lumière veineuse.
Français
37
Page 38

Après avoir rincé le sang du patient, mettre la pompe à sang hors tension. Clamper le prolongateur veineux et débrancher la tubulure de circulation du sang veineux de l’adaptateur
veineux du cathéter.
Brancher une seringue remplie de sérum physiologique stérile sur l’adaptateur veineux.
Ouvrir le clamp du prolongateur veineux et rincer le sang restant de la lumière veineuse du
cathéter. Clamper de nouveau, puis hépariniser la lumière avec une solution d’héparine de
concentration et de volume adéquats.
S’assurer que les clamps des deux prolongateurs sont fermés. Retirer les seringues et monter
un bouchon d’étanchéité d’injection sur chaque adaptateur. Fixer avec une bande adhésive
les bouchons d’étanchéité d’injection aux prolongateurs pour éviter leur perte accidentelle.
ATTENTION
Maintenir le cathéter clampé en permanence, excepté lorsqu’il est relié à la tubulure de
circulation du sang ou à une seringue pendant le traitement.
DÉBIT SANGUIN DU CATHÉTER
Débits insusants
Un débit sanguin insusant peut avoir pour origine l’occlusion des orices artériels provo-
Français
quée par un caillot ou une gaine de brine ; l’occlusion des orices latéraux artériels consécutive au contact avec la paroi vasculaire.
Tableau : Débit en fonction des caractéristiques de pression pour l’ensemble des cathéters
Retro*
Débit Intervalle moyen de pression de la
lumière interne
(ml/min) (mm Hg)
100 24 - 34
150 39 - 50
200 58 - 70
250 79 - 93
300 104 - 121
350 129 - 152
400 157 - 186
450 192 - 233
500 224 - 267
Les intervalles de pression artérielle et veineuse
sont indiqués ci-dessus. Remarque : les résultats indiqués
ci-dessus ont été obtenus en utilisant de l’eau désionisée
Obstructions à sens unique
Les obstructions à sens unique existent lorsqu’une lumière peut être rincée facilement sans
qu’il soit possible d’aspirer du sang. Ceci provient habituellement d’un caillot, de la formation
d’une gaine de brine ou d’une malposition de l’extrémité. Dans ce dernier cas, la perturbation du débit intervient peu après l’implantation.
EXPLANTATION DU CATHÉTER
ATTENTION
L’explantation du cathéter doit être eectuée par un médecin expérimenté.
Localiser la gaine du cathéter par palpation au niveau du site de sortie.
Pratiquer une anesthésie locale dans la zone correspondant à la gaine du cathéter et au site
de sortie.
38
Page 39

Couper les points de suture de l’ailette de suture. Suivre les procédures chirurgicales en
vigueur dans l’établissement.
Pratiquer une courte incision au niveau de la gaine, parallèlement au cathéter.
Disséquer vers la gaine à l’aide d’un instrument tranchant ou non tranchant.
Saisir la gaine à l’aide d’un clamp lorsqu’elle apparaît.
Clamper le cathéter entre la gaine et le site d’insertion. S’assurer que le clamp est susamment serré pour empêcher la circulation du sang dans les lumières.
Pour dégager le cathéter du tissu, tirer doucement la cathéter d’un mouvement lent et continu, en veillant à ne pas exercer de brusque traction ni de force exagérée pour ne pas risquer
une déchirure de la gaine.
Attention : ne pas tirer le cathéter en cas de résistance, mais pratiquer une incision et
retirer toutes les sutures au site de phlébotomie.
Exercer une pression sur le tunnel proximal jusqu’à l’arrêt du saignement.
Suturer l’incision et appliquer un pansement pour faciliter la cicatrisation.
Vérier l’absence de déchirure sur le cathéter et mesurer le cathéter explanté. Comparer cette
longueur à celle indiquée dans les spécications du produit pour s’assurer que cathéter a été
intégralement explanté.
1
National Kidney Foundation, Kidney Disease Outcomes Quality Initiative (KDOQI) Guidelines,
Guideline 5, “Type and Location of Tunneled Cu Catheter Placement.” (2000)
2
GX Zaleski, B. Funaki, JM Lorenz, RS Garofolo, MA Moscatel, JD Rosenblum and JA Leef.
Department of Radiology, The University of Chicago Hospital, IL 60637, USA. “Experience
with tunneled femoral hemodialysis catheters. Am J Rcmtgenol. 1999 Feb; 172 (2)c 493-496.
Close extension clamps.
Bard Access Systems, Inc. garantit à l’acheteur initial que ce produit sera dépourvu de défauts
matériel et de main-d’œuvre pendant une période de un (1) an à compter de la date d’achat. Si
ce produit s’avérait défectueux, l’acheteur pourrait le retourner à Bard Access Systems, Inc. aux
fins de réparation ou de remplacement au choix de Bard Access Systems, Inc. Tous les retours
doivent être autorisés par avance conformément à la politique de retour des marchandises de
Bard Access Systems, Inc. qui se trouve dans sa liste de prix en vigueur. La responsabilité de
Bard Access Systems, Inc. dans le cadre de cette garantie limitée sur le produit ne s’étend à
aucune utilisation abusive ou erronée de ce produit ni à sa réparation par une personne autre
qu’un représentant autorisé de Bard Access Systems, Inc.
CETTE GARANTIE LIMITÉE SUR LE PRODUIT REMPLACE TOUTE AUTRE GARANTIE, QU’ELLE
SOIT EXPLICITE OU IMPLICITE (Y COMPRIS, MAIS SANS Y ÊTRE LIMITÉ, TOUTE GARANTIE
D’APTITUDE À LA VENTE OU À UN BUT PARTICULIER). LA RESPONSABILITÉ ET LE RECOURS
INDIQUÉS DANS CETTE GARANTIE LIMITÉE DU PRODUIT SERONT LA SEULE RESPONSABILITÉ
DE BARD ACCESS SYSTEMS, INC. ET LE SEUL RECOURS DONT DISPOSERA L’ACHETEUR DE
CE PRODUIT, QU’IL S’AGISSE D’UNE RESPONSABILITÉ CONTRACTUELLE OU RELATIVE À UN
DÉLIT (Y COMPRIS LES NÉGLIGENCES) OU AUTRE, ET BARD ACCESS SYSTEMS, INC. NE POURRA
ÊTRE TENU RESPONSABLE ENVERS LES ACHETEURS POUR DES DOMMAGES INDIRECTS,
PARTICULIERS, SECONDAIRES OU CONSÉCUTIFS DÉCOULANT DE SA MANIPULATION OU DE
SON UTILISATION.
Français
© 2010 C. R. Bard, Inc. Tous droits réservés.
Date de révision : février 2010
39
Page 40

GEBRAUCHSANWEISUNG
Implant Length
Body Length
Overall Length
32cm
32cm
35cm
35cm
40cm
40cm
45cm
45cm
50cm
50cm
ANWENDUNGSGEBIETE
Der Doppellumen-Hämodialysekatheter Retro* von aus Silikon mit getrennten Spitzen ist
für die chronische Hämodialyse und Apherese vorgesehen. Es handelt sich um einen für
Röntgenstrahlen undurchlässigen Silikonkatheter, der perkutan oder über einen Einschnitt
eingeführt wird. Katheter, die länger als 40 cm sind, können in Oberschenkelvenen eingeführt
werden.
LEGEN DES KATHETERS
Der Katheter kann perkutan mit einer modizierten „Seldinger-Methode” oder über einen
oenen Veneneinschnitt gelegt werden.
Es wird empfohlen, das Verfahren unter uoroskopischer oder Ultraschall-Beobachtung
durchzuführen, um die ordnungsgemäße Orientierung und Lage der Spitze im rechten Vorhof
zu gewährleisten.
GEGENANZEIGEN
Der Katheter ist nur für einen Langzeit-Gefäßzugang vorgesehen und darf für keinen anderen
Deutsch
als den in dieser Gebrauchsanweisung angegebenen Zweck eingesetzt werden.
BESCHREIBUNG
Der Doppellumen-Hämodialysekatheter Retro* mit getrennten Spitzen besteht aus für
Röntgenstrahlen undurchlässigem, medizinischen Silikon. Seine ovale Form und die Materialzusammensetzung aus Silikon sorgen für erhöhte Flexibilität und Knickfestigkeit.
Um den Rückuss während der Hämodialyse zu vermindern, ist das arterielle Lumen des
Katheters kürzer als das venöse Lumen am distalen Katheterende. Der Katheter verfügt über
eine Filzmanschette und separate farbcodierte Verlängerungsadapter.
Die proximalen Enden des Katheters werden nach der Positionierung der Spitzen rückwärts
durch einen Tunnel zur Austrittsstelle manövriert. Der Katheter ist so konzipiert, dass die
Spitzen präzise positioniert werden können. Die beiden proximalen Enden des Katheters
- das arterielle und das venöse Ende - werden an die farbcodierten Verlängerungsadapter
angeschlossen. Jeder Verlängerungsadapter ist mit einer Kompressionshülse, einer Kompressionskappe, einer Klemme und farbcodierten Luer-Anschlüssen versehen.
ABMESSUNGEN
Implantier- Korpus- Gesamtlänge länge länge
19 cm 24 cm 52 cm
23 cm 28 cm 52 cm
27 cm 32 cm 52 cm
31 cm 36 cm 52 cm
35 cm 40 cm 52 cm
50 cm 55 cm 67 cm
30 cm 35 cm 40 cm 45 cm 50 cm
- 35 cm 40 cm 45 cm 50 cm
- - 40 cm 45 cm 50 cm
- - 40cm 45 cm 50 cm
- - - 45 cm 50 cm
- - - 60cm 65 cm
Arbeitslängen
FÜLLVOLUMINA
Die Füllvolumina bei Arbeitslängen von 30 cm, 35 cm, 40 cm, 45 cm und 50 cm sind auf dem
Katheter aufgedruckt:
40
Page 41

Arbeitslänge Arteriell Venös
30 cm 1,6 cc 1,7 cc
35 cm 1,8 cc 1,9 cc
40 cm 2,0 cc 2,1 cc
45 cm 2,2 cc 2,3 cc
50 cm 2,4 cc 2,5 cc
60 cm 2,8 cc 2,9 cc
65 cm 3,0 cc 3,1 cc
VORSICHT
Aufgrund der US-Bundesgesetze darf dieses Produkt nur von einem Arzt oder auf
Anordnung eines Arztes verkauft werden.
WARNHINWEISE
Für den Katheter von 24 cm Korpuslänge nicht vor der 30-cm-Markierung schneiden
Für den Katheter von 28 cm Korpuslänge nicht vor der 35-cm-Markierung schneiden
Für den Katheter von 32 cm Korpuslänge nicht vor der 40-cm-Markierung schneiden
Für den Katheter von 36 cm Korpuslänge nicht vor der 40-cm-Markierung schneiden
Für den Katheter von 40 cm Korpuslänge nicht vor der 45-cm-Markierung schneiden
Für den Katheter von 55 cm Korpuslänge nicht vor der 60-cm-Markierung schneiden
ALLE ANWEISUNGEN SOWIE DIE WARNHINWEISE UND VORSICHTSMASSNAHMEN
KOMPLIKATIONEN
Luftembolie
Arterielle Kanülierung
Bakteriämie
Blutung
Verletzung des Plexus brachialis
Herzrhythmusstörungen
Perikardtamponade
Katheterspitzen-Embolus oder
thrombotischer Embolus
Zentralvenenthrombose/Stenose
Chylothorax
Endokarditis
Hämatom (subkutan)
Hämorrhagie
Hinweis: Im Vergleich zu anderen Einführungsstellen besteht bei der Einführung in die Oberschenkelvene ein erhöhtes Infektionsrisiko. Weitere Komplikationen sind:
Oberschenkelarterienblutung
Schädigung des Oberschenkelnervs
WARNHINWEISE
Der Katheter darf nur durch einen qualizierten, zugelassenen Arzt eingeführt oder entfernt
werden.
Vor der Behandlung muss der Arzt mit dem Patienten die Risiken und den Nutzen der Katheterisierung sowie deren Alternativen (falls vorhanden) besprechen.
Die Lage der Katheterspitze und die Wahl der richtigen Katheterlänge bleibt dem Ermessen
des Arztes überlassen. Nach dem Einführen des Katheters sollte jedoch stets die ordnungsgemäße Lage der Katheterspitzen mit einer Routine-Röntgenaufnahme überprüft werden,
SIND VOR DER ANWENDUNG AUFMERKSAM ZU LESEN.
Hämatothorax
Infektion (Austrittsstelle)
Lazeration (des Ductus thoracicus)
Lumen-Thrombose
Pneumothorax
Lungenembolie
Punktion (Arteria subclavia, rechtes
arterielles System, Vena cava superior)
Sepsis
Verletzung des rechten Vorhofs oder
eines größeren Blutgefäßes
Tunnelinfektion (subkutan)
Gefäßlazeration, Trauma
Punktion (Oberschenkelvene oder -arterie)
Blutung hinter dem Bauchfell
Venenverengung
41
Deutsch
Page 42

bevor der Katheter in Gebrauch genommen wird. Es wird empfohlen, die Spitze am oder im
rechten Vorhof oder an der Einmündung der Vena cava superior in den rechten Vorhof (SVC/
RA) zu platzieren.
Prüfen Sie vor und nach jeder Behandlung das Lumen und die Verlängerungsteile auf Zeichen
von Schäden oder Abnutzungserscheinungen.
Ziehen Sie die Anschlussstücke des Katheters nicht zu fest an. Sie können dadurch Risse
bekommen.
Achten Sie beim Handhaben dieses Katheters und aller sterilen Teile stets auf ordnungsgemäßes steriles Vorgehen.
Verwenden Sie den Katheter oder andere Bestandteile des Kits nicht, wenn die sterile Verpackung geönet ist.
Benutzen Sie den Katheter nicht, wenn er beschädigt (z.B. zusammengedrückt, gequetscht,
zerschnitten) ist. Verwenden Sie auch keine anderen beschädigten Kit-Bestandteile, insbesondere keine überdrehten Anschlussstücke.
Um eine Luftembolie zu vermeiden, halten Sie den Katheter stets abgeklemmt, außer wenn er
während der Behandlung an Blutleitungen oder eine Spritze angeschlossen ist.
Klemmen Sie die Lumina des Katheters nicht ab; nur die Verlängerungsschläuche dürfen mit
Klemmen versehen werden.
Benutzen Sie nur ein weiches oder mit Backen versehenes Fassinstrument, wenn Sie nicht
die mitgelieferten Katheterklemmen verwenden. Klemmen Sie immer wieder an anderen
Stellen ab, um eine Beeinträchtigung der Schlaucheigenschaften und eine Verkürzung der
Lebensdauer zu vermeiden. Setzen Sie die Klemme nicht in die Nähe der Adapter und des
Katheterkorpus.
Seien Sie vorsichtig, wenn Sie in der Nähe des Katheters scharfe Instrumente einsetzen. Ver-
Deutsch
wenden Sie keine scharfen Instrumente oder Scheren zur Entfernung von Verbänden.
Verkleben Sie zwischen den Behandlungen die Injektionskappen, um versehentliches Entfernen zu vermeiden.
Für den Einmalgebrauch bestimmt. NICHT WIEDERVERWENDEN. Durch Wiederverwenden
oder Umpacken kann ein Infektionsrisiko für Patient oder Benutzer entstehen, können die
strukturelle Integrität und/oder wesentliche Material- und Konstruktionsmerkmale des Geräts
beeinträchtigt werden, was zu einer Störung des Geräts und/oder zu Verletzung, Erkrankung
oder zum Tode des Patienten führen kann.
Das Zubehör des Katheter-Kits ist nicht erneut zu sterilisieren. Der Hersteller ist nicht für
Schäden haftbar zu machen, die durch eine erneute Sterilisierung des Katheters oder der KitBestandteile verursacht werden.
Üben Sie während des Einführens keine Gewalt auf den Führungsdraht, die Dilatatoren und
das abziehbare Einführbesteck aus, da sonst Gefäße perforiert oder geschädigt werden können.
Setzen Sie den Katheter nicht für längere Zeit ultraviolettem Licht aus, um Schäden zu
vermeiden.
Führen Sie das abziehare Einführbesteck nicht weiter ein als nötig. Auf Grund der Größe des
Patienten oder der Lage des Zielortes braucht das Einführbesteck möglicherweise nicht auf die
ganze Länge gebracht zu werden.
Führen Sie das „J”-förmige Ende des Führungsdrahtes mit Hilfe des Führungsdraht-Streckers in
die Einführnadel ein. Üben Sie während des Einführens oder Entfernens von Kit-Bestandteilen
keine Gewalt auf den „J”-förmigen Führungsdraht aus, da er dadurch brechen kann.
Verwenden Sie mit den Katheter-Adaptern nur Luer-Lock-Anschlüsse mit Gewinde (einschließlich Spritzen, Blutleitungen und Injektionskappen).
Vermeiden Sie es, beim Nähen die Katheter-Lumina und Verlängerungsteile einzuritzen oder
zu punktieren.
1
Nehmen Sie keine zu engen Nähte vor.
42
Page 43

Spülen Sie den Katheter mit Kochsalzlösung, und klemmen Sie dann die Verlängerungsteile ab.
IV
V
VI
I
II
III
Spülen Sie bei der Infusion von Heparin rasch durch, und klemmen Sie sofort ab, um sicherzustellen, dass das Heparin das distale Lumenende erreicht. Nehmen Sie keine Infusion gegen
eine geschlossene Klemme vor, und infundieren Sie nicht mit Gewalt in einen blockierten
Katheter. Bei einer gewaltsamen Infusion in einen blockierten Katheter kann ein Gegendruck
entstehen, der den Adapter aus dem Schlauch heraustreiben kann.
Verwenden Sie in keinem Teil der Katheter-Schlauchleitungen Aceton- oder Iodlösungen.
Dadurch kann der Katheter beschädigt werden.
Entfernen Sie den Katheter, wenn er nicht mehr benötigt wird.
Verwenden Sie den Katheter nicht nach dem auf der Verpackung angegebenen
Verfallsdatum.
Wenn der Katheter in Patienten eingeführt werden soll, die nicht in der Lage sind, tief
einzuatmen oder den Atem anzuhalten, ist das Urteilsvermögen des Arztes in hohem Maße
gefragt. Bei Patienten, die beatmet werden oder Atemunterstützung brauchen, besteht bei
einer Kanülierung durch die Vena jugularis interna oder subclavia ein erhöhtes Risiko eines
Pneumothorax.
Dieses Dokument enthält nicht alle medizinisch akzeptierten Protokolle und Anweisungen
und ist auch nicht als Ersatz für die Erfahrung und das Urteil des Arztes bei der Behandlung
eines speziellen Patienten vorgesehen. Vor der Anwendung des Produktes sollten jedoch die
Verfahrensanweisungen, Vorsichtshinweise und Warnungen gelesen werden.
EINFÜH REN DES SILI KONKATHETERS RE TRO* MIT MANS CHETTE
I. Einführungsstelle
Die bevorzugte Einführungsstelle für den Katheter ist die Vena jugularis interna, da hier die
Katheterspitze leichter im rechten Vorhof positioniert werden kann.
Der Katheter kann auch durch die Vena subclavia eingeführt werden. Beachten Sie jedoch,
dass eine Verwendung der Vena subclavia mit einer Stenose dieser Vene assoziiert ist. Dadurch kann in der Zukunft die Anlage eines arteriovenösen Zugangs in der oberen Extremität
ausgeschlossen werden.
Der Katheter kann in die Oberschenkelvene eingeführt werden (siehe Abschnitt IV). Jedoch
geht mit der Einführung in die Oberschenkelvene ein höheres Infektionsrisiko einher.
I - VENA JUGULARIS INTERNA
II - EINFÜHRSTELLE
III - VENA CAVA SUPERIOR
IV - MANSCHETTE
V - AUSTRITTSTELLE
VI - EMPFOHLENE LAGE
DER SPITZE IM RECHTEN
II. Einführen mit Hilfe der Hülse/des Dilatators unter Anwendung der Seldinger-Methode
A. Vorbereitung der Einführungsstelle
Es wird empfohlen, den Katheter in steriler „OP”-Umgebung zu legen. Es werden außerdem sterile Abdecktücher, Instrumente und Zubehörteile benötigt. Weiterhin sind eine
chirurgische Händedesinfektion, Schutzkittel, Haube, Handschuhe und eine Gesichtsmaske
erforderlich.
VORHOF (RA)
Deutsch
43
Page 44

Wenn nötig, rasieren Sie den Patienten ober- und unterhalb der Einführungsstelle. Nachdem
der Patient abgedeckt ist, wird genügend Lokalanästhetikum verabreicht, um eine vollständige Anästhetisierung der Einführungsstelle zu gewährleisten.
Es wird empfohlen, den Patienten in leichte Trendelenburg-Lagerung zu bringen.
Nehmen Sie einen kleinen Einschnitt vor, indem Sie den Hautlinien oberhalb des gewünschten Gefäßes folgen.
B. Punktion des Blutgefäßes
Befestigen Sie eine Spritze an der Einführnadel, und führen Sie sie in die Zielvene, wenn
möglich ultraschallgeführt, ein. Aspirieren Sie zur Überprüfung der korrekten Platzierung.
Freier Blutuss weist auf Eintritt in das Blutgefäß hin. Ist das Blut hellrot oder pulsierend,
ziehen Sie die Nadel zurück und richten Sie sie neu aus.
Entfernen Sie die Spritze, und halten Sie den Daumen über das Ende der Einführnadel, um
Blutverlust und Luftembolie zu vermeiden. Wurde Blut angesaugt, schieben Sie das exible
Ende des Führungsdrahtes zurück in die Einführvorrichtung, bis nur noch das Ende des
Führungsdrahtes sichtbar ist. Setzen Sie das distale Ende der Einführvorrichtung in die Mue
der Nadel ein.
Schieben Sie den exiblen Führungsdraht vorwärts in die Mue der Nadel und darüber hinaus
in die Zielvene hinein. Die Einführungslänge hängt von der Größe des Patienten ab.
Vorsicht: Ziehen Sie den Führungsdraht nicht durch eine Komponente hindurch zurück.
Vorsicht: Überwachen Sie die korrekte Einführung und Platzierung des Führungsdrahtes
uoroskopisch oder über Ultraschall.
Wenn der Führungsdraht bis in den rechten Vorhof geschoben wird, können Herzrhyth-
Deutsch
musstörungen auftreten. Überwachen Sie den Herzrhythmus, damit Arrhythmien erkannt
werden.
Entfernen Sie die Nadel über den Führungsdraht, und achten Sie darauf, dass der Führungsdraht dabei sicher gehalten wird.
C. Gefäßdilatation und Einführung des Katheters
Gefäßdilatation und Einführung der Hülse
Setzen Sie einen Venendilatator auf den Draht auf, und schieben Sie ihn durch die Haut in
die Vene. Achten Sie darauf, nicht den Führungsdraht weiter zu schieben. Der Führungsdraht
muss während des Voranschiebens des Dilatators stationär bleiben.
Einer seriellen Dilatation ist der Vorzug zu geben. Wenn Sie weitere Dilatatoren verwenden,
schrauben Sie diese über den Führungsdraht in das Blutgefäß. Entfernen Sie den oder die
Dilatatoren, wenn das Gefäß ausreichend erweitert ist, und lassen Sie den Führungsdraht an
Ort und Stelle.
Vorsicht: Lassen Sie die Gefäßdilatatoren nicht länger als nötig im Gefäß, um eine mögliche Perforation der Gefäßwand zu vermeiden.
Schieben Sie das abziehbare Einführbesteck/die Hülse über den Führungsdraht in die Vene,
und behalten Sie dabei die Position des Führungsdrahtes bei.
Vorsicht: Dies muss unter uoroskopischer Beobachtung geschehen, um Punktion des
Gefäßes zu vermeiden.
Entfernen Sie den Führungsdraht.
Vorsicht: Lassen Sie die Hülse nicht länger als nötig im Gefäß, um eine Schädigung der
Vene zu vermeiden.
44
Page 45

Einführung des Katheters
WARNHINWEIS: VERSUCHEN SIE NIEMALS, DIE LUMINA ZU TRENNEN.
Entfernen Sie den Dilatator von der vorher eingeführten Hülse.
Um das Austreten von Blut zu verhindern, klemmen Sie die proximalen Verlängerungsteile
des Katheters mit den mitgelieferten Flachklemmen ab, bevor Sie den Katheter in die Hülse
einführen.
Führen Sie die distalen Katheterspitzen in und durch die Hülse ein, bis die Katheterspitzen
korrekt in der Zielvene positioniert sind.
Vorsicht: Führen Sie den Katheter rasch in die Hülse ein, um Blutverlust und Luftembolie
zu vermeiden.
Vorsicht: Wenn die Katheterspitzen an geeigneter Stelle platziert sind, ergibt sich ein
optimaler Blutuss, wie in den KDOQI-Richtlinien ausgeführt.
Vorsicht: Wenn die Lage des Katheters nicht überprüft wird, können schwere Verletzungen
oder tödliche Komplikationen die Folge sein.
Ziehen Sie die abziehbare Hülse vorsichtig und langsam aus dem Blutgefäß heraus.
Korrekturen der Lage des Katheters müssen unter uoroskopischer oder Ultraschall-Überwachung vorgenommen werden. Die venöse distale Spitze muss auf der Höhe des oberen Teils
des rechten Vorhofs liegen, an oder jenseits der Einmündung der Vena cava in den Vorhof.
Vorsicht: Um Schäden an den Blutgefäßen beim Entfernen der abziehbaren Hülse zu
vermeiden, ziehen Sie die Hülse so weit wie möglich zurück und ziehen Sie immer nur
wenige Zentimeter auf einmal ab. Ziehen Sie nicht an dem Teil der Hülse, der im Blutgefäß
verbleibt.
D. Tunneln des Retro*-Katheters
Nehmen Sie an der Austrittsstelle des subkutanen Tunnels einen kleinen Einschnitt vor. Durch
eine Markierung ist auf dem Katheter eine theoretische Mue angegeben. Diese Markierung
muss sich direkt außerhalb der Austrittsstelle benden. Machen Sie den Einschnitt gerade
breit genug, dass der Katheter hindurchpasst. Verabreichen Sie genügend Lokalanästhetikum,
um das Gewebe vollständig zu anästhetisieren.
Legen Sie mit Hilfe einer stumpfen Dissektion mit dem Tunnel-Führungsstab einen subkutanen Tunnel direkt zur Eintrittsstelle an.
Wenn der Tunnel-Führungsstab an der Eintrittsstelle zum Vorschein kommt, setzen Sie das
konische Ende der Tunnelhülse über das freiliegende Tunnelinstrument. Wenn nötig, drücken
Sie auf die Hülse, um der Manschette einen Weg durch den subkutanen Tunnel zu bereiten.
Den Katheteradapter/Tunneler auf den Führungsstab schrauben oder an der Schnappbefestigung aufsetzen, so dass er fest sitzt (dies häng davon ab, welcher Tunneler verwendet wird).
Entfernen Sie die proximalen Klemmen am Katheter, und schneiden Sie den Katheter an der
50-cm-Markierung auf der venösen Seite und an der 47,5-cm-Markierung auf dem arteriellen
Lumen ab.
Bei Oberschenkelkathetern (Gesamtlänge 67 cm) den Katheter an der 65-cm-Markierung an
der Venenseite schneiden, und an der 62,5-cm-Markierung am Arterienlumen.
Befestigen Sie das Ende des Katheters am Adapter, und schieben Sie die Tunnelhülse über
den Katheter.
Ziehen Sie den Tunnel-Führungsstab weiter, bis der Katheter an der Austrittsstelle zum
Vorschein kommt und die Kathetermarkierung sichtbar wird.
Nehmen Sie den Katheter vorsichtig vom Führungsstab ab, indem Sie an der Tunnelhülse
ziehen und den Führungsstab dann vorsichtig aus dem Katheter herausdrehen.
45
Deutsch
Page 46

Klemmen Sie die proximalen Enden des Katheters wieder ab.
Nach Belieben können die proximalen Katheterenden auf die gewünschte Länge geschnitten
werden. Schnitte sollten an den Längenmarkierungen vorgenommen werden, da die Füllvolumina für diese Längen dokumentiert sind.
WARNHINWEISE
WARNHINWEIS: VERSUCHEN SIE NIEMALS, DIE KATHETERLUMINA ZU TRENNEN.
Tunneln Sie nicht durch Muskelgewebe.
Ziehen Sie nicht an den Katheterschläuchen. Dadurch kann der Katheter in die Länge
gezogen und beschädigt werden.
Überdehnen Sie das subkutane Gewebe beim Tunneln nicht. Dadurch kann das Einwachsen der Manschette verzögert oder verhindert werden, und es können vermehrte
Blutungen auftreten.
Falls ein Widerstand auftritt, kann eine zusätzliche stumpfe Dissektion das Einführen
erleichtern.
III. Einführen ohne Hülse (SafeTrac*-Kit) mit der Seldinger-Methode
A. Vorbereitung der Einführungsstelle
Es wird empfohlen, den Katheter in steriler „OP”-Umgebung zu legen. Es werden außerdem sterile Abdecktücher, Instrumente und Zubehörteile benötigt. Weiterhin sind eine
chirurgische Händedesinfektion, Schutzkittel, Haube, Handschuhe und eine Gesichtsmaske
erforderlich.
Deutsch
Wenn nötig, rasieren Sie den Patienten ober- und unterhalb der Einführungsstelle. Nachdem
der Patient abgedeckt ist, wird genügend Lokalanästhetikum verabreicht, um eine vollständige Anästhetisierung der Einführungsstelle zu gewährleisten.
Es wird empfohlen, den Patienten in leichte Trendelenburg-Lagerung zu bringen.
Nehmen Sie einen kleinen Einschnitt vor, indem Sie den Hautlinien oberhalb des gewünschten Gefäßes folgen.
B. Punktion des Blutgefäßes
Befestigen Sie eine Spritze an der Einführnadel, und führen Sie sie in die Zielvene, wenn
möglich ultraschallgeführt, ein. Aspirieren Sie zur Überprüfung der korrekten Platzierung.
Freier Blutuss weist auf Eintritt in das Blutgefäß hin. Ist das Blut hellrot oder pulsierend,
ziehen Sie die Nadel zurück und richten Sie sie neu aus.
Entfernen Sie die Spritze, und halten Sie den Daumen über das Ende der Einführnadel, um
Blutverlust und Luftembolie zu vermeiden. Wurde Blut angesaugt, schieben Sie das exible
Ende des Führungsdrahtes zurück in die Einführvorrichtung, bis nur noch das Ende des
Führungsdrahtes sichtbar ist. Setzen Sie das distale Ende der Einführvorrichtung in die Mue
der Nadel ein.
Schieben Sie den exiblen Führungsdraht vorwärts in die Mue der Nadel und darüber hinaus
in die Zielvene hinein. Führen Sie den Führungsdraht ein, bis die Spitze in den rechten Vorhof
und durch ihn hindurch in die Vena cava inferior gelangt. Die Einführungslänge hängt von
der Größe des Patienten ab. Überwachen Sie während des Verfahrens die Herzfunktion des
Patienten, damit Arrhythmien erkannt werden.
Vorsicht: Ziehen Sie den Führungsdraht nicht durch eine Komponente hindurch zurück.
Vorsicht: Überwachen Sie die korrekte Einführung und Platzierung des Führungsdrahtes
uoroskopisch oder über Ultraschall.
Wenn der Führungsdraht bis in den rechten Vorhof geschoben wird, können Herzrhythmusstörungen auftreten. Überwachen Sie den Herzrhythmus, damit Arrhythmien erkannt
werden.
46
Page 47

Entfernen Sie die Nadel über den Führungsdraht, und achten Sie darauf, dass der Führungsdraht dabei sicher gehalten wird.
Setzen Sie eine Hülse/einen Dilatator von 6 Fr. auf den Draht auf, und schieben Sie sie/ihn
durch die Haut in die Vene. Achten Sie darauf, nicht den Führungsdraht weiter zu schieben. Der
Führungsdraht muss während des Voranschiebens der Hülse/des Dilatators stationär bleiben.
Entfernen Sie den Dilatator. Führen Sie einen weiteren Draht durch die Hülse ein. Entfernen
Sie die Hülse.
C. Gefäßdilatation und Einführung des Katheters
WARNHINWEIS: VERSUCHEN SIE NIEMALS, DIE KATHETERLUMINA ZU TRENNEN.
Setzen Sie die beiden mitgelieferten Intrakatheter-Dilatatoren in die Lumina des Katheters
ein. Die Intrakatheter-Dilatatoren weisen Luer-Anschlüsse auf, die jeweils auf das proximale
Ende des arteriellen und venösen Luer-Anschlusses am Katheter passen.
Schieben Sie das freiliegende Ende eines der beiden Drähte durch den venösen IntrakatheterDilatator, bis es am proximalen venösen Ende des Dilatators zum Vorschein kommt.
Schieben Sie den oder die entsprechenden Venendilatatoren über den anderen Draht, und
schieben Sie sie durch die Haut voran. Einer seriellen Dilatation ist der Vorzug zu geben.
Entfernen Sie den oder die Dilatatoren.
Vorsicht: Lassen Sie die Gefäßdilatatoren nicht länger als nötig im Gefäß, um eine mögliche Perforation der Gefäßwand zu vermeiden.
Schieben Sie den freiliegenden Draht durch den arteriellen Intrakatheter-Dilatator, bis er am
proximalen arteriellen Ende des Katheters zum Vorschein kommt.
Schieben Sie die Drähte voran, bis die Drähte zwischen dem distalen Katheterende und der
Eintrittsstelle stra sind.
Führen Sie den Katheter durch die Haut in das Blutgefäß ein. Um den Katheter in die Vene
schieben zu können, kann es erforderlich sein, in jeder Richtung eine leichte Drehung
vorzunehmen.
Zur korrekten Platzierung wird dringend empfohlen, das Verfahren mit Ultraschall oder
uoroskopisch zu überwachen.
Vorsicht: Wenn die Katheterspitzen an geeigneter Stelle platziert sind, ergibt sich ein
optimaler Blutuss, wie in den KDOQI-Richtlinien ausgeführt.
Vorsicht: Wenn die Lage des Katheters nicht überprüft wird, können schwere Verletzungen
oder tödliche Komplikationen die Folge sein.
Entfernen Sie die Intrakatheter-Dilatatoren und die Führungsdrähte.
D. Tunneln des Retro*-Katheters
Nehmen Sie an der Austrittsstelle des subkutanen Tunnels einen kleinen Einschnitt vor. Durch
eine Markierung ist auf dem Katheter eine theoretische Mue angegeben. Diese Markierung
muss sich direkt außerhalb der Austrittsstelle benden. Machen Sie den Einschnitt gerade
breit genug, dass der Katheter hindurchpasst. Verabreichen Sie genügend Lokalanästhetikum,
um das Gewebe vollständig zu anästhetisieren.
Legen Sie mit Hilfe einer stumpfen Dissektion mit dem Tunnel-Führungsstab einen subkutanen Tunnel direkt zur Eintrittsstelle an.
Wenn der Tunnel-Führungsstab an der Eintrittsstelle zum Vorschein kommt, setzen Sie das
konische Ende der Tunnelhülse über das freiliegende Tunnelinstrument. Wenn nötig, drücken
Sie auf die Hülse, um der Manschette einen Weg durch den subkutanen Tunnel zu bereiten.
Deutsch
47
Page 48

Den Katheteradapter/Tunneler auf den Führungsstab schrauben oder an der Schnappbefestigung aufsetzen, so dass er fest sitzt (dies häng davon ab, welcher Tunneler verwendet wird).
Entfernen Sie die proximalen Klemmen am Katheter, und schneiden Sie den Katheter an der
50-cm-Markierung auf der venösen Seite und an der 47,5-cm-Markierung auf dem arteriellen
Lumen ab.
Bei Oberschenkelkathetern (Gesamtlänge 67 cm ) den Katheter an der 65-cm-Markierung an
der Venenseite schneiden, und an der 62,5-cm-Markierung am Arterienlumen.
Befestigen Sie das Ende des Katheters am Adapter, und schieben Sie die Tunnelhülse über
den Katheter.
Ziehen Sie den Tunnel-Führungsstab weiter, bis der Katheter an der Austrittsstelle zum
Vorschein kommt und die Kathetermarkierung sichtbar wird.
Nehmen Sie den Katheter vorsichtig vom Führungsstab ab, indem Sie an der Tunnelhülse
ziehen und den Führungsstab dann vorsichtig aus dem Katheter herausdrehen.
Klemmen Sie die proximalen Enden des Katheters wieder ab.
Nach Belieben können die proximalen Katheterenden auf die gewünschte Länge geschnitten
werden. Schnitte sollten an den Längenmarkierungen vorgenommen werden, da die Füllvolumina für diese Längen dokumentiert sind.
WARNHINWEISE
WARNHINWEIS: VERSUCHEN SIE NIEMALS, DIE LUMINA ZU TRENNEN.
Tunneln Sie nicht durch Muskelgewebe.
Deutsch
Ziehen Sie nicht an den Katheterschläuchen. Dadurch kann der Katheter in die Länge
gezogen und beschädigt werden.
Überdehnen Sie das subkutane Gewebe beim Tunneln nicht. Dadurch kann das Einwachsen der Manschette verzögert oder verhindert werden, und es können vermehrte
Blutungen auftreten.
Falls ein Widerstand auftritt, kann eine zusätzliche stumpfe Dissektion das Einführen
erleichtern.
IV. Verfahren der Einführung in die Oberschenkelvene
WARNHINWEIS: BEI EINFÜHRUNG IN DIE OBERSCHENKELVENE BESTEHT EIN ERHÖHTES
INFEKTIONSRISIKO. Anstelle des üblichen Leistenbereiches sollten andere Katheterstellen wie beispielsweise der Beckenbereich verwendet werden, um das Infektionsrisiko zu
senken.
Die Bereiche des linken und rechten Oberschenkels sind zu untersuchen, um festzustellen,
welche der beiden Venen sich besser zum Legen des Katheters eignet. Es wird die Verwendung von Ultraschalldarstellung empfohlen.
Zum Einführen einer Hülse/eines Dilatators sind die in Abschnitt II, „Einführung mit Hülse/
Dilatator anhand der Seldinger-Technik”, aufgeführten Schritte zu befolgen.
Zum Einführen ohne Hülse sind die in Abschnitt III, „Einführung ohne Hülse (SafeTrac*-Kit)
anhand der Seldinger-Technik”, aufgeführten Schritte zu befolgen.
Die Einführung in den Oberschenkel entspricht demselben Verfahren wie in den Abschnitten
II und III, mit folgenden Ausnahmen (siehe 1, 2 und 3 unten):
1) Der Patient sollte nicht in die leichte Trendelenburg-Lagerung gebracht werden.
2) Die Spitze des Katheters sollte an der mittleren unteren Hohlvene oder am Übergang
zwischen der Darmbeinvene und der unteren Hohlvene platziert werden.
2
48
Page 49

3) Der Katheter sollte vor der Einführung an der 65-cm-Markierung am Venenlumen und an
A
B
C
A
C
der 62,5-cm-Markierung am Arterienlumen geschnitten werden.
Es sollten keine Führungsdrähte verwendet werden, um in den rechten Herzvorhof zu gelangen. Dies kann zu Herzrhythmusstörungen führen.
V. Montage des Verlängerungsadapters am Katheter oder Anwendung des Retro*Reparaturkits
Klemmen Sie den Katheter mit den im Katheter-Kit gelieferten achen Klemmen ab, wenn
dies notwendig ist und wenn Sie abgenutzte oder beschädigte Verlängerungsadapter durch
die Verlängerungsteile des „Retro*-Reparaturkits“ ersetzen.
Benutzen Sie keine gezahnten Fassinstrumente.
Wenn Sie den Katheter auf eine gewünschte Länge zuschneiden oder wenn Sie abgenutzte
oder beschädigte Verlängerungsadapter austauschen, achten Sie auf rechten Winkel und dass
das verbleibende Katheterlumen nicht beschädigt wird. Beachten Sie die „Arbeitslänge” und
das entsprechende Füllvolumen.
Schieben Sie die rote Katheterkappe (A) über das proximale Ende des Katheters, das rote Markierungen aufweist. Vergewissern Sie sich, dass sich eine Dichtung (B) im Inneren der roten
Kappe bendet. Schieben Sie den Innendurchmesser des arteriellen (roten) Katheterlumens
über die Edelstahlröhre (die ein Teil von (C) ist und den Anfang des Verlängerungsschlauches
bildet), bis die Schulter erreicht ist. Schrauben Sie die Kappe (A) in Richtung (C), bis Sie am
Adapter zum Stillstand kommt. Wiederholen Sie das Verfahren für den blauen Verlängerungsadapter.
Vorsicht: Ziehen Sie die Kappen nicht zu fest an, um Risse zu vermeiden.
Nehmen Sie die achen Klemmen vom arteriellen (roten) und venösen (blauen) Lumen ab.
Bringen Sie an beiden Verlängerungsteilen Spritzen an, und önen Sie die Klemmen. Das
Blut sollte sich sowohl auf der arteriellen als auch auf der venösen Seite gut ansaugen lassen.
Tritt beim Ansaugen des Blutes ein übermäßiger Widerstand auf, korrigieren Sie die Lage des
Katheters, bis ein angemessener Blutuss erreicht ist.
Ist ein ordnungsgemäßes Ansaugen erzielt worden, spülen Sie beide Lumina unter Anwendung
der Bolusinjektionstechnik mit Spritzen, die mit Kochsalzlösung gefüllt wurden. Vergewissern
Sie sich, dass die Klemmen der Verlängerungsteile während des Spülens oen sind.
Schließen Sie die Klemmen an den Verlängerungsteilen, entfernen Sie die Spritzen und
versehen Sie alle Luer-Lock-Anschlüsse mit Injektionskappen.
VI. Sicherung des Katheters und Wundversorgung
Für das Vernähen des Katheters an der Austrittsstelle wird ein montierbarer Nahtügel
mitgeliefert. Drücken Sie den montierbaren Nahtügel leicht zusammen, um den Spalt an der
Unterseite des Nahtügels zu önen. Platzieren Sie den Nahtügel an der Längenmarkierung
des Katheters an der Austrittsstelle, und lassen Sie ihn los. Sichern Sie den Flügel, indem Sie
ihn unter Benutzung der vorhandenen Löcher festnähen.
49
Deutsch
Page 50

Verschließen Sie durch Nähen den Eintritts- und den Austrittsort. Vernähen Sie dann die Katheteradapter mit Hilfe des Nahtügels mit der Haut. Vernähen Sie nicht die Katheterschläuche.
Vorsicht: Vermeiden Sie es, den Katheter beim Nähen einzuritzen.
Vorsicht: Scharfe Gegenstände können durch Punktionen oder Schnitte in das Katheterlumen das Versagen des Katheters bewirken.
Verschließen Sie die Eintritts- und Austrittsstelle mit festen Verbänden.
Notieren Sie in den Patientenunterlagen die Katheterlänge und die Chargennummer des
Katheters.
HEPARINISIERUNG
Wenn der Katheter nicht sofort für die Behandlung zum Einsatz kommt, befolgen Sie die
Richtlinien zur Erhaltung seiner Durchgängigkeit.
Um die Durchgängigkeit zwischen den Behandlungen aufrechtzuerhalten, heparinisieren Sie
beide Katheterlumina.
Entnehmen Sie die Heparinkonzentration den Klinikvorschriften.
Ziehen Sie in zwei Spritzen so viel Heparin auf, wie der für das arterielle und das venöse
Verlängerungsteil bestimmten Menge entspricht. Sorgen Sie dafür, dass die Spritzen frei von
Luft sind.
Nehmen Sie die Injektionskappen von den Verlängerungsteilen ab.
Befestigen Sie an der Luer-Anschlussbuchse der einzelnen Verlängerungsteile eine Spritze mit
Heparinlösung.
Deutsch
Önen Sie die Klemmen der Verlängerungsteile.
Vorsicht: Aspirieren Sie, um sicherzustellen, dass keine Luft in den Patienten gedrückt
wird.
Injizieren Sie unter Anwendung der Bolusinjektionstechnik in beide Lumina Heparin.
Vorsicht: Damit die Wirkung gewährleistet ist, müssen beide Lumina vollständig mit
Heparin gefüllt sein.
Klemmen Sie die Verlängerungsteile ab.
Vorsicht: Die Klemmen der Verlängerungsteile sollten nur beim Aspirieren, Spülen und bei
der Dialyse geönet sein.
Entfernen Sie die Spritzen.
Versehen Sie die Luer-Anschlussbuchsen der Verlängerungsteile mit sterilen Injektionskappen.
Verkleben Sie die Injektionskappen, um versehentliches Entfernen zu vermeiden.
In den nachfolgenden 48 bis 72 Stunden ist keine Heparingabe erforderlich, vorausgesetzt,
die Lumina wurden nicht aspiriert oder gespült.
HÄMODIALYSE-BEHANDLUNG
Vorsicht: Halten Sie zur Vermeidung von Luftembolien die Verlängerungsschläuche stets
abgeklemmt, wenn sie nicht in Gebrauch sind.
Vorsicht: Um eine systematische Heparinisierung zu vermeiden, muss die Heparinlösung
vor der Behandlung des Patienten aus beiden Lumina entfernt werden.
50
Page 51

Aspirieren und spülen Sie den Katheter vor jeder Benutzung mit Kochsalzlösung. Entfernen
Sie jegliche Luft aus dem Katheter und allen Verbindungsschläuchen und Kappen, wenn die
Schlauchverbindungen gewechselt werden.
Das Aspirationsverfahren muss mit dem Protokoll des Dialysegerätes übereinstimmen.
Prüfen Sie vor Beginn der Dialyse sorgfältig alle Katheteranschlüsse und extrakorporalen
Kreisläufe.
Vorsicht: Befestigen Sie die Luer-Anschlüsse während der Behandlung stets mit Klebeband
an den Blutleitungen, um ein unbeabsichtigtes Trennen zu verhüten.
Untersuchen Sie den Katheter und seine Anschlüsse visuell auf Leckstellen, damit Blutverlust
und Luftembolie vermieden werden. Ergreifen Sie, wenn erforderlich, korrigierende Maßnahmen, bevor Sie die Dialysebehandlung fortsetzen.
Vorsicht: Übermäßiger Blutverlust kann zum Schock des Patienten führen.
Die Hämodialyse ist nach der Anweisung des Arztes durchzuführen.
NACH DER DIALYSE
Bereiten Sie Spritzen mit steriler isotonischer Kochsalzlösung und Heparin vor.
Halten Sie die Blutpumpe an. Klemmen Sie das arterielle Verlängerungsteil ab. Klemmen Sie
die arterielle Blutleitung an der Verbindungsstelle ab.
Trennen Sie die arterielle Blutleitung von dem Adapter des Katheters, und schließen Sie eine
mit steriler isotonischer Kochsalzlösung gefüllte Spritze an den arteriellen Adapter an. Önen
Sie die Klemme am arteriellen Verlängerungsteil, und spülen Sie das Blut aus dem arteriellen
Lumen des Katheters heraus. Klemmen Sie das Verlängerungsteil wieder ab.
Heparinisieren Sie das Lumen mit der entsprechenden Menge/Konzentration Heparin (siehe
oben).
Spülen Sie das Blut im extrakorporalen Kreislauf über das venöse Lumen zurück.
Schalten Sie nach dem Zurückspülen des Blutes des Patienten die Blutpumpe aus. Klemmen Sie das venöse Verlängerungsteil ab, und trennen Sie die venöse Blutleitung von dem
venösen Adapter des Katheters.
Schließen Sie eine mit steriler isotonischer Kochsalzlösung gefüllte Spritze an den venösen
Adapter an. Önen Sie die Klemme am venösen Verlängerungsteil, und spülen Sie das gesamte verbleibende Blut aus dem venösen Lumen des Katheters heraus. Klemmen Sie wieder
ab, und heparinisieren Sie dann das Lumen mit der entsprechenden Menge/Konzentration
Heparin.
Stellen Sie sicher, dass beide Verlängerungsteile abgeklemmt sind. Entfernen Sie die Spritzen,
und versehen Sie jeden Adapter mit einer Injektionsverschlusskappe. Kleben Sie die Injektionsverschlusskappen an den Verlängerungsteilen fest, um unbeabsichtigtes Entfernen zu
vermeiden.
WARNHINWEIS
Halten Sie den Katheter stets abgeklemmt, außer wenn er während der Behandlung an
Blutleitungen oder eine Spritze angeschlossen ist.
BLUTFLUSS DES KATHETERS
Ungenügende Flüsse
Verschluss der arteriellen Önungen durch Blutgerinnung oder Bildung einer Fibrinhülle;
Verschluss der arteriellen Seitenönungen durch Kontakt mit der Venenwand.
Deutsch
51
Page 52

Tabelle: Charakteristik Fluss gegen Druck für alle Retro*-Katheter
Flussrate Durchschnittlicher Bereich des
inneren Lumendrucks (mm Hg)
(ml/min) (mm Hg)
100 24 - 34
150 39 - 50
200 58 - 70
250 79 - 93
300 104 - 121
350 129 - 152
400 157 - 186
450 192 - 233
500 224 - 267
Die Bereiche für den arteriellen und venösen Druck sind
oben aufgelistet. Hinweis: Die obigen Ergebnisse
wurden mit entionisiertem Wasser erhalten.
Blockade in einer Richtung
Eine Blockade in einer Richtung liegt vor, wenn ein Lumen leicht gespült, aber kein Blut angesaugt werden kann. Dies wird gewöhnlich durch Blutgerinnung, die Bildung einer Fibrinhülle
oder eine Fehlposition der Spitze verursacht. Im letzteren Fall tritt die Flussverminderung bald
nach dem Legen des Katheters auf.
ENTFERNUNG DES KATHETERS
WARNHINWEIS
Deutsch
Der Katheter darf nur durch einen Arzt entfernt werden, der mit den entsprechenden
Techniken vertraut ist.
Palpieren Sie die Austrittsstelle des Katheters, um die Lage der Kathetermanschette festzustellen.
Anästhetisieren Sie den Bereich, wo sich die Manschette bendet, und die Austrittsstelle des
Katheters, indem Sie eine ausreichende Menge Lokalanästhetikum verabreichen.
Durchtrennen Sie die Nähte vom Nahtügel. Die geltenden Klinikvorschriften sind zu
befolgen.
Nehmen Sie über der Manschette parallel zum Katheter einen kleinen Einschnitt vor.
Schneiden Sie mittels einer stumpfen oder scharfen Dissektion weiter bis zur Manschette.
Greifen Sie die Manschette, wenn sie sichtbar wird, mit einer Klemme.
Klemmen Sie den Katheter zwischen Manschette und Eintrittsstelle ab. Stellen Sie sicher, dass
die Klemme ausreichend fest sitzt, um den Blutuss in beiden Lumina zu unterbinden.
Lösen Sie den Katheter von dem Gewebe, indem Sie ihn mit einer langsamen, stetigen Bewegung vorsichtig herausziehen. Achten Sie darauf, ruckartige Bewegungen und übermäßige
Kraftanwendung zu vermeiden, damit die Manschette nicht reißt.
Vorsicht: Ziehen Sie nicht an dem Katheter, wenn Sie einen Widerstand spüren. Nehmen
Sie stattdessen einen Schnitt vor, und entfernen Sie alle Nähte an der Veneneinschnittsstelle.
Üben Sie Druck auf den proximalen Tunnel aus, bis die Blutung gestillt ist.
Vernähen Sie den Einschnitt, und legen Sie zur schnelleren Heilung einen Verband an.
52
Page 53

Überprüfen Sie den Katheter nach der Entfernung auf Risse, und messen Sie seine Länge.
Vergleichen Sie diese Länge mit den anwendbaren Produktdaten, um sicherzustellen, dass der
gesamte Katheter erfolgreich entfernt wurde.
1
National Kidney Foundation, Kidney Disease Outcomes Quality Initiative (KDOQI) Guidelines,
Guideline 5, “Type and Location of Tunneled Cu Catheter Placement.” (2000)
2
GX Zaleski, B. Funaki, JM Lorenz, RS Garofolo, MA Moscatel, JD Rosenblum and JA Leef.
Department of Radiology, The University of Chicago Hospital, IL 60637, USA. “Experience
with tunneled femoral hemodialysis catheters. Am J Rcmtgenol. 1999 Feb; 172 (2)c 493-496.
Close extension clamps.
Bard Access Systems, Inc. garantiert gegenüber dem ursprünglichen Käufer für die Dauer von
einem (1) Jahr ab Kaufdatum, dass dieses Produkt frei von Material und Fertigungsfehlern ist.
Falls sich dieses Produkt als defekt erweist, kann es der Käufer an Bard Access Systems, Inc.
zurücksenden, wo es nach Ermessen von Bard Access Systems, Inc. repariert oder ausgetauscht
wird. Alle Rücksendungen müssen im Voraus entsprechend der Richtlinie für Rücksendungen
von Bard Access Systems, Inc., die Sie in der aktuellen Preisliste finden, autorisiert werden. Die
Haftung von Bard Access Systems, Inc. unter dieser eingeschränkten Produktgarantie erstreckt
sich nicht auf Missbrauch oder missbräuchliche Nutzung dieses Produkts oder seine Reparatur
durch andere als einen autorisierten Vertreter von Bard Access Systems, Inc.
DIESE EINGESCHRÄNKTE GARANTIE ERSETZT ALLE ANDEREN GARANTIEN, OB AUSDRÜCKLICH
ODER STILLS CHWEIGEND (EINSCHLIE SSLICH, UNEINGESCHRÄN KT, JE GLICHER GARANTIE
DER MARKTGÄNGIGKEIT ODER EIGNUNG FÜR EINEN BESTIMMTEN ZWECK). DIE IN DIESER
EINGESCHRÄNKTEN PRODUKTGARANTIE ANGEGEBENE HAFTUNG UND DIE ANGEGEBENEN
RECHTSMITTEL STELLEN DIE EINZIGE HAFTUNG VON BARD ACCESS SYSTEMS UND DAS
EINZIGE FÜR DEN KÄUFER FÜR DIESES PRODUKT VERFÜGBARE RECHTSMITTEL DAR, OB AUS
VERTRAG, UNERLAUBTER HANDLUNG (EINSCHLIESSLICH FAHRLÄSSIGKEIT) ODER SONSTIGEM,
UND BARD ACCE SS SYSTEMS ÜBERNIMMT KEINE HAFTUNG GEGENÜBER KÄUFERN FÜR
INDIREKTE, BESONDERE, NEBEN- ODER FOLGESCHÄDEN, DIE SICH AUS DESSEN HANDHABUNG
ODER NUTZUNG ERGEBEN.
© 2010 C. R. Bard, Inc. Alle Rechte vorbehalten.
Revisionsdatum: Februar 2010
Deutsch
53
Page 54

ISTRUZIONI PER L’USO
Implant Length
Body Length
Overall Length
32cm
32cm
35cm
35cm
40cm
40cm
45cm
45cm
50cm
50cm
INDICAZIONI PER L’USO
Il catetere per emodialisi cronica a doppio lume in silicone Retro* di con puntali separati è
progettato per l’emodialisi cronica e l’aferesi. È un catetere in silicone radiopaco progettato
per l’inserimento percutaneo o tramite un accesso chirurgico. È possibile utilizzare cateteri di
lunghezza superiore a 40 cm per l’inserimento nella vena femorale.
POSIZIONAMENTO DEL CATETERE
Il catetere può essere posizionato per via percutanea utilizzando una “tecnica di Seldinger”
modicata o una ebotomia aperta.
Si consiglia la guida uoroscopica o ultrasonica per garantire la correttezza dell’orientamento
del puntale e il suo posizionamento all’interno dell’atrio destro.
CONTROINDICAZIONI
Questo catetere è previsto per il solo accesso vascolare a lungo termine e non va utilizzato per
ni diversi da quelli indicati in queste istruzioni.
DESCRIZIONE
Il catetere per emodialisi cronica a doppio lume Retro* con puntali separati è realizzato in
silicone radiopaco di qualità medica. La sua forma ovale e la sua composizione in materiale
siliconico orono livelli migliori di essibilità e di resistenza all’attorcigliamento.
Per ridurre la ricircolazione durante l’emodialisi, il lume arterioso del catetere è più corto del
lume venoso all’estremità distale del catetere. Il catetere ha un bracciale pneumatico in feltro
e prevede adattatori separati di prolunga con codica a colori.
Italiano
Le estremità prossimali del catetere sono tunnellizzate retrograde rispetto al sito di uscita
dopo il posizionamento dei puntali. Questa struttura consente il preciso posizionamento dei
puntali del catetere. Le due estremità prossimali del catetere, ovvero quella arteriosa e quella
venosa, sono collegate agli adattatori di prolunga codicati a colori. Ciascun adattatore di
prolunga prevede un manicotto di compressione, un cappuccio di compressione, un morsetto
e luer.
DIMENSIONI
Lungh. Lungh. Lungh.
innesto corpo totale
19 cm 24 cm 52 cm
23 cm 28 cm 52 cm
27 cm 32 cm 52 cm
31 cm 36 cm 52 cm
35 cm 40 cm 52 cm
50 cm 55 cm 67 cm
Lunghezze operative
30 cm 35 cm 40 cm 45 cm 50 cm
- 35 cm 40 cm 45 cm 50 cm
- - 40 cm 45 cm 50 cm
- - 40cm 45 cm 50 cm
- - - 45 cm 50 cm
- - - 60cm 65 cm
VOLUMI DI RIEMPIMENTO
I volumi di riempimento sono stampati sul catetere alle lunghezze operative di 30 cm, 35 cm,
40 cm, 45 cm e 50 cm, 60 e 65 cm per i cateteri corrispondenti:
54
Page 55

Lunghezza
operativa Arterioso Venoso
30 cm 1.6 cc 1.7 cc
35 cm 1.8 cc 1.9 cc
40 cm 2.0 cc 2.1 cc
45 cm 2.2 cc 2.3 cc
50 cm 2.4 cc 2.5 cc
60 cm 2.8 cc 2.9 cc
65 cm 3.0 cc 3.1 cc
ATTENZIONE
In base alla legge federale (U.S.A.) la vendita di questo dispositivo è consentita solo da
parte o su prescrizione di un medico.
AVVERTENZE
Per il catetere con lunghezza del corpo di 24 cm, non tagliare prima del contrassegno a
30 cm
Per il catetere con lunghezza del corpo di 28 cm, non tagliare prima del contrassegno a
35 cm
Per il catetere con lunghezza del corpo di 32 cm, non tagliare prima del contrassegno a
40 cm
Per il catetere con lunghezza del corpo di 36 cm, non tagliare prima del contrassegno a
40 cm
Per il catetere con lunghezza del corpo di 40 cm, non tagliare prima del contrassegno a
45 cm
Per il catetere con lunghezza del corpo di 55 cm, non tagliare prima del contrassegno a
60 cm
LEGGERE ATTENTAMENTE TUTTE LE ISTRUZIONI,
LE AVVERTENZE E LE PRECAUZIONI PRIMA DELL’UTILIZZO.
COMPLICANZE
Embolia gassosa
Incannulazione arteriosa
Batteremia
Sanguinamento
Lesione del plesso brachiale
Aritmia cardiaca
Tamponamento cardiaco
Embolo al puntale del catetere o
embolo trombotico
Trombosi/stenosi della vena centrale
Chilotorace
Endocardite
Ematoma (sottocutaneo)
Emorragia
Nota: l’inserimento nella vena femorale aumenta il rischio di infezione rispetto all’inserimento in
altri punti. Le complicanze aggiuntive comprendono:
Sanguinamento dell’arteria femorale
Danni al nervo femorale
AVVERTENZE
Il catetere va inserito o rimosso da un medico qualicato e abilitato.
Prima del trattamento, il medico dovrà discutere col paziente i rischi e i beneci delle eventuali
alternative alla cateterizzazione.
Emotorace
Infezione (sito di uscita)
Lacerazione (del dotto toracico)
Trombosi del lume
Pneumotorace
Emboli polmonari
Puntura (arteria succlavia, arteriosa destra
vena cava superiore)
Setticemia
Trauma all’atrio destro o
ad un vaso importante
Infezione del tunnel (sottocutanea)
Lacerazione vasale, trauma
Perforazione (vena femorale o arteria)
Sanguinamento retroperitoneale
Stenosi vascolare
55
Italiano
Page 56

Il posizionamento del puntale del catetere e la soluzione della lunghezza corretta sono
lasciati alla discrezione del medico. Tuttavia, una radiograa di routine dovrà sempre seguire l’
inserimento iniziale per confermare il corretto posizionamento dei puntali del catetere prima
dell’utilizzo. La posizione consigliata del puntale è sull’atrio destro o al suo interno, oppure alla
giunzione della vena cava superiore/atrio destro (VCS/AD).
Esaminare il lume e le prolunghe prima e dopo ciascun trattamento per rilevare eventuali segni
di danni o di usura.
Non serrare eccessivamente i connettori del catetere. Un serraggio eccessivo può incrinare i
connettori.
Utilizzare sempre tecniche sterili mentre si maneggia questo catetere e tutti gli articoli sterili.
Non utilizzare il catetere o i componenti del kit se il sigillo sterile è rotto.
Non utilizzare un catetere danneggiato (ad es. schiacciato, piegato, tagliato) o eventuali componenti danneggiati del kit, inclusi i connettori con lettature spanate.
Per evitare embolia gassosa, tenere sempre il catetere clampato tranne quando è collegato alle
linee del sangue o ad una siringa durante il trattamento.
Non clampare i lumi del catetere; i morsetti devono essere applicati solo alle prolunghe dei
tubi.
Utilizzare solo pinze lisce o a branche quando non si utilizzano i morsetti per catetere forniti.
Alternare la posizione di clampaggio per evitare la possibilità di inuenzare negativamente le
prestazioni dei tubi e di ridurre la durata utile. Evitare di applicare i morsetti in prossimità degli
adattatori e del corpo del catetere.
Prestare attenzione quando si utilizzano strumenti alati in prossimità del catetere. Non utilizzare strumenti alati né forbici per rimuovere la medicazione.
1
Nastrare dei tappi per iniezione fra un trattamento e l’altro per evitare la rimozione accidentale.
Inteso per il Monouso. NON RIUTILIZZARE. Il riutilizzo e/o il riconfezionamento possono
esporre a rischio d’infezione il paziente o l’utilizzatore, compromettere l’integrità strutturale
e/o speciche caratteristiche dei materiali o costruttive del dispositivo, inciandone il corretto
funzionamento, e/o causando danni, lesioni, o morte per il paziente.
Non risterilizzare gli accessori del kit del catetere. Il produttore non si assume alcuna responsabilità di alcun danno derivante dalla risterilizzazione del catetere o di componenti del kit.
Italiano
Non forzare la guida, i dilatatori, né l’introduttore a spellatura durante l’inserimento per non
rischiare di perforare o danneggiare i vasi.
Evitare l’esposizione prolungata alle luci ultraviolette per evitare danni al catetere.
Non inserire l’introduttore a spellatura più del necessario. Potrebbe non essere necessario
allungare completamente l’introduttore a seguito della taglia del paziente e del punto di
accesso.
Per inserire l’estremità della guida a “J” nell’ago dell’introduttore utilizzare il raddrizzatore della
guida. Non forzare la guida a “J” durante l’inserimento o la rimozione di alcun componente,
poiché il lo potrebbe rompersi.
Utilizzare solo connettori luer-lock lettati (compresi siringhe, linee del sangue e tappi per
iniezione) con gli adattatori del catetere.
In fase di sutura evitare di intaccare o perforare i lumi del catetere o le prolunghe.
In fase di sutura non legare in modo eccessivamente stretto.
Irrorare il catetere con soluzione salina e quindi clampare le prolunghe.
Durante l’infusione di eparina, sciacquare rapidamente e clampare per garantire che l’eparina
raggiunga l’estremità distale del lume. Non eseguire l’infusione contro un morsetto chiuso
né eseguirla con forza su un catetere bloccato. L’infusione con forza di un catetere bloccato
potrebbe creare una forza di contropressione che potrebbe causare l’espulsione dell’adattatore
dalla tubazione.
56
Page 57

Non utilizzare soluzioni di acetone né di iodio su alcuna parte della tubazione del catetere. Tale
IV
V
VI
I
II
III
esposizione potrebbe danneggiare il catetere.
Rimuovere il catetere quando non fosse più necessario.
Non utilizzare il catetere dopo la data di scadenza riportata sulla confezione.
È richiesta particolare attenzione da parte del medico quando si inserisce questo catetere in
pazienti che non siano in grado di eseguire un respiro profondo o di trattenerlo. I pazienti che
utilizzino dispositivi di respirazione assistita o che ne richiedano il supporto sono soggetti ad
un maggiore rischio di pneumotorace durante l’incannulazione della giugulare interna o della
succlavia.
In questo documento non sono elencati tutte le istruzioni né tutti i protocolli accettati in
ambito medico, né il documento va inteso come sostituto dell’esperienza e della valutazione
del medico nel trattamento di qualsiasi paziente specico. Tuttavia è opportuno rivedere le
procedure, le precauzioni e le avvertenze prima di utilizzare il prodotto.
INSERIMENTO DEL CATETERE IN SILICONE CON BRACCIALE PNEUMATICO RETRO*
I. Sito di inserimento
La vena giugulare interna è il sito di inserimento preferito per il catetere, poiché permette un
più semplice posizionamento del puntale del catetere nell’atrio destro.
Per l’inserimento è anche possibile utilizzare la vena succlavia. Notare, tuttavia, che l’utilizzo
della vena succlavia è associato alla stenosi della vena succlavia. Ciò può precludere, in futuro,
la creazione di un accesso arteriovenoso sull’arto superiore.
È possibile inserire il catetere nella vena femorale (vedere la Sezione IV). Tuttavia, l’inserimento
nella vena femorale è associato ad un rischio di infezione superiore.
I - VENA GIUGULARE INTERNA
II - SITO DI INSERIMENTO
III - VENA CAVA SUPERIORE
IV - BRACCIALE PNEUMATICO
V - SITO DI USCITA
VI - POSIZIONE CONSIGLIATA
DEL PUNTALE
NELL’ATRIO DESTRO (AD)
II. Inserimento utilizzando la guaina/il dilatatore tramite tecnica di Seldinger
A. Preparazione del sito
Si consiglia di utilizzare una sala operatoria sterile durante il posizionamento del catetere.
Sono anche necessari teli, strumenti e accessori sterili. Sono necessari un sistema per la pulizia
e disinfezione delle mani, un camice protettivo, un cappuccio, guanti e mascherina.
Radere la cute del paziente al di sopra e al di sotto del sito di inserimento se necessario. Il
paziente va coperto prima di somministrare una quantità suciente di anestetico locale per
anestetizzare completamente il sito di inserimento.
Il posizionamento consigliato è col paziente in una leggera posizione di Trendelenburg.
Praticare una piccola incisione seguendo le linee cutanee sul vaso desiderato.
B. Puntura vasale
Collegare una siringa ad un ago introduttore e inserirlo nella vena di destinazione sotto guida
Italiano
57
Page 58

ultrasonica, se disponibile. Aspirare per accertarsi della correttezza del posizionamento. Un
usso libero di sangue indica l’ingresso nel vaso. Se il sangue è rosso vivo o si riscontra un
ritorno pulsante, ritirare e ridirigere l’ago.
Rimuovere la siringa e collocare il pollice sull’estremità dell’ago introduttore per prevenire la
perdita di sangue o l’embolia gassosa. Una volta aspirato il sangue, far scivolare nuovamente
l’estremità essibile della guida nel dispositivo di avanzamento, in modo che sia visibile solo
l’estremità della guida. Inserire l’estremità distale del dispositivo di avanzamento nel raccordo
dell’ago.
Far avanzare la guida essibile con un moto in avanti nel raccordo dell’ago e oltre questo, no
alla vena di destinazione. La lunghezza di inserimento dipende dalla taglia del paziente.
Attenzione: non ritrarre la guida con alcun elemento.
Attenzione: utilizzare la guida uoroscopica o ultrasonica per garantire il corretto inserimento e posizionamento della guida.
Se la guida è lasciata penetrare nell’atrio destro, possono derivarne aritmie cardiache.
Utilizzare il monitoraggio del ritmo cardiaco per rilevare le aritmie.
Rimuovere l’ago sulla guida, accertandosi che la guida sia tenuta saldamente durante tutto il
processo di rimozione dell’ago.
C. Dilatazione del vaso e inserimento del catetere
Dilatazione del vaso e inserimento della guaina
Far scivolare un dilatatore venoso sul lo e farlo avanzare attraverso la cute e nella vena.
Prestare attenzione a non far avanzare la guida. La guida deve essere ferma durante
l’avanzamento del dilatatore.
La dilatazione seriale è preferita. Se sono utilizzati altri dilatatori, inserire i dilatatori sulla guida
nel vaso. Rimuovere i dilatatori quando il vaso sia sucientemente dilatato, lasciando la guida
in posizione.
Attenzione: non lasciare i dilatatori vasali in posizione per un periodo più lungo del necessario, per evitare la possibile perforazione della parete del vaso.
Far scivolare l’introduttore/la guaina a spellatura sulla guida nella vena, mantenendo nel
Italiano
contempo la posizione della guida.
Attenzione: è necessario utilizzare l’osservazione uoroscopica per evitare la puntura
vasale.
Rimuovere la guida.
Attenzione: non lasciare la guaina in posizione per un periodo più lungo del necessario,
per evitare di danneggiare la vena.
Inserimento del catetere
AVVERTENZA: NON TENTARE MAI DI SEPARARE I LUMI.
Rimuovere il dilatatore della guaina inserita in precedenza.
Per evitare perdite di sangue, clampare le prolunghe prossimali del catetere con i morsetti
piatti forniti prima di inserire il catetere nella guaina.
Inserire i puntali distali del catetere nella guaina e attraverso questa, no a quando i puntali
del catetere non siano correttamente posizionati nella vena di destinazione.
Attenzione: inserire rapidamente il catetere nella guaina per evitare perdite di sangue o
embolie gassose.
Attenzione: il posizionamento del puntale del catetere nella sede appropriata produce un
usso ematico ottimale, come descritto nelle indicazioni KDOQI.
58
Page 59

Attenzione: la mancata verica del posizionamento del catetere può comportare gravi
traumi o complicanze fatali.
Estrarre la guaina a spellatura dal vaso con un movimento delicato e lento.
Le regolazioni del posizionamento del catetere vanno eseguite sotto uoroscopia o guida
ultrasonica. Il puntale distale venoso va posizionato al livello della parte superiore dell’atrio
destro, in corrispondenza della giunzione atriale della vena cava o oltre questa.
Attenzione: per evitare danni vasali quando si rimuove la guaina a spellatura, ritrarre la
guaina quanto più possibile e tagliare la guaina solo di pochi centimetri alla volta. Non
tirare la parte della guaina che resta nel vaso.
D. Tunnellizzazione del catetere Retro*
Praticare una piccola incisione al sito di uscita del tunnel sottocutaneo. Il catetere è contrassegnato per indicare un raccordo teorico. Questo contrassegno dovrà essere appena
esterno al sito di uscita. Praticare l’incisione con una larghezza appena suciente ad ospitare
il catetere. Somministrare un anestetico locale in quantità suciente ad anestetizzare completamente il tessuto.
Utilizzando una dissezione smussa col mandrino di tunnellizzazione, creare un tunnel sottocutaneo direttamente verso il sito di ingresso.
Quando il mandrino di tunnellizzazione emerge dal sito di ingresso, collocare l’estremità rastremata del manicotto di tunnellizzazione sul tunnellizzatore esposto. Se necessario, spingere
il bracciale pneumatico per iniziare un percorso per consentire al bracciale pneumatico di
scivolare attraverso il tunnel sottocutaneo.
Inlare o incastrare l’adattatore/tunnellizzatore del catetere sul mandrino in modo che sia
ssato saldamente (a seconda del tunnellizzatore utilizzato).
Rimuovere i morsetti prossimali sul catetere e tagliare il catetere al contrassegno di 50 cm sul
lato venoso e al contrassegno di 47,5 cm sul lume arterioso.
Per i cateteri femorali (con lunghezza complessiva di 67 cm), tagliare il catetere al contrassegno a 65cm sul lato venoso e a 62,5 cm sul lume arterioso.
Fissare l’estremità del catetere all’adattatore, quindi spingere il manicotto di tunnellizzazione
sul catetere.
Tirare il mandrino di tunnellizzazione no a quando il catetere non fuoriesca dal sito di uscita
e il contrassegno del catetere non sia visibile.
Rimuovere con cura il catetere dal mandrino tirando il manicotto di tunnellizzazione e quindi
piegando delicatamente il mandrino no ad estrarlo dal catetere.
Collegare nuovamente i morsetti alle estremità prossimali del catetere.
Se lo si desidera, le estremità prossimali del catetere possono essere tagliate per raggiungere
la lunghezza desiderata. I tagli vanno praticati alle lunghezze contrassegnate, dal momento
che i volumi di riempimento per tali lunghezze sono documentati.
AVVERTENZE
AVVERTENZA: NON TENTARE MAI DI SEPARARE I LUMI DEL CATETERE.
Non eseguire un tunnel attraverso il muscolo.
Non tirare la tubazione del catetere. Ciò potrebbe allungare e danneggiare il catetere.
Non estendere eccessivamente il tessuto sottocutaneo durante la procedura di tunnellizzazione. Un’espansione eccessiva potrebbe ritardare o impedire la crescita del bracciale
pneumatico verso l’interno e può aumentare il sanguinamento.
Un’ulteriore dissezione smussa potrebbe facilitare l’inserimento se si dovesse incontrare
resistenza.
59
Italiano
Page 60

III. Inserimento senza guaina (SafeTrac*) tramite tecnica di Seldinger
A. Preparazione del sito
Si consiglia di utilizzare una sala operatoria sterile durante il posizionamento del catetere.
Sono anche necessari teli, strumenti e accessori sterili. Sono necessari un sistema per la pulizia
e disinfezione delle mani, un camice protettivo, un cappuccio, guanti e mascherina.
Radere la cute del paziente al di sopra e al di sotto del sito di inserimento se necessario. Il
paziente va coperto prima di somministrare una quantità suciente di anestetico locale per
anestetizzare completamente il sito di inserimento.
Il posizionamento consigliato è col paziente in una leggera posizione di Trendelenburg.
Praticare una piccola incisione seguendo le linee cutanee sul vaso desiderato.
B. Puntura vasale
Collegare una siringa ad un ago introduttore e inserirlo nella vena di destinazione sotto guida
ultrasonica, se disponibile. Aspirare per accertarsi della correttezza del posizionamento. Un
usso libero di sangue indica l’ingresso nel vaso. Se il sangue è rosso vivo o si riscontra un
ritorno pulsante, ritirare e ridirigere l’ago.
Rimuovere la siringa e collocare il pollice sull’estremità dell’ago introduttore per prevenire la
perdita di sangue o l’embolia gassosa. Una volta aspirato il sangue, far scivolare nuovamente
l’estremità essibile della guida nel dispositivo di avanzamento, in modo che sia visibile solo
l’estremità della guida. Inserire l’estremità distale del dispositivo di avanzamento nel raccordo
dell’ago.
Far avanzare la guida essibile con un moto in avanti nel raccordo dell’ago e oltre questo,
no alla vena di destinazione. Inserire la guida no a quando il puntale non passi all’interno
dell’atrio destro e attraverso questo nella vena cava inferiore. La lunghezza di inserimento
dipende dalla taglia del paziente. Sottoporre il paziente a monitoraggio cardiaco durante la
procedura per rilevare eventuali segni di aritmia.
Attenzione: non ritrarre la guida attraverso alcun componente.
Attenzione: utilizzare la guida uoroscopica o ultrasonica per garantire il corretto inserimento e posizionamento della guida.
Italiano
Se la guida è lasciata penetrare nell’atrio destro, possono derivarne aritmie cardiache.
Utilizzare il monitoraggio del ritmo cardiaco per rilevare le aritmie.
Rimuovere l’ago sulla guida, accertandosi che la guida sia tenuta saldamente durante tutto il
processo di rimozione dell’ago.
Far scivolare un dilatatore a guaina da 6 Fr sul lo e farlo avanzare attraverso la cute e nella
vena. Prestare attenzione a non far avanzare la guida. La guida deve essere ferma durante
l’avanzamento del dilatatore a guaina.
Rimuovere il dilatatore. Inserire un altro lo attraverso la guaina. Rimuovere la guaina.
C. Dilatazione del vaso e inserimento del catetere
AVVERTENZA: NON TENTARE MAI DI SEPARARE I LUMI DEL CATETERE
Collocare nei lumi del catetere i due dilatatori intracatetere forniti. I dilatatori intracatetere
hanno luer che si bloccano sull’estremità prossimale dei rispettivi luer arteriosi e venosi sul
catetere.
Far scivolare l’estremità esposta di uno dei li attraverso il dilatatore intracatetere venoso no
a quando non esca dall’estremità venosa prossimale del dilatatore.
Far scivolare sull’altro lo i dilatatori venosi appropriati e farli avanzare attraverso la cute. La
dilatazione seriale è preferita.
Rimuovere i dilatatori.
60
Page 61

Attenzione: non lasciare i dilatatori vasali in posizione per un periodo più lungo del necessario, per evitare la possibile perforazione della parete del vaso.
Far scivolare il lo esposto attraverso il dilatatore intracatetere arterioso no a quando non
esca dall’estremità arteriosa prossimale del catetere.
Far avanzare i li no a quando non esista alcun gioco nei li tra l’estremità distale del catetere
e il sito di ingresso.
Far avanzare il catetere attraverso la cute nel vaso. Potrebbe essere necessaria una leggera
torsione in una delle direzioni per far avanzare il catetere nella vena.
Per il posizionamento corretto si consiglia vivamente la guida ultrasonica o uoroscopica.
Attenzione: il posizionamento del puntale del catetere nella sede appropriata produce un
usso ematico ottimale, come descritto nelle indicazioni K/DOQI.
Attenzione: la mancata verica del posizionamento del catetere può comportare gravi
traumi o complicanze fatali.
Rimuovere le guide e i dilatatori intracatetere.
D. Tunnellizzazione del catetere Retro*
Praticare una piccola incisione al sito di uscita del tunnel sottocutaneo. Il catetere è contrassegnato per indicare un raccordo teorico. Questo contrassegno dovrà essere appena
esterno al sito di uscita. Praticare l’incisione con una larghezza appena suciente ad ospitare
il catetere. Somministrare un anestetico locale in quantità suciente ad anestetizzare completamente il tessuto.
Utilizzando una dissezione smussa col mandrino di tunnellizzazione, creare un tunnel sottocutaneo direttamente verso il sito di ingresso.
Quando il mandrino di tunnellizzazione emerge dal sito di ingresso, collocare l’estremità
rastremata del manicotto di tunnellizzazione sul tunnellizzatore esposto. Se necessario, spingere il bracciale pneumatico per iniziare un percorso per consentire al manicotto di scivolare
attraverso il tunnel sottocutaneo.
Inlare o incastrare l’adattatore/tunnellizzatore del catetere sul mandrino in modo che sia
ssato saldamente (a seconda del tunnellizzatore utilizzato).
Rimuovere i morsetti prossimali sul catetere e tagliare il catetere al contrassegno di 50 cm sul
lato venoso e al contrassegno di 47,5 cm sul lume arterioso.
Per i cateteri femorali (con lunghezza complessiva di 67 cm), tagliare il catetere al contrassegno a 65cm sul lato venoso e a 62,5 cm sul lume arterioso.
Fissare l’estremità del catetere all’adattatore, quindi spingere il manicotto di tunnellizzazione
sul catetere.
Tirare il mandrino di tunnellizzazione no a quando il catetere non fuoriesca dal sito di uscita
e il contrassegno del catetere non sia visibile.
Rimuovere con cura il catetere dal mandrino tirando il manicotto di tunnellizzazione e quindi
piegando delicatamente il mandrino no ad estrarlo dal catetere.
Collegare nuovamente i morsetti alle estremità prossimali del catetere.
Se lo si desidera, le estremità prossimali del catetere possono essere tagliate per raggiungere
la lunghezza desiderata. I tagli vanno praticati alle lunghezze contrassegnate, dal momento
che i volumi di riempimento per tali lunghezze sono documentati.
AVVERTENZE
AVVERTENZA: NON TENTARE MAI DI SEPARARE I LUMI.
Italiano
61
Page 62

Non eseguire un tunnel attraverso il muscolo.
A
B
C
A
C
Non tirare la tubazione del catetere. Ciò potrebbe allungare e danneggiare il catetere.
Non estendere eccessivamente il tessuto sottocutaneo durante la procedura di tunnellizzazione. Un’espansione eccessiva potrebbe ritardare o impedire la crescita del bracciale
pneumatico verso l’interno e può aumentare il sanguinamento.
Un’ulteriore dissezione smussa potrebbe facilitare l’inserimento se si dovesse incontrare
resistenza.
IV. Procedura per il posizionamento nelle vena femorale
AVVERTENZA: IL RISCHIO DI INFEZIONE AUMENTA CON L’INSERIMENTO NELLA VENA
FEMORALE. Per ridurre il rischio di infezione, prendere in considerazione punti di accesso
quali la zona pelvica in alternativa alla tradizionale zona inguinale.
Valutare le aree femorali destra e sinistra in modo da selezionare la vena più adatta per il
posizionamento del catetere. Si consiglia di utilizzare la visualizzazione ultrasonica.
Per l’inserimento con guaina/divaricatore, seguire la procedura nella Sezione II, “Inserimento
con l’utilizzo di guaina/divaricatore usando la tecnica di Seldinger”.
Per l’inserimento senza guaina, seguire la procedura nella Sezione III, “Inserimento senza
guaina (SafeTrac*) usando la tecnica di Seldinger”.
L’inserimento femorale è analogo a quello elencato nelle Sezioni II e III con le seguenti eccezioni (vedere 1, 2 e 3 di seguito):
1) Il paziente non va posizionato in lieve Trendelenburg
2) La punta del catetere va posizionata a metà della vena cava inferiore (VCI) o alla giunzione
della vena iliaca e della vena cava inferiore.
3) Il catetere va tagliato al contrassegno a 65cm sul lume venoso e a 62,5 cm sul lume arterioso prima della tunnellizzazione.
2
I li guida non devono penetrare nell’atrio destro. Ciò potrebbe causare aritmie cardiache.
Italiano
V. Montaggio dell’adattatore di prolunga del catetere o applicazione del kit di riparazione
Retro*
Utilizzare i morsetti piatti forniti assieme al kit del catetere per clampare il catetere se necessario e nella sostituzione di adattatori di prolunga usurati o danneggiati con prolunghe “kit di
riparazione Retro*”.
Non utilizzare una pinza seghettata.
Nelle operazioni di taglio alla lunghezza desiderata o per la sostituzione di adattatori di prolunga usurati o danneggiati, accertarsi che il catetere sia in ordine e che il lume del catetere
rimanente non sia danneggiato. Fare riferimento alla lunghezza operativa e al corrispondente
volume di riempimento.
62
Page 63

Far scivolare il cappuccio rosso del catetere (A) sull’estremità prossimale del catetere con
contrassegni rossi. Vericare che il cappuccio rosso abbia una guarnizione (B) all’interno del
cappuccio. Far scivolare il diametro interno del lume del catetere arterioso (rosso) sul tubo
in acciaio inox (che fa parte di (C) e forma l’inizio del tubo di prolunga) no a quando non
raggiunga la spalla. Inserire il cappuccio (A) verso la parte (C) no a quando non si arresta sul
corpo dell’adattatore. Ripetere la procedura per l’adattatore di prolunga blu.
Attenzione: per evitare incrinature, non serrare eccessivamente i cappucci.
Rimuovere i morsetti piatti dai lumi arterioso (rosso) e venoso (blu).
Collegare le siringhe ad entrambe le prolunghe e aprire i morsetti. Il sangue dovrebbe essere
aspirato facilmente sia dal lato arterioso che da quello venoso. Se si verica una resistenza eccessiva all’aspirazione del sangue, riposizionare il catetere per ottenere ussi ematici adeguati.
Irrorare entrambi i lumi con siringhe riempite di soluzione salina una volta ottenuta
un’aspirazione adeguata utilizzando la tecnica del bolo rapido. Vericare che i morsetti di
prolunga siano aperti durante la procedura di irrorazione.
Chiudere i morsetti di prolunga, rimuovere le siringhe, quindi collocare un tappo per iniezione
su ciascun connettore luer-lock.
VI. Fissaggio del catetere e cura della ferita
È fornita un’ala di sutura ssabile per suturare il catetere al sito di uscita. Premere leggermente le ali di sutura ssabili per aprire il lato inferiore suddiviso del corpo dell’ala di
sutura.Collocare l’ala di sutura al contrassegno della dimensione del catetere al sito di uscita e
rilasciare. Fissare l’ala suturandola in posizione attraverso i fori forniti.
Inserimento della sutura e siti di uscita chiusi. Successivamente, suturare gli adattatori del
catetere alla cute utilizzando l’ala di sutura. Non suturare la tubazione del catetere.
Attenzione: evitare di intaccare il catetere durante la sutura.
Attenzione: gli oggetti alati possono provocare la rottura del catetere a causa di forature
o tagli nel lume dello stesso.
Coprire i siti di inserimento e di uscita con medicazioni occlusive.
Registrare la lunghezza del catetere e il numero di lotto del catetere sulla scheda del paziente.
EPARINIZZAZIONE
Seguire le indicazioni sulla pervietà del catetere se il catetere non deve essere utilizzato immediatamente per il trattamento.
Per mantenere la pervietà del catetere fra un trattamento e l’altro, creare un blocco di eparina
in ciascun lume del catetere.
Seguire il protocollo ospedaliero per la concentrazione di eparina.
Prelevare l’eparina in due siringhe, corrispondenti alla quantità indicata sulle prolunghe
arteriosa e venosa. Accertarsi che le siringhe siano prive di aria.
Rimuovere i tappi per iniezione dalle prolunghe.
Collegare una siringa contenente soluzione di eparina al luer femmina di ciascuna prolunga.
Aprire i morsetti di prolunga.
Attenzione: aspirare per accertarsi che l’aria non venga immessa a forza nel paziente.
Iniettare l’eparina in ciascun lume utilizzando la tecnica del bolo rapido.
Attenzione: ciascun lume va completamente riempito di eparina per garantire l’ecacia.
Chiudere i morsetti di prolunga.
63
Italiano
Page 64

Attenzione: i morsetti di prolunga vanno aperti solo per l’aspirazione, il risciacquo e il
trattamento in dialisi.
Rimuovere le siringhe.
Fissare un tappo per iniezione sterile sui luer femmine delle prolunghe.
Applicare con nastro adesivo tappi per iniezione per evitare la rimozione accidentale.
L’eparina non è necessaria per le successive 48 - 72 ore, purché i lumi non siano stati aspirati
o sciacquati.
TRATTAMENTO DELL’EMODIALISI
Attenzione: per evitare embolia gassosa, tenere i tubi di prolunga sempre clampati
durante i periodi di mancato utilizzo.
Attenzione: per prevenire l’eparinizzazione sistemica, la soluzione di eparina deve essere
rimossa da ciascun lume prima del trattamento del paziente.
Aspirare e irrigare il catetere con soluzione salina prima di ciascun utilizzo. Disaerare
completamente il catetere e tutti i tappi e la tubazione di collegamento quando si cambia la
connessione della tubazione.
La procedura di aspirazione dovrà rispettare il protocollo dell’unità di dialisi.
Prima di iniziare la dialisi, controllare attentamente tutte le connessioni del catetere e i circuiti
extracorporei.
Attenzione: ssare sempre con nastro adesivo i luer-lock alle linee del sangue durante il
trattamento come protezione dal distacco accidentale.
Esaminare visivamente il catetere e le relative connessioni per rilevare eventuali segni di
perdite, per prevenire la perdita di sangue o l’embolia gassosa. Se necessario, adottare misure
correttive adeguate prima di continuare il trattamento di dialisi.
Attenzione: un’eccessiva perdita di sangue potrebbe provocare shock al paziente.
L’emodialisi va eseguita seguendo le istruzioni del medico.
Italiano
POST-DIALISI
Preparare siringhe con soluzione salina normale ed eparina
Arrestare la pompa del sangue. Chiudere il morsetto sulla prolunga arteriosa. Clampare la
linea del sangue arterioso al sito di collegamento.
Scollegare la linea del sangue arterioso dall’adattatore del catetere e collegare una siringa,
riempita di soluzione salina normale, all’adattatore arterioso. Aprire il morsetto sulla prolunga
arteriosa e sciacquare il sangue dal lume arterioso del catetere. Clampare nuovamente la
prolunga.
Eparinizzare il lume con i livelli appropriati di volume e concentrazione dell’eparina (vedere
in precedenza).
Risciacquare il sangue nel circuito extracorporeo attraverso il lume venoso.
Dopo aver risciacquato il sangue del paziente, spegnere la pompa del sangue. Clampare la
prolunga venosa e scollegare la linea del sangue venoso dall’adattatore venoso del catetere.
Collegare una siringa, riempita con soluzione salina normale, all’adattatore venoso. Aprire
il morsetto sulla prolunga venosa e sciacquare tutto il sangue venoso rimanente dal lume
venoso del catetere. Clampare nuovamente e quindi eparinizzare il lume con i livelli appropriati di volume e concentrazione dell’eparina.
64
Page 65

Accertarsi che i morsetti siano chiusi su entrambe le prolunghe. Rimuovere le siringhe e ssare
un tappo di tenuta per iniezione a ciascun adattatore. Fissare con nastro adesivo i tappi di
tenuta per iniezione alle prolunghe per prevenire la rimozione accidentale.
AVVERTENZA
Tenere sempre il catetere clampato, tranne quando è collegato alle linee del sangue o ad
una siringa durante il trattamento.
FLUSSO DI SANGUE NEL CATETERE
Flussi insucienti
L’insucienza del usso sanguigno può essere causata dall’occlusione dei fori arteriosi dovuta
a coaguli o a deposito di brina o dall’occlusione dei fori del lato arterioso a causa del contatto
con la parete venosa.
Tabella: Caratteristica del usso in funzione della pressione per tutti i cateteri Retro*
Portata Intervallo medio di
pressione interna del lume
(ml/min) (mm Hg)
100 24 - 34
150 39 - 50
200 58 - 70
250 79 - 93
300 104 - 121
350 129 - 152
400 157 - 186
450 192 - 233
500 224 - 267
Gli intervalli di pressione arteriosa e venosa sono elencati
in precedenza. Nota: I risultati precedenti sono stati
ottenuti utilizzando acqua deionizzata
Ostruzioni monodirezionali
Le ostruzioni monodirezionali esistono quando è possibile risciacquare facilmente un lume
ma non è possibile aspirare il sangue. Ciò è di solito causato da coaguli, depositi di brina o
errato posizionamento del puntale. In questo ultimo caso, il usso insoddisfacente avviene
subito dopo il posizionamento.
RIMOZIONE DEL CATETERE
AVVERTENZA
Solo un medico esperto nelle tecniche appropriate dovrà eseguire la rimozione del
catetere.
Palpare il catetere in prossimità del sito di uscita per localizzare il bracciale pneumatico del
catetere.
Anestetizzare l’area del bracciale pneumatico del catetere e del sito di uscita somministrando
una quantità suciente di anestetico locale.
Tagliare le suture dall’ala di sutura. Vanno seguite le procedure ospedaliere del caso.
Praticare una piccola incisione sul bracciale pneumatico, in direzione parallela al catetere.
Eseguire la dissezione verso il bracciale pneumatico con uno strumento smussato o tagliente.
Aerrare il bracciale pneumatico con un morsetto quando è visibile.
Italiano
65
Page 66

Clampare il catetere fra il bracciale pneumatico e il sito di inserimento. Accertarsi che il
morsetto sia sucientemente clampato da prevenire il usso di sangue in uno dei lumi.
Per liberare il catetere dal tessuto, tirare delicatamente il catetere con un moto continuo e
lento, prestando attenzione ad evitare strappi o l’applicazione di forza eccessiva, in modo da
evitare di strappare il bracciale pneumatico.
Attenzione: non tirare il catetere se si avverte resistenza. Eseguire invece un accesso chirurgico e rimuovere tutte le suture al sito della ebotomia.
Applicare pressione al tunnel prossimale no a quando il sanguinamento non si sia arrestato.
Suturare l’incisione e applicare una medicazione per favorire la cicatrizzazione.
Controllare l’integrità del catetere per rilevare eventuali strappi e misurare il catetere al
momento della rimozione. Confrontare la lunghezza con le speciche applicabili al prodotto
per accertarsi che l’intero catetere sia stato correttamente rimosso.
1
National Kidney Foundation, Kidney Disease Outcomes Quality Initiative (KDOQI) Guidelines,
Guideline 5, “Type and Location of Tunneled Cu Catheter Placement.” (2000)
2
GX Zaleski, B. Funaki, JM Lorenz, RS Garofolo, MA Moscatel, JD Rosenblum and JA Leef.
Department of Radiology, The University of Chicago Hospital, IL 60637, USA. “Experience
with tunneled femoral hemodialysis catheters. Am J Rcmtgenol. 1999 Feb; 172 (2)c 493-496.
Close extension clamps.
Bard Access Systems, Inc. garantisce all’acquirente che questo prodotto è privo di difetti
per quanto riguarda i materiali e la fabbricazione per un periodo di un (1) anno dalla data
dell’acquisto. Se questo prodotto risulta difettoso, l’acquirente può restituirlo a Bard Access
Systems, Inc. per l’eventuale riparazione o sostituzione, a discrezione di Bard Access Systems,
Inc. Tutte le restituzioni devono essere preventivamente autorizzate conformemente alla
Normativa sulle merci restitui te (Returned Goods Polic y) di Bard Access Systems, Inc.
contenuta nel Listino prezzi. La responsabilità di Bard Access Systems, Inc. in base a questa
garanzia limitata sul prodotto non si estende a qualsiasi abuso o uso improprio di questo
prodotto o alla sua riparazione che non sia effettuata da un funzionario autorizzato di Bard
Access Systems, Inc.
Italiano
LA GARANZIA LIMITATA PER IL PRODOTTO È VALIDA E SOSTITUISCE TUTTE LE ALTRE GARANZIE,
ESPLICITE O IMPLICITE (COMPRENDENDO, MA NON SOLO, TUTTE LE GARANZIE IMPLICITE DI
COMMERCIABILITÀ O IDONEITÀ A UN DETERMINATO SCOPO) LA RESPONSABILITÀ E IL
RISARCIMENTO DEFINITI IN QUESTA GARANZIA LIMITATA SUL PRODOTTO SARANNO LE
UNICHE RESPONSABILITÀ DI BARD ACCESS SYSTEMS, INC. E IL RISARCIMENTO DISPONIBILE
PER L’ACQUIRENTE DI QUESTO PRODOTTO, SE SOTTO CONTRATTO, A TORTO (INCLUSA
NEGLIGENZA) O ALTRO, E BARD ACCESS SYSTEMS, INC. NON SARÀ RITENUTA RESPONSABILE
DI QUALSIASI DANNO INDIRETTO, SPECIALE, INCIDENTALE O CONSEQUENZIALE DERIVANTE
DAL SUO UTILIZZO.
© 2010 C. R. Bard, Inc. Tutti i diritti riservati.
Data di revisione: febbraio 2010
66
Page 67

INSTRUÇÕES DE UTILIZAÇÃO
Implant Length
Body Length
Overall Length
32cm
32cm
35cm
35cm
40cm
40cm
45cm
45cm
50cm
50cm
INDICAÇÕES PARA UTILIZAÇÃO
Retro* Silicone Twin Lumen Chronic Hemodialysis Catheter with Separated Tips (cateter de
hemodiálise crónica de dois lúmens em silicone com pontas separadas) da foi concebido
para aferese e hemodiálise crónica. Trata-se de um cateter radiopaco concebido para inserção
percutânea ou por dissecção. Os cateteres com um comprimento superior a 40 cm podem ser
utilizados para inserção na veia femoral.
COLOCAÇÃO DO CATETER
Este cateter pode ser colocado por via percutânea utilizando uma “Técnica de Seldinger”
modicada ou por venotomia aberta.
Recomenda-se executar este procedimento sob orientação uoroscópica ou ultrassonográca
para garantir uma correcta orientação da ponta e colocação na aurícula direita.
CONTRA-INDICAÇÕES
Este cateter destina-se apenas ao acesso vascular a longo prazo, não devendo ser utilizado
para qualquer outra nalidade do que a indicada nestas instruções.
DESCRIÇÃO
O Retro* Twin Lumen Chronic Hemodialysis Catheter with Separated Tips (cateter de hemodiálise crónica de dois lúmens em silicone com pontas separadas) é fabricado em silicone
radiopaco de classicação médica. A sua forma oval e a composição do material em silicone
proporcionam uma maior exibilidade e resistência aos desvios.
A m de reduzir a recirculação durante a hemodiálise, o lúmen arterial do cateter é mais curto
do que o lúmen venoso na extremidade distal do mesmo. O cateter está dotado de uma
manga de feltro e possui adaptadores de extensões separados com códigos de cores.
As extremidades proximais do cateter são introduzidas através de túnel aberto no sentido
retrógrado para o local de saída depois de as pontas terem sido colocadas. Esta concepção
permite que as pontas do cateter sejam colocadas de forma precisa. As duas extremidades
proximais do cateter, nomeadamente a arterial e a venosa, são ligadas aos adaptadores das
extensões com códigos de cores. Cada adaptador de extensão possui uma manga de compressão e uma tampa de compressão. Cada adaptador de extensão possui uma manga de
compressão, uma tampa de compressão, clamp e luer.
DIMENSÕES
Comprimento Comprimento Comprimento
do implante do corpo geral
19 cm 24 cm 52 cm
23 cm 28 cm 52 cm
27 cm 32 cm 52 cm
31 cm 36 cm 52 cm
35 cm 40 cm 52 cm
50 cm 55 cm 67 cm
Comprimentos operacionais
30 cm 35 cm 40 cm 45 cm 50 cm
- 35 cm 40 cm 45 cm 50 cm
- - 40 cm 45 cm 50 cm
- - 40 cm 45 cm 50 cm
- - - 45 cm 50 cm
- - - 60 cm 65 cm
Português
VOLUMES DE PREPARAÇÃO
Os volumes de preparação encontram-se impressos no cateter nos comprimentos operacionais 30 cm, 35 cm, 40 cm, 45 cm, 50 cm, 60 cm e 65 cm para os cateteres correspondentes:
67
Page 68

Comprimento
operacional Arterial Venoso
30 cm 1.6 cc 1.7 cc
35 cm 1.8 cc 1.9 cc
40 cm 2.0 cc 2.1 cc
45 cm 2.2 cc 2.3 cc
50 cm 2.4 cc 2.5 cc
60 cm 2.8 cc 2.9 cc
65 cm 3.0 cc 3.1 cc
CUIDADO
As leis federais (E.U.A.) limitam a venda deste dispositivo a médicos ou por prescrição
médica.
AVISOS
No referente ao cateter com comprimento de corpo de 24 cm não cortar antes da marca
dos 30 cm
No referente ao cateter com comprimento de corpo de 28 cm não cortar antes da marca
dos 35 cm
No referente ao cateter com comprimento de corpo de 32 cm não cortar antes da marca
dos 40 cm
No referente ao cateter com comprimento de corpo de 36 cm não cortar antes da marca
dos 40 cm
No referente ao cateter com comprimento de corpo de 40 cm não cortar antes da marca
dos 45 cm
No referente ao cateter com comprimento de corpo de 55 cm não cortar antes da marca
dos 60 cm
LEIA ATENTAMENTE TODAS AS INSTRUÇÕES, AVISOS
E ADVERTÊNCIAS ANTES DE UTILIZAR
COMPLICAÇÕES
Embolia aérea
Canulação arterial
Bacteremia
Sangramento
Lesão no plexo braquial
Arritmia cardíaca
Tamponamento cardíaco
Embolia na ponta do cateter ou
Português
Embolia trombótica
Estenose/Trombose venosa central
Quilotórax
Endocardite
Hematoma (subcutâneo)
Hemorragia
Nota: A inserção na veia femoral aumenta o risco de infecção, quando comparada com a inserção
em outros locais. As complicações adicionais incluem:
Sangramento da Artéria Femoral
Danos nos Nervos Femorais
AVISOS
O cateter deve ser inserido ou removido por um médico autorizado qualicado.
Antes do tratamento, o médico deve abordar com o doente os riscos e vantagens do cateterismo e as alternativas existentes ao mesmo (se houver).
Hemotórax
Infecção (local de saída)
Laceração (do ducto torácico)
Trombose do lúmen
Pneumotórax
Embolias pulmonares
Perfuração (Artéria subclávia, direita
arterial, Veia cava superior)
Septicemia
Traumatismo na aurícula direita ou num dos
vasos principais
Infecção de túnel (subcutânea)
Laceração do vaso, Traumatismo
Perfuração (veia ou artéria femoral)
Sangramento Retroperitoneal
Estenose Venosa
68
Page 69

A colocação da ponta do cateter e a selecção do comprimento certo são deixadas ao critério
do médico. No entanto, deve executar-se sempre um raio-x de rotina após a inserção inicial no
sentido de conrmar a colocação correcta das pontas do cateter antes da utilização. O local
recomendado para a ponta do cateter é na entrada ou no interior da aurícula direita ou na
junção da veia cava superior/aurícula direita (VCS/AD).
Examinar o lúmen e as extensões antes e depois de cada tratamento para ver se existem sinais
de danos ou desgaste.
Não apertar excessivamente os conectores dos cateteres. O aperto excessivo pode rachar os
conectores.
Respeitar sempre as técnicas de esterilização correctas quando manusear este cateter
e todos os elementos esterilizados.
Não utilizar o cateter ou os componentes do kit se o selo que garante a sua esterilidade estiver
danicado.
Não utilizar um cateter danicado (por exemplo, esmagado, amolgado, cortado) nem
qualquer um dos componentes do kit se estiver danicado, incluindo conectores com roscas
desgastadas.
Para evitar embolias aéreas, manter sempre o cateter comprimido com clamp excepto quando
estiver ligado a linhas sanguíneas ou a uma seringa durante o tratamento.
Não comprimir com clamp os lúmens do cateter; os clamps destinam-se a ser aplicados apenas
nas extensões de tubos.
Utilizar apenas pinças lisas ou em forma de mandíbula quando não estiver a utilizar os clamps
de cateter fornecidos. Alternar o local de colocação do clamp de modo a evitar quaisquer
potenciais danos no desempenho do tubo que possam encurtar a sua vida útil. Evitar colocar o
clamp próximo dos adaptadores e do corpo do cateter.
Cuidado quando utilizar instrumentos cortantes próximo do cateter. Não utilizar instrumentos
com arestas ou tesouras para remover o penso.
Prender as tampas para injecção com ta entre tratamentos para evitar que sejam removidos
acidentalmente.
Indicado para uma única utilização. NÃO REUTILIZAR. A reutilização e/ou reembalamento pode
criar um risco de infecção no doente ou no utilizador, comprometer a integridade estrutural e/
ou as características essenciais de design ou material do dispositivo, o que poderá dar origem a
falha do dispositivo e/ou lesão, doença ou morte do doente.
Não voltar a esterilizar os acessórios do kit de cateter. O fabricante não se responsabilizará por
danos resultantes de reesterilização do cateter ou dos componentes do kit.
Não forçar o o-guia, os dilatadores ou o introdutor descolável durante a inserção, uma vez
que tal pode resultar em perfuração ou danos no vaso.
1
Evitar uma exposição prolongada a luzes ultravioletas para evitar danos no cateter.
Não inserir mais para dentro do que é necessário o introdutor descolável. É possível que não
seja necessário esticar o introdutor em todo o seu comprimento devido ao tamanho do doente
e ao local de acesso.
Para inserir a extremidade do o-guia em “J” na agulha introdutora, utilizar o elemento para
endireitar o o-guia. Não forçar o o-guia em “J” durante a inserção ou remoção de qualquer
componente, uma vez que este poderia partir-se.
Utilizar apenas conectores roscados luer-lock (incluindo seringas, linhas sanguíneas e tampas
para injecção) com os adaptadores dos cateteres.
Não picar nem puncionar os lúmens dos cateteres ou as suas extensões durante a sutura.
Não fazer uma sutura excessivamente apertada.
Irrigar o cateter com solução salina e, em seguida, comprimir as extensões com clamps.
Português
69
Page 70

Durante uma infusão de heparina, introduzir rapidamente e comprimir imediatamente com
IV
V
VI
I
II
III
clamp para assegurar que a heparina chega à extremidade distal do lúmen. Não executar a infusão com um clamp fechado nem tentar uma infusão forçada de um cateter bloqueado. Uma
infusão forçada de um cateter bloqueado pode criar pressão retroactiva que poderia fazer com
que o adaptador se desprendesse do tubo.
Não utilizar soluções de acetona ou iodo em qualquer parte do tubo do cateter. A exposição
pode provocar danos no cateter.
Retirar o cateter quando este já não estiver a ser preciso.
Não utilizar o cateter após o m do prazo de validade impresso na embalagem.
Recomenda-se vivamente que que ao critério do médico a inserção deste cateter em doentes
que não podem ou não conseguem respirar fundo. Os doentes que utilizam ventilador ou
que requerem apoio de ventilador correm maior risco de fazer um pneumotórax durante a
canulação subclávia interna da jugular.
Nem todas as instruções ou protocolos medicamente aceites se encontram descritos neste
documento nem o mesmo pretende substituir a experiência e o critério do médico ao tratar
um determinado doente. No entanto, os procedimentos, advertências e avisos devem ser
analisados antes da utilização do produto.
INSERÇÃO DO CATETER DE MANGA DE SILICONE RETRO*
I. Local da inserção
A veia jugular interna é o local de inserção preferido para o cateter, uma vez que permite
posicionar mais facilmente a ponta do cateter na aurícula direita.
A veia subclávia também pode ser utilizada para inserção. No entanto, a utilização da veia
subclávia está associada à estenose da mesma. Tal pode excluir a hipótese futura de criação
de um acesso arteriovenoso no membro superior.
O cateter pode ser inserido na veia femoral (ver Secção IV). Contudo, a inserção na veia femoral está associada a um maior risco de infecção.
I - VEIA JUGULAR INTERNA
II - LOCAL DA INSERÇÃO
III - VEIA CAVA SUPERIOR
IV - MANGA
Português
II. Inserção da bainha/dilatador por meio da Técnica de Seldinger
A. Preparação do local
Recomenda-se a utilização de uma “Sala de operações” esterilizada para a colocação do
cateter. São também necessários panos, instrumentos e acessórios esterilizados. São
necessários: solução de espuma para uso cirúrgico, bata, touca, luvas e máscara de protecção.
Retire os pêlos do doente acima e abaixo do local de inserção, se for necessário. O pano
esterilizado deve ser colocado sobre o doente antes de ser administrado suciente anestésico
local para anestesiar completamente o local de inserção.
Recomenda-se que o doente esteja na posição de Trendelenberg.
70
V - LOCAL DE SAIDA
VI - LOCAL RECOMENDADO
PARA A PONTA NA AURICULA
DIREITA ( CAD)
Page 71

Fazer uma pequena incisão seguindo as linhas da pele sobre o vaso pretendido.
B. Perfuração do vaso
Adaptar uma seringa à agulha introdutora e inserir na veia-alvo sob orientação ultrassonográca, se houver. Aspirar para garantir uma colocação correcta. O sangue a uir livremente
indica a introdução num vaso. Se o sangue for vermelho vivo ou estiver a pulsar, trata-se de
sangue de retorno, pelo que se deve retirar a agulha e redireccioná-la.
Remover a seringa e colocar o polegar sobre a extremidade da agulha introdutora para evitar
perda de sangue ou a ocorrência de embolia aérea. Uma vez aspirado o sangue, deslizar a
extremidade exível do o-guia de novo para dentro do elemento avançado para que apenas
a extremidade do o-guia que à vista. Inserir a extremidade distal do elemento avançado no
conector da agulha.
Fazer avançar o o-guia exível com um movimento de avanço para dentro da veia-alvo, ultrapassando o conector da agulha. O comprimento de inserção está dependente do tamanho
do doente.
Cuidado: Não puxar o o-guia para trás através de qualquer componente.
Cuidado: O procedimento deverá fazer-se sob orientação uoroscópica ou ultrassonográca para garantir uma inserção e colocação correctas do o-guia.
Podem ocorrer arritmias cardíacas no caso de se deixar o o-guia entrar na aurícula direita.
Monitorizar o ritmo cardíaco para detectar arritmias.
Remover a agulha que se encontra sobre o o-guia, certicando-se de que este ca rmemente no lugar durante a remoção da agulha.
C. Dilatação de vasos e inserção do cateter
Dilatação de vasos e inserção da bainha
Deslizar um dilatador de veia sobre o o e fazê-lo avançar através da pele e para dentro da
veia. Certicar-se de não fazer avançar o o-guia. Este deve manter-se estacionário durante o
avanço do dilatador.
É preferível fazer-se uma dilatação em série. Se forem utilizados outros dilatadores, ená-lo(s)
sobre o o-guia para dentro do vaso. Remover o(s) dilatador(es) quando o vaso estiver sucientemente dilatado, deixando o o-guia colocado.
Cuidado: Não deixar os dilatadores de vasos colocados por mais tempo do que o
necessário, de modo a evitar uma possível perfuração da parede do vaso.
Deslizar a bainha/introdutor descolável sobre o o-guia para dentro da veia, mantendo
simultaneamente a posição do o-guia.
Cuidado: Este procedimento faz-se sob orientação uoroscópica para evitar a perfuração
do vaso.
Retirar o o-guia.
Cuidado: Não deixar a bainha colocada por mais tempo do que o necessário de modo a
evitar danos na veia.
Inserção do cateter
AVISO: NUNCA TENTAR SEPARAR OS LÚMENS.
Remover o dilatador da bainha previamente inserida.
Para evitar fugas de sangue, comprimir as extensões proximais do cateter com clamps planos
fornecidas antes de inserir o cateter na bainha.
Português
71
Page 72

Inserir as pontas distais do cateter através da bainha até que estas se encontrem correctamente posicionadas na veia-alvo.
Cuidado: Inserir rapidamente o cateter na bainha para evitar perda de sangue ou embolia
aérea.
Cuidado: A colocação da ponta do cateter no local correcto produz um uxo de sangue
adequado, conforme explicado nas directrizes de KDOQI.
Cuidado: Podem ocorrer traumatismos graves ou complicações fatais por falta de vericação do correcto posicionamento do cateter.
Lentamente e com cuidado, puxar a bainha descolável para fora do vaso.
Quaisquer ajustes no posicionamento do cateter devem ser realizados sob orientação uoroscópica ou ultrassonográca. A ponta distal venosa deve ser posicionada ao nível da parte
superior da aurícula direita, na junção da aurícula cava ou um pouco além da mesma.
Cuidado: A m de evitar danos no vaso aquando da remoção da bainha descolável, puxar
para trás o mais possível a bainha, rasgando-a apenas alguns centímetros de cada vez. Não
puxar pela parte da bainha que continua dentro do vaso.
D. Abertura de túnel para o cateter Retro*
Fazer uma pequena incisão no local de saída do túnel subcutâneo. O cateter está marcado
para indicar a localização teórica do conector. Esta marca deve situar-se mesmo na parte de
fora do local de saída. Fazer uma incisão sucientemente larga para alojar o cateter. Administrar anestésico local em quantidade suciente para anestesiar completamente o tecido.
Através de uma dissecção romba com o estilete para abertura de túnel, criar um túnel
subcutâneo directamente em direcção ao local de entrada.
Quando o estilete de abertura de túnel emergir no local de entrada, colocar a extremidade
cónica da manga de abertura de túnel sobre o dispositivo de abertura de túnel exposto. Se
necessário, empurrar a manga de abertura de túnel para iniciar um caminho através do qual
irá deslizar a manga do cateter no túnel subcutâneo.
Enar ou encaixar o adaptador/instrumento de abertura de túnel do cateter no estilete, de
modo a que que bem preso (depende do instrumento de abertura de túnel utilizado).
Remover os clamps proximais no cateter e cortar o mesmo na marca dos 50 cm do lado
venoso e na marca dos 47,5 cm no lúmen arterial.
Para os cateteres femorais (67 cm de comprimento total), cortar o cateter pela marca dos
65 cm no lado venoso e 62,5 cm no lúmen arterial.
Adaptar a extremidade do cateter ao adaptador e empurrar a manga de abertura de túnel
sobre o cateter.
Português
Puxar o estilete de abertura de túnel até o cateter estar afastado do local de saída e a marca
do cateter estar à vista.
Remover cuidadosamente o cateter do estilete puxando a manga de abertura de túnel e,
depois, torcendo cuidadosamente o estilete para fora do cateter.
Voltar a colocar os clamps nas extremidades proximais do cateter.
Se pretender, as extremidades proximais do cateter podem ser cortadas de modo a atingir o
comprimento pretendido. Devem executar-se cortes nos comprimentos marcados, uma vez
que se encontram documentados os volumes de preparação para estes comprimentos.
AVISOS
AVISO: NUNCA TENTAR SEPARAR OS LÚMENS DOS CATETERES.
Não abrir túneis através do músculo.
72
Page 73

Não puxar o tubo do cateter. Tal poderia esticar e danicar o cateter.
Não expandir em excesso o tecido subcutâneo durante a abertura de túnel. Tal poderia
atrasar/impedir o crescimento para dentro da manga, podendo aumentar o sangramento.
Se for encontrada alguma resistência, pode aumentar-se a dissecção romba para facilitar
a inserção.
III. Inserção sem bainha (Kit SafeTrac*) com Técnica de Seldinger
A. Preparação do local
Recomenda-se a utilização de uma “Sala de operações” esterilizada para a colocação do
cateter. São também necessários panos, instrumentos e acessórios esterilizados. São
necessários: solução de espuma para uso cirúrgico, bata, touca, luvas e máscara de protecção.
Retire os pêlos do doente acima e abaixo do local de inserção, se for necessário. O pano
esterilizado deve ser colocado sobre o doente antes de ser administrado suciente anestésico
local para anestesiar completamente o local de inserção.
Recomenda-se que o doente esteja na posição de Trendelenberg.
Fazer uma pequena incisão seguindo as linhas da pele sobre o vaso pretendido.
B. Perfuração do vaso
Adaptar uma seringa à agulha introdutora e inserir na veia-alvo sob orientação ultrassonográca, se houver. Aspirar para garantir uma colocação correcta. O sangue a uir livremente
indica a introdução num vaso. Se o sangue for vermelho vivo ou estiver a pulsar, trata-se de
sangue de retorno, pelo que se deve retirar a agulha e redireccioná-la.
Remover a seringa e colocar o polegar sobre a extremidade da agulha introdutora para evitar
perda de sangue ou a ocorrência de embolia aérea. Uma vez aspirado o sangue, deslizar a
extremidade exível do o-guia de novo para dentro do elemento avançado para que apenas
a extremidade do o-guia que à vista. Inserir a extremidade distal do elemento avançado no
conector da agulha.
Fazer avançar o o-guia exível com um movimento de avanço para dentro da veia-alvo,
ultrapassando o conector da agulha. Inserir o o-guia até a ponta entrar na aurícula direita,
atravessando-a e entrando na veia cava inferior. O comprimento de inserção está dependente
do tamanho do doente. Monitorizar a função cardíaca do doente durante o procedimento
para detectar qualquer sinal de arritmia.
Cuidado: Não puxar o o-guia para trás através de qualquer componente.
Cuidado: O procedimento deverá fazer-se sob orientação uoroscópica ou ultrassonográca para garantir uma inserção e colocação correctas do o-guia.
Podem ocorrer arritmias cardíacas no caso de se deixar o o-guia entrar na aurícula direita.
Monitorizar o ritmo cardíaco para detectar arritmias.
Remover a agulha que se encontra sobre o o-guia, certicando-se de que este ca rmemente no lugar durante a remoção da agulha.
Deslizar um dilatador/bainha de 6 Fr sobre o o e fazê-lo avançar através da pele e para dentro da veia. Certicar-se de que não faz avançar o o-guia. Este deve manter-se estacionário
durante o avanço da bainha/dilatador.
Retirar o dilatador. Inserir outro o através da bainha. Retirar a bainha.
C. Dilatação de vasos e inserção do cateter
AVISO: NUNCA TENTAR SEPARAR OS LÚMENS DOS CATETERES
Colocar os dois dilatadores intracateter fornecidos nos lúmens do cateter. Os dilatadores
Português
73
Page 74

intracateter possuem luers que se prendem à extremidade proximal dos respectivos luers
arterial e venoso no cateter.
Deslizar a extremidade exposta de um dos os através do dilatador intracateter venoso até
que esta saia pela extremidade venosa proximal do dilatador.
Deslizar o(s) dilatador(es) de veia apropriados sobre o outro o e fazê-lo(s) avançar através da
pele. É preferível fazer-se uma dilatação em série.
Remover o(s) dilatador(es).
Cuidado: Não deixar os dilatadores de vasos colocados por mais tempo do que o
necessário de modo a evitar uma possível perfuração da parede do vaso.
Deslizar o o exposto através do dilatador intracateter arterial até que este saia pela extremidade arterial proximal do cateter.
Fazer avançar os os até não haver folga nos mesmos entre a extremidade distal do cateter e
o local de entrada.
Fazer avançar o cateter através da pele para dentro do vaso. Um ligeiro aperto em qualquer
uma das direcções poderá ser necessário para fazer avançar o cateter na veia.
Para uma colocação correcta, recomenda-se que este procedimento se faça sob orientação
utrassonográca ou uoroscópica.
Cuidado: A colocação da ponta do cateter no local correcto produz um uxo de sangue
adequado, conforme explicado nas directrizes de KDOQI.
Cuidado: Podem ocorrer traumatismos graves ou complicações fatais por falta de vericação do correcto posicionamento do cateter.
Remover os dilatadores intracateter e os os-guia.
D. Abertura de túnel para o cateter Retro*
Fazer uma pequena incisão no local de saída do túnel subcutâneo. O cateter está marcado
para indicar a localização teórica do conector. Esta marca deve situar-se mesmo na parte de
fora do local de saída. Fazer uma incisão sucientemente larga para alojar o cateter. Administrar anestésico local em quantidade suciente para anestesiar completamente o tecido.
Através de uma dissecção romba com o estilete para abertura de túnel, criar um túnel subcutâneo directamente em direcção ao local de entrada.
Quando o estilete de abertura de túnel emergir no local de entrada, colocar a extremidade
cónica da manga de abertura de túnel sobre o dispositivo de abertura de túnel exposto. Se
necessário, empurrar a manga de abertura de túnel para iniciar um caminho através do qual
irá deslizar a manga do cateter no túnel subcutâneo.
Português
Enar ou encaixar o adaptador/instrumento de abertura de túnel do cateter no estilete, de
modo a que que bem preso (depende do instrumento de abertura de túnel utilizado).
Remover os clamps proximais no cateter e cortar o mesmo na marca dos 50 cm do lado
venoso e na marca dos 47,5 cm no lúmen arterial.
Para os cateteres femorais (67 cm de comprimento total), cortar o cateter pela marca dos
65 cm no lado venoso e 62,5 cm no lúmen arterial.
Adaptar a extremidade do cateter ao adaptador e empurrar a manga de abertura de túnel
sobre o cateter.
Puxar o estilete de abertura de túnel até o cateter estar afastado do local de saída e a marca
do cateter estar à vista.
74
Page 75

Remover cuidadosamente o cateter do estilete puxando a manga de abertura de túnel e,
depois, torcendo cuidadosamente o estilete para fora do cateter.
Voltar a colocar os clamps nas extremidades proximais do cateter.
Se pretender, as extremidades proximais do cateter podem ser cortadas de modo a atingir o
comprimento pretendido. Devem executar-se cortes nos comprimentos marcados, uma vez
que se encontram documentados os volumes de preparação para estes comprimentos.
AVISOS
AVISO: NUNCA TENTAR SEPARAR OS LÚMENS.
Não abrir túneis através do músculo.
Não puxar o tubo do cateter. Tal poderia esticar e danicar o cateter.
Não expandir em excesso o tecido subcutâneo durante a abertura de túnel. Tal poderia
atrasar/impedir o crescimento para dentro da manga, podendo aumentar o sangramento.
Se for encontrada alguma resistência, pode aumentar-se a dissecção romba para facilitar
a inserção.
IV. Procedimento para a Colocação na Veia Femoral
AVISO: O RISCO DE INFECÇÃO AUMENTA COM A INSERÇÃO NA VEIA FEMORAL. Devem ser
considerados outros locais de acesso, tais como a região pélvica, em vez da tradicional
região inguinal, para diminuir o risco de infecção.
Avaliar ambas as áreas femorais, esquerda e direita, para seleccionar a melhor das duas veias
para a colocação do cateter. É recomendada a utilização de visualização ultrassonográca.
Para a inserção da bainha/dilatador, seguir os procedimentos descritos na Secção II, “Inserção
Utilizando uma Bainha/Dilatador através da Técnica de Seldinger”
Para a inserção sem bainha, seguir os procedimentos descritos na Secção III, “Inserção (Kit
SafeTrac*) sem Bainha através da Técnica de Seldinger”
A inserção femoral é semelhante à listada nas Secções II e III, com as seguintes excepções
(ver 1, 2 e 3 abaixo):
1) O doente não deve ser colocado na posição de Trendelenburg.
2) A ponta do cateter deve ser colocada a meio da veia cava inferior (VCI) ou na junção da veia
ilíaca com a veia cava inferior.
3) Antes da abertura do túnel, o cateter deve ser cortado pela marca dos 65 cm no lúmen
venoso e pela marca dos 62,5 cm no lúmen arterial.
Não se devem deixar os os-guia entrar na aurícula direita. Isso pode resultar em arritmias
cardíacas.
2
V. Montagem do adaptador de extensão do cateter ou aplicação do kit de reparação Retro*
Utilizar os clamps planos fornecidos com o kit do cateter para comprimir o cateter, sempre
que necessário, e aquando da substituição de adaptadores de extensão gastos ou danicados
por extensões do kit de reparação “Retro* Repair Kit”.
Não utilizar pinças serrilhadas.
Quando cortar ao comprimento desejado ou no caso de substituição de adaptadores de
extensões gastos ou danicados, certicar-se de que o cateter está bem enquadrado e de
que o restante lúmen do cateter não está danicado. Consultar “comprimento operacional” e
correspondente volume de preparação.
Português
75
Page 76

A
B
C
A
C
Deslizar a tampa vermelha do cateter (A) sobre a extremidade proximal do cateter que possui
marcas vermelhas. Vericar se a tampa vermelha possui uma junta (B) no seu interior. Deslizar
o diâmetro interno do lúmen do cateter arterial (vermelho) sobre o tubo em aço inoxidável
(que faz parte de (C) e constitui o início do tubo de extensão) até atingir a saliência. Enroscar a
tampa (A) em direcção à parte (C) até parar no corpo do adaptador. Repetir o mesmo procedimento em relação ao adaptador de extensão azul.
Cuidado: Para evitar fendas, não apertar excessivamente as tampas.
Remover os clamps planos dos lúmens arterial (vermelho) e venoso (azul).
Adaptar seringas a ambas as extensões e abrir os clamps. O sangue deve ser facilmente aspirado de ambos os lados, arterial e venoso. Se ocorrer uma resistência excessiva à aspiração do
sangue, reposicionar o cateter de modo a obter um uxo de sangue adequado.
Assim que tiver obtido uma aspiração adequada, irrigar ambos os lúmens com seringas com
solução salina utilizando uma técnica rápida “em bolo”. Conrmar que os clamps das extensões estão abertos durante o procedimento de irrigação.
Fechar os clamps das extensões, remover as seringas e, em seguida, colocar uma tampa para
injecção em cada um dos conectores luer lock.
VI. Fixação do cateter e tratamento da ferida
Uma aba de sutura adaptável é fornecida para suturar o cateter no local de saída. Comprimir
ligeiramente as abas de sutura anexáveis para abrir a parte inferior dupla do corpo da aba
de sutura. Colocar a aba de sutura na marca do tamanho do cateter no local de saída e soltar.
Prender a aba suturando-a no local através dos orifícios fornecidos.
Fechar os locais de inserção e saída com sutura. Em seguida, suturar os adaptadores do
cateter à pele utilizando a aba da sutura. Não suturar o tubo do cateter.
Português
Cuidado: Evitar perfurar o cateter durante a operação de sutura.
Cuidado: Os objectos pontiagudos podem provocar danos no cateter devido a perfuração
ou cortes no lúmen do mesmo.
Cobrir os locais de inserção e saída com pensos oclusivos.
Anotar na cha do doente o comprimento do cateter e o seu número de lote.
HEPARINIZAÇÃO
Seguir as directrizes relativas a desobstrução do cateter não se pretende utilizar o cateter
imediatamente para tratamento.
A m de manter a desobstrução do cateter entre tratamentos, criar um bloqueio de heparina
em cada lúmen do mesmo.
Seguir o protocolo hospitalar relativo à concentração de heparina.
76
Page 77

Aspirar heparina para dentro de duas seringas, correspondente à quantidade designada nas
extensões arterial e venosa. Certicar-se de que as seringas não têm ar no interior.
Remover as tampas de injecção das extensões.
Adaptar uma seringa com solução de heparina ao luer fêmea de cada extensão.
Abrir os clamps das extensões.
Cuidado: Aspirar de modo a garantir que não vai entrar ar no doente.
Injectar heparina em cada lúmen utilizando uma técnica “em bolo” rápida.
Cuidado: Cada lúmen deve estar completamente cheio de heparina para garantir a
ecácia.
Fechar os clamps das extensões.
Cuidado: Os clamps das extensões só devem ser abertos para aspiração, lavagem e
tratamento de diálise.
Retirar as seringas.
Adaptar uma tampa de injecção esterilizada aos luers fêmea das extensões.
Prender as tampas de injecção com ta para evitar que sejam removidas acidentalmente.
Não é necessário utilizar heparina nas 48 a 72 horas seguintes, desde que os lúmens não
tenham sido aspirados ou lavados.
TRATAMENTO DE HEMODIÁLISE
Cuidado: A m de evitar embolias aéreas, manter sempre o tubo da extensão comprimido,
quando não estiver a ser utilizado.
Cuidado: Para evitar a necessidade sistemática de heparinização, a solução de heparina
tem de ser retirada de cada lúmen antes do tratamento do doente.
Aspirar e irrigar o cateter com solução salina antes da utilização. Purgar o ar que possa
encontrar-se no cateter e em todas as tampas e tubos de ligação aquando da substituição das
ligações dos tubos.
O procedimento de aspiração deve respeitar o protocolo da unidade de diálise.
Antes de iniciar a diálise, vericar cuidadosamente todas as ligações do cateter e circuitos
extracorporais.
Cuidado: Durante o tratamento, prender sempre com ta os luer locks às linhas sanguíneas, de modo a prevenir que estas venham a soltar-se acidentalmente.
Inspeccionar visualmente o cateter e as respectivas ligações para ver se existem sinais de
fuga, de modo a evitar perda de sangue ou embolia aérea. Tomar medidas correctivas, se for
necessário, antes de continuar com o tratamento de diálise.
Cuidado: A perda excessiva de sangue pode fazer com que o doente entre em estado de
choque.
A hemodiálise deve ser executada de acordo com as instruções do médico.
PÓS-DIÁLISE
Preparar seringas com solução salina normal esterilizada e heparina.
Parar a bomba do sangue. Fechar o clamp na extensão arterial. Comprimir a linha sanguínea
arterial no local de ligação.
Desligar a linha sanguínea arterial do adaptador do cateter e adaptar uma seringa com
77
Português
Page 78

solução salina esterilizada normal ao adaptador arterial. Abrir o clamp na extensão arterial e
lavar o sangue que se encontra no lúmen arterial do cateter. Voltar a comprimir a extensão.
Heparinizar o lúmen com a concentração/volume apropriado de heparina (ver mais acima).
Lave novamente o sangue no circuito extra-corporal através do lúmen venoso.
Depois de lavar novamente o sangue do doente no circuito, desligar a bomba do sangue.
Comprimir a extensão venosa e desligar a linha sanguínea venosa do adaptador venoso do
cateter.
Adaptar uma seringa com solução salina estéril normal ao adaptador venoso. Abrir o clamp na
extensão venosa e lavar todo o sangue restante do lúmen venoso do cateter. Voltar a comprimir e heparinizar o lúmen com a concentração/volume apropriado de heparina.
Assegurar que os clamps estão fechados nas duas extensões. Remover as seringas e adaptar
uma tampa de vedação para injecção a cada adaptador. Prender as tampas de vedação para
injecção com ta às extensões para evitar que sejam removidas acidentalmente.
AVISO
Manter sempre o cateter comprimido com clamp excepto quando estiver ligado a linhas
sanguíneas ou a uma seringa durante o tratamento.
FLUXO SANGUÍNEO NO CATETER
Fluxo insuciente
O uxo insuciente de sangue pode ser causado por orifícios arteriais obstruídos devido a
coagulação ou existência de resíduos de brina ou por oclusão dos orifícios do lado arterial
devido a contacto com a parede venosa.
Quadro: Características de Fluxo vs. Pressão para todos os Cateteres Retro*
Fluxo Variação média da
pressão interna do lúmen
(ml/min) (mm Hg)
100 24 - 34
150 39 - 50
200 58 - 70
250 79 - 93
300 104 - 121
350 129 - 152
400 157 - 186
450 192 - 233
500 224 - 267
Português
Obstruções num só sentido
As obstruções num só sentido existem quando um lúmen pode ser lavado facilmente, não
sendo, no entanto, possível aspirar o sangue. Tal acontece geralmente devido a coagulação,
existência de película de brina ou posicionamento incorrecto da ponta. Neste último caso, o
uxo deciente ocorre pouco depois da colocação.
REMOÇÃO DO CATETER
AVISO
Apenas um médico experiente nas técnicas apropriadas deverá remover o cateter.
Palpar o cateter próximo do local de saída de modo a localizar a manga do mesmo.
As variações da pressão arterial e venosa são
indicadas acima. Nota: os resultados acima foram
obtidos utilizando água desionizada
78
Page 79

Anestesiar a zona da manga do cateter e do local de saída, administrando anestésico local em
quantidade suciente.
Cortar as suturas da aba da sutura. Devem seguir-se os procedimentos hospitalares aplicáveis.
Fazer uma pequena incisão sobre a manga, paralela ao cateter.
Dissecar até à manga utilizando um instrumento de dissecção rombo ou aado.
Agarrar a manga com um clamp assim que esta car à vista.
Comprimir o cateter entre a manga e o local de inserção. Certicar-se de que o clamp está
sucientemente apertado para impedir o uxo de sangue em qualquer um dos lúmens.
Para libertar o cateter do tecido, puxá-lo cuidadosamente num movimento lento e contínuo,
com o cuidado de não fazer movimentos bruscos ou que envolvam muita força para evitar
que a manga se desprenda.
Cuidado: Não puxar o cateter no caso de sentir resistência. Em vez disso, executar uma
dessecção e remover todas as suturas no local da venotomia.
Aplicar pressão no túnel proximal até estancar o sangramento.
Suturar a incisão e aplicar compressas para promover a cicatrização.
Quando o cateter tiver sido removido, vericar a integridade do mesmo para ver se está
rasgado e medi-lo. Vericar o comprimento em relação à especicação do produto aplicável
para assegurar que o cateter foi removido com êxito na sua totalidade.
1
National Kidney Foundation, Kidney Disease Outcomes Quality Initiative (KDOQI) Guidelines,
Guideline 5, “Type and Location of Tunneled Cu Catheter Placement.” (2000)
2
GX Zaleski, B. Funaki, JM Lorenz, RS Garofolo, MA Moscatel, JD Rosenblum and JA Leef.
Department of Radiology, The University of Chicago Hospital, IL 60637, USA. “Experience
with tunneled femoral hemodialysis catheters. Am J Rcmtgenol. 1999 Feb; 172 (2)c 493-496.
Close extension clamps.
A Bard Access Systems, Inc. garante ao comprador original que este produto não tem defeitos
de material nem de mão-de-obra por um período de um (1) ano a partir da data de compra.
Se for detectado algum defeito neste produto, o comprador pode devolvê-lo à Bard Access
Systems, Inc. para reparação ou substituição, de acordo com a opção da Bard Access Systems,
Inc. As devoluções devem ser previamente autorizadas pela Bard Access Systems, Inc. A Política
de Devolução de Produtos acompanha a Lista de Preços. A responsabilidade da Bard Access
Systems, Inc., segundo o disposto nesta garantia limitada do produto, não cobre qualquer
abuso ou má utilização deste produto nem a sua reparação por outra pessoa que não seja um
representante autorizado da Bard Access Systems, Inc.
ESTA GARANTIA L IMITADA D O PRODUTO PREVALECE SOBRE QUA ISQUER GA RANTIAS,
EXPRESSAS OU IMPLÍCITAS (INCLUINDO, ENTRE OUTROS, QU ALQUER GA RANTIA DE
COMERCIALIZAÇÃO OU ADEQUAÇÃO A UM DETERMINADO FIM). A RESPONSABILIDADE E
SOLUÇÃO DECLARADAS NESTA GARANTIA LIMITADA DO PRODUTO SERÃO DA EXCLUSIVA
RESPONSABILIDADE DA BARD ACCESS SYSTEMS, INC. E A SOLUÇÃO SERÁ DISPONIBILIZADA
AO CO MPRADOR DESTE PRODUTO, SEJA POR CONTRATO, RESP ONSABILIDADE C IVIL
(INCLUINDO NEGLIGÊNCIA) OU DE OUTRO MODO. E A BARD ACCESS SYSTEMS, INC. NÃO SERÁ
RESPONSÁVEL PERANTE OS COMPRADORES POR QUAISQUER DANOS INDIRECTOS, ESPECIAIS,
INCIDENTAIS OU CONSEQUENTES RESULTANTES DA SUA UTILIZAÇÃO OU MANUSEAMENTO.
© 2010 C. R. Bard, Inc. Todos os direitos reservados.
Data de revisão: Fevereiro de 2010
Português
79
Page 80

INSTRUCCIONES DE USO
Implant Length
Body Length
Overall Length
32cm
32cm
35cm
35cm
40cm
40cm
45cm
45cm
50cm
50cm
INDICACIONES DE USO
El catéter para hemodiálisis crónica de silicona y doble luz con puntas separadas Retro*, está
indicado para la hemodiálisis crónica y la aféresis. Se trata de un catéter de silicona radiopaco
concebido para la inserción hipercutánea o a través de una incisión. Los catéteres de más de
40 cm de longitud han sido diseñados para inserción en vena femoral.
COLOCACIÓN DEL CATÉTER
El catéter puede ser insertado utilizando una técnica percutánea, mediante el procedimiento
tipo Seldinger modicado o técnica abierta.
Se recomienda la guía uoroscópica o ultrasónica para asegurar la correcta orientación de la
punta y colocación en la aurícula derecha.
CONTRAINDICACIONES
Este catéter debe ser utilizado solamente para el acceso vascular a largo plazo y no debe
emplearse para otros nes que los indicados en estas instrucciones.
DESCRIPCIÓN
El catéter para hemodiálisis crónica de doble luz con puntas separadas Retro* está elaborado
en silicona radioopaca especial para uso médico. Su forma ovalada y composición en silicona
proporcionan una mejor exibilidad y resistencia a los pliegues.
Para reducir la recirculación durante la hemodiálisis, la luz arterial del catéter en su extremo
distal es más corto que la luz venosa. El catéter tiene un manguito de eltro y adaptadores de
extensión clasicados por colores.
Los extremos proximales se tunelizan en sentido contrario a la salida una vez colocadas las
puntas. Este diseño permite colocar las puntas del catéter con precisión. Los dos extremos del
catéter, es decir: los extremos arterial y venoso, se conectan a los adaptadores de extensión
clasicados por colores. Cada adaptador de extensión dispone de un manguito y una válvula
de compresión. Además, cuentan con una abrazadera y conector lúer.
DIMENSIONES
Longitud Longitud Longitud
del implante del cuerpo global
19 cm 24 cm 52 cm
23 cm 28 cm 52 cm
27 cm 32 cm 52 cm
31 cm 36 cm 52 cm
35 cm 40 cm 52 cm
Español
50 cm 55 cm 67 cm
Longitudes operativas
30 cm 35 cm 40 cm 45 cm 50 cm
- 35 cm 40 cm 45 cm 50 cm
- - 40 cm 45 cm 50 cm
- - 40cm 45 cm 50 cm
- - - 45 cm 50 cm
- - - 60cm 65 cm
VOLÚMENES DE CEBADO
Los volúmenes de cebado aparecen impresos en el catéter con las longitudes de 30, 35, 40,
45, 50, 60 y 65 cm para los catéteres correspondientes:
80
Page 81

Longitud
operativa Arterial Venosa
30 cm 1,6 cc 1,7 cc
35 cm 1,8 cc 1,9 cc
40 cm 2,0 cc 2,1 cc
45 cm 2,2 cc 2,3 cc
50 cm 2,4 cc 2,5 cc
60 cm 2,8 cc 2,9 cc
65 cm 3,0 cc 3,1 cc
PRECAUCIÓN
La ley federal estadounidense limita la venta de este dispositivo al personal médico o
por prescripción facultativa.
ADVERTENCIAS
Con cuerpo de 24cm de longitud, no corte antes de la marca de 30cm
Con cuerpo de 28cm de longitud, no corte antes de la marca de 35cm
Con cuerpo de 32cm de longitud, no corte antes de la marca de 40cm
Con cuerpo de 36cm de longitud, no corte antes de la marca de 40cm
Con cuerpo de 40cm de longitud, no corte antes de la marca de 45cm
Con cuerpo de 55cm de longitud, no corte antes de la marca de 60cm
ANTES DE USAR, LEA ATENTAMENTE TODAS
LAS INSTRUCCIONES, ADVERTENCIAS Y PRECAUCIONES
COMPLICACIONES
Embolia gaseosa
Canulación arterial
Bacteriemia
Sangrado
Lesión del plexo branquial
Arritmia cardíaca
Obstrucción cardíaca
Punta del catéter o
émbolo trombótico
Estenosis/trombosis de la vena central
Quilotórax
Endocarditis
Hematoma (subcutáneo)
Hemorragia
Nota: La inserción en vena femoral incrementa el riesgo de infección con la inserción en otras
ubicaciones. Entre las complicaciones adicionales se incluyen:
Hemorragia en la arteria femoral
Lesión del nervio femoral
ADVERTENCIAS
El catéter debe ser insertado y extraído por un médico cualicado y autorizado.
Antes de iniciar el tratamiento, el médico debe tratar con el paciente los riesgos y ventajas de la
cateterización y sus alternativas (si las hubiera).
La colocación de la punta del catéter y la selección de su longitud se dejan a criterio del médico.
Sin embargo, tras la inserción inicial y antes de usar el catéter, debe realizarse siempre una
placa de rutina para conrmar la correcta colocación de las puntas del catéter antes del uso.
La ubicación recomendada de la punta es en la aurícula derecha o en la unión de la vena cava
superior y la aurícula derecha (VCS/AD).
Hemotórax
Infección (punto de salida)
Laceración (de la vía torácica)
Trombosis de la luz
Neumotórax
Embolia pulmonar
Punción (arteria subclavia, arterial derecha,
vena cava superior)
Septicemia
Trauma en la aurícula derecha o
Vaso mayor
Infección del canal (subcutánea)
Laceración del vaso, trauma
Perforación (vena o arteria femoral)
Hemorragia retroperitoneal
Estenosis venosa
1
81
Español
Page 82

Asegúrese antes y después de cada tratamiento que la luz y las extensiones no estén dañadas
dañadas o gastados.
No apriete demasiado los conectores del catéter, de lo contrario, podría romper los conectores.
Cuando maneje este catéter y todos los componentes estériles, observe que las técnicas
estériles sean en todo momento las adecuadas.
No use el catéter ni los componentes del paquete si el cierre estéril está roto.
No use ningún catéter dañado (aplastado, roto, cortado) ni componente del paquete, incluidos
los conectores, con los cables deshilachados.
Para evitar una embolia gaseosa, mantenga durante el tratamiento y en todo momento el catéter pinzado excepto cuando lo conecte a la vía arterial o a una jeringa.
No presione los lúmenes del catéter; las abrazaderas deben aplicarse solamente en las extensiones del tubo.
Use solamente pinzas dentadas o tenazas cuando no utilice las abrazaderas que se suministran
con el catéter. Alterne el punto de aplicación de la abrazadera para evitar afectar el funcionamiento del tubo y alargar su duración. Evite la presión excesiva cerca de los adaptadores y del
cuerpo del catéter.
Tenga cuidado cuando use instrumentos alados cerca del catéter. No use instrumentos
alados ni tijeras para retirar el vendaje.
Sujete los capuchones de las jeringas con esparadrapo o cinta adhesiva para evitar que se
caigan entre los tratamientos.
Pensado para un solo uso. NO DEBE REUTILIZARSE. La reutilización o reembalaje podría
provocar riesgos de infección en el paciente o el usuario, podría comprometer la integridad
estructural y/o las características esenciales de material y diseño del dispositivo, lo que podría
acarrear fallos en el mismo y/o daños, enfermedad e incluso la muerte del paciente.
No resterilice los accesorios del paquete de catéteres. El fabricante no se responsabiliza de
ningún daño resultante de resterilización del catéter o de los componentes del paquete.
No fuerce la guía ni los dilatadores ni abra el aplicador durante la inserción, pues podría
perforar el vaso sanguíneo y dañarlo.
Evite la exposición prolongada a rayos ultravioleta para evitar dañar el catéter.
No inserte el aplicador abierto más de lo necesario. Es posible que, debido a las dimensiones
del paciente o al punto de acceso, no sea necesario utilizar toda la longitud del aplicador.
Para introducir la guía “J” en la aguja del aplicador, utilice el enderezador de guía. No fuerce la
guía “J” durante la inserción o la extracción de un componente, pues podría romperse.
Use solamente conectores de rosca con cierre tipo luer (incluidos jeringas, tubos sanguíneos y
capuchones de jeringas) con los adaptadores de catéter.
Cuando cosa, no rasgue ni pinche las luces del catéter ni las extensiones.
No tense demasiado el hilo de sutura.
Irrigue el catéter con solución salina y pince las extensiones.
Español
Cuando realice una infusión de heparina, inyecte con rapidez y cierre inmediatamente para
asegurar que la heparina alcance el extremo distal de la luz. No infunda sobre una abrazadera
cerrada ni fuerce la sonda en un catéter bloqueado. Si fuerza una sonda en un catéter bloqueado puede provocar una contrapresión que obligue al adaptador a salirse del tubo.
No use soluciones de acetona o yodo en ningún punto del catéter; de lo contrario, podría
estropear el catéter.
Extraiga el catéter cuando deje de ser necesario.
82
Page 83

No use el catéter tras la fecha de caducidad indicada en el paquete.
IV
V
VI
I
II
III
Se recomienda seguir las prescripciones del médico cuando se inserte este catéter en pacientes
con dicultad o imposibilidad de aspirar profundamente. Los pacientes bajo respiración asistida o que puedan necesitarla, suponen un mayor riesgo de neumotórax durante la canulación
subclavia yugular interna.
En este documento no se enumeran todos los protocolos aceptados o instrucciones, ni pretenden éstos sustituir la experiencia y la opinión del médico respecto al tratamiento especíco de
cada paciente. Sin embargo, antes de usar este producto, deben revisarse los procedimientos,
las precauciones y advertencias
INSERC IÓN DEL CATÉTER D E SILICONA RE TRO* CON MANGUI TO
I. Punto de inserción
La vena yugular interna es el punto de inserción más adecuado para el catéter, pues permite
una fácil colocación de su punta en la aurícula derecha.
La vena subclavia es también apta para la inserción. Sin embargo, el uso de la vena subclaviana se asocia con la estenosis de la vena subclavia, lo que en el futuro puede impedir la
creación de un acceso arteriovenoso en el miembro superior.
El catéter se puede insertar en la vena femoral (consulte la Sección IV). Sin embargo, la inserción en vena femoral está asociada con un mayor riesgo de infección.
I - VENA YUGULAR INTERNA
II - PUNTO DE INSERCIÓN
III - VENA CAVA SUPERIOR
IV - MANGUITO INFLABLE
V - PUNTO DE SALIDA
VI - UBICACIÓN RECOMENDADA
PARA LA COLOCACIÓN DE
LA PUNTA EN LA AURÍCULA
DERECHA (AD)
II. Inserción de vaina/dilatador mediante la técnica Seldinger
A. Preparación de la zona
Se recomienda un espacio estéril tipo quirófano durante la colocación del catéter. También
se requiere la esterilidad de vendas, instrumental y accesorios, así como un cepillo quirúrgico,
bata, coa, guantes y mascarilla.
En caso necesario, rasure la piel del paciente alrededor de la zona de inserción. Para anestesiar
completamente el punto de inserción, debe cubrirse al paciente antes de administrarle la
anestesia local.
Se recomienda colocar al paciente ligeramente en posición Trendelenburg.
Practique una pequeña incisión sobre las venas que desee siguiendo las líneas de la piel.
B. Punción del vaso
Inserte una aguja de inserción en la jeringa e introdúzcala en la vena a tratar haciendo uso
de la guía ultrasónica, si es posible. Succione para asegurar la correcta colocación. El ujo de
sangre indicará la entrada en el vaso. Si la sangre es de color rojo intenso o si se produce una
pulsación de retorno, extraiga la aguja y pinche otra vez.
Español
83
Page 84

Extraiga la jeringa y, al retirar la aguja, tape con el dedo pulgar el punto de punción para
evitar pérdida de sangre o embolia gaseosa. Una vez succionada la sangre, deslice el extremo
exible de la guía en el mecanismo de avance de manera que solo su extremo quede visible.
Pase el extremo distal del mecanismo de avance hacia el conector de la aguja.
Avance la guía yendo más allá al conector de la aguja hasta la vena central. La longitud de
inserción depende de la dimensión corporal del paciente.
Precaución: No extraiga la guía tirando de ella a través de ningún componente.
Precaución: Oriéntese mediante uoroscopia o ultrasonidos para asegurar la inserción la
correcta colocación de la guía.
Pueden producirse arritmias cardíacas si la guía entra en la aurícula derecha. Controle el
ritmo cardíaco para detectar arritmias.
Retire la aguja sobre la guía, asegurándose de que ésta quede bien sujeta durante el proceso
de extracción de la aguja.
C. Dilatación vascular e inserción del catéter
Dilatación del vaso sanguíneo e inserción de la vaina
Deslice un dilatador de vaso sobre la guía y atraviese la piel para introducirlo en la vena.
Asegúrese de no hacer avanzar la guía. La guía debe estar quieta durante el avance del
dilatador.
Es recomendable la dilatación en serie. Si utiliza otros dilatadores, introdúzcalos en secuencia
en la vena sobre la guía. Extraiga los dilatadores cuando la vena esté sucientemente dilatada,
dejando la guía en su lugar.
Precaución: No deje dilatadores venosos insertados más tiempo del necesario, pues podría
ocasionar la perforación de la pared venosa.
Introduzca la vaina o el aplicador abierto en la vena a través de la guía mientras mantiene ésta
en posición.
Precaución: Utilice uoroscopía para evitar pinchar el vaso.
Extraiga la guía.
Precaución: No deje la vaina insertada más tiempo del necesario, pues podría dañar l a vena.
Inserción del catéter
ADVERTENCIA: NO INTENTE NUNCA SEPARAR LAS LUCES.
Extraiga el dilatador de la vaina previamente insertada.
Para evitar la pérdida de sangre, pince las extensiones proximales del catéter con las abrazaderas planas suministradas antes de insertar el catéter en la vaina.
Inserte las puntas distales del catéter en la vaina y hágalas pasar a través de ella hasta que
estén colocadas correctamente en la vena deseada.
Precaución: Inserte el catéter rápidamente en la vaina para evitar la pérdida de sangre o
Español
una embolia gaseosa.
Precaución: Una adecuada colocación de la punta del catéter favorece el ujo sanguíneo,
como se describe en las instrucciones KDOQI (Iniciativa para la Calidad de los Resultados
en Diálisis).
Precaución: Para evitar un grave trauma o complicaciones fatales, verique siempre la
correcta colocación del catéter.
Extraiga con cuidado y lentamente, de la vena de la vaina extraíble.
84
Page 85

Los ajustes de colocación del catéter deben realizarse con control uoroscópico o ultrasónico.
La punta distal venosa debe estar colocada al nivel de la parte superior de la aurícula derecha,
en la unión, con la vena cava o más allá.
Precaución: Para evitar dañar el vaso cuando retire la vaina, tire de ésta todo lo que pueda
y ábrala unos pocos centímetros cada vez. No tire de la vaina que quede en la vena.
D. Catéter de tunelización Retro*
Realice una pequeña incisión en el punto de salida del túnel subcutáneo. El catéter está marcado para indicar un centro teórico. Esta marca debe hallarse justo en el exterior del putno
de salida. Haga el corte lo sucientemente amplio como para colocar el catéter. Administre
suciente anestesia local para anestesiar completamente el tejido.
Practique una disección roma con un estilete de tunelización y cree un túnel subcutáneo
directamente hacia el sitio de entrada.
Cuando el estilete de tunelización emerja del sitio de entrada, coloque el extremo cónico del
manguito de tunelación sobre el tunelador expuesto. En caso necesario, empuje el manguito
para que el manguito infable se deslice por el túnel subcutáneo.
Rosque o encaje el adaptador/tunelizador del catéter en el estilete de modo que esté rmemente sujeto (depende del tunelador que se use).
Retire las abrazaderas proximales del catéter y corte éste por la marca de 50 cm en el lado
venoso y por la marca de 47,5 cm en la luz arterial.
Para catéteres femorales (de una longitud total de 67 cm), corte el catéter en la marca de 65
cm en el lado venoso, y en la marca de 62,5 cm en la luz arterial.
Conecte el extremo del catéter al adaptador y empuje el manguito de tunelización sobre el
catéter.
Tire del el estilete de tunelización hasta que el catéter esté fuera del sitio de salida y la marca
del catéter esté visible.
Retire el catéter cuidadosamente del estilete tirando del manguito de tunelización y separando con un ligero giro el estilete del catéter.
Monte de nuevo las abrazaderas en los extremos proximales del catéter.
Si lo preere, puede cortar los extremos proximales del catéter para conseguir la longitud
deseada. Realice los cortes por las marcas de longitud, ya que están documentados los
volúmenes de cebado para estas longitudes.
ADVERTENCIAS
ADVERTENCIA: NUNCA INTENTE SEPARAR LAS LUCES DEL CATÉTER.
No forme túnel a través de un músculo.
No tire del tubo del catéter de lo contrario, podría alargar y dañar el catéter.
No dilate demasiado el tejido subcutáneo durante la formación de un túnel. Una sobredilatación podría atrasar o evitar la integración del manguito y aumentar el sangrado.
Una disección roma adicional puede facilitar la inserción si aparece alguna resistencia.
III. Inserción sin vaina (kit SafeTrac*) mediante la técnica Seldinger
A. Preparación de la zona
Se recomienda un espacio estéril tipo quirófano durante la colocación del catéter. También se
requiere la esterilidad de vendas, instrumental y accesorios. Así como un cepillo quirúrgico,
una bata, una coa, guantes y mascarilla.
Español
85
Page 86

En caso necesario, afeite la piel del paciente alrededor de la zona de inserción. Para anestesiar
completamente el punto de inserción debe cubrirse al paciente antes de administrarle la
anestesia local.
Se recomienda colocar al paciente ligeramente en posición Trendelenburg.
Practique una pequeña incisión sobre el vaso deseado siguiendo las líneas de la piel.
B. Punción venosa
Inserte una aguja de inserción en la jeringa y introdúzcala en la vena a tratar haciendo uso
de la guía ultrasónica, si es posible. Succione para asegurar la correcta colocación. El ujo de
sangre indicará la entrada en el vaso. Si la sangre es de color rojo intenso o, si se produce una
pulsación de retorno, extraiga la aguja y pinche otra vez.
Extraiga la jeringa y, al retirar la aguja, ponga el pulgar sobre el extremo de la aguja de
introducción para evitar pérdida de sangre o embolia gaseosa. Una vez succionada la sangre,
deslice el extremo exible de la guía en el mecanismo de avance de manera que solo su
extremo quede visible. Pase el extremo distal del mecanismo de avance hacia el conector de
la aguja de la aguja.
Avance el hilo exible y pase el centro de la aguja por la vena central. Inserte el hilo guía hasta
que la punta atraviese la aurícula derecha en la vena cava inferior. La longitud de inserción depende de la dimensión corporal del paciente. Durante el procedimiento, conecte al paciente a
un monitor de control cardíaco para detectar alguna posible arritmia.
Precaución: No extraiga la guía tirando de ella a través de ningún componente.
Precaución: Oriéntese mediante uoroscopia o ultrasonidos para asegurar la inserción y la
correcta colocación de la guía.
Si la guía entra en la aurícula derecha, existe riesgo de arritmia cardíaca. Controle el ritmo
cardíaco para detectar arritmias.
Retire la aguja sobre la guía, asegurándose de que el la guía quede bien sujeta durante la
extracción de la aguja.
Deslice un dilatador de vaina 6 Fr sobre la guía y atraviese la piel para introducirlo en la vena.
Asegúrese de no hacer avanzar la guía. La guía debe permanecer quieta durante el avance de
la vaina/dilatador.
Extraiga el dilatador. Inserte otra guía por la vaina. Retire la vaina.
C. Dilatación vascular e inserción del cateter
ADVERTENCIA: NUNCA INTENTE SEPARAR LAS LUCES DEL CATÉTER
Coloque los dos dilatadores intracatéter en las luces del catéter. Los dilatadores internos
de catéter disponen de cierres tipo luer en en los extemos proximales de los luers arterial y
venoso del catéter.
Deslice el extremo expuesto de una de las guías a través de dilatador interno de catéter
venoso hasta que sobresalga por el extremo proximal venoso del dilatador.
Deslice el dilatador o dilatadores vasculares sobre la otra guía y empújelo a través de la piel. Es
Español
recomendable la dilatación en serie.
Retire los dilatadores.
Precaución: No deje los dilatadores vasculares insertados más tiempo del necesario, pues
podría ocasionar la perforación de la pared venosa.
Pase la guía expuesta a través del dilatador intracatéter arterial hasta que sobresalga por el
extremo arterial del catéter.
Avance las guías hasta que estén tensas entre el extremo distal del catéter y el punto de entrada.
86
Page 87

Inserte el catéter en el vaso a través de la piel. Puede ser necesario torcerlo ligeramente
en ambas direcciones para hacer avanzar el catéter en la vena.
Es muy recomendable utilizar un método ultrasónico o uoroscópico para una correcta
colocación.
Precaución: Una adecuada colocación de la punta del catéter favorece el ujo sanguíneo,
como se describe en las instrucciones KDOQI (Iniciativa para la Calidad de los Resultados
en Diálisis).
Precaución: Para evitar un grave trauma o complicaciones fatales, verique siempre la
correcta colocación del catéter.
Extraiga los dilatadores intracatéter y las guías.
D. Catéter Retro* para tunelización
Realice una pequeña incisión en el punto de salida del túnel subcutáneo. El catéter está
marcado para indicar un centro teórico. Esta marca debe hallarse justo en el exterior del sitio
de salida. Haga el corte lo sucientemente amplio como para colocar el catéter. Administre
suciente anestesia local para anestesiar completamente el tejido.
Practique una disección roma con un estilete de tunelización y cree un túnel subcutáneo
directamente hacia el sitio de entrada.
Cuando el estilete de tunelización emerja del sitio de entrada, coloque el extremo cónico del
manguito de tunelación sobre el tunelador expuesto. En caso necesario, empuje el manguito
para que el manguito infable se deslice por el túnel subcutáneo.
Rosque o encaje el adaptador/tunelizador del catéter en el estilete de modo que esté rmemente sujeto (depende del tunelizador que se use).
Retire las abrazaderas proximales del catéter y corte éste por la marca de 50 cm en el lado
venoso y por la marca de 47,5 cm en la luz arterial.
Para catéteres femorales (de una longitud total de 67 cm), corte el catéter en la marca de 65
cm en el lado venoso, y en la marca de 62,5 cm en la luz arterial.
Conecte el extremo del catéter al adaptador y empuje el manguito de tunelización sobre el
catéter.
Tire del estilete de tunelización hasta que el catéter esté fuera del sitio de salida y la marca del
catéter esté visible.
Retire el catéter cuidadosamente del estilete tirando del manguito de tunelización y separando con un ligero giro el estilete del catéter.
Monte de nuevo las abrazaderas en los extremos proximales del catéter.
Si lo preere, puede cortar los extremos proximales del catéter para conseguir la longitud
deseada. Realice los cortes por las marcas de longitud, ya que están documentados los
volúmenes de cebado para estas longitudes.
ADVERTENCIAS
ADVERTENCIA: NO INTENTE NUNCA SEPARAR LAS LUCES.
No forme túnel a través de un músculo.
No tire del tubo del catéter de lo contrario, podría alargar y dañar el catéter.
No dilate demasiado el tejido subcutáneo durante la formación de un túnel. Una sobredilatación podría atrasar o evitar la integración del manguito y aumentar el sangrado.
Una disección roma adicional puede facilitar la inserción si aparece alguna resistencia.
Español
87
Page 88

IV. Procedimiento de colocación en la vena femoral
A
B
C
A
C
ADVERTENCIA: EL RIESGO DE INFECCIÓN SE INCREMENTA CON LA INSERCIÓN EN LA VENA
FEMORAL. Se deben considerar otras ubicaciones para el acceso, por ejemplo el área
pélvica en vez de la zona inguinal tradicional.
Evalúe tanto la zona femoral izquierda como la zona derecha para seleccionar la mejor de las
dos venas para la colocación del catéter. Se recomienda el uso de visualización ultrasónica.
Para la inserción de la vaina o dilatador, siga los procedimientos de la Sección II, “Inserción de
vaina o dilatador mediante la técnica Seldinger”.
Para la inserción sin vaina, siga los procedimientos de la sección III, “Inserción sin vaina
(kit SafeTrac*) mediante la técnica Seldinger”.
La inserción femoral es igual a la descrita en las Secciones II y III, con las excepciones
siguientes (véase 1, 2 y 3 a continuación).
1) No se debe colocar al paciente en la posición levemente Trendelenberg
2) La punta del catéter se debería colocar en la parte media de la vena cava inferior, o en la
unión de la vena ilíaca y la vena cava inferior.
3) El catéter se debería cortar en la marca de 65 cm de la luz venosa y en la marca de 62,5 cm
en la luz arterial antes de la tunelización.
No se debe permitir que las guías entren en la aurícula derecha. Podrían producir arritmias
cardíacas.
2
V. Montaje del adaptador de extensión de catéter o aplicación del kit de reparación Retro*
Utilice las grapas planas incluidas en el kit de catéteres para cerrar el catéter cuando sea
necesario y cuando reemplace adaptadores de extensión gastados o estropeados con extensiones “Retro* Repair Kit”.
No use pinzas dentadas.
Cuando corte a la medida deseada o reemplace adaptadores de extensión desgastados o
defectuosos, asegúrese de que el catéter cuadrado y que la luz restante del catéter no esté
dañada. Consulte la sección “longitud operativa” y el voluz de cebado correspondiente.
Español
Deslice la cápsula del catéter roja (A) sobre el extremo proximal del catéter con las marcas rojas. Compruebe si la cápsula roja tiene una junta (B) en su interior. Deslice el diámetro interior
de la luz del catéter arterial (rojo) sobre el tubo de acero inoxidable (parte de (C) y forma el
principio del tubo de extensión) hasta que toque el hombro. Enrosque la cápsula (A) hacia la
parte (C) hasta que se detenga en el cuerpo del adaptador. Repita el procedimiento para el
adaptador de extensión azul.
Precaución: Para evitar roturas, no apriete demasiado las cápsulas.
Retire las abrazaderas planas de las luces arterial (roja) y venoso (azul).
88
Page 89

Conecte las jeringas a ambas extensiones y abra las abrazaderas. La sangre debe ser
succionada con facilidad desde ambos lados (arterial y venoso). Si la succión de la sangre
encuentra demasiada resistencia, coloque el catéter en otro sitio para obtener un adecuado
ujo sanguíneo.
Una vez conseguida la succión adecuada, irrigue ambas luces con jeringuillas llenas de
solución salina usando la técnica de bolo rápido. Compruebe si las abrazaderas de extensión
están abiertas durante la irrigación.
Cierre las abrazaderas de extensión, retire las jeringas y coloque una cápsula de inyección en
cada conector con cierre luer.
VI. Sujeción del catéter y curación de heridas
Se adjunta un bastidor de sutura desmontable para suturar el catéter y el punto de salida.
Apriete ligeramente los bastidores de sutura desmontables para abrir la pestaña en la base
del cuerpo del bastidor.Coloque el bastidor de sutura en la marca de medida del catéter
en el punto de salida y suéltelo. Asegure el bastidor cosiéndolo en su lugar por los oricios
marcados.
Cosa el corte de inserción y los puntos de salida. A continuación, cosa los adaptadores de
catéteres en la piel usando un bastidor de sutura. No cosa el tubo del catéter.
Precaución: Evite rascar o cortar el catéter durante la sutura.
Precaución: Los objetos alados pueden perforar el catéter o cortar la luz del catéter y
anular su funcionamiento.
Cubra los puntos de entrada y de salida con vendas opacas.
Anote la longitud y el número de lote del catéter en la cha del paciente.
HEPARINIZACIÓN
Siga las instrucciones de permeabilidad del catéter si no va a ser usado para el tratamiento
inmediatamente.
Para conservar la permeabilidad entre tratamientos, cree un cierre de heparina en cada luz
del catéter.
Siga el protocolo del hospital para el concentrado de heparina.
Llene dos jeringas con la cantidad de heparina designada para las extensiones arterial y
venosa. Asegúrese de que las jeringas no contengan aire.
Extraiga las cápsulas de las extensiones.
Inserte una jeringa con solución de heparina en el lúer hembra de cada extensión.
Abra las abrazaderas de las extensiones.
Precaución: Succione con la jeringa para evitar que entre aire en el cuerpo del paciente.
Inyecte la heparina en cada luz usando la técnica de bolo rápido.
Precaución: Para asegurar la efectividad, cada luz debe estar completamente llena de
heparina.
Cierre las abrazaderas de las extensiones.
Precaución: Las abrazaderas de extensión deben abrirse sólo para la succión, la purga y el
tratamiento de diálisis.
Retire las jeringas.
Coloque una cápsula de inyección estéril en los lúers hembra de las extensiones.
89
Español
Page 90

Sujete las cápsulas de inyección con esparadrapo o cinta adhesiva para evitar que se desprendan accidentalmente.
La heparina no es necesaria durante las 48 a 72 horas siguientes, ya que no se habrá aspirado
por las luces ni se habrán vaciado.
TRATAMIENTO DE HEMODIÁLISIS
Precaución: Para evitar una embolia gaseosa, mantenga el tubo de extensión en todo
momento presionado cuando no lo esté utilizando.
Precaución: Para evitar la heparinización sistemática, la solución de heparina debe ser
retirada de cada luz antes de iniciar un tratamiento
Succione e irrigue el catéter con solución salina antes de cada uso. Elimine el aire del catéter y
de los tubos de conexión y cápsulas antes de cambiar los tubos de conexión.
El procedimiento de succión debe cumplir con el protocolo de la unidad de diálisis.
Antes de iniciar la diálisis, compruebe bien todas las conexiones de catéter y los circuitos
extracorporales.
Precaución: Durante el tratamiento, para evitar una desconexión accidental, sujete siempre con cinta adhesiva los cierres luer de los tubos vasculares.
Inspeccione visualmente el catéter y sus conexiones para asegurarse de que no existan fugas
para evitar pérdidas de sangre o embolia gaseosa. En caso necesario, solucione el problema
antes de continuar el tratamiento de diálisis.
Precaución: Una pérdida excesiva de sangre puede causar una conmoción al paciente.
La hemodiálisis debe ser realizada según las instrucciones del médico.
POSTDIÁLISIS
Prepare las jeringas con solución salina normal estéril y heparina.
Detenga la bomba sanguínea. Cierre la abrazadera de la extensión arterial. Cierre el tubo
sanguíneo arterial por el punto de conexión.
Desconecte del adaptador del catéter el tubo sanguíneo arterial y conecte una jeringa con
solución salina normal estéril al adaptador arterial. Abra la abrazadera de la extensión arterial
y expulse del catéter la sangre de la luz arterial. Cierre de nuevo la extensión.
Irrigue la luz con la cantidad de heparina adecuada (vea la indicación anterior).
Drene la sangre en el circuito extracorporal a través de la luz venosa.
Tras el drenaje de la sangre del paciente, apague la bomba sanguínea. Cierre la extensión
venosa y desconecte el tubo sanguíneo venoso del adaptador venoso del catéter.
Conecte una jeringa llena de solución salina estéril normal al adaptador venoso. Abra la
abrazadera de la extensión venosa y expulse la sangre restante de la luz venosa del catéter.
Cierre de nuevo e irrigue la luz con la cantidad adecuada de heparina.
Español
Asegúrese de que las abrazaderas están cerradas en ambas extensiones. Retire las jeringas
y cierre todos los adaptadores con un capuchón de inyección. Sujete con esparadrapo o
cinta adhesiva los capuchones de inyección a las extensiones para evitar que se desprendan
accidentalmente.
ADVERTENCIA
Mantenga el catéter siempre cerrado excepto cuando lo conecte a tubos sanguíneos
o a una jeringa durante el tratamiento.
90
Page 91

FLUJO SANGUÍNEO EN EL CATÉTER
Flujo insuciente
Se puede producir un ujo insuciente de sangre debido a que los oricios arteriales estén
ocluidos por una coagulación o acumulación de lamentos de la vaina, o bien a la oclusión de
los oricios laterales de la arteria debido al contacto con la pared venosa.
Tabla : Características de ujo respecto a la presión de los catéteres Retro*
Flujo Nivel medio de presion en el
interior de la luz
(ml/min) (mm Hg)
100 24 - 34
150 39 - 50
200 58 - 70
250 79 - 93
300 104 - 121
350 129 - 152
400 157 - 186
450 192 - 233
500 224 - 267
Los niveles de presión venosa y arterial se encuentran en
la lista anterior. Nota: los resultados anteriores se han
obtenido usando agua desionizada
Obstrucciones unidireccionales
Las obstrucciones unidireccionales ocurren cuando una luz puede irrigarse fácilmente pero
no es posible succionar la sangre. Esto se debe normalmente a un coágulo, lamentos de la
vaina o a una posición incorrecta de la punta. En este último caso, el mal ujo aparece poco
después de la colocación.
EXTRACCIÓN DEL CATÉTER
ADVERTENCIA
La extracción del catéter debe ser realizada únicamente por un médico familiarizado con
las técnicas apropiadas.
Palpe el catéter cerca del punto de salida para ubicar el manguito.
Aplique suciente anestesia local en el manguito del catéter y en la zona de salida.
Corte los puntos de sutura del bastidor. Siga los procedimientos del hospital.
Realice una pequeña incisión en el manguito, paralela al catéter.
Seccione hasta el manguito con un corte limpio o alado.
Cuando esté visible, sujete el manguito con una abrazadera.
Sujete el catéter entre el manguito y el punto de inserción. Para evitar ujo sanguíneo en
ambas luces, asegúrese de que la abrazadera esté sucientemente apretada.
Para liberar el catéter del tejido, empuje con cuidado con movimiento continuo, intentando
no dar tirones ni aplicar demasiada fuerza para no desgarrar el manguito.
Precaución: No tire del catéter si éste ofrece resistencia. En su lugar, corte y retire todos los
puntos de sutura del punto de venotomía.
Aplique presión sobre el túnel proximal hasta que se detenga la pérdida de sangre.
Cosa la incisión y aplique una venda para favorecer la curación.
91
Español
Page 92

Asegúrese de que el catéter no esté dañado y mídalo una vez extraído. Compare la longitud
del catéter con la especicación del producto para asegurarse de que el catéter ha sido
retirado en su totalidad.
1
National Kidney Foundation, Kidney Disease Outcomes Quality Initiative (KDOQI) Guidelines,
Guideline 5, “Type and Location of Tunneled Cu Catheter Placement.” (2000)
2
GX Zaleski, B. Funaki, JM Lorenz, RS Garofolo, MA Moscatel, JD Rosenblum and JA Leef.
Department of Radiology, The University of Chicago Hospital, IL 60637, USA. “Experience
with tunneled femoral hemodialysis catheters. Am J Rcmtgenol. 1999 Feb; 172 (2)c 493-496.
Close extension clamps.
Bard Access Systems, Inc. garantiza al comprador original que este producto estará libre de
defectos materiales y de fabricación durante un periodo de un (1) año a partir de la fecha de
compra. Si este producto resultara defectuoso, el comprador podría devolverlo a Bard Access
Systems, Inc. para su reparación o su reemplazo, aquella de las dos opciones que Bard Access
Systems, Inc. considere oportuna. Todas las devoluciones se deben autorizar por adelantado
de acuerdo con la Política de devolución de productos de Bard Access Systems, Inc., que se
puede encontrar en la versión actualizada de la Lista de precios. La responsabilidad de Bard
Access Systems, Inc. bajo esta garantía limitada de producto no incluye ningún uso indebido
de este producto ni su reparación por alguien que no sea un representante autorizado de
Bard Access Systems, Inc.
ESTA GARANTÍA LIMITADA DE PRODUCTO PREVALECE SOBRE CUALESQUIERA OTRAS
GARANTÍAS EXPRESAS O IMPLÍCITAS (INCLUIDAS, ENTRE OTRAS, LAS GARANTÍAS DE
COMERCIABILIDAD O IDONEIDAD PARA UN FIN CONCRETO). LAS RESPONSABILIDADES Y
COMPENSACIO NES MENCIONAD OS EN ESTA GARAN TÍA LIMITADA DE PRODUCTO
SON LAS ÚNICAS RESPONSABILIDADES DE BARD ACCESS SYSTEMS, INC. Y LAS ÚNICAS
COMPENSACIONES DISPONIBLES PARA EL COMPRADOR CON RESPECTO A ESTE PRODUCTO,
YA SEAN CONTRACTUALES, EXTRACONTRACTUALES (INCLUIDA LA NEGLIGENCIA) O DE OTRO
TIPO, Y BARD ACCESS SYSTEMS, INC. NO RESPONDERÁ ANTE LOS COMPRADORES POR NINGÚN
DAÑO INDIRECTO, ESPECIAL, SECUNDARIO O DERIVADO QUE PUDIERA RESULTAR DE SU
MANEJO O SU USO.
© 2010 C. R. Bard, Inc. Todos los derechos reservados.
Fecha de revisión : febrero 2010
Español
92
Page 93

BRUKSANVISNING
Implant Length
Body Length
Overall Length
32cm
32cm
35cm
35cm
40cm
40cm
45cm
45cm
50cm
50cm
ANVÄNDNINGSANVISNINGAR
Spire Biomedical, Inc.’s Retro* Silikon Dubbellumen Kronisk Hemodialyskateter
med Separerade Spetsar är designad för kronisk hemodialys och aferes. Det är en röntgentät
silikonkateter designad för perkutan införing eller införing via ett snitt. Katetrar som är längre
än 40 cm kan användas till inläggning i lårbensvenen.
KATETERPLACERING
Katetern kan placeras perkutant genom att använda en modierad “Seldinger-teknik” eller
med öppen venotomi.
Fluoroskopi eller ultraljudsguidning rekommenderas för att garantera spetsens position och
placering i höger atrium.
KONTRAINDIKATIONER
Denna kateter är endast ämnad för långsiktig vaskulär åtkomst och bör inte användas i något
annat syfte än det som anvisas i denna bruksanvisning.
BESKRIVNING
Retro* Dubbellumen Kronisk Hemodialyskateter med Separerade Spetsar är
tillverkat av röntgentät medicinskt silikon. Dess ovala form och silikonbaserade material ger
förbättrad exibilitet och kinkskydd.
För att reducera återcirkulation vid hemodialys är kateterns arteriella lumen kortare än den
venösa lumen i kateterns distala ände. Katetern har en ltku och separata färgkodade
förlängningsadaptrar.
Kateterns proximala ändar är retrograd (bakåtgående) tunnelerade till utgångsplatsen efter
spetsarna har positionerats. Denna design gör att kateterspetsarna kan placeras exakt.
Kateterns två proximala ändar, den arteriella och den venösa, ansluts till de färgkodade
förlängningsadaptrerarna. Varje förlängningsadapter har en kompressionsmu och en
kompressionshylsa. Alla har även en klämma och färgkodade luer.
STORLEKAR
Implantats- Kropps- Total
längd längd längd
19 cm 24 cm 52 cm
23 cm 28 cm 52 cm
27 cm 32 cm 52 cm
31 cm 36 cm 52 cm
35 cm 40 cm 52 cm
50 cm 55 cm 67 cm
Funktionella längder
30 cm 35 cm 40 cm 45 cm 50 cm
- 35 cm 40 cm 45 cm 50 cm
- - 40 cm 45 cm 50 cm
- - 40cm 45 cm 50 cm
- - - 45 cm 50 cm
- - - 60cm 65 cm
FLÖDESMÄNGDER
Flödesmängderna är skrivna på katetern vid funktionella längderna 30 cm, 35 cm, 40 cm,
45 cm, 50 cm, 60 cm och 65 cm på respektive kateter.
Svenska
93
Page 94

Funktionell
längd Arteriell Venös
30 cm 1.6 cc 1.7 cc
35 cm 1.8 cc 1.9 cc
40 cm 2.0 cc 2.1 cc
45 cm 2.2 cc 2.3 cc
50 cm 2.4 cc 2.5 cc
60 cm 2.8 cc 2.9 cc
65 cm 3.0 cc 3.1 cc
OBSERVERA
Enligt federal lag (USA) får systemet endast säljas till läkare eller mot läkarrekvisition.
VARNINGAR
För katetrar med en 24 cm längd, skär inte innan 30 cm märket.
För katetrar med en 28 cm längd, skär inte innan 35 cm märket.
För katetrar med en 32 cm längd, skär inte innan 40 cm märket.
För katetrar med en 36 cm längd, skär inte innan 40 cm märket.
För katetrar med en 40 cm längd, skär inte innan 45 cm märket.
För katetrar med en 55 cm längd, skär inte innan 60 cm märket.
LÄS ALLA INSTRUKTIONER, VARNINGAR
OCH OBSERVATIONER NOGGRANNT INNAN ANVÄNDNING
KOMPLIKATIONER
Luftemboli
Arteriell kanylering
Bakteriemi
Blödning
Plexus brachialis skada
Hjärtarrytmi
Hjärttamponad
Kateterspetsembolus eller
Trombembolus
Central ventrombos/ stenos
Chylotorax
Endokardit
Hematom (subkutan)
Blödning
OBS: Inläggning i lårbensven medför en större infektionsrisk jämfört med andra
inläggningsplatser. Andra komplikationer inkluderar:
Blödning från lårbensvenen
Nervskador i lårben
VARNINGAR
Katetern bör föras in eller tas bort av en kvalicerad, legitimerad läkare.
Innan behandling bör läkaren föra en diskussion med patienten om riskerna, fördelarna och
alternativen till katetrisering (om det nns några).
Kateterspetsens placering och val av lämplig längd överlåts till läkarens omdömesförmåga.
Likväl ska man rutinmässigt genomföra en röntgenundersökning som uppföljning till det
Svenska
första införandet för att bekräfta att kateterspetsen är korrekt placerad innan användning.
Placeringen av spetsen är vid eller i höger atrium, eller föreningspunkten för vena cava superior/höger atrium (SVC/RA).
1
Hemotorax
Infektion (vid utgångsplatsen)
Laceration (av ductus thoracicus)
Lumen trombos
Pneumotorax
Lungemboli
Punktion (arteria subclavia, höger
Arteriell , vena cava superior)
Septikemi
Trauma på höger atrium eller
huvudkärl
Tunnelinfektion (subkutan)
Kärllaceration, skada
Punktion (lårbensven eller artär)
Retroperitoneal blödning
Venös stenos
94
Page 95

Undersök lumen och förlängningsstycken innan och efter varje behandling för tecken
på skada eller förslitningar.
Skruva inte fast katateranslutningarna för hårt. Om de skruvas på för hårt kan anslutningarna
spricka.
Följ alltid tillbörliga steriliseringstekniker vid hantering av katetern och alla sterila objekt.
Använd inte katetern eller delar av utrustningen om sterilitetsförseglingen har brutits.
Använd inte en skadad kateter (t.ex. krossad, klämd, skuren) eller någon annan del av utrustningen som är skadad inklusive anslutningar med förvridna skruvgängor.
För att undvika luftemboli skall katetern alltid vara åtklämd förutom när den är ansluten till
blodslangar eller en spruta vid behandling.
Kläm inte kateterlumen; klämmor ska endast sättas på slangens förlängningsstycken.
Använd endast släta eller klykformade tänger om inte de bifogade kateterklämmorna används. Byt platsen som kläms åt för att undvika att slangens prestanda påverkas eller att dess
livslängd förkortas. Undvik att klämma åt nära adaptrerna och kateterkroppen.
Utöva försiktighet när vassa instrument används nära katetern. Använd inte vassa
instrument eller saxar för att ta bort förband.
Sätt tejp över injektionslocken mellan behandlingarna för att förhindra att de tas bort
oavsiktligt.
Endast avsedd för engångsbruk. FÅR INTE ÅTERANVÄNDAS. Återanvändning och/eller omförpackning utsätter både patient och användare för en infektionsrisk samt äventyrar instrumentets strukturella integritet och/eller grundläggande material- och designegenskaper, vilket kan
leda till fel på instrumentet och/eller till patientskada, sjukdom eller dödsfall.
Återsterilisera inte någon av kateterns extrautrustning. Tillverkaren skall inte hållas ansvarig
för skador som kan uppstå på grund av att katetern eller dess extrautrustning återsteriliseras.
Tvinga inte in ledaren, dilatorer, eller den bortdragbara introducern vid införing på
grund av risken för att kärl kan perforeras och skadas.
För att förhindra skada på katetern ska man undvika att utsätta den för ultraviolett ljus under
en längre tid.
Stick inte in den bortdragbara introducern längre än nödvändigt. Det kan hända att det
inte är nödvändigt att förlänga introducern till sin fulla längd p.g.a. patientens storlek och
införingsplatsen.
Använd ledarens riktare för att föra in änden av J-ledaren in i introducernålen. Tvinga inte in
J-ledaren vid införing eller borttagning av någon annan del eftersom ledaren då kan gå av.
Använd endast gängade luer-låsanslutningar (inklusive sprutor, blodslangar och injektionslock) till kateteradaptrerna.
Gör inga hack eller hål på kateterlumen eller förlängningsstyckena vid suturering.
Knyt inte åt suturen för hårt vid suturering.
Skölj katetern med saltlösning och sätt sedan på klämmorna på förlängningsstyckena.
Vid heparininfusion, skölj snabbt och sätt på klämmorna omedelbart för att garantera att
heparinet når ut i lumens distala ände. Försök inte att göra en infusion mot en stängd klämma
eller en blockerad kateter. Att försöka göra en infusion med våld i en blockerad kateter kan
skapa mottryck som kan resultera i att adaptern kommer ut ur slangen.
Använd inte aceton- eller jodlösning på någon del av kateterslangen. Kontakt med sådana
medel kan skada katetern.
Ta ur katetern när den inte längre behövs.
Använd inte katetern efter utgångsdatumet som står på paketet.
95
Svenska
Page 96

Vi rekommenderar starkt att läkaren använder sitt omdöme vid insättning av katetern i
IV
V
VI
I
II
III
patienter som inte kan ta eller hålla ett djupt andetag. Patienter anslutna till en respirator
eller som behöver hjälp av en respirator löper en större risk för pneumotorax vid intern halssubklavikulär kanylering.
Alla medicinskt godkända protokoll eller anvisningar nns inte med i detta dokument och de
är heller inte avsedda att ersätta läkarens erfarenhet och omdöme vid patientbehandling. Alla
förfaranden, observationer och varningar bör ändå läsas igenom innan produkten används.
INFÖRI NG AV RETRO* SILI KONKATETER MED KU FF
I. Införingsplats
Den bästa platsen för införande av en kateter är den inre halsvenen eftersom det där är
enklare att positionera kateterspetsen i höger atrium.
Man kan även använda subclavia vid införing. Observera emellertid att användning av subclavian är förenat med subklavikulär venstenos. Detta kan i framtiden utesluta arteriovenös
access i armen.
Katetern kan föras in i lårbensvenen (se Avsnitt IV). Inläggning i lårbensven är dock förenad
med en större infektionsrisk.
I - INRE HALSVEN
II - INFÖRINGSPLATS
III - VENA CAVA SUPERIOR
IV - KUFF
V - UTGÅNGSPLATS
VI - REKOMMENDERAD PLATS
FÖR SPETSEN I
HÖGER ATRIUM (RA)
II. Införing med skida/dilator med Seldinger-tekniken
A. Förbered lokalen
Ett sterilt “operationsrum” rekommenderas vid införing av en kateter. Sterila
operationslakan, instrument och tillbehör krävs även. Steriltvättning, skyddskläder
mössa, handskar, och ansiktsmask krävs.
Raka patientens hud ovanför och nedanför införingsplatsen, om så krävs. Patienten
bör vara klädd i operationsklädsel innan tillräckligt med lokalbedövning ges för att helt
bedöva införingsplatsen.
Patientens rekommenderade position är att vara i en lätt Trendelenberg-position.
Gör ett litet snitt som följer hudens linjer över önskat kärl.
B. Kärlpunktur
Fäst en spruta på introducerns nål och för in i avsedd ven med vägledning av ultraljud, om
det nns tillgängligt. Aspirera för att försäkra att den är korrekt placerad. Ymnigt blodöde
visar på att man gått in i kärlet. Om blodet är klarrött eller ger en pulserande återtillförsel, dra
tillbaka och återrikta nålen.
Ta bort sprutan och placera tummen över änden på inledarnålen för att förhindra blodförlust
Svenska
eller luftemboli. När blod har aspirerats, skjut in den böjbara änden av ledaren tillbaka in i
framåtledaren så att endast änden av ledaren syns. Skjut in framåtledarens distala ände in i
nålmuen.
96
Page 97

Skjut in den böjbara ledaren med en framåt rörelse in i och förbi nålmuen och in i det
avsedda kärlet. Längden för hur mycket som förs in beror på patientens storlek.
Observera: Dra inte tillbaka ledaren genom någon av delarna.
Observera: Använd uoroskopi eller ultraljud som vägledning för att försäkra att ledaren
förs in och placeras korrekt.
Om ledaren förs in i höger atrium kan det resultera i hjärtarrytmi. Använd en EKG-apparat
för att upptäcka arrytmi.
Ta bort nålen på ledaren, kontrollera samtidigt att ledaren hela tiden hålls på plats när nålen
tas bort.
C. Kärldilation och kateterinföring
Kärldilation och skidinföring
Skjut en kärldilator på ledaren och för den framåt genom huden och in i kärlet. Var noga så att
inte ledaren yttas framåt samtidigt. Ledaren måste hållas stilla när dilatorn förs framåt.
Serie-dilatering rekommenderas. Om andra dilatorer används, trä dilatorn (-erna) över ledaren
och in i kärlet. Ta bort dilatorn (-erna) när kärlet är tillräckligt utvidgat, och lämna kvar ledaren
på plats.
Observera: Låt inte kärldilatorer vara kvar längre än nödvändigt för att undvika att kärlets
väggar perforeras.
Dra den bortdragbara introducern/skidan över ledaren in i kärlet samtidigt som ledaren hålls
på plats.
Observera: Fluoroskopisk vägledning måste användas för att undvika att kärl punkteras.
Ta bort ledaren.
Observera: Låt inte skidan vara kvar längre än nödvändigt för att undvika skador på kärlet.
Kateterinföring
VARNING: FÖRSÖK ALDRIG SEPARERA LUMEN.
Ta bort dilatorn från skidan som infördes tidigare.
För att undvika blodläckage ska kateterns proximala förlängningsstycken klämmas åt med de
medföljande släta klämmorna innan katetern förs in i skidan.
För in de distala spetsarna in i och genom skidan tills kateterspetsarna är korrekt placerade i
den avsedda venen.
Observera: För snabbt in katetern i skidan för att undvika blodförlust eller luftemboli.
Observera: Om kateterspetsen placeras på rätt plats återfås det optimala blodödet enligt
beskrivningen i KDOQI anvisningarna.
Observera: Om inte kateterplaceringen kan verieras kan det resultera i allvarligt trauma
eller livshotande komplikationer.
Dra försiktigt och långsamt bort den bortdragbara skidan ut ur kärlet.
Justering av kateterns placering bör göras under vägledning av uoroskopi eller ultraljud. Den
venösa distala spetsen bör placeras i nivå med den övre (superior) delen av höger atrium, vid
eller förbi förbindelsepunkten mellan cava och förmak.
Observera: För att undvika skador på kärlet när den bortdragbara skidan tas ut, dra skidan
så långt bakåt så möjligt och riv sedan skidan bara ett par centimeter i taget. Dra inte i den
del av skidan som sitter kvar i kärlet.
97
Svenska
Page 98

D. Tunnelering Retro* Kateter
Gör ett litet snitt vid den subkutana tunnelns utgångsplats. Katetern har ett märke för att
visa en teoretisk mu. Markeringen bör nnas alldeles utanför utgångsplatsen. Gör ett snitt
som precis är brett nog för att rymma katetern. Ge tillräckligt med lokalbedövning för att helt
bedöva vävnaden.
Skapa en subkutan tunnel direkt mot införingsplatsen med hjälp av en trubbig dissektion
med tunneleringsmandrinen.
Placera tunneleringshylsans avsmalnade ände över den synliga tunneleraren när tunneleringsmandrinen kommer ut från införingsplatsen. Om det behövs, tryck på hylsan för att kuen
ska få fäste att glida genom den subkutana tunneln.
Trä eller kläm fast kateteradaptern/tunneleraren på mandrinen så att den sitter säkert fast
(beror på vilken tunnelerare som används).
Ta bort kateterns proximala klämmor och skär av katetern vid 50 cm märket på den venösa
sidan, och vid 47,5 cm märket på den arteriella lumen.
Vid användning av lårbenskateter (full längd 67 cm) ska katetern skäras vid 65 cm märket på
den venösa sidan och vid 62,5 cm märket på artärlumen.
Koppla änden av katetern till adaptern och tryck över tunneleringshylsan över katetern.
Dra tunneleringsmandrinen tills katetern är borta från utgångsplatsen och man kan se
kateterns märkningar.
Ta bort katetern försiktigt från mandrinen genom att dra tillbaka tunneleringshylsan och
sedan försiktigt vrida mandrinen ut ur katetern.
Sätt tillbaka klämmorna på kateterns proximala ändar.
Om det behövs kan kateterns proximala ändar skäras av för att få önskad längd. Avskärningar bör göras vid de markerade längderna eftersom ödesmängderna för dessa längder är
dokumenterade.
VARNINGAR
VARNING: FÖRSÖK ALDRIG SEPARERA KATETERLUMEN.
Tunnelera inte genom muskler.
Dra inte i kateterslangen. Genom att dra kan man förlänga eller skada katetern.
Utvidga inte den subkutana vävnaden för mycket vid tunnelering. Överdriven utvidgning
kan försena/förhindra kunväxt och kan öka blödning.
Ytterligare trubbig dissektion kan underlätta införing om man stöter på hinder.
III. Införing utan skida (SafeTrac* Sats) med Seldinger-teknik
A. Förbered lokalen
Ett sterilt “operationsrum” rekommenderas vid införing av en kateter. Sterila operationslakan,
instrument och tillbehör krävs även. Steriltvättning, skyddskläder, mössa, handskar och
ansiktsmask krävs.
Raka patientens hud ovanför och nedanför införingsplatsen, om så krävs. Patienten bör vara
klädd i operationsklädsel innan tillräckligt med lokalbedövning ges för att helt bedöva
införingsplatsen.
Patientens rekommenderade position är att vara i en lätt Trendelenberg-position.
Svenska
Gör ett litet snitt som följer hudens linjer över önskat kärl.
98
Page 99

B. Kärlpunktur
Fäst en spruta på introducerns nål och för in i avsedd ven med vägledning av ultraljud, om
det nns tillgängligt. Aspirera för att försäkra att den är korrekt placerad. Ymnigt blodöde
visar på att man gått in i kärlet. Om blodet är klarrött eller ger en pulserande återtillförsel, dra
tillbaka och återrikta nålen.
Ta bort sprutan och placera tummen över änden på inledarnålen för att förhindra blodförlust
eller luftemboli. När blod har aspirerats, skjut in den böjbara änden av ledaren tillbaka in i
framåtledaren så att endast änden av ledaren syns. Skjut in framåtledarens distala ände in i
nålmuen.
Skjut in den böjbara ledaren med en framåt rörelse in i och förbi nålmuen och in i det
avsedda kärlet. För in ledaren tills spetsen förs in i och genom höger atrium in i vena cava
inferior. Längden för hur mycket som förs in beror på patientens storlek. Anslut patienten till
en EKG-apparat under ingreppet för att upptäcka tecken på arrytmi.
Observera: Dra inte tillbaka ledaren genom någon av delarna.
Observera: Använd uoroskopi eller ultraljud som vägledning för att försäkra att
ledaren förs in och placeras korrekt.
Om ledaren förs in i höger atrium kan det resultera i hjärtarrytmi. Använd en EKG-apparat
för att upptäcka arrytmi.
Ta bort nålen på ledaren, kontrollera samtidigt att ledaren hela tiden hålls på plats när nålen
tas bort.
Skjut en 6Fr skida/dilator på ledaren och för den framåt genom huden och in i venen. Var
noga så att inte ledaren yttas framåt samtidigt. Ledaren måste hållas stilla när skidan/
dilatorn förs framåt.
Ta bort dilatorn. För in en annan ledare genom skidan. Ta bort skidan.
C. Kärldilation och kateterinföring
VARNING: FÖRSÖK ALDRIG SEPARERA KATETERLUMEN
För in de två medföljande intrakateterdilatorerna in i kateterns lumen. Intrakateterns dilatorer
har luer som låses fast på de proximala ändarna av kateterns arteriella och venösa luer.
Skjut in den synliga änden av ledarna genom den venösa intrakateterdilatorn tills den kommer ut genom dilatorns proximala, venösa ände.
Skjut lämplig kärldilator(-er) över den andra ledaren och för dem framåt genom huden.
Seriedilatering rekommenderas.
Ta bort dilatorn(-erna).
Observera: Låt inte kärldilatorer sitta kvar längre än nödvändigt för att undvika att kärlets
väggar perforeras.
Skjut den synliga ledaren genom den arteriella intrakateterdilatorn tills den kommer ut
genom kateterns proximala arteriella ände.
För ledarna framåt tills ledarna är helt utsträckta mellan kateterns distala ände och införingsplatsen.
För katetern framåt genom huden och in i kärlet. Man kan behöva vrida lite grann åt ett eller
andra hållet för att föra katetern framåt och in i venen.
För korrekt placering rekommenderas det att använda ultraljud eller uoroskopi som vägledning.
Observera: Om kateterspetsen placeras på rätt plats återfås det optimala blodödet enligt
beskrivningen i KDOQI anvisningarna.
99
Svenska
Page 100

Observera: Om inte kateterplaceringen kan verieras kan det resultera i allvarligt trauma
eller livshotande komplikationer.
Ta bort intrakateterdilatorer och ledare.
D. Tunnelering Retro* Kateter
Gör ett litet snitt vid den subkutana tunnelns utgångsplats. Katetern har ett märke för att
visa en teoretisk mu. Markeringen bör nnas alldeles utanför utgångsplatsen. Gör ett snitt
som precis är brett nog för att rymma katetern. Ge tillräckligt med lokalbedövning för att helt
bedöva vävnaden.
Skapa en subkutan tunnel direkt mot införingsplatsen med hjälp av en trubbig dissektion
med tunneleringsmandrinen.
Placera tunneleringshylsans avsmalnade ände över den synliga tunneleraren när tunneleringsmandrinen kommer ut från införingsplatsen. Om det behövs, tryck på hylsan för att kuen
ska få fäste att glida genom den subkutana tunneln.
Trä eller kläm fast kateteradaptern/tunneleraren på mandrinen så att den sitter säkert fast
(beror på vilken tunnelerare som används).
Ta bort kateterns proximala klämmor och skär av katetern vid 50 cm märket på den venösa
sidan, och vid 47,5 cm märket på den arteriella lumen.
Vid användning av lårbenskateter (full längd 67 cm) ska katetern skäras vid 65 cm märket på
den venösa sidan och vid 62,5 cm märket på artärlumen.
Koppla änden av katetern till adaptern och tryck över tunneleringshylsan över katetern.
Dra tunneleringsmandrinen tills katetern är borta från utgångsplatsen och man kan se
kateterns märkningar.
Ta bort katetern försiktigt från mandrinen genom att dra tillbaka tunneleringshylsan och
sedan försiktigt vrida mandrinen ut ur katetern.
Sätt tillbaka klämmorna på kateterns proximala ändar.
Om det behövs kan kateterns proximala ändar skäras av för att få önskad längd. Avskärningar bör göras vid de markerade längderna eftersom ödesmängderna för dessa längder är
dokumenterade.
VARNINGAR
VARNING: FÖRSÖK ALDRIG SEPARERA LUMEN.
Tunnelera inte genom muskler.
Dra inte i kateterslangen. Genom att dra kan man förlänga eller skada katetern.
Utvidga inte den subkutana vävnaden för mycket vid tunnelering. Överdriven utvidgning
kan försena/förhindra kunväxt och kan öka blödning.
Ytterligare trubbig dissektion kan underlätta införing om man stöter på hinder.
IV. Metod för placering i lårbensven
VARNING: INFEKTIONSRISKEN ÖKAR VID INLÄGGNING I LÅRBENSVENEN. Andra åtkomstplatser som till exempel bäckenet bör hellre övervägas, istället för det traditionella
ljumskområdet, för att minska infektionsrisken.
Se över både vänster och höger lårben och välj den ven som ser bäst ut för kateterinläggning.
Användning av ultraljusvisualisering rekommenderas.
Svenska
Följ anvisningarna i Avsnitt II för införing av skida/dilator, “Införing med hjälp av skida/dilator
med Seldinger-metoden”.
100
 Loading...