

Page 1
Barco
XHD-Series User Guide
®
Media Server
Part number: 60600320
Version: 02.00
July 29, 2015
Page 2

Barco Media Server: XHD-Series User Guide
Barco
Changes
Barco provides this manual ’as is’ without warranty of any kind, either expressed or implied, including but
not limited to the implied warranties or merchantability and fitness for a particular purpose. Barco may make
improvements and/or changes to the product(s) and/or the program(s) described in this publication at any
time without notice.
This publication could contain technical inaccuracies or typographical errors. Changes are periodically made
to the information in this publication; these changes are incorporated in new editions of this publication.
The latest edition of Barco manuals can be downloaded from the Barco web site www.barco.com or from the
secured Barco web site https://www.barco.com/en/signin.
Copyright ©
All rights reserved. No part of this document may be copied, reproduced or translated. It shall not otherwise
be recorded, transmitted or stored in a retrieval system without the prior written consent of Barco.
Guarantee and Compensation
Barco provides a guaranteerelating to perfect manufacturingaspart of the legally stipulated terms of guarantee.
On receipt,the purchaser must immediately inspect all delivered goods for damage incurred during transport,
as well as for material and manufacturing faults Barco must be informed immediately in writing of any complaints.
The period of guarantee begins on the date of transfer of risks, in the case of special systems and software on
the date of commissioning, at latest 30 days afterthe transfer of risks. In the event of justified notice of complaint,
Barco can repair the fault or provide a replacement at its own discretion within an appropriate period. If this
measure proves to be impossible or unsuccessful, the purchaser can demand a reduction in the purchase price
or cancellation of the contract.All other claims, in particular those relating tocompensation for direct orindirect
damage, andalso damage attributed to the operation of software as well asto otherservices providedby Barco,
being a component of the system or independent service, will be deemed invalid provided the damage is not
provento beattributed to the absence ofproperties guaranteedin writing ordue tothe intent or gross negligence
or part of Barco.
If the purchaser or a third party carries out modifications or repairs on goods delivered by Barco, or if the
goods are handled incorrectly, in particular if the systems are operated incorrectly or if, after the transfer of
risks, the goods are subject to influences not agreed upon in the contract, all guarantee claims of the purchaser
will be rendered invalid. Not included in the guarantee coverage are system failures which are attributed to
programs or special electronic circuitry provided by the purchaser, e.g. interfaces. Normal wear as well as
normal maintenance are not subject to the guarantee provided by Barco either.
The customer must comply with the environmental conditions as well as the servicing and maintenance regulations specified in this manual.
Trademarks
Brand and product names mentioned in this manual may be trademarks, registered trademarks or copyrights
of their respective holders.
All brand and product names mentioned in this manual serve as comments or examples and are not to be
understood as advertising for the products or their manufacturers.
Terms and Conditions
1. No redistribution of the software is allowed.
Barco Pn: 60600320
Page 3

2. Reverse-Engineering. You may not reverse engineer, decompile, disassemble or alter this
software product.
Disclaimer of Warranty
This software and the accompanying files are sold “as is” and without warranties as to performance or merchantability or any other warranties whether expressed or implied. In no event shall Barco be liable for damage
of any kind, lossof data, loss of profits, business interruption orother pecuniary loss arising directlyor indirectly.
Any liability of the seller will be exclusively limited to replacement of the product or refund of purchase price.
Federal Communications Commission (FCC Statement)
This equipment has been tested and found to comply with the limits for a class A digital device, pursuant to
Part 15 of the FCC rules. These limits aredesigned toprovide reasonableprotection against harmful interference
when theequipment isoperated in a commercial environment. Thisequipment generates, uses,and canradiate
radio frequency energy and, if not installed and used in accordance with the instruction manual, may cause
harmful interference to radio communications. Operation of this equipment in a residential area may cause
harmful interference, in which case the user will be responsible for correcting any interference at his own expense.
Changes or modifications not expresslyapproved bythe party responsible forcompliance could voidthe user’s
authority to operate the equipment.
EN55032/CISPR32 Class A Multimedia Equipment
Warning: This equipment is compliant with Class A of CISPR 32. In a residential environment this equipment
may cause radio interference.
Product Modification Warning
High End Systems products are designed and manufactured to meet the requirements of United States and
International safety regulations. Modifications to the product could affect safety and render the product noncompliant to relevant safety standards.
Mise En Garde Contre La Modification Du Produit
Les produits High End Systems sont conçus et fabriqués conformément aux exigences des règlements internationaux de sécurité. Toute modification du produit peut entraîner sa non conformité aux normes de sécurité
en vigueur.
Produktmodifikationswarnung
Design und Herstellung von High End Systems entsprechen den Anforderungen der U.S. Amerikanischen
und internationalen Sicherheitsvorschriften. Abänderungendieses Produkteskönnen dessenSicherheit beeinträchtigen und unter Umständen gegen die diesbezüglichen Sicherheitsnormen verstoßen.
Avvertenza Sulla Modifica Del Prodotto
I prodotti di High End Systems sono stati progettati e fabbricati per soddisfare i requisiti delle normative di
sicurezza statunitensi ed internazionali. Qualsiasi modifica al prodotto potrebbe pregiudicare la sicurezza e
rendere il prodotto non conforme agli standard di sicurezza pertinenti.
Advertencia De Modificación Del Producto
Los productosde High End Systems están diseñados y fabricados para cumplir los requisitos de las reglamentaciones de seguridad de los Estados Unidos e internacionales. Las modificaciones al producto podrían afectar
la seguridad y dejar al producto fuera de conformidad con las normas de seguridad relevantes.
Barco Pn: 60600320
Page 4

製品変更に対する警告
High End Systems 製品はアメリカ合衆国及び、国際安全基準の必要条件を満たすよう設計及び製造されてい
ます。この為、製品に対する変更は安全に対して影響を及ぼす場合及び、関連安全基準に満たない状態にす
る場合があります。
Barco Pn: 60600320
Page 5

Declaration of Conformity
Barco Media Server XHD-Series User Guide
Manufacturer's Name:
Manufacturer's Address:
Distributor's Name:
Distributor's Address:
Product Name:
Barco Lighting Systems Inc.
2105 Gracy Farms Lane
Austin, Texas 78758 USA
Barco Lighting Systems Inc.
2105 Gracy Farms Lane
Austin, Texas 78758 USA
Professional Video Processor
Models: XHD-404, XHD-402, XHD-400, XHD-200Product Options:
We hereby declare that the above referenced product complies with the essential requirements of Council Directives 2004/108/EC (EMC), 2006/95/EC (LVD) and 2011/65/EC
(RoHS).
Safety:
EMC:
Emission:
Restricted SubstancesROHS:
2006 + A11 (2009) + A1 (2010) + A12 (2011)EN 60950-1:
EN 55022 (2010)
EN 61000-3-2 (2006) + A1 2009) + A2 (2009)
EN 61000-3-3 (2008)
EN 55024 (2010)Immunity:
Maximum Concentration Value
(by weight inhomogeneous material)
0.01%Cadmium (Cd)
0.1%Lead (Pb)
0.1%Mercury (Hg)
0.1%Hexavalent Chromium (Cr(VI))
0.1%Polybrominated Biphenyl (PBB)
0.1%Polybrominated Diphenyl Ethers (PBDEs)
Kenneth S. Hansen
Compliance Engineer
May 29, 2015
ii
Barco Pn: 60600320
Page 6

Table of Contents
Revision history . .......................... ....... ....... ....... ................... ....... ....... ....... xi
1: Introduction ........................................................................................ 13
1.1 About this guide .......... ....... ....... ....... ................... ....... ....... ....... . 13
1.2 Symbols, pictures, and fonts .......... ....... ....... ....... ................... ...... 14
1.3 Standards and safety .... ....... ....... ....... ................... ....... ....... ....... 14
1.4 Environmental information: disposal .... .......................... ....... ....... . 19
1.5 RoHS compliance .............. ....... ....... ....... ................... ....... ....... .. 20
1.6 Terms and definitions ....... ....... ....... ................... ....... ....... ....... ..... 22
2: Installation .......................................................................................... 25
2.1 Installation requirements ....... ....... ................... ....... ....... ....... ....... 25
2.2 Initial inspection ... ....... ................... ....... ....... ....... ...................... 26
2.3 Rack-mount procedure ................. ....... ....... ....... ................... ..... 27
2.4 Connections . ....... ....... ....... ................... ....... ....... ....... ............... 28
2.5 Powering ON the Barco Media Server .......... ....... ....... ....... ........... 28
2.6 Software startup ................. ....... ....... ....... ................... ....... ....... . 28
2.7 Licensing . ....... ....... ................... ....... ....... ....... ................... ....... . 29
2.8 Shutdown and restart ........ ................... ....... ....... ....... ................. 34
2.9 Restore ..... ....... .......................... ....... ....... ....... ................... ....... 35
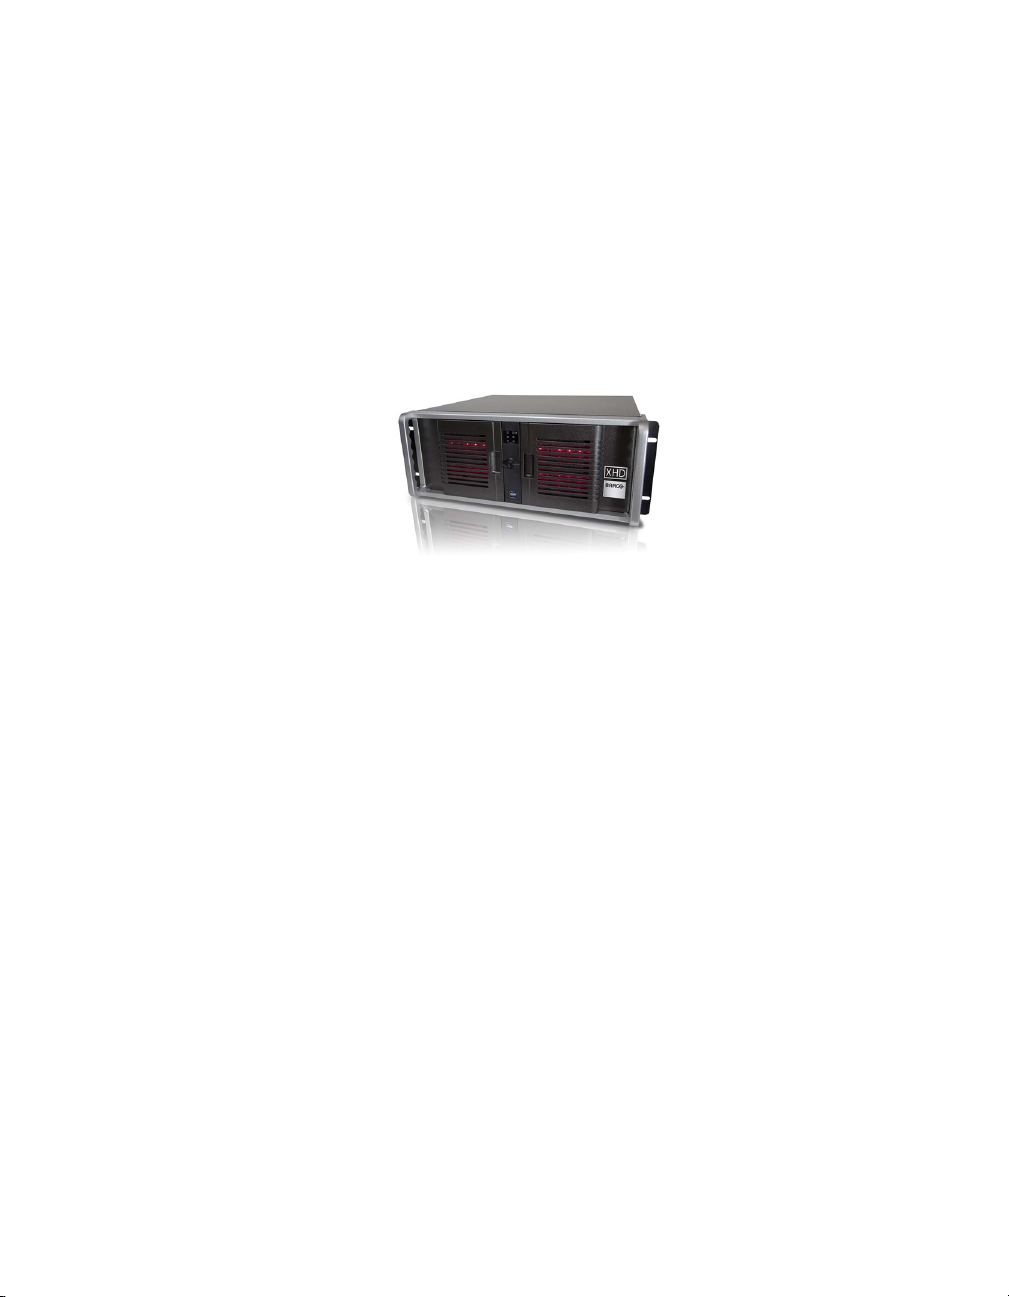
3: Hardware ........................................................................................... 43
Barco Media Server XHD-Series User Guide
1.1.1 This guide ..... ....... ....... ....... ................... ....... ....... ....... ...... 13
1.1.2 Available system documentation ..................... ....... ....... ... 13
1.2.1 Symbol overview ... ....... ....... ................... ....... ....... ....... .... 14
1.2.2 Picture overview ... ....... ....... ....... ................... ....... ....... .... 14
1.3.1 General safety instructions ................ ....... ....... ....... ........... 15
1.3.2 Standards .......... ....... ....... ....... .......................... ....... ....... 15
1.3.3 Precautions ..... ....... ................... ....... ....... ....... ................ 16
1.3.4 Additional information ....... ....... ................... ....... ....... ...... 18
1.4.1 Disposal of the product (Waste Electrical and Electronic
Equipment) ............ ....... ....... ....... ................... ....... ....... ....... ... 19
1.4.2 Disposal of batteries ............... ....... ....... ....... ....... ............. 19
1.5.1 中国大陆 RoHS (Chinese Mainland RoHS) ....... ....... ....... ....... 20
1.5.2 Turkey RoHS compliance ......... ....... ....... ....... ................... . 22
2.1.1 Disconnect device . ....... .......................... ....... ....... ....... ... 25
2.1.2 Barco Media Server Windows®image ................. ....... ....... 25
2.1.3 X-Agora GUI ....... ....... ....... ....... ................... ....... ....... ....... 25
2.2.1 General ...... ....... ....... .......................... ....... ....... ....... ....... 26
2.2.2 Unpacking .. ....... ....... ....... ................... ....... ....... ....... ...... 26
2.2.3 Box content .... ....... ....... ....... ................... ....... ....... ....... ... 26
2.2.4 Mechanical check .... ....... ....... ....... .......................... ....... 27
2.7.1 CodeMeter Control Center ......... ....... ....... ....... ................. 29
2.7.2 Launching CodeMeter Control Center ... ....... ....... ....... ...... 30
2.7.3 XHD-Series licensing ............ ....... ....... ....... ................... ..... 30
2.7.4 XDG-100 Designer licensing ..... ....... ................... ....... ....... . 32
2.8.1 Software shutdown .... ....... ................... ....... ....... ....... ....... 35
2.8.2 Hardware shutdown .... ....... ....... ....... ................... ....... ..... 35
2.9.1 System Restore ............ ....... ....... ....... ................... ....... ..... 36
2.9.2 Full System Restore .......... ....... ....... ....... ................... ....... . 39
2.9.3 Clearing CMOS ................. ....... ....... ....... ................... ..... 41
iiiBarco Pn: 60600320
Page 7

Barco®Media ServerBarco Media Server XHD-Series User Guide
3.1 XHD-200 series ............ ....... ....... ....... ....... ................... ....... ....... .. 43
3.2 XHD-400 series ... ....... ....... ....... ................... ....... ....... ....... ....... .... 44
4: Software ............................................................................................. 47
4.1 Requirements ... ....... .......................... ....... ....... ....... ................... 47
4.1.1 Hardware .... ....... ................... ....... ....... ....... ..................... 47
4.1.2 Distributed deployment ....... .......................... ....... ....... ..... 47
4.1.3 Network ................... ....... ....... ....... ................... ....... ....... . 47
4.2 The X-Agora architecture ............ ....... ....... ....... ................... ....... 48
4.2.1 X-Agora ... ....... ....... .......................... ....... ....... ....... .......... 48
4.2.2 X-Agora Agent . ....... ....... ....... ................... ....... ....... ....... . 48
4.2.3 X-Agora Player ..... ....... ....... ................... ....... ....... ....... ..... 48
4.2.4 X-Agora Server ... ....... ....... ....... ................... ....... ....... ....... 49
4.3 Getting started—Install, Uninstall, and Update ... ....... ................... . 49
4.3.1 X-Agora Wizard ... ....... ....... ....... ................... ....... ....... ...... 49
4.4 Network setup ....... ....... ....... ....... ................... ....... ....... ....... ....... 53
4.5 Configuring Agent ................. ....... ....... ....... ................... ....... ..... 54
4.6 Launching X-Agora ............... ....... ....... ....... .......................... ...... 55
4.7 X-Agora interface ........... ....... ....... ....... ....... ................... ....... ..... 55
4.7.1 Parts of the interface ..... ....... ....... ....... ....... ................... ... 56
4.7.2 The X-Agora Designer User Guide ..... ................... ....... ....... 59
A Specifications ....... ....... ....... ....... ................... ....... ....... ....... ................. 61
A.1 Barco Media Server specifications ............ ....... ....... ....... ............. 61
A.2 Standard connection specifications ............ ....... ....... ....... .......... 62
A.3 Standard connector pinouts ............... ....... ....... ....... ....... ........... 64
A.3.1 DisplayPort connector pinouts ... ....... ....... ....... ................. 64
A.3.2 DVI connector pinouts ..... ....... ....... .......................... ....... 65
A.3.3 Ethernet connector pinouts ........ ....... ....... ....... ................ 66
B Replacing a power-cord cap ..... ....... ....... ....... ................... ....... ....... ..... 69
B.1 Installing a Line Cord Cap – U.K. Only .. ....... ....... ....... ................... 69
B.2 Vatic Fitter Heads Information – Danmark ........ ....... ....... ....... ....... 69
C AMD FirePro™Control Center ............ ....... ....... ....... .......................... .... 71
C.1 Using Dedicated Fullscreen ... .......................... ....... ....... ....... ...... 71
C.2 Setting up an Eyefinity Group ....... .......................... ....... ....... ...... 71
C.3 Disable Eyefinity Group .......... ....... ....... ....... .......................... .... 77
C.4 Manage Eyefinity Group in Designer .. ................... ....... ....... ....... . 78
D EDID management .. ....... .......................... ....... ....... ....... ................... ... 81
D.1 Removing an emulated EDID through the AMD FirePro™ Control
Center ....... ....... ....... ....... ................... ....... ....... ....... ................... ... 81
D.2 Removing an emulated EDID through the NVIDIA Control Pan-
el ............ ....... ....... ....... ....... ................... ....... ....... ....... .................. 82
E Input check ................. ....... ....... ....... ................... ....... ....... ....... ....... .... 85
E.1 DVI video input check ..... .......................... ....... ....... ....... ............ 85
E.2 SDI video input check ..... ....... ................... ....... ....... ....... ............ 86
F Trouble shooting ........ ....... ....... ....... ....... ................... ....... ....... ....... ....... 89
G Window menu panes ................... ....... ....... ....... ....... ................... ....... . 93
G.1 Displays pane ... ....... ................... ....... ....... ....... ................... ...... 93
G.1.1 Display groups ....... ....... .......................... ....... ....... ....... ... 94
G.1.2 Add display .. ................... ....... ....... ....... ......................... 95
G.2 Media pane ................... ....... ....... ....... ....... ................... ....... ... 96
G.2.1 Media type .. ....... ....... ....... ................... ....... ....... ....... ..... 96
Barco Pn: 60600320iv
Page 8

Barco Media Server XHD-Series User GuideBarco®Media Server
G.2.2 Importing and refreshing media ... ....... ................... ....... .. 96
G.2.3 Previewing media ........ ....... ....... ....... ....... ................... ... 96
G.3 Timelines pane ... ................... ....... ....... ....... ................... ....... .... 97
G.4 Actions pane ........ ....... ....... ....... ................... ....... ....... ....... ...... 98
G.4.1 Lighting .. ....... ................... ....... ....... ....... ........................ 98
G.4.2 Particles ..... ....... ....... ....... .......................... ....... ....... ...... 98
G.4.3 Post-Processing . ....... ....... ....... ................... ....... ....... ....... 98
G.4.4 Sound ................. ....... ....... ....... ................... ....... ....... .... 99
G.4.5 Timeline . ....... ....... ................... ....... ....... ....... ................ 100
G.4.6 Transformations .......................... ....... ....... ....... ............. 100
G.4.7 Visibility ... ....... ................... ....... ....... ....... ....... .............. 101
G.5 3D objects pane ................... ....... ....... ....... ................... ....... ... 101
G.6 Timeline pane ....... ....... ....... ....... ................... ....... ....... ....... ..... 101
G.6.1 Timeline playback and element-manipulation con-
trols ... ................... ....... ....... ....... ................... ....... ....... ....... .. 102
G.6.2 Zooming ........ ....... ....... ....... ................... ....... ....... ....... . 103
G.6.3 TimeCue .. ................... ....... ....... ....... .......................... .. 103
G.6.4 Keyframing .............. ....... ....... ....... ................... ....... ..... 103
G.6.5 SMPTE configuration .......... ....... ....... ....... ...................... 103
G.7 Properties pane ........ ....... ....... ....... ................... ....... ....... ....... . 105
G.7.1 Video and image properties ............ ....... ....... ....... ......... 106
G.8 Inputs pane ..... ....... ....... ................... ....... ....... ....... ................. 109
G.8.1 Input variables ..... ....... ....... ....... ................... ....... ....... .. 110
G.8.2 Connecting variables to actions . ....... ....... ................... .. 112
G.9 Viewport ............ ....... ....... ....... ................... ....... ....... ....... ....... 113
G.9.1 Changing the number and layout of views . ....... ....... ...... 114
G.9.2 Camera and controls ... ....... ....... ....... ................... ....... . 115
G.10 Settings pane ... ....... ................... ....... ....... ....... ....... ............... 116
H Tools ... ....... ....... ....... .......................... ....... ....... ....... ................... ....... 119
H.1 2D mode ............ ....... ....... ....... .......................... ....... ....... ....... 119
H.1.1 Workflow ..... ....... .......................... ....... ....... ....... ............ 119
H.1.2 2D concepts ..... ....... ....... ....... ................... ....... ....... ...... 120
H.1.3 Controls ... ....... ....... .......................... ....... ....... ....... ........ 121
H.1.4 2D media manipulation .......... ....... ....... ....... .................. 122
H.1.5 Differences from 3D mode ........ ....... ....... ....... ....... ......... 125
H.2 X-Agora Agent .. ....... ................... ....... ....... ....... ................... .... 126
H.3 X-Agora Media Encoder ................ ....... ....... ....... ................... .. 127
H.3.1 Application preferences .... ....... ....... ....... ................... .... 127
H.3.2 Single video encoding ......... ....... ....... ....... .................... 129
H.3.3 Video package encoding ... ................... ....... ....... ....... .. 129
H.4 Content Production ..... .......................... ....... ....... ....... ............. 130
H.4.1 Viewpoints ................ ....... ....... ....... ....... ................... ..... 131
H.4.2 Viewpoint properties ............ ....... ....... ....... ................... . 131
H.4.3 Crops and packages . ................... ....... ....... ....... ........... 132
H.5 Remote mode ................. ....... ....... ....... ................... ....... ....... .. 132
H.5.1 To enter Remote Server mode ... ................... ....... ....... .... 133
H.5.2 To exit Remote Server mode: . ....... ....... ....... .................... 133
H.6 Live input ... ....... .......................... ....... ....... ....... ................... .... 133
H.7 Keyframing ................... ....... ....... ....... ................... ....... ....... .... 134
H.7.1 Animating an element's position ........ ....... ....... ....... ........ 135
vBarco Pn: 60600320
Page 9

Barco®Media ServerBarco Media Server XHD-Series User Guide
H.7.2 Inserting keyframes .. ....... ....... ....... .......................... ....... 136
H.7.3 Tangent control ....... ................... ....... ....... ....... .............. 137
I Workflow layouts .......................... ....... ....... ....... ................... ....... ....... . 139
I.1 Project Study layout ..... ....... ....... ................... ....... ....... ....... ....... 139
I.1.1 Layout purpose and workflow . ....... ....... ....... .................... 140
I.1.2 Viewport .. ....... ....... ....... ....... ................... ....... ....... ....... .. 140
I.1.3 Scene creation workflow ..... ....... ....... ................... ....... .... 140
I.1.4 Importing 3d objects ... ................... ....... ....... ....... ............ 143
I.1.5 Using the Projection Study Wizard ............ ....... ....... ....... .... 143
I.1.6 Projection Study Wizard interface ............ ....... ....... ....... .... 144
I.1.7 3D objects pane .... ................... ....... ....... ....... ................. 145
I.1.8 Displays ....... ....... ....... ....... .......................... ....... ....... ..... 147
I.1.9 Studies and pages ... ................... ....... ....... ....... ............... 148
I.1.10 Exporting templates with the Content Production
tool .... ................... ....... ....... ....... ................... ....... ....... ....... . 154
I.2 Programming workflow layout .... ....... ................... ....... ....... ....... . 159
I.2.1 Layout purpose and workflow ................... ....... ....... ....... .. 160
I.3 Calibration layout ................... ....... ....... ....... ................... ....... ... 161
I.3.1 Calibration workflow ..... ....... ....... .......................... ....... ... 161
I.3.2 Calibration interface elements . ................... ....... ....... ...... 162
I.3.3 3D calibration ..... ....... ....... ....... ................... ....... ....... ..... 162
I.3.4 2D projector calibration ................. ....... ....... ....... ............ 164
I.4 Outputs layout ...... ....... .......................... ....... ....... ....... .............. 172
I.4.1 Outputs workflow layout .. ....... .......................... ....... ....... . 172
I.4.2 Displays ..... ................... ....... ....... ....... .......................... .. 173
I.4.3 Display properties .......... ....... ....... ....... ....... ................... .. 174
I.4.4 Players .. ....... ....... .......................... ....... ....... ....... ........... 178
I.4.5 Player properties ... ....... ................... ....... ....... ....... ....... ... 181
I.4.6 Global Output Control properties . ....... ....... ....... .............. 186
I.5 Playback workflow layout ..... ....... ....... ................... ....... ....... ...... 187
I.5.1 Playback workflow ... ....... ................... ....... ....... ....... ....... 187
I.5.2 Starting Players .. ....... ................... ....... ....... ....... ....... ....... 188
I.5.3 Timeline control ..... ....... .......................... ....... ....... ....... ... 188
I.5.4 Monitoring outputs .... ................... ....... ....... ....... ............. 189
I.5.5 Monitoring performance ............... ....... ....... ....... ............. 189
J More information ....... .......................... ....... ....... ....... ................... ....... 191
J.1 Keyboard shortcuts ........ ....... ....... ....... .......................... ....... ..... 191
J.1.1 Viewport keyboard and mouse shortcuts . ....... ................. 191
J.1.2 Timeline keyboard and mouse shortcuts ........ ....... ....... ..... 191
J.1.3 Global keyboard shortcuts . ................... ....... ....... ....... ..... 192
J.2 Supported 3D, audio, image, and video formats ........ ....... ....... .. 192
J.2.1 Supported 3D formats ..... ....... ................... ....... ....... ....... 192
J.2.2 Supported audio formats ........ ....... ....... ....... .................. 193
J.2.3 Supported image formats ..... ....... ....... ....... ................... . 193
J.2.4 Supported video formats .. ....... ....... ....... ................... ...... 193
Barco Pn: 60600320vi
Page 10

List of Figures
1.1 NEMA 5-15 plug ..... ................... ....... ....... ....... .......................... ....... ... 17
1.2 EFUP logo ..... ................... ....... ....... ....... ................... ....... ....... ....... ..... 22
2.1 Launching CodeMeter Control Center ..................... ....... ....... ....... ....... 30
2.2 CodeMeter Control Center overview for XHD-series license. ... ............... 30
2.3 WebAdmin License page for XHD-series licenses ............ ....... ....... ....... . 31
2.4 XHD-series product codes ... ....... ....... ....... .......................... ....... ....... .. 31
2.5 CodeMeter Control Center overview for XDG-100 license. ................ ..... 33
2.6 WebAdmin License page for XDG-100 licenses ........ ....... ....... ....... ........ 33
2.7 XDG-100 product codes ... ....... ................... ....... ....... ....... ....... ............ 34
2.8 Windows shutdown menu . ....... ....... ................... ....... ....... ....... ........... 35
2.9 Barco Media Server Validation screen ... ....... ....... ................... ....... ...... 36
2.10 Barco Media Server System Restore Menu ................... ....... ....... ....... .. 37
2.11 Confirmation screen . ....... ....... ....... ....... ................... ....... ....... ....... .... 38
2.12 Sample Status screen ... ....... ................... ....... ....... ....... ................... .. 38
2.13 Completion screen .......... ....... ....... ....... ....... ................... ....... ....... .... 39
2.14 Barco Media Server Full System Restore Menu ..... ....... ....... ....... ........... 40
3.1 XHD-Series server—front panel ............... ....... ....... ....... ................... ..... 43
3.2 XHD-200 server—rear panel ....... ....... ....... ....... .......................... ....... ... 43
3.3 XHD-400 server—rear panel ....... ....... ....... ....... .......................... ....... ... 44
3.4 XHD-402 server—rear panel ....... ....... ....... ....... .......................... ....... ... 44
3.5 XHD-404 server—rear panel ............ ....... ....... ....... ................... ....... ..... 45
4.1 X-Agora F1 Help ........................... ....... ....... ....... ................... ....... ....... 49
4.2 Launch the installer, and select Next ... ....... ....... ................... ....... ....... . 50
4.3 Accept the license, and select Next ............ ....... ....... ....... ................... 51
4.4 Start the Installation or Update ....... ....... ....... ....... ................... ....... ...... 52
4.5 X-Agora ........... ....... ....... ....... ................... ....... ....... ....... .................... 53
4.6 X-Agora start screen .......................... ....... ....... ....... ................... ....... . 56
4.7 X-Agora Programming workflow layout ... ....... ................... ....... ....... ..... 56
A.1 DisplayPort connector . ....... ....... ................... ....... ....... ....... ................ 64
A.2 DVI connector ... ................... ....... ....... ....... .......................... ....... ...... 65
A.3 Ethernet connector ..... ....... ................... ....... ....... ....... ................... .... 66
C.1 "Create Eyefinity Display Group" ............ ....... ....... ....... ................... ..... 72
C.2 Use a new arrangement ......... ....... ....... ....... ....... ................... ....... ..... 73
C.3 Create the Eyefinity group ....... ....... ....... ................... ....... ....... ....... .... 74
C.4 Select a group layout ............. ....... ....... ....... .......................... ....... ..... 75
C.5 Display group complete ... ................... ....... ....... ....... ................... ...... 76
C.6 Eyefinity group spanning multiple screens ................. ....... ....... ....... ..... 76
C.7 "Arrange Eyefinity Display Group" . ................... ....... ....... ....... ....... ....... 77
C.8 "Disable Eyefinity Display Group" ... ....... ....... ....... ................... ....... ...... 78
C.9 Two screens in one Eyefinity group .............. ....... ....... ....... ................... 79
C.10 Eyefinity group spanning two outputs .......... ....... ....... ....... ................. 79
D.1 Select AMD FirePro Control Center ............... ....... ....... ....... .................. 81
D.2 AMD FirePro™ Control Center display connections . ....... ....... ....... ........ 82
D.3 Select NVIDIA Control Panel ...... ....... ....... ....... ................... ....... ....... ... 83
D.4 NVIDIA Control Panel ... ....... .......................... ....... ....... ....... ............... 83
D.5 NVIDIA Manage EDID window .... ....... ....... ....... ................... ....... ....... .. 84
E.1 Vision Window output . ....... ....... .......................... ....... ....... ....... .......... 86
E.2 dREC Record module, showing "NO SIGNAL" ................... ....... ....... ....... 87
Barco Media Server XHD-Series User Guide
viiBarco Pn: 60600320
Page 11

Barco®Media ServerBarco Media Server XHD-Series User Guide
G.1 Window tab ... ................... ....... ....... ....... ................... ....... ....... ....... .. 93
G.2 Displays groups . ....... .......................... ....... ....... ....... ................... ...... 94
G.3 New group . ....... ....... ....... ................... ....... ....... ....... ........................ 95
G.4 Add display to an existing group. ........ ....... ....... ....... ................... ....... 95
G.5 Media pane ................... ....... ....... ....... ....... ................... ....... ....... .... 96
G.6 Media preview ..... ....... ....... ................... ....... ....... ....... ...................... 97
G.7 Timelines pane ... ................... ....... ....... ....... ................... ....... ....... ..... 97
G.8 3D Object Properties pane ... ....... ....... ................... ....... ....... ....... ..... 101
G.9 Timeline layers ... ....... ....... ....... .......................... ....... ....... ....... ......... 102
G.10 Timeline playback and element-manipulation controls ..... ....... ....... .. 102
G.11 Zooming controls ................... ....... ....... ....... .......................... ....... .. 103
G.12 SMPTE device configuration ..... ....... ....... ................... ....... ....... ....... . 104
G.13 SMPTE signal quality gauge ....... ................... ....... ....... ....... ............. 105
G.14 Video properties for a Timeline element ....... ....... ....... ....... ............... 106
G.15 Properties pane for an input .............. ....... ....... ....... ....... ................. 108
G.16 Properties pane for an input variable ... ................... ....... ....... ....... .... 109
G.17 Inputs pane ..... ....... ....... ....... ................... ....... ....... ....... ................. 110
G.18 Input variables . ................... ....... ....... ....... ....... ................... ....... .... 111
G.19 Moving a "blob" using its x and y positions .......... ....... ....... ....... ......... 112
G.20 Detecting a "blob" that will trigger a Timeline . ....... ....... .................... 113
G.21 Viewport . ....... ....... ................... ....... ....... ....... ................... ....... ..... 114
G.22 Views template ....... ................... ....... ....... ....... ....... ................... .... 115
G.23 List of cameras ............ ....... ....... ....... ................... ....... ....... ....... ..... 116
G.24 Settings pane ............. ....... ....... ....... ................... ....... ....... ....... ...... 117
H.1 Create new 2d project ................ ....... ....... ....... ....... ................... ...... 119
H.2 Stage ... ....... .......................... ....... ....... ....... ................... ....... ....... ... 120
H.3 Displays . ....... ................... ....... ....... ....... ................... ....... ....... ....... .. 121
H.4 Toolbar ....... ....... ....... ....... ................... ....... ....... ....... ................... .... 122
H.5 2D media manipulation ............... ....... ....... ....... ................... ....... ..... 123
H.6 Adorner manipulation ....... ....... ....... ....... ....... ................... ....... ....... .. 124
H.7 Fit and Align .. ....... ....... ....... ................... ....... ....... ....... ................... .. 125
H.8 Agent icon in the tray ..... .......................... ....... ....... ....... .................. 126
H.9 Agent Interface . .......................... ....... ....... ....... ................... ....... .... 126
H.10 Agent logs .... ....... ....... ....... ................... ....... ....... ....... ....... ............. 127
H.11 Application preferences ....... ....... ....... ................... ....... ....... ....... .... 128
H.12 Media Encoder ....... ....... ....... ....... ................... ....... ....... ....... .......... 130
H.13 Media Encoder job .. ....... ....... ....... ................... ....... ....... ....... ....... .. 130
H.14 Content Production tool ............... ....... ....... ....... ................... ....... ... 131
H.15 Connect to Remote Server ................... ....... ....... ....... ................... ... 132
H.16 Live input on the Timeline ..... ................... ....... ....... ....... ................... 134
H.17 Keyframe activation ....... ................... ....... ....... ....... ................... ..... 135
H.18 A Keyframed Timeline Element . ....... ....... ................... ....... ....... ....... . 135
H.19 Animated position trail .... .......................... ....... ....... ....... ................. 136
H.20 Inserting a position keyframe ... ....... .......................... ....... ....... ....... .. 136
H.21 Inserting a keyframe with the + button ........................ ....... ....... ....... 136
H.22 Inserting a keyframe by hovering ..... ....... ....... ....... ................... ....... . 137
H.23 Tangent control ... ....... ................... ....... ....... ....... ....... ................... . 137
H.24 Symmetric tangent property ..... ....... ................... ....... ....... ....... ....... 138
H.25 Curve with non-symmetric keyframe tangents .. ....... ....... ....... ........... 138
I.1 Study on the menu bar ... ....... .......................... ....... ....... ....... ............. 139
Barco Pn: 60600320viii
Page 12

Barco Media Server XHD-Series User GuideBarco®Media Server
I.2 Import 3D model .. ....... ....... ....... ................... ....... ....... ....... ............... 141
I.3 Create a 3D object .. ....... ....... ................... ....... ....... ....... ................... 142
I.4 3D Object Properties pane ................. ....... ....... ....... .......................... 142
I.5 Projection Study wizard .......................... ....... ....... ....... ................... ... 143
I.6 Projection Study Wizard interface ........... ....... ....... ....... ................... .... 144
I.7 3D Objects pane . ....... ....... .......................... ....... ....... ....... ................ 146
I.8 Create a 3D Object . ....... ....... ................... ....... ....... ....... ....... ............ 146
I.9 New Study . ................... ....... ....... ....... .......................... ....... ....... ...... 148
I.10 Switch between Projection Studies ... ....... ....... .......................... ....... .. 148
I.11 New Page .... ....... ....... ....... ................... ....... ....... ....... ................... ... 149
I.12 Visualization mode ....................... ....... ....... ....... ................... ....... .... 150
I.13 Heat map ..... ....... ....... ....... ................... ....... ....... ....... ..................... 151
I.14 Change to Print layout ................. ....... ....... ....... ................... ....... ..... 151
I.15 New note .. ................... ....... ....... ....... .......................... ....... ....... ...... 152
I.16 Hide elements of Print layout ..... ....... ....... ....... .......................... ....... . 152
I.17 New view style .... .......................... ....... ....... ....... ................... ....... ... 153
I.18 Assign View Style 1 ....................... ....... ....... ....... ................... ....... ..... 153
I.19 Assign View Style 2 .... ................... ....... ....... ....... ................... ....... ..... 154
I.20 Content Production layout .... ....... ....... ....... ................... ....... ....... ..... 155
I.21 Export template ....... ................... ....... ....... ....... .......................... ..... 157
I.22 3D cube ... ....... ....... ....... .......................... ....... ....... ....... .................. 158
I.23 Cube UV map—unfolded ... ................... ....... ....... ....... ..................... 159
I.24 Programming layout ................ ....... ....... ....... ................... ....... ....... .. 160
I.25 Calibration workflow layout ...... ....... ................... ....... ....... ....... ......... 161
I.26 Edge Warping workflow ................. ....... ....... ....... ....... ................... ... 165
I.27 Calibration layout—Manual Blending ....... ....... ....... ....... ................... . 168
I.28 Warping workflow layout ... ................... ....... ....... ....... ...................... 169
I.29 Outputs Display pane ... ....... ....... ....... .......................... ....... ....... ...... 174
I.30 Display Map controls ..... ....... ....... ....... ................... ....... ....... ....... ..... 174
I.31 Outputs Properties pane for a projector ................ ....... ....... ....... ........ 176
I.32 Outputs Properties pane for an LED display ....................... ....... ....... ... 177
I.33 Outputs Properties pane for an LCD display .......... ....... ....... ....... ........ 178
I.34 Outputs Players Map ............ ....... ....... ....... ....... ................... ....... ..... 178
I.35 Player performance ....... ....... .......................... ....... ....... ....... ........... 179
I.36 Player performance— ...... ....... ....... ....... ................... ....... ....... ....... .. 180
I.37 Player controls ................... ....... ....... ....... ................... ....... ....... ....... 180
I.38 Player Map controls ........ ....... ....... ....... ....... ................... ....... ....... .... 180
I.39 Expandable menus of the Player Properties pane ................... ....... .... 181
I.40 Master Player ....... ....... ....... .......................... ....... ....... ....... .............. 182
I.41 Advanced Player Option menu .......... ....... ....... ....... ................... ...... 183
I.42 Player Outputs . ....... ....... ................... ....... ....... ....... ......................... 184
I.43 Live inputs .......... ....... ....... ....... ................... ....... ....... ....... ............... 185
I.44 Sample Live-Input Timeline ..... ....... ................... ....... ....... ....... ........... 186
I.45 Global Color control .. ....... ....... ....... ................... ....... ....... ....... ....... .. 187
I.46 Playback layout—Players pane . ................... ....... ....... ....... ....... ........ 188
I.47 Timeline controls ................. ....... ....... ....... ................... ....... ....... ....... 188
I.48 Playback performance . ....... ....... ....... ....... ................... ....... ....... ..... 190
ixBarco Pn: 60600320
Page 13

Page 14
Revision history
number
Barco Media Server XHD-Series User Guide
RemarksDateRevision
Third releaseJuly 29, 201502.00
• Added
Minimum laptop requirements (p.32) to
XDG-100 Designer licensing (p.32).
• Additions to Keyframing (p.134).
Second releaseJuly 2, 201501.00
• Added X-Agora interface (p.55).
• Added
Programming workflow layout (p.159),
Calibration layout (p.161),
Outputs layout (p.172), and
Playback workflow layout (p.187).
00.00
2015
Initial releaseJune 17,
xiBarco Pn: 60600320
Page 15

Page 16
Section 1: Introduction
Barco®Media Servers are fully integrated visual production systems that enable video
professionals to easily develop their show from idea to realization. Allowing users to
quickly and easily set up, preview, and manage their show environment, they form the
perfect connection between the creative ideas and the display systems that bring them
to life.
Barco couplesits media server hardware with theX-Agora™ software suite. This software
is scalable, compatible with popularmedia formats, supports connectivity with various
sensors and input, and makes it possible to deploy content onto the most challenging
surfaces with an advanced yet easy-to-use projection mapping tool. Itsinteractive media
system captures and processes data in real-time, creating interactive media content for
various types of displays.
Barco Media Server XHD-Series User Guide
1.1
1.1.1
1.1.2
About this guide
This guide
This user guide describes how to operate a Barco Media Server. The user guide is designed tobe a reference tool in the everyday work ofthe user with the product. Itcontains
a complete description of the hardware components and the software suite. The
manual also includes all the necessary instructions on how to upgrade and reinstall the
software.
Note
Barco provides a 1-year parts and labor warranty for all hardware components. Please refer to the Appendix B, "Warranty," for specific details regarding
the warranty terms.
Available system documentation
This guide is part of the documentation set describing the Barco Media Server product.
Please check online at the Barco Media Server website for the other documents.
Tip
Always check for the latest version of all documents on the Barco website.
13Barco Pn: 60600320
Page 17
!
i
Section 1: IntroductionBarco Media Server XHD-Series User Guide
1.2
1.2.1
Symbols, pictures, and fonts
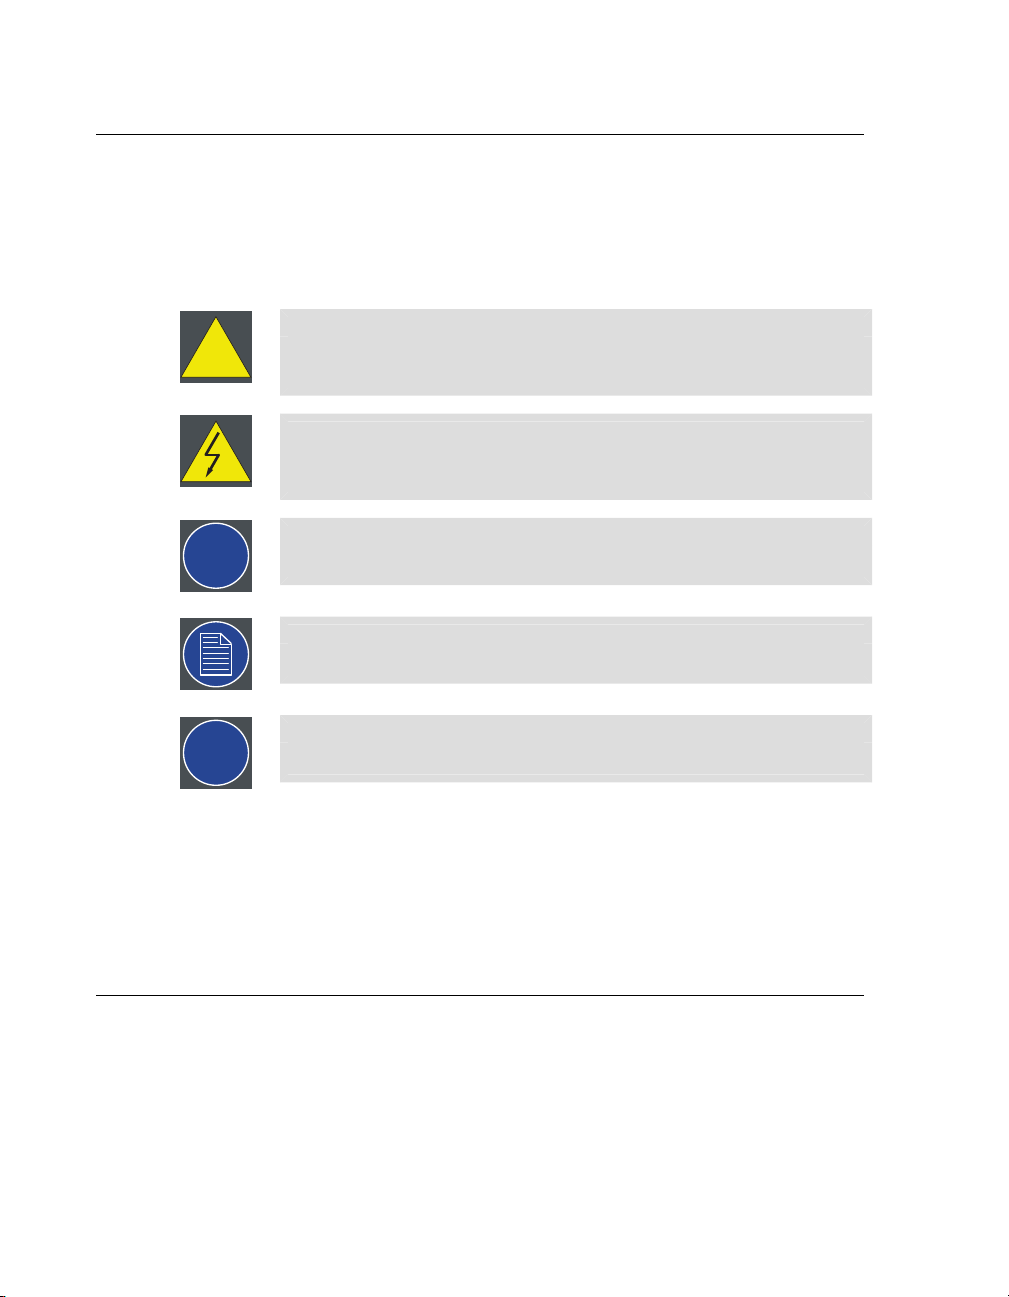
Symbol overview
The following icons are used in the manual:
Caution
This symbol appears adjacent to Caution messages. Not heeding these
messages could result in personal injury and/or damage to equipment.
Warning
This symbol appears adjacent to high voltage warning messages. Not
heeding these messages could result in serious personal injury.
Info
This symbol indicates a term definition or general information about a term.
Note
This symbol appears next to extra information about the described subject.
Tip
This symbol appears next to extra advice about the described subject.
1.2.2
1.3
Picture overview
Images and pictures given in the manual are used as illustration. The content of the
images canbe slightly different from reality, e.g. version numbers, device types,installed
modules, form and position of software windows on screen, etc.
Standards and safety
This section lists standards that apply to Barco Media Servers and describes safety
precautions that must be observed when installing and operating a product from Barco.
Barco Pn: 6060032014
Page 18

Barco Media Server XHD-Series User GuideSection 1: Introduction
1.3.1
1.3.2
Safety regulations
General safety instructions
• Read this manual thoroughly before operating this equipment.
• Adhere to all warnings in this manual.
• Follow precisely all instructions for operating and use of this equipment.
• Adhere to all local installation codes.
• Retain this manual for future reference.
For further safety information see the Barco Media Server XHD-Series Safety Guide.
Standards
This equipment is built in accordance with the requirements of the international safety
standards EN60950-1, IEC60950-1, UL60950-1, and CAN/CSA C22.2 No.60950-1, which
are the safety standards of information technology equipment, including electrical
business equipment.
These safety standards impose important requirements on the use of safety critical
components, materials, and insulation, in order to protect the user or operator against
risk of electric shock and energy hazard and having access to live parts.
Safety standards also impose limits to the internal and external temperature variations,
radiation levels, mechanical stability and strength, enclosure construction and protection
against the risk of fire.
Simulated single-fault condition testing ensures the safety of the equipment to the user,
even when the equipment’s normal operation fails.
Electromagnetic interference
Barco Media Servers comply with the following EMC standards:
Electromagnetic compatibility
—emission:
Electromagnetic compatibility
—immunity:
EN55022/CISPR22 Class A ITE (Information Technology Equipment)
Barco MediaServers are products of class A ITE. ITE stands for Information Technology
Equipment. ITEis subdivided into two categories denoted class B ITE(products intended
EN 55022: (2010)
EN 61000-3-2 (2006) +A1 (2009) + A2 (2009)
EN 61000-3-3 (2008)
EN 55024 (2010)
15Barco Pn: 60600320
Page 19
primarily for use in domestic environment)and class A ITE (all other ITE which satisfies
!
the class A ITE limits but not the class B ITE limits).
Caution
This is a class A product. In a domestic environment this product may cause
radio interference in which case the user may be required to take adequate
measures.
FCC compliance statement
This equipment has been testedand foundto comply withthe limits for a Class A digital
device, pursuant to part 15 of the FCC Rules. These limits are designed to provide
reasonable protection against harmful interference when the equipment is operated in
a commercial environment. This equipment generates, uses, and can radiate radio frequency energy and, if not installed and used in accordance with the instruction manual,
may cause harmful interference to radio communications. Operation of this equipment
in a residential area is likely to cause harmful interference in which case the user will
be required to correct the interference at his or her own expense.
Section 1: IntroductionBarco Media Server XHD-Series User Guide
1.3.3
Precautions
Warning
For your own protection, observe the following safety precautions when installing and operating your device.
• Before operating the units, please read this manual thoroughly and retain
it for future reference!
• Observe all warnings and instructions printed on the devices!
• Barco Media Servers do not require any maintenance work or servicing.
Servicing should never be carried out by unauthorized personnel!
• Never open the case of the unit without first disconnecting the power
supply cord!
• To prevent fire or electrical shock hazard, do not expose this unit to rain
or moisture!
• Do not place any warm or heat dissipating sources in the vicinity of the
unit.
• This product should be operated from an AC power source!
• Check that the voltageand frequencyof your power supply match those
printed on the device label showing the rated electrical values!
• If you are not sure of the type of AC power available, consult your
dealer or local power company!
Barco Pn: 6060032016
Page 20

Barco Media Server XHD-Series User GuideSection 1: Introduction
• This product is equipped with a 3-wire grounding plug, i.e. a plug featuring a third (grounding) pin. This plug will only fit into a groundingtype power outlet. This is a safety feature. If you are unable to insert the
plug into your outlet, contact your electrician to replace the obsolete
outlet. Do not defeat the purpose of the grounding-type plug!
• This equipment must be grounded (earthed) via the 3-conductor AC
power cable supplied. (If the power cable supplied is not the correct
one, consult your dealer.)
• Do not allow anything to rest on the power cord. Do not position this
product in places where people will walk on the cord. To disconnect the
cord, pull it out by the plug. Never pull the cord itself.
• If an extension cord is used with this product, make sure that the total
of the ampere ratings on the products plugged into the extension cord
does not exceed the extension cord ampere rating.
• Never push objects of any kind into this product through cabinet slots
as they may touch dangerous voltage points or short out parts that could
result in a risk of fire or electrical shock.
• Never spill liquid of any kind on the product. Should any liquid or solid
object fall into the cabinet, unplug the set and have it checked by qualified service personnel before resuming operations.
• Lightning—For extra protection of this video product during alightning
storm, or when it is left unattended and unused for a long period of
time, unplug it from the wall outlet. This will prevent damage to the
unit due to lightning and AC power-line surges.
Power cords with NEMA 5-15 plugs
Figure 1.1. NEMA 5-15 plug
green or yellow + green
blue or white
brown or black
• The cord set must be UL approved and CSA certified.
• The minimum specification for the flexible cord is No. 16 AWG, type
SJT, 16 A, 60°C, 4.5 m long max., 125 V, 3-conductor.
earth (ground)
neutral
line (live)
17Barco Pn: 60600320
Page 21

• The cord set must have a rated current capacity of at least 11 A.
• The attachment plug must be an earth-grounding type with a NEMA
5-15P (15 A, 125 V) configuration.
General installation instructions
• Do not place this unit on an unstable cart, stand, or table. The unit may
fall, causing serious damage to it.
• Do not use this unit near water.
• Do not use any power cords other than the one supplied with your unit.
While appearing to be similar, other power cords have not been safety
tested at the factory and must not be used to power the unit. For a replacement power cord, contact your dealer.
• Slots and openings in the cabinet and the sides are provided for ventilation; to ensure reliable operation of the unit and to protect it from overheating, these openings must not be blocked or covered. The openings
should never be blocked by placing the product on a bed, sofa, rug, or
other similar surface. This product should never be placed near or over
a radiator or heat register. This unit should not be placed in a built-in
installation or enclosure unless proper ventilation is provided.
• The maximum recommended ambient temperature for this equipment
is 40°C.
• When using the unit in a multi-unit rack assembly or closed assembly,
the ambient temperature inside the assembly may not exceed the maximum rated ambient temperature.
• When installed in a rack,the installation should be such that the amount
of airflow required for safeoperation of the equipment is not compromised. The mounting of the equipment should be such that no hazardous
condition is achieved due to uneven mechanical loading.
Section 1: IntroductionBarco Media Server XHD-Series User Guide
1.3.4
Servicing
Cleaning
Additional information
Barco Media Servers do not require any servicing or regular maintenance work.
Unplug this product from the wall outlet before cleaning. Do not use liquid or aerosol
cleaners.
Barco Pn: 6060032018
Page 22
Unpacking of devices
For unpacking, follow the instructions and advice indicated on the outside of the
packaging.
Repacking
Keep the original shipping carton and packing material; they will comein handy should
you ever have to ship your unit. For maximum protection, repack your equipment as
it was originally packed at the factory.
Barco Media Server XHD-Series User GuideSection 1: Introduction
1.4
1.4.1
1.4.2
Environmental information: disposal
Disposal of the product (Waste Electrical and Electronic Equipment)
This symbol on the product indicates that, under the European Directive
2012/19/EU governing waste from electrical and electronic equipment, this product
must not be disposed of with other municipal waste. Please dispose of your waste
equipment by handing it over to a designated collection point for the recycling of waste
electrical and electronic equipment. To prevent possible harm to the environment or
human health from uncontrolled waste disposal, please separate these items from other
types of waste and recycle them responsibly to promote the sustainable reuse of material resources.
For more information about recycling of this product, pleasecontact your local city office
or your municipal waste disposal service. For details, please visit the Barco website at:
http://www.barco.com/en/AboutBarco/weee.
Disposal of batteries
This product contains batteries covered by the Directive which must be collected and
disposed of separately from municipal waste.
If the battery contains more than the specified values of lead (Pb), mercury
(Hg) or cadmium (Cd), these chemical symbols will appear below the crossed-out
wheeled bin symbol.
By participating in separate collection of batteries, you will help to ensure proper disposal and to prevent potential negative effects on the environment and human health.
19Barco Pn: 60600320
Page 23

Section 1: IntroductionBarco Media Server XHD-Series User Guide
1.5
1.5.1
RoHS compliance
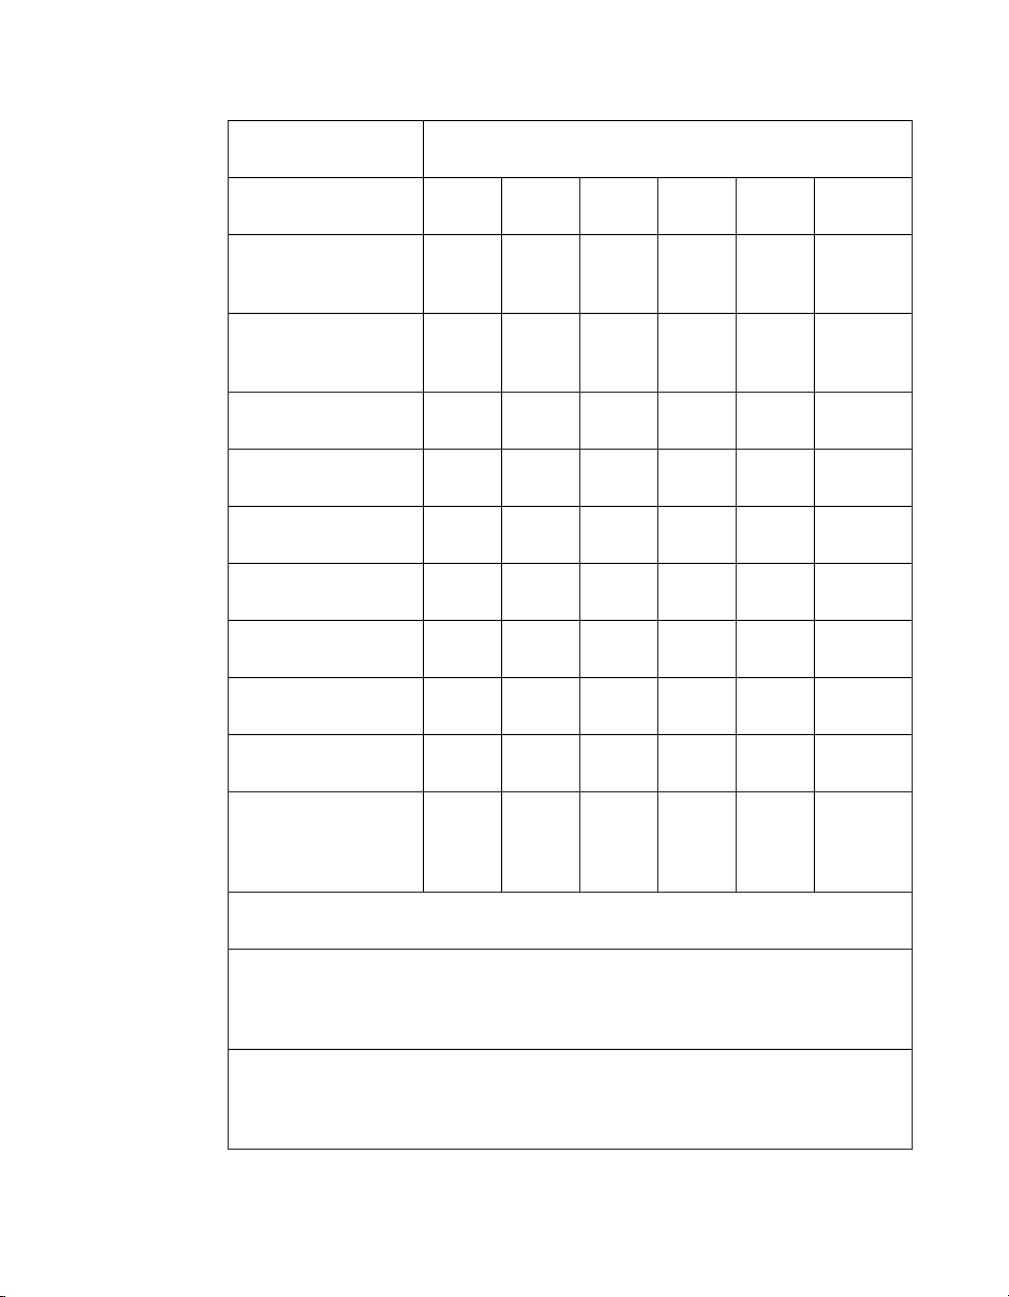
中国大陆 RoHS (Chinese Mainland RoHS)
Barco Pn: 6060032020
Page 24
Barco Media Server XHD-Series User GuideSection 1: Introduction
零件项目(名称)
Component name
有毒有害物质或元素
Hazardous substances or elements
铅
Pb
汞
Hg
镉
Cd
价铬
Cr6+
多溴联苯
PBB
多溴二苯醚
PBDE
印制电路主要配件
Main printed circuit as-
OOOOOX
sembly
插入式印制电路配件
Plug-in printed circuit
OOOOOX
assembly
外接电(线)缆
External Cables
內部线路
Internal wiring
散热片(器)
Heatsinks
电源供应器
Power supply unit
风扇
Fan
电池(组)
Batteries
底架
Chassis
OOOOOX
OOOOOX
OOOOOO
OOOOOX
OOOOOX
OOOOOX
OOOOOO
螺帽,螺钉(栓),螺旋( 钉),
垫圈, 紧固件
Nuts, bolts, screws,
OOOOOO
washers, fasteners
这个表被制备按照规定SJ/T 11364
This table is prepared in accordance with the provisions of SJ/T 11364.
O: 表示该有毒有害物质在该部件所有均质材料中的含量均在 SJ/T 11363 标准规定的限
量要求以下.
O: Indicates that this toxic or hazardous substance contained in all of the homogeneous
materials for this part is below the limit requirement in SJ/T11363.
X: 表示该有毒有害物质至少在该部件的某一均质材料中的含量超出 SJ/T 11363 标准规
定的限量要求.
X: Indicates that this toxic or hazardous substance contained in at least one of the homogeneous materials used for this part is above the limit requirement in SJ/T11363.
Table 1.1. 中国大陆 RoHS (Chinese Mainland RoHS)
21Barco Pn: 60600320
Page 25

Section 1: IntroductionBarco Media Server XHD-Series User Guide
在中国大陆销售的相应电子信息产品(EIP)都必须遵照中国大陆《电子信息产品污染
控制标识要求》标准贴上环保使用期限(EFUP)标签。Barco产品所采用的EFUP标签
(请参阅实例,徽标内部的编号使用于制定产品)基于中国大陆的《电子信息产品环保
使用期限通则》标准。
All electronic information products (EIP) that are sold within Chinese Mainland must
comply with the “Electronic Information Products Pollution Control Labeling Standard”
of Chinese Mainland, markedwith the Environmental Friendly UsePeriod (EFUP) logo.
The number inside the EFUP logo that Barco uses (see the figure) is based on the
“Standard of Electronic Information Products Environmental Friendly Use Period” of
Chinese Mainland.
Figure 1.2. EFUP logo
1.5.2
1.6
Turkey RoHS compliance
Türkiye Cumhuriyeti: AEEE Yönetmeliğine Uygundur.
[Republic of Turkey: In conformity with the WEEE Regulation]
Terms and definitions
3G
Active DisplayPort-to-DVI Adapter
Genlock
HD-SDI
A 3 Gbit/s serial digital 10-bit or 12-bit video interface (SMPTE 424M and 425M).
A DisplayPort-to-DVI adapter that converts the
DisplayPort signal to DVI. A passive DisplayPortto-DVIAdapter carries the signal from a DisplayPort
port to a DVI port, without conversion. With a
passive adapter, the video card must perform the
conversion.
A module that allows synchronization to external
sources and delivers synchronized display output.
High-Definition Serial Digital Interface; an HD-SDI
signal (SMPTE 292M). Format examples include
720p, 1080i, and 1080p.
Barco Pn: 6060032022
Page 26

Barco Media Server XHD-Series User GuideSection 1: Introduction
Master Power Switch
Power Switch
SD-SDI
System Restore
Windows Image
X-Agora
Power switch on the rear panel of a Barco Media
Server. The Master Power switch removes power
from the unit, without performing a shutdown.
Power switch on the front panel of a Barco Media
Server. The Powerswitch performs a shutdown, then
removes power from the unit.
Standard-definition Serial Digital Interface; an SDSDI signal (SMPTE 292M). Format examples include
480i and 525i.
A process that can restore the applications and settings on the C: drive to their original condition.
System Restore also restores the needed software licenses. A Full Restore can erase the data on the D:
drive.
Operating system. This version of the Barco Media
Server is based on Microsoft®Windows®8.1 EMB
Industry Pro and must be at least version 01.06.00.
Refers to the GUI application that allows you to
create, run, and monitor a project. X-Agora software
suite refers to X-Agora, X-Agora Agent, X-Agora
Player, and X-Agora Server. See The X-Agora architec-
ture (p.48).
23Barco Pn: 60600320
Page 27

Page 28
Section 2: Installation
This chaptergives instructions on howto install and run both the hardware and software
of the Barco Media Server, powered by X-Agora.
Barco Media Server XHD-Series User Guide
2.1
2.1.1
2.1.2
Installation requirements
Warning
Let the Barco Media Server acclimate to the ambient temperature after
unpacking. Ensure that the humidity is within the specification. Neglecting
this may result in startup failure of the device.
Disconnect device
Where a disconnect device is not incorporated in the equipment, or where the plug on
the power supply cord is intended to serve as the disconnect device:
• for PERMANENTLY CONNECTED EQUIPMENT, a readily accessible
disconnect device shall be incorporated external to the equipment.
• for PLUGGABLE EQUIPMENT, the socket-outlet shall be installed near
the equipment and shall be easily accessible.
Barco Media Server Windows®image
This version of the Barco Media Server is based on Microsoft®Windows®8.1 EMB Industry Pro and must be at least version 01.06.00.
Verify that the Barco Media Server is loaded with the latest Windows image available
on the Barco website. Refer to Restore (p.35) for more information about upgrading the
Barco Media Server Windows image.
2.1.3
X-Agora GUI
The X-Agora GUI software must be at least Version 2.2.000.
25Barco Pn: 60600320
Page 29
Section 2: InstallationBarco Media Server XHD-Series User Guide
2.2
2.2.1
2.2.2
2.2.3
Initial inspection
General
Before shipment, the Barco Media Server was inspected and found to be free of mechanical and electrical defects. As soon as the Barco Media Server is unpacked, inspect it
for any damage that may have occurred in transit. Save all packing material until the
inspection is completed. If damage is found, file a claim with the carrier immediately.
Notify the Barco sales and service office as soon as possible.
Unpacking
At delivery the Barco Media Server is packed in a cardboard box. Place the box on a
stable (solid), flat, and insulated support during all the unpacking. Open the box from
the top. Remove the Barco Media Server from its antistatic bag. Check the box content.
After unpacking let the BarcoMedia Server acclimate to room temperature, which must
be higher than 0°C (32°F) and lower than 40°C (104°F). Neglecting this may result in
startup failure.
Save the original shipping box and packing material; these will be necessary if you ever
have to ship your Barco Media Server. For maximum protection, repack your Barco
Media Server as it was originally packed at the factory.
Box content
After unpackingthe Barco Media Server, check if all of the following items were included:
Accessories includedProduct contains
4RU rack-mount chassis • Barco Media Server assembly
• USB keyboard
• USB mouse
• US Power Cord NEMA 5/15 (not included
with units shipped to China)
•
3× passive DisplayPort-to-DVI adapters
•
2× active DisplayPort-to-DVI adapters
•
USB System Restore drive
3
• Safety manual
Table 2.1. Box content
Notes:
1. Barco does not provide power cords for all locations. It may be neces-
sary to install a power-cord cap for your location. See Replacing a power-
cord cap (p.69).
1
2
2
Barco Pn: 6060032026
Page 30

Barco Media Server XHD-Series User GuideSection 2: Installation
2. The video output card can handle two DisplayPort-to-DVI conversions
on its own; for these conversions you may use the passive DisplayPortto-DVI adapters.
a. If you wish to connect to more than two DVI devices,
you must use the active DisplayPort-to-DVI adapters
for the any conversions beyond the first two.
b. To get all four outputs, connect the passive adapters
to ports 1 and 2, and connect the active adapters to
ports 3 and 4.
3. The USB System Restore drive contains the user guide and the recovery
software. To restore the system using the USB System Restore drive,
see Restore (p.35).
2.2.4
2.3
Mechanical check
Confirm that there are no broken parts and that the unit is free of dents or scratches. If
you find broken parts, dents, or scratches, notify your Barco sales representative as soon
as possible.
Rack-mount procedure
The BarcoMedia Server chassis is designedto be rack mounted. Please note the following
important points:
• The Barco Media Server is 4RU in height.
• The maximum ambient operating temperature is 40° C.
• Leave sufficient front and rear space to ensure that airflow through the
Barco Media Server is not restricted.
• Distribute the units evenly, when installing equipment in a rack, to
prevent hazardous conditions that may be created by uneven weight
distribution.
• Connect the Barco Media Server only to a properly rated supply circuit.
• Maintain reliable grounding (earthing) of rack-mounted equipment.
• Mount the Barco Media Server from the front rack ears, using four rack
screws (not supplied).
(Threads may be metric or otherwise, depending upon the rack type.)
27Barco Pn: 60600320
Page 31

!
Section 2: InstallationBarco Media Server XHD-Series User Guide
Caution
At a minimum, an XHD-400 Series server chassis weighs 13.6 kg (30 lbs.). To
avoid injury, we recommend that two people rack mount the chassis.
2.4
2.5
Connections
Make the following connections to the rear panel of the Barco Media Server.
1. Connect a monitor to the DVI port labelled “Desktop.”
(DVI cable not included.)
2. Connect keyboard and mouse to USB 2.0 ports.
3. Connect power cord.
Powering ON the Barco Media Server
Switch the master power switch on the rear panel to ON.
The Barco Media Server box turns on immediately.
Note
If the system is powered off any time after it has been initially powered on,
you can power on the system again using the power switch on the front
panel. If the Barco Media Server does not start, ensure that the master power
switch on the rear panel is ON.
Ensure that the Barco Media Server is connected to an appropriately-rated
power source.
Warning
This equipment is designed for connection to a branch circuit having a
maximum overload protection of 20 A.
2.6
Software startup
Barco Media Server boxes come pre-installed with Microsoft®Windows®Embedded
8.1 x64 and X-Agora™. When the box is powered on, Windows opens an empty desktop
with two icons in the left-hand corner of the taskbar.
Barco Pn: 6060032028
Page 32

Barco Media Server XHD-Series User GuideSection 2: Installation
•
Double-click the X-Agora icon either on the taskbar or on the Desktop)
to open X-Agora.
•
Right-click the Windows icon on the taskbar to gain access to the
following items:
• Control Panel
• File Explorer
• Run
• Shut down or sign out
• Desktop
• Select (left-click) the Windows icon, and select the circled down-arrow
on the Start screen, to access all applications on the machine.
2.7
2.7.1
Licensing
Barco Media Server boxes come pre-installed with Microsoft®Windows®Embedded
8.1 x64 and X-Agora™.
Barco MediaServer software is secured by the CodeMeter hardware and software licensing solution from Wibu Systems. A local runtime application, CodeMeter Control Center
(also known as CodeMeter User Runtime) controls the licenses. An XHD-Series license
or an XDG-100 Designer license contains only the licenses needed to operate Barco
Media Serversoftware. Barco Media Server software can be downloadedfrom the Barco
website. Go to http://www.barco.com/ → Products & Solutions → Image Processing →
Media Servers.
CodeMeter Control Center
The CodeMeterControl Center runtime application must run on each machine onwhich
Barco Media Server software is expected to run. CodeMeter Control Center is the local
management tool for hardware and software licenses, and it also plays a crucial part in
updating licenses remotely. CodeMeterControl Center is preinstalled on all Barco Media
Servers, and it is also part of the Barco Media Server software installer.
Note
If needed, CodeMeter Control Center (CodeMeter Runtime 5.21b or later)
can be downloaded from http://codemeter.com/us/service/down-
loads.htmlhttp://codemeter.com/us/service/downloads.html.
29Barco Pn: 60600320
Page 33

Section 2: InstallationBarco Media Server XHD-Series User Guide
2.7.2
2.7.3
Checking current licenses
Launching CodeMeter Control Center
Use the CodeMeter Control Center to check current licenses or request an update for
an existing license. Launch the CodeMeter Control Center with a single step.
1.
Double-click theCodeMeter Icon in taskbar notification area to launch
the CodeMeter Control Center.
Figure 2.1. Launching CodeMeter Control Center
XHD-Series licensing
This section describes how to check current licenses and request an update for an existing
license issued by Barco for a Barco Media Server XHD-Series server.
1. Launch the CodeMeter Control Center.
2. Find the XHD-Series license listed in CodeMeter Control Center (See
Figure 2.2, “CodeMeter Control Center overview for XHD-series license.”.)
Figure 2.2. CodeMeter Control Center overview for XHD-series license.
3. Click on WebAdmin to see more details.
Barco Pn: 6060032030
Page 34

Barco Media Server XHD-Series User GuideSection 2: Installation
This opens a webpage.
4.
Navigate to the License pane under Content. (See Figure 2.3, “WebAdmin
License page for XHD-series licenses”.)
Figure 2.3. WebAdmin License page for XHD-series licenses
5.
XHD-Series licenses must have the Product Codes shown in Figure 2.4,
“XHD-series product codes” to properly work with Barco Media Server
software.
Figure 2.4. XHD-series product codes
Requesting an update for an existing XHD-series license
1. Launch CodeMeter Control Center.
2. Find the XHD-Series License listed in CodeMeter Control Center (See
Figure 2.2, “CodeMeter Control Center overview for XHD-series license.”.)
3.
Click License Update.
4.
Click Next.
31Barco Pn: 60600320
Page 35

5.
Select Create License Request.
6.
Select Extend Existing License.
7.
Check Firm code 5000511 (Barco, Inc.) and click Next.
8.
Send the resulting .WibuCmRac file to Barco.
Section 2: InstallationBarco Media Server XHD-Series User Guide
2.7.4
Minimum laptop requirements
Checking current licenses
XDG-100 Designer licensing
This section describes how to check a current license andrequest anupdate for an existing
XDG-100 license issued by Barco.
The XDG-100 Designer may be run on a laptop computer, so long as that laptop meets
the following minimum requirements.
Video card:
CPU:
RAM:
Screen:
Storage:
OS:
1. Launch the CodeMeter Control Center.
2. Insert the XDG-100 DesignerUSB drivein a USB port on your computer.
3. Find the XDG-100 license listed in CodeMeter Control Center (See
NVIDIA GeForce GTX850M 4GB DDR3
Intel®Core™i7-4710HQ at 2.50 GHz
8 GB DDR3
15 in. screen, with 1600×900 resolution
256 GB SSD
Microsoft®Windows®8.1
Figure 2.5, “CodeMeter Control Center overview for XDG-100 license.”.)
Barco Pn: 6060032032
Page 36

Barco Media Server XHD-Series User GuideSection 2: Installation
Figure 2.5. CodeMeter Control Center overview for XDG-100 license.
4. Click on WebAdmin to see more details.
This opens a webpage.
5.
Navigate to the License pane under Content. (See Figure 2.6, “WebAdmin
License page for XDG-100 licenses”.)
Figure 2.6. WebAdmin License page for XDG-100 licenses
33Barco Pn: 60600320
Page 37

6.
XDG-100 licenses must have the Product Codes shown in Figure 2.7,
“XDG-100 product codes” to properly work with Barco Media Server
software.
Figure 2.7. XDG-100 product codes
Requesting an update for an existing XDG-100 license
1. Launch CodeMeter Control Center.
2. Insert the XDG-100 DesignerUSB drivein a USB port on your computer.
3. Find the XDG-100 license listed in CodeMeter Control Center (See
Figure 2.5, “CodeMeter Control Center overview for XDG-100 license.”.)
4.
Click License Update.
5.
Click Next.
6.
Select Create License Request.
7.
Select Extend Existing License.
8.
Check Firm code 102712 (Barco, Inc.) and click Next.
9.
Send the resulting .WibuCmRac file to Barco.
Section 2: InstallationBarco Media Server XHD-Series User Guide
2.8
Shutdown and restart
The Barco Media Server can be shut down and restarted from Windows or by means
of the hardware power switches on the front and rear panels of the Barco Media Server
box.
Note
X-Agora always opens with the most recently saved data. Remember always
to exit X-Agora before shutting down or restarting the Barco Media Server.
Upon exiting, X-Agora prompts you to save your work. If you do not save
your work in X-Agora before shutting down or restarting the Barco Media
Server, some of your work may be lost.
Barco Pn: 6060032034
Page 38

Barco Media Server XHD-Series User GuideSection 2: Installation
2.8.1
2.8.2
Software shutdown
After saving your work and closing X-Agora, you can shut down the Barco Media
Server through Windows.
1.
Right-click the Windows icon at the far-left end of the taskbar.
2.
Hover the cursor over the Shut down or sign out option in the pop-up
menu.
3.
Select Shut down or Restart.
Figure 2.8. Windows shutdown menu
Hardware shutdown
The Barco Media Server box can be powered down by means of the power switch, the
reset button, or the master power switch. Only the power switch performs a shutdown.
Hardware shutdown options
2.9
• Press the power switch on the frontpanel to shut down the Barco Media
Server.
• Press the reset button on the front panel to power off and power on the
Barco Media Server.
The box powers off, without a shutdown procedure, and powers on
again. Data may be lost.
• Press the master power switch on the rear panel to power-off the Barco
Media Server.
The box powers off without a shutdown procedure. Data may be lost.
Restore
Restore the applications, software licenses, and settings on the C: drive with a System
Restore, or both restore the applications, software licenses, and settings on the C: drive
and erase the data on the D: drive with a Full Restore.
35Barco Pn: 60600320
Page 39

Section 2: InstallationBarco Media Server XHD-Series User Guide
2.9.1
System Restore
Use the following steps to perform a System Restore.
1. Plug the USB Recovery drive into one of the external USB 3.0 ports on
the Barco Media Server.
The Barco USB Recovery drive is a USB 3.0 device; you may reduce
recovery time by using this drive in a USB 3.0 port.
2.
Right-click the Windows icon at the lower left-hand corner of the
screen to restart.
As the system restarts, it displays the Barco logo screen.
3. Press and hold the F8 key to summon the Select Boot Device screen.
4. Select the USB Recovery drive (STT ST3U16SSPS (15000MB)).
Use the up and down arrow keys on your keyboard, oruse yourmouse
to make selections.
After the system restarts, the Restore application displays the Barco
Media Server Validation screen.
Figure 2.9. Barco Media Server Validation screen
5. Allow the System Restore menu to load.
The System Restore menu takes a few minutes to load. During this
time, a number of small windows appear and disappear. Wait until
you see a full-screen menu titled Barco Media System Restore Menu.
Barco Pn: 6060032036
Page 40

Barco Media Server XHD-Series User GuideSection 2: Installation
Figure 2.10. Barco Media Server System Restore Menu
6.
Select the System Restore option or Exit to cancel the operation.
If you select System Restore, the system displays the Confirmation
screen.
Note
Do not select Full System Restore, unless you intend to de-
lete all the data on the D: drive. See Full System Restore
(p.39).
37Barco Pn: 60600320
Page 41

Figure 2.11. Confirmation screen
7.
Select Confirm, and the Restore begins.
8. Allow the Restore to run.
Section 2: InstallationBarco Media Server XHD-Series User Guide
The Restore process takes between 10 and 30 minutes. The system
displays status throughout the Restore.
Figure 2.12. Sample Status screen
Barco Pn: 6060032038
Page 42

Barco Media Server XHD-Series User GuideSection 2: Installation
Once the Restore has reached this point (Applying the main volume),
the Barco Media Server automatically restarts.
9. Allow a few minutes for the Barco Media Server to reconfigure.
Figure 2.13. Completion screen
2.9.2
After the restoration iscomplete, you may remove the USB System Restore thumb drive.
Full System Restore
The procedure for a Full System Restore is nearly the same as the procedure fora System
Restore. This not only restores the application, software licenses, and settings on the
C: drive, but it erases any data on the D: drive, restoring the system to its original condition.
1. Plug the USB Recovery drive into one of the external USB 3.0 ports on
the Barco Media Server.
The Barco USB Recovery drive is a USB 3.0 device; you may reduce
recovery time by using this drive in a USB 3.0 port.
2.
Right-click the Windows icon at the lower left-hand corner of the
screen to restart.
As the system restarts, it displays the Barco logo screen.
3. Press and hold the F8 key to summon the Select Boot Device screen.
4. Select the USB Recovery drive (STT ST3U16SSPS (15000MB)).
39Barco Pn: 60600320
Page 43

Section 2: InstallationBarco Media Server XHD-Series User Guide
Use the up and down arrow keys on your keyboard, oruse yourmouse
to make selections.
After the system restarts, the Restore application displays the Barco
Media Server Validation screen.
5. Allow the System Restore menu to load.
The System Restore menu takes a few minutes to load. During this
time, a number of small windows appear and disappear. Wait until
you see a full-screen menu titled Barco Media System Restore Menu.
6.
Select the Full System Restore option or Exit to cancel the operation.
If you select Full System Restore, the system displaysthe Confirmation
screen with the warning, "!!CLICKING CONFIRM WILLDELETE ALL
CONTENT AND DATA!!".
Note
A Full System Restore deletes all data from the D: drive. If
you wish to restore the applications, software licenses, and
settings on the C: drive without erasing the data on the D:
drive, use System Restore. See System Restore (p.36).
Figure 2.14. Barco Media Server Full System Restore Menu
7.
Select Confirm, and the Restore begins.
8. Allow the Restore to run.
The Restore process takes between 10 and 30 minutes. The system
displays status throughout the Restore.
Barco Pn: 6060032040
Page 44

!
Barco Media Server XHD-Series User GuideSection 2: Installation
Once the Restore has reached this point (Applying the main volume),
the Barco Media Server automatically restarts.
9. Allow a few minutes for the Barco Media Server to reconfigure.
2.9.3
Clearing CMOS
If the Barco Media Server hangs or fails to boot after any change to the BIOS settings,
press the clear CMOS buttonto clear the CMOS and reset the motherboard to its default
value.
The clear CMOS button is a small red button labelled CLR_CMOS, located near the
front end of the PCIe 3.0 x16_4 expansion slot. (In the XHD-402 and XHD-404 media
servers, this slot holds the video out card. In the XHD-200 and XHD-400 media servers,
this slot is empty.)
Caution
Do not press the CLR_CMOS button during a System Restore, because this
will interrupt the restore operation.
41Barco Pn: 60600320
Page 45

Page 46

Section 3: Hardware
X-Agora runs on various models of Barco Media Server. This chapter describes the
hardware configuration of the XHD-200 Series and the XHD-400 Series servers.
Although the XHD-200 Series and XHD-400/2/4 Series servers differ in height, they
have the same buttons, switches, LED indicators, and USB 3.0 ports on the front panel.
Figure 3.1. XHD-Series server—front panel
Barco Media Server XHD-Series User Guide
3.1
XHD-200 series
Figure 3.2. XHD-200 server—rear panel
• XHD–200 (2u chassis)
• Outputs – 2
• Inputs – 0
43Barco Pn: 60600320
Page 47

Section 3: HardwareBarco Media Server XHD-Series User Guide
3.2
XHD-400 series
Figure 3.3. XHD-400 server—rear panel
• XHD–400 (4u chassis)
• Outputs – 4
• Inputs – 0
Figure 3.4. XHD-402 server—rear panel
• XHD–402 (same 4u chassis as XHD–400)
Barco Pn: 6060032044
Page 48

• Outputs – 4 DisplayPort 1.2a
• Inputs – 2 single-link DVI capture
Figure 3.5. XHD-404 server—rear panel
Barco Media Server XHD-Series User GuideSection 3: Hardware
• XHD–404 (same 4u chassis as XHD–400)
• Outputs – 4 DisplayPort 1.2a
• Inputs – 4×3G SDI
• Genlock – synchronization module
45Barco Pn: 60600320
Page 49

Page 50

Section 4: Software
The X-Agora software suite is a unified software environment designed to facilitate
projection mapping project workflow from design to playback and operation.
Barco Media Server XHD-Series User Guide
4.1
4.1.1
4.1.2
4.1.3
Requirements
Hardware
X-Agora machines run Windows Embedded 8.1 x64.
These machines come pre-installed with X-Agora, including a license for the software.
To perform X-Agora updates, you must run the X-Agora wizard, which is explained in
this guide.
Distributed deployment
If your installation requires the use of multiple X-Agora machines (because of a high
number of required outputs or for performance reasons), it is important that all of the
machines run the same exact version of the software, to avoid communication problems
and feature discrepancies between components.
Network
X-Agora relies on the proper functioning ofyour network, and makes a few assumptions:
• TCP and UDP communication is open on the network. These protocols
are used for small file transfers, clock synchronization, and the communication of interactive signals.
• All X-Agora machines have the same Windows credentials. This ensures
that the use of Windows file sharing works for the transfer of media
files.
• All X-Agora machines automatically log on to a Windows session at
boot time. This ensures that all the necessary applications are running
when needed.
You may wish to isolate the X-Agora network from external inputs for security reasons.
Please keep in mind that X-Agora uses different network protocols for its proper functioning, and that within the X-Agora network it is recommended to leave all communication open.
47Barco Pn: 60600320
Page 51

Section 4: SoftwareBarco Media Server XHD-Series User Guide
4.2
4.2.1
The X-Agora architecture
The X-Agora systemoperates according to a client-server architecture to allow maximum
scalability. A typical X-Agora deployment comprises a Controller PC and multiple
Player PCs, connected together as the X-Agora network. The Controller PC runs the XAgora Server application that manages and coordinates the Player PC clients (all of
which run the X-Agora Player and X-Agora Agent applications). For larger venues, the
X-Agora architecture can beextended to support additional clientsand servers according
to project needs.
The X-Agora software suite components include:
• X-Agora
• X-Agora Agent
• X-Agora Player
• X-Agora Server
X-Agora
X-Agora allows you to create a project, import media, assignoutputs to player machines
and monitor the status of your event while it is running.
This application allows you to work with 2D projects, in which all playback takes place
on LED or LCD displays, or with 3D projects, in which you can also use projectors and
import your own 3D models.
4.2.2
4.2.3
X-Agora Agent
X-Agora Agent is an application that supports the X-Agora Player application. It is installed on every machine in the X-Agora network to facilitate the server's control of the
network and communication between the player and the server.
X-Agora Player
It is as simple as this: “The player plays your media.”
Everything programmed in X-Agora is made visible or audible by a player.
Note
The X-Agora Player is not capable of media playback on its own. It requires
the X-Agora Server and X-Agora Agent applications to coordinate its actions.
Hardware and software licenses protect each X-Agora Player with regard to managing
the number of outputs that can be connected to a physical machine and validating the
number of live input devices that can be used.
Barco Pn: 6060032048
Page 52

Barco Media Server XHD-Series User GuideSection 4: Software
4.2.4
X-Agora Server
X-Agora Server is a Windows service installed on the controller PC to coordinate all of
the X-Agoraelements on the network. Every application in the X-Agora network operates
as a client of X-Agora Server, allowing you to remotely monitor and maintain your XAgora network from the controller PC.
The X-Agora Server—
• Coordinates all nodes on the X-Agora network.
• Acts as a centralized logger and message relay carrier between players.
• Hosts all media files.
• Synchronizes all players with updates to the media and virtual scene.
This documentation can be accessed from within X-Agora by pressing the F1 key. You
can also press F1 in each pane to display its documentation.
4.3
4.3.1
Figure 4.1. X-Agora F1 Help
Getting started—Install, Uninstall, and Update
X-Agora Wizard
1.
Launch X-Agora Installer.exe.
2.
Select Next.
49Barco Pn: 60600320
Page 53

Figure 4.2. Launch the installer, and select Next
Section 4: SoftwareBarco Media Server XHD-Series User Guide
3.
Select Accept to accept the license; then select Next.
Barco Pn: 6060032050
Page 54

Barco Media Server XHD-Series User GuideSection 4: Software
Figure 4.3. Accept the license, and select Next
4.
Select either Install, Uninstall, or Update in the drop-down menu;
then select Next.
If the software is already installed, select Uninstall or Update in the
drop-down menu and select Next. If the software isnot already present,
the Installation Wizard automatically chooses the Install option. You
can choose where to put the software and also where to put the project
files. By default, the Installation Wizard picks the disk partition with
the most free space as the target for project files.
51Barco Pn: 60600320
Page 55

Figure 4.4. Start the Installation or Update
Section 4: SoftwareBarco Media Server XHD-Series User Guide
5.
Select Next to start the Installation or Update.
You may have to confirm to some prompts for X-Agora requirements.
Barco Pn: 6060032052
Page 56

Figure 4.5. X-Agora
Barco Media Server XHD-Series User GuideSection 4: Software
4.4
6.
Select Close to exit the Installation Wizard.
Note
Uninstalling the software removes all the files that were placed on the
computer at installation: binary files, some configuration files, and the demo
project. Extra files such as your own projects or additional configuration files
are not removed.
Note
Updating an installation is possible for upgrades and also downgrades, using
the same steps.
Network setup
Every machine in your setup can be a Player or the Master Player.
Also, as explained in Remote mode (p.132), it is possible to connect remotely to the Master
Player (e.g., with your laptop), so you can modify your project remotely.
53Barco Pn: 60600320
Page 57

Section 4: SoftwareBarco Media Server XHD-Series User Guide
To set up a project on multiple machines, you need a Server machine and at least one
Player machine.
1. On a Server machine, open X-Agora Server.
The process opens in the background, and an icon appears in the notification area on the taskbar.
2. On a Player machine, open X-Agora Agent and follow the steps in
Configuring Agent (p.54).
Every machine in your setup can be a Player or the Master Player.
It is also possible to connect remotely to the Master Player (e.g., with your laptop), so
you can modify your project remotely.
4.5
Configuring Agent
X-Agora Agent is configured by default to connect to its local X-Agora Server service.
When changing the Master Player in your project, all the required instances of X-Agora
Agent point to the new Master Player. You can also change the default configuration
manually.
To change the default configuration manually—
1.
Launch Agent as an administrator.
(Double-click on the Agent icon in the notification area.)
2.
Select the Configuration tab.
3. Enter the X-Agora Player Executable path (if not entered already).
The default path is C:\X-Agora\xagora-projection\xframe-3d.exe.
4. Enter the Media Server Directory path (if not entered already).
The default path is C:\X-Agora\xagora-projection\.
5. Enter the Master Player type:
•
For a local Master Player, select Manual, enter address
127.0.0.1 or 'localhost', use Port 5000, and select Connect.
• For a remote Player, select the address of the server,
use Port 5000, and select Connect.
6.
Select Save to save the settings parameters.
X-Agora asks you to restart.
Barco Pn: 606003205 4
Page 58

7. Restart X-Agora Agent.
Note
If remote share has not been configured prior to X-Agora installation, enter
User and Password to access the remote machine and select Connect To
Remote Share.
Barco Media Server XHD-Series User GuideSection 4: Software
4.6
4.7
Launching X-Agora
1.
Launch X-Agora Server by selecting the X-Agora Server shortcut from
the Desktop or from the Start Menu.
2.
Launch X-Agora by selecting the X-Agora shortcut from the Desktop
or from the Start Menu.
Note
X-Agora Server must be running for X-Agora to launch.
Note
The Windows service xagoraServer MUST be running for X-Agora to launch.
It is enabled by default and launched automatically at Windows boot time.
Also make sure that you have the proper license for running the software.
X-Agora interface
Figure 4.6, “X-Agora start screen” shows the X-Agora start screen. From this screen, you
can open a new project or an existing project by clicking either New Project… or the
name of an existing project, for example xagoraShape.
55Barco Pn: 60600320
Page 59

Figure 4.6. X-Agora start screen
Section 4: SoftwareBarco Media Server XHD-Series User Guide
4.7.1
Parts of the interface
X-Agora opens the project, defaulting to the workflow layout that was in use the last
time the project was open. In the case of a new project, X-Agora opens the Study layout.
Figure 4.7, “X-Agora Programming workflow layout” shows an existing project open in the
Proramming workflow layout.
Figure 4.7. X-Agora Programming workflow layout
Barco Pn: 6060032056
Page 60

Menu bar
Barco Media Server XHD-Series User GuideSection 4: Software
The interface comprises a menu bar, divided into left-hand and right-hand halves, and
a workspace containing various panes.
The left-hand side of the menu bar has five menus: File, Edit, Window, Tools, and Help.
From the File menu you can select…
New…
Open
Save
Save As…
Import…
Export…
Connect to a Remote Server
Close
Exit
From the Edit menu you can either undo or redo changes to a project.
From the Window menu you may choose which panes to display in the workspace. See
Workspace (p.58) for a brief description of the Window menu panes.
From the Tools menu you may open any of the listed tools.
Content Production
Projection Study Wizard
X-Agora Media Encoder
Export Projectors Textures
Logs
to open a new project
to open an existing project
to save a project
to save a project with a different name
to import a file injto a project
to export a project as a 3D model (*.fbx)
to connect to a remote server
to close a project
to exit X-Agora
From the Help menu you may select About to open the X-Agora splash screen, which
displays the copyright and the software release number. You can also select Help (or
press the F1 key) to open the X-Agora Designer User Guide.
Workflow layouts
The right-hand side of the menu bar allows you to choose from among the five workflow
layouts in X-Agora.
Study: Study, also called Projection Study, is mostly used in the initial phases of a production. It is the layout best suited for creating your 3D scene and arranging your displays. You can create multiple display configurations, and produce a study document
to detailand evaluate each configuration. If there is no need to produce such documents,
57Barco Pn: 60600320
Page 61

Section 4: SoftwareBarco Media Server XHD-Series User Guide
you should still usethe Projection Study layout to create your scene and displays, because
this layout has features that may help people working at a more technical level: technical
directors, architects, and integrators.
Programming: The Programming tool allows you to build content Timelines. X-Agora
allows you to create as many Timelines as you want in each X-Agora project. Because
it was designed for large-scale installations, X-Agora also allows you toplayback multiple
Timelines simultaneously. Often, in large-scale installations, there are multiple screen
spaces, and often it is easier to compartmentalize content for each screen space on a
dedicated Timeline.
Outputs: Use the Outputs layout to connect individual projectors and displays to the
physical outputs of the graphic cards on your Player computers. The Outputs layout
also allows you to tweak settings, such as the position of windows and the amount of
antialiasing.
Calibration: Use the Calibration layout to calibrate individual projectors when on site.
X-Agora features four projection calibration tools, some of which can be used in conjunction with each other.
Playback: The Playback layout is meant to play your show. It features a simplified interface for streamlined playback, in which Timelines are not editable to avoid accidental
changes. It also features the control room view of player outputs, allowing you to
monitor the output and performance of your player machines during operation.
Workspace
The workspace is divided into several panes. You may show or hide any of the panes
by selecting or deselectingthem in the Window menu. The central pane isthe Viewport.
The Viewport pane is where most manipulation and visualization of your 3D scene occurs.
Displays pane: The Displays pane allows you to adjust the properties of projectors and
screens to the real-world constraints of your project.
Media pane: X-Agora supports various types of video, image, sound and real-time
media formats (such as particle systems and live-feeds). See Supported 3D, audio, image,
and video formats (p.192). The Media pane allows you to import, preview, and refresh
media.
Timelines: The Timelines pane contains all the Timelines and Timeline Groups in a
given scene. Do not confuse the Timelines pane with the Timeline pane, in which you
assemble media assets to compose a show or multimedia installation.
Actions pane: Actions give you real-time tools to go beyond basic video and sound
playback. They make it possible to add real-time visualeffects to your Timelines, control
external systems such as Art-Net lighting fixtures, and move 3D objects in the scene.
3D objects pane: The 3D objects pane provides a list of all the 3D objects in a scene. It
also allows you to select them individually in order to highlight them in the Viewport
and expose their parameters in the Properties pane.
Barco Pn: 6060032058
Page 62

Barco Media Server XHD-Series User GuideSection 4: Software
Timeline pane: The Timeline pane displays the layered content of one timeline. Do not
confuse the Timeline pane with the Timelines pane, which contains all the Timelines
and Timeline Groups in a given scene. Use the Timeline pane to compose the show or
multimedia installation by assembling media assets in time. Create as many Timelines
as you want, and add video, image, sound, or real-time graphics in layers.
Properties pane: TheProperties pane gives access to all user-editable elements. To access
the properties of any user-interface element, click on the element to open its Properties
pane.
Inputs: The Inputs pane allows you to create open sound control (OSC) and tangible
user interface object (TUIO) inputs that can then be used to control real-time media
elements in your project.
Viewport: The Viewport pane provides up to four distinct viewsof the 3Dscene in order
to facilitate viewing and moving 3D objects and displays. Click on the Views Template
button, in the top right-hand corner of the Viewport pane, to change the number and
layout of views.
Settings pane: The Projection study section of the Settings menu provides access to key
features of the Projection Study Tool.
4.7.2
The X-Agora Designer User Guide
The X-Agora Designer User Guide documents the panes, tools, and workflow layouts in
X-Agora. You may access this documentation from within X-Agora by selecting the
Help menu from the left-hand side of the menu bar and selecting Help from the Help
menu. You may also access this documentation by pressing the F1 key. With your
cursor in any pane, you can press the F1 key to display the documentation for that pane.
59Barco Pn: 60600320
Page 63

Page 64

Appendix A: Specifications
This appendix contains specifications for Barco Media Servers and specifications and
pinouts for standard connectors.
Barco Media Server XHD-Series User Guide
A.1
Barco Media Server specifications
Max. 2× HD at 60 fpsOutput resolution
–Capture cards
Audio output
Dimensions
Warranty
Balanced Audio XLR Connectors
• Width: 48 cm (19.0 in)
• Length: 28 cm (11 in)
• Height: 9 cm (3.5 in)
Full one-year parts and labor
standard, extended warranty
and support available.
XHD-400 SeriesXHD-200 SeriesSpecification
4× DP 1.21× DP 1.2, 1× DVI-DChannel outputs
1× DVI, 1× DP 1.2–Designer outputs
Max. 1× 4K at 60 fps, 4× HD at
60 fps
Max. 2× 4K, 8× HDMax. 4× HDVideo layers
Mini JackMini JackSMPTE input
• XHD-400: none
• XHD-402: 2× Dual-link
DVI-D
• XHD-404: 4× 3G SDI
SoftwareSoftwareEDID management
Balanced Audio XLR Connectors
8× USB 3.0, 4× USB 2.04× USB 3.0, 2× USB 2.0USB
100 V AC, 220 V AC100 V AC, 220 V ACInput voltage
2× Gigabit Ethernet1× Gigabit EthernetNetworking
512G SSD256G SSDStorage
• Width: 48 cm (19.0 in)
• Length: 42 cm (16.6 in)
• Height: 18 cm (7 in)
13.6 kg (30 lbs.)6.4 kg (14 lbs.)Weight
14.9 kg (33 lbs.)7.3 kg (16 lbs.)Shipping weight
Full one-year parts and labor
standard, extended warranty
and support available.
Table A.1. Barco Media Server specifications
61Barco Pn: 60600320
Page 65

Appendix A: SpecificationsBarco Media Server XHD-Series User Guide
A.2
Standard connection specifications
Barco Pn: 6060032062
Page 66

DescriptionSpecification
Main (DisplayPort) and Exten-
Desktop • Resolution:
• Display Connectors: DVI-I DL and DP 1.2
• Maximum Simultaneous Displays: 2 direct, 4 DP 1.2
Multi-Streamded (DVI)
• 3,840×2,160 at 60 Hz Max DP 1.2 Res-
• 2,560×1,600 at 60 Hz Max DVI-I DL
• 1,920×1,200 at 60 Hz Max DVI-I SL
• 2,048×1,536 at 85 Hz Max VGA Resol-
• Memory Bandwidth: 29.0 GB/s
• Memory Interface: 128-bit
• GPU Memory: 2 GB DDR3
• Maximum Power Consumption: 45 W
Barco Media Server XHD-Series User GuideAppendix A: Specifications
olution
Resolution
Resolution
ution
Video Outputs
(DisplayPort)
Genlock • Synchronization to external sources
• Four Standard DisplayPort outputs
• DisplayPort 1.2a support, including Adaptive-Sync
and HBR2
• Resolution:
• 4,096×2,160 Maximum DisplayPort
1.2a resolution
• 2,560×1,600 Maximum DisplayPort
1.1 resolution
• PCIe®3.0 compliant, ×16 bus interface
• 8-GB GDDR5 memory
• 256-bit memory interface
• Up to 160 GB/s bandwidth
• Less than 150-W maximum power consumption
• Clock-accurate synchronization
• BNC connector for receiving and synchronizingvideo
input source, including:
• PAL & NTSC SD video black burst
• HDTV tri-level sync
• TTL
• Sync signals on SDI
63Barco Pn: 60600320
Page 67

DVI video capture
Appendix A: SpecificationsBarco Media Server XHD-Series User Guide
DescriptionSpecification
• DVI-I (DL) connector
• Input channels: 2
• Output channels: 0
• Supports HDMI, DVI, and composite video capture
• PCIe ×4 half size plug-in card (110 mm × 170 mm)
A.3
A.3.1
SD/HD/3G SDI
video capture
Table A.2. Standard connection specifications
• SD/HD/3G SDI on BNC connector
• Input channels: 4
• Output channels: 0
• 6G Ready (via future firmware upgrade)
• PCI Express: 4-lane PCIe 2.0
Standard connector pinouts
DisplayPort connector pinouts
Figure A.1, “DisplayPort connector” illustrates the DisplayPort connector.
Figure A.1. DisplayPort connector
Table A.3, “DisplayPort connector pins” lists the DisplayPort connector pinouts.
Barco Pn: 6060032064
Page 68

Table A.3. DisplayPort connector pins
Barco Media Server XHD-Series User GuideAppendix A: Specifications
SignalPinSignalPin
GND11ML_Lane 0 (p)1
ML-Lane 3 (n)12GND2
CONFIG1 (connected to Ground)13ML_Lane 0 (n)3
CONFIG2 (connected to Ground)14ML-Lane 1 (p)4
AUX CH (p)15GND5
GND16ML_Lane 1 (n)6
AUX CH (n)17ML-Lane 2 (p)7
Hot Plug Detect18GND8
Return (return for power)19ML_Lane 2 (n)9
DP_PWR Power for connector (3.3
20ML_Lane 3 (p)10
V, 500 mA)
A.3.2
DVI connector pinouts
Figure A.2, “DVI connector” illustrates the DVI connector.
Figure A.2. DVI connector
Table A.4, “DVI connector pins” and Table A.5, “MicroCross pins” list the DVI connector
pinouts. Please note:
• TMDS = Transition Minimized Differential Signal
• DDC = Display Data Channel
65Barco Pn: 60600320
Page 69

Table A.4. DVI connector pins
Appendix A: SpecificationsBarco Media Server XHD-Series User Guide
SignalPinSignalPin
TMDS Data 3+13TMDS Data 2–1
+5V Power14TMDS Data 2+2
GND (for +5V)15TMDS Data 2/4 Shield3
Hot Plug Detect16TMDS Data 4–4
TMDS Data 0–17TMDS Data 4+5
TMDS Data 0+18DDC Clock6
TMDS Data 0/5 Shield19DDC Data7
TMDS Data 5–20Analog Vertical Sync8
TMDS Data 5+21TMDS Data 1–9
TMDS Clock Shield22TMDS Data 1+10
TMDS Clock +23TMDS Data 1/3 Shield11
TMDS Clock –24TMDS Data 3–12
SignalPinSignalPin
Analog Horizontal SyncC4Analog Red VideoC1
Analog Common Ground ReturnC5Analog Green VideoC2
––Analog Blue VideoC3
A.3.3
Table A.5. MicroCross pins
Ethernet connector pinouts
Figure A.3, “Ethernet connector” illustrates the Ethernet connector.
Figure A.3. Ethernet connector
Table A.6, “Ethernet connector pins” lists Ethernet connector pinouts.
Barco Pn: 6060032066
Page 70

Barco Media Server XHD-Series User GuideAppendix A: Specifications
ColorPairPin
10/100 Base-T – RJ45 port
description
23
ange
Table A.6. Ethernet connector pins
1000 Base-T – RJ45 port description
TX0+TXD+white/green31
TX0–TXD–green32
RX0+RXD+white/or-
TX1+–blue14
TX1––white/blue15
RX0–RXD–orange26
RX1+–white/brown47
RX1––brown48
67Barco Pn: 60600320
Page 71

Page 72

Barco Media Server XHD-Series User Guide
Appendix B: Replacing a power-cord cap
The Barco Media Server ships with an IEC power cord. Different locations (even within
the same country) may require a different power cord cap to connect the server to a
power outlet. Because of the variety of power cord caps used worldwide, Barco cannot
make specific recommendations for the power cord cap. Contact a local authority for
the type of power cord cap needed. When installing the power cord cap, note that the
cores in the mains lead are colored according to the following code:
• green and yellow = earth
• blue = neutral
• brown = live
B.1
B.2
Installing a Line Cord Cap – U.K. Only
In the United Kingdom, core colours in the mains lead of this equipment may not correspond with the coloured markings identifying the terminals in the fixture’s plug. In
that case, install a line cord cap according to the following code:
• Connect the green and yellow core to the plug terminal marked with
the letter “E,” or by the earth symbol or coloured green, or green and
yellow.
• Connect the blue core to the terminal marked with the letter “N” or
coloured black.
• Connect the brown core to the terminal marked with the letter “L” or
coloured red.
Warning
Class 1 equipment – This equipment must be earthed.
Vatic Fitter Heads Information – Danmark
Advarsel: Beskyttelse mod elektrisk chock.
Vigtigt!
Lederne med gul/groen isolation maa kun tilsluttes en klemme maerket eller .
69Barco Pn: 60600320
Page 73

Page 74

Barco Media Server XHD-Series User Guide
Appendix C: AMD FirePro™Control Center
C.1
C.2
Using Dedicated Fullscreen
Using Dedicated Fullscreen assures optimal video playback by taking full control of
the GPU and bypassing desktop composition similar to what they do in video games.
However, to use that mode, all outputs must be set in an Eyefinity Group. This section
explains how to setup an Eyefinity Group using the AMD FirePro Control Center and
how to manage the Eyefinity Group inside the X-Agora.
Setting up an Eyefinity Group
1.
Right-click on Desktop and select AMD FirePro Control Center.
2.
Expand AMD Eyefinity Multi-Displayand click on the Create Eyefin-
ity Display group.
71Barco Pn: 60600320
Page 75

Appendix C: AMD FirePro™Control CenterBarco Media Server XHD-Series User Guide
Figure C.1. "Create Eyefinity Display Group"
3.
Click on Use a new arrangement.
Barco Pn: 6060032072
Page 76

Barco Media Server XHD-Series User GuideAppendix C: AMD FirePro™Control Center
Figure C.2. Use a new arrangement
4. Select the screen from which you want to create the Eyefinity group
and click on Next.
The other screens will be disabled.
73Barco Pn: 60600320
Page 77

Appendix C: AMD FirePro™Control CenterBarco Media Server XHD-Series User Guide
Figure C.3. Create the Eyefinity group
5. Select the layout type—for now, X-Agora supports only horizontal
layouts (2x1, 3x1, 4x1, etc.)—and click on Next.
Barco Pn: 6060032074
Page 78

Barco Media Server XHD-Series User GuideAppendix C: AMD FirePro™Control Center
Figure C.4. Select a group layout
75Barco Pn: 60600320
Page 79

Appendix C: AMD FirePro™Control CenterBarco Media Server XHD-Series User Guide
Figure C.5. Display group complete
6.
Click on Next twice.
The Eyefinity group should now span across multiple screens, as shown
in Figure C.6, “Eyefinity group spanning multiple screens”.
Figure C.6. Eyefinity group spanning multiple screens
Barco Pn: 6060032076
Page 80

Barco Media Server XHD-Series User GuideAppendix C: AMD FirePro™Control Center
7.
If the screens are not in the proper order, click on Arrange Eyefinity
Display Group and follow the screen indications to set up the correct
screen order.
C.3
Figure C.7. "Arrange Eyefinity Display Group"
Disable Eyefinity Group
To disable the Eyefinity Group, click on Disable Eyefinity Group in the AMD Eyefinity
Multi-Display menu.
77Barco Pn: 60600320
Page 81

Appendix C: AMD FirePro™Control CenterBarco Media Server XHD-Series User Guide
C.4
Figure C.8. "Disable Eyefinity Display Group"
Manage Eyefinity Group in Designer
In X-Agora, an Eyefinity Group is considered as one display so using the Identify
Monitors button shows only one large number for the group. The displays that are part
of the Eyefinity Group, however, are also identified individually with smaller numbers
from 1 to 6, depending of the number of displays in the group.
Barco Pn: 6060032078
Page 82

Barco Media Server XHD-Series User GuideAppendix C: AMD FirePro™Control Center
Figure C.9. Two screens in one Eyefinity group
If the X-Agora Player is in Dedicated Fullscreen, the Eyefinity group is also represented
by a rectangle that spans across the correct number of displays in the group. In the following screenshot, the group spans across two outputs:
Figure C.10. Eyefinity group spanning two outputs
79Barco Pn: 60600320
Page 83

Page 84

Appendix D: EDID management
Extended display identification data (EDID) is managed through either the AMD
FirePro™ Control Center or the NVIDIA Control Panel.
Barco Media Server XHD-Series User Guide
D.1
Removing an emulated EDID through the AMD FirePro™
Control Center
1. Right-click anywhere on the desktop to summon the desktop menu.
2.
Click on AMD FirePro Control Center.
Figure D.1. Select AMD FirePro Control Center
3.
Select AMD FirePro in the navigation pane, and click EDIDEmulation.
4. Select any emulated display connection.
An EDID that is being read from a display cannot be deleted; only
emulated EDIDs can be deleted.
81Barco Pn: 60600320
Page 85

Appendix D: EDID managementBarco Media Server XHD-Series User Guide
Figure D.2. AMD FirePro™ Control Center display connections
The four icons at the right-hand side of the selected connection allow
you to…
D.2
a. View the selected EDID in HEX format.
b. Save the selected EDID to a file.
c. Add or modify emulation properties.
d. Remove the selected EDID or branch emulation.
5.
Click on the Minus icon to remove the selected EDID.
The text for the selected connection changes from “DisplayPort (Emulated:…)” to “DisplayPort (Connected:…).”
Removing an emulated EDID through the NVIDIA Control
Panel
1. Right-click anywhere on the desktop to summon the desktop menu.
2.
Click on NVIDIA Control Panel.
Barco Pn: 6060032082
Page 86

Barco Media Server XHD-Series User GuideAppendix D: EDID management
Figure D.3. Select NVIDIA Control Panel
3.
Select Workstation and View system topology from the Select a Task
pane of the NVIDIA Control Panel.
Figure D.4. NVIDIA Control Panel
Figure D.4, “NVIDIA Control Panel” shows that the DVI port of the
Quadro K620 is not connected, but the DisplayPort port is connected
to an ASUS monitor.
4. Click, under Settings, on the EDID you wish to manage.
83Barco Pn: 60600320
Page 87

Figure D.5. NVIDIA Manage EDID window
Appendix D: EDID managementBarco Media Server XHD-Series User Guide
The NVIDIA Manage EDID screen has three tabs.
a.
Export allows you to create an EDID file based on the
current display.
b.
Load allows you to load an EDID file to use as an
emulated EDID.
c.
Unload allows you to remove an emulated EDID file
from a connection.
5.
Select the Unload tab on the Manage EDID window.
6. Select the emulated EDID that you wish to remove.
Only emulated EDIDs may be selected and removed. If the connector
is reading an EDID from an active display, the connector is grayed out
and is not selectable.
7.
Click on the Unload EDID button.
Barco Pn: 6060032084
Page 88

Appendix E: Input check
The Barco Media Server has two applications that allow you to check whether or not
the video capture card is receiving input. The dREC application checks the SDI input
on the video capture card in the Barco Media Server XHD-404, and the Vision window
application checks the DVI input on the video capture card in the Barco Media Server
XHD-402.
Barco Media Server XHD-Series User Guide
E.1
DVI video input check
Use the Vision window application check the DVI input on the Datapath VisionAV-HD
video capture card in the Barco Media Server XHD-402.
1.
Click the Windows icon at the lower left-hand corner of the screen
to access the Windows Apps screen.
2.
Select the Vision window icon to open the New Vision Window.
3. Select the input (1 or 2) that you want to check from the Input dropdown list.
4.
Click OK.
The Vision Window checks the selected input. If the input is present, Vision Window
shows the input. (See Figure E.1, “Vision Window output”.) If no input is detected, Vision
Window displays the message, "No input."
85Barco Pn: 60600320
Page 89

Appendix E: Input checkBarco Media Server XHD-Series User Guide
E.2
Figure E.1. Vision Window output
SDI video input check
Use the dREC application check the SDI input on the Delta-3G-elp 40-bb video capture
card in the Barco Media Server XHD-404.
1.
Click the Windows icon at the lower left-hand corner of the screen
to access the Windows Apps screen.
2.
Select the dREC icon to open dREC.
3. dREC displays the Record module.
• The Device Control panel displays the video capture
card parameters.
• The Card field identifies the card.
• The Channel field allows you to select
the video input channel (RX0 – RX3).
Barco Pn: 6060032086
Page 90

Barco Media Server XHD-Series User GuideAppendix E: Input check
• The Video Preview panel shows the input, if there is
any.
If there is no input signal, the Video Preview panel
displays the message, "NO SIGNAL."
Figure E.2. dREC Record module, showing "NO SIGNAL"
87Barco Pn: 60600320
Page 91

Page 92

Appendix F: Trouble shooting
!
Use Table F.1, “Trouble-shooting matrix” to trouble-shoot problems with the Barco
Media Server.
Caution
When handling power connections, remember to always follow safety procedures.
• Power down the Barco Media Server.
Switch off the power switch on the front panel and the
master power switch on the rear panel.
• Disconnect the power cord from the Barco Media Server.
• Remove all cables from the Barco Media Server.
• Make sure that your hands are free of dirt, grease, or foreign
substances that may damage the PCIe card or any components that you may touch inside the server.
• Make sure you are "grounded."
Wear an anti-static wrist strap, also known as a ground
bracelet, or make sure that you touch a metal object that
is touching the ground todischarge any static electricity you
may have accumulated.
Barco Media Server XHD-Series User Guide
89Barco Pn: 60600320
Page 93

Media server
does not start
No video output
Images unstable
or showing bad
performance
The Master Power switch is not
ON.
The power supply is not connected to a valid power source.
EATX12V connector is loose or
disconnected from the motherboard.
If EATX12V is not connected, the
system may repeatedly start and
stop, start and stop.
The DisplayPort-to-DVI adapter
may be incorrect.
The video cable may not be properly connected.
The display has not been enabled
by Windows.
The EDID does not match the attached display.
The operating temperature is too
high.
The content is not properly encoded or has too many layers.
Appendix F: Trouble shootingBarco Media Server XHD-Series User Guide
RemedyPossible causeProblem
Make sure that the Master Power
switch on the rear panel is ON.
Make sure power supplyis connected to a valid power source.
Check motherboardfor any power
indication or errors.
Make sure that the EATX12V connector is firmly seated.
When handling power connections, remember to always follow
safety procedures. See Caution.
Be sure to use supplied active and
passive adapters in proper order.
See the notes to Table 2.1 in the
Box content (p.26) section of this
user guide.
Make surecable is seated correctly
and the thumbscrews are tight.
Enable the display inthe Windows
screen setting.
Remove the previously used EDID
and verify that you can see the
Windows desktop. (See EDID
management (p.81).)
Operating ambient temperature
must be higher than 0°C (32°F)
and lower than 40°C (104°F).
Leave sufficient front and rear
clearance to ensure that airflow
through the chassis is not restricted.
Be sure to encode content with XAgora Media Encoder.
Content is not properly encoded,
or it has too many layers.
Barco Pn: 6060032090
Page 94

Bad output on a
specific channel
Bad input on a
specific channel
Barco Media Server XHD-Series User GuideAppendix F: Trouble shooting
The connectionsmay be incorrect.
The suggested cable length has
been exceeded.
The converters are unsupported.
A connection or cable is bad.
The suggested cable length has
been exceeded.
The converters are unsupported.
The input format is unsupported.
RemedyPossible causeProblem
Make sure that the cable is seated
correctly and that the thumbscrews are tight.
Be sure not to exceed maximum
cable length.
Be sure to use the supplied converters. (See Note #2 to Table 2.1,
“Box content”.) Swap the converter
for a converterwith a known good
output.
Make sure that the cable is seated
correctly and that the thumbscrews are tight.
Swap the cable for a known good
cable.
Be sure not to exceed maximum
cable length.
Be sure to use the supplied converters. (See Note #2 to Table 2.1,
“Box content”.) Swap the converter
for a converterwith a known good
output.
• Be sure to use specified video
input formats. See the Supported
3D, audio, image, and video formats
(p.192) section of this user guide.
• To check the DVI inputs, use the
Vision window application installed on the server. See the DVI
video input check (p.85) section of
this user guide.
• To check the SDI inputs, use the
dREC application installed on the
server. See the SDI video input
check (p.86) section of this user
guide.
91Barco Pn: 60600320
Page 95

Devices do not
communicate
through the network.
The dynamic
configuration
(DHCP) does
not work, when
connecting adesigner laptop to
the server.
The unit does
not respond to
any front panel
switches.
The front-panel
USB ports do
not work.
Cannot read
from or write to
the USB drive.
Unable to perform a System
Restore
Data on the D:
drive is lost after
a System Restore.
This is a possible cable or network
switch issue.
The IP address is incorrect; the IP
address is not within your LAN
range.
The IP address is incorrect; there
is a conflict between network addresses.
This configuration does not have
a DHCP server.
The internal cables may be disconnected.
The USB device may be faulty.
The internal cable may be disconnected.
The USB drive may be bad or
formatted incorrectly.
Power may have been lost during
System Restore.
A Full System Restore, rather than
a System Restore, was performed.
Appendix F: Trouble shootingBarco Media Server XHD-Series User Guide
RemedyPossible causeProblem
Check all of the Ethernet cables
and verify that they are plugged
in.
If you are using a network switch,
verify that is ON and is operating
properly.
Check to see if the IP address is
within your LAN range.
Check if the BMS network address
is already in use by another device
on the local network.
Disable the DHCP option and
enter a static network address
compatible with the PC running
the Event Master control software
(range, subnet mask, etc.).
Make surethat the cablesfrom the
front-panel switches are plugged
in on the motherboard.
Try a different USB device in the
port.
Make sure that the cable from the
front-panel USB port is firmly
seated in the USB3_78 connector
on the motherboard.
Make surethat the USBflash drive
is formatted to use the FAT32 file
system. If you cannot access the
USB flash drive from another PC,
then you may have a faulty USB
flash drive.
Restart System Restore.
There isno immediate remedy; the
data is lost.
See the Restore (p.35) section of
this user guide.
Table F.1. Trouble-shooting matrix
Barco Pn: 6060032092
Page 96

Barco Media Server XHD-Series User Guide
Appendix G: Window menu panes
The X-Agora interface offers several panes for viewing aspects of your project. You can
access these panes by using the Window menu on the menu bar at the top of the screen.
A checkmark next to an item in the Window drop-down menu indicates that the pane
for that item is active.
G.1
Figure G.1. Window tab
Displays pane
The Displays pane allows you to adjust the properties of projectors and screens to the
real-world constraints of your project.
93Barco Pn: 60600320
Page 97

Appendix G: Window menu panesBarco Media Server XHD-Series User Guide
G.1.1
Figure G.2. Displays groups
1. Open the Displays pane and select the projector or screens the position
or parameters of which you wish to modify. (See Figure G.2, “Displays
groups”.)
Selecting a display (either in the Displays pane or in a Viewport) causes
the Properties panel to show the parameters of the selected display.
2. Edit the parameters of the display, such as its x, y, and z coordinates,
lens shift and throw ratio (for projectors), or resolution.
Display groups
The displays created to simulate real-world projector and screen setups appear as Projector Groups or Screen Groups in the Displays pane. Groups can be used to organize
your displays for ease-of-use.
Barco Pn: 6060032094
Page 98

Figure G.3. New group
Barco Media Server XHD-Series User GuideAppendix G: Window menu panes
G.1.2
Add display
To add a display, you can use the menu shown in Figure G.3, “New group”. If you want
to add adisplay to an existing display group, use the +icon of that group. SeeFigure G.4,
“Add display to an existing group.”.
Figure G.4. Add display to an existing group.
95Barco Pn: 60600320
Page 99

Appendix G: Window menu panesBarco Media Server XHD-Series User Guide
G.2
G.2.1
G.2.2
Media pane
Media type
X-Agora supports various types of video, image, sound and real-time media formats
(such as particle systems and live-feeds).See Supported 3D, audio, image, and video formats
(p.192).
Figure G.5. Media pane
Importing and refreshing media
To add media files, simply drag and drop media files from Windows Explorer onto a
Timeline or onto the Media Tab itself. This copies them to the X-Agora scene folder.
G.2.3
Note
The X-Agora media folder is located at <X-Agora Installation Folder>/xframescenes/<scene name>/medias. Media assets are placed in their respective
subfolders (depending on their type).
To split high-resolution video files into the appropriate number of cropped sections
(according to the number of projectors defined in your projection study), use the X-
Agora Media Encoder (p.127).
Previewing media
To preview a media file, double-click on it, and a preview appears in the Properties
pane on the right.
Barco Pn: 6060032096
Page 100

Figure G.6. Media preview
Barco Media Server XHD-Series User GuideAppendix G: Window menu panes
G.3
Timelines pane
The Timelines pane contains all the Timelines and Timeline Groups in a given scene.
Note
Do not confuse the Timelines pane with the Timeline pane, in which you assemble media assets to compose a show or multimedia installation.
Figure G.7. Timelines pane
97Barco Pn: 60600320
 Loading...