

Page 1
Wireless Presentation Sy st em
(Model Name: WGA-510P)
Version: 1.0
Date: 26, October 2016
Page 2
WGA-510P
2
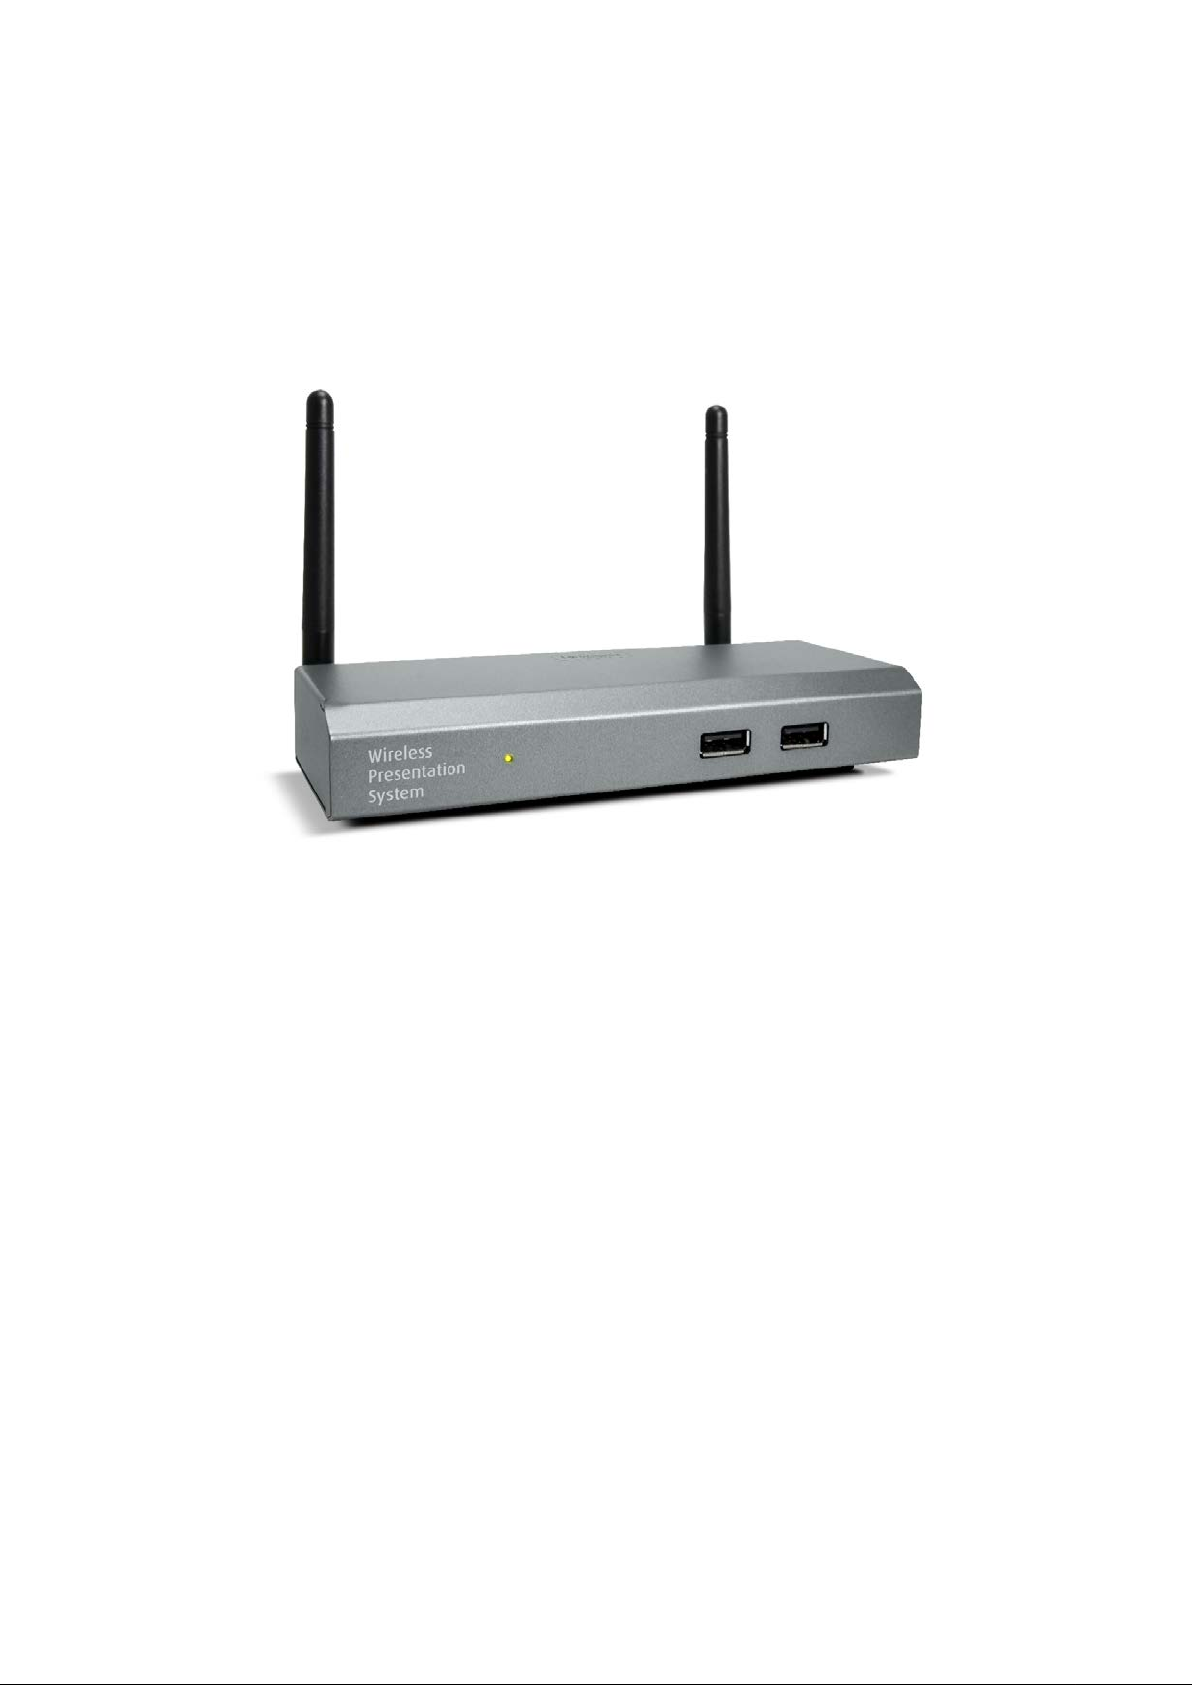
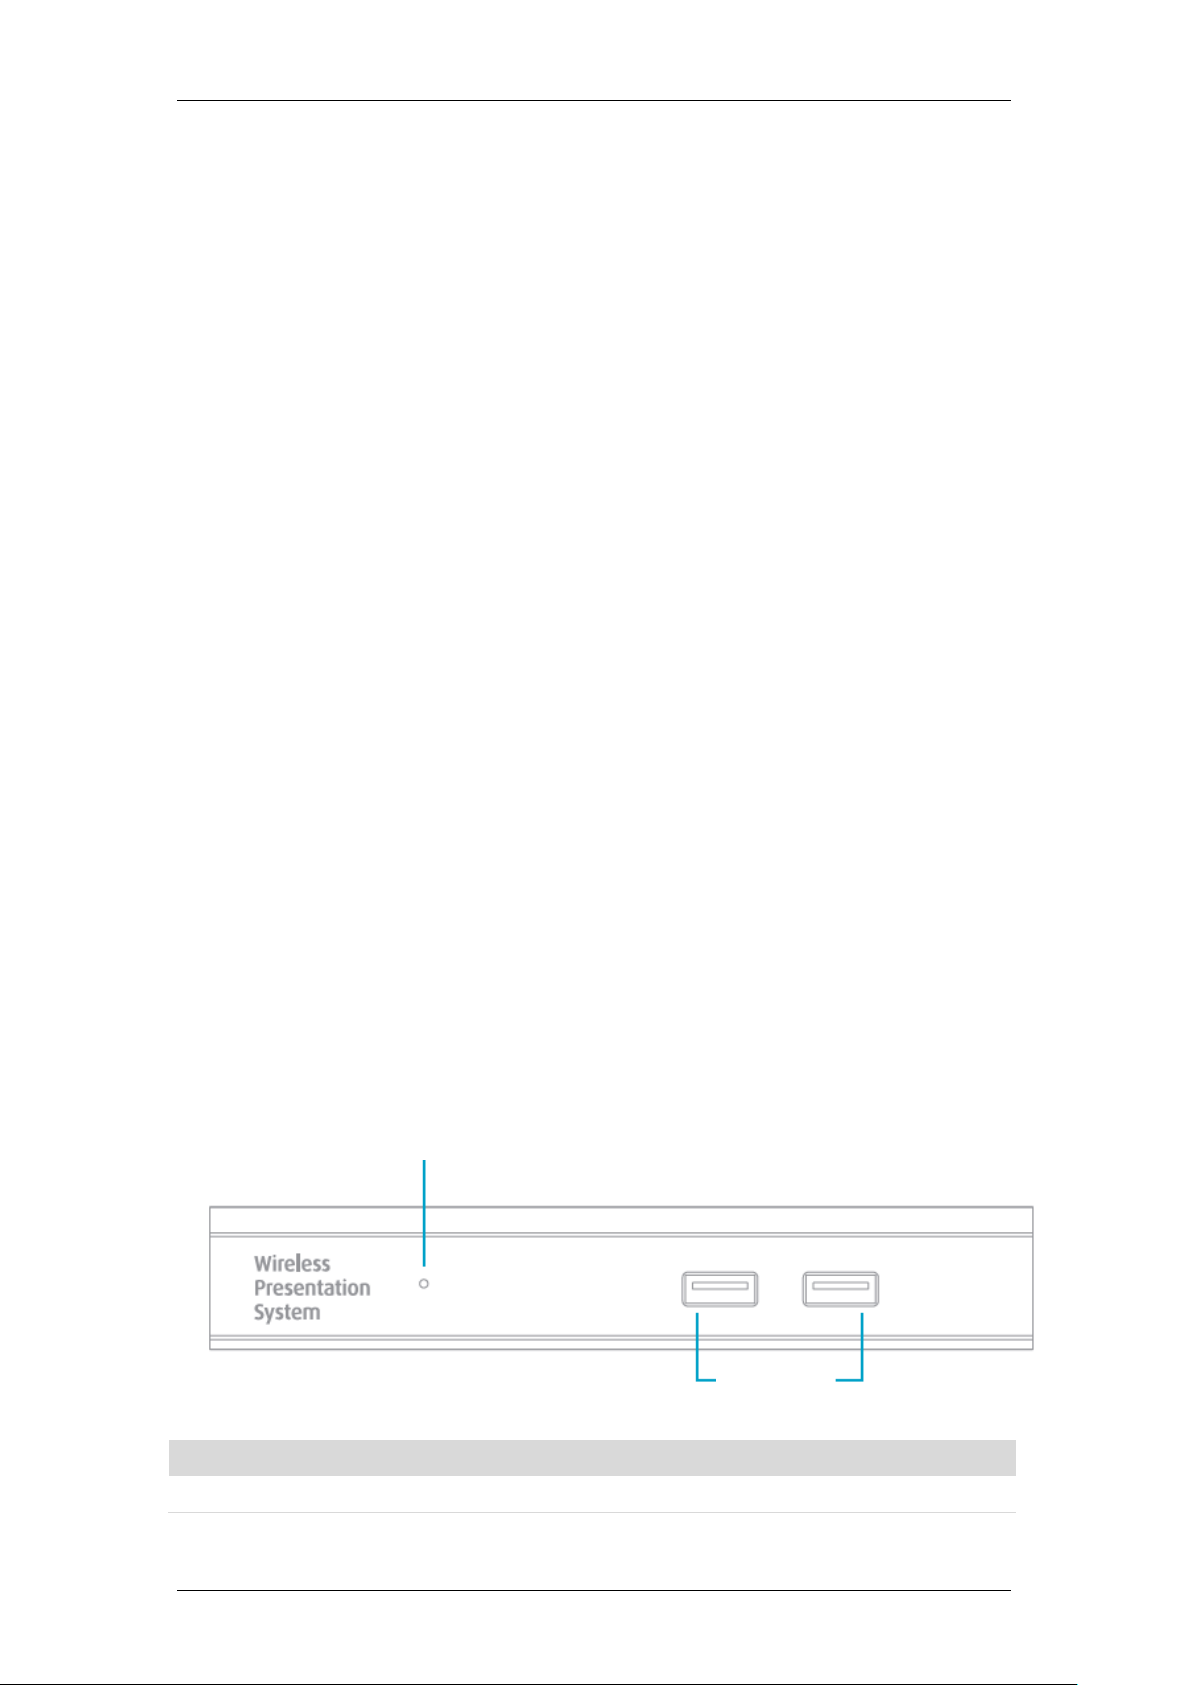
Power LED
USB Port
1. Package Contents
WGA-510P Box
USB Token
Power Adapter (DC +5V, 2.6A)
WiFi Antenna x 2
Wall-Mount Kit
Quick Installation Guide
Warranty Card
CE DoC
2. USB Token Contents
MirrorOp Installer for Windows
MirrorOp Installer for Mac
Executable MirrorOp Application for Windows
Executable MirrorOp Application for Mac
SVS Driver (For Mac Extended Screen)
SNMP MIB File
User Manual
3. Physical Details
•
Front Panel
Power LED LED Indicator: Syste m Loading (Red), Ready (Green)
USB Port (Front) 2 USB Ports for USB Mouse and Keyboard
- -
Page 3
WGA-510P
3
(for the Wall-Mount Kit)
RJ-45
HDMI
Audio Jack
•
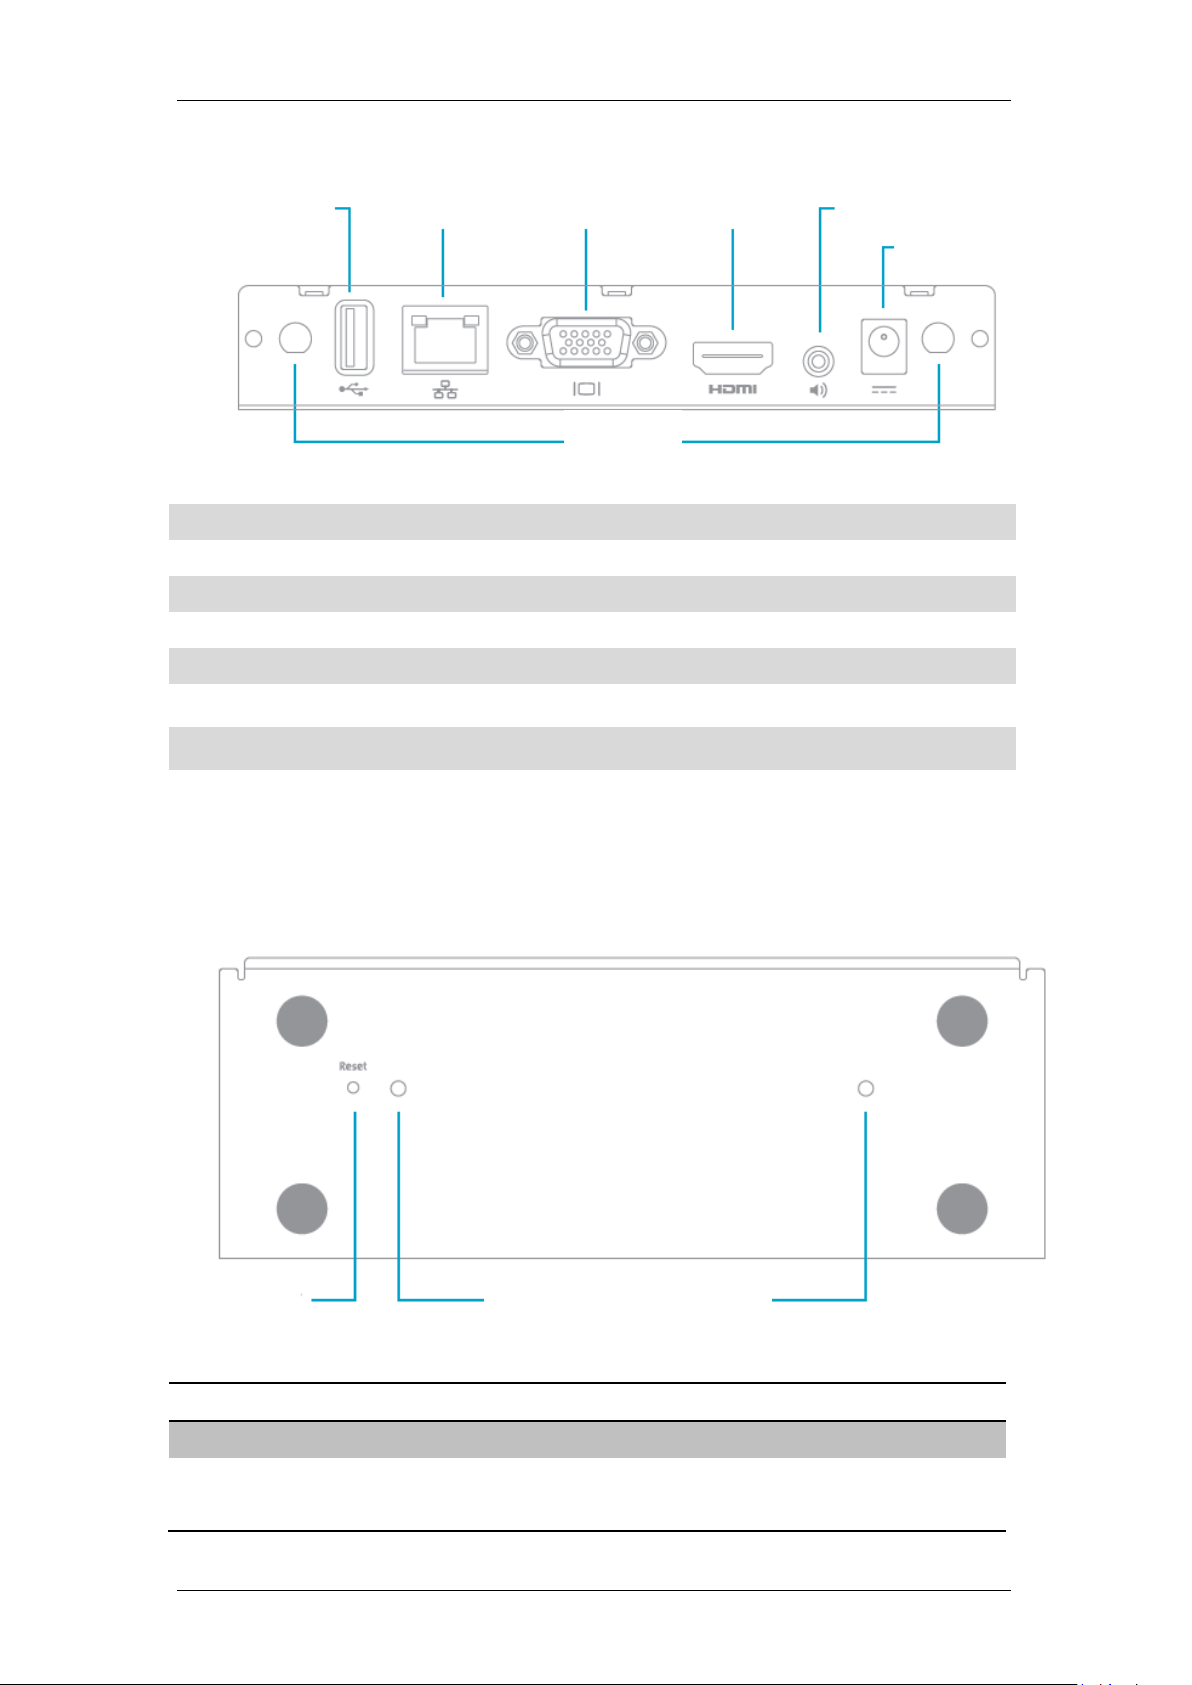
Rear Panel
USB Port
VGA
Antenna
Antenna WiFi Antenna
USB Port (Rear) USB Port for USB IWB Device (HID Type)
RJ-45 10/100M RJ-45 Port
VGA VGA Connector
HDMI HDMI Connector
Audio Jack
Power Jack
Audio Jack (3.5mm)
Power Jack (5V/2.6A)
Power Jack
♦ Each USB port can supply up to 5V/0.5A to the touch device/USB drive.
• Bottom Side
Reset Button
Screw Hole
Description
Screw Hole Screw hole for the wall-mount kit
Reset Button Press the Reset button and the Power button on the
device to execute hardware reset.
- -
Page 4
WGA-510P
4
4. What You Might Need
Projector/Display with VGA/HDMI Interface
Windows or Mac PC/Laptop
Apple iPhone, iPad or iPod Touch
Android Phone or Tablet
Speaker (Optional, for Audio Projection)
USB Mouse and Keyboard (Optional, for Remote Desktop)
USB HID Touch Screen/IWB Device (Optional, for USB over IP)
5. Quick Installation
1) Connect the WGA-510P box to the projector/display through the VGA/HDMI
port and turn on the projector/display power.
2) Connect the power adaptor to the WGA-510P box. The system will be ready
when the LED light turns green.
The default st an db y scr een a s shown below will be display ed when the
system is ready.
3) Insert the speaker cable to the WGA-510P audio jack for audio output
(Optional when using VGA).
- -
Page 5

WGA-510P
5
6. Windows
Do not support Windows Phone, Windows RT.
6.1 Install the application
1) Make sure your PC is WiFi-enabled, and connect your PC to the
WGA-510P box through WiFi. You can find the WiFi network name
(SSID) of your WGA-510P box on the standby screen of the
projector/display. [Default SSID is WGA-510P]
2) Open your browser, and enter the IP ad dr ess of y our WGA-510P box in
the address bar of the browser. You can find the IP address on the
standby screen of the projector/display. [Default IP address is
192.168.100.10]
- -
Page 6

WGA-510P
6
3) Download the software (i.e. “MirrorOp”) for “Windows 7 / 8 / 10”, and
follow the Setup Wizard to insta ll the softwa re. (Y o u can also install the
“MirrorOp” software from t he USB token directly.) Make sure the
software is not block ed by your firewall.
6.2 Start the application
1) Click the Mirror Op icon on the desktop to execute the application,
or launch the MirrorOp application fr om the USB token directly.
2) It will start to search for the WGA-510P device automatically.
- -
Page 7

WGA-510P
7
3) Click on the WGA-510P device and enter the login code shown on the
display.
4) Click the “PLAY” button to start the screen sharing.
- -
Page 8

WGA-510P
8
7. Mac
7.1 Install the application
1) Make sure your Mac is WiFi-enabled, and connect your Mac to the
WGA-510P box through Wi F i .
2) Open your browser, and enter the IP address of your WGA-510P box in
the address bar of the browser. You can find the IP address on the
standby screen of the projector/display. [Default IP address is
192.168.100.10]
3) Download the software for “Mac 10.9~10.11”, and you will see a DMG
file with a MirrorOp i c on .
- -
Page 9

WGA-510P
9
4) Drag the MirrorOp icon into the Applications folder.
7 .2 Start the application
1) Click on the Mirr orOp icon from the Applications fold er to execute the
application.
2) It will start to search for the WGA-510P device automatically.
3) Click on the WGA-510P device and enter the login code shown on the
display.
- -
Page 10

WGA-510P
10
4) Click the “PLAY” button to start the screen sharing.
Safety :
Federal Communications Commission (FC C) Statement
This equipment has been tested and found to comply with the limits for a Cla ss
B digital device, pursuant to part 15 of the FCC rules. T hese limits are desig ned
to provide reasonable protect ion against harmful interference in a residential
installation.
This equipment generates, uses and can ra diate rad io frequency ener gy and, if
not installed and used in accor da nce with the instructions, may cause harmful
interference to radio communications. However, there is no guarantee that
interference will not occur in a particular installation. If this equipment d oes
cause harmful interference to radio or television reception, which can be
determined by turning the equipment off a nd o n, t he user is enco ura ged t o t ry
to correct the interference by one or more of the fo ll owing measures:
-Reorient or relocate the receiving a ntenna.
-Increase the separation between the equi pment and receiver.
- -
Page 11

WGA-510P
11
-Connect the equipment into an o utlet on a circuit different from that to which
the receiver is connect ed.
-Consult the dealer or an experienced radio/TV technician for help.
You are cautioned that changes or modificat ions not expressly app roved by the
part responsible for compliance coul d void the user’s authority to operate the
equipment.
FCC RF Radiation Exposure Statement:
1. This Transmitter must not be co-located or operating in conjunction with any
other antenna or transmitter.
2. This equipment complies with FCC RF radiation exposure limits set for th for
an uncontrolled environment. T his equipment sho uld be insta lled and o perated
with a minimum distance of 20 centimeters between the radiator and your
body.
Operation in the band 5150-5250 MHz is only for indoor use to reduce the
potential for harmful interference to co-channelmobile satell i te systems.
NCC 警語
1) 第十二條:經型式認證合格之低功率射頻電機,非經許可,公司、商號或使用
者均不得擅自變更頻率、加大功率或變更原設計之特性及功能。
2) 第十四條:低功率射頻電機之使用不得影響飛航安全及干擾合法通信;經發現
有干擾現象時,應立即停用,並改善至無干擾時方得繼續使用。 前項合法通信,
指依電信法規定作業之無線電通信。低功率射頻電機須忍受合法通信或工業、科
學及醫療用電波輻射性電機設備之干擾。
- -
 Loading...