


Data Capture for Workforce in Motion
D-Fly - Programming Guid e
©Baracoda TM – December 2009

Data Capture for Workforce in Motion
SUMMARY
SUMMARY................................................................... |
2 |
||
REVISION HISTORY.......................................................... |
4 |
||
INTRODUCTION.............................................................. |
5 |
||
1. |
GENERAL CONFIGURATION ................................................. |
6 |
|
1.1. |
GENERAL DEFAULT SETTINGS ................................................ |
6 |
|
1.2. |
BARACODA ADVANCED FEATURES ............................................... |
7 |
|
1.2.1. |
SWITCH ON DELAY .............................................................. |
7 |
|
1.2.2. |
SHUTDOWN TIMERS .............................................................. |
7 |
|
1.2.3. |
TURN SCANNER OFF ............................................................. |
7 |
|
1.2.4. NO DATA LOSS MODE AND BARACODA HEADER ............................................. |
8 |
||
1.3. |
READING MODE .......................................................... |
8 |
|
1.4. |
OPERATING MODE ....................................................... |
10 |
|
1.4.1. |
REAL TIME MODE .............................................................. |
10 |
|
1.4.2. NO DATA LOSS MODE - ENABLE “ACK” BEEP .......................................... |
10 |
||
1.4.3. NO DATA LOSS MODE - DISABLE “ACK” BEEP.......................................... |
11 |
||
1.4.4. REAL TIME - BUFFERED DATA OPTION................................................ |
11 |
||
1.5. THE DIFFERENT CONNECTION METHODS ......................................... |
11 |
||
1.6. BUZZER AND LED SETTINGS ................................................ |
12 |
||
1.7. |
BLUETOOTH SETTINGS .................................................... |
14 |
|
1.7.1. |
BLUETOOTH NAME .............................................................. |
14 |
|
1.7.2. |
SNIFF PERIOD SETTINGS ......................................................... |
15 |
|
1.7.3. |
SECURITY (CODE PIN) SETTINGS .................................................. |
16 |
|
1.8. |
DATA FORMAT .......................................................... |
17 |
|
1.8.1. |
BARCODE PREFIX/SUFFIX ........................................................ |
17 |
|
1.8.2. |
AIM SYMBOLOGY IDENTIFIER...................................................... |
18 |
|
2. |
DECODER PARAMETERS ................................................... |
19 |
|
2.1. |
DECODER DEFAULT SETTINGS ............................................... |
19 |
|
2.2. |
ENABLE/DISABLE ALL SYMBOLOGIES .......................................... |
19 |
|
2.3. SET DECODER BARCODE LENGTH .............................................. |
19 |
||
2.4. |
VOTING .............................................................. |
20 |
|
2.5. MIN/MAX LENGTH PER SYMBOLOGY ............................................ |
21 |
||
2.5.1. |
SYMBOLOGY TABLE ............................................................. |
22 |
|
2.6. |
CODABAR SETTINGS ...................................................... |
22 |
|
2.6.1. |
ENABLE/DISABLE CODABAR ....................................................... |
22 |
|
2.6.2. |
CODABAR START/STOP CHARACTERS .................................................. |
23 |
|
2.6.3. CODABAR CHECK DIGIT VERIFICATION (AIM RECOMMENDATION) .............................. |
23 |
||
2.6.4. SET LENGTHS FOR CODABAR ....................................................... |
23 |
||
2.7. |
CODE 11 SETTINGS ..................................................... |
24 |
|
2.7.1. |
ENABLE/DISABLE CODE 11 ....................................................... |
24 |
|
2.7.2. CODE 11 CHECK DIGIT(S) VERIFICATION ............................................. |
24 |
||
2.7.3. TRANSMIT CODE 11 CHECK DIGIT(S) ................................................ |
24 |
||
2.7.4. SET LENGTH FOR CODE 11 ....................................................... |
24 |
||
2.8. |
CODE 39 SETTINGS ..................................................... |
25 |
|
2.8.1. |
ENABLE/DISABLE CODE 39 ....................................................... |
25 |
|
2.8.2. ENABLE/DISABLE CODE 39 FULL ASCII ............................................. |
25 |
||
2.8.3. CODE 39 START/STOP CHARACTERS .................................................. |
25 |
||
2.8.4. |
ACCEPTED CODE 39 CHARACTERS ................................................... |
26 |
|
D-Fly – Programming Guide v1.5 |
- 2 - |

|
|
|
Data Capture |
|
|
|
for Workforce |
|
|
|
in Motion |
|
|
||
2.8.5. CODE 39 CHECK DIGIT VERIFICATION ............................................... |
26 |
||
2.8.6. SET LENGTHS FOR CODE 39....................................................... |
26 |
||
2.8.7. |
ITALIAN PHARMACODE SETTINGS .................................................... |
27 |
|
2.9. CODE 93 SETTINGS ..................................................... |
27 |
||
2.9.1. |
ENABLE/DISABLE CODE 93 ....................................................... |
27 |
|
2.9.2. SET LENGTHS FOR CODE 93 ...................................................... |
27 |
||
2.10. |
CODE 128 SETTINGS ................................................... |
28 |
|
2.10.1. ENABLE/DISABLE CODE 128/EAN 128 ............................................. |
28 |
||
2.10.2. SET LENGTHS FOR CODE 128/EAN 128 ............................................. |
28 |
||
2.10.3. EAN 128: GROUP SEPARATOR .................................................... |
29 |
||
2.10.4. ENABLE/DISABLE AIM ID TRANSMISSION ............................................ |
30 |
||
2.11. INTERLEAVED 2 OF 5 SETTINGS ........................................... |
30 |
||
2.11.1. ENABLE/DISABLE INTERLEAVED 2 OF 5 ............................................. |
30 |
||
2.11.2. INTERLEAVED 2OF 5 CHECK DIGIT ................................................. |
30 |
||
2.11.3. SET LENGTHS FOR INTERLEAVED 2 OF 5 ............................................. |
31 |
||
2.12. |
MSI CODE SETTINGS ................................................... |
31 |
|
2.12.1. |
ENABLE/DISABLE MSI ......................................................... |
31 |
|
2.12.2. |
MSI CHECK DIGIT............................................................ |
31 |
|
2.12.3. SET LENGTHS FOR MSI......................................................... |
32 |
||
2.13. STANDARD 2 OF 5 SETTINGS .............................................. |
32 |
||
2.13.1. ENABLE/DISABLE STANDARD 2 OF 5................................................ |
32 |
||
2.13.2. STANDARD 2 OF 5 CHECK DIGIT .................................................. |
32 |
||
2.13.3. SET LENGTHS FOR STANDARD 2 OF 5 ............................................... |
33 |
||
2.14. |
UPC/ EAN SETTINGS................................................... |
33 |
|
2.14.1. |
ENABLE/DISABLE UPC/EAN ..................................................... |
33 |
|
2.14.2. TRANSMIT EAN13 CHECK DIGIT .................................................. |
34 |
||
2.14.3. TRANSMIT UPC-E CHECK DIGIT .................................................. |
34 |
||
2.14.4. TRANSMIT EAN 8 CHECK DIGIT................................................... |
34 |
||
2.14.5. TRANSMIT UPC-A CHECK DIGIT .................................................. |
34 |
||
2.14.6. TRANSMIT UPC NUMBER SYSTEM FOR UPC-E .......................................... |
35 |
||
2.14.7. UPC-A, UPC-E, EAN CONVERSIONS .............................................. |
35 |
||
2.14.8. |
ISSN/ISBN SETTINGS ........................................................ |
36 |
|
2.14.9. |
ADD-ON DIGITS SETTINGS ....................................................... |
36 |
|
2.15. GS1 DATABAR (RSS) 14 SETTINGS ........................................ |
37 |
||
2.15.1. ENABLE/DISABLE GS1 DATABAR 14................................................ |
37 |
||
2.15.2. GS1 DATABAR 14 CHECK DIGIT TRANSMISSION ........................................ |
37 |
||
2.15.3. GS1 DATABAR 14 LINKAGE FLAG TRANSMISSION ....................................... |
37 |
||
2.15.4. GS1 DATABAR 14 APPLICATION ID TRANSMISSION ..................................... |
37 |
||
2.16. GS1 DATABAR (RSS) LIMITED SETTINGS .................................... |
38 |
||
2.16.1. ENABLE/DISABLE GS1 DATABAR LIMITED ............................................ |
38 |
||
2.16.2. GS1 DATABAR LIMITED CHECK DIGIT TRANSMISSION .................................... |
38 |
||
2.16.3. GS1 DATABAR LIMITED LINKAGE FLAG TRANSMISSION.................................... |
38 |
||
2.16.4. GS1 DATABAR LIMITED APPLICATION ID TRANSMISSION.................................. |
38 |
||
3. |
APPENDIX 1: ASCII TABLE (A-Z, A-Z, 0-9, PUNCTUATION, CONTROL |
|
|
CHARACTERS).............................................................. |
39 |
||
4. |
APPENDIX 2 – AIM SYMBOLOGY IDENTIFIERS STRUCTURE ..................... |
44 |
|
D-Fly – Programming Guide v1.5 |
- 3 - |

Data Capture for Workforce in Motion
Revision History
Changes to the original manual are listed below.
Document |
Date |
Description |
1.1 |
13 July 07 |
Initial release |
1.226 Aug. 08 Add “The different connection method” section
1.302 July 09 Modify “Operating Mode” section & Add “buffered data” section.
1.422 Sept 09 Modify “reading mode” section and add No Duplicate scan option
1.525 Nov 09 Add : paragraphs 1.2.3 ‘Turn OFF’ ; add feature Buzzer ON/OFF (par. 1.6) ;
Modify paragraph 1.8 ; add 2.8.7 “Italian Pharmacode settings” ;
Add 2.14.8 “ISSN/ISBN settings” ; Add 2.15 “GS1 Databar 14 settings ;
Add 2.16 “GS1 Databar Limited settings
D-Fly – Programming Guide v1.5 |
- 4 - |

Data Capture for Workforce in Motion
Introduction
The D-Fly barcode scanner can be programmed by scanning barcode labels which contain commands for the 1D decoder.
Programming labels must be Code128, with specific starting and ending characters. These labels will always be read, even if Code128 symbology is disabled.
The scanner will acknowledge a good and valid programming bar code label reading with two beeps and a green enlightening led. It will give two other beeps (lower tone) and a red enlightening led for either an invalid or bad reading.
Please do not read the programming barcodes while being connected to the BaracodaManager software. Programmable options are divided into 2 groups. The first group includes the options that show the general behaviour of the scanner. The second group sets the decoding parameters for each barcode symbology.
All our documentations can be downloaded from the Partners download section of Baracoda website (registration is required):
http://www.baracoda.com
D-Fly – Programming Guide v1.5 |
- 5 - |

Data Capture for Workforce in Motion
1.General Configuration
1.1.General default settings
The reading of the "Reset to factory settings” label turns all the parameters of the scanner back to default settings and switches it off
Reset to factory settings
D-Fly – Programming Guide v1.5 |
- 6 - |

Data Capture for Workforce in Motion
1.2.Baracoda advanced features
1.2.1.Switch on delay
In order to switch on the scanner in its standard mode, you should just press the trigger. You can set up the scanner to be switched on only after keeping the trigger pressed for two (2) seconds by reading the appropriate barcode.
Switch on delay : 2 seconds
Switch on delay : 0 second (*)
1.2.2.Shutdown timers
There are two (2) different ‘shutdown timers’:
-When connected timer: delay between the last scanned barcode and the switch off when the scanner is connected to a host
-Not connected timer: delay between the last scanned barcode and the switch off when the scanner is not connected to any host
It is possible to set those timers to ‘infinite’. In this case, the scanner will stay all the time ON.
Set shutdown timers to infinity
By default, timers value are:
-When connected timer = 20 minutes
- Not connected timer = 10 minutes
Set shutdown timers to defaults
1.2.3.Turn scanner OFF
Supported from version v1.46. To turn off the scanner, read the following barcode:
Turn off scanner
D-Fly – Programming Guide v1.5 |
- 7 - |

Data Capture for Workforce in Motion
1.2.4.No data loss mode and Baracoda Header
Baracoda header:
It is a proprietary data encapsulation. It is necessary to activate it to use the Baracoda keyboard emulation (Kemul) and Terminal.
The Baracoda header is enabled in default settings
No data loss mode:
Baracoda has developed a proprietary communication protocol in order to enhance the security of the Bluetooth transmission.
Every barcode sent to the host must be acknowledged by the host (until then, the scanner will transmit it again and again).
This acknowledgment is disabled in default settings. It is strongly recommended to set this protocol acknowledgment on when using the scanner with the BaracodaManager.
Enable Baracoda header + “No Data loss mode” ON
Enable Baracoda header + “No Data loss mode” OFF (*)
Disable Baracoda header + “No data loss mode” OFF
1.3.Reading Mode
In Trigger mode, pressing the trigger will activate the beam.
Trigger (*)
The Aiming trigger mode has been developed for users who need to scan barcodes very close one to another and they have to be sure to always read the correct one. Once in this mode, in order to read a barcode user will have to press the trigger twice. Pressing it the first time will switch on the beam but will not switch on the decoder (thus allowing user to aim at the correct barcode) while pressing the trigger the second time will activate the decoder thus allowing the scanner to actually decode the barcode.
Aiming Trigger Mode
D-Fly – Programming Guide v1.5 |
- 8 - |
Data Capture for Workforce in Motion
The “No duplicate scan” option has been developed for users who do not want to scan the same barcode twice.
«no duplicate scans » disabled (*)
«no duplicate scans » enabled + error signal
If the same barcode is scanned, an error signal is played (two beeps (lower tone) and a red
enlightening of the led)
«no duplicate scans » enabled + no decoding
If the same barcode is trying to be scanned, it won’t be. The laser beam will still be enlightening.
D-Fly – Programming Guide v1.5 |
- 9 - |

Data Capture for Workforce in Motion
1.4.Operating Mode
Real Time mode
In real time mode, the barcode is decoded and transmitted to the remote host without any delay. If the scanner is not connected, the data is lost.
Real Time mode with No Data Loss option
If the No Data Loss option is activated and if the scanner is not connected or out of Bluetooth range, the scanner will store the data. It can memorise up to 10 000 barcodes (UPC format) and later automatically upload them to the remote host when a Bluetooth connection is established to the host.
Every barcode sent to the host must be acknowledged by the host. If the host fails to send an acknowledgement, the scanner will continue to transmit the barcode until the host does send an acknowledgement.
This acknowledgment is disabled in the default settings. It is strongly recommended to set the No Data Loss mode to ON. This configuration can be set with the BaracodaManager software or with the Programming Guide.
Additionally, this protocol acknowledgment allows an end user to set an audio acknowledgment indicating that the barcode has been successfully transmitted to the host.
1.4.1.Real Time mode
Erases all captured data stored in memory and forces the scanner in Real time mode. No other setting is changed.
Important reminder: if an ACK beep or buffer is needed, the scanner must be set in the “no data loss mode” first.
Enable Real Time with « No Data Loss » mode
Enable Real Time without « No Data
Loss » mode
1.4.2.No Data Loss mode - Enable “ACK” beep
Forces the scanner in Real Time mode (with data acknowledgement); Erases all captured data stored in memory. The scanner should have been previously set in the “No data loss mode” ON (So scan the “Enable Real Time with No Data Loss mode” barcode before).
Enable ACK beep
D-Fly – Programming Guide v1.5 |
- 10 - |

Data Capture for Workforce in Motion
1.4.3.No Data Loss mode - Disable “ACK” beep
Forces the scanner in Real Time mode (without data acknowledgement); Erases all captured data stored in memory. The scanner should have been previously set in the “No data loss mode” ON (So scan the “Enable Real Time with No Data Loss mode” barcode before).
Disable ACK beep
1.4.4.Real Time - Buffered data option
It’s possible to set the scanner in “Real Time with No Data Loss mode” but with no bufferisation (buffer configured to 0) when it’s not connected. In this particular situation the trigger will not activate the beam: so impossible to read barcodes in this mode, and Both LEDs blinks orange.
Max Buf f er ed Bar codes = 0
Max Buf f er ed Bar c odes = MAX
1.5.The different connection methods
There are two (2) different way to create a connection from a Host and a scanner:
-Slave mode (by default)
The Host (PC, BaracodaManager, …) is creating the connection onto the scanner.
-Master mode
The scanner is creating itself a connection to the recorded Host Bluetooth address. This connection attempt is set after a scan of barcode. The configuration of Host address (on which the scanner will set up a connection) can be done:
o Via BaracodaManager software. o Via scan of barcodes.
All usage mode (Real Time, No Data Loss, Batch) are obviously available on those two different ways of connection.
Enabl e mas t er mode Di s abl e mast er mode
\ V T \ V T Z \ N U L \ S OH \ S OH \ F F \ F F |
\ V T \ V T Z \ N U L \ S OH \ N U L \ F F \ F F |
Enabl e mas t er mode and di s connect |
Di sabl e mas t er mode and di s connect |
\ VT \ VT Z \ NUL \ ST X\ SOH\ SOH\ F F \ F F \ VT \ VT Z \ NUL \ ST X\ NUL \ SOH\ F F \ F F
The configuration of the Host Bluetooth address (BDA) is made by scanning the 0-9, a-f, A-F labels (Appendix 1) as on a calculator; following the timestamp format shown above.
D-Fly – Programming Guide v1.5 |
- 11 - |
For example: to set the following BDA: 00:c3:EF:44:a2:B9, the user will scan:
-“Set Remote BDA” label,
-“0” label,
-“0” label,
-“c” label,
-“3” label,
-“E” label,
-“F” label,
-“4” label,
-“4” label,
-“a” label,
-“2” label,
-“B” label,
-“9” label,
-“End of Config” label.
Set Remot e BDA
Data Capture for Workforce in Motion
End of Conf i g
\ V T \ V T ^ \ N U L \ S OH \ E N Q\ L F \ L F |
\ L F \ L F E N D \ F F \ F F |
1.6.Buzzer and Led Settings
You can use these options to enable or disable the buzzer and / or the Led.
LED ON (*)
LED OFF
Good read beep on (*)
Good read beep off
D-Fly – Programming Guide v1.5 |
- 12 - |

Data Capture for Workforce in Motion
ACK beep on (*)
ACK beep off
Beep level volume = HIGH (*)
Beep level Volume = LOW
BUZZER ON (*)
BUZZER OFF
D-Fly – Programming Guide v1.5 |
- 13 - |
Data Capture for Workforce in Motion
1.7.Bluetooth settings
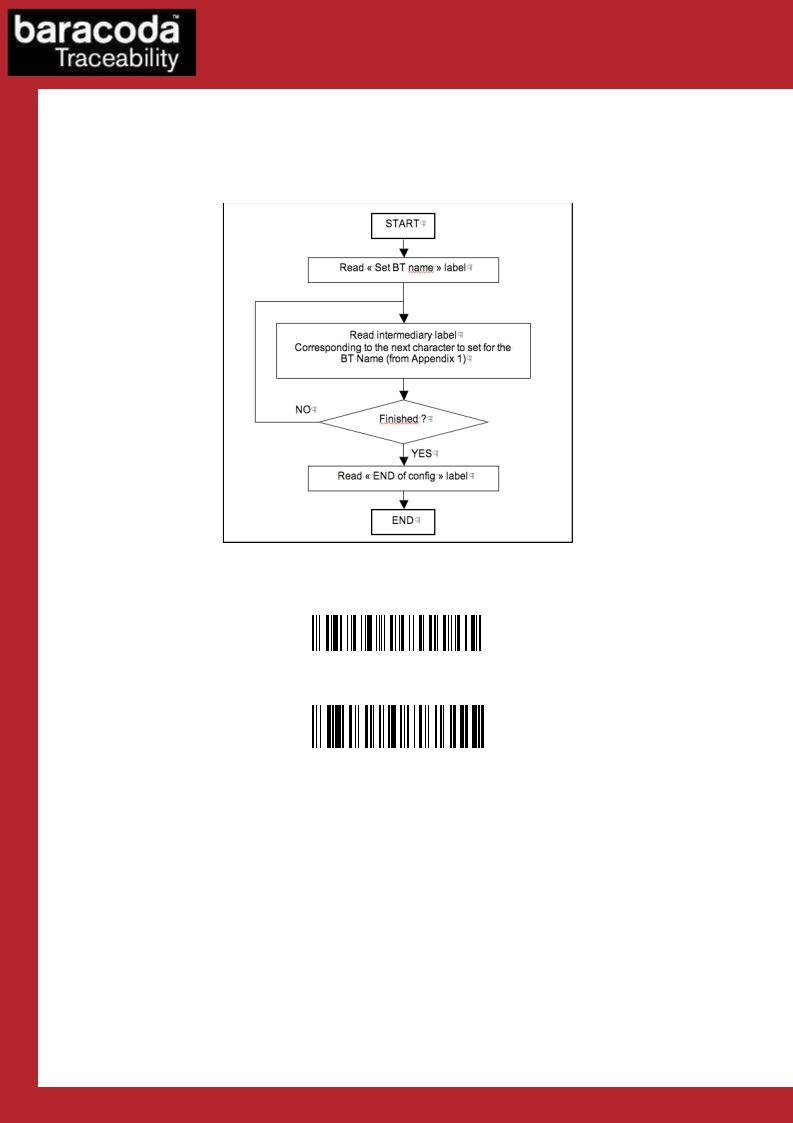
1.7.1.Bluetooth name
You can change the scanner Bluetooth name; name that you see during a search of Bluetooth peripheral.
Programming procedure for “Set Bluetooth Name”
Set BT Name
End of config
D-Fly – Programming Guide v1.5 |
- 14 - |
 Loading...