


DM-1701

To users:
Thank you for your favor with our products.
We are dedicated to providing high performance and high stability radio communication products. This two-way
radio is no exception. The radio is a DMR dual-slot digital walkie-talkie developed and produced by my team with
3000 memory channels, full-color LCD display and full keyboard hand-tuning function. In order to make you fully
understand the various advantages of the radio performance and use and maintenance methods, please read
this manual carefully.
Main Features
Broadband walkie talkie
Support UV double segment, frequency range UHF400.000-480.000MHz / VHF136.000-174.000MHz
DMO True2-Slot dual time slot
Direct mode dual-slot communication achieves two groups of calls at a frequency point at the same time, so
that the communication efficiency is doubled and frequency resources are saved
Digital and analog compatible, smooth over
Support DMR digital and analog two communication modes to ensure that the original analog products
smooth transition to digital products to meet different communication needs
Digital signaling function
Rich calling modes that support DMR protocol, including single call, group call and all call; supports remote
inhibit function and other applications
SMS function
Supports SMS, text editing and draft in 64 characters in Chinese and English, so that text messages calls can
be sent when voice call is inconvenient
High sound quality
This digital two-way radio uses advanced AMBE +2TM voice processing technology to achieve high quality
Manual writing-frequency
Supports channel / frequency mode, allows manual writing-frequency in frequency mode, and
writing-frequency software can be used to set the required frequency without connecting the computer
High/low power switch
Meets the power requirements of different call distances to save more energy

Alarm function
Supports general alarm and silent alarm in emergency situations
Digital mode supports the use of relays
Side buttons can be customized without changing the user’s operating habits
Contents
1. Familiar with this machine------ 4
Key introduction----- 4
Programmable key -------5
2. Safety and Overview------4
Handheld walkie-talkies product safety and radio frequency radiation 4
3. Preparation before use------- 4
Charging -----4
Attachment Installation -------5
Status indication --------4
4. Basic Operations Making and Receiving Calls ---------5
Turn on the walkie talkie --------4
Volume adjustment --------5
Area Selection-------- 5
Select walkie talkie channel, user ID, call group ID --------6
Receive and reply group call --------6
Receive and reply single call----------6
Receive all call --------------7
Start a walkie - talkie call-------------8
Use the channel knob to place a call ------------8
Initiate group call --------------8
Start a single call --------------9
Initiate all call ---------------------9
Use one-touch call button to initiate group call or single call --------------10

5. Emergency alarm function -------------------10
Receive emergency alert ----------------11
Reply to emergency alert -------------------------------12
Send emergency alert ---------------------------12
Send emergency alert with call ------------------------13
Send an emergency alert with voice following-------------- 14
Restart emergency mode --------------15
Exit emergency mode
6. Menu Function Operation -------------------15
Menu navigation --------------------------15
Character input------------------------------ 15
English alphabet pattern: ----------------------16
Pinyin input mode: ------------------------17
Digital Input Mode: --------------------------17
How to use the menu--------------18
walkie talkie detection ------------------18
Send walkie-talkie detection ------------------18
Remote monitoring --------------------19
Start remote monitoring---------------19
Address book settings --------------------------20
Initiated by the address book group call ------------------21
Initiated by address book -----------------------21
Call record function ----------------------22
Check out the latest call number-------------22
Missed call screen ----------------23
Stores the alias or ID in the missed call list --------------------23
Delete the call in the call list -----------------------24
Call prompt operation ----------------------------24
Receive and confirm call alert --------------------------24
Initiate a call from the communication list----------------25

SMS function--------------25
Edit and send SMS ------------------25
Send pre-sent text messages-----------------26
Send SMS using the one-touch call button --------------------27
Manage sending failed messages ---------------27
Manage sent SMS -----------------29
Receive SMS ----------------------31
View SMS ----------------------32
Manage Received SMS --------------------32
Check your inbox SMS -----------------------33
Reply to inbox message -------------------------33
Delete messages in your inbox--------------34
Delete all messages in your inbox--------------34
Encryption ----------------------35
Basic encryption --------------------35
Dual tone multi frequency (DTMF) ----------------------36
Confidentiality ----------------------36
Walkie talkie remote kill -----------------------36
Walkie talkie activated --------------------37
Scan list --------------------37
View the members in the scan list ------------------38
Scanning instructions and methods ------------------------38
Start and stop scanning -------------------------------39
Press preprogrammed on / off key or enter scan menu function ---------------39
Scan reply--------------------- 39
7. Set --------40
Walkie talkie settings --------------------40
Offline --------------41
Walkie talkie Tone / Hint ------------41
Mute all -------------------42

Turn on or off keyboard sound ----------------42
Set power level ----------------43
Control the screen backlight -------------------43
Set noise reduction level --------------44
Open or close the boot screen ----------------------45
Lock the key and unlock the key -----------------------45
Language Selection -----------------46
Turn LED on or off----------------46
Turn VOX function on or off ---------------47
Power on password ----------------48
Clock -----------------48
Time -----------------49
Date -------------------49
Mode ---------------------50
Access general walkie talkie information-----------------------50
Check walkie talkie ID --------------------51
Walkie Talkie version --------------------51
walkie talkie configuration ---------------51
Reception frequency --------------------52
Launch frequency -----------------52
Channel name --------------53
Time-out timer -------------54
CTCSS --------------54
CTCSS code ------54
CTCSS decoding -------55
Color code ---------------56
Relay station slot ---------------------56
1. Familiar with this Product
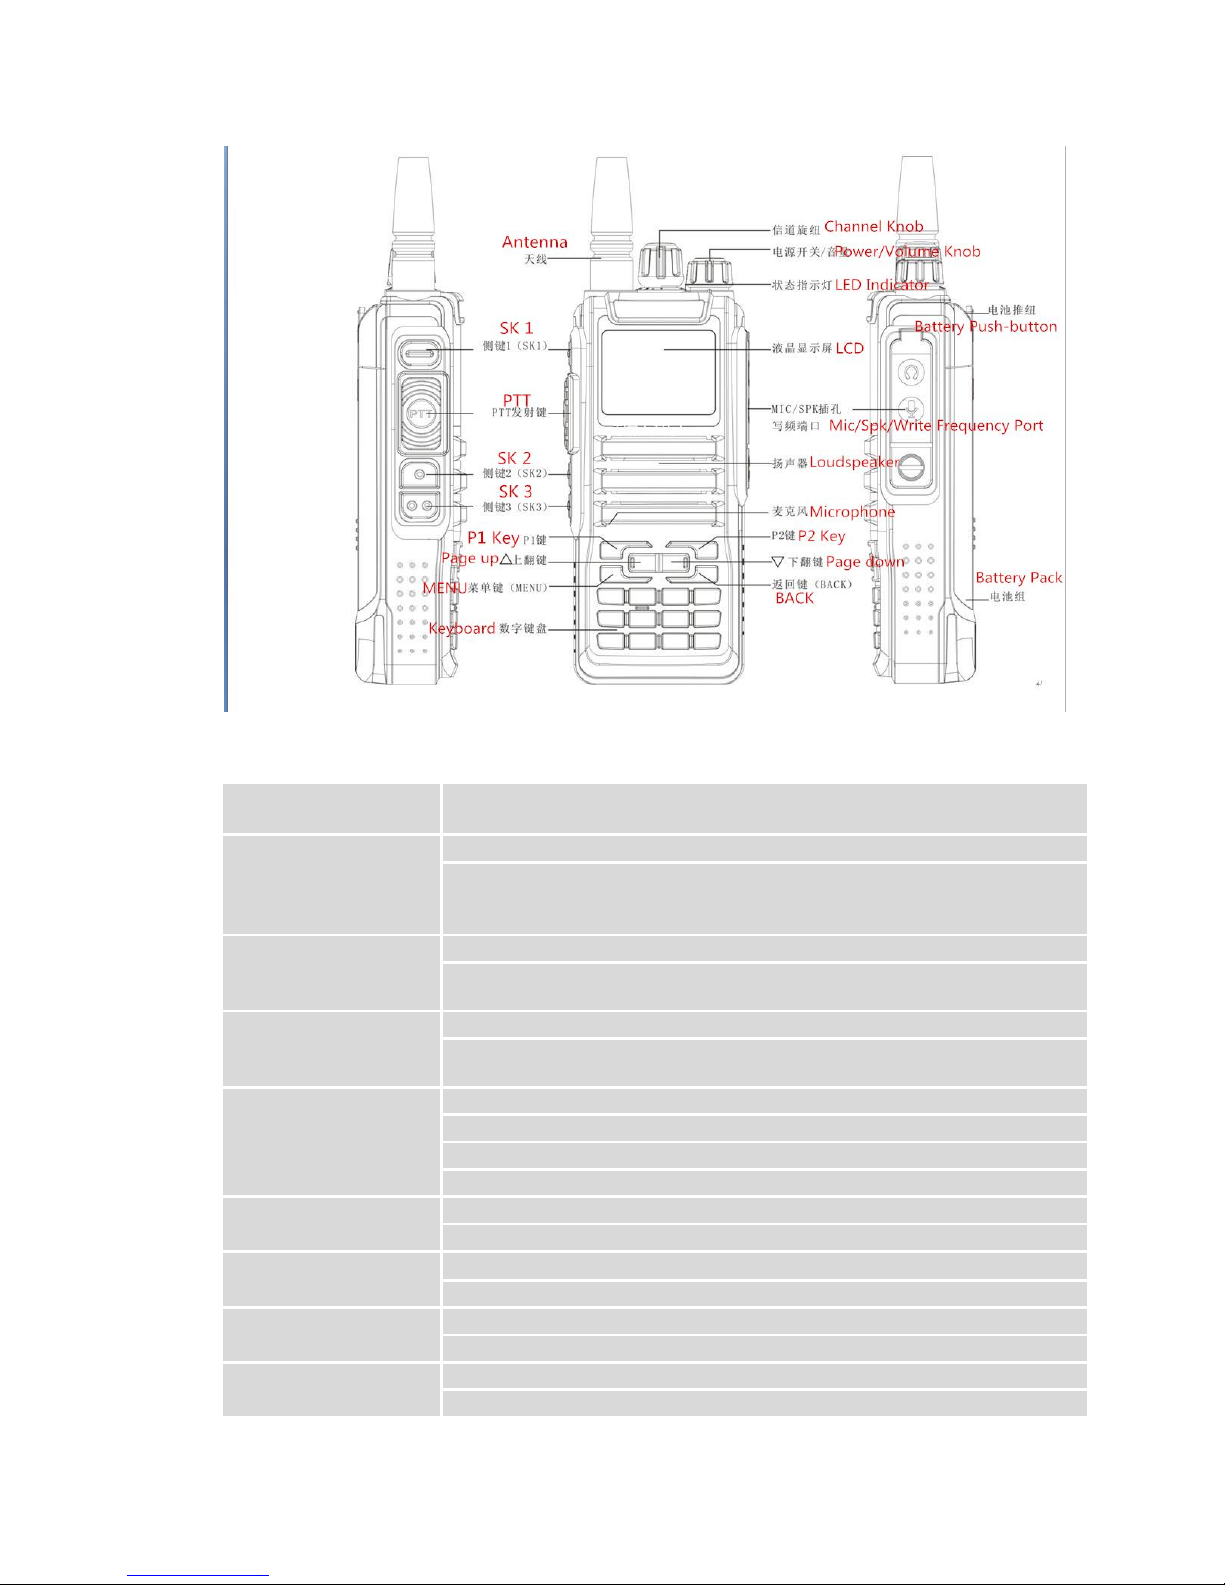
■ Description of Buttons
[PTT]Transmit button
Switch between transmission and reception; when transmitting, press this button and speak to the
microphone; release the button to receive.
Side button 1
* Defaults to Up and down screen
switch
Short press this button to quickly switch the upper and lower screen.
Press and hold it to enter the alarm mode, press and hold it again or press briefly to exit the alarm mode. If
the current channel is digital and no alarm system is configured, the alarm function can’t be started.
Side button 2
* The default is to select the
channel up
Short press shortcut select channel up.
Press and hold it to turn on the monitor function (only support analog channels).
Side button 3
* The default is to select the
channel down
Short press shortcut select channel down.
Long press for the power switch, select the high and low power.
0-9 number buttons
Default: 0~9
[0~9] code words in DTMF function
Select punctuation marks or letters in Pinyin input method.
If numeric shortcut function is set, you can press and hold this button to jump to the corresponding contact.
[MENU] button
Press it to activate the menu mode, enter the menu and press this button to select menu items.
Press and hold it to enter the radio settings.
[]button
Move up; change the scanning direction in scanning state.
Move left in SMS editing interface.
[]button
Move down; change the scanning direction in scanning state.
Move right in SMS editing interface.
[Exit]/[Clear] button
Clear the entered information in input state.
Press and hold this button to switch channel mode or frequency mode.

[*]button
Press and hold this button to lock on / off keyboard
Code word * in DTMF function
[#]button
Switch the input method in input method interface.
Code word # in DTMF function
■ Programmable Buttons
In order to improve the operational convenience, the function shortcut keys provided by this product are 【SK1】 key, 【SK2】 key,
【SK3】 key, 【P1】 key and 【P2】 key. For the specific function, please consult the distributor. For the detailed description of each
function, please refer to the corresponding contents of "Function and Operation".
No.
Shortcut name
Purpose
1
None
No function is assigned to the preset button.
2
All prompt tone
on/off
Quickly enable or disable all prompt tones at the same time.
3
Emergency mode
on
Quickly establish an emergency call. This is the recommended option for the orange button.
4
Emergency mode
off
Quickly end an emergency call initiated outward.
5
Select high/low
power
Quickly switch between high power and low power.
6
Monitor
Quickly turn on or off the monitor function.
7
Push to talk 1
Quickly make digital group calls, digital single call, call prompts, or send text messages (only for digital mode) via
push to talk. (This option is only available if the digital function is enabled on t he device.) Push-to-talk 1 to
push-to-talk 6 can be set.
8
Relay / offline
Quickly switch between relay mode and offline mode.
9
Scan on / off
Quickly turn the scan function on or off. Note: double-segment double-waiting scan does not work
10
Strict/normal
squelch
Quickly switch between strict squelch and normal squelch (only for analog mode).
11
Encryption on/off
Quickly turn on/off encryption for channel (only for digital mode).
12
Voice control on/off
Quickly turn on or off the voice control function.
13
Area switching
Quickly select the area, allowing the user to switch between two areas.
14
Battery power
indication
Quickly access to battery power. The user can check the battery status by LED. The battery power is sufficient if
the LED is constantly in green, the battery power is still available if the LED is constantly in yellow, and the battery
power is low if the LED is in red.
15
Individual
operation switch
Quickly turn on or off individual operation function.
16
Recording switch
(Based on firmware) to quickly turn on/off the recording
17
Record playback
(Based on firmware) to quickly playback of recordings
18
Delete all the
recordings
(Based on firmware) to quickly delete all recordings
19
1750Hz
Fast launch 1750 pilot signal
20
Up and down
screen switch
Quickly switch the upper and lower screen
21
Left key 22
Right key
Note:
●The same button short press and long press can achieve different functions, specific by the dealer settings.
2. Security and overview

RF radiation information
This product is intended for professional applications that meet RF radiation requirements. Users must be aware
of the hazards of RF radiation and take appropriate measures to meet the requirements of RF radiation limit.
Common sense in RF radiation
RF refers to the electromagnetic frequency that can be radiated into space. It is a technology widely used in the
fields of communication, medical treatment and food processing. It will produce some RF radiation during use.
Control and operating instructions of RF radiation
In order to maximize the performance of the product and to ensure compliance with the radiation limits in the
relevant occupational or controlled environment of the above criteria, the sending time shall not exceed 50% of
the rated factor and shall follow the instructions below:
• RF radiation is generated only during transmission (speech) rather than reception (listening) and standby.
• The distance between the terminal and the body during transmission should be at least 2.5 cm.
3. Preparation before use
Charging
Be sure to ensure that the product is off when charging. Battery into the charger may be charging red
flashing constantly flashing, this is the battery power is too low, the charger to protect the battery pre-charge
process, is a normal phenomenon, Generally continue for 30 seconds to turn the red light of the normal state of
charge.
Please use the charging seat specified by our company to charge the battery, the charging seat indicator shows
the charging status.
1. Plug the power adapter into a power outlet;
2. Plug the other end of the power adapter into the socket on the back of the charging cradle;
3. Insert the battery or the battery-equipped product into the charging cradle correctly; the indicator light on the
charging cradle shows the charging status. When the indicator light is red, it indicates the start of charging. When
the indicator turns green, the charging is completed. The specific table below.
Indicator display
Current charge status
Red light flashes
Battery power is too low

Red light
In charging
Green light
The charging is completed
Note:
For best battery performance, charge for a minimum of 4 hours on first charge.
■Battery information
●The first use of the battery
Since the battery is not fully charged at the factory, please charge the new battery before use. Under normal
circumstances, the battery when used for the first time, need to charge 4 hours, lithium-ion battery charging
using slow charge or fast charge can be performed when charging. It is recommended that the new battery be
operated as above for the first three uses. When you find the battery power is low, you need to charge the
battery.
●Suitable battery type
Please use the specified battery for charging; use of other batteries may cause explosion, resulting in human
injury.
●Battery safety attention
1. Do not allow metal contacts (including coins, keys, jewelry, or other conductive metal) to be touched by the
battery contacts or pole pieces. Otherwise, the battery may short circuit, discharge, heat or leak, which may
result in damage to the item or personal injury. Therefore, be careful when handling any battery.
2. Do not short-circuit the battery terminals or discard the battery in a fire. Do not disassemble the battery
pack. When the battery is discarded, please put into a dedicated battery recycling box.
●Battery normal operation instructions
★Please charge the battery indoors, battery charging at room temperature best.
★Under normal circumstances, the charger indicator from red to green when the battery is fully charged, at this
time the battery can be removed.
★You can charge when Battery installed in the walkie-talkie, but when charging is best to turn off the walkie
talkie, to ensure that the battery is fully charged.

★Please do not charge the battery when the battery power is not used up (after the battery is exhausted, the
voice prompt alarm will be given), which will shorten the service life of the battery.
★Do not put a fully charged battery back on the charger to "power up" again, as this operation significantly
reduces the cycle life of the battery.
●Extend battery life
★Battery performance will reduce below -20 ℃ temperature conditions. Prepare back-up batteries for use in
colder weather. Please do not throw away cold batteries that cannot work. These batteries may be used at
room temperature.
★Dusting the battery contacts may affect the battery life. Please wipe the contacts with a clean, dry cloth before
inserting the batteries into the walkie-talkie.
●Battery storage needs to know
1.Since the battery will have a self-discharge phenomenon, the battery when not in use for a long time, please
fully charge the battery and then stored to avoid over-discharge of its battery to damage the battery.
2. When the battery is in storage, remove the battery to recharge when stored about 6 months. To avoid
over-discharge of electrolyte affect battery capacity.
3. Pay attention to the temperature and humidity of the battery storage environment. Store the battery at room
temperature in a cool, dry place to minimize self-discharge of the battery.
■Battery Voltage & Power Indication
If the dealer has set the 【battery power prompt】 shortcut key for the product, you can press and hold the
shortcut key to check the remaining battery power by LED indicator, tone and battery icon. Release the shortcut
to cancel viewing the remaining battery power. The top right of the screen shows the current battery power icon
is as follows:
Battery icon
Battery power
High Medium
Low
Insufficient

■ Accessories installation
1. Install / remove the antenna
Turn off the radio and insert the antenna into the mounting hole and turn clockwise. (Figure 1-1)
When removing the antenna, turn it counterclockwise to remove the antenna. (Figure 1-2)
Do not shake the top of the antenna by hand, otherwise it will reduce the working performance and service
life of the antenna.
2. Install / remove the battery
●Install the battery
Align the battery with the battery holder on the back of the walkie-talkie. Push the battery firmly into the
walkie-talkie and slide the battery up until it locks into place. (Figure 2-1)
●Remove the battery
To remove the battery, turn off the transceiver. Slide the battery latch into the unlocked position and hold,
and then slide the battery downward and out of the battery mount.(Figure 2-2)
3. Install / remove the belt clip
●Unscrew the two screws on the battery. Align the two screw holes in the belt clip with the screw holes in the
top of the battery, and then tighten the screws (Figure 3)
●Loosen and remove the screw from the belt clip (it is recommended that you screw the screw to the battery for
the next time you are installing and using the belt clip).
4. Install external headphones / microphone (optional separately)
Open the headset cover, the headset plug into the headset hole will be ok. When you do not need to use the
headset, unplug the headset plug from the earphone jack and cover the earphone cap. When not using the
universal interface, please cover the dust cover. (Figure 4)
■ Status indication
★Description of LCD Icons
Icon name
Icon
Description of product status
Signal strength
icon
The more signal bars, the stronger the signal is
Transmission
power icon
The current channel transmits at high power
M
The current channel transmits at middle power
The current channel transmits at low power
Speaker icon
Speaker is enabled, and reception is effective
Relay mode icon
The current transmission frequency is the reception frequency plus a frequency bias
(positive bias)
The current transmission frequency is the reception frequency minus a frequency bias
(negative bias)
Currently in offline state
Scan icon
The scan is on and is in normal mode
Battery power
icon
The more bars, the more battery power
Pointer icon
Currently pointing to the main digital mode; press A/B button to switch the main channel
up and down. When double-waiting is turned on and works in digital sub-channel, the
icon is

Currently pointing to the main analog mode; press A/B button to switch the main channel
up and down. When double-waiting is turned on and works in analog sub-channel, the
icon is
★LED Indicators
This product has LED indicators so you can easily grasp the current operating state.
Indicator status
Product status
Red on
Transmitting
Green on
Receiving
Green flash
Scanning
4. Basic operation
■ Power on and off
To turn on the power, turn the [Power Switch / Volume Control] knob clockwise until you hear a "click" sound
and a short beep sounds. To turn off the radio, turn the knob counterclockwise until you hear a click. (English
version supports channel number broadcast)
If you disable the tone function of this product (setting path: "Menu -> Settings -> Walkie talkie Settings ->
Tones / Tips -> All Tones -> off"), there will be no boot tone.
If all LED's are disabled, the transmit / receive light does not come on during turning on. A short beep sounds to
indicate successful boot detection. (Setting path: "Menu-> Settings-> Walkie talkie Settings-> LED-> off"), the LED
will not light up.
■ Volume adjustment
Turn on the power, turn the [Power Switch / Volume Control] knob clockwise to increase the volume of voice
reception, and turn counterclockwise to reduce the volume of voice reception. When adjusting the volume, the
product LCD displays the corresponding length of the volume bar.
■ Transmit and receive
★Selecting Region
Region is a channel group in which you can include channels with the same attributes (such as call type, digital
mode and analog mode) in a region, which makes it easy for you to manage existing channels. The unit supports
up to 250 regions, and each region contains up to 64 channels. You can select a region in two ways:
Select from the menu: “MENU-->Region-->Region list”, press []/ [] to select the desired region, and
then press [MENU] to switch to the selected region.
Select through the programming button: If the dealer has set the [Regional switch] shortcut, you can press
the shortcut to switch to the desired region.
★Add Region
If necessary, you can add a new region and set the path: "Menu-> Area-> New Area", press 【MENU】 key, input
the region name in the new region, edit region name, then press 【MENU】 key Save the new area.
★Digital and analog channel switch
Each channel in this product can be configured by the dealer as either an analog channel or a digital channel. If
the current region contains digital channels and analog channels, you can switch channels to analog channels or
digital channels.

★VFO frequency mode frequency setting
In frequency mode, long press 【BACK】 key on the standby interface, V on the right side of the screen means
that it is in manual input frequency mode. You can manually input the frequency and specify a certain frequency
to transmit.
• Select via menu
Set the path: "Menu-> Settings-> Walkie talkie Settings-> Mode-> Frequency Mode" and then press the [MENU]
key to set the frequency mode.
• Frequency selecting
In addition to press 【】or 【】 key, you can also choose to directly enter the frequency. If the required
operating frequency is far away from the current frequency, you can use the keyboard to enter the frequency
directly. Press the numeric keys ([0] to [9]) to enter the desired frequency (MHZ for the first three digits of the
decimal point and KHZ for the fifth digit after the decimal point).
Write frequency software configuration path: open the write software -> Edit -> VFO mode -> VFO A ->
digital / analog data -> channel mode -> select "number."
• Or set VFO B to Analog. Normally set VFO A to digital mode and VFO B to analog mode.
★Single / dual band mode switch
When the radio is standby, press 【】/【】 key to switch the primary and secondary channels.
1. The black pointer points to the primary channel and is the digital channel; the other channel is the
secondary channel.
• If the black pointer points to the primary channel and indicates that the channel is an analog channel;
the other channel is the secondary channel.
2. Press 【BACK】 to switch to dual band single standby or dual band dual standby
-channel is displayed , it indicates that the product is working in the mode of “dual
band single standby ", and the sub-channel does not receive the signal at this time.
Note: The ARTS Auxiliary function does not work because the dual keep mode is in the primary and secondary
channel scanning status, DTMF, auto-scan and work alone.
★Select channel, user ID, group call ID
After power on, if you have more than one region in the radio, select the desired region and turn the Channel
knob to select the desired channel, user alias or ID, or the group alias or ID.
★Receive and reply group calls
To receive a call from a user group, the transceiver must be configured to belong to the talk group.
When receiving a group call:
1. LED indicator light is green.
2. The top line of the screen displays status icons such as RSSI. In the display area below the top line: The first line
shows the group alias for the talk group, the middle shows the caller ID, and the bottom shows the group call icon
(digital only).
3. Hold the walkie talkie in its upright position and at a distance of 1 to 2 inches (2.5 to 5.0 cm) from the mouth
4. Press 【PTT】 key to reply the call, LED indicator light is red.
5. Release the [PTT] key to answer.
6. If there is no voice activity for the scheduled time period, the call is terminated.
If the walkie talkie receives a group call and is not at home at this time, it remains on the current screen

until the call is answered. Press 【BACK】 to enter the main screen and view the caller's alias before reply.
★Receive and reply single call
A single call is an individual walkie-talkie call to another individual walkie-talkie. There are two types of single
call types: the first type, the walkie talkie presence test is performed before the call is ready, and the other type is
ready for the call immediately.
When receiving a single call:
1. LED indicator light is green.
2. The top line of the screen shows the status icons such as RSSI. In the display area below the top line, the first
line shows a single call with the user's alias or ID in the middle and the one-way icon at the bottom (digital mode
only).
3. Hold the walkie talkie in a vertical position and keep it 1 to 2 inches (2.5 to 5.0 cm) from the mouth. If the
"Channel Idle Tone" feature is enabled, when the transceiver intercepts the PTT key, you will hear a short beep
indicating that the channel is free for you to answer.
4. Press 【PTT】 key to reply the call, LED indicator light is red.
5. Release the [PTT] key to answer.
6. If there is no voice activity for the scheduled time period, the call is terminated.
7. You will hear a short tone, the screen shows the call ended.
★Receive all call
All call is an individual walkie-talkie call to all walkie-talkies on the channel. It is used to publish important
notices that require special attention from users.
When receiving all call:
1. LED indicator light is green.
2. The top line of the screen shows the status icons such as RSSI. In the display area below the top line: The first
line shows the All call, the middle shows the user's alias or ID, the bottom shows the all call icon (digital mode
only)
3. After the termination of all calls, the walkie-talkie will return to the screen before receiving the call. If "channel
idle tone" is enabled, you will hear a short tone when the walkie talkie releases the [PTT] key, indicating that the
channel is ready for use and you cannot reply to all calls.
When you receive an all call, if you switch to another channel, the transceiver stops receiving the full call.
During a full call, you will not be able to use any of the preprogrammed keys until the call is ended.
★Start a walkie-talkie call
You can choose a channel, user ID or talk group in the following ways:
Channel knob
• Pre-programmed one-touch call button
• Address book list
• Manual Dialing (Via Contacts) - This method is suitable for single calling only and dialing using the keypad
★Use the channel knob to place a call
•Initiate group call
To initiate a call to a user group, the transceiver must be configured to belong to the talk group.
1. Rotate the channel knob to select the channel using the active talk group alias or ID.

2. Hold the walkie talkie in its upright position and keep it at a distance of 1 to 2 inches (2.5 to 5.0 cm) from the
mouth.
3. Press 【PTT】 key to initiate a call, LED indicator light is red. The screen displays the talk group alias or ID, as
well as the group call icon.
4. Release the [PTT] key to answer. When the target radio replies, the LED indicator will light green. The group call
icon, call group alias or ID, and walkie talkie alias or ID is displayed on the screen.
5. If the Channel Idle Tone feature is enabled, when the target radio releases the PTT button, you will hear a short
beep indicating that the channel is free for you to answer. Press the PTT key to answer, or if there is no voice
activity for a predetermined period of time, the call is terminated.
6. The walkie talkie returns to the screen before receiving the call. You can also initiate a group call from your
address book.
•Start a single call
1. Rotate the channel knob to select the channel using the active user alias or ID.
2. Hold the walkie talkie in its upright position and keep it at a distance of 1 to 2 inches (2.5 to 5.0 cm) from the
mouth.
3. Press 【PTT】 key to initiate a call, LED indicator light is red. The top line of the screen shows status icons such
as RSSI. In the display area below the top line, the first line shows a single call, the middle shows a user alias or ID,
and the bottom shows a one-way icon (digital mode only).
4. Release the [PTT] key to answer. When the target radio replies, the LED indicator will light green.
5. If the "Channel Idle Tone" feature is enabled, when the target radio releases the [PTT] key, you will hear a short
beep indicating that the channel is free for you to answer. Press the PTT key to answer, or if there is no voice
activity for a predetermined period of time, the call is terminated.
6. You will hear a short tone, the screen shows the call ended.
You can also initiate a one-touch address book or make quick contact access via the keyboard entry to find
the desired walkie talkie.
•Initiate all call
This feature lets you signal all users on the channel. The walkie-talkie must be programmed to allow you to use
this feature.
1. Rotate the channel knob to select the channel using the active full call group alias or ID.
2. Hold the walkie talkie in its upright position and keep it at a distance of 1 to 2 inches (2.5 to 5.0 cm) from the
mouth.
3. Press 【PTT】 key to initiate a call, LED indicator light is red. The screen displays the all-call group alias or ID, as
well as the all-call icon.
Channel users cannot reply to all calls.
★Use the one-touch call button to initiate a group call or a single call
One-touch calling features make it easy to group calls or single calls to predefined aliases or IDs. This function
can be assigned to short programming or long programming keys.
You can assign only one alias or ID to a one-touch call key, and the walkie talkie can have multiple programmed
one-touch call keys.
 Loading...