


TABLE OF CONTENTS
Important Safety Messages and Electrical Safeguards……………………3-4
Introduction………………………………………………………………….5
Specifications………………………………………………………………..5
Initial Setup……………………………………………………………….6-8
ØUnpacking……………………………………………………………6
ØComponents………………………………………………………….6
∙Motor Switch……...……………………………………………...6
∙Reverse Switch………...…………………………………………6
∙Heater Switch……………...……………………………………..8
∙Heat Indicator Light……………………………………………...8
Loading Laminating Film onto Mandrels…………………………….....8-9 Threading Laminating Film…………………………………………....9-12 Adjusting Mandrel/Film Tension……………………………………..12-13 Setting Heat Shoe Temperature………………………………………13-14 Laminating…………………………………………………………....14-15 Troubleshooting………………………………………………………15-16 Maintenance…………………………………………………………......17
ØCleaning the Heat Shoes and Laminator Rollers……………........17
ØRemoving Wrap-arounds…………………………………..….….18
Warranty………………………………………………………………...18
Return Policy…………………………………………………………....18
Parts List and Illustrations…………………………………………..19-20
IMPORTANT SAFETY MESSAGES AND
ELECTRICAL SAFEGUARDS
For your protection, do not connect the laminator to electrical power or attempt to operate it until you have read these instructions completely. Keep these instructions in a convenient location for future reference. This instruction manual and labels affixed to the laminator are important safety messages. Read these messages carefully.
For Your Safety
ØSave these Operating Instructions for later use.
ØKeep hands, long hair, clothing, and other loose articles, such as jewelry and ties, away from laminator’s moving parts.
ØDo not touch the heat shoes while the laminator power is turned on. Allow shoes to cool completely before touching.
ØDo not use the laminator for other than its intended purpose.
ØPlace the laminator on a stable cart, stand, or table. A laminator placed on an unstable surface may fall, causing serious bodily injury or damage to the unit.
ØMove the laminator with caution. Quick stops, excessive force, or uneven floor surfaces may cause the laminator and cart to overturn.
ØDo not insert items or objects other than recommended laminating material. Do not store liquids or flammable material near laminator that may spill or cause electrical shock or fire damage.
ØThe laminator should be operated only from the type of power source indicated in these Operating Instructions and on the data plate located on the rear panel of the laminator.
ØThe three-pronged grounding plug is a safety feature and will fit only into a grounding-type power outlet. If you are unable to insert the
3
plug into an outlet, contact a qualified electrician to have a suitable outlet installed.
ØDo not leave the laminator power on overnight. Unplug the laminator at the end of the day.
ØUnplug the laminator before moving it or when it is not in use for an extended period of time as a precaution against the possibility of an internal malfunction that could create a fire hazard.
Do not operate the laminator with a damaged power supply cord or plug, or after it malfunctions or has been damaged in any manner.
ØKeep the power cord away from hot or wet surfaces.
ØDo not overload electrical outlets beyond their capacity, as this can result in fire or electrical shock. This unit is rated at 15 amps and should be the only item plugged into a 20 amp branch circuit.
ØAdjust only those controls that are specified in these Operating Instructions.
ØDo not attempt to service or repair the laminator yourself. Unplug the laminator from the electrical outlet and contact an authorized service representative under any of the following conditions:
∙When the power supply cord or plug is damaged or frayed.
∙If liquid has been spilled into the laminator or it has been exposed to water.
∙If the laminator has been subjected to excessive jarring through being dropped or bumped.
∙If the laminator does not operate normally when following the operating instructions.
∙KEEP THE LAMINATOR OUT OF REACH OF CHILDREN.
4
INTRODUCTION
Congratulations on your purchase of the Easy-Lam II Roll Laminator. This unit is designed to provide years of trouble-free service.
The Easy-Lam II will accept rolls of laminating film up to 27” wide in both 1.5 and 3 mil thicknesses. Paper and card stock up to 1/16” (1.6mm) thick may be laminated without adjusting the feed rollers.
The Easy-Lam II will accept 5 mil film if the machine was purchased with the 5 mil switch only!
Your Easy-Lam II is preset at the factory for most applications, so any adjustments should be minor. A thermometer provides continual indication of the heat shoe temperature, which may be adjusted as needed.
SPECIFICATIONS
Plastic Width |
Up to 27” (68.6cm) |
Plastic Thickness |
1.5 mil and 3 mil (37 and 75 micron). |
|
5 mil (125 micron) with 5 mil option switch |
|
only. |
Maximum Roll Length |
1.5 mil – 1,000 feet (304.8 meters) |
|
3 mil – 500 feet (152.4 meters) |
|
5 mil – 250 feet (76.2 meters) |
Speed |
5 feet per minute (1.64m/minute) |
Net Weight |
91 lbs (41 kg) |
Power Requirements |
120VAC, 60Hz, 1840 watts (UL), |
|
220VAC available |
5

INITIAL SETUP
Unpacking
Before unpacking the unit, inspect the shipping container for signs of damage. Notify the carrier and your dealer immediately if any damage is noted.
CAUTION! The laminator weighs approximately 91 lbs. Use two people when removing the laminator from the shipping container.
NOTE! We recommend saving the packaging in case you have to return the unit.
Components
Figure 1 shows the location of the major components and controls of the Easy-Lam II. You should become familiar with these before operating the laminator.
Motor Switch
This switch provides power to the motor. If the switch is pressed to the “on” position, the rollers move the plastic film and laminating material through the unit.
Reverse Switch
This toggle switch is found on the back of the machine. When this switch is pressed to the “REV” (upper) position, and the motor switch is on, the rollers move in the reverse direction. This is useful for clearing film from the rollers.
6
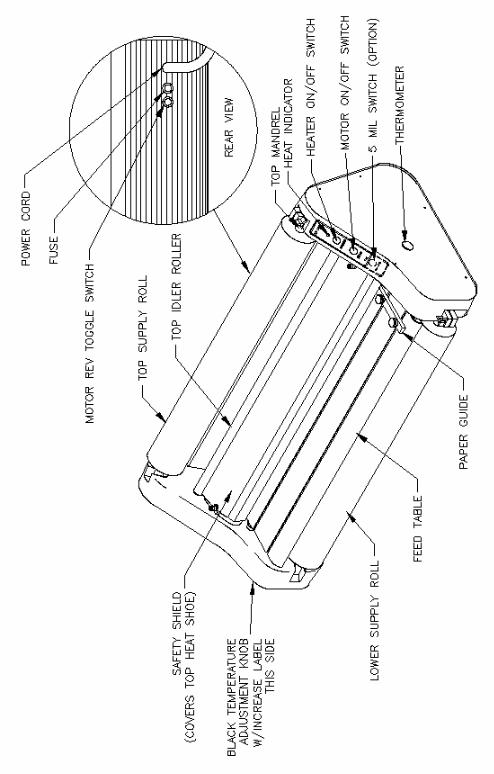
Figure 1
7

Heater Switch
This switch turns power on and off to the top and bottom heat shoe. (Switch will light up in the “on” position).
Heat Indicator Light
This light goes on when the heat switch is first turned on and then remains on until the heat shoe reaches the operating temperature. After that point, the light will go on and off periodically as the thermostat cycles.
Loading Laminating Film onto Mandrels
Slide film with a one-inch core onto the mandrel as in Figure 2. Note that one mandrel is labeled TOP and the other BOTT (for bottom). They are not interchangeable.
ØWhen sliding roll of film onto mandrel, you must push the core gripper to the flat position. When core gripper is inside the core, the core gripper spring will cause the core gripper to grab the film so the tension adjustment knob will tighten the tension on the film.
ØMake sure film is aligned from left to right on top and bottom mandrels when loading film. See Figure 2a.
Figure 2
8
 Loading...