


Triko

User's guide
Version 1.1 septembre 2015

2
Before starting
PLEASE READ CAREFULLY ALL INSTRUCTIONS BEFORE USING THIS APPLIANCE. KEEP THIS
INSTRUCTION SHEET FOR FURTHER REFERENCE. THE SAFETY INSTRUCTIONS MENTIONED IN
THIS USER'S GUIDE CAN'T COVER ALL POSSIBLE CONDITIONS AND SITUATIONS. USERS SHOULD
BE VERY CAREFUL WHEN USING THIS APPLIANCE.
The above symbols warn the users of potential danger in case of misuse of electrical appliances. The
thunderbolt in a triangle symbol shows that there is danger of electrocution. The exclamati o n point symb ol
shows that there are usage and safety measures which must be observed.
Do not open the appliance under any circumstances. Do not try to repair or to make any modifications
(except when your users ' guide gives you specifi c instruct io ns to do so). Contact the manufacturer or your
nearest reseller for all repairs or alterations.
When disposing of the appliance, contact a collection and recycling centre for
electronic appliances.
INSTALLATION
THIS APPLIANCE MUST BE EARTHED.
Do not remove the protection offered by the polarised o r ea r thed connectors.
A polarised plug has a pin larger than the other. An earthed plug has a receptacle for an equipotential
connection. If the connector provided does not match your wall plug, have one installed by a qualified
electrician.
Use only the power cord provided which should not be used with any other device.
Take good care of the power cord. Do not let it become twisted, do not walk on it and do not put other
things on it. A damaged cord could cause electrocution or a fire!
Before using the appli ance ov erseas, check with your resell er, an approved repair centre or the
manufacturer for compatibility with the local standards.
Do not use or store the appliance in very hot (in direct sunlight, near heating devices) or humid conditions
(bathrooms, floodable cellars etc.). Do not expose the appliance to rain, dust or strong vibrat ions.
Take care to always put the appliance on a flat and stable surface. Do not ever install it in unstable
positions. Do not ever install the appliance on feet, supports or racks other than those indicated by the
manufacturer. If using in a rack, avoid rocking it while moving it. Do not obstruct the ventilation holes.
Do not let any foreign objects (flammables, paper clips, pins etc.) or liquids (water, soda, alcohol, cleaning
products) get inside the appliance.

3
If there is a risk of thunderstorms or if not using the product for a longer period of time, unplug the
appliance from the wall.
This appliance, used alone, with an amplifier or with earphones, can produce sound levels which could
provoke terminal loss of hearing. Never use it at high levels for long periods of time or in any circumstance
where the listening could become uncomfortable. In case of loss of hearing, consult a specialist
immediately.
Only use the accessories advised by the manufacturer.
IMPORTANT
Unplug immediately the appliance and contact your reseller, an authorised repair centre or the
manufacturer in the following situations :
• The power cable or its plug have been damaged.
• Smoke or unusual odours come out of the appliance.
• Foreign objects or liquids have accidentally come in contact with the appl iance.
• The appliance has been expos e d to rain or excessive humidity.
• The appliance seems to not function properly or its performance is diminished.
The manufacturer legal warranty does not cover the costs of repairs or replacement in case of
improper or incorrect use. These costs are not covered by the manufacturer warranty and
therefore will be supported by the owner of the appliance.

4
Summary
Introduction ................................................................................................................................... 5
Synopsis ......................................................................................................................................... 6
Front .............................................................................................................................................. 7
Back ............................................................................................................................................... 8
Connections ................................................................................................................................... 9
Keyboards and Instruments Premixer .......................................................................................................................... 9
Send / Return / Console group ..................................................................................................................................... 9
Using The Triko ............................................................................................................................ 10
Programs loading ........................................................................................................................................................ 10
Programs editing ......................................................................................................................................................... 10
Programs recording .................................................................................................................................................... 11
Volume and balance controls ..................................................................................................................................... 11
Setting Input Level ...................................................................................................................................................... 12
System Menu .............................................................................................................................................................. 12
Bypass function ........................................................................................................................................................... 12
Sections ....................................................................................................................................... 13
Load ............................................................................................................................................................................. 13
Save ............................................................................................................................................................................. 13
Input ............................................................................................................................................................................ 13
Master ......................................................................................................................................................................... 13
Chorus 1, 2 and 3 ........................................................................................................................................................ 14
Card ............................................................................................................................................................................. 15
System ......................................................................................................................................................................... 17
Optional card ............................................................................................................................... 18
Inserting a optional card ............................................................................................................................................. 18
The FV-1 card .............................................................................................................................................................. 18
MIDI interface .............................................................................................................................. 19
Using the MIDI interface ............................................................................................................................................. 19
MIDI specifications ...................................................................................................................................................... 20
Legal declaration ......................................................................................................................... 22

5
Introduction
Thank you for choosing The Triko. We hope that you will be entirely satisfied with your choice.
We all imagine ethereal, stratospherical, totally unique strings sounds or warm and swirling notes of a
simple guitar. All have something in common, the use of a chorus, often multiple (bi or tri). The Triko
allows you to rediscover the magic of these enveloping sounds while also offering you the chance to
discover yet unknown landscapes.
The basic principle is relatively simple. The original signal is practically delayed by a few milliseconds and
then modulated by a slow signal. To create this effect, The Triko uses BBD (Bucket-Brigad e Device):
imagine that you are water porters, the first receives a water quantity which they pour in the second
bucket, then the same happens between the second and the third and so on.
The water is recovered in the l ast bucket, less the drops that have been lost in the process. It is far from
perfect, noisier than the best digital solutions, it needs input and output filters, but it so unds good ;)
By varying the delay, the amplitude of the modulation (amp), the modulation speed (rate), the original
signal dosage (dry) and the delayed signal dosage (FX), slow tonal and amplitude modulations are
obtained. The Triko combine s three separate or synchronised chorus giving you the bes t effe ct. The
optional FV-1 card, highly recommended, offers varied reverberations and echoes to finish sculpti ng your
sound.
Do not hesitate to contact us on the www.baloran.com
forum with your opinions and suggestions.

6
Synopsis
1 Inputs 1 to 8 TS 6.35
2 Volume and Balance controls for Inputs 1 to 8
3 L and R Input Summing.
4 Chorus Input Summing
5 Overmodulation LFO Added with each Chorus LFO
6 Individual LFOs for each Chorus
7 Chorus Output Volume and Balance controls
8 Chorus 2 Re-injection Switch (Flanger)
9 Summing Output L and R Adders
10 L and R Level Settings for Master FX (Chorus)
11 L and R Level Settings for Master Dry (Direct Signal)
12 L and R Summing of Master
13 Connector optional card
14 Output Signal Balun (Line Driver)
15 TRS 6.35 and XLR L and R Outputs
7
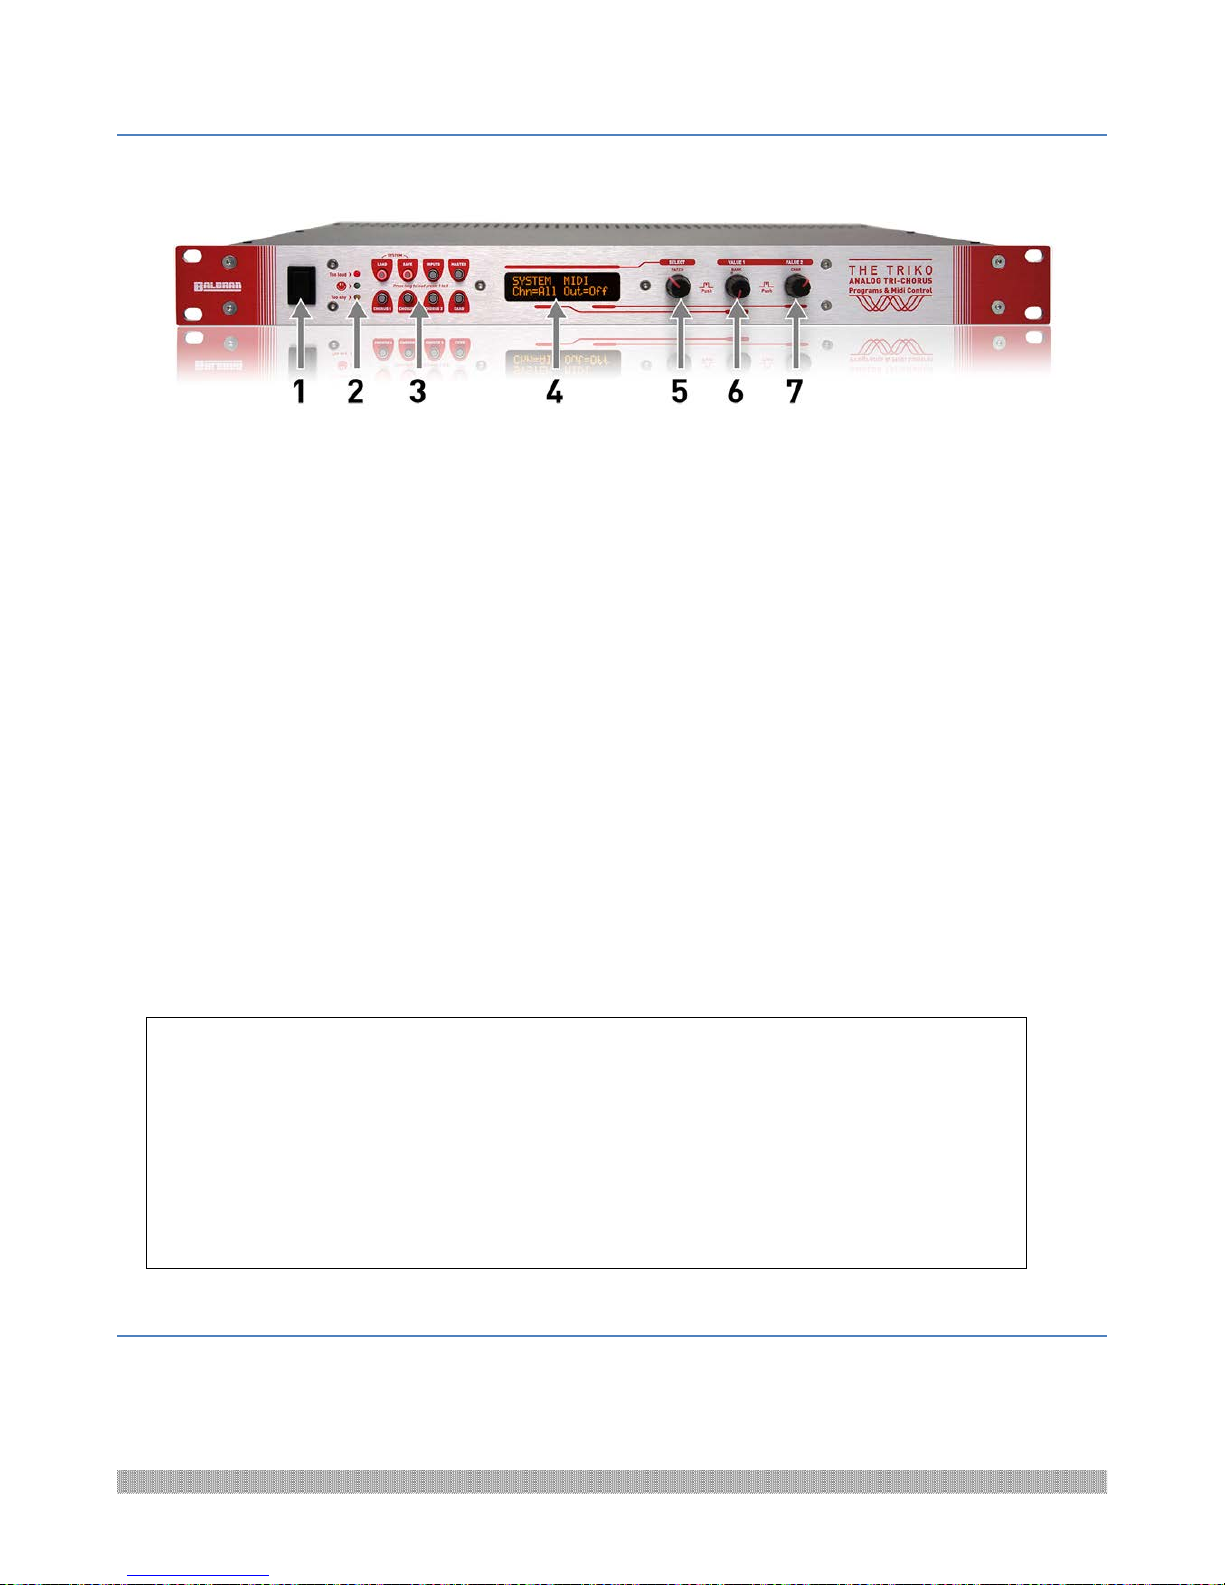
Front
1 ON/OFF switch. In the OFF position, power consumption is zero.
2 Indicators of the intensity of input signal. The measured signal is the inputs mix injected to the
three Chorus.
3 8 lit push buttons for accessing the settings.
4 2x16 LCD screen
5 SELECT encoder and push button
6 VALUE1 encoder and push button
7 VALUE2 encoder and push button
At both ends of the front are standard 19inch rack attachment holes.
 Loading...