

Baldor VS1GV Installation And Operational Manual
VS1GV
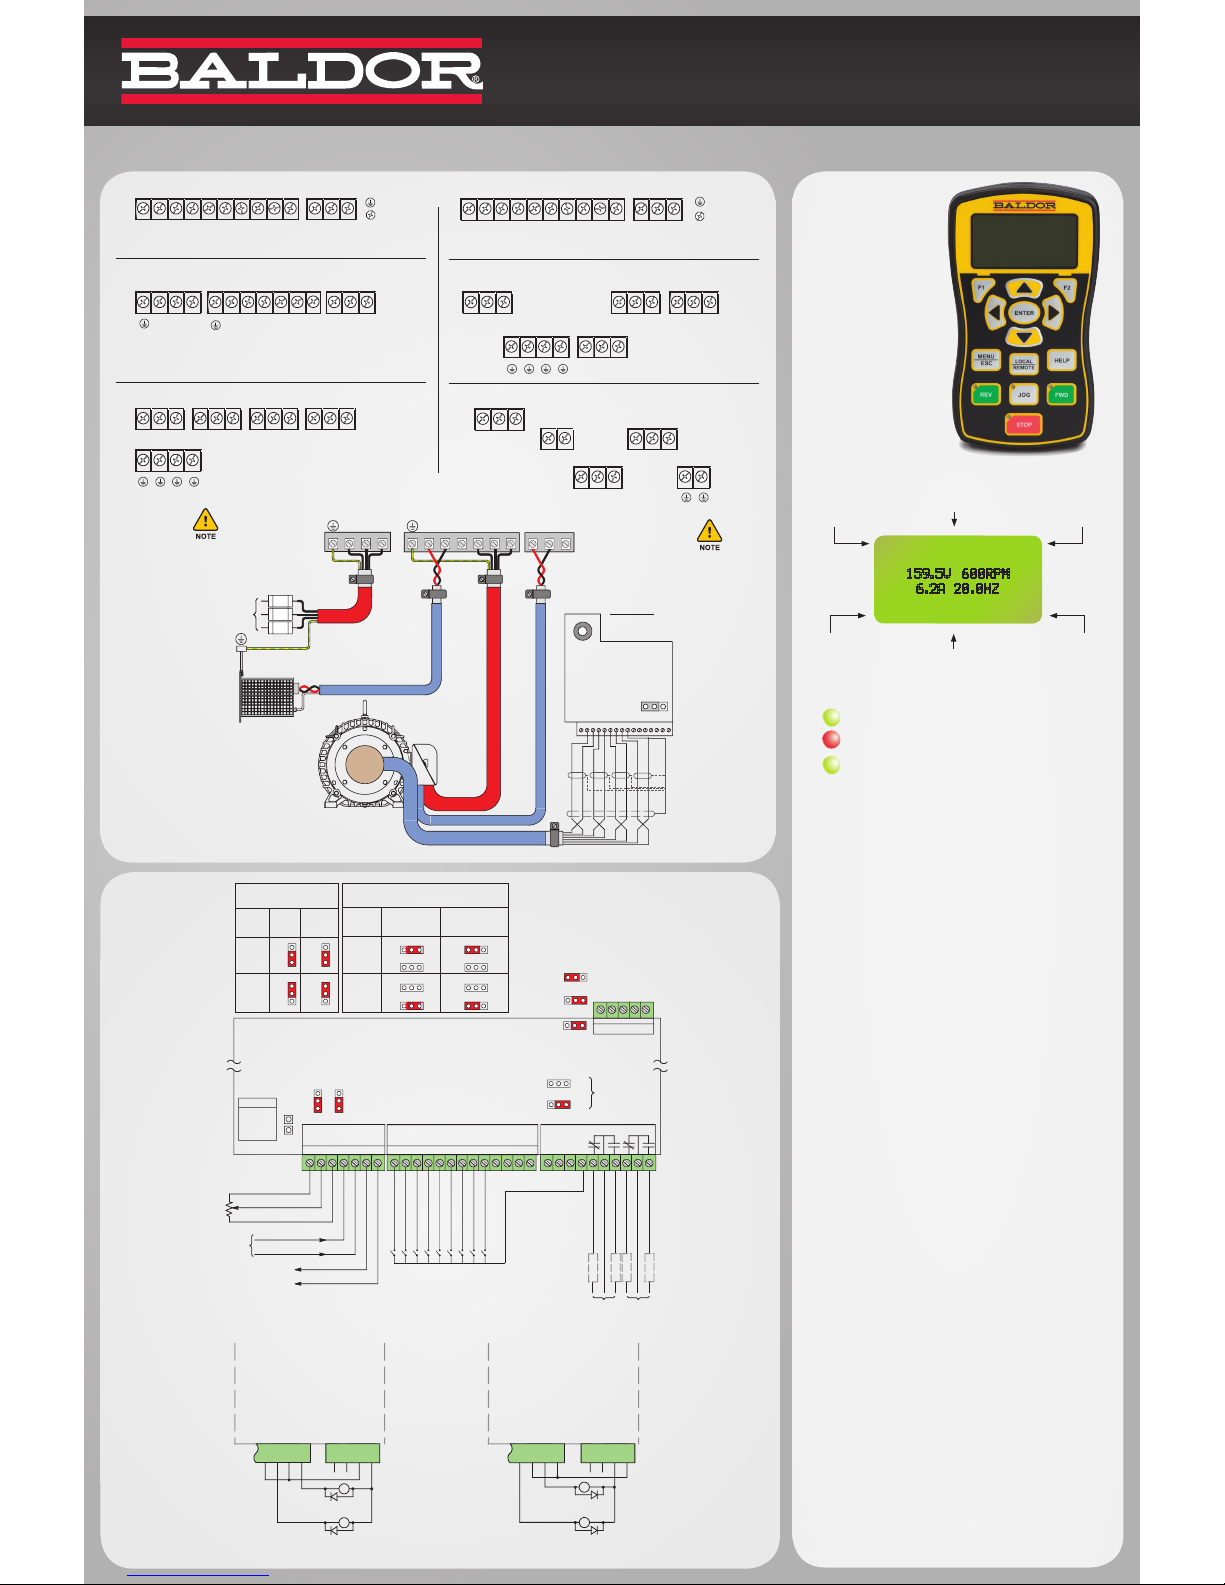
Analog I/O
Jumper Settings
Control Circuit Board
Relay outputs
Type
Function
Internal
supply
Active
high
JP6
JP1
J1 J2 J3
P3
JP3
JP3
JP2
ENP
ENP
EPN
EPN
EPN
EPN
EPN
DFT
DFT
DFT
DFT
DFT
INP
INP
INP
INP
INP
ENP
ENP
ENP
JP6
120 ohm
termination
No
termination
JP5
JP5
JP5
JP5
JP5
JP6 JP6
JP6
Factory
settings as
shown
Note:
Relay outputs are
rated at 10-30 VDC or
240 VAC @ 5 A resistive
(non-inductive).
Digital input connections
shown when using factory
default jumper settings
1
1
1
1 2 3 4 5 6
7 8 9 10 11 12 13 14 15 16 17 18 19 20 21 22
Load
Load
Load
P1503 P1504
Load
Relay Out 1 N.C.
Enable
0-10 VDC
Dig. Input 1
Analog GND
Analog input 1
Pot. reference
Analog input +2
Analog output 1*
Analog output 2*
*Referenced to J1-1
Analog input -2
P1408
P1510, P1511, P1512
P1513, P1514, P1515
Dig. Input 2
Dig. Input 3
Dig. Input 4
Dig. Input 5
Dig. Input 6
Dig. Input 7
Dig. Input 8
Relay Out 1 COM
Relay Out 2 COM
Relay Out 1 N.O.
Relay Out 2 N.O.
Relay Out 1 N.C.
232425 26 27 28 29 30
P1
Fault
USB
USB port
1
1
1
1
RS485
S G A B S
1
1
Active
low
External
supply
ANAIN2
JP1
ANAOUT1
JP2
Voltage
Current
Communications
Termination jumper
Digital Outputs
Control Board
Control Board
Sourcing Current Connections
Sinking Current Connections
Note: Digital outputs are rated at 24 VDC @ 60 mA resistive (non-inductive).
J2
J2
P1501
Out 1
P1501
Out 1
P1502
Out 2
P1502
Out 2
J3
J3
Digital output 1+ (Collector)
Digital output 1+ (Collector)
Digital output 2+ (Collector)
Digital output 2+ (Collector)
Digital output 1- (Emitter)
Digital output 1- (Emitter)
Digital output 2- (Emitter)
Digital output 2- (Emitter)
External User Return
External User Return
External User +24 V
External User +24 V
Internal +24 V
Internal +24 V
Internal 24 V Return
Internal 24 V Return
171718181919202021212222232324
24
L1 L2 L3
Fuses
TH1 TH2 GND
R1/B+
R2 B- T1 T2 T3
AC Input power
PE
Encoder
Encoder Board
Chassis
GND
J1
1
1
16
J1 plns
1-2 5 VDC
2-3 12 VDC
Star
Point
Optional regen
resistor
(Dynamic Brake)
Note: Optional equipment such as
input/output reactors/filters are not
shown. See instruction manual MN765
Note: See instruction manual MN765
for important information regarding AC
power wiring and fusing.
Note: See
instruction
manual MN765
for important
information
regarding motor
power wiring and
output reactors.
Thermostat,
encoder and control
leads must be in
separate conduits.
J1 jumper setting
for encoder output
power
GRY
SHIELD
A+A-B+B–C+
C-
VIO
YEL
ORN
BLU
GRN
WHT
BLK
V+
V-
Frame Size AA 1-Phase Input Drives
Frame Size AA 3-Phase Input Drives
Frame Size E Drives
Frame Size F Drives
Frame Size B and C Drives
Frame Size D Drives
L1 L2 N GND
R1/B+
R2 B- T1 T2 T3 TH1 TH2 GND L1 L2 L3 GND
R1/B+
R2 B- T1 T2 T3 TH1 TH2 GND
L1 L2 L3
B+/R1
R2 B- T1 T2 T3 TH1 TH2 GND L1 L2 L3
L1 L2 L3
R1 R2
T1 T2 T3
T1 T2 T3
R+/R1 R2 B-
L1 L 2 L3 B+/R1 R 2 B - TH1 TH2 GND T1 T2 T3
Motor
Chassis
Ground
Motor
Chassis
Ground
TH1 TH2 GND
TH1 TH2 GND
See instruction
manual MN765
AC Input
Dynamic Brake
Motor Power
Thermostat
Keypad Components
The keypad is used to
program the control
parameters, to operate
the motor and to monitor
the status and outputs of
the control by accessing
the display options, the
diagnostic menus and the
fault log. Additionally, drive
parameters can be stored
in the keypad for future
retrieval.
Display Features
Speed Reference
Defines action of F2 keyDefines action of F1 key
Local RemotePresent Menu Selection
Stop – Forward – Reverse
Indicator Lights:
(On when indicated Key is active)
FWD & REV: Green light indicator.
STOP: Red light indicator
JOG: Jog Speed Selected Green light indicator
Display Diagnostics –
I/O Status
I/O Function configuration
Modified Parameters
Control Operation Data
Custom Units
Fault Display – 10 Faults with Time Stamp
F2 – Clears faults or undo parameter edit changes or function
indicated by text displayed directly above key.
Up Arrow Left Arrow
Down Arrow Right Arrow
Moves cursor to select menu choices.
LOCAL/REMOTE – Switches between local and remote
modes.
HELP – Provides help at each display screen, setup parameter
and fault. Press to view/close help information.
JOG – Initiates Jog mode. Press FWD or REV for motion. Only
in local mode.
FWD –
When pressed, initiates a forward direction run command.
Indicator Lights – (on indicated key)
STOP key with red light indicator.
FWD key with green light indicator.
REV key with green light indicator.
JOG key with green light indicator.
Keypad Display – Displays status Information during Local or
Remote operation. It also displays information during parameter
setup and fault or Diagnostic information.
F1 – Alternates or "toggles" between the last two menu choices
or function indicated by text displayed directly above key.
ENTER – Press ENTER to save parameter value changes. In
the display mode the ENTER key is used to directly set the local
speed reference. It is also used to select other operations when
prompted by the keypad display.
MENU/ESC – Selects the menu display when viewing status.
The following menu items are shown: Status, Basic Params,
Advanced Prog, Event Log, Diagnostics and Display Options.
Backs up one level for other screens.
REV – When pressed, initiates a reverse direction run com-
mand.
STOP – Initates a stop command. Note: Pressing the stop key
twice in succession will immediately disable the top drive placing the motor in a coast stop condition.
STATUS FWD LOCAL
159.5V 600RPM
6.2A 20.0HZ
DIAG 600R MAIN
Digital Input Jumper Settings
Please consult the VS1GV Installation and Operation Manual, MN765, before operating the drive.
Also, please read the precautionary and warning statements in the Safety Notice, Paragraph 1.2, in MN765.
STATUS
BASIC PARAMS
ADVANCED PROG
EVENT LOG
DIAGNOSTICS
STATUS BACK
STATUS
BASIC PARAMS
ADVANCED PROG
EVENT LOG
DIAGNOSTICS
STATUS BACK
STATUS
BASIC PARAMS
ADVANCED PROG
EVENT LOG
DIAGNOSTICS
STATUS BACK
STATUS
BASIC PARAMS
ADVANCED PROG
EVENT LOG
DIAGNOSTICS
STATUS BACK
STATUS
BASIC PARAMS
ADVANCED PROG
EVENT LOG
DIAGNOSTICS
STATUS BACK
STATUS
BASIC PARAMS
ADVANCED PROG
EVENT LOG
DIAGNOSTICS
STATUS BACK
LEVEL 1 BLOCKS
LEVEL 2 BLOCKS
LEVEL 3 BLOCKS
MODIFIED PARAMS
LINEAR LIST
STATUS BACK
LEVEL 1 BLOCKS
LEVEL 2 BLOCKS
LEVEL 3 BLOCKS
MODIFIED PARAMS
LINEAR LIST
STATUS BACK
LEVEL 1 BLOCKS
LEVEL 2 BLOCKS
LEVEL 3 BLOCKS
MODIFIED PARAMS
LINEAR LIST
STATUS BACK
BASIC PARAMS BASIC PARAMS
BASIC PARAMS
LEVEL 2 BLOCKS
LEVEL 2 BLOCKS
LEVEL 2 BLOCKS
ADVANCED PROG
ADVANCED PROG
ADVANCED PROG
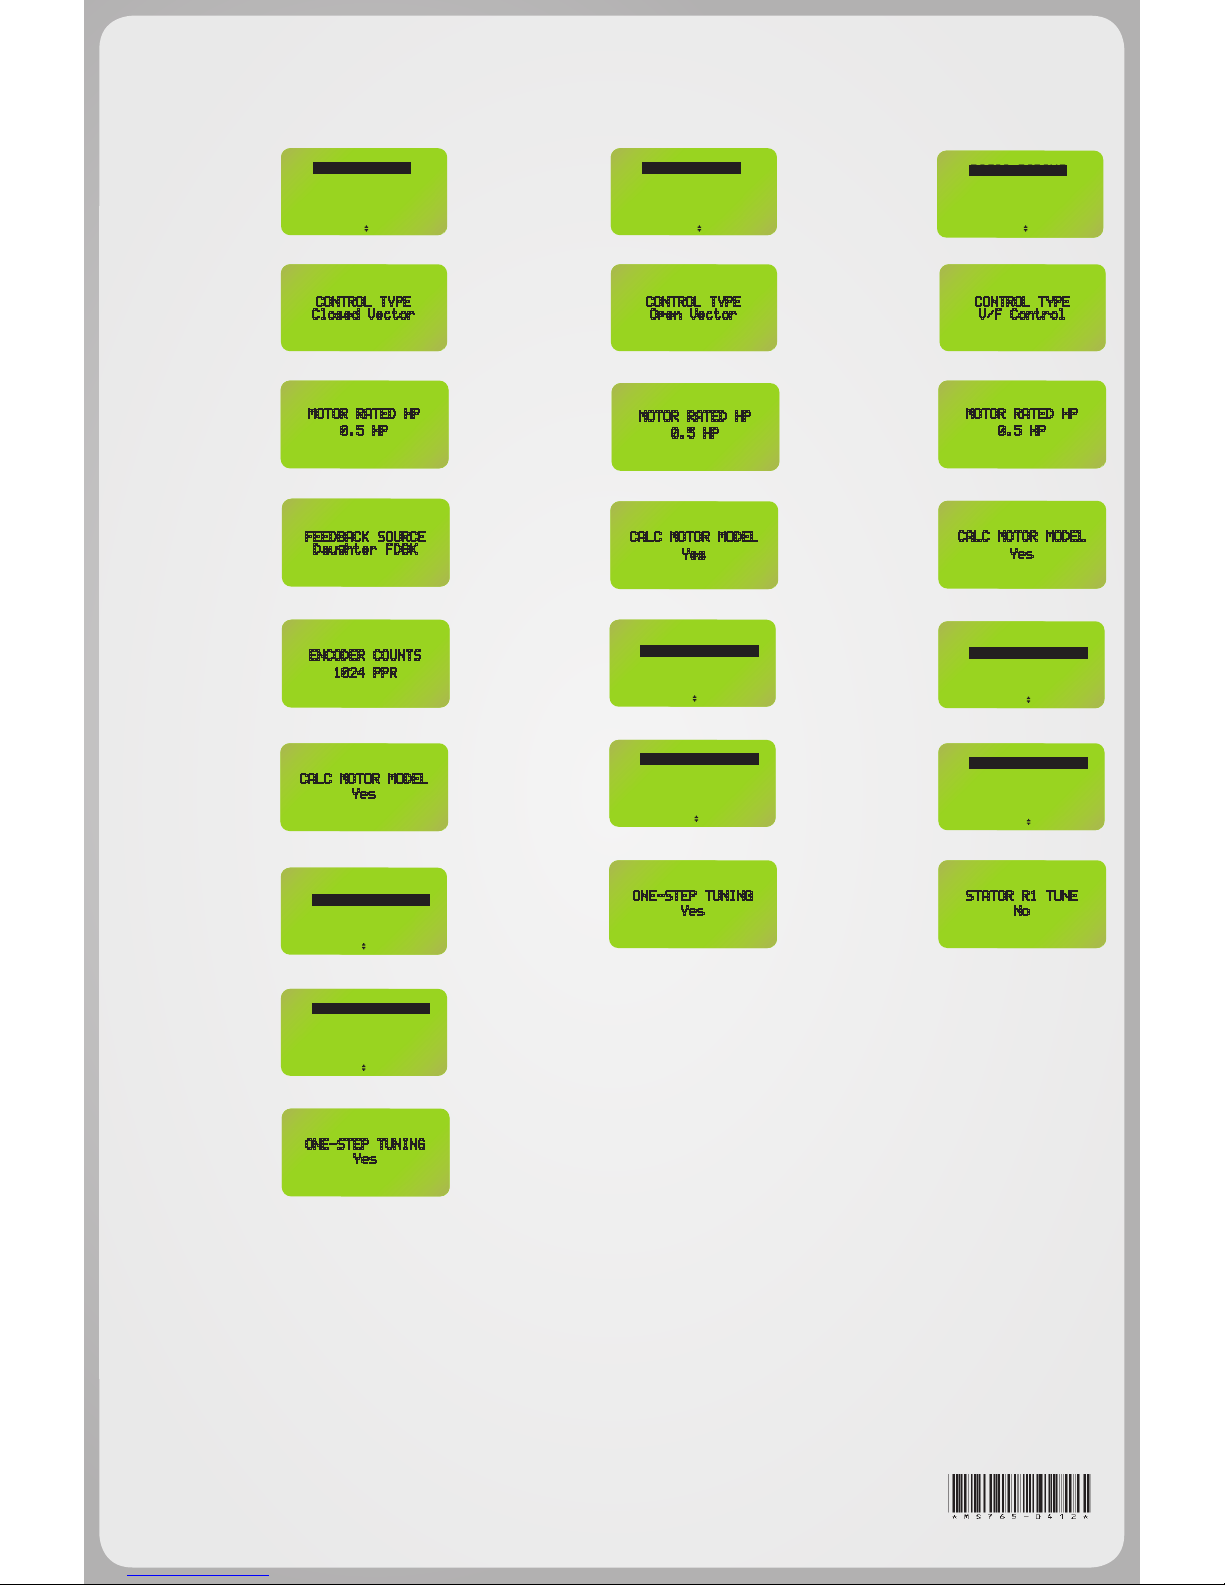
Auto Tuning Procedures for Closed Vector, Open Vector and V/F Control
For Closed Vector Control Type: For Open Vector Control Type: For V/F Control Type:
1) Press MENU.
Scroll to BASIC PARAMS.
Press ENTER.
At this point the display
shows CONTROL TYPE
F1601, – the default value is
"Closed Vector" – press ENTER to change the setting to
Open Vector C1601, – press
ENTER.
2) Press the DOWN Arrow
key and enter values from the
motor nameplate for each of
the following "MOTOR DATA"
parameters. Press ENTER
to begin editing – after each
value is programmed, press
ENTER then DOWN arrow for
the next item.
• MOTOR RATED HP
• MOTOR RATED VOLT
• MOTOR RATED AMPS
• MOTOR MAG AMPS*
• MOTOR RATED SPD
• MOTOR RATED FREQ
*If this is not shown on the
motor nameplate, use the
formula:
MOTOR MAG AMPS = 0.4 X
MOTOR RATED AMPS.
3) CALC MOTOR MODEL –
press ENTER – select "Yes"
– press ENTER
4) After CALC MOTOR
MODEL is complete, Press
F2 to exit MOTOR DATA and
BASIC PARAMS to return to
the MENU.
5) ENABLE DRIVE, (close
J2-8 – J3-24 circuit).
6) Scroll to ADVANCED
PROG – press ENTER.
7) Scroll to LEVEL 2 BLOCKS
– press ENTER
8) Scroll to AUTO TUNE –
press ENTER.
9) Skip ANA OFFSET TRIM
– Scroll to ONE-STEP TUN-
ING – press ENTER – select
"Yes" – press ENTER. The
ONE-STEP TUNING will
take approx. 3-4 minutes to
complete.
10) After the static portion
of AUTO TUNE is complete,
the display will alternately
show STATIC TEST DONE
– ROTARY FOLLOW and
PRESS ENTER FOR FLUX
CUR TUNE. Select one of the
following:
a) if the motor is coupled
to the load, press F2 to exit
AUTO TUNING
b) If the motor is not coupled
to the load, press ENTER to
begin rotation tuning. The
rst test is "FOR FLUX CUR
TUNE" – press ENTER.
11) After "FLUX CUR TUNE"
TEST PASSED – press
ENTER for "MEASURE
Xm(ROT)"
12) After "MEASURE
Xm(ROT)" TEST PASSED –
press ENTER for "END OF
TEST".
13) PRESS F2 three times to
return to MENU – press F1 to
show STATUS display.
14) Couple motor to load and
run " SPEED LOOP TUNE"
to get a better response or
manually tune the speed
loop using Speed Prop Gain
(P1635), Speed Int Gain
(P1636) and Speed Diff Gain
(P1637)
OPEN VECTOR AUTO TUNE
COMPLETE
1) Press MENU.
Scroll to BASIC PARAMS.
Press ENTER.
At this point the display
shows CONTROL TYPE
F1601, – the default value is
"CLOSED VECTOR" – press
ENTER to change the setting
to V/F Control C1601, –
press ENTER.
2) Press the DOWN Arrow
key and enter values from the
motor nameplate for each of
the following "MOTOR DATA"
parameters. Press ENTER
to begin editing – after each
value is programmed, press
ENTER then DOWN arrow for
the next item.
• MOTOR RATED HP
• MOTOR RATED VOLT
• MOTOR RATED AMPS
• MOTOR MAG AMPS*
• MOTOR RATED SPD
• MOTOR RATED FREQ
*If this is not shown on the
motor nameplate, use the
formula:
MOTOR MAG AMPS = 0.4 X
MOTOR RATED AMPS.
3) CALC MOTOR MODEL –
press ENTER – select YES
– press ENTER
4) After CALC MOTOR
MODEL is complete, Press
F2 to exit MOTOR DATA and
BASIC PARAMS to return to
the MENU.
5) ENABLE DRIVE, (close
J2-8 – J3-24 circuit).
6) Scroll to ADVANCED
PROG – press ENTER.
7) Scroll to LEVEL 2 BLOCKS
– press ENTER
8) Scroll to AUTO TUNE –
press ENTER.
9) Skip ANA OFFSET
TRIM – Scroll to STATOR
R1 TUNE – press ENTER –
select "Yes" – Press ENTER.
After STATOR R1 TUNE is
complete – (TEST PASSED),
press ENTER to END (This is
a static tune, motor will not
rotate).
10) PRESS F2 three times to
return to MENU – press F1 to
show STATUS display.
V/F CONTROL AUTO TUNE
COMPLETE
1) Press MENU.
Scroll to BASIC PARAMS.
Press ENTER.
At this point the display shows
CONTROL TYPE F1601,– the
default value is "Closed Vector"
– press DOWN arrow to continue "Closed Vector" tuning.
2) Enter values from the motor nameplate for each of the
following "MOTOR DATA"
parameters. Press ENTER to
begin editing – after each value
is programmed, press ENTER
then DOWN arrow for the next
item.
• MOTOR RATED HP
• MOTOR RATED VOLT
• MOTOR RATED AMPS
• MOTOR MAG AMPS*
• MOTOR RATED SPD
• MOTOR RATED FREQ
*If this is not shown on the mo-
tor nameplate, use the formula:
MOTOR MAG AMPS = 0.4 X
MOTOR RATED AMPS.
3) FEEDBACK SOURCE –
(Standard VS1GV drives factory
setting is "Daughter FDBK") –
press DOWN arrow.
4) ENCODER COUNTS – Enter
the Pulse Per Revolution value,
PPR – press DOWN arrow.
5) Scroll to CALC MOTOR
MODEL – press ENTER – select
YES – press ENTER.
6) After CALC MOTOR MODEL
is complete, press F2 to exit
MOTOR DATA and BASIC
PARAMS to return to the menu.
7) ENABLE DRIVE, (Close J2-8
– J3-24 circuit).
8) Scroll to ADVANCED PROG
– press ENTER.
9) Scroll to LEVEL 2 BLOCKS –
press ENTER
10) Scroll to AUTO TUNE –
press ENTER
11) Skip ANA OFFSET TRIM –
Scroll to ONE-STEP TUNING
– press ENTER – select Yes –
press ENTER. The ONE-STEP
TUNING will take approx. 3-4
minutes to complete.
12) After the static portion of
AUTO TUNE is complete, the
display will alternately show
STATIC TEST DONE – ROTARY
FOLLOW and PRESS ENTER
FOR FEEDBACK ALIGN. Select
one of the following:
a) if the motor is coupled to the
load, press F2 to exit AUTO
TUNING
b) If the motor is not coupled to
the load, press ENTER to begin
rotation tuning. The rst test is
"FEEDBACK ALIGN" – press
ENTER.
13) After "FEEDBACK ALIGN"
TEST PASSED – press ENTER
for "FLUX CUR TUNE".
14) After "FLUX CUR TUNE"
TEST PASSED – press ENTER
for "MEASURE Xm(ROT)"
(Note: All procedures require that load be decoupled from motor shaft. See details below if this is not possible.
15) After "MEASURE Xm(ROT)" TEST PASSED –
press ENTER for "SPD LOOP TUNE".
16) After "SPD LOOP TUNE" TEST PASSED – press
ENTER for "END OF TEST".
17) Press F2 to return to the MENU – press F1 to
return to the STATUS display.
Optional Fine Tune (Steps 18 and 19)
18) Some applications perform better when the drive
is tuned with the load. For further tuning couple the
motor to the load.
19) Run the SPD LOOP TUNE to automatically tune
the speed loop, or adjust SPEED PROP GAIN, SPEED
INT GAIN, and SPEED DIFF GAIN to manually tune.
CLOSED VECTOR AUTO TUNE COMPLETE
BASIC MOTOR CONTROL
CONTROL TYPE
Closed Vector
STATUS F1601T1 BACK
BASIC MOTOR CONTROL
CONTROL TYPE
Open Vector
STATUS C1601T1 BACK
BASIC MOTOR CONTROL
CONTROL TYPE
V/F Control
STATUS C1601T1 BACK
BASIC MOTOR CONTROL
MOTOR RATED HP
0.5 HP
STATUS F2416T1 BACK
BASIC MOTOR DATA
MOTOR RATED HP
0.5 HP
STATUS C2416T1 BACK
BASIC MOTOR DATA
MOTOR RATED HP
0.5 HP
STATUS C2416T1 BACK
BASIC MOTOR DATA
FEEDBACK SOURCE
Daughter FDBK
STATUS F2409T1 BACK
BASIC MOTOR DATA
CALC MOTOR MODEL
Yes
STATUS F2414 BACK
BASIC MOTOR DATA
CALC MOTOR MODEL
Yes
STATUS F2414 BACK
BASIC MOTOR DATA
ENCODER COUNTS
1024 PPR
STATUS F2408T1 BACK
BASIC MOTOR DATA
CALC MOTOR MODEL
Yes
STATUS F2414 BACK
PROG AUTO TUNE
ONE-STEP TUNING
Yes
BASIC F2902 BACK
PROG AUTO TUNE
ONE-STEP TUNING
Yes
BASIC F2902 BACK
PROG AUTO TUNE
STATOR R1 TUNE
No
BASIC F2903 BACK
MS765 04/12 TCP 5000
 Loading...