

Page 1

Tier 2/3 Towable Generators
(Trailer and Skid Mounted)
(Diesel Liquid Cooled)
TS25, 35, 45, 60, 80, 130, 175, 250 and 400
Installation & Operating Manual
8/06 MN2417
Page 2

WARNING:
CALIFORNIA PROPOSITION 65 WARNING:
Engine exhaust from this product contains chemicals known
to the state of California to cause cancer, birth defects and
other reproductive harm.
WARNING:
CALIFORNIA PROPOSITION 65 WARNING:
Battery posts, terminals and related accessories are known to
the state of California to cause cancer, birth defects and other
reproductive harm.
Page 3

Table of Contents
Section 1
Product Safety Information 1-1. . . . . . . . . . . . . . . . . . . . . . . . . . . . . . . . . . . . . . . . . . . . . . . . . . . . . . . . . . . . . . . . . . . . . . .
Safety Notice 1-1. . . . . . . . . . . . . . . . . . . . . . . . . . . . . . . . . . . . . . . . . . . . . . . . . . . . . . . . . . . . . . . . . . . . . . . . . . . . . . . . .
Responsibility 1-1. . . . . . . . . . . . . . . . . . . . . . . . . . . . . . . . . . . . . . . . . . . . . . . . . . . . . . . . . . . . . . . . . . . . . . . . . . . . . . . .
IMPORTANT SAFETY INSTRUCTIONS 1-2. . . . . . . . . . . . . . . . . . . . . . . . . . . . . . . . . . . . . . . . . . . . . . . . . . . . . . . . .
Caution Statements 1-6. . . . . . . . . . . . . . . . . . . . . . . . . . . . . . . . . . . . . . . . . . . . . . . . . . . . . . . . . . . . . . . . . . . . . . . . . . .
Section 2
General Information 2-1. . . . . . . . . . . . . . . . . . . . . . . . . . . . . . . . . . . . . . . . . . . . . . . . . . . . . . . . . . . . . . . . . . . . . . . . . . . . . .
Section 3
Receiving & Installation 3-1. . . . . . . . . . . . . . . . . . . . . . . . . . . . . . . . . . . . . . . . . . . . . . . . . . . . . . . . . . . . . . . . . . . . . . . . . . .
Receiving & Inspection 3-1. . . . . . . . . . . . . . . . . . . . . . . . . . . . . . . . . . . . . . . . . . . . . . . . . . . . . . . . . . . . . . . . . . . . . . . .
Lifting the Generator 3-1. . . . . . . . . . . . . . . . . . . . . . . . . . . . . . . . . . . . . . . . . . . . . . . . . . . . . . . . . . . . . . . . . . . . . . . . . . .
Physical Location 3-1. . . . . . . . . . . . . . . . . . . . . . . . . . . . . . . . . . . . . . . . . . . . . . . . . . . . . . . . . . . . . . . . . . . . . . . . . . . . .
Secure the Generator 3-2. . . . . . . . . . . . . . . . . . . . . . . . . . . . . . . . . . . . . . . . . . . . . . . . . . . . . . . . . . . . . . . . . . . . .
Hot Exhaust Gasses 3-3. . . . . . . . . . . . . . . . . . . . . . . . . . . . . . . . . . . . . . . . . . . . . . . . . . . . . . . . . . . . . . . . . . . . . .
Installation 3-3. . . . . . . . . . . . . . . . . . . . . . . . . . . . . . . . . . . . . . . . . . . . . . . . . . . . . . . . . . . . . . . . . . . . . . . . . . . . . . . . . . .
Fuel Connections 3-3. . . . . . . . . . . . . . . . . . . . . . . . . . . . . . . . . . . . . . . . . . . . . . . . . . . . . . . . . . . . . . . . . . . . . . . . .
Electrical Connections 3-4. . . . . . . . . . . . . . . . . . . . . . . . . . . . . . . . . . . . . . . . . . . . . . . . . . . . . . . . . . . . . . . . . . . . .
Battery Connections 3-7. . . . . . . . . . . . . . . . . . . . . . . . . . . . . . . . . . . . . . . . . . . . . . . . . . . . . . . . . . . . . . . . . . . . . . . . . . .
Recommended Engine Oil and Battery Type 3-9. . . . . . . . . . . . . . . . . . . . . . . . . . . . . . . . . . . . . . . . . . . . . . . . . . . . . .
Post Installation Checks 3-9. . . . . . . . . . . . . . . . . . . . . . . . . . . . . . . . . . . . . . . . . . . . . . . . . . . . . . . . . . . . . . . . . . . . . . .
Section 4
Operation 4-1. . . . . . . . . . . . . . . . . . . . . . . . . . . . . . . . . . . . . . . . . . . . . . . . . . . . . . . . . . . . . . . . . . . . . . . . . . . . . . . . . . . . . . . .
Towing the Generator 4-1. . . . . . . . . . . . . . . . . . . . . . . . . . . . . . . . . . . . . . . . . . . . . . . . . . . . . . . . . . . . . . . . . . . . . . . . . .
Selecting the Proper Towing Equipment 4-1. . . . . . . . . . . . . . . . . . . . . . . . . . . . . . . . . . . . . . . . . . . . . . . . . . . . . .
Safe Driving Tips 4-2. . . . . . . . . . . . . . . . . . . . . . . . . . . . . . . . . . . . . . . . . . . . . . . . . . . . . . . . . . . . . . . . . . . . . . . . .
Safety Checks 4-3. . . . . . . . . . . . . . . . . . . . . . . . . . . . . . . . . . . . . . . . . . . . . . . . . . . . . . . . . . . . . . . . . . . . . . . . . . . .
Towing Instructions 4-4. . . . . . . . . . . . . . . . . . . . . . . . . . . . . . . . . . . . . . . . . . . . . . . . . . . . . . . . . . . . . . . . . . . . . . . . . . . .
Lug Nut Tightness 4-4. . . . . . . . . . . . . . . . . . . . . . . . . . . . . . . . . . . . . . . . . . . . . . . . . . . . . . . . . . . . . . . . . . . . . . . . . . . . .
Trailer Setup 4-5. . . . . . . . . . . . . . . . . . . . . . . . . . . . . . . . . . . . . . . . . . . . . . . . . . . . . . . . . . . . . . . . . . . . . . . . . . . . . . . . .
Voltage Selection 4-5. . . . . . . . . . . . . . . . . . . . . . . . . . . . . . . . . . . . . . . . . . . . . . . . . . . . . . . . . . . . . . . . . . . . . . . . . . . . .
Pre−Start Procedure 4-8. . . . . . . . . . . . . . . . . . . . . . . . . . . . . . . . . . . . . . . . . . . . . . . . . . . . . . . . . . . . . . . . . . . . . . . . . . .
Operating Procedures 4-8. . . . . . . . . . . . . . . . . . . . . . . . . . . . . . . . . . . . . . . . . . . . . . . . . . . . . . . . . . . . . . . . . . . . . . . . .
Digital Engine Controller Description 4-9. . . . . . . . . . . . . . . . . . . . . . . . . . . . . . . . . . . . . . . . . . . . . . . . . . . . . . . . . . . . .
Alarms 4-12. . . . . . . . . . . . . . . . . . . . . . . . . . . . . . . . . . . . . . . . . . . . . . . . . . . . . . . . . . . . . . . . . . . . . . . . . . . . . . . . . . . . . . .
Inputs and Outputs 4-13. . . . . . . . . . . . . . . . . . . . . . . . . . . . . . . . . . . . . . . . . . . . . . . . . . . . . . . . . . . . . . . . . . . . . . . . . . . .
Analog Inputs 4-16. . . . . . . . . . . . . . . . . . . . . . . . . . . . . . . . . . . . . . . . . . . . . . . . . . . . . . . . . . . . . . . . . . . . . . . . . . . . . . . . .
Setpoints 4-16. . . . . . . . . . . . . . . . . . . . . . . . . . . . . . . . . . . . . . . . . . . . . . . . . . . . . . . . . . . . . . . . . . . . . . . . . . . . . . . . . . . .
Section 5
Troubleshooting and Maintenance 5-1. . . . . . . . . . . . . . . . . . . . . . . . . . . . . . . . . . . . . . . . . . . . . . . . . . . . . . . . . . . . . . . . .
Maintenance 5-1. . . . . . . . . . . . . . . . . . . . . . . . . . . . . . . . . . . . . . . . . . . . . . . . . . . . . . . . . . . . . . . . . . . . . . . . . . . . . . . . .
Problems and Solutions 5-2. . . . . . . . . . . . . . . . . . . . . . . . . . . . . . . . . . . . . . . . . . . . . . . . . . . . . . . . . . . . . . . . . . . . . . . .
Appendix A
Wiring Diagrams A-1. . . . . . . . . . . . . . . . . . . . . . . . . . . . . . . . . . . . . . . . . . . . . . . . . . . . . . . . . . . . . . . . . . . . . . . . . . . . . . . . .
Wiring Diagrams A-1. . . . . . . . . . . . . . . . . . . . . . . . . . . . . . . . . . . . . . . . . . . . . . . . . . . . . . . . . . . . . . . . . . . . . . . . . . . . . .
Table of Contents iMN2417
Page 4

ii Table of Contents MN2417
Page 5

Section 1
Product Safety Information
Safety Notice Be sure that you are completely familiar with the safe operation of this equipment. This
equipment may be connected to other machines that have rotating parts or parts that are
controlled by this equipment. Improper use can cause serious or fatal injury. Always
disconnect all electrical loads before starting the generator.
Installation and repair procedures require specialized skills with electrical generating equipment
and liquid cooled engine systems. Any person that installs or repairs this generator must have
these specialized skills to ensure that this generating unit is safe to operate. Seek expert advise
for repairs or any questions you may have about the safe installation and operation.
The precaution statements are general guidelines for the safe use and operation of this
generator. It is not practical to list all unsafe conditions. Therefore, if you use a procedure that is
not recommended in this manual you must determine if it is safe for the operator and all
personnel in the proximity to the generator and connected loads. If there is any question of the
safety of a procedure please seek expert advise before starting or stopping the generator.
This equipment contains high voltages. Electrical shock can cause serious or fatal injury. Only
qualified personnel should attempt the start−up procedure or troubleshoot this equipment.
This equipment may be connected to other machines that have rotating parts or parts that are
driven by this equipment. Improper use can cause serious or fatal injury. Only qualified
personnel should attempt the start−up procedure or troubleshoot this equipment.
− System documentation must be available to anyone that operates this equipment at all
times.
− Keep non-qualified personnel at a safe distance from this equipment.
− Only qualified personnel familiar with the safe installation, operation and maintenance
of this device should attempt start-up or operating procedures.
− Always stop engine before making or removing any connections.
− Always stop engine and allow it to cool before refueling.
Responsibility When your generator is delivered, it becomes the responsibility of the owner/operator of the
generator set to prevent unsafe conditions and operation of the equipment. Some
responsibilities include (but are not limited to) the following:
1. It is the responsibility of the owner/operator of this generator to ensure that this
equipment is correctly and safely installed.
2. It is the responsibility of the owner/operator of this generator to ensure that this
equipment, when installed fully complies with all federal, state and local codes.
3. It is the responsibility of the owner/operator of this generator to ensure that any person
operating this equipment has been properly trained.
4. It is the responsibility of the owner/operator of this generator to ensure that any person
operating this equipment has access to all manuals and information required for the
safe use and operation of this equipment.
5. It is the responsibility of the owner/operator of this generator to ensure that it is properly
maintained and safety inspected at regular scheduled intervals.
6. It is the responsibility of the owner/operator of this generator to ensure that any person
who has not been trained on the safe use of this equipment does not have access to
this equipment.
Read This Manual Thoroughly
If you do not understand any concept, any procedure, any safety warning statement, any safety
caution statement or any portion of this manual, seek expert advise. Make sure you understand
the information in this manual so that you can safely enjoy the full use of this generator.
Product Safety Information 1-1MN2417
Page 6

Symbols
This symbol is shown throughout the manual to indicate a connection to ground reference point.
Indicates a potentially hazardous situation which, if not avoided, could result in injury or death.
Indicates a potentially hazardous situation which, if not avoided, could result in injury or death.
Precaution Statements Used In This Manual
WARNING: Indicates a potentially hazardous situation which, if not avoided, could result in injury or
Caution: Indicates a potentially hazardous situation which, if not avoided, could result in damage to
Note: Additional information that is not critical to the installation or operation.
There are three classifications of precautionary statements used in this manual. The most critical
is a WARNING statement, then the Caution statement and the least critical is the Note
statement. The usage of each statement is as follows:
death.
property.
IMPORTANT SAFETY INSTRUCTIONS
SAVE THESE INSTRUCTIONS − This manual contains important instructions for the generator that
should be followed during installation, operation and maintenance of the generator.
For ease of reading, the Warning statements are divided into four categories: Operation, Burn, Installation,
and Maintenance.
Operation
WARNING: Never allow a person to ride in or on a trailer that is being towed. All states prohibit
passengers in towed vehicles. A person can fall off and be struck be another vehicle or run
over by the towed trailer. Failure to observe this warning can result in death.
WARNING: Before using a tow vehicle with a trailer mounted generator, verify that the vehicle is designed
for the load. Using a vehicle that is too small is very dangerous. Be certain that it can handle
the M.G.T.W. (Maximum Gross Trailer Weight) and the tongue weight for safe towing and
braking.
WARNING: For a new trailer, the wheel lug nuts should be tightened to the proper torque specification
before use, after 25 miles of operation and every 100 miles of operation thereafter. Failure to
check the lug nuts for proper tightness can result in an accident due to a wheel falling from
the trailer.
WARNING: Never operate a trailer or tow vehicle that has a loose, missing or broken lug nut. The trailer
is designed for safe operation with all lug nuts installed and all at the proper torque rating.
Operating the trailer with one or more broken or missing lug nuts greatly increases the load
on the remaining nuts and can cause failure of the remaining nuts that can result in an
accident due to a wheel falling from the trailer.
WARNING: Never operate this generator in a manner other than as described in this manual. Operation
in any manner not described in this manual should be considered unsafe and should not be
attempted. Never start the engine unless you have first verified that the installation and
operation of the generator are as described in this manual.
WARNING: Be sure that you are completely familiar with the safe operation of this equipment. This
equipment may be connected to other machines that have rotating parts or parts that are
controlled by this equipment. Improper use can cause serious or fatal injury.
WARNING: Exhaust fumes/gases are extremely dangerous and can cause severe illness or death. Never
breath exhaust fumes produced by a running engine. Only run the engine outdoors where
ventilation is plentiful. Exhaust gases contain carbon monoxide, a colorless, odorless and
extremely dangerous gas that can cause unconsciousness or death. Symptoms of carbon
monoxide poisoning include: dizziness, nausea, headaches, sleepiness, vomiting or
incoherence. If you or anyone else experiences these symptoms, get out into fresh air
immediately. Stop the engine and do not restart the engine until it has been inspected and if
necessary repaired or reinstalled in a well ventilated area.
WARNING: When operating this generator remain alert at all times. Never operate machinery when
physically or mentally fatigued, or while under the influence of alcohol, drugs or medication.
Continued on next page.
1-2 Product Safety Information MN2417
Page 7

Operation Warning Statements Continued
WARNING: Over crank indication can mean a loss of crank disconnect signal during the previous run
period. Attempting to restart the engine with no crank disconnect signal can destroy the
starter motor, which can cause serious personal injury.
WARNING: Hot exhaust gasses must never be directed toward anything that may catch fire or explode.
WARNING: This generator must not be used on or near any forest covered, brush covered, or grass
covered land unless the engine’s exhaust system is equipped with a spark arrestor. The
spark arrestor must be maintained in effective working order by the operator.
WARNING: Never operate the generator set indoors or in a poorly ventilated area such as a tunnel or cave.
Exhaust fumes are extremely dangerous to all personnel that are in or in contact with that area.
WARNING: Keep generator at least three feet away from buildings and other structures.
WARNING: Keep generator away from flammable or hazardous materials (trash, rags, lubricants,
explosives, paints etc.) and grass or leaf build up.
WARNING: Some parts of this generator rotate during operation. Rotating parts can present extreme
danger if clothing or body extremities are caught by the rotating part and can cause serious
or fatal injury. Never touch a part of the generator until the engine has been stopped and all
rotating parts are completely stopped. Also, disconnect the battery terminals to prevent
accidental engine rotation during servicing.
WARNING: Never move a generator set that is running. Loads should be connected and position secure
before starting the engine. Hazards are caused by moving a generator set that is running.
WARNING: Never connect or disconnect loads during operation. Always connect load circuits before
starting the engine and use external branch disconnects etc. to switch loads On/Off.
WARNING: High voltage is present whenever engine is running. Electrical shock can cause serious or
fatal injury. Never operate electrical equipment while standing in water, on wet ground or with
wet hands, feet or shoes or while barefoot.
WARNING: High voltage is present whenever the engine is running. Electrical shock can cause serious
or fatal injury. Always stop engine before connecting or disconnecting power cords or
external devices.
WARNING: Be sure that you understand how to stop the engine quickly in case of an emergency situation.
Become familiar with the controls and safety systems provided with this generator set.
WARNING: Always wear safety glasses with side shields and hearing protection when working near the
generator.
WARNING: Improper operation may cause violent motion of connected equipment. Be certain that
unexpected movement will not cause injury to personnel or damage to equipment.
WARNING: Never permit anyone to operate the generator without proper instructions. Be sure to keep a
copy of this manual with the generator so that all users can be properly informed of its safe
operation.
WARNING: Never allow children or pets to be in the area where the generator is running. The generator
and the equipment being powered by the generator may cause injury or death.
WARNING: Never operate the generator unless all guards, covers, shields and other safety items are
properly installed.
WARNING: Do not put hands, feet, tools clothing or other objects near rotating parts such as drive shaft,
pulley, belt etc. Rotating parts cause extremely dangerous situations because they can catch
loose clothing or extremities and cause serious or fatal injury.
WARNING: Never operate the engine when the air cleaner is removed. An engine backfire can cause
serious burns.
WARNING: Never “jump start” a generator to start the engine. If the battery charge is insufficient to start
the engine, charge or replace the battery and try to restart. Jump starting a battery can cause
the battery to explode and cause severe injury or death to anyone in the area.
WARNING: Do not smoke near generator during operation or when close to fuel source. LPG and natural
gas fuels are flammable and can cause fire, explosions, injury or death.
WARNING: Keep a fire extinguisher near the generator while generator is in use. An extinguisher rated
“ABC” by the National Fire Protection Association is appropriate.
Continued on next page.
MN2417
Product Safety Information 1-3
Page 8

Warning Statements Continued
Burn
WARNING: Parts of this generator are extremely hot during and after operation. To prevent severe burns,
do not touch any part of the generator until you have first determined if the part is hot. Wear
protective clothing and after use allow sufficient time for parts to cool before touching any
part of the generator.
WARNING: Do not touch the hot exhaust parts. In addition to a sever burn, the sudden involuntary jerk of
the hand or body part caused by contact with high voltage or a hot surface can result in injury
to yourself or others.
WARNING: Engine coolant is under pressure and is near the boiling point of water when engine is hot.
Do not open the coolant system until the engine has completely cooled. Hot coolant can
cause severe burns and other injuries. When engine is cool, coolant level can be checked.
Installation
WARNING: Disconnect the battery’s ground terminal before working in the vicinity of the battery or
battery wires. Contact with the battery can result in electrical shock when a tool accidently
touches the positive battery terminal or wire. The risk of such shock is reduced when the
ground lead is removed during installation and maintenance.
WARNING: Installation and repair procedures requires specialized skills with electrical generating
equipment and small engine systems. Any person that installs or performs repairs must have
these specialized skills to ensure that the generator set is safe to operate. Seek expert advise
for installation or repairs.
WARNING: Be sure all wiring complies with the National Electrical Code (NEC) and all regional and local
codes or CE Compliance. Improper wiring may cause a hazardous condition and exposure to
electrical hazards can cause serious injury or death.
WARNING: Be sure the system is properly grounded before applying power. Do not apply AC power
before you ensure that grounds are connected. Electrical shock can cause serious or fatal
injury. NEC requires that the frame and exposed conductive surfaces (metal parts) be
connected to an approved earth ground. Local codes may also require proper grounding of
generator systems.
WARNING: Place protective covers over all rotating parts such as drive shaft, pulley, belt etc. Rotating
parts cause extremely dangerous situations because they can catch loose clothing or
extremities and cause serious or fatal injury.
WARNING: Unauthorized modification of a generator set may make the unit unsafe for operation or may
impair the operation of the unit. Never start a generator set that has been modified or tampered
with. Be sure that all covers and guards are properly installed and that the unit is safe before
starting the engine. If you are unsure, seek expert advise before starting the engine.
WARNING: When moving the generator, use reasonable caution. Be careful where you place fingers and
toes to prevent injury “Pinch Points”. Never try to lift a generator without a hoist or lift means
because they are heavy and bodily injury may result.
Warning: Never connect this generator to the electrical system of any building unless a licensed
electrician has installed an approved transfer switch. The national electrical code (NEC)
requires that connection of a generator to any electrical circuit normally powered by means of
an electric utility must be connected by means of approved transfer switch equipment to
isolate the electrical circuit from the utility distribution system when the generator is
operating. Failure to isolate the electrical circuits by such means may result in injury or death
to utility power workers due to backfeed of electrical energy onto the utility lines.
WARNING: Circuit overload protection must be provided in accordance with the National Electrical Code
and local regulations.
WARNING: Check Ground Fault Circuit Interrupt (GFCI) receptacles monthly by using the “Test” and
“Reset” buttons.
WARNING: Only a professional experienced technician should install a fuel supply system. Diesel, LPG and
natural gas fuels are flammable and can cause fire, explosions, injury or death. Fuel supply lines
should be kept away from sharp objects to prevent rupture. Comply with all NFPA regulations
and local codes for shut−off valves, regulators, fuel line type, connectors etc.
WARNING: Have electrical circuits and wiring installed and checked by licensed electrician or qualified
technician. Electrical shock can cause serious or fatal injury.
Continued on next page.
1-4 Product Safety Information
MN2417
Page 9

Warning Statements Continued
WARNING: Incorrect installation of this generator set could result in property damage, injury or death.
Connection of the generator to its fuel source must be done by a qualified professional
technician or contractor.
WARNING: Never stand under or close to an object that is being hoisted or lift into position. Accidents
happen and if the object falls or tips over you or someone else could be crushed by the
weight of the object causing severe injury or death to to yourself or others. Always remain a
safe distance from the object and always wear protective head gear (hard hat).
Maintenance
WARNING: Before servicing the generator set, be sure to disconnect the battery terminals to prevent
accidental engine rotation or starting.
WARNING: Before cleaning, inspecting, repairing or performing any maintenance to the generator set,
always be sure the engine has stopped and that all rotating parts have also stopped. After
stopping, certain components are still extremely hot so be careful not to get burned.
WARNING: Before servicing the generator set, be sure to disconnect the glow plugs or spark plug wires
and the battery terminals to prevent accidental engine rotation or starting.
WARNING: Engine coolant is under pressure and is near the boiling point of water when engine is hot.
Do not open the coolant system until the engine has completely cooled. Hot coolant can
cause severe burns and other injuries. When engine is cool, coolant level can be checked.
WARNING: Inspect all wiring frequently and replace any damaged, broken or frayed wiring or wires with
damaged insulation immediately. Electrical shock can cause serious or fatal injury.
WARNING: Disconnect all electrical wires and load devices from generator power outlets before servicing
the generator. Electrical shock can cause serious or fatal injury. Always treat electrical
circuits as if they are energized.
WARNING: Check all fuel supply piping, and their connections monthly for fuel leaks. Diesel, LPG and
natural gas fuels are flammable and can cause fire, explosions, injury or death. If a leak is
found, replace only with approved pipe or components.
WARNING: A battery presents a risk of fire and explosion because they generate hydrogen gas.
Hydrogen gas is extremely explosive. Never jump start a battery, smoke in the area around
the battery or cause any spark to occur in the area around the battery.
WARNING: Do not mutilate the battery or dispose of a battery in a fire. The battery is capable of
exploding. If the battery explodes, electrolyte solution will be released in all directions.
Battery electrolyte solution is caustic and can cause severe burns and blindness. If
electrolyte contacts skin or eyes, immediately flush the area with water and seek medical
attention quickly.
WARNING: The battery electrolyte is a dilute sulfuric acid that is harmful to the skin and eyes. It is
electrically conductive and corrosive. If electrolyte contacts the skin, flush the area
immediately with water and wash it off using soap and water. If electrolyte contacts the eyes,
immediately flush the eye thoroughly with water and seek medical attention quickly.
WARNING: A battery presents a risk of electrical shock hazard and high short circuit current. Electrical
shock can cause serious or fatal injury. Never wear jewelry, watch or any metal objects when
in the area around the battery.
MN2417
Continued on next page.
Product Safety Information 1-5
Page 10

Caution Statements
Caution: Avoid installing the generator set beside heat generating equipment, or directly below water
or steam pipes or in the vicinity of corrosive substances or vapors, metal particles and dust.
Heat can cause engine problems to develop and unwanted substances can cause rust or
generator failure over time.
Caution: Do not apply high voltage to windings (do not start the generator) in a moisture−saturated
condition. Moisture can cause insulation breakdown, making it necessary to repair the
generator and consequent expense and loss of time.
Caution: Use only original equipment or authorized replacement parts. Using the correct parts will
assure continued safe operation as designed.
Caution: Do not support the generator from the top of the frame or enclosure.
Caution: Do not tamper with or change the engine speed. Engine speed is factory set to produce the
correct voltage and output frequency.
Caution: Never operate the engine without a muffler. The engine is designed to have the correct
exhaust components installed and operating without these components can present a fire
hazard, cause excessive exhaust gases and cause damage to engine. Inspect muffler
periodically and replace if necessary.
Caution: The Programmable Output Contacts selection must agree with the external control wiring
prior to energizing the controller. Failure to do so may cause severe equipment damage.
Caution: If a dead battery is suspected, remove the controller fuse, charge battery (or replace), and
then attempting starting. Damage to engine control may result from jump starting.
Caution: This generator must have a battery installed for operation. The battery is used during starting
and during operation. If engine operation is attempted while the battery is removed, damage
to the engine’s electrical components may result.
Caution: Large “Engine Compartment Doors” on each side of enclosure must remain closed during
operation. If doors remain open, engine will overhead due to insufficient air flow around
engine.
1-6 Product Safety Information
MN2417
Page 11

Section 2
General Information
Thank you for purchasing your Baldor Generator Set. This manual contains information you need to safely and efficiently
install and operate your generator set. During the preparation of this manual every effort was made to ensure the
accuracy of its contents. This manual describes only very basic engine information. A separate owner’s manual for the
engine is supplied with this unit for your use. Please refer to the engine manual for information relative to engine
operation, maintenance, recommendations and additional safety warnings.
Copyright Baldor 2006. All rights reserved.
This manual is copyrighted and all rights are reserved. This document may not, in whole or in part, be copied or
reproduced in any form without the prior written consent of Baldor Electric Company, Inc.
Baldor Generators have earned the reputation of being high quality and dependable. We take pride in this fact and
continue to keep our quality standards high on our list of priorities. We are also constantly researching new technological
ideas to determine if they could be used to make our generator sets even better.
Baldor makes no representations or warranties with respect to the contents hereof and specifically disclaims any implied
warranties of fitness for any particular purpose. The information in this document is subject to change without notice.
Baldor assumes no responsibility for any errors that may appear in this document.
Limited Warranty
Baldor will replace or repair free of charge any part or parts of the generator of their manufacture that are defective in
workmanship and materials for a period of time as set forth in the Warranty Period chart below. All Baldor products
requiring warranty service shall be transported or shipped freight pre−paid to a Baldor Generator repair facility.
Notification of the defect or problem, a description of the manner in which the Baldor generator is used, and the name,
address and telephone number of the customer requiring warranty service must be included. Baldor is not responsible for
removal and shipment of the Baldor product to the service center or for the reinstallation of the Baldor product upon its
return to the customer, or any incidental or consequential damages resulting from the defect, removal, reinstallation,
shipment or otherwise. Problems with Baldor products can be due to improper maintenance, faulty installation,
non−Baldor additions or modifications, or other problems not due to defects in Baldor workmanship or materials. If a
Baldor Generator repair facility determines that the problem with a Baldor product is not due to defects in Baldor
workmanship or materials, then the customer will be responsible for the cost of any necessary repairs. Genset engines
are covered under the engine manufacturers warranty. Proper engine maintenance is required. Any request for engine
warranty or repair should be made directly with the engine manufacturers warranty center. See engine manufacturers
data for applicable engine warranty periods and location of repair centers. This Limited Warranty and Service Policy
represents Baldor’s sole and exclusive warranty obligation with respect to Baldor products. Baldor’s liability to a customer
or any other person shall not exceed Baldor’s sales price of the applicable Baldor product. BALDOR DISCLAIMS ALL
OTHER EXPRESSED AND IMPLIED WARRANTIES INCLUDING THE IMPLIED WARRANTIES OF FITNESS FOR A
PARTICULAR PURPOSE AND MERCHANTABILITY.
Warranty Period
Generator Series Labor* Parts
Portable Products (Premier, Powerchief,
3600 RPM Standby Systems
1800 RPM Standby Systems
(Some AE Models, DLC, GLC)
Industrial Standby Systems 1 Year or 1,000 Hours 2 Years or 1,000 Hours
Industrial Prime Power Systems 1 Year or 1,000 Hours 1 Year or 1,000 Hours
DG Series)
Towable Products (TS) 1 Year or 3,000 Hours 3 Years or 3,000 Hours
POW’R LITE Light Towers 1 Year or 3,000 Hours 3 Years or 3,000 Hours
1 Year or 1,000 Hours 3 Years or 1,000 Hours
(Some AE Models)
1 Year or 3,000 Hours 3 Years or 3,000 Hours
International 1 Year or 1,000 Hours 1 Year or 1,000 Hours
1 Year 3 Years
Light Fixture, Lamps and Ballasts are excluded
from any warranty coverage
*For products covered under labor coverage, travel expenses will be allowed up to 7 hours straight labor or 300 miles,
whichever occurs first, and only applies to permanently wired and mounted products (AE, DLC, GLC, IDLC).
You must save the purchase receipt. Proof of purchase, date, serial number and model number will be required for all
portable and Towable products to qualify for any warranty consideration.
A start−up inspection form/warranty registration must be completed in its entirety and submitted to Baldor Generators
within 30 days of start−up to qualify for any warranty consideration, excluding: Portables, Towables and Light Towers.
General Information 2-1MN2417
Page 12

2-2 General Information MN2417
Page 13
Section 3
Receiving & Installation
Receiving & Inspection When you receive your generator, there are several things you should do immediately.
1. Observe the condition of the shipping container and report any damage immediately to
the commercial carrier that delivered your system.
2. Verify that the part number of the system you received is the same as the part number
listed on your purchase order.
3. If the system is to be stored for several weeks before use, be sure that it is stored in a
location that conforms to published storage temperature and humidity specifications.
WARNING: Never stand under or close to an object that is being hoisted or lift into position. Accidents
happen and if the object falls or tips over you or someone else could be crushed by the
weight of the object causing severe injury or death to to yourself or others. Always remain a
safe distance from the object and always wear protective head gear (hard hat).
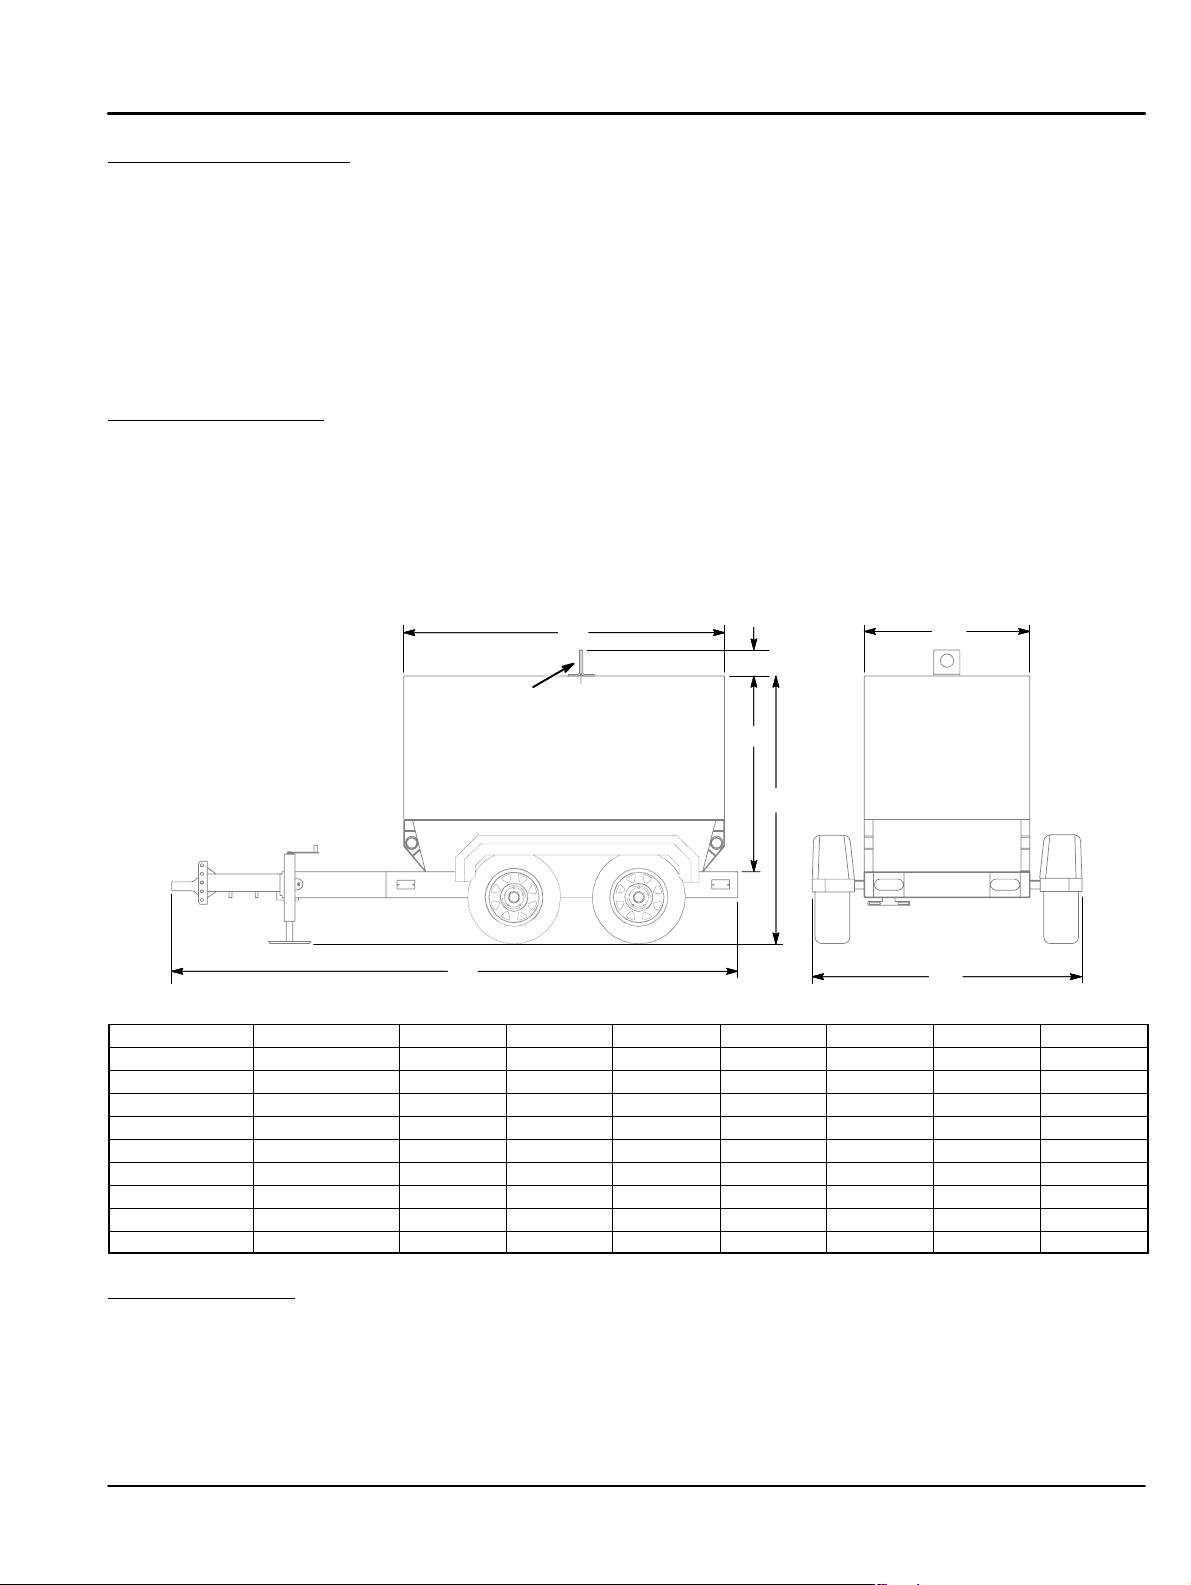
Lifting the Generator When lift or hoist equipment is used to lift the generator and move it to position, be careful not
to contact overhead wires or other obstacles. Be sure the lift or hoist equipment has appropriate
capacity and tires for the terrain to avoid becoming stuck or tipping over. If the shipping pallet is intact,
use a fork lift to move the generator. If the shipping pallet has been removed, use the “Lift Point”
hole at the top of the generator, Figure 3-1.
The lift point is designed only for the weight of the generator and factory trailer. Do not lift by these
points if the generator is mounted to a trailer that has been modified from the factory specifications
for stock units. Please consult Baldor for custom designs.
Figure 3-1 Generator Lifting
B1
A2
Lift Point
A1
A
B
C1
C
Table 3-1 Mounting Dimensions
Generator No. of Axles A A1 A2 B B1 C C1
TS25 1 67 47.5 5.5 130 74 62 38
TS35 1 67 47.5 5.5 130 74 62 38
TS45 2 82 60 5.5 146 84 62 38
TS60 2 82 60 5.5 146 84 62 38
TS80 2 76 55 5.5 146 84 62 38
TS130 2 88 68 6 180 118 75 42
TS175 2 88 68 6 180 118 75 42
TS250 2 102 76 7 218 159 82 54
TS400 2 126 93 5.22 251 195 98 66
Physical Location The mounting location of the system is important. It should be installed in an area that is
protected from direct harmful gases or liquids, dust, metallic particles, shock and vibration.
It should be installed in an outdoor location so the exhaust fumes are vented to the atmosphere.
When the Generator is installed outdoors
The factory installed enclosure is designed to keep out undesirable weather elements while
providing cooling and ventilation.
Receiving & Installation 3-1MN2417
Page 14
Several other factors should be carefully evaluated when selecting a location for installation:
1. For effective cooling and maintenance, the system should be mounted on a flat,
smooth, noncombustible level surface. A concrete pad is ideal and provides a secure
installation.
2. Installation should prevent water levels from reaching the generator. Drainage must be
adequate to keep concrete pad free from standing water.
3. Installation should prevent obstructions by buildup of leaves, grass, sand, snow, etc. If
these items pose a problem, consider building a small fence or other break to protect
the unit from accumulation of debris.
4. Installation should place the generator as close as possible to the transfer switch.
5. At least forty−eight (48) inches clearance must be provided on all sides for air flow.
6. Access must be provided to allow the enclosure covers to be opened or removed for
service and maintenance.
7. Maximum Ambient temperature is 122°F (50°C).
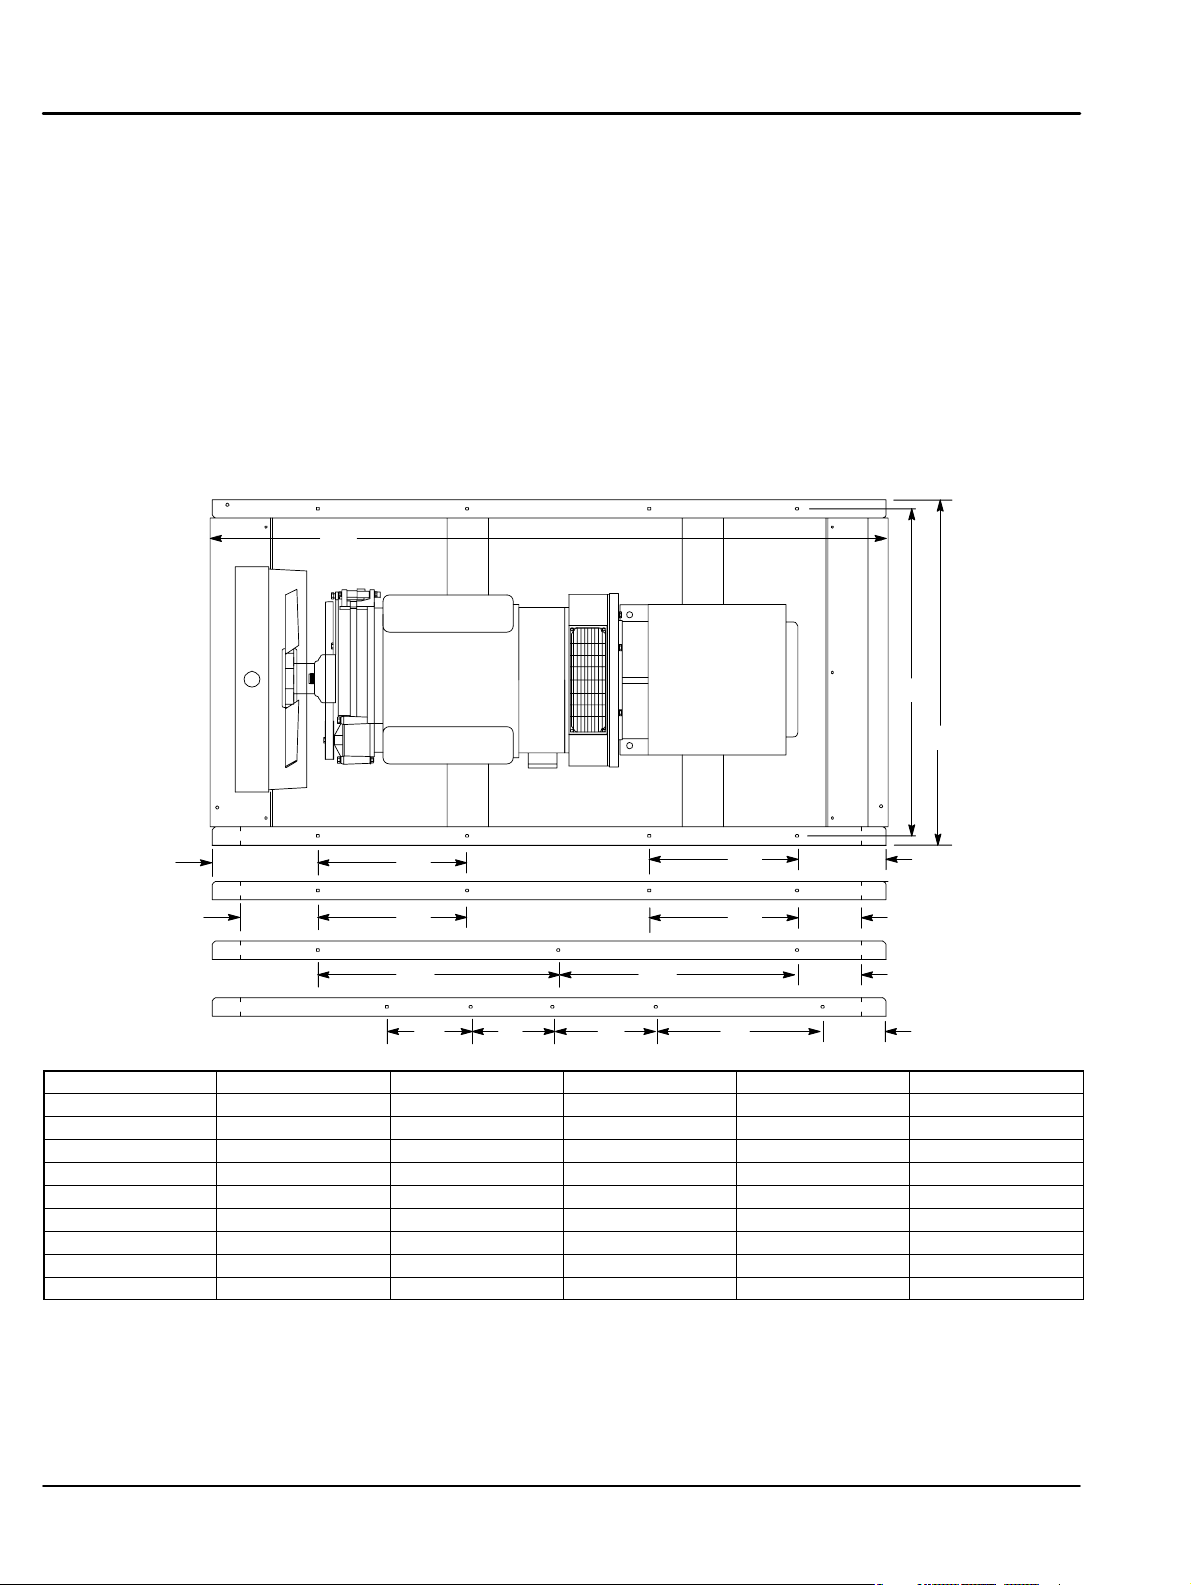
Figure 3-2 Generator Mounting (Skid)
A
B1
Holes each side
TS250 only
(4 Holes)
TS130/175 only
(4 Holes)
TS25/45/80 only
(3 Holes)
TS400 only
(6 Holes)
TA0000C10
BA0236A00
BA0236A02
10.85401−G10
A2A1
A2A1
212427
A2 A1
A2 A1
A1A2 A2
Table 3-2 Mounting Dimensions
Generator A A1 A2 B B1
TS25 74 8.12 23.81 38 36
TS35 74 8.38 28.56 38 36
TS45 84 8.38 28.56 38 36
TS60 84 8.38 28.56 38 36
TS80 84 8.38 28.56 38 36
TS130 118 16.57 26.57 42 40
TS175 118 16.57 26.57 42 40
TS250 159 18.00 40.00 54 52
TS400 195 12.00 See Figure 3-2 66 63
Secure the Generator (Skid Mount only)
Six mounting bolts (eight for TS130/175/250) in the base frame secure the generator to the
shipping pallet. Remove these bolts, lift the generator and remove the shipping pallet. Secure
the generator to the concrete pad using anchor hardware (not provided) in the base frame
mounting holes (holes are 0.66” diameter). See Figure 3-2 and Table 3-2. Anchor bolts must be
long enough to extend through the generator mounting frame.
B
A148
3-2 Receiving & Installation MN2417
Page 15

Hot Exhaust Gasses
WARNING: Exhaust fumes/gases are extremely dangerous and can cause severe illness or death. Never
breath exhaust fumes produced by a running engine. Only run the engine outdoors where
ventilation is plentiful. Exhaust gases contain carbon monoxide, a colorless, odorless and
extremely dangerous gas that can cause unconsciousness or death. Symptoms of carbon
monoxide poisoning include: dizziness, nausea, headaches, sleepiness, vomiting or
incoherence. If you or anyone else experiences these symptoms, get out into fresh air
immediately. Stop the engine and do not restart the engine until it has been inspected and if
necessary repaired or reinstalled in a well ventilated area.
WARNING: Hot exhaust gasses must never be directed toward anything that may catch fire or explode.
Exhaust must always be directed away from living areas or buildings that are occupied by people
or animals. Never allow exhaust gases to be directed towards any openings or air entry routes
(doors, windows, vents, etc...) of an occupied building.
The direction of the discharged hot air and hot exhaust gases is important as they have the
potential to create brown spots on the lawn or shrubs. In extreme cases this extremely hot air
could cause dried grass, shrubs, trees or other debris to ignite.
It is also recommended that an exhaust rain cap be used whenever it is possible that rain could
get into the system. This will help to prevent corrosion and damage to the exhaust system and
engine.
Installation The generator is completely assembled, tested and adjusted at the factory before it is shipped.
The procedures presented in this manual are suggestions and it is the responsibility of the
Owner/Operator to arrange for these procedures to be performed by licensed contractors
according to all applicable codes including local codes for your Municipality/City/County and
State. External connections required at the time of installation are:
1. Electrical Connections − power wiring (optional transfer switch) and control wiring.
2. Ground Connection.
After installation, the post installation checks must be performed prior to starting the engine.
After these checks have been performed and the system operation is verified to be good, refer to
Section 5 Maintenance for periodic checks that must be performed at scheduled intervals to
ensure continued operation with minimal problems.
WARNING: Disconnect the battery’s ground terminal before working in the vicinity of the battery or
battery wires. Contact with the battery can result in electrical shock when a tool accidently
touches the positive battery terminal or wire. The risk of such shock is reduced when the
ground lead is removed during installation and maintenance.
Fuel Connections
External fuel connections are not required. A self contained fuel tank is located within the base
of the generator set.
MN2417
Receiving & Installation 3-3
Page 16
Electrical Connections Class 1 wiring methods must be used for field wiring connections to terminals of a class 2
Generator
Catalog
Generator
Catalog
circuit. It is the responsibility of the owner/operator to arrange for these procedures to be
performed by a licensed electrical contractor and ensure conformance to all applicable codes
including local codes peculiar to your municipality/city/county and state. Wire size and insulation
type should be as required by NEC (National Electrical Code) and local codes.
Warning: Never connect this generator to the electrical system of any building unless a licensed
electrician has installed an approved transfer switch. The national electrical code (NEC)
requires that connection of a generator to any electrical circuit normally powered by means of
an electric utility must be connected by means of approved transfer switch equipment to
isolate the electrical circuit from the utility distribution system when the generator is
operating. Failure to isolate the electrical circuits by such means may result in injury or death
to utility power workers due to backfeed of electrical energy onto the utility lines.
Warning: Incorrect installation of this generator set could result in property damage, injury or death.
Connection of the generator to its fuel source must be done by a qualified professional
technician or contractor.
WARNING: Be sure the system is properly grounded before applying power. Do not apply AC power before
you ensure that grounds are connected. Electrical shock can cause serious or fatal injury. NEC
requires that the frame and exposed conductive surfaces (metal parts) be connected to an
approved earth ground. Local codes may also require proper grounding of generator systems.
Intended Use The intended purpose of this generator set is to provide electrical power when the main utility power
supply is interrupted. Therefore, it is important that all the wiring that connects the generator set with
your house, transfer switch, distribution box, battery charger, etc. be properly installed.
Protection Single Phase circuit protection is provided within the generator. The power output connections
are rated and sized according to the KW of the generator. Proper lead wire from these points to
the automatic transfer switch (or load switching device) is mandatory. See transfer switch
information for corresponding generator input terminals.
Three phase circuit protection is provided by the generator. When connecting the generator
output to an electrical load, a UL listed circuit breaker with the appropriate ratings shall be
provided within 25 feet of the Genset. Use only copper wires.
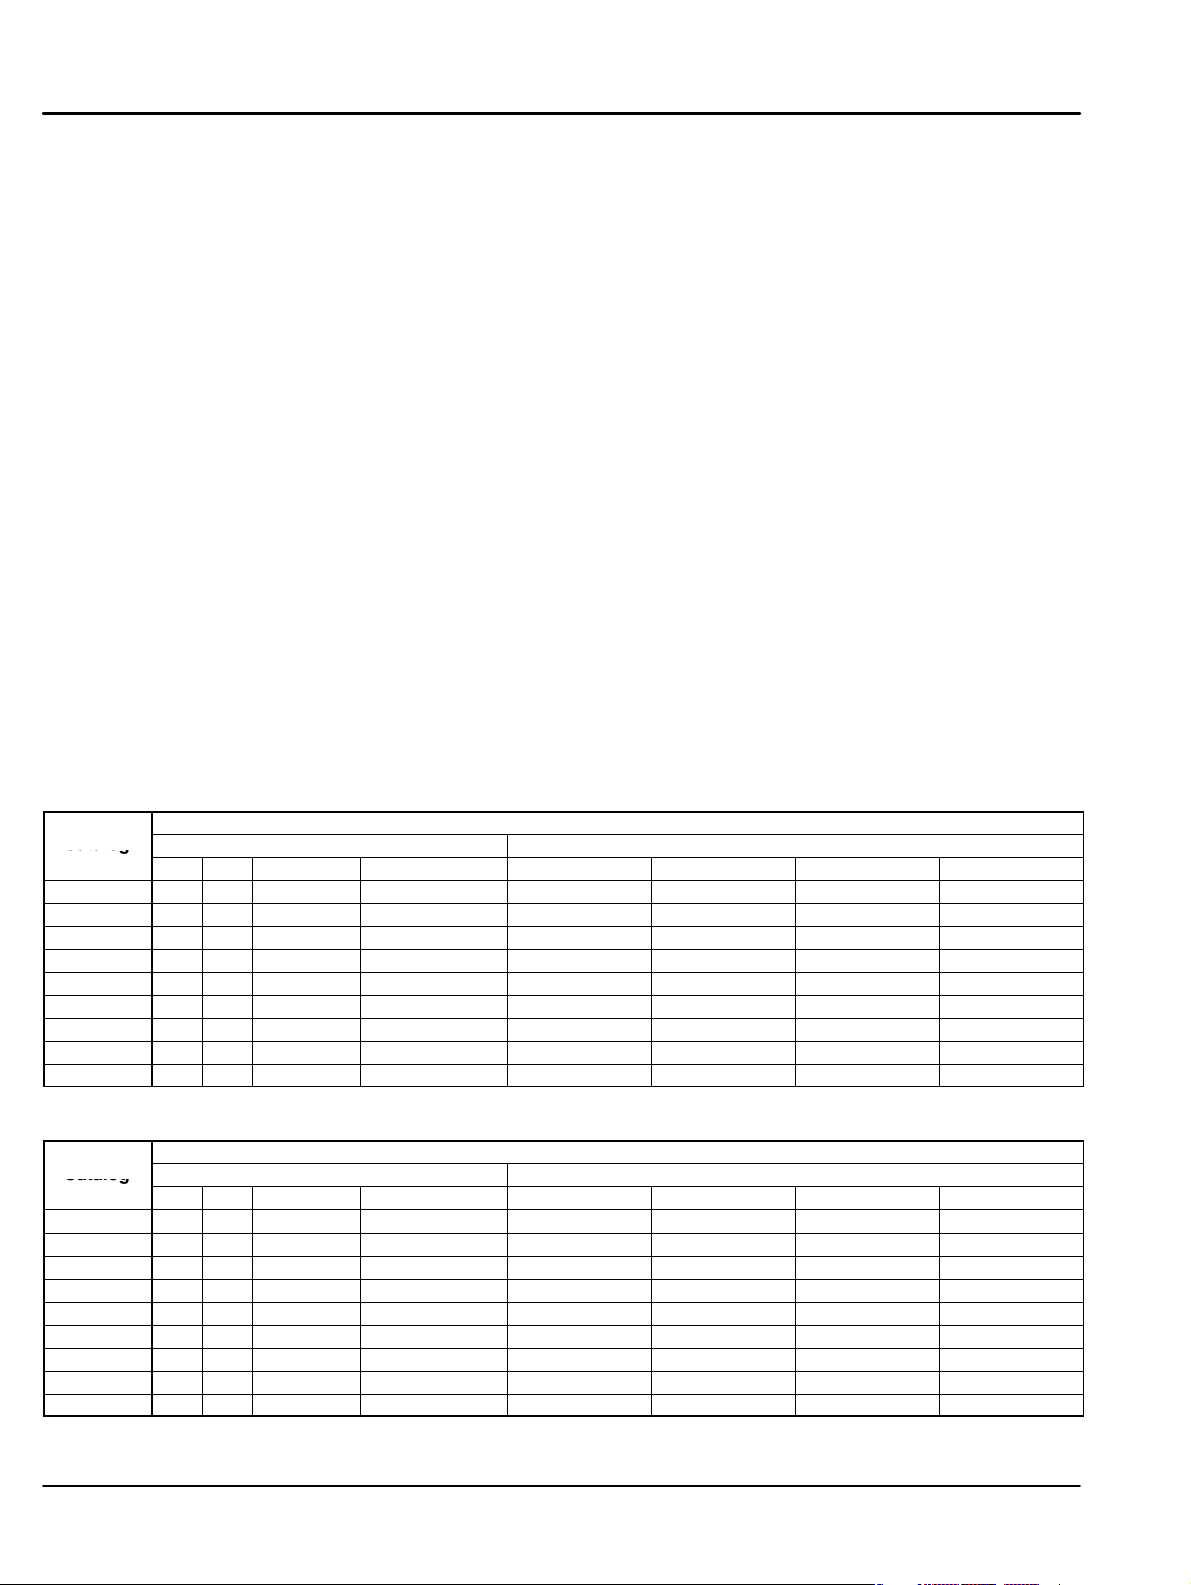
Table 3-3 Standby Power Ratings
Generator
Catalog
No.
TS25 18 18 240/120 75/2x75 25/25/25 20/20/20 208/240/480 69/60/30
TS35 25 25 240/120 104/2x104 37/37/37 30/30/30 208/240/480 104/90/45
TS45 27 27 240/120 112/x2112 46/46/48 37/37/38 208/240/480 128/111/57
TS60 43 43 240/120 179/2x179 60/60/61 48/48/49 208/240/480 166/144/73
TS80 45 45 240/120 187/2x187 72/72/81 58/58/65 208/240/480 201/174/97
TS130 70 70 240/120 291/2x291 131/131/134 105/105/107 208/240/480 364/315/160
TS175 100 100 240/120 416/2x416 169/169/175 135/135/140 208/240/480 468/405/210
TS250 175 175 240/120 729/2x729 250/250/250 200/200/200 208/240/480 693/601/300
TS400 250 250 240/120 1041/2x1041 400/400/400 320/320/320 208/240/480 1110/962/481
* Example 2x75 means 2 lines (Line to Neutral) of 120V @ 75 amps each.
kVA kW Volts Amps * kVA kW Volts Amps
1 Phase 3 Phase
Electrical Load Capacity Standby Power Ratings
Table 3-4 Prime Power Ratings
Generator
Catalog
No.
TS25 18 18 240/120 75/2x75 23/23/23 18/18/18 208/240/480 62/54/27
TS35 22 22 240/120 91/2x91 33/33/33 27/27/27 208/240/480 93/81/40
TS45 25 25 240/120 104/2x104 44/44/44 35/35/35 208/240/480 121/105/52
TS60 40 40 240/120 166/2x166 56/56/56 45/45/45 208/240/480 156/135/67
TS80 43 43 240/120 179/2x179 69/69/75 55/55/60 208/240/480 190/165/90
TS130 66 66 240/120 275/2x275 119/119/121 95/95/97 208/240/480 329/285/145
TS175 95 95 240/120 395/2x395 156/156/159 125/125/127 208/240/480 433/375/190
TS250 160 160 240/120 666/2x666 227/227/227 180/180/180 208/240/480 624/541/270
TS400 240 240 240/120 1000/2x1000 365/365/365 292/292/292 208/240/480 1013/878/439
* Example 2x75 means 2 lines (Line to Neutral) of 75 amps each.
kVA kW Volts Amps * kVA kW Volts Amps
1 Phase 3 Phase
Electrical Load Capacity Prime Power Ratings
3-4 Receiving & Installation
MN2417
Page 17
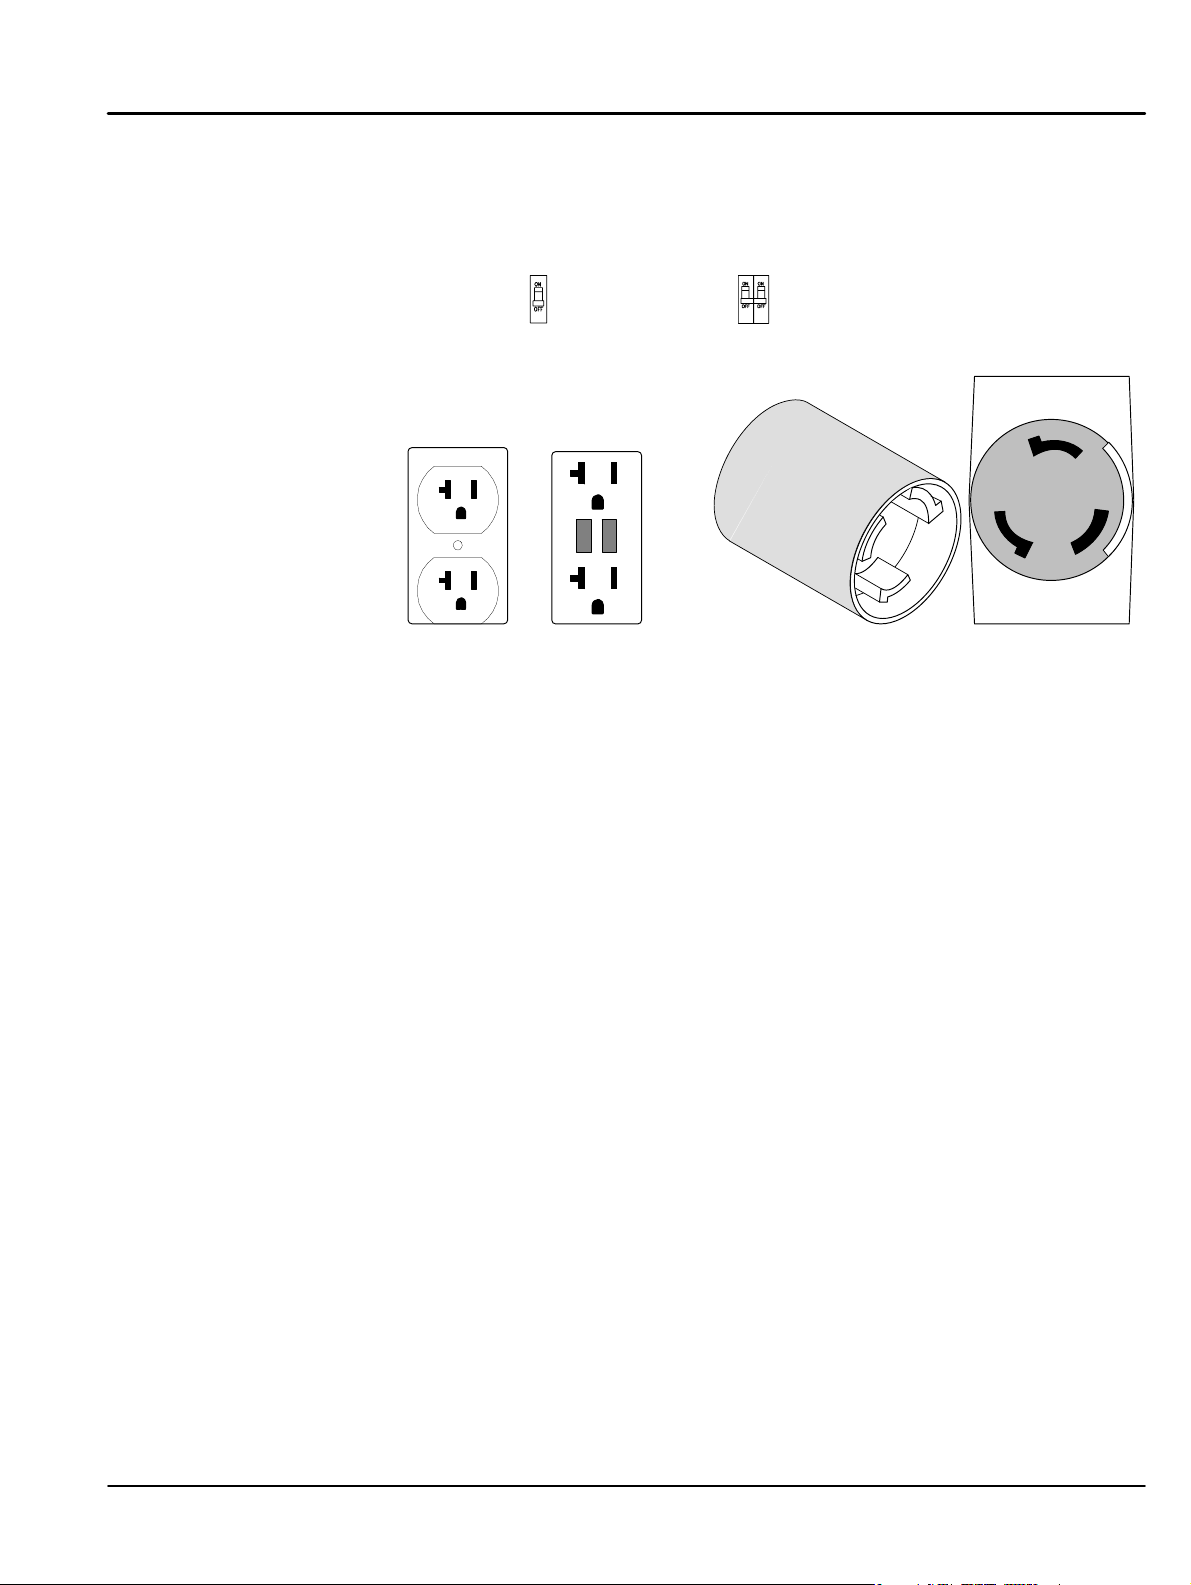
Single Phase Connections
Single phase connections are made at load receptacles located by the operator panel, see
Figure 3-3. Simply open the rear panel access door and make the connections. When the panel
door is closed, the connections are weather tight.
Single phase power is
always available.
Figure 3-3 Receptacle Panel (Single Phase)
Circuit Breakers (Single or Double pole)
Single pole breaker
for 120VAC outlets
Reset
Test
Double pole breaker
for 240VAC outlets
CS6365N
Circuit Breakers provides protection on some
units. To reset a breaker, place it in the OFF
then the ON position.
(GOLD)
X
X
CS6369
125/250V
50A
Y
W
G
(GOLD)
Y
(SILVER)
W
STD Outlet
120V, 20A
GFI Outlet
120V, 20A
240V, 50A
MN2417
Receiving & Installation 3-5
Page 18
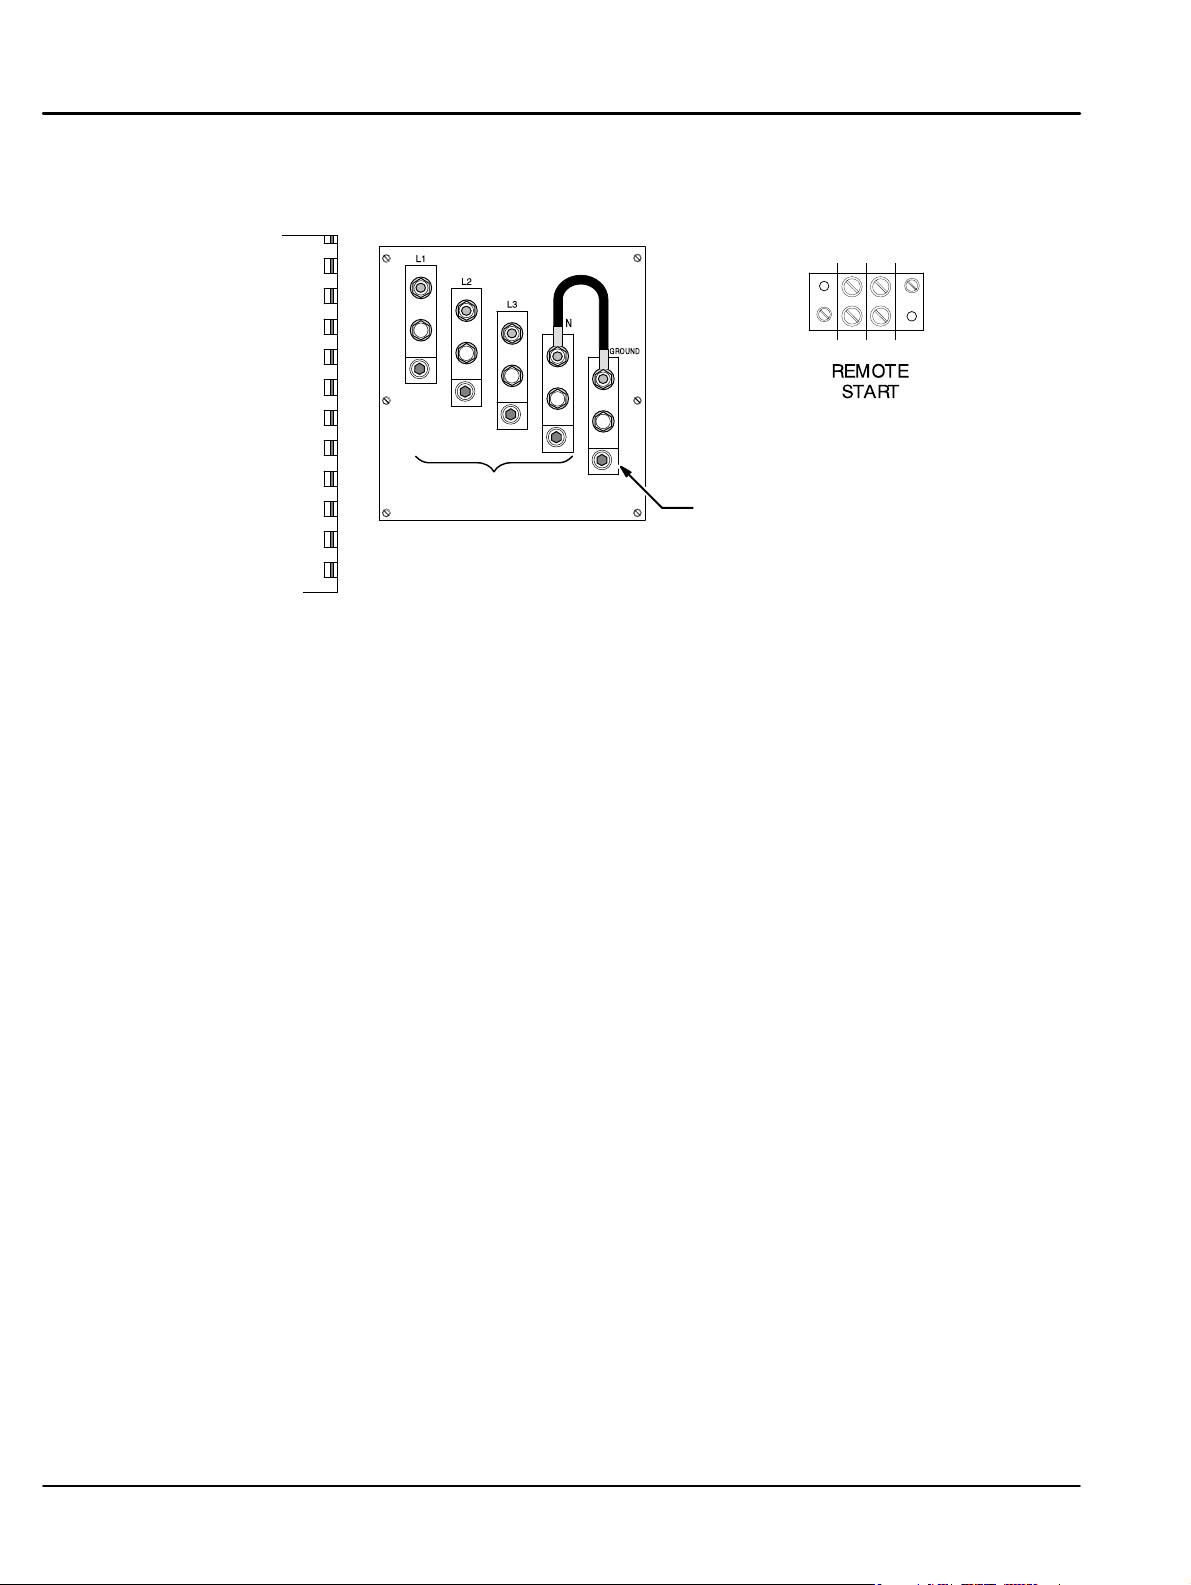
Three Phase Connections
Three phase connections are made at L1, L2, L3 and N connections shown in Figure 3-4.
For power to be applied to these
terminals, the Output Voltage Selector
Switch must be in the 120/208V,
120/240V or 277/480V positions.
Figure 3-4 Three Phase and Remote Start Connections
RR1 RR2
Remote Start Connections
Customer Connections
L1, L2, L3 and N
Earth Ground Connection
(Connect to Driven Earth Ground Rod)
Transfer Switch Considerations
The following are general considerations for the safe use of a transfer switch:
1. The transfer switch should be located inside the building near the main breaker box or
the disconnect box.
2. The transfer switch must be kept away from any location that might allow water to get
on it.
3. If the transfer switch is mounted outside, it must be protected from the environment and
it’s elements.
4. Do not mount the transfer switch on the generator set.
5. Do not mount the transfer switch where flammable liquids or vapors are present.
Remote Start Contacts
This two−wire connection will start and stop the generator, when properly connected to a remote
start contact, shown in Figure 3-4. These contacts RR1 and RR2 are connected to the “Engine
Start Contacts” of the automatic transfer switch. A two pole normally open, closed to operate
switch may also be used to start the generator.
Shore Power Use extension cord with appropriately sized conductors to connect the optional “Shore Power”
receptacle to 120VAC (240VAC for TS400) single phase utility power. This powers battery
chargers, block heaters etc. when the generator is not in operation. A single phase 20 amp
breaker is provided for circuit protection.
AC Input These connections are for units with float type battery charger or engine block heater. A
constant supply of 120 volts AC (or as specified) is needed at these terminals to power these
devices when generator is not operating.
Note: Power is not required when the unit is in operation. Internal battery charging and radiant
heat during operation eliminate the need for these devices.
Battery Charger Considerations
1. Mount the battery charger inside the generator enclosure as close to the battery as is
reasonably possible.
2. Do not mount the battery charger where flammable liquids or vapors are present.
When the battery is charging it produces explosive gasses.
General Wiring Considerations
1. When routing the interface wiring, do not route it up against anything that could cut or
chafe the wiring. do not route the wire up against any hot or potentially hot object.
2. Make sure that all the electrical components (generator set, transfer switch, battery
charger, etc.) share a common ground.
3. Check with your local building inspector to determine what you must do to comply with
the local regulations for grounding of this type of permanent installation.
3-6 Receiving & Installation
MN2417
Page 19

Frame Ground Connection
WARNING: Be sure the system is properly grounded before applying power. Do not apply AC power
before you ensure that grounds are connected. Electrical shock can cause serious or fatal
injury. NEC requires that the frame and exposed conductive surfaces (metal parts) be
connected to an approved earth ground. Local codes may also require proper grounding of
generator systems.
It is important for safety reasons that the Generator set, transfer switch and battery charger share
a common Ground and neutral.
The NEC requires that the frame and exposed metal surfaces be at local ground reference
potential to avoid electrical shock hazard. A local ground reference may require a driven earth
ground conductor at the generator installation site. Make the ground connection as shown in
Figure 3-4. Use the appropriate size wire as required by NEC and local codes.
1. Open the enclosure electrical access panel door.
2. Connect the ground wire to the “earth ground connection” terminal shown in Figure 3-4.
This is the local ground reference to ground the generator enclosure and frame.
Battery Connections The generator is shipped with no battery installed.
Caution: This generator must have a battery installed for operation. The battery is used during starting
and during operation. If engine operation is attempted while the battery is removed, damage
to the engine’s electrical components may result.
WARNING: Installation and servicing of batteries is to be performed or supervised by personnel
knowledgeable of batteries and the required precautions. Keep unauthorized personnel away
from batteries.
WARNING: Do not dispose of battery or batteries in a fire. The battery is capable of exploding. If the
battery explodes, electrolyte solution will be released in all directions. Battery electrolyte
solution is caustic and can cause severe burns and blindness. If electrolyte contacts skin or
eyes, immediately flush the area with water and seek medical attention quickly.
WARNING: Do not mutilate the battery . The battery contains electrolyte solution which is caustic and
can cause severe burns and blindness. If electrolyte contacts skin or eyes, immediately flush
the area with water and seek medical attention quickly.
WARNING: A battery presents a risk of electrical shock hazard and high short circuit current. The
following precautions are to be followed when working on batteries:
1. Remove watches, rings, necklaces and all other metal objects.
2. Use tools with insulated handles.
3. Wear safety goggles, rubber gloves and boots.
WARNING: The battery electrolyte is a dilute sulfuric acid that is harmful to the skin and eyes. It is
electrically conductive and corrosive. The following precautions are to be followed when
working on batteries:
1. Wear full eye protection (safety glasses or goggles) and protective clothing.
2. Where electrolyte contacts the skin, flush the area immediately with water and wash it
off using soap and water.
3. Where electrolyte contacts the eyes, immediately flush the eye thoroughly with water
and seek medical attention quickly.
4. Spilled electrolyte is to be washed down with an acid neutralizing agent. A common
practice is to use a solution of one pound (500 grams) bicarbonate of soda to one
gallon (four liters) of water. the bicarbonate solution is to be added until evidence of
reaction (foaming) has ceased. The resulting liquid is to be flushed with water and the
area dried.
MN2417
Receiving & Installation 3-7
Page 20

WARNING: A battery presents a risk of fire because they generate hydrogen gas. Hydrogen gas is
extremely explosive. Never jump start a battery, smoke in the area around the battery or
cause any spark to occur in the area around the battery. The following precautions are to be
followed when working on batteries:
1. Do not smoke when near batteries.
2. Do not cause flame or spark in battery area.
3. Discharge static electricity from body before touching batteries by first touching a
grounded metal surface.
WARNING: Disconnect the battery’s ground terminal before working in the vicinity of the battery or
battery wires. Contact with the battery can result in electrical shock when a tool accidently
touches the positive battery terminal or wire. The risk of such shock is reduced when the
ground lead is removed during installation and maintenance.
Procedure: The correct type battery must be installed in the battery compartment provided, see Table 3-5.
Installation and servicing of batteries is to be performed or supervised by personnel
knowledgeable of batteries and the required precautions.
Keep unauthorized personnel away from batteries.
1. Open access doors and locate battery tray.
2. Remove battery cables from the battery, the (−) negative first then the (+) positive.
3. Remove the Battery Hold Down Bar and Rods.
4. Remove the old battery and place the correct new battery (see Table 3-5) on the tray.
5. Install the Battery Hold Down Bar and Rods as shown in Figure 3-5.
a. Place the bent end of the Battery Hold Down Rod through the hole in the Battery Tray.
b. Place the threaded end of the Battery Hold Down Rod through the hole in the
Battery Hold Down Bar and secure with flat washer, lock washer and nut.
c. Repeat steps a and b for the other Battery Hold Down Rod.
Figure 3-5 Battery Installation
Washers & Nut
Battery Hold Down Bar
(Install away from terminals)
6. Connect the positive lead to the positive (+) battery terminal.
7. Connect the negative lead to the negative (−) battery terminal.
8. Do not lay tools or metal parts on top of batteries.
9. Connect charging source to the battery terminals.
10. Disconnect the battery’s ground terminal before working in the vicinity of the battery or
battery wires. Contact with the battery can result in electrical shock when a tool
accidently touches the positive battery terminal or wire. The risk of such shock is
reduced when the ground lead is removed during installation and maintenance.
The + and − terminals of your battery may
be different than shown. Be sure that the
Positive lead is connected to the positive
(+) terminal of your battery.
Battery
Washers & Nut
Battery Hold Down Rod
Battery Tray
3-8 Receiving & Installation
MN2417
Page 21
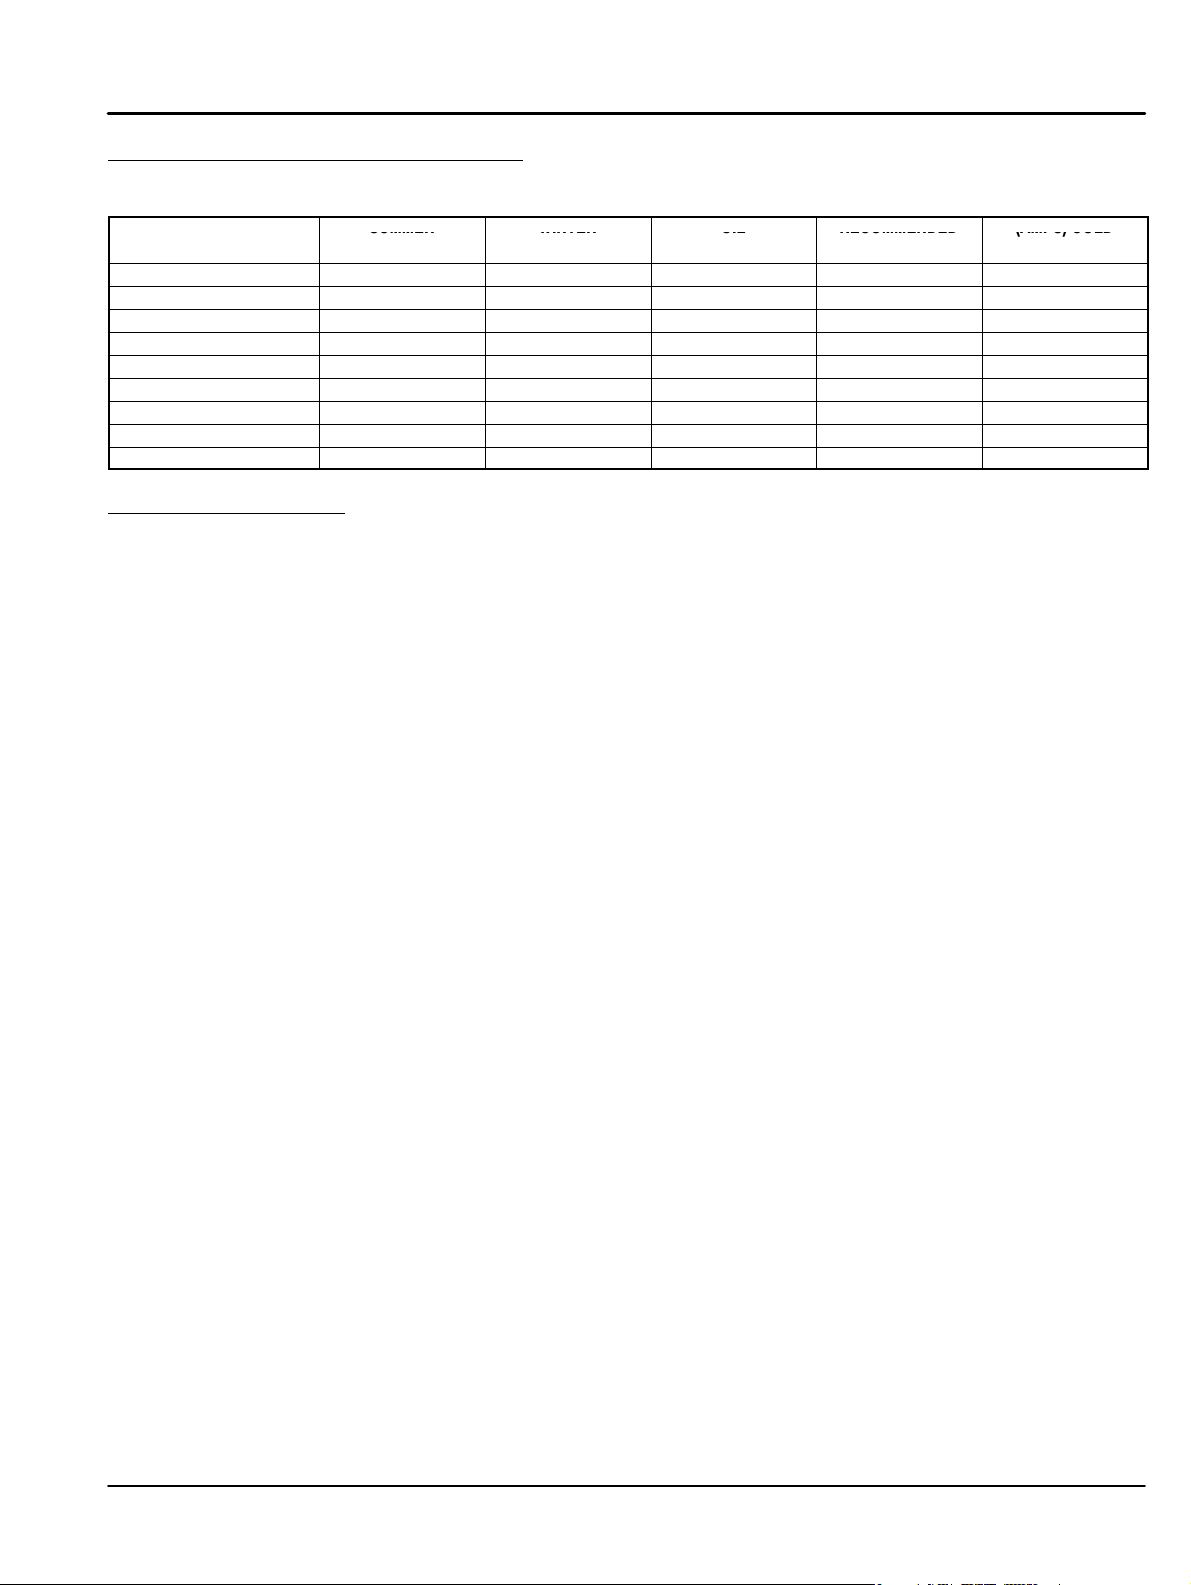
Recommended Engine Oil and Battery Type
MODEL
SUMMER
WINTER
OIL
RECOMMENDED
(AMPS) COLD
When replacing batteries, use only the recommended battery for your generator, see Table 3-5.
Table 3-5 Oil & Battery Recommendations
SUMMER WINTER OIL RECOMMENDED (AMPS) COLD
OIL
TS25 SAE. 20W/50 5W/30 8.6 QTS BCI Group 24 925
TS35 SAE. 20W/50 5W/30 8.5 QTS BCI Group 925
TS45 SAE. 20W/50 5W/30 11.8 QTS BCI Group 925
TS60 SAE. 20W/50 5W/30 11.8 QTS BCI Group 925
TS80 SAE. 20W/50 5W/30 14.0 QTS BCI Group 925
TS130 SAE. 20W/50 5W/30 18.0 QTS BCI Group (2) 750
TS175 SAE. 20W/50 5W/30 34.0 QTS BCI Group (2) 750
TS250 SAE. 20W/50 5W/30 34.0 QTS BCI Group (2) 750
TS400 SAE. 20W/50 5W/30 45.0 QTS BCI Group (2) 750
OIL
CAPACITY
BATTERY
CRANKING
Post Installation Checks
When the initial installation is complete, these checks must be performed before starting the
engine. These checks are not required before each start, only after the initial installation.
1. Generators that have been in transit or storage for long periods may be subjected to
extreme temperature and moisture changes. This can cause excessive condensation,
and the generator windings should be thoroughly dried before bringing the generator
up to full nameplate voltage. If this precaution is not taken, serious damage to the
generator can result.
Caution: Do not apply high voltage to windings (do not start the generator) in a moisture−saturated
condition. Moisture can cause insulation breakdown, making it necessary to return the
generator to the factory for repair, and consequent expense and loss of time.
Note: These precautions are especially necessary in locations such as seaboard installations and
other high humidity areas. Some installations will be in atmospheres that are much more
corrosive than others. Prevention of a failure is better than being forced to make a repair.
2. Verify that the transfer switch is in Utility Power mode. No power must be present at
the generator or transfer switch connections. Verify with a voltmeter.
3. Verify that the engine starting battery is disconnected so accidental starting is not possible.
4. Verify generator is securely mounted and anchored to cement pad (skid mount only).
5. Verify that proper clearance exists on all sides and top of enclosure.
6. Verify no debris (buildup of leaves, grass, sand, snow, etc.) is present.
7. Assure generator is a safe distance from any flammable or combustible material.
8. Verify that the three phase generator power (L1, L2, L3 and N) are properly connected
to the transfer switch.
9. Verify that the generator and transfer switch load are voltage compatible.
10. Verify that no load is connected to the circuit breaker and/or transfer switch.
11. Inspect the engine and generator and verify that there are no loose wires or
components. Tighten if necessary.
12. Verify that the ground conductor is of correct wire size and properly connected.
13. Verify engine oil level is full. Refer to engine manual if necessary.
14. Verify engine coolant level is full. Refer to engine manual if necessary.
15. Verify exhaust system to assure it is in properly connected and pointing away from
occupied living space, air entry routes (doors, windows, vents etc.) and combustible
materials.
MN2417
Receiving & Installation 3-9
Page 22

Post Installation Checks Continued
16. Place the voltage output selector switch in the appropriate position.
17. Verify all loads are disconnected.
18. Verify the Master Control is in the “Stop” position.
Connect the engine starting battery to the starter. Verify it is installed correctly.
19. Verify the fuel source is available.
20. Remove all tools, rags, etc. from inside the generator enclosure. Close all enclosure
doors and be sure no hands are inside the generator enclosure when it starts.
21. Start the generator.
22. The engine should begin to crank and start when the fuel moves to the engine. If the
engine fails to start, refer to Section 5 Troubleshooting.
23. With the engine running, several checks must be made:
a. Verify there are no fuel leaks. If a fuel leak is detected, stop the engine (set the
Master Control in the “Stop” position) immediately and repair the leak before
proceeding.
b. Verify there are no coolant or oil leaks. If a leak is detected, stop the engine (set
the Master Control in the “Stop” position) immediately and repair the leak before
proceeding.
c. Verify that operation is smooth. If squeals, vibrations or other abnormal sources of
noise exist, stop the engine (set the Master Control in the “Stop” position)
immediately and repair before proceeding.
d. Verify the correct voltage exists at the receptacles.
WARNING: Engine coolant is under pressure and is near the boiling point of water when engine is hot.
Do not open the coolant system until the engine has completely cooled. Hot coolant can
cause severe burns and other injuries. When engine is cool, coolant level can be checked.
24. After the operation checks are made, stop the engine (set the Master Control in the
“Stop” position) and wait 2 hours for the engine to cool. When the engine is cool,
check engine oil and coolant levels as instructed in the engine operation manual.
25. Close all enclosure covers. The post installation checks are now complete.
3-10 Receiving & Installation
MN2417
Page 23

Section 4
Operation
Towing the Generator
WARNING: Never allow a person to ride in or on a trailer that is being towed. All states prohibit
passengers in towed vehicles. A person can fall off and be struck be another vehicle or run
over by the towed trailer. Failure to observe this warning can result in death.
WARNING: Before using a tow vehicle with a trailer mounted generator, verify that the vehicle is designed
for the load. Using a vehicle that is too small is very dangerous. Be certain that it can handle
the M.G.V.W. (Maximum Gross Vehicle Weight) and the tongue weight for safe towing and
braking.
WARNING: For a new trailer, the wheel lug nuts should be tightened to the proper torque specification
before use, after 50 miles of operation, after 100 miles of operation and periodically thereafter.
Failure to check the lug nuts for proper tightness can result in an accident due to a wheel
falling from the trailer.
WARNING: Never operate a trailer or tow vehicle that has a loose, missing or broken lug nut. The trailer
is designed for safe operation with all lug nuts installed and all at the proper torque rating.
Operating the trailer with one or more broken or missing lug nuts greatly increases the load
on the remaining nuts and can cause failure of the remaining nuts that can result in an
accident due to a wheel falling from the trailer.
S Make sure the tow vehicle is able to tow the load. Vehicle brake capacity is extremely
critical and the tow vehicle must be able to handle the additional weight of the trailer
mounted generator. Radiator and transmission cooling must also be considered.
S Be sure hitch capacity is equal to or greater than the load when mounted on the
vehicle.
S Be sure the size and rating of the hitch ball is equal to or greater than the load.
S Make sure the safety chain(s) rating is equal to or greater than twice the maximum
gross vehicle weight rating of your trailer.
S It is illegal to transport passengers in any trailer.
S Reduce weight in car trunk and rear seat areas by the amount of tongue weight of your
trailer.
S Any alterations or changes made to the trailer void any express or implied warranties
on the trailer or towing equipment.
Selecting the Proper Towing Equipment
When selecting the proper towing equipment, the two most important factors that must be
considered are the M.G.V.W. (Maximum Gross Vehicle Weight) and the Tongue Weight (trailer
tongue weight at the hitch). The M.G.V.W. is the total weight of the trailer plus the payload in the
trailer. The tongue weight is the downward pressure exerted at the coupler. The easiest way to
measure the gross vehicle weight is to place the loaded trailer on a vehicle scale making sure
that the scales are supporting the entire weight of the loaded trailer.
The easiest method to measure tongue weight is to place the jack stand (trailer tongue) on a
scale making sure the trailer is level. The trailer tongue should be level and in its normal towing
position. Tongue weight should be 10% of trailer weight and not more than10% of M.G.V.W.
Tow Vehicle
Make sure the vehicle you are using to tow the trailer is capable of towing the weight. Check the
vehicle Owner’s Manual for towing capability of the towing vehicle or contact the vehicle
manufacturer for this information. Make sure the tow vehicle is able to tow the load. Vehicle
brake capacity is extremely critical and the tow vehicle must be able to handle the additional
weight of the trailer mounted generator. Radiator and transmission cooling must also be
considered. Seek expert advise to select the proper tow vehicle. Trailers with a gross vehicle
weight rating that exceeds 10,000 lbs require special consideration.
Table 4-1 Tow Hitch Capacity
Tow Vehicle Hitch Class Maximum Tow Capacity Maximum Tongue Weight
Compact Vehicle Sub Class I 1000 Lbs. 100 Lbs.
Compact Vehicle Class I 2000 Lbs. 200 Lbs.
Mid & Full Size Vehicle Class II 3500 Lbs. 300 Lbs.
3/4 Ton or larger Truck Class III 5000 Lbs. 500 Lbs.
1 Ton or larger Truck Class IV 10000 Lbs. 1000 Lbs.
Class 3−8 Vehicle Custom Engineered Custom Engineered Custom Engineered
Operation 4-1MN2417
Page 24

Selecting the Proper Towing Equipment Continued
Electrical Trailer Wiring
All trailers must have taillights, brake lights and turn signals connected to the towing vehicle’s
electrical system. It is also recommended that a heavy duty turn signal flasher and emergency
flasher (if separate) be installed since the trailer lights place an extra load on car flasher units.
Towing Heavy Trailer Loads
1. Trailer brakes. In all cases refer to your vehicle’s owner manual and the trailer
operating manual to be certain you have an adequate braking system to handle the
vehicle/trailer combination. Also, State and local requirements, road and weather
conditions and grade of road, etc. should be considered for trailer braking.
2. Additional equipment. The following items may be helpful for towing heavy loads. Consult
your vehicle’s owner manual or dealership for recommended towing accessories.
a. Overload Springs
b. Overload or air shocks
c. Transmission Oil Cooler
d. Engine Oil Cooler
e. Coolant recovery System
f. Heavy Duty Fan
g. Side View Mirrors
h. Sway Control
Safe Driving Tips 1. Loading Trailer. The trailer should be loaded so that the downward tongue weight is
approximately 10% of the gross vehicle weight. The trailer tongue should be level with
the tow vehicle coupling during towing. Adjust load, hitch and coupling as necessary to
ensure trailer tongue remains level during towing.
2. Following and stopping distance. The stopping distance is increased when towing a
trailer. A rule of thumb for the minimum distance that should be maintained between
you and the preceding car on dry pavement is one car and trailer length (2 car lengths)
for every 10 MPH you are traveling. The distance should be increased accordingly
depending on road and weather conditions. Avoid sudden stops if possible.
3. Passing. Accelerating and passing should be done slowly to allow extra distance for
passing. Signal well in advance when passing and returning to the proper lane. Allow for
the extra length of the trailer before changing lanes. Never change lanes abruptly as this
may cause the trailer to sway and push the tow vehicle into a “jack knife” condition.
4. Turning. Allow for the extra length of the trailer. Drive slightly beyond normal turning point
to avoid running over curbs and soft shoulders. Turning radius increases when towing.
5. Uphill and Downhill Grades. Reduce speed and use a lower transmission gear for
steep or long up or down hill grades. Maintain safe distance from other vehicles.
6. Parking.
S Avoid parking on uphill or downhill grades
S Place transmission in “PARK”
S Apply parking brake.
S Use wheel chocks.
S In a parking lot, avoid parking close to other vehicles. Turning radius is greater
and it may be impossible to get out of a parking space after a few other vehicles
have parked around your vehicle.
7. Trailer Sway. If trailer sway occurs, reduce speed. Apply trailer brakes rather than car
brakes to control sway. See step 1 and ensure trailer tongue remains level during
towing. If sway persists, seek expert advise.
8. Trailer Backing. Backing a trailer can be frustrating. The most important item to remember
is that the trailer will go in the opposite direction of the tow vehicle. It is helpful to have
another person help you back the trailer and watch for objects.
Turn the vehicle’s wheels to the right to make the trailer go left, and vice versa.
Put your hand at the bottom of the steering wheel. The trailer will go in the same direction
your hand moves (moving your hand to the right will cause the trailer to go right, and vice
versa). Sharp steering wheel corrections will cause the trailer to jackknife and may cause
damage to the rear of the tow vehicle or the front of the trailer.
4-2 Operation MN2417
Page 25
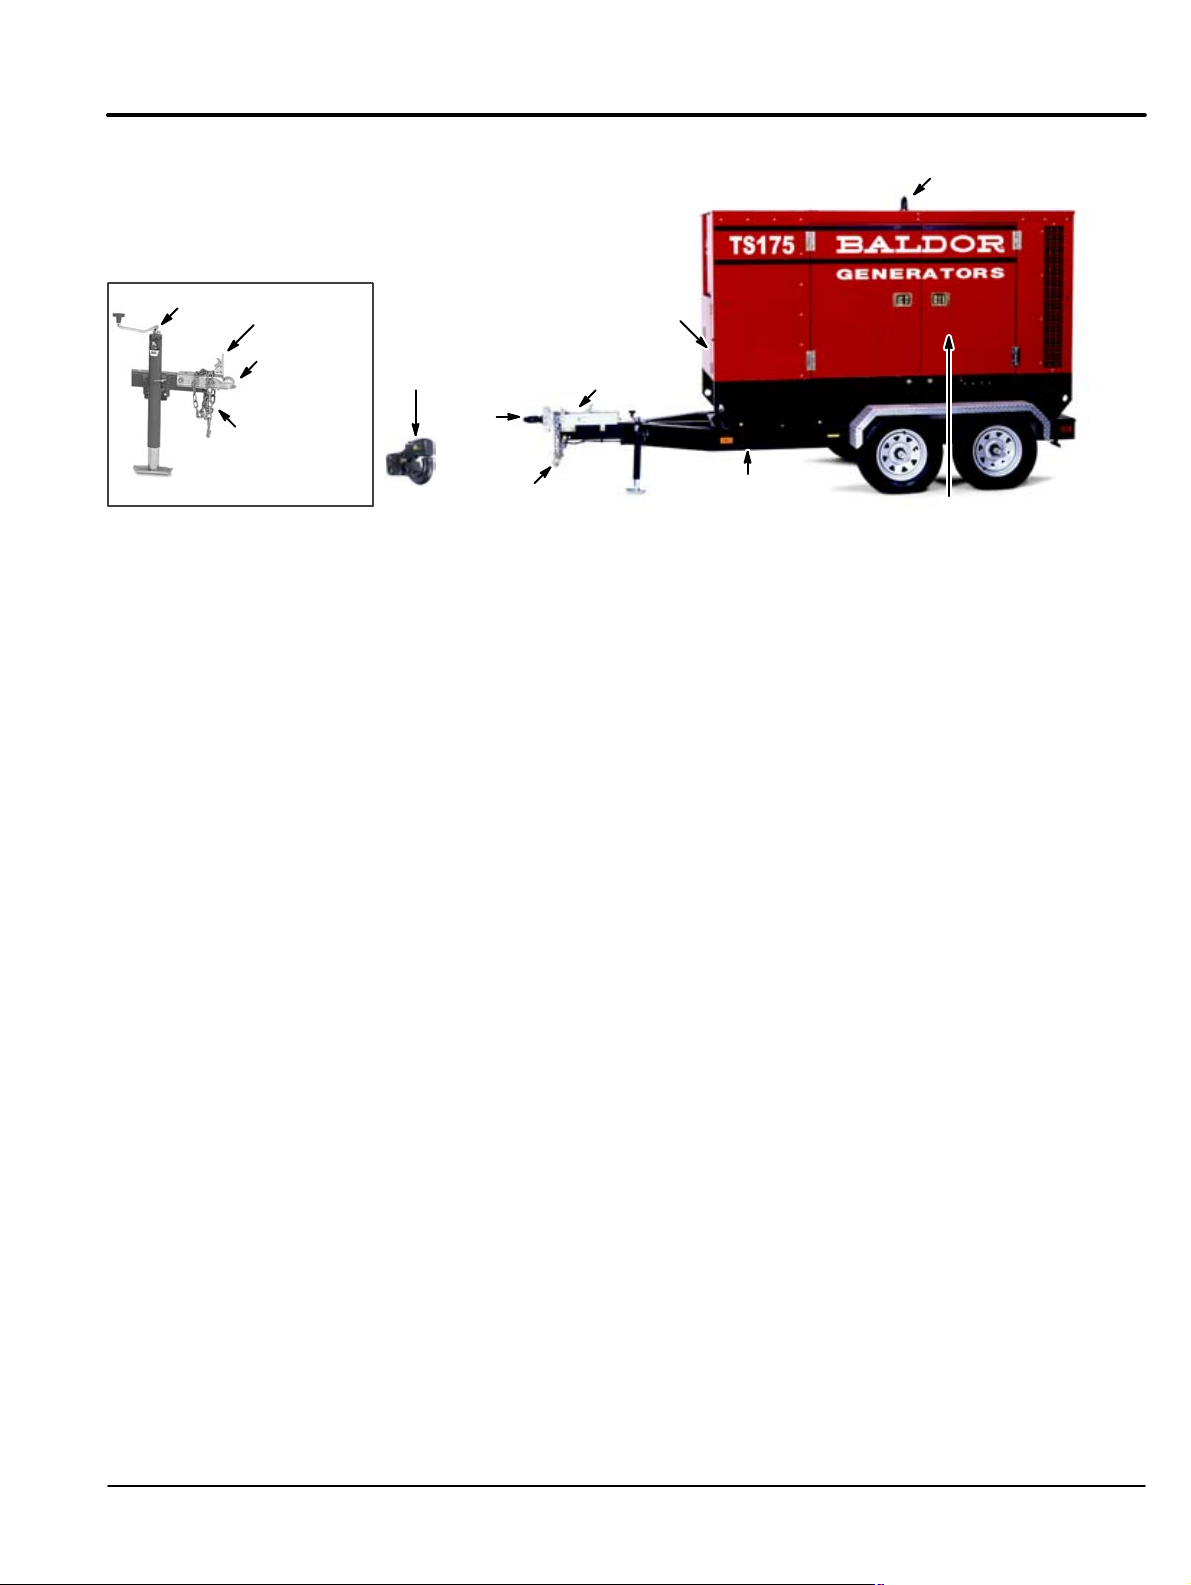
Figure 4-1 Trailer Component Identification
Lift Hook
Jack
Safety
Chains
Ball Coupler
Coupler Handle
Coupler
Tow Vehicle Mounted
Pintle Hook
Pintle
Safety
Chains
Battery
Compartment
Trailer Brake
Jack
Trailer
Single or
Double Axle
Engine
Compartment
Caution: Large “Engine Compartment Doors” on each side of enclosure must remain closed during
operation. If doors remain open, engine will overhead due to insufficient air flow around engine.
Safety Checks The following items should be checked before each use and once every 100 miles of towing:
1. Verify the tow vehicle is designed to tow the trailer before trailer is connected to the
vehicles hitch. Using a tow vehicle that is too small is very dangerous.
2. Verify the stop, tail and turn signals are working properly.
Replace damaged lenses, reflectors or bulbs.
3. Check wires for good connections and possible fraying or wearing of insulation.
4. Check and properly maintain the trailer, hitch, jack, ball and coupler.
5. Inspect hitch and ball for damage. Ball or hitch can be damaged in parking, hitting
curbs, dragging when crossing ditches or railroad tracks.
6. Check and properly tighten all bolts on trailer, hitch, ball and coupler (including trailer
wheels).
7. Check safety chains for wear and do not allow them to drag on ground or roadway.
8. Test breakaway system.
Hydraulic surge brake system, normally have a cable or chain connected to the tow
vehicle. In a break away condition, this cable or chain activates the master cylinder and
operates the brakes as the trailer stops.
An electric brake system, the emergency breakaway system has a battery, charger,
breakaway switch with a pull pin and cable connected to the tow vehicle. In a break
away condition, this cable operates the electric brakes (power provided by the brake
battery) as the trailer stops.
9. Check all generator mounting hardware for tightness.
10. Check tow vehicle tires for wear and proper inflation. (Check vehicle’s owner manual
for proper level of inflation of tires for towing a trailer).
11. Check trailer tires for wear and proper inflation. Replace only with a tire of the same
size and capacity ratings.
12. Carry emergency flares, reflectors and fire extinguisher.
13. Carry spare light bulbs and fuses.
14. Wheel bearings should be checked and regreased after the first 100 miles, and every
4000 miles thereafter or at least once a year. Wheel bearing grease or a good grade of
multi−purpose grease should be used for packing wheel bearings. If you don’t know
how to repack your wheel bearing, take your trailer to a service shop. Be sure to
properly tighten the axle nut and wheel nuts during assembly.
15. For proper tow vehicle maintenance while towing a trailer, check vehicle’s owner
manual and manufacturer’s specifications.
MN2417
Operation 4-3
Page 26
Towing Instructions See Figure 4-1 for component identification.
1. Be sure the generator is off.
2. Shut all enclosure doors and latch the locks.
3. Back the tow vehicle to within a few inches of the trailer coupler (Pintle or Ball).
4. Be sure the Coupler Handle is in the “UP” (open) position or the Pintle Hook is Open.
5. Adjust the trailer jack for the height of the hitch on the tow vehicle.
6. Back the tow vehicle so the trailer coupler is directly over the tow vehicle ball hitch or
the Pintle hook.
7. Lower the trailer so the trailer coupler rests securely on the ball hitch of the tow vehicle.
Move the Coupler Handle to the horizontal position and lock it in place to securely hold
the ball hitch of the tow vehicle.
OR
Latch the Pintle and lock the Pintle device securely.
Note: If this is not done properly, the trailer may become unhitched when it is towed.
8. Retract the front jack, pull the jack pin and rotate the jack 90 degrees from vertical to
the horizontal position, making sure the self−locking pin reseats and the jack is secured
to the tow bar (stowed position).
9. Connect safety chains, making sure to cross them. If a safety chain is too long, simply
twist it a few turns to shorten the chain before attaching to the tow vehicle.
10. Connect the trailer light connector to the tow vehicle.
11. Test the trailer lights to ensure they are operational.
12. Check tires for proper inflation.
13. Check wheel lug nuts for correct tightness (see Lug Nut Tightness).
Wheel nuts/bolts should be torqued before the first road use and after each wheel
removal. Check and re−torque after the first 50 miles and again at 100 miles.
Check periodically thereafter.
14. Verify that all jacks, pins, cables, and doors are secured and trailer tongue is level.
15. Remove tire chocks (if used). These prevent the trailer from moving when parked.
Lug Nut Tightness Be sure to use only the fasteners matched to the cone angle of your wheel (usually 60 or 90
degrees.) The proper procedure for attaching your wheel is as follows, see Figure 4-2:
1. If a wheel is removed and installed, start each nut by hand to prevent cross threading.
2. Tighten lug nuts in the following sequence.
a. Tighten each bolt in the sequence shown in Figure 4-2 and tighten to one half the
torque specified until all lug nuts are tightened to one half the torque.
b. Tighten each bolt in the sequence shown in Figure 4-2 and tighten to three fourths
the torque specified until all lug nuts are tightened to three fourths the torque.
c. Tighten each bolt in the sequence shown in Figure 4-2 and tighten each to the
specified torque until all lug nuts are tightened to the correct torque.
Figure 4-2 Lug Nut Tightening Specifications
Tightening
Sequence
Torque
Specification
4-4 Operation
4 Bolt 5 Bolt 6 Bolt 8 Bolt 10 Bolt
Description
1/2” Cone nut
5/8” Cone nut
5/8” Cone nut
3/4” Hex nut
Application
12” − 13” Wheel
14” − 16” Wheel
Flat Disc Wheel
Clamp Ring
Demountable Ring Clamp
Minimum Torque (ft−lbs.)
50
90
175
190
210
Maximum Torque (ft−lbs.)
65
120
225
210
260
MN2417
Page 27
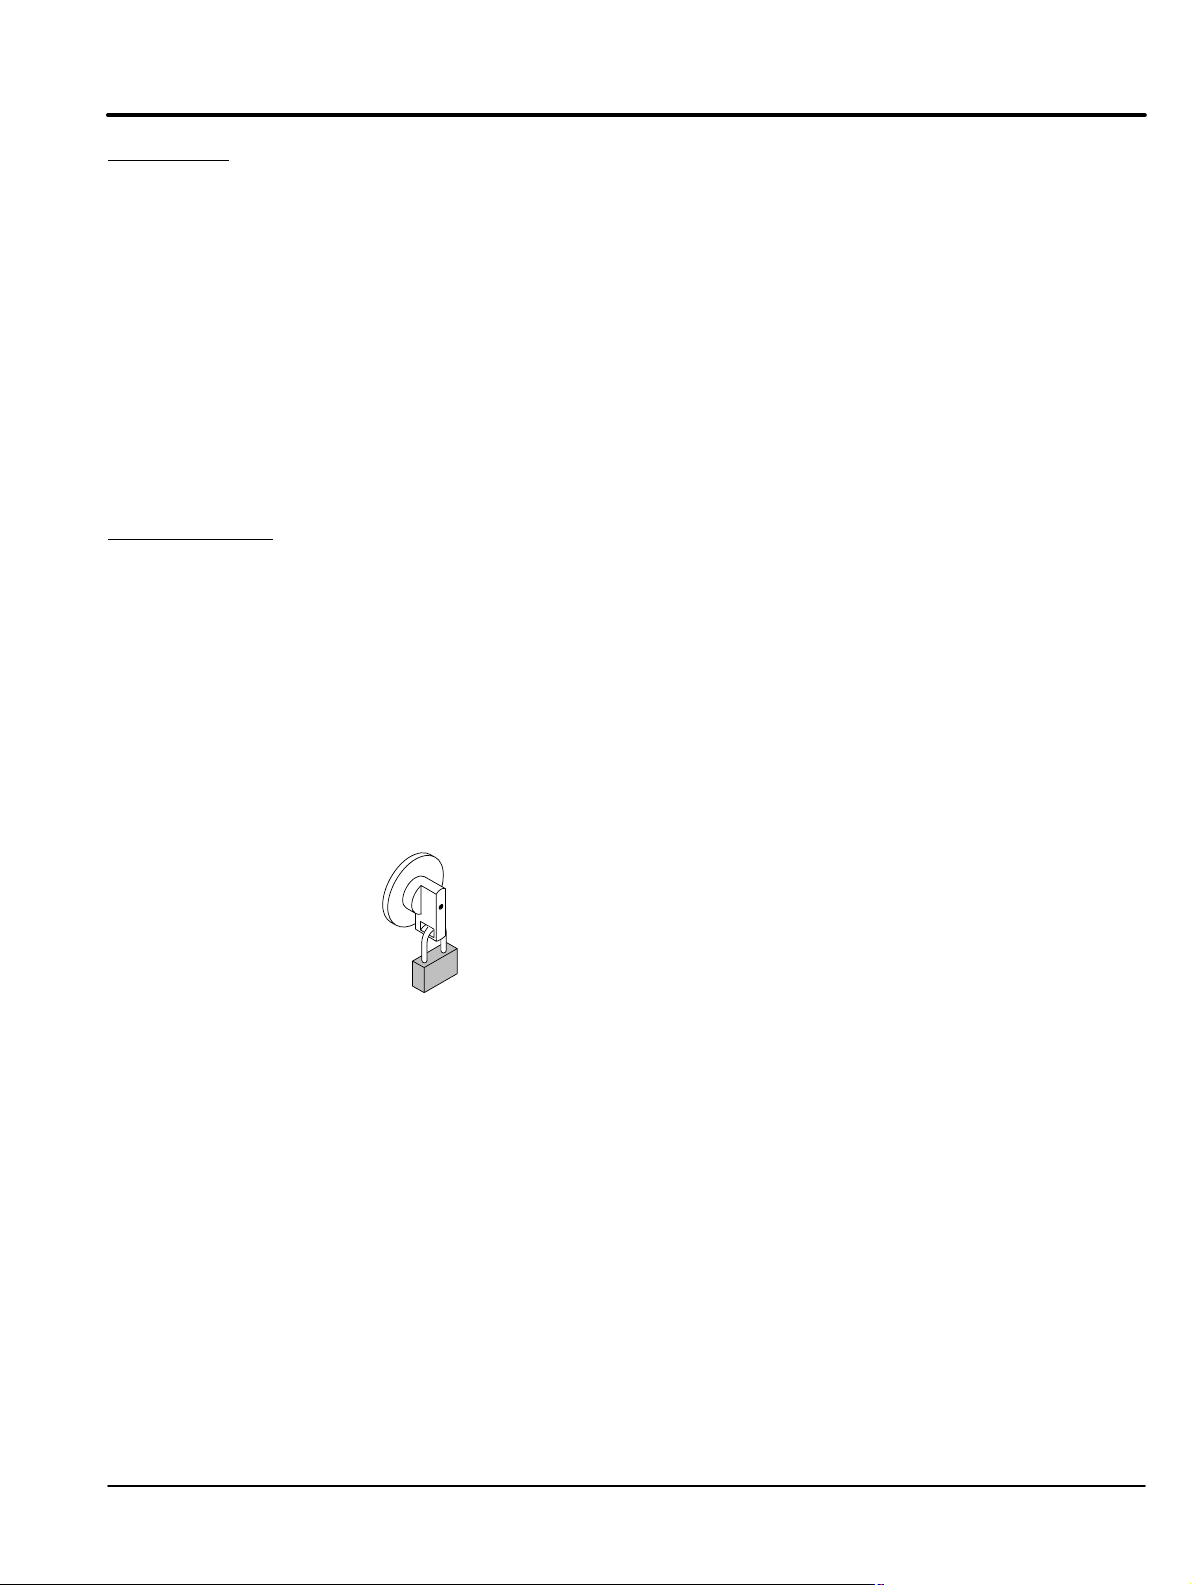
Trailer Setup See Figure 4-1 for component identification. Carefully read all instructions before starting.
1. Locate a suitable, level location. Also be sure there are no overhead wires or
obstructions.
The trailer is balanced so the majority of the weight rests on the tow bar (Jack).
If on a minor incline, the safest way to position the tailer is to have the tow bar facing
down the incline (front of the trailer lower than the rear of the trailer).
2. Install tire chocks if used. These prevent the trailer from moving when parked.
3. Disconnect the safety chains and the trailer light connector from the tow vehicle.
4. Pull the pin on the front jack and rotate the jack 90 degrees to the vertical position.
Lock the jack in the vertical position using the pin to secure it.
5. Move the Coupler Handle to the vertical position to release the ball hitch.
OR
Release the Pintle hook.
6. Use the jack to raise the trailer coupler from the ball hitch of the tow vehicle.
7. The tow vehicle can now be moved away from the trailer.
8. Use the jack to level the trailer for operation.
Voltage Selection
WARNING: High voltage is present whenever the engine is running. Electrical shock can cause serious
or fatal injury. Always stop engine before connecting or disconnecting power cords or
external devices.
WARNING: High voltage is present whenever engine is running. Electrical shock can cause serious or
fatal injury. Never operate electrical equipment while standing in water, on wet ground or with
wet hands, feet or shoes or while barefoot.
Hard Wire Load Terminal Block, shown in Figure 3-4.
1. Ensure the generator is off.
2. Place voltage select switch in the correct position 208/120, 240/120 or 480/277VAC.
Refer to Table 4-2 for voltages available in each position. To ensure the switch position
is not accidently changed, it should be padlocked as shown in Figure 4-3.
Figure 4-3
Insert padlock through the hole in the handle.
This activates an internal mechanism that
prevents handle rotation.
3. Carefully inspect all Individual load cables for broken insulation or other signs of
damage. Never use a damaged cable. Replace it before usage.
4. L1, L2, L3, Neutral and Ground cables must be brought into load block compartment
through access hole in base of enclosure.
5. Ensure that wires are properly connected and connections are secure.
6. Use disconnect at the load to turn off the load. Do not start engine with load switched
“on”. Allow engine to come up to speed and warm up before load is switched on.
Note: When the generator is running, opening load block door will cause load disconnect to trip.
7. Observe the output voltage indicator and set the Voltage Adjust (Figure 4-5) for proper
voltage.
8. If left unattended, lock all doors to prevent tampering or injury.
MN2417
Operation 4-5
Page 28

Table 4-2 Three/Single Phase Operation
Position
C
Positi
480/277
W
208/120
W
240/120
ZigZ
Voltage at Terminal Lugs Voltage at Plug Receptacles
Switch
Position
480/277
208/120
240/120
Alternator
Winding
onnection
Series High
ye
Parallel Low
ye
Parallel Low
ag
Voltage
Adjust
on
Line To Line Voltage Line To Neutral Voltage
L1−L2 L2−L3 L1−L3 L1−N L2−N L3−N L−N L−L L−N
Minimum 416 416 416 240 240 240 120 208 120
Middle 460 460 460 266 266 266 133 230 133
Maximum 480 480 480 277 277 277 139 240 139
Minimum 208 208 208 120 120 120 120 208 120
Middle 230 230 230 133 133 133 133 230 133
Maximum 240 240 240 139 139 139 139 240 139
Minimum
Middle
Maximum
No connection at Terminal Lug #2.
Receptacle Panel Load Connections, see Figure 4-4.
1. 240/120VAC voltage is present at the receptacle panel at all times when generator is
running.
2. Carefully inspect all Individual load cables for broken insulation or other signs of
damage. Never use a damaged cable. Replace it before usage.
3. Individual load cables may be routed into the receptacle compartment through the
Enclosure Electrical Access Panel.
4. Individual load cables may be connected or disconnected while generator is running.
Use extreme care not to touch any electrical wire or terminal to avoid shock hazard.
5. Keep Enclosure Electrical Access Panel closed at all times. This prevents rain or other
harmful elements from entering the compartment. Output metering and gauges can be
observed through the window in the Enclosure Electrical Access Panel.
Figure 4-4 Receptacle Panel (Single Phase)
200 100
220 110
240 120
120VAC
Receptacles
240VAC Receptacles
(Twist Lock)
100 100 200 100
110 110 220 110
120 120 240 120
Circuit Breakers (Single or Double pole)
Circuit Breakers provides protection on some
units. To reset a breaker, place it in the OFF
then the ON position.
4-6 Operation
Note:
Single phase power is
always available.
STD Outlet
120V, 20A
Reset
GFI Outlet
120V, 20A
Test
CS6365N
240V, 50A
(GOLD)
Y
Y
W
(SILVER)
X
CS6369
125/250V
50A
(GOLD)
X
W
G
MN2417
Page 29

Meters, switches, lights and other operator control components are located in various places on
each panel. Figure 4-5 can be used to identify the function and features of each operator control
regardless of where it is located on your panel.
Figure 4-5 Operator Control Panel Components
OFF
Volts
Analog display of generator output voltage
Battery
Displays the voltage of the engine starting battery.
in RMS volts.
Water Temp
Displays the temperature of the engine coolant.
AMPS
Analog display of generator output current
in RMS amps.
Oil Press
Displays engine oil pressure.
Horn A Horn (annunciator or buzzer) sounds an
HERTZ
alarm when operator attention is needed.
Analog display of generator RPM which
relates to the output frequency in Hertz.
Shore Power Inlet Connect an extension cord that
has an appropriate rating from utility power to this
outlet. To power onboard battery charger, block
heater, etc.
1
2
Selects what is displayed on AC
Amperes meter.
Off − No AC Ampere display.
−+
Amps Switch switch (On−Off )
Voltage Adjust
Increase or Decrease the Generator output
voltage.
1 − Phase 1 current display.
2 − Phase 2 current display.
3 − Phase 3 current display.
Voltage Select Switch switch
Selects 208/120, 240/120 or 480/277VAC.
PANEL LIGHTS
Panel Lights)
Lamps to illuminate the operator panel.
Panel Lights switch (On−Off )
ON OFF
Turns on the panel lights.
BREAKER
2 Pole
1 Pole
MN2417
15
Breaker Circuit Breakers provides protection on
or
some units. To reset a breaker, simply press
the center button when tripped or move
FUSE
Fuse Fuses provides protection on some units.
(Do not remove while generator is running).
handle to Off" then back to On".
or
Auto Start Connection for external two wire starting from
transfer switch or other controller. Strip the
insulation from the remote start wires. Simply
press while inserting the wire then release to
secure the connection.
Operation 4-7
Page 30

Pre−Start Procedure Before attempting to start the generator set, several things must first be verified or
performed. These are:
1. Fill system fuel tank with clean, fresh diesel fuel.
2. Fill engine crankcase to full mark with clean, fresh lubricating oil per engine
manufacturer operating guide.
3. Radiator coolant should be checked at the beginning of each day and filled in
compliance with the engine manufacturer’s guidelines.
4. Secure the generator for operation.
a. Skid mounted − the power generating system should be mounted to a smooth,
hard surface suitable for supporting the system under all stress conditions.
b. Trailer mounted − block wheels to prevent accidental movement.
Use jack (Figure 4-1) to level the generator.
c. Adequate clearance must be provided for access doors to fully open.
Note: The exhaust also exits radiator end. When positioning a generator system ensure position
does not cause a concentration of toxic emissions.
5. Place voltage select switch in the correct position 208/120, 240/120 or 480/277VAC
and pad lock it in position if required (Figure 4-3).
6. Carefully inspect all Individual load cables for broken insulation or other signs of
damage. Never use a damaged cable. Replace it before usage.
7. L1, L2, L3, Neutral and Ground cables must be brought into load block compartment
through access hole in base of enclosure.
8. Ensure that wires are properly connected and connections are secure.
9. Ensure that an external ground connection is made when required for safety.
10. Ensure that the Remote Start wires are properly connected, if used.
11. Use disconnect at the load to turn off the load. Do not start engine with load switched
“on”. Allow engine to come up to speed and warm up before load is switched on.
Caution: Large “Engine Compartment Doors” on each side of enclosure must remain closed during
operation. If doors remain open, engine will overhead due to insufficient air flow around
engine.
12. Ensure that Engine Compartment doors are closed for proper ventilation.
Note: Receptacle Panel Load cables may be routed into the receptacle compartment through the
Enclosure Electrical Access Panel after generator is started and has warmed up.
Operating Procedures The engine−generator controller is designed to start and stop an engine from either AUTO
“Automatic” mode or Manual “NOT IN AUTO”. Refer to Figure 4-6.
Manual Start Procedure
1. Press Mode until “Not in AUTO” LED is ON, control is in MAN mode.
2. Press “Start”.
3. The controller closes GCB after engine is running and generator parameters are within
limits.
Manual Stop Procedure
1. Use disconnect at the load to turn OFF the load. Allow generator cool down if needed.
2. Press “Stop”. Press Mode until control is in OFF mode.
AUTO Start Procedure
1. Press Mode until control is in AUT mode.
In Auto mode, the generator will start when the remote start input closes.
GCB is closed automatically when generator voltage is within limits.
2. In Auto mode, the generator will stop when the remote start input opens.
4-8 Operation
MN2417
Page 31

Digital Engine Controller Description EM0046A21 (MRS17)
Figure 4-6 Operator Control Panel
Operating Modes and
Horn & Fault Reset
Manual
Display
Menu
Group
LED Indicators
Run
Stop
LED Indicators Alarm (red) − Alarm (shutdown) condition occurred. Annunciates & shuts down generator.
Not In Auto (red) − Control is not in auto mode and cannot provide standby power.
Running (green) − Generator is running, no alarms or warnings.
Warning (yellow) − A warning condition has occurred. Annunciates only.
Ready/Auto (green) − Control is in Auto mode and ready to provide standby power.
Supplying Load (green) − Generator is providing output voltage to load.
Table 4-3 Alarm & Warning Conditions
Alarm Warning
X High Coolant temperature
X Low Oil pressure
X Low Fuel level
X Generator Over Voltage
X Generator Over Frequency
X Generator Over Current
X Generator Overspeed
X Coolant temperature High/Low
X Starting battery Over/Under Voltage
Manual Run Immediately energizes the crank cycle to start the generator set and produce power.
Start Start generator set operation.
Stop Stops the Engine and generator set.
Display Displays setpoints, adjustments, Alarms and Warning conditions and Operating Mode selections.
Page Changes menu displayed − Measurement, Adjustment or History.
Mode A and " Allows selection of OFF − MAN − AUTO mode choices.
Horn Reset Deactivates the Horn output.
Fault Reset Acknowledge Alarms and Warnings.
Y and B Selects the menu choice, select the setpoint or select the menu or increase/decrease the
setpoint value.
Enter Confirm and accept changed setpoint value.
MN2417
Operation 4-9
Page 32

Digital Engine Controller Description EM0046A21 (MRS17) Continued
Operating Mode Press Mode or to scroll though the list of operating modes: Off, Manual and Automatic.
The control mode is shown in the highlighted area at the top of the display, Figure 4-7.
When the desired Control Mode is highlighted, press Start to begin operation.
Press Stop to terminate operation.
OFF − Generator set operation is not allowed.
MAN − Press Start to manually start the generator set immediately.
Press Stop to stop the generator set immediately.
AUT − Start and Stop buttons are ignored.
The binary input terminal conditions start and stop the generator set.
Display Menus Three display menus are available: Measurement, Adjustment and history.
Press the Page button repeatedly to display each menu. Use and Enter keys to change
and accept setpoint values or press the Page button to cancel changes.
Measurement Menu
The measurement menu, shown in Figure 4-7 displays the operating mode, and operating
parameters such as kW, engine RPM etc.
Figure 4-7 Measurement Menu
Control Mode
Operating Modes and
Horn & Fault Reset
OFF MAN AUT = Control operating mode (highlighted)
OFF MAN AUT
Ready
PF
RPM
0kW
Timer
L!
0.00
L = Access level is active and Locked
! = Alarm indication is active
Ready = Status
kW = Active power produced by generator
PF = Power Factor
0
RPM = Engine speed in revolutions per minute
0
Timer = Event counting time (e.g. prestart, cooling etc.)
OFF Mode
Starting of the generator set is not possible. Outputs STARTER (BO1), Generator CB (BO3) and
FUEL SOLENOID (BO2) are not energized. No action if buttons START and STOP are pressed.
MAN Mode
START button starts the generator set. Generator CB (BO3) is closed after engine is running
and generator parameters are within limits.
STOP button opens Generator CB (BO3) and stops the generator set.
This operation is further defined in Table 4-4.
AUT Mode
No action if buttons START and STOP are pressed.
Engine Start/Stop request is given by binary input REM Start/Stop (BI1).
Generator CB (BO3) is closed automatically when generator voltage is within limits.
4-10 Operation
MN2417
Page 33

Digital Engine Controller Description EM0046A21 (MRS17) Continued
S
Table 4-4 Manual Mode Sequence Description
Menu Status Condition of Transition
Start request PRESTART on,
RPM > 2 or Oil pressure detected or
Gen voltage > 10V
OFF mode selected or Shut down alarm active Not Ready
no shutdown alarm active, other than OFF mode
selected
RPM> Start RPM STARTER off, PRESTART off Starting
D+ input activated or oil pressure detected or
Gen voltage > 25% Vgnom
MaxCrank time elapsed, 1st attempt STARTER off, FUEL SOLENOID off,
MaxCrank time elapsed, last attempt STARTER off, PRESTART off Shutdown (Start fail)
Stop request READY TO LOAD off,
RPM = 0 or any other shutdown condition READY TO LOAD off,
Generator CB = Closed Loaded
Generator CB = Opened Running
Cooling time elapsed FUEL SOLENOID off,
RPM = 0 or any other shutdown condition FUEL SOLENOID off,
Start request READY TO LOAD on Running
RPM = 0, Oil pressure not detected, Vgen < 10V Ready
60 sec. Elapsed Stop (Stop fail)
Main
Measurement
Ready
Not Ready RPM < 2, Oil pressure not detected, Vgen < 10V,
Prestart Prestart time elapsed STARTER on, FUEL SOLENOID on,
Cranking
Crank Pause CrankFail pause elapsed STARTER on, FUEL SOLENOID on,
Starting 80% Nominal speed reached READY TO LOAD on,
Running
Loaded RPM = 0 or any other shutdown condition FUEL SOLENOID off, STOP SOLENOID
Cooling
top
Some output conditions are optional and may require additional programming of field connection.
Action
Prestart time counter started
MaxCrank time counter started
STARTER off, PRESTART off Cranking
STOP SOLENOID on,
CrankFail pause timer started
STOP SOLENOID off,
MaxCrank time counter started
MaxStabTime counter started
Cooling time timer started
FUEL SOLENOID off
on, READY TO LOAD off
STOP SOLENOID on
STOP SOLENOID on
See appropriate wiring diagram.
Adjustment Menu
The adjustment menu, Figure 4-8 allows setting engine and generator values such as
Passwords, Pre−Start Time, Crank Time, Cool Down Time, Alarm Conditions and values,
Shutdown Conditions and values, power transfer settings, etc.
Figure 4-8 Adjustment Menu
> ENGINE BASIC
ENGINE PROT
GEN BASIC
GEN PROTECT
MAINS FAIL
Use and to move the cursor to the desired parameter.
Press ENTER to select the parameter group.
Press PAGE to move to the next page of menu items.
Next State
PRESTART
Stop (Stop fail)
Ready
Cranking
Crank pause
Cranking
Running
Cooling
Shutdown
Shutdown
Stop
Shutdown
History Menu
The History file stores 117 records. When full, the oldest record is overwritten. Use and to
move through the records and Enter key to select the record you want to view. Then use the
and to move through the data in that record. Each record has a date and time stamp to help
discover what happened at a certain time.
MN2417
Operation 4-11
Page 34

Alarms Following alarms are available:
Sensor fail (FLS) see Table 4-5
Sensor fail is detected when measured value is 6% out of selected sensor characteristic.
Sensor fail is indicated by ##### symbol instead measured value.
Warning (WRN) see Table 4-5
When warning comes up, only alarm outputs and common warning output are closed.
Shut down (SD) see Table 4-5
When the shut−down alarm comes up, InteliLite opens outputs GCB CLOSE/OPEN, FUEL
SOLENOID, STARTER and PRESTART to stop the engine immediately. Alarm outputs and
common shutdown output are closed. Active or not reset protection disables start.
Table 4-5 Possible Warnings
Events specification Protection type Binary output available, Table 4-7.
Wrn Oil press WRN YES
Sd Oil press SD YES
Wrn Water temp WRN YES
Sd Water temp SD YES
Wrn Wtemp Low WRN YES
Wrn Fuel Level WRN YES
Sd Fuel Level SD YES
Analog inp IOM/PTM − Wrn WRN YES
Analog inp IOM/PTM − Sd SD YES
Binary input Configurable YES
Battery voltage <, > WRN YES
Battery flat SD YES
Start fail SD YES
ParamFail NONE NO
Vgen <, > SD YES
Vgen unbl SD YES
Fgen <, > SD YES
Igen unbl SD YES
Overload SD YES
RPM over SD YES
RPM under SD YES
TotalStop SD NO
PickupFault SD NO
Stop fail SD YES
WrnServiceTime WRN NO
ChrgAlternFail WRN YES
SprinklActive WRN NO
Wrn RA15 fail WRN NO
Sd IOM fail SD NO
4-12 Operation
MN2417
Page 35

Inputs and Outputs
Any Binary input or output can be configured to any controller terminal Inputs are BI1 − BI6,
Outputs are BO1 − BO6) or changed to different function by LiteEdit software.
There is fixed 1 sec delay when any binary input is configured as protection.
Table 4-6 Binary Inputs
Alarm Alarm type Warning or Shut down
Alarm active All the time, or Engine running only
Rem start/stop External request for engine run. AUT mode only.
Emergency stop If the input is opened, shut down is immediately activated. Input is
inverted (normally closed).
Sprinkler If the input is closed all alarms are disabled except the binary input
EMERGENCY STOP and ”engine over speed protection”.
Access lock If input is closed, no setpoints can be adjusted from controller front
panel and gen−set mode (OFFMAN−AUT) cannot be changed.
Rem start/stop External request for engine run. AUT mode only.
Remote OFF If closed, iL is switched to OFF mode (there are four modes
OFF−MAN−AUT−TEST).
If open, controller is switched back to previous mode.
Start Binary input has the same function as Start button.
It is active in MAN mode only.
Stop Binary input has the same function as Stop.
It is active in MAN mode only.
FaultRes Binary input has the same function as Fault reset button.
HornRes Binary input has the same function as Horn reset button.
Table 4-7 Binary outputs
Starter (relay output) The closed relay energizes the starter motor.
The relay opens if:
The firing speed is reached or
Maximum time of cranking is exceeded or
Request to stop occurs
Fuel solenoid (relay output) Closed output opens the fuel solenoid and enables the engine start.
The output opens if:
Emergency stop occurs or
Cooled gen−set is stopped or
In pause between repeated starts
GCB Close/Open The output controls the generator circuit breaker.
Prestart Output is closed prior to the engine start (Prestart) and opens when
START RPM speed is reached.
During repeated crank attempts the output is closed too.
The output could be used for pre−glow, pre−heat or prelubrication.
Ready to Load Output is closed if genset is running and all electric values are in limits
no alarm is active − it is possible to close GCB or it is already closed.
The output opens during cooling state.
CommonWrnSd Output is closed if :
any warning or shutdown occurs or
the gen−set malfunctions
The output opens if:
FAULT RESET is pressed
The output closes again if a new fault occurs.
Prestart Output is closed prior to the engine start (Prestart) and opens when
START RPM speed is reached.
During repeated crank attempts the output is closed too.
The output could be used for pre−glow, pre−heat or prelubrication.
Idle/Nominal Countdown when Start speed reached. The Underspeed protection is
not evaluated during idle period. A Start fail protection occurs if the
RPM drop below 2RPM during idle.
GCB Close/Open The output controls the generator circuit breaker.
AnImIOM1..4 Wrn Output is closed if the corresponding IG−IOM or IG−PTM Analog input
warning is active.
MN2417
Operation 4-13
Page 36

Table 4-7 Binary outputs Continued
GenParamsOK
CommonWrnSd Output is closed if :
CommonWrnSd Output is closed if :
Horn Output is closed if:
Ready/Auto Output is closed if controller is ready in AUTO mode − no Shut down
Ready Output is closed if:
Ready to load Output is closed if genset is running and all electric values are in limits
Stop solenoid The closed output energizes stop solenoid to stop the engine.
ChrgAlternFail Output is closed if gen−set is running and D+ input not energized.
Vgen failed Output is closed if the generator over/under voltage shutdown alarm
fgen failed Output is closed if the generator over/under frequency shutdown
Overload Output closes if the generator overload shutdown alarm activates.
Stop failed Output closes when the engine has to be stopped, but speed or
Overspeed Output closes if the gen−set over speed alarm activates.
Underspeed Output closes if the gen−set under speed alarm activates.
Start failed Output closes after the gen−set start−up fails.
Overcurrent Output closes if the generator IDMT over current or current unbalance
Battery flat Output closes when iL performs reset during start procedure (probably
V batt failed Output closes when battery over/under voltage warning appears.
The output is same as generator status LED on panel. Output is
closed if genset is running and all genset electric values are in limits.
Any warning or shutdown are active or the gen−set malfunctions
The output opens if:
FAULT RESET is pressed. The output closes again for a new fault.
Any warning or shutdown occurs or the gen−set malfunctions
The output opens if:
FAULT RESET is pressed or the output closes again for a new fault.
Any warning or shutdown are active or the gen−set malfunctions
The output opens if:
FAULT RESET is pressed, HORN RESET is pressed or Max time of
HORN is exceeded (Horn timeout). Output closes again at next fault.
or Slow stop alarm is active,
Gen−set is not running and
No Shut down or Slow stop alarm is active and
Controller is not in OFF mode
no alarm is active − it is possible to close GCB or it is already closed.
The output opens during cooling state.
The output opens again 10 s after RPM < 2 and
Generator voltage < 10 VAC and
Oil pressure < Engine params: Starting oil.
The output opens, if alarm is not active and FAULT RESET is pressed.
Note: Treshhold level for D+ input is 80% supply voltage.
or voltage asymmetry shutdown alarm activates.
The output opens, if alarm is not active and FAULT RESET is pressed.
alarm activates.
The output opens, if alarm is not active and FAULT RESET is pressed.
The output opens, if alarm is not active and FAULT RESET is pressed.
frequency or voltage or oil pressure is detected. This protection goes
active 60s after stop command.
The output opens, if alarm is not active and FAULT RESET is pressed.
The output opens, if alarm is not active and FAULT RESET is pressed.
The output opens, if alarm is not active and FAULT RESET is pressed.
The output opens, if alarm is not active and FAULT RESET is pressed.
or short current alarm activates.
The output opens, if alarm is not active and FAULT RESET is pressed.
due to weak battery).
The output opens, if alarm is not active and FAULT RESET is pressed.
The output opens, if alarm is not active and FAULT RESET is pressed.
4-14 Operation
MN2417
Page 37

Table 4-7 Binary outputs Continued
Common Wrn
Common Sd Output closes when any shut−down alarm appears.
Sd OilPress Output closes if the oil pressure shutdown alarm activates.
Wrn OilPress Output closes if the oil pressure warning alarm activates.
Sd Water Temp Output closes if the water temperature shutdown alarm activates.
Wrn Water Temp Output closes if the water temperature warning alarm activates.
OFF mode The output is closed, if OFF mode is selected.
MAN mode The output is closed, if MAN mode is selected.
AUT mode The output is closed, if AUT mode is selected.
Sd FuelLevel The output closes if the Fuel level shutdown alarm activates.
Wrn FuelLevel The output closes if the Fuel level warning alarm activates.
WrnTempLow The output closes if the low water temperature warning alarm
Not In Auto The output closes in OFF and MAN mode.
Vgen warning The output closes if the generator over/under voltage warning alarm
fgen warning Output closes if the generator over/under frequency warning alarm
Overload wrn Output closes if the generator overload warning alarm activates.
Running Output closes if the engine is in Running state.
ServiceTime Output closes if the ServiceTime alarm activates.
BI1 ... BI6 − stat
IOM BI1 ... IOM BI8 − stat
AnImIOM 1..4 Sd Output closes if shutdown alarm on the appropriate IOM or PTM
ECU CommOK Output is closed when ECU communication is OK.
VP warning Output is closed when at least on of following alarms is active:
Supplying load Closed when the generator current is > 0,5% of the CT ratio.
Output closes when any warning alarm appears.
The output opens, if alarm is not active and FAULT RESET is pressed.
The output opens, if alarm is not active and FAULT RESET is pressed.
The output opens, if alarm is not active and FAULT RESET is pressed.
The output opens, if alarm is not active and FAULT RESET is pressed.
The output opens, if alarm is not active and FAULT RESET is pressed.
The output opens, if alarm is not active and FAULT RESET is pressed.
activates.
activates.
activates.
The output opens, if alarm is not active and FAULT RESET is pressed.
The outputs give information about the assigned binary input.
In case the assigned binary input is configured to alarm type, then the
output closes when the alarm activates.
The output opens, if alarm is not active and FAULT RESET is pressed.
In case the assigned binary input is configured to any control function,
the output propagates the state of the input.
analog input activates.
The output opens, if alarm is not active and FAULT RESET is pressed.
Overspeed Alarm, Oil Pressure Alarm, Oil Temperature Alarm,
Coolant Temperature Alarm, Coolant Level Alarm, Charge Alarm
Exact formulas: Output is closed when the current at least in one
phase is for 1 sec over CT ratio/200+2
Output is opened when the current in all three phases is for 1 sec
below CT ratio/200+2
Note: Values are truncated after division, not rounded
MN2417
Operation 4-15
Page 38

Analog Inputs Three analog inputs for resistive sensor 0 to 2400 Ù measuring are available on IL controller.
Use LiteEdit software to modify configuration.
The Analog inputs values assignment (AI1 = Oil press, AI2 = Water temp, AI3 = Fuel level) is fix.
It is possible to configure on each Analog input:
Reading from IL Analog inputs or from Engine Control Unit via CAN bus (J1939)
Sensor characteristics from the list,
Value dimension (e.g. psi − bars, °F − °C, % − l)
Number of decimal points (0, 1, 2, ...).
Note: Corresponding Analog input terminal is dead when reading is switched to ECU.
All values from ECU shall show ####, but no alarm is displayed when CAN communication
is interrupted.
Warning and shut−down limits are adjusted in Engine protection group.
Table 4-8 Analog Inputs
AI1 Oil press Oil pressure analog input. Default VDO sensor in range 0 to 145 psi.
AI2 Water temp
AI3 Fuel level Fuel level analog input. Default VDO sensor 0−180R = 0−100%.
Water temperature analog input. Default VDO sensor in range 32 to 212°F
Set points
Table 4-9 Setpoints
EnterPassword Password is a four−digit number. Password enables change of relevant
ChangePassword Use ⇑or ⇓keys to set and ENTER key to change the password.
Gen−set name User defined name, used for InteliLite identification at remote phone or
Nomin power(3ph) Nominal power of the generator in three phases connection.
Nomin power(1ph) Nominal power of the generator in single−phase connection.
CT Ratio Gen−set phases current transformers ratio.
PT ratio Gen−set potential transformers ratio.
Nominal freq Nominal generator frequency (usually 50 or 60 Hz )
Gear teeth Number of teeth on the engine gear for the pick−up. Set to zero, if no
Nominal RPM Nominal engine speed. Step: 1RPM; Range: 100 − 4000 RPM.
Mode IL [ OFF, MAN, AUT ]
RS232 mode
[Standard/Modbus ]
Num rings AA Number of rings prior to open modem connection. Step: 1; Range: 1 − 30
protected set points Use ⇑or ⇓keys to set and ENTER key to enter the
password.
mobile connection. Gen−set name is max 14 characters long and have to
be entered using LiteEdit software.
Step: 1 kW; Range: 1 − 3000 kW
Step: 1 kW; Range: 1 − 3000 kW
Step: 1 A; Range: 1 − 5000 A / 5A
Step: 0,1 V / V; Range: 0,1 − 500,0 V / V
Step: 1Hz; Range: 45 − 65 Hz
pick−up is used. Engine speed is counted from the generator frequency.
Step: 1; Range: 0 − 500
Note: Generator frequency can be used only when generator voltage
(min 5V) is present before reaching of the firing speed
(Starting RPM) after start.
Equivalent to Controller mode changes by MODE or MODE buttons.
Note: Controller Mode change can be separately password protected.
Communication protocol switch.
Standard: LiteEdit communication protocol. Modbus: Modbus protocol.
Note: For detail description see chapter Modbus protocol.
Note: NumberRings AA change is not activated immediately. It is activated
after controller is switched on or when modem is connected to controller.
4-16 Operation
MN2417
Page 39

Table 4-9 Setpoints Continued
Start RPM
Starting POil When reached controller stops cranking (starter goes OFF).
Prestart time Time of closing of the PRE−START output prior to the engine start.
MaxCrank time Maximum time limit of cranking. Step: 1s; Range: 1 − 60 s
CrnkFail pause Pause between crank attempts. Step: 1s; Range: 5 − 60 s
Crank attemps Max number of crank attempts. Step: 1; Range: 1 − 10
Idle time Idle time delay starts when RPM exceeds Start RPM . Start fail is detected
Start RPM
“Firing” speed when iL controller stops cranking (starter goes OFF).
Step: 1% of nominal RPM; Range: 5 − 50 %
Step: 0,1 psi; Range: −100 − 10000
Note: There are three conditions for stop cranking: Starting RPM,
StartingPOil and D+ (when enabled). Starter goes off when any
of these conditions is valid.
Set to zero if you want to leave the output PRE−START open.
Step: 1s; Range: 0 − 600 s
when during Idle state RPM decreases below 2.
During the Idle time timer running the binary output IDLE/NOMINAL is
opened, when it elapses the IDLE/NOMINAL output closes.
Binary output IDLE/NOMINAL opens during Cooling period again.
Step: 1 s; Range: 0 − 600 s
Note: If the IDLE function not supported on the governor, set the Idle time
nevertheless to minimum 5s to avoid Underspeed possibly
caused by instability of the engine short after start.
RPM
RPM
RPM = 2
Idle Function
Stabil Time
BO Starter
BO IDLE/RATED
Idle tim e M in stab tim e
Start Fail
Electric protections
activ e
MN2417
Operation 4-17
Page 40

Table 4-9 Setpoints Continued
GCB CloseDelay
Stabil time Generator Nominal voltage is detected during genset start after starter is
MinStpValvTime Binary output Stop solenoid closes when stop sequence begins and
Cooling time Runtime of the unloaded gen−set to cool the engine before stop.
D+ function ENABLED: The D+ terminal is used for both functions running
Eng prot del During the start of the gen−set, some engine protections have to be
Horn timeout Max time limit of horn sounding. Set to zero if you want to leave the output
Overspeed Threshold for over speed protection.
Wrn Oil press Warning threshold level for ANALOG INPUT 1.
Sd Oil press Shutdown threshold level for ANALOG INPUT 1.
Oil press del Delay for ANALOG INPUT 1. Step: 1 s; Range: 0 − 180
Sd Water temp Warning threshold level for ANALOG INPUT 2.
Wrn Water temp Warning threshold level for ANALOG INPUT 2.
Wrn Wtemp low Warning threshold level for low value on ANALOG INPUT 2.
Water temp del Delay for ANALOG INPUT 2 alarm. Step: 1 s; Range: 0 − 180 s
Wrn Fuel Level Warning threshold level for ANALOG INPUT 3.
Sd Fuel Level Shutdown threshold level for ANALOG INPUT 3.
Fuel Level del Delay for ANALOG INPUT 3. Step: 1 s; Range: 0 − 180 s
Batt overvolt Warning threshold for high battery voltage.
Batt undervolt Warning threshold for low battery voltage.
Batt volt del Delay for low battery voltage alarm. Step: 1s; Range: 0 − 600 s
NextServTime Counts down when engine running. If reaches zero, an alarm appears.
GCB can be closed earliest GCB CloseDelay after Stabil time when all
electric values are in overunder voltage and over−under frequency limits.
Step: 1 s; Range: 0 − 300 s
switched off and Idle time elapses. Electric generator protections are
active since detection. Step: 1 s; Range: 0 − 300 s
closes at least for MinStpValvTime. Example MinStpValvTime = 20 sec.
a) When engine stops (RPM=0) in 10 seconds, Binary output Stop
solenoid still stays closed for 10 sec.
b) When engine stops in 30 seconds, Binary output Stop solenoid opens
10 seconds after RPM=0 and Vg =0 and Oil pressure = 0. Those 10 sec is
fix time for safe stop. Step: 1s; Range: 0 − 180 s
Note: Stop of engine is detected when all following conditions are met:
RPM =0, Oil pressure < StartingPOil and Generator voltage < 10 VAC.
Stop fail is detected when is difference between those conditions, e.g
RPM=O and Generator voltage > 10V.
Step: 1s; Range: 0 − 3600 s
engine
CHRGFAIL: The D+ terminal is used for charge fail detection only
DISABLED: The D+ terminal is not used.
Note: Magnetization current is independent of this setpoint value.
blocked (e.g. Oil pressure). The protections are unblocked after the
Protection del time. The time starts after reaching Start RPM.
Step: 1s; Range: 0 − 300 s
HORN open. Step: 1s; Range: 0 − 600 s
Step: 1% of nominal RPM; Range: 100 − 150%
Step: 1 psi; Range: Sd Oil press − 10000
Step: 1 psi; Range: −100 − Wrn Oil press
Step: 1 °C; Range: Wrn Wtemp − 10000
Step: 1 °F; Range: Wrn Wtemp low − Sd Water temp
Step: 1 °F; Range: −100 − Wrn Water temp
Step: 1 %; Range: Sd Fuel Level − 10000
Step: 1 %; Range: −100 − Wrn Fuel Level
Step: 0,1 V; Range: Batt undervolt − 40V
Step: 0,1 V; Range: 8V − Batt overvolt
Step: 1h; Range: 0 −65535h
detection and charge fail detection.
4-18 Operation
MN2417
Page 41

Table 4-9 Setpoints Continued
Overload
Overload Wrn Threshold for generator overload warning (in % of Nominal power)
Overload del Delay for generator overload alarm. Step: 0.1s; Range: 0 − 60.0 s
Ishort Shutdown occurs when short circuit limit Ishort limit is reached.
2Inom del IDMT curve shape selection. 2Inom del is Reaction time of IDMT
Curr unbal Threshold for generator current asymmetry (unbalance).
Curr unbal del Delay for generator current assymetry. Step: 0.1 s; Range: 0 − 60.0 s
Gen >V Shutdown level for generator overvoltage. All three phases are checked.
Gen >V Wrn Warning level for generator overvoltage. All three phases are checked.
Gen <V Wrn Warning level for generator under voltage. All three phases are checked.
Gen <V Shutdown level for generator under voltage. All three phases are checked.
Gen V del Delay for generator under voltage and over voltage alarm
Volt unbal Threshold for generator voltage unbalance alarm.
Volt unbal del Delay for generator voltage unbalance alarm.
Gen >f Shutdown level for generator over frequency.
Gen >f Wrn Warning level for generator over frequency.
Gen <f Shutdown level for generator under frequency.
Gen <f Wrn Warning level for generator under frequency.
Gen f del Delay for generator under frequency and over frequency alarm.
Calibr AI1,AI2, AI3 Calibrating constant to adjust the measured value of IL analog inputs.
AnOut−kW/20mA Conversion coefficient from gen−set power to iG−IOM or PTM analog
Threshold for generator overload (in % of Nominal power)
Step: 1% of Nominal power; Range: 0 − 200%
Step: 1% of Nominal power; Range: 0 − 200%
Step: 1 % of Nominal current; Range: 100 − 500 %
protection for 200% overcurrent Igen = 2* Nominal current.
Step: 0,1 s; Range: 0,1 − 20 s
IDMT is “very inverse” generator over current protection. Reaction time is
not constant but depends on generator over current level according
following formula. Reaction time is limited up to 900 sec = 15 minutes.
IDMT protection is not active for Reaction time values longer than 15
minutes.
Reaction Time +
Step: 1% of Nominal current; Range: 1 − 100% of Nominal current
Maximum out of three is used.
Step: 1% of Nominal voltage; Range: Gen >V Wrn −200%
Maximum out of three is used.
Step: 1% of Nominal voltage; Range: Gen <V Wrn − Gen >V
Minimum out of three is used.
Step: 1% of Nominal voltage; Range: Gen <V − Gen >V Wrn
Minimum out of three is used.
Step: 1% of Nominal voltage; Range: 0% − Gen <V Wrn
Step: 0.1s; Range: 0 − 60 s
Step: 1% of Nominal voltage; Range: 0 − 100% of Nominal voltage
Step: 0.1s; Range: 0 − 60.0 s
Step: 0.1% of Nominal frequency; Range: Gen > Wrn − 200.0%
Step: 0.1% of Nominal frequency; Range: Gen <f Wrn − Gen >V
Step: 0.1% of Nominal frequency; Range: 0.0 − Gen <f Wrn
Step: 0.1% of Nominal frequency; Range: Gen <f − Gen >f Wrn
Step: 0.1s; Range: 0 − 60.0 s
Physical dimension of calibrating constant is corresponding to Analog
input. Step: 1; Range: −1000 to +1000
output. Step: 1; Range: 1 to 32000
2lnom del * Nomin current
lgen * Nomin current
MN2417
Operation 4-19
Page 42

Table 4-9 Setpoints Continued
AnlInIOM1 lev1
AnlInIOM1 lev2 The level for IOM ANALOG INPUT 1 alarm detection.
AnlInIOM1 del Delay for IOM ANALOG INPUT 1 alarm. Step: 1 s; Range: 0 − 180 s
AnlInIOM2 lev1 The level for IOM ANALOG INPUT 2 alarm detection.
AnlInIOM2 lev2 The level for IOM ANALOG INPUT 2 alarm detection.
AnlInIOM2 del Delay for IOM ANALOG INPUT 2 alarm. Step: 1 s; Range: 0 − 180 s
AnlInIOM3 lev1 The level for IOM ANALOG INPUT 3 alarm detection.
AnlInIOM3 lev2 The level for IOM ANALOG INPUT 3 alarm detection.
AnlInIOM3 del Delay for IOM ANALOG INPUT 3 alarm.
AnlInIOM4 lev1 The level for IOM ANALOG INPUT 4 alarm detection.
AnlInIOM4 lev2 The level for IOM ANALOG INPUT 4 alarm detection.
AnlInIOM4 del Delay for IOM ANALOG INPUT 4 alarm. Step: 1 s; Range: 0 − 180 s
Calibr AInIOM 1..4 Calibrating constant to adjust the measured value of IOM/PTM analog
The level for IOM ANALOG INPUT 1 alarm detection.
Step: 1; Range: −100 to +10000
Step: 1; Range: −100 to+10000
Step: 1; Range: −100 to +10000
Step: 1; Range: −100 to +10000
Step: 1; Range: −100 to +10000
Step: 1; Range: −100 to +10000
Step: 1 s; Range: 0 − 180 s
Step: 1; Range: −100 to +10000
Step: 1; Range: −100 to +10000
The protection of IOM/PTM inputs is activated by over crossing the limits.
inputs. Physical dimension of calibrating constant is corresponding to
Analog input. Step: 1; Range: −1000 to +1000
4-20 Operation
MN2417
Page 43

Digital Engine Controller Description EM0046A21 (MRS17) Continued
Figure 4-9 Controller Connection Diagram
DIESEL/GASENGINE
GENERATOR
G
FUELSOLENOID
LOAD
Generator C.B.
L1
L2
L3
N
− +
BATTERY
STARTER
FUELLEVEL
WATER TEMP
OIL PRESSURE
RPM
L2l
L1k
L1l
GENERATOR
CURRENT
EXTENSIONMODULES
ANALOG INPUTS
COM
AI1 OIL
AI2TEMP
L3l
AI3FUEL
N
L1L2L3
GENERATOR
VOLTAGE
BOOT JUMPER
D
RPM IN
RPM GN
Ground
Remote Start/Stop
Access Lock
Emergency Stop
Remote Off
Sprinkler
Not Used
BI1
BI2
BI3
BI4
BI5
BINARYINPUTSBINARYINPUTS
BI6
RS 232
BO1
STARTER
BINARY OUTPUTSRPM
START
BO2
FUEL
BO3
BO4
D
PRESTART
RDY TO LOAD
GENERATOR CB
FUELSOLENOI
HORN
POWER
8− 36 V DC
D+
BO6
BO5
+
ALARM
MN2417
Operation 4-21
Page 44

Digital Engine Controller Description EM0046A21 (MRS17) Continued
Figure 4-10 Controller Connection Diagram
−
BATTERY
CHRG
ALT ER NATOR
Generator C.B.
LOAD
EDC
GENERATOR
G
L3l
L2l
L1l
CO M
GENERATOR
CURRENT
0− 5A
EXTENSIONMODULE
ANALOG INPUTS
COM
AI1 (OIL)
L1
L2
L3
N
AI2 (TEMP)
N
GENER ATOR
V O LTA G E
3 x 230 / 400 V
RPM
AI3 (FUEL)
L1L2L3
BOOT JUMPER
RPM IN
RPM GND
PE
REMOTE S/S
ACCESS LOCK
EMERGENCY STOP
NOTUSED
REMOTE OFF
SPRINKLER
CONTROL
C O NT RO L
SIGNALS
SI GNALS
BI1
BI5
BI6
BI2
BI3
BI4
BINARY INP UTS
LB 1
RS−232C
RS232
BI NA RY
OUTPUTS
BO1
(START)
BO2
(FUEL)
BO3
BO4
BO5
BO6
PO W ER
8−36VDC
+
D+
−
Int erface
ModemorPC
DI ESEL /GASENGIN E
FUEL SOLENOID
+
START ER
D+
8− Pole Connector
87654321
STARTER
GENC.B.
FUELSOLENOID
BINARY OUTPUTS
PRESTART
RE ADYTOL OA D
ALARM
+24 V
4-22 Operation
MN2417
Page 45

Section 5
Troubleshooting and Maintenance
WARNING: Never “jump start” a generator to start the engine. If the battery charge is insufficient to start
the engine, charge or replace the battery and try to restart. Jump starting a battery can cause
the battery to explode and cause severe injury or death to anyone in the area.
Caution: If a dead battery is suspected charge battery (or replace), and then attempting starting.
Damage to engine control may result from jump starting.
Maintenance This manual contains only very minimal engine maintenance instructions. Refer to the engine
manufacturer’s owner’s manual for specific engine maintenance instructions for your generator
set. Any maintenance instructions or recommendations in the engine owner’s manual take
precedence over any of the following general recommendations.
General:
1. Inspect the fuel system for leaks. Replace all defective components immediately.
2. Inspect and replace any fuel line that shows signs of deterioration.
3. Inspect all the fuel clamps to ensure they are tight.
4. Make sure the fuel cap fits snugly on the fuel tank and that the fuel tank contains no
leaks.
5. Inspect and clean the battery posts and the associated battery cable terminals.
6. Inspect the external wire cables and connectors used with the generator set for cuts,
fraying, or loose connections. Repair or replace any problems prior to using the unit.
Engine:
1. Clean and/or replace any fuel, oil, and/or air filters per the engine manufacturers’
guidelines.
2. Check oil level regularly; at least every 5 to 8 operating hours. Maintain the proper oil
level.
3. Change the oil as is recommended in the engine manufacturer’s owner’s manual.
4. Clean the cooling fins on the engine to keep the engine’s heat dissipation potential at
it’s maximum.
5. Inspect and clean all governor and fuel supply linkages so they operate properly.
Alternator: ( also called Generator End)
This generator set must be run at its proper speed to obtain the correct electrical power at its
output. All engines have a tendency to slow down when a load is applied to it. The engine
governor is designed to hold the operating speed as nearly constant as possible. When the
electrical load is increased, the engine is more heavily loaded and engine speed drops slightly.
This slight decrease in engine speed results in a slight decrease in generator voltage and
frequency output. This voltage and frequency variation has no appreciable effect in the operation
of motors, lights, and most appliances and tools. However, timing devices and clocks may not
keep perfect time.
1. Clean the generator set and remove any and all dust, dirt, or other foreign material.
2. Inspect and clean the cooling air intake and exhaust louvers of the generator end.
Make sure they are clean. Remove dirt or any buildup that may restrict the cooling air
flow.
3. Clean the generator set and its components with a damp cloth or sponge.
Never use a water hose or pressure washer as this may damage electrical
components.
4. Inspect and replace any control panel components that are broken or not working
properly (receptacles, circuit breakers, switches, etc.)
Troubleshooting and Maintenance 5-1MN2417
Page 46

Problems and Solutions
Some of the more common problems are listed in Table 5-1. This information is intended to be a
check or verification that simple causes can be located and fixed. It is not an exhaustive “how to”
for all types of problems. Procedures that require in depth knowledge or skills (like flashing the
field) should be referred to an authorized service department.
Table 5-1 Troubleshooting Guide
Problem Possible Cause Remedy
Engine will not start
Engine will not crank Dead battery. Remove battery and trickle charge or replace with new battery.
Engine starts but will not run smoothly Fuel or ignition problem Refer to engine manual.
Engine overheats Excessive load
Output voltage varies Irregular speed
Low Voltage (0−15 VAC output) Bad Voltmeter
Low Voltage (15−20 VAC output) Bad Voltmeter
Incorrect voltage output Bad Voltmeter
High output voltage Excessive speed Check engine for malfunction
No fuel.
Restricted air flow.
Damaged glow plug
Debris or dirt buildup on engine
Low Coolant Level
Fluctuating speed
Loose terminal or load connections
Defective alternator bearing (uneven air
gap)
Bad/Open Circuit Breaker/Fuse
Bad Connection
Loss of Residual Magnetism
Bad Voltage Selector Switch
Bad Stator Windings
Incorrect Engine Speed
Bad/Open Circuit Breaker/Fuse
Bad Connection
Bad Voltage Selector Switch
Bad Stator Windings
Bad Voltage Adj. Rheostat
Bad Voltage Regulator
Bad Rotor Diodes
Bad Rotor Windings
Incorrect Engine Speed
Bad Voltage Adj. Rheostat
Bad Voltage Regulator
Bad Connection
Bad Voltage Selector Switch
Check that fuel valves are ON. Check fuel level in fuel tank.
Check/replace air filter.
Check/replace glow plug(s). Check that engine switch is in Start
position.
Never Jump Start.
Remove one or more electrical loads.
Remove debris. Clean engine surfaces to allow cooling.
Replenish coolant
Check engine for malfunction or load for fluctuation
Stabilize load. The addition of a lamp load (resistance load) may
compensate partially for load changes caused by intermittent motor
operation. Do not overload.
Verify all connections are proper and check tighness torque of
terminals.
Replace worn bearing
Measure the voltage across the voltage meter with an accurate
voltmeter to verify.
Check continuity across Breaker/Fuse. Replace if defective.
Check wiring including grounds, crimps and connection points.
Repair defects.
The generator needs to be flashed. Contact service center to
perform this procedure.
Replace switch, contact service center to perform this procedure.
Contact service center to perform this procedure.
Measure the voltage across the voltage meter with an accurate
voltmeter to verify.
Remove electrical load, output should be 61−62 Hertz adjust engine
speed if necessary.
Check continuity across Breaker/Fuse. Replace if defective.
Check wiring including grounds, crimps and connection points.
Repair defects.
Replace switch, contact service center to perform this procedure.
Contact service center to perform this procedure.
Replace rheostat, contact service center to perform this procedure.
Replace regulator, contact service center to perform this procedure.
Contact service center to perform this procedure.
Contact service center to perform this procedure.
Measure the voltage across the voltage meter with an accurate
voltmeter to verify.
Remove electrical load, output should be 61−62 Hertz adjust engine
speed if necessary.
Replace rheostat, contact service center to perform this procedure.
Replace regulator, contact service center to perform this procedure.
Check wiring including grounds, crimps and connection points.
Repair defects.
Replace switch, contact service center to perform this procedure.
5-2 Troubleshooting and Maintenance MN2417
Page 47

Table 5-1 Troubleshooting Guide Continued
Problem Possible Cause Remedy
Genset will not pull load Incorrect Engine Speed
Load not connected properly
Load too large for unit
Electrical shock when frame is
touched
Mechanical noise (alternator) Defective bearing
Trailer lights inoperable Trailer to tow vehicle connection
Trailer sways during towing Tow vehicle trailering ratings too small
Static charge.
Grounded armature or field coil.
Rotor rubbing on stator
Loose or misaligned coupling
Trailer electrical connection not compatible
Insufficient Ground connection
Faulty light bulb
Trailer tongue not level on tow vehicle
Towing at excessive speed
Remove electrical load, output should be 61−62 Hertz adjust engine
speed if necessary.
Verify voltage at the load and the connections to the proper
receptacle or load terminal block.
Verify load amperage is less than the generator set rated.
Note: For inductive loads, use the starting amperage rating of the
load (not the running amperage rating). Starting amps may be as
much as 5 times the running amps.
Ground generator frame at local reference ground (see Section 3).
Contact service center.
Replace bearing.
Bad bearing − replace.
Bent shaft − contact service center.
Loose end bell − tighten;
Loose drive Discs − tighten
Tighten; align coupling and alternator shaft to engine shaft.
Connect trailer lighting connector to tow vehicle trailering connector
Use adapter plug to convert from connector style found on trailer to
connector style found on tow vehicle or replace connector with compatible mate
Verify there is a ground wire connection from the tow vehicle to the
trailer. Do not rely on the trailer tow coupling for the battery ground
connection. Repair as necessary.
Replace as necessary
Check tow vehicle ratings meet or exceed the Gross Vehicle Weight
Rating (GVWR) of the trailer. Use larger tow vehicle as necessary.
Seek expert advise.
Adjust trailer or tow vehicle as necessary for trailer tong to be level
or slightly higher than rear of tow vehicle when additional supports
have been removed. View and make adjustments while vehicle and
trailer are on level surface. Seek expert advise.
Reduce tow vehicle speed and use caution while braking. Obey all
local laws and regulations, never exceed the posted speed limit,
and use reasonable care when towing any type of trailer.
Contact local authority having jurisdiction.
Note: After the engine is stopped, there is a 15 second restart delay before engine cranking.
Fault Shutdowns Under certain operating conditions, onboard sensors determine that a condition may cause
damage if operation continues. The onboard controller is programmed to sound an alarm or
immediately stop (shutdown) the generator. These conditions are as follows:
1. An alarm fault is indicated by an alarm light located on the operator panel:
a. Overspeed − indicates the engine governor allowed speed to exceed safe limits.
b. Overcrank − indicates engine failed to start within programmed time period.
c. Low Oil Pressure − Safe engine operating oil pressure was not maintained.
d. Overtemperature − indicates safe operating coolant temperature was exceeded.
2. Engine cannot be restarted until the alarm condition is corrected.
3. Reset the alarm condition (after alarm condition is corrected) by pressing “Reset”.
Operation can be attempted, observe the operator panel when operation is resumed to
ensure alarm condition is removed.
Overload When maximum current output exceeds the output breaker limit, the main breaker will trip. When
this occurs, the load must be reduced and the breaker reset before operation can be resumed.
Note: The Main Breaker cannot be reset if load connection box door is open. This door must be
closed before the breaker can be reset to connect the electrical load.
Service & Parts Service and parts for your generator can be obtained from an authorized service center.
Please have the following information available prior to contacting the service center:
The model number and serial number of the generator set.
A complete and accurate description of the part (part number if known).
Note: Engine parts can usually be obtained from a local distributor by using the information in
the engine manufacturer’s owner’s manual.
MN2417
Troubleshooting and Maintenance 5-3
Page 48

5-4 Troubleshooting and Maintenance
MN2417
Page 49

Appendix A
Wiring Diagrams
Replacement Parts Replacement parts information is provided in Replacement Parts Catalog CA2401.
Engine parts are identified in the engine manual that was provided with your generator set.
IMPORTANT: Fuses are installed in the control box to protect the engine controller and associated
control circuits. When replacing fuses, use the exact replacement fuse (manufacturer and
part number).
Wiring Diagrams Wiring diagrams for these generators are contained on the following pages of this appendix.
Wiring Diagrams A-1MN2417
Page 50

Figure A-1 TS25 Connection Diagram
A-2 Wiring Diagrams MN2417
Page 51

Figure A-2 TS25 Connection Diagram
MN2417
Wiring Diagrams A-3
Page 52

Figure A-3 TS25 Connection Diagram
A-4 Wiring Diagrams
MN2417
Page 53

Figure A-4 TS25 Connection Diagram
MN2417
Wiring Diagrams A-5
Page 54

Figure A-5 TS25 Connection Diagram
A-6 Wiring Diagrams
MN2417
Page 55

Figure A-6 TS25 Connection Diagram
MN2417
Wiring Diagrams A-7
Page 56

Figure A-7 TS35 Connection Diagram
A-8 Wiring Diagrams
MN2417
Page 57

Figure A-8 TS35 Connection Diagram
MN2417
Wiring Diagrams A-9
Page 58

Figure A-9 TS35 Connection Diagram
A-10 Wiring Diagrams
MN2417
Page 59

Figure A-10 TS35 Connection Diagram
MN2417
Wiring Diagrams A-11
Page 60

Figure A-11 TS35 Connection Diagram
A-12 Wiring Diagrams
MN2417
Page 61

Figure A-12 TS35 Connection Diagram
MN2417
Wiring Diagrams A-13
Page 62

Figure A-13 TS35 Power Connection Diagram
A-14 Wiring Diagrams
MN2417
Page 63

Figure A-14 TS60 Connection Diagram
MN2417
Wiring Diagrams A-15
Page 64

Figure A-15 TS60 Connection Diagram
A-16 Wiring Diagrams
MN2417
Page 65

Figure A-16 TS60 Connection Diagram
MN2417
Wiring Diagrams A-17
Page 66

Figure A-17 TS60 Connection Diagram
A-18 Wiring Diagrams
MN2417
Page 67

Figure A-18 TS60 Connection Diagram
MN2417
Wiring Diagrams A-19
Page 68

Figure A-19 TS60 Connection Diagram
A-20 Wiring Diagrams
MN2417
Page 69

Figure A-20 TS60 Connection Diagram
MN2417
Wiring Diagrams A-21
Page 70

Figure A-21 TS80 Connection Diagram
A-22 Wiring Diagrams
MN2417
Page 71

Figure A-22 TS80 Connection Diagram
MN2417
Wiring Diagrams A-23
Page 72

Figure A-23 TS80 Connection Diagram
A-24 Wiring Diagrams
MN2417
Page 73

Figure A-24 TS80 Connection Diagram
MN2417
Wiring Diagrams A-25
Page 74

Figure A-25 TS80 Connection Diagram
A-26 Wiring Diagrams
MN2417
Page 75

Figure A-26 TS80 Connection Diagram
MN2417
Wiring Diagrams A-27
Page 76

Figure A-27 TS80 Connection Diagram
A-28 Wiring Diagrams
MN2417
Page 77

Figure A-28 TS80 Connection Diagram
MN2417
Wiring Diagrams A-29
Page 78

Figure A-29 TS80 Connection Diagram
A-30 Wiring Diagrams
MN2417
Page 79

Figure A-30 TS80 Connection Diagram
MN2417
Wiring Diagrams A-31
Page 80

Figure A-31 TS400 Connection Diagram
A-32 Wiring Diagrams
MN2417
Page 81

Figure A-32 TS400 Connection Diagram
MN2417
Wiring Diagrams A-33
Page 82

Figure A-33 TS400 Connection Diagram
A-34 Wiring Diagrams
MN2417
Page 83

Figure A-34 TS400 Connection Diagram
MN2417
Wiring Diagrams A-35
Page 84

Figure A-35 TS400 Connection Diagram
A-36 Wiring Diagrams
MN2417
Page 85

Figure A-36 TS400 Connection Diagram
MN2417
Wiring Diagrams A-37
Page 86

Figure A-37 TS400 Connection Diagram
A-38 Wiring Diagrams
MN2417
Page 87

Figure A-38 TS400 Connection Diagram
MN2417
Wiring Diagrams A-39
Page 88

Figure A-39 TS400 Connection Diagram
A-40 Wiring Diagrams
MN2417
Page 89

Baldor District Offices
Page 90

WARNING:
CALIFORNIA PROPOSITION 65 WARNING:
Engine exhaust from this product contains chemicals known
to the state of California to cause cancer, birth defects and
other reproductive harm.
WARNING:
CALIFORNIA PROPOSITION 65 WARNING:
Battery posts, terminals and related accessories are known to
the state of California to cause cancer, birth defects and other
reproductive harm.
© Baldor Electric Company
MN2417
BALDOR ELECTRIC COMPANY
P.O. Box 2400
Ft. Smith, AR 72902−2400
(479) 646−4711
Fax (479) 648−5792
www.baldor.com
Printed in USA
8/06
 Loading...