

Page 1

COMBINATION OVEN OPERATION MANUAL
OPERATION MANUAL
COMBINATION OVENS
SERIES: EHE & EHG
BUILT BY CRAFTSMEN. TESTED BY TIME®.
Page 2
DEAR CUSTOMER
COMBINATION OVEN OPERATION MANUAL
Bakers Pride Oven Company, LLC is a wholly owned
subsidiary of Standex International Corporation.
Congratulations on the purchase of your new Bakers
Pride® combination oven. By purchasing this new oven,
you have entered into a new era of cooking. With the
new technology and simplicity built into the combination
oven, you will receive excellent results in no time at all.
The oven’s ease and simplicity of operation will help you
realize savings in training dollars.
With the one touch, simply identify the relevant food,
push start, and you are cooking. The simplicity of
operation guarantees consistently produced products
without having to set times, temperatures, and finishes.
For the Chef, the offers a wide array of functions and
steps that once tested can be saved and recreated
by experienced kitchen staff as well as the first time
operator.
NOTICE
Please read the operations manual in full before
starting up the appliance to make sure all the
benefits and safety information is understood.
For more information, culinary support, and customer
service please contact 1- 800-927-6887
Appliance Model
S/N
Dealer
Installer
Date of Install
WARNING
California Residents Only
WARNING: This product can expose you to
chemicals including chromium which is known to
the State of California to cause cancer and birth
defects or other reproductive harm. For more
information go to www.P65Warnings.ca.gov.
BAKERS PRIDE OVEN COMPANY, LLC.
1307 N. Watters Rd., Suite 180
Allen, TX 75013
Phone: 800.527.2100 | Fax: 914.576.0605 | www.bakerspride.com
9/18
2
Page 3

COMBINATION OVEN OPERATION MANUAL
TABLE OF CONTENTS (continued)
INTRODUCTION 5
Intended use 5
SAFETY INFORMATION 5
Safety precautions 5
Safety signs and messages 5
Safe work practices 6
Specific precautions 7
General safety guidelines for installers, users, and service technicians 8
HEALTH AND SANITATION PRACTICES 9
WATER QUALITY 10
PRODUCT OVERVIEW 11
OPERATION 12
Oven commissioning and testing 12
Control panel 12
Pictograms key 13
Recipe screen by product type 13
Manual cooking screen 14
Home screen 15
How to interact with the touch-screen 15
Manual cooking mode 15
Cooking modes: convection, mixed and steam 16
Hold mode 18
Smoking mode 18
Starting and stopping cooking 19
Customized cooking programs 19
Creating a cooking program 20
Saving a cooking program 21
Modifying a cooking program 22
Copy, move, rename and delete 22
Selecting a program from the menu 23
The recipetuner interfaces 24
Rack control service mode 24
using the rack control function 25
creating a new rackcontrol program 27
using the easyservice function in rackcontrol 28
the regeneration function 29
regeneration programs 30
3
Page 4

COMBINATION OVEN OPERATION MANUAL
TABLE OF CONTENTS (continued)
The core probe and cooking in ∆t 30
Recommendations for cooking 31
Cooking advice: cooking uniformity 31
Recommendations for cooking–vacuum cooking and pasteurization 31
Recommendations for cooking–hydration of the steam 32
Functions menu 32
Washing 32
Cooling 33
Service 34
Configuration 34
Boiler cleaning 35
Log display 35
Advanced services 35
MAINTENANCE AND CLEANING 37
PRODUCT OVERVIEW 38
WARRANTY 40
4
Page 5
COMBINATION OVEN OPERATION MANUAL
INTRODUCTION/SAFETY INFORMATION
Intended Use
Bakers Pride® combination ovens are solely intended for
use in commercial kitchens.
The units may only be used for cooking food using the
correct racks, containers, baking sheets, and slide in
pans. Roll in rack dollies and cassettes must only be
supplied for correct operation by Bakers Pride.
Units should only be used with purest quality drinking
water for unit protection. The owner of the oven should
test water for filtration needs. Water quality needs can
be found in the manual under “Water Quality.”
Your new oven should not be used for the following
purposes, among others:
• As a dishwasher
• Drying towels, paper, or dishes
• As a storage container
• Heating brines, oils, or other chemicals
• Heating closed containers (i.e. canned goods)
Safety Precautions
Always follow recommended safety
precautions listed in this manual. To
the left is the safety alert symbol. When
you see this symbol on your equipment, be alert to the
potential for personal injury or property damage.
Safety Signs and Messages
The following safety signs and messages are placed
in this manual to provide instructions and identify
specific areas where potential hazards exist and special
precautions should be taken. Know and understand the
meaning of these instructions, signs, and messages.
DANGER
Damage to the equipment, death or serious
injury to you or other persons may result if
these messages are not followed.
WARNING
• Heating flammable liquids
• Deep frying
• Cleaning air filters or equipment parts
This message indicates an imminently hazardous
situation which, if not avoided, will result in death
or serious injury.
CAUTION
This message indicates a potentially hazardous
situation, which, if not avoided, may result in
minor or moderate injury. It may also be used
to alert against unsafe practices.
NOTICE
This message is used when special information,
instructions or identification are required
relating to procedures.
5
Page 6

COMBINATION OVEN OPERATION MANUAL
+
911
SAFETY INFORMATION–SAFE WORK PRACTICES
Beware of High Voltage
This equipment uses high
voltage. Serious injury can
occur if you or any untrained
or unauthorized person
installs, services, or repairs
this equipment. Always use an
Authorized Service Agent to service your equipment.
Beware of Hot Surfaces–
DO NOT Touch
The door on this unit reaches
temperatures that can cause
burns. Use caution when
opening and closing the door.
Do not touch any of the surfaces
when the unit is heated.
Protect Children
Keep children away from this
equipment. Children may not
understand that this equipment
is dangerous for them and
others.
NEVER allow children to
play near or operate your
equipment.
Be Prepared for
Emergencies
Be prepared for fires, injuries,
or other emergencies.
Keep a first aid kit and a
fire extinguisher near the
equipment. You must use
a 40-pound type BC fire
extinguisher and keep it within
25 feet of your equipment. Keep emergency numbers
for doctors, ambulance services, hospitals, and the fire
department near your telephone.
+
911
Know Your Responsibilities
as an Employer
• Make certain your employees
know how to operate the
equipment.
• Make certain your employees
are aware of the safety
precautions on the equipment and in this manual.
• Make certain that you have thoroughly trained your
employees about operating the equipment safely.
• Make certain the equipment is in proper working
condition. If you make unauthorized modifications to
the equipment, you will reduce the function and safety
of the equipment as well as void the warranty.
Keep this Manual With the
Equipment
This manual is an important
part of your equipment. Always
keep it nearby for easy access.
If you need to replace this
manual, contact:
Bakers Pride
Technical Services Department
2812 Grandview Dr.
Simpsonville, SC 29680
Or call toll free: 1-800-927-6887
Outside the U.S., call 864-963-3471
6
Page 7

COMBINATION OVEN OPERATION MANUAL
WARNING
WARNING
NOTICE
NOTICE
NOTICE
SAFETY INFORMATION–SPECIFIC PRECAUTIONS
CAUTION
Equipotential Ground Plane
When a high current flows through a conductor,
differences in potential appear between the
conductor and nearby metallic surfaces near the
appliance. As a result, sparks may be produced
between the appliance and surrounding metal
surfaces. These sparks could cause serious
injury, damage, or fire.
Bakers Pride provides an Equipotential
ground terminal for the connection of a
bonding conductor after the installation of
the appliance per lEC60417-1. This terminal is
located on the inside of the Power Entry Supply
box near the Earth connection and is marked with
this symbol.
WARNING
Disconnect power before servicing.
Improper installation, adjustment, alteration,
service, or maintenance can cause property
damage, injury, or death. Read the installation,
operating, and maintenance instructions
thoroughly before installing or servicing this
equipment.
For Your Safety
Do not store or use gasoline or other flammable
vapors or liquids in the vicinity of this or any other
appliance.
All services must be performed by a qualified
Bakers Pride authorized technician.
This manual is a part of your new combination
oven. You must keep and maintain it for the entire
life span of your oven and pass it on to the next
owner of the unit.
Retain this manual for reference; keep it where
you can use it.
This manual may be subject to new technical
developments, modifications, and unforeseen
errors.
Do not operate or attempt to operate this
appliance or any accessories without reading
completely and fully understanding this manual.
Do not connect Combi Steamer vent drain
connection to any drain material that cannot
sustain 175° Fahrenheit.
7
Page 8

SAFETY INFORMATION
COMBINATION OVEN OPERATION MANUAL
General Safety Guidelines for Installers, Users,
and Service Technicians
• Read, understand, and follow the instructions,
and heed and obey the warnings of the Installation
Manual, the Operator’s Manual, and the labels on the
Combi, accessories, and supporting products.
• Improper installation, maintenance, cleaning, or
modifications to the Combi can lead to injury or death
of the operator(s), and equipment and property
damage.
• Steam – To avoid steam burns, open the Combi door
by turning the handle to the left or clockwise (“airing”)
position and waiting for the steam and condensate
to clear. Then, turn to the right or counterclockwise
and slowly open the door. Never breathe steam,
superheated steam, or hot air. NOTE: The cooking
program is interrupted whenever the door is opened.
• Heat – The Combi, cooking containers, shelves,
and inner door and anything else inside the cooking
compartment are HOT, as are many of the component
parts. Wear DRY heatproof gloves or mitts.
• Cleaning and Daily Maintenance – Wait for the
Combi to cool before cleaning and performing daily
maintenance. Do NOT spray water in a hot cooking
compartment. Do not use hoses, power cleaners,
pressure washers, or harsh or abrasive cleaning
agents inside OR outside the cooking compartment.
• Cleaning Agents – Use only Bakers Pride approved
cleaning and descaling products. Follow the
instructions and heed and obey the warnings on the
labels. Other products can damage the Combi, cause
injury, or present health hazards.
• Wear appropriate shoes/boots to the work area to help
protect feet and to help prevent slips and falls.
• Use non-slip, draining, anti-fatigue FLOOR MATS (not
included) rated for use in wet, greasy, and dry work
areas to help prevent slipping and/or falling injuries.
Obtain the best mats for your needs from your local
supplier.
• Exhaust Vents – The top of the Combi, and the gas
and steam exhaust vents are very hot during operation
and remain hot for some time. Never breathe gas or
steam from the exhaust vents. Use extreme caution
when working on or near this area and component
parts.
• Scalds – Do not place containers with liquid contents
or contents that become liquid on oven racks higher
than you can see. You must be able to see into the
container. Cover containers (individual or on trolleys)
containing hot or hot liquid items to help prevent spills
during transport. Observe and heed, and obey the
additional warning labels posted on the Combi.
• Grease Spatter – Hot grease will spatter and cause
burns if sprayed with water. Locate fryers and similar
appliances outside the range of the Combi hand
shower.
• Electric Shock – Use the hand shower only on the
inside of the oven. Use of the hand shower, hoses,
power cleaners, or pressure washers on the outside of
the Combi can cause electric shock and/or damage to
electrical and electronic components.
8
Page 9

COMBINATION OVEN OPERATION MANUAL
HEALTH AND SANITATION PRACTICES
®
Bakers Pride
comply with health regulations and are tested and
certified to UL® and NSF® standards. You must operate
the equipment properly using only quality products and
use meat thermometers to insure meats are thoroughly
cooked.
Food Handling
• Wash hands thoroughly in warm, soapy water after
handling raw poultry or meats.
• Clean and sanitize all utensils and surfaces that have
been in contact with raw products. Clean and sanitize
the meat forks or baskets between cooking.
• Never place cooked meats on the same surfaces
used to prepare raw meats, unless the area has been
thoroughly cleaned and sanitized.
Combi Ovens are manufactured to
Storage of Raw Meats
• Designate an area or shelf strictly for the storage of all
raw meats to be used in the rotisserie.
• Raw products must always be stored at temperatures
below 38° F. (3° C.).
• Never store or mix raw foods above cooked foods, as
this is a health hazard. The drippings from raw foods
contaminate cooked or processed foods.
• All chicken and chicken parts to be stored overnight
must be thoroughly iced down and refrigerated.
Coding Cooked Foods
• All products cooked during the day should be sold the
same day.
NOTE: Follow your company’s procedures for the
handling of any leftover product.
Storage of Prepared Foods
• Cold foods should be kept at or below 38° F. (3° C.).
• Hot foods must be maintained to meet local health
codes, usually a minimum 145° F. (63° C.)
9
Page 10

WATER QUALITY
COMBINATION OVEN OPERATION MANUAL
As with all steam related products, water filtration and
regular filter replacements may be necessary with the
Combi. It is strongly recommended to have a water
analysis performed prior to installing the Combi. Poor
water quality can have a big impact on cook quality,
performance, and longevity of the Combi. Varying
combinations of pH; alkalinity; hardness; chlorides; total
dissolved solids; and other chemical characteristics,
when subjected to high temperatures, will cause water
to have a tendency to either scale or corrode.
There are a number of different water filter/treatment
systems available and each has its own benefits and
specialties. Below are a different styles and their
benefits. Multiple styles may need to be used to get the
water to proper levels.
• Particle Filter
When the water contains sand, iron particles, or
suspended matter, we recommend a 5-15 μm
(micrometer) particle filter.
• Active Carbon Filter
When the level of chlorine (Cl2) in the water exceeds
0.5 mg/L (ppm) (information available from the water
company), an active carbon filter should be installed.
• Phosphate Additive System
A Phosphate Additive (Feeder) System is recommended
for steam generator units only when a moderate level
of scale (not containing chloride) is experienced. The
system recommended is Kleensteam from Everpure.
• Blended Reverse Osmosis (RO)
When the water has a chloride Cl- concentration above
20 mg/L (= 20 ppm), a blended RO system should be
installed to avoid corrosion.
Note: Make sure a minimum conductivity of 20 μS/
cm (microSiemens) remains in the water for steam
generator units.
Water quality must conform to the below requirements.
If water does not meet the minimum quality and
damage to the oven is determined to be due to water
quality, it will be considered non-warranty and will not
be covered under the stated warranty policy.
Bakers Pride Minimum Water Quality
Requirements
– Hardness (CaCO3) = Less than
7.5 GPG (Grains per Gallon)
– TDS (Total Dissolved Solids) = Less than
100.0 mg/L (Milligrams per Liter)
– Free Chlorine = Less than 0.5 mg/L
(Milligrams per Liter)
– Chlorides = Less than 20 mg/L
(Milligrams per Liter)
– Chloramines = Less than 0.5 mg/L
(Milligrams per Liter)
– Total Alkalinity = Less than 20 mg/L
(Milligrams per Liter)
• Ion Exchange System
An ion exchange system is recommended for a steam
generator based unit when a high level of scale (not
containing chloride) is experienced and for a spritzer
based unit when any scale (not
containing chloride) is experienced. Systems
recommended: Claris from Everpure (H+ Ion
Exchanger). Sodium ion exchangers (as used in
dishwashers) must not be used.
– Total Silica = Less than 10 mg/L
(Milligrams per Liter)
–pH level = 7.0 to 8.0
– Conductivity (Steam Generator Models only) =
Minimum of 20 μS/cm (microSiemens per cm)
10
Page 11
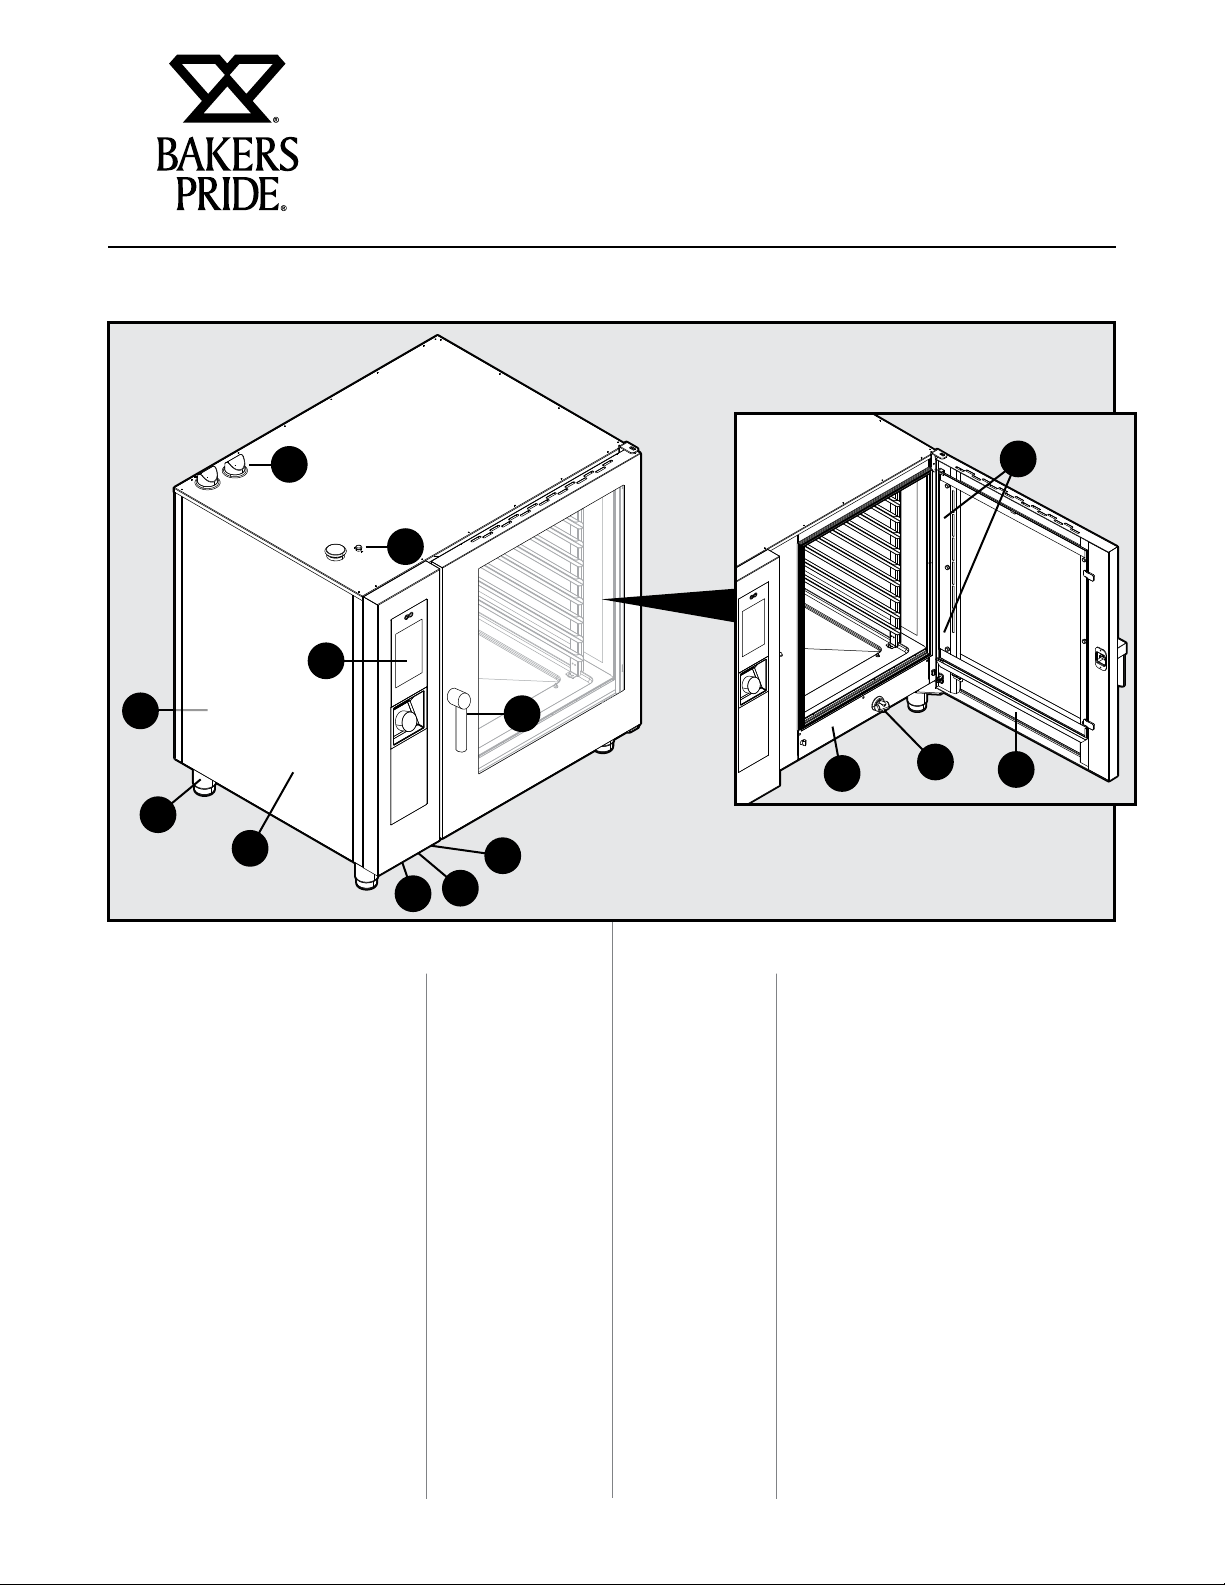
PRODUCT OVERVIEW
COMBINATION OVEN OPERATION MANUAL
14
1
9
8
5
1. Control Panel
2. Door Handle (2-step)
–Left to vent position
–Right to open
13
11
2
6
7
7. Core Temperature Port
–Under control panel
– Removable on table top unit
only
12
3
4
10
3. Oven Lights
–On the door
4. Hose Reel
– Behind the door on table top
units
5. Side Panel
–Removable for service access
6. USB Port
–Under control panel
8. Legs
–6" adjustable
9. Rating Plate (on Back
Corner)
• Contains the following
information:
–Model Number
–Serial Number
–Voltage
–Power Consumption
–Amp Draw
–Breaker Size
–Phase
–Frequency
11
Page 12

A
OPERATION
COMBINATION OVEN OPERATION MANUAL
Oven commissioning and testing
Before putting the oven into operation, you should
carefully carry out all the necessary checks to ascertain
the conformity of the equipment and installation of
the appliance as provided by law and according to the
technical and safety instructions given in this manual.
The compliance of the following must also be checked:
• The temperature in the oven installation area must be
greater than 39° F (4° C).
• The cooking chamber must be empty.
• All packaging must be entirely removed, including the
protective film applied on the oven walls.
• The vents and air slots must be open and free of
obstructions.
• Any pieces of the oven that were removed for
installation must be replaced.
• The general electrical switch must be closed and the
water and gas cut-off valves upstream of the appliance
must be open.
Control Panel/Testing
The oven should be tested by completing a cooking
cycle to verify that the equipment works properly and
without any anomalies or problems.
• The fan/s motor reverses the direction of rotation
automatically; reversal takes place approximately
every 3 minutes (time varies depending on the
cooking time).
• For the ovens with two fans in the cooking chamber,
the motors have the same direction of rotation.
• Check that the water is escaping in the direction of
the fan from the humidity inlet tube in the cooking
chamber.
At the end of the cooking cycle, the oven emits an
audible signal.
Control Panel
ON/OFF
Venerdì 11 marzo 2016 16:20
MANUAL
Manual
STEAMED GRILLED ROASTED
Steamed Grilled Roasted
FRIED BRAISED AU GRATIN
Fried Braised Au Gratin
BAKED
Baked
EGGS
Eggs
Recipes
RECIPES
LOW TEMP.
Low Temp. Smoked
RACK CONTROL
REGENERATED
Rack Control
SMOKED
Regenerated
Home
Screen
1. Switch the oven on by pressing the ON/OFF button.
Function
Chamber
2. Set a cooking cycle with temperature at 300° F (150°
C), time set to 10 min., and humidity at 5%.
Carefully check the points given in the following list:
• The lights in the cooking chamber turn on when
pressing the button and turn off automatically after 45
seconds (if they are not turned off early by pressing
the button again).
Knob
• The oven fan and heating elements stop if the door is
opened and starts again when the door is closed.
12
Page 13

OPERATION
ICON Key
Start Screen
Manual
COMBINATION OVEN OPERATION MANUAL
Recipe screen by product type
Pasta and
Rice
Poultry
Steamed Grilled Roasted
Fried and
Sautéed
Baked
(bread & pastry)
Eggs Rack Control Regeneration
Braised Au Gratin
Low
Temperature
Smoked
Meat
Vegetables Dessert
Bread Extra
Fish and
Seafood
Recipes
FUNCTIONS CHAMBER
LIGHTS
13
Page 14

OPERATION
MANUAL COOKING SCREEN
Cooking Mode: Convection only*
Cooking Mode: Mixed (Steam and
Convection)
Cooking Mode: Steam only*
Mode: Hold of Temperature
Automatic Cooling
COMBINATION OVEN OPERATION MANUAL
Humidity Discharge Valve: Closed
Humidity Discharge Valve: Open
Relative Humidity Percentage
SteamTuner Adjustment
(steam hydration)
(present only from phase 2)
Mode: Smoking
Time / Timer
Mode with Core Probe
Delta-T Mode
Unlock Button: allows one to change a
program
Program Change Indicator (changed by
the user or new program)
During cooking allows one to verify the
SET of the program
Manual Humidifier Button
Home Button (brings one back to the
start screen)
14
Page 15

A
B
A
C
OPERATION
COMBINATION OVEN OPERATION MANUAL
HOME SCREEN
Switch the oven on by pressing the ON/OFF BUTTON.
The home page will appear on the display.
It is possible to select whether to perform
Manual Cooking (A) or use one of the pre-set programs
in the Cooking type groups (B) or in the RecipeS (C).
Press the FUNCTIONS BUTTON (D) to set washing,
import and export the cooking programs and operate on
the oven system settings. (Some of these functions are
reserved exclusively to specialized technicians.)
MANUAL
A
B
STEAMED GRILLED ROASTED
FRIED BRAISED AU GRATIN
BAKED
EGGS
LOW TEMP.
RACK CONTROL
SMOKED
REGENERATED
HOW TO INTERACT WITH THE TOUCH-SCREEN
All of the operations can be selected by pressing the
desired item.
To modify a cooking parameter, e.g., the temperature,
press the relative field and turn the knob.
To confirm the modification, press the parameter again
or press the knob.
MANUAL COOKING MODE
From the home page, press Manual to gain access to
the cooking parameters setting screen.
In Manual MODE, the oven can be set for individual
cooking with one or more phases and/or a cooking
program can be set and saved in the cooking type
recipe book and/or classic recipe book.
Setting automatic pre-heating
The preheating function takes the oven to the
temperature before the food to be cooked is introduced.
Pre-heating is set automatically, but this function can
be modified after the start button has been pressed by
clicking on the temperature displayed.
Also, this function can be activated or deactivated by
pressing the PREHEAT BUTTON on the right
or left.
RECIPES
C
D
The cooking type groups (B) allow access to type of
cooking program, such as grilling. These programs are
found inside groups that refer to products of different
categories, but which share the same cooking type (for
example, grilled fillet steak and grilled fish).
The recipe book (C) groups cooking programs by
product type (for example, meat, vegetables, desserts,
etc.).
NOTE: Perform preheating with oven empty.
Setting the cooking mode
I
O
200°
57'
The convection icon is the default in the convection
15
Page 16

COMBINATION OVEN OPERATION MANUAL
B
A
C
B
A
C
O
I
200°
B
A
C
OPERATION–MANUAL COOKING MODE
cooking mode (hot air). By pressing the COOKING
MODE BUTTON, the cooking mode can be changed to
mixed or steam. The cooling cycle (from phase 2 only)
or the HOLD cycle can also be set.
I
O
200°
57'
CONVECTION MIXED
COOLING HOLD
Furthermore, the oven can be set in smoke mode.
New Phase
Delete Phase
STEAM
START
SMOKING
Setting the timer/probe/Delta-T
After having selected the cooking mode,
it is possible to cook in a timed manner or via the
core probe.
The timer can be set by pressing INF (infinity mode)
countdown.
I
O
200°
INF
Cooking Mode
with Core Probe
New Phase
Cooking Mode
Delete Phase
in ∆T
START
COOKING MODES:
CONVECTION, MIXED AND STEAM
Setting the cooking temperature
Set the cooking chamber temperature by pressing the
TEMPERATURE BUTTON. The set temperature can
vary depending on the selected cooking method.
The time is indicated in the minutes format
(1h30’ = 90 minutes).
When the desired cooking time ends, the oven emits
a sound and cooking stops unless other phases are
programmed.
If the time is not set, cooking will take place in infinity
mode (INF) and the oven will continue to cook until the
operator intervenes manually to stop cooking.
When cooking with the core probe it is possible to
choose between PIN (Cooking with Core Probe) or ∆T
. This mode allows the product to be cooked more
accurately.
Further information regarding ∆T cooking is described
on page 30.
16
Page 17

COMBINATION OVEN OPERATION MANUAL
START
New Phase
Delete Phase
INF
B
C
INF
MANUAL COOKING MODE
Setting the humidity vent valve
In convection mode is it possible to manually set the
opening or closing of the humidity discharge valve.
When open, the humidity present in the cooking
chamber is evacuated allowing the cooking chamber
(the product) to dry. Press HUMIDITY BUTTON to open
or close the valve.
NOTE: This cannot be completed in STEAM MODE.
Setting the degree of hydration with the Steam
Tuner
The level of hydration of the steam can be set in Steam
mode using the patented Steam Tuner control.
The setting must be made according to the product
being cooked and the result you wish to obtain. Other
information is described on page 32.
To set the desired degree of hydration of the steam,
press the STEAM TUNER BUTTON and then set the
value (left for dry, right for wet). If the default value is
not set, it is normal.
I
O
Valve closed
Valve opened
Setting the relative humidity percentage
In Mixed mode is it possible to set the percentage of
humidity that the oven will maintain during cooking.
With the patented MeteoSystem humidity control, the
oven can measure the relative humidity in the cooking
chamber and then add or remove humidity according to
the valve set by the operator.
To set the desired level of humidity, press the HUMIDITY
button and then select the value.
I
O
200°
200°
INF
Setting fan rotation speed
The fan rotation speed parameter can be modified in
the Convection and Mixed modes.
In the Steam mode this setting is automatic.
Fan operation, in relation to the temperature set, evenly
distributes the heat inside the oven chamber for uniform
cooking and browning of the products on the various
trays. Further information is described on page 31.
To set the rotation speed, press FAN SPEED BUTTON
and select the desired level.
INF
30%
17
Page 18

B
A
C
B
A
C
OPERATION
COMBINATION OVEN OPERATION MANUAL
HOLD MODE
The hold mode maintains the products at a minimum
safe temperature of 135°F (55°C) without product core
cooking. It is used at the end of night time cooking to
maintain the products temperature until the operator
returns.
The hold mode by default has humidity set at 20%
and the fan speed at 1. For effective holding, it is
recommended not to modify fan speed. For roasted
products, the recommended hold humidity setting is
between 20% and 35%; for brazing or stewing, the
recommended hold humidity is between 90% and 100%.
To modify the hold phase, press the COOKING MODE
BUTTON and select HOLD.
I
O
70°
Once cooking has been started by pressing the Start
button, the oven will request for the smoker to be
introduced before the smoking phase begins. At the end
of the smoking phase, the oven will request the removal
of the smoker. Both these steps must be confirmed by
the operator. Only after confirmation will the oven pass
to the next phase.
The temperature, time, ventilation and humidity
discharge valve can be adjusted during smoking. It is
I
O
200°
INF
INF
20%
New Phase
Delete Phase
SMOKING MODE
The smoker accessory is required to perform smoking in
the oven. This must be inserted into the oven on one of
the trays before the smoking phase begins.
If the cooking program requires a cooking phase after
the smoking phase, the smoker accessory must be
removed from the oven. Refer to the accessory manual
for further information regarding the connection and use
of the smoker.
START
New Phase
Delete Phase
recommended to keep the discharge closed so that
smoke does not escape from the chamber.
Smoking can be performed both hot and cold,
depending on the type of product and the desired
result.
In the cold smoke case, set a temperature between
50° F (10° C) and 87° F (30° C). The minimum
temperature in the oven chamber will be similar to room
temperature. The chamber can be cooled further by
inserting ice. Products used at this low of a temperature
must be prepared correctly. Refer to www.haccp.com
for additional details.
START
18
Page 19

B
A
C
OPERATION
COMBINATION OVEN OPERATION MANUAL
STARTING AND STOPPING COOKING
After having set the cooking parameters as desired,
press the START button to start cooking.
New Phase
Delete Phase
The oven will start in pre-heat mode if this has been
previously selected, or otherwise directly in cooking
mode.
Cooking will last until the end of the time set or on
reaching the core temperature in the core probe
cooking mode. If the time is set on infinity, cooking must
be stopped manually.
Press the STOP BUTTON to stop cooking.
New Phase
Delete Phase
START
STOP
must be started manually. For example, in the night
time cooking of roast dishes, it is preferred to brown the
dish on return of the operator to the kitchen, therefore
after the hold phase.
To pass from one cooking phase to another, hold the
number of the phase to which you want to pass down or
use the arrows to select the desired phase number and
press the GO button at the side of the phase number.
To start the program of a specific phase (different
from the first set), select the program, then press the
Advanced Customization BUTTON and use the arrow to
go to the desired phase. After pressing the Start Button,
the program will start from this phase.
250°
100°
60°
20°
65°
I
O
10'
35°
55°
OVEN
35%
35%
25%
Roast beef
Roasted
COOKING BROWNING
1
2
3
4
5
CUSTOMIZED COOKING PROGRAMS
Creating customized cooking programs with up to nine
different phases plus pre-heating is easy.
Every cooking phase is represented by a cooking mode
(convection, mixed, steam, etc.) with specific time,
humidity, ventilation parameters, etc.
For example, a program can be created for a roast dish
that contains a browning phase, a cooking phase, and a
hold phase.
To create a successive phase, the previous phase must
have a defined time. For example, if phase 1 has the
time set on infinity, it will not be possible to create phase
2 because the first phase has no end. The hold phase
is an exception, which can be set on INFINITY and then
have one or more successive phases, each of which
Advanced
customisation
START
In this program, preheating it will not be performed.
The program can be modified using the Cooking Tuner
interface before pressing the Advanced Customization
button.
19
Page 20

B
A
C
OPERATION
COMBINATION OVEN OPERATION MANUAL
CREATING A COOKING PROGRAM
A cooking program can be made up from several
phases, which the oven performs in increasing order
(phase 1, phase 2, phase 3...) passing from one to
another automatically. In between phases, there will be
an audible sound to identify the phase change.
After having set the parameters relative to the initial
phase (phase 1), press the new phase button to create
the next phase.
New Phase
Delete Phase
Then, set the parameters of phase 2.
Additional phases can be created by repeating the
above steps.
At the end of programming, press the START BUTTON
to start cooking.
START
Setting a cooling phase between two phases
The temperature inside the oven chamber may have
to be cooled between one phase and another. For
example, when roasting the chamber must be cooled
between the browning phase (at high temperature) and
the cooking phase (at low temperature).
This operation can be performed automatically by
selecting an automatic cooling phase. The automatic
cooling phase can only be set from phase 2 onwards.
After having set a high temperature phase, create a new
phase and select automatic cooling from the cooking
modes button.
1
250°
8’
2
100°
New Phase
Delete Phase
Press the DELETE Phase button to delete a
phase.
New Phase
Delete Phase
START
START
New Phase
Delete Phase
Once this mode has been selected, the oven will
propose default temperature, ventilation, and humidity
discharge valve values. Set the desired cooling
temperature min. 212° F (100° C).
In order to make cooling as fast as possible, do not
modify the ventilation and humidity discharge valve
values unless necessary.
20
START
Page 21

B
A
C
Rename
Delete
OPERATION
COMBINATION OVEN OPERATION MANUAL
SAVING A COOKING PROGRAM
A cooking program created can be saved in order to
use it at a later date, inside a cooking type group (grill,
braise, steam, etc.), or within a product type group in
the classic recipe book (meat, fish, chicken, etc.). It is
also possible to save the program simultaneously in both
recipe books. For example. grilled fillet steak can be
saved simultaneously in grill and meat.
After having created a cooking program, press the
functions Button to access the program’s function
screen.
New Phase
Delete Phase
Press the SAVE PROGRAM BUTTON and then press the
SAVE BUTTON.
START
In the next screen, select the group in which to save the
setting (example ROASTED). To save the program, press
the FORWARD BUTTON.
Enter the program name and press the SAVE ICON
BUTTON to save.
SAVE PROGRAMME
SELECT GROUPS IN WHICH TO SAVE
COOKING METHODS
STEAMED
ROASTED
BRAISED
BAKED
SMOKED
RECIPES
PASTA & RICE
FISCH
BREAD
DESSERTS
GRILLED
FRIED
AU GRATIN
LOW TEMP.
EGGS
MEAT
POULTRY
VEGETABLES
EXTRA
Save Programme
Washing
Save
Copy
Rename
Delete
21
BACK
FORWARD
Roast
W E R T Y U I O PQ
S D F G H J K LA
X C V B N MZ
Page 22

START
5
4
3
2
65°
20°
60°
35°
55°
OVEN
35%
25%
35%
Advanced
customisation
8’
START
New Phase
Delete Phase
OPERATION
COMBINATION OVEN OPERATION MANUAL
MODIFYING A COOKING PROGRAM
On delivery, the oven will have some cooking programs
preloaded.
Both the preloaded cooking programs and the newly
created ones can be customized.
To modify a program, first select the desired program
from one of the recipe books. Once open, a summary
of the set phases can be seen. In this reading mode
it is not possible to modify the cooking parameters. If
one or more cooking parameters are to be changed or
automatic
pre-heating is to be activated/deactivated, press the
Advanced customization button to release the program
and make the desired modifications. Use the arrow
BUTTONS to select the phase to be modified and
change it at will.
Once the modification has been completed, cooking can
be started directly and/or the program can be saved to
overwrite the previous setting or create a copy with a
different name.
COPY, MOVE, RENAME AND DELETE
Every program present can be copied, moved, renamed,
or deleted totally or partly.
Copy a program
If a new program is to be created by starting from a
program already present (because the old and new
program share some cooking aspects), it can be copied.
Select the base program, open it, and modify it by
pressing Advanced Customization.
Make the desired modifications and using the Functions
BUTTON, select Save and then Copy.
Select the group where in which to save the program
and then enter the new name and press the Enter
BUTTON to confirm.
1
250°
8’
2
100°
New Phase
Delete Phase
Move a program
If you want to move from one program group to another,
open the program and press the functions Button.
Select Save and then MOVE. Select the new group(s)
where it is to be moved and confirm with the Forward
BUTTON.
START
22
Page 23

START
New Phase
Delete Phase
OPERATION
COMBINATION OVEN OPERATION MANUAL
Rename a program
Open the program, press the Functions BUTTON, select
Save, and then Rename. Enter the new name and press
Enter.
Delete a program
Open the program, press the Functions BUTTON, select
SAVE, and then DELETE. Confirm the choice by pressing
YES in the pop-up that is shown.
Save
Copy
Rename
Delete
Move
The product recipe book
Press the recipeS button, to display the cooking modes
divided by product category (meat, fish, vegetables).
MANUAL
STEAMED
FRIED BRAISED AU GRATIN
BAKED
EGGS ...
GRILLED
LOW TEMP.
ROASTED
SMOKED
REGENERATED
RECIPES
Select the desired product category, to view the list of all
cooking programs relative to that category.
SELECTING A PROGRAM FROM THE MENU
The oven is supplied with a series of cooking programs
preloaded in the memory. These are divided by cooking
type (grilled, roasted, fried, etc.) and by product type
(meat, fish, vegetables, etc.).
They can be viewed both from the main menu, which
divides them by cooking type, and from the recipe
menu, which divides them by product type.
Cooking methods
The cooking modes are displayed on oven
start-up, where the cooking programs are collected
together.
By selecting the desired cooking mode, the list of all
cooking programs will open relative to that cooking
mode.
Select the desired program from the list.
Select the desired program from the list.
Press the COOKING TYPES BUTTON to go back to the
display of the types of cooking.
MANUAL
PASTA AND RICE
FISH
BREAD
DESSERTS
MEAT
POULTRY
VEGETABLES
EXTRA
COOKING
TYPES
23
Page 24

OPERATION
COMBINATION OVEN OPERATION MANUAL
THE RECIPETUNER INTERFACES
Once a cooking program has been opened, it can be
modified simply by using the RecipeTuner interfaces.
Depending on the type of cooking selected, a product’s
cooking, browning, degree of rising, etc. can be easily
modified. The RecipeTuner function is present for the
pre-set programs and the new ones created. The
RecipeTuner system recognizes the phase to be
modified in order to meet cooking requirements.
Function of the interfaces
Cooking: Allows modification of the cooking of a
product. Starting from average cooking at 140° F (60°
C), from the left the following types of cooking will be
obtained: rare, medium-rare, medium, medium-well
done and well done.
Browning: Product browning can be modified on
five different levels from the lightest (on the left), to the
most intense (on the right).
Humidity: During braising, this refers to the residual
humidity on the product at the end of cooking.
Roast beef
Roasted
COOKING BROWNING
Rising: it is possible to add the degree of rising
(20 minute steps) to perform an automatic rising and
cooking program.
Cooking method Interfaces
Grilling
Braising
Au gratin
Frying
Bakery products
Low temperature
Cooking Browning
Moisture
Cooking Browning
Browning
Rising Browning
Cooking
RACK CONTROL MODE
The Rack Control function allows separate control of
up to 10 different levels during cooking. This function
manages a unique Cooking Mode setting, temperature,
humidity, etc. However, each level may have a core
cooking time or temperature independent from the
others.
Press the RACK CONTROL BUTTON to access the list
of pre-set programs (breakfast, lunch, multibaker, mixed
steam, etc.). Each of these programs will contain a
series of dishes.
1
2
3
4
5
Advanced
customisation
250°
100°
60°
20°
65°
O
10'
35°
55°
OVEN
START
MANUAL
I
GRILLED
LOW TEMP.
ROASTED
SMOKED
REGENERATED
35%
35%
25%
STEAMED
FRIED BRAISED AU GRATIN
BAKED
EGGS ...
RECIPES
24
Page 25

OPERATION
COMBINATION OVEN OPERATION MANUAL
Example: The lunch program will contain the dishes
regarding the lunch service such as the grilled steak,
Milan-style meat, stir-fried vegetables, and lasagne.
It is possible to create and add other programs and subprograms (dishes).
USING THE RACK CONTROL FUNCTION
Selecting a rack control program
Selecting one of the programs from the list (for
example, lunch) will open a screen with the general
program settings on the left: Pre-heat, Cooking
Mode, Temperature, Fan, Butterfly valve, humidity or
SteamTuner if the mixed or steam cooking mode is set.
The 10 empty levels will be seen on the right.
Starting a Rack Control Program
All rack control programs basically function with infinite
time. Therefore, independently whether the program
requires pre-heating or not, start the program pressing
the START button.
Add the dishes to the program levels
After having started the program and at the end of
pre-heating (if present), press any one of the right hand
buttons (1-10) to add the name of the dish to insert in
the level selected.
I
O
1
2
3
4
250°
5
6
7
8
9
10
EasyService
I
O
START
The list of set sub-programs will open (dishes). Select
one and it will automatically be added to the previously
selected box. The dish must be placed inside the oven
at the same time it is selected. Continue by adding the
rest of the servings that are to be cooked. It is possible
to add and manage up to a maximum of 10 levels per
time.
The time remaining until the end of cooking will be seen
beside of the level name or, if probe pin cooking has
been selected, beside the real core temperature.
Create new names for dishes levels
New dish names can be added both to the programs
created by the user and to pre-set programs.
Enter the list of dishes and click on an empty box, press
the NEW BUTTON. Enter the name of the serving along
with the cooking time and the core temperature.
Lunch
A-La-Carte
Baking pan
Fillet of beef
Salmon
Milanese
Pizza
Sautéed vegetables
Tomato au gratin
New
Delete
25
Page 26

OPERATION
COMBINATION OVEN OPERATION MANUAL
Press the Save icon. Continue pressing NEW to add
others.
A-La-Carte
WRITE THE DESIRED NAME
New dish ...
20'
2 3 4 5 6 7 8 9 01
W E R T Y U I O PQ
S D F G H J K LA
X C V B N MZ
_
1#}
Delete a dish from the list
To delete a serving from the list hold the name to be
removed down for a few seconds. This operation is only
possible if the cooking of this dish is NOT active.
Direct or scheduled use
RackControl can be used in direct mode and in
scheduled mode.
The first mode is that described on the previous page
(add the plates to the program) in which the dishes are
added after having pressed the START button (and at
the end of pre-heating, if present).
In the programmed mode the servings are added when
the oven is in STOP mode, i.e. when it is not cooking.
The levels selected will not activate. At the end of
pre-heating, if present, press the START BUTTON to
activate the servings one by one, pressing the time box
on the right.
.
Modifying the time or the temperature of the
dish probe
To modify the set cooking time or the set core probe
of a dish in manual mode, press the “+” button until
the screen changes, then enter in the desired time or
temperature.
To modify in a specific program, enter the list of dishes,
press the name of the dish until the screen changes,
then enter the new time (or probe temperature). The
name of the serving can also be modified in this way.
If the time of a serving is to be changed during cooking,
press the remaining time box and enter the new time or
temperature probe.
The end of cooking a dish
At the end of the pre-established cooking time for a dish
(or on reaching the core temperature set), the oven will
emit a sound and END will appear in the time box. At
this point, open the oven door and remove the product
that is prepared. Opening and closing the door will
automatically reset the level.
Lunch
A-La-Carte
I
O
1
Grilled chicken
2
breast
3
4'
45°C
4
250°
Pizza
5
END
6
7
Baked salmon
8
2'
9
10
EasyService
I
O
START
26
Page 27

COMBINATION OVEN OPERATION MANUAL
OPERATION
Quick entry of a dish
During the cooking phase, the necessity to cook a
product not present in the list can be accomplished. It
is possible to quickly insert a dish in the RackControl
without having to record it with a specific name. The
generic name of the tray will appear.
To do this, click on an empty level and select the subprogram (example: Baking Pan). This represents a
sub-program to which a different time can be set each
time. Several tray servings can be introduced into the
RackControl simultaneously.
Lunch
A-La-Carte
Baking pan
Fillet of beef
Salmon
Milanese
Pizza
Sautéed vegetables
Tomato au gratin
Lunch
A-La-Carte
I
O
1
Grilled chicken
2
breast
3
4'
45°C
4
END
A
250°
Pizza
5
6
7
Baked salmon
8
2'
9
10
EasyService
I
O
CREATING A NEW RACKCONTROL PROGRAM
In addition to the RackControl programs already
present, customized programs can be created.
START
New
Delete
Modifying a RackControl program
To modify a RackControl program, operate on the sets
shown in the left hand column (A). The cooking mode,
temperature, fan (excluding steam mode) and butterfly
valve (humidity or SteamTuner) can be modified at any
time.
Once the modification is made, you may save, copy,
rename or delete the program. In this case, press the
functions BUTTON and proceed as explained on page
26 of this instruction manual.
From the home sceen, press the RackControl icon.
Then press the MANUAL BUTTON.
A-La-Carte
Manual
Breakfast
Lunch
Multibaker
Steam Mix
27
Page 28

OPERATION
COMBINATION OVEN OPERATION MANUAL
The Manual program allows the creation of a new
program and also works in RackControl mode without
memorizing the program. In the second case, on exiting
the program, the cooking sets set will be lost.
To create a new program, enter the RackControl Manual
section and enter the desired cooking settings into
the left hand column. Press the functions BUTTON
and save the program as explained on page 26 of this
instruction manual.
Only after the program has been saved is it possible to
enter the list of dishes.
Using the RackControl in Manual mode
If the program set is to be saved, RackControl can be
used in manual mode.
However, in this mode specific plates cannot be saved
and the generic name “Tray” is displayed for all levels.
USING THE EASYSERVICE FUNCTION IN
RACKCONTROL
RackControl is designed to cook dishes separately on
different levels. Dishes can be introduced at the same
time or at different times. At the end of cooking as the
time expires, the oven will indicate which level has been
reached.
By activating the EasyService function, it is possible to
have all of the dishes ready at the same time. In this
way, the oven informs when it is time to insert the dishes
at the various levels so that they are ready at the same
time.
Only levels with the time parameter setting can be
selected (not with the core probe parameter).
Activate EasyService
The EasyService function is only available when the
oven is in STOP mode and can be activated by moving
the EasyService switch BUTTON to position l. This
action allows access to the list of dishes of the relative
RackControl program.
Select the dishes to be served at the same time
(maximum 10) and press the START button.
Lunch
A-La-Carte
I
O
1
2
3
4
250°
5
6
7
8
9
10
EasyService
I
O
At the end of pre-heating (if present), the oven will beep
and the word IN will appear in the right hand box. Enter
the dishes with the longest cooking time. The acoustic
signal is reset and the countdown begins with the
opening and closing of the door.
In the other levels, the respective time to place each
dish in the oven is highlighted in green. The warning
sound starts intermittentantly for 15 seconds. Wait until
the timer reaches 0 and the wording IN is displayed
before placing the dish in the oven. By doing this all of
the dishes will cook exactly at the same time.
START
28
Page 29

COMBINATION OVEN OPERATION MANUAL
Manual
Regeneration parameters
OPERATION
Using RackControl with Easy Service
During the use of EasyService, other plates can be
added in RackControl mode, which will be controlled
independently from those selected for EasyService.
Both functions can be used at the same time by first
activating EasyService and then adding other plates in
RackControl mode.
STEAMED
MANUAL
GRILLED
ROASTED
Lunch
A-La-Carte
O
250°
I
Salmon
1
Milanese
2
Sautéed vegetables
3
Tomato au gratin
4
5
-3'
OV
-3'
-2'
6
7
8
9
10
STOP
EasyService cannot be activated if RackControl is
already activated.
FRIED BRAISED AU GRATIN
BAKED
EGGS ...
LOW TEMP.
SMOKED
REGENERATED
The regeneration programs list will be displayed. Select
the desired program from the list or press MANUAL to
create a customized program.
Using the regeneration function
Select MANUAL program from the regeneration
programs list to set the oven to regenerate one or more
products.
The screen will display SOFT or CRISPY functions.
Select SOFT if a dish cooked at low temperature is being
regenerated. Select CRISPY if a high temperature dry
phase is to be performed to regenerate the product’s
surface crust at the end of regeneration. The functions
are optional and can both be disabled. They cannot
both be selected at the same time: they are opposite to
each other.
THE REGENERATION FUNCTION
The Regeneration function was developed to regenerate
(or take to service temperature) pre-cooked and blast
chilled/frozen products
34° F (1° C) to 39° F (4° C). This function is particularly
suitable for regenerating products already on the plate,
but can also be used for the regeneration of whole
products on trays.
Accessing the Regeneration function
Press the Regeneration pictogram on the HOME page.
29
Page 30

OPERATION
COMBINATION OVEN OPERATION MANUAL
Enter the regeneration time (A) or the core temperature
(B) and press the START BUTTON (C). The oven will
pre-heat automatically (empty) and then notify when
to place the items in the oven via a sound signal and
display on the screen.
Manual
Regeneration parameters
B
START
8'
A
C
Modifying a program
If a program that is already saved is to be modified,
select it from the programs list of the regeneration
menu.
Make the modifications desired.
Use the START BUTTON to start the program or to save
the modifications by pressing the FUNCTION BUTTON
(D) and then the SAVE BUTTON.
Rename/Delete a program
Like the cooking programs, the Regeneration programs
can also be renamed and deleted.
From the program selected, through the functions
menu, access the SAVE function and rename or delete
to perform the desired procedure.
THE CORE PROBE AND COOKING IN ∆T
Positioning the probe
The probe detects the temperature via a tip positioned
in proximity of the probe.
The tip of the probe must be inserted into the center
and thickest part of the product.
D
REGENERATION PROGRAMS
Saving a new program
Personal programs can be added to the programs
already present.
To create a new program, select Manual program
from the list of regeneration programs and set the
regeneration time (or the temperature of the core probe)
and activate one of the SOFT or CRISPY functions if
necessary.
Once the desired parameters have been set, press the
functions button and save the program in the oven
memory as explained on page 21 of this instruction
manual.
Cooking in ∆T (Delta-T)
The ∆T function is used mainly for slow, low
temperature cooking.
In ∆T mode instead of setting the temperature in the
chamber, the temperature that the oven must maintain
as constant between the product core temperature and
the chamber must be set.
30
Page 31

T° core probe
OPERATION
COMBINATION OVEN OPERATION MANUAL
As the core temperature rises, the temperature in the
chamber will increase in parallel. A probe must be used
for the ∆T function. It is advised to set ∆T between 15°C
and 30°C maximum.
T° oven
ΔT
Food Cooking T° core
Red meat Rare 125° F (50°C)
Medium 140° F (60° C)
Well done 158° F (70° C)
Veal, pork and white
meat in general
Chicken Well done
Boiled and braised
meat
Fish Well done
RECOMMENDATIONS FOR COOKING
Roasts
For more effective cooking, place roasted foods on the
steel rod grill in order to achieve more uniform cooking
between the top and bottom of the food without having
to turn it during cooking.
To collect the juices, place a tray on the lower level of
the oven.
Well done 158° F (70° C)
176° F -194°
F(80-90° C)
Well done
176° F -194° F
(80-90° C)
152° F -161° F
(67°-72° C)
Grilling
The grill accessory must be used for grilling in the oven.
Grill on the aluminium rod grill for the best results.
During grilling, the oven is typically set in convection
mode with valve open and temperature between 446°
F (230° C) and 518° F (270° C), depending on the
type of product and browning that is desired, with the
ventilation set between 4 and 6.
Frying
All breaded and pre-fried frozen foods can be fried.
For breaded products, spray a thin layer of oil so
that it is absorbed by the breading. Frozen pre-fried
products can be fried without adding oil. Use non-stick
aluminium trays or frying baskets. Set the convection
oven with the valve open at a temperature of 482° F
(250° C) and ventilation between 4 and 6.
COOKING ADVICE: COOKING UNIFORMITY
The uniformity of cooking can be modified according
to the type of product by lowering the temperature and
increasing or decreasing the fan rotation speed.
Using the correct trays increases the oven’s general
cooking uniformity. Always select the tray with the
minimum depth possible for the product to be cooked.
Aluminum trays offer more uniform cooking than steel
trays.
Recommendations for cooking–vacuum cooking and
pasteurization
Vacuum cooking
Cooked a product directly inside a vacuum bag results
in particularly soft and flavored meat and decreases the
perishability of the product.
Vacuum pack the product using proper cooking bags,
then set the oven with the MIXED CYCLE at 100%
humidity and fan speed between 3 and 4. The cooking
chamber temperature must be a maximum of (5-10°
F) above the temperature the core must reach. For
example, to vacuum cook an average fillet 140° F (60°
C) at the core, set the oven temperature at 145° F (63°
C).
31
Page 32

OPERATION
COMBINATION OVEN OPERATION MANUAL
Pasteurization in jar
A product is considered pasteurized when the core
temperature reaches a value between 181° F (83° C)
and 185° F (85° C).
Based on the type of product, dimension of the jar, and
amount of product it contains, the time to reach the
core temperature may vary. It is therefore recommended
to use the core probe on a sample jar (perforating the
lid to allow the probe to enter) in order to detect the
temperature of the entire production batch.
At the end of cooking the product must be blast frozen
quickly to 37° F (3° C) to end the pasteurization cycle.
RECOMMENDATIONS FOR COOKING–HYDRATION OF
THE STEAM
With the patented control for the hydration of the steam,
SteamTuner can modify the quality of the steam, from
very dry to very wet, according to the product to be
cooked. The dry steam is generally used for delicate
products, while the wet steam is normally used for
products that have hard fibers and are therefore more
difficult to cook.
Pastry such as:
VERY DRY
248° F
(120° C)
steamed sponge
cake, muffins,
crème caramel.
FUNCTIONS MENU
The FUNCTIONS menu found on the HOME screen
allows access to the routine maintenance functions and
oven use settings.
WASHING
Four types of washing that can be selected: HARD,
NORMAL and SOFT, or the RINSE ONLY mode.
SAVE PROGRAM
WASH
COOLING
SERVICE
DRY
STANDARD
MOIST
VERY
MOIST
167° F
(75° C)
176° F
(80° C)
203° F
(95° C)
239° F
(115° C)
Fish and shellfish
in general
Steamed chicken
meat
Red meat and
boiled meats in
general
Vegetables whole
and in pieces,
pasta and rice
Choose one of these types of washing based on the
amount of food residues and deposits of fat in the oven
cooking chamber. HARD should be used for deep
washing and very resistant dirt. SOFT should be used
for a light wash.
Washing duration varies based on the type:
SOFT approx. 1 hour 15 mins
NORMAL approx. 1 hour 30 mins
HARD approx. 2 hour 30 mins
The rinse only mode duration depends on the use of a
rinse aid:
duration of approx. 10 mins without rinse aid,
duration of approx. 20 minutes with rinse aid.
32
Page 33

OPERATION
COMBINATION OVEN OPERATION MANUAL
Select the type of detergent; liquid (Liquid Degreaser) or
solid (Solid Tabs).
Additionally, the program will ask for the selection
between rinse aid Descaler & Rinse, vinegar or none.
WASH
SELECT PARAMETERS
Wash Types
HARD WASH
NORMAL WASH
SOFT WASH
RINSE ONLY
Detergent Rinse agent
LIQUID
DEGREASER
SOLID TAB
LIQUID
DEGREASER
VINEGAR
NONE
Check Container levels
before starting wash
Container levels OK
Detergent replaced
Rinse agent replaced
Both replaced
IMPORTANT:
For correct maintenance and quality of the oven
chamber, using the detergent recommended by the
manufacturer is required.
Once selections have been made, press the OK button
and verify the product levels (detergent and rinse aid) in
the tanks.
Put the tanks of detergent and rinsing aid near the oven
and insert the small white and red tubes which are
placed under the oven into their respective tanks:
CLEAR tube -> RINSE AID
RED tube -> DETERGENT
THE USE OF A NON-APPROVED DETERGENT CAN VOID THE
WARRANTY!
COOLING
This function quickly reduces the temperature inside
the oven chamber, in order to pass from a high
temperature type of cooking to more delicate cooking at
lower temperatures (for example, to pass from roasting
to steaming vegetables).
Press the START BUTTON and the fan will begin. Open
the oven door to promote the exit of hot air and the entry
of cooler air. This allows the desired temperature to be
reached in a short time in order to proceed with more
delicate cooking.
33
Page 34

OPERATION
COMBINATION OVEN OPERATION MANUAL
For safety reasons, the cooling function can be enabled
only with the door closed. The door can be opened only
after this program has started. By default the oven cools
the chamber to 122° F (50° C), but a custom value can
be set.
Upon reaching this temperature, the oven stops cooling
and emits a sound signal.
50°
START
Date and Time
The Date and Time function allows the user to update
the current date and time in order to use the oven.
DATE AND TIME
SAVE
System Information
The SYSTEM INFO FUNCTION displays the software
version installed in the oven, the serial number of the
oven, and the number of hours passed since the last
time the steam generator was cleaned.
SERVICE
The service menu includes four functions:
CONFIGURATION; LOG DISPLAYS, BOILER CLEANING;
and ADVANCED SERVICES which displays a range of
functions and procedures for maintenance of the oven.
CONFIGURATION
A series of parameter configurations can be performed
from this menu:
Clean Boiler
Display LOG
Advanced services
SYSTEM INFO
05/06/2012
Serial number:
000000/00/00
Recipe book: V 3.1
Boiler: 2 hr
34
Page 35

COMBINATION OVEN OPERATION MANUAL
OPERATION
Language
The language in which the commands and messages
are seen on the display can be selected using this
function.
Shower Block/Unblock
This function allows the solenoid valve that delivers
water to the retractable hand shower, to be open and
closed.
You can choose the following options:
• Shower always usable
• Shower active with door open
• Shower always blocked
Lighting
The Lighting function allows the brightness of the
display to the adjusted. Select this function, then adjust
the brightness using the knob on the control panel and
press SAVE.
CLEAN BOILER
SELECT PARAMETERS
B
Rinse agent
DESCALER & RINSE
VINEGAR
START
CLEAN BOILER (STEAM GENERATOR MODELS ONLY)
The boiler is descaled automatically during washing.
It can be started manually, whenever deemed
necessary, by selecting CLEAN BOILER.
Make sure the tank is positioned correctly and check
the level of liquid under the outlet pipe.
Check the fluid level and carefully place the descaling
liquid tank near the oven and insert the clear suction
tube (rinsing aid tube).
Cleaning can be performed using rinse aid
Descaler & Rinse or vinegar.
The duration varies according to the descaling
products used (30 minutes if you use the Descaler &
Rinse, recommended by the manufacturer or six hours
if you use vinegar).
During the cleaning procedure, the oven can still be
used for any type of cooking. During this process, the
steam will be produced only by direct injection (without
using the steam generator).
DISPLAY LOG
The function proposes the chronological list of the
ALARMS LOG and the WASHING LOG.
ALARMS LOG displays all of the errors that have been
detected and shown on the oven display during its
operation.
WASHES LOG displays all of the washes and the type of
wash performed by the oven with the date and start time
recorded.
ADVANCED SERVICES
This function is protected by a password and allows
access to the configuration settings and inspection
functions reserved for qualified technical staff.
Date Import/Export
By connecting a USB under the control panel, the
import and export functions of some of the functions
described above are activated.
35
Page 36

COMBINATION OVEN OPERATION MANUAL
OPERATION MAINTENANCE AND CLEANING
Insert an empty USB to export the RECIPE BOOK and
HACCP LOGS (when activated this function records
the cooking procedure and all its data: time, chamber
temperature, core probe temperature, start-up and all
phase changes, etc.).
Insert a loaded USB drive to import data (for example,
new recipes, new parameters, or new languages) to the
oven software.
MANUAL CLEANING
Disconnect the appliance from the electric power supply
before performing any cleaning or maintenance actions.
At the end of the working day, clean the appliance, both
for reasons of hygiene and to prevent operating faults.
The oven should never be cleaned with direct water or
high pressure jets. Moreover, the appliance should not
be cleaned with ordinary steel brushes or scrapers.
Wait until the cooking chamber is cold. Remove the
tray-trolley stops . Remove the loose residue manually
and put the detachable parts in the dishwasher.
You should use warm soapy water to clean the cooking
chamber. All the surfaces must be thoroughly rinsed
afterwards, ensuring that there is no detergent residue.
To clean the outside of the oven, use a damp cloth and
a mild detergent.
Cleaning Chemicals
Use only Bakers Pride approved cleaning agents to
clean the oven interior.
Always use protective gloves and eyewear when
handling any chemical including wash or rinse liquids.
Use and follow all directions supplied by the
manufacturer of the liquids listed on the containers and
as instructed by your manager.
Observe all rules for storage of chemicals supplied by
the chemical manufacturer.
Do not use unauthorized abrasive cleaners on the oven
for any reason, including any wire or metal scrapers, or
pressure washing of any kind.
NOTE: Damage caused to any surface, gasket, or part
due to abrasive chemicals or tools because of improper
cleaning or without using the specified cleaning agents
will void any warranty claims.
Detergent must contain less than 5% (by weight)
Sodium Hydroxide.
If the oven is equipped with the automatic cleaning
system, the cleaning hoses will be pre-attached to the
unit. Please take care placing the correct hose in the
correct chemical. The red hose is for cleaning detergent
and the clear hose is for rinse aid.
Bakers Pride Approved Cleaning Chemicals
Detergent – ECOLAB Greasecutter Plus
Rinse Aid – ECOLAB R/O Free Rinse Additive
Solid Tablet – Bakers Pride
Unauthorized cleaning agents may discolor or harm
interior surfaces of the oven.
Read and understand the manufacturer’s label and
material safety data sheet before using the oven cleaner
and rinse aid.
Detergent Rinse Aid
36
Page 37

COMBINATION OVEN OPERATION MANUAL
OPERATION MAINTENANCE AND CLEANING
Daily Cleaning
At the end of a working day, clean the equipment, both
for hygienic reasons and to avoid malfunctioning.
The oven must never be cleaned using direct or high
pressure water jets.
Never use pan-scrubbers, steel brushes, or scrapers or
abrasive cleaners to clean the inside or outside of the
oven.
Wait for the cooking compartment to cool down.
Remove the side tray racks. Clean by hand or in dish
washer.
To clean the oven external parts, use a damp cloth and
a non-aggressive cleaner.
Cleaning The Glass
The door window can be cleaned both on the outside
and on the inside. To do this, turn the latch that locks
the internal window in position in a clockwise direction
and, once the window is open, clean it with a suitable
detergent. Never use abrasive materials.
Check that it is always perfectly clean and free from
obstructions.
Steam/Humidity Stack
Cleaning–Control Panel Ventilation Filter
The oven control panel ventilation filter must be cleaned
at least once a month by washing the
filter by hand with soap and water. Depending on
working environment, additional cleaning may be
required.
To slide the filter out, pull downward and apply force on
the relevant hand-hold.
1
2
The glass should then be closed properly and locked in
place by turning the relevant latch counterclockwise.
Humidity Discharge
The humidity discharge expels the vapors produced
inside the cooking chamber.
It is good practice to replace the filter at least once a
year or even more frequently whenever the oven
operates in environments in which there is a high
concentration of flours or similar substances.
Filter
In all cases, the filter must be replaced when it is
consumed or damaged; it must be requested from
Bakers Pride as a non-warranty part.
37
Page 38

COMBINATION OVEN OPERATION MANUAL
PRODUCT OVERVIEW
Name Description Action Name
Chamber Probe Compartment probe error Cooking block, automatic restore. Replace compartment
probe.
Core Probe Core probe error Manual restore. Replace core probe.
Motor Safety Motor alarm Cooking block, automatic re-set. If continuous, contact
service agency.
Inv Motor Inverter alarm Cooking block, automatic re-set. If continuous, contact
service agency.
Chamber Safety Compartment safety high
limit.
PWM PWM board error
(communication timeout or
problems on fan speed)
PWM 2 PWM second board error
(communication timeout or
problems on fan speed)
Hi Temp Control compartment
temperature too high.
Com PWM PWM board communication
error
Com PWM2 PWM2 board communication
error
Communication Main board communication
error
No Drain Boiler water did not drain
correctly
Power Fail Electrical power failure Cooking block. Press master knob for
Probe 4 Humidity control probe 4
alarm
Probe 5 Humidity control probe 5
alarm
Cooking block,
manual re-set.
Cooking block. Contact service agency
Cooking block. Contact service agency.
Cooking is blocked, automatic
restore.
Cooking block. Remove power and then
Cooking block. Remove power and then
Cooking block. Remove power and then
Cooking block. Remove power and then
Cooking block. Replace humidity probe 4.
Cooking block. Replace humidity probe 5.
If continuous, contact
service agency
Check oven’s perimeter
ventilation (louvers) and
the correct functioning
of the cooling fans of the
components. Clean Filter
(see page 37).
give back. If continuous,
contact service agency
give back. If continuous,
contact service agency
give back. If continuous,
contact service agency
give back. If continuous,
contact service agency.
1 second.
38
Page 39

COMBINATION OVEN OPERATION MANUAL
PRODUCT OVERVIEW
Name Description Action Name
GAS Gas burner block Cooking cycle block, manual
reset.
GAS 2 Second gas burner block Cooking cycle block, manual
reset.
Air Flow Air flow rate alarm on gas
burner
Air Flow 2 Air flow rate alarm on second
gas burner
No water There is no water to generate
steam
No water litremeter
Litre-meter, washing alarm Washing block, manual restor Press the manual restor
Cooking cycle block, manual
reset.
Cooking cycle block, manual
reset.
Cooking cycle block; automatic
reset.
Press manual restore.
(encoder button); if the
problem persists, contact
the support centre.
Press manual restore.
(encoder button); if the
problem persists, contact
the support centre.
Check the obstructions
of the combustion fumes
exhaust chimney, otherwise
contact the assistance
centre.
Check obstructions to
the combustion fumes
discharge chimney,
otherwise contact after-sales
assistance.
Check the connection to
water pipeline and make
sure the shut-off valve is
open.
(encoder button) If the
problem persists, contact
the support centre.
39
Page 40

COMBINATION OVEN OPERATION MANUAL
BAKERS PRIDE LIMITED WARRANTY
2 years standard warranty boiler plate attached adjusted
to 2 years
LIMITED WARRANTIES AND REMEDIES. Seller
warrants that at the time of shipment the Products will
be free from defects in material and workmanship for
a period of no longer than TWO YEAR from the original
installation by an authorized representative or no longer
than TWO YEAR AND THREE MONTHS from the date
of shipment from the factory. Defective conditions
caused by abnormal use or misuse lack of or improper
maintenance damage by third parties alterations by
unauthorized personnel acts of God failure to follow
installation and/or operating instructions or any other
events beyond the reasonable control of the Seller will
NOT be covered under this Warranty. The obligations
of the Seller under this warranty shall be limited to
repairing or replacing (at the option of the Seller) any
part with the exception of lamps, fuses, door gaskets,
and glass (which are not covered under this warranty)
which is found defective in the reasonable opinion of
the Seller. Any part found defective by the Seller will
be repaired or replaced without charge F.O.B. factory
Simpsonville South Carolina or F.O.B. authorized BKI
Distributor. Seller and/or its authorized representatives
will assume the normal replacement labor expense
for the defective part for the period of the warranty as
stated above including reasonable (up to 100 mile or
2 hr round trip) travel time where replacement work
is performed during standard business hours and not
subject to overtime holiday rates and/or any additional
fees. IN NO EVENT SHALL THE SELLER BE LIABLE
FOR LOSS OF USE LOSS OF REVENUE OR LOSS OF
PRODUCT OR PROFIT OR FOR INDIRECT INCIDENTAL
SPECIAL OR CONSEQUENTIAL DAMAGES INCLUDING
BUT NOT LIMITED TO FOOD SPOILAGE OR PRODUCT
LOSS. THIS WARRANTY DOES NOT COVER GLASS
BREAKAGE. THE ABOVE WARRANTY IS EXCLUSIVE
AND ALL OTHER WARRANTIES EXPRESS OR
IMPLIED ARE EXCLUDED INCLUDING THE IMPLIED
WARRANTIES OF MERCHANTABILITY AND FITNESS
FOR A PARTICULAR PURPOSE. Any appliance
replacement part with the exception of lamps fuses
and glass which proves to be defective in material or
workmanship within ninety (90) days of installation will
be replaced without charge F.O.B. Factory Simpsonville
SC or F.O.B. authorized BKI Distributor. The user shall
have the responsibility and expense of removing and
returning the defective part to the Seller as well as the
cost of reinstalling the replacement or repaired part.
40
Page 41

Food Service Equipment Group
The Standex Food Service Equipment Group (FSEG) is a manufacturer of innovative commercial food
service equipment offering a wealth of refrigeration and cooking expertise. Products include walk-in
coolers and freezers; hot and cold display cabinets, cases, and storage systems; commercial ovens,
rotisseries, and cooking equipment; and rotary vane pumps.
Ask your sales representative about how the power of all Standex brands can work for you.
www.standex.com/segments/food-service
Be sure to keep up with new product announcements
and events on social media!
 Loading...