

Page 1
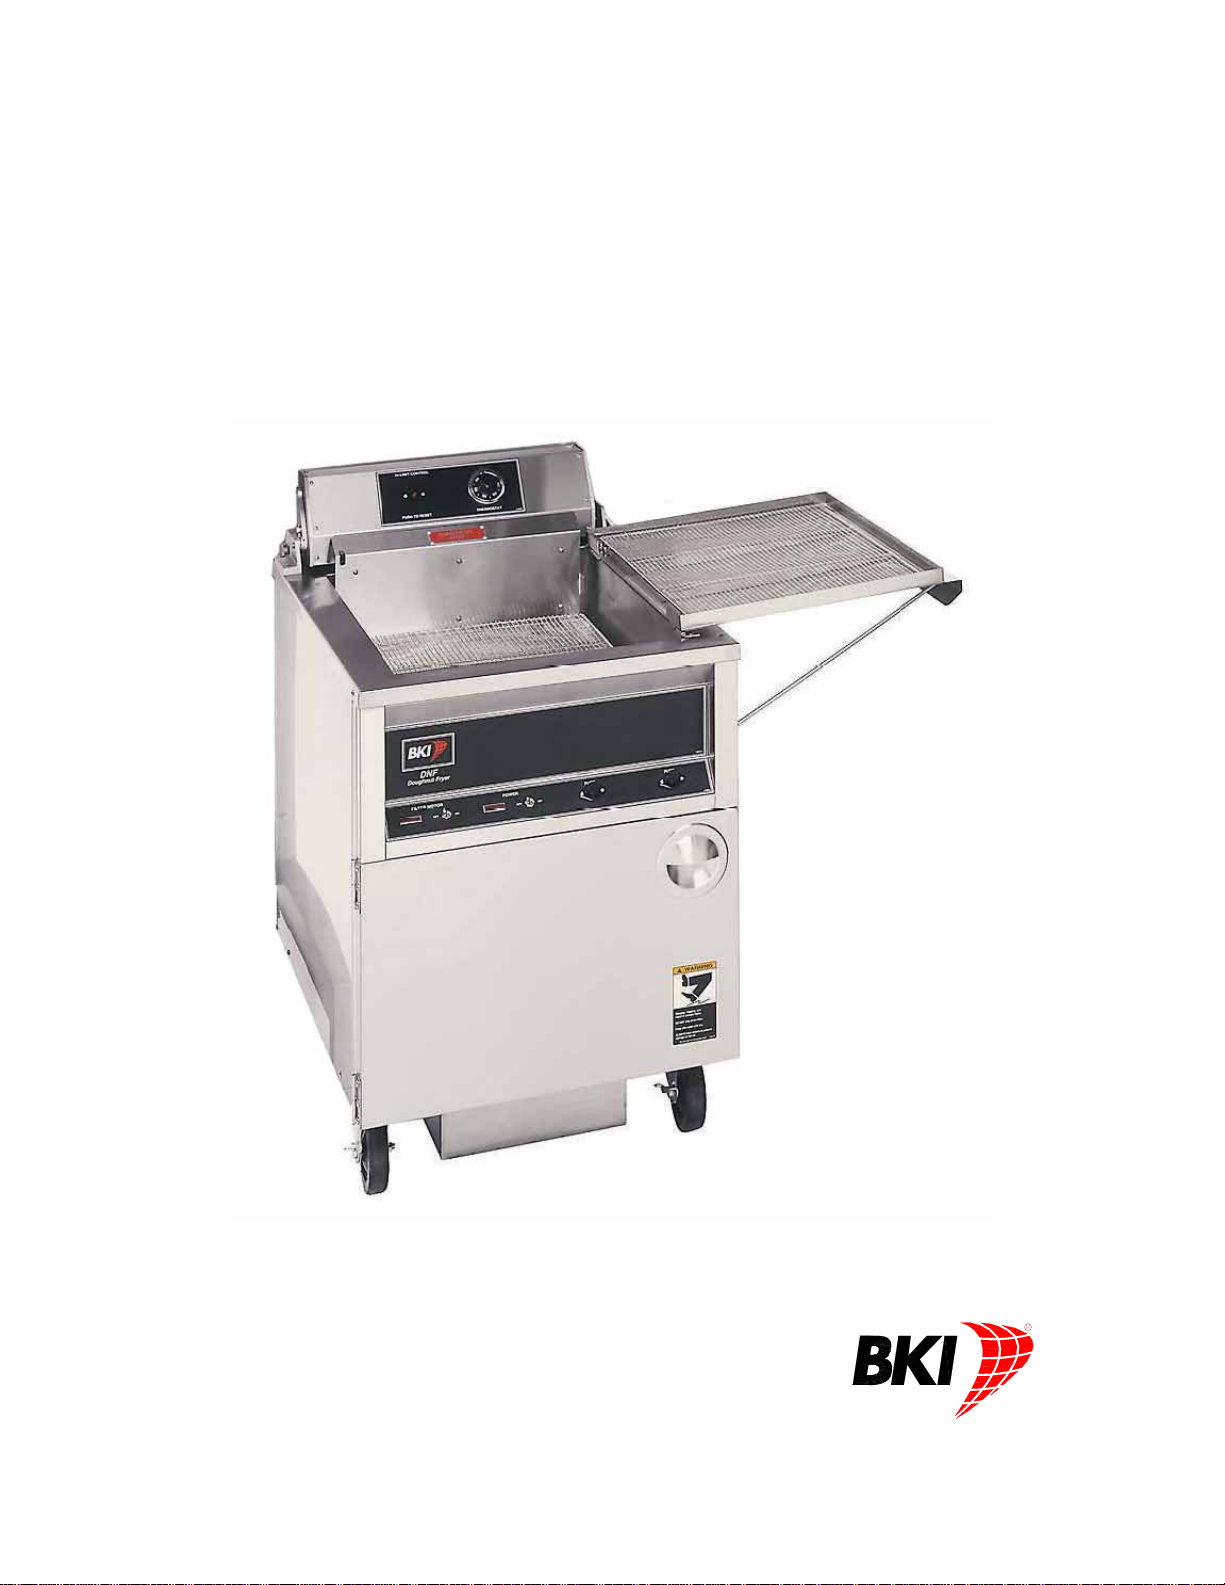
Doughnut Fryer
MODELS DNF, DNF-F
Installation & Operation Manual
Serial Numbers 123439 and higher
Page 2

Warranty Information
LIMITED ONE YEAR WARRANTY
BKI (The "Company") warrants to the original purchaser that at time of shipment from the
Company factory, this equipment will be free from defect in materials and workmanship. Written
notice of a claim under this warranty must be received by the Company within ONE YEAR from
the date of installation, but no longer than ONE YEAR AND THREE MONTHS from date of
shipment from the factory. Defective conditions caused by abnormal use or misuse, lack of or
improper maintenance, damage by third parties, alterations by unauthorized personnel, acts of
God, failure to follow installation and/or operating instructions, or any other events beyond the
reasonable control of the Company will NOT be covered under this warranty. The obligation of
the Company under this warranty shall be limited to repairing or replacing (at the option of the
Company) any part, with the exception of lamps, fuses, and glass (which are not covered under
warranty), which is found defective in the reasonable opinion of the Company. Any part found
defective by the Company will be repaired or replaced without charge F.O.B. factory,
Simpsonville, South Carolina or F.O.B. authorized BKI Distributor. The Company and/or its
authorized representatives will assume the normal replacement labor expense for the defective
part for the period of the warranty as stated above, excluding travel and/or other expenses
incidental to the replacement of the defective part, where replacement work is performed during
standard business hours and not subject to overtime, holiday rates, and/or any additional fees. IN
NO EVENT SHALL THE COMPANY BE LIABLE FOR LOSS OF USE, LOSS OF REVENUE OR
LOSS OF PRODUCT OR PROFIT OR FOR INDIRECT OR CONSEQUENTIAL DAMAGES
INCLUDING BUT NOT LIMITED TO, FOOD SPOILAGE OR PRODUCT LOSS. WARRANTY
DOES NOT COVER GLASS BREAKAGE. THE ABOVE WARRANTY IS EXCLUSIVE AND ALL
OTHER WARRANTIES, EXPRESS OR IMPLIED, ARE EXCLUDED INCLUDING THE IMPLIED
WARRANTIES OF MERCHANTABILITY AND FITNESS FOR A PARTICULAR PURPOSE.
REPLACEMENT PARTS
Any appliance replacement part, with the exception of lamps, fuses, and glass, which proves to
be defective in material or workmanship within ninety (90) days of installation will be replaced
without charge F.O.B. Factory, Simpsonville, SC or F.O.B. authorized BKI Distributor. The user
shall have the responsibility and expense of removing and returning the defective part to the
Company as well as the cost of reinstalling the replacement or repaired part.
Page 3

Doughnut Fryer Table of Contents
Table of Contents
Table of Contents........................................................................................................................................1
Introduction .................................................................................................................................................2
Safety Precautions....................................................................................................................................2
Safety Signs and Messages.................................................................................................................2
Safe Work Practices.............................................................................................................................3
Safety Labels........................................................................................................................................7
Installation ...................................................................................................................................................8
Unpacking and Handling...........................................................................................................................8
Assembly and Mounting ...........................................................................................................................8
Wiring........................................................................................................................................................8
Initial Test and Adjustment .......................................................................................................................9
Operation ...................................................................................................................................................10
Controls and Indicators...........................................................................................................................10
Care of the Shortening............................................................................................................................12
Start-Up...................................................................................................................................................13
Cooking Yeast Doughnuts......................................................................................................................14
Cooking Cake Doughnuts.......................................................................................................................15
Maintenance ..............................................................................................................................................16
Scheduled Maintenance.........................................................................................................................16
Filtering Procedure.............................................................................................................................17
DNF-F.............................................................................................................................................17
DNF................................................................................................................................................18
Boil-Out Procedure.............................................................................................................................18
Filter Pad Replacement......................................................................................................................20
Troubleshooting......................................................................................................................................21
1
Page 4
Doughnut Fryer Introduction
Introduction
The BKI Doughnut Fryer is intended for general commercial use. It consists of an oil vat, 2 electrical
control panels, a manual drain control and an oil filter system (DNF-F only). The oil vat holds the cooking
oil that is heated by tubular heating elements. The Lower Electrical Panel controls and indicates power to
the unit as well as power to the filter system. This panel also contains 2 fuses that protect the circuitry
within the unit. The Upper Electrical Panel contains a thermostat that regulates the oil temperature and a
push button for resetting the heating elements in the event of an overtemperature condition. A drain
control is provided behind the door to allow the user to drain the cooking oil for filtering purposes. The
DNF-F comes with a built-in oil filter system consisting of an oil container, filter screen assem bly and
pump motor/piping necessary to filter cooking oil.
The BKI name and trademark on this unit assures you of the finest in design and engineering -- that it has
been built with care and dedication -- using the best materials available. Attention to the operating
instructions regarding proper installation, operation, and maintenance will result in long lasting
dependability to insure the highest profitable return on your investment.
PLEASE READ THIS ENTIRE MANUAL BEFORE OPERATING THE UNIT. If
you have any questions, please contact your BKI Distributor. If they are unable to
answer your questions, contact the BKI Technical Service Department, toll free:
1-800-927-6887. Outside the U.S., call 1-864-963-3471.
Safety Precautions
Always follow recommended safety precautions listed in this manual. Below is the safety alert symbol.
When you see this symbol on your equipment, be alert to the potential for personal injury or property
damage.
Safety Signs and Messages
The following Safety signs and messages are placed in this manual to provide instructions and identify
specific areas where potential hazards exist and special precautions should be taken. Know and
understand the meaning of these instructions, signs, and messages. Damage to the equipment, death or
serious injury to you or other persons may result if these messages are not followed.
This message indicates an imminently hazardous situation which, if not avoided,
will result in death or serious injury.
This message indicates a potentially hazardous situation, which, if not avoided,
could result in death or serious injury.
This message indicates a potentially hazardous situation, which, if not avoided,
may result in minor or moderate injury. It may also be used to alert against
unsafe practices.
This message is used when special information, instructions or identification are
required relating to procedures, equipment, tools, capacities and other special
data.
2
Page 5
Doughnut Fryer Introduction
Safe Work Practices
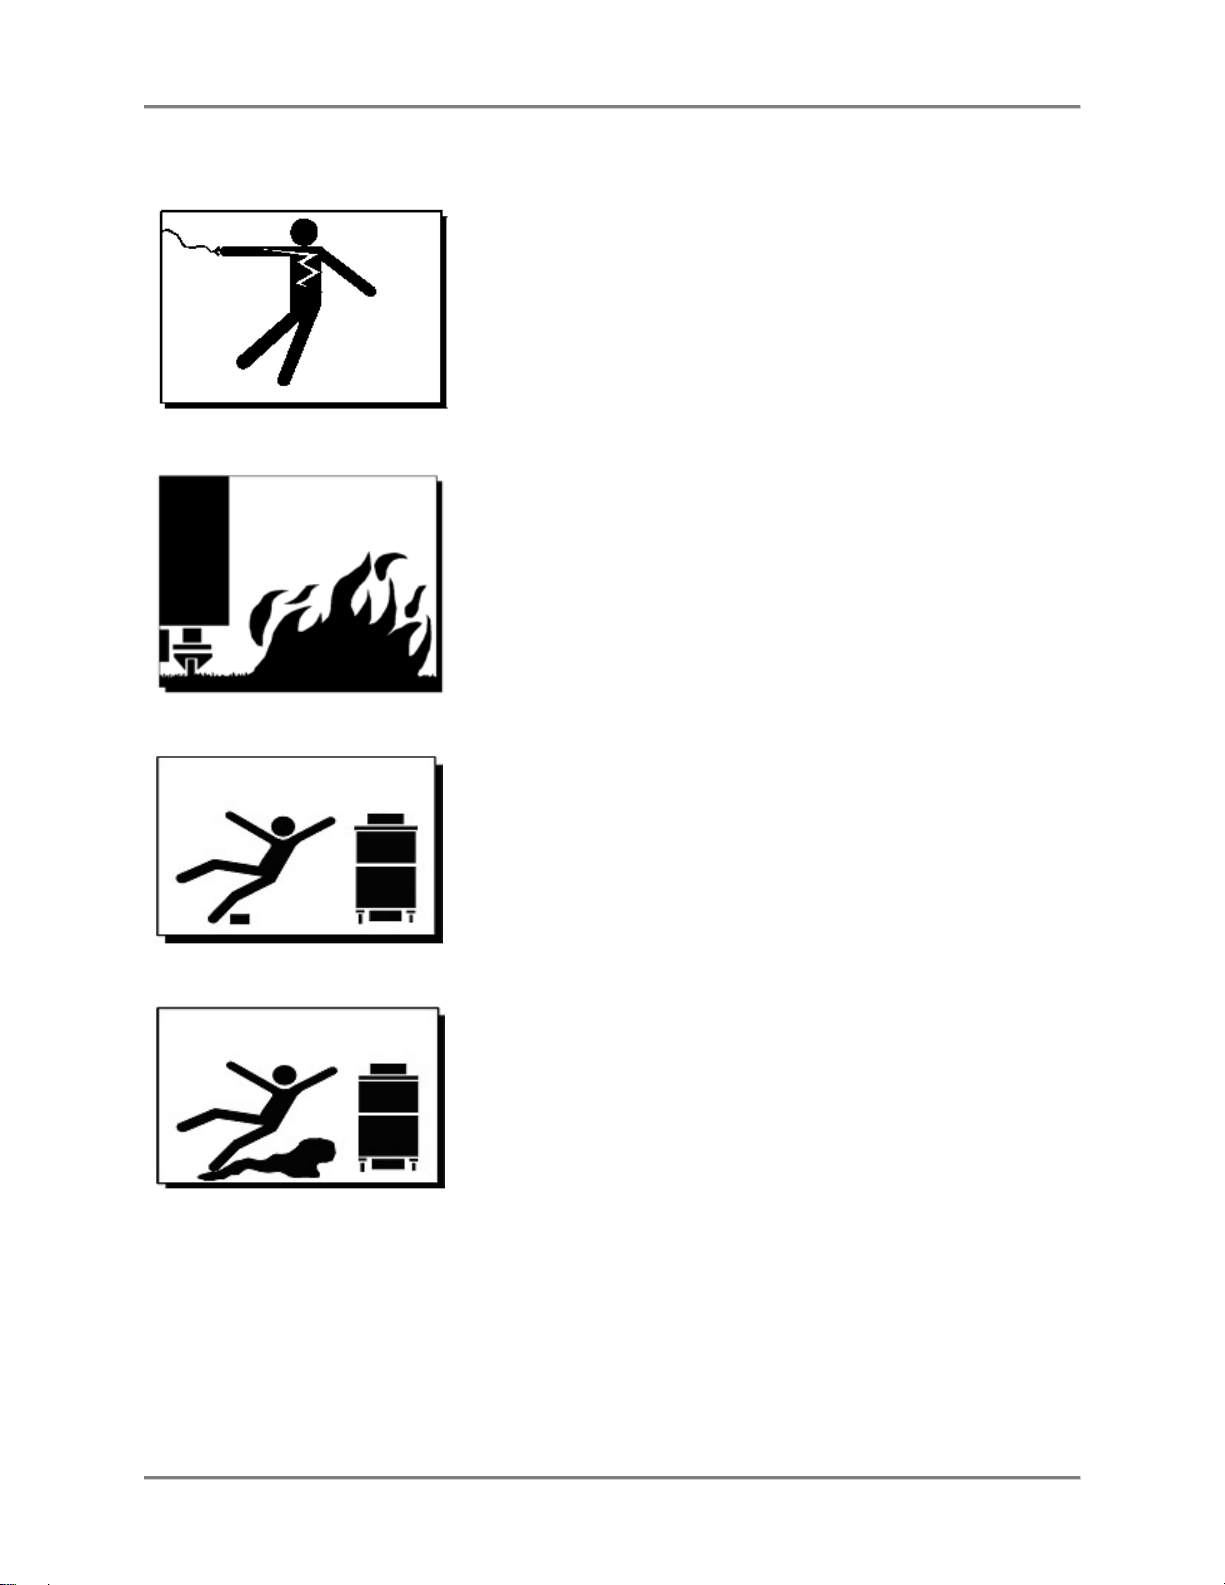
Beware of High Voltage
This equipment uses high voltage. Serious injury can occur if you
or any untrained or unauthorized person installs, services, or
repairs this equipment. Always Use an Authorized Service agent to
Service Your Equipment
Noncombustible Floors Only
Make sure your floor is noncombustible. Do not operate your fryer
on floors that are wood, carpeted or have rubber mats.
• Placing your fryer on a combustible floor could cause a
fire. Serious injury could result.
• Examples of noncombustible floors where you can safely
place your fryer are concrete, tile, and ceramic.
Keep The Area Around Your Fryer Uncluttered
Make sure to keep the area around your fryer clear of any
obstacles.
Serious injury can occur if you trip or fall near the fryer. You could
be burned by hot shortening that splashes out of the fryer or by
falling against the hot metal of the fryer.
Keep The Floor Around Your Fryer Clean Of Shortening
Make sure to keep the floor around your fryer clean of shortening
and other liquids.
Serious injury can occur if you slip near your fryer. You could be
burned by hot shortening that splashes out of the fryer or by falling
against the hot metal of the fryer.
3
Page 6
Doughnut Fryer Introduction
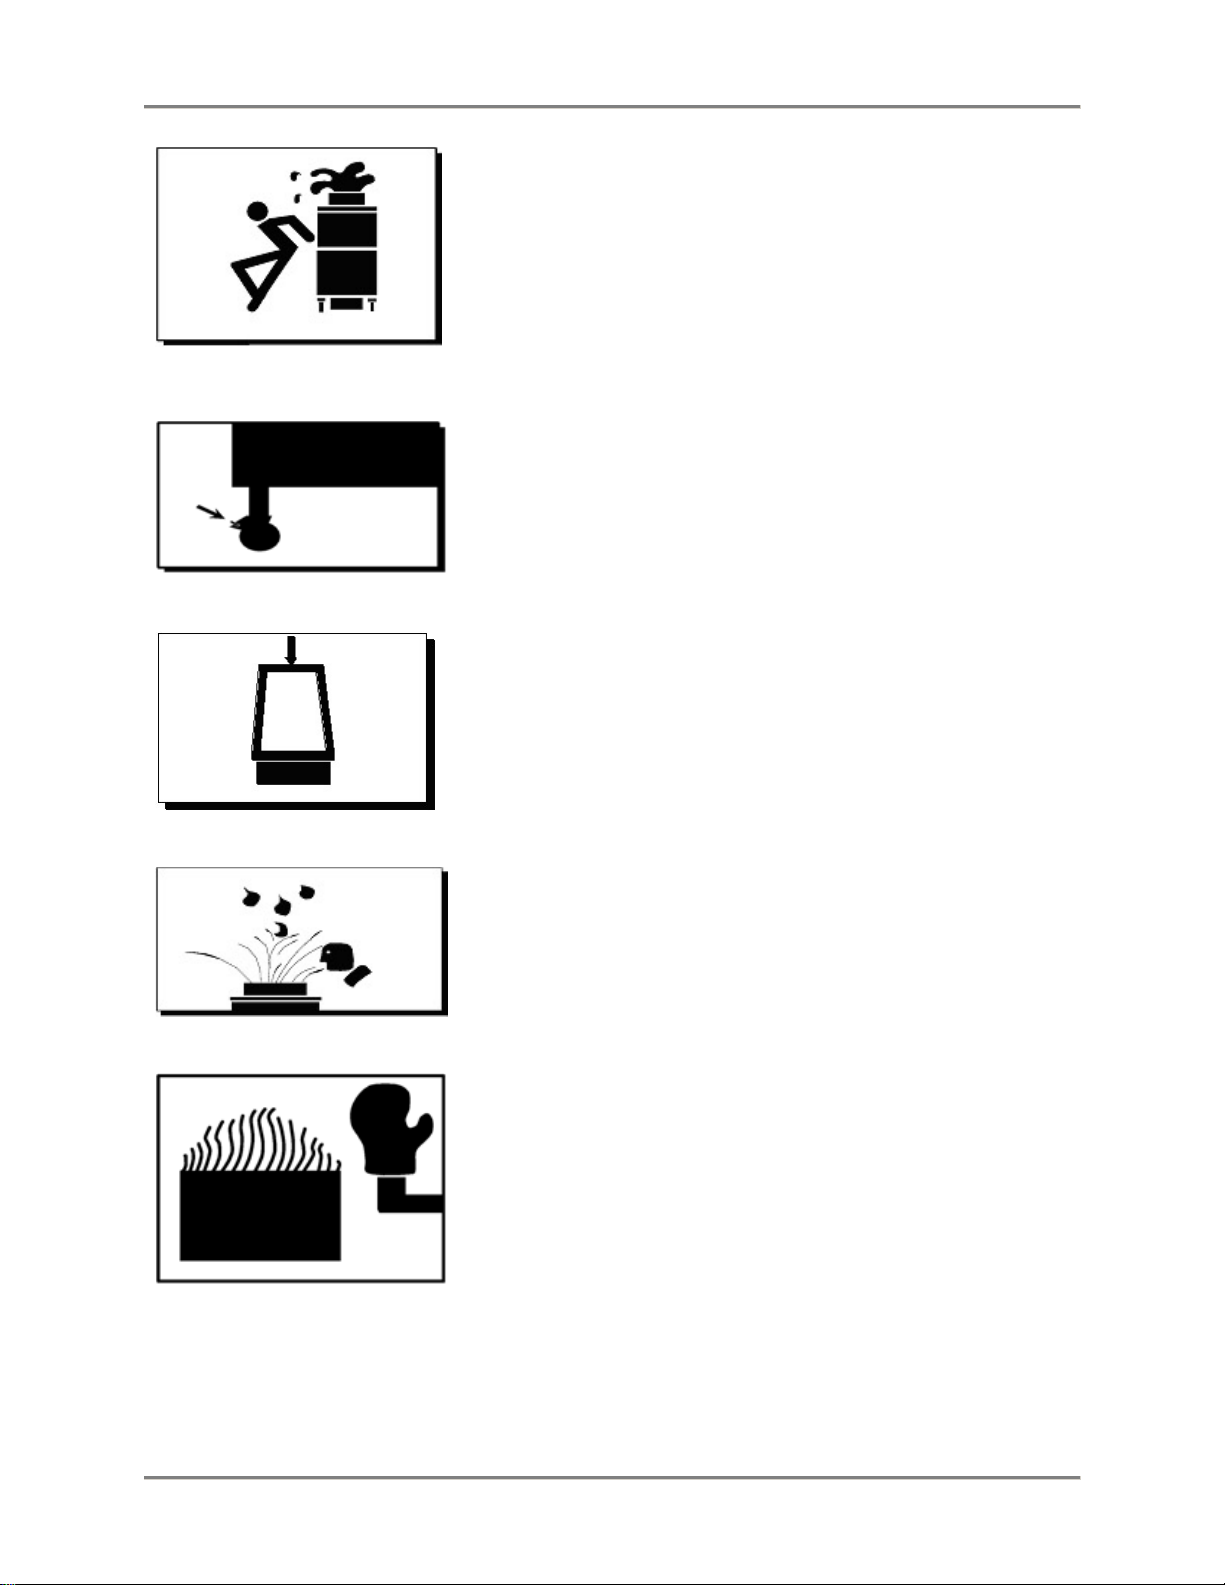
Keep The Lid Closed When The Fryer Is Not In Use
Hot shortening can splash if someone moves the fryer or bumps
into it. Serious injury can occur if hot shortening splashes out of
the fryer.
Do not lean, sit or stand on the fryer or perform any maintenance
or cleaning duties while the fryer or the shortening is hot. You
could be burned.
Keep The Casters Locked
To avoid spilling shortening, keep the casters locked. If any
shortening spills near your fryer, clean it up immediately.
Do Not Overfill The Fryer With Shortening
Hot shortening and steam may escape and burn you if you put too
much shortening in the fryer. Fill the fryer to approximately one
inch below the fill marks that are inside the fryer vat. Heat the
shortening. If needed, carefully add more shortening to bring the
level to the fill marks.
Do Not Let Any Water Get Into The Fryer
Always remove excess moisture from food before placing it into
the fryer vat. Water will cause the hot shortening to spatter. You
could be burned.
Wear Safe Clothing Appropriate To Your Job
Always wear your insulated mitts when handling the racks or touch
any hot metal surfaces. You received a pair of insulated mitts with
your fryer. If you lose or damage your mitts, you can buy new ones
at your local restaurant equipment supply store or from your local
BKI Distributor.
Always wear non-skid shoes when working around the fryer or any
other equipment that uses shortening. Never wear loose clothing
such as neckties or scarves while operating your fryer. Keep loose
hair tied back or in a hair net while operating your fryer.
Always wear appropriate personal protection equipment during the
filtering process to guard against possible injury from hot oil.
4
Page 7
Doughnut Fryer Introduction
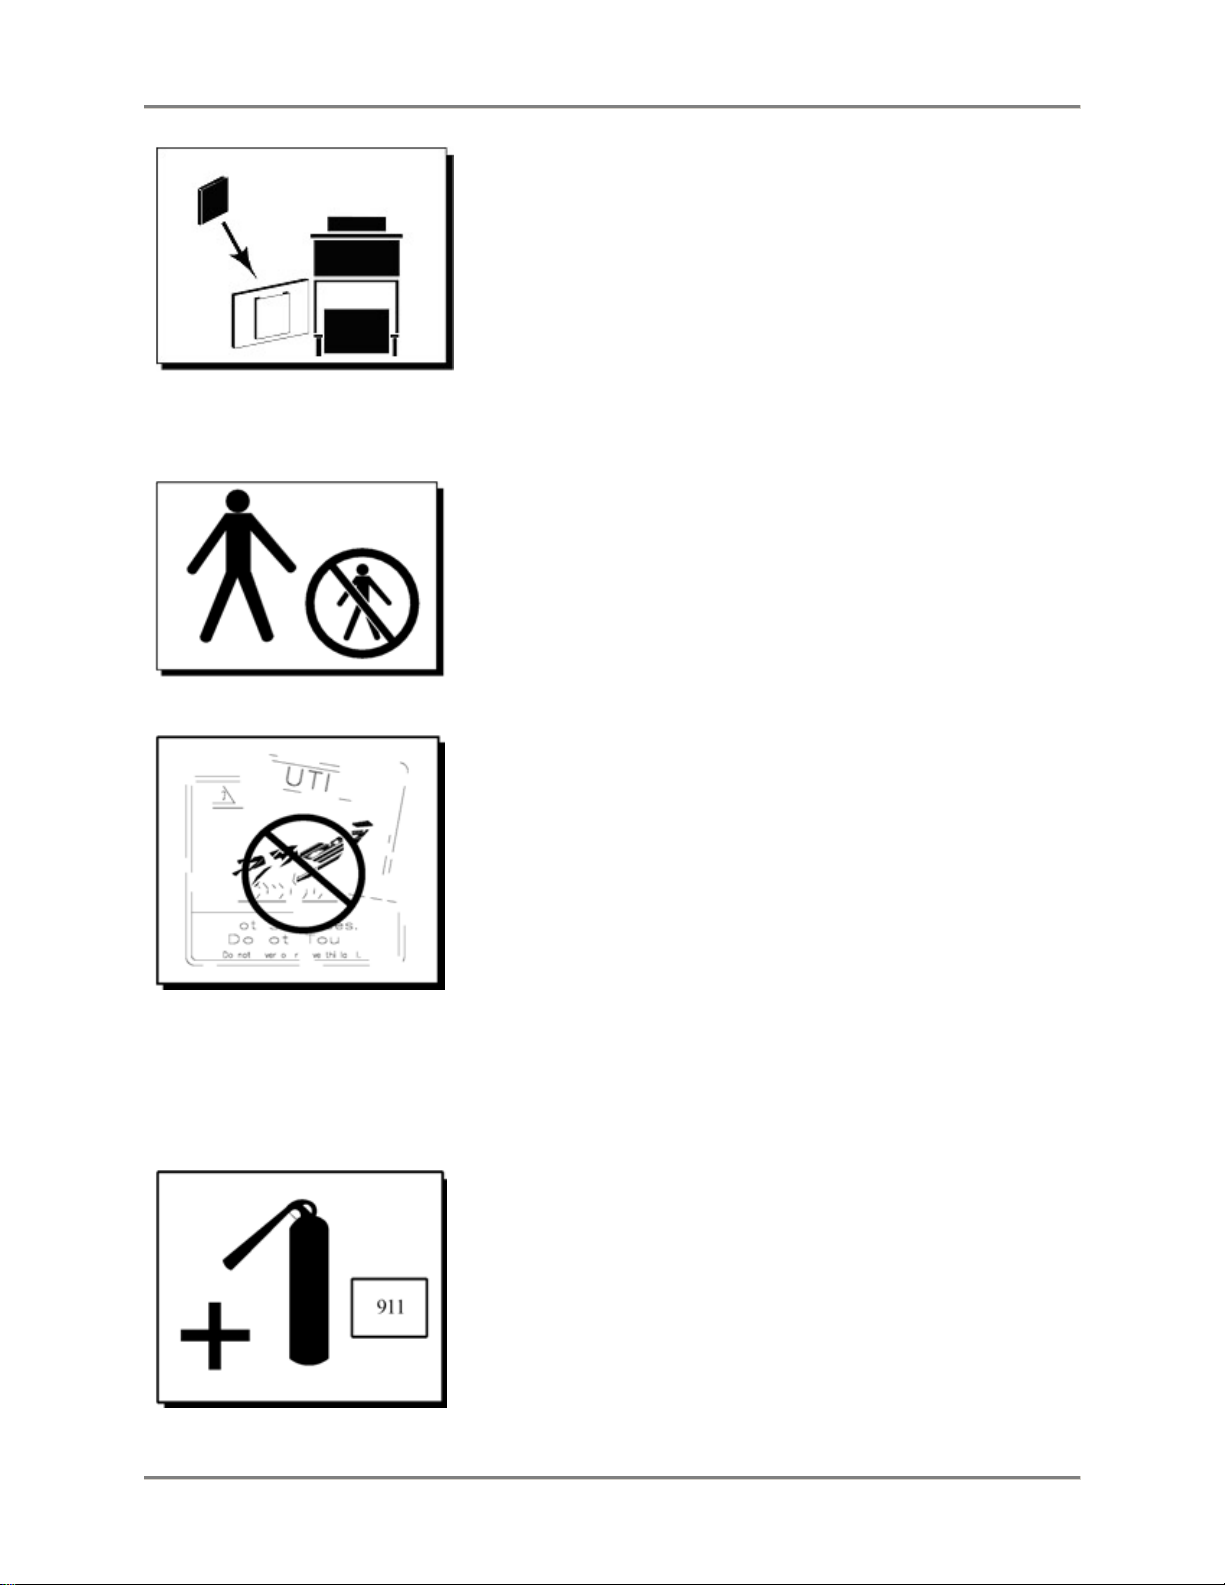
Keep this manual with the Equipment
This manual is an important part of your equipment. Always keep it
near for easy access.
If you need to replace this manual, contact:
BKI
Technical Services Department
P.O. Box 80400
Simpsonville, S.C. 29680-0400
Or call toll free: 1-800-927-6887
Outside the U.S., call 864-963-3471
Protect Children
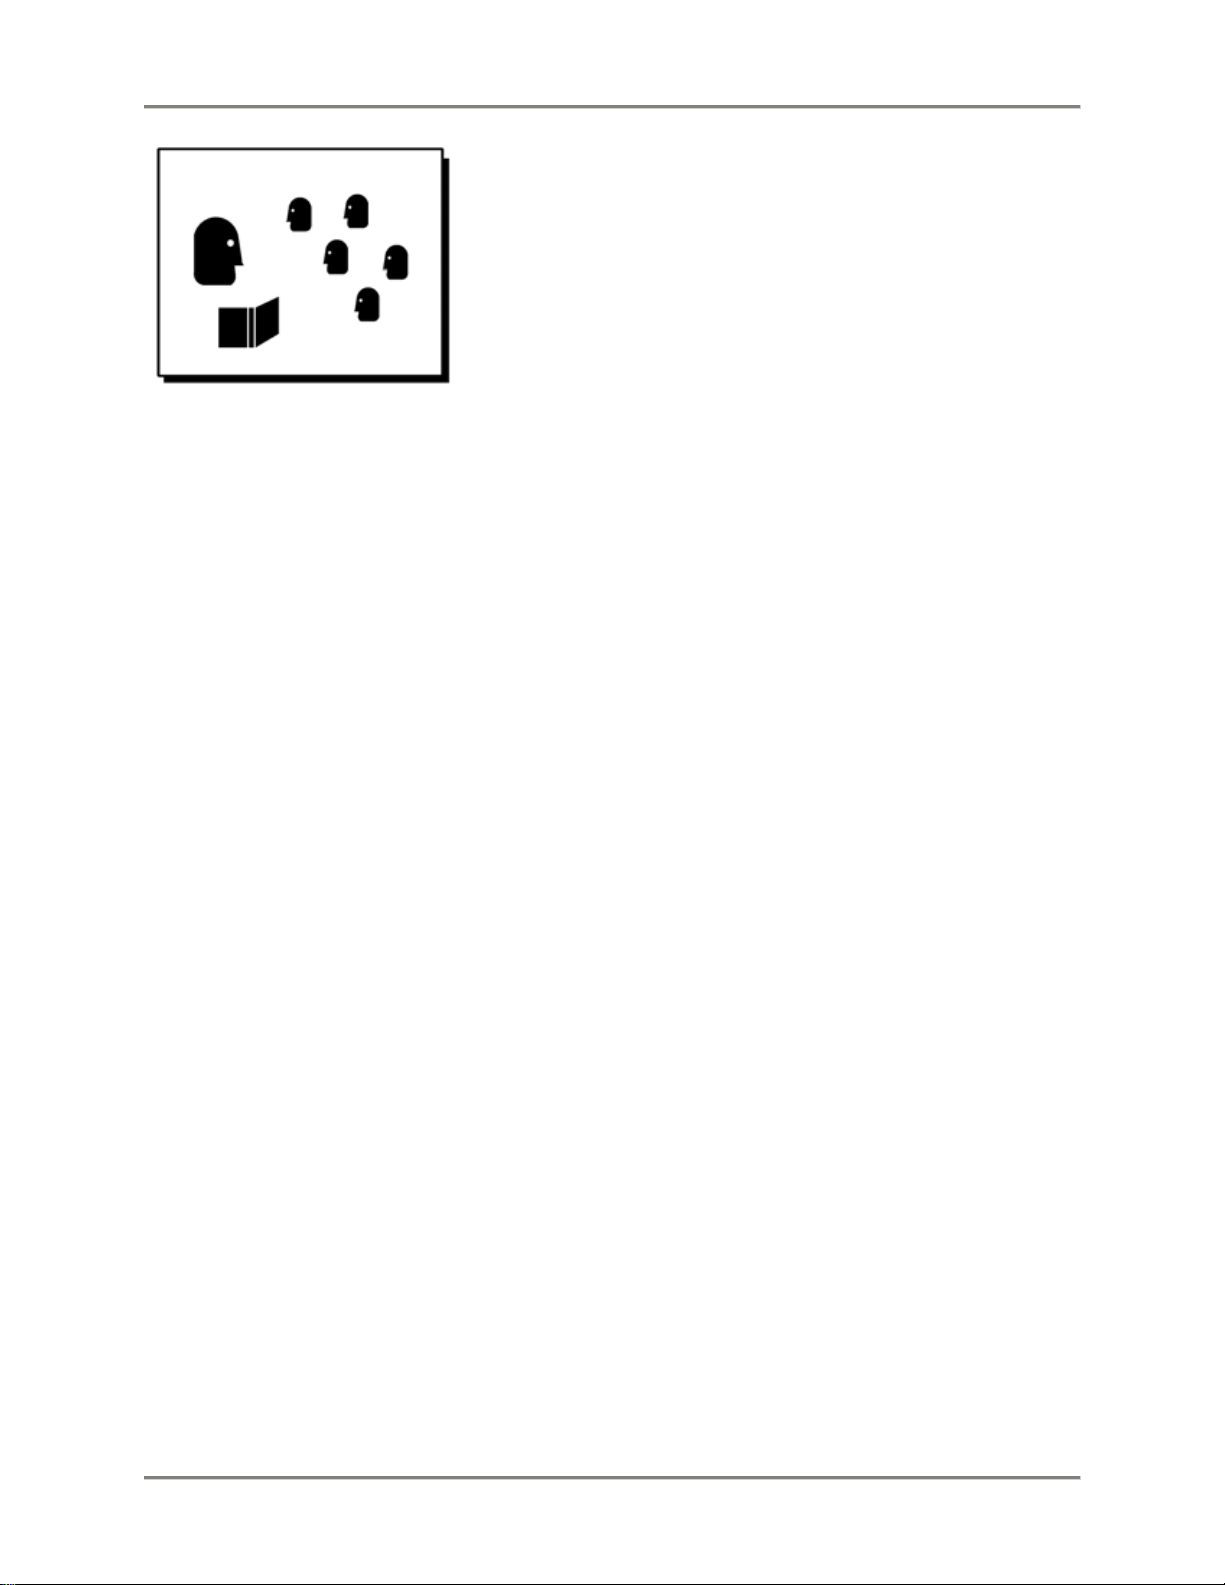
Keep children away from this equipment. Children may not
understand that this equipment is dangerous for them and others.
NEVER allow children to play near or operate your equipment.
Keep Safety Labels Clean and in Good Condition
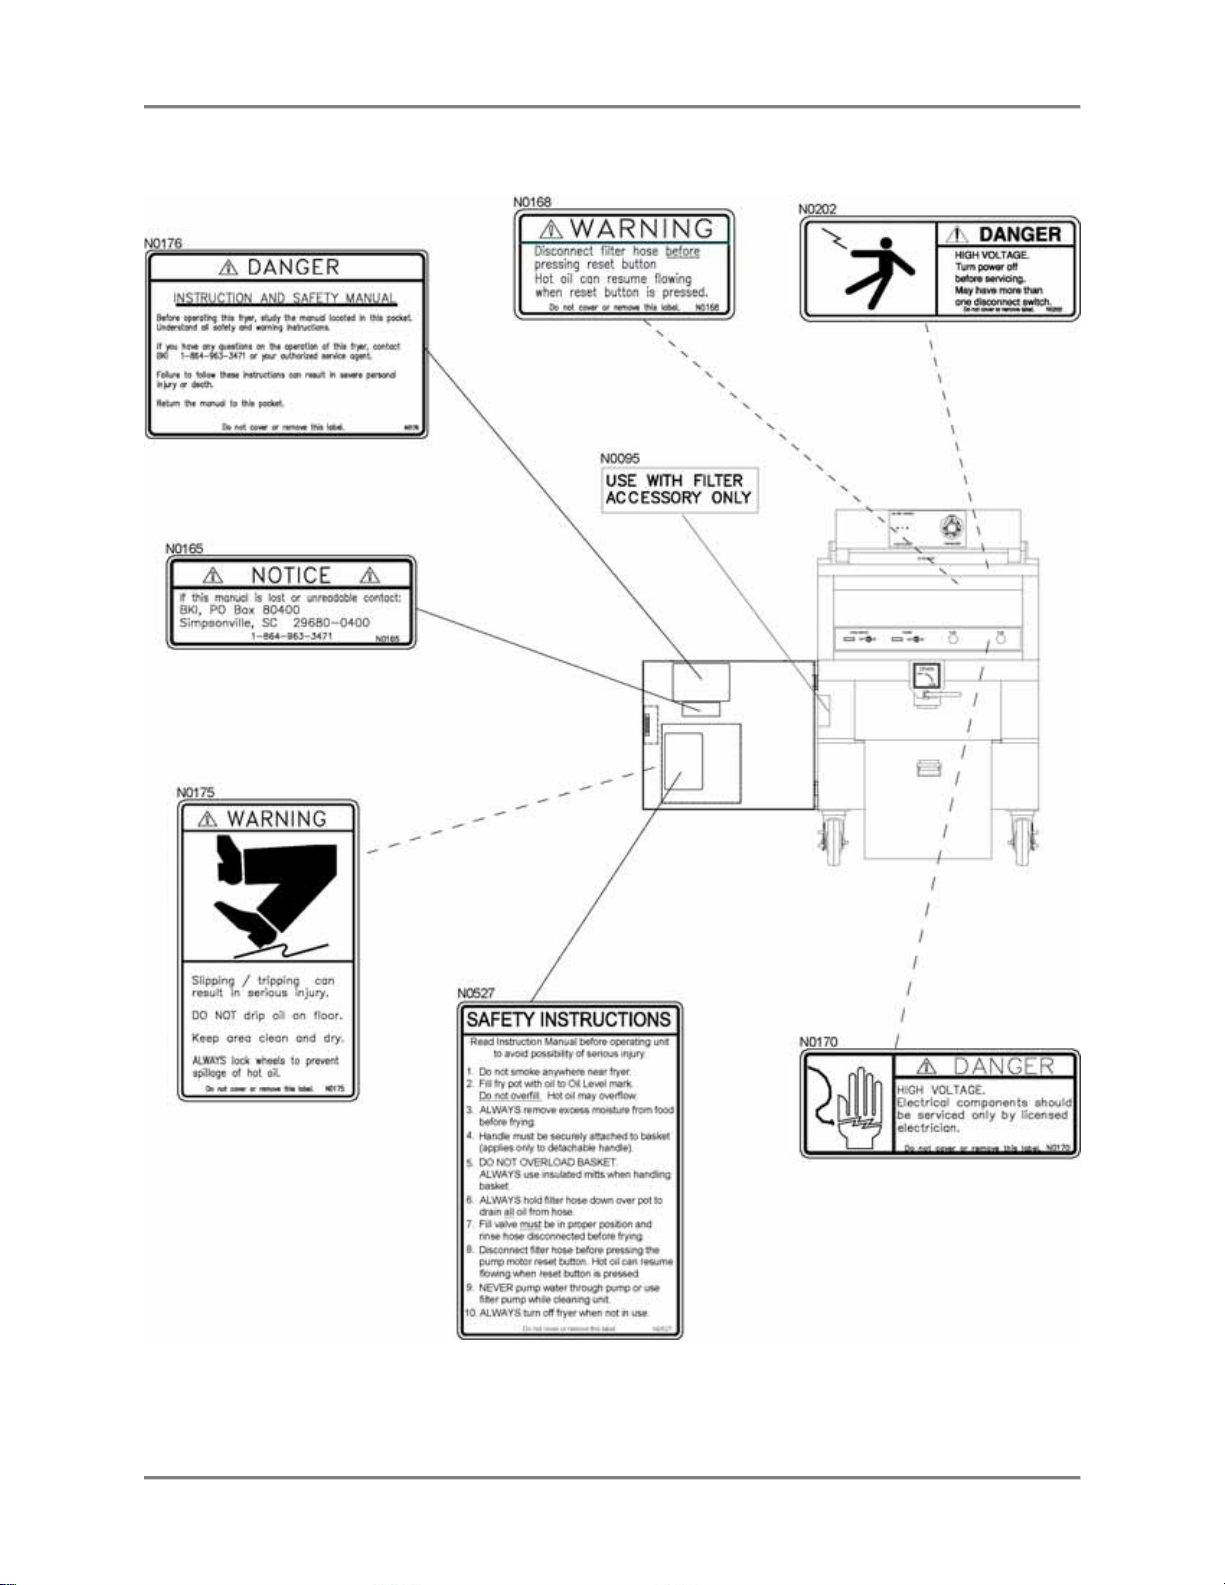
Do not remove or cover any safety labels on your equipment.
Keep all safety labels clean and in good condition. Replace any
damaged or missing safety labels. Refer to the Safety Labels
section for illustration and location of safety labels on this unit.
If you need a new safety label, obtain the number of the specific
label illustrated on page 7, then contact:
BKI
Technical Services Department
P.O. Box 80400
Simpsonville, S.C. 29680-0400
Or call toll free: 1-800-927-6887
Outside the U.S., call 864-963-3471
Be Prepared for Emergencies
Be prepared for fires, injuries, or other emergencies.
Keep a first aid kit and a fire extinguisher near the equipment. You
must use a 40-pound Type BC fire extinguisher and keep it within
25 feet of your equipment.
Keep emergency numbers for doctors, ambulance services,
hospitals, and the fire department near your telephone.
5
Page 8
Doughnut Fryer Introduction
Know your responsibilities as an Employer
• Make certain your employees know how to operate the
equipment.
• Make certain your employees are aware of the safety
precautions on the equipment and in this manual.
• Make certain that you have thoroughly trained your employees
about operating the equipment safely.
• Make certain the equipment is in proper working condition. If
you make unauthorized modifications to the equipment, you will
reduce the function and safety of the equipment.
6
Page 9
Doughnut Fryer Introduction
Safety Labels
7
Page 10
Doughnut Fryer Installation
Installation
Serious injury, equipment damage or death could result if attempting to install
this fryer yourself. Ensure that an authorized BKI service agent installs the fryer.
Unpacking and Handling
It is the owners’ responsibility to file all freight claims with the delivering truck line. Inspect all cartons and
crates for damage as soon as they arrive. If damage to cartons or crates is found, or if a shortage is
found, note this on the bill of lading (all copies) prior to signing.
If damage is found when the equipment is opened, immediately call the delivering truck line and follow up
the call with a written report indicating concealed damage to your shipment. Ask for an immediate
inspection of your concealed damage item. Packaging material MUST be retained to show the inspector
from the truck line.
Assembly and Mounting
1. Remove all packing from the interior and exterior of the fryer.
2. Move the fryer to its permanent location and lock the casters so the fryer does not move. Every
time you use the fryer, ensure that the casters are locked.
3. Clean the fryer vat before filling with shortening.
4. Place the DRAIN handle in the CLOSED position.
5. If you plan to cook cake doughnuts, attach the submersion screen (R0019) to the calrod shield
(DNFA007).
Wiring
Electrocution, equipment failure or property damage could result if an unlicensed
electrician performs the electrical installation. Ensure that a licensed electrician
perform the electrical installation in accordance with local codes, or in the
absence of local codes, with the National Electrical Code, ANSI NFPA 70-20XX.
This unit, when installed by an authorized BKI service agent, must be wired for use in accordance with all
applicable local, state, and federal codes. For specific electrical requirements and conne ctions refer to the
wiring diagram attached to the unit or provided in the Service Manual.
8
Page 11
Doughnut Fryer Installation
Initial Test and Adjustment
1. Fill vat with shortening to about one inch below the mark.
NOTE: A solid type vegetable shortening is recommended for frying because doughn uts tend to
absorb more shortening and are heavy when fried in liquid shortening.
Overfilling the fryer vat with shortening could lead to serious injury. Ensure that
the fryer vat is filled with shortening only to the fill mark when shortening is hot.
Do not use any shortening other than what is specified in this manual and do not
overfill the fryer vat.
Use only high-quality shortening that has low moisture content, a high smoke
point and no additives.
2. Place the POWER switch to the ON position.
3. Set the thermostat to the desired temperature (best results are obtained at 370º F to 380º F). The
shortening should begin to heat and begin to reach the fill mark inside the vat. Add more
shortening as required to reach the fill mark. Refer to the troubleshooting section if this does not
occur.
9
Page 12
Doughnut Fryer Operation
Operation
Controls and Indicators
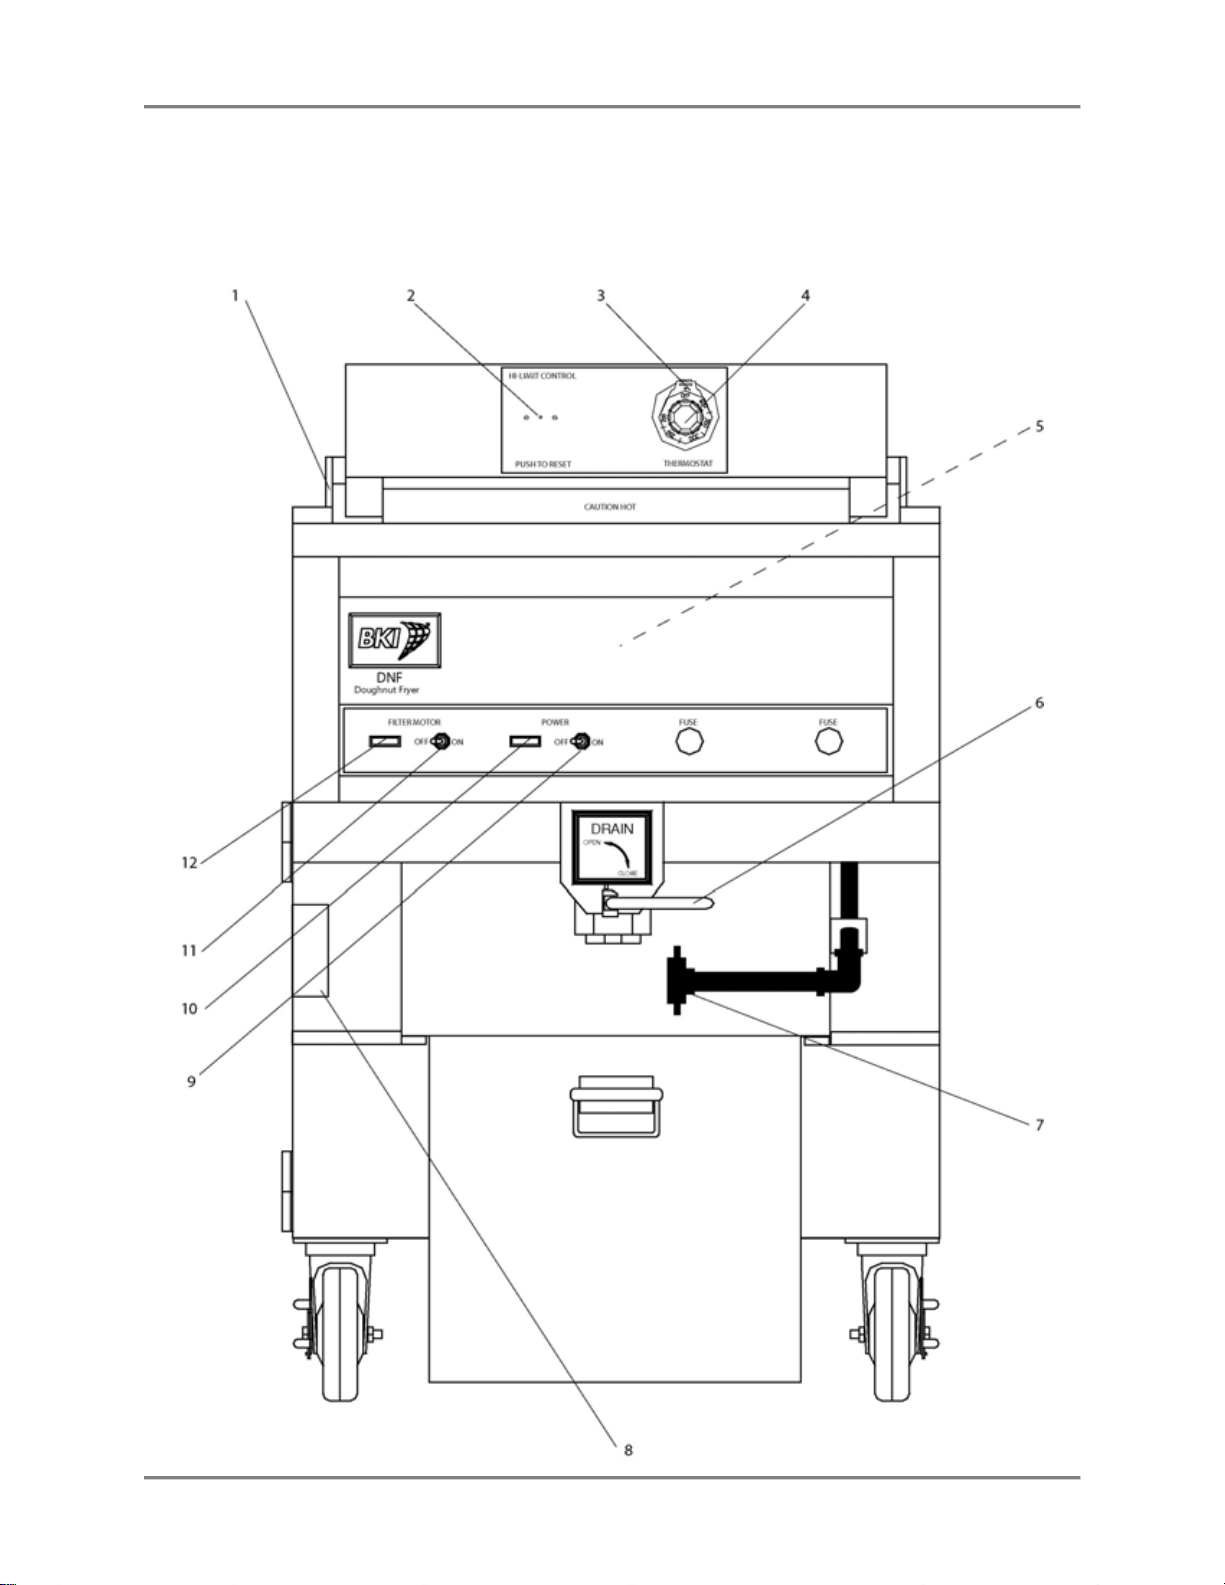
Refer to the figure and table below for an explanation of the fryer’s controls and indicators.
10
Page 13
Doughnut Fryer Operation
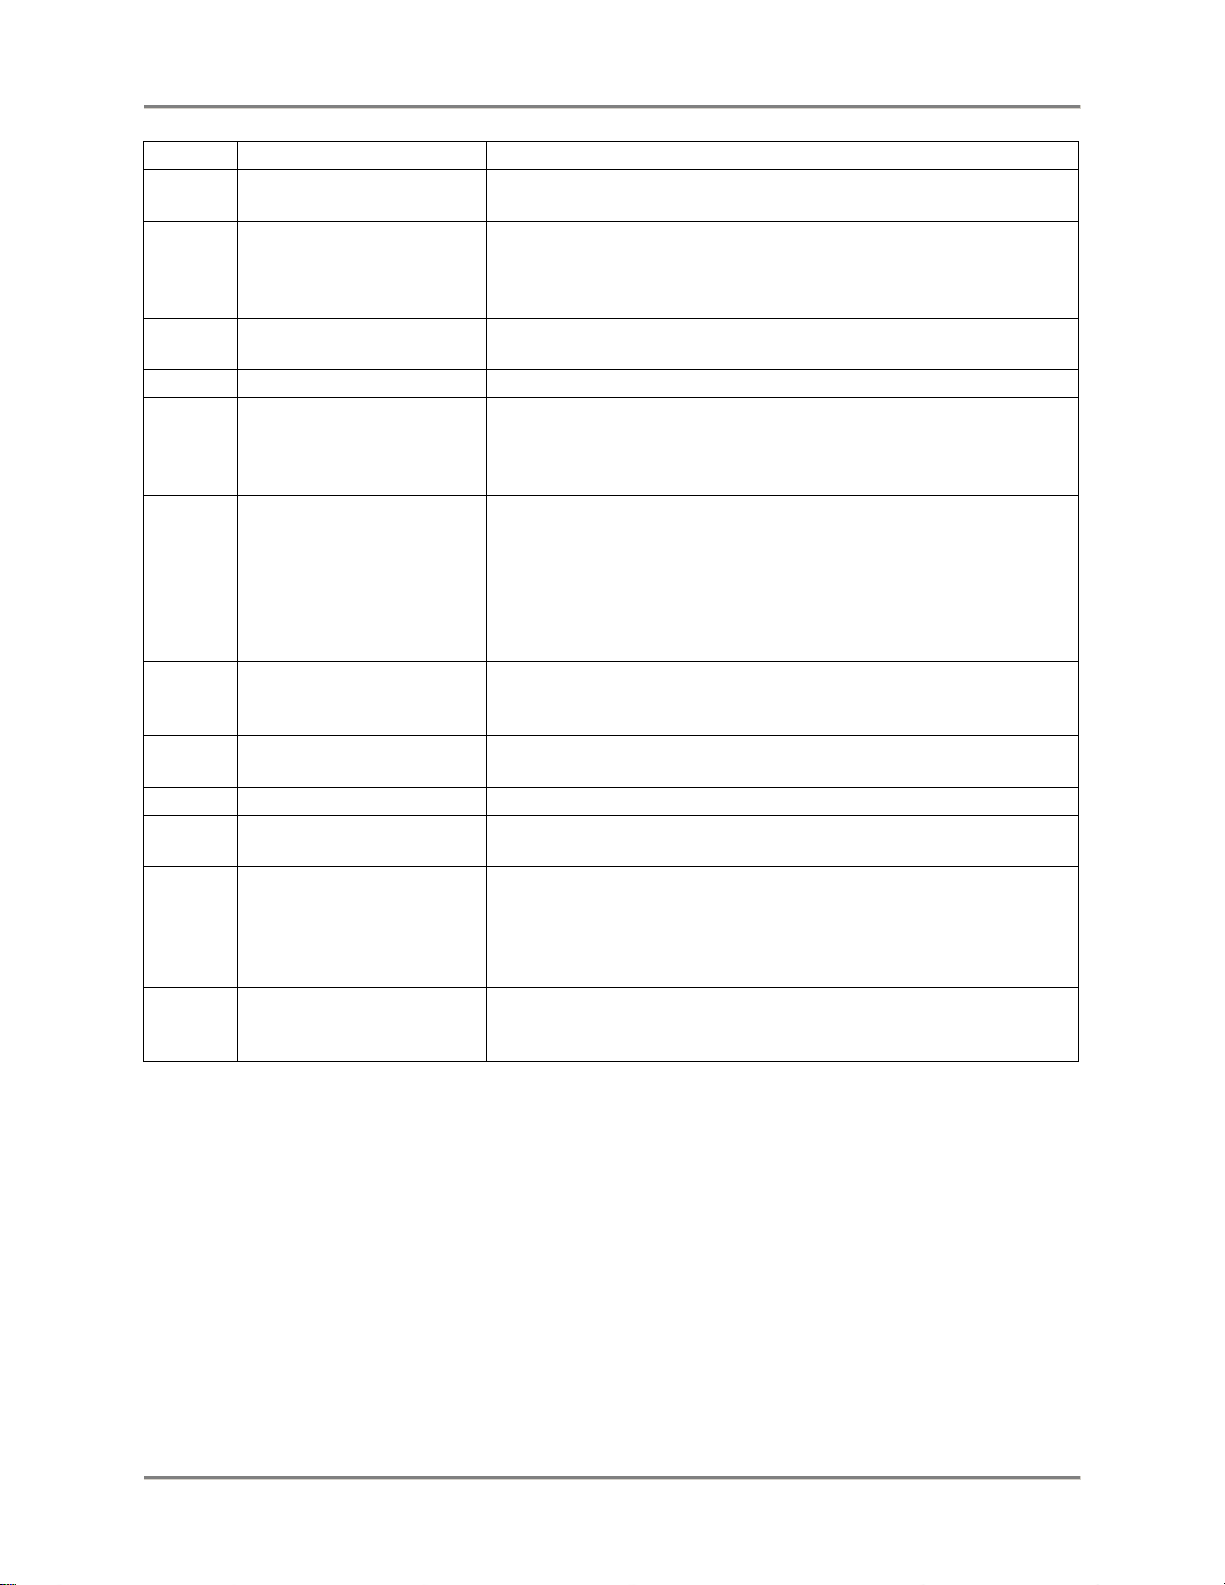
Item # Description Function
1 Hinge Casting Enables you to raise and lock the Upper Control Panel
(including heating elements) for cleaning the oil vat.
2 High Limit Reset Switch If the heating elements inside the vat reach an unsafe
temperature, power is automatically removed from the control
panel and elements. Pressing this switch returns power to the
control panel and elements.
3 Thermostat Light Illuminates red indicating that the heating elements are
activated.
4 Thermostat Knob Used to set the temperature of the shortening.
5 Pump Motor Reset
Switch (DNF-F only)
This is a red push-button switch on the end of the pump motor.
If the motor overheats while filtering, it will automatically shut off.
Wait 15 minutes to allow motor to cool before pressing this
switch.
6 Drain Lever DRAIN OPEN – When placed in this position, the drain valve
opens and shortening in the vat drains into the oil container.
Also power is removed from the control panel and elements.
DRAIN CLOSED – When placed in this position, the drain valve
is closed to prevent shortening from draining into the oil
container.
7 Handlebar Union
(DNF-F only)
Used to connect the filter screen assembly to the pump motor
piping or disconnect the filter screen assembly from the pump
motor piping.
8 Portable Filter Power
Used to supply power to the portable filter.
Receptacle (DNF only)
9 POWER ON/OFF Switch Used to control power to the fryer.
10 POWER ON/OFF
Indicator
11 FILTER MOTOR
ON/OFF Switch
This light illuminates to indicate that power is being supplied to
the fryer.
Used to control power to the pump motor (DNF-F) or portable
filter power receptacle (DNF). For a DNF-F, when this switch is
ON, power is applied to the motor and shorting is pumped into
the vat. The POWER switch must be ON in order to activate this
switch.
12 FILTER MOTOR
ON/OFF Indicator
This light illuminates to indicate that power is being supplied to
the pump motor (DNF-F) or portable filter power receptacle
(DNF).
11
Page 14

Doughnut Fryer Operation
Care of the Shortening
Solid shortening should always be returned to the filter vat while in the liquid state. If this is not done, it
will have to be heated to a liquid state. When using solid shortening, the fryer must be equipped with a
pump heater. After filtering with solid shortening, the filter lines must be completely emptied of shortening.
The pump heater will take care of any residual shortening in the pump, but cannot melt all of the
shortening in the filter lines. The pump heater accessory may be purchased separately from BKI.
To extend the life of your shortening, for the best possible flavor in your products, and for economy and
efficiency of operation, we urge you to follow these recommendations:
1. Use only high-quality frying shortening without additives, of low moisture content and with a high
smoke point.
2. Filter at least once a day or once every three loads during frequent cooking.
3. Clean any residue or crust formations from the sides and bottom of the vat each time you filter the
shortening.
4. Add fresh shortening as needed to maintain the proper shortening level TO THE FILL MARK ON
THE VAT WALL.
5. DO NOT HOLD SHORTENING AT HIGH TEMPERATURE when the fryer is not in use. If you
expect an elapsed time of one hour or more between cooking, close the lid and set the thermostat
to 150º F.
6. Excessive boiling and foaming are definite signs of shortening breakdown and indicate the need
to replace the shortening.
7. After you have finished frying for the day, filter the shortening and replace the filter pad.
8. IMPORTANT! Before the first cooking operation each day, stir the shortening freely while it is
heating to provide a balanced shortening temperature for excellent results with the first cookin g.
In addition, in some cases, failure to stir the shortening while it is initially heating may cause the
HI-LIMIT safety to disable the power due to a false overshoot condition.
12
Page 15
Doughnut Fryer Operation
Start-Up
1. Make sure the main drain valve is closed.
2. Open the Drainboard and secure it in place with the Drainboard rod.
3. Fill vat with shortening to about one inch below the fill mark.
Overfilling the fryer vat with shortening could lead to serious injury. Ensure that
the fryer vat is filled with shortening only to the fill mark when shortening is hot.
Do not use any shortening other than what is specified in this manual and do not
overfill the fryer vat.
4. Once the fryer is filled with shortening, place the POWER switch in the ON position.
5. Set the thermostat to the desired temperature (best results are obtained at 370º F to 380º F). The
temperature light will go on. When the temperature is reached, the light will go off. The light will
continue to cycle on and off as the fryer tries to maintain the set temperature.
6. The shortening should begin to heat and begin to reach the fill mark inside the vat. Add more
shortening as required to reach the fill mark.
IMPORTANT! Before the first cooking operation each day, stir the shortening freely while it is
heating to provide a balanced shortening temperature for excellent results with the first cookin g.
Failure to do this can result in an undercooked product internally. In addition, in some cases,
failure to stir the shortening while it is initially heating may cause the HI-LIMIT safety to disable
the power due to a false overshoot condition.
13
Page 16
Doughnut Fryer Operation
Cooking Yeast Doughnuts
1. Ensure that the Start-Up procedures have been performed.
NOTE: Use fry screens for proofing yeast raised products. Keep the fry screens clean and oily to
prevent the doughnuts from sticking to the screens.
Hot shortening may splash out of the vat causing severe injury when lowering fry
screen into vat. Carefully lower fry screen into vat to prevent shortening
splashes.
Failure to use the insulated mitts will result in severe injury. Always use the
insulated mitts when handling the fry screen and fry screen lifter.
2. Place a fry screen with proofed doughnuts on the fry screen lifter and slowly lower into the
shortening. The doughnuts should release from the screen and float to the surface.
3. Use flip sticks for turning the doughnuts.
4. When the doughnuts are done, remove the doughnuts from the shortening by raising the screen
lifter out of the shortening and placing on the drainboard.
5. Glaze the doughnuts while they are hot.
6. Remember to filter the shortening at least every 3-5 frying loads. Refer to the procedure in this
manual. Also filter the shortening and clean the fryer at the end of each day. If you do not plan to
use the fryer for an hour or more, turn the thermostat down to 150º F and close the lid.
7. When you have finished frying for the day, turn the POWER switch to the OFF position.
14
Page 17
Doughnut Fryer Operation
Cooking Cake Doughnuts
1. Ensure that the Start-Up procedures have been performed.
Hot shortening may splash out of the vat causing severe injury when lowering fry
screen into vat. Carefully lower fry screen into vat to prevent shortening
splashes.
Failure to use the insulated mitts will result in severe injury. Always use the
insulated mitts when handling the fry screen, fry screen lifter and submersion
screen.
2. Place the submersion screen in the upright position.
3. Place a fry screen on the fry screen lifter and slowly lower into the shortening.
4. Use a doughnut cutter to carefully drop doughnuts in the shortening.
5. Use flip sticks to turning the doughnuts.
6. Lower the submersion screen.
7. When the doughnuts are done, raise the submersion screen.
8. Remove the doughnuts from the shortening by raising the screen lifter out of the oil and placing
on the drainboard.
9. Let the doughnuts cool for about 5 minutes before glazing.
10. Remember to filter the shortening at least every 3-5 frying loads. Refer to the procedure in this
manual. Also filter the shortening and clean the fryer at the end of each day. If you do not plan to
use the fryer for an hour or more, turn the thermostat down to 150º F and close the lid.
11. When you have finished frying for the day, turn the POWER switch to the OFF position.
15
Page 18
Doughnut Fryer Maintenance
Maintenance
Failure to comply with the maintenance below could result in a serious accident.
Your fryer will need periodic maintenance and servicing. We strongly suggest
that you use only a service company that is authorized by BKI to do this work.
The DNF appliance is not intended to be cleaned with a water jet.
Scheduled Maintenance
Use the following table to help manage scheduled maintenance activities.
FREQUENCY PERFORMED BY PART ACTIVITY
Daily
Weekly
Every 6 Months
User Filter Pad Replace filter pad. Refer to the
procedure in this manual.
User Filter system Filter the shortening using the
procedure in this manual.
User Fryer Vat Perform the boil-out procedure in this
manual.
Authorized BKI
service agent
Connections,
Fittings
Check for leakage while oil is
pumping.
16
Page 19
Doughnut Fryer Maintenance
Filtering Procedure
We recommend the shortening be filtered after every 3-5 frying loads. When the shortening starts to show
signs of foaming and has a bad taste, replace it. The fryer vat should be cleaned before refilling with new
shortening. Best results for filtering are obtained while the shortening is hot. You should filter at the end of
every business day.
Always wear appropriate personal protection equipment during the filtering
process to guard against possible injury from hot oil.
DNF-F
1. Set the POWER switch to ON and the FILTER MOTOR switch to OFF.
2. Make certain that the filter pad is clean and not torn.
IMPORTANT: Make certain the vat cover is properly positioned underneath the drain valve.
Also make certain the filter vat and filter screen is under the main drain valve before starting
the filtering process.
3. Move the DRAIN handle slowly to the OPEN position so that the shortening starts to flow
evenly. This is to prevent excessive splashing of hot shortening.
4. When the vat is empty, place the DRAIN handle in the CLOSED position.
Hot shortening may splash out of the vat causing severe injury when filling the
vat if the lid is not closed. To prevent shortening splashes, close the lid before
filling.
5. Close the lid to prevent shortening splashes.
6. Position the FILTER MOTOR switch to ON. Shortening will automatically pump into the vat.
7. After 1 minute carefully open the lid to check the level of the shortening.
8. Let the filter continue to pump the shortening until the fill mark in the fryer vat is reached or
until air starts bubbling through the shortening.
9. As soon as air is seen in the shortening, position the FILTER MOTOR switch to OFF to
prevent shortening degradation and prevent the filter pump and lines from filling up with
shortening.
10. Add new shortening if the fill mark has not been reached.
17
Page 20
Doughnut Fryer Maintenance
DNF
1. Set the POWER switch to ON and the FILTER MOTOR switch to OFF.
2. Make certain that the FKF filter unit or portable filter unit filter pad is clean and not torn.
3. Position the FKF filter unit or portable filter unit under the main drain valve and make sure it’s
filter screen is in place.
4. Ensure that the FKF filter unit or portable filter unit is plugged into the filter power receptacle.
5. Move the DRAIN handle slowly to the OPEN position until the shortening starts to flow
evenly. This will prevent excessive splashing of hot shortening.
6. When the vat is empty, place the DRAIN handle in the CLOSED position.
7. Make certain that the rinse hose is connected to it’s mating part on the FKF filter unit or
portable filter unit.
8. Holding the hose by the handle, place hose nozzle inside the vat.
Hot shortening may splash out of the vat causing severe injury when filling the
vat if the lid is not held down over the hose nozzle. To prevent shortening
splashes, hold the lid down over the hose nozzle.
9. Hold the lid down over the hose nozzle to prevent shortening splashes.
10. Position the FILTER MOTOR switch to ON and shortening will automatically pump into the
vat.
11. After 1 minute, hold the hose by the handle and carefully raise the lid to check the level of the
shortening.
12. Let the filter continue to pump the shortening until the fill mark in the fryer vat is reached or
until air starts bubbling through the shortening.
13. As soon as air is seen in the shortening, position the FILTER MOTOR switch to OFF to
prevent shortening degradation.
14. Add new shortening if the fill mark has not been reached.
Boil-Out Procedure
Boil-outs remove microscopic particles of carbon that build up on the walls of the fryer vat. To avoid
eventual carbon build-up, off flavors, and shortening breakdown, boil-outs should be done once a week
on each fryer following these procedures.
Always wear appropriate personal protection equipment during the boil-out
process to guard against possible injury from hot cleaning solution.
1. Position the POWER switch to OFF.
2. Drain the clean shortening into an adequate storage container. (Allow the shortening to cool to
room temperature before attempting storage.)
18
Page 21
Doughnut Fryer Maintenance
3. CLOSE the drain and fill the fryer vat with HOT water to the shortening level fill mark. Do not
overfill by allowing the water level higher than the fill mark.
4. Add ½ cup (4 ounces) of BKI cleaner.
5. Wash down the inside of the vat and lid with a vat brush to loosen the sediment.
6. Position the POWER switch to ON.
7. Set the thermostat to a temperature of 190º F.
8. Bring the cleaning solution to a rolling boil and maintain the boil for 5 minutes.
9. Place the POWER switch to OFF.
10. Scrub the inside of the fryer vat.
11. Before draining the cleaning solution, remove the filter bag, screen and pipe connections from
the filter vat. This must be done before draining the cleaning solution.
NEVER pump water or detergent through the filter system.
12. After 15 minutes, slowly open the drain valve. Drain the solution into the filter vat and discard.
13. Rinse the vat with hot water, using the vat brush to remove remaining sediment, drain and
discard.
14. Close the drain and refill the fryer vat with hot water to the proper level.
15. Add approximately 4 to 6 ounces of distilled (white) vinegar to develop a neutralizing solution. Stir
the solution briefly. Leave in the vat for three to five minutes and discard.
NOTE: Foaming of shortening after boil-outs is caused by failure to follow proper
neutralizing procedures.
16. Repeat above steps as needed to remove all traces of cleaning solution.
17. Rinse the vat again with Cool water, drain and discard.
Damage to the fryer could result if the fryer vat is not completely dry before filling
with shortening. Refill the fryer vat with shortening ONLY when it is completely dry.
18. Dry the fryer vat, lid, and filter vat COMPLETELY.
19. Close the main drain and fill with new shortening to the proper level.
19
Page 22
Doughnut Fryer Maintenance
Filter Pad Replacement
The filter pad must be replaced daily. If the shortening has a milky color when it is pumped into the vat,
the filter pad should be replaced immediately.
If the filter pad is not properly closed, breading crumbs will get through the pad
opening and clog the pump. Ensure that the filter pad is properly closed upon
replacement.
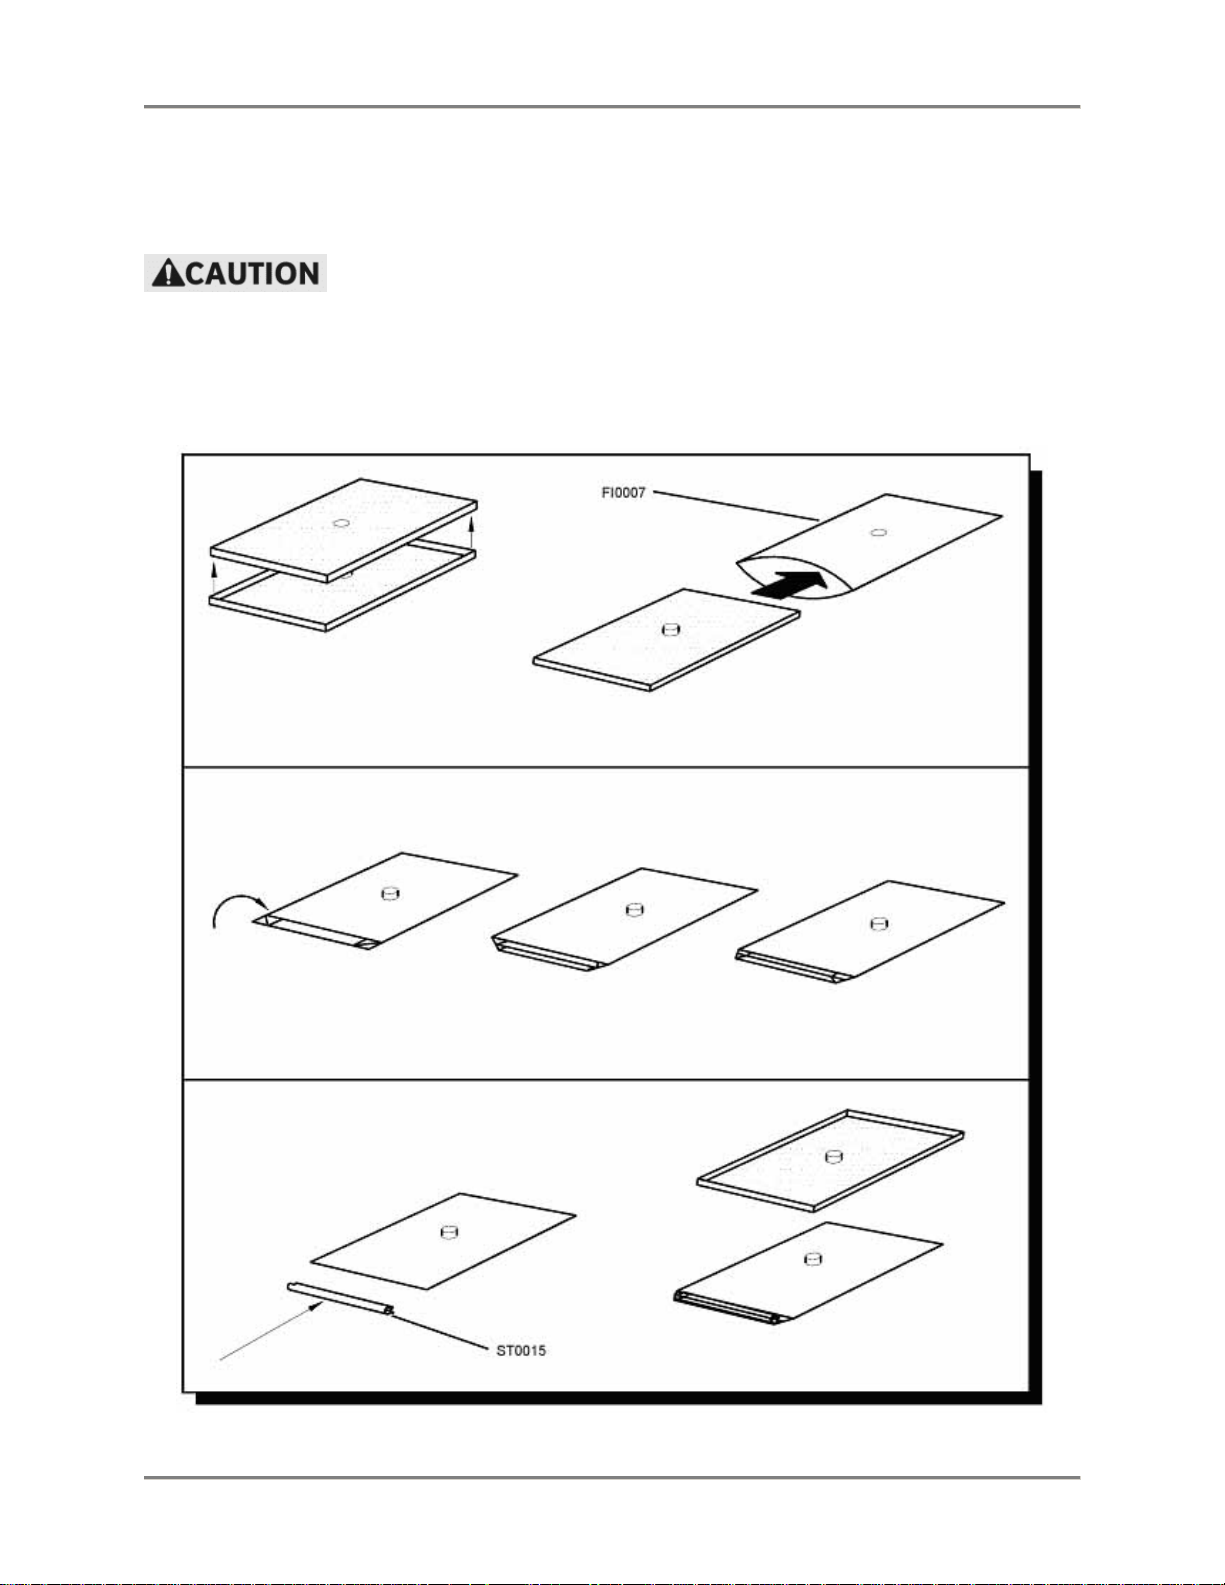
1. Place the filter screen inside the filter pad.
2. Fold the end of the pad and seal with the bag clip.
20
Page 23
Doughnut Fryer Maintenance
Troubleshooting
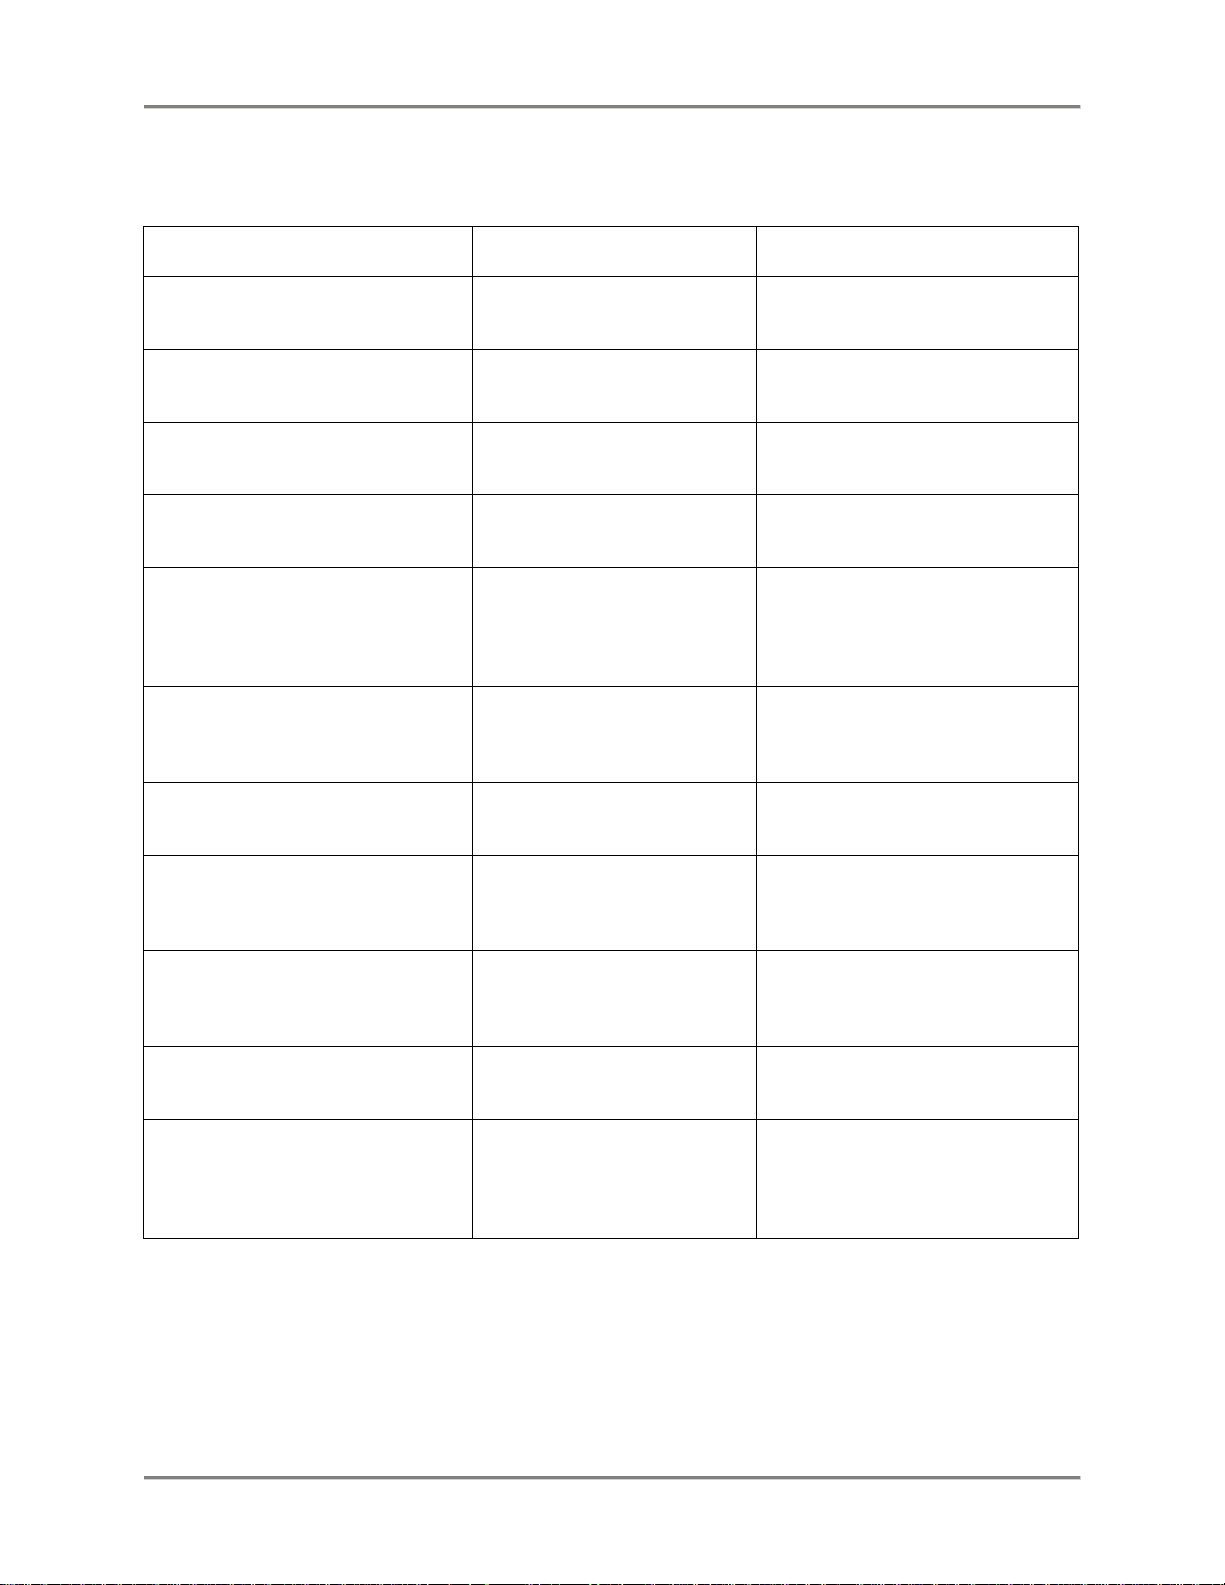
Refer to the table below for troubleshooting information.
Problem Cause Possible Solution
Shortening Heating Too Slowly
Bad thermostat or loose
Weak heating elements or
Coil on contactor is bad Contact an authorized BKI
Filter System Not Working
Connections not tight Tighten the connections. If
Filter valve not open Contact an authorized BKI
Filter paper on screen
Motor hums, but does not
Motor and pump coupling
No power to control panel Make sure drain valve is
Low voltage or improper
voltage
wires
heating elements breaking
down
Uncertain Press the reset button on end of
clogged with crumbs
pump
worn
Contact an authorized BKI
service agent for corrective
action.
Contact an authorized BKI
service agent for corrective
action.
Contact an authorized BKI
service agent for corrective
action.
service agent for corrective
action.
pump and hi-limit reset button on
control panel. If problems persist,
contact an authorized BKI service
agent for corrective action.
problems persist, contact an
authorized BKI service agent for
corrective action.
service agent for corrective
action.
Change filter paper. If problems
persist, contact an authorized
BKI service agent for corrective
action.
Check for clogged pump. If
problems persist, contact an
authorized BKI service agent for
corrective action.
Contact an authorized BKI
service agent for corrective
action.
completely closed. If problems
persist, contact an authorized
BKI service agent for corrective
action.
21
Page 24

P.O. Box 80400, Simpsonville, S.C. 29680-0400, USA
http://www.bkideas.com
Made and printed in the U.S.A
LI0105/0407
 Loading...