

Page 1
BMPM012
12 Quart Planetary Mixer
Installation, Operation manual
WARNING: Please fully read operations manual before using this machine. Failure
to do so could result in injury or void of warranty!
1
Page 2

+ SAVE THESE INSTRUCTIONS +
Page 3

GENERAL
This Mixer is an advanced design, highly-reliable professional food processing tool, and is ideal for mixing all types
of dough, as well as eggs, cream, mayonnaise, etc.
This model Mixers are equipped with powerful 1/2 HP motors and strong gear drive design. The gears are made of
heat treated alloy steel and a hardness steel worm wheel. There is 3 speeds and various style attachments which can
be selected to obtain the best using food are made of alloy aluminum or their with hygiene standard.
If your operation and maintenance are correct, then it will give you years of service, and obtain the best using result.
INSTALLATION
UNPACKING
Immediately after unpacking the mixer, check it for possible shipping damage. If this machine is found to be
damaged after unpacking, save the packaging material and contact the carrier immediately. Prior to installation, test
the electrical service to assure it agree with the specifications on the machine data plate located on the back side of
the pedestal.
LOCATION
Place the mixer in its operating location. Bench should be placed on a sturdy level surface. There should be adequate
space around the mixer for the user to operate the control and install and remove bowls.
Holes are provided in the base to permanently secure the mixer, although this not necessary in normal installations.
Floor models must be leveled front-back and side-to-side by sliding shims under the legs as required.
ELECTRICAL CONNECTIONS (Cord Connected Mixers)
WARNING: THIS SUPPLY CORD ON THIS MACHINE IS PROVIDED WITH A THREE-PRONG
GROUNDING PLUG. IT IS IMPERATIVE THAT THE OUTLET TO WHICH THIS PLUG IS
CONNECTED BE PROPERLY GROUNDED. IF THE RECEPTACLE IS NOT THE PROPER
GROUNDING TYPE, AN ELECTRICIAN SHOULD BE CONTACTED.
A 3 PHASE MIXER SHOULD CHECK MIXING ROTATION WHEN ELECTRICAL
CONNECTED.
Page 4
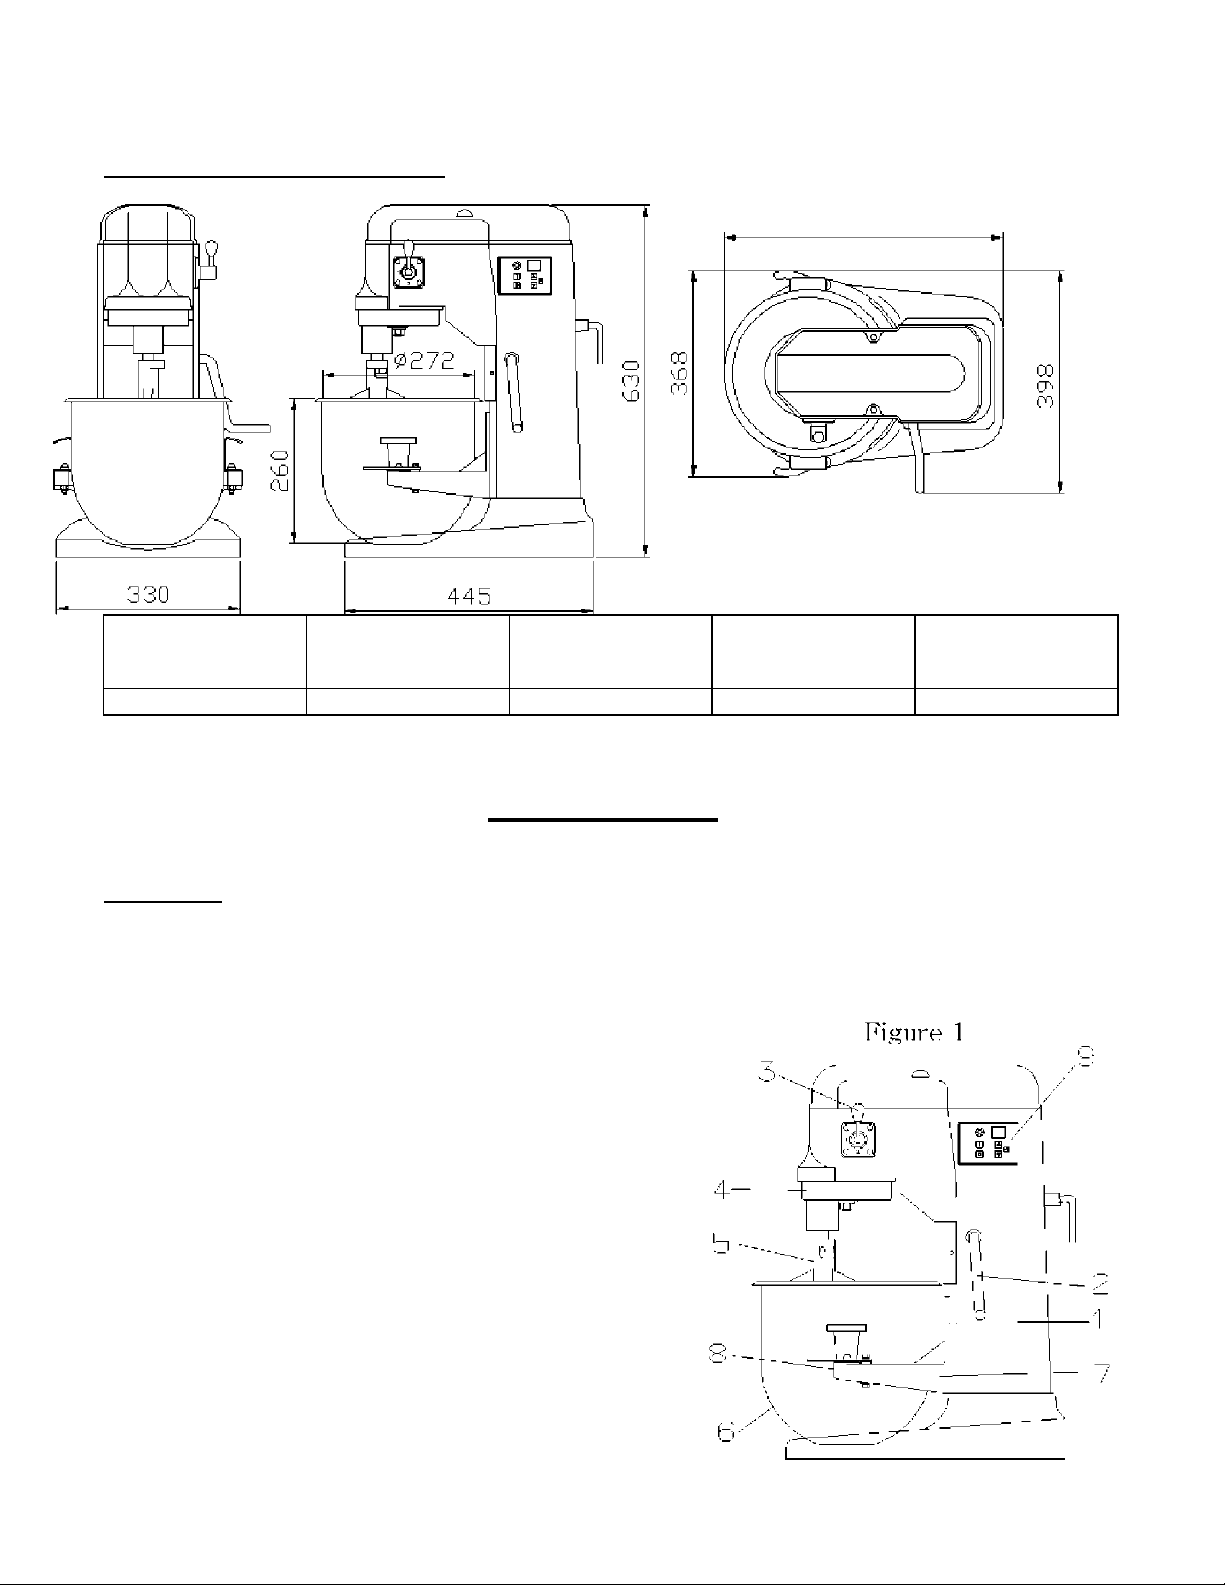
Model No.
Bowl Capacity
Motor for Agitator
Agitator speeds
(R.P.M.)
ELECTRICAL
BMPM012
12 Qt.
0.5 HP
489/218/121
115V/50HZ/1 PH
INSTALLATION DIAGRAM (mm)
499
OPERATION
WARNING: MOVING BEATER IN BOWL. KEEP HAND, CLOTHING, AND UTENSILS OUT WHILE IN
OPERATION.
All models are furnished with an ON-OFF switch (figure 19),
which controls power to the mixer.
The GEAR SHIFT LEVER (figure 1-3) is used to change speeds.
Always stop the mixer before changing speeds. To change speeds,
turn the switch OFF, move the gear shift lever to the desired
speed, and turn the switch back ON.
• Speed 1 (low) - This speed is for heavy mixtures such as
bread dough, heavy batters, and potatoes.
• Speed 2 (medium) - This speed is for light dough which must
rise quickly, heavy batters, and some whipping operations.
• Speed 3 (high) - This speed is fast speed for light work such
as whipping cream, beating eggs, and mixing thin batters.
Page 5
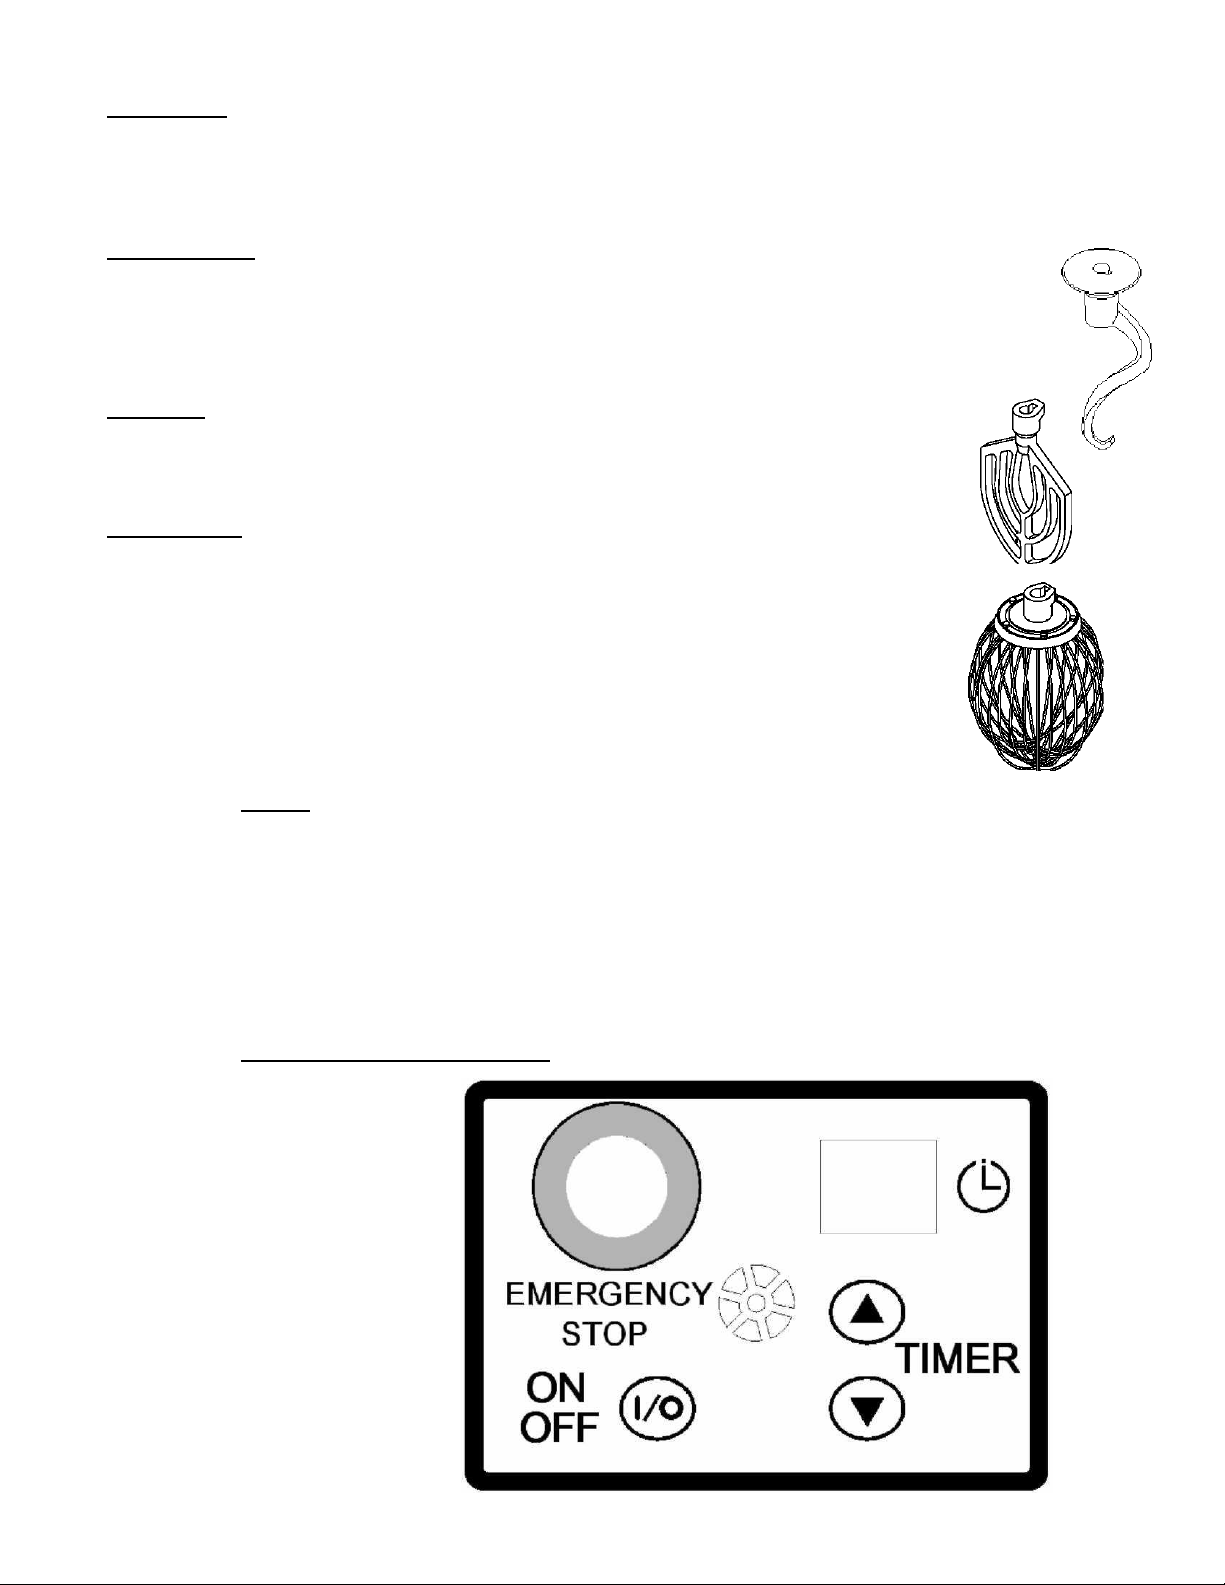
AGITATOR
To install an agitator (figure 1-5), the bowl (Figure 1-6) must be installed and fully lowered. Place the agitator in the
bowl, push it up on the agitator shaft, and turn it clockwise to seat the shaft pin in the slot of the agitator shank.
DOUGH ARM:
Frequently used for heavy bread dough, and preferable to be used at low speed. The moisture content of
heavy dough is critical when selecting proper mixing speed. You should never use 2nd speed when
mixing heavy dough with an Absorption Ratio (AR) of 50% or less.
BEATER:
Commonly used for thin batters, cake and mashing potatoes, like stuffing and preferable to be
used at middle speed.
WIRE WHIP:
Best for whipping cream and beating eggs and preferable to be used at high speed.
BOWL
New mixer's bowl (Figure 1-6) and agitators (beaters, whip, and dough arms) should be
thoroughly washed with hot water and mild soap solution, rinsed with either a mild soda
or vinegar solution, and thoroughly rinsed with clean water BEFORE being put into
service. This cleaning procedure should also be followed for bowls and agitators before
whipping egg whites with or whole eggs.
CONTROL PANEL (Figure 1-9)
Page 6

MAINTENANCE
NOTE: ALL MAINTENANCE WORK SHOULD BE DONE ONLY AFTER UNIT
HAS BEEN
DISCONNECTED FROM ELECTRICAL POWER AND GROUNDING.
Never use a metal or stiff brush to clean the mixer. Never clean the mixer with a
water hose or any fluid pressure.
The mixer should be thoroughly cleaned daily.
Bowls and agitators should be removed from the mixer and cleaned in a link.
The transmission case and planetary mechanism should be inspected weekly for
leaks, damage, etc. Should it become necessary to repack the ball bearings, an authorized
service technician or the manufacturer should be contacted. Use of unproved grease of
lubricants may lead to damage and void the unit's warranty.
The bowl lift sideways (Figure 1-1) should be lubricated semi-annually, or more often
under heavy usage. Disconnect the unit from the power supply before removing the top
housing or apron. The drip cup (Figure 1-4) or safety guard should be inspected
periodically for moisture or lubricant dripping. Remove the cup and wipe it with a soft
cloth.
CLEANING
The mixer should be thoroughly cleaned daily.
Bowls and agitators should be removed from the mixer and cleaned in a sink.
DO NOT use a hose to clean the mixer - it should be washed with a clean damp cloth.
The drip cup (Figure 1-4) should be removed periodically and wiped clean. A large flat
blade
screwdriver may be used to remove the drip cup
Page 7
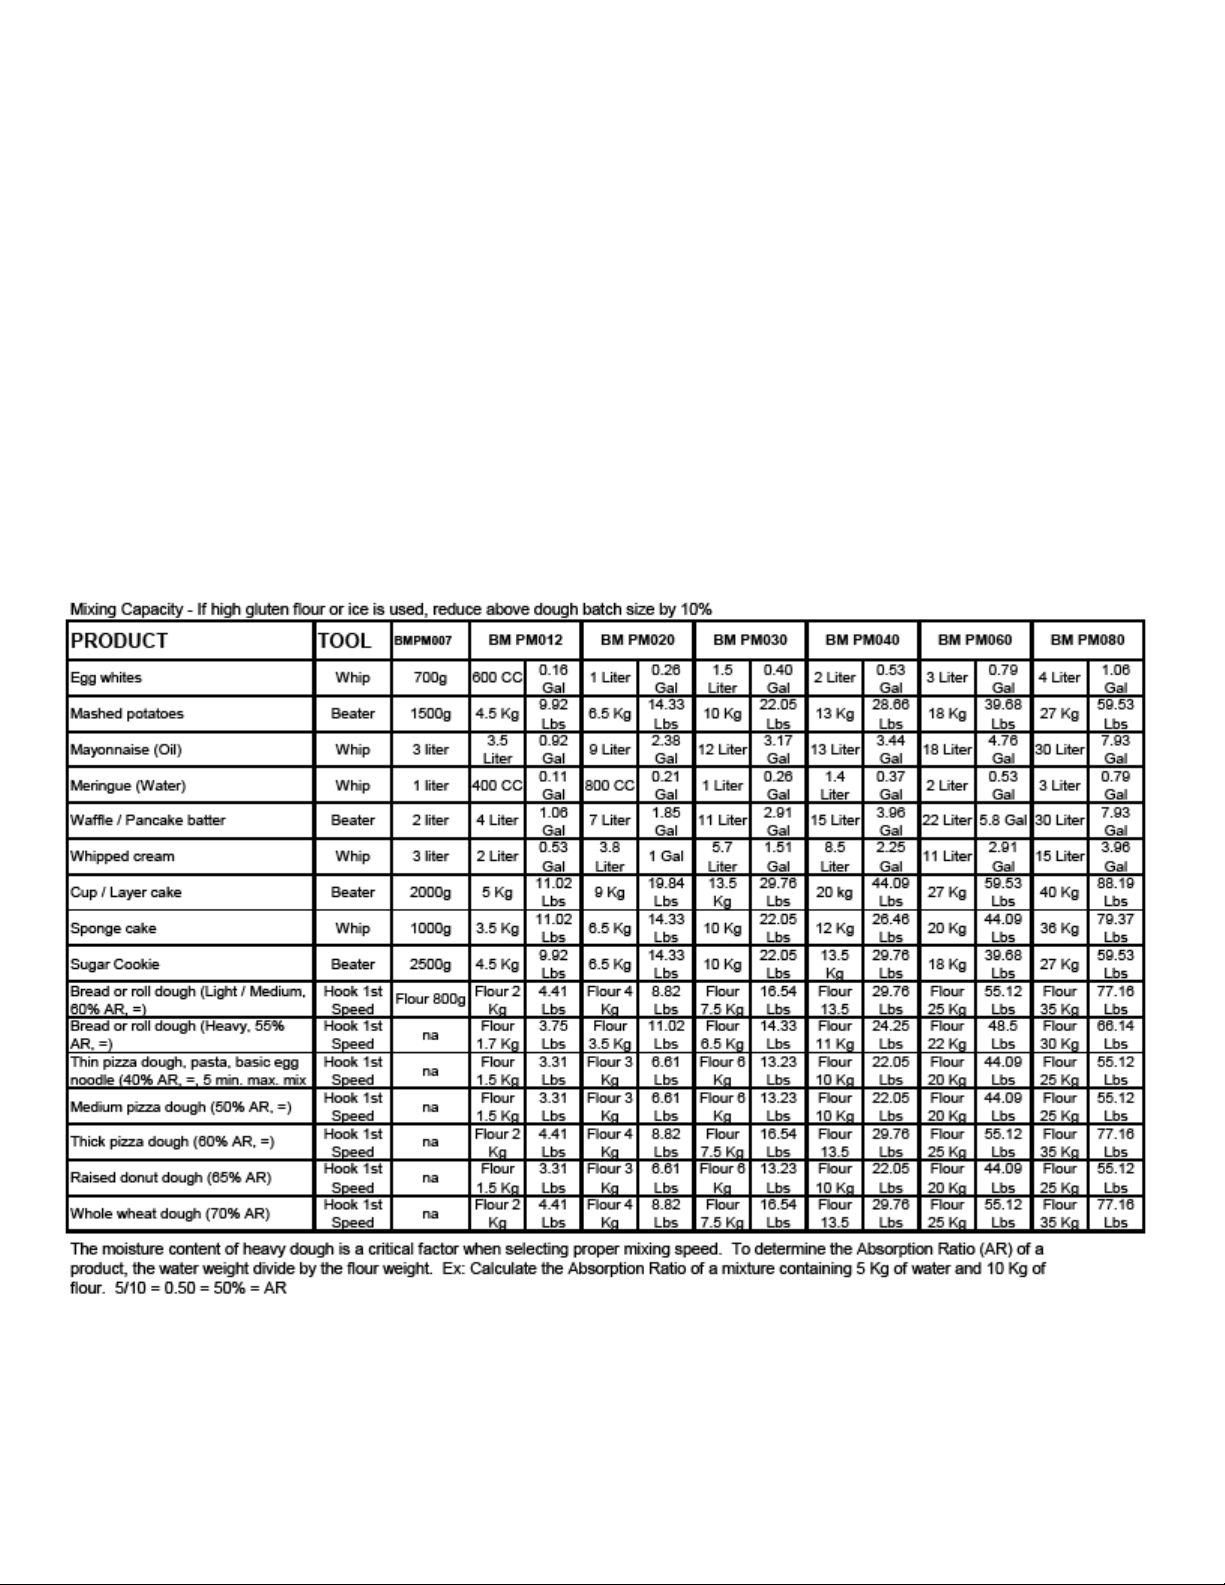
WARNING:
Ensure your recipe meets mixers capacity.
Ensure water is 70 Degrees Fahrenheit or reduce
capacity.
Ensure flour is at room temperature.
Ensure mixer is turned off when changing gears.
FAILURE TO COMPLY VOIDS ALL WARRANTY.
Page 8

 Loading...