

Page 1

FLOW METERING EQUIPMENT
Installation and In struc tion
Man u al
Venturi Flow Meters
Models: SSL, SSM, LPL, VISSL VISSM, VILPL, CV, VBR
Page 2

I. Introduction
Preso Venturi ow meters are di erential pressure ow devices providing highly accurate and
repeatable measurements of liquids, gases, and steam. The Venturi restricts the ow at its throat and
measures the pressure di erence of the unrestricted ow and restricted ow. The Venturi's throat
can be designed to meet the ow mearurement application optimizing the Venturi's accuracy and
permanent pressure loss.
The Preso Venturi's design provides longer lasting accuracy and lower permanent pressure loss
than ori ce type meters, reducing maintenance and operating costs. The Preso Venturi can be built
to meet the highest pressure and temperature speci cations often limited in other ow meter
technologies. All models can also be supplied with RTDs and transmitters to provide an economical
mass ow measurement solution.
II. Speci cations
Applications: Liquids, gases and steam
SSL - Classical (Herschel) Design / VISSL - Insert Version
Pipe Sizes: ½ to 60 inches and larger (13 to 1524 mm)
Pressure & Temperature: Varies, dependent upon materials of construction
Pressure Loss: 6% of DP maximum
Turndown Ratio: 10:1
Process Connections: SSL; NPT, anged, butt weld, socket weld, grooved
VISSL; Insert ts between pair of anges
Instrument Connections: NPT, socket weld, anged
Accuracy: ±1% of reading uncalibrated; ±0.5% of reading calibrated
Standard Beta Ratios: 0.35, 0.49, 0.63 and 0.75;
exact sizing available to provide custom beta ratios
SSM - Hydraulic Shape Design (Nozzle Type) / VISSM - Insert Version
Pipe Sizes ½ to 60 inches and larger (13 to 1524 mm)
Pressure & Temperature: Varies, dependent upon materials of construction
Pressure Loss: 6% of DP maximum
Turndown Ratio: 10:1
Process Connections: SSM; NPT, anged, butt weld, socket weld, grooved
VISSM; Insert ts between pair of anges
Instrument Connections: NPT, socket weld, anged
Accuracy: ±1% of reading uncalibrated; ±0.5% of reading calibrated
Standard Beta Ratios: 0.35, 0.49, 0.63 and 0.75;
exact sizing available to provide custom beta ratios
Page 2 Form #4-20-23 11/10
Page 3

Speci cations (continued)
LPL - Low-Loss Design (Short Form) / VILPL - Insert Version
Pipe Sizes: ½ to 60 inches and larger (13 to 1524 mm)
Pressure & Temperature: Varies, dependent upon materials of construction
Pressure Loss: 3% of DP maximum
Turndown Ratio: 10:1
Process Connections: LPL; NPT, anged, butt weld, socket weld, grooved
VILPL; Insert ts between pair of anges
Instrument Connections: NPT, socket weld
Accuracy: ±3-5% of reading uncalibrated; ±0.5% of reading calibrated
Standard Beta Ratios: -10, -20, -38, -65;
exact sizing available to provide custom beta ratios
CV Series
Pipe Sizes: 2 to 16 inches and larger (51 to 406 mm)
Pressure: 300 PSIG (2070 kPa) maximum
Temperature: 250 °F (120 °C) maximum
Process Connections: NPT, butt weld, anged, grooved
Instrument Connections: NPT
Standard Beta Ratios: -38, -65
VBR Series
Pipe Sizes: ½ to 2 inches (13 to 51 mm)
Pressure: 400 PSIG (2756 kPa) maximum
Temperature: 250 °F (120 °C) maximum
Process Connections: FNPT, socket/sweat
Instrument Connections: NPT
Standard Beta Ratios: -10, -20, -38, -65
Form #4-20-23 11/10 Page 3
Page 4
III. Installation
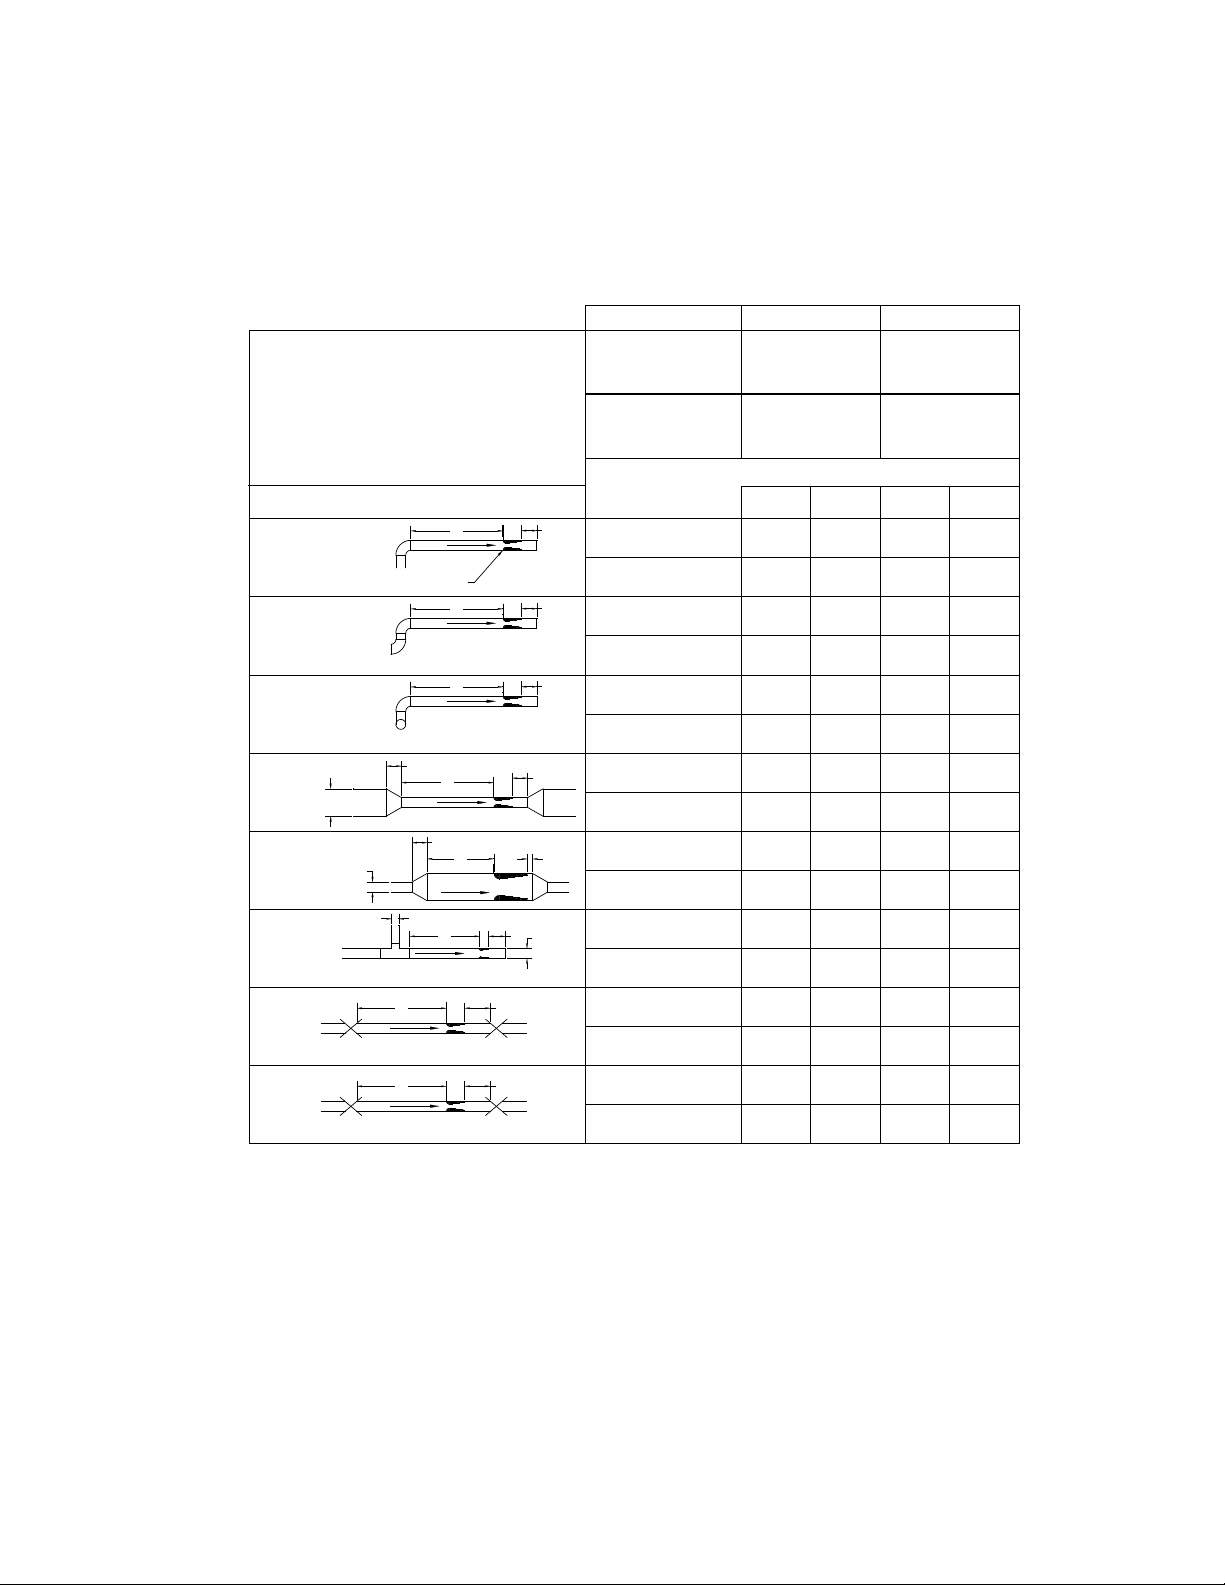
Straight Pipe Run Requirements - SSL, SSM, LPL, VISSL, VISSM, VILPL
As with most ow elements, proper operation and performance is dependent on the required
lengths of unrestricted upstream and downstream piping. The recommended minimum length
of the upstream side of the Venturi ow element depends on the type of tting at the start of the
straight run and the pipe con guration. A fully developed symmetrical ow pro le is achieved with
the minimum upstream and downstream lengths as shown in Figure 1.
INSTALLATION DISTURBANCE
A
Single elbow
Two elbows in the same plane
Two elbows in dierent planes
≤ 2D
Reducer
≥ 0.5D
Expander
Tee connection with dierent diameters
Venturi
A
A
1.5 to 3D
A
1D to 2D
A
d or D
AB
A
B
MODEL
SSL / VISSL – Classical
SSM / VISSM – Nozzle
LPL / VILPL – Low-Loss
B
B
B
B
B
D
A
B
A
B
A
B
A
B
A
B
A
B
A
THROAT SIZE
–1
–2
–3
–4
–10
–20
–38
–65
Minimum Recommended Pipe Diameters
–1
–10
4
222 2
8
333 3
15
4
6
2
8
3
8
3
6
–2
–20
4
8
15 15
4
2
3
33
6
BETA RATIO
0.35
0.49
0.63
0.75
0.35
0.49
0.62
0.81
–3
–38
45
9
4
66
2
88
33
88
6
–4
–65
10
20
10
10
4
7
2
3
3
Globe / Gate valve fully opened
A
Globe / Gate valve partially opened
B
B
A
B
3
12
3333
3
12
14
3
3
18
FIGURE 1
Venturi Pipe Diameter Recommendations
SSL, SSM, LPL, VISSL, VISSM and VILPL Models
NOTES:
1. For upstream and downstream lengths equal to one half the values shown, add 2 percent to the accuracy
value.
2. Any ow conditioner shall be installed in the straight length between the primary element and the
upstream distance, or the tting closest to the element. The straight lengths between tting and
conditioner shall be at least 5D and the length between conditioner and Venturi meter shall be at least 8D.
3. For other ttings, con gurations, consult Preso.
4. Reference - ISO-5167, "Flow Measurement Engineering Handbook", R.W. Miller.
Page 4 Form #4-20-23 11/10
Page 5

Straight Pipe Run Requirements - CV, VBR
Preso CV and VBR Model Venturi elements can be installed in any position with minimal straight
pipe run requirements. The recommended minimum lengths for these models are 5 pipe diameters
upstream and 2 pipe diameters downstream.
Selecting a Mounting Location
The primary Venturi station can be installed in any position on vertical or horizontal lines. However,
on horizontal liquid lines where the risk of gas/gas entrapment in the meter tubing is prevalent, it
is recommended to install the element with the connections below the horizontal center line. For
horizontal air or gas lines, it is recommended to install the element with the connection above the
horizontal centerline. For steam lines, to protect the transmitter, it is recommended to install the
element so that the connections are in the horizontal centerline on meters with the instrument
taps in the same plane. See Figure 5 for meters with instrument taps that are not in the same
plane. Make sure that the ow arrow or the indicated inlet is correctly oriented. Other positions are
acceptable provided proper venting of the secondary element is accomplished and di erences in
tap line elevations are considered.
Vertical installations may introduce a slight hydrostatic head e ect, which must be considered
when zeroing a transmitter. The use of a 3-valve manifold is recommended particularly for zeroing
a transmitter.
Before installation of any Venturi element, inspect for damage, particularly at the sealing surfaces.
Any damage should be reported to Preso as soon as possible. Each ow element has an arrow
indicating the required direction of ow. Failure to properly orient the Venturi element according
to the direction of ow will cause improper results.
For Venturi elements supplied with lifting rings, the installer should take care to ensure the
connections are in the desired position for their application. Thus, supplied lugs location may not
be appropriate for all applications and may require other means of lifting.
WARNING:
Never exceed the maximum pressure or temperature recommended for the measured
process. Exceeding proper pressure or temperature ratings can lead to personal injury
or equipment damage. The process piping anges should be identical to those on the
Venturi. The process temperature and pressure should never exceed those for which
the element has been designed.
Form #4-20-23 11/10 Page 5
Page 6

HI
LO
Flow
Top View
DP Transmitter or
Direct Read Gage
3-Valve Manifold
HI
LO
Side View
Notes:
1. ф = 1 in / ft (80 mm/m) for water;
2 to 4 in / ft (160 to 320 mm/m) for more viscous uids
2. Minimize all lead line lengths
Flow
Up to -45°
Front View
FIGURE 2
Typical Horizontal Installation for Liquid
DP Transmitter or
Direct Read Gage
Flow
Notes:
1. ф = 1 in / ft (80 mm/m)
2. Minimize all lead line lengths
Top View
Side View
HI
LO
3-Valve Manifold
HI
LO
FIGURE 3
Typical Horizontal Installation for Gas
Page 6 Form #4-20-23 11/10
Page 7

Flow
HI
LO
Filling Crosses
(Fill with water
to same level)
DP Transmitter or
Direct Read Gage
DP Transmitter or
Direct Read Gage
By-pass
Valve
Side View Front View
FIGURE 4
Typical Horizontal Installation for Steam
HI
Filling Crosses
(Fill with water
to same level)
Flow
By-pass
Valve
Side View
Front View
FIGURE 5
Optional Horizontal Installation for Steam
(Instrument Taps Not in the Same Plane)
NOTE: Please see instructions in Selecting a Mounting Location section on page 4 for additional
information.
Form #4-20-23 11/10 Page 7
Page 8

LO
HI
LO
HI
3-Valve
Manifold
Flow
DP Transmitter or
Direct Read Gage
Front View
FIGURE 6
Typical Vertical Installation for Liquid
DP Transmitter or
Direct Read Gage
LO
Flow
HI
3-Valve Manifold
Side View
LO
HI
Flow
Front View
Side View
FIGURE 7
Typical Vertical Installation for Gas
Page 8 Form #4-20-23 11/10
Page 9

Filling Crosses
(Fill with water
to same level)
Flow
Flow
Line Installation
LO
HI
3-Valve
Manifold
Front View
DP Transmitter or
Direct Read Gage
FIGURE 8
Typical Vertical Installation for Steam
LO
HI
Side View
All anged Venturi ow elements require a gasket between the process line connection and the
mating ange. Select gaskets that match the pressure rating of the Venturi anges and resist corrosive
attack of the process uid.
Before completing the bolting process, be sure that the gaskets are properly centered so that
protrusion into the pipe opening is minimized. Misalignment may cause added ow turbulence.
However, performance e ects are typically minimal depending upon the application. Bolt the
element in line with suitable hardware using recommended bolt torques for the type and class
rating of the anges.
Torque all models per ANSI ange ratings.
Tighten the ange bolts in a progressive "star" pattern to avoid localized stress on the gaskets.
CAUTION:
Do not exceed speci ed torque!
Form #4-20-23 11/10 Page 9
Page 10

Di erential Pressure Connections
The high pressure connection is always on the upstream side of the ow direction arrow and the
low pressure connection on the downstream side. Fittings used must be able to withstand the
process temperature and pressure conditions, as well as provide proper corrosion resistance. Refer
to appropriate secondary instrument instructions for connections to the seondary instrument high
and low ports. All tting threads should be coated with a process compliant thread sealant prior to
tightening. Once tightened, torque mark all ttings for future reference.
Secondary
Instruments
Transmitter
3-Valve Manifold
Flow
Primary
Element
FIGURE 9
Secondary Instrument Illustration
Direct Read Gage
(Gage shown with
optional by-pass)
Page 10 Form #4-20-23 11/10
Page 11

NOTES
Form #4-20-23 11/10 Page 11
Page 12

FLOW METERING EQUIPMENT
Limited Warranty and Disclaimer
Preso Flow Metering Equipment, Division of Racine Federated Inc. warrants to the end pur chas er, for
a period of one year from the date of shipment from the fac to ry, that all flow meters manufactured
by it are free from defects in materials and workmanship. This warranty does not cover products
that have been dam aged due to misapplication, abuse, lack of main te nance, modi ed or improper
in stal la tion. Preso’s obligation under this war ran ty is limited to the repair or re place ment of a
defective prod uct, at no charge to the end purchaser, if the product is in spect ed by Preso and found
to be defective. Repair or re place ment is at Preso’s discretion. A return goods au tho ri za tion (RGA)
number must be obtained from Preso before any product may be re turned for warranty repair
or re place ment. The product must be thoroughly cleaned and any process chem i cals removed
before it will be ac cept ed for return.
The purchaser must determine the applicability of the product for its desired use and assumes
all risks in connection there with. Preso assumes no responsibility or liability for any omissions or
errors in con nec tion with the use of its products. Preso will under no circumstances be liable for
any in ci den tal, con se quen tial, con tin gent or special dam ag es or loss to any person or prop er ty
arising out of the failure of any product, com po nent or accessory.
All expressed or implied warranties, including the implied warranty of mer chant abil i ty and the
implied war ran ty of tness for a particular purpose or ap pli ca tion are ex press ly dis claimed
and shall not apply to any products sold or services rendered by Preso.
The above warranty supersedes and is in lieu of all other warranties, either ex pressed or implied
and all other ob li ga tions or li a bil i ties. No agent or rep re sen ta tive has any au thor i ty to alter the
terms of this war ran ty in any way.
8635 Washington Avenue • Racine, WI 53406-3738 USA
Tel: 262-639-6770 • Fax: 262-417-1148
Toll Free: 800-632-7337
www.preso.com • info@preso.com
©2010 Racine Federated Inc.
PRESO is a registered trademark of Racine Federated Inc.
UL is a registered trademark of Underwriters Laboratories.
All rights reserved.
Printed in USA
Form #4-20-23 04/10
 Loading...