

BabyTrend 8211BCC User Manual
Model #8211BCC
Read all instructions BEFORE assembly and USE of product.
KEEP INSTRUCTIONS FOR FUTURE USE.
DELUXE TREND NURSERY CENTER
Instruction Manual
Convenience through Innovation and thoughtful design
12.05
Trend Nursery Center
Read all instructions BEFORE assembly and USE of Playard. KEEP
12.05
INSTRUCTIONS FOR FUTURE USE.
WARNING: FAILURE TO FOLLOW THESE WARNINGS AND
THE ASSEMBLY INSTRUCTIONS COULD RESULT IN SERIOUS INJURY OR
DEATH FROM ENTRAPMENT, STRANGULATION, SUFFOCATION, ETC.
WARNING: INFANTS CAN SUFFOCATE: IN GAPS BETWEEN
A MATTRESS TOO SMALL OR TOO THICK AND PRODUCT SIDES, ON
SOFT BEDDING. NEVER ADD A MATTRESS, PILLOW, COMFORTER, OR
PADDING. USE ONLY THE MATTRESS PROVIDED BY MANUFACTURER.
• To reduce the risk of SIDS, pediatricians recommend healthy infants be placed on their back to sleep, unless
otherwise advised by your physician.
• Never leave changer on top of playard when child is in the playard. Always flip changer to the outside when
not in use.
• IF REFINISHING, USE A NONTOXIC FINISH SPECIFIED FOR CHILDREN’S PRODUCTS.
• DO NOT LEAVE CHILD IN PRODUCT WITH SIDE LOWERED.
• BE SURE SIDE IS IN RAISED AND LOCKED POSITION WHENEVER CHILD IS IN PRODUCT.
• The Playard, including side rails, must be fully erect prior to use. Make sure locks are secure.
• Discontinue use of the Playard when child is able to climb out or reaches the height of 35 inches (890 mm)
or the weight of 30 lbs.. (14 kg)
• When child is able to pull to a standing position, remove bumper pads, large toys, and other objects that
could serve as steps for climbing out.
• Always provide the supervision necessary for the continued safety of your child. When used for playing,
never leave child unattended.
• Strings can cause strangulation! DO NOT place items with a string around the child’s neck, such as hood
strings or pacifier cords. DO NOT suspend strings over a Playard/crib or attach strings to toys.
• DO NOT place the Playard near a window where cords from blinds or drapes can strangle a child. DO NOT
add padding or other objects inside the Playard that will permit your child to climb out. Keep Playard away
from stoves, heaters, campfires and other hazards.
• Never use plastic shopping bags or other plastic film as mattress covers not sold and intended for that
purpose. They can cause suffocation.
• Before each usage or assembly, inspect product for damaged hardware, loose joints, missing parts, or sharp
edges. DO NOT use Playard if any parts are missing or broken. Please contact Baby Trend Customer
Service for replacement parts, repair or instructional literature if needed. DO NOT substitute parts.
• DO NOT use a water mattress with this product.
• This product is not intended for commercial use.
MAINTENANCE AND CLEANING INSTRUCTIONS: *Use only household soap or detergent and
warm water. *NO BLEACH.
Please: If you experience any difficulty with the use of our product or have a question regarding these
instructions, please contact our Customer Service Department at (800) 328-7363 between the hours of
8:00 a.m. and 4:30 p.m. Pacific Standard Time. Please do not return the product to the store as once it is
returned it cannot be re-sold and the materials and energy used to make it are wasted.
To Contact Us:
Baby Trend, Inc. Customer Service Hot Line
1567 S. Campus Ave. (800) 328-7363
Ontario, CA 91761 8:00 a.m. to 4:30 p.m. Pacific Standard Time
2

FOR THE SAFETY OF YOUR CHILD, PLEASE READ THE INSTRUCTIONS COMPLETELY
BEFORE ASSEMBLING THE PLAYARD, BASSINET AND CHANGING AREA
TO ASSEMBLE PLAYARD
CONTENTS (Fig. 1-1):
1 Playard
1 Mattress
1 Organizer
2 Leg extensions (1 Left,1 Right)
2 Leg extensions (1 Left, 1 Right) with Wheels,
and hardware
1 Travel or Storage bag
BEFORE YOU BEGIN: The Baby Trend Playard is designed so that,
when properly setup, the fabric of the playard places pressure on the 4
top rails making them nearly impossible to unlock. This safety feature
is activated when you push down on the playard floor to lock the bottom
rails. When setting up the playard, if you allow the bottom rails to lock
before locking the top rails, the fabric pressure will not allow you to lock
the top rails. Please see (Fig. 7.) for the proper position of the bottom of the
playard when locking the top rails. Always keep fingers away from corners
when setting playard up.
Figure 1-1.
Figure 1.
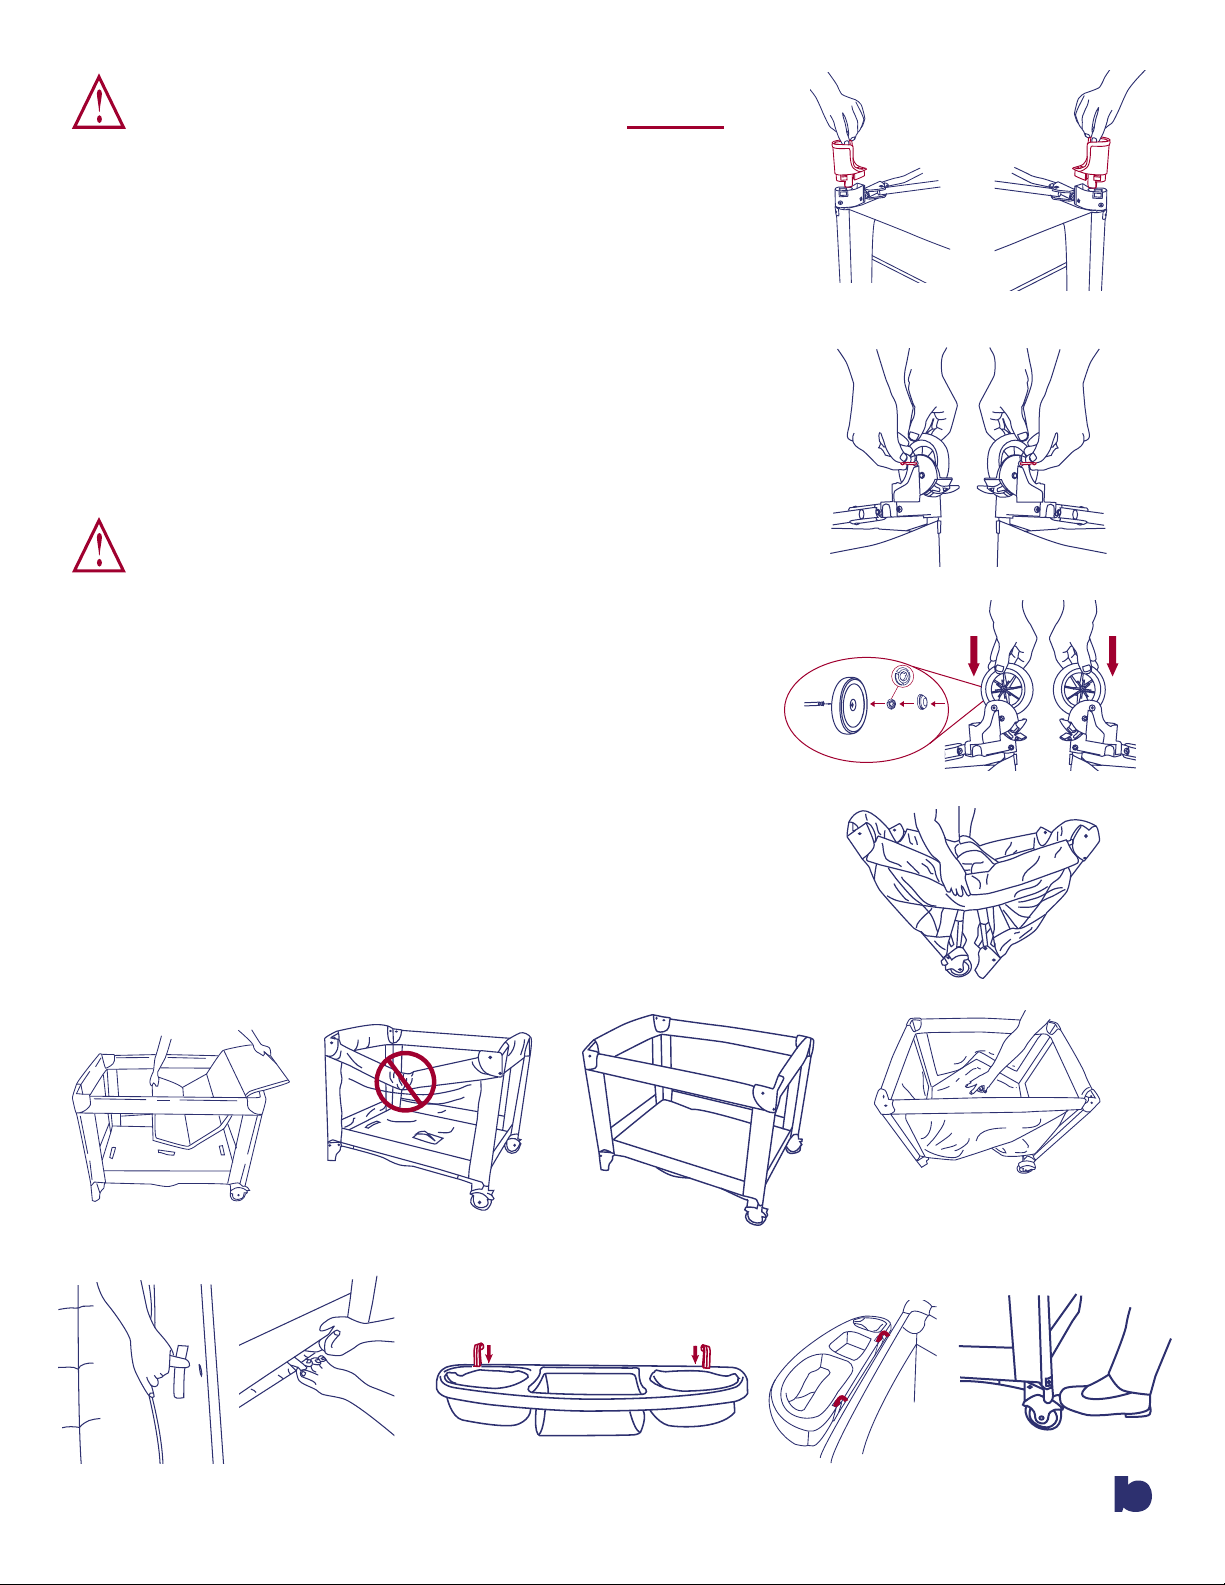
1. Unzip bag and remove Playard frame (Fig. 1). Undo the 3 hook and
loop straps and set mattress aside (Fig. 2).
2. Turn the playard upside down. (Fig. 3). Push each leg extension into
the bottom of the leg until both sides of extension snap into place. (Fig.
4). Check that the extension is firmly connected. Attach the wheels to
the playard with the axle and nut as shown in figure (Fig. 5). The brake
cluster on the wheel must face to the inside. The axle is inserted from
the outside to the inside. (Fig. 6). Check that the wheels are firmly
connected.
3. Stand Playard on legs keeping feet of playard close together as shown in
(Fig. 7). Pull up on top rails until all rails “click” and “lock”.
* READ IMPORTANT: In order to continue, the handle in the center
of the floor of the Playard MUST remain raised in order for the
rail to lock (approx. 45.7 cm or 18 inches). The feet of the playard
should almost touch each other. All 4 bottom rails must be pointed
upward in order to LOCK top rails.
4. Push down on center of Playard floor until it is flat and locks into
position (Fig. 8). The center lock mechanism will lock automatically.
Figure 2.
Leg extensions
Wheels
NOTE: Test rails to make sure they are locked. Push down on each
rail making sure they are rigid and in a set position.
Figure 3
3
WARNING: All top rails MUST be
L
E
F
T
R
IGH
T
straight and locked in position or child may
become entrapped and suffocate.
See figure 9 and 10.
5. Place mattress in Playard with padded side up (Fig. 11).
NOTE: DO NOT insert mattress if using bassinet feature. Go to
bassinet instructions.
6. Feed the 3 hook and loop straps (found underneath the mattress),
through the slots on the bottom of the sides of the Playard. Fasten
the hook and loop straps to the underside of Playard to prevent the
mattress from moving (Fig. 12) (Fig. 13).
WARNING: To prevent child from
becoming entrapped under the mattress pad
and suffocating, hook and loop straps MUST
be secured to underside of Playard.
7. The organizer can attach to any side of the playard. Insert the plastic
hooks into the organizer as shown in (Fig 14 ). For best results, attach
the organizer on the long side of the playard.
8. Attach the organizer, by pushing the plastic clips down over the top
rail. (Fig. 14 A). The maximum weight capacity of the organizer is 3
pounds.
9. To operate the brakes on the wheels, press downward on the brake
lever as shown in figure 15. To release, lift upward on the lever.
Left
Insert
axle from
outside
Figure 4
Left Figure 5 Right
Outside Inside
Right
Insert
axle from
outside
Figure 6
Assembly is now complete and playard is ready to use.
Figure 11
Figure 12
Figure 13
Figure 14
Figure 7
Figure 8
Figure 9Figure 10
Figure 14A
Figure 15
4
 Loading...