


TM
Instructions for use

The Elle TENS+™is a 3-in-1 state-of-the art, efficient method of drug-free pain relief. This powerful digital TENS unit is smooth, sophisticated and simple to use. It has been cleverly crafted by Babycare TENS specifically for home use for mums-to-be, for the management of pain for labour and beyond. The Elle TENS+ contains a powerful TENS unit to combat labour pain with a built in contraction timer, a TENS unit for general pain relief and a Pelvic Floor Stimulator (PFS) for treating post-natal incontinence.
The instructions in this manual are designed to cover most operational issues. If you have any questions concerning setting up, using or maintaining this device which are not covered by these instructions or any other concerns please do not hesitate to contact Babycare TENS at help@babycaretens.com.
TENS is recognised as a safe and highly effective method of pain relief and is regularly recommended by medical professionals.
TENS is drug-free, with no known side effects. It can also be used in conjunction with any additional medication if required.
Explanation of symbols on unit
Equipment providing a particular degree of protection against electric shock particularly regarding allowable leakage currents having an F type (floating) applied part.
Warning -
Please read these instructions before use.
Denotes a product which must be disposed of safely.
2

What is TENS?
TENS (Transcutaneous Electrical Nerve Stimulation) works by passing mild electrical impulses through the skin, via electrode pads, into the nerve fibres which lie below.
The TENS impulses help your body produce its own pain killing chemicals, such as endorphins. The level of pain relief obtained varies from person to person.
What can the Elle TENS+ be used for?
1.The Elle TENS+ provides pain relief during labour. However some people may find that other analgesics are also needed during the later stages of labour.
2.The Elle TENS+ can be used for many chronic and acute pain conditions such as back pain, shoulder pain, arthritis, sciatica, sports injuries, migraine, period pain and post-operative pain.
3.The Elle TENS+ can also be used for treating incontinence. (NOT to be used during the 12 weeks following childbirth).
Section
1
Section 2
Section
3
Using your Elle TENS+ in BIRTH mode:
See page 4
Using your Elle TENS+ in PAIN mode:
See page 16
Using your Elle TENS+ in PELVIC mode:
See page 24
3

Section1
For more information
Please also refer to your ‘Women’s guide to drug free pain relief’.
4
BIRTH mode
Waiting for that big day to finally arrive is exciting, but it is perfectly natural to feel a little apprehensive. You will be thinking about how to make giving birth as easy as possible - preparation is essential.
Babycare TENS has become the most popular choice for mums-to-be as it is specifically designed to combat pain during childbirth. This is a safe, effective drug-free method of pain relief, which still allows you to use other analgesics, such as pethidine or gas-and-air if you wish.
Contents for BIRTH mode
Controls on you rElle TENS+ |
5 |
Display symbols and their meanings |
6 |
Setting up your Elle TENS+ for birth |
7 |
Suggested electrode placement diagram |
9 |
Entering BIRTH mode |
10 |
Adjusting intensity for pain relief during labour |
10 |
Burst (use between contractions) |
11 |
Boost (use during contractions) |
11 |
Using the contraction timer |
12 |
Recalling your contraction history |
12 |
The Mode Button |
13 |
The Opti-Max Key |
14 |
Questions, answers and troubleshooting |
15 |

Controls on your Elle TENS+ in BIRTH mode
The Elle TENS+ is very simple to use. |
r |
However, it is essential to read these |
e |
m |
|
T |
|
|
i |
|
/ |
instructions to obtain the most out of |
t |
o |
|
|
s |
|
o |
the unit. |
B |
|
Please ensure that all of the contraindications and precautions have been read thoroughly.
See pages 34 and 35.
Opti-Max Key
Adjusts depth of the pulses: Refer to p14 for more details.
Channel 1 Intensity
Adjustment Keys
Mode Button
Selects modes.
ELLETENS+ |
 +
+
Opti
Max
CH1+  CH2+
CH2+
Mode
CH1 CH2 
Space to attach neck cord 
Leadwire Jack Plug Sockets
Boost/Timer Button
Used for an extra surge of power during contractions and also activates Contraction Timer.
On/Off Button
Channel 2 Intensity
Adjustment Keys
N.B. Automatic Power Off
When the intensity levels are zero, and the Elle TENS+ has not been in use for 5 minutes, it will shut off automatically.
5
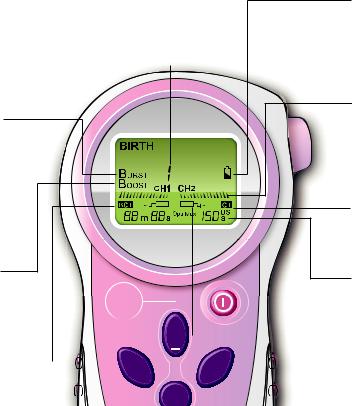
Display symbols and their meanings in BIRTH mode
BURST |
Mode 1 and 2 |
This function is used at the |
There are two mode ranges |
onset of labour and in between |
available each with a Burst and |
contractions. There are two |
Boost function (see page 13). |
Burst modes available indicated |
|
by a 1 or 2. You can switch |
|
between them by pressing the |
|
Mode Button (see page 11). |
r |
|
e |
BOOST |
m |
Ti |
|
|
/ |
|
t |
The Boost Button at the top right |
s |
o |
|
|
o |
of the unit activates the BOOST |
B |
|
|
mode. This function is used |
|
during contractions. There are |
|
two Boost modes available |
|
indicated by a 1 or 2. You can |
ELLETENS+ |
switch between them by |
|
pressing the Mode Button. |
|
Between Contraction Timer |
|
Starts by pressing the Boost |
|
|
+ |
|
Button, this automatically |
|
|
|
|
measures the time interval |
|
|
Opti |
|
|
|
Max |
|
|
between your contractions. |
|
|
|
|
+ |
+ |
|||
|
|
CH1 |
|
CH2 |
Mode
Low Battery Indicator
This sign will start flashing if the batteries run low. If this is the case, change both batteries. Please refer to page 7 for instructions.
Power Bar
This shows the output from 0 to 15 for both channel 1 and 2. Each segment represents approximately 7% of the total output.
Contraction Timer
Starts by pressing the Boost Button, this automatically records the duration of your contractions.
Opti-Max
Indicates the Opti-Max output. Refer to p14 for more details.
Pad contact warning (safety cut-out)
This symbol will appear if any of your pads are not attached securely to the skin.
6

Setting up your Elle TENS+ for BIRTH
Check the following contents:
•1 x Elle TENS+ Unit
•1 x Pack of 4 Self Adhesive Electrodes (40mm x 100mm)
•2 x Leadwires and 1 Spare
•2 x AA Batteries and 2 Spare
•1 x Carrying Pouch
•1 x Easy-Release Neck Cord
•1 x Instruction Manual
•1 x Quick Start Guide
•1 x Women’s Guide*
•1 x Electrode Placement Chart*
•1 x Lubricant Gel Sachet
1 x vaginal probe
(NOT to be used until at least 12 weeks after childbirth. See contraindications and precautions on pages 34 and 35.
For use only in the PELVIC mode - see p24).
The Assembly Stage |
|
a) Press and rotate the belt |
Rotate |
clip at the back of the Elle |
|
TENS+ in either direction |
|
to reveal the battery |
|
compartment. |
|
b) Release the battery compartment cover and insert 2 x AA batteries ensuring the positive (+) and negative (-) terminals are correctly positioned as marked in the battery compartment.
Replace the cover.
*(only if you have purchased this unit)
AA R6 1.5v
+
+ AAR6 1.5v
Press
Cover
Release
7

Setting up your Elle TENS+ for BIRTH
c) Take two of the pink |
|
d) Now insert the pins |
leadwires and insert |
|
(at the other end of the |
each of the black jack |
|
leadwires) into the |
plugs into the sockets |
|
sockets attached to the |
at the top of the Elle |
|
sticky electrodes. |
TENS+ unit. |
|
Do not remove the |
|
|
electrodes from the |
Jack Plug |
Jack Plug |
backing at this stage. |
|
||
|
|
N.B. Each leadwire has a red |
|
|
and black pin. It makes no |
|
|
difference which electrode |
|
|
they are attached to. |
Pins  Sockets
If you wish, attach the easy-release neck cord which enables you to hang the Elle TENS+ from your neck.
Sticky Electrodes
8

Suggested electrode placement diagram
The sticky electrode pads need to be placed in the correct position for maximum pain relief. It is preferable to obtain assistance from either your birthing partner or medical adviser when positioning the pads.
Please read the following instructions carefully:
1.Clean the skin thoroughly and allow skin to dry before applying the pads.
2.Carefully peel the pads from the plastic backing using your forefinger and thumb. Do not pull on the lead wires. Retain plastic backing and pouch for storage after use.
3.Position the top two pads (connected to the left socket CH1) approximately 4cm either side of the spine and 4-5cm above the imaginary navel line as seen in the diagram.
4. Position the bottom two pads (connected to the right socket CH2) approximately 4cm either side of the spine and 4-5cm below
the imaginary navel line as seen in the diagram.

 CH1
CH1

 CH1
CH1
CH2


 CH2
CH2

Reference: Cluett E. (1994) SRN RM ADM PGCEA. Analgesia in Labour: A review of the TENS method. Professional Care of Mother and Child. Mar;4 (2): 50-2.
Bra line
Naval line
Panty line
9

Using the Elle TENS+ in BIRTH mode
Press
Mode
 +
+
Opti
Max
CH1+
10
Display
Entering BIRTH mode
a). You are now ready to use your Elle TENS+. Ensure that the Boost Button located at the top right of the unit is not pressed in. Switch the unit ON by pressing the On/Off Button. You will see ‘BIRTH’ flashing in the top left corner of the display.
b). Press Mode to confirm ‘BIRTH’ mode, otherwise your Elle TENS+ will automatically enter the BIRTH mode after a few seconds.
c). If the unit does not already display ‘BIRTH’ (i.e. PAIN or PELVIC is flashing), use the Opti-Max Key to cycle through the modes, until ‘BIRTH’ is flashing.
N.B. Your Elle TENS+ always starts up in the mode used previously. To select another mode you must first turn off the unit and follow the instructions as above.
Adjusting intensity for pain relief during labour
Begin by pressing the CH1+ key. Each time this key is pressed, ‘half-moons’ will appear on the screen increasing in number and size as the intensity is
Using the Elle TENS+ in BIRTH mode
|
increased. You will begin to feel a pulsating sensation. The unit is in |
|
|
BURST mode. Press CH1- should you wish to reduce the intensity. |
|
CH2 |
Repeat the previous step with the CH2+ and CH2- keys. You will now feel a |
|
+ |
sensation in both sets of pads. |
|
|
|
|
|
Burst 1 (use between contractions*) |
|
|
|
|
|
This is the first mode that you will use. It feels like a pulsing, tingling |
|
|
sensation i.e. the pulses are off and on periodically. This mode will help to |
|
|
promote those all-important natural pain-killing chemicals known as |
|
|
‘endorphins’ and ‘encephalins’. |
|
|
Boost 1 (use during contractions*) |
|
|
When experiencing a contraction, simply press the Boost Button once and |
|
|
|
|
|
|
|
|
release. This is the big button located at the top right of the unit. Your Elle |
|
B |
TENS+ will then switch automatically into the BOOST mode for that extra |
|
|
|
|
|
surge of power required to combat pain during contractions. This will feel |
|
|
|
|
|
like a continuous sensation. You do not need to hold the button in. |
|
|
*See page 13 for additional BURST and BOOST information. |
|
Display
11
 Loading...