

Page 1
TRIM MOULDING DECK PORCH RAIL PAVERS
AZEK Rail
Install Guide
Installing AZEK Rail with CableRail by Feeney® .......................................................................... 1
Installing CableRail by Feeney® for AZEK Rail ........................................................................... 7
Installing AZEK Rail Stairs with CableRail by Feeney® ............................................................10
Installing CableRail by Feeney® Stairs for AZEK Rail ...............................................................14
Notes .................................................................................................................................................... 18
• Please read all instructions completely before starting any part of the installation.
• AZEK Rail should be installed using the same good building principles used to install wood or composite
railing and in accordance with the local building codes and the installation guidelines included below.
AZEK Building Products Inc. accepts no liability or responsibility for the improper installation of this product.
• AZEK Rail may not be suitable for every application and it is the sole responsibility of the installer to be sure
that AZEK Rail is t for the intended use. Since all installations are unique, it is also the installer’s
responsibility to determine specic requirements in regards to each Rail application.
• AZEK Building Products Inc. recommends that all applications be reviewed by a licensed architect, engineer
or local building ofcial before installation. If you have any questions or need further assistance, please call
AZEK Customer Service at 877-ASK-AZEK (877-275-2935) or visit our website at www.azek.com.
• AZEK Railing is tested as a whole system and should be used that way. It is not intended to be used in
conjunction with other railing systems or fasteners.
• The following Installation Guidelines are applicable for installation of AZEK Premier, AZEK Trademark, and
AZEK Reserve Rail Systems (except AZEK Reserve over post applications).
• IMPORTANT: Make sure the DRIVE TOOL/DRILL is congured or set to use the SCREW setting when driving
and/or tightening all FASTENERS.
• SAFETY: Always wear goggles when handling, cutting, drilling and fastening materials.
• Failure to install this product in accordance with applicable building codes and AZEK’s written Rail Install
Guide may lead to personal injury, affect rail system performance and void the product warranty.
Page 2
Installing AZEK Rail with CableRail by Feeney
•
Miter Saw
•
Drill Bits: 7/64”,1/4”, 3/16”,
2.64”
2.72”
3.5”
2.63”
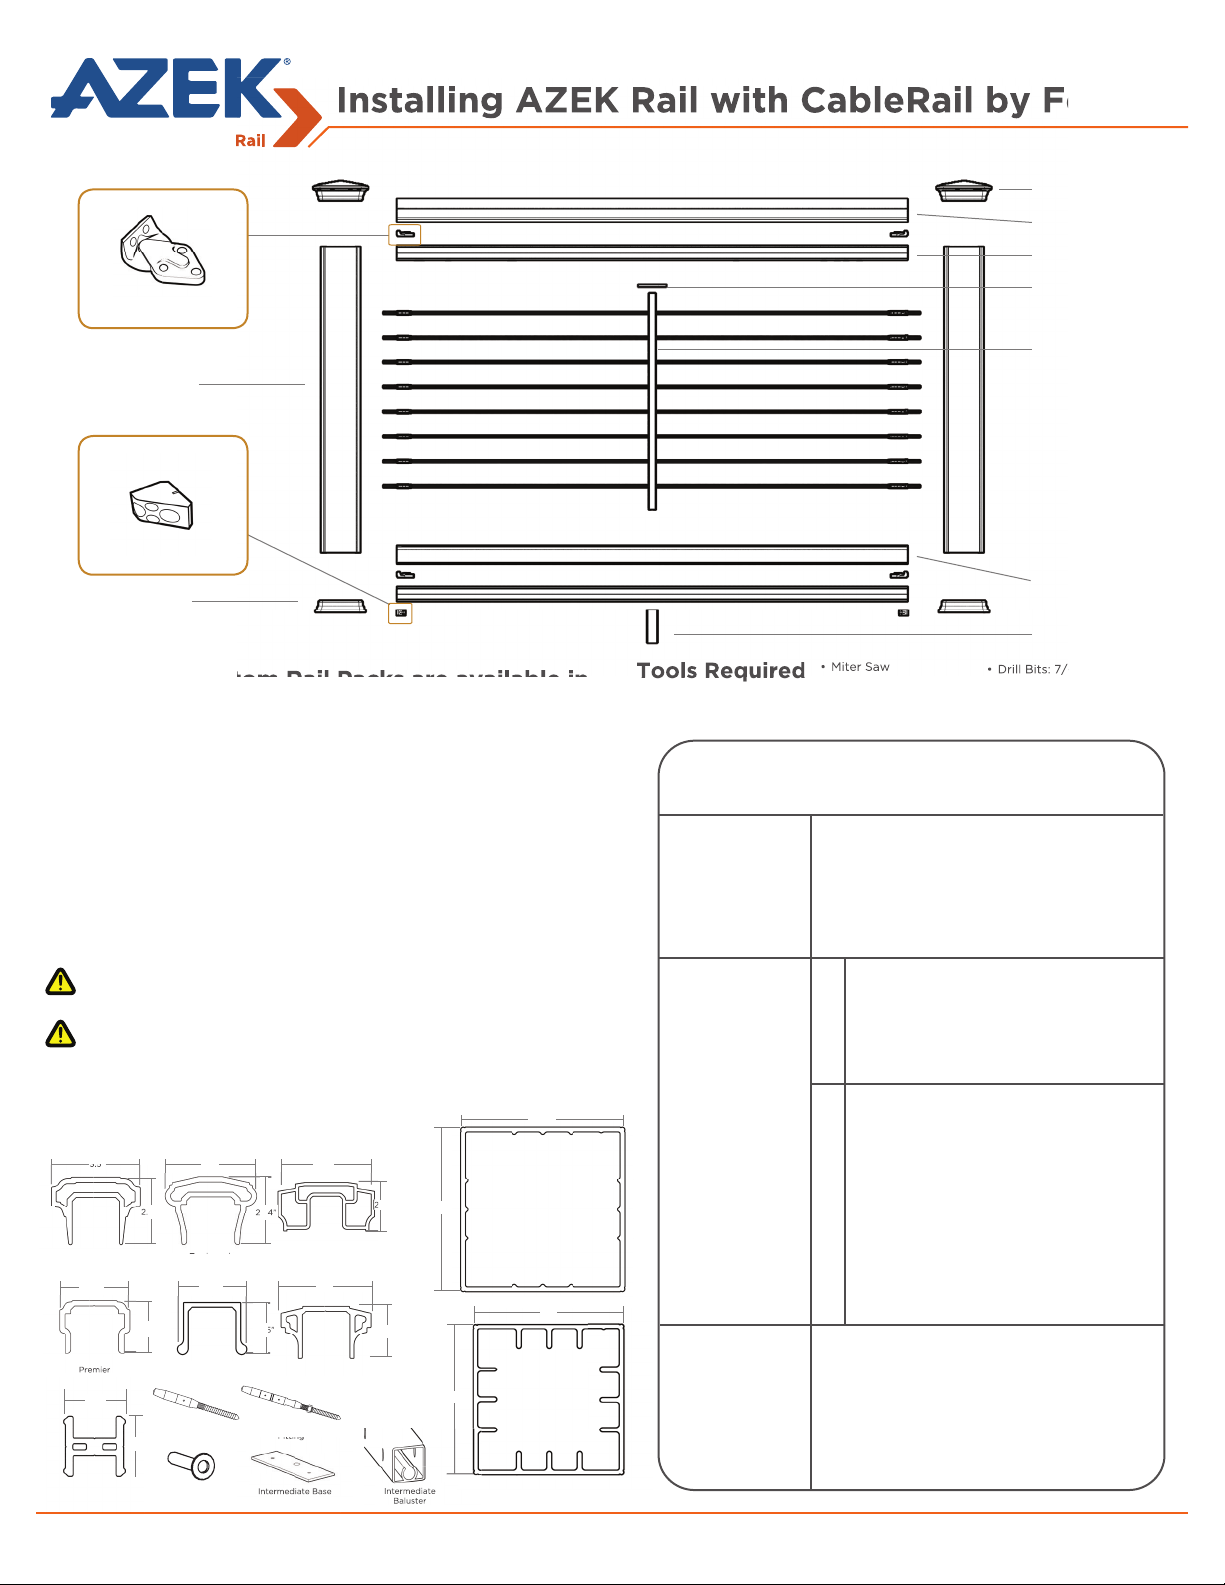
Premier
Plate
Fitting
Intermediate Base
Intermediate
Baluster
®
Mounting Bracket (4
)
Post Sleeve (2)
Support Block (2)
Post Skirt (2)
AZEK Rail Custom Rail Packs are available in
10’, 8’ and 6’ lengths.
Visit www.azek.com/installation to view AZEK installation videos.
Consult your local building codes for guard and handrail requirements.
Measuring Your Railing Area
• Measurements are from center to center of the posts. Kits
are produced in 10’, 8’ and 6’ to allow for fi nished end cuts
and angles.
•Determine how many 10’, 8’ and 6’ AZEK Rail Custom Rail
Packs you need and check to be sure you have all the
components (and quantities) listed in the chart shown
to the right.
Important Information
•AZEK Rail 10’, 8’ and 6’ Rails are designed not to
exceed 10’, 8’ and 6’ from center of post to center of post,
respectively.
•For stair applications maximum rail length must not exceed 91”.
•4x4 lumber posts should be installed plumb.
•Cut slowly, using a fi ne tooth saw blade to avoid chipping.
•Cannot be installed using Secure Mount Post.
•For 42” railing, use 54” Post Sleeve.
Component Dimensions
2.63”
Quick-Connect
3.5”
Trademark
Top Rail
2.73”
Trademark
Bottom Rail
Fitting
5.38”
2.64”
Reserve Top
Rail
3.5”
2.05”
Reserve
Bottom Rail
Quick-Connect Swivel
Fitting
3.5”
Premier Top
Rail
2.72”
Premier
Bottom Rail
1.8”
2.05”
1.8”
2.72”
6.32”
2.05”
5.5”
6.32”
6” x 6” Post Sleeve
5.5”
Tools Required
Components Needed For Installing
The AZEK Rail Section
Hardware
included in
Hardware Kits:
Components
available
separately for
mix-and-match
rail
systems
Additional
Components
Needed for Each
System
Post Cap (2)
Top Rail (1)
Support Rail (2)
Intermediate
Base Plate
Intermediate
Baluster
Bottom Rail (1)
Foot Block (2)
• Miter Saw
• Tape Measure
• Drill
• Cable Cutters
• #2 Square Drive
Hardware Mounting Kit
4 - Mounting Brackets
2 - Support Blocks
16 - #8 x 3/4” screws
6 - #8 x 1 3/4” screws
6 - #8 x 2 5/8” screws (Stairs Only)
6 - #8 x 3” Screws
12 - #8 x 3” Green Screws
T20 Driver Bit
1 - Top Rail (Reserve Top Rail sold separately)
1 - Bottom Rail
2 - Support Rails (1-Aluminum Top Support Rail for 10')
Hardware Mounting Kit
Support Block Mounting Templates
Foot Blocks
Rail Pack
- 1 in 6’ Packs, - 2 in 8’ Packs, - 3 in 10' Packs
AZEK Rail Custom
36” Intermediate Baluster
-1 for 6’, 2 for 8’, 3 for 10'
42” Intermediate baluster
-1 for 6’, 2 for 8’, 3 for 10'
Stair Intermediate
baluster
-1 for 6’, 2 for 8’, 3 for 10'
Cable
-100’ spool or 500’
spool
CableRail Components
2 - Post Sleeves
2- Post Caps
2- Post Skirts
Protector Sleeves
- 42” System: 22 per Thru Post
- 36” System: 18 per Thru Post
• Drill Bits: 7/64”,1/4”, 3/16”,
1/8” 9/64”
• Extended 1/4” Drill Bit
• 2 3/8” Open-End
Wrenches
36” Hardware Kit
- 9 Quick-Connect
Fittings
- 9 Quick-Connect
Swivel Fittings
- 18 Hanger Bolts
- 9 lock nuts
42” Hardware Kit
- 11 Quick-Connect
Fittings
- 11 Quick-Connect
Swivel
Fittings
- 22 Hanger Bolts
- 11 lock nuts
CableRail Accessory
Pack Includes:
- Quick-Connect release
tool
- Lacing Needle
- Hanger Bolt
Installation Tool
Support Rail
Protector Sleeve
Intermediate
Baluster
5 1/2” x 5 1/2” Post Sleeve
Page 2
Page 3
Installing AZEK Rail with CableRail by Feeney
skirt.
For angled rail installations
- align angled face of Support
Block parallel to rail section.
®
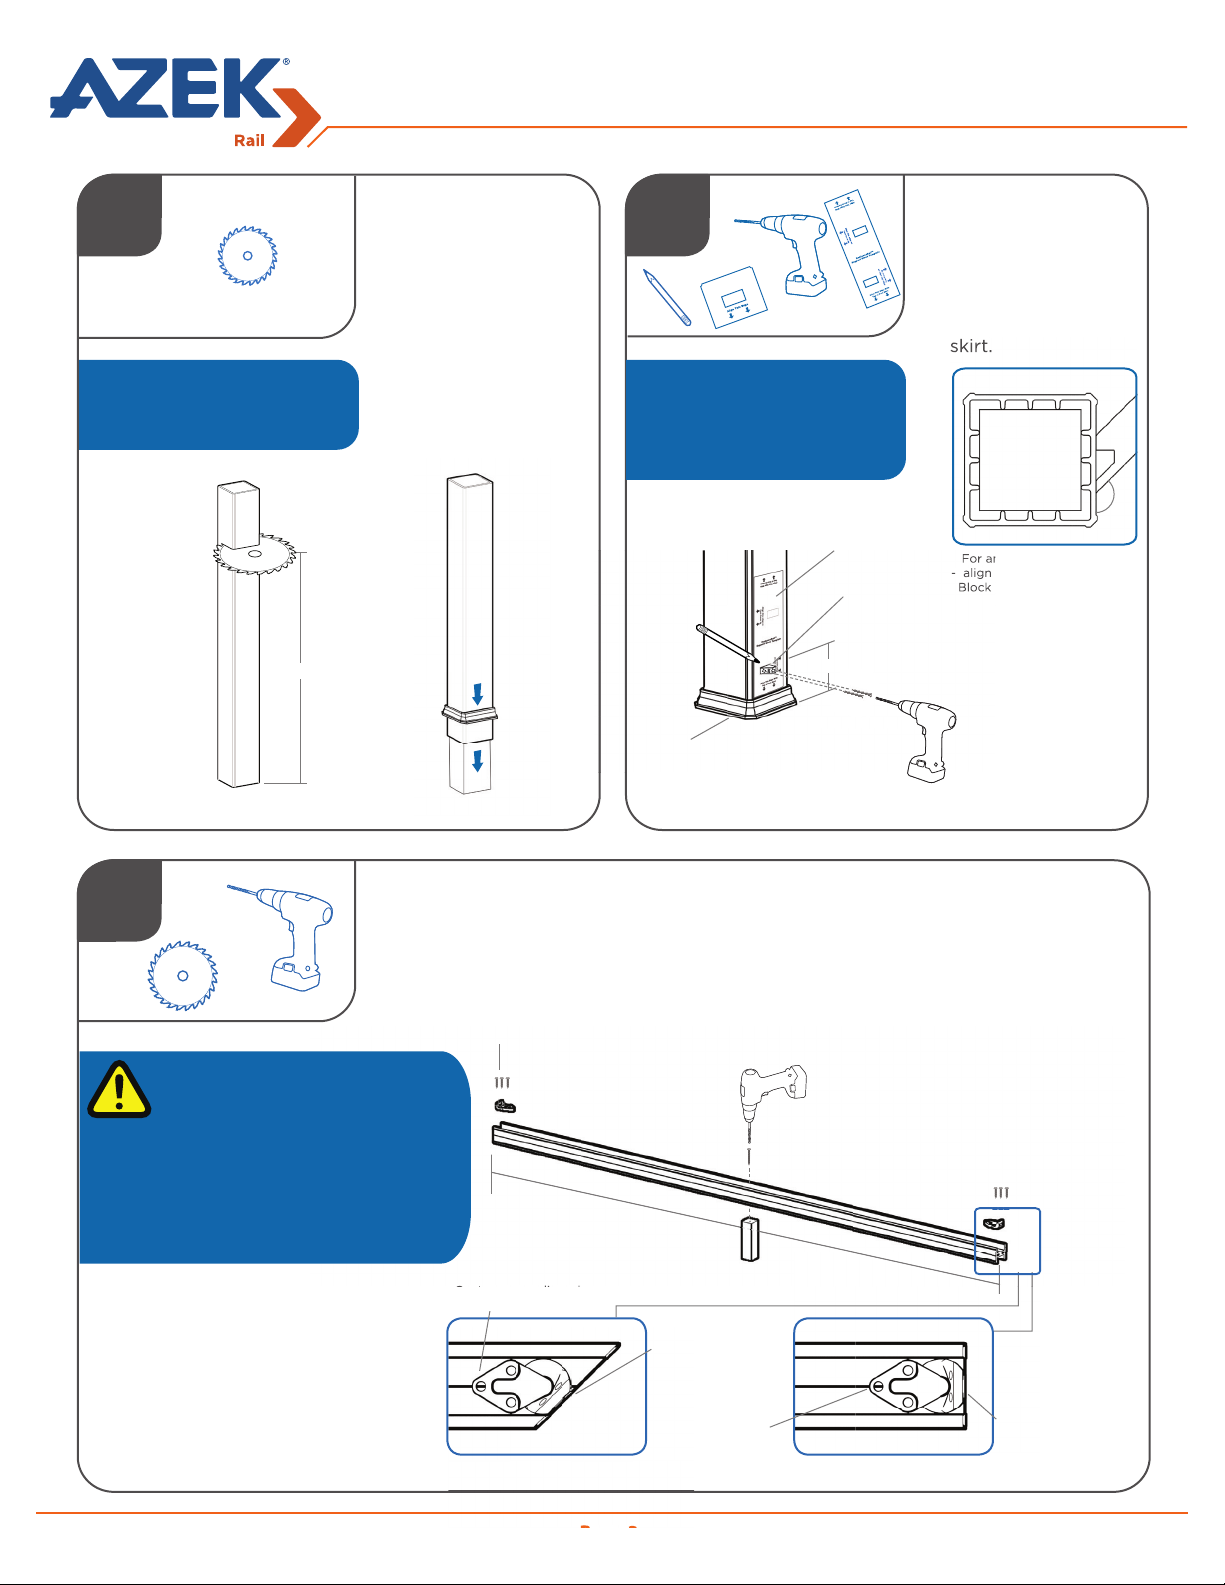
1
40” above deck surface is
optimal for 36” railing heights.
Optimal 40”
INSTALL POST
SLEEVE
• Trim Post Sleeve to
desired length.
• Slide Post Sleeve and
Post Skirt over post
(do not force).
• Ensure posts are
square and plumb.
2
If you do not have a the
template, position
the top of the Support Block 4”
above the deck.
Template
Support
4”
7/64” Pre-drill
Post
Skirt
#8 x 3” Green
Coated Screws
Block
INSTALL LOWER
SUPPORT BLOCK
• Position template at
bottom of post
sleeve above post
skirt.
For angled rail installations
- align angled face of Support
Block parallel to rail section.
45°
3
CUT AND ASSEMBLE BOTTOM SUPPORT RAIL
•Cut the Bottom Support Rail to length.
For sections up to 6’: Place one Foot
Block in the center of the rail.
For sections 6’ to 8’: Space two Foot
Blocks approximately at 1/3 intervals on
the rail.
For sections 8’ to 10’: Space three Foot
Blocks approximately at 1/4 intervals on
the rail.
7/64” Pre-drill
#8 x 3/4” Coated Screws
1/2
Center screw aligned
to rail centerline
Angled Section
7/64” Pre-drill
#8 x 3” Coated
Screws
Bracket set
fl ush to rail
face
Foot Block
Center screw
aligned to rail
centerline
Straight Section
1/2
Bracket set
fl ush to rail
face
Page 3
Page 4
4
#8 x 3” Green
Coated Screws
#8 x 3” Green
Coated Screws
Installing AZEK Rail with CableRail by Feeney
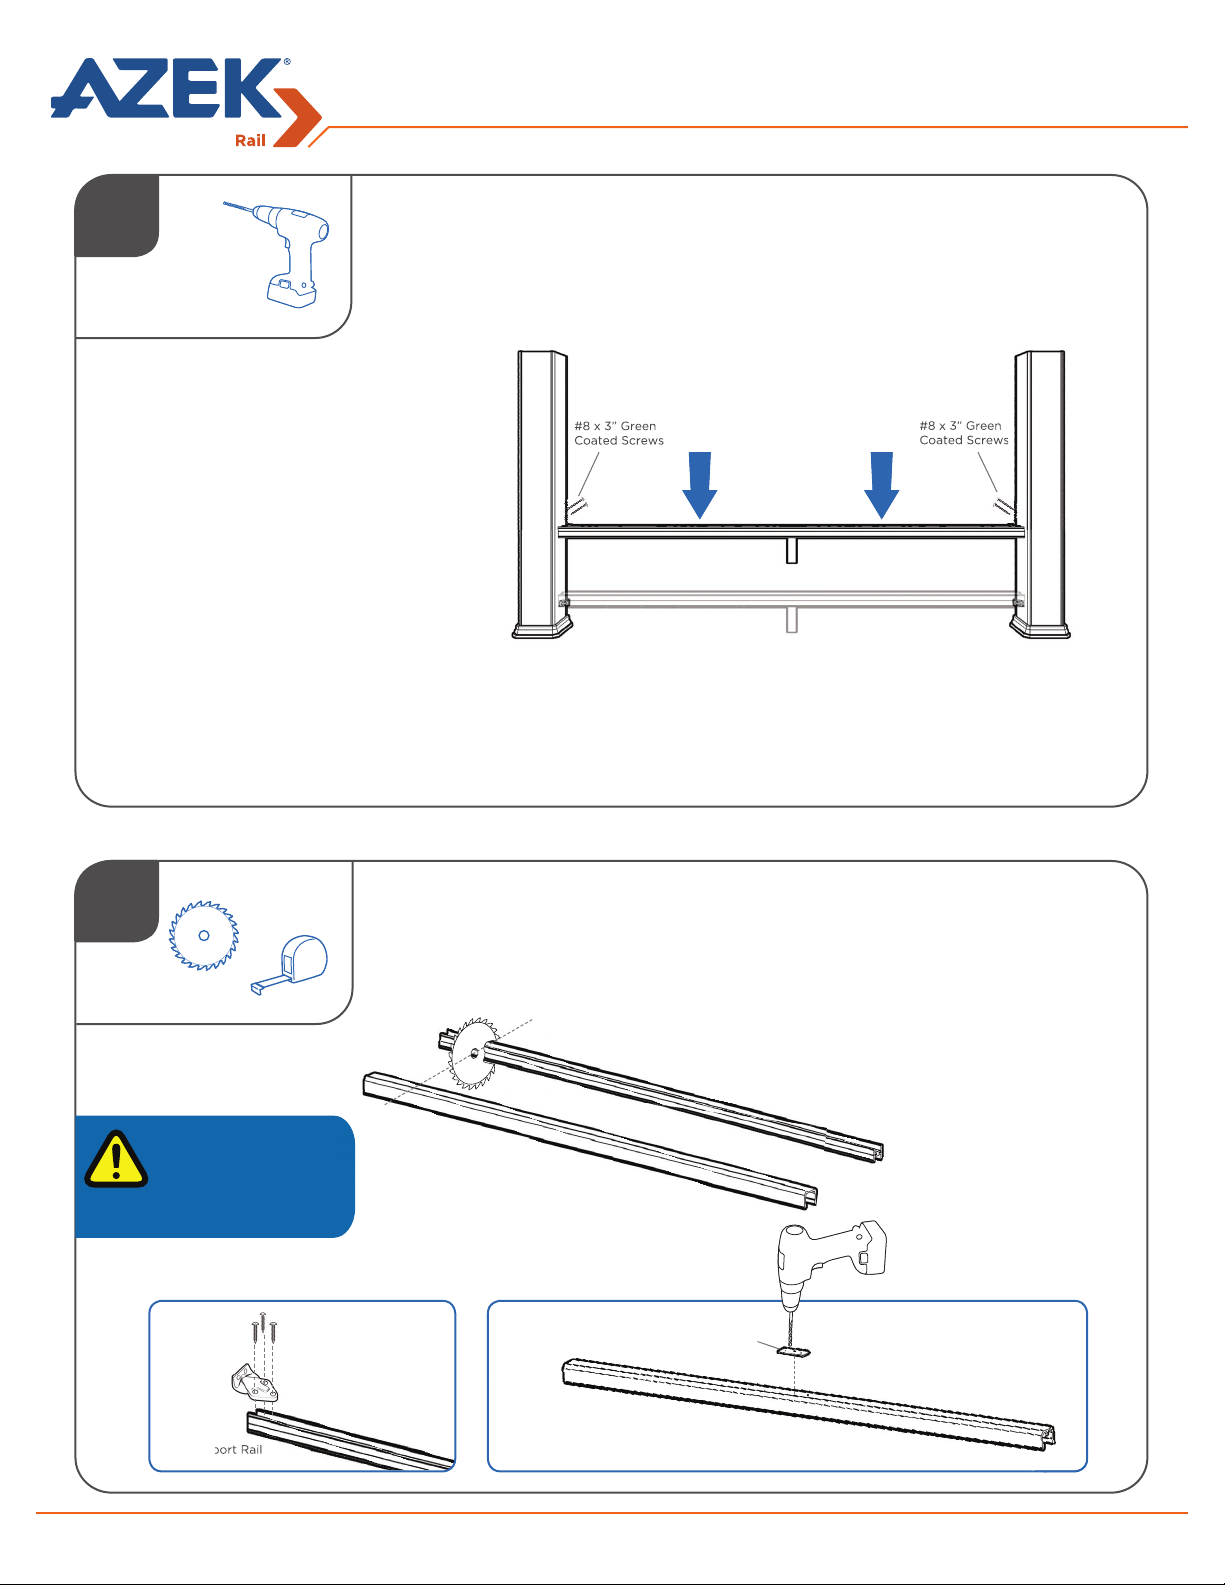
INSTALL BOTTOM SUPPORT RAIL
• Position rail assembly onto Support Blocks.
®
5
#8 x 3” Green
Coated Screws
#8 x 3” Green
Coated Screws
CUT AND PREP BOTTOM RAIL AND TOP SUPPORT RAIL
• Measure distance between the posts at the Bottom Rail and Top Support Rail.
• Cut to length.
• Attach Brackets to the Top Support Rail.
6’ sections require 1
Intermediate Baluster;
8’ sections require 2
Intermediate Balusters.
10’ sections require 3
Intermediate Balusters.
8 x 3/4” Coated
Screws
Top Support Rail
Top Support Rail
Bottom Rail
Page 4
Use
Intermediate
Base Plate as
template
Bottom Rail
Pre-drill 3/16”
Page 5
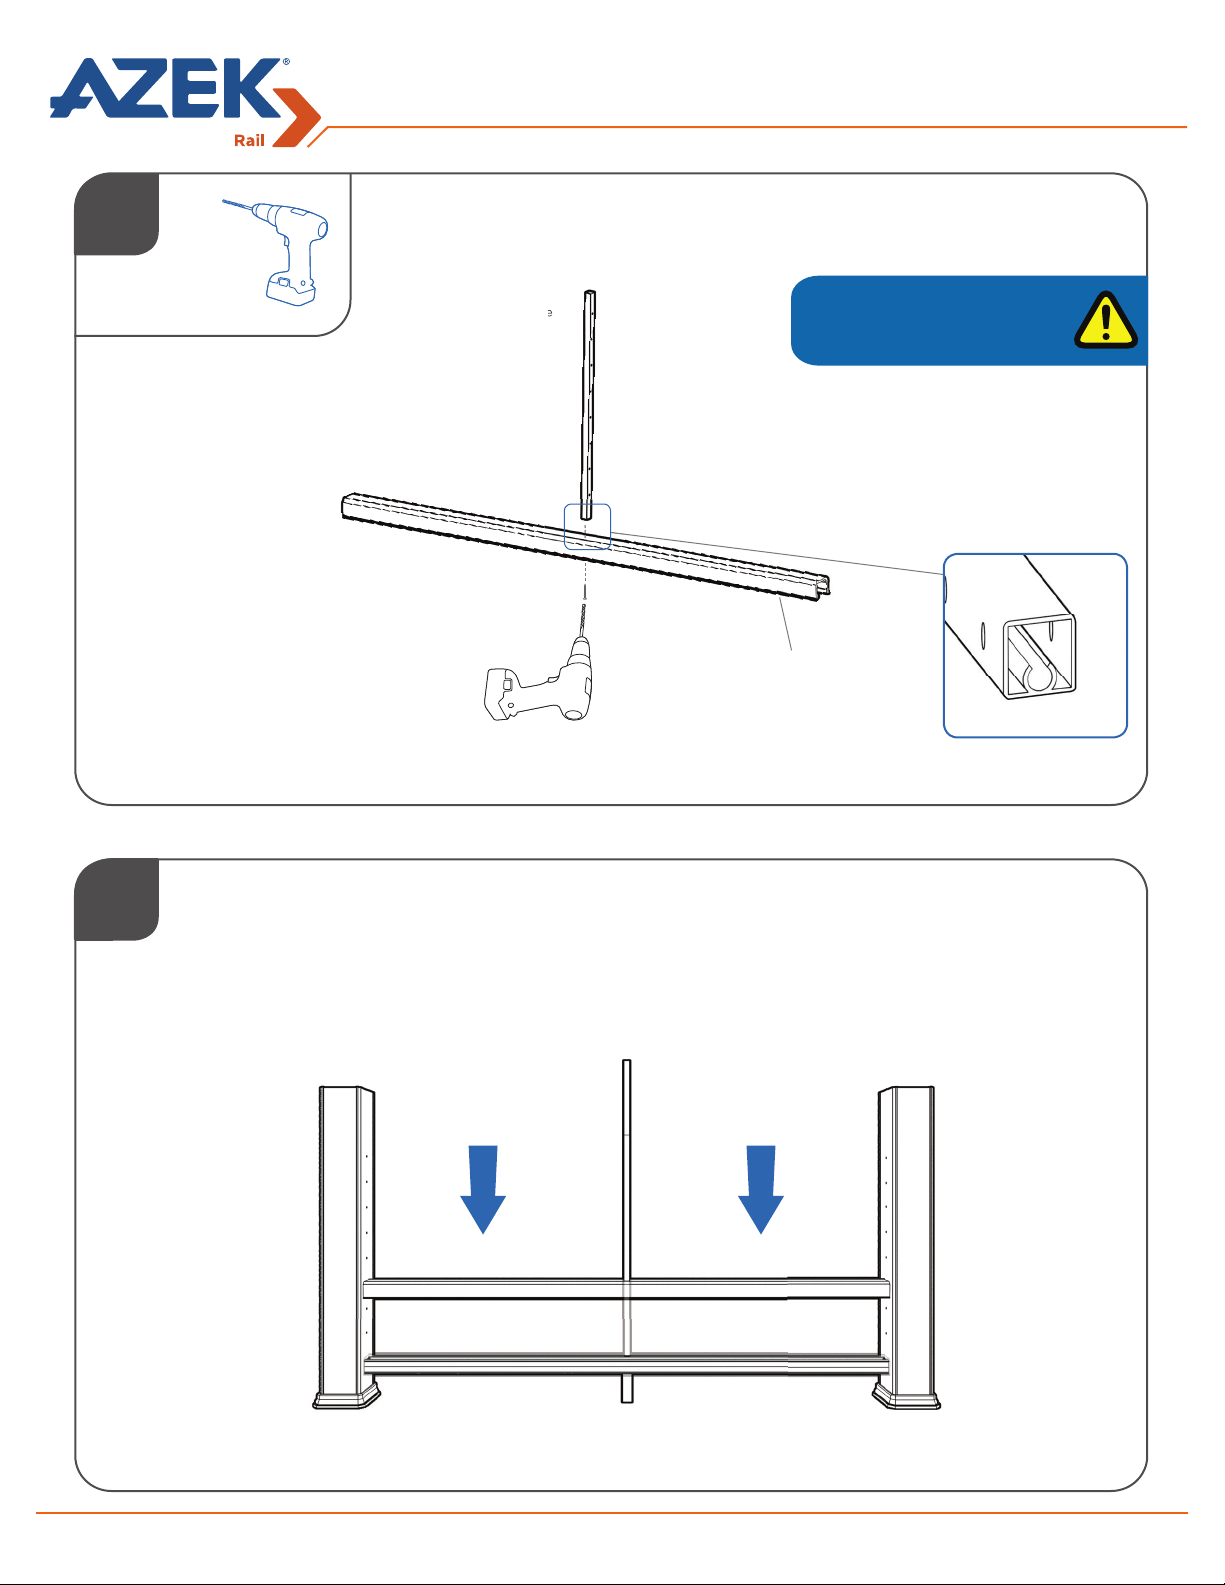
6
Installing AZEK Rail with CableRail by Feeney
ATTACH INTERMEDIATE BALUSTERS
®
Intermediate
Baluster
Pre-drill
3/16”
#10 x 2” Coated
Screws
For ease of installation, pre-drill
screw chase with a 3/16” drill bit.
Ensure the screw fi nds the screw
chase.
Screw Chase
Bottom Rail
7
INSTALL BOTTOM RAIL
• Place the Bottom Rail between the posts and allow the rail to
rest on the Bottom Support Rail.
Bottom Rail
Bottom
Support Rail
Page 5
Page 6
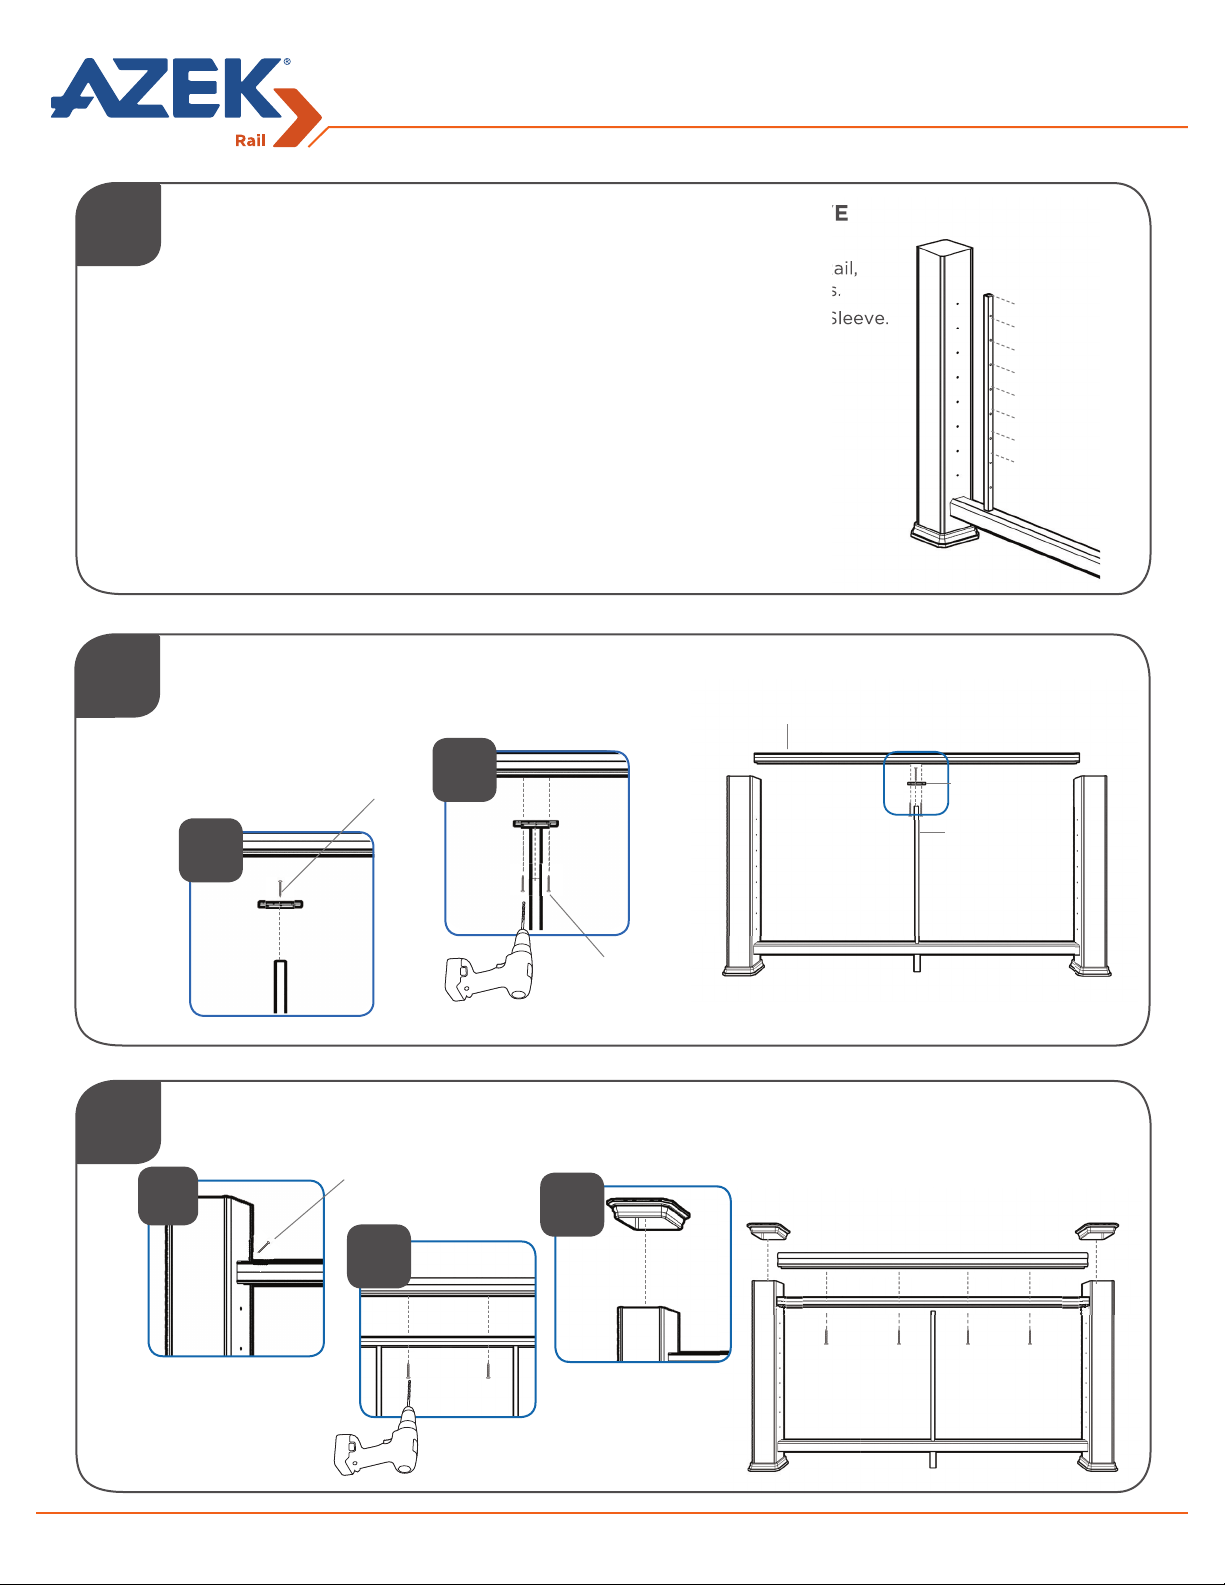
8
9
Installing AZEK Rail with CableRail by Feeney
TRANSFER HOLE LOCATION ONTO POST SLEEVE
• Use an extra Intermediate Baluster, rested on the Bottom Rail,
as a template for the CableRail Hardware and through holes.
• Using a 3/16” drill bit to transfer your marks onto the Post Sleeve.
ATTACH TOP SUPPORT RAIL
Support
Rail
®
10
a
a
#10 x 1”
Coated
Screws
b
Pre-drill
9/64”
#10 x 1”
Coated
Screws
INSTALL TOP RAIL AND POST CAPS
Pre-drill 7/64”
#8 x 3” Green
Coated Screws
c
b
Secure Post
Caps with
exterior
grade caulk.
Intermediate
Base Plate
Intermediate
Baluster
Pre-drill 3/16”
#8 x 1 3/4” Coated
Screws
Page 6
Page 7
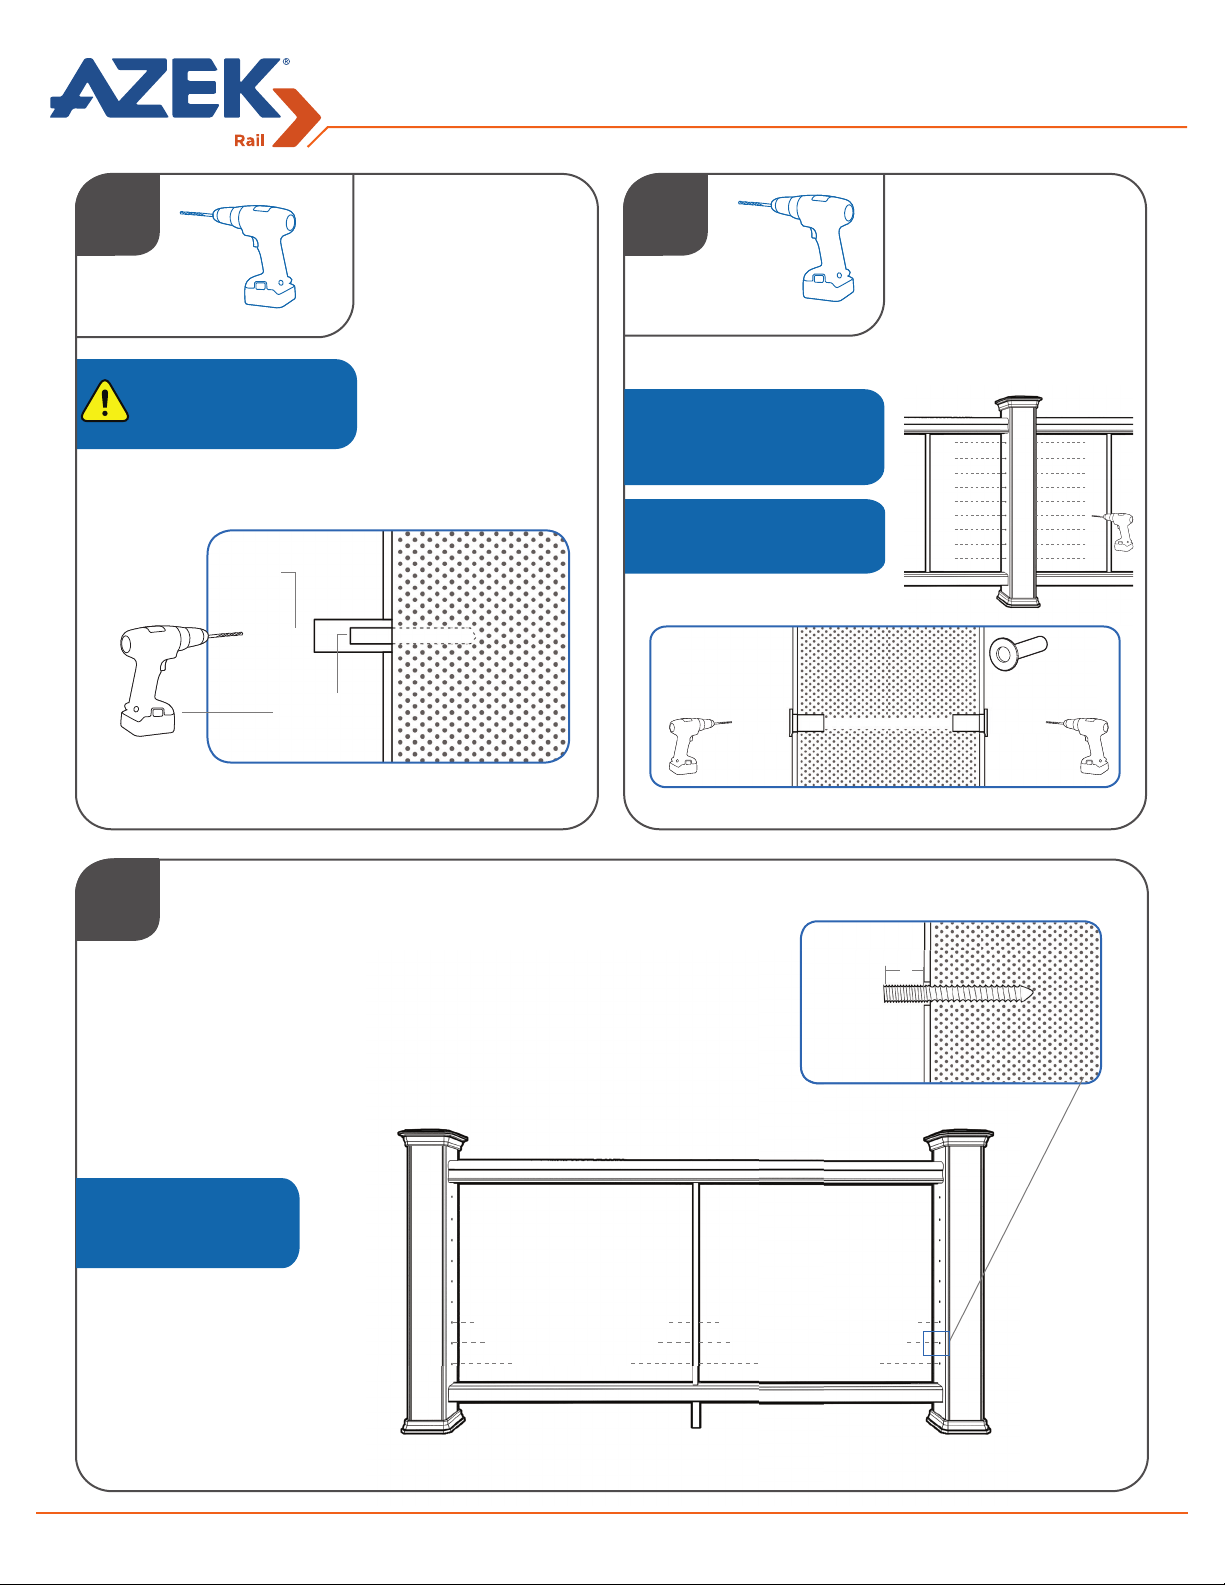
Installing CableRail by Feeney® for AZEK Rail
1
Anchor posts should not
exceed 60 feet apart during
any continuous run of cable.
Drill through
Post Sleeve
with 1/4” bit
1/4”
Pre-drill 1/8”
into 4”x4”
PRE-DRILL
ANCHOR POST
SLEEVE
• Using the marks on
the Anchor Posts, drill
a through hole only in
the Post Sleeve with a
1/4” Bit drill.
1/8”
2
Optional - Protector Sleeves
are not required on the through
posts, but do offer a more
fi nished appearance.
Use a dab of adhesive on
Protector Sleeve if needed.
1/4” 1/4”
Drill through
Post Sleeve
with 1/4” bit
PRE-DRILL
THROUGH POST
SLEEVES
• For the through
posts, drill a 1/4”
hole through both
the Post and Post
Sleeve.
Protective
Sleeve (X2)
Drill through
Post Sleeve
with 1/4” bit
3
Leave about 1” of machine
thread exposed for cable
take-up.
DRIVE IN HANGER BOLTS
• On Anchor Posts, screw the Hanger Bolts
into the pilot holes in the Post with the
Hanger Bolt Installation Tool.
• Once Hanger Bolts are all driven in, then
screw on Quick-Connect Fittings.
1”
Page 7
Page 8
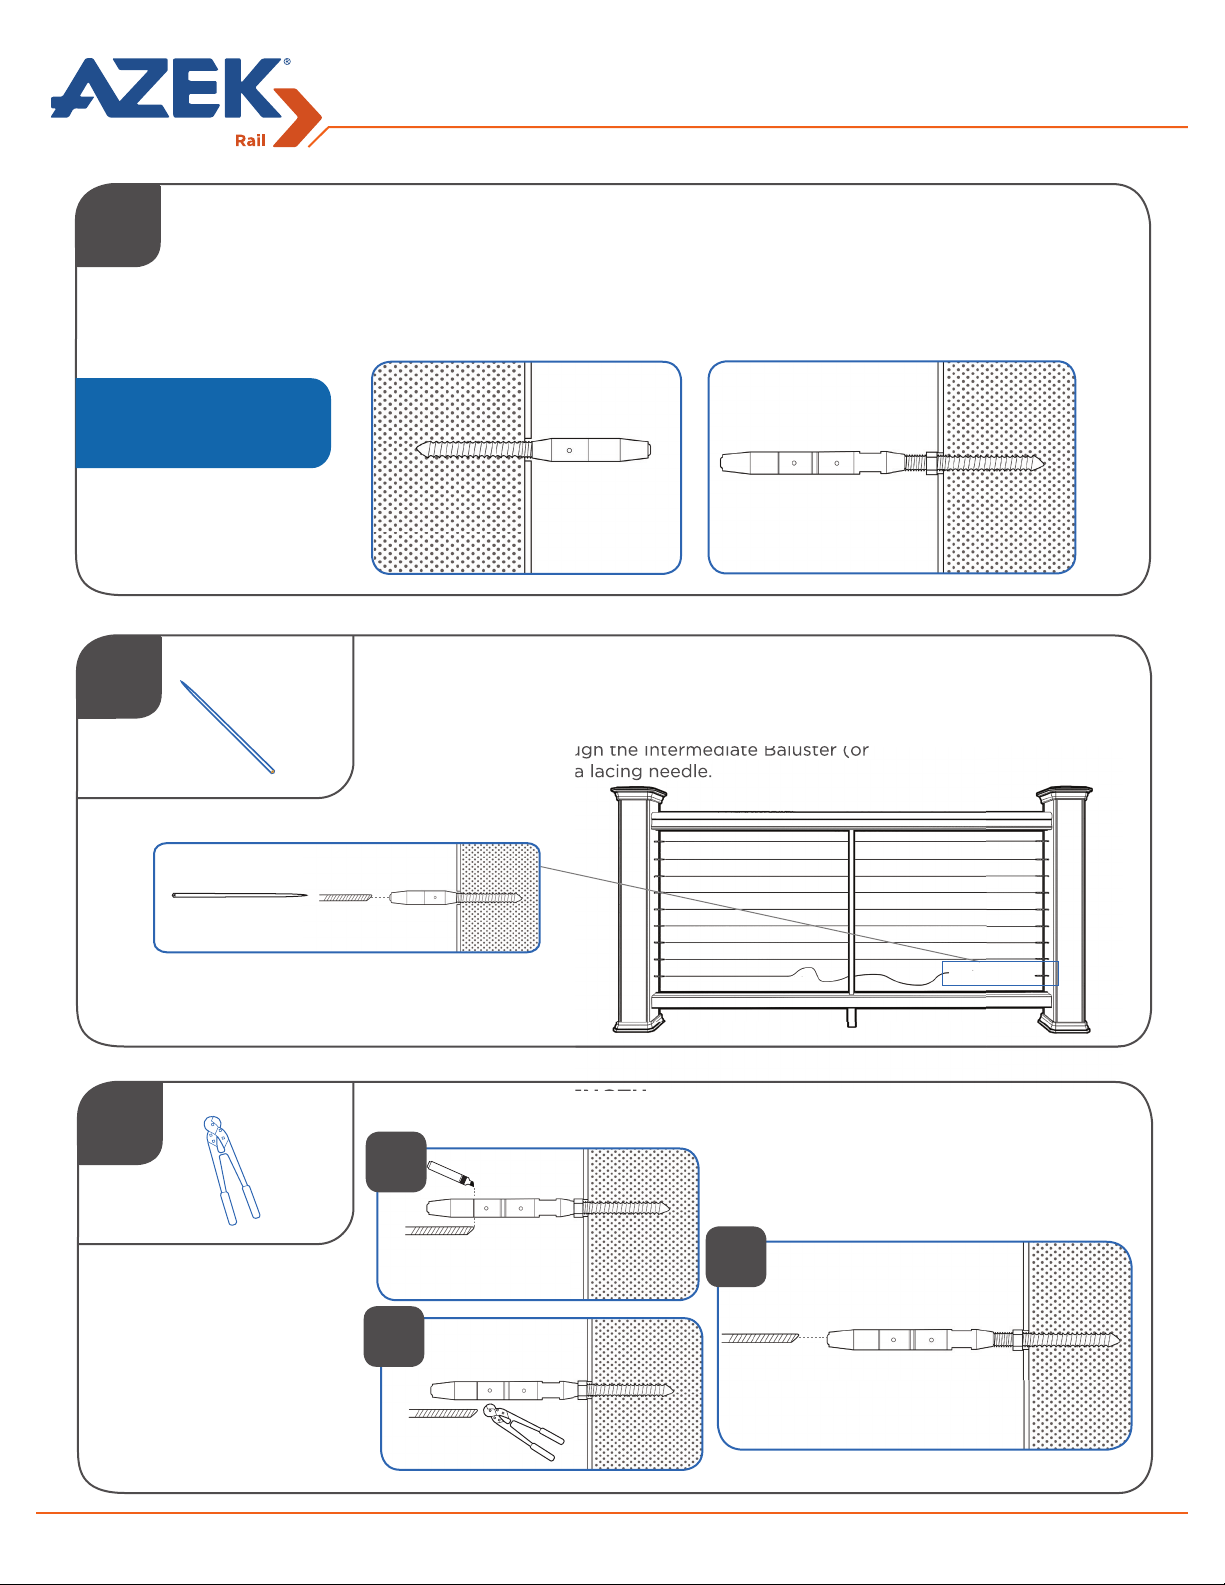
4
One side of the railing will be
only Quick-Connect fi ttings, the
other side will be Quick Connect
swivel fi ttings and lock nuts.
5
Installing CableRail by Feeney® for AZEK Rail
ATTACH QUICK-CONNECT AND QUICK-CONNECT SWIVEL FITTINGS
• Screw on Quick-Connect fi ttings snuggly against Post Sleeve onto one side
of the railing and lock nuts onto hanger bolts on the other side.
• Screw on Quick-Connect Swivel fi tting onto the Hanger Bolt with the lock
nut already installed.
INSERT AND THREAD CABLE
• When all of the hardware is in place, insert one end of the
Cable into the Quick-Connect fi tting.
• Feed the Cable through the Intermediate Baluster (or
through posts) with a lacing needle.
6
Lacing Needle
CUT CABLE TO LENGTH
a
Unscrew the Quick-Connect
swivel fi tting from the post to
measure length of cable
Trim Cable at the fi rst
b
cut line on QuickConnect Swivel Fittings
c
Insert Cable into
Quick-Connect
swivel fi ttings
Page 8
Page 9
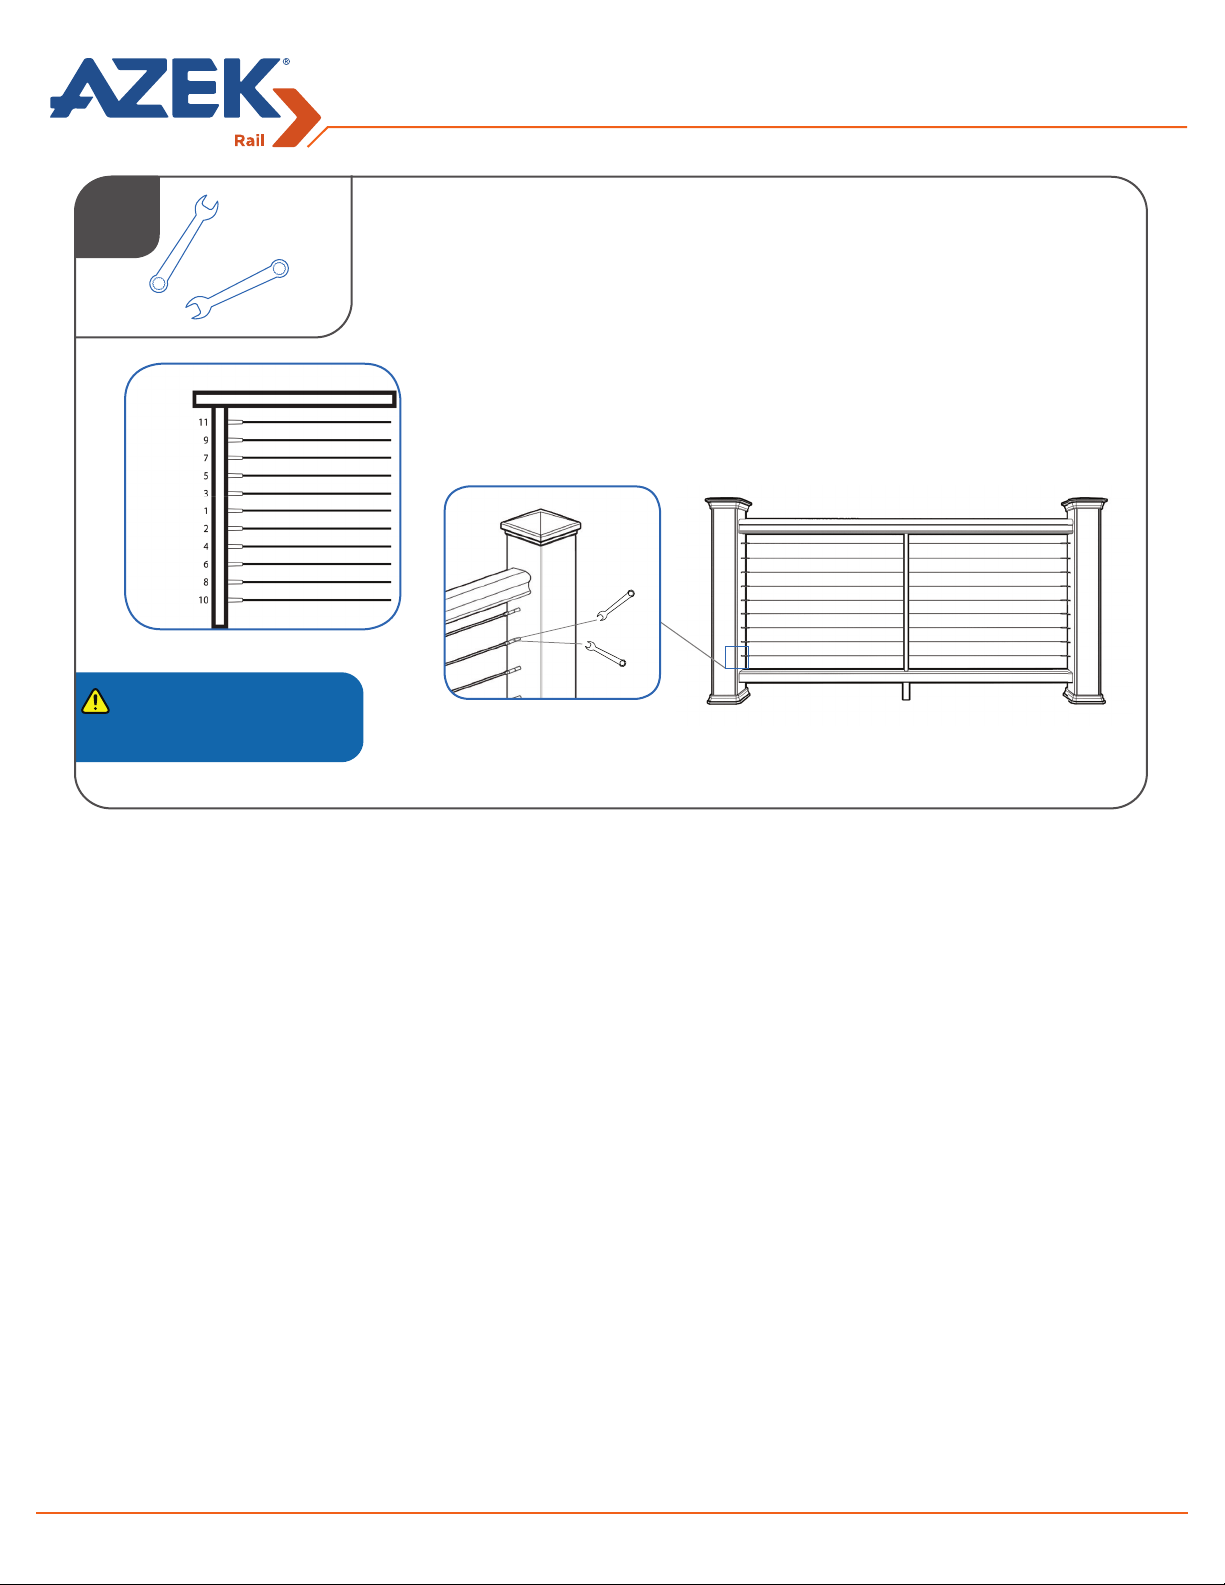
6
Tightening Order
If necessary, the Cable can be
removed from the Quick-Connect
fi tting by using the
Quick-Connect Release Tool.
Installing CableRail by Feeney® for AZEK Rail
ATTACH QUICK-CONNECT AND QUICK-CONNECT CABLE FITTINGS
• Use a set of 3/8” open-ended wrenches to tighten the Cable
using the “swivel” end insuring the Cable does not twist.
• Once the Cable is tight, tighten the lock nuts against the
Quick-Connect swivel fi tting.
Page 9
Page 10
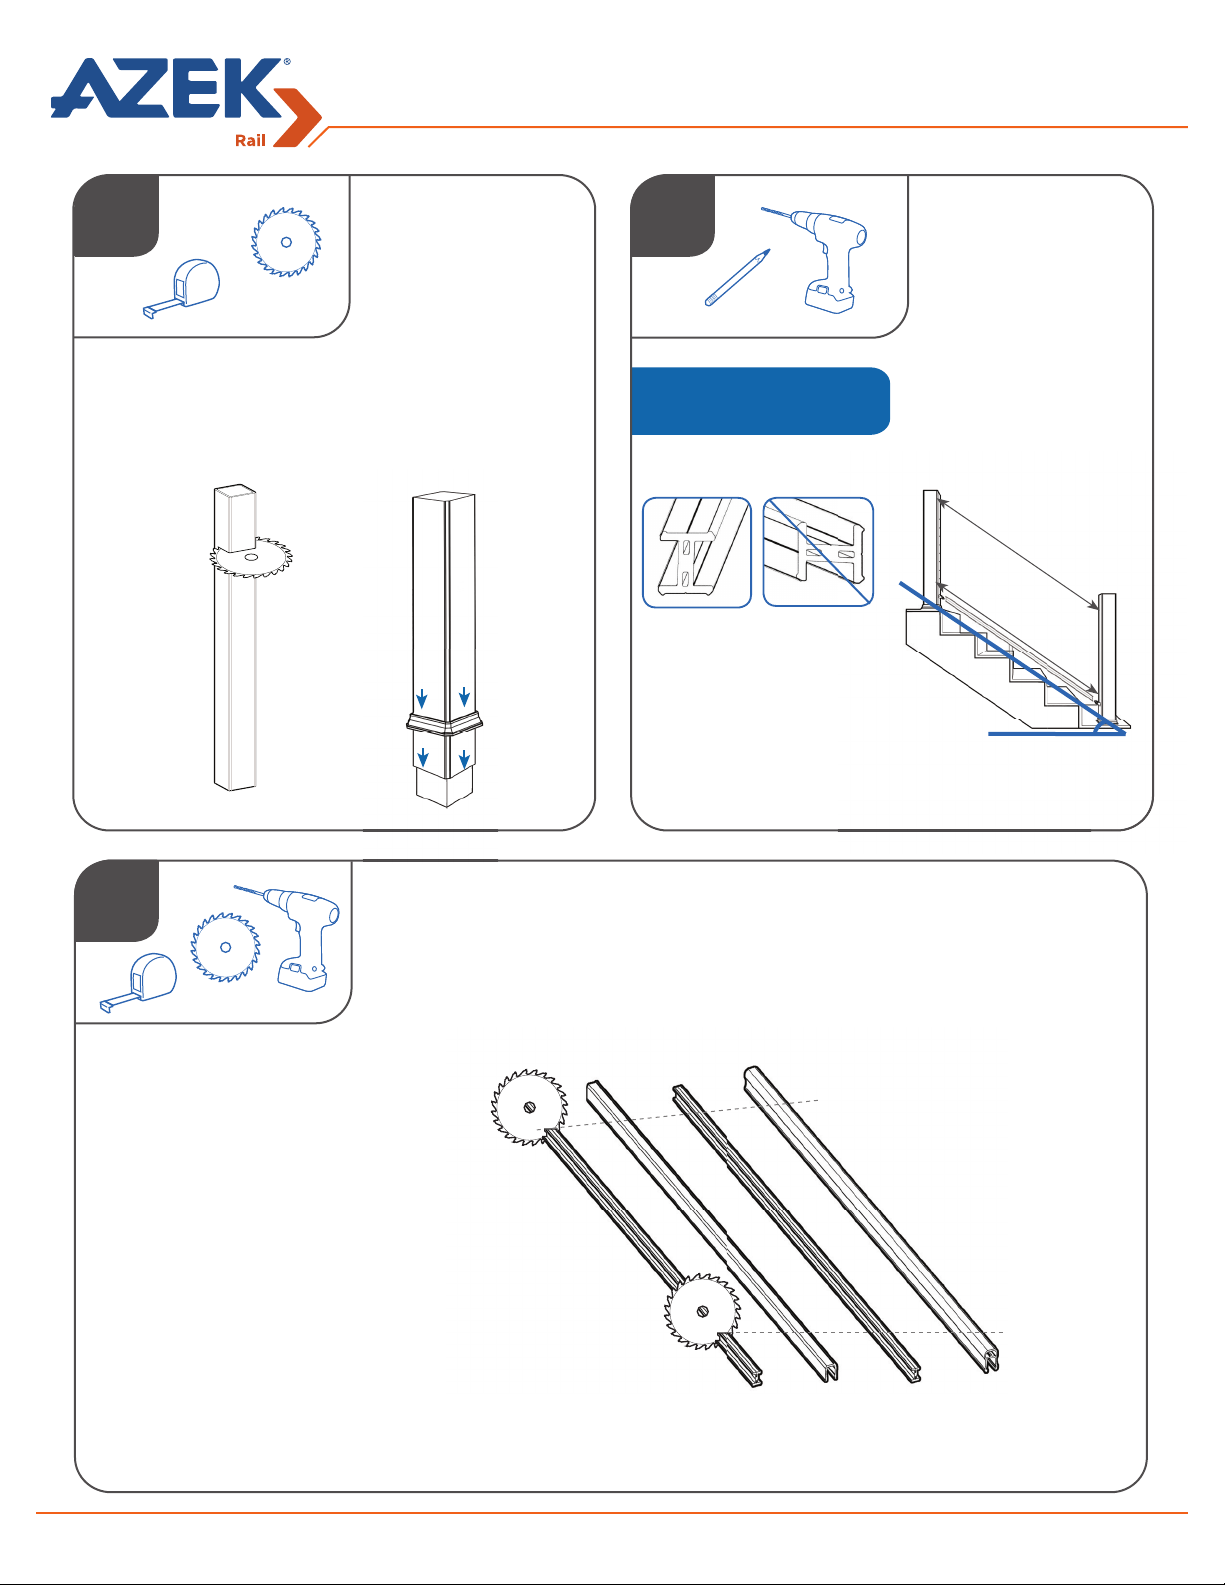
Installing AZEK Rail Stairs with CableRail by Feeney
®
1
INSTALL POST
SLEEVES
• Trim Post Sleeve to
desired length.
• Slide Post Sleeve and
Post Skirt over post
(do not force).
• Ensure posts are
square and plumb.
2
Support Rails are rotated 90° for
stair rail applications.
Right
Wrong
MEASURE
SUPPORT RAILS
• Determine
measurements
and angle as shown.
• Trim both the Top
Support Rail and the
Bottom Support Rail
to those dimensions.
• Test fi t rails to check
for accuracy.
Top Rail Length
Bottom Rail Length
Stair Angle
3
TRIM RAILS
• Transfer measurement from both Support Rails to Bottom Rail and Top Rail.
• Trim Top Rail and Bottom Rail to match the Support Rails at the appropriate
angle.
Bottom
Support
Rail
Bottom
Rail
Top
Support
Rail
Top Rail
Page 10
Page 11
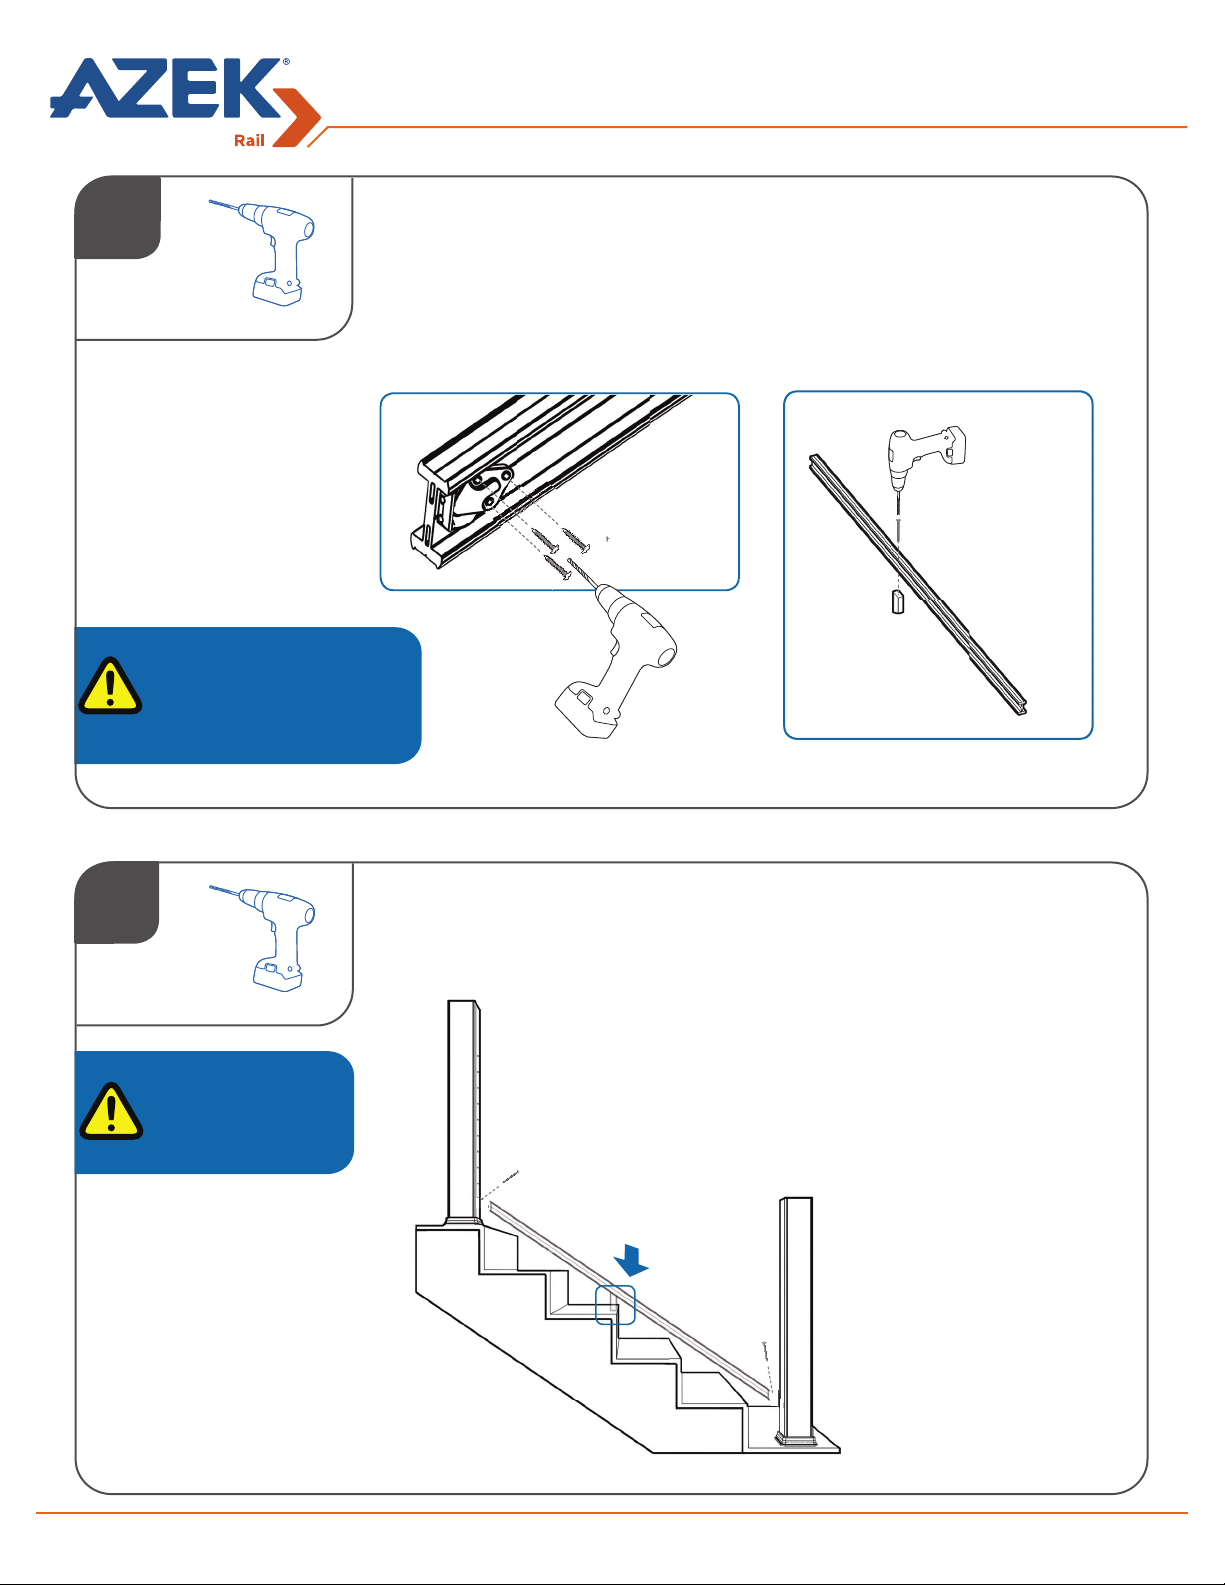
Pre-drill 7/64”
4
4
Installing AZEK Rail Stairs with CableRail by Feeney
PREP BOTTOM SUPPORT RAIL
®
For sections up to 6’: Place one Foot
Block in the center of the rail.
For sections 6’ to 8’: Space two Foot
Blocks approximately at 1/3 intervals
on the rail.
5
• Attach Mounting Brackets to
Bottom Support Rail.
Center screw
aligned with rail
centerline
Pre-drill 7/64”
#8 x 3/4” Coated
Screws
INSTALL BOTTOM SUPPORT RAIL
• Secure Mounting Brackets.
• Trim and Attach Foot
Blocks.
Pre-drill through
Bottom Support Rail
with 3/16” bit
#8 x 3” Coated
Screws
Bottom Support
Rail
Brackets must be
installed to the stair
tread side of the rail.
Pre-drill 7/64”
#8 x 3” Green
Coated Screws
Page 11
Page 12
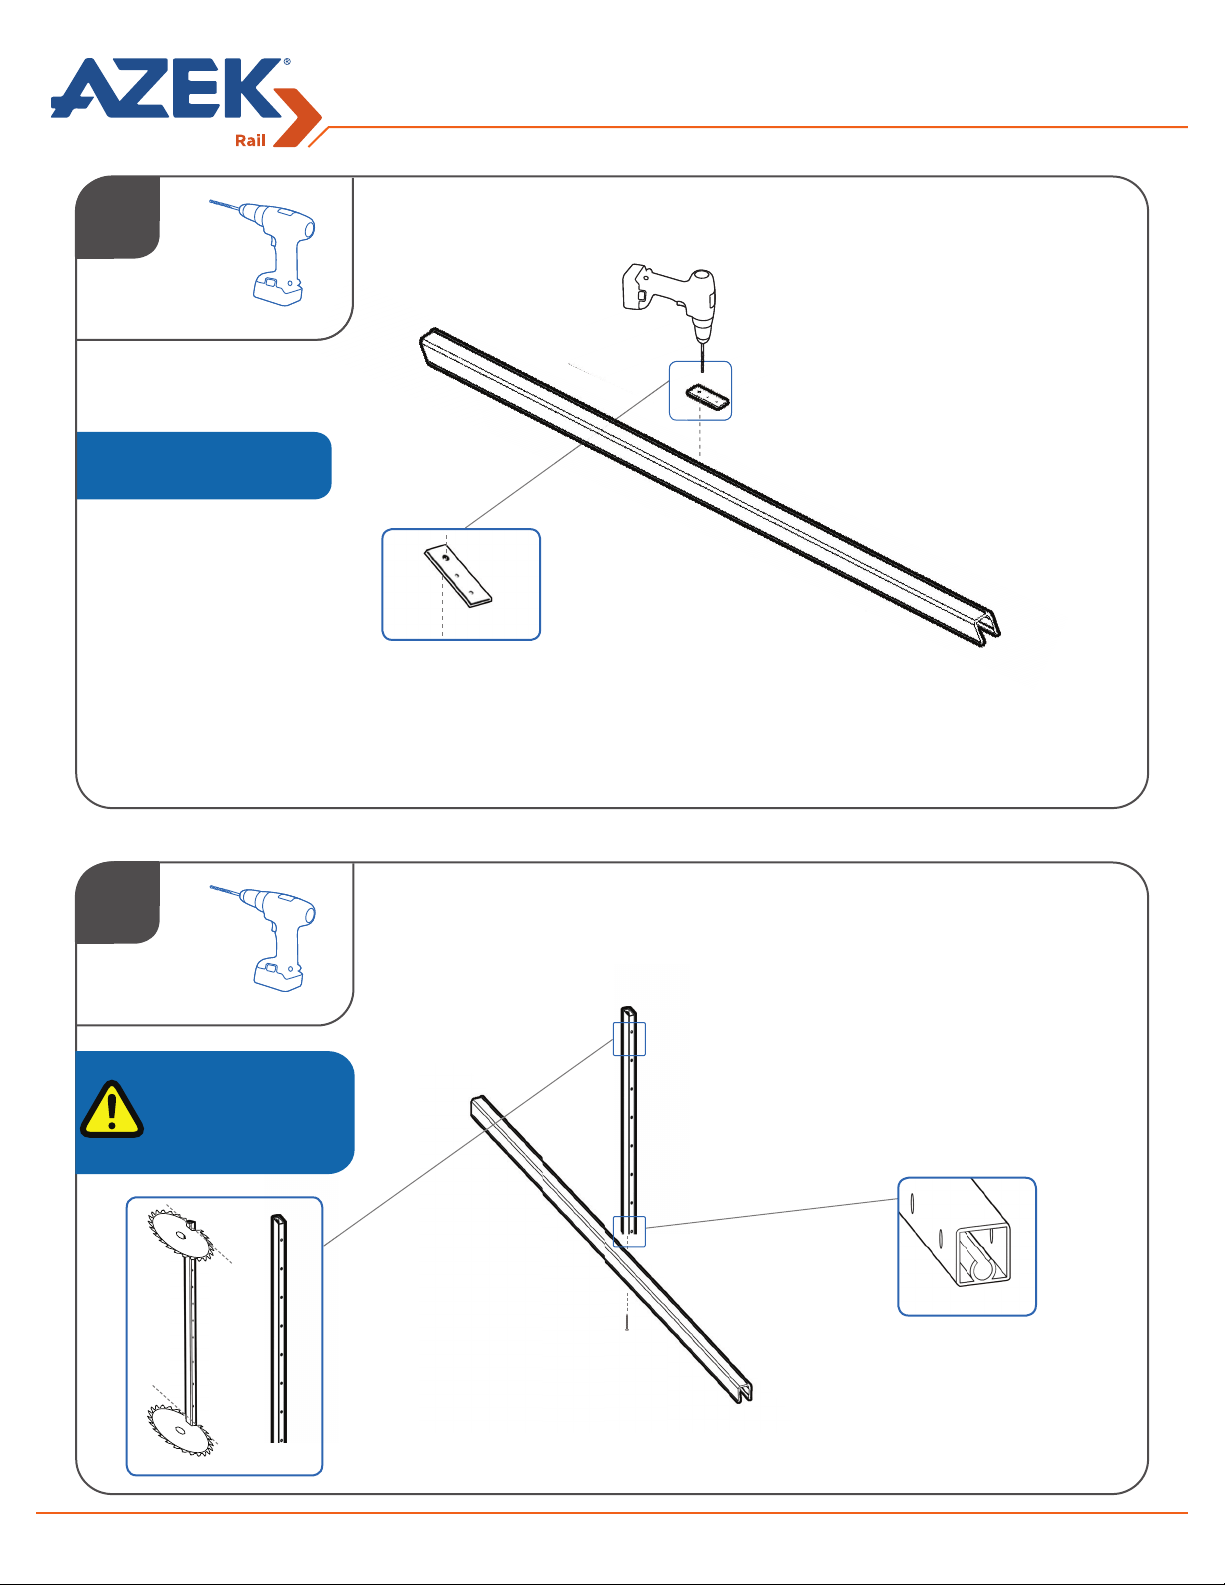
6
Use the Intermediate Base Plate
as a Template, as shown to the
right.
Installing AZEK Rail Stairs with CableRail by Feeney
PRE-DRILL BOTTOM RAIL
Pre-drill 3/16”
Bottom Rail
Use
Intermediate
Base Plate as
template
®
7
Be sure the screw fi nds
the screw chase
For easier installation,
pre-drill screw chase
with a 3/16” drill bit.
ATTACH STAIR INTERMEDIATE BALUSTER
• Trim Stair Intermediate Baluster to match stair angle.
#10 x 2”
Coated Screws
Screw chase
Page 12
Page 13
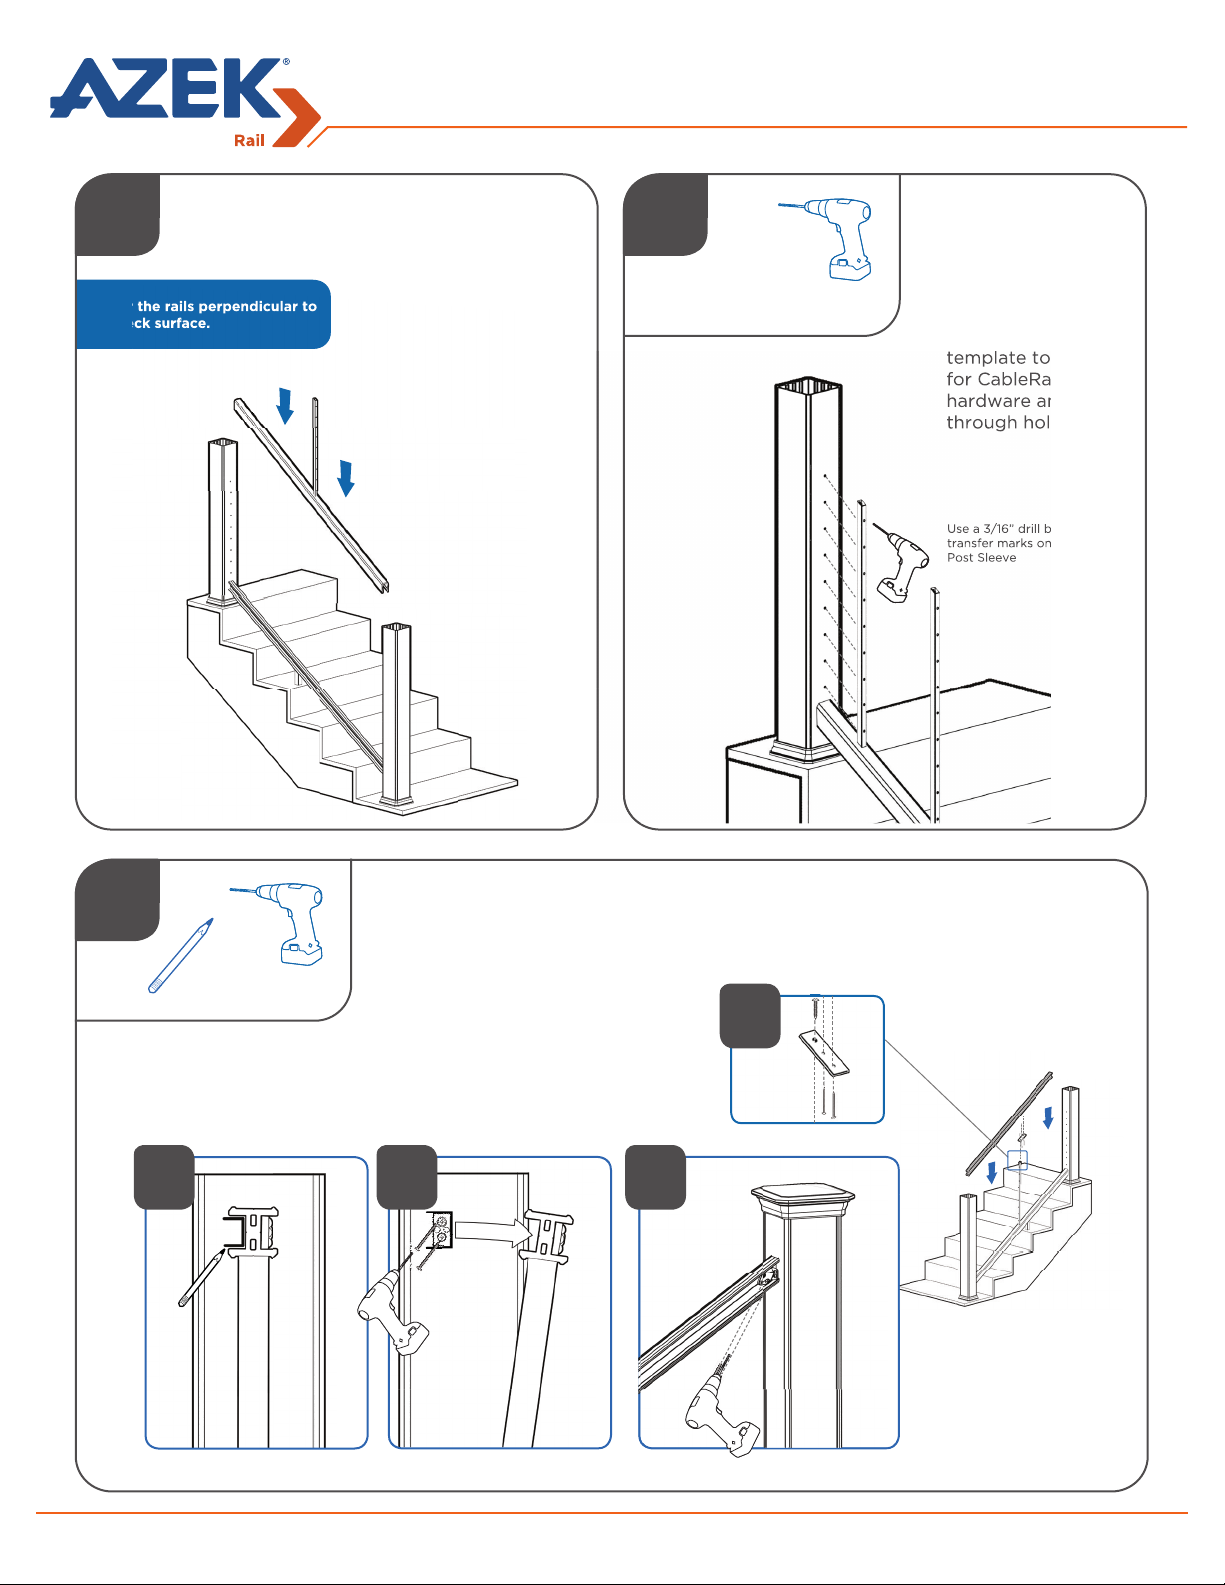
Installing AZEK Rail Stairs with CableRail by Feeney
Use a 3/16” drill bit to
transfer marks onto the
Post Sleeve
template to mark
for CableRail
®
8
Lower the rails perpendicular to
the deck surface.
INSTALL BOTTOM
RAIL
• Place the Bottom
Rail over the Bottom
Support Rail with
the Intermediate
Baluster(s).
9
TRANSFER HOLE
LOCATION ON
POST SLEEVE
• Use an extra
Intermediate
Baluster as a
template to mark
for CableRail
hardware and
through holes.
Use a 3/16” drill bit to
transfer marks onto the
Post Sleeve
10
ATTACH TOP SUPPORT RAIL
• Mark Ends of Top Support Rail.
• Rotate Rail assembly out of way to fasten Support Block.
• Secure Mounting Brackets to Posts.
b c d
#8 x 3” Green
Pre-drill
7/64”
#8 x 3” Green
Coated
Screws
Pre-drill
7/64”
Coated
Screws
a
Step 1
Step 2
Page 13
Page 14
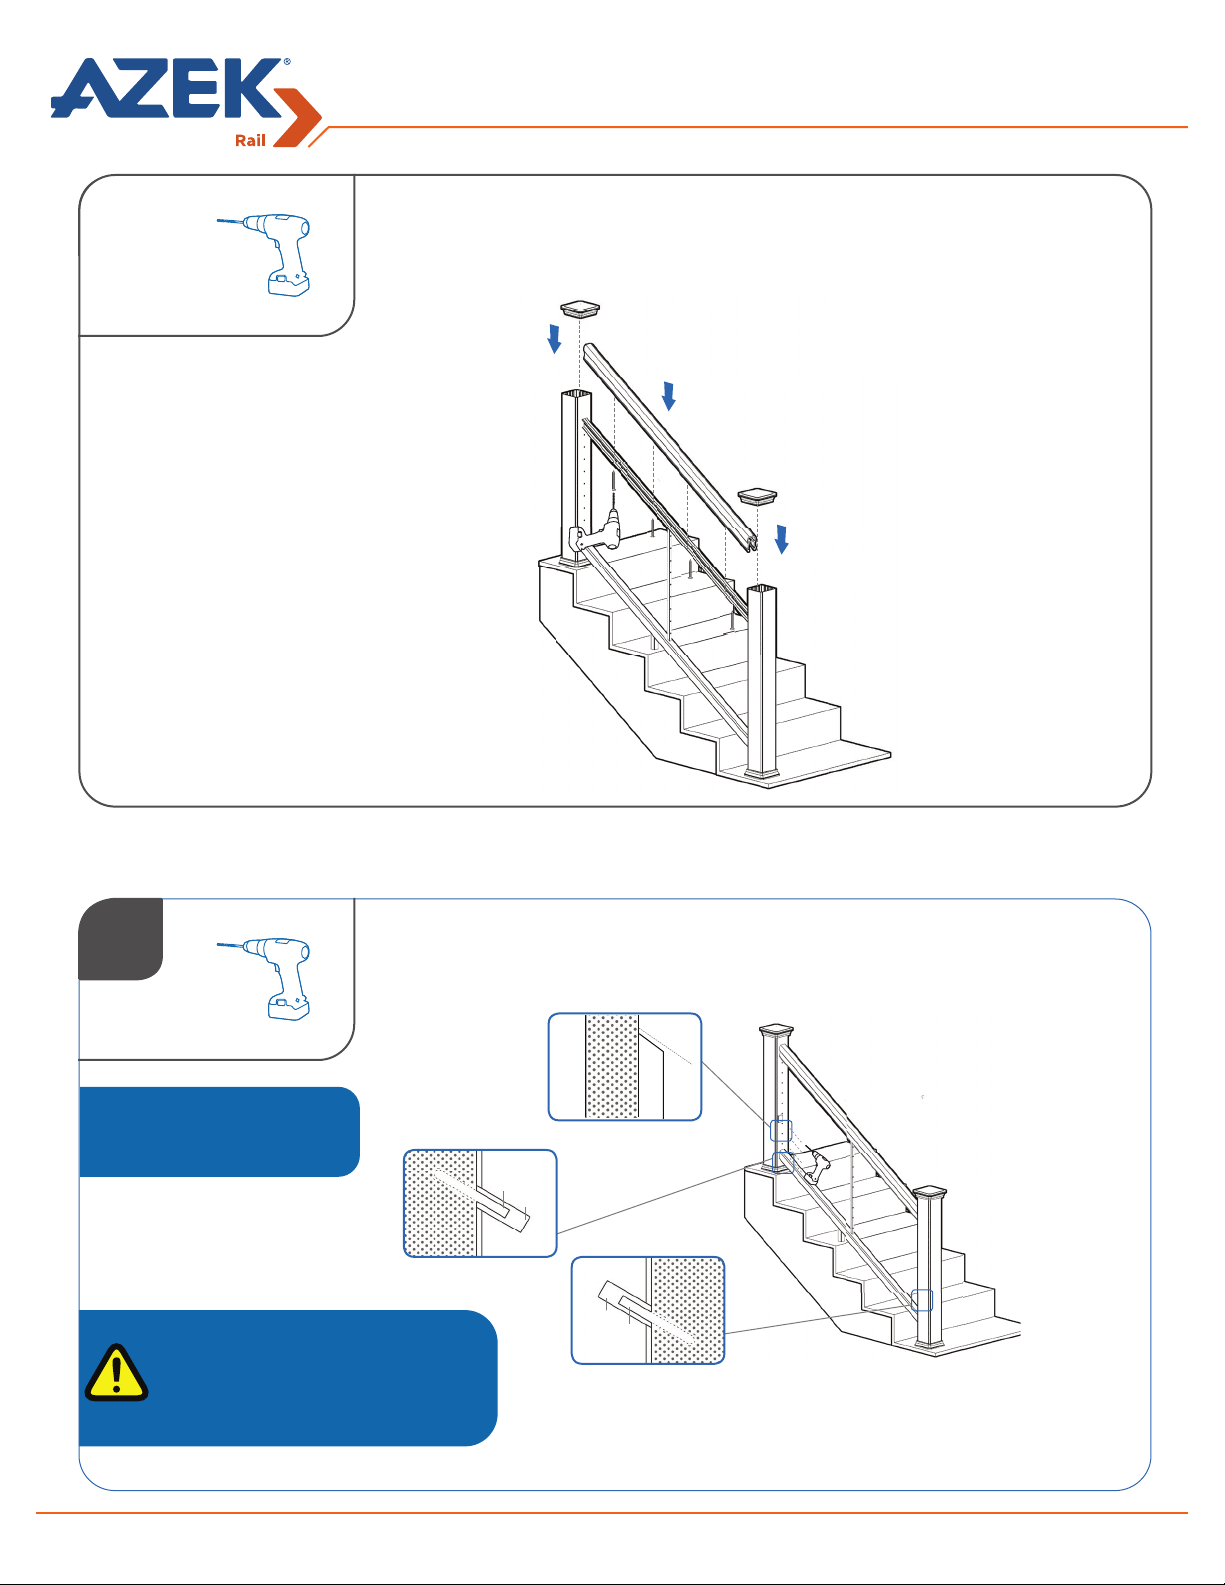
11
Installing AZEK Rail Stairs with CableRail by Feeney
INSTALL TOP RAIL AND POST CAPS
• Position Top Rail over Support Rail and attach with screws.
• Secure Post Caps with exterior grade caulk.
Pre-drill 3/16”
#8 x 2 5/8”
Coated Screws
®
Installing CableRail by Feeney® Stairs for AZEK Rail
Installing Cable Installation Section
PRE-DRILL ANCHOR POST SLEEVE
1
Scrap
Baluster for
drill angle
Drill a through hole only in the
post sleeve with a 1/4” drill bit at
the same angle as the stair run
1/8”
1/4”
1/4”
Use a scrap piece of baluster trimmed at the
stair angle as a guide.
Anchor posts should not exceed 60 feet apart
during any continuous run of cable.
1/8”
Page 14
Page 15
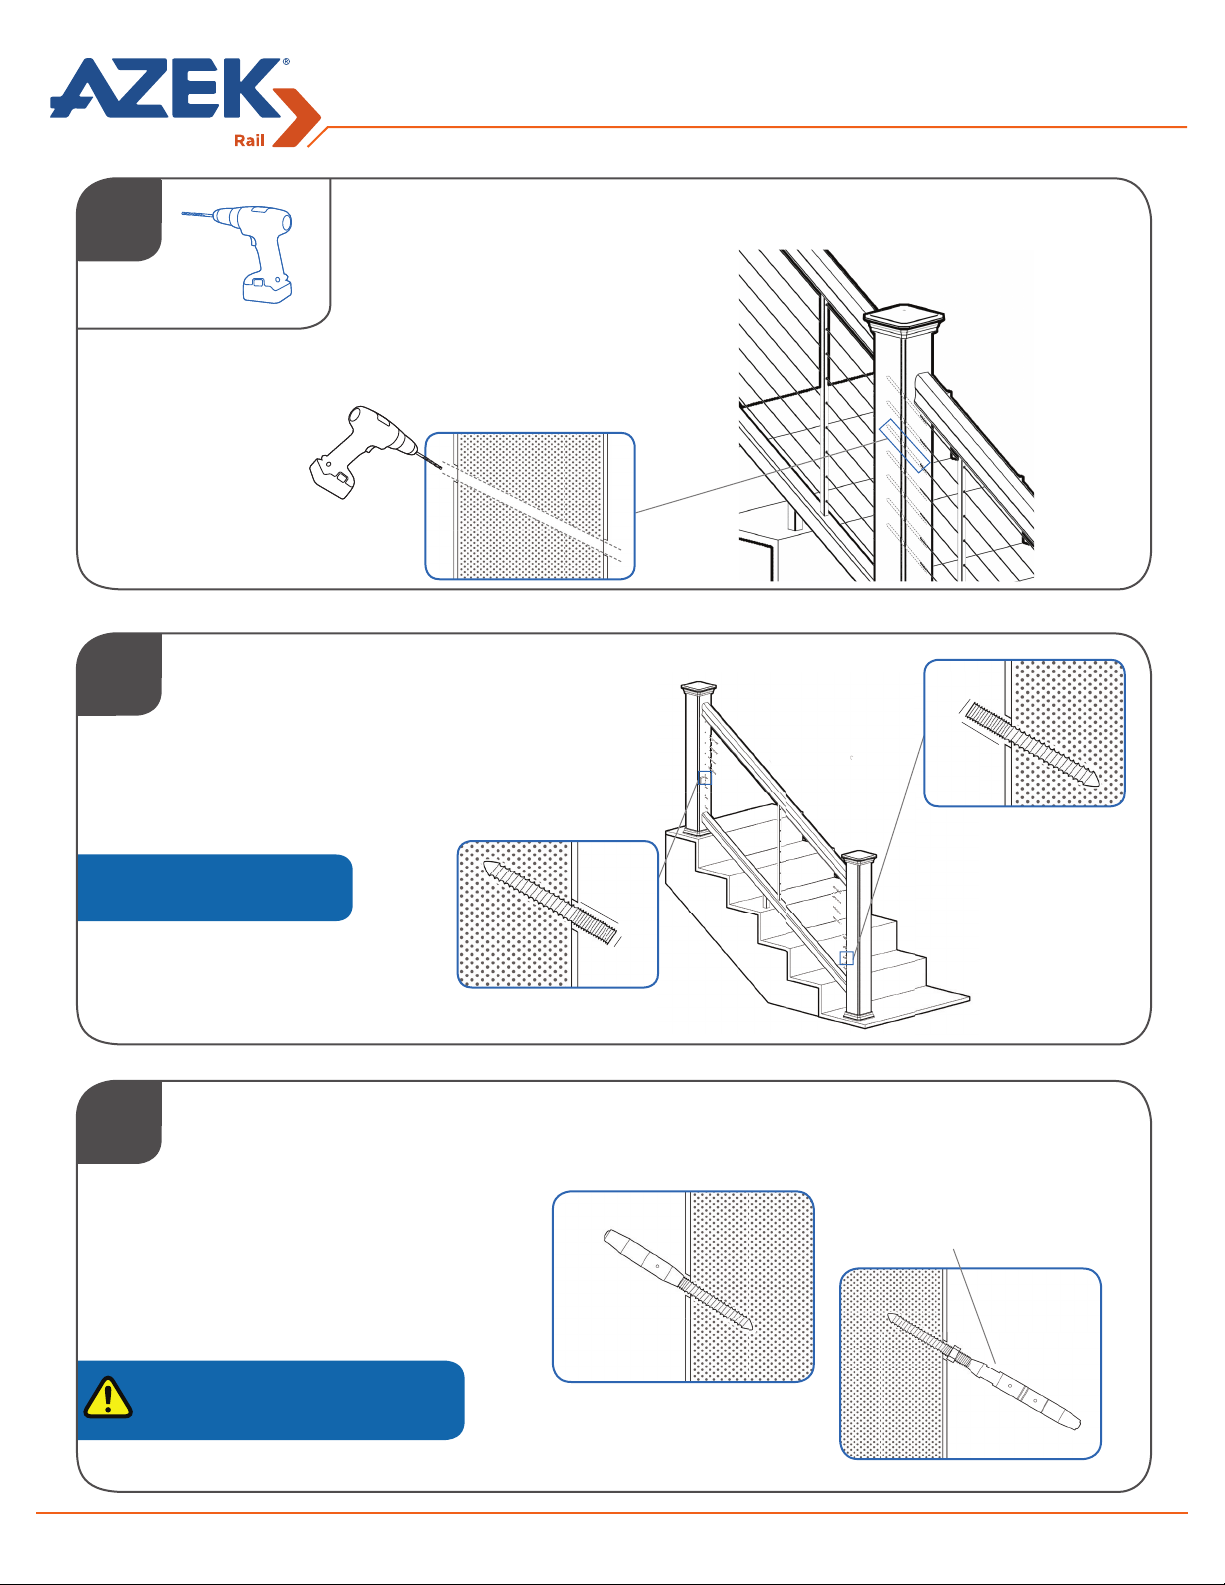
2
3
Installing CableRail by Feeney® Stairs for AZEK Rail
PRE-DRILL THROUGH POST SLEEVES
• Drill a 1/4” hole through both
the Post and Post Sleeve at
stair angle.
1/4”
DRIVE IN HANGER BOLTS
• Screw Hanger Bolts into the
pilot holes at the same angle of
the stairs using the Hanger Bolt
Installation Tool.
1/4”
1”
Leave about 1” of machine thread
exposed for cable take-up.
4
One side of the railing will be only
Quick-Connect fi ttings, the other side will be
Quick-Connect swivel fi ttings and lock nuts
Bottom Anchor Post
1”
1/4”
Top Anchor Post
ATTACH QUICK CONNECT FITTINGS
• Place one Quick-Connect fi tting at one end and the Quick-Connect Swivel fi tting
on the opposite end.
Quick-Connect
fi tting with Lock
Nut
On the side with the lock nuts, screw on
the Quick-Connect fi ttings after the lock
nuts, onto the hanger bolts
Page 15
Page 16
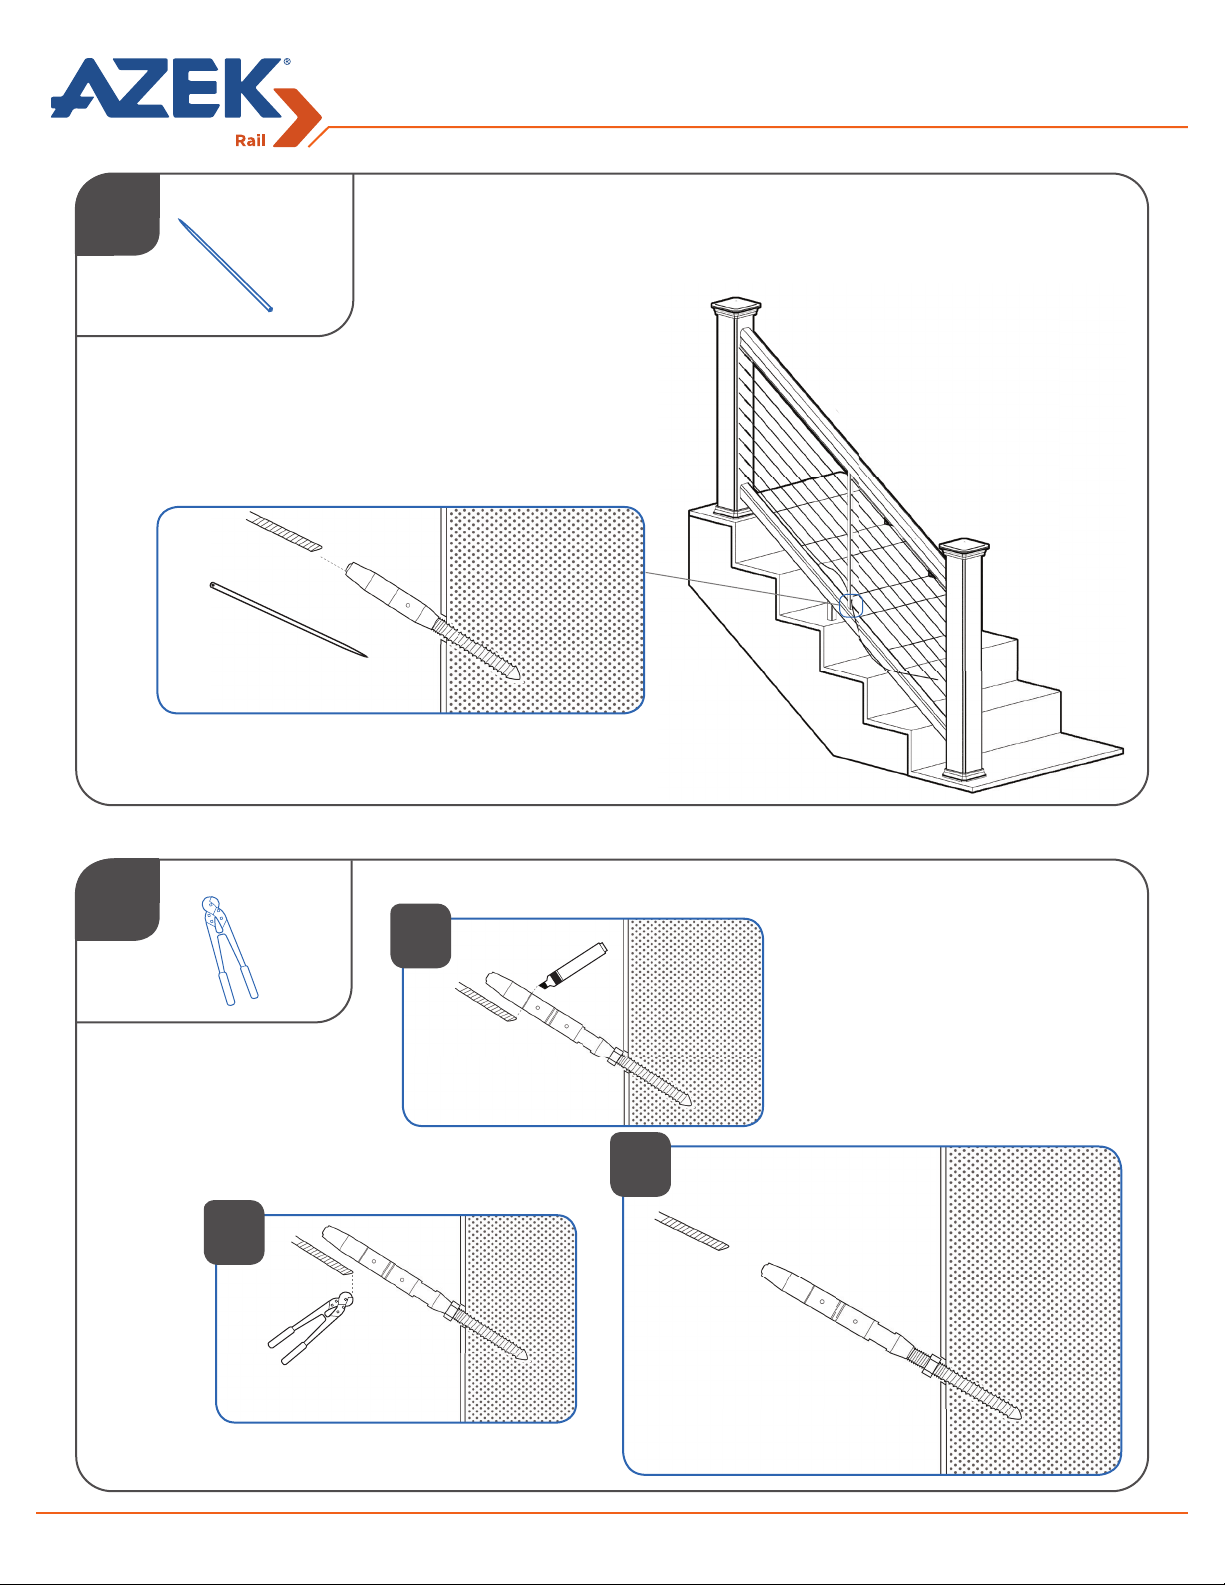
5
Lacing
Needle
Installing CableRail by Feeney® Stairs for AZEK Rail
THREAD CABLE
• When all of the hardware is in place, insert one end of the Cable into the Quick-
Connect fi tting.
• Feed the Cable through the Intermediate Baluster (or through posts) with a lacing
needle.
6
b
Trim Cable at the cut line
on Quick-Connect Swivel
Fittings
CUT CABLE TO LENGTH
a
Unscrew the Quick-Connect
swivel fi tting from the post to
measure length of cable
c
Insert Cable into Quick-
Connect swivel fi ttings
Page 16
Page 17
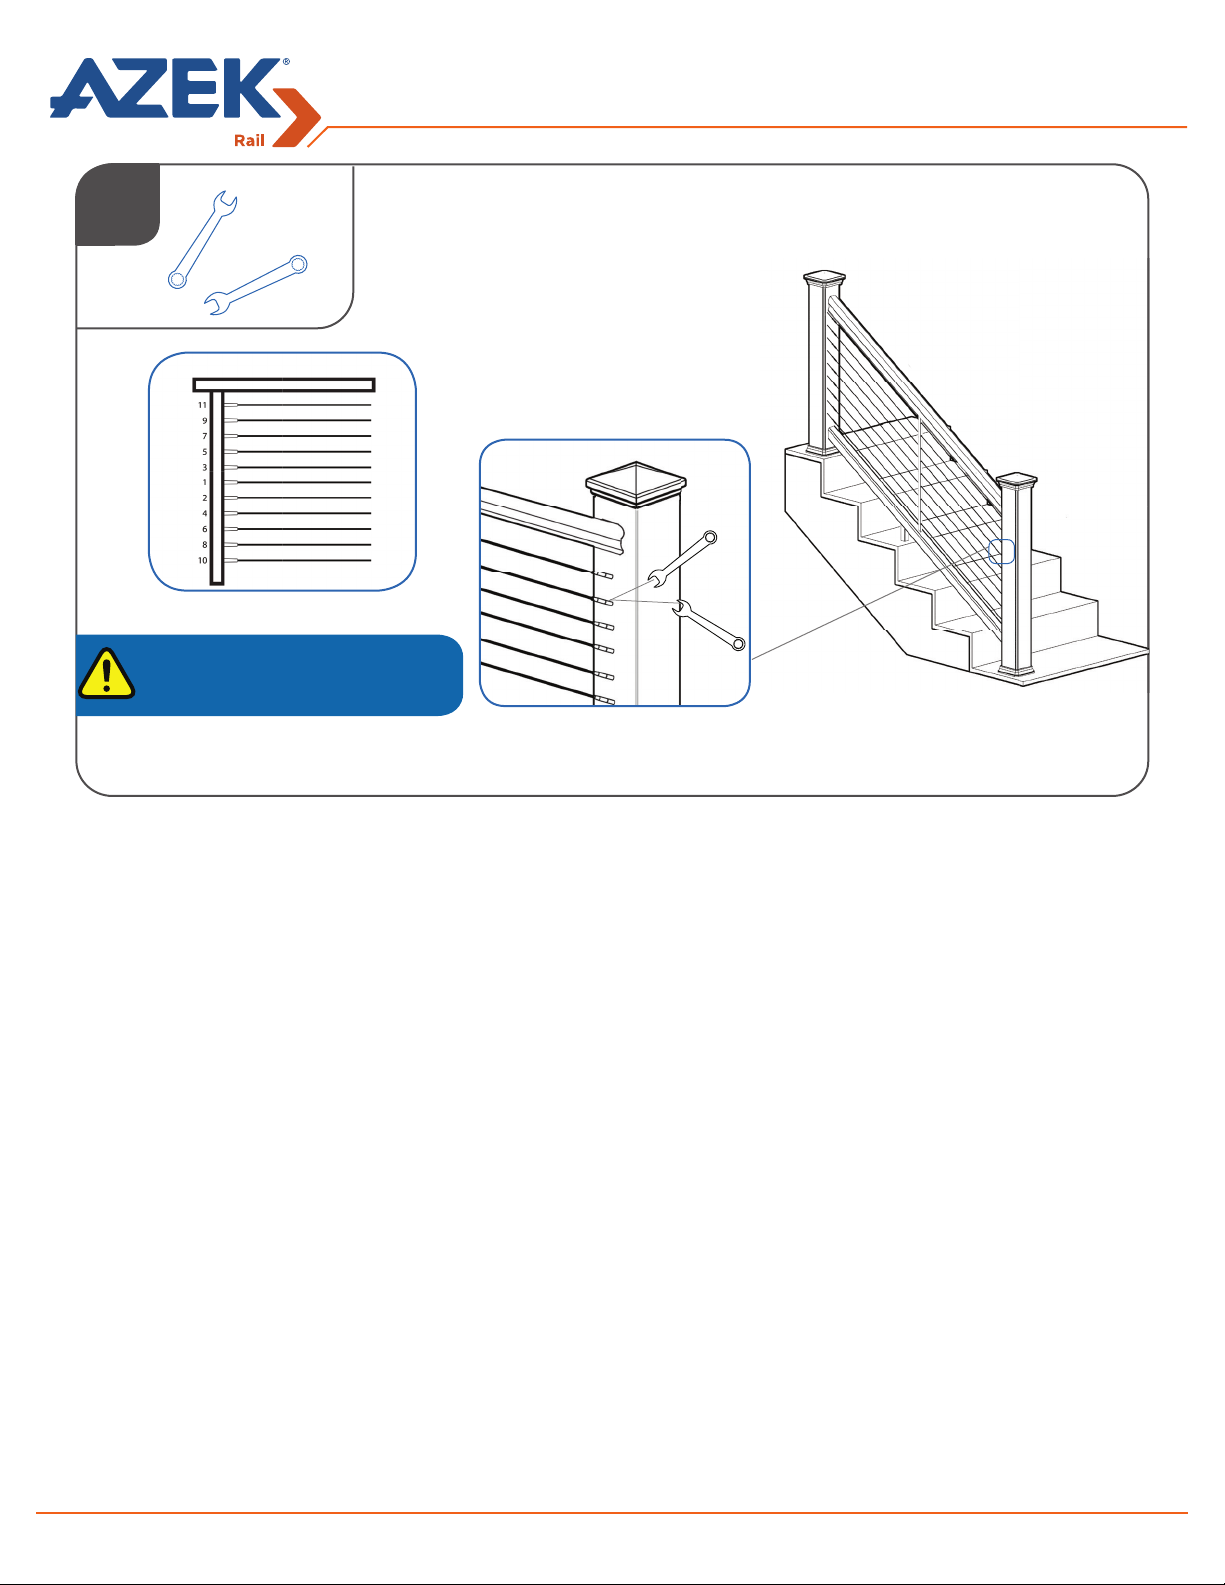
Installing CableRail by Feeney® Stairs for AZEK Rail
7
Tightening Order
If necessary, the Cable can be removed
from the Quick-Connect fi tting by using the
Quick-Connect Release Tool
TIGHTEN CABLE
• Once the Cable is tight, tighten the lock nuts against the Quick-Connect swivel
fi ttings.
Use a set of 3/8” openended wrenches to tighten
the Cable using the “swivel”
end insuring the Cable does
not twist.
Page 17
Page 18
Notes
Page 18
Page 19
Notes
Page 19
Page 20

AZEK Building Products, Inc.
888 North Keyser Avenue • Scranton, PA 18504
www.AZEK.com • (877) ASK-AZEK (877) 275-2935
© 2013 AZEK ARAILINSTALL (CABLE) | 03/14
 Loading...