

Page 1
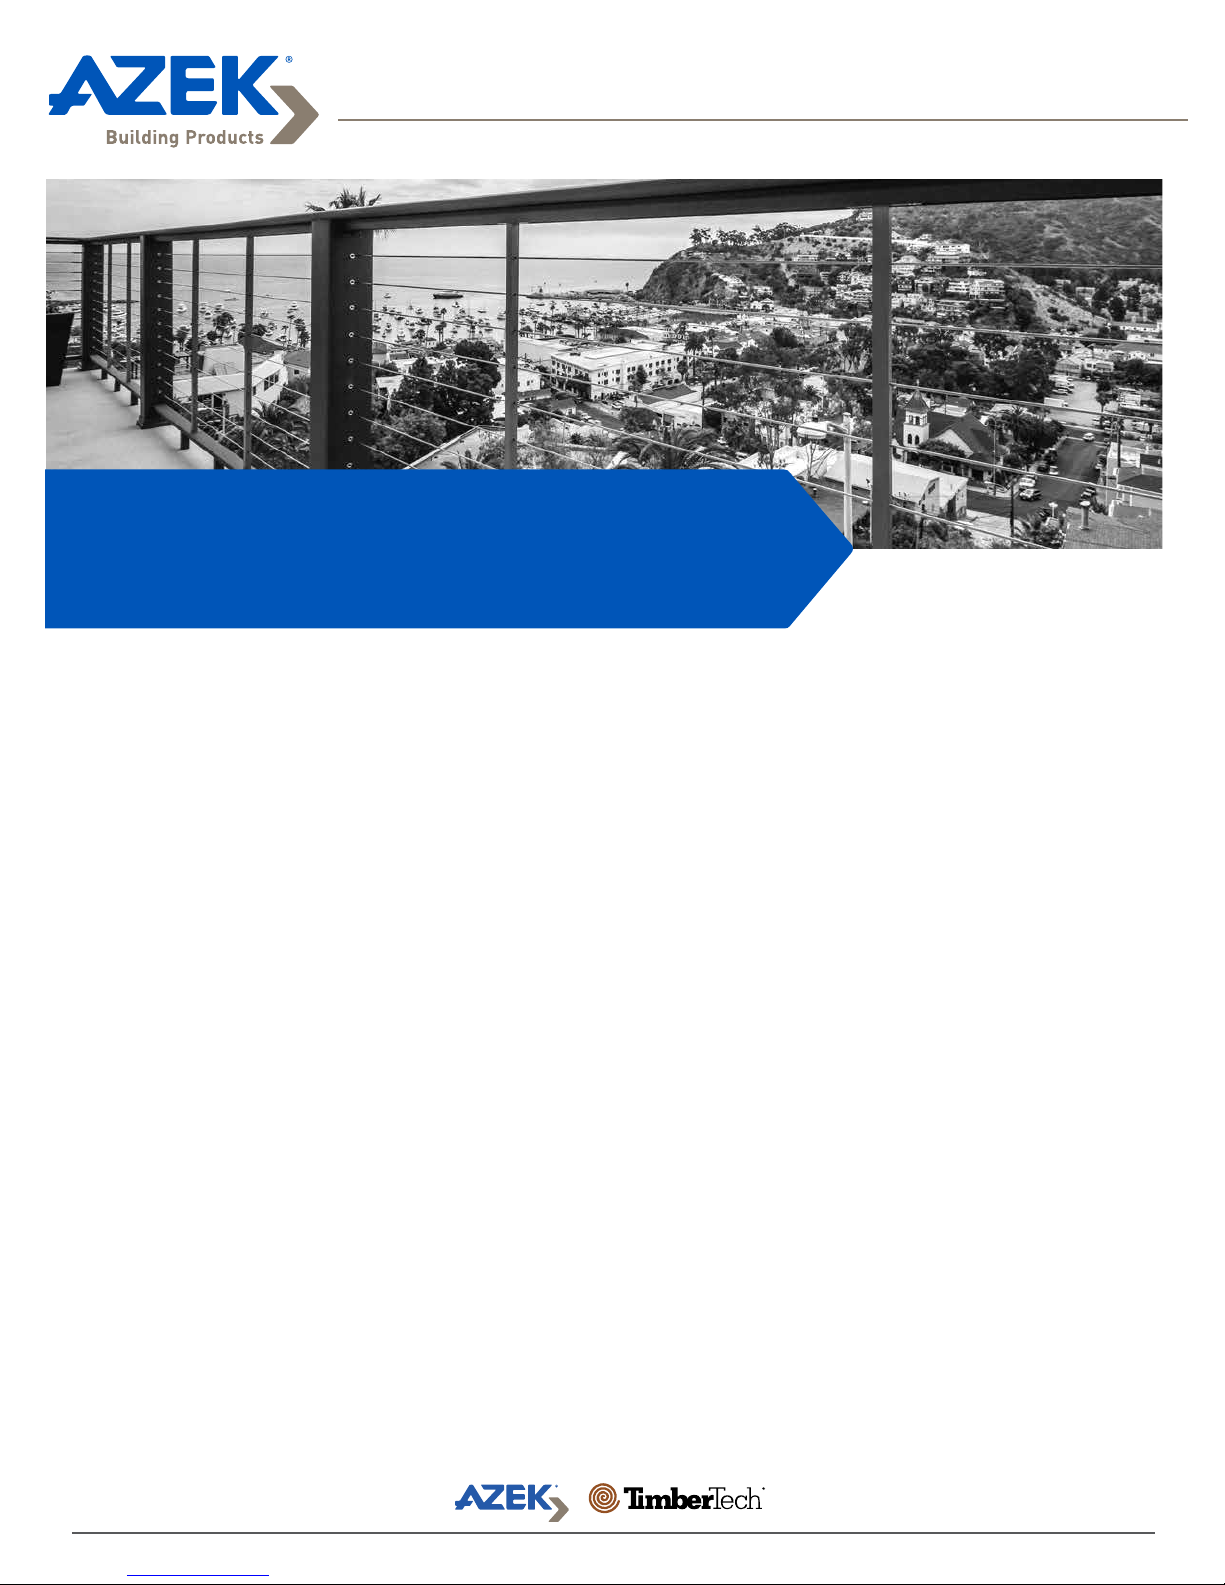
Installing Evolutions RailTM Contemporary
with CableRail by Feeney
®
Installing AZEK Evolutions Rail
™
Installing Evolutions Rail™ Contemporary Style with CableRail by Feeney® ......................................... 2
®
Installing CableRail by Feeney
Installing Evolutions Rail™ Contemporary Style Stairs with CableRail by Feeney
Installing CableRail by Feeney
Important Information
• Please read all instructions completely before starting any part of the installation.
• Evolutions Rail™ should be installed using the same good building principles used to install wood, composite, or metal railing and in
accordance with the local building codes and the installation guidelines included below.
• AZEK® Building Products accepts no liability or responsibility for the improper installation of this product.
• Evolutions Rail may not be suitable for every application and it is the sole responsibility of the installer to be sure that Evolutions Rail
is fit for the intended use. Since all installations are unique, it is also the installer's responsibility to determine specific requirements
in regards to each rail application.
• AZEK® Building Products recommends that all applications be reviewed by a licensed architect, engineer or local building official
before installation. If you have any questions or need further assistance, please call AZEK Customer Service at 877-ASK-AZEK (877275-2935) or TimberTech Customer Service at 800-307-7780, or visit our website at www.azek.com or www.timbertech.com.
• Evolutions Rail is tested as a whole system and should be used that way. It is not intended to be used in conjunction with other railing
systems or fasteners.
• The following Installation Guidelines are applicable for installation of Evolutions Rail only.
• IMPORTANT: Make sure the DRIVE TOOL/DRILL is configured or set to use the SCREW setting when driving and/or tightening
all FASTENERS.
• SAFETY: Always wear goggles when handling, cutting, drilling and fastening materials.
• Failure to install this product in accordance with applicable building codes and Evolutions Rail’s written Rail Install Guide may lead to
personal injury, affect rail system performance and void the product warranty.
• The buildup or generation of static electricity is a naturally occurring phenomenon in many plastic based products such as carpeting,
upholstery, and clothing, and can occur on alternative decking under certain environmental conditions. This static electricity can
discharge once contact is made with hardware, railing, or other conductors of electricity.
for Evolutions Rail™ Contemporary Style ........................................... 8
®
............................. 11
®
Stairs for Evolutions Rail™ Contemporary Style ............................... 16
Page 1
Page 2
Installing Evolutions RailTM Contemporary
with CableRail by Feeney
Visit www.timbertech.com/installation to view TimberTech installation videos.
Consult your local building codes for guard and handrail requirements.
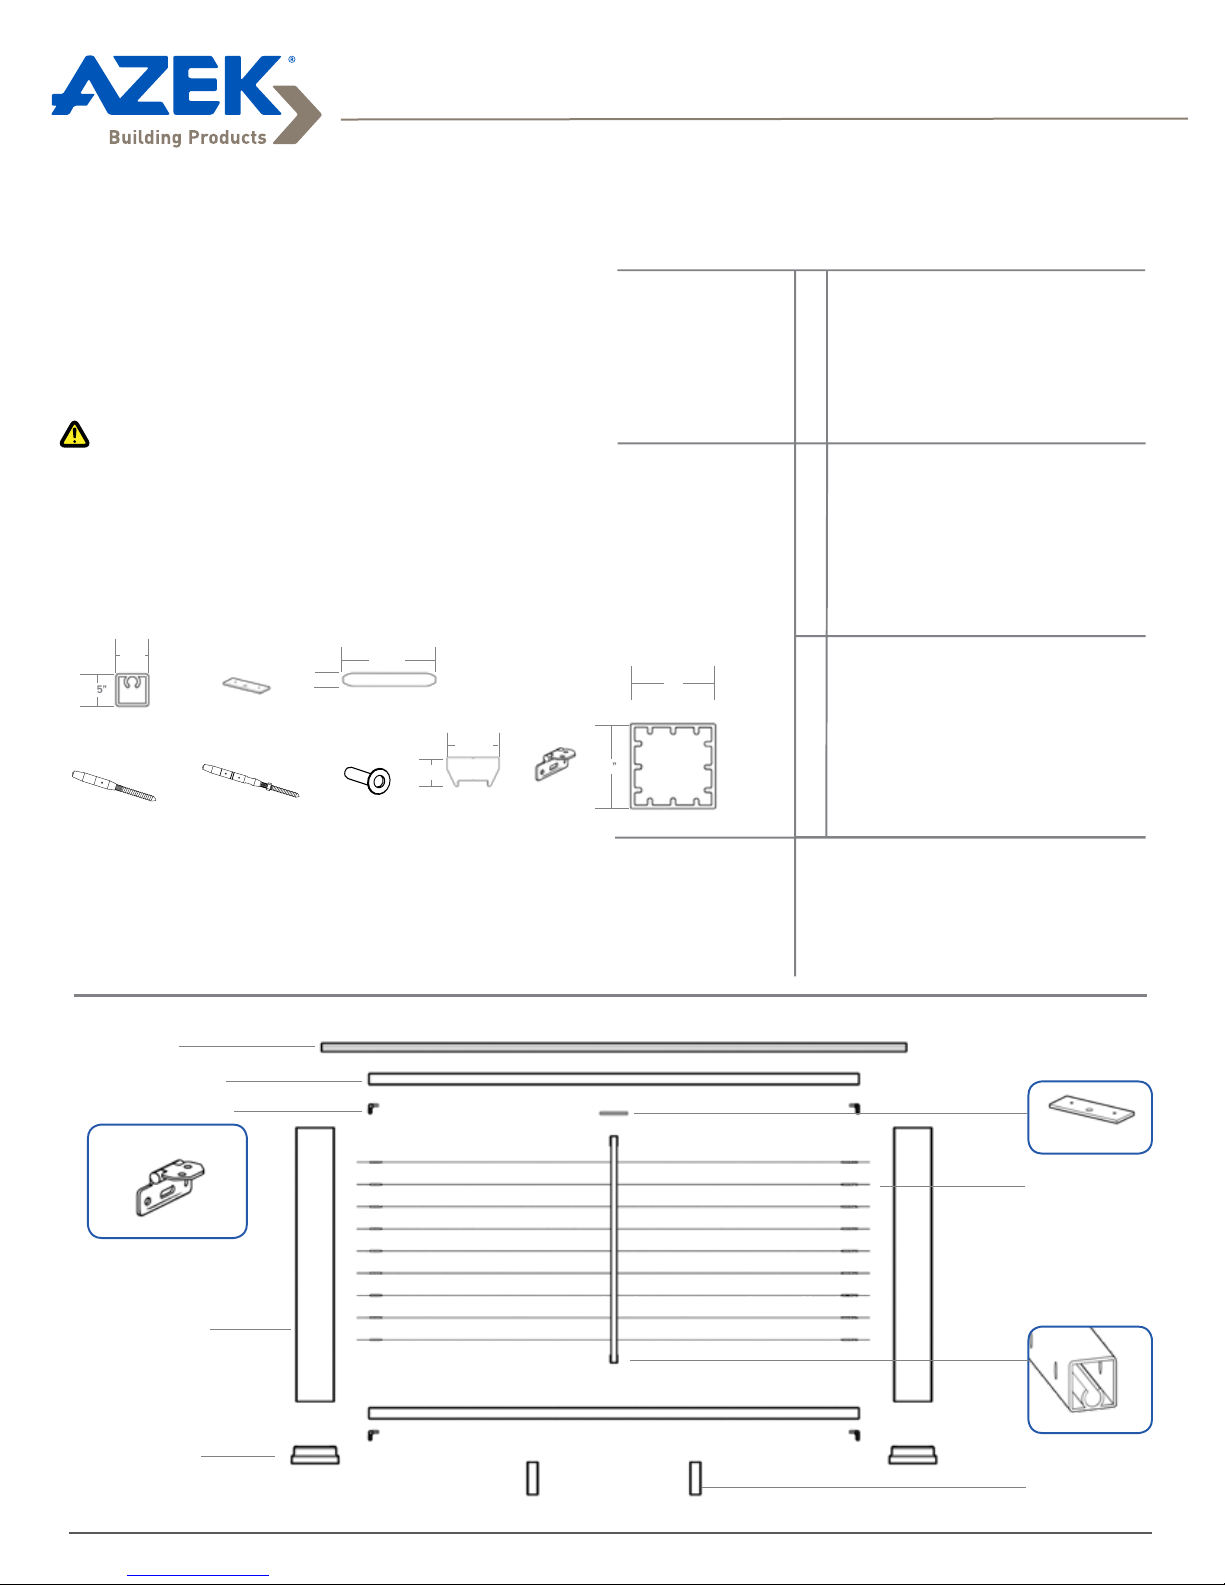
Evolutions RailTM Contemporary Rail Packs are
available in 6’ or 8’ lengths.
Measuring Your Railing Area
• Measurements are from center to center of post. Packs are
produced to 6’ and 8’ to allow for finished end cuts and angles.
• Determine how many 6’ or 8’ Contemporary Rail packs you
need and check to be sure you have all the components
(and quantities) listed in the chart and shown to the right.
Important Information
• Contemporary Style 6’ and 8’ Packs are designed not to
exceed 6’ and 8’ center of post to center of post, respectively.
• Cut slowly, using a fine tooth saw blade to avoid chipping.
• For 42” railing, use 8’ Post Sleeves.
• Evolutions Rail Contemporary Style is designed and tested solely for
over the post applications with the top rail profile affixed to the top of the
structural 4x4.
• This does not include applications where the 4x4 posts extend above or
through the top rail profile.
• Evolutions Rail Contemporary requires a top rail profile (deck plank) to
complete the system for a proper installation and code compliance.
®
Components Needed For Installing
One Contemporary Style Rail Section
Hardware included in
Hardware Kits:
Components available
in Mix-and-Match Rail
Systems
4 - Hinged Brackets
11 - #10x2” Screws
8 - #10x7/8” Screws
4 - #10x1/2” Screws
T25 Torx Driver Bit
2 - Universal Rails
Hardware Mounting Kit
8 - Top Rail screws
Foot blocks
- 2 in 6’ Pack
- 3 in 8’ Pack
Component Dimensions
.75”
.75”
Intermediate
Baluster
Quick-Connect
Fitting
Intermediate Base
Plate
Quick-Connect
Swivel Fitting
Tools Required
• Miter Saw (blade
designed for
finished cuts)
• Drill
Top Rail (1)
Universal Rail (2)
Hinge Bracket (4)
• Cable Cutters
• Extended 1/4”
drill bit
• 2 - 3/8” open-
ended wrenches
.900”
Top Rail
Protector
Sleeve
6.35”
2.225”
1.25”
Universal Rail Hinge
• Drill Bits: 1/4”,
3/16”, 1/8”, 9/64”
• Tape Measure
• #2 square drive
Bracket
5”
5”
Post Sleeve
Additional Components
Needed for Each
System
Contemporary Rail PackCableRail Components
36” Intermediate Baluster
- 1 for 6’ -2 for 8’
42” Intermediate Baluster
- 1 for 6’ -2 for 8’
Stair Intermediate Baluster
- 1 for 6’ -2 for 8’
Cable
- 100’ spool or 500’ spool
2 - Post Sleeves
2 - Post Skirts
1 - Contemporary Top Rail
End Coating- optional
36” Hardware Kit
- 9 Quick Connect Fittings
- 9 Quick Connect Swivel
Fittings
- 18 Hanger Bolts
- 9 Lock Nuts
42” Hardware Kit
- 11 Quick Connect Fittings
- 11 Quick Connect Swivel
Fittings
- 22 Hanger Bolts
- 11 Lock Nuts
CableRail Accessory Pack
Includes:
- Quick-Connect Release Tool
- Lacing Needle
- Hanger Bolt Installation Tool
Protector Sleeves
- 42” system: 22 per through post
- 36” system: 18 per through post
Intermediate
Base Plate (1 for
each Intermediate
Baluster)
CableRail
(9 Cables for 36”)
(11 Cables for 42”)
Post Sleeve (2)
Post Skirt (2)
Page 2
Intermediate
Baluster
(1 for 6’)
(2 for 8’)
Foot Block
(3 in 8’ Section)
(2 in 6’ Section)
Page 3
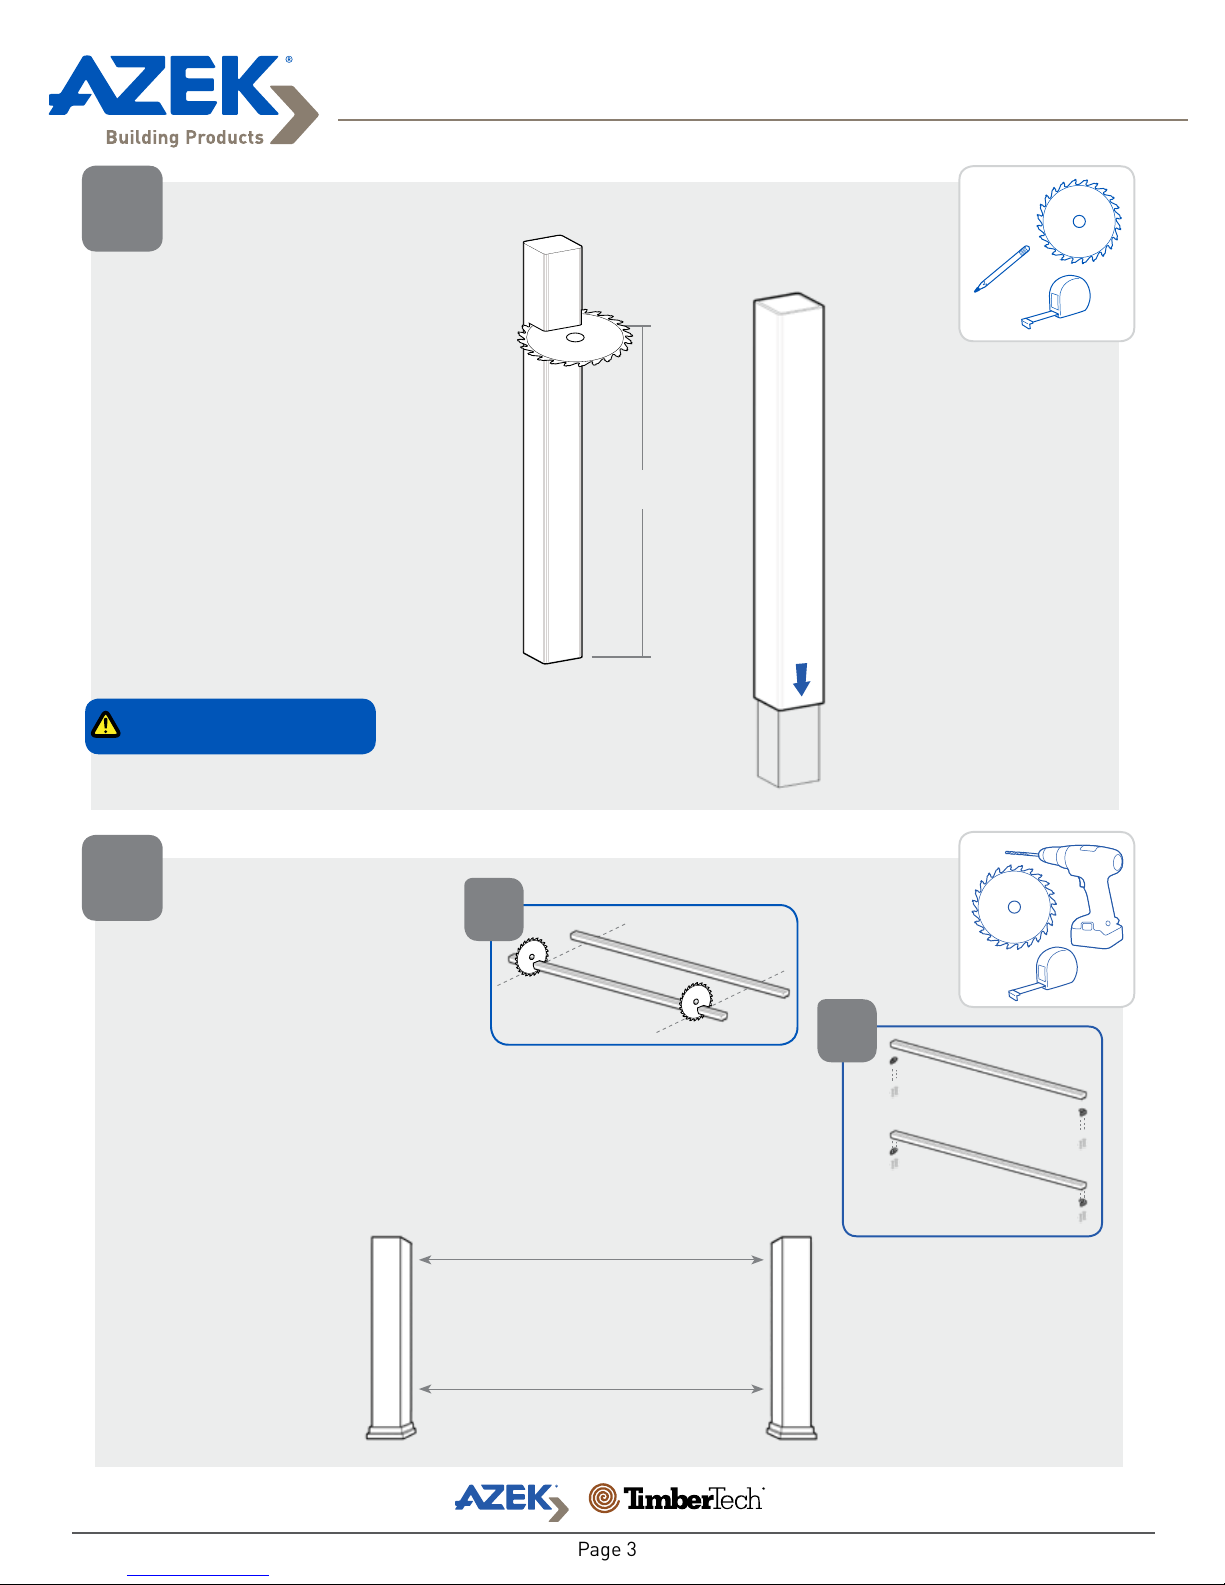
CUT POSTS AND
1
TEMPORARILY
INSTALL POST
SLEEVES
• Posts must be positioned
no more than 8’ on center,
and must be plumb.
• Trim post a min of 35
1/2” (for 36”) or 41 1/2”
(for 42”) above finished
deck surface.
• Slide Post Sleeve over
4x4 Post (do not force).
Installing Evolutions RailTM Contemporary
with CableRail by Feeney
®
Min.
35 1/2”
Do not cut Post Sleeves in this step.
2
PREPARE UNIVERSAL
RAILS
• Measure the length
between the posts and
trim the rails to those
dimensions.
• Pre-Drill Universal Rails
with a 9/64” drill bit,
attach provided brackets
to the Universal Rails using
the #10 x 7/8” screws.
a
Top Rail Length
b
Pre-Drill 9/64”
#10 x 7/8”
Coated Screws
Bottom Rail Length
Page 3
Page 4
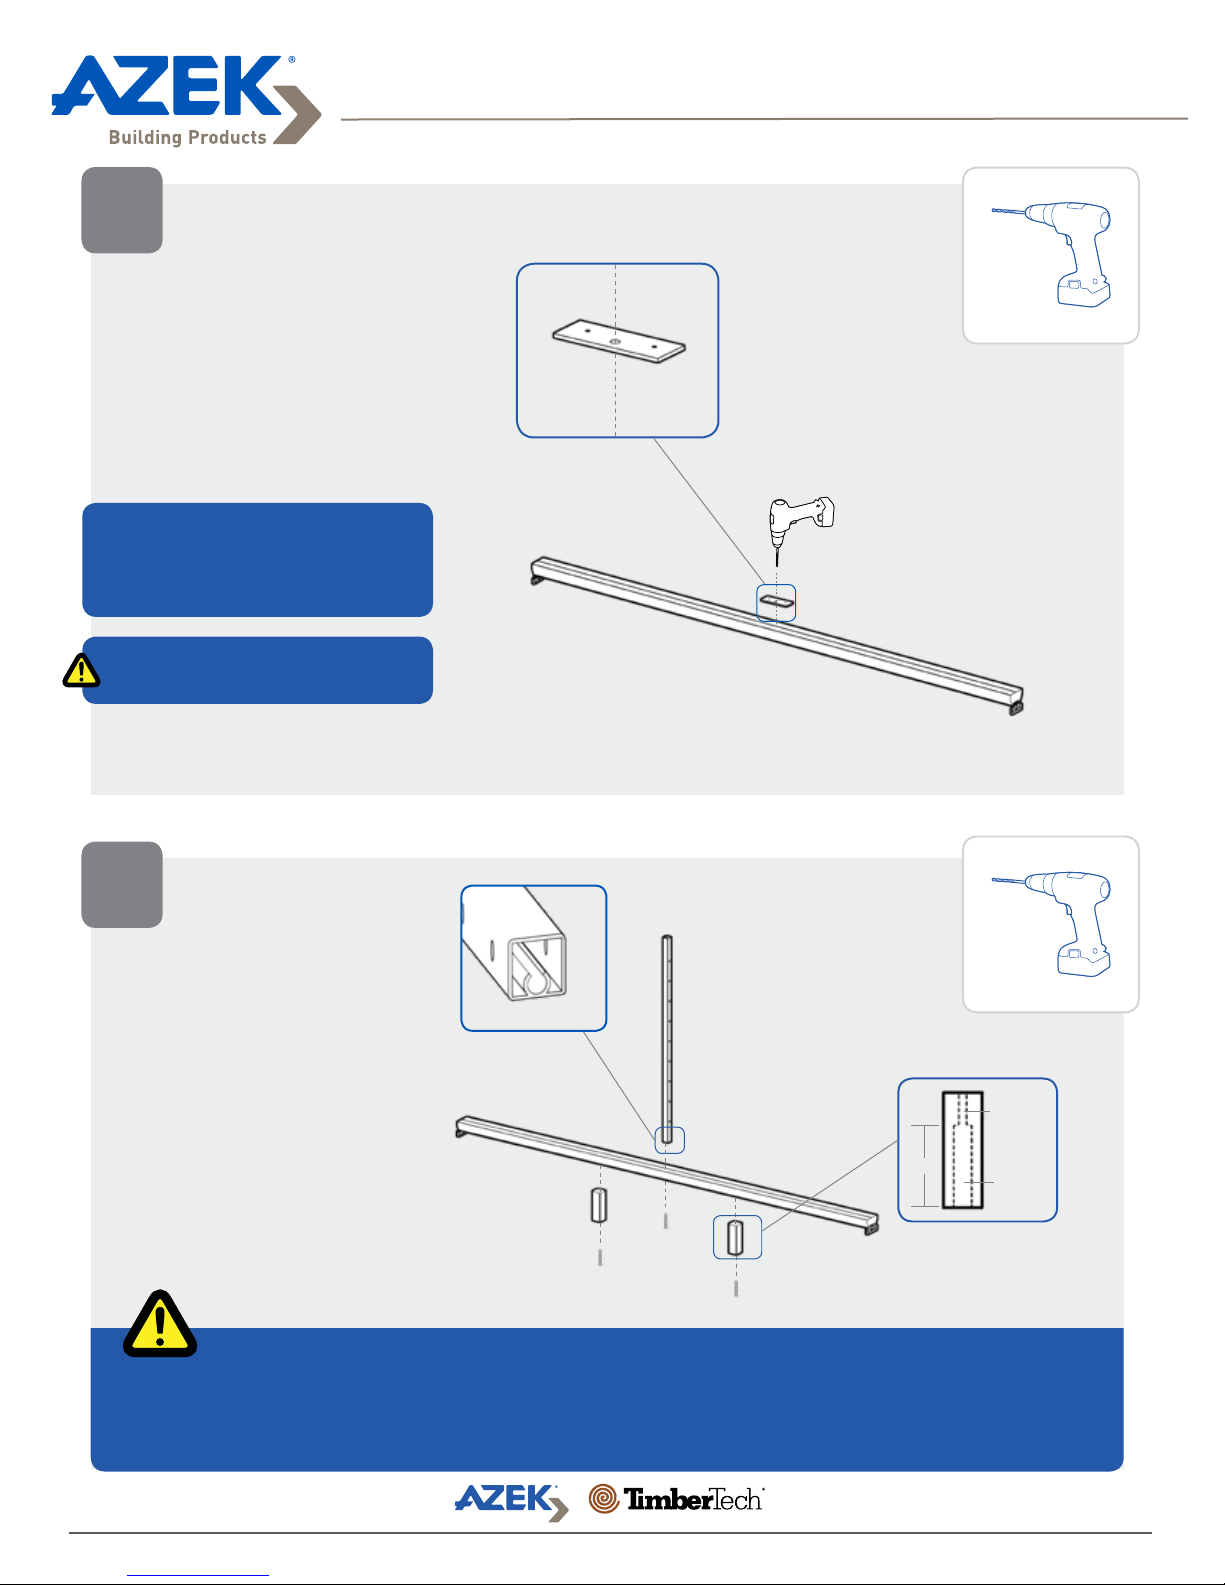
DETERMINE
3
INTERMEDIATE
BALUSTER LOCATION
• Use the Intermediate
Base Plate of the
Intermediate Baluster as
a template on the bottom
Universal Rail.
1’ to 6’ on center requires 1 Intermediate
Balusters.
6’ to 8’ on center requires 2 Intermediate
Balusters.
Installing Evolutions RailTM Contemporary
with CableRail by Feeney
®
Pre-Drill center hole 3/16”
Pre-drilled hole will be offset from the
centerline.
ATTACH
4
INTERMEDIATE
BALUSTER AND FOOT
BLOCKS
• Attach the Intermediate
Baluster to the bottom
Universal Rail using the
#10x2” screw.
• Attach provided foot
blocks to the underside
of one Universal rail by
counter-boring the foot
block and using the
#10x2” screws.
Screw Chase
#10 x 2”
Stainless
Screws
Pre-Drill 9/64” into Universal Rail
#10 x 2” Coated Screws
2 1/2”
Foot Block Preparation
Drill 3/16”
Hole
Bore 1/2”
Be sure the screw finds the screw chase.
For easier installation, pre-drill screw chase with a 3/16” drill bit.
For sections up to 6’: Place two Foot Blocks at 1/3 intervals on the rail.
For sections 6’ to 8’: Space three Foot Blocks approximately at 1/4 intervals on the rail.
Page 4
Page 5
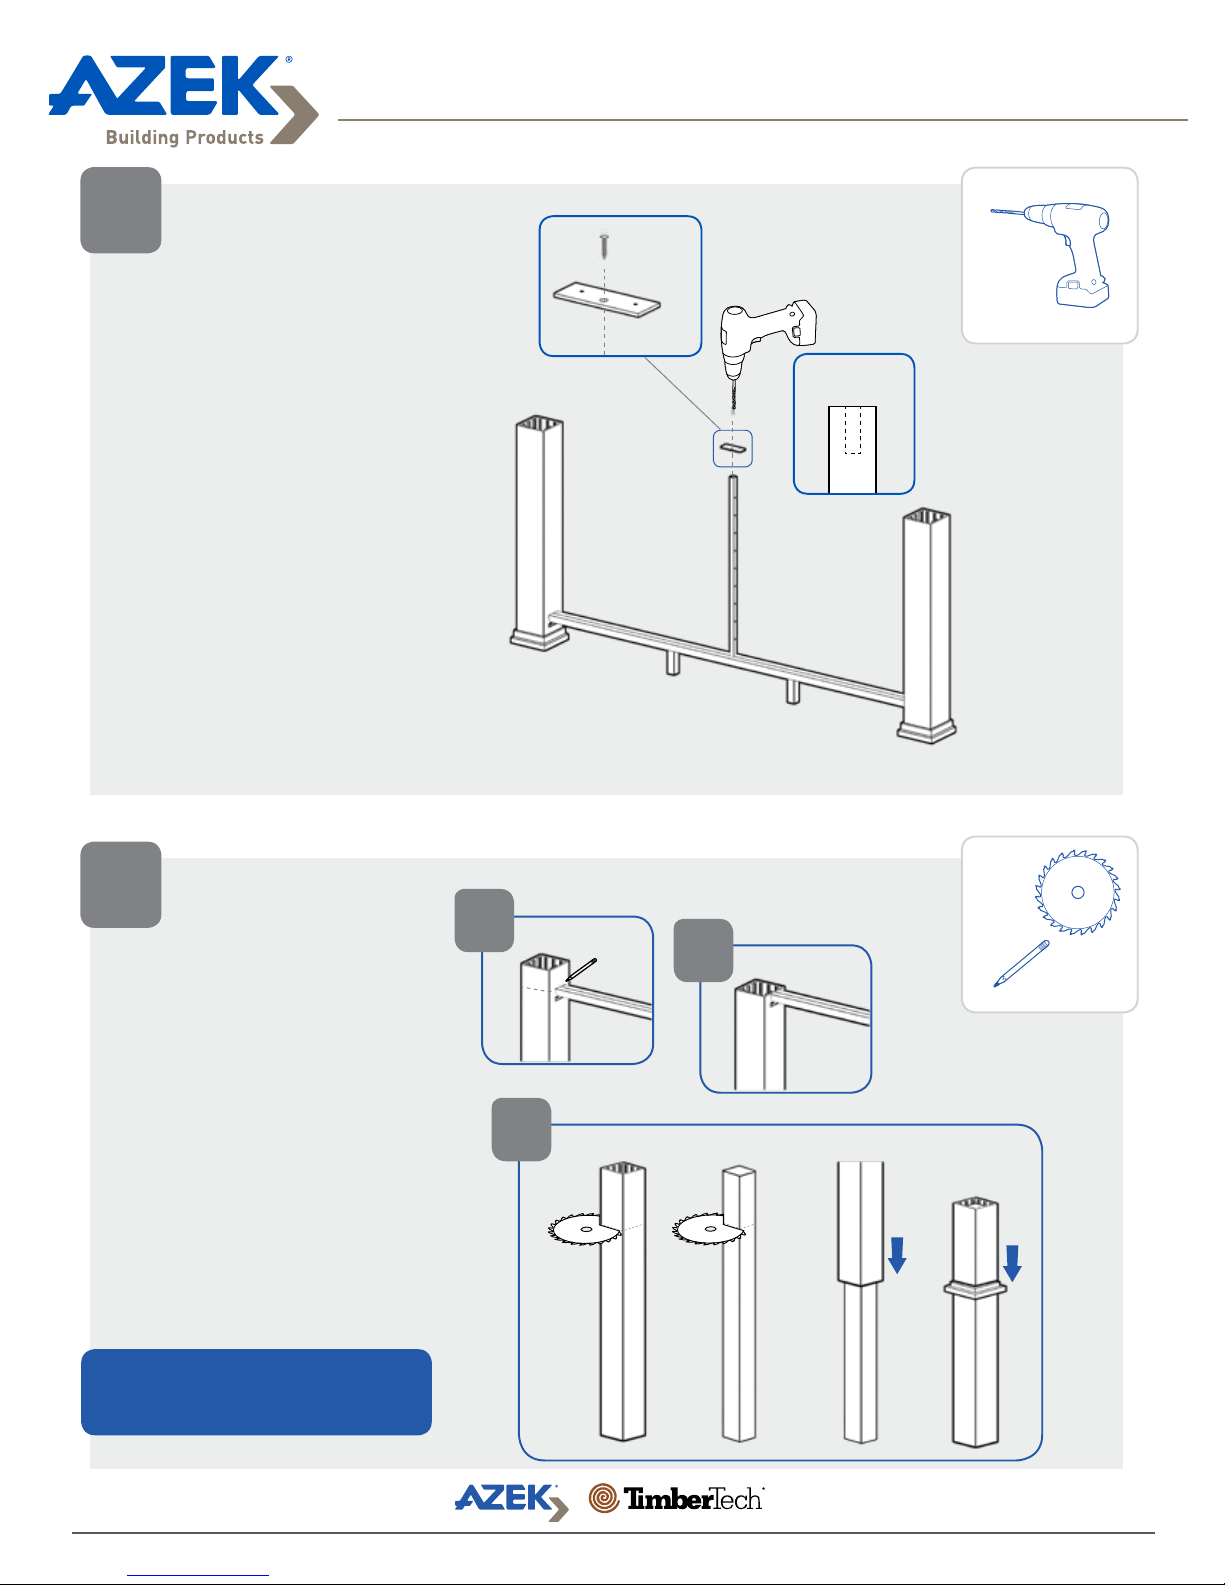
ATTACH BASE PLATE TO
5
INTERMEDIATE BALUSTER
• Place the bottom
Universal Rail and allow
the rail to rest on its foot
blocks.
• Attach base plate to the
Intermediate Baluster.
Installing Evolutions RailTM Contemporary
with CableRail by Feeney
®
#10 x 1”
Stainless
Screws
Pre-Drill 3/16”
into Intermediate
Baluster
MEASURE AND CUT
6
POST SLEEVES
• Temporarily install top
Universal Rail.
• Mark the height of the
Post Sleeves.
• Cut your Post Sleeves and
posts to desired length.
• Place the Post Sleeves
over the 4x4” posts.
• Slide Post Skirts over
Post Sleeves.
Post Sleeves should be flush with the top
Universal Rail.
a
c
b
Page 5
Page 6
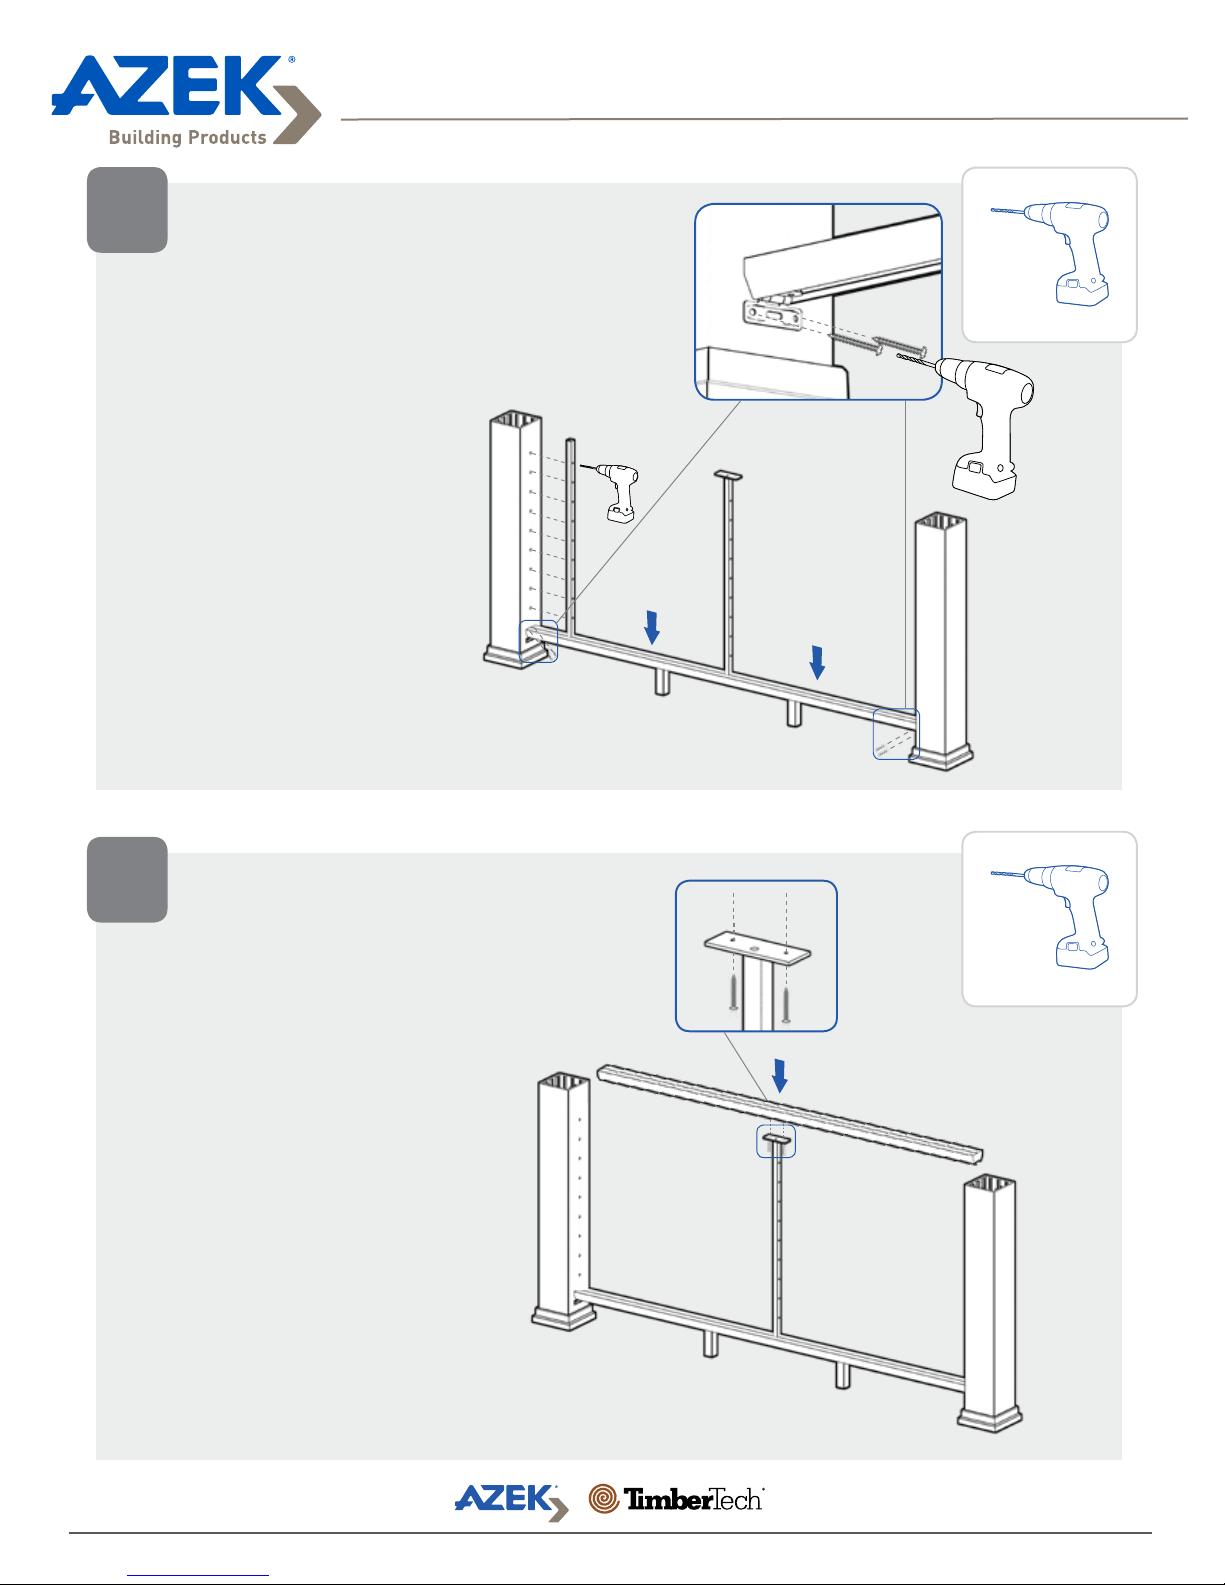
ATTACH BOTTOM UNIVERSAL
7
RAIL AND TRANSFER HOLE
LOCATION ONTO POST SLEEVE
• Set the bottom Universal
railing into place and
Pre-Drill pilot holes
through the Post Sleeve
and into the post through
the bracket holes.
Secure with #10x2”
screws.
• Use an extra
Intermediate Baluster
as a template for the
CableRail hardware and
through holes. Use a
3/16” drill bit to transfer
your marks to the Post
Sleeves.
Installing Evolutions RailTM Contemporary
with CableRail by Feeney
®
Pre-Drill 3/16
Pre-Drill 9/64”
#10 x 2”
Coated Screws
TRIM TOP RAIL
8
AND SECURE TOP
UNIVERSAL RAIL
• Attach Intermediate
Baluster to the underside
of the top Universal Rail
with 2 #10x1” screws.
#10 x 1”
Stainless
Screws
Page 6
Page 7
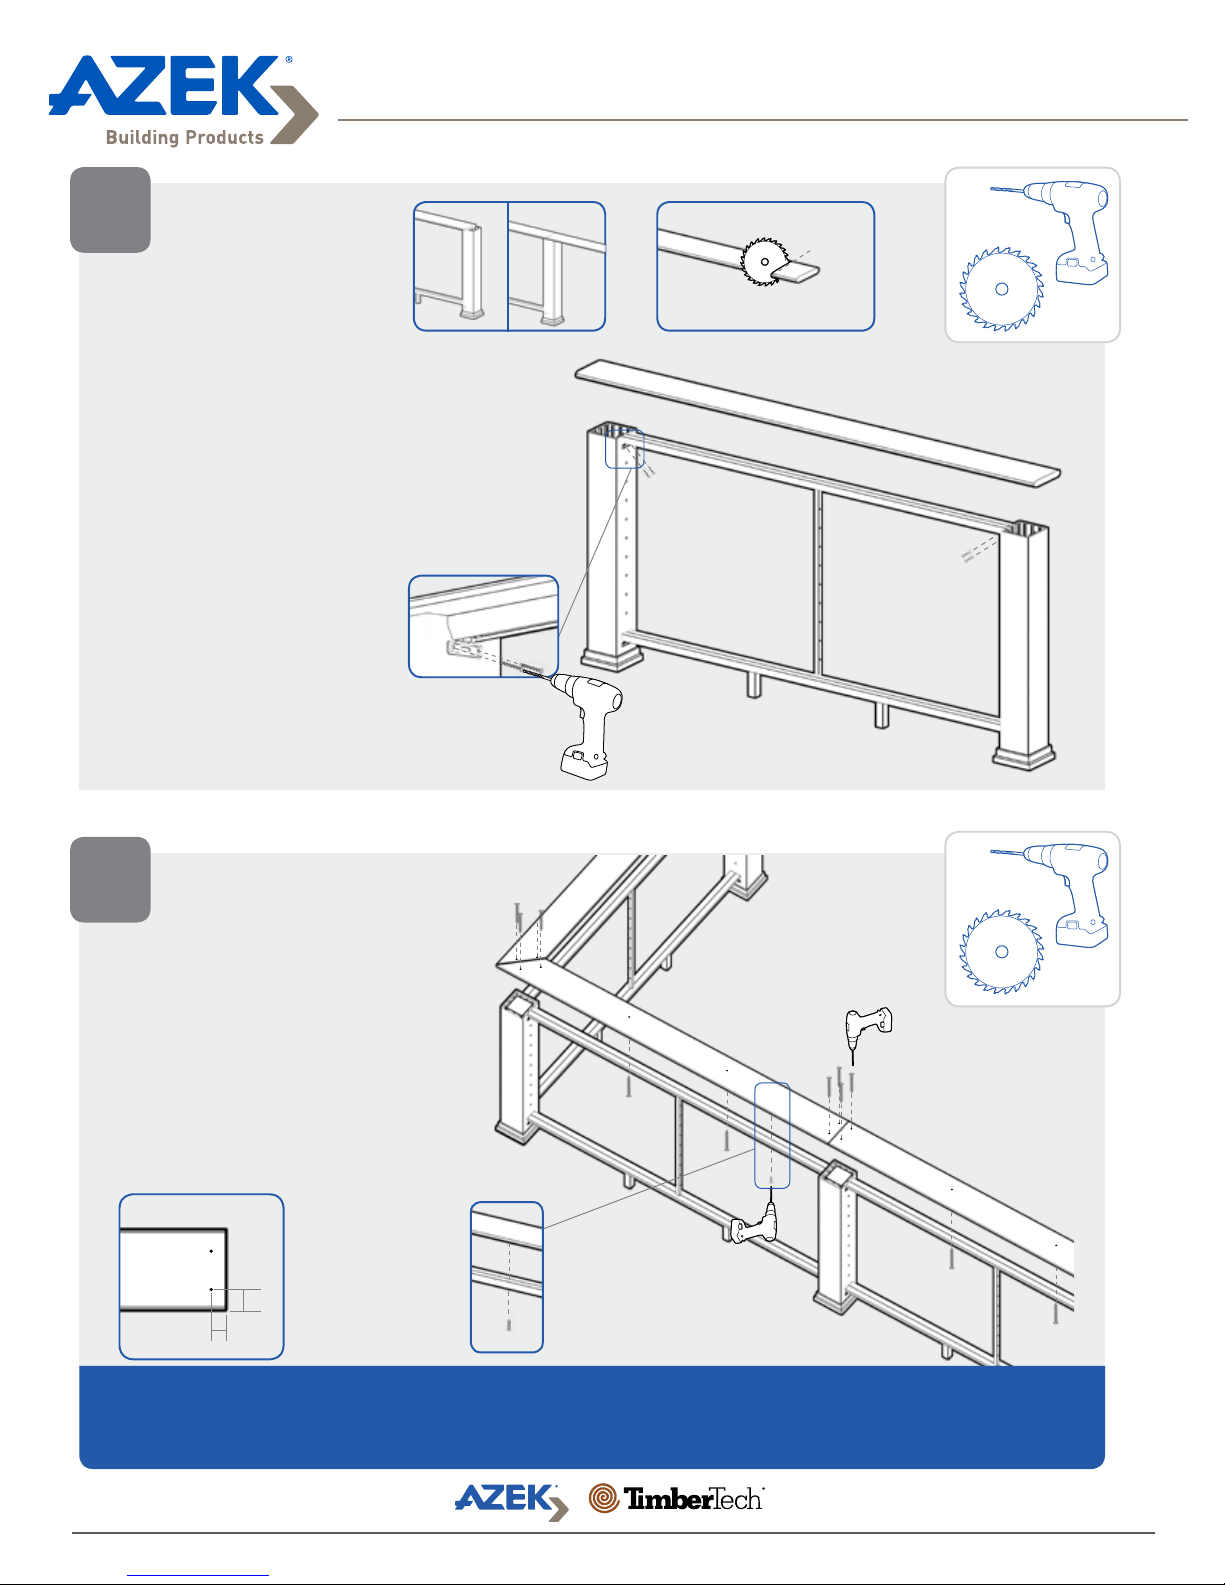
9
SECURE TOP
UNIVERSAL RAIL &
TRIM TOP RAIL
Installing Evolutions RailTM Contemporary
with CableRail by Feeney
®
• Pre-Drill pilot holes
through the Post Sleeve
and into the post through
holes in the brackets of
the top Universal Rail and
fasten using #10 x 2”
Coated Screws.
• Cut the Top Rail so that
any seams fall at the
center of a post.
10
INSTALL TOP RAIL
Make sure any seams fall at
the center of a post
Pre-Drill 9/64”
#10 x 2”
Coated Screws
• Cut Top Rail so that any
seams fall at the center
of a post. Miter the
planks at corner posts.
• All fastener locations
must be pre-drilled with
a 3/16” drill bit, or
mushrooming or splitting
may occur.
Top Rail Screw Placement
1 1/2”
3/4”
If your rail has stair sections, start installing the cap at the stairs. Wait until all
rail sections are complete before beginning Top Rail installation.
Pre-Drill 3/16” through
Universal Rail
Pre-Drill 9/64” through
hole in Universal Rail and
up into Top Rail.
#10 x 1 1/2” Coated
Screws
Pre-Drill 3/16”
#8 2 1/2” Coated Screws
Page 7
Page 8
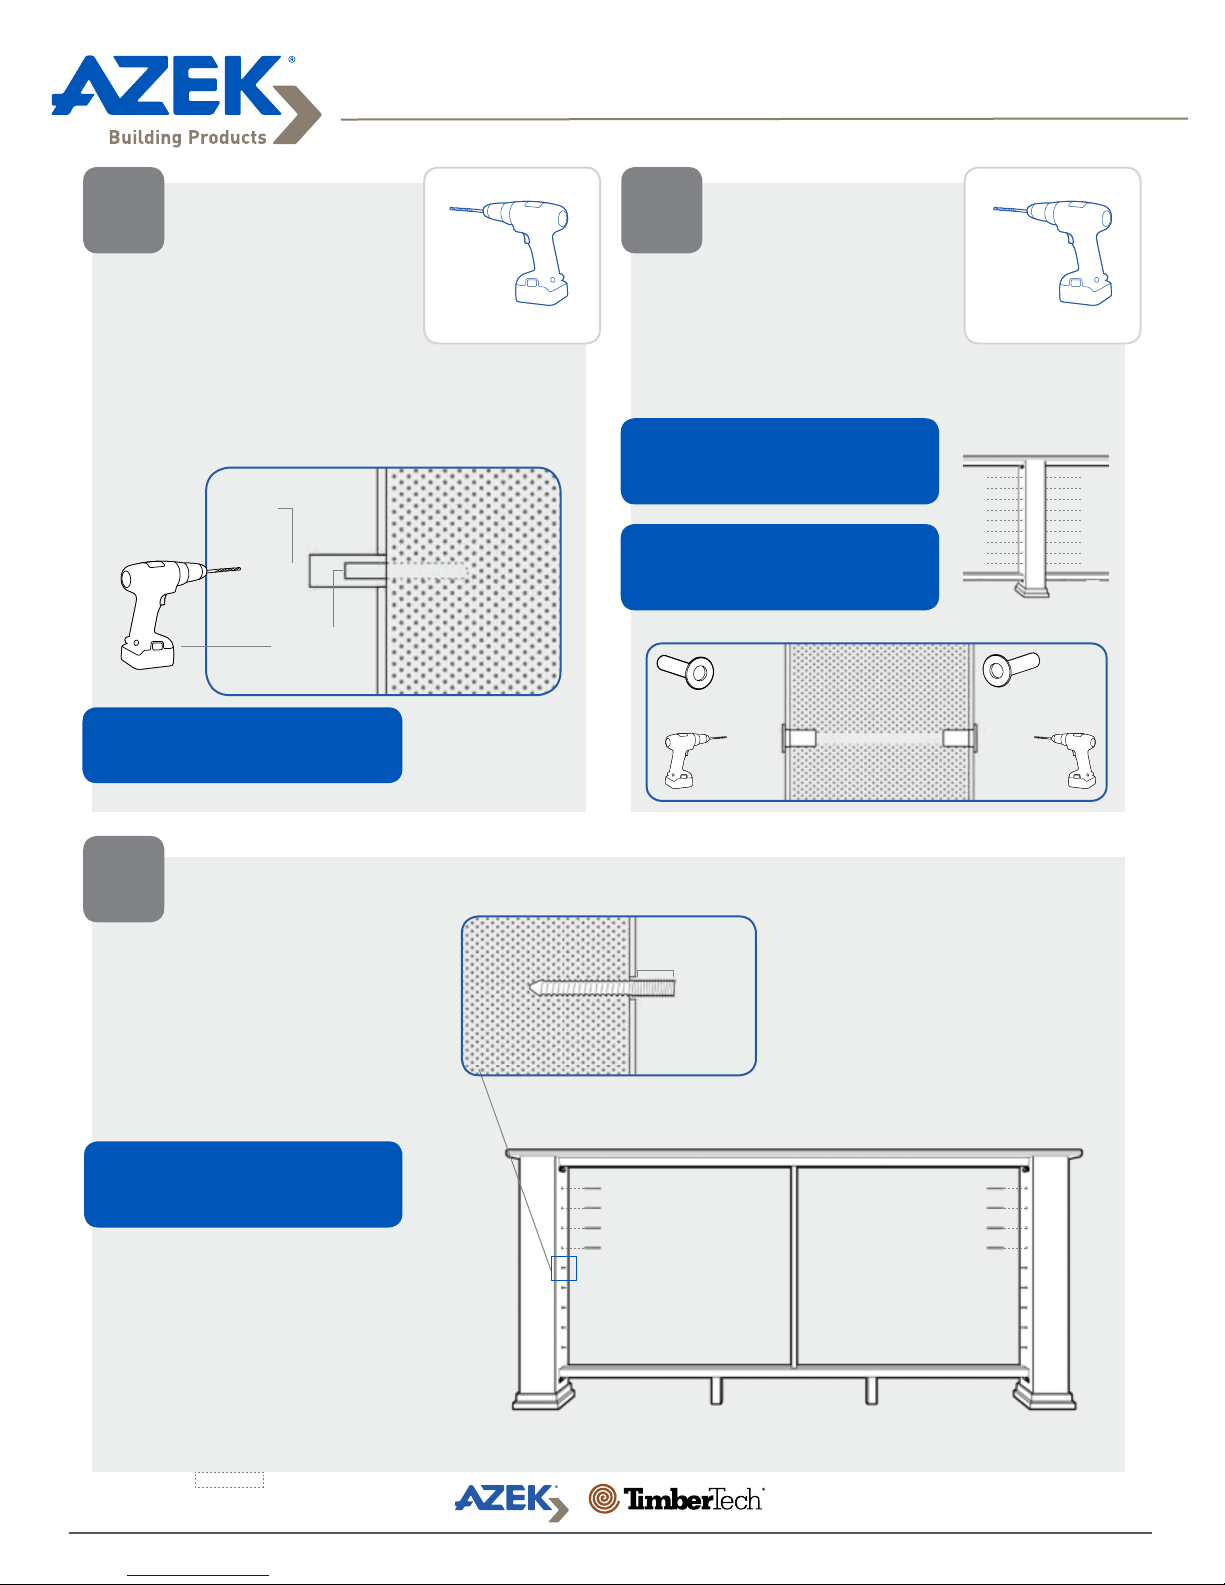
Installing CableRail by Feeney®
for Evolutions RailTM Contemporary
PRE-DRILL ANCHOR
1 2
POST SLEEVE
• Using the marks on the
Anchor Posts, drill a
through hole only in the
Post Sleeve with a 1/4”
drill bit.
Drill through
Post Sleeve
with 1/4” bit
1/4” 1/8”
Pre-Drill 1/8”
into 4”x4”
Anchor posts should not exceed 60 feet
apart during any continuous run of cable.
PRE-DRILL
THROUGH POST
SLEEVES
• For the through posts,
drill a 1/4” hole through
both the Post and Post
Sleeve.
Optional - Protector Sleeves are not
required on the through posts, but do
offer a more finished appearance.
If needed, use a dab of adhesive on
Protector Sleeves.
Protective
Sleeve 1
1/4” 1/4”
Drill through
Post Sleeve
with 1/4” bit
Drill through
Post Sleeve
with 1/4” bit
Protective
Sleeve 2
3
BOLTS
• On Anchor Posts, screw
the Hanger Bolts into the
pilot holes in the Post
with the Hanger Bolt
Installation Tool.
Leave about 1” of machine thread
exposed for cable take-up.
DRIVE IN HANGER
1”
Page 8
Page 9
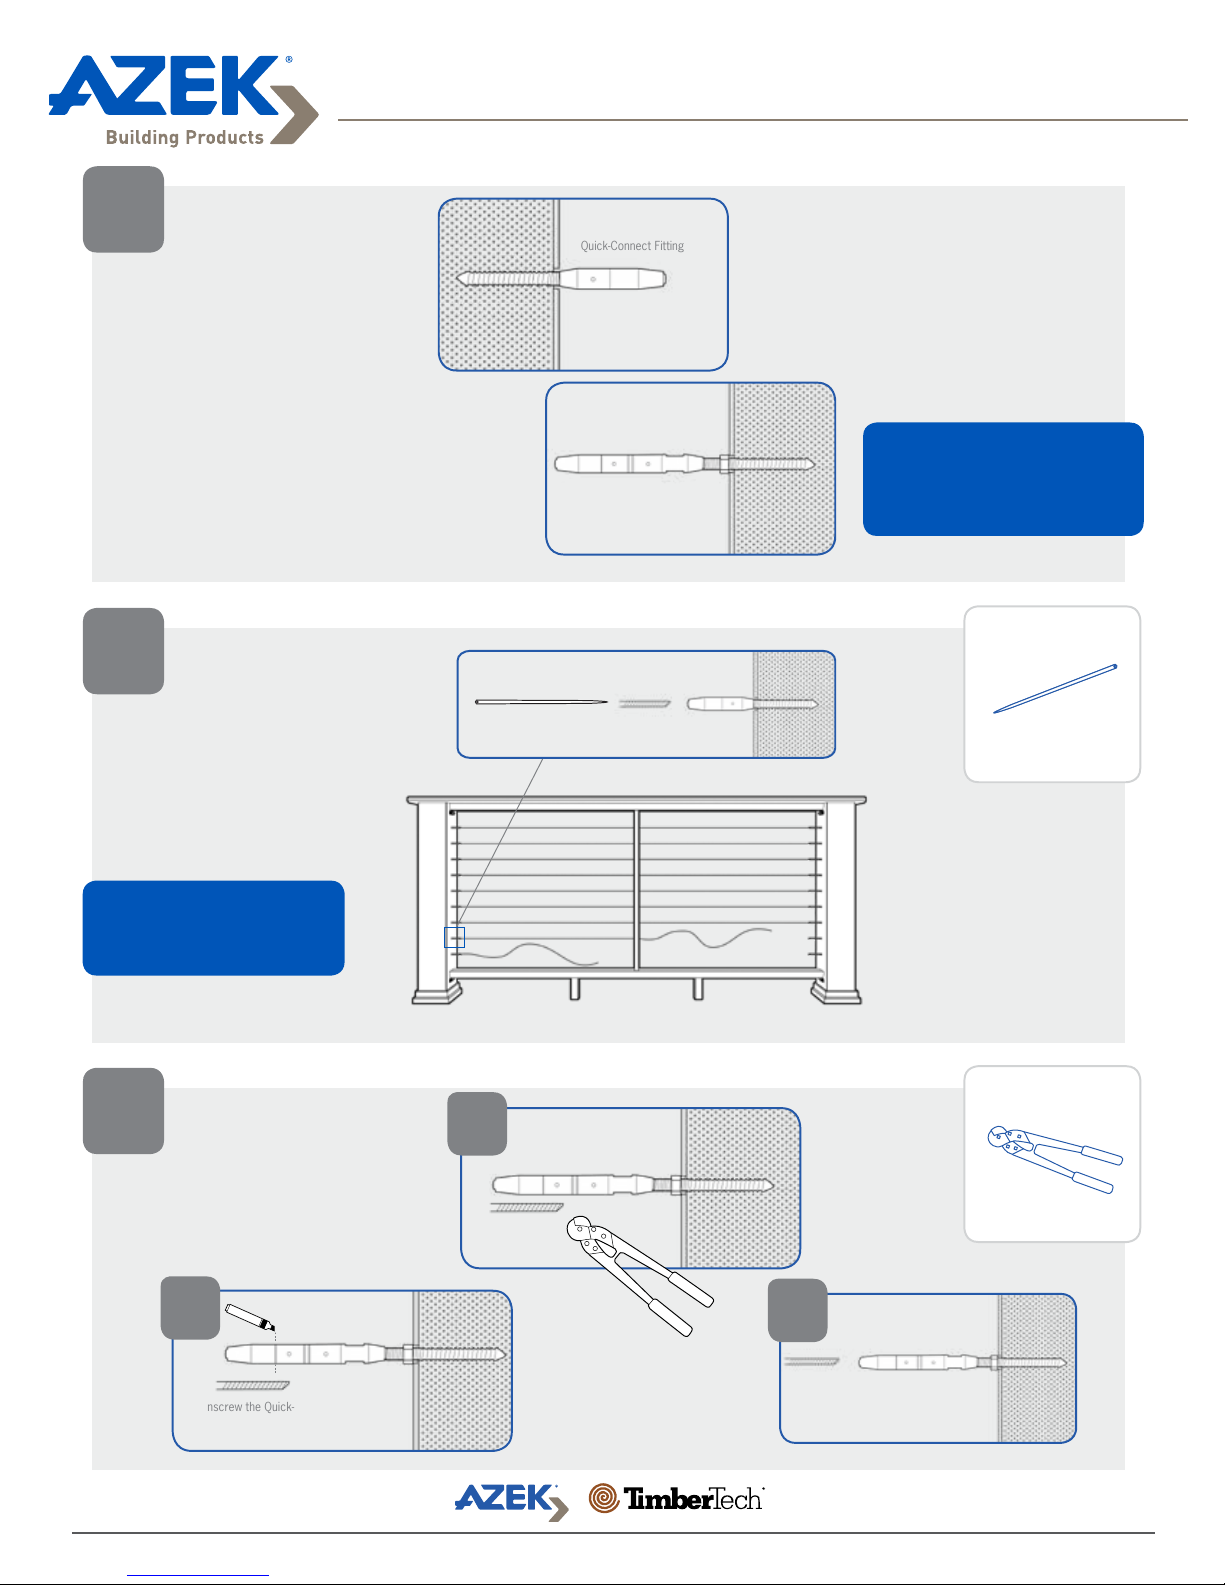
Installing CableRail by Feeney®
for Evolutions RailTM Contemporary
4
5
ATTACH QUICKCONNECT FITTINGS
• Screw on Quick-Connect
fitting onto one side of
the railing and QuickConnect Swivel fittings
lock nuts onto the hanger
bolts on the other side.
INSERT AND THREAD
CABLE
• When all of the hardware
is in place, insert one
end of the Cable into the
Quick-Connect fitting.
Lacing Needle
Quick-Connect Fitting
Quick-Connect Swivel
Fitting
Lock Nut
One side of the railing will be only
Quick-Connect fittings, the other
side will be Quick-Connect swivel
fittings and lock nuts
Feed the Cable through the
Intermediate Baluster (or through
posts) with a lacing needle.
6
CUT CABLE TO
LENGTH
a
Unscrew the Quick-Connect swivel
fitting from the post to measure length
of cable
Trim Cable at the first cut
b
line on Quick-Connect Swivel
Fittings
c
Insert Cable into QuickConnect swivel fittings
Page 9
Page 10
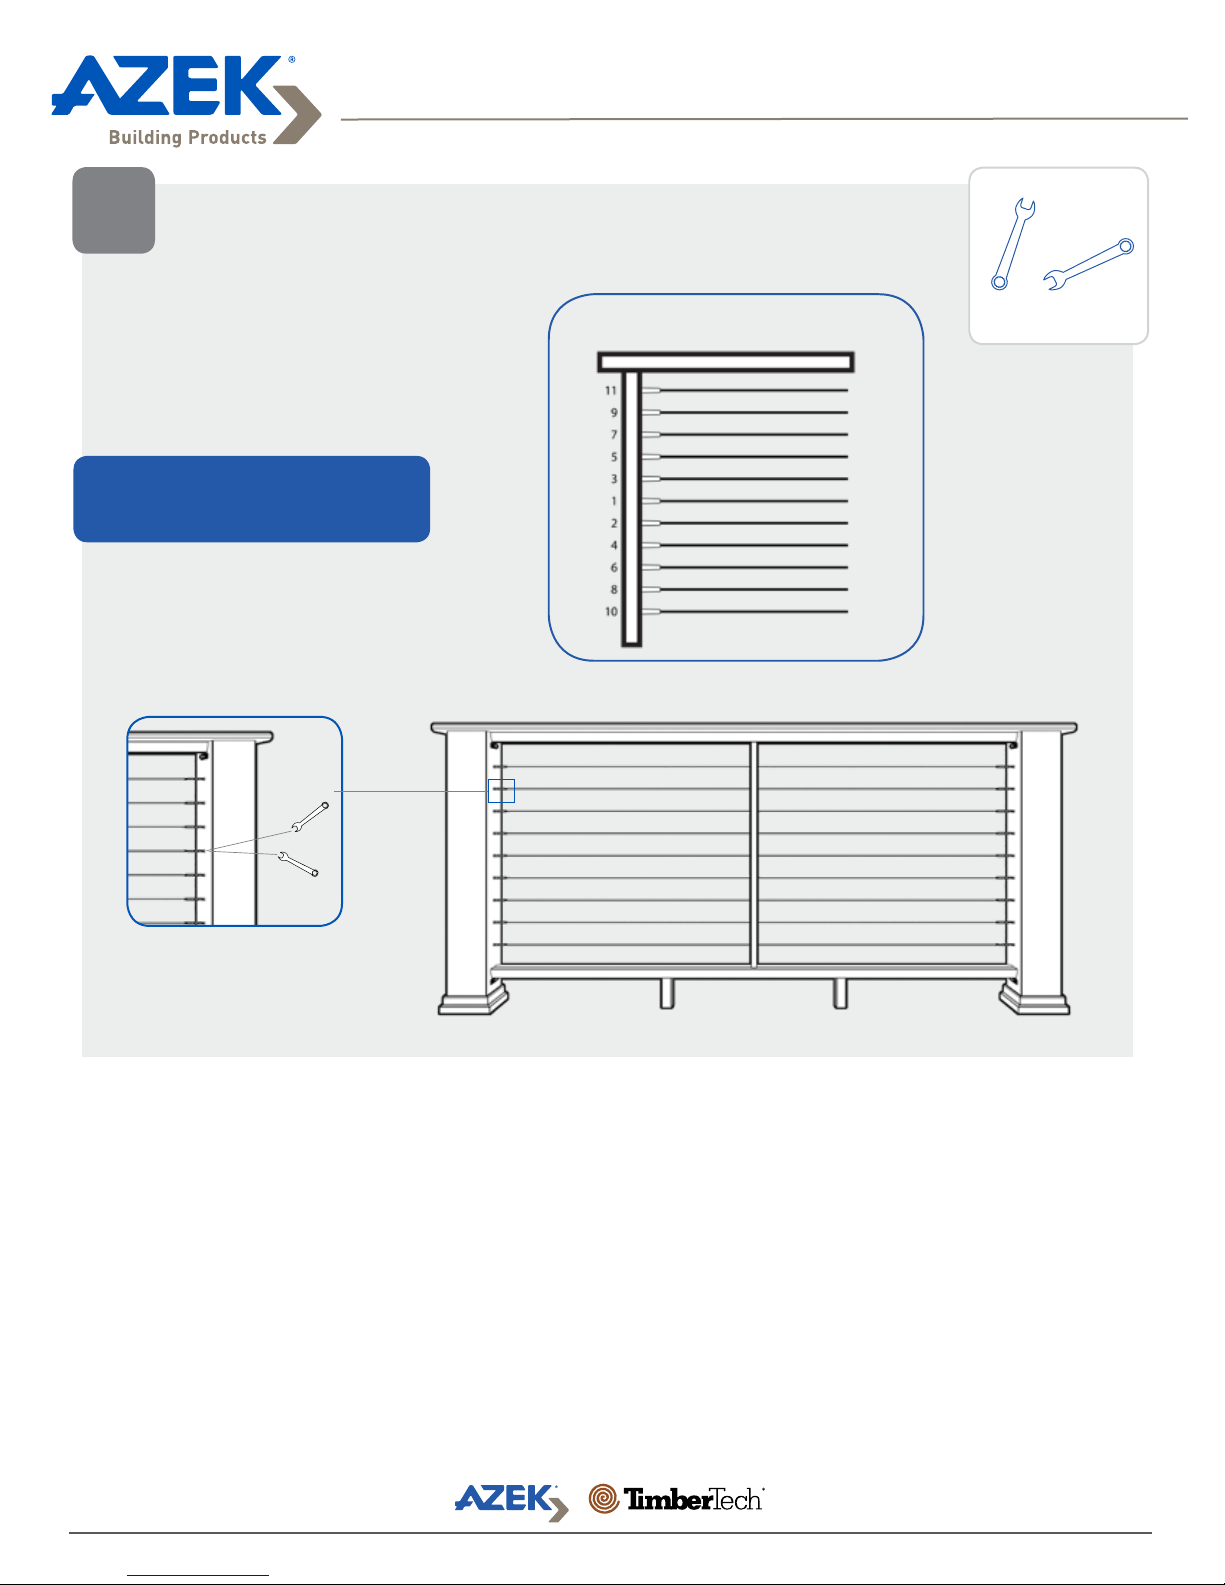
7
Installing CableRail by Feeney®
for Evolutions RailTM Contemporary
TIGHTEN CABLE
• Use a set of 3/8” openended wrenches to
tighten the Cable using
the “swivel” end insuring
the Cable does not twist.
If necessary, the Cable can be removed
from the Quick-Connect fitting by using the
Quick-Connect Release Tool.
• Once the Cable is tight,
tighten the lock nuts
against the QuickConnect fitting.
3/8” open
ended
wrenches
Tightening Order
Page 10
Page 11
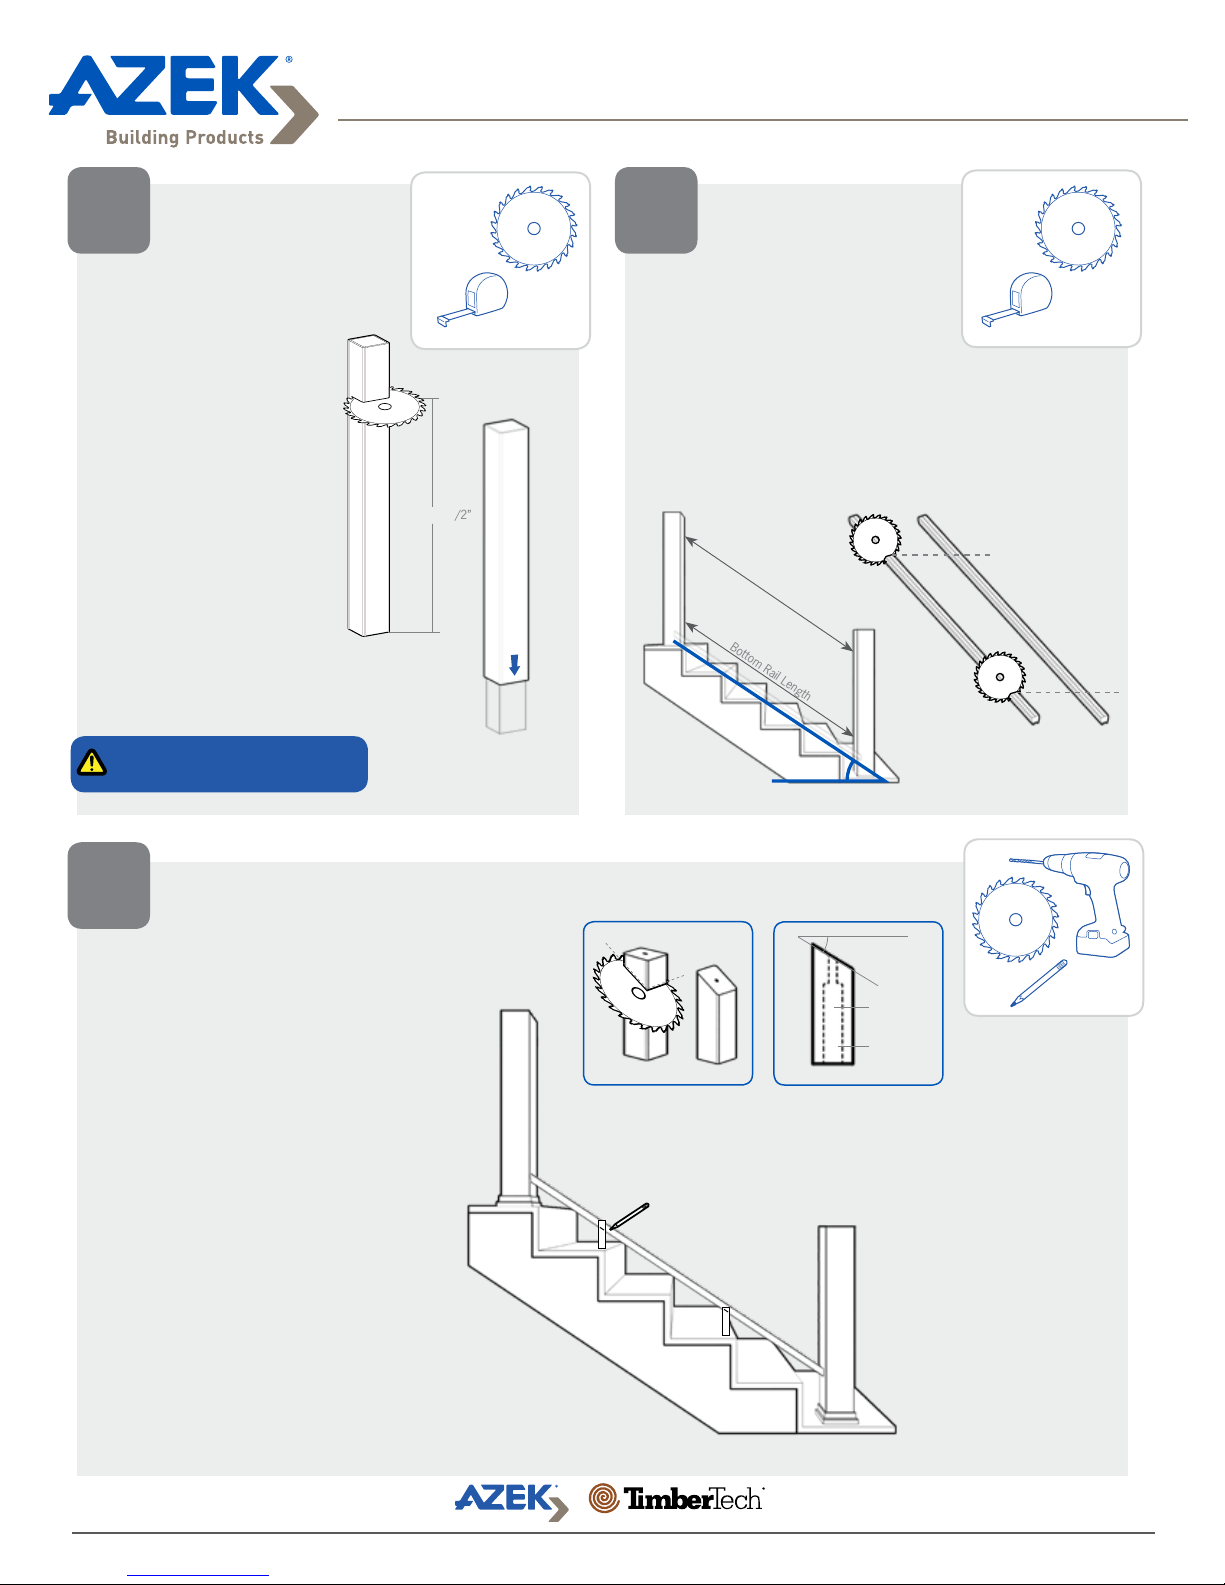
Installing Evolutions Rail™ Contemporary Stairs
with CableRail by Feeney
®
CUT POSTS AND
1
• Posts must be
• Trim post a min of
• Slide Post Sleeve
• Posts may need to
TEMPORARILY
INSTALL POST
SLEEVES
positioned no more
than 8’ on center,
and must be plumb.
35 1/2” (for 36”) or
41 1/2” (for 42”)
above finished deck
surface.
over 4x4 Post. Do
not force.
be slightly taller for
stairs.
Do not cut Post Sleeves in this step.
Min. 35 1/2”
MEASURE AND TRIM
2
• Rest the bottom Universal
• Trim the rails to
UNIVERSAL RAILS
Rail on stairs and transfer
the length and angle of
the stairs onto the rail.
necessary length and
angle.
Top Rail Length
Bottom Rail Length
Stair Angle
3
PREPARE FOOT
BLOCKS
• Temporarily place bottom
Universal Rail in place to
plan where Foot Blocks
will go.
• Cut Foot Blocks to length
at the correct angle.
• Counter-bore the foot
block and using the #10
x 2” screws
Stair Angle
Drill 3/16”
Hole
Bore 1/2”
by 2 1/2”
deep
Page 11
Page 12
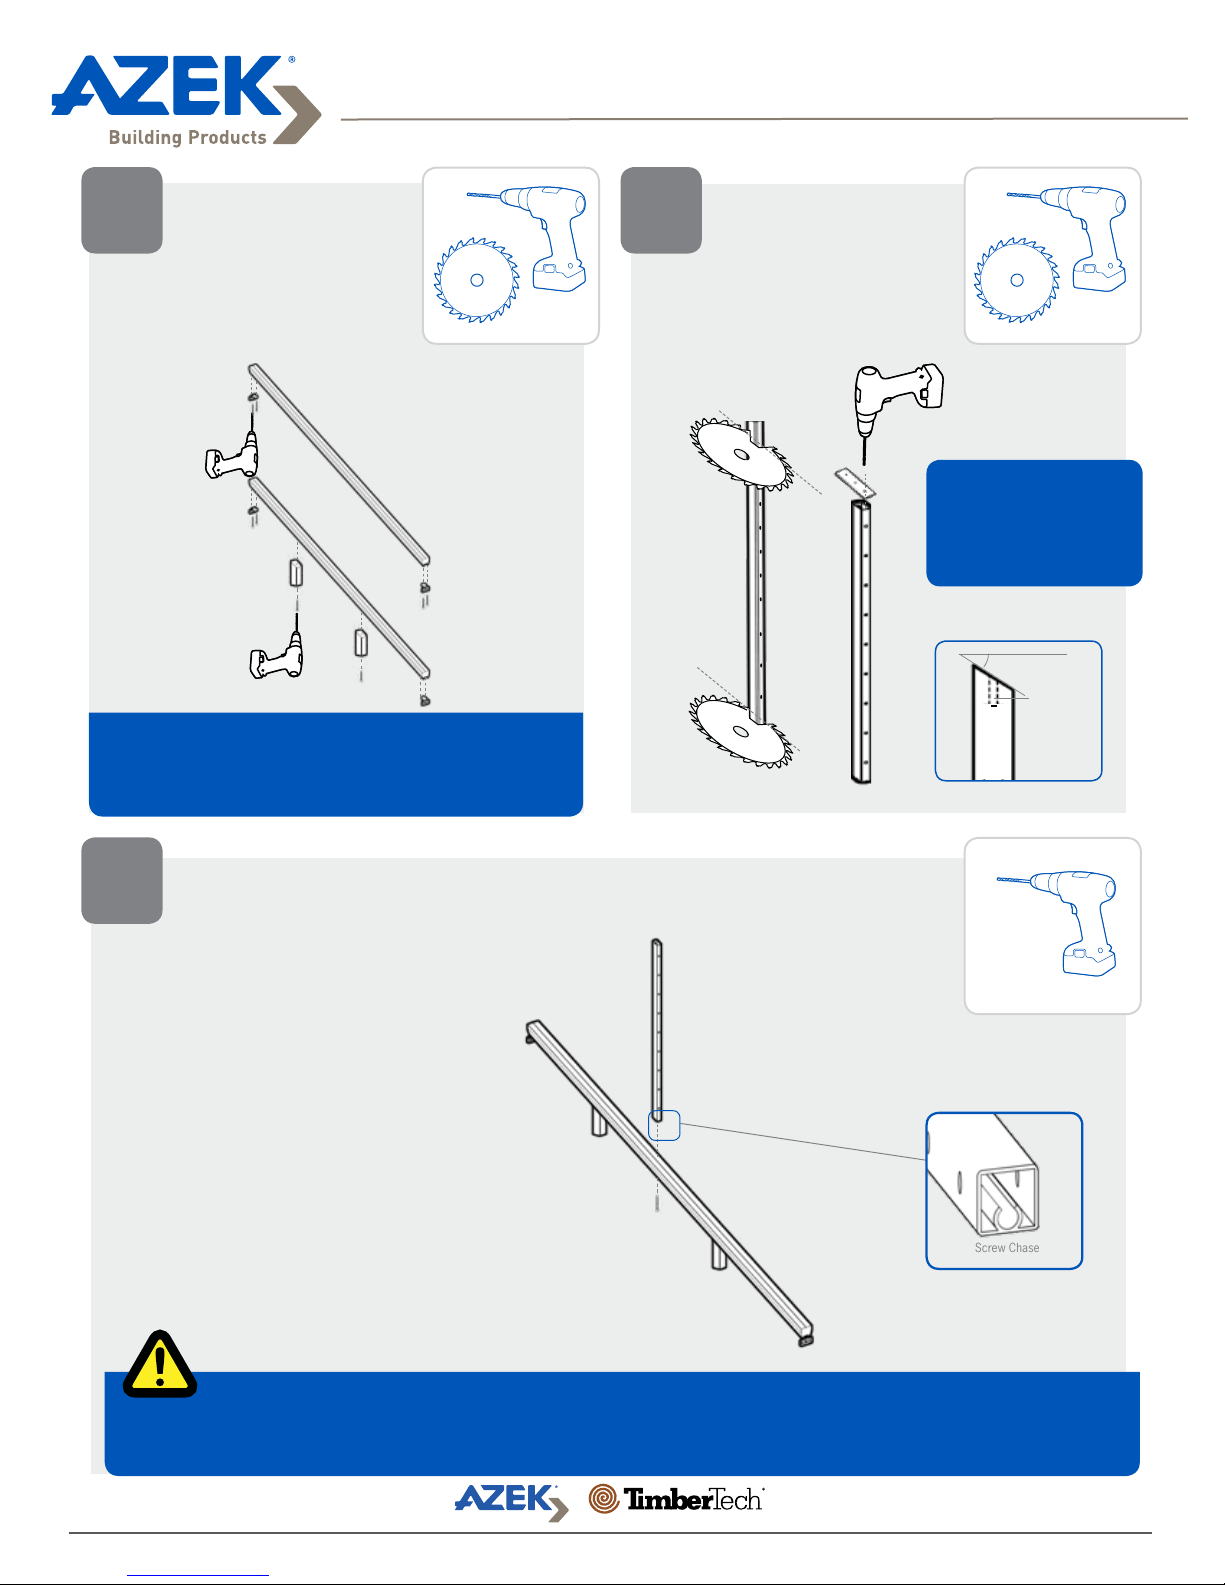
Installing Evolutions Rail™ Contemporary Stairs
with CableRail by Feeney
®
ATTACH FOOT
4 5
BLOCKS AND
BRACKETS
• Attach provided brackets
to the Universal Rails.
Pre-Drill 9/64”
through Brackets
#10 x 7/8”
Coated Screws
Pre-Drill 9/64” into
Universal Rails
#10 x 2” Coated
Screws
For sections up to 6’: Place two Foot Blocks at 1/3
intervals on the rail.
For sections 6’ to 8’: Space three Foot Blocks
approximately at 1/4 intervals on the rail.
TRIM
INTERMEDIATE
STAIR BALUSTERS
• Trim Baluster to length
and angle. Pre-Drill
center hole.
Pre-Drill
3/16”
1’ to 6’ on center requires 1
Intermediate Balusters.
6’ to 8’ on center requires 2
Intermediate Balusters.
Stair Angle
Drill 3/16”
Hole
6
INTERMEDIATE
BALUSTERS
• Pre-drill screw chase in
Intermediate Balusters
with a 3/16” bit.
• Attach Intermediate
Balusters to the bottom
Universal Rail using #10
x 2” screws provided.
Be sure the screw finds the screw chase.
For easier installation, pre-drill screw chase with a 3/16” drill bit.
ATTACH
#10 x 2”
Stainless
Screws
Screw Chase
Page 12
Page 13
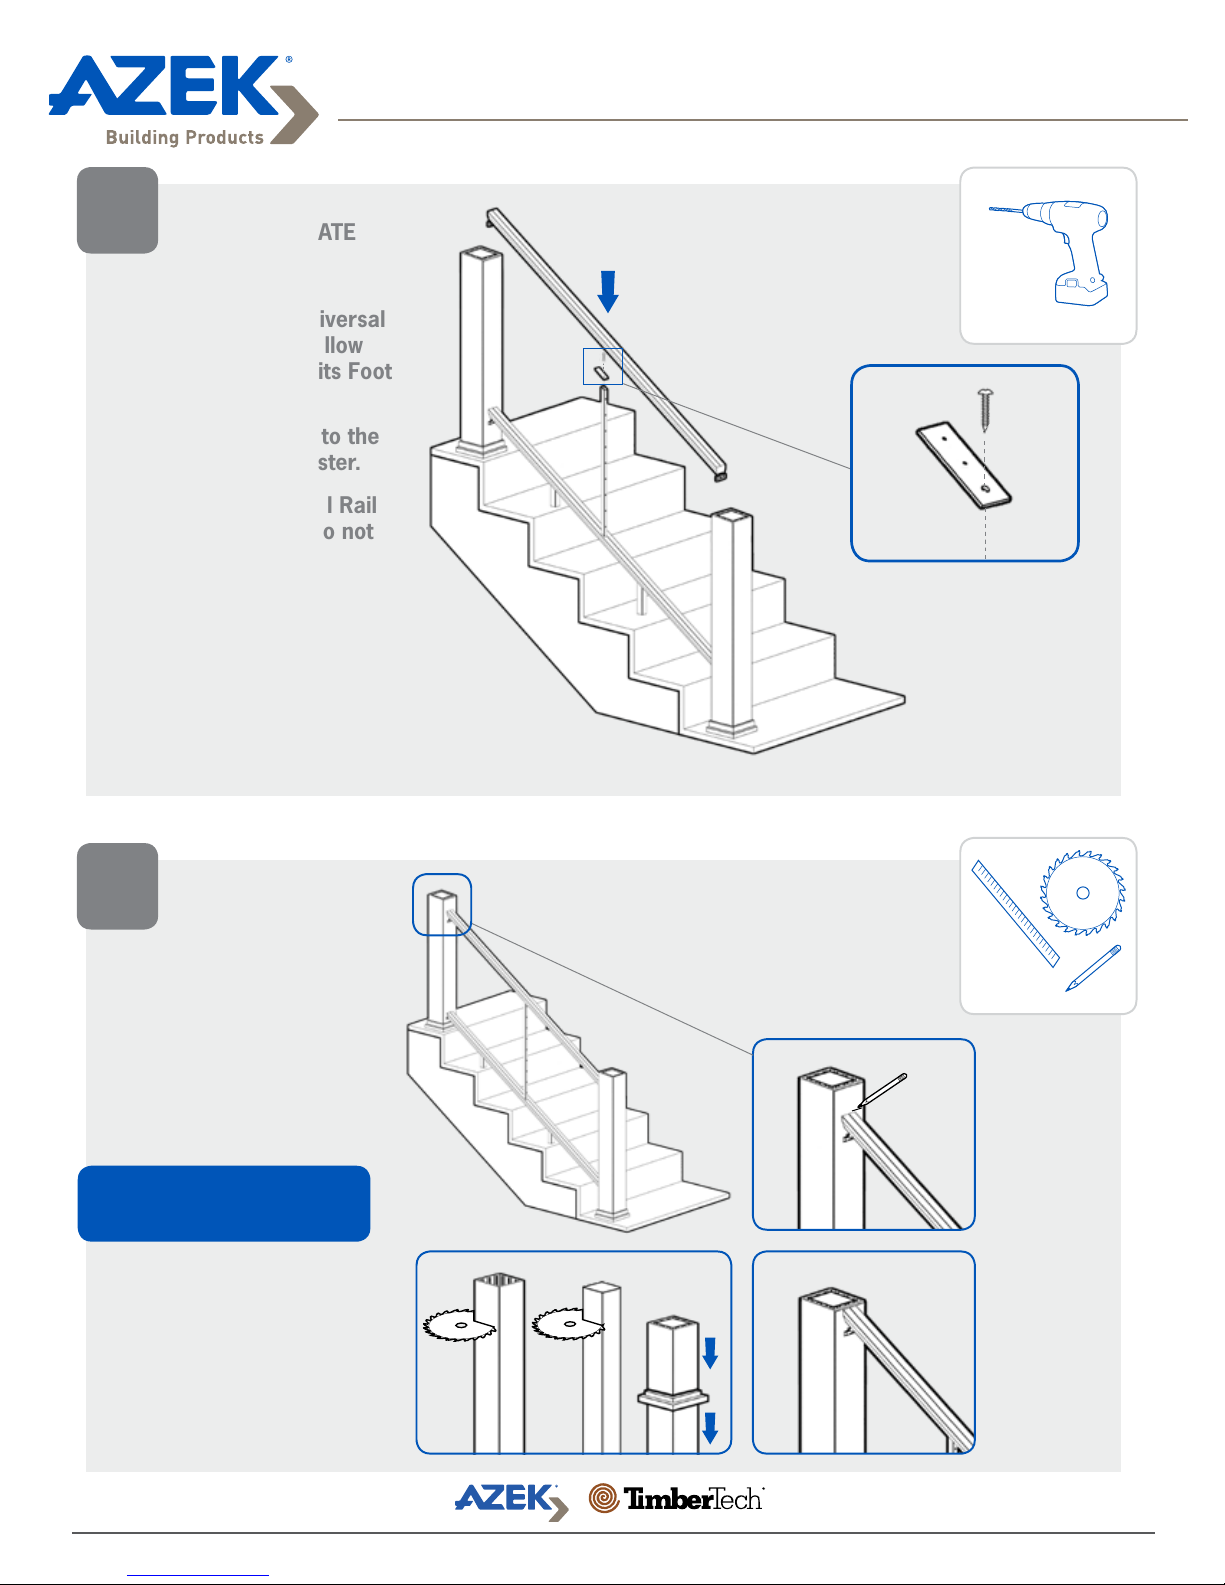
ATTACH BASE PLATE
7
TO INTERMEDIATE
BALUSTERS
• Set the bottom Universal
Rail in place and allow
the rail to rest on its Foot
Blocks.
• Attach base plate to the
Intermediate Baluster.
Installing Evolutions Rail™ Contemporary Stairs
with CableRail by Feeney
®
• Place top Universal Rail
on assembly but do not
fasten.
MEASURE AND TRIM
8
TOP POST AND TOP
POST SLEEVE
• Mark the top of the top
Universal Rail.
• Remove Post Sleeve and
trim to length, then Trim
Post to same length.
#10 x 1”
Coated Screws
• Replace Post Sleeve.
Post Sleeves should be flush with
top Universal Rail.
Page 13
Page 14
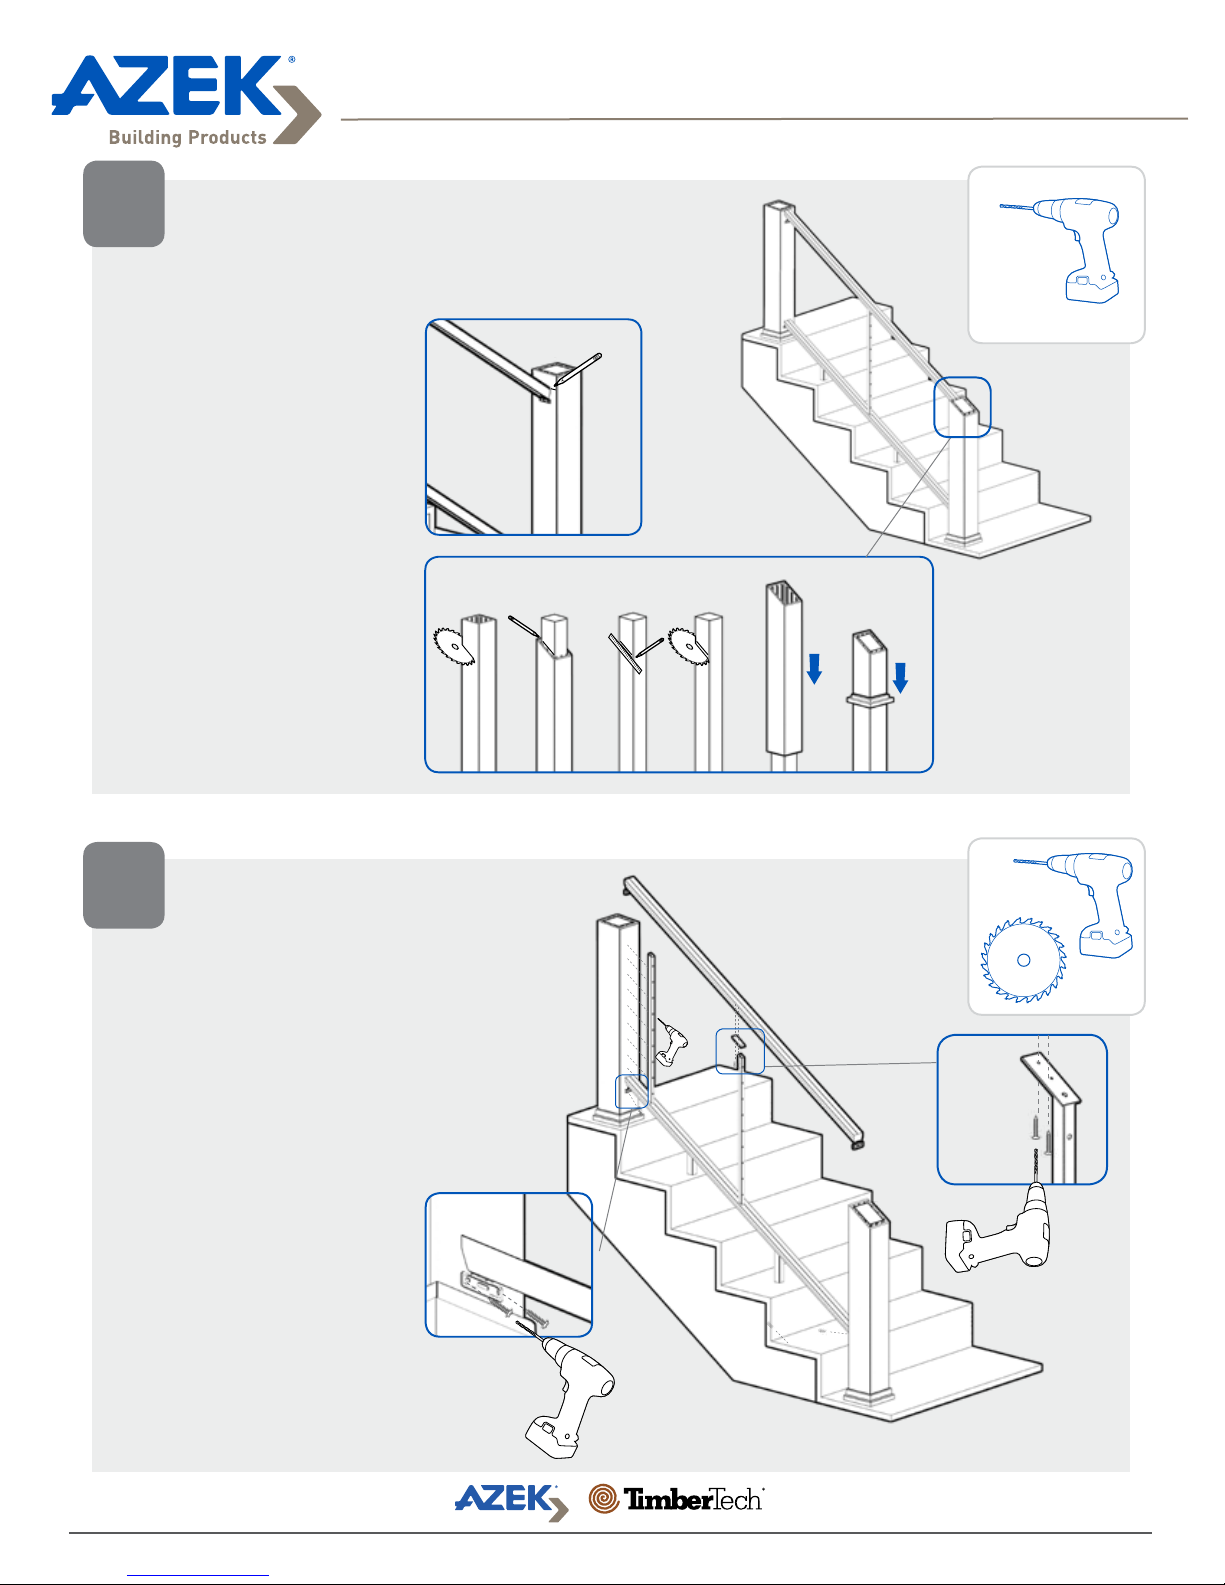
Installing Evolutions Rail™ Contemporary Stairs
with CableRail by Feeney
®
9
MEASURE AND TRIM
BOTTOM POST AND
BOTTOM POST SLEEVE
• Mark where Top
Universal Board meets
Bottom Post Sleeve.
• Remove Post Sleeve
and trim to stair angle.
Replace Post Sleeve.
• Use Post Sleeve to mark
the angle of cut on Post.
Remove Post Sleeve.
• Using a straight edge,
draw a line roughly 1/8”
below previous mark on
Post.
• Trim Post at lower line.
• Replace Post Sleeve.
• Slide on Post Skirts.
INSTALL BOTTOM
10
UNIVERSAL RAIL
• Attach the Bottom
Universal Rail to the Posts
• Attach Intermediate
Baluster to the underside
of the top Universal Rail
with the 2 #10x1” screws.
• Use an extra Intermediate
Baluster, rested at the
bottom Universal Rail,
as a template for the
CableRail hardware and
through holes.
• Use a 3/16” drill bit to
transfer your marks onto
the Post Sleeve.
Pre-Drill 9/64”
#10 x 2” Coated Screws
Pre-Drill
3/16”
Pre-Drill 3/16”
#10 x 1”
Stainless Screws
Page 14
Page 15
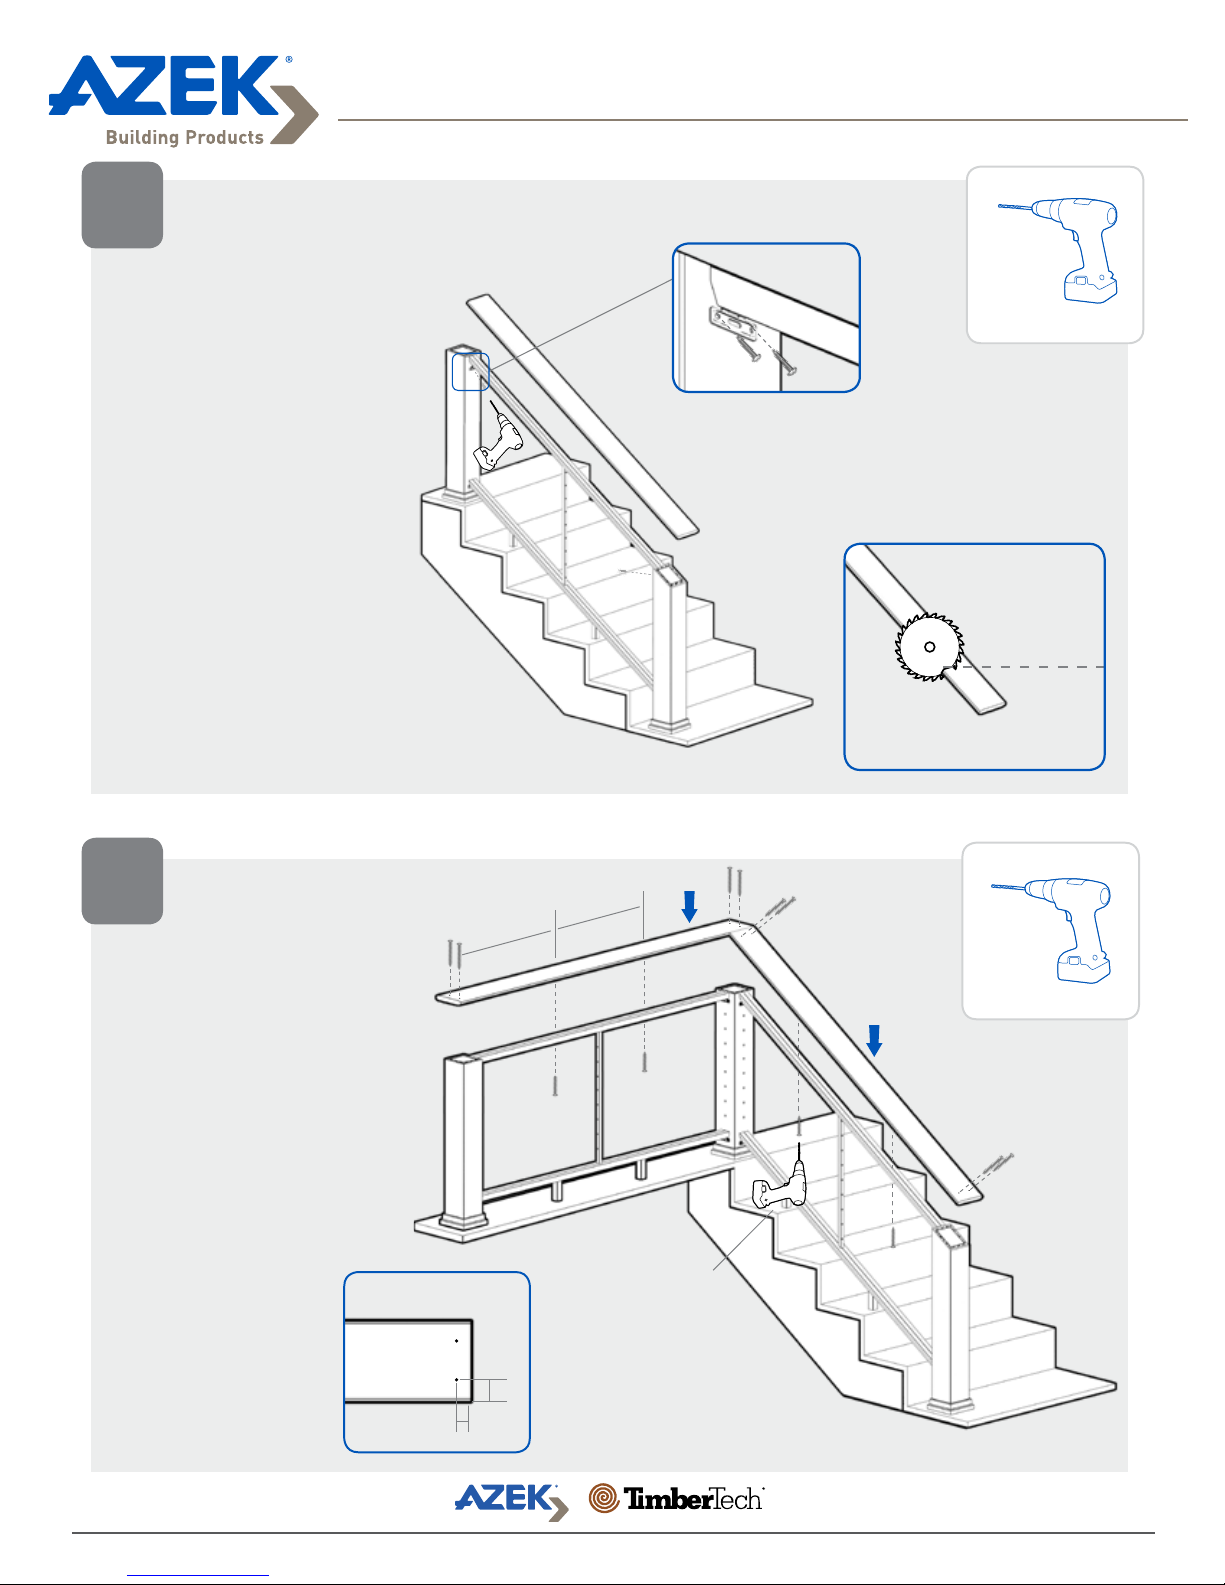
Installing Evolutions Rail™ Contemporary Stairs
with CableRail by Feeney
®
11
SECURE TOP
UNIVERSAL RAIL AND
PREPARE TOP RAIL
• Pre-Drill pilot holes
through the Post Sleeve
and into the post through
holes in the brackets of
the top Universal Rail.
• Cut the Top Rail so that
any seams fall at the
center of a post.
Pre-Drill 9/64”
#10 x 2”
Coated Screws
Make sure any seams fall at
the center of a post
12
INSTALL TOP RAIL
• Finish railing system by
applying an Evolutions
Contemporary Top Rail
to the top of the rail
assembly.
• Use optional End Coating
on exposed Top Rail
ends.
• All fastener locations
must be pre-drilled with
a 3/16” drill bit, or
mushrooming or
splitting may occur.
Top Rail Screw Placement
3/4”
2’
1 1/2”
2’
Pre-Drill 3/16” through
Universal Rail
Pre-Drill 9/64” through hole
in Universal Rail into up into
Top Rail
#10 x 1 1/2” Coated Screws
Pre-Drill 3/16”
#8 x 2 1/2”
Coated Screws
Page 15
Page 16
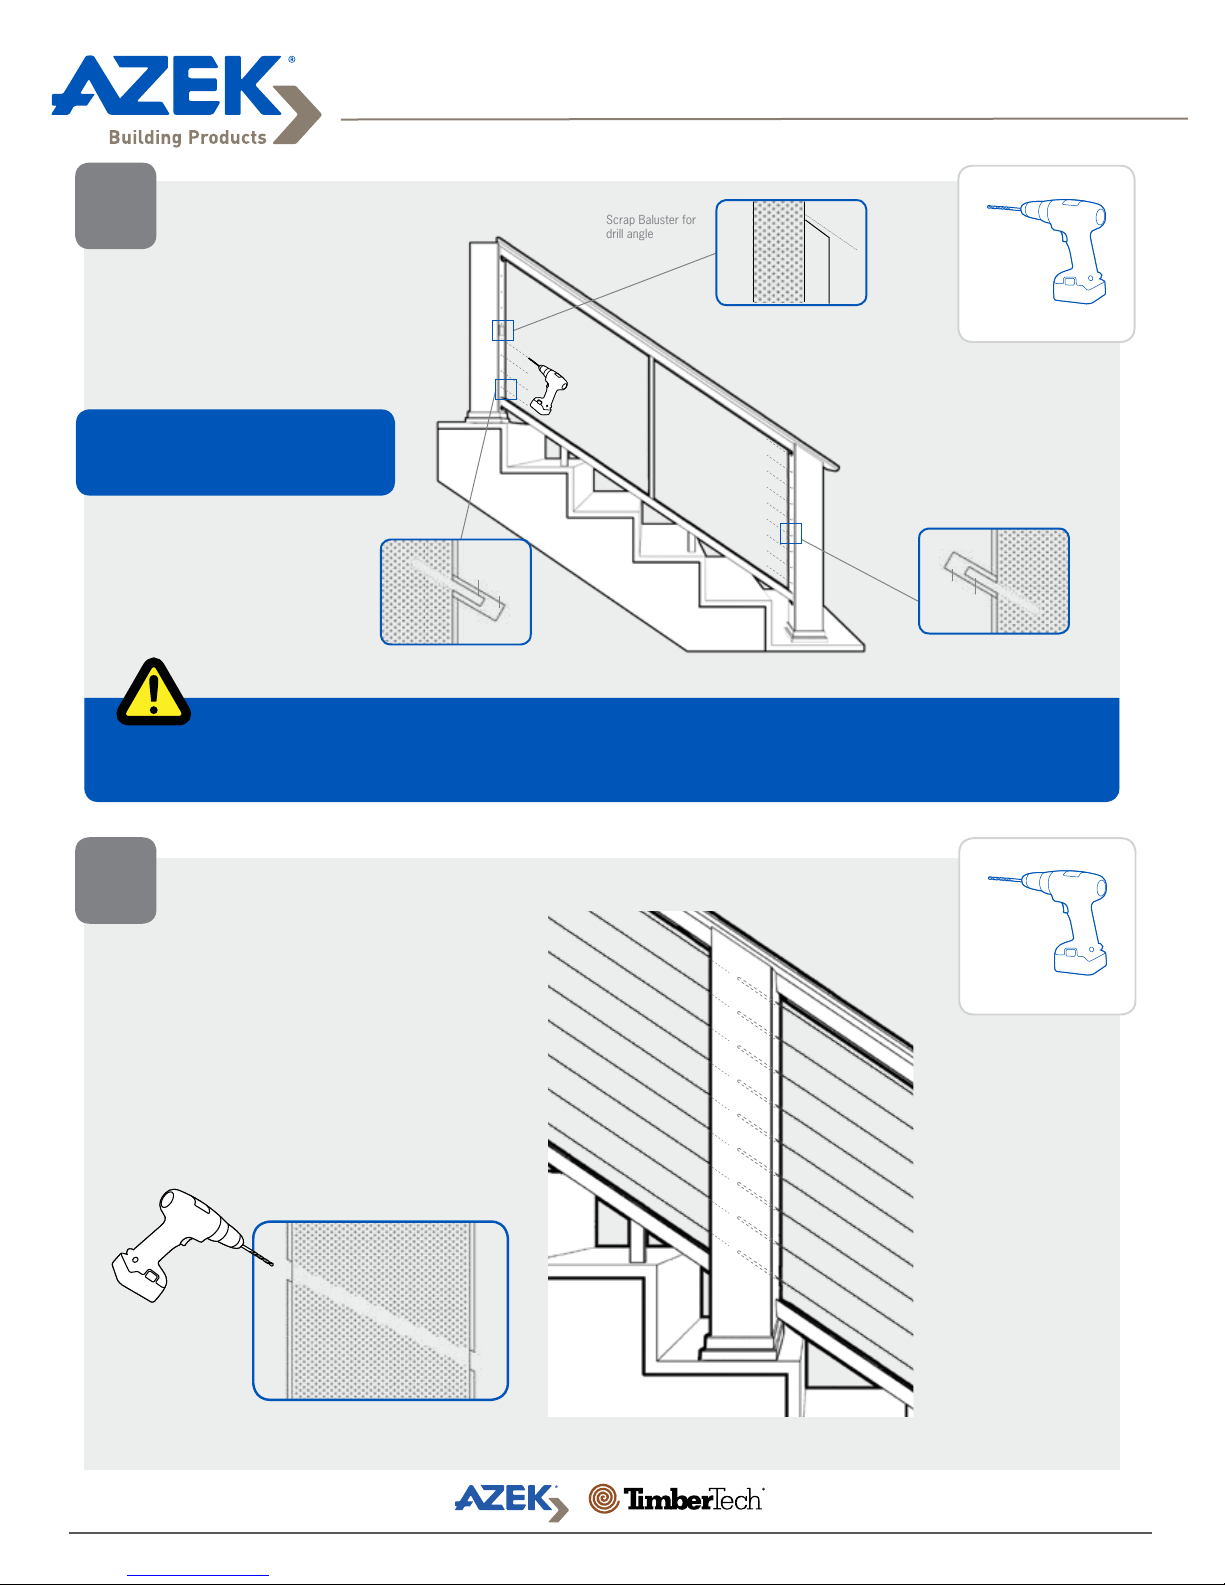
Installing CableRail by Feeney® Stairs
for Evolutions Rail™ Contemporary
1
PRE DRILL POST
SLEEVES
Drill a through hole only in the Post Sleeve
with a 1/4” drill bit at the same angle as
the stair run.
Use a scrap piece of baluster trimmed at the stair angle as a guide.
Anchor posts should not exceed 60 feet apart during any continuous run of cable.
1/8”
1/4”
Scrap Baluster for
drill angle
1/4”
1/8”
2
PRE-DRILL THROUGH
POSTS
• Drill a 1/4” hole through
both the Post and Post
Sleeve at stair angle.
1/4”
Page 16
Page 17
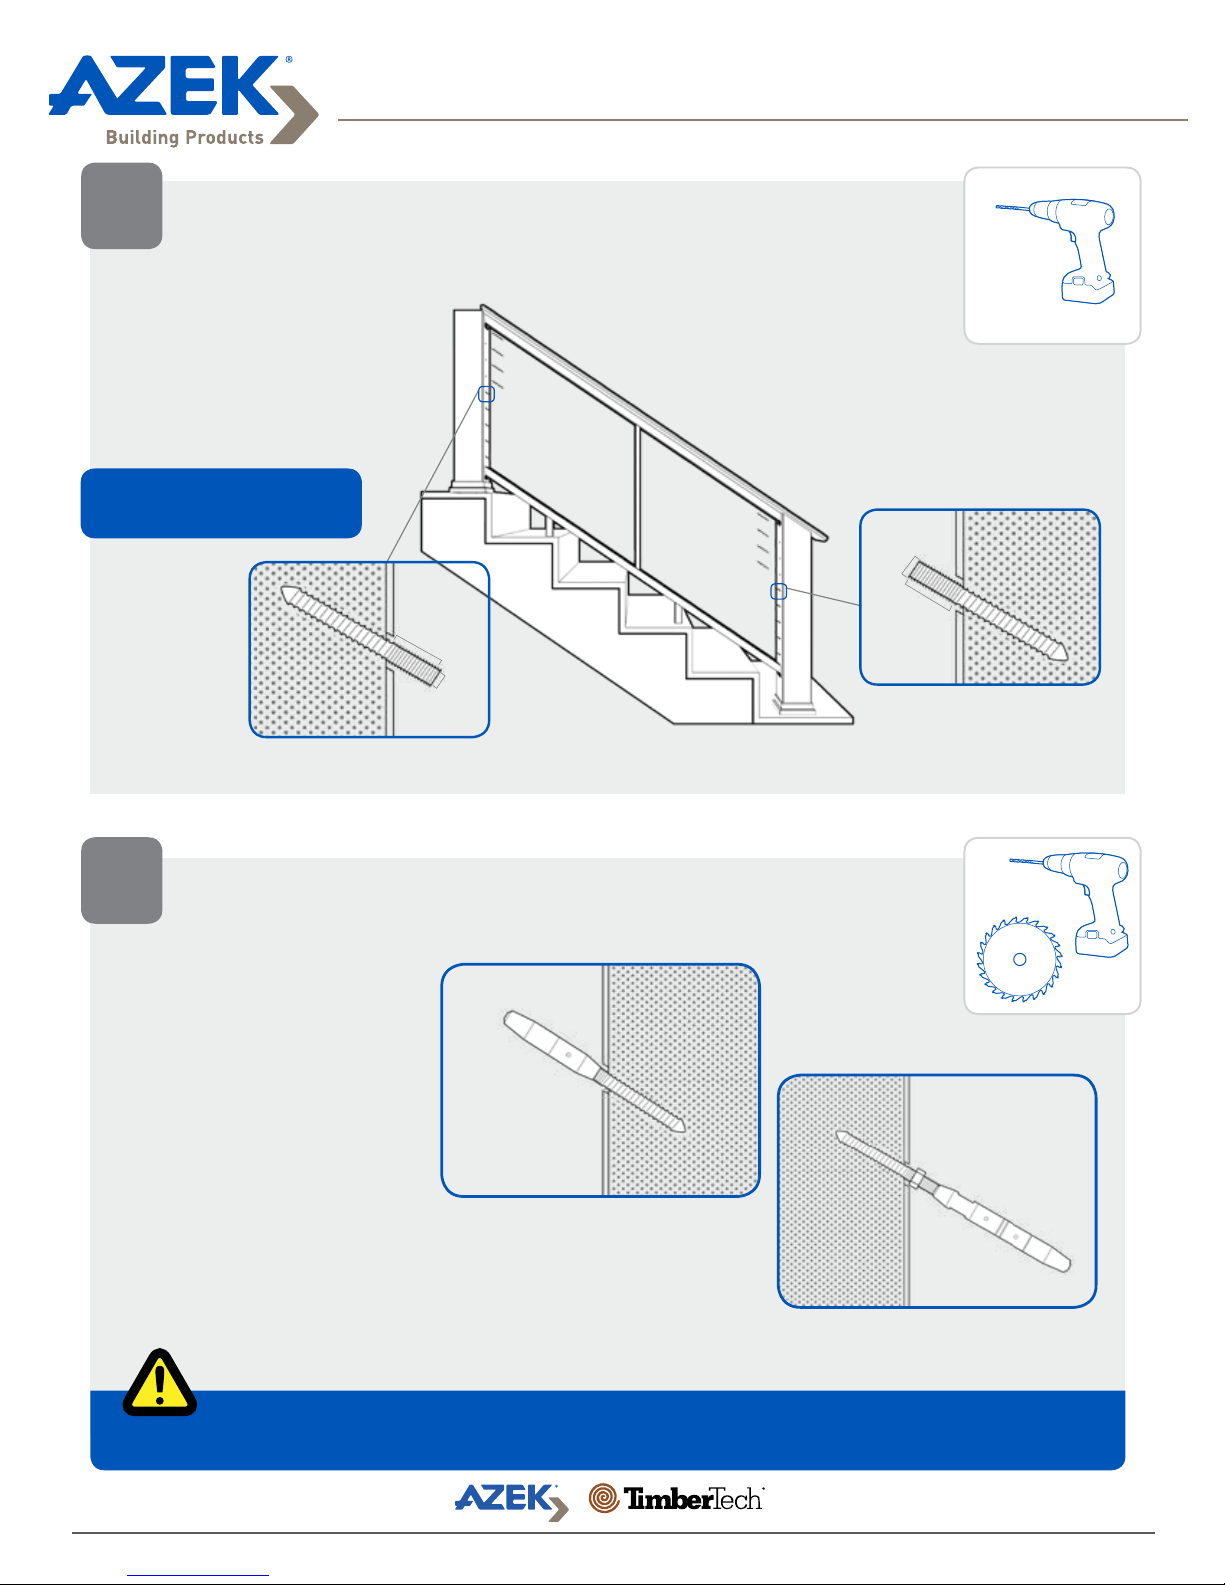
Installing CableRail by Feeney® Stairs
for Evolutions Rail™ Contemporary
3
BOLTS
• Screw Hanger Bolts into
the pilot holes at the
same angle of the stairs
using the Hanger Bolt
Installation Tool.
Leave about 1” of machine thread
exposed for cable take-up.
Top Anchor Post
DRIVE IN HANGER
1/4”
1”
1”
1/4”
Bottom Anchor Post
4
CONNECT FITTINGS
• Place one Quick-Connect
fitting at one end and
the locknuts and QuickConnect Swivel fitting on
the opposite end.
One side of the railing will be only Quick-Connect fittings, the other side will be Quick-Connect swivel fittings and lock nuts.
ATTACH QUICK
Quick-Connect Fitting
Quick-Connect Swivel Fitting
with Lock Nut
Page 17
Page 18
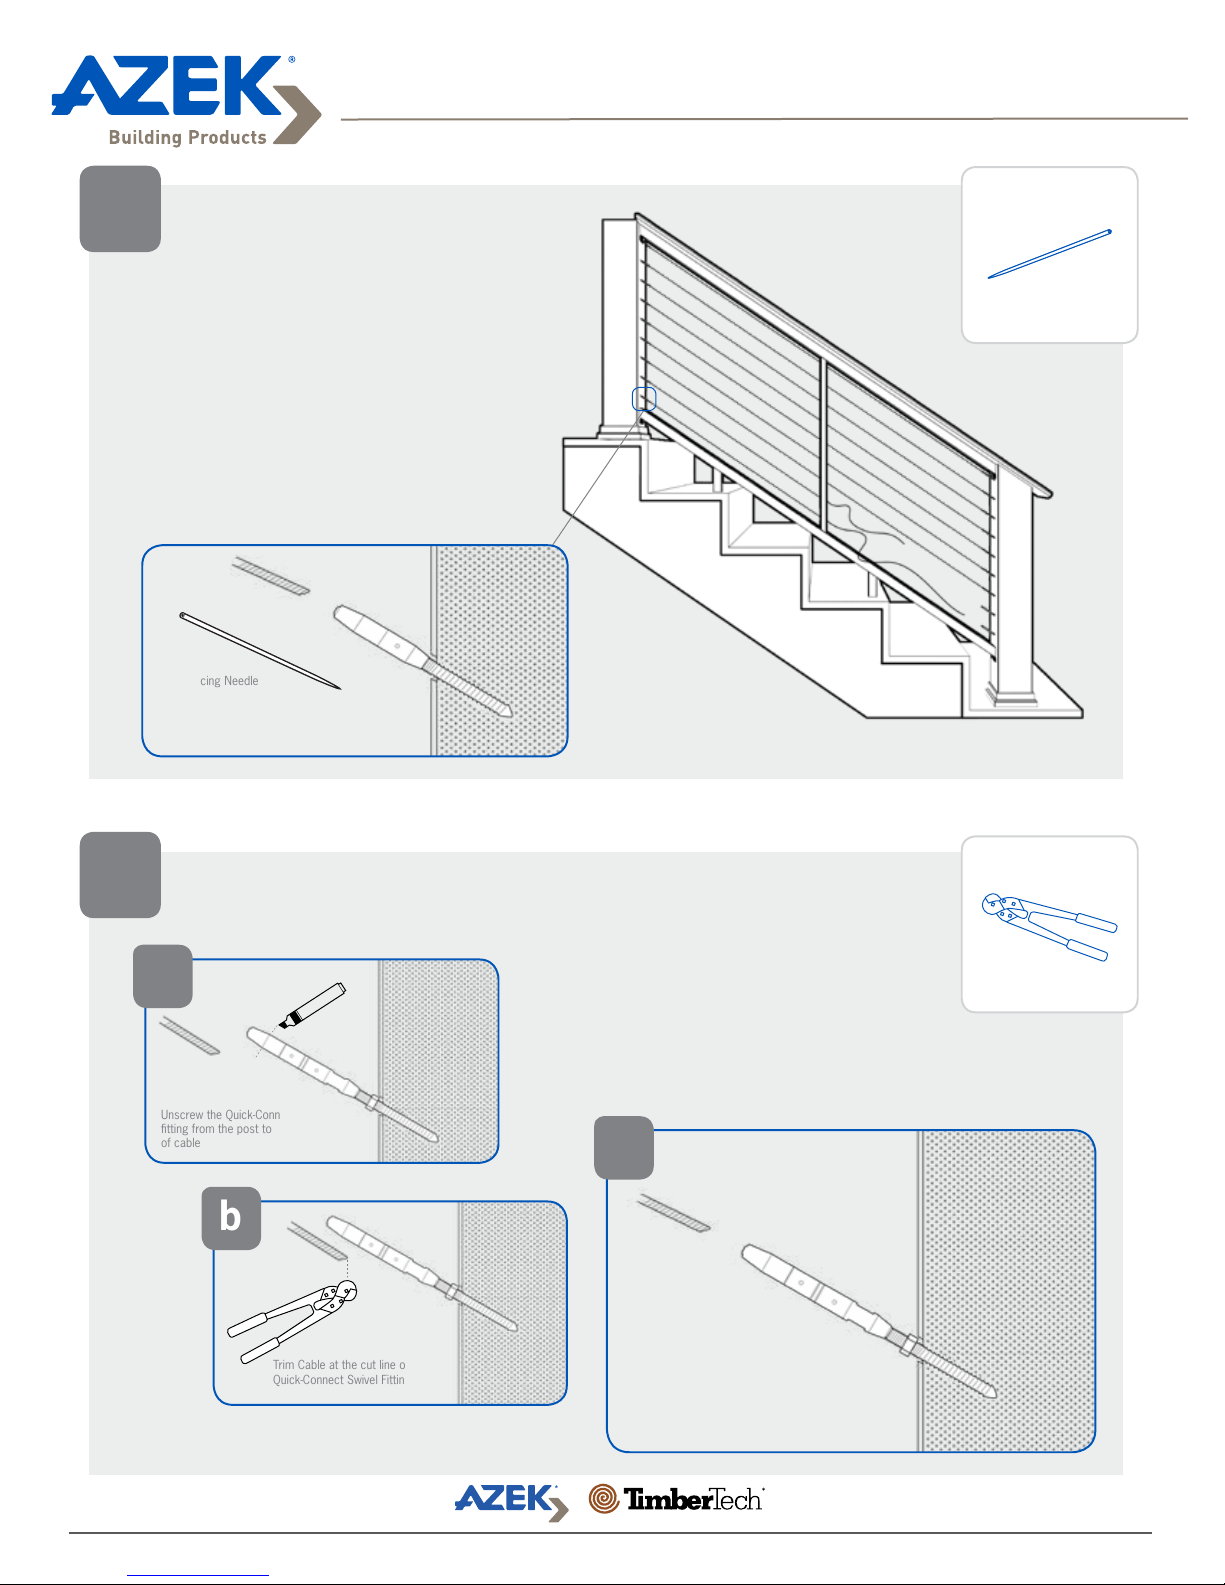
Installing CableRail by Feeney® Stairs
for Evolutions Rail™ Contemporary
5
THREAD CABLE
• When all of the hardware
is in place, insert one
end of the Cable into the
Quick-Connect fitting.
• Feed the Cable through
the Intermediate Baluster
(or through posts) with a
lacing needle.
Lacing Needle
6
CUT CABLE TO LENGTH
a
Unscrew the Quick-Connect swivel
fitting from the post to measure length
of cable
b
Trim Cable at the cut line on
Quick-Connect Swivel Fittings
c
Insert Cable into QuickConnect swivel fittings
Page 18
Page 19
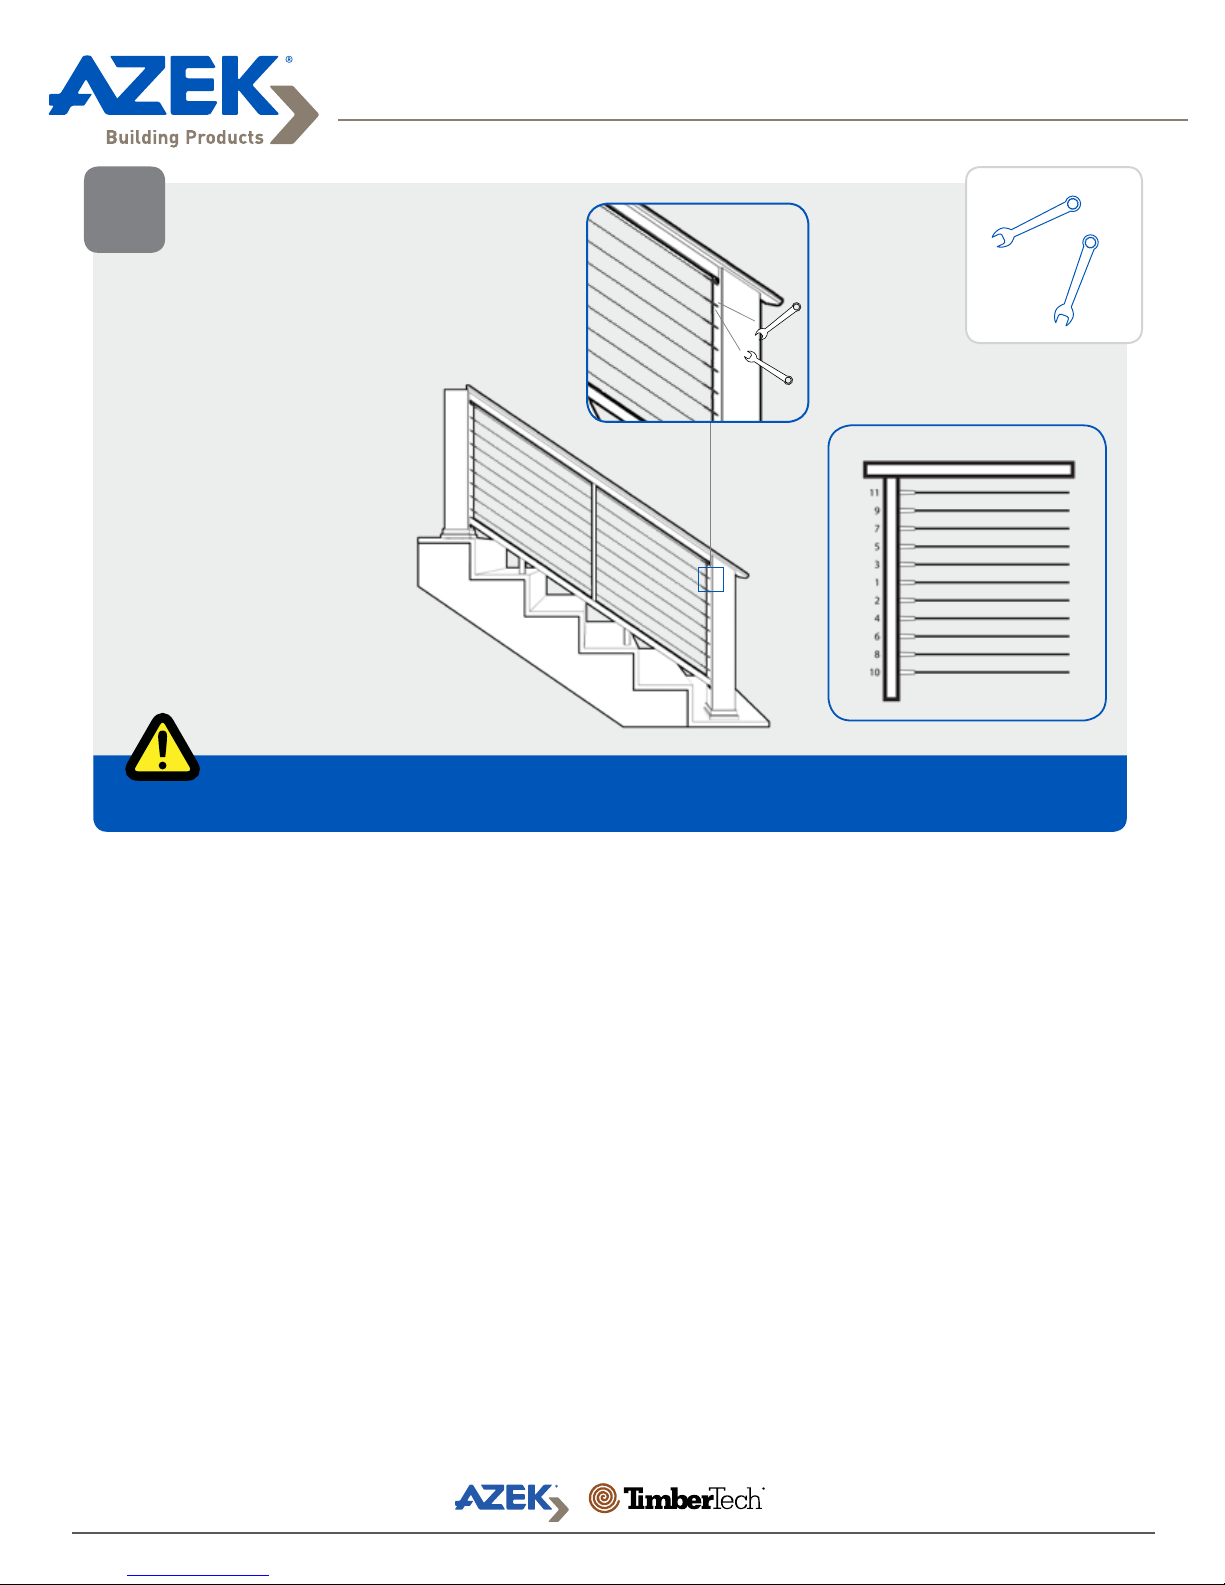
Installing CableRail by Feeney® Stairs
for Evolutions Rail™ Contemporary
TIGHTEN CABLE
7
• Use a set of 3/8”
open-ended wrenches to
tighten the Cable using
the “swivel” end insuring
the Cable does not twist.
• Once the Cable is
tight, tighten the lock
nuts against the QuickConnect swivel fittings
If necessary, the Cable can be removed from the Quick-Connect fitting by using the
Quick-Connect Release Tool
3/8” open
ended wrenches
Tightening Order
Page 19
Page 20

The AZEK Company
1330 W. Fulton Street, Suite 350
Chicago, IL 60607
AZEK.com | TimberTech.com
©2018 AZEK Building Products LIT-EVRAILINSTALL-CABLE | REV 11/18
Page 20
 Loading...