

Page 1
TRIM MOULDING DECK PORCH RAIL PAVERS
AZEK Deck
Install Guide
Installation Guidelines .......................................................................................................... 2
Tools Required ....................................................................................................................... 2
Installation Preparation ........................................................................................................3
Working with AZEK Deck Boards ...................................................................................... 3
CONCEALoc® Hidden Fasteners .......................................................................................6
Stair Code Compliance ....................................................................................................... 11
Trimming an AZEK Deck .................................................................................................... 12
Care and Cleaning ............................................................................................................... 13
Warranty ............................................................................................................................... 14
Notes ...................................................................................................................................... 15
Page 2
Installation Guidelines
Visit http://azek.com/technical-center/installations/deck.aspx to view AZEK installation videos.
AZEK Deck/Rim Joist Covers/Riser should be installed using the same good building principals used to
install wood or composite decking and in accordance with the local building codes and the installation
guidelines included below. AZEK Building Products Inc. accepts no liability or responsibility for the
improper installation of this product. AZEK Deck/Rim Joist Covers/Riser may not be suitable for every
application and it is the sole responsibility of the installer to be sure that AZEK Deck/Rim Joist Covers/
Riser is t for the intended use. Since all installations are unique, it is also the installer’s responsibility to
determine specic requirements for each Deck application. AZEK Building Products recommends that all
applications be reviewed by a licensed architect, engineer or local building ofcial before installation. If
you have any questions or need further assistance, please call AZEK Customer Service at 1-877-ASK-AZEK,
(877) 275-2935 or visit our website at www.azek.com.
Tools Required
AZEK Deck/Rim Joist Covers/Riser can be installed with a minimum number of readily available tools.
Many other tools are available that can be used for installation. All tools should be used per applicable
manufacturers’ instructions. Some of the basic tool requirements:
• Cordless Driver • Carpenter Square
• Chalk Line • Spacing Tools
• Tape Measure • Miter Saw
• Jig Saw • Safety Glasses
Use the jigsaw to cut around obstructions such as posts. For best results a miter saw with a ne-toothed,
carbide-tipped nish trim blade (12”-60 tooth minimum) works well for cutting. For a power miter or
compound power miter saw a ne nish alternate top bevel blade is also recommended. When working
with AZEK products be sure to wear proper clothing and safety equipment. Safety glasses should be
used during the entire installation process. Do not use any cordless saws.
STOP! Read this section before you start!
For most current care and cleaning, technical information and more, visit www.azek.com.
AZEK Deck
AZEK does not recommend the use of rubber or
vinyl products (welcome mats, planters, etc.) on
deck boards. A reaction can occur that causes
discoloration of the decking under the rubber/vinyl
product. This is a common caution for vinyl decking
products. Do NOT nail AZEK Deck boards. Cutting
or drilling metal should not be done on AZEK Deck
boards as metal shavings may be come hot and
embed themselves into the deck boards. Always be
sure to check and cut the factory cut ends of boards
to ensure they are square.
Walking Surface
AZEK deck boards need to be installed embossed
side up.
Static Electricity
Static build-up is a natural occurring phenomenon
that can occur with many plastic products including
PVC Decking. It could occur with AZEK products
under the right environmental conditions.
Cantilevering
For best results, don’t cantilever over 1/2”.
Routing
AZEK Deck/Rim Joist Covers/Riser should not be
routed with the exception of the start/stop boards
in the XLM Collection (see page 6 step 8).
Color and Grain Patterns
Color variation is purely aesthetic and does not or
will not affect the performance of the product.
Note
AZEK Deck is NOT intended for use as columns,
support posts, beams, joist stringers, guard
railing or other primary load-bearing members.
AZEK must be supported by a code-compliant
substructure. While AZEK products are great
for deck re-planking (removing old deck surface
boards and installing AZEK on code-compliant
substructure), AZEK Deck Boards CANNOT be
installed on top of an existing deck.
Failure to install AZEK Deck products in accordance with applicable building codes and this Installation
Guide may lead to personal injury, affect deck system performance and void the product warranty.
Page 2
Page 3
Working with AZEK Deck Boards
Extreme Heat Warning
Be aware of excessive heat on the surface of
AZEK products from external sources, such as but
not limited to, re or reection of sunlight from
energy-efcient window products. Low-emissivity
(Low-E) glass can potentially harm AZEK
products. Low-E glass is designed to prevent
passive heat gain within a structure and can cause
unusual heat build-up on exterior surfaces. This
extreme elevation of surface temperatures, which
exceeds that of normal exposure, can possibly
cause AZEK products to melt, sag, warp, discolor,
increase expansion/contraction, and accelerate
weathering.
Excessive Construction Debris
It is important during construction, the deck’s
surface stay clear from excessive build-up
of dirt, sand, and dust from tile, concrete,
landscape blocks, or any other masonry
products. If these materials are not removed
immediately, the deck surface will become
difcult to clean and can potentially damage
the deck’s surface nish.
Do not use AZEK Deck as a work surface.
If a build-up does occur please refer to
the Care and Cleaning section in AZEK’s
installation guide or website, AZEK.com.
Current or potential AZEK customers that have
concerns about possible damage by Low-E glass
should contact the manufacturer of the product
which contains Low-E glass for a solution to reduce
or eliminate the effects of reected sunlight.
Installation Preparation
Follow these guidelines for best deck installation:
• AZEK Deck Boards are one-sided products. Deck Boards are to be installed with the grain side up for
the walking surface. Rim Joist Covers are to be installed grain side out.
• AZEK Rim Joists are one-sided with exception to the XLM Collection.
• Prior to installation, check to make sure all joists are level, structurally sound, and there are no nails or
screws protruding.
• Ensure that all joists are crowned correctly and that all joists are level across the top as AZEK Deck will
conform to the surface contour of the substructure.
• Proper joist spacing is required for proper installation. Joist spacing should never exceed 16” on center.
For a more rigid feel, 12” may be preferred.
• For best results, installing solid wood blocking between each joist, placed every 4’ - 6’ within the
structure, can help reduce movement or twisting of the joists. Limiting joist movement can help reduce
excessive gapping and also ensure more uniform nished surface of the AZEK Deck.
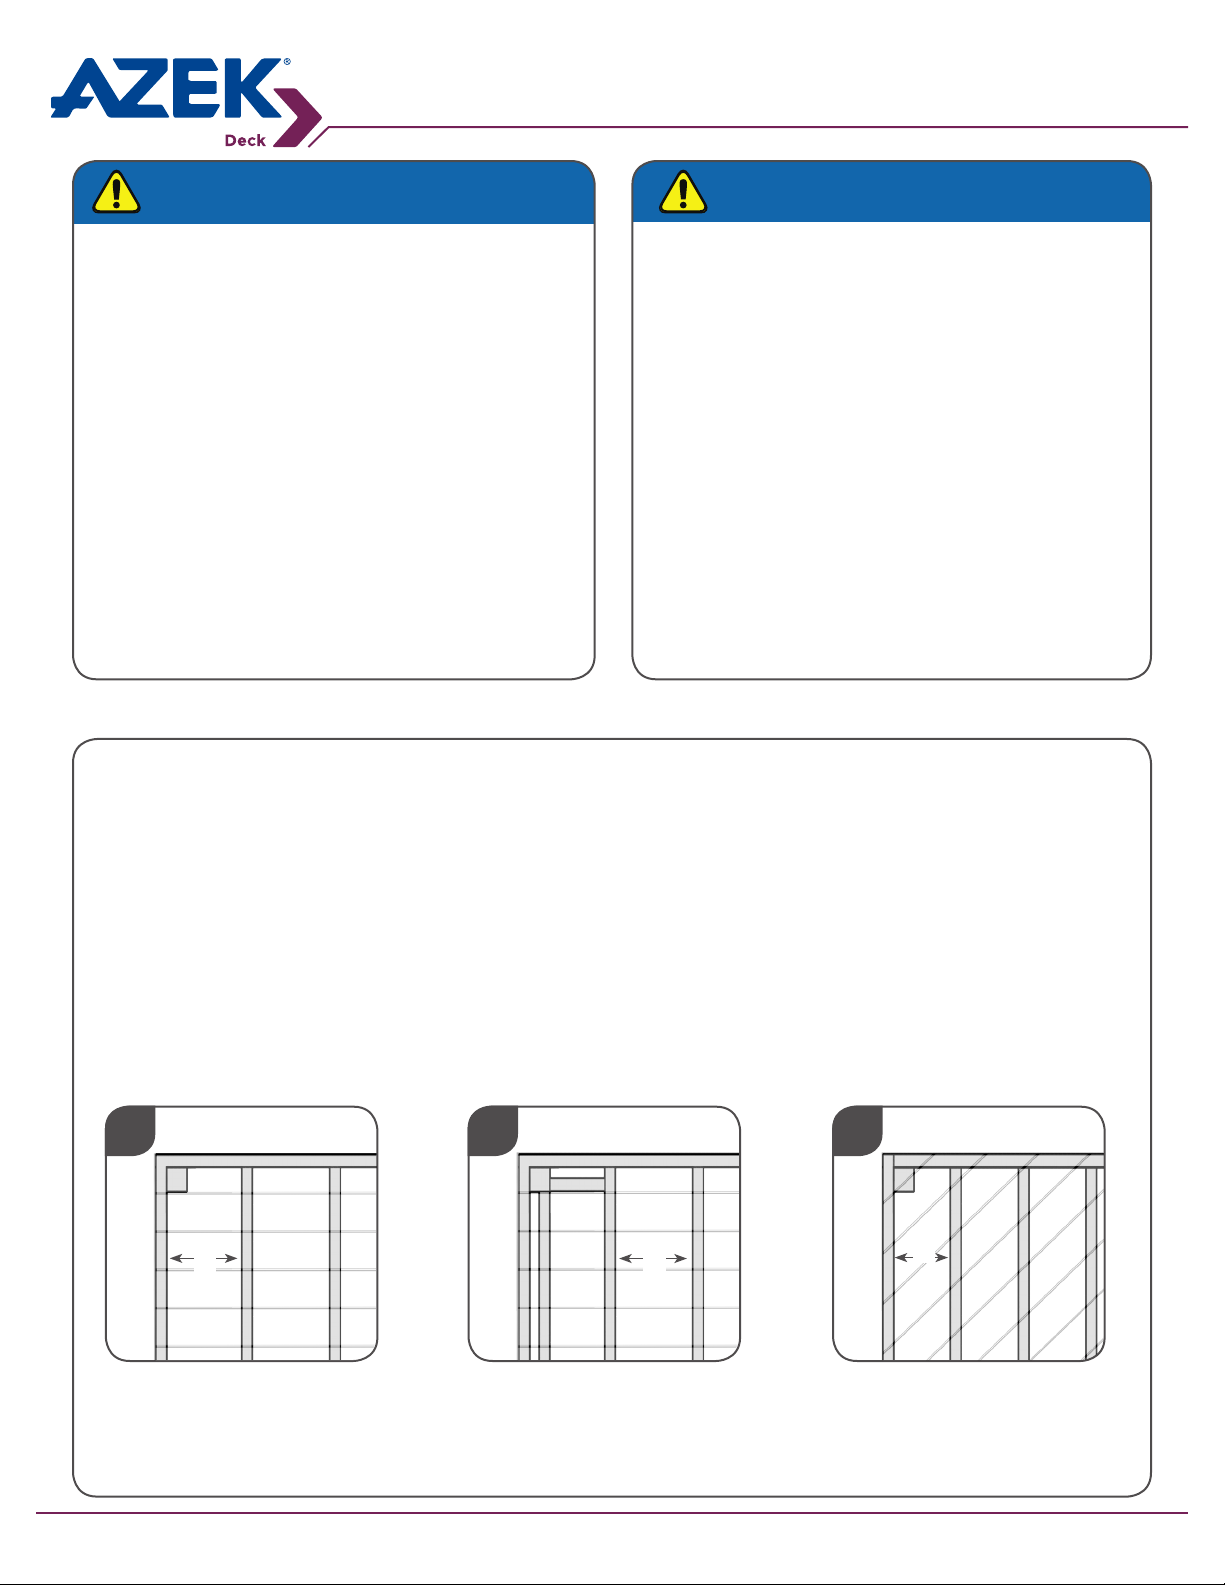
1 2 3
16”
16”BASIC INSTALLATION
SUBSTRUCTURE
16” on center maximum joists.
(12” on center for commercial
applications)
PICTURE FRAME INSTALLATION
SUBSTRUCTURE
16” on center maximum joists plus
additional support for picture
frame structure (12” on center for
commercial applications)
Page 3
16”
12”
DIAGONAL INSTALLATION
SUBSTRUCTURE
12” on center maximum joists.
More severe angles may require
closer joist spacing.
Page 4
Working with AZEK Deck Boards
Expansion and Contraction
AZEK Deck/Rim Joist Covers/Riser will have expansion and contraction with changes in temperature,
unlike wood whose size will uctuate with moisture changes. The expansion and contraction encountered
may result in slight gaps, which might be noticed at the ends of boards or in splice joints. Fastening the
deck boards according to the Installation Guidelines will help minimize expansion and contraction.
• Expansion/contraction is most signicant where extreme temperature change may exist.
• Best practice is to cut and fasten the deck boards as soon after cutting as possible.
• Install the boards together tightly at splices or miters.
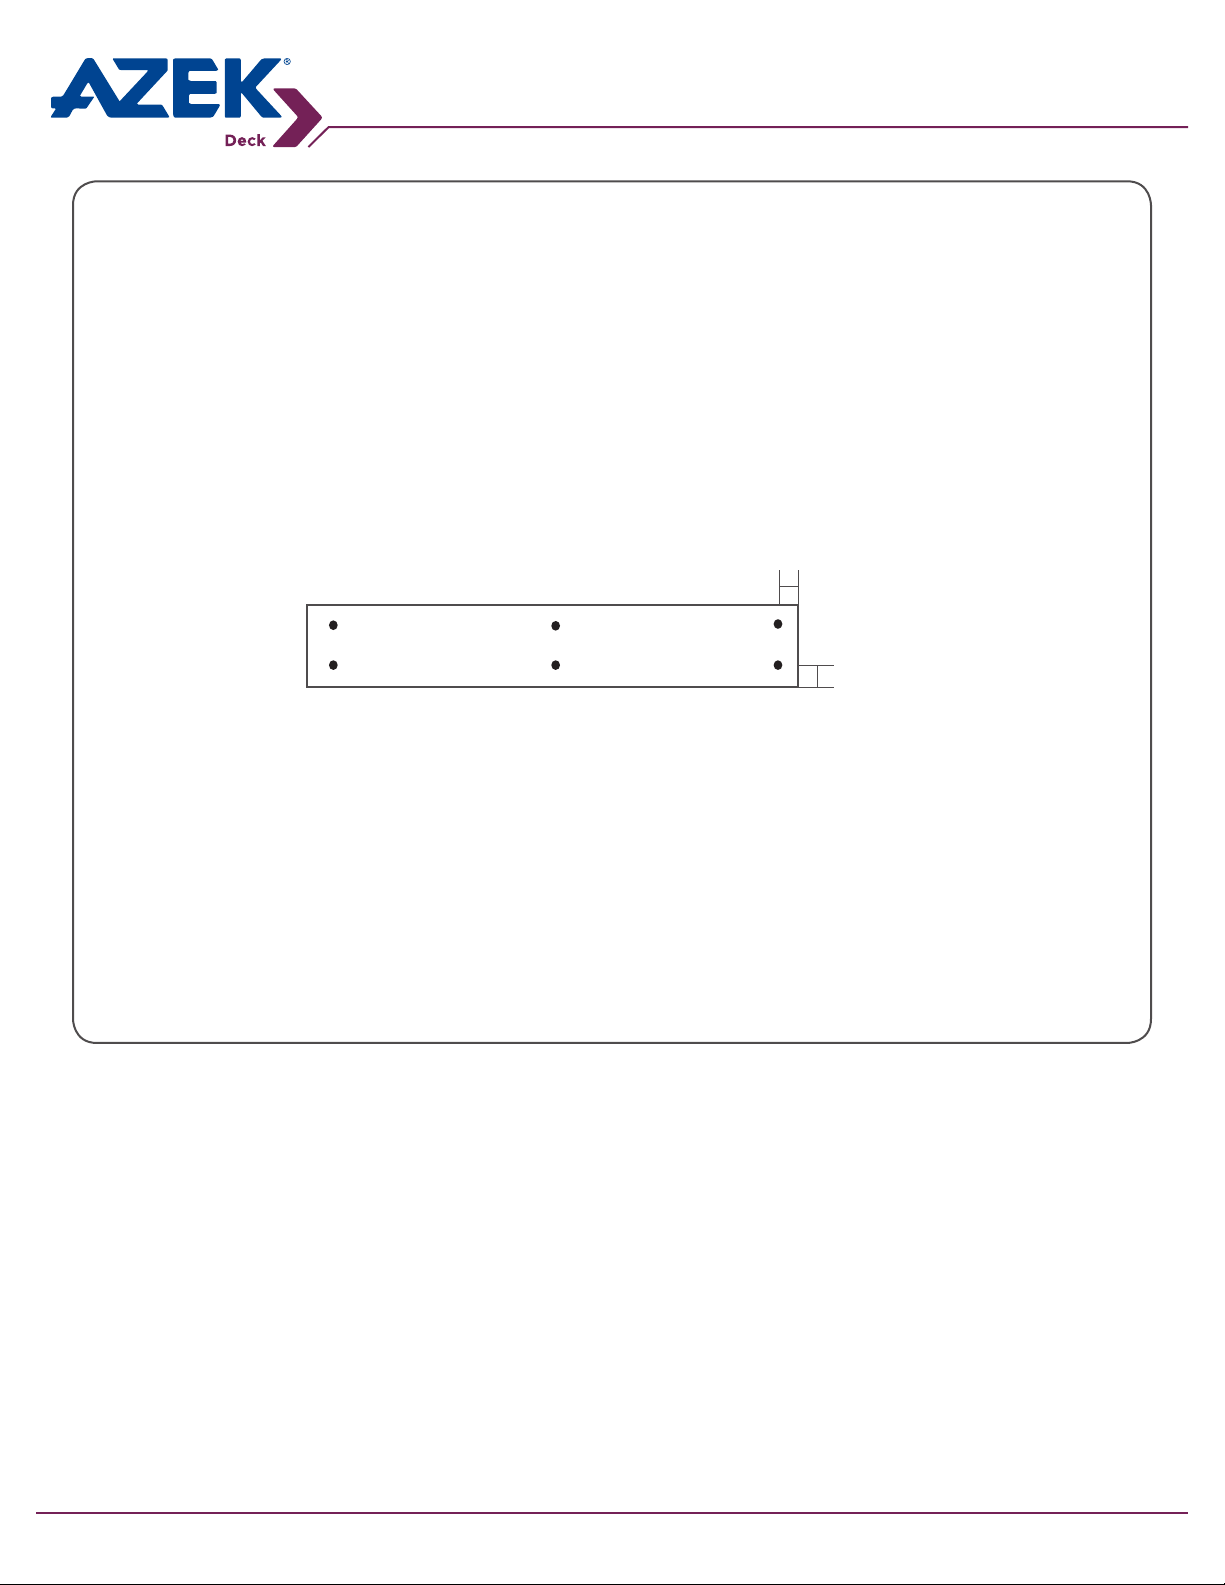
• Be sure to fasten ends of boards, splices, or abutments to building or structure securely into framing
using 2 screws. Position the screws at or within 1/2” of each board end or joint and 3/4” from side of
deck plank.
1/2”
3/4”
• Provide a 1/8” to 1/4” side to side gap between deck boards.
• In areas with obstructed airow such as roofs and on-grade applications, a minimum of 1-1/2” sleeper
system supported by and connected to the substructure over which the deck is built is required.
• All deck frames and substructure should be securely attached to ground footings or building
structure. No oating substructures should be used (from preparation section AZEK).
• For best results, stagger splices and miters across deck surface so that all splices and miters do not
break on the same joist or beam.
• To further minimize expansion and contraction, proper ventilation and air ow should be considered.
• Some area building codes may require double joisting when joining boards end to end. Double
joists are always required at butt joints when using CONCEALoc. Always check with your local code
authority for specic requirements before installation.
Page 4
Page 5
Working with AZEK Deck Boards
Fasteners
• Due to the durability of AZEK deck products, a high-quality fastener is recommended that meets the
following specications:
• Stainless Steel
• Minimum Screw Size: #7
• Face screws to be a minimum length of 2 1/4”
• Be sure that screws are driven to a minimum depth of 1 1/4” into solid wood framing below the
bottom of the AZEK Deck Board. This will enhance holding power and uplift resistance.
• Avoid using athead screws. Trim head screws typically provide a better result. As always, you should
try the fastener in a sample board before using on your deck.
• Be sure to install 2 screws per joist on each deck board.
• For salt water coastal applications, we suggest using the above minimum fastener requirements in 316
stainless steel.
• Color-matched stainless steel deck screws are also available. Your AZEK Building Products dealer can
assist with more information on these products.
• AZEK does not recommend any fastener that is not explicitly stated in the AZEK Decking and
Installation Guide. Use of any alternative fastener does not void the AZEK warranty; however, if a
decking failure is caused by using one of these alternative fastening methods, any corresponding
claims will be denied.
• Many of these fasteners have either not been tested, or directly affect the performance of AZEK
products. As such, AZEK is not comfortable recommending them.
• Hidden Fasteners: for Arbor, Harvest and Terra Collections.
• Tiger Claw® TC-P, Fastenmaster’s Cortex®, HIDfast™, and CAMO™ fasteners are some hidden
fastener systems commonly used by contractors installing AZEK Deck. Before using other
types of hidden fasteners, check with the manufacturer of the fastener and/or AZEK customer
service to ensure compatibility.
• WARNING: When installing AZEK Deck with hidden fasteners, always use a beater board against side
of deck board. Do not strike deck board directly with hammer or rubber mallet.
*Tiger Claw is a registered trademark of Tiger Claw Incorporated. Cortex is a registered trademark of Handy & Harman Corporation. HIDfast is a
trademark of HIDfast. CAMO is a trademark of National Nail Corporation.
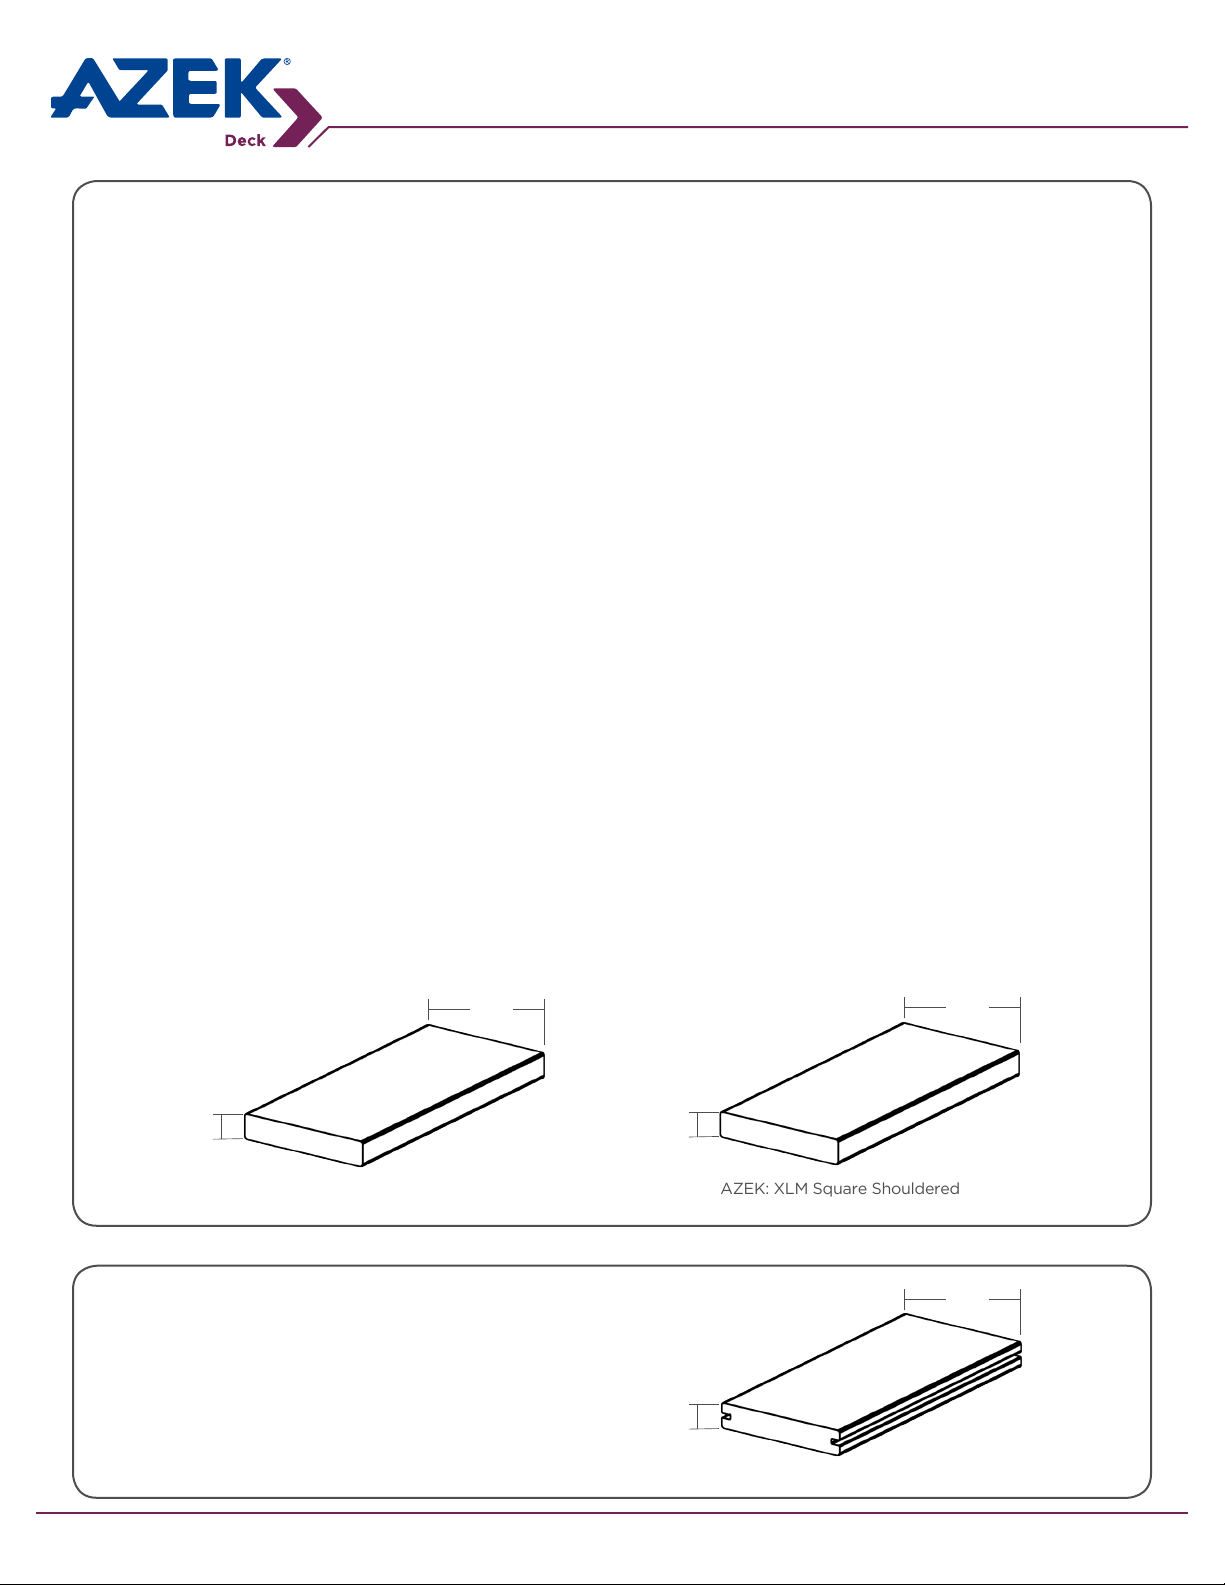
Solid Deck Boards
1”
AZEK: Arbor, Harvest, &
Terra
5.50”
XLM Collection Grooved Deck Boards
1”
AZEK: XLM Square Shouldered
5.50”
5.50”
Use AZEK CONCEALoc Hidden Fasteners. Follow the
directions on the CONCEALoc bucket, box or page 6
of this guide.
1”
AZEK: XLM Grooved
Page 5
Page 6
CONCEALoc® Hidden Fasteners Installation
CONCEALoc® Hidden Fasteners for use with AZEK XLM Collection Deck Boards
CONCEALoc & Accessory Installation Instructions
• CONCEALoc Hidden Fasteners – retail box for 100-square-foot coverage or bulk bucket for 1,000-square-
foot coverage. Includes stainless steel screws.
• CONCEALoc Gun Pail – 500-square-foot coverage for use with the fastener installation gun sold separately
by TigerClaw. Includes quality coated pneumatic fasteners. Stainless steel fasteners for coastal applications
available through TigerClaw.
• L-Bracket – avoid face-screwing by using the L-Bracket on rst and last boards or as a butt seam clip to
ensure a fastener-free surface.
• CONCEALoc Router Bit – cut the correct groove dimension on a solid plank for a perfect CONCEALoc
fastener t even allows for cutting an installed plank over a joist.
CONCEALoc® Hidden Fasteners Installation Instructions
Tools Needed
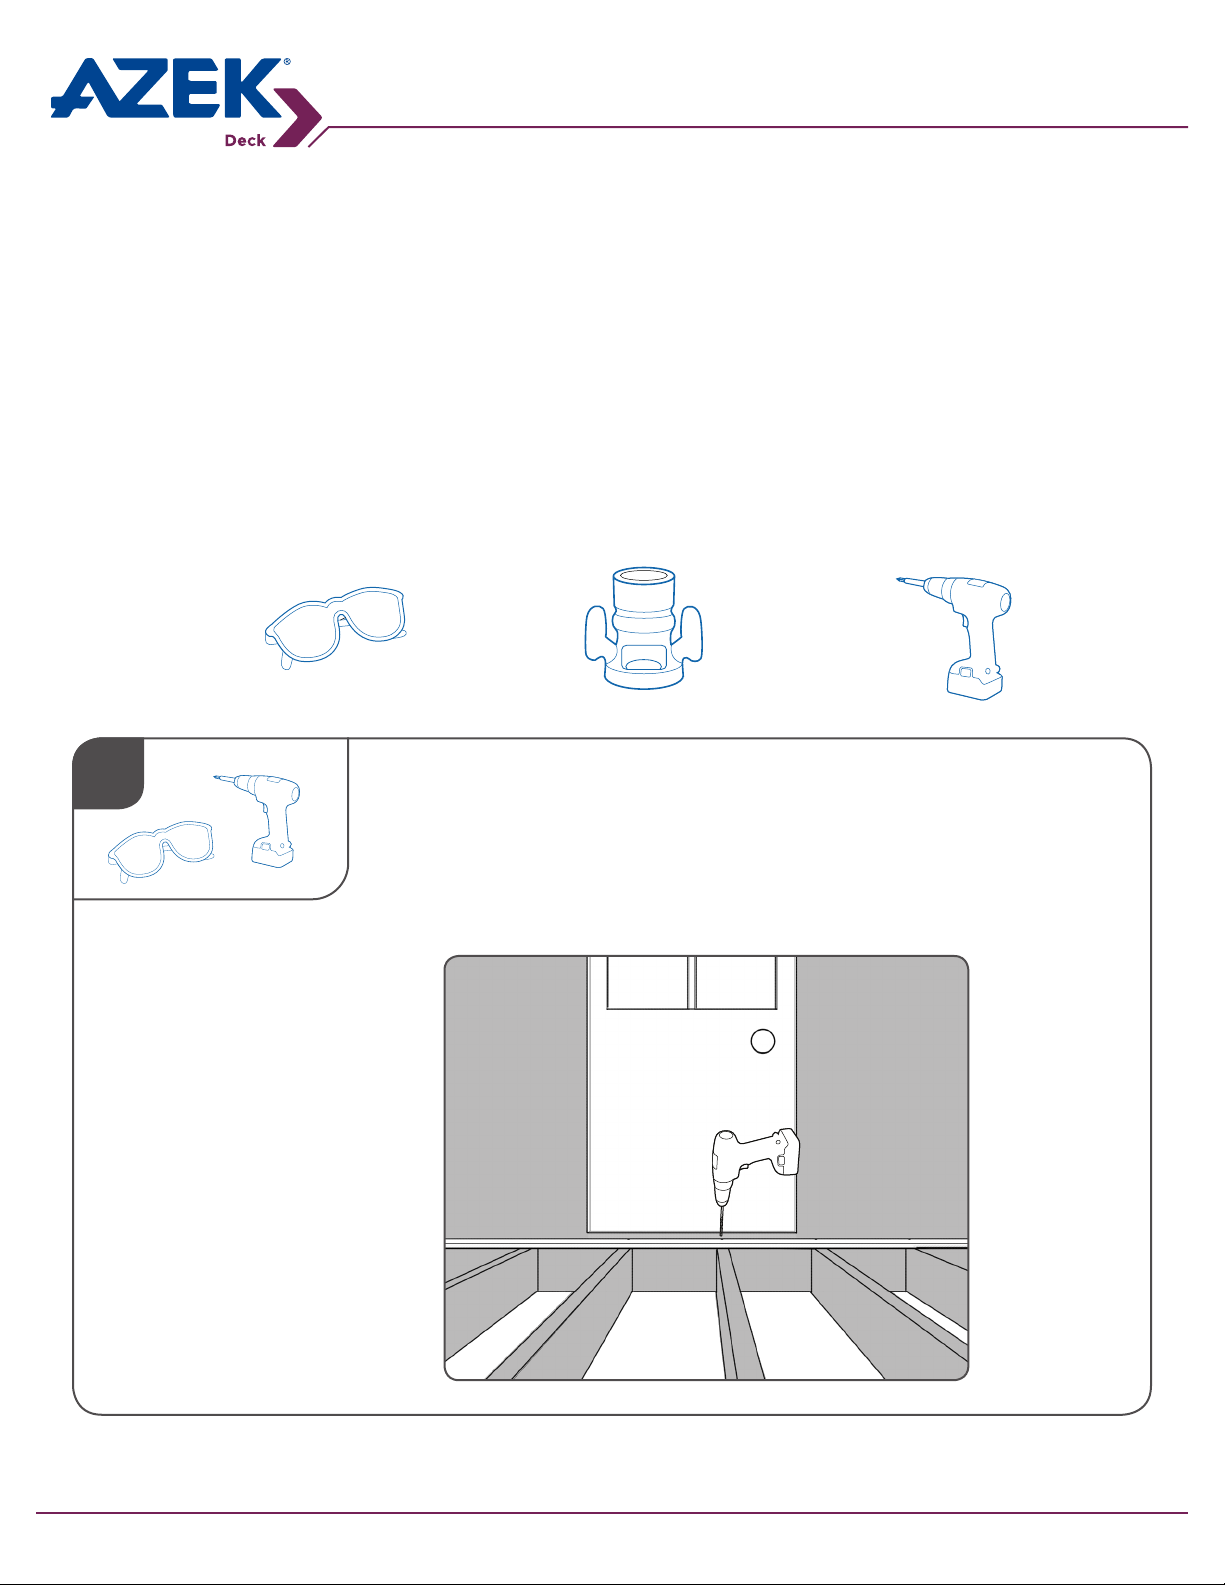
1
Safety Glasses
Router with Slot
Cutting Blade
(Optional)
INSTALL THE FIRST PLANK
• Fasten outer edge of the rst plank at each framing support 1” from the
edge using #7- 2 1/4” deck screws. For a complete fastener-free surface,
the L-Bracket or Cortex can be used on rst and last boards.
• For further CONCEALoc L-Bracket or Cortex installation help please
refer to the installation guide found in the retail packages.
Drill
Page 6
Page 7
CONCEALoc® Hidden Fasteners Installation
CONCEALoc® Hidden Fasteners Installation Instructions
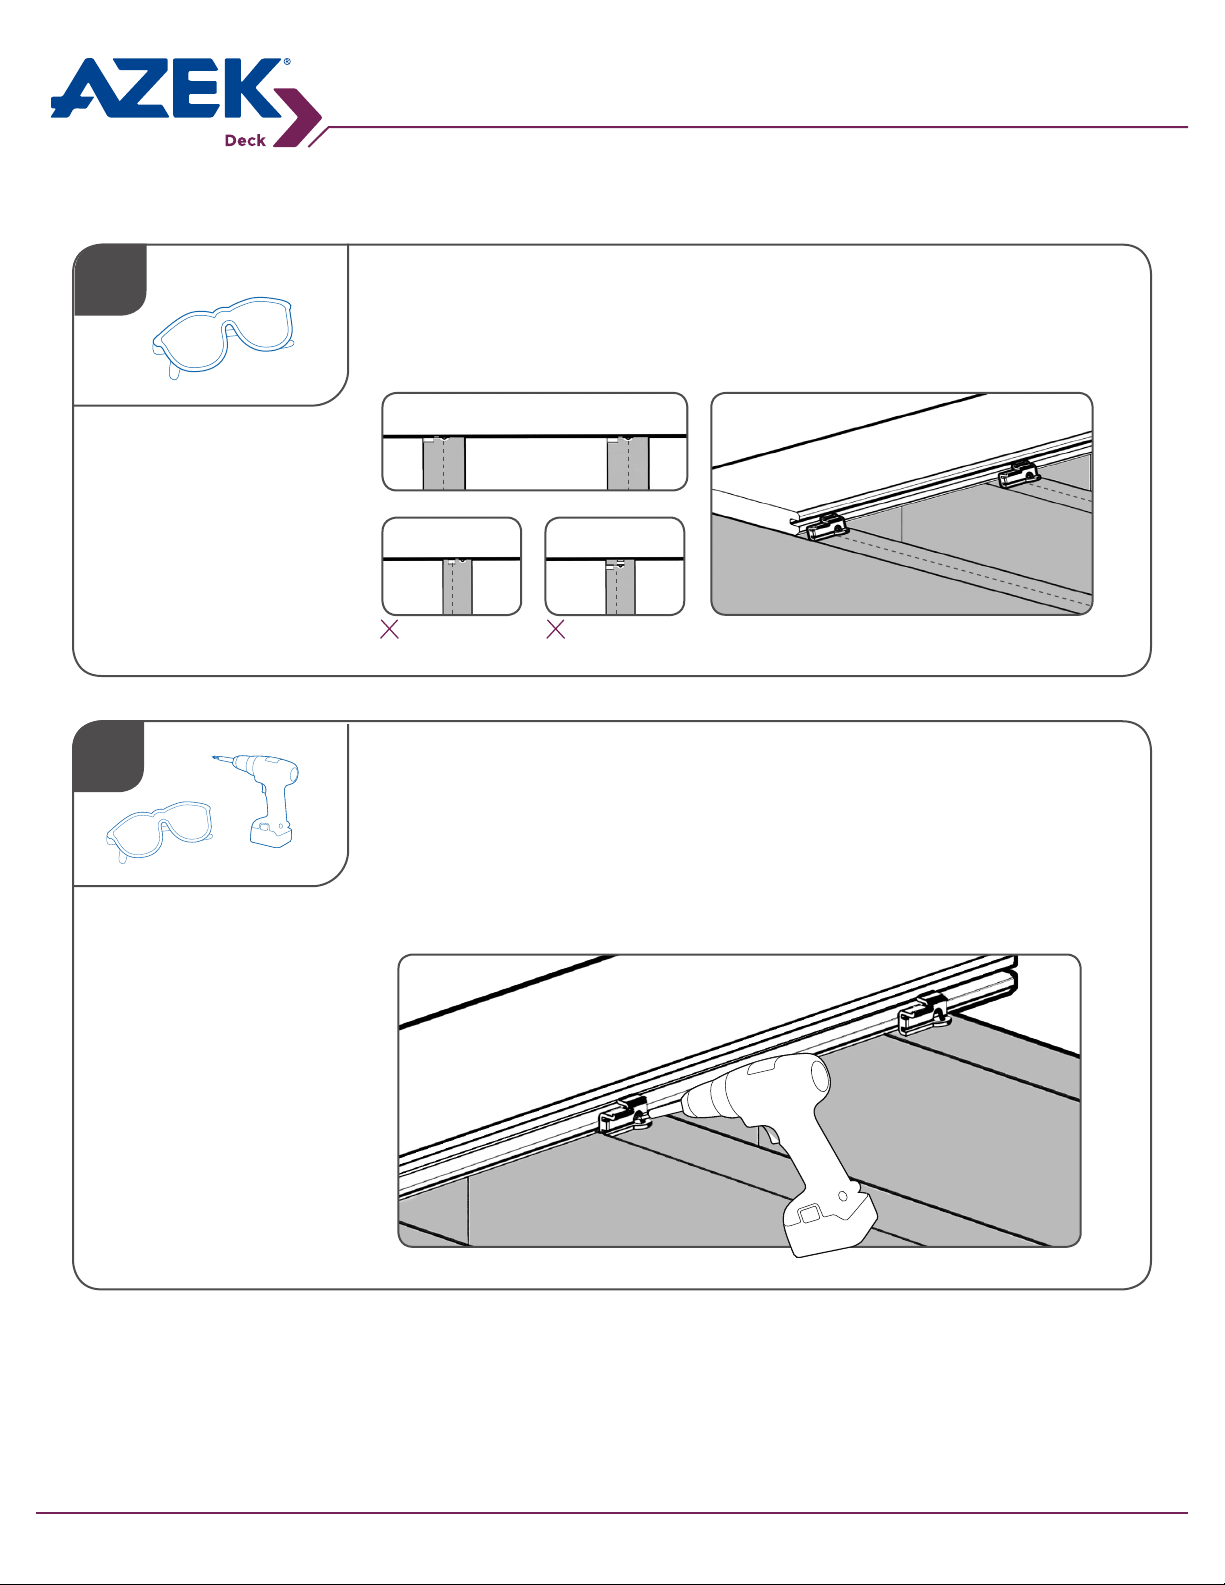
2
3
POSITION CONCEALoc FASTENERS
• Fully insert the CONCEALoc fastener into grooved edge of plank.
Screw hole should be lined up with the center of support joist.
Correct
Incorrect
INSTALL CONCEALoc FASTENERS
• Install provided screw at 45° angle through the fastener and into the joist
while applying pressure on the fastener.
• Install one fastener and screw at each joist.
• Make sure fastener is in full contact with edge of plank and the screw is
holding the fastener down tight to the deck board.
Incorrect
Correct
Page 7
Page 8
CONCEALoc® Hidden Fasteners Installation
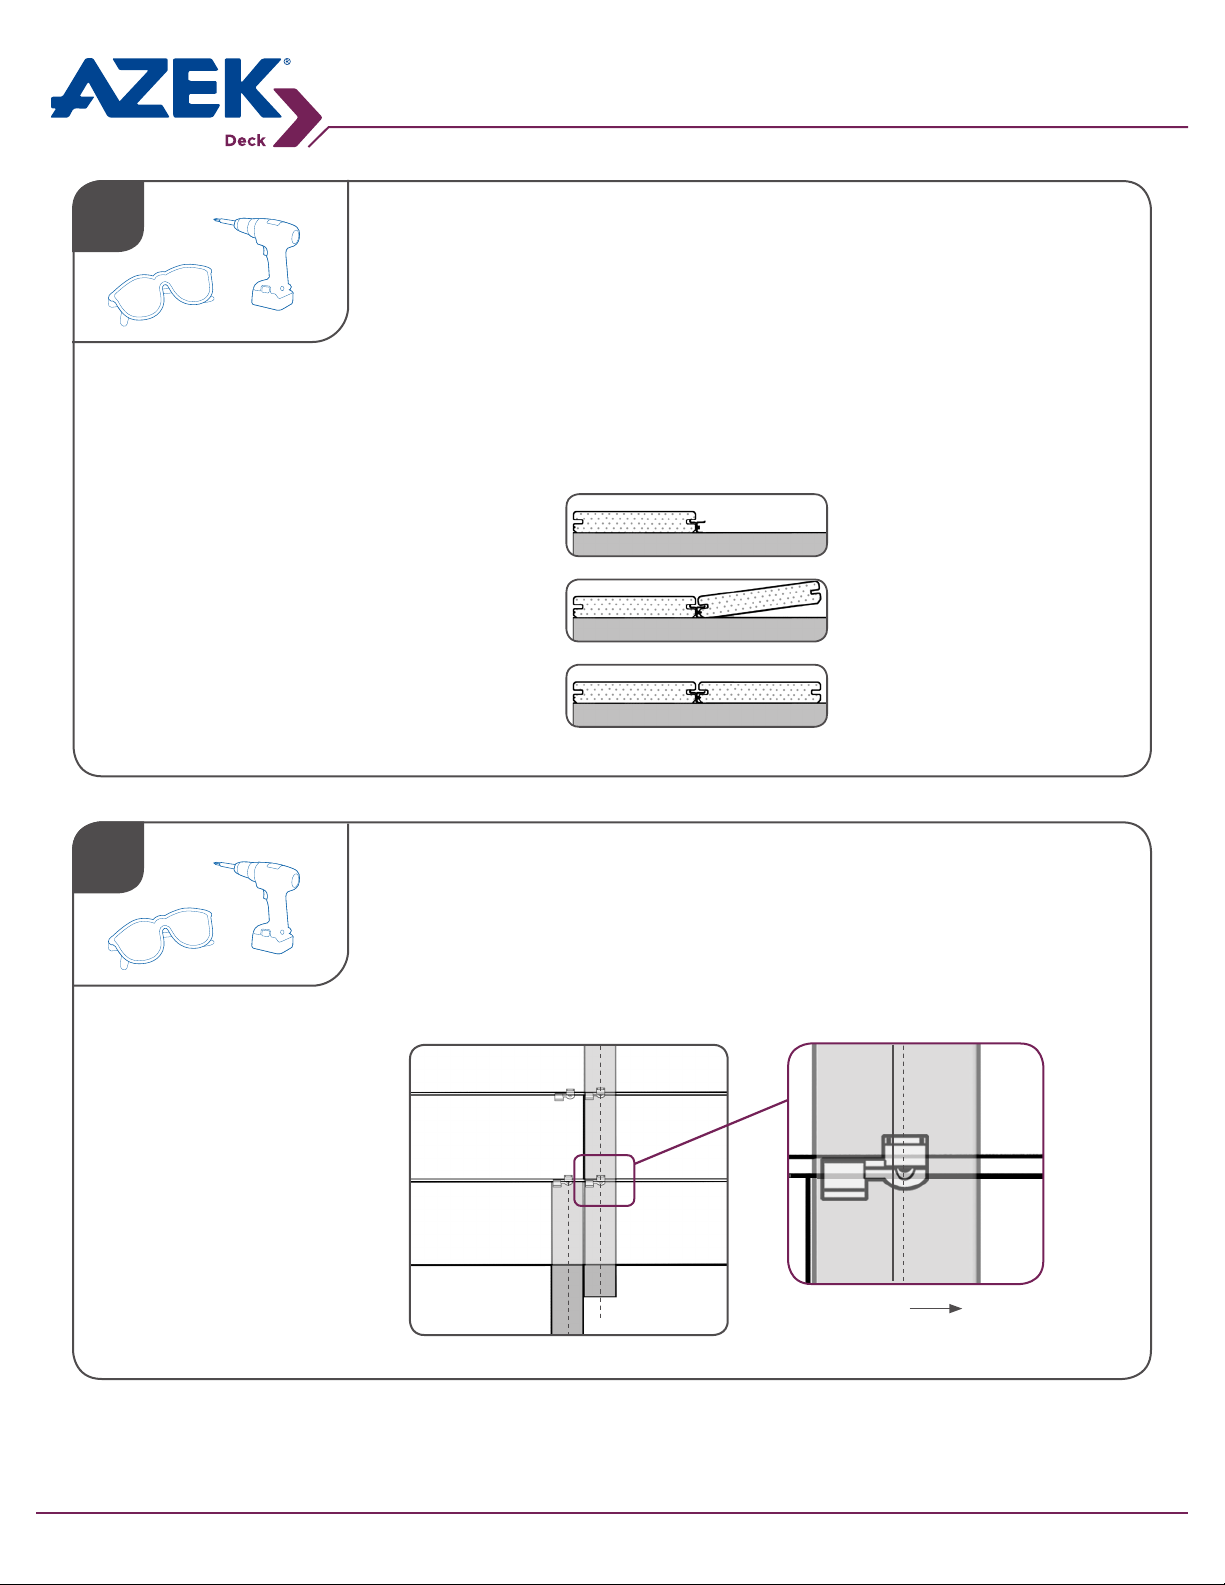
4
COMPLETE INSTALLATION
• Place the next plank into position against the fasteners. Slightly raise the
outer edge of the plank being installed and slide it onto the fastener until
the plank contacts the spacer tab. When properly installed the inserted
plank should be in contact with the bent-forward spacer tab at the left
end of the clip. To achieve this use a scrap piece of decking at least 24”
in length and use it as a tamping block to drive the plank further onto
the clip and the screw will fully engage the plank to the spacer tab if not
already in contact.
• Do not use a hammer or damage to the edge of the plank may occur.
a.
b.
c.
5
HOW TO INSTALL AT BUTT JOINTS
(UNLESS USING AZEK L-BRACKET)
• Joists at butt joints must be doubled up for proper fastener attachment.
• Install fasteners as detailed below. Note that the two clips on the right
are shifted approximately 1/4” to the right of center on the joists. If this
is not done the spacer tab may fall within the gap of the butt joist.
Offset 1/4”
From Center
Page 8
Page 9
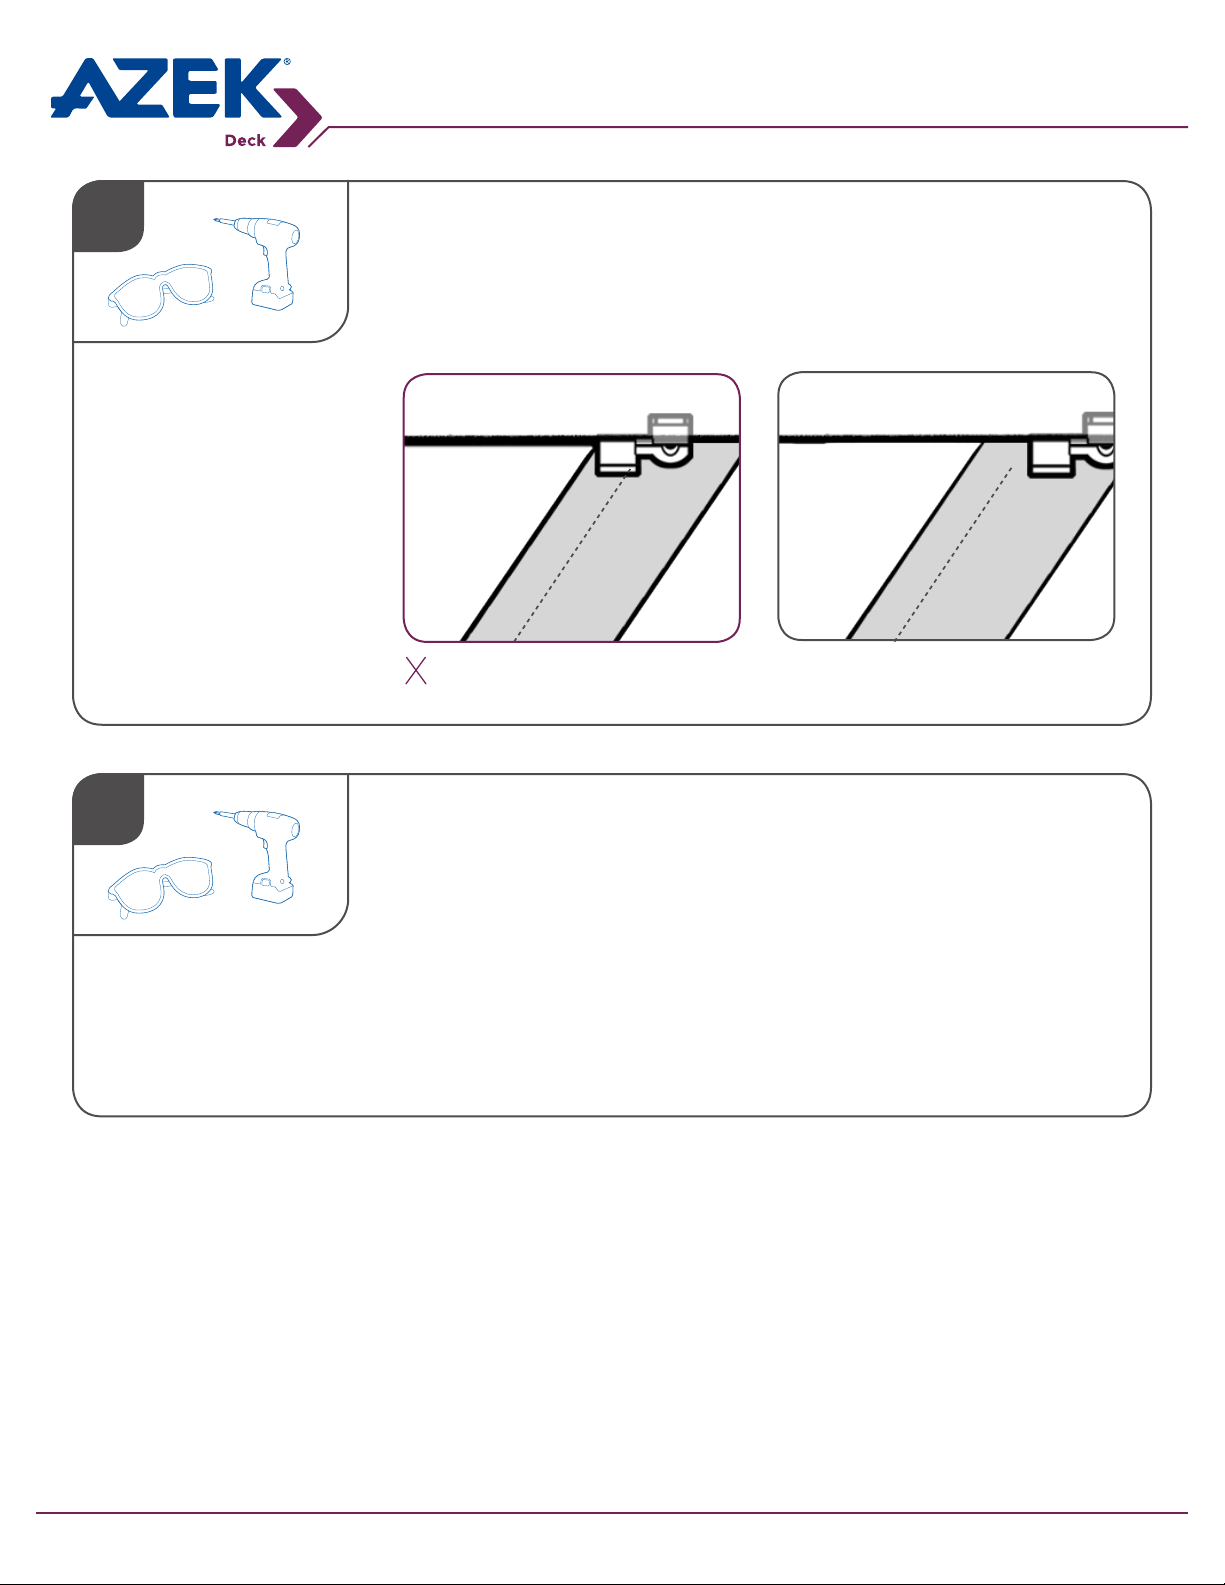
CONCEALoc® Hidden Fasteners Installation
6
HOW TO INSTALL ON DIAGONAL
• When the deck is located in a corner of the house, start with small
triangular piece of decking in the corner and work your way out.
• Offset the clip 1/2” to the right of center line of the joist, so screw will not
exit the side of the joist when driven.
Incorrect Correct: Shift over 1/2”
7
HOW TO REPLACE A PLANK
• Make two parallel cuts down the center of the board to be replaced,
then remove the center piece.
• Using a small pry bar, remove the remaining pieces of decking from
the tabs.
• Using a reciprocating saw, remove the tabs on the side of the board with
the screw heads showing.
• Position new board into place, and drive onto remaining tabs.
• Once the board is set into position, secure the loose edges with L-Bracket,
Cortex, stainless steel, or high-quality coated deck screws.
Page 9
Page 10
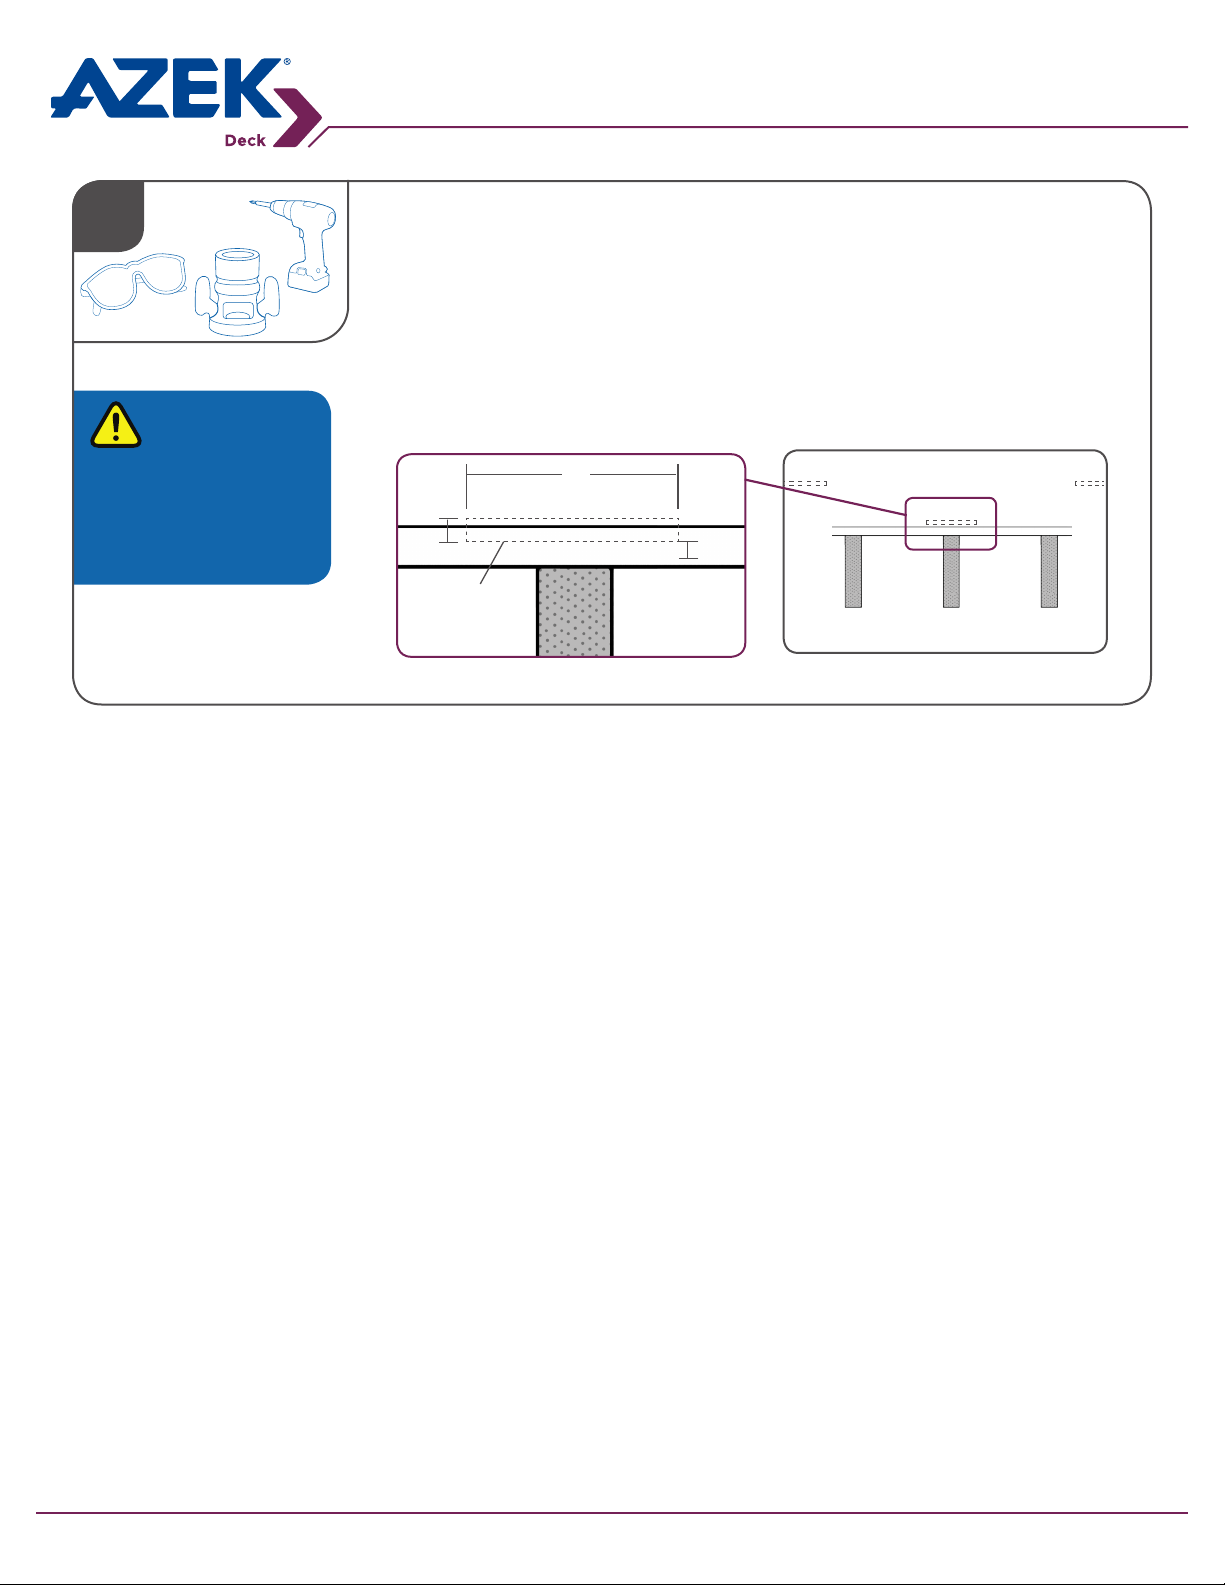
CONCEALoc® Hidden Fasteners Installation
8
Do not use
CONCEALoc®
Hidden
Fasteners or
L-Brackets
for stair
installation.
TO USE CONCEALoc® HIDDEN FASTENERS WITH AZEK XLM
COLLECTION SOLID DECK BOARDS
• Create a 2” long groove on the edge of the plank at every joist.
• Use AZEK’s CONCEALoc Groove Cutting Router Bit or a Freud model
#56-112 or Bosch model #85610M 1/4” slot cutting bit.
• Flip the plank over and start the groove 3/8” off the bottom of the plank.
• Set the depth of the cut from 7/16” to 1/2” deep.
2”
1/4”
3/8”
3/8”
Depth
Page 10
Page 11
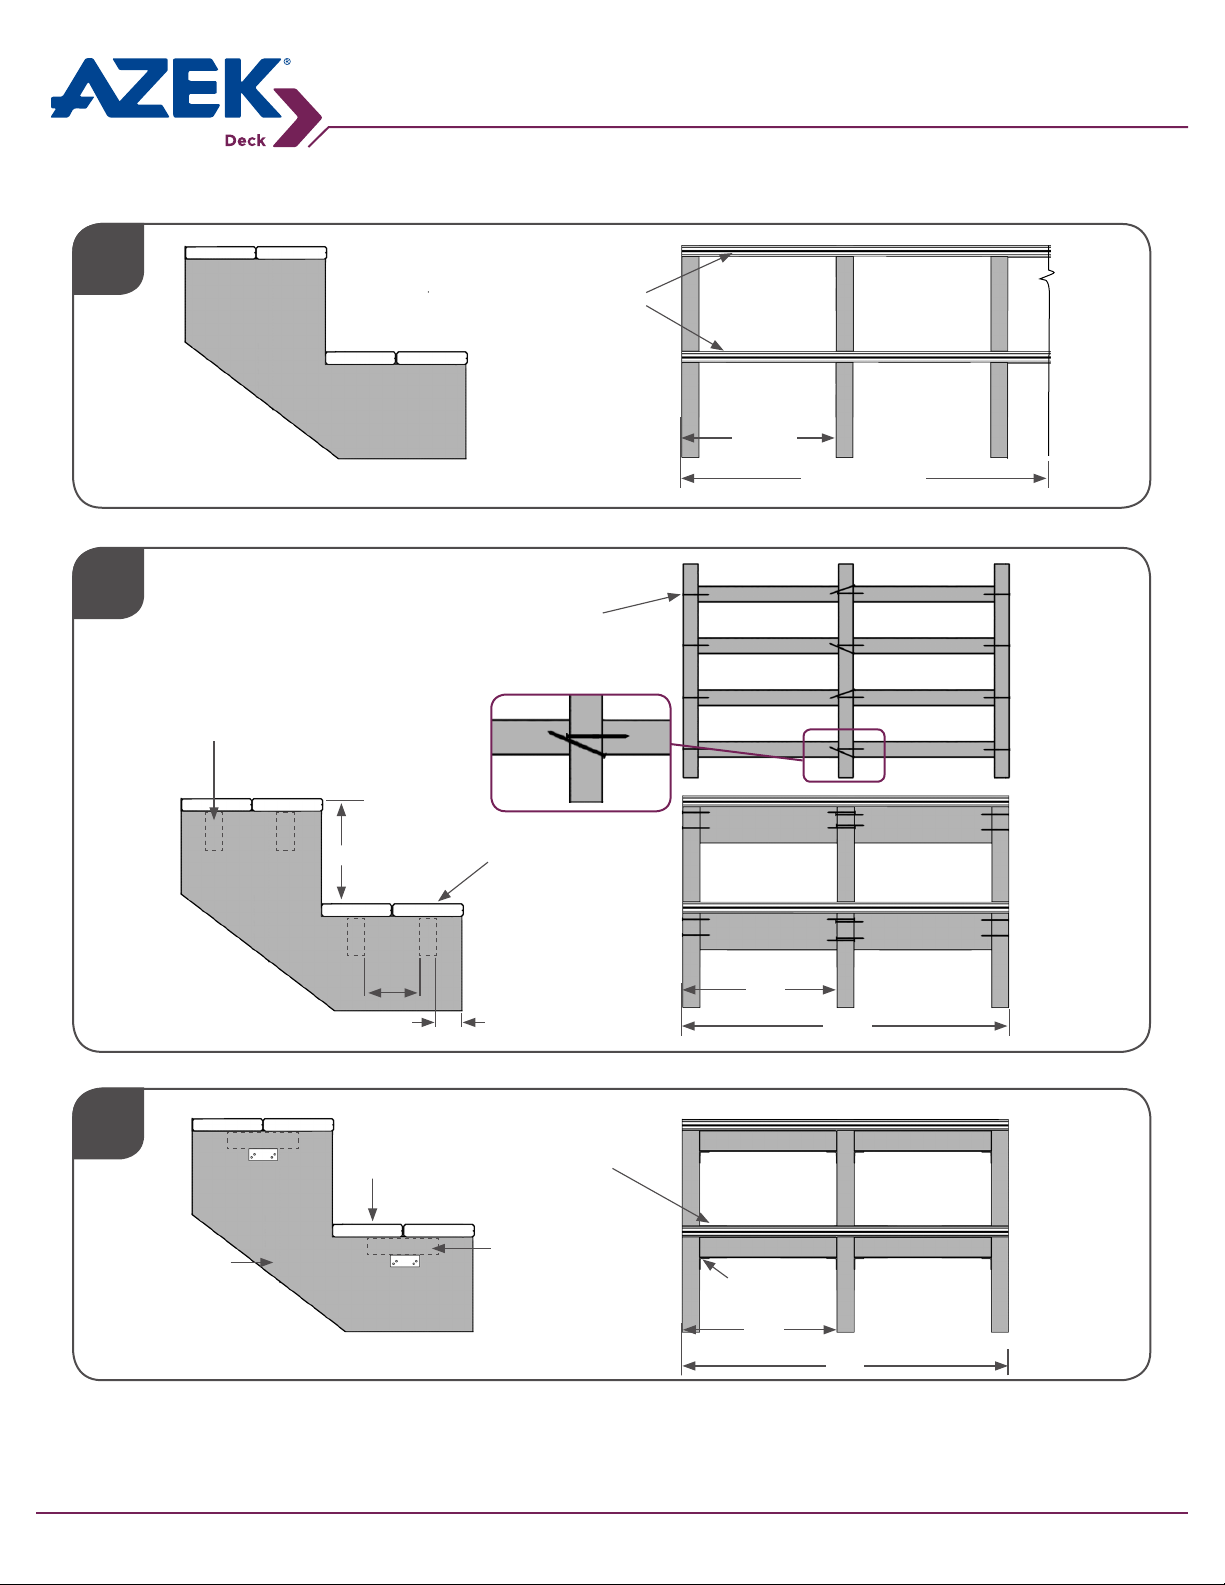
Stair Code Compliance
In order to meet the AC174 Requirement for stair loading, follow one of the methods below:
1
AZEK 1x6 Decking
attached to
Stringers using (2)
#7 x 2 1/4” Screws
9.00”
Maximum
26.00” Minimum
2
3
Attach 2 x 4 treated pine
centered under treads using
pneumatic framing nailer.
Nail positions as shown.
7.50”
AZEK
Deck
Tread
4.25”
3 1/4” x .0131
roundrive framing
nail in locations
shown using
pneumatic nailer.
AZEK Deck Board
(Typical)
1.875”
AZEK Deck Board
attached to Stringers
using 2 Screws/
Stringers.
24.0”
49.5”
Stair Stringer
Treated Pine
Angle
Brackets
17.25”
36”
Installing Stairs
• Stairs should be constructed per local code requirements.
• Use XLM Riser Board or a AZEK ripped Rim Joist Covers for riser installation.
Page 11
Page 12
Trimming an AZEK® Deck
AZEK Deck Rim Joist Covers
• 12’ lengths – 1/2” thick by 11.7” wide.
Arbor Collection
· Acacia®, Morado®, Redland Rose®, Silver Oak®
Terra Collection
· Sedona®, Tahoe®
Harvest Collection
· Clay, Brownstone, Slate Gray, Modena®, Kona®
XLM Natural (available in two surface nishes)
· Mountain Cedar, RiverRock, SandRidge
AZEK Stair Risers
• Use as a riser for stairs.
• Can also be used as a Rim Joist Cover for a 2x8
rim joist.
• See fastening guidelines for Rim Joist Covers
• 12’ lengths and 1/2” thick x 7-1/4” wide.
XLM Deck Natural (available in two surface nishes)
· Mountain Cedar, River Rock, Sand Ridge
XLM Deck Tropical (available in two surface nishes)
· Walnut Grove, RusticBark, Harvest Bronze
XLM Tropical (available in two surface nishes)
· Walnut Grove, RusticBark, Harvest Bronze
Fastening Methods: AZEK Rim Joist Cover/Riser Installation Guidelines
Recommended Fasteners
• Due to the durability of AZEK Deck products, a high-quality fastener is recommended that meets the following
specications:
• Stainless Steel
• Minimum Screw Size: #7
• Face screws to be a minimum length of 1 3/4”
• Avoid using athead screws. Trim head screws typically provide a better result. As always, you should try the
fastener in a sample board before using on your deck.
• For salt water coastal applications, we suggest using the above minimum fastener requirements in 316 stainless
steel.
• Color-matched stainless steel deck screws are also available. Your AZEK Building Products dealer can assist with
more information on these products.
Storage
• Store rim joist cover in a cooler, shady area prior to installation.
• Store rim joist covers on a at solid surface.
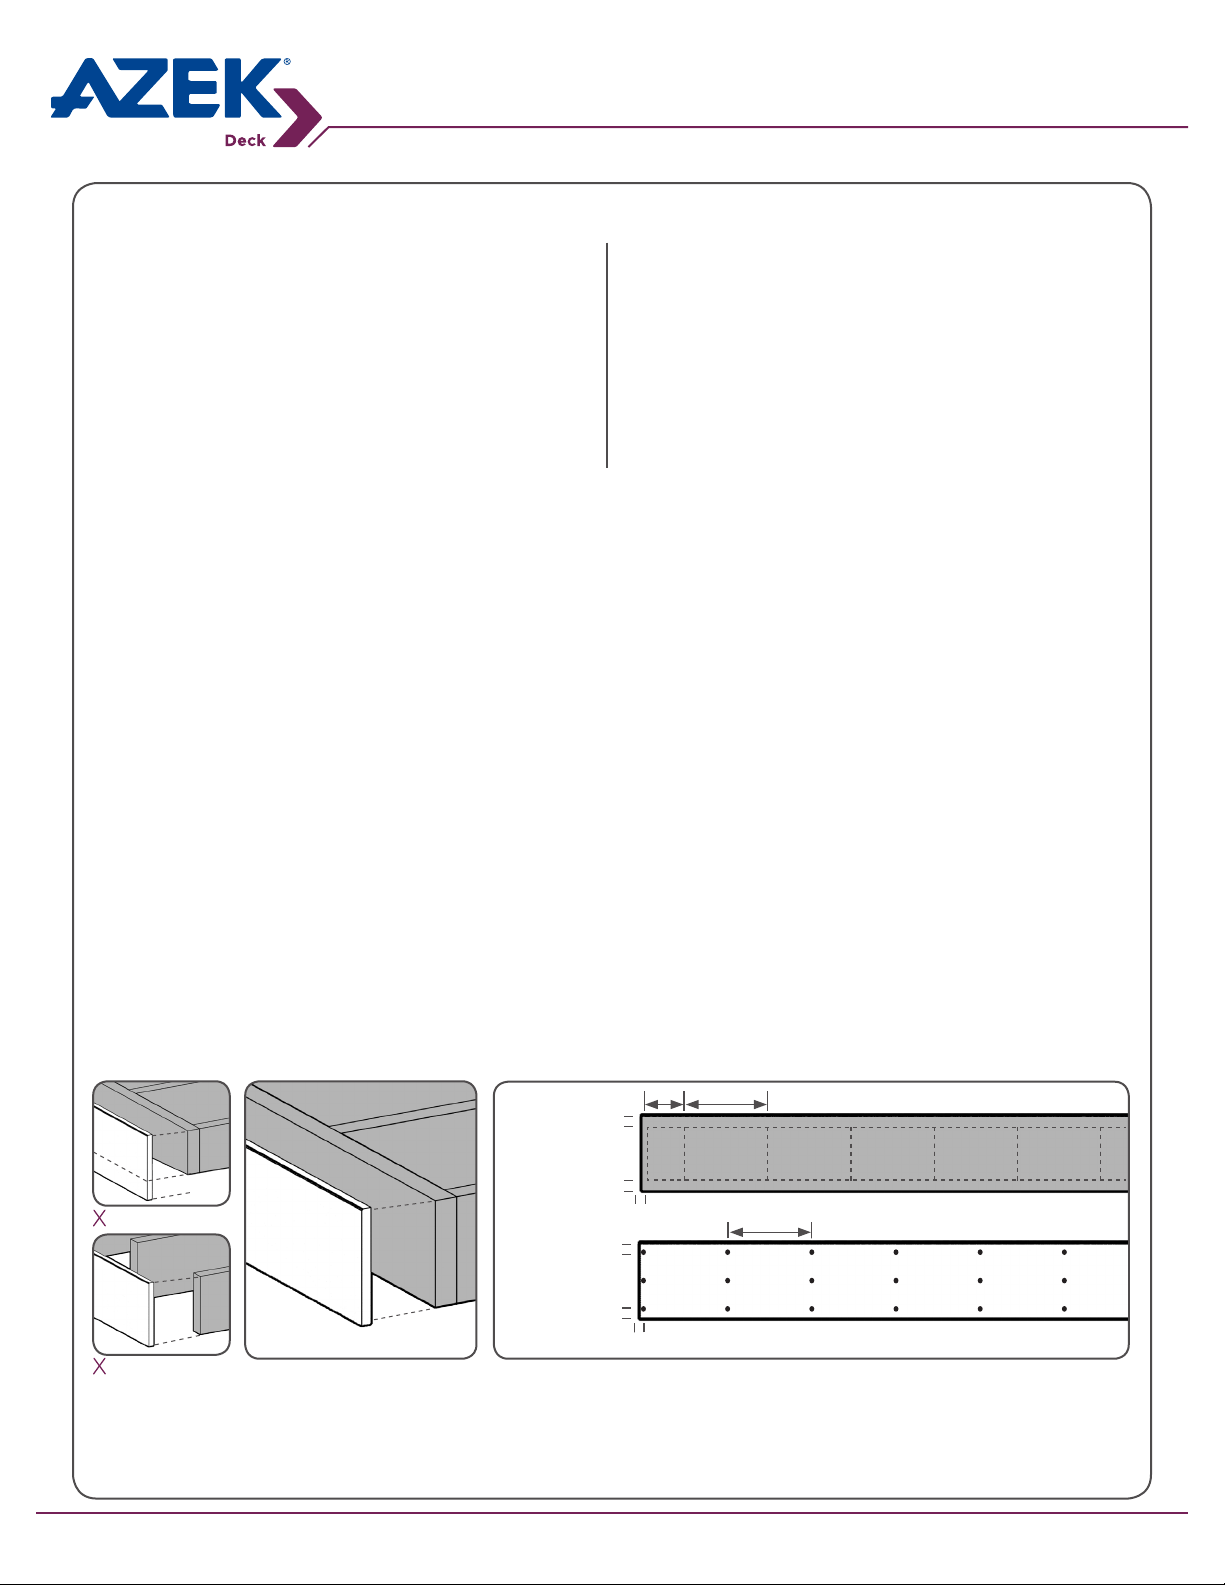
Rim Joist Cover/Riser Attachment
• Attach rim joist cover to a solid backer wide enough to support the entire width of the rim cover. Use 2 x 12 wood
rim board or rip cut rim joist cover to t exactly.
• Use a quality exterior rated construction adhesive as shown below.
• Install three (3) screws from top to bottom with top and bottom screws positioned no more than 1/2” from the edge
as shown below. The third screw should be approximately centered in the board. Repeat this conguration every
12”. Screws at ends of boards should be no more than 1/2” from the end.
6”
12”
12”
Incorrect: Overhang
Incorrect: Missing
Solid Backer
Correct
Construction
Adhesive
Screws
On Rim
Joist
Cover
1”
1”
1”
1/2”
1/2”
1/2”
The techniques shown above should be used for best results. Results may vary as expansion and contraction could still occur. AZEK Building Products Inc. claims
no liability or responsibility for the improper installation of this product. Since all installations are unique, it is the sole responsibility of the installer to determine
specic requirements in regard to each decking application. AZEK Building Products recommends that all designs be reviewed by a licensed architect, engineer or
local building ofcial before installation. Please contact AZEK Customer Service prior to installing if you have question or concerns.
Page 12
Page 13
Care and Cleaning
Storage & Handling
• Store AZEK Deck, Porch, & Rim Joist Covers
on a at and level surface.
• Store products in a cool, shady area prior to
installation.
• Do not stack bundles over 8 units high.
• Always leave factory applied protective
wrap, If stored outdoors, the product must be
covered with non-translucent material.
• Use care when handling product with a forklift
as forks can easily damage the material.
• If banding is used, use protective corners to
prevent indents from the bands.
• Avoid storing AZEK Deck, Porch, Rim Joist
Covers, & Riser in areas of excessive heat.
Considerations
• Depending on environmental conditions, AZEK
Deck, Porch, Rim Joist Covers, & Riser colors
may appear to lighten over time as part of the
natural weathering process.
• Please be aware that excessive heat build on
the surface of AZEK products from external
sources such as, but not limited to, re or
reection of sunlight can potentially lead
to damage. For example, sunlight which
may be reected by low-emissivity (Low-E)
glass can potentially lead to damage of
exterior building products, including AZEK
Deck, Porch, & Rim Joist Covers, Riser,
Trim, Moulding or Railing products, due to
elevation of surface temperatures which far
exceed that of normal exposure of the same
materials to direct sunlight. Possible damage
by such reected concentrated light may
include melting, sagging, warping, distortion,
surface discoloration, increased expansion or
contraction, and unusual weathering.
• Static build-up is a natural occurring
phenomenon that can occur with many plastic
products including PVC Decking. It could
occur with AZEK products under the right
environmental conditions
• Although AZEK Deck & Porch products
are cooler to the touch than many other
deckboard products in similar colors, all
decking products will get hot in the sun.
Additionally, the darker the decking color, the
hotter it will feel.
• Always remove jobsite dust, clay, dirt, mud,
and other construction products from AZEK
Deck, Porch, Rim Joist Covers, & Riser quickly.
Do not allow construction dirt and debris to sit
on the AZEK Deck/Porch surface.
• IMPORTANT: Do not allow airborne dust from
concrete, landscape blocks, or any masonry
product to accumulate on the AZEK Deck,
Porch, Rim Joist Covers, & Riser surface as it
may damage the surface of the deck. Do not
cut any product on or near AZEK Deck, Porch,
& Rim Joist Covers.
Page 13
Page 14
Care and Cleaning
Care & Maintenance
To keep your AZEK Deck/Porch looking its best:
• To remove rust stains, use a household cleaner
such as Krud Kutter “the must for rust”.
• Avoid the use of rubber-backed mats, tarps,
pool toys, and other non-porous items on the
deck/porch for any extended period of time
as these items may cause discoloration to the
decking surface.
• Some products, such as sunblock and insect
repellent, contain chemicals that may alter the
surface of AZEK Deck, Porch, Rim Joist Covers,
& Riser. Check product labels and consult with
the manufacturer as to product compatibility
with plastic materials, such as AZEK Deck, Porch,
Rim Joist Covers, & Riser, prior to use on or near
AZEK Deck/Rim Joist Covers.
• Do not get any PVC glue or similar product on
the surface of any AZEK Decking/Porch Product
as it may discolor and permanently damage the
surface.
• To clean AZEK Deck/Porch, use an all-surface
deck cleaner or another all-purpose cleaner such
as Chomp Gutter cleaner, Zep 505, Simple Green
or Krud Kutter Cleaner/Degreaser with a stiff
natural ber brush.
• Always read the cleaning product manufacturers
specic information before using any product on
your AZEK Deck and follow their instructions. It
is also a good idea to test the cleaner on a scrap
piece or inconspicuous area of the deck to make
sure it does not harm the surface.
• WARNING: Keep children and pets away from
cleaning products and AZEK Deck until dry.
• Store products under cover to maintain a
clean surface.
• If stored outdoors, they must be covered with
a non-translucent material.
For ice removal:
• Most products containing calcium chloride can
be used without damage to the deck/porch
surface.
• These products may leave a white residue
which can be cleaned using the cleaning
guidelines above.
• Metal shovels or plastic shovels with a metal
leading edge may damage the surface of
AZEK Deck and are not recommended for
clearing snow from deck/porch surface.
(These guidelines may not cover every care
and maintenance scenario encountered.
For additional questions about care and
maintenance, call (877) ASK-AZEK).
Warranty
AZEK Building Products are made exclusively from technologically advanced materials designed to
provide years of enjoyment. AZEK Deck products are covered by a Limited Lifetime Warranty for
residential applications and a 20-year Limited Warranty for commercial applications. The warranty
covers defects resulting in blistering, peeling, aking, cracking, splitting, cupping, rotting or structural
defects from termites or fungal decay.
Page 14
Page 15

Notes
Page 15
Page 16

AZEK Building Products, Inc.
888 North Keyser Avenue • Scranton, PA 18504
www.AZEK.com • (877) ASK-AZEK (877) 275-2935
© 2014 AZEK LIT-ADECKINSTALL | 2/14
 Loading...