

Page 1
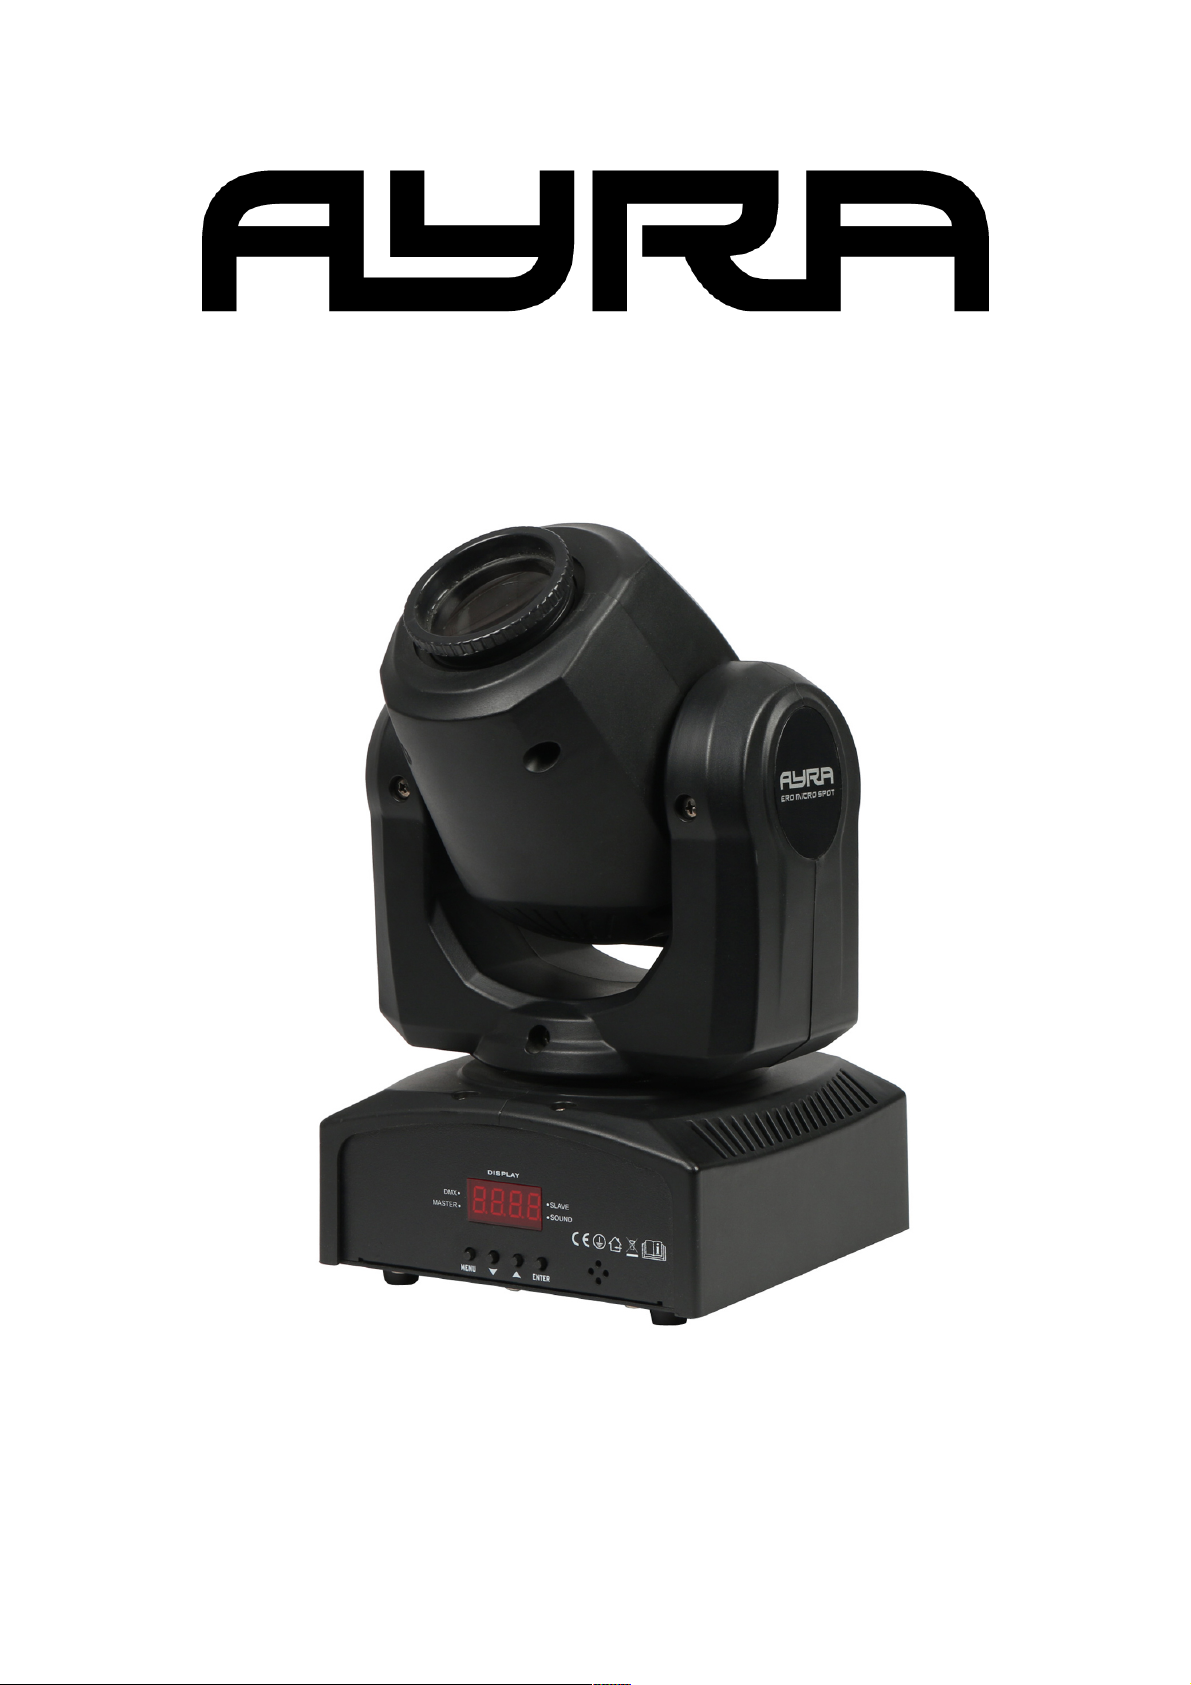
ERO Micro Spot
LED moving head
User manual
The information in this user manual is subject to change at any time without notice.
Version: 1.0 Date of creation and author's initials:18-02-2017 RV Revision date and author's initials: -
Page 2
Introduction
Thank you for purchasing the ERO Micro Spot. This versatile device is compact in size, but full of technology
that will make a statement at your party or event. This user manual offers you all the information you need to
get started.
We advise that you read this user manual in its entirety before unpacking the contents of the box, so that you
are familiar with all of the functionality that this product has to offer. Please be sure to check that all of the
parts and accessories listed below under 'Box contents' are included in the package. In the event that the
ERO Micro Spot does not function properly, or if you have any issues while operating it, please remove the
plug from the power socket and contact your dealer for assistance.
Box contents:
- ERO Micro Spot LED moving head
- mounting bracket + hardware
- safety eyelet
- power cable from IEC C13 to Schuko, 1.5 mm²
- power cable from IEC C13 to UK plug, 1.5 mm²
Please inspect the device and the included accessories.
Should you discover that either the device or one or more of the included parts have been damaged or
rendered defective while in transit, please contact your dealer directly.
Please note that the pictures in this user manual serve illustrative purposes only and may differ from the
actual product.
The information in this user manual is subject to change at any time without notice.
Version: 1.0 Date of creation and author's initials:18-02-2017 RV Revision date and author's initials: -
Page 3
Safety instructions
Everyone involved with the installation, operation and maintenance of this device must:
- Be qualified
- Be skilled
- Have read the instructions in this user manual
- Be sure that neither the device nor the included accessories are damaged. Should the device or the
included accessories be damaged, please contact your dealer for more information.
- Ensure that the device is in good working condition and is safe to operate. Please follow the advice and
instructions as they are described in this user manual.
Damage caused by misuse and/or modifications made to the device are not covered by the warranty.
This device does not contain any parts that can be repaired or replaced by the user. Should maintenance or
repairs be necessary, they must be handled by a qualified technician.
The light source of this device is not replaceable. If the light source no longer functions, the entire device
needs to be replaced.
Important information regarding safety and health:
- Do not remove any labels or stickers from this device.
- Do not leave any cables lying around.
- The device should not be opened up, and any hardware or software that may be present should not be
modified.
- To achieve optimal performance, inputs on this device should not be fed with a signal higher than
necessary.
- The device should only be used indoors; contact with water, rain and moisture should always be avoided.
Do not place any objects containing liquid on top of the device.
- Remove the device from any nearby flames or heat sources; do not place it near flammable fluids, gasses
or objects.
- Disconnect this device from a power source if it will not be used for a longer period of time, if maintenance
The information in this user manual is subject to change at any time without notice.
Version: 1.0 Date of creation and author's initials:18-02-2017 RV Revision date and author's initials: -
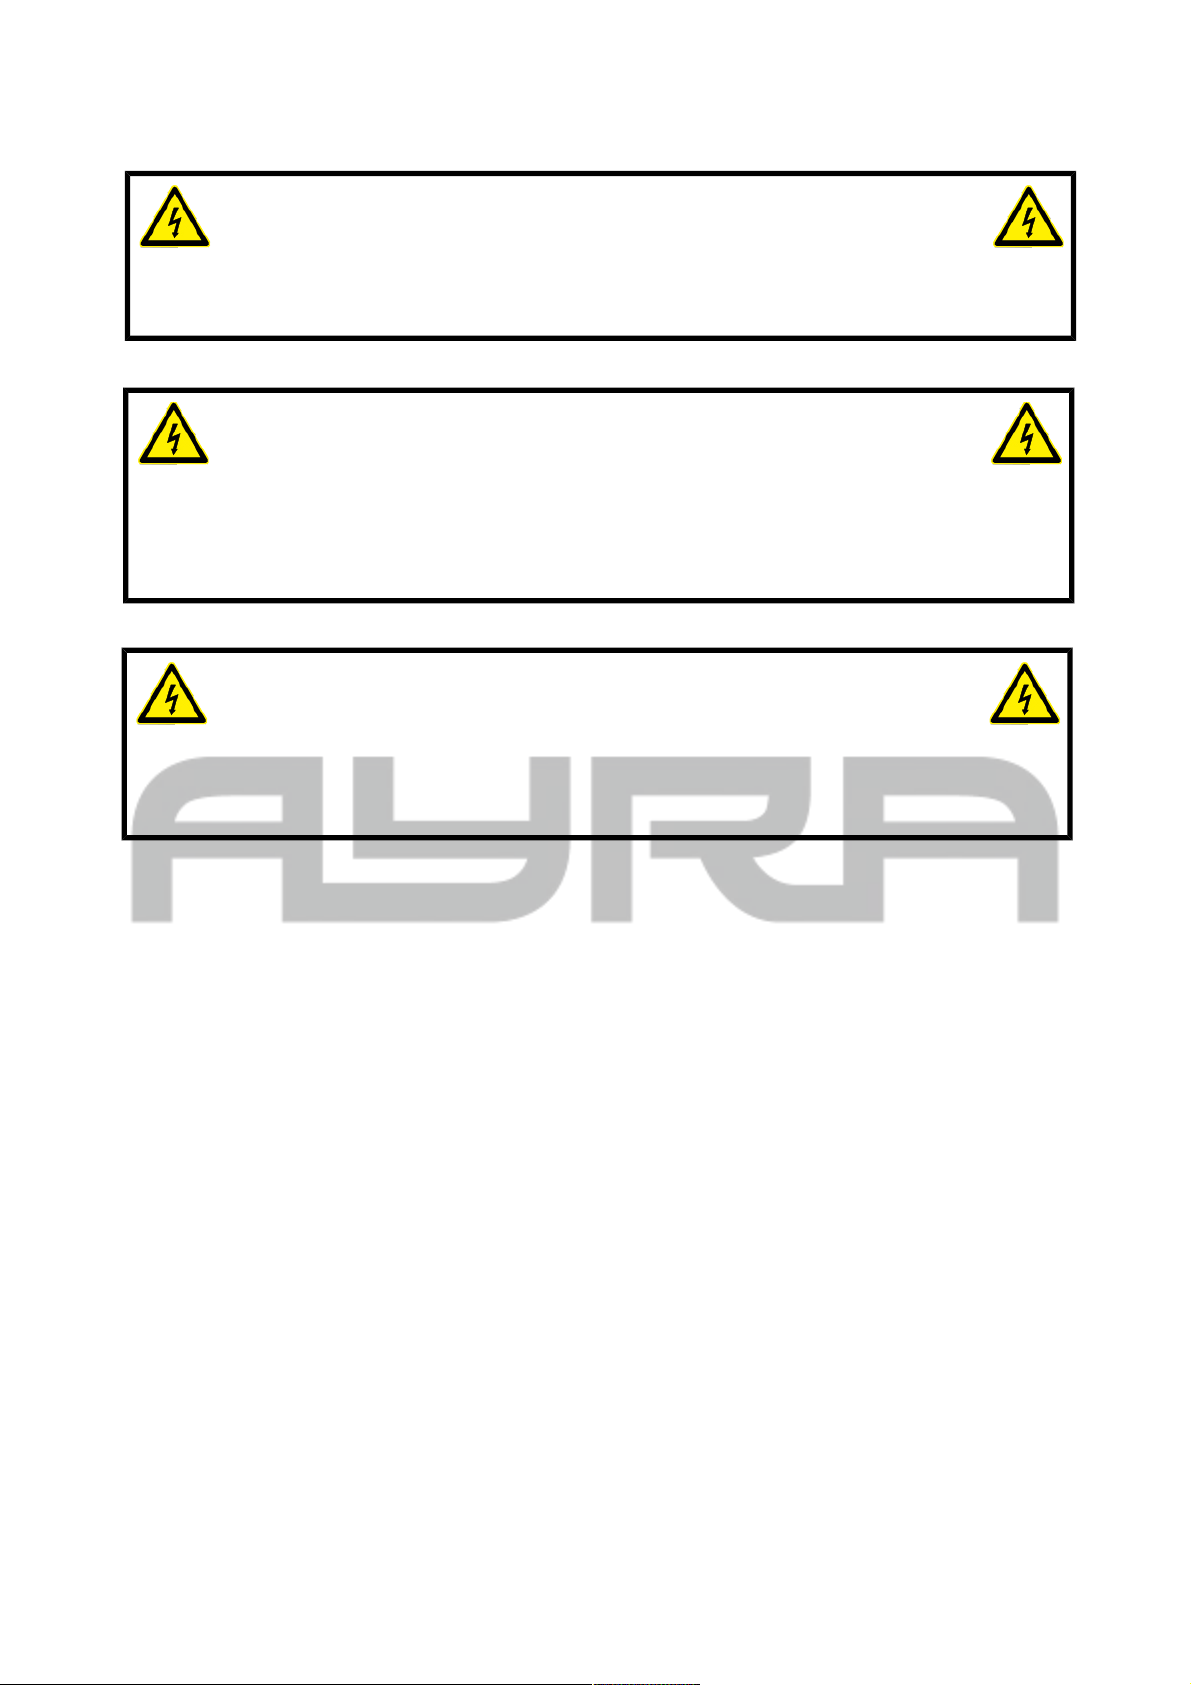
WARNING!
Keep this device away from moisture, water and rain to avoid the chance of electric shocks.
WARNING!
Only connect this device to a suitable power socket. This device functions on a specific power
voltage. If it is plugged into a power socket with a different voltage, it could result in permanent
damage and even dangerous situations such as fire or electric shocks.
WARNING!
Be careful when operating this device. Touching the wires that are connected to the mains,
inside or outside the device, could result in electric shocks.
Page 4
is necessary, or if it needs to be cleaned.
- Do not pull on the cable to remove a connector, as it can cause damage.
- Do not use any cables other than the ones described in this manual. Do not use defective cables. Please
contact your dealer if the included or necessary cables do not function properly with this device.
- Only use this device with a stable AC power supply.
- Only use this device with power from a grounded power source.
- In the event that the device is exposed to extreme temperature changes (e.g. transported through a cold
outside environment into a warm indoor environment), it should not be turned on until it has reached room
temperature. This is necessary to prevent moisture from forming in the device, which could lead to electric
shocks.
Guidelines and operation of this device:
- This device is intended for use by professionals on stage, in theatres, in clubs, and in similar entertainment
locations.
- This device is not suitable for use by children, and should always be operated by an adult.
- This device is designed to create light effects for entertainment purposes. It is not suitable for household
illumination.
- This device may only be used in a suitable environment where no damage to the device can occur. Do not
use the device in moist or dusty environments such as:
- indoor swimming pools where chlorine is used
- beaches where there is sand and salt
- outdoors
- indoors in spaces where intense heat sources are present, or where it reaches temperature levels
that would be considered uncomfortable for a person
- Avoid impact and collisions during use and transport. Do not transport the device while it is in use. Avoid
using excessive force when installing and operating the device.
- The user should become familiar with the functions of this device before using it.
- Should the device not be used in the manner described in this user manual, damages or even injuries could
occur. Ayra cannot be held responsible for any injuries or damages that occur as a result of improper use of
this product.
Storage and transport:
- This product was designed for mobile use. Please only transport the device in the original packaging, or in
a flight case with a suitable foam inlay.
- This device was not designed for permanent (24/7) use. The expected lifespan of the device will not be
affected by occasionally turning the device off. Disconnect the device or turn off the power when it is not
actively in use.
- If the device will not be used for a longer period of time, it should be disconnected and stored in a dust-free
environment.
- Do not expose the device to extreme temperature differences.
Housing
- Inspect the device's housing frequently, and always just before use. Avoid operating the device if there are
large dents or cracks, or if screws are missing. Do not use the device if the housing is not in good condition.
Contact your dealer or a qualified technician if you are unsure about the state of the device.
- Check the device and the screws for corrosion. Corrosion must not be present on this device. Contact your
dealer or a qualified technician if you find any corrosion on the screws.
Every power and signal connector should be securely mounted. Do not use the device if the connectors are
not secure.
- Avoid dust and dirt build-up. Clean the device once a month by disconnecting it from the power supply and
wiping it down with a dry or slightly moist cloth. If the device is used frequently, the cleaning intervals should
increase.
The information in this user manual is subject to change at any time without notice.
Version: 1.0 Date of creation and author's initials:18-02-2017 RV Revision date and author's initials: -
Page 5
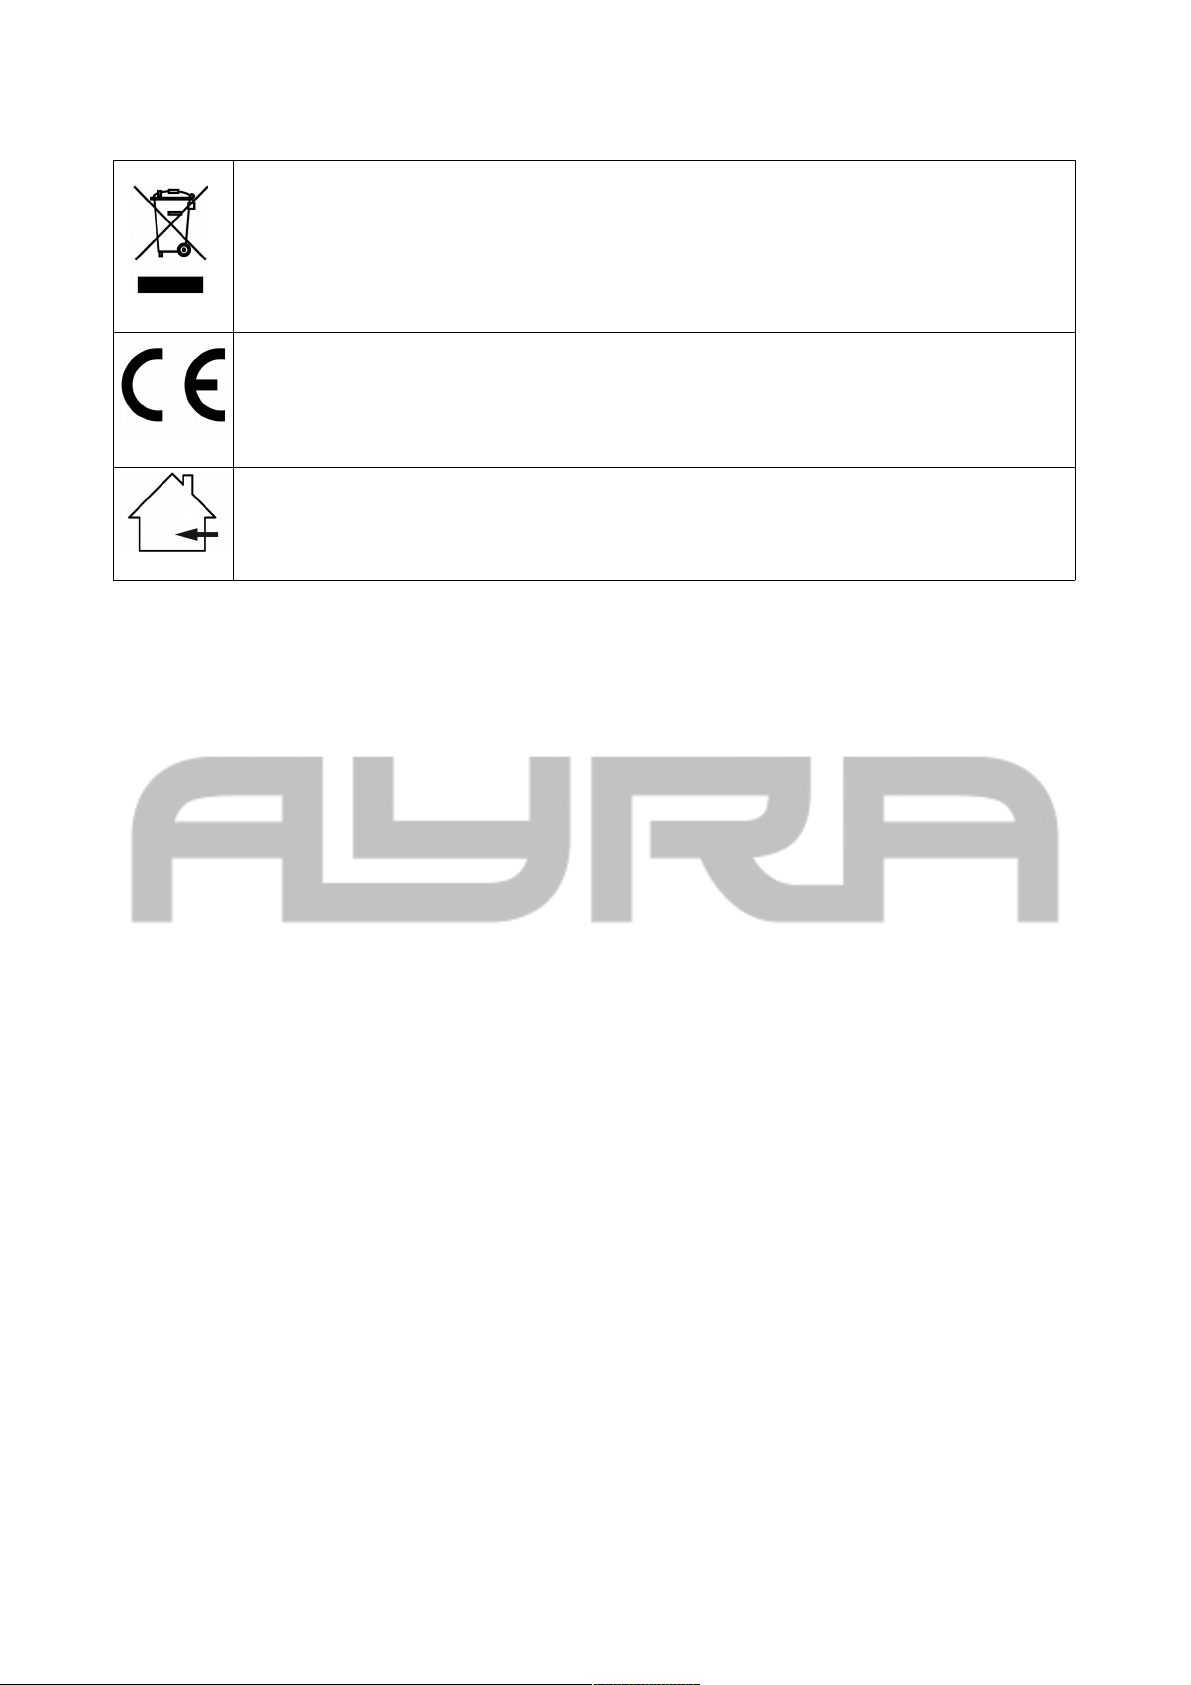
Symbol explanation:
WEEE: Ensure that this device is disposed of properly. This product falls under the WEEE
(Waste Electrical and Electronic Equipment) directive. The requirements of this directive apply
to all manufacturers and producers of electronic devices in the EU. Do not throw this product
away with regular rubbish. Please contact your local authority for more information about how
to recycle and dispose of these products in your region. By recycling this product in the proper
manner, we can work together to ensure that we can continue to enjoy these kinds of
products and still protect the environment as much as possible from pollution.
CE: The CE logo indicates that this product meets the European norms and requirements to
which it must legally conform.
Only suitable for indoor use: this product was only designed for indoor use. The maximum
environmental temperature must not exceed 40 degrees Celsius (104 degrees Fahrenheit).
Contact:
Ayra professional lighting products
Verrijn Stuartweg 18
4462 GE Goes
The Netherlands
Please do not send any products to this correspondence address.
Should you wish to send in a product for repairs or for a refund, please contact your dealer for an RMA
request (Return Merchandise Authorisation).
The information in this user manual is subject to change at any time without notice.
Version: 1.0 Date of creation and author's initials:18-02-2017 RV Revision date and author's initials: -
Page 6
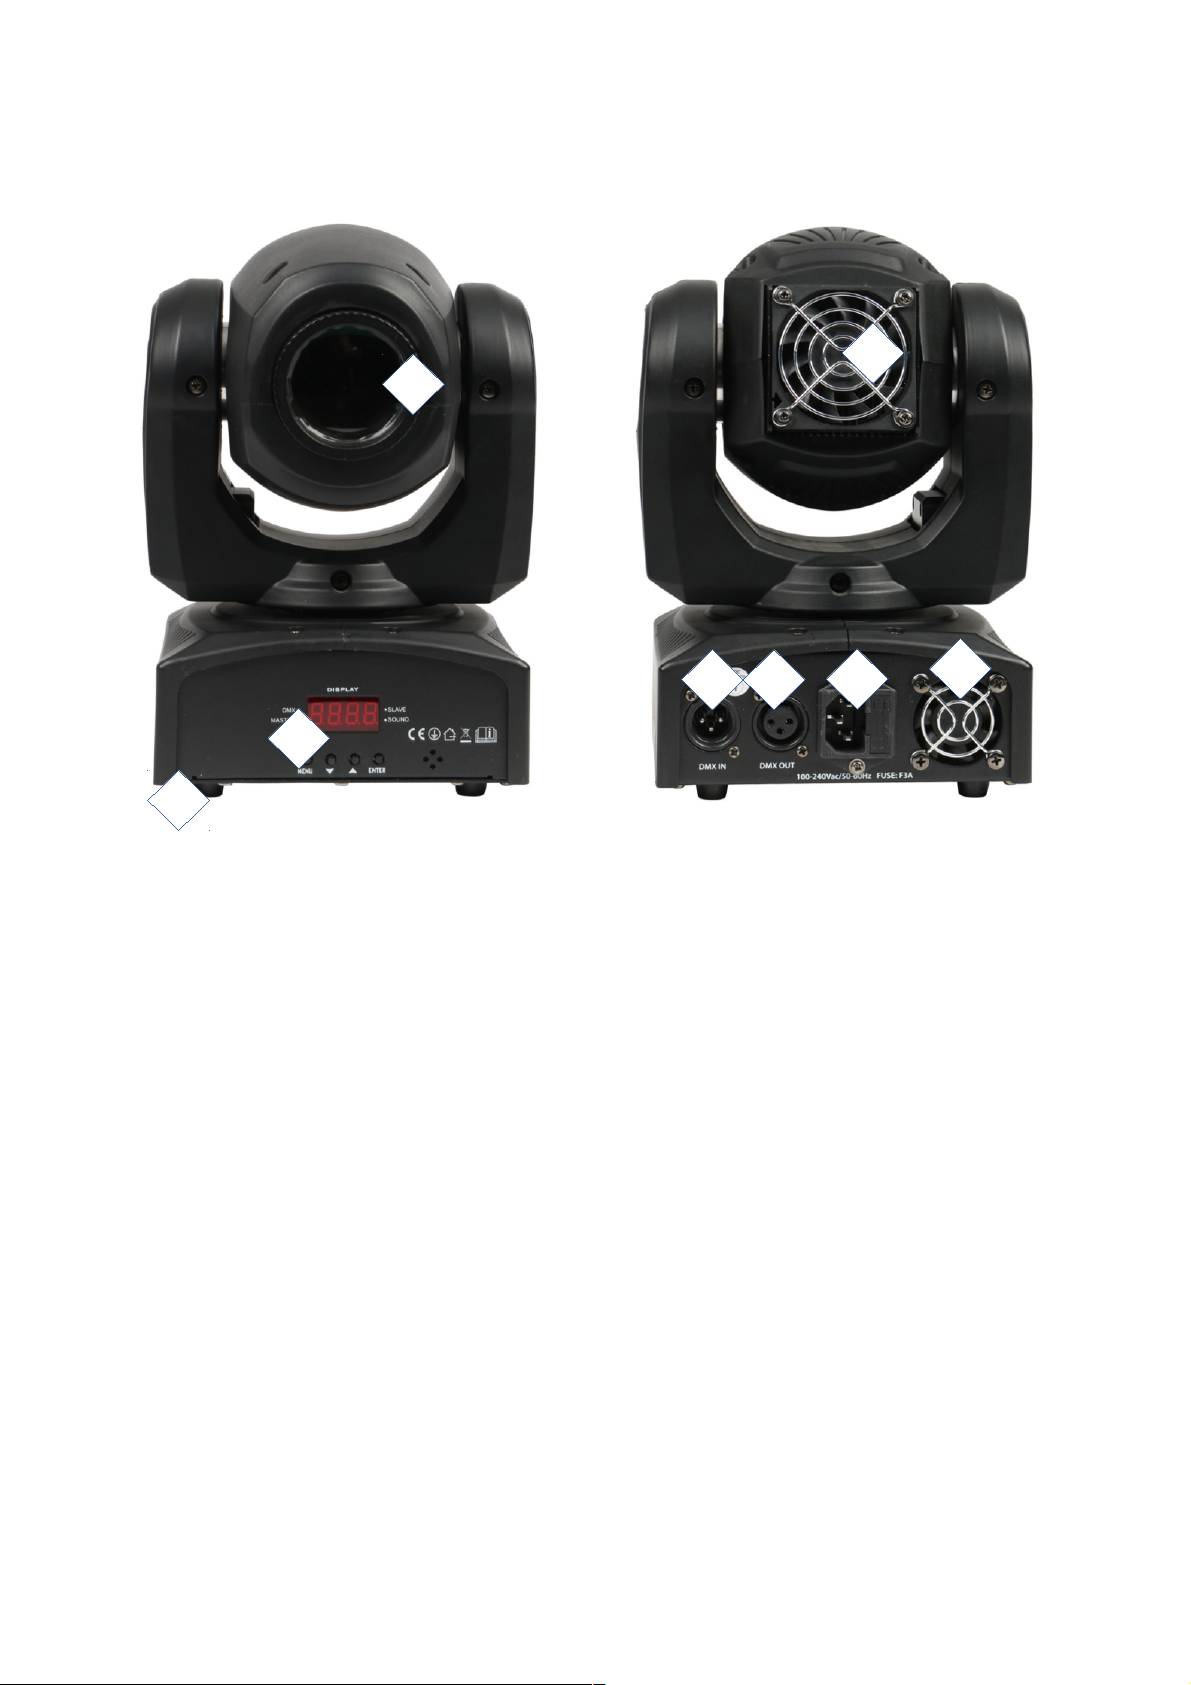
Guidelines and operation of this device
1. moving head with light output via lens (manually adjustable focus)
2. rubber feet
3. LED display with menu buttons
4. DMX input via 3-pin XLR
5. DMX output via 3-pin XLR
6. power input with fuse holder
7. body ventilator
8. head ventilator
The information in this user manual is subject to change at any time without notice.
Version: 1.0 Date of creation and author's initials:18-02-2017 RV Revision date and author's initials: -
4 5
6
7
8
1
3
2
Page 7
Operation and mounting
To activate the device, plug it into a mains socket. Once it's connected to an active power source, it will turn
on automatically.
During calibration, ‘AYRA’ will be shown on the display, which means the device is not ready to be operated.
Once the device has fully started up, it will jump to the last-used mode. Operation modes and other settings
shown on the display can now be adjusted or changed by means of the menu buttons.
Should the device detect a DMX signal, it will automatically switch to DMX mode and will display the lastused address. For new devices, this will normally be DMX address 001. Of course, you can change the DMX
address via the display using the menu buttons.
Using the display and the menu buttons, you can adjust the functions and settings of the device. Press
'Enter' to confirm an adjustment or select a function, use ‘Up’ and ‘Down’ to change amounts and ‘Menu’ to
go back to the menu. By holding the ‘Menu’ button down for 2 seconds after saving a specific setting, the
device will return to operation mode and adopt the setting. This will also be done after any changes in the
operation mode or DMX address. This operation is not always necessary, considering the device
automatically does this after a new setting is confirmed.
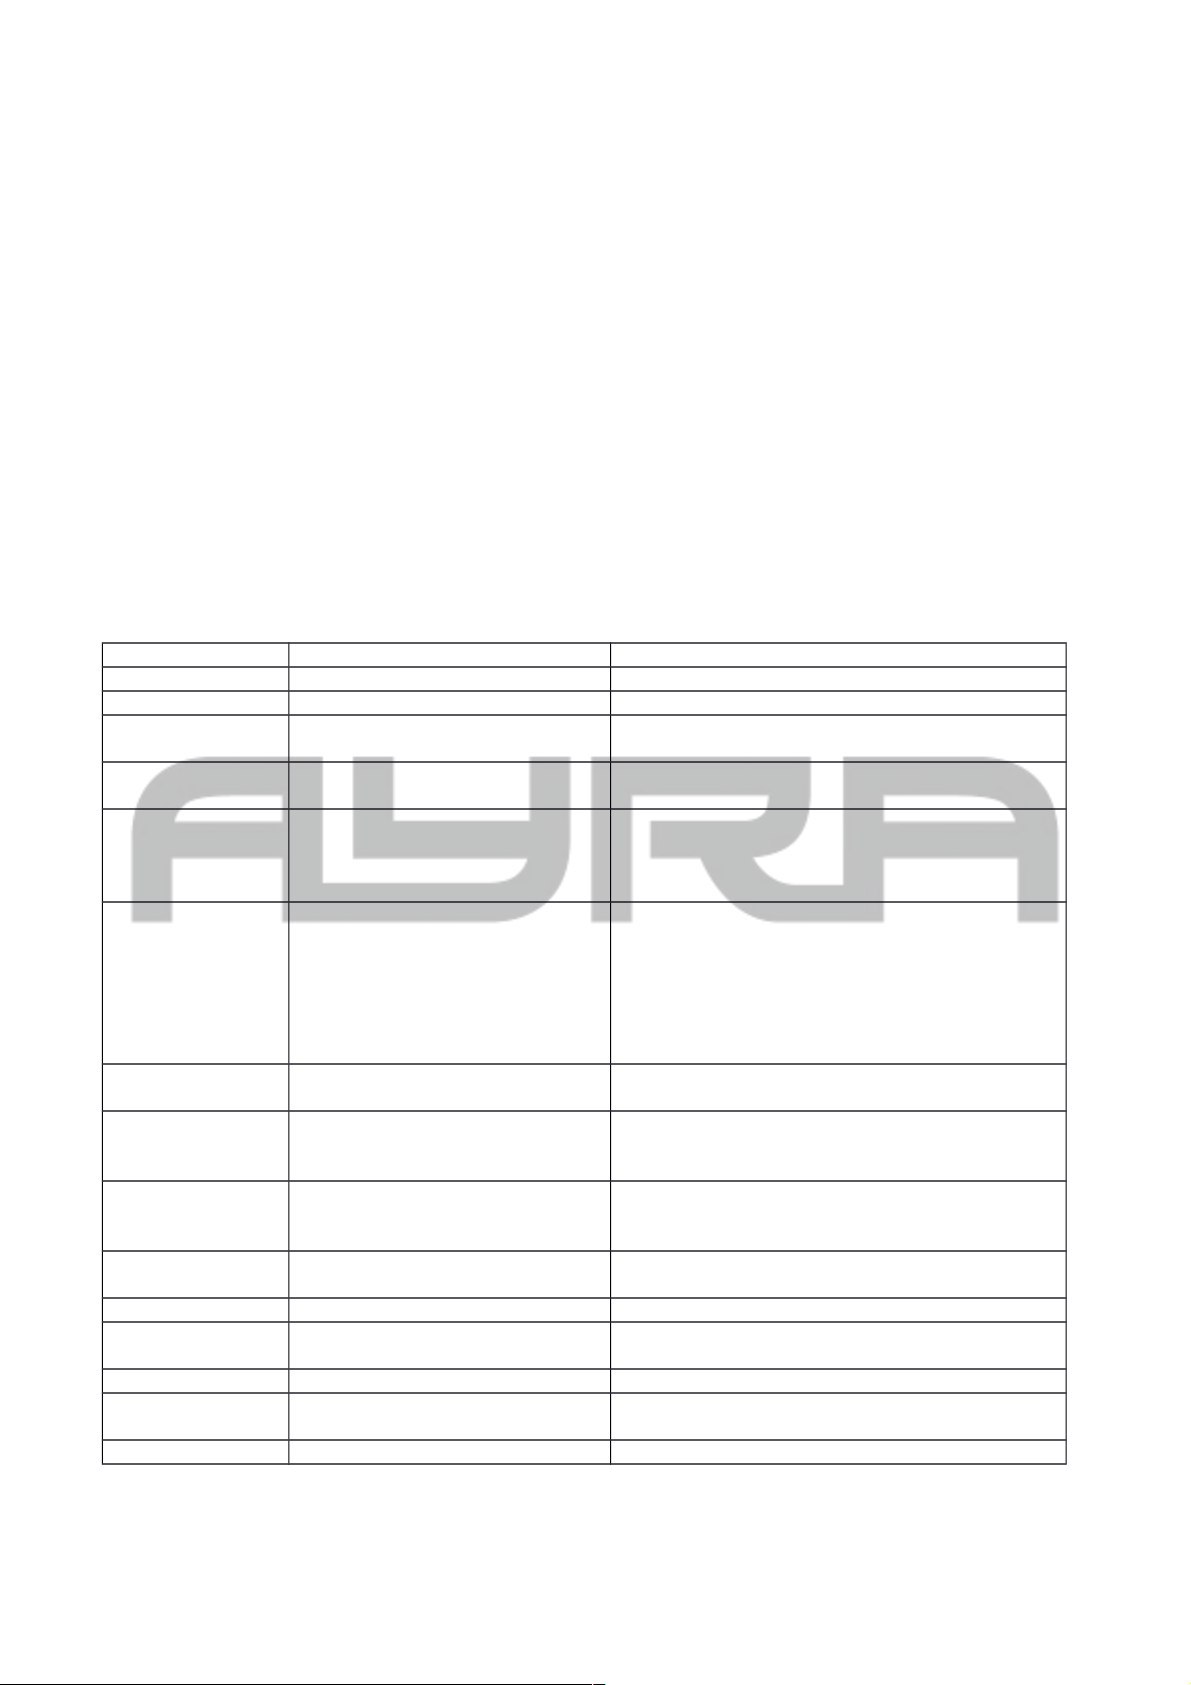
The menu contains the following options and functions
Display Mode Function
ADDR DMX address configuration Address A001 … A512
CHND Channel mode selection 1CH/8CH/10CH
RCND Remote Control mode Specific addresses available for compatible
controllers (RC 1-4 adjustable)
SLND Slave mode Master - NAST
Slave 1 – SL 1
SHND Show mode (for sound-activated
operation)
SH 1 – Show program 1
SH 2 – Show program 2
SH 3 – Show program 3
SH 4 – Show program 4
AUTO Automatic mode (speed user-
adjustable)
AUT1 – Auto program 1
AUT2 – Auto program 2
AUT3 – Auto program 3
AUT4 – Auto program 4
(Adjust the speed per program by holding down
the 'Enter' button and using the Up/Down keys to
select a speed between 1 and 9. 1=slow, 9=fast)
SPLC Split Colour on/off YES (Split colour on)
NO (Split colour off)
PPOS Pan Position, limited pan range 180 (180-degree pan)
360 (360-degree pan)
540 (540-degree pan)
TPOS Tilt Position, limited tilt range 70 (70 degrees)
90 (90 degrees)
180 (180 degrees)
SOUN Sound-controlled mode (activates
built-in microphone)
Mode: ON / OFF
SENS Sound sensitivity 000 – 100: Sensitivity in %
LED LED Display on/off when not in
use
ON/OFF
DISP Display inversion Invert display, Idsp-dspI
PAN Invert Pan (mirror) NO – do not invert pan
YES – invert pan
TILT Invert tilt (mirror) NO – do not invert tilt
The information in this user manual is subject to change at any time without notice.
Version: 1.0 Date of creation and author's initials:18-02-2017 RV Revision date and author's initials: -
Page 8
YES – invert tilt
TEST Test mode This mode tests all the functions displayed to
make sure they are working properly.
HOUR Time registration 0000 – 9999 usage in hours
VER Firmware version number Display of firmware version number (can not be
updated by user)
RSET Reset function Restart the device (as if the power has been
turned off and back on)
You'll find an explanation of the various functions below:
ADDR: With this function, you can determine the DMX start address of the device. Set it channel 001, and
the device will respond from DMX channel 1. Set it to channel 003, then the device will respond from DMX
channel 3, etc.
CHND: This device is equipped with various DMX channel modes. With this function, you can choose a
concise channel mode if your DMX circle is full and you do not require complete control over the functions. It
is also possible to use the most comprehensive channel mode, which makes more channels available, each
with its own separate function.
RCND: The Remote Control mode is a practical feature which helps addressing multiple fixtures, combined
with a special controller which supports this mode.
SLND: The Master-Slave mode is designed to sync multiple devices. A copy of the internal program is sent
to the daisy-chained devices so that each one projects the same effect. The master-slave function works by
means of standard 3-pin XLR cables. The only difference is that the first device in the chain does not receive
DMX input. In Slave 1 mode, the device will copy the exact signal directly from the Master.
PLEASE NOTE: When Slave mode is activated, the device will wait for a signal from the Master device. In
this case it is not possible to simply select an automatic or sound-controlled mode! To cancel this, select
'NAST' mode in the SLND menu, so the device goes to Master mode. Then, all standalone functions can be
activated.
SHND: This mode consists of automatic programs, designed for sound-controlled operation. In soundcontrolled mode, the device uses the built-in microphone that can be activated by means of the SOUN
setting and adjusted in sensitivity. Any time the microphone detects sound, the device will change movement
and/or colour in a way that syncs perfectly with your light show. If no sound is detected, the device will move
slowly and change colour gradually until sound is detected again.
AUTO: With this mode, you can select the same automatic programs as in the SHND mode, but they run at
an automatic speed. The user can adjust the speed between 1 and 9, where 1 is the slowest and 9 is the
fastest speed.
SPLC: This device has a colour wheel with 8 colours (7 colours + open). By activating the Split Colour
option, it's possible to mix the colours in between. This way, a figure can have 2 colours, like half red and half
white, half purple and half blue, etc. The Split Colour function is available in all modes, as well as via DMX.
PPOS / TPOS: This product is virtually the only one of its kind that allows the user to correct the pan and tilt
range. This gives you more control over the freedom of movement of the moving head, should it be
positioned near a wall for instance, preventing unnecessary light projection that would otherwise go
unnoticed.
The pan range can be set to 540, 360 and 180 degrees. The tilt range can be set to 180, 90 or 70 degrees.
SOUN: This setting shows if the microphone function is activated or not, which you can see in the display as
ON or OFF.
SENS: This mode allows you to determine the sensitivity of the internal microphone. The further the device is
The information in this user manual is subject to change at any time without notice.
Version: 1.0 Date of creation and author's initials:18-02-2017 RV Revision date and author's initials: -
Page 9
from the speaker, the higher the sensitivity of the microphone needs to be so it can react properly to the
music. The microphone is built to handle high sound pressure levels, but the louder the signal the higher the
microphone sensitivity level, the more difficulty the device will have detecting the beat of the music.
Experiment with the level of sensitivity and distance/positioning of the device to find the best results.
LED: If the LED display is not in use, it can be de-activated by turning the LED mode OFF. The red symbols
will no longer light up when using the device in a dark environment. Press one of the menu buttons and the
display will light up again and show any relevant information. If the device registers that the menu is not
actively being used, it will automatically turn off within 30 seconds.
DISP: This function determines whether the display is shown normally or inverted. If the device is
suspended, the display may be harder to read. This function allows you to rotate it vertically for better
legibility.
PAN/TILT: Invert the pan and/or tilt values separately to make the motors turn in the opposite direction. This
function is available for all modes.
TEST: Should the device need cleaning or maintenance, this function can be used to test one or more
devices simultaneously. The device plays a continuous program while the step motors and LEDs are used.
This way you can quickly detect any abnormalities or defects. The device will run the program until stopped
manually (for example when the sound-controlled mode is activated.)
HOUR: If this device is used professionally or rented, it should be regularly maintained and inspected in
between use. The HOUR function shows exactly how long the device has been in use. This amount of time
accumulates over time as long as the device is being used and cannot be manipulated by the user.
VERS: This function shows the device's current firmware version number. The user can not be updated by
the user.
RSET: By selecting this function, you can restart the device completely without having to physically unplug it
and plug it back in.
Operating modes
The following overview is designed to show the differences between the various operation modes that are
supported by the above-mentioned menu functions.
Auto:
In automatic mode, choose one of the operating modes where the device is not dependent on external
factors (such as a sound-controlled signals or the presence of noise). Choose one of the basic programs and
set the options such as the switching speed or the intensity correction, if desired.
Sound:
When in Sound-controlled mode, the device's internal microphone detects the music and reacts to the beat.
The device will move in sync with the music and provide an automated light show.
When there is no music for the device to detect or when only high frequencies are audible, the device will
continue its program at a slower pace, so the light show will not stop abruptly. As soon as the microphone
detects music again, it will resume the automated program and follow the beat.
Slave
In Slave mode, you can daisy-chain multiple devices of the same type so they all function a specific way.
This way you can coordinate your light show by having multiple separate devices moving the same way
instead of all different directions, which can be chaotic. Basically, you can connect an unlimited number of
slave devices to a master device, but a DMX booster is required in between. Generally speaking, you can
connect up to four armatures together without the need for a DMX booster.
Be aware that when you attempt to connect devices of different types and brands, they may behave
The information in this user manual is subject to change at any time without notice.
Version: 1.0 Date of creation and author's initials:18-02-2017 RV Revision date and author's initials: -
Page 10
strangely and you may not get the desired effect because certain functions are linked to the wrong channels.
This is true of DMX lighting of all brands and types.
The ERO Micro Spot can function in conjunction with the ALO Micro Scan because they share exactly the
same operating programs. Moving heads and scanners of this type can work together seamlessly.
DMX
The DMX mode is the most comprehensive way to maintain ultimate control over all the functions this device
has to offer. It enables you to determine exactly how many functions you want to control via the DMX
controller or DMX software.
This device can be set to various channel modes so the channel layout, which is shown below, corresponds
perfectly with your DMX circle layout, as well as with the functions you will be using.
1CH mode:
CH Function Value
1 Sound-controlled show modes 000-007 No function (Blackout)
008-067 Show 1
068-127 Show 2
128-187 Show 3
188-247 Show 4
248-255 Random show
8CH mode:
CH Function Value
1 Pan position min - max 000-255
2 Tilt position min - max 000-255
3 Colour wheel
PLEASE NOTE: the SPLC colours will not work if SPLC
is not activated.
000-007 Open white
008-015: SPLC 1
016-023: Red
024-031: SPLC2
032-039: Orange
040-047: SPLC3
048-055: Yellow
056-063: SPLC4
064-071: Green
072-079: SPLC5
080-087: Dark blue
088-095: SPLC6
096-103: Light blue
104-111: SPLC7
112-127: Magenta
128-255: Rainbow effect, slow - fast
4 Gobo wheel 000-007: Open
008-015: Gobo 1
016-023: Gobo 2
024-031: Gobo 3
032-039: Gobo 4
040-047: Gobo 5
048-055: Gobo 6
056-063: Gobo 7
064-071: Open shake
072-079: Gobo 1 shake
080-087: Gobo 2 shake
The information in this user manual is subject to change at any time without notice.
Version: 1.0 Date of creation and author's initials:18-02-2017 RV Revision date and author's initials: -
Page 11
088-095: Gobo3 shake
096-103: Gobo4 shake
104-111: Gobo 5 shake
112-119: Gobo 6 shake
120-127 Gobo 7 shake
128-255 Gobo scroll slow - fast
5 Shutter 000-007 Blackout
008-015: Open
016-131 Stroboscope mode, slow - fast
132-139: Open
140-181: Shutter slow open, close fast,
slow - fast
182-189: Open
190-231: Shutter slow close, open fast,
slow-fast
232-239: Open
240-247: Random strobe
248-255: Open
6 LED dimmer 0-0100% 000-255 0-100%
7 Movement speed 000-255 fast movement – slow
movement
8 Various functions 000-199 No function
200-209 Reset after 3 seconds within
this value
210-239 No function
240-255 Sound-controlled mode
10CH mode:
CH Function Value
1 Pan position min - max 000-255
2 Pan fine position min-max 000-255
3 Tilt position min - max 000-255
4 Tilt position min - max 000-255
5 Colour wheel
PLEASE NOTE: the SPLC colours will not work if SPLC
is not activated.
See 8CH mode, CH3
6 Gobo wheel See 8CH mode, CH4
7 Shutter See 8CH mode, CH5
8 LED dimmer 0-0100% 000-255 0-100%
9 Movement speed 000-255 fast movement – slow
movement
10 Various functions 000-199 No function
200-209 Reset after 3 seconds within
this value
210-239 No function
240-255 Sound-controlled mode
The information in this user manual is subject to change at any time without notice.
Version: 1.0 Date of creation and author's initials:18-02-2017 RV Revision date and author's initials: -
Page 12
Installation and connection requirements
Now that you know how the ERO Micro Spot works, it's important to know how to use it correctly and safely,
according to the installation and connection requirements.
Make sure the device and connection cables are out of reach of children, and that if children are present,
they are under adult supervision at all times. Because this device can be used upright or suspended, children
could pull on the cables, causing the device to fall on top of them. To avoid injury, it is important to pay close
attention to the position and/or installation of this device.
Upright use
Should you want to use the ERO Micro Spot in an upright position, make sure it's on a flat, stable surface like
a table, DJ booth or bar. The device is equipped with rubber feet that grip the surface underneath it.
Suspended use (brackets)
Should you want to suspend the ERO Micro Spot, you can use the mounting bracket attached to the top of
the device. Mounting material is included.
If you want to mount a half coupler or a G-hook to the brackets, it is advised to do this before mounting the
brackets to the armature. You can find standard hooks and/or brackets for 35 or 50mm tubes (truss or light
stand) at your local dealer.
Hardware for mounting the ERO Micro Spot to a wall, ceiling, or beam is not included. Contact a specialist if
you're not surewhich hardware is required for your situation. A wooden beam and stone wall require different
mounting methods.
When suspending the ERO Micro Spot, you will need to attach a safety cable to the armature. This is not
included, but is available at your local dealer. The ERO Micro Spot is supplied with an eye bolt which can be
installed on the bottom of the device. A safety cable can be attached to this eyelet. Once it's hooked on, you
can wrap the cable around the truss or light stand and attach it again by means of the same hook. This
ensures the device is secured and prevents it from falling, even if one or both of the brackets should come
loose.
Ensure that the safety cable has a load capacity of 10x the weight of the armature and that the device can
not fall farther than 30 cm. You can wrap the safety cable around the truss or light stand several times to
ensure the fall is as short as possible. The shorter the fall, the less chance of damage or injury.
Light source
The ERO Micro Spot contains powerful LED modules that create an even more powerful effect thanks to a
special lens that bundles the beams together. Never look directly into the lens from at close range, as the
human eye can't adjust to the sudden intensity of the beam of light this device produces. It won't result in
permanent injury, but it can cause temporary blind spots, which may cause disorientation and discomfort.
Cooling
The ERO Micro Spot is cooled by fans that are installed in the housing. They are activated when the device
turns on. Make sure the fan or ventilation slots are not blocked and regularly check that they are functioning
normally. Be aware that should the fan suck in substances like dust, smoke and moisture, this may impair its
operation.
Parts and repair
This product does not include spare parts and can not be repaired by the user. All inspections and overall
maintenance should be done by a specialist.
Cleaning and maintenance
Clean the exterior of this device monthly with a dry, or slightly damp microfibre cloth. Ensure that the device
is unplugged before cleaning it.
The information in this user manual is subject to change at any time without notice.
Version: 1.0 Date of creation and author's initials:18-02-2017 RV Revision date and author's initials: -
Page 13
Check if all the screws are intact and secured and tighten or replace them where needed. Check all metal
parts of the device for any signs of corrosion. If corrosion is found, the device needs to be checked
thoroughly.
Manually-adjustable focus
Depending on the application and distance, the projected beams may not be in focus. For that reason, the
ERO Micro Spot is equipped with a manually adjustable focus.
Preferably, the focus should be adjusted when the device is turned off, or carefully while the device is
projecting a fixed beam of light and not moving.
Adjust the focus by turning the projection lens clockwise or counter-clockwise. The projected beam will
appear sharper.
The information in this user manual is subject to change at any time without notice.
Version: 1.0 Date of creation and author's initials:18-02-2017 RV Revision date and author's initials: -
Page 14
DMX lighting troubleshooting
If you have a problem with your device, please consult the troubleshooting section for possible solutions. If,
after consulting this section, the problem remains unresolved, please contact your dealer for more
information and/or help.
This troubleshooting section contains information on how to solve the most common DMX light effect
problems, but it does not and cannot cover every eventuality. It is possible that you won't find your problem,
cause and solution in this section due to differences between various connecting devices.
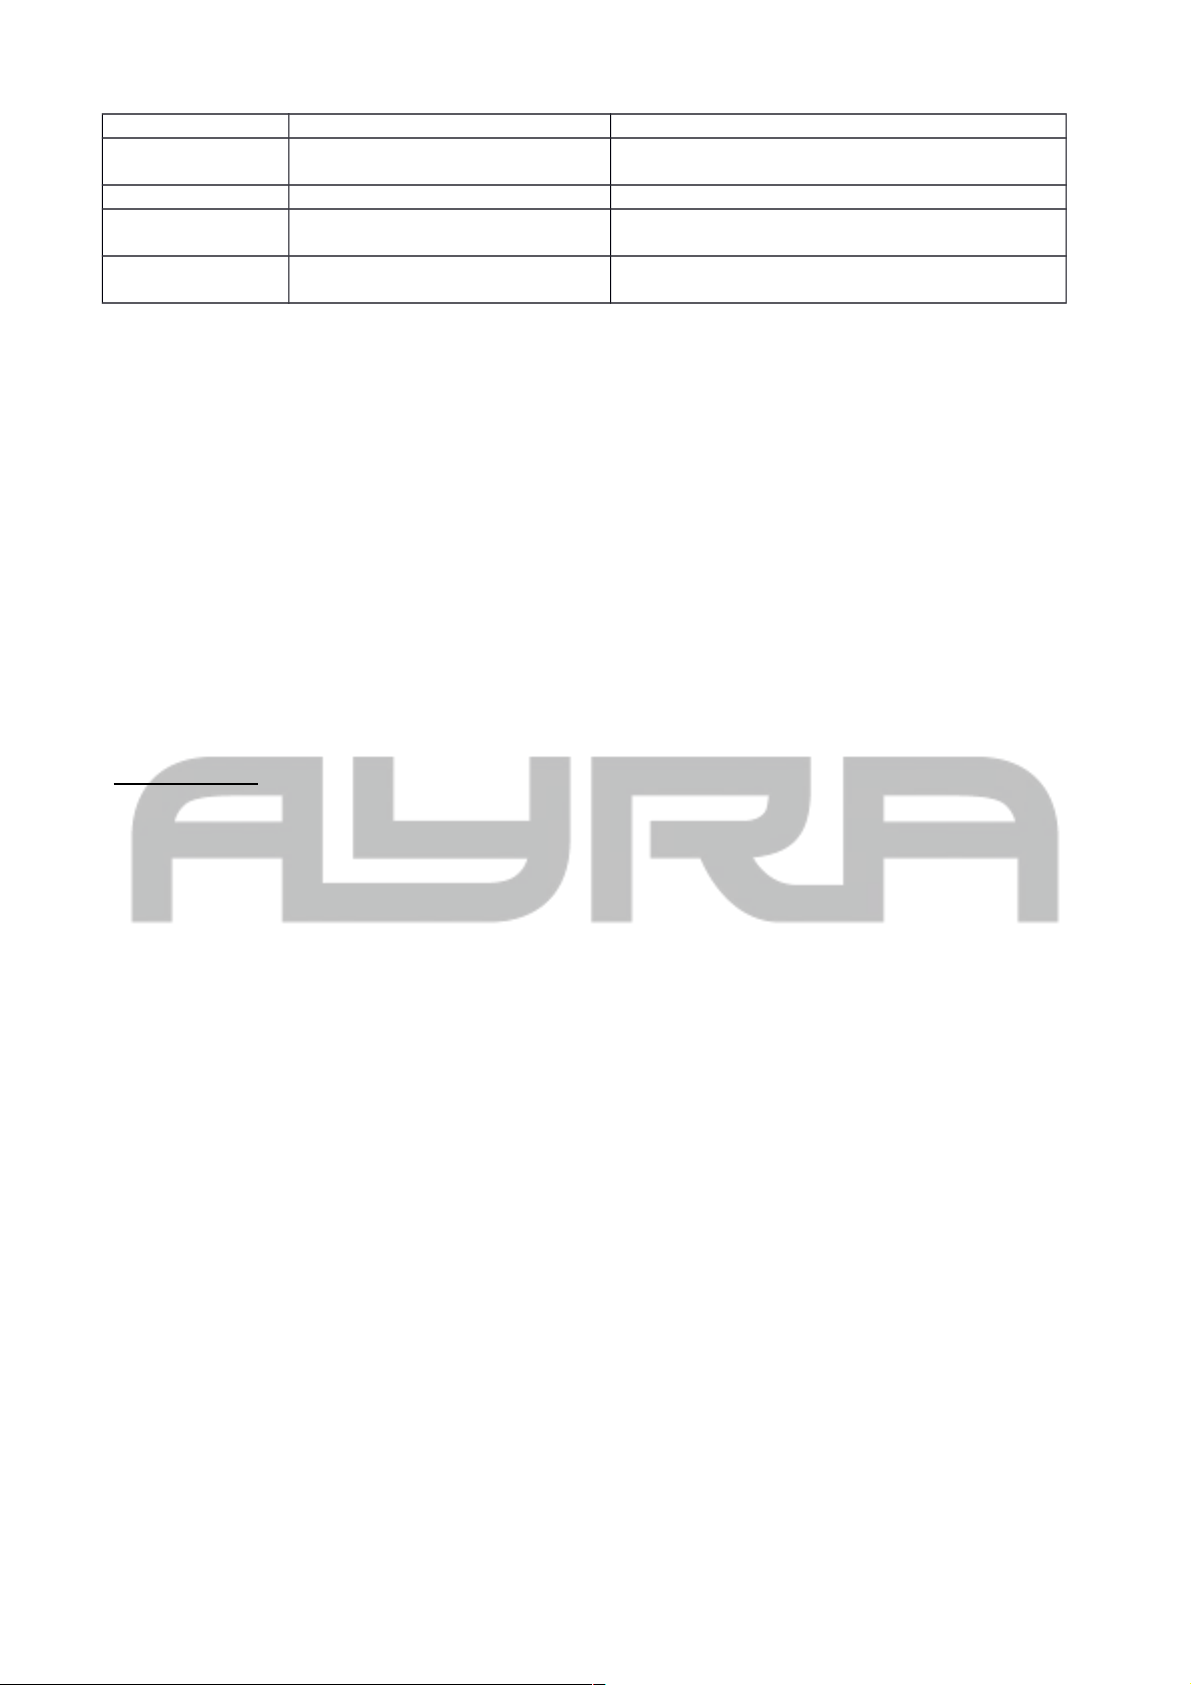
Problem Possible cause Solution
The device can not be turned on. A fuse is blown Check the fuse to rule out if it is
blown or not. If it is blown, replace
it with a new fuse of the same type
and class.
Power cable not plugged in Check if the power cable is
properly connected to the device
andplugged into an active power
socket.
The device is not reacting to DMX
signals
Incorrect DMX start address Check if the device has been set
to the correct DMX start address
DMX controller is on ‘Blackout’ Make sure the ‘Blackout’ function
on the DMX controller is not
activated
Make sure the polarity switch on
the DMX controller is set correctly
Try to reverse the DMX polarity
switch on the DMX controller.
The device is not reacting, there is
no DMX signal indication
Make sure the XLR cables are
connected properly and are not
defective. Replace if necessary.
The device does not react to
sound/music
Incorrect operation mode Make sure the sound-activated
mode has been selected
The internal microphone sensitivity
is too low
Check the microphone sensitivity
level and increase it if necessary.
The speaker is too far away, or is
not producing enough low tones
Place the light effect closer to a
speaker (or vice versa) and/or
increase the low-frequency level.
The built-in microphone is not
triggered by high tones.
The amount of projected light is
minimal
Dirty or dusty optics Clean the lens and/or other optics
Dimmer is not completely open Check if the dimmers on the
spotlights themselves or if the
master dimmer is completely open.
The DMX signal appears to be
interrupted and some devices are
flashing or behaving strangely
Damaged/defective cables Check and replace the DMX
cables if necessary.
Power interference on the DMX
signal
Avoid connecting signal cables
parallel to power cables
DMX terminator missing Close the DMX circle with a DMX
terminator
The information in this user manual is subject to change at any time without notice.
Version: 1.0 Date of creation and author's initials:18-02-2017 RV Revision date and author's initials: -
Page 15
Signal loss or interference in the
DMX circle
Close the DMX circle with a
terminator or connect a booster
after maximum 32 fixtures.
The operation mode can not be
changed
The device is in Slave mode If the device is in Slave mode, it
will wait for a master signal unless
there is a DMX signal present. Set
the device to Master to activate the
sound-controlled or automated
operation modes.
Movement is choppy Movement speed is too slow In some cases, if the programmed
movement speed is too slow, the
moving head will move step by
step. In DMX mode, you can
correct this to a certain extent by
adjusting the pan/tilt speed of one
device and programming the rest
to follow.
Pan/tilt range is minimal The pan/tilt range needs to be
reset
Check to make sure the pan/tilt
range is set properly and adjust it if
necessary.
Pan and/or tilt functions in reverse Pan or tilt is set to invert Check to rule out whether the pan
or tilt is set to invert and turn it off if
necessary.
The information in this user manual is subject to change at any time without notice.
Version: 1.0 Date of creation and author's initials:18-02-2017 RV Revision date and author's initials: -
Page 16
Technical specifications
Specifications:
- compact LED moving head
- metal housing with plastic covers
- light source: 10 W CREE white LED
- LED display with menu buttons
- various operation modes
- automatic mode with 4 programs that are adjustable in speed in 9 steps
- sound-controlled mode with adjustable sensitivity
- master/slave option
- pan/tilt inverse option
- pan/tilt limit option
- DMX control via 1, 8 or 10 channels
- colour wheel: 7 colours + open + rainbow effect
- gobo wheel: 7 gobos + open + shake effect
- beam angle: 12 degrees
- light yield: 6500 lux @ 1m distance
- manually-adjustable focus
- separate mounting bracket to attach to underside
- separate safety eyelet to attach to underside
- IEC C14 power input
- 3-pin XLR input and output for DMX
- fuse: F3AL 250V
- 400Hz constant current LED driver
- to be used in environmental temperature: 0 - 40 degrees Celsius
- housing temperature under normal conditions: 60 degrees Celsius
- power consumption: 24.4 W
- power consumption: 0.226A
- power factor: 0.457
- power supply: 90-240V AC, 50/60 Hz
- dimensions: 170 x 150 x 270 mm
- weight: 3.1 kg
Menu functions:
- 'Blackout' function when display is not in use
- Pan Range correction: 180 / 360 / 540 degrees
- Tilt Range correction: 70/ 90 / 180 degrees
- Display Invert option
- Pan/Tilt Invert option for all heads
- Test function (to check movement and colour)
- Split Colour function
- Reset function (restart the device)
- Time Register readable
- Firmware Version readable
The information in this user manual is subject to change at any time without notice.
Version: 1.0 Date of creation and author's initials:18-02-2017 RV Revision date and author's initials: -
 Loading...