

Page 1
INSTALLATION INSTRUCTIONS FOR PART RFASWC
IGNITION
TERMINALS
WIRE
CUTTER
M3.5
M2.6
M3
M5
M4
ISO
6
2.5
1.5
RFASWC
The RFASWC is designed for adding steering wheel controls to vehicles
that do not have OE steering wheel controls installed. With Aftermarket
radio’s with steering wheel control outputs the RFASWC is able to
give the driver control of their aftermarket radio without taking their
hands off the steering wheel allowing you to maintain the most popular
feature your aftermarket radio has to offer. The RFASWC will come
pre-programmed with your standard commands, volume up, volume
down, seeks up, seek down, and source. In addition you will be able to
mount the RFASWC anywhere on the steering wheel and reprogram
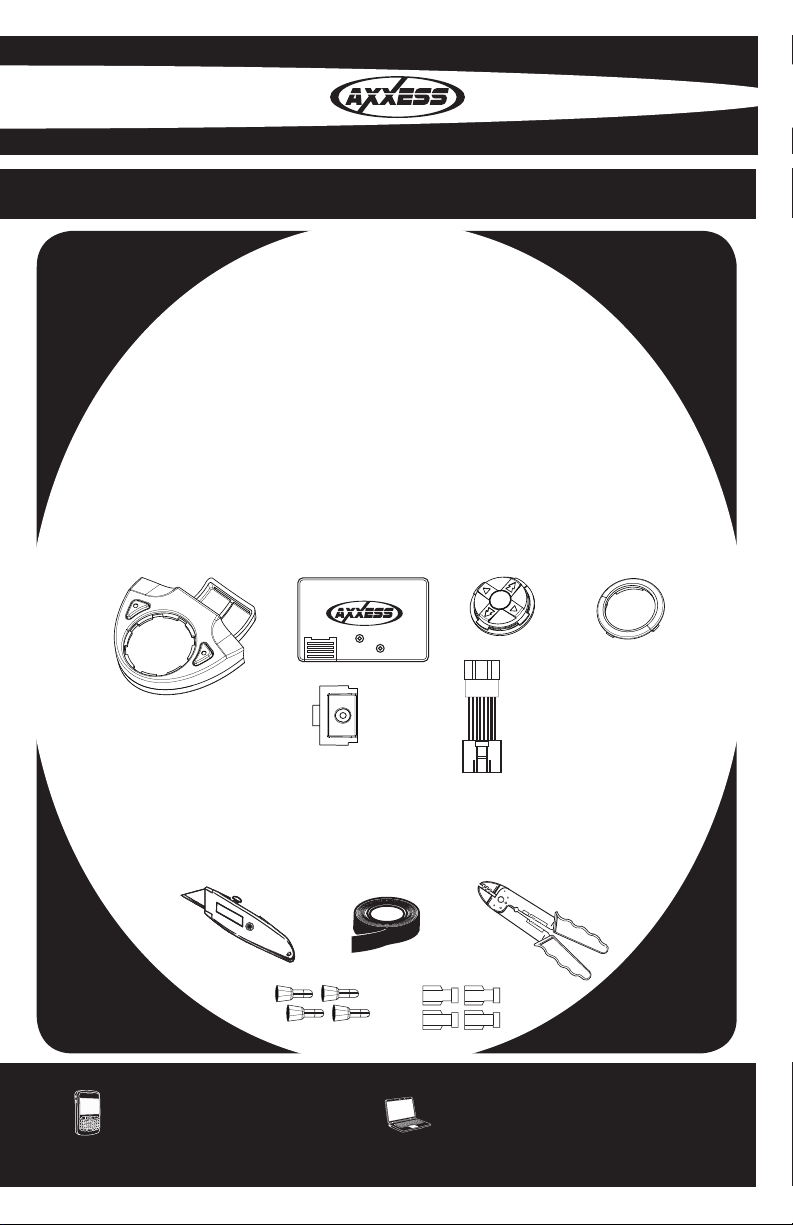
INTERFACE COMPONENTS
A B C D
the buttons, making this a truly custom piece.
• A) RFASWC • B) RFASWC Interface • C) Keypad
• D) Trim Ring • E) Strap Cover • F) RFASWC Harness
E
F
TOOLS REQUIRED FOR INSTALLATION
•Cutting Tool •Tape •Crimping Tool
•Connectors (I.E. butt-connectors, bell caps, ECT…)
1-800-221-0932 axxessinterface.com
© COPYRIGHT 2004-2011 METRA ELECTRONICS CORPORATION
Page 2
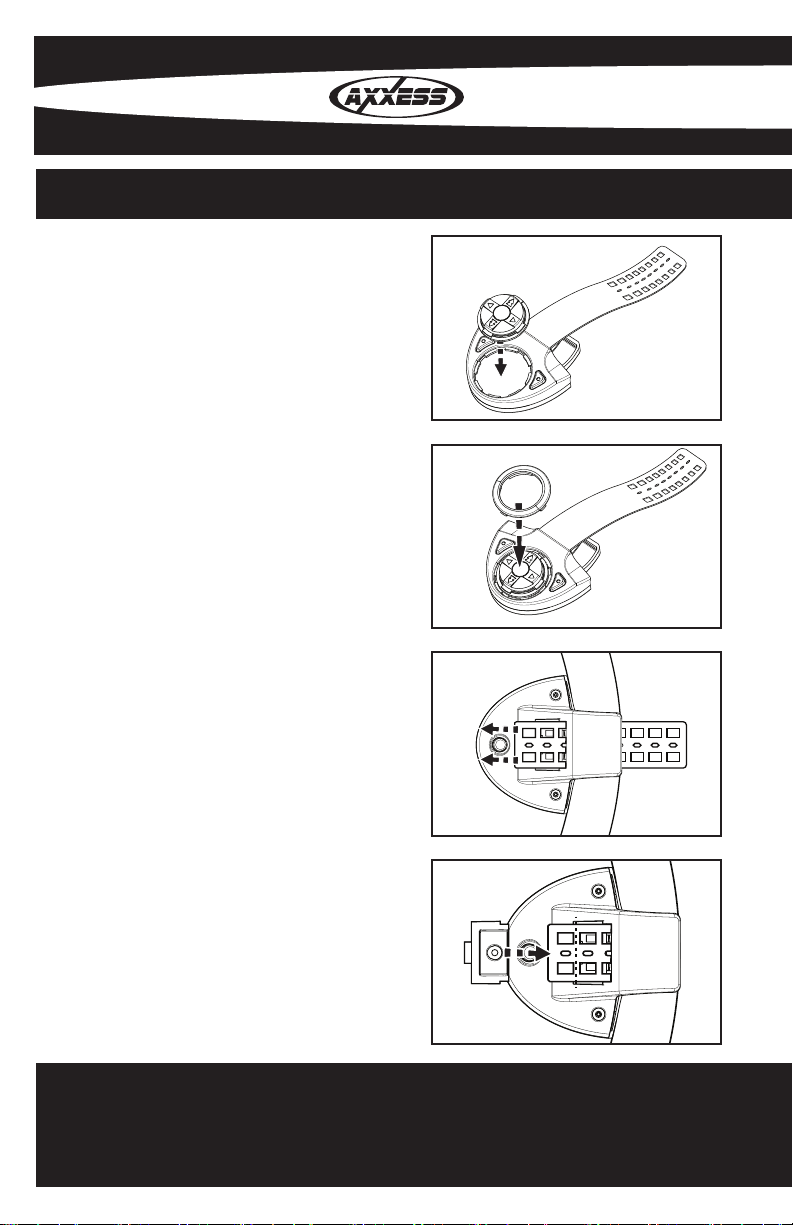
Mounting The RFASWC Transmitter
1. Place button pad in the OESWC
transmitter with the volume up
arrow (^) in the spot where you
want volume up to be.(g. 1)
2. Snap in trim ring to secure keypad
in place. (g. 2)
1
3. Install the OESWC transmitter in
desired place on steering wheel,
wrapping the rubber strap around
the steering wheel, through the
slot, and hook it into the back side
of the transmitter. (g. 3)
4. Cut off the unused portion of the
rubber strap and screw in strap
cover with provided screw. (Do not
over tighten screw) (g.4)
2
3
4
1
Page 3

Wiring The OESWC Interface
1. Connect the red wire to 12 volt accessory
2. Connect the Black wire to ground (you may use the same ground that
you use for the aftermarket radio)
If you are using an Eclipse or Kenwood radio, plug the female 3.5mm
connector with the Brown and Brown/White wires into the male 3.5mm
connector of the ASWC harness.
* For Kenwood radios: Connect the Kenwood SWC wire (normally Blue/
Yellow) to the Brown wire of the ASWC. Isolate and tape the Brown/White
wire, it will not be used.
* Kenwood Models: The following three models, DNX9960, DNX7160,
and DDX896, need a 10k to 12k ohm resistor between the Blue/Yellow of
the Kenwood and the Brown wire of the female 3.5 during programming.
After programming remove the resistor and reconnect the Blue/Yellow
and brown wire.
* For Eclipse radios: Connect the Eclipse SWC wires (Normally Brown
and Brown/Black) to the Brown and Brown/White wires of the ASWC.
Brown goes to Brown and Brown/White goes to Brown/Black.
Setting Up the RFASWC
1. Press the Red and Green buttons simultaneously for 5 seconds, and
then press volume up for two seconds. This will orientate your button
direction.
2
Page 4

2. Turn on the ignition and press volume up on the RFASWC. This will
“marry“ the RFASWC to the interface.
NOTE: If you are replacing a transmitter you must turn on the ignition
and within the rst 10 seconds press and hold the source button for ten
seconds. This will “marry the new transmitter.
Programming the RFASWC
1. Complete connections to the vehicle and the aftermarket radio
* If this is the rst time the RFASWC is being installed in a vehicle:
2. Turn the ignition on; the led will start ashing rapidly which means the
ASWC is looking for the radio. Go to step 4.
Or
* If the RFASWC was installed in a vehicle before:
2. Turn the ignition on, the led will ash slowly
3. Hold down the reset button for more then 2 seconds but less then 10
seconds, the led will start ashing rapidly
4. After a couple of seconds the led should stop ashing and not light up
for 2 seconds.
3
Page 5

5. The led will then ash up to 10 times.
6. This is the end of the auto detection stage. If the RFASWC detected
the radio successfully the led will light up solid red.
7. Make sure the steering wheel control buttons function correctly in the
vehicle and enjoy your radio.
So what if the led does not light up solid red? Check out troubleshooting
section below.
Troubleshooting the Auto Detect Mode
So you tried the auto detect feature and at the end the led did not stay on
solid red, it started ashing. That means the RFASWC did not detect the
radio. Follow these couple steps to determine what happened:
First some basic steps:
1. Verify that you have 12 volt accessory and a good ground to the
RFASWC.
2. Verify that the 3.5mm connector is connected to your radio securely
and in the correct location.
3. If using the female 3.5mm connector on an Eclipse or Kenwood radio,
verify that the radio’s SWC wire is connected to the correct wire on
the RFASWC.
4
Page 6

Once all the information above has been veried and correct, refer back
to the 2 sets of led ashes during the auto detect sequence. Here is what
the ashes stand for:
LED Feedback
The led ashes represent what brand radio the RFASWC believes it
is connected to. Each ash is for a different radio manufacturer. For
example you installed a JVC radio; the led should ash 5 times.
1st led ash is for Eclipse
2nd led ash is for Kenwood
3rd led ash is for Clarion
4th led ash is for Sony and Dual
5th led ash is for JVC
6th led ash is for Pioneer and Jensen
7th led ash is for Alpine*
8th led ash is for Visteon
9th led ash is for Valor
10th Clarion 5V
* Note: If the ASWC ashes 7 times and you do not have an Alpine
radio connected to it that means that the RFASWC did not see any radio
connected. Verify the 3.5mm connector is connected to the SWC input on
the radio.
5
Page 7

Remapping the SWC Buttons
Let’s say you have the RFASWC programmed to your radio and you want
to change the button assignment for the steering wheel controls. For
instance you would like Seek Up to be Mute.
NOTES:
• The RFASWC must have detected the radio it is attached to before
you can remap any buttons.
• You can only start the remapping of the steering wheel controls
process within the rst 20 seconds of turning the ignition key on. If you
wait longer then the 20 seconds you will have to turn the ignition off
then back on again.
• Within the rst 20 seconds if any button other then Volume Up or
Volume Down is pushed, the remapping process will stop.
• If during the remapping process no button is pushed for 30 seconds
the remapping process is aborted and the original settings are reset.
So Let’s Begin The Remapping Process:
1. Ideally having the RFASWC visible is recommended since you can
see the led ashes to conrm button recognition.
2. Turning off the radio is recommended
3. Within the rst 20 seconds of turning the ignition on, press and hold
down the Volume Up button for at least 25 seconds.
4. The led will light up solid red. Release Volume Up and the led will go
out. Volume Up has now been programmed.
6
Page 8

5. Follow the list below in order however pushing the steering wheel
control button you want for the function below. If you want to skip a
command press the Volume Up on the steering wheel, this will tell the
ASWC to skip the command and go to the next one.
1. Volume Up
2. Volume Down
3. Seek Up/Next
4. Seek Down/Prev
5. Source/Mode
6. Mute
7. Preset Up
8. Preset Down
9. Power
10. Band
11. Play/Enter
12. PTT (Push To Talk)
13. On Hook
14. Off Hook
15. Fan Up
16. Fan Down
17. Temp Up
18. Temp Down
7
Page 9

* Note: Remember not all radios will have all these commands. Please
refer to the radios’ owners manual for specic commands recognized by
the radio.
For instance the next command to be mapped is the Volume Down
command. Let’s say you want the Mode button on your steering wheel
to be the Volume Down command. Hold down the Mode button till the
led lights up solid red, and then release it. Now your Mode button on the
steering wheel is Volume Down.
6. After the last button is programmed on your steering wheel (you do
not have to go through the whole list), hold down the Volume Up
button for at least 10 seconds then the led will go out.
Or
After the 18th button is programmed or skipped the led will go out and the
remapping is completed.
If for any reason after remapping the steering wheel controls you want to
go back to the original steering wheel control settings, follow these steps:
1. Within the rst 20 seconds of turning the ignition on. Press and hold
down the original Volume Down button (not the Volume Down button
you just remapped) for at least 25 seconds.
Page 10

2. The led will turn on then release the Volume Down button and the led
will turn off.
3. The original steering wheel control settings will be restored.
Manually Setting The Radio Type
1. Within the rst 20 seconds of turning the ignition on. Press and hold
down the original Volume Down button (not the Volume Down button
you just remapped) for at least 25 seconds.
2. The led will turn on then release the Volume Down button and the led
will turn off.
3. The original steering wheel control settings will be restored.
1. To manually program the aftermarket radio, press and hold the
Volume Up button on the steering wheel control until the led goes
solid red, then release Volume Up.
2. At this point Eclipse is programmed.
If you are using an Eclipse radio go to step 3.
If you are using a different radio go to step 4.
3. Press and hold Volume Down for 5 seconds. The led will ash once
then go solid red indicating the programming has nished. Go enjoy
your radio.
Page 11

4. If you have a different radio then Eclipse, press the Volume Up button
again till the led goes solid red, then release Volume Up. You have
now programmed Kenwood.
5. Here is the chart to show how many presses of the Volume Up button
is needed for which radio you are trying to program:
1st led ash is for Eclipse
2nd led ash is for Kenwood
3rd led ash is for Clarion
4th led ash is for Sony and Dual
5th led ash is for JVC
6th led ash is for Pioneer and Jensen
7th led ash is for Alpine*
8th led ash is for Visteon
9th led ash is for Valor
10th Clarion 5V
* Note: If the ASWC ashes 7 times and you do not have an Alpine
radio connected to it that means that the ASWC did not see any radio
connected. Verify the 3.5mm connector is connected to the SWC input on
the radio.
6. Once the radio manufacturer has been selected hold Volume Down
for at least 5 seconds. The led will ash the number of times which
radio was selected then the led will remain on to indicate the ASWC
has nished programming.
7) Go enjoy your radio.
Page 12

INSTALLATION INSTRUCTIONS FOR PART RFASWC
KNOWLEDGE IS POWER
Enhance your installation and fabrication skills by
enrolling in the most recognized and respected
mobile electronics school in our industry.
Log onto www.installerinstitute.com or call
800-354-6782 for more information and take steps
toward a better tomorrow.
Metra recommends MECP certified
technicians
REV. 1/10/11
1-800-221-0932 axxessinterface.com
© COPYRIGHT 2004-2011 METRA ELECTRONICS CORPORATION
 Loading...